Bradley Stand-On Hydro Drive Mower Owner s Manual
|
|
|
- Kory Park
- 6 years ago
- Views:
Transcription

1
2 Bradley Stand-On Hydro Drive Mower Owner s Manual TABLE OF CONTENTS About This Manual... 3 Warranty... 4 Safety Information Before Using Equipment... 5 Operation of Equipment... 6 Safety Information Decals... 7 Operating the Mower Operating Controls... 8 Starting the Engine... 9 Moving the Mower... 9 Height-of-Cut Changing the Height-of-Cut Measuring the Height-of-Cut Removing and Adjusting the Blades Adjusting the Front Wheels Adjusting the Deck General Maintenance Maintenance Schedule Fuel and Engine Oil Air Filter Tire Pressure Blades Cleaning the Mower Lubrication Points Service Adjustments Engine to Blade Belt Adjustments Blade to Blade Belt Adjustment Engine to Hydro Transmission Belt Adjustment Safety Interlock System Troubleshooting Guide Parts List Frame Assembly Front Deck Assembly Transmission Drive Assembly Brake and Wheel Assembly Handle Control Assembly Rear Deck Assembly Front Caster Assembly Fuel Tank Assembly Standing Platform Assembly Product Registration Havener Enterprises, Inc. 2
3 Bradley Stand-On Hydro Drive Mower Owner s Manual ABOUT THIS MANUAL Congratulations on the purchase of your new Bradley commercial mower. We at Havener Enterprises, Inc. are confident that this mower will provide you with years of excellent performance, durability, and trouble-free service when operated and maintained as directed in this manual. This owner's manual is considered a permanent part of the mower. It must be available to all of the operators and/or person(s) servicing the mower. Should the mower be resold, this manual must remain with the mower. All information, illustrations, and specifications contained in this manual were in effect at the time of publication. Havener Enterprises, Inc. reserves the right to change, modify, and/or discontinue specifications and/or design without notice. If there is a change that has been made to your mower which is not shown or reflected in this manual, please see your authorized Bradley dealer before operating and/or servicing the equipment. Should you ever have any questions regarding the operation, maintenance, or safety of your mower, please contact your authorized Bradley dealer who has been specially trained on operation and service of Bradley Commercial Lawn Mowers. A space has been provided below to record information about your new Bradley Commercial Lawn Mower. Please take time to record such information for future reference, especially when you contact an Authorized Bradley dealer with questions. Date Purchased: Model Number: Serial Number: Place of Purchase: 3
4 Bradley Stand-On Hydro Drive Mower Owner s Manual WARRANTY STATEMENT Bradley Commercial Lawn Mowers are warranted for one (1) year for the original date of purchase against defects in material or workmanship, when operated and maintained in accordance with the Bradley Owner's Manual. Havener Enterprises, Inc. will replace or repair, free of charge, any part of the original equipment returned to us or our authorized servicing representative with transportation or postage prepaid and upon examination deemed defective. The cost of replacing items subject to normal wear, such as but not limited to: air filters, batteries, belts, blades, oil filters, and tires will be borne by the purchaser/owner unless such wear was caused by a defect in material and workmanship. The Pumps and Engines are warranted by their respective manufacturer(s). Please see engine owner's manual for engine warranty. This warranty does not cover any mower that has been subject to neglect, negligence, misuse, or accident, or that has been operated in any way contrary to the operating instructions as specified in the Bradley Owner's Manual. This warranty does not cover any mower that has been altered or modified changing its performance or durability. In addition, the warranty is not extended to repairs made necessary by the use of parts or accessories which, in the reasonable judgment of Havener Enterprises, Inc. are incompatible with the mower or adversely affect its operation, performance, or durability. Havener Enterprises, Inc. assumes no responsibility or incidental, consequential, or other damages including, but not limited to, expense for gasoline, expense of delivering the mower to a Bradley authorized dealer and expense of returning it to the owner, mechanic's travel time, telephone or communication charges, rental of a like product during the time warranty repairs are being performed, travel, loss or damage to personal property, loss of revenue, loss of the use of the time or inconvenience. There are no other expressed or implied warranties and liability for consequential damages under this warranty and are excluded to the extent exclusions are permitted by law. No warranty service will be authorized until your product registration has been received by Havener Enterprises, Inc. See page. 4
5 Bradley Stand-On Hydro Drive Mower Owner s Manual SAFETY INFORMATION Read This Manual Carefully and Thoroughly Before Operating Your Mower! 1. Carefully and thoroughly read the owner's manual. Allow adequate time to fully understand the controls and operation of the equipment. Never allow anyone to operate the mower that has not read and fully understood the owner s manual. 2. Never allow anyone to operate the mower who is not old enough, large enough, and strong enough to safely handle the machine. 3. Do not carry passengers. Avoid mowing while people, especially children, and pets, are nearby since rotating blades can throw rocks and other items with enough force to cause serious injury. BEFORE USING EQUIPMENT OPERATOR Wear protective clothing while mowing. Long trousers and safety glasses will help reduce the risk of injury from thrown objects. It is recommended that steel toe shoes with aggressive soles or some other type of substantial footwear be worn to help protect your feet and maintain traction on slopes or uneven ground. MOWING AREA Thoroughly inspect the area where the equipment is to be used. Look for items such as stones, sticks, bones, wire, and other foreign objects. When struck by the mower, these and other objects may become projectiles that could lead to serious injury and/or death. MOWER For your safety and the long life of your mower, always inspect the mower before each use. Before inspection, make sure the mower is on a flat and level surface, the blades are disengaged, the ignition switch off with the key removed, and the spark plug wire is off of the spark plug(s) and hidden so that accidental contact cannot be made. GENERAL CONDITION Walk around the mower looking for any fluid spills or leaks on or underneath the mower. Remove any and all excessive debris, dirt, and/or fluids. Look for signs of damage or excessive wear. Check the tightness of all nuts, bolts, pins, and screws. Tighten any that may be loose and replace any that may have been lost during use. Be sure the safety interlock controls are operating properly so that the engine cannot be started unless the ground speed control lever is in neutral and the blades disengaged. Check the mower blades for any damage or abnormal wear and replace in sets so that they are balanced. Check the mower cutting height to assure a high quality and even cut. See pages 11 & 12 for details. Check the tire pressure on all four (4) tires. See page 14 for details. Check all belts for proper wear and correct tension. See pages for details. Check engine oil and air filter as recommended in the engine manufacturer s operators manual. 5
6 Bradley Stand-On Hydro Drive Mower Owner s Manual OPERATION OF EQUIPMENT 1. DANGER: GASOLINE IS HIGHLY FLAMMABLE AND EXPLOSIVE. DO NOT ADD FUEL WHILE THE ENGINE IS RUNNING OR IS HOT. KEEP OPEN FLAMES, SPARKS, AND HEAT AWAY FROM THE FUEL AND STORE FUEL IN CONTAINERS SPECIFICALLY DESIGNED FOR THAT PURPOSE. ADD FUEL OUTDOORS ONLY AND IF THE.FUEL IS SPILLED, DO NOT START THE ENGINE. MANUALLY PUSH THE MOWER AWAY FROM THE SPILL AND IMMEDIATELY WIPE UP. 2. DANGER: GASES EMITTED BY A CHARGING BATTERY ARE EXPLOSIVE. KEEP HEAT, SPARKS AND OPEN FLAMES AWAY FROM A CHARGING BATTERY. 3. Do not operate the engine in a confined space where dangerous carbon monoxide fumes can collect. Carbon monoxide is odorless, tasteless, and can be fatal. 4. Mow only in daylight. 5. Make sure the mower is in neutral and the blades are disengaged before attempting to start the engine. 6. Do not stop or start suddenly when going uphill. Never use riding attachments on slopes since there is an increased risk that they might roll over. 7. Avoid steep slopes and use extreme caution when changing directions or speed when operating on a slope. 8. Be extremely careful when operating on a slope or when the grass is damp or wet. Reduced traction could cause sliding. Never mow by pulling the mower back towards you as you might slip. 9. Watch for traffic when crossing surfaces other than grass (i.e. transporting), loading a trailer or vehicle, or when the mower is not in use. 10. Never operate the mower with defective guards, shields, or without the safety devices securely mounted in place. 11. Never direct discharge of material toward bystanders or allow anyone near the mower while in operation. 12. Do not change the engine governor settings or over-speed the engine. 13. Always stop the engine whenever you leave the mower, even for a moment. 14. To help reduce the risk of a fire hazard, keep the engine and the area around the engine free of grass, leaves, or any other type of foreign material. 15. Beware of cutting edges. Always wear gloves for safety when performing blade maintenance activities. Beware on multiple blade units since the rotation of one blade may cause the rotation of the other blades. 16. Keep body and hands away from pin holes or nozzles that eject hydraulic fluid since fluid escaping under pressure may have sufficient force to penetrate skin and cause serious injury. If foreign fluid is injected into the skin, it must be surgically removed within a few hours by a doctor familiar with this form of injury. Always use paper or cardboard and not hands to search for leaks. 6

7 Bradley Stand-On Hydro Drive Mower Owner s Manual SAFETY INFORMATION DECALS The following labels are intended to alert you to potential hazards and to provide you with important safety information. Should these decals become difficult to read or are missing from the mower, contact your Bradley dealer for a replacement. 7

8 Bradley Stand-On Hydro Drive Mower Owner s Manual OPERATING THE MOWER It is recommended that before you operate the mower, you allow adequate time to fully understand the controls and operation of the equipment. When reading this manual, it is recommended that you do so with the equipment nearby for quick orientation, to reference the controls, and understand maintenance adjustments. OPERATING CONTROLS Before continuing to read the manual, it is recommended that you take adequate time to identify the controls of the mower. A Blade Control Lever F Right Control Lever B Throttle Control G Ignition/Key Switch C Choke Control H Parking Brake Lever D Safety Switch I Neutral Lever E Left Control Lever 8
9 Bradley Stand-On Hydro Drive Mower Owner s Manual STARTING THE ENGINE DANGER: DO NOT OPERATE THE ENGINE IN A CONFINED SPACE WHERE DANGEROUS CARBON MONOXIDE FUMES CAN COLLECT. CARBON MONOXIDE IS ODORLESS, TASTELESS, AND CAN BE FATAL. After going through the steps on pages 5 and 6, you are ready to start the engine. NOTE: THIS UNIT WAS SHIPPED WITHOUT GAS, BE SURE TO ADD FRESH GAS AND DOUBLE CHECK THE OIL IN THE ENGINE BEFORE ATTEMPTING TO START THE MOWER. 1. Make sure the fuel shut-off valve, located at the bottom of the fuel tank is in the ON position. 2. Make sure the Parking Brake Lever is in the ON position. 3. Make sure the Neutral lever is disengaged. 4. Make sure the Blade Control Lever is in the OFF position. 5. Slide the Throttle Control to the position or to Choke if the engine is cold. 6. For Electric Start engines, turn the key clockwise to the Start position. Once started, the key will return to the Run position. Note: Do not keep the key in the Start position more than a few seconds. If engine does not start, wait 15 seconds before trying again. 7. For Pull Start engines, turn the key clockwise to only the Run position. 8. Test the pull start cord by slowly pulling it until just past compression. Stop and return the start cord and then pull firmly with a smooth, steady motion to start the engine. 9. Once the engine is running, slowly move the Throttle Control out of the Choke position to the desired engine speed. MOVING THE MOWER FORWARD BECOME COMPLETELY FAMILIAR WITH THE OPERATION AND CAUTION CHARACTERISTICS OF THE MOWER BEFORE ATTEMPTING TO USE IT. 1. Make sure the Left Control Lever is down out of the Neutral Lock position. 2. Gently push the controls forward. Push the Left and Right Control Levers away from you an equal amount to go straight. It is recommended you start slow and increase your speed as you increase your comfort with the controls. 3. Allowing the Left and Right Control Levers to return to a center neutral position allows the mower to stop moving. Note: if the operator lets go of the Left Control Lever while the blades are engaged and/or the mower is moving, the safety interlock system will stop the engine. To restart the mower, reset the Blade Control Lever to Off and the parking brake to the On position. NOTE: Top speed is suggested only for transport. MOVING THE MOWER IN REVERSE Slowly and evenly pull the Left and Right Control Levers toward you. The more the Control Levers are pulled toward you, the faster you will move. It is recommended to move in reverse slowly. NOTE: When moving in reverse, be aware of your surroundings by looking down and behind. STOPPING THE MOWER Gently let the Left and Right Control Levers return to their neutral, at rest position. If the operator is leaving the operator position for any reason, disengage the blades, shut off the engine, engage the parking brake, and remove the key. NOTE: Park the mower on level ground. If it is not possible to do so, be sure to the block the wheels to prevent the mower from rolling away. 9
10 Bradley Stand-On Hydro Drive Mower Owner s Manual TURNING THE MOWER To turn the mower in the desired direction, gently pull the chosen direction s Control Lever toward you (i.e. to turn right, pull the Right Control Lever toward you). The more a particular Control Lever is pulled toward you, the sharper the turn the mower will make. MOWING DANGER: THOROUGHLY INSPECT THE AREA WHERE THE MOWER IS TO BE USED. LOOK FOR ITEMS SUCH AS STONES, STICKS, WIRE, AND OTHER FOREIGN OBJECTS. WHEN STRUCK BY THE MOWER, THESE AND OTHER OBJECTS MAY BECOME PROJECTILES THAT COULD LEAD TO SERIOUS INJURY AND/OR DEATH. CLEAR AREA OF ALL DEBRIS AND KEEP PEOPLE AND PETS AWAY. DANGER: DO NOT OPERATE THE MOWER WITH DEFECTIVE GUARDS OR SHIELDS. DO NOT OPERATE THE MOWER WITHOUT THE SAFETY DEVICES SECURELY IN PLACE. For the highest quality of cut and performance, mow with the engine at full throttle. Quality of cut may be determined by the ground speed and speed of the mower. Generally, the slower the mower travels across the terrain, the better the cut. 1. With the engine running and the mower placed at the beginning of the area to be mowed, make sure the left control level is down and out of the neutral lock position. 2. Push the Blade Control Lever forward to the On position to engage the blades. 3. To disengage blades, come to a complete stop and pull the Blade Control Lever to the Off position. MOVING THE MOWER WITH THE ENGINE OFF 1. Engage the Parking Brake Lever by moving it to the On position. 2. Engage the Neutral Lever by moving it in the direction of the arrow. 3. Disengage the Parking Brake Lever by moving it to the Off position. 4. Move the mower. NOTE: Be careful of the weight of the mower as you move it without using the engine. 5. Before starting the mower, make sure the hydro transmission is completely closed, the parking brake engaged, and the neutral lever disengaged. PARKING THE MOWER Pull the Parking Break Lever to the On position. NOTE: Gently engage the braking mechanism. Excessive force may cause damage. CAUTION IF YOU ARE NOT FAMILIAR WITH THE OPERATION OF THE HYDRO DRIVE AND ZERO TURN FEATURE, PRACTICE TURNING AND MANUEVERING WITH THE CONTROLS BEFORE ENGAGING THE BLADE 10
11
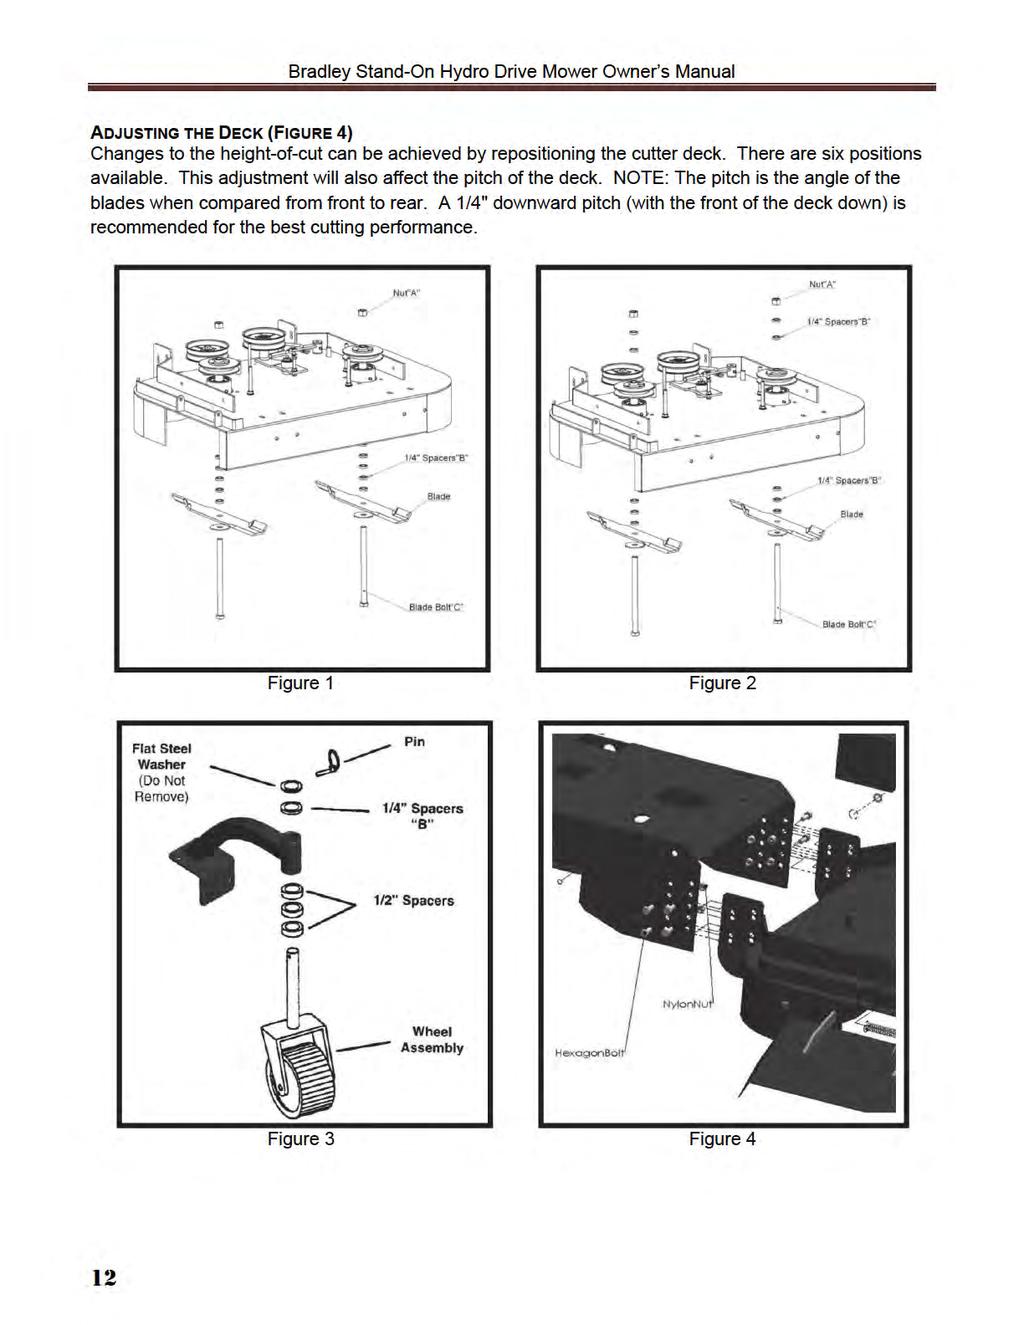
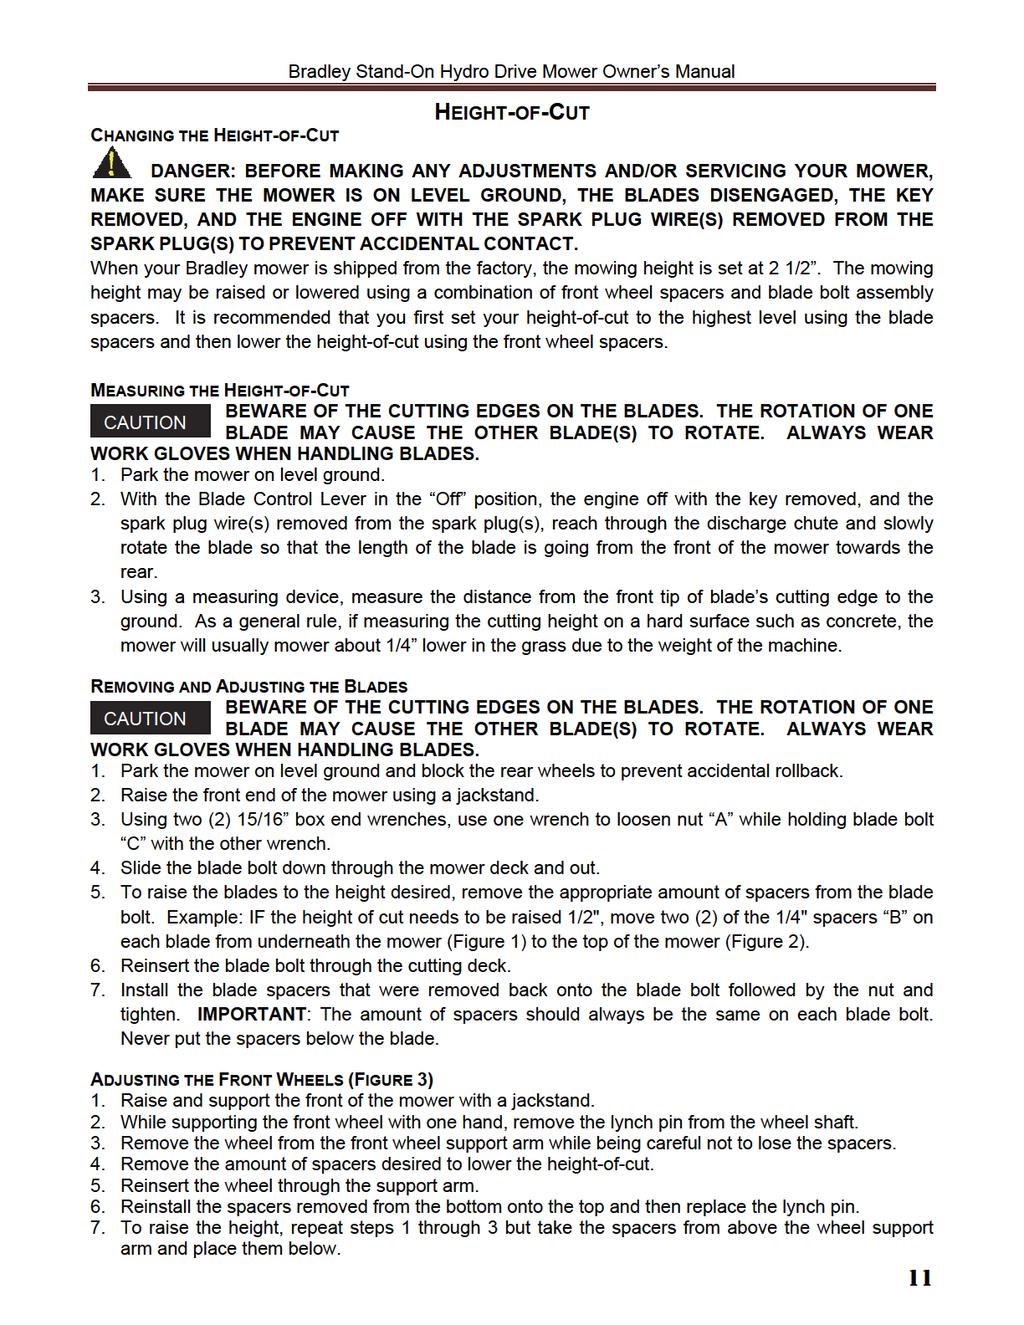
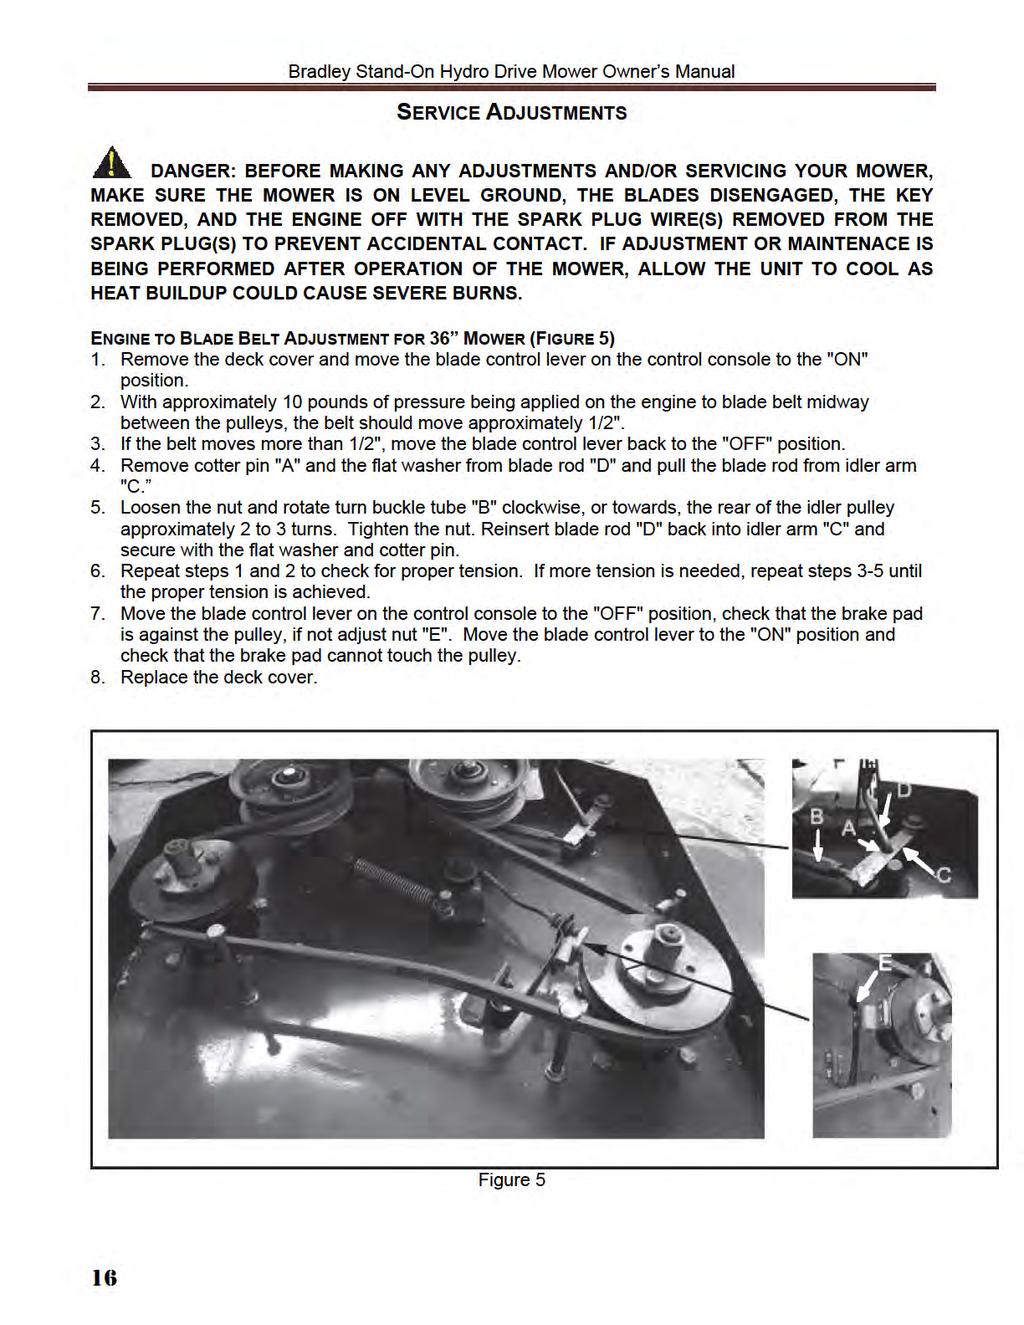
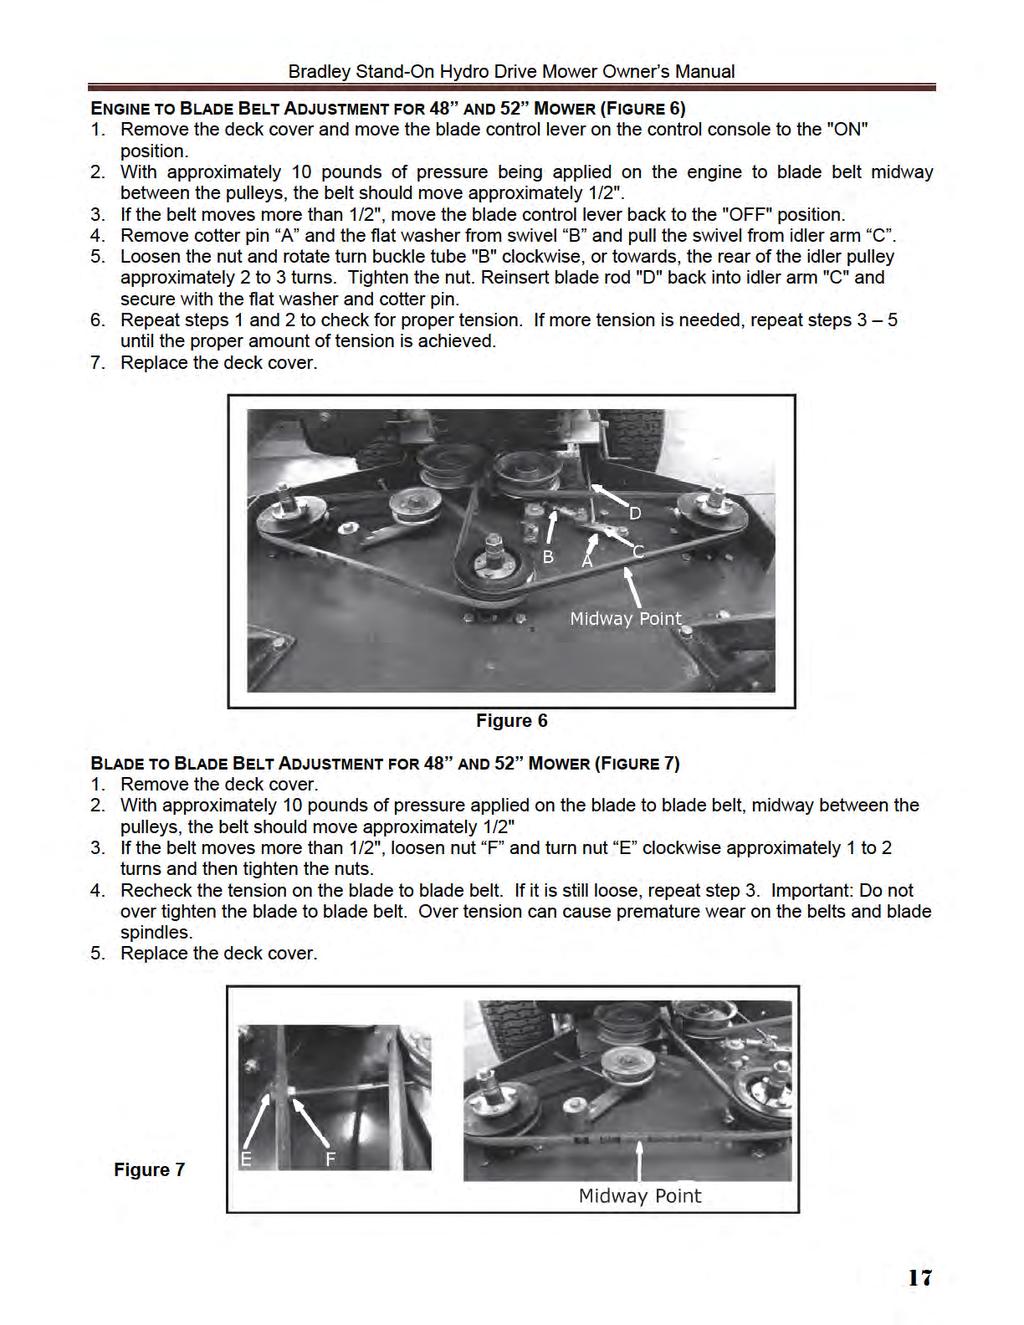
12
13 Bradley Stand-On Hydro Drive Mower Owner s Manual GENERAL MAINTENANCE Proper maintenance and adjustment of your Bradley hydro mower is necessary to keep the mower in good, working and safe condition. The maintenance of the mower is the responsibility of the owner/operator and must be performed at regular intervals. When replacing any parts or servicing your mower, be sure to use only genuine Bradley mower replacement parts to ensure quality performance of your mower. DANGER: BEFORE MAKING ANY ADJUSTMENTS AND/OR SERVICING YOUR MOWER, MAKE SURE THE MOWER IS ON LEVEL GROUND, THE BLADES DISENGAGED, THE KEY REMOVED, AND THE ENGINE OFF WITH THE SPARK PLUG WIRE(S) REMOVED FROM THE SPARK PLUG(S) TO PREVENT ACCIDENTAL CONTACT. IF ADJUSTMENT OR MAINTENACE IS BEING PERFORMED AFTER OPERATION OF THE MOWER, ALLOW THE UNIT TO COOL AS HEAT BUILDUP COULD CAUSE SEVERE BURNS. MAINTENANCE SCHEDULE ITEM PROCEDURE TIME INTERVAL Break-In (first 5 hours) Every 8 hours (Daily) Every 40 hours (Weekly Every 100 hours (Bi-weekly) Every 200 hours (Monthly) Belts Inspect (adjust as needed) Blades Inspect and Sharpen Engine Air Filter Inspect (see engine owner s manual) Engine Cooling Areas Clean (see engine owner s manual) Engine Oil Check (see engine owner s manual) Change (see engine owner s manual) Engine Oil Filter Change (see engine owner s manual) Engine Spark Plug(s) Inspect (see engine owner s manual) Fuel Filter Replace Fuel Line Check Replace every 2 years Grease Fittings Refer to page 15 Hardware Check for proper tightness Mower Main Frame Remove debris from under belt cover Power wash engine mower Safety Interlock Check operation and System switches Tires Check air pressure 13
14 Bradley Stand-On Hydro Drive Mower Owner s Manual FUEL DANGER: GASOLINE IS HIGHLY FLAMMABLE AND EXPLOSIVE. DO NOT ADD FUEL WHILE THE ENGINE IS RUNNING OR IS HOT. KEEP OPEN FLAMES, SPARKS, AND HEAT AWAY FROM THE FUEL AND STORE FUEL IN CONTAINERS SPECIFICALLY DESIGNED FOR THAT PURPOSE. ADD FUEL OUTDOORS ONLY AND IF FUEL IS SPILLED, DO NOT START THE ENGINE. MANUALLY PUSH THE MOWER AWAY FROM THE SPILL AND WIPE UP IMMEDIATELY. Refer to the Engine Owner s Manual for the type of fuel to use. A fuel shut off valve is located on the bottom of the fuel tank. It is recommended that the fuel valve be shut off when transporting between job sites and when storing the mower for extended periods of time. ENGINE OIL NOTE: CHECK THE ENGINE OIL BEFORE EACH USE. Refer to the Engine Owner s Manual for the type of oil, oil change intervals, and the proper procedures to check and change oil. AIR FILTER Refer to the Engine Owner s Manual for recommended maintenance. TIRE PRESSURE The recommended tire pressure for the two drive wheels is 28 P.S.I. The recommended tire pressure for the two front wheels is 22 P.S.I. Incorrect tire pressure may cause the mower to pull to one side and/or cause an uneven cut. Always use caution when filling the tire and never exceed the recommended tire pressure. BLADES DANGER: BEFORE WORKING ON THE BLADES, MAKE SURE THE ENGINE IS OFF, KEY REMOVED, AND THE SPARK PLUG(S) WIRES REMOVED FROM THE SPARK PLUG(S) TO PREVENT ACCIDENTAL CONTACT. BEWARE OF THE CUTTING EDGES ON THE BLADES. THE ROTATION OF ONE BLADE MAY CAUSE THE OTHER BLADE(S) TO ROTATE. ALWAYS WEAR WORK GLOVES CAUTION WHEN PERFORMING BLADE MAINTENANCE. Blades should be inspected on a daily basis for nicks, bends, and/or excessive wear. If the blades are worn, cracked, bent, or damaged, replace with a new blade immediately before using the mower. Use only genuine Bradley replacement blades as substitute blades may not meet Bradley mower specifications and may be dangerous. To remove the blades, refer to: page 11, Removing and Adjusting the Blades. When sharpening the blades, sharpen only the cutting edges and try to maintain the original angle of the blade. Do not make the cutting edge razor sharp. Remove the same amount from each side of the blade so that balance is maintained. CLEANING THE MOWER It is recommended that the mower be cleaned on a daily basis. Excessive accumulation of dirt, debris, oil, etc. causes premature wear on the components and may present a potential safety hazard. 14


15 Bradley Stand-On Hydro Drive Mower Owner s Manual LUBRICATION POINTS To ensure proper lubrication on moving parts, it is recommended that you lubricate the following components with a high-quality EP2 high-temperature based grease or equivalent. Should the conditions of operation be more severe than normal, the lubrication interval may be shorter than recommended. GRT/OPE Grease is the recommended lubricant. Blade Bell Crank Every 40hrs/Weekly Draft Plank Seat Every 40hrs/Weekly Link Idler Arm Pivot Every 40hrs/Weekly Rear Deck Arm Pivot Every 40hrs/Weekly Blade Engagement Pivot Every 40hrs/Weekly Cutterhousings Every 100hrs/Monthly Front Caster Support Right and Left Side Every 40hrs/Weekly Front Caster Wheel Left and Right Side Every 40hrs/Weekly 15
16
17
18
19 Bradley Stand-On Hydro Drive Mower Owner s Manual TROUBLESHOOTING PROBLEM POSSIBLE CAUSE SOLUTION Engine does not start Engine starts hard or loses power Engine overheats Mower pulls to one side Blades do not turn Rough or uneven cut Parking Brake Lever in OFF position Blade Control Lever in ON position Out of fuel Fuel shut-off valve closed Safety interlock switch out of adjustment Spark plug loose or disconnected Faulty spark plug Dirty air filter Clogged fuel filter Bad fuel Dirt or water in the fuel tank Clogged or dirty fuel filter Dirty air filter Faulty spark plug Incorrect oil level Dirt in fuel line Dirty grass screen Incorrect oil level Dirty air filter Faulty spark plug Incorrect tracking adjustment Blade belt broken or slipping Excessive build-up underneath mowing deck Tire pressure not equal Unequal spacer configuration on blades or front casters Mower speed too fast for mowing conditions Blades bent Blades dull Excessive build-up underneath mowing deck Blades installed upside down Move lever to ON position Move lever to OFF position Fill fuel tank Open valve Adjust switches Connect spark plug wire Replace Replace Replace Drain and refill with fresh fuel Drain and clean fuel tank Replace Replace Replace Check and adjust Clean and replace Clean Check and adjust Check and adjust Replace Check and adjust Replace or adjust Check and clean Check and adjust Check and adjust Reduce speed Check and replace Sharpen or replace Check and clean Remove and replace in correct direction 19


20 Bradley Stand-On Hydro Drive Mower Parts List 36 FRAME ASSEMBLY ITEM PART NUMBER DESCRIPTION QTY Deck Weldment Hood Plain Washer 10 GB Plastic Knob a Rear Deck Weldment Hexagon Bolt M10x25 GB Battery Box Lock Washer 10 GB Hexagon bolt M10x30GB Hexagon bolt M8x25 GB Plain Washer 8 GB Nylon Nut M10 GB Nylon Nut M8 GB Lock Washer 8GB Skid Plate Chute Deflector Torsion Spring Hexagon Bolt M10x240 GB
21 Bradley Stand-On Hydro Drive Mower Parts List 48 & 52 FRAME ASSEMBLY ITEM PART NUMBER DESCRIPTION QTY Deck Weldment Deck Weldment Hood Hood Plain Washer 10 GB Plastic Knob a Rear Deck Weldment Battery Box Hexagon Bolt M10x25 GB Lock Washer 10 GB Hexagon bolt M8x25 GB Plain Washer 8 GB Lock Washer 8 GB Skid plate Hexagon bolt M10x30GB Nylon Nut M10 GB Chute Deflector Torsion Spring Hexagon Bolt M10x240 GB Hexagon Bolt M10x140 GB Nut Flange M10 GB
22 Bradley Stand-On Hydro Drive Mower Parts List 36 FRONT DECK ASSEMBLY 22
23 Bradley Stand-On Hydro Drive Mower Parts List 36 FRONT DECK ASSEMBLY ITEM PART NUMBER DESCRIPTION QTY Idler Pulley Belt 36 Engine to Blade Nylon Nut M10 GB Nut Flange M10 GB Key 6.35x6x Hexagon Nut M16x Plain Washer 10 GB Hexagon Bolt M10x100 GB Bushing, Straight Pivot Washer 1.5x23idx32od Snap Ring 22 GB Hexagon Bolt M10x40 GB Hexagon Bolt M10x90 GB Clevis Pin Hexagon Bolt M10x55 GB Idler Bushing Pivot Tube Link Idler Arm Hair Pin, Cotter Hexagon Bolt M10x35 GB Spindle Assembly Spacer Belt Tension Release Lever Bolt M16x1.5x Turn Buckle Nut Pulley, Single H-Bushing Lock Washer 9 GB Hexagon Bolt M8x30 GB Grease Fitting M6 GB Turn Buckle Bolt LH Hexagon Bolt M8x40 GB Blade Idler Arm Turn Buckle Bolt RH Nylon Nut M8 GB Bushing, Flange Pivot Nut Flange M8 GB Tension Spring Blade Hexagon Bolt M6x20 GB Nylon Nut M6 GB Belt Guide Spindle Clevis Clip Ring 6 GB Brake Linkage Clip Ring 9 GB Spring I Nylon Flange Pivot Brake Pad Brake Spring Pivot Bushing Plain Washer 8 GB Lock Washer 10 GB Hexagon Bolt M5x16 GB Nylon Nut M5 GB
24 Bradley Stand-On Hydro Drive Mower Parts List 48 & 52 FRONT DECK ASSEMBLY 24
25 Bradley Stand-On Hydro Drive Mower Parts List 48 & 52 FRONT DECK ASSEMBLY ITEM PART NUMBER DESCRIPTION QTY Idler Pullev Pulley Single Pulley Double H-Bushing Pivot Hub Spindle Assemblv Spacer Blade 48" Plain Washer 3x16.5idx50od Bolt M16x1.5x Hexagon Nut M16x Grease Fitting M6 GB Spacer H Belt 48" Engine to Blade H Belt 48" Blade to Blade Rod End RH Rod End LH Hexagon Bolt M10x120 GB Hexagon Bolt M10x35 GB Key 6.35x6x Belt Guide Spindle Hair Pin Cotter Nut Flange M8 GB Nylon Nut M8 GB Idler Pulley IV Tension Spring Blade Rod Nylon Nut M10 GB Blade Idler Arm Weldment Deck Idler Arm Weldment Tensioner Linkage Plain Washer 3x10.5idx38od Plain Washer 10 GB Belt Guide I Bushing Flange Pivot I Bushing Flange Pivot Hexagon Bolt M10x70 GB Hexagon Bolt M10x65 GB Hexagon Bolt M8x30 GB Lock Washer 8 GB Lock Washer 10 GB Turn Buckle Rod Clevis End Link Idler Arm Nut Thin M10 GB Hexagon Bolt M8x40 GB Hexagon Bolt M10x50 GB Clevis Pin Nut Flange M10 GB Plain Washer 2x26idx38od Hexagon Bolt M10x110 GB Pulley Pivot Hub Link Bushing 7x10.5idx14od Space
26 Bradley Stand-On Hydro Drive Mower Parts List & 52 TRANSMISSION DRIVE ASSEMBLY 26
27 Bradley Stand-On Hydro Drive Mower Parts List & 52 TRANSMISSION DRIVE ASSEMBLY ITEM PART NUMBER DESCRIPTION QTY A Rear Deck Weldment Nylon Nut M10 GB Nylon Nut M8 GB Parking Brake Linkage Plain Washer 8 GB Hexagon Bolt M8x30 GB B Rod End RH Hexagon Bolt M6x35 GB Nylon Nut M6 GB Hexagon Bolt M8x20 GB Hydraulic Reservoir Bracket Hydro Reservoir Hexagon Bolt M6x20 GB Plain Washer 6 GB A Parking Brake Rod Parking Brake Bracket Plain washer 8 GB Bushing Flange Pivot Hexagon Bolt M8x20 GB Phillips Pan Head Screws M5x Plain Washer 5 GB Nylon Nut M5 GB Switch Hexagon Bolt M6x16 GB Switch Mounting Plate Hexagon Bolt M10x35 GB Plain Washer 10 GB A Rod End RH Nut M10 GB Blade Bell Crank Grease Fitting M6 GB Shoulder Bolt Plain Washer 10 GB Hexagon Bolt M10x40 GB Idler Pulley III Hexagon Bolt M10x55 GB Pivot Hub Bushing, Straight Pivot Pivot Arm Belt Guide Spindle Spring Nut Flange M10 GB Threaded Rod Idler Bracket Hexagon Bolt M10x25 GB Link Bushing 7x10.5idx14od 1 27
28 Bradley Stand-On Hydro Drive Mower Parts List & 52 BRAKE AND WHEEL ASSEMBLY 28
29 Bradley Stand-On Hydro Drive Mower Parts List & 52 BRAKE AND WHEEL ASSEMBLY ITEM PART NUMBER DESCRIPTION QTY Nut 1/ Tire and Wheel Assembly Nylon Nut M10 GB Neutral Handle Knob Neutral Handle Lock Washer 8 GB Plain Washer 8 GB Hexagon Bolt M10x75 GB Square Neck Bolt M8x35 GB Nylon Nut M8 GB Hydraulic Motor Support Plate Hexagon Bolt M8x60 GB Plain washer 8 GB Right Side Neutral Linkage Flexible cylindrical pin 3X Neutral Spring Reverse linkage Left Side Neutral Linkage Neutral Lever Weldment Hair Pin Cotter Threaded Tube Plain Washer 12 GB Lock Washer 12 GB Hexagon Bolt M12x25 GB Hexagon Bolt M10x35 GB Hexagon bolt M10x20 GB Plain Washer 10 GB A Rod End RH A Right Transmission Bracket Right Side Hydro Drive Hexagon Bolt M8x65 GB B Left Transmission Bracket Left side Hydro Drive 1 29
30 Bradley Stand-On Hydro Drive Mower Parts List & 52 HANDLE CONTROL ASSEMBLY 30
31 Bradley Stand-On Hydro Drive Mower Parts List & 52 HANDLE CONTROL ASSEMBLY ITEM PART NUMBER DESCRIPTION QTY RH Control Frame Hexagon Bolt M10x70 GB Plain Washer 10 GB Parking Brake Lever Support Sleeve Nylon Nut M10 GB B Rod End RH Hair Pin Cotter Plain Washer 8 GB Hexagon Bolt M8x30 GB Parking Brake Handle Flat Grip Swivel Lever Shaft Bushing LH Control Lever Handle Grip Control Lever Grip A Ignition Switch Nut Bolt M5x16 GB Throttle Cable Throttle Control Dash Panel Ignition Switch RH Control Lever Nylon Nut M5 GB Handle Bar Dash Panel Weldment Nut Flange M6 GB Mushroom Head Square Neck Bolts Switch Phillips Pan Head Screws M5x Nylon Self-Locking Flange Surface Nut Spring Nylon Nut M6 GB Hexagon Bolt M6x40 GB RH Operating Handrail Weldment Hexagon Bolt M10x45 GB Hexagon Bolt M10x25 GB Lock Washer 10 GB Handle Shaft Weldment Hexagon Bolt M8x20 GB Leaning Pad Plate Hexagon Bolt M6x40 GB Hexagon Xolt M10x35 GB Leaning Pad Blade Control Handle A Rod End RH Hexagon Bolt M10x40 GB Nut M10 GB LH Control Frame Blade Control Rod Fuel Tank Supporting Plate Direction Control Lever Nut M8 GB Parking Brake Control Lever Nylon Nut M8 GB
32 Bradley Stand-On Hydro Drive Mower Parts List & 52 REAR DECK ASSEMBLY 32
33 Bradley Stand-On Hydro Drive Mower Parts List & 52 REAR DECK ASSEMBLY ITEM PART NUMBER DESCRIPTION QTY 1 N/A Engine Assembly Oil Drain Tube Nylon Washer Hexagon Bolt M14x1.5x Hexagon Bolt M8x20 GB Pipe Clamp Fitting Transmission Belt Nylon Nut M10 GB Plain Washer 10 GB Lock Washer 10 GB Hexagon Bolt M10x40 GB Spacer Key 6.35x6x Pulley, Input Pulley, Single Plain Washer 3x12idx38xod Bolt 7/16-20, Engine 1 33
34 Bradley Stand-On Hydro Drive Mower Parts List & 52 FRONT CASTER ASSEMBLY ITEM PART NUMBER DESCRIPTION QTY Castor Support Nylon Nut M10 GB Plain Washer 10 GB Hexagon Bolt Ml0x25 GB Bushing, Castor Spacer Spacer Lynch Pin Nylon Nut M12 GB Bushing Front Wheel Washer Needle Roller Bearings Tire 11x Hub Bushing Needle Roller Bearings Hexagon Bolt M12x170 GB Castor Yoke Grease Fitting M6 GB


35 Bradley Stand-On Hydro Drive Mower Parts List & 52 FUEL TANK ASSEMBLY ITEM PART NUMBER DESCRIPTION QTY Fuel Line Fuel Line Clamp Fuel Shut Off Valve Tube Insert Tank Pad Fuel Tank Strap Nylon Nut M6 GB Plain Washer 6 GB Lock Washer 6 GB Hexagon Bolt M6x50 GB Fuel Tank Cap Fuel Tank Body 1 35
36 Bradley Stand-On Hydro Drive Mower Parts List & 52 STANDING PLATFORM ASSEMBLY 36
37 Bradley Stand-On Hydro Drive Mower Parts List & 52 STANDING PLATFORM ASSEMBLY ITEM PART NUMBER DESCRIPTION QTY Connecting pin Plain Washer 14 GB Hair Pin Cotter Bearing Cover Cotter Pin 4x36 GB Hexagon Slotted Nut Adjustment Washer Tapered Roller Bearings Grease Fitting M6 GB Castor Yoke Nylon Nut M12 GB Plain Washer 12 GB Spacer Front Wheel Washer Needle Roller Bearings Tire 11x Needle Roller Bearings Pivot Tube, Castor Hexagon Bolt M12x170 GB Lynch Pin Plain Washer 2x26idx38od A Copper Sleeve A Hitch Arm A Standing Platform 1 37
38
39 Cut here or make a copy CUSTOMER INFORMATION Name: Business Name (if any): Address: PRODUCT REGISTRATION City: State: Zip: Phone Number: Address: DEALER INFORMATION (place of purchase) Dealer s Name (required): Dealer s Address: Fax Number: City: State: Zip: Phone Number: (The remaining dealer Information will help you get warranty service faster should you need it.) DEALER INFORMATION Product Name and Model Number: Serial Number (required for all mowers): Engine Brand and Size: Engine Serial Number: (Engines are warranted through their respective manufacturers. Please see your engine manual for more details.) Signature Date of Purchase: KEEP YOUR RECEIPT WITH A COPY OF THIS REGISTRATION FORM Mail your completed form to: your completed form to: Fax your completed form to: Havener Enterprises, Inc. info@havenerent.com S. Michigan Ave. Bradley, IL Your first answer in product service is your authorized Bradley dealer! Your product warranty is only valid if this form is completed, signed, and returned to Havener Enterprises, Inc. within two weeks of product purchase. See the warranty statement for more details. check here to decline communication by mail or 39
40
Parts and Owners Manual
 Parts and Owners Manual MOWER MODEL: SERIAL: ENGINE MODEL & HP: DATE PURCHASED: PURCHASED FROM: You must receive special training from the dealer before operating this mower. 9/30/2005 Commercial Mower
44in Side Discharge Mower for Wheel Horse XL 440H Lawn Tractors Model No Serial No and Up
 Form No. 5-8 in Side Discharge Mower for Wheel Horse XL 0H Lawn Tractors Model No. 790 Serial No. 5000000 and Up Operator s Manual Register your product at www.toro.com Original Instructions (EN) Contents
48 Mower Wheel Horse 5xi Garden Tractor Attachment
 Form No. 6-565 8 Mower Wheel Horse 5xi Garden Tractor Attachment Model No. 786 Serial No. 000000 and Up Model No. 786 Serial No. 000000 and Up Operator s Manual Domestic English (EN) Contents Page Introduction................................
44 Mower Wheel Horse 5xi Tractor Attachment
 Form No. -660 44 Mower Wheel Horse 5xi Tractor Attachment Model No. 7857 890000 and Up Model No. 7858 890000 and Up Operator s Manual Domestic English (EN) Introduction We want you to be completely satisfied
Tru Trak Sulky Proline Mid Size Mower Attachment
 Form No. -7 Tru Trak Sulky Proline Mid Size Mower Attachment Model No. 00 000000 and Up Operator s Manual Domestic English (EN) Contents Page Introduction................................ Safety.....................................
310 SERIES TILT-TO-LOAD ROTATOR. The Specialist In Drum Handling Equipment
 OPERATOR S MANUAL FOR MORSE TILT-TO-LOAD DRUM ROTATOR SAFETY INFORMATION: While Morse Manufacturing Co. drum handling equipment is engineered for safety and efficiency, a high degree of responsibility
100 TOW BEHIND MOWER Owner s Manual
 100 TOW BEHIND MOWER Owner s Manual This manual contains important safety instructions for the gasoline engine powered tow behind mower model: READ SAFETY WARNINGS AND OPERATING INSTRUCTIONS CAREFULLY.
1650EXLT, ,
 1650EXLT, 96193008901, 2012-10 "CHASSIS, ENGINE & PULLEYS" - 000 00 00-00 W/O DESCRIPTION 1 B&S 21M307-0135-F1 FOR SERVICE & PARTS 1-800-233-3723 1 532 42 92-03 FRAME 1 2 532 15 04-06 BOLT 1 3 532 42 88-67
OPERATOR'S MANUAL. MODEL GC-F4 Fabric Grass Catcher P/N 9055 GRASS CATCHER GC-F4. PART Rev.2 SC301G
 OPERATOR'S MANUAL MODEL GC-F4 Fabric Grass Catcher P/N 9055 GRASS CATCHER GC-F4 1 2 8 11 10 9 5 6 7 4 3 SC301G PART 03213 Rev.2 SAFETY INSTRUCTIONS Your mower is only as safe as the operator! As with any
OPERATOR S MANUAL. Fabric Grass Catcher PART NO PRINTED 1/2011 PRINTED IN USA
 OPERATOR S MANUAL Fabric Grass Catcher Models: GC-F4 Congratulations on owning a Scag mower! This manual contains the operating instructions and safety information for your Scag mower accessory. Reading
OPERATOR S MANUAL. Striper. Models: SZL, SFZ, SFZP, SPZ, SCZ48/52 STRIPER STC, STCII, SCZ61/72, STT, STTII STRIPER
 OPERATOR S MANUAL Striper Models: SZL, SFZ, SFZP, SPZ, SCZ48/2 STRIPER STC, STCII, SCZ1/72, STT, STTII STRIPER This manual contains the operating instructions and safety information for your Scag mower
OPERATOR'S MANUAL GRASS CATCHER GC-4D
 OPERATOR'S MANUAL MODEL GC-4D Metal Grass Catcher P/N 9054 GRASS CATCHER GC-4D 5 1 7 10 11 13 14 6 8 9 3 2 7 4 SC300G PART 032 Rev.1 SAFETY INSTRUCTIONS Your mower is only as safe as the operator! As with
OWNER S MANUAL. Sarlo BigMo 30 Hydro Walk-Behind. IMPORTANT: Date Purchased: Mower Model #: Mower Serial #: Engine Model #: Engine Serial #: Dealer:
 Sarlo BigMo 30 Hydro Walk-Behind OWNER S MANUAL IMPORTANT: Date Purchased: Mower Model #: Mower Serial #: Engine Model #: Engine Serial #: Dealer: CONGRATULATIONS on the purchase of your new Sarlo Mower.
Vac Bagger Wheelhorse 42 and 48 Mowers for Classic Garden Tractors
 Form No. -80 Vac Bagger Wheelhorse and 8 Mowers for Classic Garden Tractors Model No. 790 000000 & Up Operator s Manual Domestic English (EN) Contents Page Introduction................................
Thanks for shopping with Improvements! 20 Reel Mower with Catcher Item #
 Thanks for shopping with Improvements! 20 Reel Mower with Catcher Item # 411837 To order, call 1-800-642-2112 West Chester, OH 45069 0313 If you have any questions regarding this product, call 1-800-642-2112
Parts & Operators Manual
 Parts & Operators Manual (888) 317-5878 www.talet.ca To The Owner General Comments Congratulations on the purchase of your new Talet Mat Grapple. Your unit was carefully designed and manufactured to give
ATV 90 Y-12 YOUTH 2-STROKE RED (A2004ATB2BUSR) Page 1 of 52 A-ARM, FLOOR PANEL, AND BUMPER ASSEMBLY
 Page 1 of 52 A-ARM, FLOOR PANEL, AND BUMPER ASSEMBLY") 2004 ATV 90 Y-12 YOUTH 2-STROKE RED (A2004ATB2BUSR) Page 1 of 52 A-ARM, FLOOR PANEL, AND BUMPER ASSEMBLY 2004 ATV 90 Y-12 YOUTH 2-STROKE RED (A2004ATB2BUSR) Page 2 of 52 A-ARM, FLOOR PANEL, AND BUMPER
2004 ATV 90 Y-12 YOUTH 2-STROKE RED (A2004ATB2BUSR) Page 1 of 52 A-ARM, FLOOR PANEL, AND BUMPER ASSEMBLY 2004 ATV 90 Y-12 YOUTH 2-STROKE RED (A2004ATB2BUSR) Page 2 of 52 A-ARM, FLOOR PANEL, AND BUMPER
MODEL: HM381 COBRA LAWN MOWER OWNER S MANUAL
 MODEL: HM381 COBRA LAWN MOWER OWNER S MANUAL Cobra Garden Machinery Henton and Chattell Ltd., London Road, Nottingham NG2 3HW UK www.cobragarden.co.uk WARNING: For your own safety please read this manual
60 PRO FINISH CUT OWNER S MANUAL. With Assembly Instructions For Model: Pro60K KUNZ ENGINEERING, INC. / MENDOTA, IL / PH (815) /08
 /08") 60 PRO FINISH CUT OWNER S MANUAL With Assembly Instructions For Model: Pro60K KUNZ ENGINEERING, INC. / MENDOTA, IL 61342 / PH (815) 539-6954 1/08 ASSEMBLY INSTRUCTIONS READ THE COMPLETE ASSEMBLY INSTRUCTIONS
60 PRO FINISH CUT OWNER S MANUAL With Assembly Instructions For Model: Pro60K KUNZ ENGINEERING, INC. / MENDOTA, IL 61342 / PH (815) 539-6954 1/08 ASSEMBLY INSTRUCTIONS READ THE COMPLETE ASSEMBLY INSTRUCTIONS
OPERATOR S MANUAL. Striper. Models: SZL/SFZ/SCZ48/52 STRIPER STC/SCZ/STT STRIPER Scag Power Equipment Division of Metalcraft of Mayville, Inc.
 OPERATOR S MANUAL Striper Models: SZL/SFZ/SCZ48/2 STRIPER STC/SCZ/STT STRIPER This manual contains the operating instructions and safety information for your Scag mower accessory. Reading this manual can
Reproduction. Not for 27" & 29" TWO STAGE INTERMEDIATE SNOWTHROWERS Parts Manual for M1227E M1227EX M1529E
 Parts Manual for 27" & 29" TWO STAGE INTERMEDIATE SNOWTHROWERS 2011 Model No. Description 1696001 M1227E 1696002 M1227EX 1696003 M1529E Briggs & Stratton Yard Power Products Group 535 Macon Road McDonough,
MAGNETIC INDOOR CYCLING BIKE
 MAGNETIC INDOOR CYCLING BIKE SF-B1805 USER MANUAL IMPORTANT! Please retain owner s manual for maintenance and adjustment instructions. Your satisfaction is very important to us, PLEASE DO NOT RETURN UNTIL
MODEL 840 AIR HYDRAULIC PUMP INSTRUCTION
 MODEL 840 AIR HYDRAULIC PUMP INSTRUCTION Jackco Transnational Inc. 202 South El Monte, CA 888-452-2526 www.jackco.com FOR YOUR SAFETY Read all instructions, warnings and cautions carefully. Follow all
60 FINISH CUT OWNER S MANUAL MODEL NO. T1360B1 T1360T T1360H T1360K T13560 RK1360 T Assembly Operation Service and Adjustment Repair Parts USA
 www.swisherinc.com OWNER S MANUAL MODEL NO. T1360B1 T1360T T1360H T1360K T13560 RK1360 T17560 60 FINISH CUT TRAILMOWER IMPORTANT Read and follow all Safety Precautions and Instructions before operating
1. SAFETY 2. PREPARATION 3. FRAME 4. TRANSMISSION 5. DRIVE 6. ROW UNIT 7. OPTIONAL EQUIPMENT
 TABLE OF CONTENTS 1. SAFETY 2. PREPARATION 3. FRAME 4. TRANSMISSION 5. DRIVE 6. ROW UNIT 7. OPTIONAL EQUIPMENT This symbol means: ATTENTION - BECOME ALERT YOUR SAFETY IS INVOLVED. When you see this symbol
WALL-MOUNT GARDEN HOSE REEL OWNER S MANUAL
 WALL-MOUNT GARDEN HOSE REEL OWNER S MANUAL Perpendicular Mount Parallel Mount WARNING: Read carefully and understand all ASSEMBLY AND OPERATION INSTRUCTIONS before operating. Failure to follow the safety
60 Drum Style Spike Aerator
 60 Drum Style Spike Aerator OWNER S MANUAL WARNING: Read carefully and understand all ASSEMBLY AND OPERATION INSTRUCTIONS before operating. Failure to follow the safety rules and other basic safety precautions
INSTALLATION INSTRUCTIONS
 INSTALLATION INSTRUCTIONS Pattern Mowing Kit ST60119 02/11/2016 ENGLISH LP63764 Product Compatibility This kit is compatible with ZTrak Models with 48 in. or 54 in. Accel Deep TM (48A, 54A) mower decks
60 FINISH CUT H60B OWNER S MANUAL. With Assembly Instructions For Models: H60T, H60B & C60K
 60 FINISH CUT C60K H60T H60B OWNER S MANUAL With Assembly Instructions For Models: H60T, H60B & C60K KUNZ ENGINEERING, INC. / MENDOTA, IL 61342 / PH (815) 539-6954 1/09 SAFETY INTRODUCTION Your safety,
Pressure Relief Valve Instruction Manual
 CVR3-M0_062017 Pressure Relief Valve Instruction Manual MODEL: CVR3 SFA Companies 10939 N. Pomona Ave. Kansas City, MO 64153 Tel: 888-332-6419 * Fax: 816-448-2142 E-mail: sales@bvahydraulics.com Website:
COMPACT METAL bender 99826
 COMPACT METAL bender 99826 Set up And Operating Instructions Distributed exclusively by Harbor Freight Tools. 3491 Mission Oaks Blvd., Camarillo, CA 93011 Visit our website at: http://www.harborfreight.com
SUMMITTM 400 & 600. Natural Gas Barbecues. Step-By-Step Guide
 SUMMITTM 400 & 600 Natural Gas Barbecues Step-By-Step Guide W E B E R W E B E R W E B E R W E B E R Summit 400 NG Summit 600 NG CANADIAN GAS ASSOCIATION R A P P R O V E D WARNING: Follow all leak check
42 inch Mower for TimeCutter Z Riding Mowers. Note: Determine the left and right sides of the machine from the normal operating position.
 Recycler Form No. -7 Kit inch Mower for TimeCutter Z Riding Mowers Model No. 798 Note: Determine the left and right sides of the machine from the normal operating position. Loose Parts Note: Use the chart
Reproduction. Not for. Installation Instructions. Installation Instructions. Part No Installation. 32/36 Bagger 32/36 Kit WARNING
 Installation Instructions Installation Instructions 32/36 agger 32/36 Kit Part No. 5600268 its 32/36 Mowers Kit ontents Part No. Qty. escription Part No. Qty. escription 5404389 1 Weld, agger Mount, 32/36
TECHNICAL DATA ZTR Model 312
 DIXON INDUSTRIES. INC. A BLOUNT COMPANY AIRPORT INDUSTRIAL PARK PO BOX 1569 COFFEYVILLE KS 67337 0945 316 251 2000 FAX 316 251 4117 TECHNICAL DATA ZTR Model 312 IMPORTANT - READ OPERATOR'S MANUAL BEFORE
The 30 Inch Rotary Mower is designed and built to be used with the Gravely two wheel tractors.
 ~GRAVELY CLARKE GRAVELY CORPORATION A Studebaker-Worthington Company NAME: 0 INCH ROTARY MOWER PART NUMBER(S): OPERATOR'S MANUAL Drive - 5 Deck (single blade) - 075 Deck (twin blade) - 076 The 0 Inch Rotary
AIR COMPRESSOR. Failure to follow all instructions as listed below may result in electrical shock, fire, and/or serious personal injury.
 2 GALLON AIR COMPRESSOR Model: 7517 DO NOT RETURN TO STORE. Please CALL 800-348-5004 for parts and service. CALIFORNIA PROPOSITION 65 WARNING: You can create dust when you cut, sand, drill or grind materials
KEY PART KEY PART NO. NO. DESCRIPTION NO. NO. DESCRIPTION
 1 874 78 04-10 Bolt, Fin Hex 1/4-20 x 5/8 12 532 13 09-86 Lens, LH 3 532 12 84-45 Bracket, Pivot Hood LH 13 532 13 09-84 Grille 4 819 09 10-16 Washer, Flat 1/4 21 532 12 69-38 Bumper, Hood 5 817 49 05-12
SSFU SUPER SPRAYFAST UNIVERSAL ADHESIVE APPLICATOR
 S S F U SSFU SUPER SPRAYFAST UNIVERSAL ADHESIVE APPLICATOR MACHINERY DIVISION OWNER S MANUAL UNIT INSTRUCTIONS Please follow all SSFU Safety Instructions. Contact your Duro Dyne Tech Service if you have
AIR INLINE METAL SHEAR
 AIR INLINE METAL SHEAR ASSEMBLY and OPERATING INSTRUCTIONS 3491 Mission Oaks Blvd. / Camarillo, CA 93011 Copyright 1997 by Harbor Freight Tools. All rights reserved. No portion of this manual or any artwork
Congratulations on your purchase of a JC Series Performer trike! The Performer JC Series is designed for everything from touring to commuting and
 Congratulations on your purchase of a JC Series Performer trike! The Performer JC Series is designed for everything from touring to commuting and shopping in the city. The JC Series frames are made of
SIGNATURE DEF REELS Models: Bare Reel Reel Reel Reel
 SERVICE BULLETIN SB2023 Rev C 7/11 SIGNATURE DEF REELS Models: 2400-006 Bare Reel 2400-007 16 Reel 2400-008 20 Reel 2400-009 30 Reel Thoroughly read and understand this manual before installing, operating
Tube-Line Accelerator Spinner Kit
 Tube-Line Accelerator Spinner Kit Operator's Manual PP-00799 (19/09/11) 2 TO THE OWNER This manual contains information concerning the adjustment, assembly and maintenance of your Tube-Line Spinner Kit.
All it takes is you. No gas, cords or batteries. StaySharp TM Max Reel Mower Model number:
 All it takes is you. No gas, cords or batteries StaySharp TM Max Reel Mower Model number: 362050 Before assembling or using the mower, read through the entire manual and fully understand the safety information.
HYDRAULIC WINCH FOR AUGERS UP TO WR10 X 71 / W130 X 41 ASSEMBLY & OPERATION MANUAL
 HYDRAULIC WINCH ASSEMBLY & OPERATION MANUAL Read this manual before using product. Failure to follow instructions and safety precautions can result in serious injury, death, or property damage. Keep manual
OPERATING and MAINTENANCE INSTRUCTIONS MAXIS 3K Puller (M3K-M)
") OPERATING and MAINTENANCE INSTRUCTIONS MAXIS 3K Puller (M3K-M) 04/17 (M3K-M) READ AND UNDERSTAND ALL OF THE INSTRUCTIONS AND SAFETY INFORMATION IN THIS MANUAL BEFORE OPERATING OR SERVICING THIS TOOL TABLE
OPERATING and MAINTENANCE INSTRUCTIONS MAXIS 3K Puller (M3K-M) 04/17 (M3K-M) READ AND UNDERSTAND ALL OF THE INSTRUCTIONS AND SAFETY INFORMATION IN THIS MANUAL BEFORE OPERATING OR SERVICING THIS TOOL TABLE
AC1810 / AC1810-A TECHNICAL SPECIFICATIONS. Operating Pressure psi ( kgs/cm²) [AC1810] Displacement. Net Weight
![AC1810 / AC1810-A TECHNICAL SPECIFICATIONS. Operating Pressure psi ( kgs/cm²) [AC1810] Displacement. Net Weight](/thumbs/83/88369739.jpg "AC1810 / AC1810-A TECHNICAL SPECIFICATIONS. Operating Pressure psi ( kgs/cm²) [AC1810] Displacement. Net Weight") Technical Specifications Operating Instructions Maintenance Information Troubleshooting Guide Parts Diagrams AC1810 / AC1810-A THE EVOLUTION OF PERFECTION CAUTION: Before attempting to use or service this
Technical Specifications Operating Instructions Maintenance Information Troubleshooting Guide Parts Diagrams AC1810 / AC1810-A THE EVOLUTION OF PERFECTION CAUTION: Before attempting to use or service this
HEAVY-DUTY AIR RATCHET WRENCH OWNER S MANUAL
 HEAVY-DUTY AIR RATCHET WRENCH OWNER S MANUAL WARNING: Read carefully and understand all INSTRUCTIONS before operating. Failure to follow the safety rules and other basic safety precautions may result in
SKYBIRD TRAP OWNER S / OPERATOR S MANUAL PARTS AND ASSEMBLY INSTRUCTIONS
 SKYBIRD TRAP PART NO. 40903 OWNER S / OPERATOR S MANUAL PARTS AND ASSEMBLY INSTRUCTIONS WARNING: THIS MACHINE CAN CAUSE SERIOUS INJURY OR DEATH! THOROUGHLY READ INSTRUCTIONS AND SAFETY INFORMATION BEFORE
4 ANGLE GRINDER MODEL NO: CAT 52 PART
 4 ANGLE GRINDER 4 ANGLE GRINDER MODEL NO: CAT 52 PART No: 3110685 OPERATION & MAINTENANCE INSTRUCTIONS 0807 Fig.1 SPECIFICATIONS Model:...CAG52 Part Number:...3110685 Rated Wheel...Capacity: 4 x 1/4 (type
AIR/OVER HYDRAULIC JACK 20 TON
 AIR/OVER HYDRAULIC JACK 0 TON 4487 ASSEMBLY AND OPERATING INSTRUCTIONS 349 Mission Oaks Blvd., Camarillo, CA 930 Visit our Web site at http://www.harborfreight.com Copyright 999 by Harbor Freight Tools.
444C DUAL PERFORMANCE VALUE PACK
 (Chrome) PART NO. 44432 IMPORTANT: It is essential that you and any other operator of this product read and understand the contents of this manual before installing and using this product. SAVE THIS MANUAL
1000-Lb. Rapid Lift Hydraulic Table
 1000-Lb. Rapid Lift Hydraulic Table Owner s Manual WARNING: Read carefully and understand all ASSEMBLY AND OPERATION INSTRUCTIONS before operating. Failure to follow the safety rules and other basic safety
TECHNICAL DATA BROCHURE Model 304
 DIXON INDUSTRIES, INC. A BLOUNT COMPANY AIRPORT INDUSTRIAL PARK PO BOX 1569 COFFEYVILLE KS 673370945 316 251 2000 FAX 316 251 4117 TECHNICAL DATA BROCHURE Model 304 IMPORTANT - READ OPERATOR'S MANUAL BEFORE
MICHIGAN FFA ZERO TURN MOWER SAFETY, MAINTENANCE & OPERATION - TEST BANK
 MICHIGAN FFA ZERO TURN MOWER SAFETY, MAINTENANCE & OPERATION - TEST BANK NOTE: These are examples of the type and subject of the questions you may see. They may appear re-worded or in another form at the
BELT DRIVE INDOOR CYCLING BIKE SF-B1712 USER MANUAL
 BELT DRIVE INDOOR CYCLING BIKE SF-B1712 USER MANUAL IMPORTANT! Please retain owner s manual for maintenance and adjustment instructions. Your satisfaction is very important to us, PLEASE DO NOT RETURN
OWNER S MANUAL. Page: 1 of 8
 Air Needle Scaler OWNER S MANUAL WARNING: Read carefully and understand all INSTRUCTIONS before operating. Failure to follow the safety rules and other basic safety precautions may result in serious personal
TN548 TRENCHER OPERATOR S MANUAL
 TN548 TRENCHER OPERATOR S MANUAL DEC 2014 T A B L E O F C O N T E N T S S E C T I O N D E S C R I P T I O N P A G E 1 Introduction................... 1 1.1 Overview................... 1 1.2 Intended Use
HPB25 Hydraulic Paving Breaker
 INSTRUCTION MANUAL HPB25 Hydraulic Paving Breaker Read and understand all of the instructions and safety information in this manual before operating or servicing this tool. Register this product at www.greenlee.com
OPERATING and MAINTENANCE INSTRUCTIONS MAXIS 6K Puller (M6K-M)
") OPERATING and MAINTENANCE INSTRUCTIONS MAXIS 6K Puller (M6K-M) READ AND UNDERSTAND ALL OF THE INSTRUCTIONS AND SAFETY INFORMATION IN THIS MANUAL BEFORE OPERATING OR 04/17 (M6K-M) SERVICING THIS TOOL TABLE
OPERATING and MAINTENANCE INSTRUCTIONS MAXIS 6K Puller (M6K-M) READ AND UNDERSTAND ALL OF THE INSTRUCTIONS AND SAFETY INFORMATION IN THIS MANUAL BEFORE OPERATING OR 04/17 (M6K-M) SERVICING THIS TOOL TABLE
Grounds Equipment Operation Contest Guidelines
 Contest Guidelines The Grounds Equipment Operation contest includes the following: 1. General safety test (true/false and multiple choice)* covering: a. Walk behind power lawn mower. b. Gasoline powered
Cylinder Tilt Saddle Instruction Manual
 Cylinder Tilt Saddle Instruction Manual MODELS: SDT05, SDT10, SDT15, SDT25 SFA Companies 10939 N. Pomona Ave. Kansas City, MO 64153 Tel: 888-332-6419 - Fax: 816-448-2142 E-mail: sales@bvahydraulics.com
TRAILMATE METEOR ASSEMBLY MANUAL
 TRAILMATE METEOR ASSEMBLY MANUAL (DISC BRAKE VERSION) The Trailmate Meteor recumbent has been designed for easy assembly. This means more time to enjoy the smooth ride with single speed, 3 speed coaster
16 IN., 40 V LITHIUM-ION MOWER MODEL #KM-1640 ATTACH YOUR RECEIPT HERE
 ITEM #0710565 16 IN., 40 V LITHIUM-ION MOWER MODEL #KM-1640 KOBALT and the K Design are registered trademarks of LF, LLC. All Rights Reserved. Español p. 25 Français p. 49 ATTACH YOUR RECEIPT HERE Serial
OPERATION & MAINTENANCE INSTRUCTIONS
 1 /2 REVERSIBLE AIR DRILL MODEL NO: CAT123 PART NO: 3110879 OPERATION & MAINTENANCE INSTRUCTIONS GC1110 INTRODUCTION Thank you for purchasing this CLARKE product. Before attempting to use this product,
REPAIR PARTS MANUAL MODEL NO. EDITION 1 MFG. ID. NO Rotary Lawn Mower
 REPAIR PARTS MANUAL MODEL NO. EDITION 1 MFG. ID. NO. 96141011700 Rotary Lawn Mower 532 40 27-08 Rev. 1 01.06.06 BY Printed in U.S.A. ROTARY LAWN MOWER - - MODEL NO. EDITION 1 (96141011700) - PRODUCT NO.
INTENDED USE TECHNICAL SPECIFICATIONS
 1/2IN. HEAVY-DUTY AIR IMPACT WRENCH OWNER S MANUAL WARNING: Read carefully and understand all INSTRUCTIONS before operating. Failure to follow the safety rules and other basic safety precautions may result
IMPORTANT: RECEIVING INSTRUCTIONS:
 Instruction Sheet Sidewinder Mechanical Bender IMPORTANT: RECEIVING INSTRUCTIONS: Visually inspect all components for shipping damage. If any shipping damage is found, notify carrier at once.shipping damage
400C & 450C DUAL PERFORMANCE VALUE PACKS
 (Chrome) PART NO. 40013 (Silver) PART NO. 45012 (Chrome) PART NO. 45013 IMPORTANT: It is essential that you and any other operator of this product read and understand the contents of this manual before
3/8" Dr. Air Butterfly Impact Wrench
 8192106 3/8" Dr. Air Butterfly Impact Wrench Owner s Manual Read and understand all instructions before use. Retain this manual for future reference. Specifications Construction: Polished aluminum and
WHEELED AIR COMPRESSOR AC658HB AC708RB AC908HB AC6520HB. User Manual
 WHEELED AIR COMPRESSOR AC658HB AC708RB AC908HB AC6520HB User Manual table of contents table of contents Introduction 4 Using the Operators Manual Product Identification 5 Record Identification Numbers
IMPORTANT SAFETY INFORMATION
 WARNING SYMBOLS AND DEFINITIONS This is the safety alert symbol. It is used to alert you to potential personal injury hazards. Obey all safety messages that follow this symbol to avoid possible injury
OPERATOR S MANUAL AND PARTS LISTING FOR THE. STM Mounted Harrow
 MANUFACTURERS OF QUALITY AGRICULTURAL EQUIPMENT SINCE 1936 OPERATOR S MANUAL AND PARTS LISTING FOR THE STM Mounted Harrow With FH 5-Bar Section VERSION: 10-07AJF TO THE OWNER AND OPERATORS Before assembling
Ecomow Electric Mower
 Ecomow Electric Mower 1100 Watt Operation Manual 2 Year Replacement Warranty ECO-320 - Type 1 0509 To view the entire range visit: www.ozito.com.au SPECIFICATIONS - MODEL NO. ECO-320 Motor Size: 1100W
CUT OFF TOOL MODEL: CAT113
 CUT OFF TOOL MODEL: CAT113 Part No: 3120135 ASSEMBLY & INSTRUCTION MANUAL LS0309 INTRODUCTION Thank you for purchasing this CLARKE product Before attempting to use the product, it is essential that you
7130 Lancer Rear Drive Magnetic Commercial Indoor Cycling Bike
 7130 Lancer Rear Drive Magnetic Commercial Indoor Cycling Bike Owner s Manual Made in Taiwan INDEX IMPORTANT SAFETY INFORMATION... 1 EXPLODED DRAWING... 2 PARTS LIST... 3 ASSEMBLY INSTRUCTION... 4-9 USER
Flexfence Swaging Unit. Product Manual. Release 02/16.
 Product Manual www.ingalcivil.com.au 1.0 Safety Precautions 1.1 Personal Protection While operating this equipment it is recommended that the following personal protective equipment be worn; Long sleeve
OPERATOR S MANUAL Expand-it Brushcutter Attachment UT15702A
 OPERATOR S MANUAL Expand-it Brushcutter Attachment UT15702A Your Expand-it Brushcutter Attachment has been engineered and manufactured to a high standard for dependability, ease of operation, and operator
REPAIR PARTS MANUAL MODEL NO. BH55Y21RH MFG. ID. NO Rotary Lawn Mower
 REPAIR PARTS MANUAL MODEL NO. BH55Y21RH MFG. ID. NO. 96141000100 Rotary Lawn Mower 532 19 53-42 Rev. 1 12.08.04 BY Printed in U.S.A. ROTARY LAWN MOWER - - MODEL NO. BH55Y21RH (96141000100) - PRODUCT NO.
Item N o.: Item N am e:40cm Boys Rival Bike
 Item N o.:42272892 Item N am e:40cm Boys Rival Bike 9 bell 8 grip 30 crash pad 10 brake lever 26 wheel reflector 22 saddle 23 seat post 25 rear reflector 24 quick release 6 handle bar 7 stem 2 top tube
DRAG HARROW SAFETY & OPERATING INSTRUCTIONS. Original Language. Serial No. Order No.
 DR ` DRAG HARROW SAFETY & OPERATING INSTRUCTIONS Serial No. Order No. Original Language DR Power Equipment Toll-free phone: 1-800-DR-OWNER (376-9637) Fax: 1-802-877-1213 Website: www.drpower.com Read and
HYDRAULIC MOBILE LIFTING TABLE
 HYDRAULIC MOBILE LIFTING TABLE MODEL NO: HTL300 & HTL500 PART NO: 7610148 & 76210152 OPERATION & MAINTENANCE INSTRUCTIONS ORIGINAL INSTRUCTIONS GC1116 INTRODUCTION Thank you for purchasing this CLARKE
Parts Manual STRIKER Striker 2840 Parts List - PN Printed in USA 03/18/08
 Parts Manual STRIKER 2840 Striker 2840 Parts List - PN 238155 - Printed in USA 03/18/08 Standard Parts Recommended General Wear Parts Ref No Part Description Qty Part No 1 Squeegee Hose Assembly
Santa Fe Cycles Assembly Guide Introduction
 Santa Fe Cycles Assembly Guide Introduction Congratulations on your purchase of your new Santa Fe bicycle. You have purchased a bicycle that has many features and qualities. Please take a few minutes and
600 / 600FC OWNER'S MANUAL
 PROGRESSION 600 / 600FC OWNER'S MANUAL Issue 2 / Version E - Dec. 10, 1997 Copyright 1997 GAMMA Sports - All Rights Reserved PROGRESSION 600 / 600FC OWNER'S MANUAL TABLE OF CONTENTS PAGE 1... WARRANTY
The installation of this kit must be performed by an authorized Honda riding mower dealer. These instructions are provided for dealer use.
 1. DEALER INSTALLATION INSTRUCTIONS The installation of this kit must be performed by an authorized Honda riding mower dealer. These instructions are provided for dealer use. FOLLOW THESE INSTRUCTIONS
accidents which arise due to non-observance of these instructions and the safety information herein. SPECIFICATIONS
 18 GAUGE 2 INCH BRAD NAILER Model: 7555 CALIFORNIA PROPOSITION 65 WARNING: You can create dust when you cut, sand, drill or grind materials such as wood, paint, metal, concrete, cement, or other masonry.
AC558RB AC7011RB. operation manual
 AC558RB AC7011RB operation manual table of contents Introduction 4 Using the Operators Manual Specifications 4 Specifications Product Identification 5 Record Identification Numbers Safety 6 Safety Instructions
G10K - 1/2" Heavy-Duty Air Impact Wrench
 G10K - 1/2" Heavy-Duty Air Impact Wrench OWNER S MANUAL WARNING: Read carefully and understand all ASSEMBLY AND OPERATION INSTRUCTIONS before operating. Failure to follow the safety rules and other basic
Duo/Trio Office Bike Owner s Manual
 Duo/Trio Office Bike Owner s Manual Welcome Congratulations on choosing to enhance your productivity and wellness with LifeSpan. You ve made a healthy decision, as the need for increased amounts of daily
! CAUTION! ! WARNING! General Information
 Great Plains Mfg., Inc. Installation Instructions Used with: 2SF24, 24-Foot Two-Section Drill General Information Two-Section, Hydraulic Folding Marker 2SF30, 30-Foot Two-Section Drill 2SBM30, 30-Foot
Freedom8 ShoeBox Compressor Manual
 Freedom8 ShoeBox Compressor Manual Warning!! This product is not a toy! Use or misuse can cause severe injury or death! Use only with adult supervision. This unit is only to be used with tanks, hoses and
BELT DRIVE INDOOR CYCLING BIKE SF-B1712
 BELT DRIVE INDOOR CYCLING BIKE SF-B1712 USER MANUAL IMPORTANT! Read all instructions carefully before using this product. Retain owner s manual for future reference. For customer service, please contact:
IMPORTANT SAFETY INSTRUCTIONS
 IMPORTANT SAFETY INSTRUCTIONS CAUTION - To reduce risk of electrical shock: - Do not disassemble. Do not attempt repairs or modifications. Refer to qualified service agencies for all service and repairs.
accidents which arise due to non-observance of these instructions and the safety information herein. SPECIFICATIONS
 18 GAUGE 1-1/4 INCH BRAD NAILER Model: 7611 CALIFORNIA PROPOSITION 65 WARNING: You can create dust when you cut, sand, drill or grind materials such as wood, paint, metal, concrete, cement, or other masonry.
S E R V I C E I IPL, LR10 36, LR Spare parts Ersatzteile Pièces détachées Reserve onderdelen Repuestos Reservdelar
 S E R V I C E I9400033 IPL, LR10 36, 1994-01 LR10 36 Spare parts Ersatzteile Pièces détachées Reserve onderdelen Repuestos Reservdelar 1 874 76 04-12 Bolt Fin Hex 1/4-20 x 3/4 8 873 68 04-00 Locknot W/lnsert
Yoke Block Instruction Manual
 Yoke Block Instruction Manual ! WARNING IMPORTANT: READ MANUAL COMPLETELY BEFORE OPERATING THIS DEVICE This manual contains instructions on periodically required checks to be performed by the user. These
CLAY DIGGER. Safety, Operating, Maintenance Instructions & Spare Parts List MCD-30A 1" MCD-30A 7/8"
 CLAY DIGGER Safety, Operating, Maintenance Instructions & Spare Parts List MCD-30A 1" MCD-30A 7/8" Read and understand this manual and all other safety instructions before using the equipment. CONTENTS
200 PSI COMPRESSORS - MODEL NUMBERS
 200 PSI COMPRESSORS - MODEL NUMBERS 380C AIR COMPRESSOR KIT PART NO. 38033 480C AIR COMPRESSOR KIT PART NO. 48043 380C 480C IMPORTANT: It is essential that you and any other operator of this product read
100C Air Compressor Kit
 10010 100C Air Compressor (standard mounting bracket, CE Spec) 10014 100C Air Compressor (no leader hose or check valve, CE Spec) 10016 100C Air Compressor (with Omega Bracket, CE Spec) IMPORTANT: It is