PRIOR LAKE BASEBALL PITCHING DEVELOPMENT
|
|
|
- Dominick Shaw
- 6 years ago
- Views:
Transcription

1 PRIOR LAKE BASEBALL PITCHING DEVELOPMENT 1
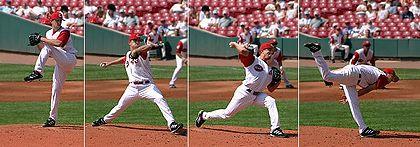
2 In order to perform consistently, pitchers need to develop their arm strength and fine-tune their mechanics year round. THIS DOES NOT REQUIRE CONSTANT THROWING. The following are ideas/concepts for developing your pitching mechanics, which will improve your overall pitching performance. Pitching can be as easy or as complicated as each player wants to make it. This packet will attempt to keep pitching simple, yet effective. The ideas in this packet should be practiced as often as possible (everyday, every other day, three times a week). These are areas that a pitcher must be improving upon in and out of season: 1. Pitching mechanics 2. Mental development (strategies, adjustments, & refinements) 3. Arm strength (along with total body) 4. Recognizing hitter s tendencies/flaws 5. Overall Athleticism There are four other areas that a pitcher must develop as the season progresses: 1. Holding runners-pickoffs 2. Pitcher s defense (bunts, come-backers, covering bases) 3. Backing up bases 4. Bullpens/ pre-game warm up Pitching Mechanics Pitching mechanics is defined as your throwing motion. Being able to consistently repeat your mechanics is essential in being a successful pitcher. Being able to consistently repeat your mechanics gives the pitcher a consistent release point, thus improving control and making it tougher on the hitter to recognize pitch type. There are some basic things that a pitcher should do during their delivery; however, we want to avoid the cookie-cutter approach. Pitchers should be allowed some personal freedom in their mechanics. Pitching mechanics can be easily broken down into three basic positions. 1. Balance a. Weight centered over rubber 2. Direction a. Shoulders, Elbows, Head, Knees, and Feet all in line with their target 3. Extension a. Extending out/reaching out as far as physically possible to deliver the ball. 2


 Keeping")
 Leg Lift is")
 Slight knee bend with leg")
 Lifted foot is relatively under")

3 Balance Whether you are in the windup or the stretch, all pitchers must achieve a balanced position. If we are inconsistent with our balance point, we stand a greater chance to make more mistakes during the rest of the motion. This can result in drifting, dropping back shoulder, collapsing the back leg, and arching your back. Here is what a GOOD balance point should look like: Here is what a POOR or INEFFECTIVE balance point looks like: Keys to the Balance Point Straight line through body from pivot foot to chin (do not lean back) Keeping shoulders in a straight line to the plate (avoid the coil; a little is ok) Leg Lift is around 90 and under control (avoid leg kicks that are too high) Slight knee bend with leg on ground (avoid locking straight or collapsing) Lifted foot is relatively under lifted knee (lefties should never cross) Relaxed front foot Leg and arms should be kept as close to center mass as possible to improve balance Player on LEFT is not centered Player on RIGHT is centered 3


4 Relaxed Front Foot This is a key factor in maintaining good balance throughout the pitching motion. If you have bad balance it will affect everything else during the throwing motion. Bad balance will result in poor direction, lack of extension, and increased muscle fatigue. If a player cannot relax their front foot, teach them to point it straight down. This will aid them in keeping their center of balance underneath them during the balance point position. Examples of a STIFF front foot resulting in bad balance: In both of these photos you can see that both pitchers have a stiff front foot. This is causing both pitchers to lean back to stabilize their balance and center of gravity. This will not affect them greatly in pitch number 1, or 10, or 30. But fatigue will set in and the players will be unable to maintain good balance because of this small problem. Because of a superior workout routine and God given ability the player on the right was able to produce a fairly productive baseball career. Practicing Balance Point There are several drills we can do to improve our balance point. Remember that we want to reach the same balance position every time. All drills can also be done with eyes closed to give the pitcher that FEEL. MUSCLE MEMORY! Regular Leg Lift Balance Point Crunch Partner Push Lift leg to balance point Do a mini crunch/sit-up Lift leg into balance position hold for as long as possible when at balance point position and hold. While holding position repeat many, many times causing weight to stay over front a partner circles around and lightly rubber/feet pushes to see if you maintain poses Facing the Wall Leg Lifts Back to the Wall Leg Lifts Partner Toss Stand close to the wall facing Stand close to wall - back Lift leg into balance position lift leg to balance point lift leg to balance point and hold. While holding position lifted foot should be 1-inch away keep back close to wall a partner circles and tosses you the keeps from raising too high stops you from leaning back baseball. Some good throws, some repeat many, many times repeat many, many times not. Pitcher must maintain balance or regain balance before throwing. *Challenge yourself by standing on a balance beam. Can you stay on? 4


.")

 Here")


5 Direction After reaching your balance point, pitchers must stride to the plate in order to deliver the ball. This is called direction. It is important that pitchers step straight towards the plate. If our stride is not straight (meaning closed or open). It makes it very hard to be consistent with our mechanics. Also we increase our risk of injury. You must have your HEAD, SHOULDERS, KNEES, and FEET all lined up and pointing toward your target (your catcher) Here is what GOOD direction looks like: Here is what BAD direction looks like: Feet are off line. Head is WAY off line. Arm is dragging through 2. Front foot landed closed, causing pitcher to lose balance and puts strain on shoulder 3. Shoulders not aligned to target, pitcher is leaning back 4. Head is off line, pulling body to his glove side 5. Shoulders are angled upward, causing the upper body to over rotate and pitchers to be high Keys to Direction Stride is straight to the plate Body and head stays balanced over center of gravity Weight does not get transferred too soon (just like hitting) Hands have broken apart and in throwing motion Shoulders, Elbows, Head, Knees, and Feet are all in line and pointing to target. 5


. This is generally the comfortable distance that pitchers use for stride.")
6 Practicing Direction Drills for improving direction are fairly limited. Start with the balance position every time. MUSCLE MEMORY! Up-Down-Slide L Position Wall/Tape Bullpen Simply lift your leg straight On 1 knee with chest square to With your back to a wall Up. Try to keep your arms/legs partner. Raise throwing arm up into throw while in SET position as close to center as possible. Put L position. Glove out front. Extend Not no time should your leg straight down and push off out as far as possible and release. back, elbow, shoulders, head back foot. Slide with feet in line Bring chest to your glove and touch the wall. Or run a tape complete follow through. Line from rubber to floor. Length of stride should be slightly less than the height of the player. Place a tapeline on your floor to represent the pitching rubber. Lay down so that your head is on the line and your body is straight. Place another tapeline on the floor just short of where your feet are. Connect the two lines with tape down the middle (you just made a capital I ). This is generally the comfortable distance that pitchers use for stride. Adjust as you see fit, however we should be able to get our head over our stride knee when releasing the ball. If not, shorten up! See picture below (good example): Stride Out Start in balance position using your tape setup; stride out to the proper distance Weight stays back when stride foot hits ground; Back knee has a slight bend Throwing arm should be 90 with hand to the sky Torso should not have begun to twist yet; Head is looking at the plate Repeat many, many times NOTE: Throwing arm and glove side arm should mirror each other. Elbows flexed with a firm front side. Shoulders are in a straight line for as long as possible. Your backside (throwing arm) is in CHARGE and starts the throwing motion. The two pictures above are good examples. 6

 and create downward movement on the")


7 Extension (which includes follow through) The final step in our pitching delivery is called extension. The goal of extension is to reach out as far as possible towards the plate in order to maximize our power potential (velocity) and create downward movement on the pitch. Hold on to the ball as long as possible to increase the downward force and to keep the ball down in the hitting zone. Pitchers who struggle with extension are often weak in the core area and have balance issues. They do not feel comfortable in extending out. Here is what GOOD extension looks like: Keys to extension Head is over stride knee Stride knee is slightly bent during release Bring chest to your glove with a firm front side. Ball is released in front of the shoulder, NOT ABOVE THE SHOULDER. Here is what GOOD follow through/finish looks like: Keys to follow through Throwing arm finishes on outside of opposite leg Stride foot remains stationary while back foot swings up and around Head stays up and looking at target Body bends over at the waist Extension naturally flows from good direction. Think of reaching out and placing your hand in the catcher s glove during release. Full extension allows us to maximize our power and hand speed. Just as important, full extension will assure consistency. If we are consistent with extension early on in the game and we tire as the game progresses, we should be able to feel ourselves short arming the ball. If we can feel a difference, then we should be able to make an adjustment to get back to extension. Always allow your arm to stop itself naturally and let it finish. Let your muscles work. DO NOT STOP YOUR ARM MOTION OR JERK BACK YOUR ARM 7


8 Here is what BAD follow through/finish looks like: Pitcher is not finishing, standing up Both pitchers are not allowing their body to finish Practicing Extension These two drills can be done with a partner or alone. Either way you will need some sort of a target to strike. Cut a strip of an old, thin towel so that it is approximately 3x12 inches. During drills hold the middle of the towel like a baseball so that the ends of the towel are on the sides of your index and middle finger. Your partner holding a glove or whatever target you are hitting should be far enough away so that only the ends of the towel strip will strike. If you use enough hand speed, you should hear a crack upon impact. Direction Towel Drill Balance Towel Drill No Feet Throw Start in direction position Start in balance position Be squared up to your partner Throw a pitch Throw a pitch Feet stay locked to the floor Ends of towel hit target Ends of towel hit target Rotate upper body and throw Make sure you are reaching Make sure you are reaching Release ball in front of body Repeat many, many times Repeat many, many times Allow finish of body, bend at waist L Position On 1 knee with chest square to partner. Raise throwing arm up into L position. Glove out front. Extend out as far as possible and release. Bring chest to your glove and complete follow through. 1 Knee Pull-up Pitcher is on 1 knee Rotate body and throw Release ball in front of body Will cause your weight to shift forward Stand up and take 2-3 steps forward Practice dry mechanics with a slightly larger towel strip to simulate a ball. Muscle Memory = Consistency By practicing these drills as often as possible, you will attain muscle memory. Dry mechanics will help you build muscle memory. Muscle memory will build consistency. Consistency in mechanics is the ultimate goal. Consistency will not only improve our performance and decrease our chances of injury, but will also allow us to make in-game adjustments to get us back on track. 8
 Right handed move is built around speed and quickness Left handed move is built around deception As a right-handed pitcher we need to get rid of the ball")
.")
9 Pick Offs (holding runners) The pitcher is more responsible for keeping runners from stealing than the catcher. The catcher reacts to the steal while the pitcher is more proactive. Picks to First Base (left- and right handed) Right handed move is built around speed and quickness Left handed move is built around deception As a right-handed pitcher we need to get rid of the ball as fast as possible. There are two keys to quick release. Many pitchers confuse quick release with throwing the ball as hard as possible. In order to have a quick release, pitchers should: #1 - short arm the ball (this is the one time it is ok to short arm a throw). #2 use the jump turn instead of stepping back first before throwing Quick Release Separate hands as soon as you start your pick off Throwing hand should go form glove directly to your ear Do not take your arm through the entire throwing motion Make sure your shoulders get squared to your target (first base) Think quick shoulders and your feet will follow It doesn t matter where your hands come set Hands separate straight up to ear Jump-turn Take a small step with your right foot towards your left foot Drop step left foot so that it is pointing to first OR spin both feet at same time so that they are squared to first Make sure your hips get all of the way around When performing a pick to first, our body momentum should be moving to first. After throwing the ball, our body should drift to first a few steps (walk off the throw). Think QUICK not HARD. As a left-handed pitcher we will try to fool the runner into thinking that we are throwing home. In order to have a deceptive move to first, pitchers should: #1 develop consistent mechanics to the plate #2 - make our move to first look like we are going home as long as possible 9
10 Important Keys to a Left-handed move Going to first home Going to First Stare at the runner (lefties give the pick away when they look home right away during their leg kick). Try to look at the runner as long as possible. Look away at the last second then look back to first to complete the throw (Look at 1 st base dugout as a look-away ) Leg kick needs to look the same as when you are going home (never cross) Drift with your hips towards home a little to make it appear that you are going home Try to keep shoulders straight to home as long as possible before committing to the pick Use the 45 degree rule to the best of your ability Walk off the mound towards first after throwing (do not let the umpire get a good look at where your right foot came down) Lefties do not forget the snap throw to first too. Wait until the runner is in the middle of taking another step off of first and then snap over. Some other things to consider for lefties/righties Freeze hold the ball, ruin the timing of the base-stealer Make the runner stop moving don t give up the walking lead Show off a few bad moves first then get them with your best Mix up your timing to home avoid getting into a pattern Pick off to first to expose the bunt (third basemen is watching batter) Off speed counts are good for stealing Fastball counts are good for hit-and-runs Don t wait for the catcher to call a pick; do it on your own Pick Offs to Second Base There are two main ways to pick to second. There is the inside move and the spin move. The spin move is the same as a right-handed pick to first except that the body will keep spinning until it is lined up with second. It is built around speed. The inside move is similar to a left-handed move to first except that the body will rotate back to line up with second base. It is built around deception 10
11 Keys to the spin move to second base Take a small step with your back foot towards your front foot Spin both feet backwards at same time until they are squared to second Or drop step your front foot back so that it is pointing to second base You must step behind the rubber Make sure your hips get all of the way around Use the short arm throw just like a pick to first for righties Keep your elbow up or you will tail your throw into center field Keys to the inside move Lift front leg to balance point while looking at the runner Look home and spin on back foot to line up hips to second Make sure lead foot lands behind rubber *Note try bending pivot-foot leg a little more to help with rotating your body. It is important to make it look like we are going home during our leg kick. Obviously you need to set up a timing play with your middle infielders. Chances are you will not pick the runner off 2 nd, but instead get the runner to increase their lead and get them in a run-down. This move is perfect for a 3-2 count with 2 outs and the runners running on the pitch. Pick Offs to Third Base Picks to third are just like picks to first except now the roles are reversed. - Righties will us deception to fool the runner (left-handed move to first) - Lefties will use speed/quickness to beat the runner back to the base (right-handed move to first) See above for information. Again, set up a timing play with your third basemen. Practicing Pick Offs Out of Season just as you practice your mechanics of pitching you should be practicing your mechanics of pick offs. Repeat the footwork and body movements to build muscle memory. Repeat many, many times. Mental Know-how There are several categories under mental know-how. Situations, personal limitations, plan of attack, pitch selection, and reflection are the big ones. Situations Understand situations and how to react to them (you need to know before they happen) Know your bunt defense responsibilities and who else is charging with you Know outs, runners, score, count, what the batter did last time Know where to go once the ball has been hit (backup bases) Personal Limitations Understand your own limitations (it is not your job to strike people out but to make quality pitches) Understand that you only have control over yourself (you can t control what the batter does) Risks are ok to take as long as you have a chance to be successful. Dumb risks are just that... dumb. 11
12 Plan of Attack Pitch to your strengths (FB versus CH or BB) Use pick offs to keep runners off balance (freeze, hold for a long time then throw, etc.) Mix up your timing to mess up the hitter (hitting is timing; pitching is messing up timing) Talk to your catcher ahead of the game about your goals Get ahead of hitter, stay ahead Lead-off hitter out is extremely important (chances of scoring significantly decreases when lead-off hitter is out) 0-2, 1-2 hitters must be finished off; be aggressive Stop the bleeding; end the rally Don t try to out-think the hitter I thought he would be looking for Don t blame the catcher; you have the ability to shake-off; better have a good reason Try to get hitters out as soon as possible; early in the count Never give up; you re always only one pitch away from getting out of a jam Pitch Selection Any pitch can be thrown at any time; execution Establish the fastball first; make them prove they can hit the FB Middle of the plate is fine as long as the ball is down; walks lose games 0-2 curveballs are too predictable. Try a low and away FB to get the batter leaning Second time through the lineup mix up your first pitch selection Watch out for first pitch swingers (will know by 2 nd or 3 rd AB) If a pitch is working, repeat it; go with what is working Don t always give up on a pitch that isn t working, show all of your pitches to keep the batters guessing. Work inside on batters with long swings; go for the jam With the game on the line; go down with your best pitch Commit yourself 100% to every pitch thrown. Just because the catcher/coach calls a pitch that you are not excited about, it does not give you the right to not try your best. You ve heard the saying before: play the game one pitch at a time. Reflection During the game ask these questions: What is working and what is not? make the adjustments Ask catcher: What are you seeing? What can we do better? Ask coach: What are you seeing? What do I need to improve? After the game: Was I prepared the best I could be? How can I be better prepared next time? What was I thinking about before the game? Was I focused yet relaxed? What did I do well during the game? What did not go well? How can I fix it for next time? What do I need to work on in practice before my next appearance? 12
13 Getting Loose Start with a total body cardio activity (jogging or jumping rope for 5-7 minutes), work up a sweat and get your blood pumping before stretching. After stretching and rotator cuffs, start with knee drills and progress to full motion (throw from balance and direction). Work your way out to a distance of at least feet. Throws should have a arch (rainbow like) to allow your should to warm-up. Work your way back in and finish with close range throws. When you start working your way in you begin to throw on a line. Work all the way to your starting distance of 40 feet. Bullpens/Pre-game During practices pitchers should be throwing bullpens. The number of bullpens per week depends on how many times you throw and when the next appearance will happen. Starters will throw more pens than relievers will. Before the game, starting pitchers need to properly prepare the body. The following are general guidelines that pitchers can use to get prepared. Adjust as necessary. Before you step on the mound: Run loosen your legs; little jogging; a few sprints Stretch appropriately and perform rotator cuff exercises Get loose; throwing along with progression drills Develop a plan; you should practice with a goal in mind During the bullpen: Start off at about 60% to get comfortable on the mound Find the strike zone before working on anything else (got to throw strikes) Work your way up to 90-95% velocity Establish FB on the corners; don t move on until you have one side down Work on CB and CH over the middle of the plate and down; don t try to be too fine Have the catcher call signs and work a few counts; create situations Finish by working your FB in the middle of the plate and down After the bullpen (or after the game): Run and stretch (NO ROTATOR CUFFS) If possible ice right away; otherwise do it at home later Reflect upon the whether you accomplished anything As you do more bullpens increase the number of pitches you throw. Start off at 25 pitches and try to get to 75 or 80 by the start of the season. It does no good to throw 100 pitches in December or even January. We want to be in game shape and ready first week of April. All of the above should be used as a pre-game warm up too. Starting pitchers should be sweating when the game starts. This is not too much throwing before a game. Relievers will have less time to get ready and will need to loosen up faster. Between innings relievers should stay loose by running and playing catch with the odd outfielder. Running Ideas Sprints of varying lengths (40, 50, 60, 70 yards) Distance (poles, neighborhoods, etc.) purpose is time not speed Run pass patterns with a partner Shuttles Jump Rope Ply metrics (jumping, hopping, leaping, shuffling etc.) Timed poles (suggest 34 seconds) Uphill/downhill 13
14 Warm-up Stretches & Rotator Cuffs *Total Body Cardio (running, jumping rope) should be done for 5-7 minutes before stretching. Got to get the blood following and the muscles warmed up before stretching. Upper Body Stretches Arm circles (small to big) (forward & backwards) Across chest Triceps extension Forearm flexion (up & down) Supernate & Pronate forearm Wing stretch (hands in ribs) Partner Airplane Mid Section Trunk twists Obliques (side to side) Stomach thrusts (pregnant lady) Lower back lean (partner push) Lower Body Standing Quadriceps Standing Hamstrings (cross feet) Sitting Upper Hamstrings (Gluts) Sitting Quadriceps Calve lunges Rotator Cuffs (2-3 lb weights) Bent over arm circles Bent over figure 8 s Bent over flies Front raises Lateral raises Medial-Lateral rotations 14
15 Tubing (Stride leg out) Woodchoppers Side to Side Forward Flies Airplanes Negative Pitching Reverse Woodchoppers Reverse Side to Side Reverse Flies Reverse Airplane Internal/External Rotation The Final Arc Tubing/Med Ball/Abdominals Workout Medicine Ball Workout Side to Side (Speed & Power) Diagonals (Speed & Power) Woodchoppers Overhead Balance Overhead Throw (MPH) Torques 1 knee catapult Running catapult Strong Man toss Abdominals Workout feet raised crunchies 2 sets/20 reps sit-up twists 20 each side obliques (knees at 90 degrees) 5 sets/10 sec Supermans 5 sets/10 sec Straight Leg Holds 2 sets/25 Partner Leg throws 15
16 Pitcher Progression/Throwing Drills GRIPS OF PITCHES (USE CONSISTENT ARM SPEED AND ACTION ON ALL PITCHES) 1. Fastball Four Seam Pointer and middle finger across the seams with horseshoe visible on either side of your fingers Fingers are together or slightly apart. Pads of fingers and thumb are on seams (pressure points) Thumb is underneath and bisects middle and pointer finger Light grip with a space between the ball and palm of hand Ball is straight hit a specific location Two Seam Fingers with the seams (inside the seams or on top of seams) Pads of fingers and thumb at various (pressure) points Light grip with a space between the ball and palm of hand Less accuracy and velocity then four seam because there are only two seams cutting the wind (more movement) 2. Change-Up Various Grips 1. Straight Change-up add 3 rd finger (ring finger) to four seam fastball grip, place pinkie underneath ball 2. 4 finger Change-up same as straight change-up, except pinkie moves to top of baseball or to the side 3. Circle Change-up index finger and thumb make a circle on the side of the ball. Other 3 fingers cover top of ball. Typically the pitcher has to have big hands to throw circle change-up. Fingertips are off the seams More fingers and a smaller space between the ball and palm of hand Use the same arm speed and arm action as a fastball Change speeds first, movement (downward) come second Reach toward homeplate and use your wrist to snap down at release Pitcher should try all 3 grips for comfort and command 3. Curveball Middle finger on seam with pointer finger next to it for support Thumb underneath and on seam Tight grip with horseshoe of ball against middle finger Use same arm speed and arm action as fastball until release point Snap your wrist with your thumb pushing up and over the top and your middle and index fingers pushing downward Thumb gives downward break Middle and pointer finger give tightness of rotation Four seams to cut the wind Throwing Preparation 1. Total Body Cardio (Break a sweat, get the blood pumping). Running, Jumping Rope 2. Stretches and Rotator Cuffs (See Warm-up stretches and rotator cuffs) 3. Be mentally prepared 4. Loosen arm (long toss and drills) 5. Always throw with a purpose use proper mechanics and throw to a target 16
17 Pitcher Progression/Throwing Drills 1. Wrist Flips Stand facing your partner (10-15 feet apart) Throwing arm is in throwing slot. Looks like you are raising your hand in class Wrist snap ball to partner wrist snaps apiece Ball should be on a line, even if that means bouncing the ball 2. 1 Knee extended follow through Facing your partner (30-40 feet apart) Start with your throwing side knee down and your back foot turned up (shoelaces down) Glove side knee should be bent with foot out in front of knee (45-60 degree angle) Rotate your hips and shoulders and keep your frontside closed Break your hands at your chest and behind the midline of your body Break your hands and throwing arm is Power L. Glove side elbow pointing to target Use fluid arm action Follow through: Chest landing over glove side knee/thigh. Let arm finish Focus on: 1) Fluid arm path 2) Upper body balance (shoulders level) 3) Keeping frontside closed 4) Backside starts the frontside 5) Finishing follow through 3. Standing follow through Facing your partner (40-50 feet apart) Start with glove side leg out in front of throwing side leg Rotate your hips and shoulders and keep your frontside closed Break your hands at your chest and behind the midline of your body Break your hands and throwing arm is Power L. Glove side elbow pointing to target Use fluid arm action Follow though: glove side elbow tucked in ribs, bent at the waist, throwing side leg rotates over ALTERATION: Get on both knees with legs pointed to partner. If follow through is proper, thrower will fall forward. Focus on: 1) Fluid arm path 2) Upper body balance (shoulders level) 3) Keeping frontside closed 4) Backside starts the frontside 5) Finishing follow through 4. Flash heal to partner Stretch position to partner (45-55 feet apart) Pick glove side leg to balance position, drive leg towards partner, turn knee inward and show heal of shoe to partner Touch ground (No weight transfer) and pick glove side leg back up to balance position Under control drive and deliver throw to partner Follow though: glove side elbow tucked in ribs, bent at the waist, throwing side leg rotates over Focus on: 1) No to minimal weight transfer 2) Rotating hip and keeping frontside closed 3) Under control in balanced position 4) Fluid arm path 5) Backside starts the frontside 6) Finishing follow through 5. Stretch-Pause-Finish Stretch position to partner (55-60 feet apart) Pick glove side leg to balance position, pause and hold body under control for 2-3 seconds Under control drive and deliver throw to partner Follow though: glove side elbow tucked in ribs, bent at the waist, throwing side leg rotates over Focus on: 1) Under control in balanced position 2) Keep frontside closed 3) Fluid arm path 4) Backside starts the frontside 5) Finishing follow through 17
18 Pitcher Progression/Throwing Drills Leg lift to Balance Position Can/should be done 3 different ways: Glove side against wall, arm side against wall, back to wall Start in stretch position, pick glove side leg into balanced position If you drift or lean in any direction you will touch the wall Repeat, repeat, repeat. MUSCLE MEMORY! Balance Position to Power L Start with back to wall Come set and progress into balanced position From balanced position breakdown into Power L 1. Glove side elbow pointing at target 2. Throwing side arm in line with shoulders 3. Throwing hand above elbow Power L 4. Stride leg extended and pointing to target If you have poor balance or wrap your arm you will touch wall Repeat, repeat, repeat. MUSCLE MEMORY! Arm path behind partner flip Start in stretched position Come set and progress into balanced position From balanced position breakdown into Power L As you withdraw ball from glove and into Power L flip the ball to your partner located directly behind you If you the ball goes off the right or left your arm was not lined up with shoulders Fast arm Whiffle Ball drill Distance for 10 feet from net Start with feet in stretch position Pick a target in the strike zone area on the net Hands in glove with fingers on top of the ball Come to balanced position Break hands as front knee starts to lower Go through proper arm path and frontside mechanics Get off back side when frontside lands Release ball out front of head & on a down hill plane Finish with hand below knee and glove past hip 18
19 Suggested Weekly Schedule (in season) Day #1 5 minute Jump Rope Arm Stretching & Rotator Cuffs Throwing yards (8-10 minutes)-light PFP's (Pitcher Fielding Practice) 20 Poles (walk last 10 ft to pole) Abdominal & Med Ball workout Repeat Arm Stretching Recap with coach about last performance Day #2 5 minute Jump Rope Arm Stretching & Rotator Cuffs Long Toss yards (10-12 minutes) 25 Pitch/45 feet bullpen from set (FB & CH only) Poles (walk last 10 ft to pole) Thera Bands/Tubing workout Abdominal & Med Ball workout Repeat Arm Stretching Day #3 5 minute Jump Rope Arm Stretching & Rotator Cuffs Long Toss yards (12-15 minutes) 20 towels drill 10 sprints of 90 feet Mechanical work (Wall drill, Elbows) Pick-offs (to 1B, to 2B, to 3B, and 3B-1B) 16 poles (walk last 10 ft to pole) Abdominal & Med Ball workout Repeat Arm Stretching Day #4 5 minute Jump Rope Arm Stretching & Rotator Cuffs Long Toss yards (8-10 minutes) 5 sprints of 90 feet PFP's (Pitchers Fielding Practice) Pitch Bullpen 10 poles (walk last 10 ft to pole) Abdominal workout Repeat Arm Stretching Day #5 If no game, day is same as Day #4 (bullpen may vary) 19
20 Starters: Long-toss needs to be maintained even when we are in season. Remember there is a difference between sore and pain. Minor adjustments can be made depending on game schedule and need. Your mid-cycle bullpen could be a one- or two-inning appearance in a game (35-40 pitches). Relievers: Your schedule is more flexible as you see fit. Maintain running and long-toss. If you get the feeling that you won t pitch today, mix in a bullpen (25-30 pitches) during the game. Ask coach first. Suggested Pre-game Preparation for Starters It is very important to determine how long it takes you to prepare for a game. For some pitchers they get ready too soon and end up waiting for the game to start. Whatever routine you develop it should be something that you are consistent with. Minor adjustments are okay, but just because you didn t have success in the game, that doesn t mean your pre-game was all wrong. Activity Approx. Time 1. Loosen up legs run 5 minutes 2. Stretch 8 minutes 3. Rotator Cuffs 5 minutes 4. Loosen arm (drills and distance) 16 minutes 5. Mound work (see below) 20 minutes 6. Down Time (relax; talk to catcher) 4-6 minutes max. Approximate Time needed to prepare: 60 minutes During your pre-game routine you should be thinking about situations, practicing pick offs, and formulating a plan. This does not mean you can t talk to teammates and have fun. However, you have a job to get done and many people are relying on you to be well prepared. You may need to keep a watch with you the first few times until you get the timing down. This will take practice, patience, and dedication. Relievers need to get ready as soon as possible. When a coach sends you to get loose and says, I need to you right away, that means you should RUN to the bullpen. ALWAYS HAVE A BALL IN YOUR GLOVE! Suggested Pre-game Mound Work 8-10 FB middle of the plate, down 75% 5 FB middle of the plate, down 90% 5 FB on arm-side corner, down 90% 5 FB on glove-side corner, down 90% 5 CH middle of the plate, down 5 BB middle of the plate, down Break time catch your breath 2-3 minutes Work two counts (K or BB) to a hitter - could have a teammate stand in Work two 0-2 counts (use your out pitch, in a safe location) Throw a pitch out to each side of the plate Last pitch dead center of the plate Relievers mostly fastballs, mix in a few off speed, get ready quickly 20
21 In Between Innings Warm-up 2 fastballs middle of plate, down 80% 1-2 change-ups middle of plate, down 1-2 breaking balls middle of plate, down On coming down, 1 fastball from stretch -Catchers hate off-speed pitches on coming down This assortment allows the pitcher to know what is working that inning and allows the catcher to know what you can command. Time Your Own Pre-game Prep Loosen up legs run Stretch Rotator Cuffs exercises Loosen arm (drills and distance) Mound work Down Time (relax; talk to catcher) Total Time Any adjustments: Loosen up legs run Stretch Rotator Cuffs exercises Loosen arm (drills and distance) Mound work Down Time (relax; talk to catcher) Total Time Loosen up legs run Stretch Rotator Cuffs exercises Loosen arm (drills and distance) Mound work Down Time (relax; talk to catcher) Total Time Relievers When entering the middle of a game, you do not have time to prep like a starter. You need to get ready as the coach dictates. You will probably get on the mound right away and get loose as quickly as possible. *You have to be able to get ready quickly. If it takes you twenty minutes to get ready as a reliever, you may have to get started earlier. Baseball is a sport you need to be prepared for even before your first day of practice. The more a player can develop prior to the spring season, the bigger advantage he will have over his competition. 21
22 Off Season Throwing Program LONG TOSS Long-toss is a must in improving arm strength. If you want to build throwing strength and add miles per hour to your throws, long-toss can help. Total Body Cardio (running, jumping rope) should be done for 5-7 minutes before stretching. Stretching should be done before and after each throwing session Rotator Cuff exercises should be done before each throwing session Start off close to get loose and create distance between yourself and your partner gradually Once you have reached your set distance, stay at that distance for 5-11 minutes Crow-hops should be used for throws of greater distance Throws should be on an arch or rainbow as you increase distance and on a line as you shorten distance. When your time is up at maximum distance begin shortening the distance between yourself gradually Finish with light tossing at a close range to slow the muscles down again Remember 3 feet in a yard Long-toss 3 times a week (Monday, Wednesday, Friday for example) Over time, increase your distance and then increase your time at that distance. We want to reach our maximums at the start of the PLAYING season, not necessarily the start of practices. Use the following schedule for a 13 week long-toss program WEEK 1 50 yards for 10 minutes total (5-7 minutes at max distance) WEEK 2 50 yards for 12 minutes total (5-7 minutes at max distance) WEEK 3 60 yards for 10 minutes total (5-7 minutes at max distance) WEEK 4 60 yards for 12 minutes total (6-8 minutes at max distance) WEEK 5 70 yards for 12 minutes total (6-8 minutes at max distance) WEEK 6 70 yards for 15 minutes total (6-8 minutes at max distance) WEEK 7 80 yards for 10 minutes total (5-7 minutes at max distance) WEEK 8 80 yards for 12 minutes total (5-7 minutes at max distance) WEEK 9 80 yards for 15 minutes total (7-10 minutes at max distance) WEEK yards for 10 minutes total (5-7 minutes at max distance) WEEK yards for 12 minutes total (6-8 minutes at max distance) WEEK yards for 15 minutes total (8-11 minutes at max distance) WEEK yards for 15 minutes total (8-11 minutes at max distance) All players should take their time with this program. We want to build strength slowly and time our maxout for the beginning of games. Once you are in season, continue to long-toss 3 times a week. Distance should be less than maximum (example 70 yards for minutes). In season we want to continue to rebuild power as we use it up in games, but at the same time save most of our strength for games. Final thought: Soreness is good. Pain is bad. You will need to learn the difference. 22
Main Points Feet Balance Power Position (Power T Position)- Rotation Follow-through
- Rotation Follow-through") Pitching Main Points 1. Feet-take a small step back with non-throwing side foot, keeping the weight over the stationary foot, which is turned parallel and touching the rubber 2. Balance Position-non-throwing
Pitching Main Points 1. Feet-take a small step back with non-throwing side foot, keeping the weight over the stationary foot, which is turned parallel and touching the rubber 2. Balance Position-non-throwing
2-HOUR PRACTICE PLAN EXAMPLE
 2-HOUR PRACTICE PLAN EXAMPLE Notes: In the following example, 5 minutes are allotted for flex-time. Have a written practice plan for every practice. Get good at time management. Wear a watch. 5 minutes:
Baseball Dudes Off- Season Throwing Program for Pitchers
 Baseball Dudes Off- Season Throwing Program for Pitchers Why do I need a throwing program? To be one of the best at this game takes a lot of hard work and dedication. Every professional pitcher heads into
Off Season Throwing Program for Pitchers 9-12 years old
 Off Season Throwing Program for Pitchers 9-12 years old Why do I need a throwing program? To be one of the best at this game takes a lot of hard work and dedication. Every professional pitcher heads into
Pitcher Daily Schedule 2016
 Tim Richardson Memorial Baseball Varsity Coach Pitcher Daily Schedule 2016 Day 1: This is the day you pitch. It may be a game, or a simulated game. If you are pulled from a game before hitting 75 pitches
Player Development. Pitching 1
 Pitching Player Development Pitching 1 Delivery Mechanics Checklist: 1. Feet slightly spread on throwing arm side of rubber 2. Body weight positioned over stride leg 3. Torso upright 4. Hips and shoulders
Juniors BB Curriculum. Baserunning Curriculum (Juniors Level)
") Juniors BB Curriculum 1. Baserunning 2. Catcher 3. Batting 4. Infield 5. Outfield 6. Pitcher Objectives: Baserunning Curriculum (Juniors Level) Learn to take extra bases on a batted ball or an error Focus
Juniors BB Curriculum 1. Baserunning 2. Catcher 3. Batting 4. Infield 5. Outfield 6. Pitcher Objectives: Baserunning Curriculum (Juniors Level) Learn to take extra bases on a batted ball or an error Focus
Randolph College Softball 2008 Summer Program
 Randolph College Softball 2008 Summer Program Week 1 Week 2 Endurance: 1 mile run 4x per Endurance: 1.25 mile run 4x per Core workout: 4x per Core workout: 4x per Week 3 Week 4 Endurance: 1.5 mile run
Softball Pitching Mechanics
 Softball Pitching Mechanics When teaching softball pitching mechanics, the best way to avoid injury, develop consistency, and see results is through repetition and attention to detail. Even a slight change
OBA CATCHING PROGRAM
 Catcher s Individual Responsibilities 1. Strength training and conditioning 2. Fundamentals; fielding and throwing 3. Attitude and leadership skills 4. Knowledge of baseball OBA CATCHING PROGRAM Working
Batting Fundamentals
 Batting Fundamentals Hitting Program Elements 1. Teach proper Hitting mechanics Batting grip Bat and Plate position Training the batters eyes Proper swing Upper body Mechanics Lower body mechanics Finishing
AYRA International League Minimum Skills
 AYRA International League Minimum Skills The International League should continue to work on all previous teachings and build upon these skills. This is a good age to start introducing more advanced skills,
Fielding Throwing and Catching Techniques, Practice and Drills
 Fielding Throwing and Catching Techniques, Practice and Drills Not to be reproduced without permission 1 1) Teach proper Fielding mechanics Ball grip Hand, glove and arm position Proper stance Throwing/Catching
LESSON PLAN. -Dynamic warm up (high knees, butt kicks, hip swings, trunk twists, shoulder circles, arm crossovers, skiers)
") Date: Session #1 Age: 8-15 Practice objectives: At the end of the practice, players should be able to properly grip a baseball, get into proper throwing position, and start the throw with their lower half.
Date: Session #1 Age: 8-15 Practice objectives: At the end of the practice, players should be able to properly grip a baseball, get into proper throwing position, and start the throw with their lower half.
FLLGS. AAA Practice Plan
 FLLGS AAA Practice Plan General Manager Guidelines When you get your roster be sure to contact all of your parents as soon as possible and introduce yourself. Parents are often just as excited as the girls
Glencoe Youth Baseball Player Coach Developmental Series
 Glencoe Youth Baseball Player Coach Developmental Series Dynamic Warm-ups: (Tony Bastinelli) 10-15 minutes -Start with a light jog, maybe two / three gym laps, w/ gloves on. Single file, no passing and
Moorhead Baseball Routines/Hitting Drills
 Moorhead Baseball Routines/Hitting Drills Philosophy How we train: Teach everyday with the goal of our players becoming their own coach. Get them to feel what s going on. Consistent mix of instruction
The Grip: Place the shot comfortably on the base of the hand with the thumb down and the four fingers balancing the shot.
 The Javelin By Mark Mirabelli, Throwing Specialist - www.mmtrackandfield.com If I could use one word to express success in all three styles of throwing the shot put I would have to say the word drill.
Coaches Handbook. Coaches Handout Page 1
 Coaches Handout 2009 Page 1 General Session 1: How to Warm-up! Players are put through basic warm-ups and exercises that they should perform each week when they come to Tball. Stretching should be the
Granite Falls Little League Coaching Manual
 Page 1 of 12 Coaching Basic Skills Granite Falls Little League Coaching Manual GFLL approach to Teaching Basic Skills by level of Play Granite Falls Little League Page 2 of 12 Coaching Basic Skills Coaching
Hitting and Bunting Drills
 Hitting and Bunting Drills Hitting from a Tee o Benefits - The Hitting from a Tee drill can be used to develop and reinforce the hitting fundamentals. This drill emphasizes that the player must keep her
QUICK TIPS THROWING & FIELDING
 PRACTICE ACTIVITIES The number one reason children decided to stop playing baseball is they get bored. The best approach to planning and organizing practices is to make sure players are always active rather
Beginning Softball Pitching Adapted from a guide created by Stan VanderSlik
 Beginning Softball Pitching Adapted from a guide created by Stan VanderSlik Pitching a softball is not like throwing a softball. Pitching is an underhand motion that, when done correctly, can result in
NORTH READING GIRLS SOFTBALL Our Mission
 NORTH READING GIRLS SOFTBALL Our Mission North Reading Girls Softball is a non-profit youth sports organization dedicated to providing a safe, positive and fun environment in which our players can learn
PEE WEE AND LIONS RULES AND SKILLS HANDOUT (April 2005) THE RULES
 THE RULES") PEE WEE AND LIONS RULES AND SKILLS HANDOUT (April 2005) THE RULES 1. When the whistle is blown by the coach, stand still, be quiet, and look at the coach; 2. If you want to speak raise your hand and wait
PEE WEE AND LIONS RULES AND SKILLS HANDOUT (April 2005) THE RULES 1. When the whistle is blown by the coach, stand still, be quiet, and look at the coach; 2. If you want to speak raise your hand and wait
Little League Pitching Mechanics - Simple Instructions For Little League
 Little League Pitching Mechanics - Simple Instructions For Little League Pitchers By Steven Ellis, former Chicago Cubs pitching pro The goal for any Little League coach or parent is to keep the game simple
BEGINNING PITCHING TIPS BRYC Softball Updated February 4, 2008
 BEGINNING PITCHING TIPS BRYC Softball Updated February 4, 2008 General 1. Work on sound mechanics before anything else. The earlier a player learns the mechanics, the quicker she will progress in learning
As a pitching coach or an instructor, you do most of your work from behind the
 Basic Fundamentals of Pitching As a pitching coach or an instructor, you do most of your work from behind the mound watching pitchers throw. There is a certain progression to use when you are observing
PRACTICE 2 TIP : Rebounding From Mistakes (Mistake Ritual)
") PRACTICE GOALS: What Your Team Should Learn 1. Be able to hold a ball with a four seem grip 2. How to throw to a two-hand target using a four-seam grip 3. Run through first base 4. Attempt to catch the
PRACTICE GOALS: What Your Team Should Learn 1. Be able to hold a ball with a four seem grip 2. How to throw to a two-hand target using a four-seam grip 3. Run through first base 4. Attempt to catch the
Ultimate Hitting Drills
 If You Enjoy This Report, Please Check Out Ultimate Hitting Drills Discover 56 Game-Te Tested Hitting Drills For A Faster, Smoother, And More Powerful Swing! Get Instant Access To The Complete Report Today,
Warm-up Effective Throwing/Pitching Mechanics Make it Simple/More Pitchers PFP s: Pitchers Fielding Practice Drills
 Warm-up Effective Throwing/Pitching Mechanics Make it Simple/More Pitchers PFP s: Pitchers Fielding Practice Drills bgrengs@farmington.k12.mn.us Phone: 651-295-0449 Focus: * Stretch/Flexibility * Proper
GOLDEN HILL LITTLE LEAGUE. Coach s Clinic 2007
 GOLDEN HILL LITTLE LEAGUE Coach s Clinic 2007 All Star Kids Sports (714) 579-1987 www.allstarkidssports.com All Star Kids Sports Coaches Clinic Outline I. Introduction II. Curriculum III. Hitting IV. Infield
to : entire team - warmup exercises (jumping jacks, leg stretches, arm circles, etc.) ( 10 minutes )
 ( 10 minutes )") Practice Plan - Minors: ( 2 hour practice) Practice #1 Date: Time: Team Roster: to : entire team - warmup exercises (jumping jacks, leg stretches, arm circles, etc.) ( 10 minutes ) to : entire team - throwing
Practice Plan - Minors: ( 2 hour practice) Practice #1 Date: Time: Team Roster: to : entire team - warmup exercises (jumping jacks, leg stretches, arm circles, etc.) ( 10 minutes ) to : entire team - throwing
RFYBO Catching Guidelines
 RFYBO Catching Guidelines * Look for the vocal leader who s not afraid to direct traffic * STANCE When in the catching stance, you should be in a comfortable crouch, compact and relaxed. Move your entire
HAYAA Baseball Coaching Clinic. 3) Emphasize teamwork/cheering on teammates/giving a good effort
 Emphasize teamwork/cheering on teammates/giving a good effort") The Essentials of coaching youth baseball 1) Make the game FUN! 2) Learn the basics HAYAA Baseball Coaching Clinic 3) Emphasize teamwork/cheering on teammates/giving a good effort The more you can make
The Essentials of coaching youth baseball 1) Make the game FUN! 2) Learn the basics HAYAA Baseball Coaching Clinic 3) Emphasize teamwork/cheering on teammates/giving a good effort The more you can make
2015 Spencerport Rangers Pitching Manual
 2015 Spencerport Rangers Pitching Manual Pitching Philosophy 1. We need to take care of arms. Adhere to the 7 Mechanical Steps and keep mound pitching to a minimum during practice. Flat ground work can
Rome wasn t built in a Day.
 Fundamental Focus of Week #4: Team Defense This week we are going to build the team defense portion of our practice plan. To cover the different situations players encounter during a game, we like to rotate
 Hi Coach! Thanks for checking out this free report. Inside, you're going to discover 20 "plug and play" tips that will dramatically improve any hitter's swing. For better quality at-bats, improved contact,
Pitching Skills and Drills
 Pitching Skills and Drills Copyright Notice -IT IS ILLEGAL TO POST THIS DOCUMENT ONLINE The material enclosed is copyrighted. You do not have resell rights or giveaway rights to the material provided herein.
CHAPTER 4 ADVANCED GROUND-FIGHTING TECHNIQUES
 (FM 21-150) CHAPTER 4 ADVANCED GROUND-FIGHTING TECHNIQUES After achieving an understanding of the basics of ground fighting, other elements of fighting on the ground are added. These techniques, however,
Glencoe Youth Baseball Player Coach Developmental Clinic Series
 Glencoe Youth Baseball Player Coach Developmental Clinic Series PCDC Infield/Outfield Session #1 Dynamic Warm-ups: (Tony Bastinelli) 10-15 minutes -Start with a light jog, maybe two / three gym laps, w/
BaseballTutorials.com
 BaseballTutorials.com 1 Copyright Notice - IT IS ILLEGAL TO POST THIS DOCUMENT ONLINE The material enclosed is copyrighted. You do not have resell rights or giveaway rights to the material provided herein.
AUSTRALIAN BASEBALL UMPIRE S MANUAL
 AUSTRALIAN BASEBALL UMPIRE S MANUAL UMPIRE POSITIONS AND SIGNALS 2009 by Australian Baseball All rights reserved. No part of this publication may be reproduced or distributed in any form without prior
THROWING & FIELDING. Why Building Good Technique Is Important
 THROWING & FIELDING Nose, Toes, and Throws For beginning players, it is helpful to use a rhyme to help the players remember the proper throwing motion. Say "Nose, Toes and Throws" as they practice throwing.
Ab Plank with Straight Leg Raise
 Ab Plank with Straight Leg Raise Position yourself face up with your knees bent at 90 degrees, feet flat on the floor. Your hands should be directly under your shoulders facing forward. While in this position
Baseball Hitting Principles Version 2
 Baseball Hitting Principles Version 2 Scott Kluemper 2/17/2013 Scott Kluemper 1 Table of Contents Page Swing Phases 3 Stance 4 Negative Move 10 Positive Move 12 Toe Touch 15 Heel Plant 17 Posture Lines
WGAAA Baseball Skill/Coaching Manual
 WGAAA Baseball Skill/Coaching Manual All baseball players regardless of age should have a base knowledge and capability of proper baseball mechanics. If a team is mechanically sound, more often than not,
Figure 8.45 (continued) Hit easy grounders directly to the players.
 Hit easy grounders directly to the players.") Tactics and Skills 133 3B SS 3 1 2B 1B R b 3B R SS 1 2B 3 1B c Figure 8.45 (continued) To make the game easier Hit easy grounders directly to the players. To make the game harder Hit harder ground balls.
Tactics and Skills 133 3B SS 3 1 2B 1B R b 3B R SS 1 2B 3 1B c Figure 8.45 (continued) To make the game easier Hit easy grounders directly to the players. To make the game harder Hit harder ground balls.
MATERIALS: PRACTICE GOALS: What Your Team Should Learn. PRACTICE 1 TIP: Honoring the Game (ROOTS) PRACTICE 2 TIP: Mistakes as Learning Opportunities
 PRACTICE 2 TIP: Mistakes as Learning Opportunities") PRACTICE GOALS: What Your Team Should Learn 1. How to hold a ball with a four-seam grip out of the glove 2. Successfully throw from a knee to a two-hand target using a four-seam grip 3. Round first base
PRACTICE GOALS: What Your Team Should Learn 1. How to hold a ball with a four-seam grip out of the glove 2. Successfully throw from a knee to a two-hand target using a four-seam grip 3. Round first base
I've been ending practices with this drill for many years. It works with either baseball or softball.
 BASE RUNNING DRILLS 3-2-1: Place three balls equal distance apart about three fourths of the way from third to home. Have a runner (team 1) and have a fielder on third base and one one 2nd base (team 2).
The Ranger Way The First 30 of Every Practice. Being Ready, Pressure on the Bases and Player Catch = SUCCESS
 The Ranger Way The First 30 of Every Practice Being Ready, Pressure on the Bases and Player Catch = SUCCESS DYNAMIC STRETCHING ROUTINE Each stretch should be 15-30 seconds. Most running can be done with
WEEK 5: TEAMWORK T-Ball Practice Plan
 WEEK 5: TEAMWORK T-Ball Practice Plan INTRODUCTION, STRETCHES & WARM UP - 7 MINUTES 1. Have players share their favorite part about last week and talk about what they think teamwork means. 2. Refer to
Baseball Training Program
 Baseball Training Program Always consult your physician before beginning any exercise program. The information and advice published or made available through the Orthopaedic and Neurosurgery Specialists,
Coaching Clinic. Coach with Class. Rich Coletta & Bob McCreary
 Coaching Clinic Coach with Class Rich Coletta & Bob McCreary What to expect from your players every practice... What to expect from yourself every DAY... Things to remember when scheduling your practice...
FUNDAMENTAL SOFTBALL SKILLS (DEVELOPING FUNDAMENTAL SKILLS)
") FUNDAMENTAL SOFTBALL SKILLS (DEVELOPING FUNDAMENTAL SKILLS) Learning outcomes: At the completion of this Module the candidate will be able to: Identify the fielding positions in softball and the responsibilities
FUNDAMENTAL SOFTBALL SKILLS (DEVELOPING FUNDAMENTAL SKILLS) Learning outcomes: At the completion of this Module the candidate will be able to: Identify the fielding positions in softball and the responsibilities
HOPPING Grade 1. Standard 1: The physically literate individual demonstrates competency in a variety of motor skills and movement patterns.
 HOPPING Grade 1 S1.E1.1: Hops, gallops, jogs and slides using a mature pattern. Hop in general space on preferred foot. 1. Students in scattered formation with personal space of at least 3-feet square
COACH RIC EVERMAN THE BASICS FOR BECOMING A FAST-PITCH SOFTBALL PITCHER
 COACH RIC EVERMAN THE BASICS FOR BECOMING A FAST-PITCH SOFTBALL PITCHER IMPORTANT: There are a lot of steps to learn here. Don t try to do them all of them at once. Take things one at a time. Nobody learns
I. General Coaching Tips
 I. General Coaching Tips 1. Be Enthusiastic 2. Build Confidence n Help kids believe in themselves n Instead of being critical or creating pressure 3. Enthusiasm and confidence building more important than
OBA Bunting Program Philosophy: team philosophy I. Bunting Basics Box Position Body Position Arm/Hand Position Bat Position Other Notes
 OBA Bunting Program Philosophy: Bunting is a team philosophy. The ability to utilize bunts and bunt situations will be one of the main focuses of our offense. To be a successful aggressive offensive team,
TEACHING TIPS REQUIREMENTS OBJECTIVES INJURIES THIS GUIDE
 2014 Coaching Guide REQUIREMENTS Submit a CORI/SORI Form Before you meet with your team, you must submit a Criminal Offender Record Information form or Sex Offender Record Information form to your league
PRACTICE 2 TIP : Filling Emotional Tanks (Winner s Circle)
") PRACTICE GOALS: What Your Team Should Learn 1. How to hold a ball with a four-seam grip 2. Successfully throw to a two-hand target using a four-seam grip 3. Attempt to catch the ball using two hands below
PRACTICE GOALS: What Your Team Should Learn 1. How to hold a ball with a four-seam grip 2. Successfully throw to a two-hand target using a four-seam grip 3. Attempt to catch the ball using two hands below
Mosinee Baseball Hitting
 Mosinee Baseball Hitting Drills & Techniques Daily Team Warm-Up 1. Jog forward/backward (2 Times) 2. Butt Kicks (down & back) 3. High Knees (down & back) 4. Karaoke (Left & right) 5. Walking Lunges (down
Post-Op UCL Throwing Program for Pitchers
 If you want to throw hard and throw accurately you must throw hard and throw repeatedly. However, your shoulder and arm must have time to heal and adapt to the imposed demand. Progression too rapidly in
PROPER PITCHING MECHANICS
 PROPER PITCHING MECHANICS While each pitcher is a different person and can display some individuality in his mechanics, everyone has similar anatomy (the same muscles, bones and ligaments in the same locations)
Plymouth New Hope Little League Coaching Manual
 Plymouth New Hope Little League Coaching Manual Presented by 2012 PNHLL - Baseball Development Committee Matt Deterding, Kevin Gray, Matt Haberle, Rob Lundquist, Jed Meyer, Jerry Persson, Rick Reed, John
Rogers Area Youth Baseball. Coaching Guidelines
 Rogers Area Youth Baseball Coaching Guidelines The Rogers Area Youth Baseball Association board of directors welcomes you to Youth Baseball! Your willingness to step up and help coach the youth of our
BYS BASEBALL Coaches Handbook BYS Baseball PO BOX 551 Birdsboro, PA 19508
 BYS BASEBALL Coaches Handbook BYS Baseball PO BOX 551 Birdsboro, PA 19508 Revised 2/12 Coach Thanks for volunteering your time and talents to coach our youth. Coaching is a rewarding, tiring, exciting,
PART IV: Coaching Development Objectives
 PART IV: Coaching Development Objectives Coaching Development Objectives These objective are being developed as a guideline only. Each player must be taught based upon his or her talent level as well as
Orono Pitching Program
 Orono Pitching Program Objective: We expect our pitchers to be prepared to show up everyday ready to compete. This competitive attitude will give our team a chance to win. We will stress mechanical, psychological,
PARTNER With all partner stretches: communicate with partner and use caution!!
 - warm up prior to stretching - isolate the muscle group to be stretched - move slowly and smoothly into stretch - use proper mechanics and correct alignment - breathe normal - slowly come out of stretch
2010 Skills & Drills
 2010 Skills & Drills 1 2 Table of Contents Introduction 5-6 1. Defensive Skills 7-19 Basic Fielding Position 7 Receiving a Thrown Ball 8-9 Throwing a Ball 10-12 Fielding Ground Balls 13-17 Fielding Fly
Stance Recap Blocking Positions To the Right:
 Stance Recap We must create the ability to block out of both the primary (no runners on base) and the secondary (runners on base) stances. We have to put ourselves in a position to be able to get our feet
2. The average fastball crosses the plate at a 6 degree downward angle (pitched from a sloped pitchers mound)
") Some Hitting Facts: 1. A hitter has a limited amount of time to react to the pitch 90 mph = Approx. 0.45 sec. 80 mph = Approx. 0.50 sec. 70 mph = Approx. 0.55 sec. 60 mph = Approx. 0.60 sec. 50 mph = Approx.
Some Hitting Facts: 1. A hitter has a limited amount of time to react to the pitch 90 mph = Approx. 0.45 sec. 80 mph = Approx. 0.50 sec. 70 mph = Approx. 0.55 sec. 60 mph = Approx. 0.60 sec. 50 mph = Approx.
Coaching Points. SAFE LANDING When landing on one leg it is important to teach the players which foot they should be landing on.
 Footwork and Movement Skills Coaching Points INITIAL STANCE Forms the starting point for most attacking and defending skills. Feet shoulder-width apart Shoulders back and down Knees slightly flexed Knees
HOW TO HOLD THE SHOT
 HOW TO HOLD THE SHOT Balance the shot in his hand so it is resting at the point where the fingers are connected to the palm of the hand. Keep their fingers together and allow their thumb to gently rest
T-BALL PRACTICE PLAN WEEK 5: CONFIDENCE
 T-BALL PRACTICE PLAN WEEK 5: CONFIDENCE INTRODUCTION, STRETCHES & WARM UP 7 MINUTES 1. Have players take turns sharing what their favorite thing about last week was. 2. Refer to the WOW pack discussion
Thrower s Maintenance Program
 Thrower s Maintenance Program Elbow at 90 and fixed at side. Pull out with arm keeping elbow at side Elbow at 90 and fixed at side. Pull arm into body keeping elbow at side. Shoulder at 90 and elbow at
There are 9 positions on the softball field labeled as follows
 DEFENSE There are 9 positions on the softball field labeled as follows THROWING MECHANICS Dynamic throwing warmup o Wrist flicks, wrist snap is super important for a strong, fast accurate throw. Have arm
Discus Technique: Basic Technique A Technical Analysis Grip Fork Gr Purpose: To provide control over Discus is held with Discus is held
 Discus Technique: A Technical Analysis Sandy Fowler University of Michigan Assistant Track & Field Coach Grip Purpose: To provide control over the implement throughout the spin. To provide for a proper
Throwing. How to Throw a Baseball. Grip
 Throwing Nose, Toes, and Throws For beginning players, it is helpful to use a rhyme to help the players remember the proper throwing motion. Say "Nose, Toes and Throws" as they practice throwing. "Nose"
SPAIN PARK YOUTH BASEBALL COACHES HANDBOOK MINOR LEAGUE. Striving for Excellence in Life Through Baseball 2017 EDITION
 SPAIN PARK YOUTH BASEBALL COACHES HANDBOOK MINOR LEAGUE Striving for Excellence in Life Through Baseball 2017 EDITION Table of Contents INTRODUCTION... 3 Our Mission... 4 Park Goals and Objectives... 5
Pitching Basics For Youth Baseball
 Pitching Basics For Youth Baseball Copyright Notice - IT IS ILLEGAL TO POST THIS DOCUMENT ONLINE The material enclosed is copyrighted. You do not have resell rights or giveaway rights to the material provided
NYSCA. Volunteer Coach Training Program. Coaching Youth Softball
 NYSCA Volunteer Coach Training Program Coaching Youth Softball Table of Contents CHAPTER 1: INTRODUCTION 3 CHAPTER 2: WARM-UP... 4 CHAPTER 3: THROWING. 5 CHAPTER 4: INFIELD PLAY PART 1. 6 CHAPTER 4: INFIELD
Mt. Ararat High School. Softball. Skills and Drills. Table of Contents. Skills: Catchers Skills: Outfield...
 Mt. Ararat High School Softball www.mtasoftball.com Skills and Drills Table of Contents Skills: Catchers... 3 Skills: Outfield... 4 Skills: Infield... 6 Skills: Pitching... 8 Fundamentals of the Pitching
Hi Coach! And welcome to Baseball Tutorials! Motivating Your Kids!
 1 Hi Coach! And welcome to Baseball Tutorials! In this free PDF, we re going to check out 7 fundamental drills that will rapidly improve your player s skill level. There s enough here to run a practice
SLP Little League: Coaching Certification
 SLP Little League: Coaching Certification Agenda o Preparation and Safety (10 min) Organization Equipment/Field o Teaching Skills, Drills and Games Throwing/Catch (45 mins) Grip Finish Drills/Games Fielding
ACTIVITY TYPE. Coaching Points COACHING RESOURCE
 ACTIVITY TYPE Coaching Points COACHING RESOURCE 171 Footwork, Balance and Movement Skills Initial Stance Forms the starting point for most attacking and defending skills. Feet shoulder-width apart Shoulders
Baseball Hitting Drills for Batting Tee Work
 Baseball Hitting Drills for Batting Tee Work In my experience, the difference between those players who make it in baseball and those who don t is consistency repeating your swing with drills is an important
FLLGS. A Ball Practice Plan
 FLLGS A Ball Practice Plan General Manager Guidelines When you get your roster be sure to contact all of your parents as soon as possible and introduce yourself. Parents are often just as excited as the
to Successful & Effective Practices
 COACH S GUIDE to Successful & Effective Practices Thank you for volunteering your time to coach a Junior Giants team this summer! New to coaching? Great! We created step-by-step Practice Plans for volunteers
Coaching Course READ FIRST
 Coaching Course READ FIRST 1. DOWNLOADABLE NOTES: SAVE THIS FILE some place on your computer where you ll be able to find it. Be sure to make note of the folder and location where you save it, so you can
MATERIALS: PRACTICE GOALS: What Your Team Should Learn. PRACTICE 1 TIP: Trying Hard (DIMITT) PRACTICE 2 TIP : Self-Control (Cool Head) DETERMINATION
 PRACTICE 2 TIP : Self-Control (Cool Head) DETERMINATION") PRACTICE GOALS: What Your Team Should Learn 1. Run the bases 2. Catching a ball using two hands above the waist 3. Consistently hit the ball off a tee 4. To see the ball from the coaches hand when hitting
PRACTICE GOALS: What Your Team Should Learn 1. Run the bases 2. Catching a ball using two hands above the waist 3. Consistently hit the ball off a tee 4. To see the ball from the coaches hand when hitting
BODY BALANCE. Focusing on improved lower body strength, core strength, and overall balance. Warm Up:
 BODY BALANCE Focusing on improved lower body strength, core strength, and overall balance Warm Up: Seated Forward big arm circles/backward big arm circles (10 seconds) Forward small arm circles/ backward
Sitting. Volleyball. Skills and Systems
 Sitting Volleyball Skills and Systems Sitting Volleyball Skills Ready Positions There are two ready positions commonly used in sitting volleyball depending on the situation presented. Reception ready position
Overview. Time Learning Activities Learning Outcomes. 10 Workshop Introduction
 Overview Time Learning Activities Learning Outcomes 10 Workshop Introduction 40 Town Hall Presentation Pitching Phases 20 Jig Saw Grips Pair and Share, Storm and Solve, Fish Bowl 55 Understanding your
Stance Starting point; need vision, balance, and plate coverage. Grip Loose grip in the fingers with the Door Knocking knuckles lined up to unlock
 Stance Starting point; need vision, balance, and plate coverage. Grip Loose grip in the fingers with the Door Knocking knuckles lined up to unlock the wrists and allow for greater bat speed. Weight Shift
Fundamentals of Infield
 Fundamentals of Infield V3.0 February 2018 Copyright Palo Alto Girls Softball 2016-18. All Rights Reserved. Author/Person to Blame: Tom Kemp 1 Agenda Fielding Groundballs Stance Approach Securing the Ball
COACHES RESPONSIBILITES. Coach all 12 players on your roster. Teach discipline and respect. Set team rules.
 RWLL COACHES CLINIC 2017 COACHES RESPONSIBILITES Coach all 12 players on your roster. Fun equates into success Build confidence in all players. Be positive in your coaching style. Teach discipline and
AAA/U9/U10 League. Stretching and Warmups
 AAA/U9/U10 League Stretching and Warmups Players should get to the field 30 mins before game Stretches and warmups required before doing any throwing or hitting Warmups can be led by one player (i.e.,
Mosquito Parent Guide
 Mosquito Parent Guide Rev: January 26, 2017 Introduction Welcome to Aylmer Minor Baseball s Mosquito program. This is a non-competitive, instructional program with an emphasis on teaching the fundamentals