SRAM E-Paper No.54 Date: 2017/9
|
|
|
- Vincent Owens
- 5 years ago
- Views:
Transcription
1 SRAM E-Paper No.54 Date: 2017/9 Content: I. SRAM news/announcement Lost Found II. Product information Quarq DFour91 Quarq DZero for Specialized III.Installation & maintenance ZIPP Cognition Rear Hub Service 1

2 I. SRAM news/announcement Lost Found Emily Kachorek, the Sacramento-based pro cyclocross racer and co-owner of Squid Bikes, brings us the following account of her experience with her team at the Lost and Found gravel grinder in Portola, California. All photos are courtesy of Angel Perez unless otherwise noted. Lost and Found isn t your typical gravel grinder, it's a gravel grinder done Sierra Buttes Trail Stewardship style. Following the wettest and snowiest winter on record, this year's event was far from the fast-rolling, graded farm roads that many people expect from a gravel race. Drafting was not much of an option rain ruts, loose rocks and sandy turns forced you to keep your head up and wits about you. Technical climbs rode more like single track than fire road, and high elevation views of June snow-capped peaks pleaded with you to stop and enjoy the moment. I would imagine that a few of this year's 1,000 participants may have wondered if the name "Lost and Found" was just a bad joke at some point during their two- (or nine-) hour journey. If you are familiar with California s famed Downieville trail system and mountain bike race, you are probably familiar with the Sierra Buttes Trail Stewardship. They are responsible for restoring, maintaining, and building all the wonderful trails in the greater Downieville and Lakes Basin area. This year's Lost and Found, now in its fourth year, required a completely new route thanks to Mother Nature's wild winter. The new route covered 93 miles (150 km) and 6,500 feet (1980 meters) of elevation gain which was almost equally divided between four climbs and was comprised of 65% dirt. 2


3 Additionally, there were two shorter, 57-mile (92 km), and 25-mile (40 km) options to make sure everyone had a challenging and fun outing. Photo credit: Sierra Buttes Trail Stewardship Having been to the past three years of the event, I was excited to bring the entire Squid Squad out to Lake Davis. Wednesday afternoon our Pro Squad arrived, Anthony Clark from Western Massachusetts and Sammi Runnels from Austin, Texas. We built bikes, went for an evening river shred, and discussed and organized the supplies for Friday evening's Race Day Rattlecan. By Thursday morning we had the Squid Van loaded with four days of camping, bike racing, and painting supplies. We secured a lovely spot right on Lake Davis and explored the singletrack that loops around the lake until the sun disappeared over the nearby 8,000-foot peaks. 3


4 The Stewardship knows how to create a rugged and beautiful off-road adventure, but they also throw a bike party that is seamlessly rolled in with leg and lung busting efforts. Festivities started Friday afternoon on the shores on Lake Davis with an expo area, beer tent, snacks, and packet pick-up. Last year we painted my Dreamsicle-themed bike for our first iteration of our Race Day Rattlecan, and this year our plan was to paint a bike for Sammi. One of our friends said it perfectly: A Race Day Rattlecan Is the Iron Chef of bike racing. A little desperation. A little creativity. Event participants and their families get to see the whole process of spray painting a bike, ask questions, and even try their hand with Spray.Bike spray paint. We decided to keep this year's paint job "fast and dirty" and incorporated a piece of found trash as the masking we used for creating a polka dot pattern. We left the frame with a nice matte finish and master mechanic and Squid co-owner, Chris Namba, built the bike that night back at the campsite under a Coleman lantern. By 10pm the bike was built. Sammi took it for a test ride around the campground and we were ready for the following day's adventure. 4


5 The race started with a few miles of paved road but then quickly started up a well-graded dirt climb. Anthony took off with the lead men's group and Sammi and I worked in with the solid group of pro women that included multiple National Champions and Olympians. Like almost everyone, flats slowed us all down, knocking Anthony of out the lead group back to 8th and me back to 5th. After a few flats, Sammi opted for the party pace, showing off her new bike, and stopping to enjoy the views. After we cleaned dirt out of, well, everything, we meet up to enjoy the sunset over the lake, recount the day's high points, misadventures, and to wash down some of that Sierra Nevada dirt with beer, tacos, and campfire s'mores. It seems that with every hour I spend in the Lost Sierra I fall more in love with its beauty and the people who are drawn to it. 5


6 Product information Quarq DFour91 The DFour chassis pairs with Shimano s 11-speed Dura-Ace 9000, Ultegra 6800 and chainrings. New DFour91 is designed for Shimano s Dura-Ace R9100 chainrings. Both use Quarq s lightweight, sturdy Exogram carbon crank arms. GXP and BB30 versions work with every bottom bracket shell, including BBright and BB386EVO. If you already have a power meter with an 8-bolt interface, upgrade using the DFour or DFour91 power meter spider. THINGS TO REMEMBER- DFour91 is designed for Dura-Ace R9100 chainrings. Must be paired with a compatible SRAM bottom bracket. 8-bolt power meter owners can upgrade using a power meter spider. Bluetooth low energy technology and ANT+ wireless data transfer AxCad -- no cadence magnet required 10K Temperature Compensation Battery -- CR2032, 200-hour battery life, change without tools Power Balance. OmniCal -- swap chainrings without affecting accuracy IPX7 waterproof rating Accuracy -- within 1.5%, measuring both legs. R8000 chainrings have not been tested yet. 6

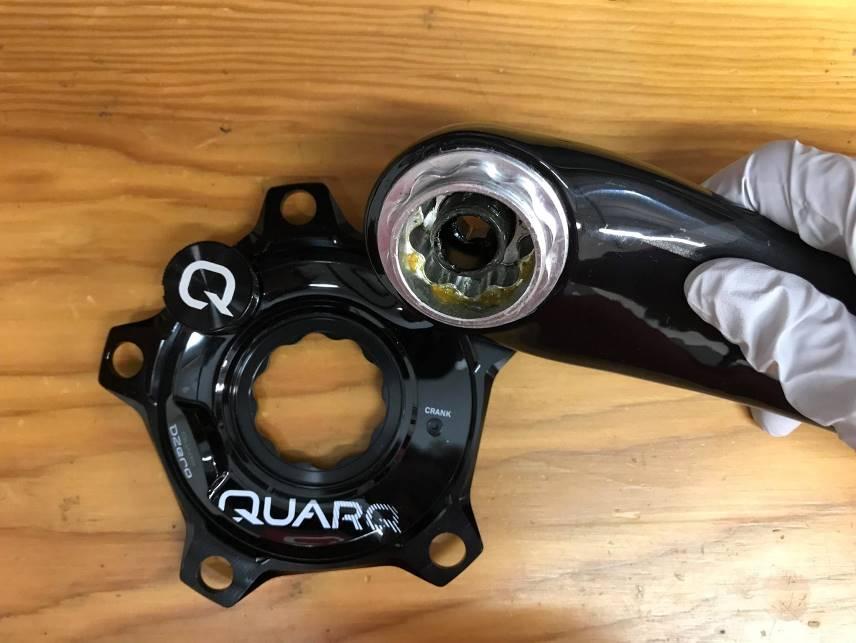
7 SPECIFICATIONS Crank arm length BB Compatibility Bolt Circle Diameter (BCD) Chainline BB Spindle Interface Crank arm material Color (Crank arm) DFOUR mm, 165mm, 170mm, 172.5mm, 175mm, 177.5mm BB30/PF30-68mm, GXP/PF GXP 68mm 4 Arm 110 BCD 45.0mm 24mm, 30mm Carbon Black Quarq DZero For Specialized Quarq has introduced a DZero spider designed to replace the factory spider on Specialized s S-Works carbon crankset. Quarq DZero for Specialized embodies 10 years of Quarq advances in power meter technology, plus new features such as dual Bluetooth low energy and ANT+ wireless data transfer, revised circuitry, a new strain gauge design and the Qalvin BLE app. 7

8 THINGS TO REMEMBER- Bluetooth low energy technology and ANT+ wireless data transfer. AxCad no cadence magnet required. 10K Temperature Compensation. Battery CR2032, 200-hour battery life, change without tools. Power Balance. OmniCal swap chainrings without affecting accuracy. IPX7 waterproof rating. Accuracy within 1.5%, measuring both legs. Free firmware upgrades with the Qalvin app. A Specialized crank lock ring tool is required for installation. Traditional 5-arm spider compatible with Specialized S- Works Carbon Road Crank Arms. 8
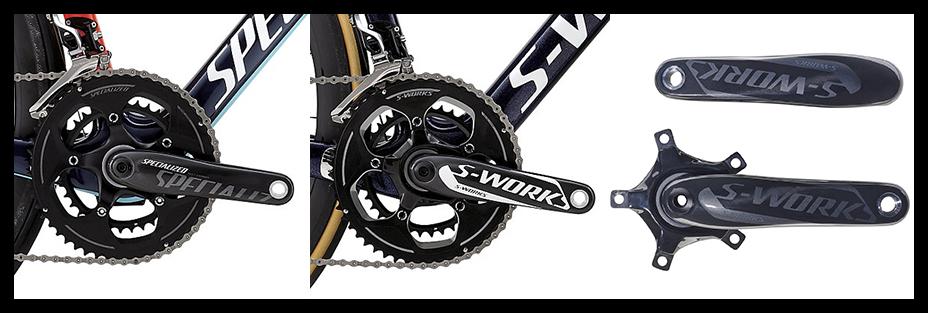
9 COMPATIBLE Thick Crank Arm 9


10 NOT COMPATIBLE 2012 or Earlier Thin Crank Arm 10
11 III.Installation& maintenance ZIPP Cognition Rear Hub maintain Video Link:Service for the rear Zipp Cognition hub Rear Hub Service The hub can be serviced while in the wheel. However, if your spokes or rim are damaged, you can remove the hub from the wheel which will make servicing your hub easier. To remove the hub, use a spoke wrench to de-tension the spokes, then use a pair of metal snips to cut the spokes, remove the hub from the wheel, and remove the spoke ends from the hub. Tools and Supplies Needed for Service Safety glasses Nitrile gloves Clean, lint-free rags Grease brush Pick Bench vise Park Tool AV-4 or AV-5 Axle and Spindle Vise Inserts Vise soft jaws (aluminum) Plastic mallet Zipp CognitionTM Grease Zipp Cognition Oil and small oil syringe Isopropyl alcohol Blind Hole Bearing Puller Set 17 mm slotted attachment 20 mm slotted attachment Bearing Press Tools Zipp 6804 Bearing Press Tool SRAM 6903 Bearing Press Tool Replacement Parts Zipp Cognition hub bearing (drive side) Zipp Cognition hub bearing (non-drive side) Zipp Cognition driver body (optional) Cognition clutch assembly (optional) Cognition driver body seal For part numbers, please refer to the Zipp Spare Parts Catalog in the Support section of 11

12 SAFETY INSTRUCTIONS Always wear nitrile gloves when working with bicycle lubricants. Rear Hub End Cap and Driver Body Removal Notice: To prevent damage to the hub surfaces, do not use Acetone or similar products to clean parts. Step:1 Insert the Park Tool AV-4 or AV-5 Axle and Spindle Vise Insert tool into a vise. Clamp the small diameter of the drive side end cap into the smallest slot in the vise insert tool and pull up on the wheel/hub to remove the end cap. Repeat on the non-drive side to remove the other end cap. 12


13 Step2: Use your fingers to remove the driver body assembly from the hub and axle. Use your fingers to remove the driver body seal. Use your fingers to remove the driver body seal from the clutch seal cap if necessary. The procedure for driver body removal and installation is the same for each type of driver body (SRAM 10/11 SPD, SRAM XDTM, and Campagnolo ). The SRAM 10/11 SPD driver body is pictured. Rear Hub Axle and Bearing Removal Notice: Bearing removal causes permanent damage to the bearings. Do not reinstall the bearings. Step1: Use a plastic mallet to gently tap the axle on the non-drive side of the hub to remove the axle from the hub shell. Pull the axle and drive side bearing out of the drive side of the hub. If the drive side bearing was not removed with the axle, it must be removed with the Blind Hole Bearing Puller tool. Skip to step 3. 13


14 Step2: Place the axle in between flat aluminum vise soft jaws, drive side down, with the bearing resting on top of the soft jaws. Make sure the axle bearing step does not contact the soft jaws. Using a plastic mallet, gently tap on the top of the non-drive end of the axle until it is dislodged from the bearing. Discard the bearing. Spray isopropyl alcohol onto the axle and clean the axle with a rag. Notice: To avoid damage to the axle, do not allow the axle to contact the vise soft jaws. If the axle bearing step is damaged, the axle must be replaced. Step3: If the drive side bearing was not removed with the axle, remove the drive side bearing from hub shell with a Blind Hole Bearing Puller tool. Insert the 20 mm slotted bearing puller attachment through the drive side bearing. Align the slotted attachment with the bottom of the bearing, then tighten the slotted attachment to expand the puller inside the bearing. 14


15 Notice: Do not overtighten the slotted attachment. For more detailed assembly and usage information, consult your bearing puller manufacturer's instructions. Step4: Thread the shaft of the bearing puller into the slotted attachment. While holding the wheel securely, forcefully pull back on the slide hammer to remove the bearing from the drive side of the hub shell. Remove the bearing from the slotted attachment. Discard the bearing. Step5: Insert the 17 mm slotted bearing puller attachment through the non-drive side bearing. Align the slotted attachment with the bottom of the bearing, then tighten the slotted attachment to expand the puller inside the bearing. Notice: Do not overtighten the slotted attachment. For more detailed assembly and usage information, consult your bearing puller manufacturer's instructions. 15


16 Step6: Thread the shaft of the bearing puller into the slotted attachment. While holding the wheel securely, forcefully pull back on the slide hammer to remove the bearing from the non-drive side of the hub shell. Remove the bearing from the slotted attachment and discard the bearing. Step7: Spray isopropyl alcohol in the rear hub bearing bores and clean the hub with a rag. Rear Hub Bearing Installation Notice:Use only Zipp CognitionTM replacement bearings in Zipp Cognition hubs. Step1: Place the drive side end of the axle on a flat surface. Install a new Zipp Cognition drive side bearing onto the non-drive side of the axle, black seal side first. Slide the bearing to the drive side of the axle, to the bearing step until it stops. Step2: Slide the Zipp 6804 bearing press tool over the non-drive side of the axle and rest it flat on the bearing. Use a plastic mallet to gently tap the Zipp bearing press tool until the bearing is seated onto the axle. Stop when the bearing is flush against the axle bearing step. 16

 bearing press tool on top of")

17 Step3: Place the wheel on flat surface, non-drive side up. Insert a new Zipp Cognition bearing into the non-drive side of the hub shell, with the black seal facing outward. Step4: Place the SRAM 6903 (30 mm x 17 mm) bearing press tool on top of the bearing. Use a plastic mallet and gently tap the bearing press tool until the bearing is pressed into the hub shell. Stop when the bearing stops inside the hub bearing bore. 17
 bearing press tool on a flat table. Position the non-drive side of the hub on the bearing press tool.")

18 Step5: Insert the non-drive side of the axle into the drive side of the hub, through the non-drive side bearing. Position the drive side bearing into the drive side hub bearing bore. Step6: Place the SRAM 6903 (30 mm x 17 mm) bearing press tool on a flat table. Position the non-drive side of the hub on the bearing press tool. Insert the Zipp 6804 bearing press tool, grooved end first, onto the drive side axle. Notice : The grooved end of the Zipp 6804 bearing press tool has an internally tapered interface that fits over the driver axle bearing step to prevent damage to the axle. Step7: Gently tap the 6804 Zipp bearing press tool with a plastic mallet until the drive side bearing is seated into the hub shell. Stop when the drive side bearing stops inside the hub bearing bore. 18


19 Rear Hub Clutch Removal Step1: Use a pick to gently pry the clutch seal cap from the hub shell. Use your fingers to remove the clutch seal cap. Use your fingers to remove the o-ring. Spray isopropyl alcohol onto the clutch seal cap and o-ring and wipe them with a rag. Install the o-ring back onto the clutch seal cap. Step2: Use a pick to lift one side of the clutch assembly from the hub shell. Use your fingers to remove the clutch assembly from the hub shell. Spray the clutch assembly with isopropyl alcohol to remove the clutch oil, and 19

20 place the clutch assembly on a rag to dry. Notice: Do not disassemble the clutch assembly. If the clutch assembly is damaged, it will need to be replaced. Consult the ZIPP Spare Parts Catalog at for part number information. Do not allow the magnets on the bottom of the clutch assembly to contact any of the opposing magnets seated inside the hub shell. Do not remove the magnets seated in the hub shell. In the event a magnet assembly is removed from the hub, re-install the magnet into the hub shell. Rear Hub Clutch Installation Step1: Align the three magnets on the bottom of the clutch assembly with the empty circular magnet bores in the hub shell. Align the clutch teeth with the hub teeth, and install the clutch assembly into the drive side of the hub shell. Notice: Do not allow any of the magnets on the bottom of the clutch assembly to contact any of the opposing magnets seated inside the hub shell. Do not remove the magnets seated in the hub shell. 20


21 Step2: Use a small syringe to apply approximately 0.5 ml of Zipp Cognition clutch oil onto the clutch assembly. Do not apply grease to the new clutch assembly. Step3: Install the clutch seal cap and press it into the hub shell with your thumbs. Driver Body Service Zipp recommends replacing the entire driver body if the bearings are worn or any part is damaged. For part numbers, please refer to the Zipp Spare Parts Catalog in the Support section of Driver Body Installation Step1: Use your fingers to install a new driver body seal onto the driver body. 21

.")
22 Step2: Apply Zipp CognitionTM grease to the drive side of the rear axle. Wipe away any excess grease with a rag. Notice: Do not apply grease to the clutch or bearing. Step3: Slide the driver body assembly, onto the drive side axle. Align the driver body teeth with the clutch teeth, and press the driver body into the hub shell until it is seated. The procedure for driver body removal and installation is the same for each type of driver body (SRAM 10/11 SPD, SRAM XDTM, and Campagnolo ). The SRAM 10/11 Speed driver body is pictured. Rear Hub End Cap Installation Step1: Apply Zipp CognitionTM grease to the non-drive side axle and bearing. Wipe away any excess grease with a rag. 22


23 Step2: Spray isopropyl alcohol on a rag and clean the end caps. Apply Zipp Cognition grease to the inside of each end cap. Remove any grease from the outside surface of the end caps before installation. Grease is applied to prevent moisture from entering the hub assembly. Notice: Ensure the o-ring is in the groove on the internal surface of the end cap before installing the end caps. Improperly installed seals may result in hub drag. Step3: Install the end caps by pressing them onto the axle by hand until they snap securely into place. Wipe away any excess grease from the hub and end cap. -END- 23
INSTRUCTION GUIDE S-WORKS ROAD CARBON CRANKSET (Carbon and Alloy OSBB cups)
") INSTRUCTION GUIDE S-WORKS ROAD CARBON CRANKSET (Carbon and Alloy OSBB cups) THIS BRIEF INSTRUCTION GUIDE CONTAINS IMPORTANT INFORMATION. PLEASE READ CAREFULLY AND STORE IN A SAFE PLACE. Congratulations!
INSTRUCTION GUIDE S-WORKS ROAD CARBON CRANKSET (Carbon and Alloy OSBB cups) THIS BRIEF INSTRUCTION GUIDE CONTAINS IMPORTANT INFORMATION. PLEASE READ CAREFULLY AND STORE IN A SAFE PLACE. Congratulations!
CRANKSET 1 - TECHNICAL SPECIFICATIONS 2 - COMPATIBILITY CHAIN LINE SIZE 53/39-55/42-54/42 BORA ULTRA. 11s BORA ULTRA CRANKSET
 BORA ULTRA 1 - TECHNICAL SPECIFICATIONS 53/39-55/42-54/42 BOLT CIRCLE DIAMETER CHAIN LINE MINIMUM CHAINSTAY LENGHT AXLE THREADS 1.1 - CHAIN LINE SIZE Chain line for double crankset (Fig, 1) LINEA CHAIN
CRANKSET 1 - TECHNICAL SPECIFICATIONS 2 - COMPATIBILITY CHAIN LINE SIZE 52/39 53/39 55/42 54/42 50/34 52/36. Ultra - torque 11s ULTRA-TORQUE
 ULTRA-TORQUE 1 - TECHNICAL SPECIFICATIONS STANDARD BOLT CIRCLE DIAMETER CHAIN LINE MINIMUM CHAINSTAY LENGHT AXLE THREADS 52/39 53/39 55/42 54/42 COMPACT BOLT CIRCLE DIAMETER CHAIN LINE MINIMUM CHAINSTAY
INSTRUCTION GUIDE S-WORKS ROAD CARBON CRANKSET (Carbon and Alloy OSBB cups)
") INSTRUCTION GUIDE S-WORKS ROAD CARBON CRANKSET (Carbon and Alloy OSBB cups) THIS BRIEF INSTRUCTION GUIDE CONTAINS IMPORTANT INFORMATION. PLEASE READ CAREFULLY AND STORE IN A SAFE PLACE. Congratulations!
INSTRUCTION GUIDE S-WORKS ROAD CARBON CRANKSET (Carbon and Alloy OSBB cups) THIS BRIEF INSTRUCTION GUIDE CONTAINS IMPORTANT INFORMATION. PLEASE READ CAREFULLY AND STORE IN A SAFE PLACE. Congratulations!
ZIPP VUMAQUAD INSTALLATION INSTRUCTIONS
 ZIPP VUMAQUAD INSTALLATION INSTRUCTIONS CAUTION All Zipp Crank and BB products should be installed by a professional bicycle mechanic using the appropriate tools. Zipp assumes no responsibility for damages
(since 2015) (since 2018) (since 2018) (since 2018)
 (since 2018) (since 2018) (since 2018)") CRANKSET - 11s ULTRA-TORQUE (since 2015) (since 2018) (since 2018) (since 2018) This technical manual is intended for use by professional mechanics. Anyone who is not a qualified professional for bicycle
CRANKSET - 11s ULTRA-TORQUE (since 2015) (since 2018) (since 2018) (since 2018) This technical manual is intended for use by professional mechanics. Anyone who is not a qualified professional for bicycle
Front chainwheel. Dealer's Manual. ROAD MTB Trekking. City Touring/ Comfort Bike ACERA FC-M3000 FC-M3000-B2 FC-M ALTUS FC-M2000
 (English) DM-MDFC001-01 Dealer's Manual ROAD MTB Trekking City Touring/ Comfort Bike URBAN SPORT E-BIKE Front chainwheel ALIVIO FC-M4000 FC-M4050 FC-M4050-B2 FC-M4060 ACERA FC-M3000 FC-M3000-B2 FC-M3000-8
Have questions? Chat with us live at raleighusa.com or call us at , 8am 5pm PST
 1 2 Have questions? Chat with us live at raleighusa.com or call us at 1-800-251-8435, 8am 5pm PST The bicycle you have purchased is a complex piece of equipment that must be properly assembled and maintained
TABLE OF CONTENTS INTRODUCTION
 R3 DISC MANUAL TABLE OF CONTENTS Introduction... 1 Frame Features... 2 Fork Preparation... 3 Small Parts... 5 Frame Preparation... 6 Brake Housing Installation... 7 Mechanical Cable Routing... 9 Electric
DM-RD (English) Dealer s Manual. ROAD Rear Derailleur RD-9000 RD-6800 RD-5800 RD-4700
 Dealer s Manual. ROAD Rear Derailleur RD-9000 RD-6800 RD-5800 RD-4700") (English) DM-RD0003-09 ROAD Rear Derailleur Dealer s Manual RD-9000 RD-6800 RD-5800 RD-4700 CONTENTS IMPORTANT NOTICE...3 TO ENSURE SAFETY...4 LIST OF TOOLS TO BE USED...6 INSTALLATION...8 Chain length...
(English) DM-RD0003-09 ROAD Rear Derailleur Dealer s Manual RD-9000 RD-6800 RD-5800 RD-4700 CONTENTS IMPORTANT NOTICE...3 TO ENSURE SAFETY...4 LIST OF TOOLS TO BE USED...6 INSTALLATION...8 Chain length...
Santa Fe Cycles Assembly Guide Introduction
 Santa Fe Cycles Assembly Guide Introduction Congratulations on your purchase of your new Santa Fe bicycle. You have purchased a bicycle that has many features and qualities. Please take a few minutes and
Special instruction of installation for SAINT FH-M800/RD-M800 and FH-M805/RD-M805
 Technical Service Instructions SI-5VB0E t RD-M805 / RD-M800 Rear derailleur Special instruction of installation for SAINT FH-M800/RD-M800 and FH-M805/RD-M805 A hub axle is an essential component for the
DM-RARD (English) Dealer's Manual. ROAD MTB Trekking. City Touring/ Comfort Bike. Rear Derailleur DURA-ACE RD-R9100 ULTEGRA RD-R8000
 Dealer's Manual. ROAD MTB Trekking. City Touring/ Comfort Bike. Rear Derailleur DURA-ACE RD-R9100 ULTEGRA RD-R8000") (English) DM-RARD001-03 Dealer's Manual ROAD MTB Trekking City Touring/ Comfort Bike URBAN SPORT E-BIKE Rear Derailleur DURA-ACE RD-R9100 ULTEGRA RD-R8000 CONTENTS IMPORTANT NOTICE... 3 TO ENSURE SAFETY...
(English) DM-RARD001-03 Dealer's Manual ROAD MTB Trekking City Touring/ Comfort Bike URBAN SPORT E-BIKE Rear Derailleur DURA-ACE RD-R9100 ULTEGRA RD-R8000 CONTENTS IMPORTANT NOTICE... 3 TO ENSURE SAFETY...
Have questions? Chat with us live at raleighusa.com or call us at , 8am 5pm PST
 1 2 Have questions? Chat with us live at raleighusa.com or call us at 1-800-251-8435, 8am 5pm PST The bicycle you have purchased is a complex piece of equipment that must be properly assembled and maintained
Front derailleur. Dealer's Manual DURA-ACE FD-R9100 ULTEGRA FD-R FD ROAD MTB Trekking. City Touring/ Comfort Bike DM-RAFD001-03
 (English) DM-RAFD001-03 Dealer's Manual ROAD MTB Trekking City Touring/ Comfort Bike URBAN SPORT E-BIKE Front derailleur DURA-ACE FD-R9100 ULTEGRA FD-R8000 105 FD-5801 Procedures for cable tension adjustment
Rear Drive System SERVICE INSTRUCTION. Specifications SI-R670B
 - SERVICE INSTRUCTION SI-R670B t Rear Drive System Before use, read these instructions carefully, and follow them for correct use. In order to realize the best performance, we recommend that the following
TECH SHEET ORANGE PIVOT TOOL INSTRUCTIONS
 page 1 ORANGE PIVOT TOOL INSTRUCTIONS This is a guide of how to change the pivot bearings on an Orange frame with a bore style pivot axle. 4 8 Bore Type Pivot Axle Horiz-Hold Type Pivot Axle Please read
Bicycle Noise Diagnosis
 Bicycle Noise Diagnosis Bottom bracket noise is a common complaint but most times the noise could be coming from another area on the bicycle. Noises that are telegraphing through the frame often sound
TABLE OF CONTENTS FRAME FEATURES INTRODUCTION
 S3 DISC MANUAL TABLE OF CONTENTS Introduction...1 Frame Features...2 Fork Preparation...3 Small Parts...5 Frame Preparation...6 Brake Housing Installation...7 Mechanical Cable Routing...9 Electric Cable
HOME ASSEMBLY INSTRUCTIONS
 HOME ASSEMBLY INSTRUCTIONS This Papillionaire Bicycle now belongs to you. It will take you to work, wait patiently outside your local cafe, and carry your groceries home. This is the start of your long-term
Have questions? Chat with us live at raleighusa.com or call us at , 8am 5pm PST
 1 2 Have questions? Chat with us live at raleighusa.com or call us at 1-800-251-8435, 8am 5pm PST The bicycle you have purchased is a complex piece of equipment that must be properly assembled and maintained
FRAME FEATURES TABLE OF CONTENTS INTRODUCTION
 R3 MANUAL TABLE OF CONTENTS Introduction...1 Frame Features...2 Fork Preparation...3 Small Parts...5 Frame Preparation...6 Mechanical Cable Routing...7 Electric Cable Routing...9 Seatpost Assembly & Installation...11
CODA EXPERT CRANK INSTRUCTION MANUAL
 CODA EXPERT CRANK INSTRUCTION MANUAL Congratulations and thanks for your purchase of the new CODA Expert crankset. You have invested in a component which offers light weight, high strength, and stiffness
Front derailleur. Dealer's Manual FD-M9000 FD-M9020 FD-M9025 FD-M8000 FD-M8020 FD-M8025 FD-M612 FD-M617 FD-M618 FD-M672 FD-M677
 (English) DM-FD0003-05 Front derailleur Dealer's Manual FD-M9000 FD-M9020 FD-M9025 FD-M8000 FD-M8020 FD-M8025 FD-M612 FD-M617 FD-M618 FD-M672 FD-M677 CONTENTS IMPORTANT NOTICE... 4 TO ENSURE SAFETY...
9-speed super narrow. chain such as. CN-7701 / CN-HG93 8- / 7- / 6-speed narrow. chain such as CN-HG50 / CN-IG51
 - Technical Service Instructions SI-5VH0B t RD-M600 Rear derailleur General Safety Information WARNING The ST-M600 DUAL CONTROL lever is used for both gear shifting and braking operations. Make sure that
Front Chainwheel. Dealer's Manual MTB. Bottom bracket. ROAD MTB Trekking. City Touring/ Comfort Bike XTR FC-M9000 FC-M9020 SM-BB93 SM-BB94-41A
 (English) DM-MAFC001-01 Dealer's Manual ROAD MTB Trekking City Touring/ Comfort Bike URBAN SPORT E-BIKE Front Chainwheel MTB XTR FC-M9000 FC-M9020 Bottom bracket SM-BB93 SM-BB94-41A CONTENTS IMPORTANT
Front Chainwheel. Dealer's Manual. Non-Series FC-MT500-2 FC-MT500-B2 FC-MT500-3 FC-MT600-2 FC-MT600-B2 FC-MT700-2 FC-MT700-B2
 (English) DM-MBFC001-01 Dealer's Manual ROAD MTB Trekking City Touring/ Comfort Bike URBAN SPORT E-BIKE Front Chainwheel DEORE XT FC-M8000-1 FC-M8000-B1 FC-M8000-2 FC-M8000-B2 FC-M8000-3 SLX FC-M7000-11-1
Front derailleur. Dealer's Manual XTR FD-M9000 FD-M9020 FD-M9025 DEORE XT FD-M8000 FD-M8020 FD-M8025 DEORE FD-M612 FD-M617 FD-M618 SLX FD-M672 FD-M677
 (English) DM-FD0003-06 Dealer's Manual ROAD MTB Trekking City Touring/ Comfort Bike URBAN SPORT E-BIKE Front derailleur XTR FD-M9000 FD-M9020 FD-M9025 DEORE XT FD-M8000 FD-M8020 FD-M8025 DEORE FD-M612
Cleaning rod: spring steel, stainless steel or carbon fibre cleaning rod - only use a one-piece rod. Avoid using snakes.
 Telemark Biathlon Where performance and precision come together http://telemarkbiathlon.com Rifle Cleaning Date : July 19, 2013 Anschutz Rifle Manual - Click Here Izhmash 7-3 Rifle Manual - still looking
RBEA MYO OWER ETERS FORCE X DISTANCE TIME POWER (WATTS)
") 2 / OBOOK 2017 RBEA MYO OWER ETERS In the past a rider s training schedule might consist of riding until the sun disappeared, now it's based on training zones, power output and analytical software. At
2 / OBOOK 2017 RBEA MYO OWER ETERS In the past a rider s training schedule might consist of riding until the sun disappeared, now it's based on training zones, power output and analytical software. At
Dealer's Manual. ROAD MTB Trekking. City Touring/ Comfort Bike. Front chainwheel METREA FC-U5000. Bottom bracket SM-BBR60 SM-BB72-41B
 (English) DM-UAFC001-01 Dealer's Manual ROAD MTB Trekking City Touring/ Comfort Bike URBAN SPORT E-BIKE Front chainwheel METREA FC-U5000 Bottom bracket SM-BBR60 SM-BB72-41B CONTENTS IMPORTANT NOTICE...
INSTALLATION INSTRUCTIONS
 INSTALLATION INSTRUCTIONS KIT CONTENTS: PART NUMBER: DESCRIPTION: E361SXA300 ROOF MOUNT BICYCLE CARRIER B9 TRIBECA Short Carriage Bolt Long Carriage Bolt 3x Over-Molded Wrench Button Head Screw 2x Washer
BOTTOM BRACKET BEARINGS
 BOTTOM BRACKET BEARINGS This basic tutorial will demonstrate the workings of a typical 3 piece bottom bracket, showing the removal and installation of the various components that make up the bearing system.
Wheel Set. Dealer's Manual DURA-ACE WH-R9100-C40-CL WH-R9100-C40-TU WH-R9100-C60-CL WH-R9100-C60-TU. ROAD MTB Trekking. City Touring/ Comfort Bike
 (English) DM-RAWH001-01 Dealer's Manual ROAD MTB Trekking City Touring/ Comfort Bike URBAN SPORT E-BIKE Wheel Set DURA-ACE WH-R9100-C40-CL WH-R9100-C40-TU WH-R9100-C60-CL WH-R9100-C60-TU CONTENTS IMPORTANT
1 - TECHNICAL SPECIFICATIONS
 REAR DERAILLEUR - CURRENT RANGE (since 2015) (since 2017) (since 2018) This technical manual is intended for use by professional mechanics. Anyone who is not a qualified professional for bicycle assembly
DM-MBRD (English) Dealer's Manual. ROAD MTB Trekking. City Touring/ Comfort Bike. Rear Derailleur SLX RD-M7000 DEORE RD-M6000
 Dealer's Manual. ROAD MTB Trekking. City Touring/ Comfort Bike. Rear Derailleur SLX RD-M7000 DEORE RD-M6000") (English) DM-MBRD001-04 Dealer's Manual ROAD MTB Trekking City Touring/ Comfort Bike URBAN SPORT E-BIKE Rear Derailleur SLX RD-M7000 DEORE RD-M6000 CONTENTS IMPORTANT NOTICE... 3 TO ENSURE SAFETY... 4
(English) DM-MBRD001-04 Dealer's Manual ROAD MTB Trekking City Touring/ Comfort Bike URBAN SPORT E-BIKE Rear Derailleur SLX RD-M7000 DEORE RD-M6000 CONTENTS IMPORTANT NOTICE... 3 TO ENSURE SAFETY... 4
Rear Drive System SERVICE INSTRUCTIONS SI-R920A WARNING. Note Always be sure to use the sprocket set bearing the same group
 - SERVICE INSTRUCTIONS SI-R90A t Rear Drive System Before use, read these instructions carefully, and follow them for correct use. WARNING Use neutral detergent to clean the chain. Do not use alkali-based
INSTALLATION INSTRUCTIONS
 KIT CONTENTS: INSTALLATION INSTRUCTIONS PART NUMBER: DESCRIPTION: E361SXA302 roof MOUNT BICycle CARRIER SINGLE Short Carriage Bolt 1x Long Carriage Bolt 3x Over-Molded Wrench 1x Button Head Screw 2x Washer
DM-MARD (English) Dealer's Manual. ROAD MTB Trekking. City Touring/ Comfort Bike REAR DERAILLEUR XTR RD-M9100 RD-M9120
 Dealer's Manual. ROAD MTB Trekking. City Touring/ Comfort Bike REAR DERAILLEUR XTR RD-M9100 RD-M9120") (English) DM-MARD001-00 Dealer's Manual ROAD MTB Trekking City Touring/ Comfort Bike URBAN SPORT E-BIKE REAR DERAILLEUR XTR RD-M9100 RD-M9120 CONTENTS CONTENTS...2 IMPORTANT NOTICE...3 TO ENSURE SAFETY...4
(English) DM-MARD001-00 Dealer's Manual ROAD MTB Trekking City Touring/ Comfort Bike URBAN SPORT E-BIKE REAR DERAILLEUR XTR RD-M9100 RD-M9120 CONTENTS CONTENTS...2 IMPORTANT NOTICE...3 TO ENSURE SAFETY...4
600 / 600FC OWNER'S MANUAL
 PROGRESSION 600 / 600FC OWNER'S MANUAL Issue 2 / Version E - Dec. 10, 1997 Copyright 1997 GAMMA Sports - All Rights Reserved PROGRESSION 600 / 600FC OWNER'S MANUAL TABLE OF CONTENTS PAGE 1... WARRANTY
CRANKSET 1 - TECHNICAL SPECIFICATIONS. 44,5 mm 8 mm
 CRANKSET THIS TECHNICAL MANUAL IS INTENDED FOR USE BY PROFESSIONAL MECHANICS. Anyone who is not professionally qualified to assemble bicycles should not attempt to install and operate on the components
Reinforced connecting pin. Silver. 6.5mm. Black. 7.1mm
 - SERVICE INSTRUCTIONS SI-R70C t Rear Drive System Before use, read these instructions carefully, and follow them for correct use. WARNING Use neutral detergent to clean the chain. Do not use alkali-based
R3 RIM MANUAL EN. Version 1 I
 R3 RIM MANUAL EN Version 1 I 07.02.2017 TABLE OF CONTENTS Introduction...1 Frame Features...2 Fork Preparation...3 Small Parts...5 Frame Preparation...6 Mechanical Cable Routing...7 Electric Cable Routing...9
Thank you for purchasing a WIKE BOX BIKE!
 Thank you for purchasing a WIKE BOX BIKE! Contents Safety.....3 Front wheel.4 Kickstand..5 Handle Bar & Box 6 Seat post and Saddle 7 Final pre-ride check 8 Tools needed to assemble Bike: -High table or
Dealer's Manual ROAD MTB Trekking City Touring/ URBAN SPORT E-BIKE Comfort Bike Front derailleur ALIVIO Non-Series
 (English) DM-MDFD001-02 Dealer's Manual ROAD MTB Trekking City Touring/ Comfort Bike URBAN SPORT E-BIKE Front derailleur ALIVIO FD-M4000 FD-M4020 Non-Series FD-MT400 CONTENTS IMPORTANT NOTICE... 3 TO ENSURE
Lectric Cycles Mid-Drive Electric Motor Installation
 Lectric Cycles Mid-Drive Electric Motor Installation This write-up describes the installation of a Lectric Cycles electric motor. The model is the e-rad Mid-Drive 750 Watt conversion kit, installed on
Shiftable Unicycle Hub, Type KH
 Shiftable Unicycle Hub, Type KH 10/06/30 schlumpf innovations gmbh Dorfstr. 10 CH - 7324 Vilters/Switzerland Tel: +41 (0)81 723 80 09 Fax: +41 (0)81 723 83 64 email: info@schlumpf.ch www.schlumpf.ch Geschäftsführer/CEO:
DM-FD (English) Dealer's Manual. Front derailleur FD-M9000 FD-M9020 FD-M9025 FD-M8000 FD-M8020 FD-M8025 FD-M612 FD-M617 FD-M618 FD-M672
 Dealer's Manual. Front derailleur FD-M9000 FD-M9020 FD-M9025 FD-M8000 FD-M8020 FD-M8025 FD-M612 FD-M617 FD-M618 FD-M672") (English) DM-FD0003-04 Front derailleur Dealer's Manual FD-M9000 FD-M9020 FD-M9025 FD-M8000 FD-M8020 FD-M8025 FD-M612 FD-M617 FD-M618 FD-M672 FD-M677 CONTENTS IMPORTANT NOTICE... 3 TO ENSURE SAFETY...
(English) DM-FD0003-04 Front derailleur Dealer's Manual FD-M9000 FD-M9020 FD-M9025 FD-M8000 FD-M8020 FD-M8025 FD-M612 FD-M617 FD-M618 FD-M672 FD-M677 CONTENTS IMPORTANT NOTICE... 3 TO ENSURE SAFETY...
M30 THRU BB FAMILY 30mm drive 30mm non-drive. M30 BB FAMILY 30mm drive 28mm non-drive
 LYFT & LYFT HD Hollow carbon arm construction 170 / 175 3-bolt direct mount ring interface M30 THRU Spindle Requires Praxis M30 Thru BB Wave Tech DM ring 49mm or Boost 52mm chain line Works with 10/11/12sp
PIVOT SHUTTLE Chain Ring Replacement Maintenance Procedure
 PIVOT SHUTTLE Chain Ring Replacement Maintenance Procedure This maintenance guide provides detailed instructions to replace the chain ring of the Shimano Steps E8000 E-bike system should something malfuction
1. General Safety Information. Silvio V2.2 Assembly Instructions Assembly. Adjust to the rider.
 Silvio V. Assembly Instructions support@cruzbike.com. General Safety Information WARNING to avoid serious injuries:. If you are unsure about fitting, testing and adjusting brakes or gearing on a bicycle,
ELECTRON PRO 245A: ASSEMBLY GUIDE. Revision Valid for MY2017 Electron Pro
 ELECTRON PRO 245A: ASSEMBLY GUIDE Revision 2.0 04-19-2017 Valid for MY2017 Electron Pro ELECTRON PRO 245A: Table of Contents 1. Tools Needed and First Aid Kit...3 2. Specifications...4 3. Configurations...5
Front Chainwheel. Dealer's Manual. Trekking ROAD MTB. Comfort XTR FC-M9000 FC-M9020 DEORE XT FC-T780 FC-T781 SORA FC-3503 FC-3550
 (English) DM-FC0002-07 Front Chainwheel Dealer's Manual MTB XTR FC-M9000 FC-M9020 DEORE XT FC-M780 FC-M782 FC-M785 FC-M8000 SLX FC-M670 FC-M672 FC-M675 FC-M677 ZEE FC-M640 FC-M645 DEORE FC-M610 FC-M612
ROAD wheel set. Dealer's Manual DURA-ACE WH-R9100-C24-CL WH-9000 ULTEGRA WH-6800
 (English) DM-WH0002-11 Dealer's Manual ROAD MTB Trekking City Touring/ Comfort Bike URBAN SPORT E-BIKE ROAD wheel set DURA-ACE WH-R9100-C24-CL WH-9000 ULTEGRA WH-6800 Non-Series WH-RS81 WH-RS61 WH-RS31
GG/DH Owner s Manual
 GG/DH Owner s Manual Hell yeah! You just bought one of the first Guerrilla Gravity bikes! First things first, thank you for supporting us and supporting American manufacturing. As we re sure you re already
FRAMESET ASSEMBLY GUIDE TRUE GRIT. LaufCycling.com
 FRAMESET ASSEMBLY GUIDE TRUE GRIT LaufCycling.com Congratulations on your True Grit Frameset! We understand you are in a hurry to go riding a.s.a.p. - but please take a deep breath and read this installation
UNPACKING AND ASSEMBLING YOUR DIAMONDBACK ROAD BIKE
 EMAIL SIGNUP BIKE REG SEARCH BIKES THE RIDE HEALTH FITNESS SKILLS SHOP MAINTENANCE CYCLING 101 RIDERS LIKE YOU TEAMS SUPPORT UNPACKING AND ASSEMBLING YOUR DIAMONDBACK ROAD BIKE 1. Begin by carefully cutting
Fenix SLX disc. frame passport
 Fenix SLX disc frame passport type: 7E2 last update: 05/10/2017 INDEX 0. UPDATES... 3 1. GENERAL... 3 1.1. Description... 3 1.2. Part codes... 3 2. MATERIAL... 3 3. WEIGHT... 3 3.1. Frame... 3 3.2. Fork...
ELECTRON PRO: ASSEMBLY GUIDE. Revision Valid for MY2017 Electron Pro
 ELECTRON PRO: ASSEMBLY GUIDE Revision 1.0 10-20-2016 Valid for MY2017 Electron Pro ELECTRON PRO: Table of Contents 1. Tools Needed and First Aid Kit...3 2. Specifications...4 3. Configurations...5 4. Geometry...7
Cantilever Brake. Dealer's Manual. ROAD MTB Trekking. City Touring/ Comfort Bike
 (English) DM-RCBR001-00 Dealer's Manual ROAD MTB Trekking City Touring/ Comfort Bike URBAN SPORT E-BIKE Cantilever Brake BR-CX70 BR-CX50 BL-4700 BL-4600 BL-R780 BL-R3000 ST-7900 ST-6700 ST-5700 ST-4600
DM-RBRD (English) Dealer's Manual. ROAD MTB Trekking. City Touring/ Comfort Bike. Rear Derailleur
 Dealer's Manual. ROAD MTB Trekking. City Touring/ Comfort Bike. Rear Derailleur") (English) DM-RBRD001-00 Dealer's Manual ROAD MTB Trekking City Touring/ Comfort Bike URBAN SPORT E-BIKE Rear Derailleur CLARIS RD-R2000 CONTENTS IMPORTANT NOTICE... 3 TO ENSURE SAFETY... 4 LIST OF TOOLS
(English) DM-RBRD001-00 Dealer's Manual ROAD MTB Trekking City Touring/ Comfort Bike URBAN SPORT E-BIKE Rear Derailleur CLARIS RD-R2000 CONTENTS IMPORTANT NOTICE... 3 TO ENSURE SAFETY... 4 LIST OF TOOLS
DM-RCWH (English) Dealer's Manual. ROAD MTB Trekking. City Touring/ Comfort Bike. Wheel Set. WH-RX31 SM-AX x12 SM-AX x12
 Dealer's Manual. ROAD MTB Trekking. City Touring/ Comfort Bike. Wheel Set. WH-RX31 SM-AX x12 SM-AX x12") (English) DM-RCWH001-00 Dealer's Manual ROAD MTB Trekking City Touring/ Comfort Bike URBAN SPORT E-BIKE Wheel Set WH-RX31 SM-AX720-100x12 SM-AX720-142x12 CONTENTS IMPORTANT NOTICE... 3 TO ENSURE SAFETY...
(English) DM-RCWH001-00 Dealer's Manual ROAD MTB Trekking City Touring/ Comfort Bike URBAN SPORT E-BIKE Wheel Set WH-RX31 SM-AX720-100x12 SM-AX720-142x12 CONTENTS IMPORTANT NOTICE... 3 TO ENSURE SAFETY...
HUB SET (DISC BRAKE)
") (English) DM-MAHB001-00 Dealer's Manual ROAD MTB Trekking City Touring/ Comfort Bike URBAN SPORT E-BIKE HUB SET (DISC BRAKE) XTR HB-M9110 FH-M9110 FH-M9125 HB-MT900 FH-MT900 E-THRU Axle 12 mm SM-AX75 SM-AX76
(English) DM-MAHB001-00 Dealer's Manual ROAD MTB Trekking City Touring/ Comfort Bike URBAN SPORT E-BIKE HUB SET (DISC BRAKE) XTR HB-M9110 FH-M9110 FH-M9125 HB-MT900 FH-MT900 E-THRU Axle 12 mm SM-AX75 SM-AX76
R5 DISC MANUAL EN. Version 1 I
 R5 DISC MANUAL EN Version 1 I 30.04.2017 TABLE OF CONTENTS Introduction...1 Frame Features...2 Fork Preparation...3 Small Parts...5 Frame Preparation...6 Brake Housing Installation...7 Mechanical Cable
X-6 STRINGING MACHINE OWNER'S MANUAL. Issue 1 - May Copyright 2004 GAMMA Sports - All Rights Reserved
 X-6 STRINGING MACHINE OWNER'S MANUAL Issue 1 - May 2004 Copyright 2004 GAMMA Sports - All Rights Reserved OWNER'S MANUAL GAMMA X-6 TABLE OF CONTENTS PAGE 1... WARRANTY PAGE 2... FEATURES PAGE 3...ASSEMBLY
NITROGEN DISC 286A: ASSEMBLY GUIDE
 NITROGEN DISC 286A: ASSEMBLY GUIDE Valid for MY2019 Nitrogen Disc 286A Revision 1.0-07-26-2018 NITROGEN DISC 286A: Table of Contents 1. Tools Needed and First Aid Kit...3 2. Frameset inspection...4 3.
Rocky Mountain Instinct / Pipeline Alloy Frame Assembly Guide. Date: April 7, 2017
 Rocky Mountain Instinct / Pipeline Alloy Frame Assembly Guide Date: April 7, 2017 1 Table of Contents Front Triangle Preparation... 4 Parts Needed... 4 Instructions... 4 Chain Stay Preparation... 6 Parts
model - CYPRESS DX W
 Contents model - CYPRESS DX W Maintenenace manual Read and Save these instructions Welcome Contents 1 Preparing Nothing makes us happier than seeing people out riding bikes. For over thirty years Giant
Service Information. Speed Concept Note about performing mechanical work on bicycles:
 Service Information Speed Concept 2011 The Trek Speed Concept bike is the fastest frameset we have ever made. To accomplish this, we have used shaped tubes, hidden front and rear brakes, and very thin-walled
Shimano Di2 Installation on S5
 Installing Shimano Dura Ace Di2 Shifting Systems Note these instructions and pictures are for assembling the Shimano Dura Ace Di2 system (Internal Spec) on the Cervélo S5 frame. The Shimano Ultegra Di2
RS Important Notes. Contact. Bicycle Maintenance Stand instructions manual. Warranty Period : 1 year (from the date of your purchase)
") Warranty Period : 1 year (from the date of your purchase) RS-1700 Bicycle Maintenance Stand instructions manual (ver.1.2 2016/12) For more details, read the attached "Minoura Limited Warranty Policy" card.
Warranty Period : 1 year (from the date of your purchase) RS-1700 Bicycle Maintenance Stand instructions manual (ver.1.2 2016/12) For more details, read the attached "Minoura Limited Warranty Policy" card.
Front derailleur. Dealer's Manual SORA FD-R3000 FD-R3030 CLARIS FD-R2000 FD-R2030. ROAD MTB Trekking. City Touring/ Comfort Bike DM-RBFD001-01
 (English) DM-RBFD001-01 Dealer's Manual ROAD MTB Trekking City Touring/ Comfort Bike URBAN SPORT E-BIKE Front derailleur SORA FD-R3000 FD-R3030 CLARIS FD-R2000 FD-R2030 CONTENTS IMPORTANT NOTICE... 3 TO
R5 RIM MANUAL EN. Version 1 I
 R5 RIM MANUAL EN Version 1 I 28.04.2017 TABLE OF CONTENTS Introduction...1 Frame Features...2 Fork Preparation...3 Small Parts...5 Frame Preparation...6 Mechanical Cable Routing...7 Electric Cable Routing...9
FLAT BAR ERGOPOWER 1 - TECHNICAL SPECIFICATIONS 2 - COMPATIBILITY WARNING! COMPATIBILITY
 ERGOPOWER FLT R 1 - TECHNICL SPECIFICTIONS 2 - COMPTIILITY WRNING! COMPTIILITY These controls were conceived, sized and created solely for use on roads. They are therefore not suited to other purposes
Front Derailleur. Shifters and derailleurs work together!
 The drivetrain consists of the cranks, chainring(s), chain, and cog(s). On multispeed bikes, derailleurs, which move the chain to change gears, are also considered part of the drivetrain. ANATOMY of the
LIQUIP DRYBREAK COUPLER. API800 Series MAINTENANCE INSTRUCTIONS
 LIQUIP DRYBREAK COUPLER API800 Series MAINTENANCE INSTRUCTIONS API LOADING COUPLER TO API RP1004 June 2015 Issue: F M:\Product-Info\API8xx\6-Service-Maintenance\API800 MAINTENANCE INSTRUCTIONS 40183.doc
FC-M820 / FC-M825 SM-BB71 / SM-CR82
 (English) DM-FC0001-00 Dealer's Manual FC-M820 / FC-M825 SM-BB71 / SM-CR82 IMPORTANT NOTICE This dealer's manual is intended primarily for use by professional bicycle mechanics. Users who are not professionally
FRONT DERAILLEUR - CURRENT RANGE
 FRONT DERAILLEUR - CURRENT RANGE (since 2015) (since 2018) (since 2017) (since 2018) WARNING! This technical manual is intended for use by professional mechanics. Anyone who is not a qualified professional
Fenix SL. frame passport
 frame passport type: 7dF last update: 05/10/2017 INDEX 0. UPDATES... 3 1. GENERAL... 3 1.1. Description... 3 1.2. Part codes... 3 2. MATERIAL... 3 3. WEIGHT... 3 3.1. Frame... 3 3.2. Fork... 3 4. GEOMETRY...
7130 Lancer Rear Drive Magnetic Commercial Indoor Cycling Bike
 7130 Lancer Rear Drive Magnetic Commercial Indoor Cycling Bike Owner s Manual Made in Taiwan INDEX IMPORTANT SAFETY INFORMATION... 1 EXPLODED DRAWING... 2 PARTS LIST... 3 ASSEMBLY INSTRUCTION... 4-9 USER
Nexus. Dealer's Manual. ROAD MTB Trekking. City Touring/ Comfort Bike SG-3R40 SG-3R45 SG-3R75 SG-3R75-A SG-3R75-B SG-3D55 SG-3C41
 (English) DM-SG0005-01 Dealer's Manual ROAD MTB Trekking City Touring/ Comfort Bike URBAN SPORT E-BIKE Nexus SG-3R40 SG-3R45 SG-3R75 SG-3R75-A SG-3R75-B SG-3D55 SG-3C41 SL-3S35-E SL-3S41-E SL-3S42-E SM-BC03
SI-F971A. 9-speed super narrow chain such as CN-7700 / CN-HG92 8- / 7- / 6-speed narrow chain such as CN-HG50 / CN-IG51
 SERVICE INSTRUCTIONS SI-F971A Front Drive System Before use, read these instructions carefully, and follow them for correct use. WARNING Use neutral detergent to clean the chain. Do not use alkali-based
Assembly Tools. Assembly will take about an hour
 Assembly Guide Assembly Tools Included in your parts box: Pedals Toolkit (4+5mm combo Allen wrench, 13+15mm combo open-end wrench) Touch-up paint Spare fuses (for battery) Assembly will take about an hour
TRAILMATE METEOR ASSEMBLY MANUAL
 TRAILMATE METEOR ASSEMBLY MANUAL (DISC BRAKE VERSION) The Trailmate Meteor recumbent has been designed for easy assembly. This means more time to enjoy the smooth ride with single speed, 3 speed coaster
Shifting Lever. Dealer's Manual. RAPIDFIRE Plus SL-M2000 SL-M3010 SL-M4010. Thumb Shifter SL-TZ500. ROAD MTB Trekking. City Touring/ Comfort Bike
 (English) DM-MDSL001-01 Dealer's Manual ROAD MTB Trekking City Touring/ Comfort Bike URBAN SPORT E-BIKE Shifting Lever RAPIDFIRE Plus SL-M2000 SL-M3010 SL-M4010 Thumb Shifter SL-TZ500 CONTENTS IMPORTANT
Rev B. Mar 23, 2011 Page 1 of 5
 Rev B. Mar 23, 2011 Page 1 of 5 www.topendwheelchair.com Invacare Top End Sports and Recreation Products (800) 532-8677 (727) 522-8677 fax: (727) 522-1007 Force G: Fork Assembly 1 1166257 1 Fork, Force
comfort without compromising on performance and to fit your various needs on touring,
 Congratulations on your purchase of Goal-26X. Goal-26X is made to enhance comfort without compromising on performance and to fit your various needs on touring, shopping and communicating. Let s have fun
DEALER MANUAL REV
 DEALER MANUAL REV 1.0-2018 WWW.PRAXIS-WORKS.COM SANTA CRUZ, CALIFORNIA ROAD CRANKS ZAYANTE CARBON - M30 Carbon arms Direct Mount X-Spider 160/104BCD 165 / 170 / 172.5 / 175 lengths X-Rings 48/32, 50/34,
8. Carefully layout all the parts of the reservoir setup and clean any dirt, grime or dust from the parts. ( image 8 ) 8
 8") INSTRUCTIONS TO SERVICE AMADAXTREME SHOCKS 2.0 REMOTE RES AUSTRALIAN VERSION PART 1 - SERVICE THE RESERVOIR 1.Prior to cleaning the shock check for any leaks or signs of damage to the res, lines, bushes
INSTRUCTIONS TO SERVICE AMADAXTREME SHOCKS 2.0 REMOTE RES AUSTRALIAN VERSION PART 1 - SERVICE THE RESERVOIR 1.Prior to cleaning the shock check for any leaks or signs of damage to the res, lines, bushes
CHAPTER 5 REWIND STARTERS
 GENERAL INFORMATION CHAPTER 5 REWIND S Rewind starters used on vertical shaft Tecumseh engines are top mount horizontal pull style or side mount vertical pull style. Horizontal shaft engines use side mounted
IMPORTANT: RECEIVING INSTRUCTIONS:
 Instruction Sheet Sidewinder Mechanical Bender IMPORTANT: RECEIVING INSTRUCTIONS: Visually inspect all components for shipping damage. If any shipping damage is found, notify carrier at once.shipping damage
DM-MAPD (English) Dealer's Manual. ROAD MTB Trekking. City Touring/ Comfort Bike SPD PEDALS XTR PD-M9100 PD-M9120
 Dealer's Manual. ROAD MTB Trekking. City Touring/ Comfort Bike SPD PEDALS XTR PD-M9100 PD-M9120") (English) DM-MAPD001-00 Dealer's Manual ROAD MTB Trekking City Touring/ Comfort Bike URBAN SPORT E-BIKE SPD PEDALS XTR PD-M9100 PD-M9120 CONTENTS CONTENTS...2 IMPORTANT NOTICE...3 TO ENSURE SAFETY...4
(English) DM-MAPD001-00 Dealer's Manual ROAD MTB Trekking City Touring/ Comfort Bike URBAN SPORT E-BIKE SPD PEDALS XTR PD-M9100 PD-M9120 CONTENTS CONTENTS...2 IMPORTANT NOTICE...3 TO ENSURE SAFETY...4
Dual Pivot Caliper Brake
 (English) DM-RBBR001-01 Dealer's Manual ROAD MTB Trekking City Touring/ Comfort Bike URBAN SPORT E-BIKE Dual Pivot Caliper Brake SORA BL-R3000 BR-R3000 CLARIS BL-R2000 BR-R2000 Brake cable BC-1051 CONTENTS
ROAD Wheel Set. Dealer's Manual WH-9000-C24-CL WH-9000-C24-TL WH-9000-C35-CL WH-9000-C35-TU WH-9000-C50-CL WH-9000-C50-TU WH-9000-C75-TU
 (English) DM-WH0002-00 Dealer's Manual ROAD Wheel Set WH-9000-C24-CL WH-9000-C24-TL WH-9000-C35-CL WH-9000-C35-TU WH-9000-C50-CL WH-9000-C50-TU WH-9000-C75-TU WH-RS21 WH-RS61 CONTENTS IMPORTANT NOTICE...
USER MANUAL. you pedal, something amazing happens
 TM USER MANUAL you pedal, something amazing happens THANK YOU! In our humble beginnings we ran a bike-powered smoothie booth at Northern California music festivals called The Juice Pedaler. We saw the
Contents. Assembly. Setup. Crush Mode/ Plush Mode Onboard Frame Storage Maintenance and Small Parts Safety
 Owner s Manual Contents Assembly Frame fittings Fastener torque Fork compatibility Drivetrain compatibility ISCG Mount Setup Fork Shock install & orientation, air springs vs coil springs Suspension sag,
FRONT DERAILLEUR 10/11x3
 FRONT DERAILLEUR 10/11x3 1 - TECHNICAL SPECIFICATIONS 52 52 2 - COMPATIBILITY WARNING! Different combinations from those included in the table could cause the malfunction of the drivetrain and result in
Rev D. May 12, 2011 Page 1 of 7
 Rev D. May 12, 2011 Page 1 of 7 www.topendwheelchair.com (800) 532-8677 (727) 522-8677 fax: (727) 522-1007 Force R: Fork/Crank Assy 1 1153309 1 Fork, Force R (incl: fork, 2 clamps, 4 bolts, 4 nuts) -Serial
rotoruk.co.uk UK Distributors Velotech Services Ltd Tel:
 2018 rotoruk.co.uk UK Distributors Velotech Services Ltd sales@velotechservices.co.uk Tel: 0845 475 5339 www.rotoruk.co.uk ROAD NEW Introducing ROTOR s lightest crankset ever, the new ALDHU 3D+ cranks
OWNER'S MANUAL. Copyright 2003 GAMMA - All Rights Reserved
 OWNER'S MANUAL AL Issue 1 - December 2003 Copyright 2003 GAMMA - All Rights Reserved OWNER'S MANUAL TABLE OF CONTENTS PAGE 1... WARRANTY PAGE 2... ASSEMBLY INSTRUCTIONS PAGE 4... MOUNTING THE RACQUET PAGE