Review of. Bell B206 Replica Torque Pedals. Manufactured by OE-XAM
|
|
|
- Dwayne Bryan
- 5 years ago
- Views:
Transcription

1 Review of Bell B206 Replica Torque Pedals Manufactured by OE-XAM Intro During my quest around flight simulation hardware I have set my focus on hardware manufactured specifically for helicopter flight simulation. My last experience was a replica Bell 206 collective from the Austrian company OE-XAM, and the experience I had using that collective was flight simulation on a completely new level. Therefor I decided to explore the helicopter hardware market once again and now set my focus on a set of torque pedals. The torque pedals in this review are replica Bell 206 torque pedals which is also manufactured by the Austrian company OE-XAM. The pedals are plug and play and is tested using FSX on both Win7 and Win 8.1.
2 Packing & Delivery I ordered the set of torque pedals directly at OE-XAM. The ordering went with ease and I used PayPal as paying method. After completing the order and payment, the pedals were manufactured, packed and shipped with an international forwarder. There were a short lead time of about one week covering the process of the pedals going through the production, being packed and getting ready for transport. Hereafter the transport was about 4 days, so the complete lead time was about 1-2 weeks which is quite fair. The delivery had a cost of Euro 25,- since it was inside the EU, but OE-XAM is also able to deliver to both the US/Canada (Euro 35,-) and Australia/New Zealand (Euro 48,-) prices can be found on OE- XAMs website. The pedals were carefully packed inside a hard cardboard box. The inner wrapping around the pedals was bobble plastic which was sealed with tape with the marking Remove before Flight which I think is a quite fun idea. Furthermore the cardboard box was filled with polystyrene foam pieces between the bobble plastic and the cardboard box. The conclusion in regards of the packing is that the pacing is indeed very professional and I don t think it could be much better. An additional touch is that the tape used outside the hard cardboard box, was with black and yellow stripes making the box look very cool and inside was a surprise some nice Remove before Flight stickers.

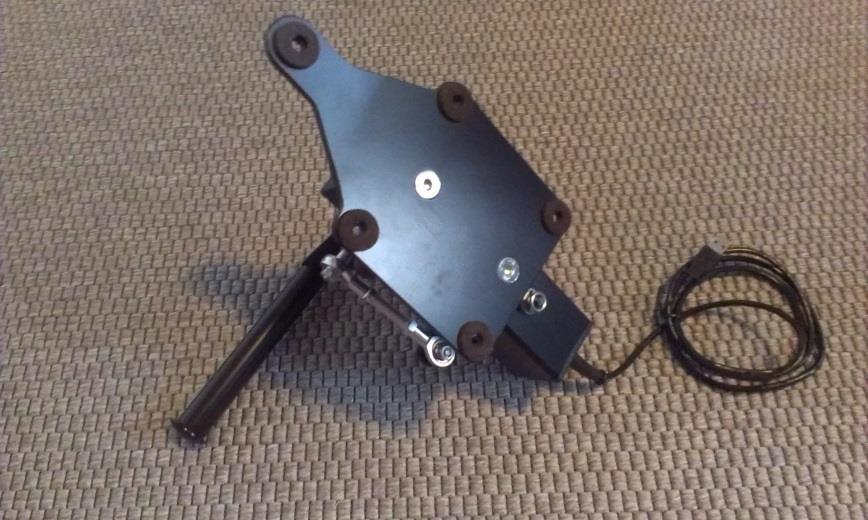
3 The Look & Feel When taking a look at the pedals I could quickly see that these pedals were not the standard flight simulator hardware pedals, but indeed some high quality and very professional manufactured pedals. The first think that I discovered was that everything that I could see and touch was all made of metal. No plastic parts what so ever! Just this simple fact already raised my expectation to a completely new level. The pedals are created with an eye for the details and do resemble their real world counterparts very well. I found some images on the website of exactly some Bell 206 pedals and the resemblance was remarkable. I could only see some minor differences like the base casing which is the center and heart of the pedals. On the images that I found of the real pedals, I could see that the base casing was cylindrical and the pedals that I have tested have a square shaped tube casing instead. I know that OE-XAM has created two versions of the Bell 206 torque pedals and the upgraded set of pedals (not included in this review), is created with the cylindrical base casing, so if you want to go all the way in regards of replica realism, then OE-XAM can provide that for sure. The torque pedals basically consists of a base casing where all the electronics are placed within. The base casing is created with metal which is then painted with a black and mat paint providing the pedals with a very realistic look. The base casing is mounted onto a metal bracket, which of course has also been painted the same black and then welded together so that the base and the bracket is one piece. The bracket has the exact same

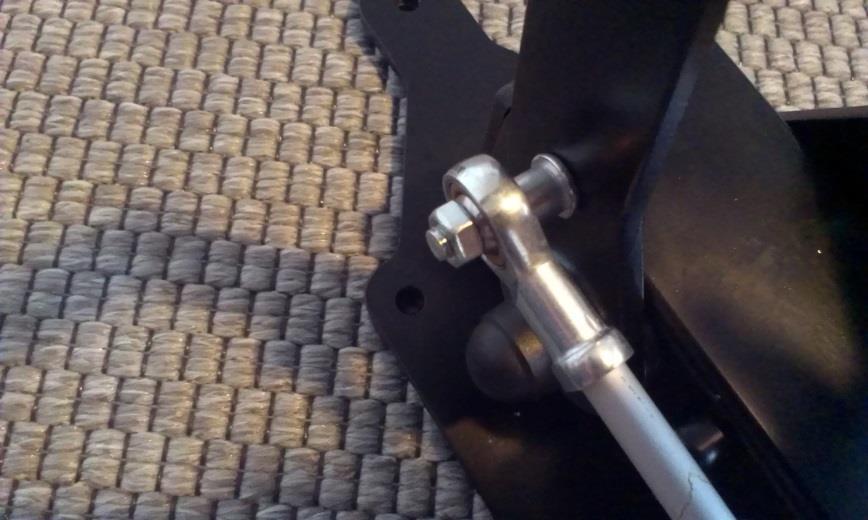
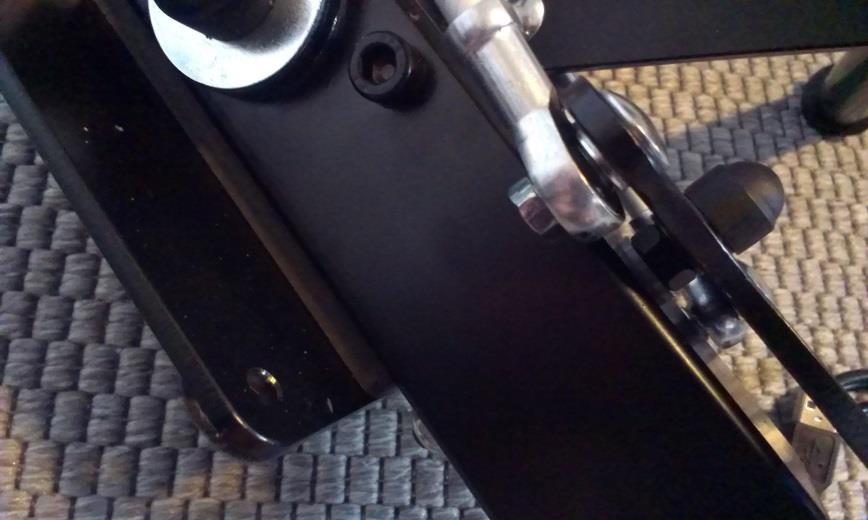
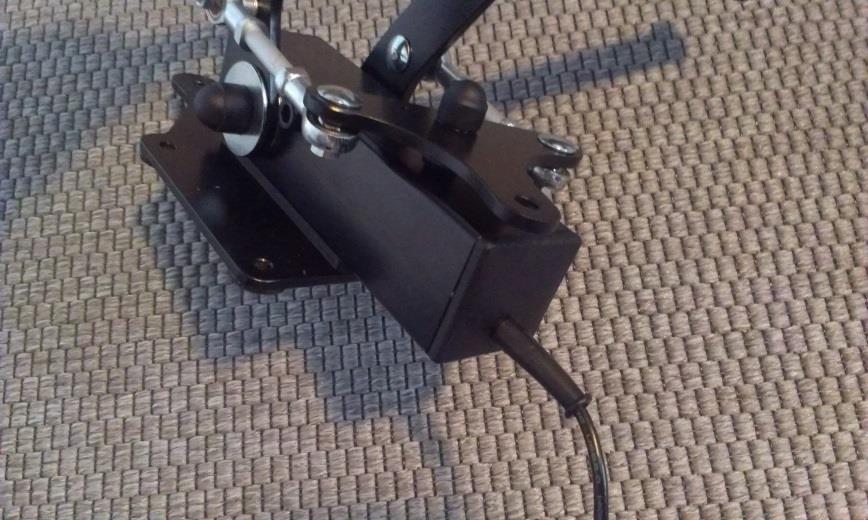
4 shape as the real Bell 206 torque pedals bracket, which I have also confirmed from pictures from There are drilled a total of 5 holes in the bracket to support the screws that can be used to mount the pedals in the home cockpit. One hole is located in the tip pointing towards the pilot and the remaining four holes are located in each corner of the square part of the bracket. The pedals are then mounted with one pedal on each side of the base casing. Each pedal consists of a special cut pedal arm and a cylindrical tube or pipe which both are made of metal and then also painted the same black color as the rest of the pedal set. The cylindrical tube/pipe and the pedal arm is welded together on a 90 degrees angle and then connected to the base casing with a bolt and screw connection. Additionally the pedal arms are connected to a T-shaped piece of metal located on the top end of the base casing. This T-shaped piece of metal has a direct connection to a potentiometer placed inside the base casing. The connection from the pedals arms to the T-shaped metal piece is by a connection bar featuring a ball bearing on each end. This provides a very firm and very steady connection when using the pedals and also adds to a longer unit life due to reduced wear and tear.
5 I have not tried to open the base casing to verify how the electronics etc. is created within, but I am quite confident that the torque pedals is created with just one potentiometer which is then connected to a PCB with an output connection to the USB cable. The USB cable is mounted to the PCB located inside the base casing and are therefore a part of the complete unit, so no additional USB cable is needed. Actually the USB cable is the only part of these pedals that are not created entirely by metal. This fact together with the fact that all wiring and electronics are placed inside the base casing, certainly adds very positively to the overall experience of the pedals. In regards to the potentiometer used I cannot verify if the pedals are created using hall-effect sensors but I can confirm that the potentiometer used is certainly of a high quality since I have not experienced any kinds of errors, glitches or outfalls or similar using the pedals throughout the entire test. There are no tension control like on the collective, so the pilot is not able to tighten or release the pedals to his/hers comfort, however this is not necessary in my opinion and when looking at the real world torque pedals I also could not find a tension control, so this is very true to real life. Also there are no buttons or switches on the torque pedals as per real life. This of course means that if you enjoy flying GA aircrafts or other fixed wing aircrafts you don t have the wheel brakes located as a function on the pedals. These pedals are replica torque pedals and are only meant to be used for helicopter simulation especially for the Bell 206 from DodoSim. I have tried out several different GA aviation rudder pedals together with a single set of helicopter torque pedals prior to this test, and I was certainly very amazed by my new experience. The movement of the pedals is super smooth with no noise of any kind and defiantly increased the realism greatly.
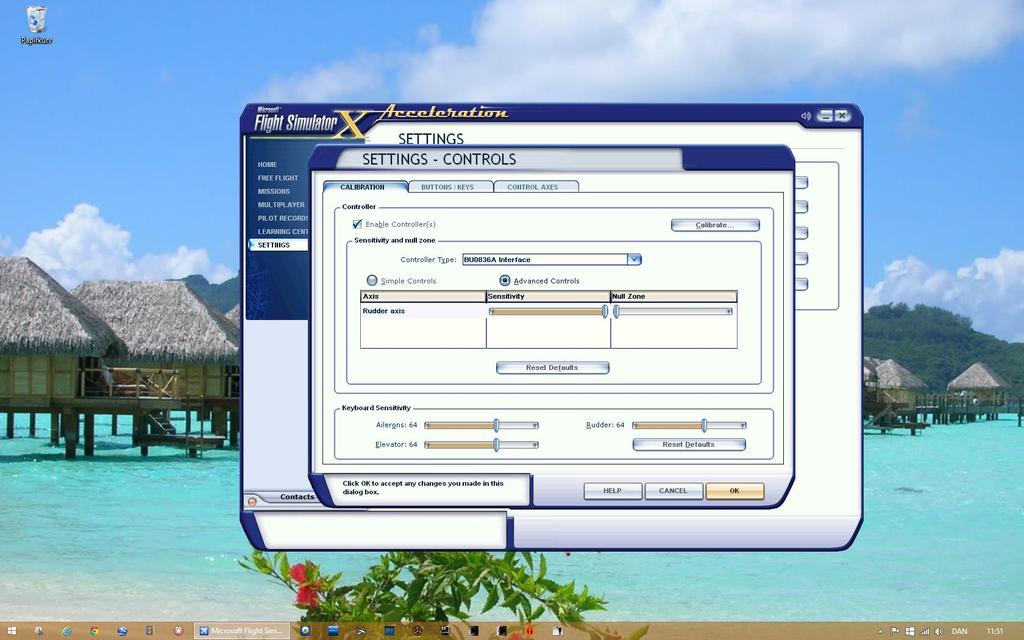
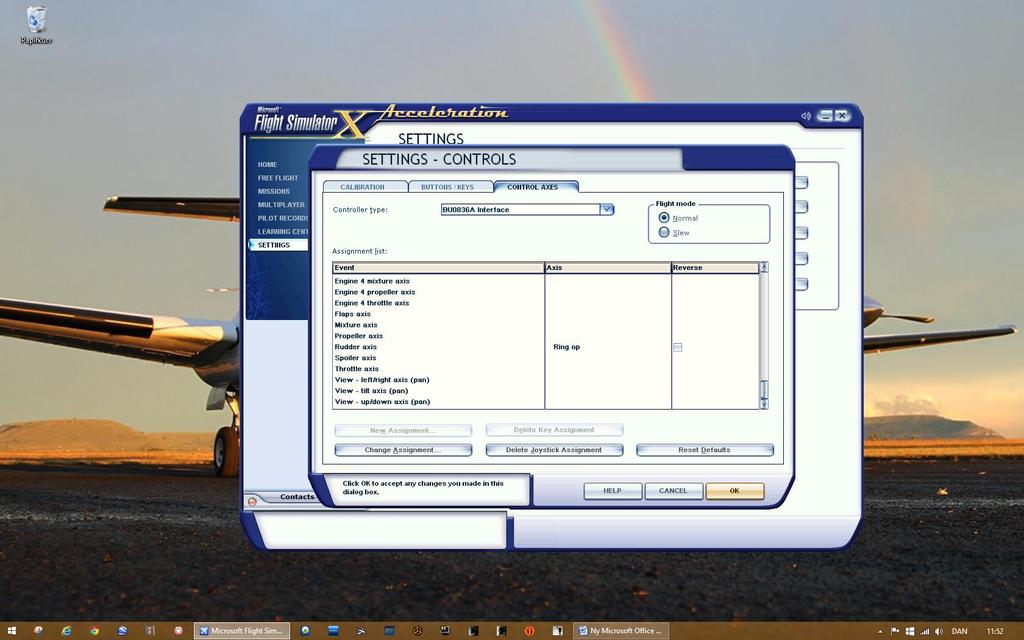
6 Setup, Connecting & Programing Connecting the pedals is very simple the pedals is a plug and play USB unit, so all you have to do is to mount the pedals in your home cockpit setup, plug in the USB cable to your computer and you are now ready. I placed the pedals on top of the floor frame which in my home cockpit is made out of wood, and simply just put a screw into each of the five mounting holes in the base bracket. I have discovered that some hardware does not go well with USB3.0 as well as with Win 8.1 therefore I have tested the connection of the torque pedals on both Win7 and Win 8.1 and furthermore tested the connection on both USB2.0 and USB3.0 on both systems. I found that the pedals work beautifully on both systems and can without any issues be connected through USB3.0 which is indeed a huge plus. Programing the pedals is automatically done the plug and play is really a plug and play, but if you wish to alter the programing this can easily be done through the assignment tool within FSX or by FSUIPC or similar programing software. When you have connected the pedals to your computer and started up FSX you can start up a flight, but I would recommend doing a calibration of the pedals prior to your first flight. This is also easily done through either the windows calibration tool or even just the calibration tool within FSX. Other programs with a calibration function I am sure could also be used. You can of course also setup the sensitivity on the pedals which is also done through various 3 rd party software s or just by using the control software in FSX. When you purchase the pedals there is no manual included and also there is no downloadable manual from OE-XAMs website (maybe to come) however OE-XAM has written a 7 page manual which can be requested simply by writing OE-XAM a mail. The manual describes the torque pedals, how to connect, assign and calibrate them etc. and is a very easy to read manual with several images of the different steps. E.g. the manual also shows you how to set the optimal sensitivity within the FSX calibration/assignment tool 100% sensitivity and 0% Nullzone. This setting is of course up to the simmer him/herself, but this is the recommended setting from OE-XAM.
7

8 Conclusion To wrap up this review, my conclusion is that these pedals are indeed a high quality product. One thing is the materials used for building the pedals this is all metal together with high quality ballbearings to strengthen and support the movable connection between the pedal itself and the base casing, but another thing is the look and feel the movement of the pedals is super smooth, they resemble the real Bell 206 torque pedals well, the assembly of the pedals is very professional with good quality welding and a smooth and clean black painting. I am unsure if the electronics or more specifically the potentiometer is with hall-effect sensor, but even if it is not, the potentiometer is certainly of a good quality and I have not experienced any outfalls, glitches or similar during my test. Everything from the assigning of the pedals to the calibration and controlling the sensitivity is super easy and can all be done without the use of 3 rd party software FSX can do it all. However the pedals are not limited to FSX and can be programmed etc. also by e.g. FSUIPC. The torque pedals can be used on both USB2.0 and USB3.0 which makes the pedals future friendly. As written earlier in this review, I have tried some hardware that did not function when connected with USB3.0 and that can or will be an issue on modern computers USB2.0 seems to be phased out slowly. All wiring, potentiometer, PCB etc. is all hidden inside the base casing and the appearance of the pedals is very realistic. I certainly had an increased flight simulation experience using these helicopter torque pedals and helicopter flight simulation has truly been lifted to a greater level of realism. If you are into helicopter flight simulation and want to go all the way in regards of realism, then I would certainly recommend adding this set of torque pedals to your home cockpit setup. The pedals are awesome and I was very amazed by my increased flight simulation experience. The price tag of a set of pedals like these are Euro 350,- + delivery. I do understand that this is a rather high cost for a set of pedals when you can purchase GA aviation pedals for close to a third of that price. However the quality of these pedals is on a completely different level and in my opinion the pedals are well worth the costs. I rate this set of torque pedals from OE-XAM with a full house of 5/5-Stars and thanks the team at OE- XAM for contributing to the flight simulation community with such an excellent addition for the helicopter flight simulation enthusiast. An Awesome product indeed! Rays Aviation
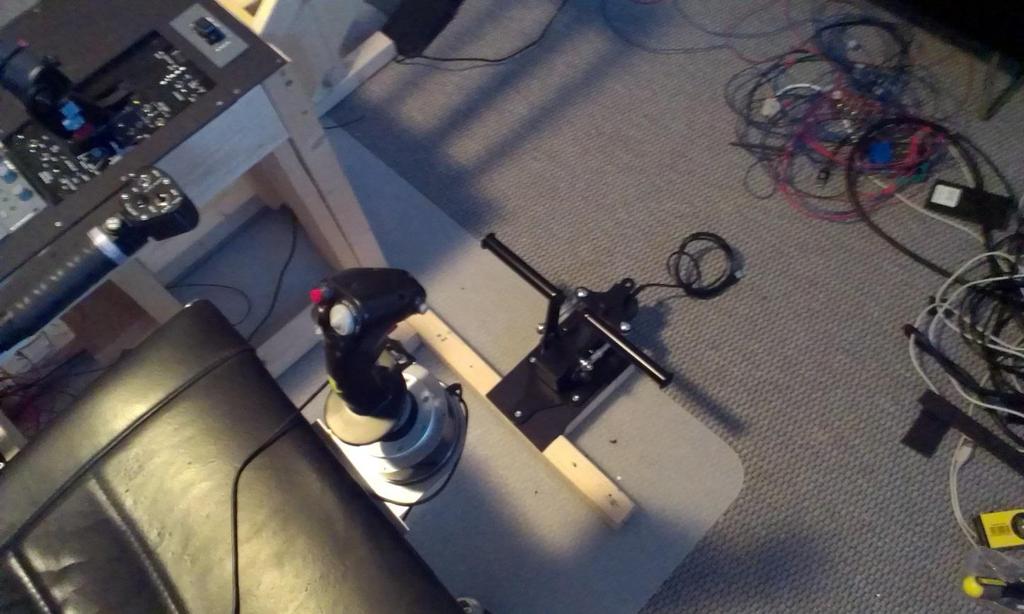
9 Additional pictures from the test

10 OE-XAM Replica vs. Real Version B206 Torque Pedals
11 Test System
Test of. Boeing CH-47D Chinook. Produced by Virtavia
 Test of Boeing CH-47D Chinook Produced by Virtavia The Boeing CH-47 Chinook is a twin engine, tandem rotor, heavy-lift helicopter originally built by Boeing Vertol back in the early 1960 s (today Boeing
Magnetic Bike. Model No: AENERGISER BODY WORX. Retain this owner s manual for future reference Read and follow all instructions in this owner s manual
 BODY WORX Magnetic Bike Model No: AENERGISER Retain this owner s manual for future reference Read and follow all instructions in this owner s manual Version A 1 EXPLODE DRAWING -02- PARTS LIST AND TOOLS
Konza District Pinewood Derby Track Parts And Assembly Instructions
 Konza District Pinewood Derby Track Parts And Assembly Instructions - 1 - Pinewood Derby Track Parts List: Box 1 of 3 2 each - Race Track Flat Sections 1 each - Race Track Finish Line Section 1 each -
Trike-Bike Assembly Manual
 Be sure to check our website for more instruction details, videos and photographs as well as a complete listing of each Nut and Bolt for the Trike Bike. www.trike-bike.com.au Go to the page marked ASSEMBLY
E-trike Li Assembly Guide
 PREPARATION 1. Read this assembly manual BEFORE commencing assembly. 2. Carefully remove all the components and packaged hardware from the shipping boxes. 3. Unpack the contents of the large double box
GV Standard X-Vent. Setup, Commissioning & Installation Guide
 GV Standard X-Vent Setup, Commissioning & Installation Guide Technical experts in the design, manufacture and supply of precision engineered, architectural rooflights for residential and commercial buildings.
RAI-M series RUDDER ANGLE INDICATOR SYSTEM
 RUDDER ANGLE INDICATOR SYSTEM RAI-M series SEAFIRST ENGINEERING CO 45-16, Ga Um Dong, Chang Won, Kyong Nam Korea Tel : 82 55 267 1645 Fax ; 82 55 266 1646 http://www.seafirst.co.kr GENERAL Seafirst Rudder
Building Instructions ME 163 B 1a M 1:5 Turbine
 Building Instructions ME 163 B 1a M 1:5 Turbine Thank you for choosing our kit of the Me-163B. We ask you to read the instruction once in advance before building this kit in order to avoid mistakes. Make
NITROGEN DISC 286A: ASSEMBLY GUIDE
 NITROGEN DISC 286A: ASSEMBLY GUIDE Valid for MY2019 Nitrogen Disc 286A Revision 1.0-07-26-2018 NITROGEN DISC 286A: Table of Contents 1. Tools Needed and First Aid Kit...3 2. Frameset inspection...4 3.
Glove Box Installation Manual
 Glove Box Installation Manual 1998 by M. Braun Company File: GB-UNI-INS.DOC! Edition 08-00 by M. Boutin! Subject to be changed without notice Glovebox Installation Your Glove box has been fully assembled,
Field Setup. Match Scoring
 Vex Competition Tuesday March 13, 2018 Biscuit in the Basket is a head-to-head robotics competition designed and scaled to be run in a classroom environment by a single teacher. This game provides a challenge
Falcon 3 145, 170, 195 and Tandem Owner / Service Manual
 Falcon 3 145, 170, 195 and Tandem Owner / Service Manual January 2007 - Second Edition Removing The Sail From The Airframe And Short Packing The Glider Many maintenance and repair procedures will require
READ-ME-FIRST RMF-01. DOWNLOAD COMPLETE TECHNICAL OWNER MANUAL
 RMF-01 READ-ME-FIRST DOWNLOAD COMPLETE TECHNICAL OWNER MANUAL www.nuvincicycling.com/downloads HOW TO GET STARTED WITH NFINITY TM GROUP SETS (330/380)? 2 Components of group sets 2 Shifting 3 Adjusting
Gurney Flap for WRX and STI w/low Profile Trunk Spoiler
 Gurney Flap for 2015+ WRX and STI w/low Profile Trunk Spoiler 2017-12-05 Thank you for purchasing this PERRIN product for your car! Installation of this product should only be performed by persons experienced
Babolat Star 5 Review. Babolat Star 5. A Review MSRP $
 Babolat Star 5 A MSRP $3500.00 The Babolat Star 5 presents a technological and professional machine that uses the many years of Babolat development making this machine a reasonably priced option for any
WHERE TO INSTALL THIS MIRROR
 ROUND LED MIRRORS 3003-L-60 3005-L-60 BEFORE YOU START, HERE IS SOME IMPORTANT INFORMATION. 1) General Information Please inspect this product upon delivery. Any missing parts or manufacturing defects
Laboratory Mortar Mixer (Testing)
") TomTom-Tools GmbH Zelgli 20 8905 Arni info@tomtom-tools.com Switzerland www.tomtom-tools.com User Manual Version February 22, 2015 Laboratory Mortar Mixer (Testing) 1 Introduction The Laboratory Mortar
TomTom-Tools GmbH Zelgli 20 8905 Arni info@tomtom-tools.com Switzerland www.tomtom-tools.com User Manual Version February 22, 2015 Laboratory Mortar Mixer (Testing) 1 Introduction The Laboratory Mortar
GALLIUM PRO 210A: ASSEMBLY GUIDE
 GALLIUM PRO 210A: ASSEMBLY GUIDE Revision 5.0-05-23-2017 GALLIUM PRO 210A: Table of contents Assembly overview...2-3 1. Frame inspection...4 2. Headset installation...5 3. Cables & housing installation...6-9
Rudder Kit Assembly Instructions for Quest 13
 Rudder Kit Assembly Instructions for Quest 13 Revised 4/2/2015 78501 Rudder System The Hobie Quest is designed for the addition of an optional rudder system. Rudder systems in boats like this allow you
Shimano Di2 Installation on S5
 Installing Shimano Dura Ace Di2 Shifting Systems Note these instructions and pictures are for assembling the Shimano Dura Ace Di2 system (Internal Spec) on the Cervélo S5 frame. The Shimano Ultegra Di2
-Round Down- Description & Overview. VEX Classroom Competition Round Down
 -Round Down- Description & Overview Round Down is a head-to-head robotics competition designed and scaled to be run in a classroom environment by a single teacher. This game provides a challenge for designers
BR-2444 ROWING MACHINE
 BR-2444 ROWING MACHINE Important Safety Information Please keep this manual in a safe place for reference. 1. It is important to read this entire manual before assembling and using the equipment. Safe
Changing Out the Rear Hub and Sprocket on a 2012 Morgan Three Wheeler Calum Fraser 17/07/2015
 Intro The early Three Wheelers had the rear sprocket in a stepped arrangement relative to the front sprocket with the belt overhanging the sprocket on the outside face. While this is probably less of a
Quattrocycle BV. Quattrocycle. User Manual. Last update February Quattrocycle BV Bremkant EJ Middelbeers. User Manual Quattrocycle 1
 Quattrocycle User Manual Last update February 2010 Quattrocycle BV Bremkant 6 5091 EJ Middelbeers User Manual Quattrocycle 1 Table of Contents Page Chapter 1: Introduction 3 Chapter 2: Instructions for
Pre-Paint>Fuselage>Empennage>Fit vertical tail fin. Objectives of this task: Materials and equipment required: Fit the spar extender
 Pre-Paint>Fuselage>Empennage>Fit vertical tail fin Objectives of this task: To fit the vertical tail fin to the fuselage, including fitting the static probe, static tube, optional strobe light wiring and
Southern Eagles Soaring
 Southern Eagles Soaring N56LS Standard Cirrus Disassembly / Assembly Procedure. Version 2, 2017 You landed out so what now? First, hopefully you made arrangements with someone who has a hitch on their
Final Assembly Instructions Bikes with Threaded Headsets
 Final Assembly Instructions Bikes with Threaded Headsets Thank you for buying your new bicycle from L.L.Bean. Read these instructions carefully before beginning the final assembly. Prior to shipping, our
Installation Guide, MPower Echelon Console
 Installation Guide, MPower Echelon Console AC Performance, AC Sport and AC Performance Plus Schwinn Echelon Console (External Routing) 1. Install batteries to console. Mount the console to the bike. 2.
PRO1030 Bi-Directional Assembly Replacement
 PRO1030 Bi-Directional Assembly Replacement 1. Remove both side covers using the Crank and Cover Removal procedure. Fig. 1 2. Disconnect both brake cables (not shown) from the brake (S3611). (Fig. 1) 3.
Helium Micro Air Vehicle (MAV)
") Helium Micro Air Vehicle (MAV) By Fawaz Alenezi, Hamoud Alkhaldi, Abdulrahman Almuqhawi, Matthew Kohr, Conrad Nazario, Randal Spencer Operations Manual May 6, 2016 Submitted towards partial fulfillment
Helium Micro Air Vehicle (MAV) By Fawaz Alenezi, Hamoud Alkhaldi, Abdulrahman Almuqhawi, Matthew Kohr, Conrad Nazario, Randal Spencer Operations Manual May 6, 2016 Submitted towards partial fulfillment
High Altitude Deployment Article By Jim Jarvis Rockets Magazine, June 2011 Edited May 2013
 High Altitude Deployment Article By Jim Jarvis Rockets Magazine, June 2011 Edited May 2013 I usually use a CO 2 device for high altitude deployment and it works pretty well. However, in the interest of
User s Manual. USB Golf Simulator. Contents
 USB Golf Simulator User s Manual Contents safety information...1 identifying the components...2 assembly in 3 easy steps...3 plug & play...4 playing tips...5 care...6 troubleshooting...7 notes...8 warranty...9
HOME ASSEMBLY INSTRUCTIONS
 HOME ASSEMBLY INSTRUCTIONS This Papillionaire Bicycle now belongs to you. It will take you to work, wait patiently outside your local cafe, and carry your groceries home. This is the start of your long-term
Final Assembly Instructions Bikes with Threaded Headsets
 Final Assembly Instructions Bikes with Threaded Headsets Thank you for buying your new bicycle from L.L.Bean. Read these instructions carefully before beginning the final assembly. Prior to shipping, our
Quick Start Guide. A. Hardware installation B. Software installation C. Start the software for the first time D. Do your first measurement
 Quick Start Guide This Quick Start Guide describes the hardware and software installation process and the Measurement feature in a simple way. Please follow the sequence of the steps to avoid problems
7130 Lancer Rear Drive Magnetic Commercial Indoor Cycling Bike
 7130 Lancer Rear Drive Magnetic Commercial Indoor Cycling Bike Owner s Manual Made in Taiwan INDEX IMPORTANT SAFETY INFORMATION... 1 EXPLODED DRAWING... 2 PARTS LIST... 3 ASSEMBLY INSTRUCTION... 4-9 USER
Installation Instructions MODEL VSTI-A020 Tank Indicator Installation Model: VSTI-A020, Stainless Reverse Read System Versa Steel Inc. Guide Cables No
 Tank Indicator Installation Model: VSTI-A020, Stainless Reverse Read System Guide Cables No Guide Cables 1 August 4, 2011 Assembly Instructions: (Shown with a 2 board, 12 ft kit) ITEM NO. PART NUMBER DESCRIPTION
frequently asked questions
 Hydra Pilot Fault Codes What do the fault codes for the Hydra Pilot mean? Fault Cause FAULT 100 FAULT 101 FAULT 102 FAULT 103 FAULT 104 FAULT 105 FAULT 106 FAULT 108 FAULT 109 FAULT 110 FAULT 111 FAULT
GALLIUM PRO 259A & 259B: ASSEMBLY GUIDE
 GALLIUM PRO 259A & 259B: ASSEMBLY GUIDE GALLIUM PRO 259A & 259B: Table of Contents 1. Tools Needed and First Aid Kit... 3 2. Sizing Chart... 4 3. Trouble-shooting / Tips... 5 4. Seat Post Collar Assembly...
CRANKSET 1 - TECHNICAL SPECIFICATIONS. 44,5 mm 8 mm
 CRANKSET THIS TECHNICAL MANUAL IS INTENDED FOR USE BY PROFESSIONAL MECHANICS. Anyone who is not professionally qualified to assemble bicycles should not attempt to install and operate on the components
Final Assembly Instructions Bikes with Quill Stems
 Final Assembly Instructions Bikes with Quill Stems Thank you for buying your new bicycle from L.L.Bean. Read these instructions carefully before beginning the final assembly. Prior to shipping, our expert
Assembly Instructions. -Cantilever Boat Lifts
 Assembly Instructions -Cantilever Boat Lifts Winch Instruction Page Safety Information 1. The winch is built for the multipurpose of hauling and lifting operations. It is not to be used as a hoist for
SI-F971A. 9-speed super narrow chain such as CN-7700 / CN-HG92 8- / 7- / 6-speed narrow chain such as CN-HG50 / CN-IG51
 SERVICE INSTRUCTIONS SI-F971A Front Drive System Before use, read these instructions carefully, and follow them for correct use. WARNING Use neutral detergent to clean the chain. Do not use alkali-based
Model 130M Pneumatic Controller
 Instruction MI 017-450 May 1978 Model 130M Pneumatic Controller Installation and Operation Manual Control Unit Controller Model 130M Controller is a pneumatic, shelf-mounted instrument with a separate
TS1. Ultrasonic Tank Sender. Installation and Operating Instructions. For TS1 Firmware v3.8. Page 1 INST-TS1-V13 18/11/10
 TS1 Ultrasonic Tank Sender Installation and Operating Instructions For TS1 Firmware v3.8 Page 1 Table of Contents 1. FEATURES... 3 2. SPECIFICATIONS... 3 3. DIMENSIONS... 4 4. MOUNTING AND INSTALLATION...
GT-4130 STUNT PLANE. 3 Channel 2.4GHz RC Aeroplane Modelled after the famous Cessna 182 Skylane SKYLARK (GT-4130) Contents & Accessories
 Contents & Accessories") GT-4130 STUNT PLANE 3 Channel 2.4GHz RC Aeroplane Modelled after the famous Cessna 182 Skylane SKYLARK (GT-4130) Contents & Accessories Remote Control Remote Control Setup BATTERY & POWER SPECIFICATION
GT-4130 STUNT PLANE 3 Channel 2.4GHz RC Aeroplane Modelled after the famous Cessna 182 Skylane SKYLARK (GT-4130) Contents & Accessories Remote Control Remote Control Setup BATTERY & POWER SPECIFICATION
Copyright Velocomp LLP 2006
 ibike Pro Cadence Handlebar Mount Owners Manual January 2007 1 Table of Contents Installing the ibike Pro cadence mount on your bicycle Installing the ibike Pro cadence mount on your time trial bike Installing
Order No Projection Backboard
 Basketball Basketball Single Post System The single-post basketball stand is made with oval aluminium profiles with a cross-section of 120 x 100 mm. The wall thickness of this robust apparatus is 4 to
INSTRUCTION MANUAL FOR NEXT LEVEL RACING GTTRACK PLAYSTATION EDITION
 INSTRUCTION MANUAL FOR NEXT LEVEL RACING GTTRACK PLAYSTATION EDITION Thank-you for purchasing a If you require any support with your product please contact our friendly team at: support@nextlevelracing.com
Vibration isolation system 1VIS10W. User manual
 Vibration isolation system 1VIS10W User manual Standa 2014 Table of contents 1. General information 3 1.1. Introduction 3 1.1.1. Safety 5 1.2. Location of the table 5 1.3. Air supply requirements 5 2.
Building a Wind Tunnel
 Technical Report TR-5 Building a Wind Tunnel Estes Industries 1963 These reports are published as a service to its customers by Estes Industries, Inc., Box 227, Penrose, Colorado 81240 Building a Wind
KRYPTON X ROAD : ASSEMBLY GUIDE
 KRYPTON X ROAD : ASSEMBLY GUIDE Revision 3.0-06-01-2016 KRYPTON X ROAD : Table of contents Assembly overview.........................2 1. Frame inspection........................3 2. Headset installation.......................4
Lectric Cycles Mid-Drive Electric Motor Installation
 Lectric Cycles Mid-Drive Electric Motor Installation This write-up describes the installation of a Lectric Cycles electric motor. The model is the e-rad Mid-Drive 750 Watt conversion kit, installed on
Preparation and Installation of the Sanitary BDI-FLX Sensor and Connection to the BDI-FLX Interface Cable
 GEP-6075 Rev. B 101574 Ref. I.D.: 16973 Preparation and Installation of the Sanitary BDI-FLX Sensor and Connection to the BDI-FLX Interface Cable WARNING USER SHOULD READ AND THOROUGHLY UNDERSTAND THESE
PPM-8240 JEEP XJ REAR SPRING HANGER BRACKET Version 1.1
 SYNERGY MFG. 870 INDUSTRIAL WAY, SAN LUIS OBISPO, CA (805) 242-0397 PPM-8240 JEEP XJ REAR SPRING HANGER BRACKET Version 1.1 GENERAL NOTES: These instructions are also available on our website; www.synergymfg.com.
INSTRUCTION MANUAL. January 23, 2003, Revision 0
 INSTRUCTION MANUAL Model 810A In-Vitro Test Apparatus for 310B Muscle Lever January 23, 2003, Revision 0 Copyright 2003 Aurora Scientific Inc. Aurora Scientific Inc. 360 Industrial Parkway S., Unit 4 Aurora,
INSTALLATION INSTRUCTIONS FOR EXHAUST CUFF MODIFICATION
 INSTALLATION INSTRUCTIONS FOR EXHAUST CUFF MODIFICATION Document # PCA1001-22 Revision LTR: A Date: 07/06/09 1 Notes: 1. The cuff must be installed onto the aircraft prior to painting. Once installed the
GALLIUM CS 281A: ASSEMBLY GUIDE. Revision Valid for MY2019 Gallium CS
 GALLIUM CS 281A: ASSEMBLY GUIDE Revision 0.0-2018-05-04 - Valid for MY2019 Gallium CS GALLIUM CS 281B: ASSEMBLY GUIDE Revision 0.0-2018-05-04 - Valid for MY2019 Gallium CS GALLIUM CS 281A / 281B: Table
BASIC AIRCRAFT STRUCTURES
 Slide 1 BASIC AIRCRAFT STRUCTURES The basic aircraft structure serves multiple purposes. Such as aircraft aerodynamics; which indicates how smooth the aircraft flies thru the air (The Skelton of the aircraft
icreasepro Creaser Operators Manual
 6-2013 Version 3.0 icreasepro Creaser Operators Manual WWW.MBMCORP.COM 800-223-2508 TABLE OF CONTENTS SPECIFICATIONS.1a SAFETY PROCEDURES/CARE & MAINTENANCE..1b COMPONENT IDENTIFICATION 2 TOUCH SCREEN
Microfluidic Demonstration
 Microfluidic Demonstration Co-flow of liquids across a microfluidic chip Create a microfluidic controller to flow liquids across a microfluidic chip. 1. Assemble fluidic circuits and attach to breadboard.
SPECIAL THANKS TO THE FOLLOWING PEOPLE FOR THEIR HELP IN THIS PROJECT!
 The Viper Mark VII is the state of the art fighter of the Colonial Fleet. It is sleeker and more modern than the Viper Mark II. The Mk7 is designed for both space and atmospheric environments and is also
GALLIUM PRO: ASSEMBLY GUIDE
 GALLIUM PRO: ASSEMBLY GUIDE Revision 2.0-04-08-2016 GALLIUM PRO : Table of contents Assembly overview..........................2-3 1. Frame inspection........................4 2. Headset installation.......................5
Prince Neos 1500 Review. Prince Neos A Review $
 A $1395.00 The is a lock-out machine and the natural extension of the venerable Neos 1000 Neos genre that has been around for some time. This machine, at this price, is an entry level machine that you
BlueArrow. Venus DLG. Construction and Flight Manual. Note: Read this manual carefully before construction and flight!
 BlueArrow Venus DLG Construction and Flight Manual Note: Read this manual carefully before construction and flight! 1 1. Introduction Thank you for choosing this fantastic Venus DLG brought to you by BlueArrow
Installing N-Strike Recon CS-6 Stage 1 and Stage 2 Performance Kits
 Installing N-Strike Recon CS-6 Stage 1 and Stage 2 Performance Kits The Nerf N-Strike Recon CS-6 is a currently available blaster that is relatively easy to modify. The guys at Orange Mod Works have produced
Stringway ML100 Review. Stringway ML100. A Review MSRP $1,195.00
 Stringway ML100 A MSRP $1,195.00 The Stringway ML100 is a technical table top machine with features that are unique. The racquet support plate is adequate and the internal supports and hold down mechanics
Savage Cub RTF Assembly Manual
 Savage Cub RTF Assembly Manual Aircraft Type & Model: Savage Cub 912 100hp Aircraft Registration Number: Aircraft Serial Number: Zlin Aviation S.R.O. 2. Kvetna N.685 763 61 Napajedla Czech Republic www.zlinaero.com
Tru Flight TRUFLIGHT INSTALLATION GUIDE TRUGOLF.COM
 Tru Flight T R A C K I N G S Y S T E M TRUFLIGHT INSTALLATION GUIDE TRUGOLF.COM TruFlight Camera Tracking System Setup & Installation TruFlight : How It Works... 1 TruFlight Components... 1 TruFlight Installation...
FLL Indonesia Category
 FLL Indonesia Category Rules & Scoring System Page1 This document explains the rules and valid scoring system for FIRST LEGO League (FLL) Indonesia Category in Indonesian Robotic Olympiad 2016 (IRO2016).
REPLACING THE AFT RUDDER CABLES
 REPLACING THE AFT RUDDER CABLES Note: You must have the assistance of a qualified Aircraft Mechanic to perform this procedure. A logbook entry with the mechanics signature is required. Please read these
CIRRUS AIRPLANE MAINTENANCE MANUAL MODELS SR22 AND SR22T CHAPTER 55-40: RUDDER GENERAL. Rudder 55-40: RUDDER. 1. General
 CIRRUS AIRPLANE MAINTENANCE MANUAL Rudder CHAPTER 55-40: RUDDER GENERAL 55-40: RUDDER 1. General The rudder provides airplane directional (yaw) control and includes a rudder trim tab used for yaw trim
Inside Front cover This page will remain blank.
 Owner s Manual Inside Front cover This page will remain blank. 1 Table of Contents Parts of the AirCAT...3 Assembling the AirCAT...4 Attaching the wheels to the stand...4 Attaching the battery box to the
New product release. Universal Rebreather Monitor (URBM) Single O2 cell and Dual HP package
 Single O2 cell and Dual HP package") New product release Closed Circuit Research is pleased to announce the launch of our range of Universal Rebreather Monitors Key features and benefits include: Universal Rebreather Monitor (URBM) Single
New product release Closed Circuit Research is pleased to announce the launch of our range of Universal Rebreather Monitors Key features and benefits include: Universal Rebreather Monitor (URBM) Single
-SWEPT AWAY- Description & Overview. VEX Classroom Competition Swept Away
 -SWEPT AWAY- Description & Overview Swept Away is a head-to-head robotics competition designed and scaled to be run in a classroom environment by a single teacher. This game provides a challenge for designers
Annex E(M) - Final inspection checklist - monowheel
 - Final inspection checklist - monowheel") Annex E(M) - Final inspection checklist - monowheel A/C Reg... Owner...Kit S/N...Date... (U.K. Only) L.A.A No...Inspector...Insp. No... Note: This check list only covers specific items for inspection of
Annex E(M) - Final inspection checklist - monowheel A/C Reg... Owner...Kit S/N...Date... (U.K. Only) L.A.A No...Inspector...Insp. No... Note: This check list only covers specific items for inspection of
Tether Tender. User Manual. Revision 1A. KCF Technologies, Inc. 336 South Fraser St., State College, PA
 Tether Tender User Manual Revision 1A KCF Technologies, Inc. 336 South Fraser St., State College, PA 16801 www.kcftech.com 814.867.4097 1. CONTENTS 1. Contents... 2 2. Introduction... 3 3. Care and Handling
Installation, Compensation and Maintenance Instructions for. RITCHIE Compasses. Made In U.S.A
 Installation, Compensation and Maintenance Instructions for RITCHIE Compasses Made In U.S.A All Magnetic Compasses are vulnerable to magnetic interference, which will produce errors, called deviation.
10.2. Basketball Single Post System
 Basketball Basketball Single Post System The single-post basketball stand is made with oval aluminium profiles with a cross-section of 120 x 100 mm. The wall thickness of this robust apparatus is 4 to
Miss Mayflower. Build Manual
 Miss Mayflower Build Manual Thank you for the purchase of the Miss Mayflower, this new exciting craft will give you fun on many types of terrain including snow, gravel, pavement, grass, water, and when
Your kit contains the following items. Additional Items You May Need. Pre- cut parts Propeller rigging and rubber Sandpaper Covering sheet
 Your kit contains the following items Pre- cut parts Propeller rigging and rubber Sandpaper Covering sheet The SkyFox offers great glide performance in a rubber powered plane due to its built up wing.
2019 MADONE ASSEMBLY MANUAL
 2019 MADONE ASSEMBLY MANUAL 2019 MADONE Rim brakes and Di2 drivetrain Rim brakes and mechanical drivetrain Disc brakes and Di2 drivetrain Disc brakes and mechanical drivetrain TABLE OF CONTENTS Common
Fiber Cable Puller with Tuf-Lugger lite
 7 OPERATING INSTRUCTION MANUAL Fiber Cable Puller with Tuf-Lugger lite Copyright 2015 DCD Design & Manufacturing Ltd. Revision 1.0 IMPORTANT SAFETY INSTRUCTIONS READ ALL INSTRUCTIONS BEFORE USING The Fiber
KAYAK ERGOMETER. Operating Instructions (Rev 3.0)
") KAYAK ERGOMETER Operating Instructions (Rev 3.0) Weba Sport und Med.- Artikel GmbH Liesneckgasse 6/1 1210 Vienna Austria Tel.: ++43 1 2723550 Fax: ++43 1 27235504 office@webasport.at www.weba-sport.com
KAYAK ERGOMETER Operating Instructions (Rev 3.0) Weba Sport und Med.- Artikel GmbH Liesneckgasse 6/1 1210 Vienna Austria Tel.: ++43 1 2723550 Fax: ++43 1 27235504 office@webasport.at www.weba-sport.com
Basketball Instructions
 Quality Family Games Basketball Instructions Model 752.69 Product Registration 752.69 08/14/14 Visit www.carrom.com to register your product to receive the latest product updates, special offers, and other
Congratulations, once again, on buying an E RIDER Model 18!!!!
 Congratulations, once again, on buying an E RIDER Model 18!!!! USER MANUAL We are sure you will be excited by the delivery of your brand new bike and you will be eager to start using your E RIDER as soon
TECH SHEET ORANGE PIVOT TOOL INSTRUCTIONS
 page 1 ORANGE PIVOT TOOL INSTRUCTIONS This is a guide of how to change the pivot bearings on an Orange frame with a bore style pivot axle. 4 8 Bore Type Pivot Axle Horiz-Hold Type Pivot Axle Please read
A Table Top Wind Tunnel You Can Build
 A Table Top Wind Tunnel You Can Build Basic principles of aerodynamics can be studied in the classroom with this simple, inexpensive wind tunnel. All you need to build it is some cardboard boxes, glue,
SUPERIOR X-ROAD CRB BF-RB03/BF-F05 SERVICE MANUAL
 SUPERIOR X-ROAD CRB BF-RB03/BF-F05 SERVICE MANUAL Superior would like to congratulate you on the purchase of your new bicycle. We place a great emphasis on the choice of materials and their processing
Converting a 2006 Royal Enfield Classic to a Kick Start Only Machine. There are good reasons for not having an electric start.
 Converting a 2006 Royal Enfield Classic to a Kick Start Only Machine Reasons There are good reasons for not having an electric start. They are: 1. Reliability. There simply are fewer parts to fail. When
Guide of the BrickIt balloon system for LEGO Blimps
 Guide of the BrickIt balloon system for LEGO Blimps Introduction At LEGO WORLD Zwolle 2010 we saw the blades on the LEGO Education Renewable Energy Add-On Set 9688 for the first time (See Figure 1). We
GALLIUM: ASSEMBLY GUIDE
 GALLIUM: ASSEMBLY GUIDE Revision 2.0-04-08-206 GALLIUM: Table of contents Assembly overview..........................2. Frame inspection........................3 2. Headset installation.......................4
Improvement of an Artificial Stall Warning System for Sailplanes
 Improvement of an Artificial Stall Warning System for Sailplanes Loek M. M. Boermans and Bart Berendsen Delft University of Technology, Faculty of Aerospace Engineering P.O.Box 5058, 2600 GB Delft, The
MAGNETIC CYCLING TRAINER SF-B0419 USER MANUAL
 MAGNETIC CYCLING TRAINER SF-B049 USER MANUAL IMPORTANT: Read all instructions carefully before using this product. Retain owner s manual for future reference. For customer service, please contact: support@sunnyhealthfitness.com
Model Aero AT-6 Texan Introduction
 1 Model Aero AT-6 Texan Introduction We are excited to introduce the Model Aero AT-6 Texan! Originally used as an advanced trainer by the U.S. Armed Forces, the AT-6 is a relaxing slow flyer, equally at
CANYON WORKSHOP: CORRECT PACKAGING FOR TRANSPORT
 Whether you're travelling or sending your bike in for a service, the Canyon BikeGuard is sturdy and can be used several times. It is of course necessary that you retain all the packaging material delivered
WINCH USER GUIDE WARN 3700 Utility Winch Part Number: 93700
 WINCH USER GUIDE WARN 3700 Utility Winch Part Number: 93700 Your safety, and the safety of others, is very important. To help you make informed decisions about safety, we have provided installation and
Relay Judging Platforms with Speedlights
 Relay Judging Platforms with Speedlights RJPLD User Guide F968 Rev. 201501 Customer Service Department www.coloradotime.com Email: customerservice@coloradotime.com Phone: 970-667-1000 Toll Free U.S. /Canada
STUDY OF LANDING TECHNIQUE DURING VISUAL APPROACH
 24 TH INTERNATIONAL CONGRESS OF THE AERONAUTICAL SCIENCES STUDY OF LANDING TECHNIQUE DURING VISUAL APPROACH Hiroshi TAKAHARA*, Takashi KONDO*, Shinji SUZUKI** *All Nippon Airways Co., LTD., **University
Model: 5100 OmniSteel Volleyball System
 Model: 5100 OmniSteel Volleyball System Installation, Operation and Maintenance Instructions Please read all instructions before attempting installation or operation of these units SAVE THESE INSTRUCTIONS