Big Cat HPV, LLC 720 Business Park BLVD, Unit 22 Winter Garden, FL phone number: (407) fax number: (407)
|
|
|
- Alan Wood
- 6 years ago
- Views:
Transcription
1 Owner s Manual 2007 TM
2

3 Road speed
4 Big Cat HPV, LLC 720 Business Park BLVD, Unit 22 Winter Garden, FL phone number: (407) fax number: (407)
5 Contents 06 Introduction 07 Safety and riding tips 09 Maintenance tips 10 Assembly instructions 22 Specifications 23 Limited Warranty
6 Introduction Thank you for purchasing a Catrike! You made a great decision by buying a fine quality product that performs well and will bring you fun and good times for years to come. Please take a moment to read through this document, especially the sections on safety and riding tips. You may find that the most comfortable place to be while you're doing this is sitting (stationary) on your trike! We hope you enjoy owning and riding your Catrike! Happy Trails, Paulo Camasmie, CEO Big Cat HPV, LLC
7 Safety and riding tips Safety tips Riding safely depends on many things, from proper equipment to alertness to your attitude on the road. Above all, use common sense. The ideal place to ride your Catrike is bicycle trails & paths. The Catrikes are probably the best choice in that setting. You will enjoy the view, relax and socialize. You will have the most comfort, peace of mind and fun. If you elect, however, to ride on streets, you will have to do it at your own risk and know that whether it is a regular bicycle, a recumbent or a tricycle you have to be very careful. Because a trike is so low to the ground you have to be extra careful with cars and trucks. Therefore you have to take a great care to make yourself visible. In part, you do this with equipment such as brightly colored clothing and helmets, use of the safety flag that comes with every Catrike, and also with blinking lights and reflective stickers. But you also have to ride in such a way that you engage the attention of motorists, making eye contact, signaling your intentions, being courteous, smiling and waving. You use your voice to get attention. You also pay a lot of attention when riding in traffic and you obey all traffic laws and rules of the road. The positive side is that recumbent tricycles are very much a novelty, and once you make sure that you are being seen, you generally find that motorists leave you more room and respect when you're on our Catrikes than they do when you're on upright bicycles. Nevertheless, always assume that they don't see you. Reflective and high-visibility gear is great (and we use it all the time), but it's no substitute for lights when riding at night or in low-light conditions. The new super-high-output LED rear lights are very effective. Any small headlight (those that look like flashlights) may be enough to help oncoming motorists see you, but it's not sufficient to actually light your way. If you're going to ride at night, spend the money and get a good headlight. While it may seem silly to wear a helmet on a low-slung tricycle, you should always do so. It's very hard to tip the trike over, but it can happen. Also, if you have a close encounter of the worst kind with a car or stationary object, chances are you won't stay on the trike. Always wear a CPSC-approved cycling helmet when riding your Catrike. A brightly colored helmet also helps motorists see you. You're very low, and it's possible for road grit to get whipped up by the wind or kicked up by passing cars and hit you in the face. This is especially true in the spring in areas where sand is used on the roads in winter. It's a good idea to wear sunglasses to protect your eyes. You may also want to wear gloves. It's easy to reach the ground on your Catrike, and getting a palm full of sand and ground glass is no fun. We strongly recommend the use of a mirror. Don't rely entirely on it. Turn and look before changing lanes or turning across the line of traffic. Riding along a line of parked cars presents a particular danger for those on low-slung bikes and trikes. Motorists have a habit of opening their doors suddenly without looking behind them and even if they do look, they're concentrating on looking for oncoming cars, not a low trike. When riding along a line of parked cars, look for occupants inside as you approach. If you see someone sitting in the car, give them a bit of extra room. Pedestrians, too, often aren't looking where you are. Use caution when approaching crosswalks and use your bell, horn or your voice to alert those who may be stepping into the street. Your Catrike has a fixed seat for several good reasons, and one of these is that it keeps the center of gravity where it should be for good handling. If you carry loaded panniers, avoid putting the weight too high and too far aft, or it can cause poor, even unsafe, handling. owner s manual - page 07
8 Riding tips If you don't have experience with recumbent tricycles, you may find that for the first few rides you experience noticeable pedal steer (pushing hard on the pedals makes the trike swerve) and brake steer (grabbing one brake harder than the other causes the trike to swerve). These two phenomena become much less noticeable as you gain experience. Pedal steer is minimized or eliminated by pedaling smoothly at a fairly high cadence, rather than mashing hard. Brake steer is minimized by braking smoothly and evenly if the trike lurches under braking you're overdoing it (it's like driving your car you don't stand on the brakes every time you slow the car; rather, you learn to modulate the pressure so that the car does not lurch). The smoothest, most enjoyable ride comes when you learn not to over control the trike. The steering is very responsive, and does not require much input at all to make the trike change direction. The less you try to steer, the smoother the ride will be. It's possible to get the trike up onto two wheels, but this should be avoided. It puts a lot of stress on the components and can cause loss of control. Bicycle wheels, hubs and tires are not designed for heavy lateral loads, and if you go up on two wheels you're asking them to do something they were never meant for. Your Catrike is wonderfully responsive and handles very well, but it's possible to overdo it. Use common sense. You'll find that the trike stays more firmly planted when going around a corner at speed if you lean to the inside of the turn. CAUTION: The brakes on your Catrike are very powerful. It is quite possible to do a stoppie on the Catrike (lock the front wheels and lift the rear wheel off the ground by jamming on the brakes). In extreme cases, you can hit the chain rings on the ground and damage them. Use common sense. Don't use maximum braking unless you really need to. (At high enough speeds, the trike won't lift the rear wheel it will just skid. And at very low speeds, there isn't enough momentum to hit the chain rings on the ground.) CAUTION: Brake Steering: Our frames are designed for a diminished brake steer effect. However keep in mind that the trike is not a heavy vehicle such as a car. It does not have hydraulic, electronics or self correcting mechanisms either. It is instead, a very light recreational vehicle with a mechanical steering linkage that carries a rider sometimes over 8 times its weight. Therefore the weight & dynamics of the driver can exert total control over the capabilities of the vehicle. It does demand that the rider develops proper riding skills, such as smooth pedaling, smooth steering and smooth breaking and that it is always conscious when riding. The Catrike has front brakes only, since in a breaking situation 90% of the weight is transferred to the front of the trike. The front brakes are also independent, meaning that you can break the right wheel only, or the left wheel only. Therefore, especially in high speed or down hill situations, it is mandatory that you pull both brakes at the same time and with the same intensity. If you elect however, to brake only with one brake, this could cause the trike to steer out of your path and cause serious injury or death. CAUTION: our new peace boom and boom clamp is designed for high pressure clamping and has an indexing system to keep the boom from twisting more than a few degrees. Make sure the boom clamp is tight enough, so the boom will not twist while you pedal. The indexing tab should be used as a guide; it is not intended to keep the boom from twisting under pressure. Just like a bicycle seat post clamp, it is the rider's responsibility to check for the boom clamp for tightness. There is a plastic shim included between the boom and the main frame to eliminate any gap and to increase clamping action. Make sure the plastic shim is correctly placed before riding your Catrike. If for any reason, you are unable to install or tighten the boom clamp or are missing the boom shim, please do not ride your Catrike and contact your Catrike Dealer or Big Cat HPV, LLC. Failure to do so might cause the boom to twist and cause serious injury. owner s manual - page 08

9 Maintenance tips Make it a habit to inspect your trike from time to time, especially when new. Fasteners have a habit of working loose at first and this can cause a safety hazard. Also, you'll find that the right front wheel tends to pick up debris from the edge of the road faster than the left front wheel, because it's running closer to the curb. The Catrike comes with Kevlar-belted tires for puncture resistance, but this does not mean they're immune to flats. Keeping your trike clean will maximize its life. Wash it from time to time, but avoid the use of pressure washers. They do a great job of getting dirt out of tight spaces, but they do an equally good job of driving lubricant out of where it needs to be. It's better to use a bucket of water, mild detergent and a soft brush. Many new owners tend to over-lube the chain. It should not be dripping with lube. A properly lubricated chain looks dry and clean, and while it may leave a bit of a mark on your hand if you grab it, it should not be a gloppy mess. Use your favorite lube and follow the instructions. Always keep your tires filled to the recommended pressure (printed on the tire sidewall). The tubes are not entirely airtight, and the tire will lose pressure over time. Trikes by nature will scrub the tires a bit, so they may not last as long as they would on a bicycle. Overly aggressive riding will shorten tire life. Your seat mesh will stretch a bit and settle in over time. It's not meant to be drum-tight it's meant to support you comfortably. Pull the straps tight from time to time when the trike is new eventually the mesh and straps will settle into a stable configuration that you'll find is quite comfortable. If you've purchased the optional headrest, we recommend placing the pad so that it's behind your neck, just under the lower edge of the helmet, and in a position that lets you rest your head on it if you need to but which doesn't force you to have your head on it all the time. The headrest is nice and soft, but it does transmit road vibration. If you're adjusting the trike to fit another rider, make absolutely certain that the chain is of the right length. In order to get the maximum possible gear range, the Catrike drive train pushes the derailleurs close to their maximum capacity. The chain must be long enough to handle the big chainring/big cog combination if it's too short; it's possible to severely damage the drive train by shifting into this gear combination and applying power. You can get away with a slightly slack chain, but NEVER ride with a chain that's too short. Improper toe can cause extremely rapid tire wear. Toe is set by the mechanic during installation of the tie rod. We've heard reports from the field of improperly set toe, with resulting excessive tire wear. Don't assume it's been done right! Check it yourself. Toe is checked by measuring the distance between the front tires at approximately axle height ahead of the axle, then comparing this measurement with the distance between the tires behind the axle. The difference should be no more than 1/16 inch with the front narrower than the rear. See the section on toe in the assembly instructions to learn more. CTT# for Trail CTP# for Pocket CTR# for Road CS# for Speed CTE# for Expedition CT7# for 700 You will see on the bottom of your trike your frame serial number. It is very common among Catrike owners on the net to identify themselves with their names followed by their trike models and serial numbers. Welcome to this nice group. owner s manual - page 09


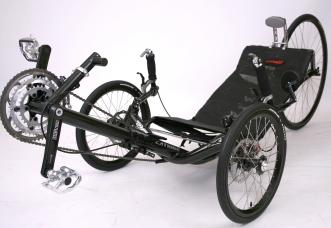
10 Assembly instructions Your Catrike should be fully assembled, tested and fine tuned by your Catrike dealer or local bike store. Here are the assembly instructions in order to show how this process is done. The first step is to inventory the parts: A complete trike includes: Main frame with cups for headsets in place. The idler pulley and chain tube also are pre-assembled and installed on the frame. The quick-release boom clamp is also installed. Boom. Seat mesh. One tie rod with two right hand thread aluminum rod-end bearings, jam nuts, and tie rod bolts installed. Two spindle/axle assemblies with headsets, hollow axles, axle spacers (when required), and dust caps installed. Adjustable handlebars. A plastic boom shim. Quick-release rear wheel skewer. Brake cables and two lengths of brake cable housing. Gear cable housing. Cable ferrules and cable ends. Flag mount. Safety flag. Derailleur hanger with screw. Computer sensor mount Space Neck Rest (for Road, Speed, Expedition and 700) Two front wheels with tubes and tires installed. One rear wheel with tube and tire installed. Disk brakes Brake levers Shifters Cassette Crank Set Front derailleur Rear derailleur Bottom bracket Chain with (1) MasterLink Mirror Other accessories such as a rack, or fenders may also be in the box. owner s manual - page 10
.")
11 Tools required To put your Catrike together, you'll need: A set of metric Allen wrenches. A set of English Allen wrenches. A small adjustable wrench. We strongly recommend against the use of pliers to hold and turn nuts. It only serves to frustrate you and destroy the nut. A bicycle chain tool. A small screwdriver (to adjust the derailleurs). A bicycle cable and housing cutter (ordinary wire snips tend to flatten and mangle the end of the cable). Torx driver. Park FRW-1 cassette installation tool (for standard cassette). Also very good to have but not absolutely mandatory are: Anti-seize compound (available at any automotive store). RTV or silicon sealant is recommended instead of thread-lock. The strong bond of thread-lock can damage aluminum threads. Zip ties. Bicycle pedal wrench. Fourth hand tool (a cable stretcher handy for holding the cable while you make derailleur and brake adjustments). A good bicycle maintenance book. There are many excellent ones out there pick your favorite. Sharpie indelible marker (to mark the location of the boom once it's adjusted to fit you).! IMPORTANT NOTE! The frame and many other parts of your Catrike are made of aluminum. It is VERY easy to strip aluminum threads, especially if steel fasteners are going into them. BE CAREFUL not to crossthread or over tighten any fastener! TIP: An easy way to estimate the proper tightness for aluminum fasteners is to use two or three fingers on the wrench. This limits the amount of force you can apply to the tool. Use two fingers for small fasteners, or three for larger ones. Because we have no control over how tightly you assemble your Catrike it is extremely important for you to re-check all of the threaded fasteners (pedals, axle bolts, and all other nuts and bolts) on the trike after you've ridden it for a couple of hours, just to make sure everything is still tight. Periodic checks during the riding season also are a good idea. Virtually all of the trouble reports we receive are nothing more than fasteners that have worked loose. owner s manual - page 11


 with the ribs and snap it into place.")


12 Begin assembly Prepare the wheels. Attach the brake rotors to the front wheels using the screws provided with the brakes. Both the brake rotors and the tread on the tire are directional so attention must be paid to how they are mounted. The direction of the brake rotor and tire must match! Direction of rotation for the tires can be determined by looking at the tread. All treads have some form of arrow contour to them. The arrow is always pointing in the direction of rotation. The direction of rotation is written on the brake rotors. In the picture on the up, the arrows point left, giving you direction of rotation. Install the cassette on the rear wheel. When you remove the cassette from the packaging there will be two loose pieces. The ribs on the hub line up with the slots inside the cassette. One rib/slot is wider than the rest. Line this one up and push the cassette down over the hub. Line up the ring (the loose piece with the slots) with the ribs and snap it into place. Apply some grease to the inside of the cassette and carefully thread the cap into the cassette. Use the Park cassette tool to FIRMLY tighten this cap down. Install the rear wheel. Insert the derailleur hanger into its recess on the right dropout and tighten the bolt. Insert the quick release into the rear wheel, put the wheel into the dropouts, tighten and close the quick release. Prepare the spindles. First, identify the right and left spindles. Mount the brake calipers on the spindles. The left-hand assembly has the brake caliper on top, and the right hand has the brake caliper underneath. Use the provided M6 washers between the head of the calipers mounting brackets and the plates to space out the bolt. Install the spindles with headsets into the head tubes. Remove the top half of the head set assembly and slide the spindle up into the head tube. Replace the bearing and crown race on the spindle. Install the handle bar support tube onto the spindle without tightening the bolts. For standard handlebar positioning, the handle bar supports should angle slightly down, not up. Replace the head set top cap and tighten it to 70 inch-pounds to pre-load the head sets. Now adjust the handle bars in the proper position and tighten them down.! IMPORTANT NOTE! Make sure the head sets are tensioned properly to 70 inch-pounds. Failure to do this could make the trike perform unsatisfactory. owner s manual - page 12


13 Install the front wheels. Attach the front wheels to their respective spindle/steering arm assemblies. First, re-identify the left and right wheels and set them on the correct side of the trike. Loosen the brake caliper adjustment bolts. This will let the caliper float free while you're mounting the wheel. Unscrew the quick release bolts. Remove them and the retaining washer from the end of the axle tube. Now you can place the wheel in position, sliding the disc in between the brake pads. Place the wheel hub opening directly over the axle, then slide the axle through the hub from behind the spindle assembly. The quick release lever goes on the inside of the spindle. The bolt and its retaining ring go on wheel. Place the cone-shaped retaining ring (flat side in) against the hub, thread the quick release bolt in and hand-tighten it. Then close the quick release level for a tight hold.! IMPORTANT NOTE! These quick releases hold the wheels on, so it's VERY important that they be kept secure. Check them from time to time. Next, adjust the calipers. One of the nice things about the Avid disc brakes on your Catrike is that they are very easy to adjust: If the caliper mounting bolts have been tightened, loosen them. Adjust the brake pads; use the knurled plastic adjuster knobs on either side of the caliper until the pads are firmly contacting the rotor. First screw the larger knob (the one closest to the wheel hub) in until the disc is offset slightly away from the wheel hub. Then screw the smaller knob in until the rotor is held tightly. Tighten the caliper mounting bolts. Back off the pad adjuster knobs until the disc spins freely and without noise about 1/2 turn each. The wheel should now spin freely. If you hear any noise, back off the adjusting knobs a bit more until it goes away. Now it's time to finish installing the handlebars you started when working on the spindles. Install the brake levers and shifters on the grip portion of the handle bars. First, slide on the brake lever, then the shifter. The exact positioning and twist of these parts depends on how you install your adjustable handlebars. Find the best position and tighten them down. See the following section for determining your preferred handle bar positioning. owner s manual - page 13


14 Adjustable handlebars Your new Catrike adjustable handlebars can be adjusted in many ways to give each Catrike owner a custom fit. The long, horizontal portion of the handlebar has a gentle incline to it. For those riders who prefer lower handlebars, this can be installed upside down to provide a gentle downward slope. The same holds true for the shorter grip portion of the handlebar. It has a gentle angle leaning forward, but can be reversed. You can see the difference in mounting in the pictures below. The picture on the top shows the recommended standard setup. The handlebar sets come in left and right sides. When mounting them upside down, simply swap sides to keep the heads of the screws on the inside of the trike, making them easier to reach with the allen key. TIP: Be sure the tightening bolts are completely loosened before attempting to move or rotate the short grip portion of the handlebar to avoid scratching the paint. They can be adjusted to be long or short for better ergonomics. When adjusting the handlebars in short, the excess post can be used for mounting mirrors or a computer. They can be adjusted wide out for a better turning radius or in close to the body for better aerodynamics. The twist of the grip portion of the handlebar is also fully adjustable. Install the tie rod. Next comes the tie rod. The rod goes under the seat side rails and over the main frame tube, and bolts in place on top of the small plates on the spindle assemblies. All tie rods now come with two right hand thread ends. For now, just install the tie rod. We'll be checking the toe later in the assembly instructions. owner s manual - page 14


15 Bolt each rod end bearing to its spindle assembly, placing the ball of the rod-end bearing on top of the spindle plate. The bolt goes in from the top, and the nut goes on underneath the plate. Tighten everything snugly. TIP: This is one of the few places on the Catrike where a steel bolt is threaded into a steel nut. The caution about the ease of stripping threads does not apply here.! IMPORTANT SAFETY NOTE! The tie rod bolts should be kept tightened securely. If they get loose, the steering will get sloppy and the wheels may shimmy under certain circumstances. If the bolts fall out, loss of control could result. Check them from time to time! Install the brake cables. This is done by threading the cable through the brake lever and fitting the small metal cylinder on the end into the recess in the lever. Screw the barrel adjusters on the bottom of the levers almost all of the way in (they'll be used later to take up slack during brake adjustment). The procedure for the left and right brake is the same. Slide the brake cable housing on. You should have eight cable ferrules. Four are for the brake cable housings. Thread the cable through a ferrule, then through the housing, then through another ferrule. Thread the end of the cable through the fittings in the brake actuating arm. The ferrule fits under the rubber boot. Loosen the cable clamp bolt, put the cable under the clamp plate, pull it taut and retighten the bolt. Using a bicycle cable cutter (preferred) or a SHARP pair of wire cutters cut the brake cable so that a few inches extend beyond the clamp bolt.! IMPORTANT SAFETY NOTE! The end of the cut cable MUST be sealed, or it will fray and cause a serious safety hazard. Those wires are sharp! Crimp on one of the included cable ends. TIP: If you run out of cable ends, and can't get to a bike shop for more, you can use a drop of cyanoacrylate glue (Krazy Glue), some epoxy or a blob of solder to seal the cable ends. Adjust the brakes First pull hard on both brake levers to seat the cables. Turn the barrel adjusters out until the levers do not bottom out when the brakes are applied fully. Screw in the lock nuts on the adjusters. If the brake makes noise or drags, adjust the brake pad relief using the pad adjusting knobs. Install the bottom bracket and crank set on the boom. Refer to the manufacturers instructions for installation of these components. owner s manual - page 15
.")


16 Install the boom on the main frame tube. There is a boom shim glued inside of the main frame tube. The boom will fit very snug inside your frame. First insert the boom clamp on the boom with the indexing tab in the channel of the boom (make sure the indexing tab is toward the bottom bracket). Slide the boom clamp about half way up then insert the boom into the main frame. Now you can slide the boom clamp over the main frame tube and adjust the boom to the approximate length and tighten the quick releases enough to keep it from slipping. You can adjust it to the correct length later.! IMPORTANT NOTE! Never lubricate or wax the part of the boom that sits inside the frame. This can cause it to slip. Once it's adjusted, make sure it's tightened enough to avoid slipping under power. CAUTION: Make sure the boom clamp is tight enough, so the boom will not twist while you pedal. Just like a bicycle seat post clamp, it is the rider responsibility to check for the boom clamp tightness. The boom clamp is designed for a high pressure clamp action. It also included a plastic shim to be installed between the boom and the main frame for zero gap and increased clamping action. Make sure the plastic shim is correctly placed and that the boom clamp is tight enough to avoid the boom to spin inside the frame. If for any reason, you are unable to install or tight the boom clamp enough, please don't ride and contact your Catrike dealer or Big Cat HPV, LLC. Failure to do so might cause the boom to twist and cause serious injury. Install the derailleurs. Install the front derailleur on the derailleur post. Line up the cage with the chain rings and position the curve of the derailleur cage so that it clears the big chainring by about 2mm (1/8 ). There should be a small plastic guide taped to the cage to assist you in this. Install the rear derailleur by bolting it in place. Next, run the shifter cables. Cable guides have been provided on the boom and rear chain stay. The actual routing is not important, as long as sharp bends are avoided. The recommended routing for the left side (front derailleur cable) is to run the cable between the seat brace and the seat mesh (not yet installed) from behind before running it forward. Likewise, run the rear derailleur cable between the seat brace and the mesh from the front. Installation of the cables at the derailleurs is similar to the installation on the brakes. Put a ferrule on the end of each cable housing. Thread the cables into the derailleurs, pull them taut, clamp them down, trim and seal the ends. Before you clamp the rear derailleur cable in place, screw the barrel adjuster on the derailleur in as far as it will go, then back it off 1 to 1-1/2 full turns. Note that there is no adjuster on the front derailleur. owner s manual - page 16


17 Install Clipless Pedals. We strongly recommend that you use clipless pedals. They're not only safer; they're far more convenient and comfortable than using plain pedals.! IMPORTANT NOTE! The left pedal is reverse threaded. Make sure you don't try to install the pedals backwards, or you might strip the crank threads. Your pedals will be clearly marked so you can tell which is which. TIP: Using anti-seize compound on the pedal threads will make future disassembly much easier and will help prevent damage to the threads in the crank arms. Install the seat mesh. Lay the mesh out to get your bearings. The upper edge of the seat has two straps and buckles. Place the seat mesh over the frame and thread the straps into the buckles. Note that there's a right way and a wrong way to thread the straps into the buckles. It's easy to tell if you've done it wrong: it won't hold tension. First thread the straps on loosely and position the seat mesh so that it is square on the frame, with the cutouts for the lower seat support tubes positioned properly. Tighten all of the buckles as tight as you can with your hands. You will find that when you sit on the seat, the mesh will loosen a bit and buckles will slip or the mesh will shift a bit. This is normal. Adjust the position and re-tighten as needed. The seat mesh will stretch a bit at first, requiring re-tightening, but will soon break in and stop moving. The comfort of the Catrike seat comes from the mesh cradling and supporting your body, so it's okay if the buckles slip a bit as they find their preferred tension. Trying to keep them drum-tight is not only futile, it's not as comfortable as letting them support your body fully. It is normal to have a small wrinkle on the seat tubes at the base of the seat back. Set the boom length. Sit on the trike, wearing shoes like those you'll have on when riding, and adjust the boom length. This is done by loosening the boom release enough to allow the boom to move, then putting your instep on one pedal and extending your leg fully (the boom will rotate just move it back to vertical with your hand). You should be able to lock your knee, but not have to lock your knee. You can finetune the position later. Re-tighten the boom release (or pinch bolts) enough to keep the boom from slipping. Humans are capable of producing some incredible power for very short periods of time when accelerating from a dead stop. If your boom is not clamped tightly enough, it will rotate and slip forward. owner s manual - page 17


18 Install the chain. Start at the chain rings in the front of the trike. Run the chain through the front derailleur; between the main cross member and the tie rod; through the upper chain tube; under the idler wheel; over the rear cassette; through the rear derailleur and back through the lower chain tube. Now you can use the MasterLink to connect the chain together. Note the chain routing above there is a chain guide tube (return) running beneath the cross member. The drive part of chain runs underneath the black guide pulley and over the top of the chain ring. TIPS: It's easier to thread the chain if you immobilize the crank. This can get messy! Protect your work surface and keep paper towels handy. It's easy to thread the chain through the rear derailleur cage incorrectly. Make sure the chain runs cleanly through it, and not over the retaining tabs. Adjust the chain length. To do this, shift onto the largest cog on the rear and the largest chainring in the front. Pull the chain taut, so that the rear derailleur cage is fully extended. Then add two links. That will be close to the ideal length for the chain. Use the included PowerLink to hold the chain together. If your Catrike will be used by more than one person, feel free to use two MasterLink so that the chain can be easily adjusted for other riders: simply set the trike up for the shorter rider, then insert a piece of chain long enough to accommodate the taller rider. If this short piece of chain is between two MasterLinks, adjusting the trike should take only a couple of minutes. It's a good idea to mark the boom for both length and orientation for each rider using a Sharpie marker, so that the setting can be repeated easily. Just to be clear on what we mean by two links, check the photo. Don't forget that the PowerLink counts as one link. There's a trick to opening a PowerLink that seems to elude many people. First hold the link between your thumb and forefinger, and push the plates together (towards one another). Then slide them in opposite directions, as if you were snapping your fingers. Opening a PowerLink should be easy if you find yourself reaching for a pair of pliers you're not doing it correctly. TIP: It's easier to work on a chain under tension if you create a loop of slack and hold it in place with a stiff, bent wire, made from an old spoke or wire coat hanger. owner s manual - page 18
. Adjust the toe.")


19 Adjust the derailleurs. Your Catrike should have shipped with information sheets for both the front and rear derailleurs that describe this process. It will also be described in any bicycle maintenance book. Air the tires. Fill the tires to the recommended pressure (you can find this on the sidewall of the tire). Adjust the toe. Any vehicle with left and right wheels has a setting called toe. This refers to the extent to which the front wheels point towards one another. Toe in means that the front edges of the wheels point inward slightly. Toe out means they point outward slightly. The purpose of toe is to keep the steering nice and tight. All bearings have a little slop in them. By applying a bit of force to the entire system, it's possible to remove that slop. Too much toe and you cause the tires to scrub. This causes premature tire wear and increased rolling resistance. What you're looking for is just a little bit of toe. Toe is checked by measuring the distance between the front wheels at axle height ahead of the axles, then comparing it to the distance between the wheels at axle height behind the axles. The difference should be only 1/16. It can be measured with a tape measure. Be sure to measure between the same points (e.g. inner surfaces of the front tires, centerline of tires, etc.) on both front and back. Take a locking steel tape measure, hold the tape just above the boom, place the tape measure housing firmly against the wheel rim and extend the tape until the end is firmly against the opposite rim. Take careful note of the measurement. Now do the same for the back of the wheel, running the tape just above the seat. The rear measurement should be no more than 1/16 greater than the front measurement. It's very important to get this right if you have a quarter inch of toe your tires will wear out VERY quickly and your trike will handle oddly. Sharp-eyed readers will note that if you use this method you won't actually be measuring points on the wheel that are 180 degrees apart. This is true the boom and seat tubes get in the way of taking measurements that are actually at axle height. However, the difference between the measurement you get and the true measurement is very small. TIE RODS The washer included on the tie rod assembly goes between the tie rod end and the mounting plate on the spindle. Now all tie rods come with two right hand thread tie rod ends. Simply assemble the trike, and adjust the toe. To adjust the toe, unbolt one end of the tie rod, loosen the jam nut and give it a half turn to lengthen or shorten the rod. Once it's adjusted, it will not run out of alignment. owner s manual - page 19


20 Install Mirror Your Catrike comes with a mirror. Remove the bar-end cap from the left handlebar and install mirror in the end of the handlebar. Attach the flag Your Catrike comes with a flag mount. Using the M5x16 socket head cap screw provided, attach it to the rear threaded hole of the left drop out. Place the flag in the mount and use a zip tie to secure it.! IMPORTANT NOTE! It is normal for cables and assembled parts to settle and bed in during the first several days of riding. It is important to go over the trike carefully during this break-in period and adjust anything that's loosened up. That means all fasteners, especially the axle bolts and the tie rod nuts and bolts. Attach Computer Sensor Mount There is a hole on both spindle assemblies to mount the Computer Sensor Mount on the desired side of your trike. The Mount and the Bolt should be on the bottom of the spindle assembly with only the lock-nut on top. Attach Neck Rest Your space neck rest comes assembled in the box with your trike. Top M5 adjusting bolts Neck Rest Stop Bottom M5 adjusting bolts owner s manual - page 20
21 Remove the screws from the seat bar clamps to mount the clamps on the top horizontal seat bar. Center the space neck rest and barely snug up the clamp bolts. You'll likely be moving this clamp as you adjust the neck rest. You can now adjust the space neck rest height and angle to fit you. Loosen the bottom adjusting bolts to slide the side plates up and down to adjust height. Loosen the top adjusting bolts to adjust the angle of the top of the space neck rest. Once you have the neck rest where you want it rotate the clamps on the horizontal seat bar until the neck rest stop is in contact with the side plate. Tighten all the bolts and you are ready to ride in style! owner s manual - page 21
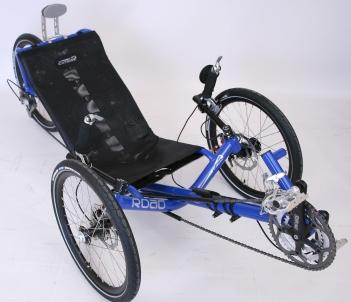
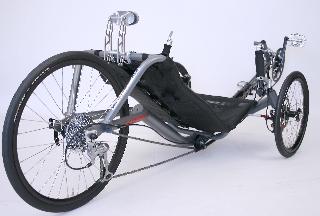
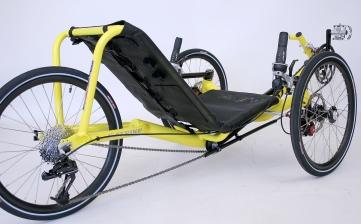
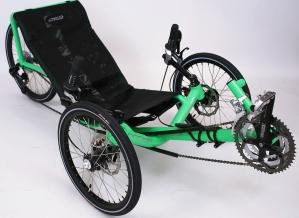
22 2007 PRODUCT SPECIFICATIONS DESCRIPTION Road CATRIKE MODEL (2007) speed WHEELS FRONT/REAR GEOMETRY SEAT ANGLE TRACK WHEEL BASE SEAT HEIGHT GROUND CLEARANCE WEIGHT TOTAL WIDTH TOTAL HEIGHT TOTAL LENGTH BB HEIGHT TURNING CIRCLE TURNING RADIUS 406/ " (737mm) 36" (914mm) 9.25" (235mm) 3.5" (89mm) 32 lbs (14.5kg) 33" (838mm) 23.5" (597mm) 71" (1803mm) 14.5" (368mm) 14' 4" (4.37m) 86" (2184mm) 349/ " (699mm) 35" (889mm) 8.25" (210mm) 3" (76mm) 29 lbs (13.2kg) 31.5" (800mm) 22" (559mm) 70" (1778mm) 14.5" (368mm) 14' (4.27m) 84" (2134mm) 406/ " (737mm) 39" (991mm) 8" (203mm) 3" (76mm) 33 lbs (15.0kg) 33" (838mm) 24" (610mm) * 74" (1880mm) 15" (381mm) 16' (4.88m) 96" (2438mm) 349/ " (699mm) 40" (1016mm) 7" (178mm) 2" (51mm) 30 lbs (13.6kg) 31.5" (800mm) 22" (559mm) * 75" (1905mm) 15" (381mm) 16' 6" (5.03m) 99" (2515mm) 406/ " (737mm) 43" (1092mm) 10" (254mm) 4.25" (108mm) 35 lbs (15.9kg) 33" (838mm) 26" (660mm) * 79" (2007mm) 16" (406mm) 18' (5.49m) 108" (2743mm) 349/700c " (699mm) 45" (1143mm) 7" (178mm) 2.25" (57mm) 33 lbs (15.0kg) 31.5" (800mm) 26.75" (675mm) * 83" (2108mm) 16" (406mm) 18' 4" (5.59m) 110" (2794mm) * HEIGHT WITH NECK REST FOLDED DOWN **TOTAL LENGTH, BB HEIGHT, AND TURNING CIRCLE/RADIUS ARE AVERAGES AND VARY BY RIDER FEATURES STRUCTURAL FRONT BOOM INDEXING CLAMP FLAG MOUNT COMPUTER SENSOR MOUNT CLIPLESS PEDALS LEFT MIRROR DOUBLE BEND FRAME ERGO SEAT SPACE NECK REST TERRA CYCLE PULLEY VERTEBRAE FRAME STANDARD COLORS SILVER YELLOW SILVER LIME GREEN SILVER BLUE SILVER GRAPHITE SILVER RED SILVER BLACK COMPONENTS SHIFTER REAR MECH DISC BRAKE CRANK BOTTOM BRACKET FRONT MECH CASSETTE BRAKE LEVER CHAIN TIRES SRAM SX5 TWIST SHIFTER SRAM SX5 REAR DER AVID BB5 TRUVATIV TOURO TRIP 165mm TRUVATIV BB POWER SPLINE TIAGRA SRAM PG AVID FR5 KMC X9 PRIMO COMET SRAM SX5 TWIST SHIFTER SRAM SX5 REAR DER AVID BB5 TRUVATIV TOURO TRIP 165mm TRUVATIV BB POWER SPLINE TIAGRA SRAM PG AVID FR5 KMC X9 PRIMO COMET DURA-ACE BAR END DEORE LX SGS AVID BB7 TRUVATIV TOURO TRIP 165mm TRUVATIV BB POWER SPLINE TIAGRA SRAM PG AVID FR5 KMC X9 SCHWALBE MARATHON RACER DURA-ACE BAR END DEORE LX SGS AVID BB7 TRUVATIV ELITA TRIP 165mm EXTERNAL CUP TIAGRA SRAM PG AVID FR5 KMC X9 SCHWALBE STELVIO DURA-ACE BAR END DEORE LX SGS AVID BB7 TRUVATIV ELITA TRIP 165mm EXTERNAL CUP TIAGRA SRAM PG AVID FR5 KMC X9 SCHWALBE MARATHON RACER DURA-ACE BAR END DEORE LX SGS AVID BB7 TRUVATIV ELITA TRIP 165mm EXTERNAL CUP TIAGRA SRAM PG AVID FR5 KMC X9 SCHWALBE STELVIO owner s manual - page 22
23 Catrike Limited Warranty Big Cat HPV, LLC warrants Catrike tricycle frames and steering components against defects in materials or manufacturing for the life of the tricycle, while owned by the original retail purchaser. The limited lifetime warranty on the frame and steering components does not apply to the paint/finish; this is covered under the limited 1-year warranty. Warranty coverage on Catrike proprietary components (excluding tires, tubes and cables) extends for one year while owned by the original retail purchaser. Warranty coverage of nonproprietary components will be covered by the warranty stated by their original manufacturers. Warranty coverage is conditioned upon the tricycle being assembled and adjusted correctly, being operated under normal conditions and use, and being properly maintained. Proof of purchase is required for any claims made under this warranty. The warranty is valid for the original purchaser only and is non-transferable. This warranty does not cover: Normal wear and tear. Any damage, failure or loss caused by accident, misuse, neglect, abuse, theft, or failure to follow instructions or warnings in the owner's manual. Any damage, failure or loss caused by use of tricycles for stunt riding, ramp jumping, acrobatics or other similar activities, or in any other manner for which they were not designed. Bending of frames, handlebars or wheel rims can be a sign of misuse or abuse. Any damage, failure or loss caused by the use of tricycles, not intended for such use as, power driven vehicles. The original owner shall pay all labor charges connected with the repair or replacement of all parts. Under no circumstances does this limited warranty include the cost of shipment or transportation to or from an authorized Catrike dealer or Big Cat HPV. Useful product life cycle Every Catrike tricycle and frameset has a useful life cycle. This useful life cycle is not the same as the warranty period. The warranty identifies the period of time that Big Cat HPV will replace the product if this becomes necessary. When Big Cat HPV provides a lifetime warranty, this does not guarantee that the product will last forever. The length of the useful life cycle will vary depending on the riding conditions and care the trike receives. Competition, jumping, downhill racing, trick riding (e.g. riding on two wheels, wheelstands), trial riding, riding in severe conditions or climates, riding with extremely heavy loads or any other non-standard use can substantially shorten the useful product life cycle of a Catrike tricycle or frame set. Any one or a combination of these conditions may result in an unpredictable failure of a Catrike tricycle or frame set that would not be covered by this warranty. All Catrike tricycles and frame sets should be periodically checked by an authorized Catrike dealer for indications of potential failures including cracks, corrosion, dents, deformation, paint peeling and any other indications of potential problems, inappropriate use or abuse. These are important safety checks and very important to help prevent accidents, bodily injury to the rider and shortened useful product life cycle of a Catrike tricycle frameset. Crash Replacement Program If your Catrike tricycle or frameset ever fails in such a manner that the warranty is denied, you are still eligible for Catrike's crash replacement program. This program is intended to provide for a low cost frame replacement when a frame failure is determined to be caused by accident, crash, abuse or any other non-standard use. Please see your Catrike dealer for details. This crash replacement program is available to the original owner for the lifetime of the tricycle or frame set. Your proof of purchase will be required. Limitations Big Cat HPV reserves the right to make sole determination of whether any failure or damage claimed under warranty was caused by material or manufacturing defect. Proof of purchase from an authorized Catrike dealer is required for any limited warranty replacement/repair or crash replacement program. The foregoing warranties are in lieu of and exclude all other warranties not expressly set forth herein, whether express or implied by operation of law or otherwise, including but not limited to any warranties of merchantability for a particular purpose. owner s manual - page 23
24 Big Cat HPV shall in no event be liable for incidental or consequential losses, damages or expenses in connection with its tricycle products. Big Cat HPV's liability hereunder is expressly limited to the replacement of goods not complying with this warranty. Some states do not permit the exclusion or limitation of implied warranties or consequential damages, so the preceding limitations and exclusions may not apply to you. Procedures Warranty service will be performed by Big Cat HPV or an authorized Catrike dealer. Proof of purchase must be provided. Transportation to and from the authorized Catrike dealer is the responsibility of the purchaser. Big Cat HPV will have the option of either repair or replacement at no charge for any defective product. In the event Big Cat HPV elects to replace a defective frame, a new frame of equal or greater value will be provided. The new frame may not be the exact model purchased. Big Cat HPV is not responsible for dealer labor charges for component changeovers when a frame is replaced after one year from the date of original retail purchase. If you elect to repair a defective product yourself or use the services of someone other than a Catrike authorized dealer, or if you use a replacement part not supplied by Big Cat HPV, Big Cat HPV will not be liable for any damage, failure or loss caused by the use of such unauthorized service or parts. IF YOU HAVE A PROBLEM Contact your Authorized Catrike Dealer. Proof of purchase required. Or contact Big Cat HPV at Big Cat HPV, LLC 720 Business Park Blvd, Suite 22 Winter Garden, FL USA Phone: (407) Fax: (407) This warranty gives you specific legal rights and you may also have other rights which may vary from state to state. owner s manual - page 24
25
26 Big Cat HPV. LLC 720 Business Park Blvd Ste 22 Winter Garden, Fl TM
Big Cat HPV, LLC 720 Business Park Blvd, Unit 22 Winter Garden, FL USA phone number: (407) fax number: (407)
 fax number: (407)") 2 0 1 1 Big Cat HPV, LLC 720 Business Park Blvd, Unit 22 Winter Garden, FL 34787 USA email: info@catrike.com phone number: (407) 905-0626 fax number: (407) 905-0820 www.catrike.com Page 1 Page 2 TM Introduction
2 0 1 1 Big Cat HPV, LLC 720 Business Park Blvd, Unit 22 Winter Garden, FL 34787 USA email: info@catrike.com phone number: (407) 905-0626 fax number: (407) 905-0820 www.catrike.com Page 1 Page 2 TM Introduction
Congratulations on your purchase of a JC Series Performer trike! The Performer JC Series is designed for everything from touring to commuting and
 Congratulations on your purchase of a JC Series Performer trike! The Performer JC Series is designed for everything from touring to commuting and shopping in the city. The JC Series frames are made of
Introduction. Page 3. We hope you enjoy owning and riding your Catrike! Happy Trails, Paulo Camasmie, CEO Big Cat HPV, LLC.
 TM 2 0 1 2 Page 1 Page 2 TM TM Introduction Thank you for purchasing a Catrike! You made a great decision by buying a fine quality product that performs well and will bring you fun and good times for years
comfort without compromising on performance and to fit your various needs on touring,
 Congratulations on your purchase of Goal-26X. Goal-26X is made to enhance comfort without compromising on performance and to fit your various needs on touring, shopping and communicating. Let s have fun
Introduction. Page 3. We hope you enjoy owning and riding your Catrike! Happy Trails, Paulo Camasmie, CEO Big Cat HPV, LLC.
 TM Page 1 Page 2 TM Introduction Thank you for purchasing a Catrike! You made a great decision by buying a fine quality product that performs well and will bring you fun and good times for years to come.
Parts List. 7. Handlebars 8. Grips 9. Handlebar Stem 10. Front Brake 11. Front Wheel 12. Crank 13. Chain
 Woodworm Cruise Parts List 1. Free Wheel with Rear Hub 2. Fenders 3. Fender Stay 4. Quick Release 5. Saddle 6. Seat Post 7. Handlebars 8. Grips 9. Handlebar Stem 10. Front Brake 11. Front Wheel 12. Crank
Owner s Manual ALL CATRIKE MODELS
 Owner s Manual ALL CATRIKE MODELS More resources available at Catrike.com Table of Contents I. Introduction... 3 II. Register your Catrike... 4 III. Serial numbers... 4 IV. Catrike Models... 5 V. Safety
Owner Manual 2004 / Road and Speed v.6, revised 03/17/06
 Owner Manual 2004 / Road and Speed v.6, revised 03/17/06 pg - 01 Contents 03 Introduction 04 Safety and riding tips 06 Maintenance tips 07 Assembly instructions 13 Specifications 14 Limited Warranty pg
Owner s Manual ALL CATRIKE MODELS. More resources available at Catrike.com
 Owner s Manual ALL CATRIKE MODELS More resources available at Catrike.com Table of Contents I. Introduction... 3 II. Register your Catrike... 4 III. Serial numbers... 4 IV. Catrike Models... 5 V. Safety
CRUZBIKE Quest 2.0 Assembly
 CRUZBIKE Quest 2.0 Assembly CRUZBIKE Quest 2.0 Assembly... 1 General notes on assembly... 2 Un box and evaluate the frame and major parts... 2 Unfold the rear swing arm and arrange the frame... 3 Rear
E-trike Li Assembly Guide
 PREPARATION 1. Read this assembly manual BEFORE commencing assembly. 2. Carefully remove all the components and packaged hardware from the shipping boxes. 3. Unpack the contents of the large double box
Final Assembly Instructions Bikes with Threaded Headsets
 Final Assembly Instructions Bikes with Threaded Headsets Thank you for buying your new bicycle from L.L.Bean. Read these instructions carefully before beginning the final assembly. Prior to shipping, our
HELMETS SAVE LIVES!!! ALWAYS WEAR A PROPERLY FITTED HELMET WHEN YOU RIDE YOUR SCOOTER. DO NOT RIDE AT NIGHT. AVOID RIDING IN WET CONDITIONS.
 HELMETS SAVE CORRECT FITTING - MAKE SURE YOUR HELMET COVERS YOUR FOREHEAD. LIVES!!! ALWAYS WEAR A PROPERLY FITTED HELMET WHEN YOU RIDE YOUR SCOOTER. DO NOT RIDE AT NIGHT. AVOID RIDING IN WET CONDITIONS.
Owner s Manual ALL CATRIKE MODELS. More resources available at Catrike.com
 Owner s Manual ALL CATRIKE MODELS More resources available at Catrike.com Table of Contents I. Introduction... 3 II. Register your Catrike... 4 III. Serial numbers... 4 IV. Catrike Models... 5 V. Safety
Final Assembly Instructions Bikes with Quill Stems
 Final Assembly Instructions Bikes with Quill Stems Thank you for buying your new bicycle from L.L.Bean. Read these instructions carefully before beginning the final assembly. Prior to shipping, our expert
TRAILMATE METEOR ASSEMBLY MANUAL
 TRAILMATE METEOR ASSEMBLY MANUAL (DISC BRAKE VERSION) The Trailmate Meteor recumbent has been designed for easy assembly. This means more time to enjoy the smooth ride with single speed, 3 speed coaster
Have questions? Chat with us live at raleighusa.com or call us at , 8am 5pm PST
 1 2 Have questions? Chat with us live at raleighusa.com or call us at 1-800-251-8435, 8am 5pm PST The bicycle you have purchased is a complex piece of equipment that must be properly assembled and maintained
Lectric Cycles Mid-Drive Electric Motor Installation
 Lectric Cycles Mid-Drive Electric Motor Installation This write-up describes the installation of a Lectric Cycles electric motor. The model is the e-rad Mid-Drive 750 Watt conversion kit, installed on
Final Assembly Instructions Bikes with Threaded Headsets
 Final Assembly Instructions Bikes with Threaded Headsets Thank you for buying your new bicycle from L.L.Bean. Read these instructions carefully before beginning the final assembly. Prior to shipping, our
Ladies Shopper Bike Assembly Manual 28C03
 Ladies Shopper Bike Assembly Manual 28C03 Ecosmo Ltd 1 Know your bike 1. Wheel 2. Rear Derailleur 3. Chain 4. Crank Set 5. Pedal 6. Seat Quick Lock 7. Saddle and Post 8. Frame 9. Front Light 10. Front
Have questions? Chat with us live at raleighusa.com or call us at , 8am 5pm PST
 1 2 Have questions? Chat with us live at raleighusa.com or call us at 1-800-251-8435, 8am 5pm PST The bicycle you have purchased is a complex piece of equipment that must be properly assembled and maintained
SANTA CRUZ BICYCLES Cable Routing Procedure MY17
 SANTA CRUZ BICYCLES Cable Routing Procedure MY17 Copyright Santa Cruz Bicycles 2017 TABLE OF CONTENTS SAFETY INSTRUCTIONS... 3 CABLE ROUTING... 3 INTRODUCTION...3 TOOLS AND SUPPLIES...3 REAR DERAILLEUR
Folding Dual Suspension MTB. Instruction Manual
 Folding Dual Suspension MTB Instruction Manual Introduction The Stowabike Folding MTB has been made to last and with proper maintenance, it will give you years of enjoyable rides and journeys. The following
Have questions? Chat with us live at raleighusa.com or call us at , 8am 5pm PST
 1 2 Have questions? Chat with us live at raleighusa.com or call us at 1-800-251-8435, 8am 5pm PST The bicycle you have purchased is a complex piece of equipment that must be properly assembled and maintained
Santa Fe Cycles Assembly Guide Introduction
 Santa Fe Cycles Assembly Guide Introduction Congratulations on your purchase of your new Santa Fe bicycle. You have purchased a bicycle that has many features and qualities. Please take a few minutes and
BICYCLE ASSEMBLY INSTRUCTIONS. dutchcycles.com.au. Distribution Centre
 BICYCLE ASSEMBLY INSTRUCTIONS dutchcycles.com.au Distribution Centre Shed 68, 400-422 Somerville Road, Tottenham, VIC 3012 email: service@dutchcycles.com.au BICYCLE COMPONENTS KEY INTRODUCTION CONGRATULATIONS
model - CYPRESS DX W
 Contents model - CYPRESS DX W Maintenenace manual Read and Save these instructions Welcome Contents 1 Preparing Nothing makes us happier than seeing people out riding bikes. For over thirty years Giant
Owner s Manual. The most comfortable upright bicycles ever made.
 Owner s Manual The most comfortable upright bicycles ever made. At Day 6, we hope you will enjoy riding our bicycles as much as we enjoy designing them. We have truly combined the best features of a recumbent
Owner's Manual Product Line
 Owner's Manual 2017 Product Line Table of contents 1. Safety Information 2. Quick release procedure I. Installation II. Adjustment and operation III. Inspection of proper installation 3. Registering your
DM-RD (English) Dealer s Manual. ROAD Rear Derailleur RD-9000 RD-6800 RD-5800 RD-4700
 Dealer s Manual. ROAD Rear Derailleur RD-9000 RD-6800 RD-5800 RD-4700") (English) DM-RD0003-09 ROAD Rear Derailleur Dealer s Manual RD-9000 RD-6800 RD-5800 RD-4700 CONTENTS IMPORTANT NOTICE...3 TO ENSURE SAFETY...4 LIST OF TOOLS TO BE USED...6 INSTALLATION...8 Chain length...
(English) DM-RD0003-09 ROAD Rear Derailleur Dealer s Manual RD-9000 RD-6800 RD-5800 RD-4700 CONTENTS IMPORTANT NOTICE...3 TO ENSURE SAFETY...4 LIST OF TOOLS TO BE USED...6 INSTALLATION...8 Chain length...
Mini Glider Manual. Your Glider comes partially assembled. The front wheel and the handlebars require assembly.
 Mini Glider Manual Congratulations on your purchase of the Mini Glider! Your glider is designed for years of nearly carefree use by your child. These instructions include how to set up your glider and
Bicycle Owner's Manual Easy Access Bike
 Bicycle Owner's Manual Easy Access Bike AGE: FROM 9 YEARS OLD AND UP IMPORTANT Check bike after assembly or any adjustments. Consult bicycle retailer with questions. Always wear a helmet. Children should
ASSEMBLY GUIDE AROUND THE BLOCK - 1, 3, 7, & 21 SPEED SIXTHREEZERO
 ASSEMBLY GUIDE AROUND THE BLOCK - 1, 3, 7, & 21 SPEED SIXTHREEZERO OUR COMMITMENT We want you to love your bike as much as we do. If you run into any issues, no matter how small, let us know and we ll
Thank you for purchasing a WIKE BOX BIKE!
 Thank you for purchasing a WIKE BOX BIKE! Contents Safety.....3 Front wheel.4 Kickstand..5 Handle Bar & Box 6 Seat post and Saddle 7 Final pre-ride check 8 Tools needed to assemble Bike: -High table or
EZee Glider Manual. Tools needed for Assembly: Wrench (included) Philips Screwdriver (not included) Assembly Instructions
 Philips Screwdriver (not included) Assembly Instructions") EZee Glider Manual Congratulations on your purchase of the EZee Glider! Your glider is designed for years of nearly carefree use by your child. These instructions include how to set up your glider and
EZee Glider Manual Congratulations on your purchase of the EZee Glider! Your glider is designed for years of nearly carefree use by your child. These instructions include how to set up your glider and
Special instruction of installation for SAINT FH-M800/RD-M800 and FH-M805/RD-M805
 Technical Service Instructions SI-5VB0E t RD-M805 / RD-M800 Rear derailleur Special instruction of installation for SAINT FH-M800/RD-M800 and FH-M805/RD-M805 A hub axle is an essential component for the
EZ-3 USX HD Supplemental Owner s Manual
 EZ-3 USX HD Supplemental Owner s Manual Find us online at SunSeeker.Bike Revised 2/2016 CONGRATULATIONS! Congratulations and welcome to the Sun Seeker family! You have selected one of the most comfortable
INTRODUCTION CONTENTS
 INTRODUCTION This manual contains information on how to properly adjust and operate your Lightning bicycle for maximum comfort, safety, and performance. The recumbent position and seat require alternate
KMX Kompact Sports Trike
 KMX Kompact Sports Trike Assembly Instructions 1.0 Introduction Thank you for choosing KMX! When properly assembled and set up your KMX will provide many years of enjoyment. KMX Karts Ltd does its utmost
HOME ASSEMBLY INSTRUCTIONS
 HOME ASSEMBLY INSTRUCTIONS This Papillionaire Bicycle now belongs to you. It will take you to work, wait patiently outside your local cafe, and carry your groceries home. This is the start of your long-term
DM-MARD (English) Dealer's Manual. ROAD MTB Trekking. City Touring/ Comfort Bike REAR DERAILLEUR XTR RD-M9100 RD-M9120
 Dealer's Manual. ROAD MTB Trekking. City Touring/ Comfort Bike REAR DERAILLEUR XTR RD-M9100 RD-M9120") (English) DM-MARD001-00 Dealer's Manual ROAD MTB Trekking City Touring/ Comfort Bike URBAN SPORT E-BIKE REAR DERAILLEUR XTR RD-M9100 RD-M9120 CONTENTS CONTENTS...2 IMPORTANT NOTICE...3 TO ENSURE SAFETY...4
(English) DM-MARD001-00 Dealer's Manual ROAD MTB Trekking City Touring/ Comfort Bike URBAN SPORT E-BIKE REAR DERAILLEUR XTR RD-M9100 RD-M9120 CONTENTS CONTENTS...2 IMPORTANT NOTICE...3 TO ENSURE SAFETY...4
Assembly Tools. Assembly will take 1-2 hours
 Assembly Tools Included in your parts box: Pedals Quick release skewer Reflectors (if not already installed) Toolkit (4+5mm combo Allen wrench, 13+15mm combo open-end wrench) Helpful Tools: Scissors (for
TABLE OF CONTENTS INTRODUCTION
 R3 DISC MANUAL TABLE OF CONTENTS Introduction... 1 Frame Features... 2 Fork Preparation... 3 Small Parts... 5 Frame Preparation... 6 Brake Housing Installation... 7 Mechanical Cable Routing... 9 Electric
Using Your Bike Friday : Folding Rear Rack
 Using Your Bike Friday : Folding Rear Rack Green Gear Cycling, Inc. 3364 W. 11th Ave. Eugene, OR 97402 800-777-0258 USA & Canada +1-541-687-0487 Int l +1-541-687-0403 Fax www.bikefriday.com info@bikefriday.com
Assembly Tools. Assembly will take about an hour
 Assembly Guide Assembly Tools Included in your parts box: Pedals Toolkit (4+5mm combo Allen wrench, 13+15mm combo open-end wrench) Touch-up paint Spare fuses (for battery) Assembly will take about an hour
BIKE TO GO - USER MANUAL - MODEL#: JBTG24
 BIKE TO GO 24 - USER MANUAL - MODEL#: JBTG24 GET ACQUAINTED WITH YOUR 24 BIKE TO GO Congratulations on your new Jetson 24 folding bicycle! The Jetson 24 Bike to Go is an innovative and fun personal transportation
Final Assembly Instructions Bikes with 16 Wheel Size
 Final Assembly Instructions Bikes with 16 Wheel Size Thank you for buying your new bicycle from L.L.Bean. Read these instructions carefully before beginning the final assembly. Prior to shipping, our expert
We strongly recommend watching our video tutorial for the easiest installation process.
 Introduction We strongly recommend watching our video tutorial for the easiest installation process. GTRO is dedicated for all non-sports bicycles. Please, remember it has not been tested for heavy-duty
Inspecting before riding
 Inspecting before riding ) Squeeze both brake levers firmly. Do they move smoothly, yet their movement stops before they touch the handlebar grip? Do both wheels spin without wobbling or binding? Gently
UNPACKING AND ASSEMBLING YOUR DIAMONDBACK ROAD BIKE
 EMAIL SIGNUP BIKE REG SEARCH BIKES THE RIDE HEALTH FITNESS SKILLS SHOP MAINTENANCE CYCLING 101 RIDERS LIKE YOU TEAMS SUPPORT UNPACKING AND ASSEMBLING YOUR DIAMONDBACK ROAD BIKE 1. Begin by carefully cutting
DM-RARD (English) Dealer's Manual. ROAD MTB Trekking. City Touring/ Comfort Bike. Rear Derailleur DURA-ACE RD-R9100 ULTEGRA RD-R8000
 Dealer's Manual. ROAD MTB Trekking. City Touring/ Comfort Bike. Rear Derailleur DURA-ACE RD-R9100 ULTEGRA RD-R8000") (English) DM-RARD001-03 Dealer's Manual ROAD MTB Trekking City Touring/ Comfort Bike URBAN SPORT E-BIKE Rear Derailleur DURA-ACE RD-R9100 ULTEGRA RD-R8000 CONTENTS IMPORTANT NOTICE... 3 TO ENSURE SAFETY...
(English) DM-RARD001-03 Dealer's Manual ROAD MTB Trekking City Touring/ Comfort Bike URBAN SPORT E-BIKE Rear Derailleur DURA-ACE RD-R9100 ULTEGRA RD-R8000 CONTENTS IMPORTANT NOTICE... 3 TO ENSURE SAFETY...
welcome to the family contents
 manual 2 trike anatomy welcome to the family Congratulations on your purchase of a Greenspeed Anura trike. We believe that you have purchased the finest recumbent tricycle available in the world today.
9-speed super narrow. chain such as. CN-7701 / CN-HG93 8- / 7- / 6-speed narrow. chain such as CN-HG50 / CN-IG51
 - Technical Service Instructions SI-5VH0B t RD-M600 Rear derailleur General Safety Information WARNING The ST-M600 DUAL CONTROL lever is used for both gear shifting and braking operations. Make sure that
DISASSEMBLING & REASSEMBLING CARTRIDGE INSTALLING SEATPOST ON BIKE
 INTRODUCTION BILL OF MATERIALS SPECIFICATIONS & TOOLS PROCEDURES DISASSEMBLING & REASSEMBLING CARTRIDGE INSTALLING SEATPOST ON BIKE OPERATION OF SEATPOST GIANT LIMITED WARRANTY 1 INTRODUCTION Congratulations
BackCountry ebikes 2019 MULE Assembly
 BackCountry ebikes 2019 MULE Assembly Required Tools: Cutting Pliers (to cut box poly strapping and heavy bike banding) Scissors (to remove bubble wrap) Allen wrenches (3mm, 4mm, 5mm, 6mm) Wrenches (10mm,
2,500/4,000 LB Easy Riser Vertical Cable Feighner Lift
 2,500/4,000 LB Easy Riser Vertical Cable Feighner Lift CAUTION - PUT SAFETY FIRST 1. Before attempting to install or operate this lift, study and fully understand the proper operating procedures and safety
Instructions for Assembly and Operation
 Instructions for Assembly and Operation Congratulations on the purchase of your new bike! With proper assembly and maintenance it will offer you years of enjoyable riding! IMPORTANT: Carefully read and
8MAY15 US RACK, Inc Falcon Drive, Madera, CA
 8MAY15 US RACK, Inc. - 2850 Falcon Drive, Madera, CA 93637-559-661-3050 INSTRUCTIONS for Bedrail-mounted MOTORCYCLE RACK, Model 2001-4TRA WARNING: Do NOT attempt to install or use this rack without following
Quattrocycle BV. Quattrocycle. User Manual. Last update February Quattrocycle BV Bremkant EJ Middelbeers. User Manual Quattrocycle 1
 Quattrocycle User Manual Last update February 2010 Quattrocycle BV Bremkant 6 5091 EJ Middelbeers User Manual Quattrocycle 1 Table of Contents Page Chapter 1: Introduction 3 Chapter 2: Instructions for
DM-RCWH (English) Dealer's Manual. ROAD MTB Trekking. City Touring/ Comfort Bike. Wheel Set. WH-RX31 SM-AX x12 SM-AX x12
 Dealer's Manual. ROAD MTB Trekking. City Touring/ Comfort Bike. Wheel Set. WH-RX31 SM-AX x12 SM-AX x12") (English) DM-RCWH001-00 Dealer's Manual ROAD MTB Trekking City Touring/ Comfort Bike URBAN SPORT E-BIKE Wheel Set WH-RX31 SM-AX720-100x12 SM-AX720-142x12 CONTENTS IMPORTANT NOTICE... 3 TO ENSURE SAFETY...
(English) DM-RCWH001-00 Dealer's Manual ROAD MTB Trekking City Touring/ Comfort Bike URBAN SPORT E-BIKE Wheel Set WH-RX31 SM-AX720-100x12 SM-AX720-142x12 CONTENTS IMPORTANT NOTICE... 3 TO ENSURE SAFETY...
TABLE OF CONTENTS FRAME FEATURES INTRODUCTION
 S3 DISC MANUAL TABLE OF CONTENTS Introduction...1 Frame Features...2 Fork Preparation...3 Small Parts...5 Frame Preparation...6 Brake Housing Installation...7 Mechanical Cable Routing...9 Electric Cable
RADROVER REAR RACK INSTALLATION MANUAL
 RADROVER REAR RACK INSTALLATION MANUAL WWW.RADPOWERBIKES.COM We are here to help! Please contact us at SUPPORT@RADPOWERBIKES.COM or 1-800-939-0310 if you have questions. REV022216 Welcome Thanks you for
INTRODUCTION BILL OF MATERIALS SPECIFICATIONS & TOOLS PROCEDURES OPERATION OF SEATPOST GIANT LIMITED WARRANTY
 INTRODUCTION BILL OF MATERIALS SPECIFICATIONS & TOOLS PROCEDURES OPERATION OF SEATPOST GIANT LIMITED WARRANTY 1 INTRODUCTION Congratulations on the purchase of your new GIANT CONTACT SWITCH seatpost. This
Performance & Sports Trike
 Performance & Sports Trike THE KMX KOLT THE KMX KOBRA THE KMX KOYOTE Assembly Instructions 1.0 Introduction Thank you for choosing KMX! When properly assembled and set up your KMX will provide many years
1. General Safety Information. Silvio V2.2 Assembly Instructions Assembly. Adjust to the rider.
 Silvio V. Assembly Instructions support@cruzbike.com. General Safety Information WARNING to avoid serious injuries:. If you are unsure about fitting, testing and adjusting brakes or gearing on a bicycle,
Owner s Manual for Multi Speed & Freewheel Bicycles This Owner's Manual contains assembly, operation, and maintenance instructions.
 Your Model Number is: (write your model number here) Owner s Manual for Multi Speed & Freewheel Bicycles This Owner's Manual contains assembly, operation, and maintenance instructions. WARNING: - Check
Trike-Bike Assembly Manual
 Be sure to check our website for more instruction details, videos and photographs as well as a complete listing of each Nut and Bolt for the Trike Bike. www.trike-bike.com.au Go to the page marked ASSEMBLY
Helios Separable Tandem Manual
 Helios Separable Tandem Manual This manual accompanies the Helios owners manual Introduction The separable kit fitted to your Helios tandem allows for even greater flexibility in the way you can enjoy
Owner s Manual for Coaster Brake Bicycles This Owner's Manual contains assembly, operation, and maintenance instructions.
 Your Model Number is: (write your model number here) Owner s Manual for Coaster Brake Bicycles This Owner's Manual contains assembly, operation, and maintenance instructions. WARNING: - Check operation
Assembly Instructions And User Guide
 EZ-1/EZ-CLASSIC QUADRIBENT By Blackbird Designs Inc. Mark 5.2 June 2011 Assembly Instructions And User Guide 1 The Quadribent is 2-seat, side-by-side, human powered vehicle that enables almost anyone to
Shoreline Cantilever Lift 2500lb Capacity Models: (108" inside width) - Part # (120" inside width) - Part #
 - Part # (120 inside width) - Part #") Shoreline Cantilever Lift 2500lb Capacity Models: 25108 (108" inside width) - Part # 1017402 25120 (120" inside width) - Part # 1017403 1. 2. 3. 4. 5. CAUTION - PUT SAFETY FIRST Before attempting to install
Shoreline Cantilever Lift 2500lb Capacity Models: 25108 (108" inside width) - Part # 1017402 25120 (120" inside width) - Part # 1017403 1. 2. 3. 4. 5. CAUTION - PUT SAFETY FIRST Before attempting to install
2019 MADONE ASSEMBLY MANUAL
 2019 MADONE ASSEMBLY MANUAL 2019 MADONE Rim brakes and Di2 drivetrain Rim brakes and mechanical drivetrain Disc brakes and Di2 drivetrain Disc brakes and mechanical drivetrain TABLE OF CONTENTS Common
SANTANA STOWAWAY TANDEM WITH AIRLINER SAFECASE AND FTS FOAM TRAY SYSTEM ASSEMBLY AND DISASSEMBLY
 SANTANA STOWAWAY TANDEM WITH AIRLINER SAFECASE AND FTS FOAM TRAY SYSTEM ASSEMBLY AND DISASSEMBLY Congratulations! You are now the proud owner of the world s most travel-ready, performance tandem. The following
NEVADA BICYCLING GUIDE
 NEVADA BICYCLING GUIDE BE BICYCLE SAFE EVERY TIME YOU RIDE LET S ALL BE SAFE TOGETHER. In Case of Emergency Contact: Name: Phone: Relationship: REMEMBER TO ALWAYS, BE SAFE AND BE SEEN! Before you head
SANTA CRUZ BICYCLES Geometry Adjust Flip Chip
 SANTA CRUZ BICYCLES Geometry Adjust Flip Chip Copyright Santa Cruz Bicycles 2017 TABLE OF CONTENTS SAFETY INSTRUCTIONS... 3 GEOMETRY ADJUST FLIP CHIP... 3 INTRODUCTION...3 TOOLS AND SUPPLIES...3 MY18 NOMAD
2018 ACCESSORY ATTACHMENTS OWNER S MANUAL
 2018 ACCESSORY ATTACHMENTS OWNER S MANUAL WWW.RADPOWERBIKES.COM We are here to help! Please contact us at SUPPORT@RADPOWERBIKES.COM or 1-800-939-0310 if you have questions. REV031418 Welcome Thanks you
T R A F F I C S K IL L S 101
 page 1/5 GENERAL INSTRUCTIONS Mark your answers on the answer sheet provided. DO NOT make any marks on the test. Please read the following definitions and assumptions carefully before answering the test
MAGNETIC INDOOR CYCLING BIKE
 MAGNETIC INDOOR CYCLING BIKE SF-B1805 USER MANUAL IMPORTANT! Please retain owner s manual for maintenance and adjustment instructions. Your satisfaction is very important to us, PLEASE DO NOT RETURN UNTIL
ASSEMBLY GUIDE: Izip & Ezip Electric Bicycles with Rack-Top Mounted Batteries ( RTMB Bicycles )
") ASSEMBLY GUIDE: Izip & Ezip Electric Bicycles with Rack-Top Mounted Batteries ( RTMB Bicycles ) Please Refer to your Owner s Manual for Detailed Setup Instructions Technical & Customer Service: 1-800-377-4532
ASSEMBLY GUIDE: Izip & Ezip Electric Bicycles with Rack-Top Mounted Batteries ( RTMB Bicycles ) Please Refer to your Owner s Manual for Detailed Setup Instructions Technical & Customer Service: 1-800-377-4532
BikeEd Need to Know: Teenager / Adult
 BikeEd Need to Know: Teenager / Adult Always Practice bike handling skills to better control your bike Wear a helmet, fitted correctly Perform ABC Quick Check on your bike before each ride Ride on the
Co-Motion Co-Pilot Bicycles for travel
 Revised October 2014 Co-Motion Co-Pilot Bicycles for travel Packing and travel instructions Eugene Oregon USA Toll free 1-866-282-6336 www.co-motion.com Congratulations! A Co-Motion Co-Pilot is a great
EXTERNALLY ROUTED DROPPER POST owner S MANUAL
 EXTERNALLY ROUTED DROPPER POST owner S MANUAL Introduction: This adjustable height seat post with internal cable routing allows for micro-adjustments using a remote handlebar mounted lever. The cable actuated
Nexus. Dealer's Manual. ROAD MTB Trekking. City Touring/ Comfort Bike SG-3R40 SG-3R45 SG-3R75 SG-3R75-A SG-3R75-B SG-3D55 SG-3C41
 (English) DM-SG0005-01 Dealer's Manual ROAD MTB Trekking City Touring/ Comfort Bike URBAN SPORT E-BIKE Nexus SG-3R40 SG-3R45 SG-3R75 SG-3R75-A SG-3R75-B SG-3D55 SG-3C41 SL-3S35-E SL-3S41-E SL-3S42-E SM-BC03
FRAME FEATURES TABLE OF CONTENTS INTRODUCTION
 R3 MANUAL TABLE OF CONTENTS Introduction...1 Frame Features...2 Fork Preparation...3 Small Parts...5 Frame Preparation...6 Mechanical Cable Routing...7 Electric Cable Routing...9 Seatpost Assembly & Installation...11
MANUAL LEKKER BIKES 2016
 MANUAL LEKKER BIKES 2016 CONTACT For your own safety, never do work on your bicycle unless you feel absolutely sure about it. If you are in doubt or if you have any questions please contact our helpdesk:
Shifting Lever. Dealer's Manual. RAPIDFIRE Plus SL-M2000 SL-M3010 SL-M4010. Thumb Shifter SL-TZ500. ROAD MTB Trekking. City Touring/ Comfort Bike
 (English) DM-MDSL001-01 Dealer's Manual ROAD MTB Trekking City Touring/ Comfort Bike URBAN SPORT E-BIKE Shifting Lever RAPIDFIRE Plus SL-M2000 SL-M3010 SL-M4010 Thumb Shifter SL-TZ500 CONTENTS IMPORTANT
Front derailleur. Dealer's Manual SORA FD-R3000 FD-R3030 CLARIS FD-R2000 FD-R2030. ROAD MTB Trekking. City Touring/ Comfort Bike DM-RBFD001-01
 (English) DM-RBFD001-01 Dealer's Manual ROAD MTB Trekking City Touring/ Comfort Bike URBAN SPORT E-BIKE Front derailleur SORA FD-R3000 FD-R3030 CLARIS FD-R2000 FD-R2030 CONTENTS IMPORTANT NOTICE... 3 TO
DM-MBRD (English) Dealer's Manual. ROAD MTB Trekking. City Touring/ Comfort Bike. Rear Derailleur SLX RD-M7000 DEORE RD-M6000
 Dealer's Manual. ROAD MTB Trekking. City Touring/ Comfort Bike. Rear Derailleur SLX RD-M7000 DEORE RD-M6000") (English) DM-MBRD001-04 Dealer's Manual ROAD MTB Trekking City Touring/ Comfort Bike URBAN SPORT E-BIKE Rear Derailleur SLX RD-M7000 DEORE RD-M6000 CONTENTS IMPORTANT NOTICE... 3 TO ENSURE SAFETY... 4
(English) DM-MBRD001-04 Dealer's Manual ROAD MTB Trekking City Touring/ Comfort Bike URBAN SPORT E-BIKE Rear Derailleur SLX RD-M7000 DEORE RD-M6000 CONTENTS IMPORTANT NOTICE... 3 TO ENSURE SAFETY... 4
2012 K9100 COMPACT Worldwide Cycling Solutions Through Creative Innovations.
 Home Instruction Sheet Step-1Please check for any missing parts. Model K9100 COMPACT (Basic AirCaddy) aircaddy web page 20 04/03/12 98% (1) T3230-00 METAL WHEEL TRUCK Model K8350 (Aircraft Kit) (Optional)
Front derailleur. Dealer's Manual DURA-ACE FD-R9100 ULTEGRA FD-R FD ROAD MTB Trekking. City Touring/ Comfort Bike DM-RAFD001-03
 (English) DM-RAFD001-03 Dealer's Manual ROAD MTB Trekking City Touring/ Comfort Bike URBAN SPORT E-BIKE Front derailleur DURA-ACE FD-R9100 ULTEGRA FD-R8000 105 FD-5801 Procedures for cable tension adjustment
Item N o.: Item N am e:40cm Boys Rival Bike
 Item N o.:42272892 Item N am e:40cm Boys Rival Bike 9 bell 8 grip 30 crash pad 10 brake lever 26 wheel reflector 22 saddle 23 seat post 25 rear reflector 24 quick release 6 handle bar 7 stem 2 top tube
7130 Lancer Rear Drive Magnetic Commercial Indoor Cycling Bike
 7130 Lancer Rear Drive Magnetic Commercial Indoor Cycling Bike Owner s Manual Made in Taiwan INDEX IMPORTANT SAFETY INFORMATION... 1 EXPLODED DRAWING... 2 PARTS LIST... 3 ASSEMBLY INSTRUCTION... 4-9 USER
ALTERNATOR RACKS 135, 170 & 190 INSTRUCTIONS
 Figure A Item # Description Quantity 1 Alternator Rack 1 1 3 4 11 5 10 8 2 Lower Mount Kit (see detail) 2 3 16mm M5 Swivel-Mount Bolt 2 4 M7 Washer 2 5 M6 Lock Nut 2 6 Lock Washer 2 7 Swivel Mount 2 8
HUB SET (DISC BRAKE)
") (English) DM-MAHB001-00 Dealer's Manual ROAD MTB Trekking City Touring/ Comfort Bike URBAN SPORT E-BIKE HUB SET (DISC BRAKE) XTR HB-M9110 FH-M9110 FH-M9125 HB-MT900 FH-MT900 E-THRU Axle 12 mm SM-AX75 SM-AX76
(English) DM-MAHB001-00 Dealer's Manual ROAD MTB Trekking City Touring/ Comfort Bike URBAN SPORT E-BIKE HUB SET (DISC BRAKE) XTR HB-M9110 FH-M9110 FH-M9125 HB-MT900 FH-MT900 E-THRU Axle 12 mm SM-AX75 SM-AX76
600 / 600FC OWNER'S MANUAL
 PROGRESSION 600 / 600FC OWNER'S MANUAL Issue 2 / Version E - Dec. 10, 1997 Copyright 1997 GAMMA Sports - All Rights Reserved PROGRESSION 600 / 600FC OWNER'S MANUAL TABLE OF CONTENTS PAGE 1... WARRANTY
Rear Drive System SERVICE INSTRUCTION. Specifications SI-R670B
 - SERVICE INSTRUCTION SI-R670B t Rear Drive System Before use, read these instructions carefully, and follow them for correct use. In order to realize the best performance, we recommend that the following
BELT DRIVE INDOOR CYCLING BIKE SF-B1712 USER MANUAL
 BELT DRIVE INDOOR CYCLING BIKE SF-B1712 USER MANUAL IMPORTANT! Please retain owner s manual for maintenance and adjustment instructions. Your satisfaction is very important to us, PLEASE DO NOT RETURN
DM-RBRD (English) Dealer's Manual. ROAD MTB Trekking. City Touring/ Comfort Bike. Rear Derailleur
 Dealer's Manual. ROAD MTB Trekking. City Touring/ Comfort Bike. Rear Derailleur") (English) DM-RBRD001-00 Dealer's Manual ROAD MTB Trekking City Touring/ Comfort Bike URBAN SPORT E-BIKE Rear Derailleur CLARIS RD-R2000 CONTENTS IMPORTANT NOTICE... 3 TO ENSURE SAFETY... 4 LIST OF TOOLS
(English) DM-RBRD001-00 Dealer's Manual ROAD MTB Trekking City Touring/ Comfort Bike URBAN SPORT E-BIKE Rear Derailleur CLARIS RD-R2000 CONTENTS IMPORTANT NOTICE... 3 TO ENSURE SAFETY... 4 LIST OF TOOLS
FACTORBIKES.COM. Assembly Manual DISC V1.05
 FACTORBIKES.COM V1.05 Introduction I Limited Lifetime Warranty On Bicycles And Framesets I Necessary Tools 01 Instructions 01 1 Seatpost 01 2 Cut the cable housing to the correct length 03 3 Di2 Cable
VERSA BIKE RACK INSTRUCTIONS
 VERSA BIKE RACK INSTRUCTIONS Models #8, 8 Important This rack is designed for use with a or. receiver hitch. The rack is designed to hold a maximum of two bicycles. Do not use it for anything other than