KAYAK ERGOMETER. Operating Instructions (Rev 3.0)
|
|
|
- Holly Preston
- 5 years ago
- Views:
Transcription
1 KAYAK ERGOMETER Operating Instructions (Rev 3.0) Weba Sport und Med.- Artikel GmbH Liesneckgasse 6/ Vienna Austria Tel.: Fax: office@webasport.at
2 Contents Introduction... 6 Step I - Unboxing... 8 STEP II Removing parts... 9 STEP III Removing PVC bands STEP IV Opening KAYAK STEP V Opening the toolbox STEP VI Removing screws STEP VII Connecting parts STEP VIII Connecting parts STEP IX Releasing inner parts STEP X Managing inner parts STEP XI Release rubber bands STEP XII - Seat STEP XIII Feet holder STEP XVI Paddle knots STEP XVII Paddle assembling Adjustment of resistance Download android application WebaSportHub
3 Assembly Instructions Before assembling, or using the Kayak ergometer, please read the following instructions carefully. Manual contains important information for usage and maintenance of the equipment, as well as for your personal safety. Keep these instructions in a safe place for maintenance purposes or for ordering spare parts. For your safety Kayak ergometer should be used only for intended purpose, i.e. for physical exercise. Any other use of the equipment is prohibited and may be dangerous. The manufacturer cannot be held liable for damage or injury caused by improper use of the equipment. Kayak ergometer has been designed in accordance to the latest standards of safety. Any features which may have been a possible cause of injury have been avoided or made as safe as possible. Incorrect repairs and structural modifications (e.g. removal or replacement of original parts) may endanger the safety of the user. Damaged components may endanger your safety or reduce the lifetime of the equipment. For this reason, worn or damaged parts should be replaced immediately and the equipment taken out of use until this has been done. In case of enquiry for spare parts, please contact Weba-Sport. If the equipment is in regular use, check all its components thoroughly every 1-2 months. Pay particular attention to the tightness of bolts and nuts. Instruct persons using the equipment (in particular children) on possible sources of danger during exercising. Before beginning your program of exercise, consult your doctor to ensure that you are fit enough to use the equipment. Base your program of exercise on the advice given by your doctor. Incorrect or excessive exercise may damage your health. Our products are subject to a constant innovative quality assurance. We reserve the right to perform technical modifications. 3
4 Handling the equipment It is not recommended to use or store the apparatus in a damp room as this may cause it to rust. Please ensure that no part of the machine comes in contact with liquids (drinks, perspiration, etc.) This may cause corrosion. The Kayak Ergometer is designed for use by adults and children should not be allowed to play with it. Children at play behave unpredictably and dangerous situations may occur for which the manufacturer cannot be held liable. If, in spite of this, children are allowed to use the equipment, ensure that they are instructed in its proper use and supervised accordingly. The Ergometer complies fully with DIN EN 957 1/5, class SA. It is therefore suitable for therapeutic purposes. Please ensure that liquids or perspiration never enter the machine or the electronics. Do not use corrosive or abrasive materials to clean the equipment. Ensure that such materials are not allowed to pollute the environment. The equipment does not require any special maintenance. All bearings are lubricated (further lubrication is not required). Before use, always check all screws and plug-in connections, as well as if respective safety devices fit correctly. 4
5 Instructions for assembly Ensure that you have received all parts required and that they are not damaged. If you have any cause for complaining, please contact Weba Sport. Before assembling the equipment, study drawings carefully and carry out operations in the order shown by the diagrams. The correct sequence is given in capital letters. The equipment must be assembled with due care by an adult person. If in doubt, call someone (technically talented, if possible) to help you. Please note that there is always a danger of injury when working with tills or doing manual work. Therefore please be careful when assembling this machine. Ensure that your working area is free of possible sources of danger, for example don t leave any tools lying around. Always dispose packaging material in such a way that it may not cause any danger. There is always a risk of suffocation of children play with plastic bags. Bolt all the parts together loosely at first, and check if they have been assembled correctly. Tighten the locknuts by hand until resistance is felt, then use spanner to finally tighten nuts completely against resistance (locking device). Then check that all screw connections have been tightened firmly. Please keep original packaging. It may be used for transport, if necessary. For technical reasons, we reserve the right to carry out preliminary assembly work. 5


6 Introduction Company Weba Sport has developed excellent product, which gives recreational and top-athletes great opportunity to simulate the motion stereotype of paddle sport for testing and training. The complexity of the smooth and gentle motions increases the muscles strength and flexibility of the upper body. This product offers the optimal cardio-vascular training. Unlimited range of resistance is given through air displacement turbine, which simulates water fluid dynamics. This break system allows everyone to use Kayak ERGOMETER regardless of their age or fitness-level. The load is regulated by the pulling effort. There is additional mechanism for regulation of the fly wheel drag. The working position is adjustable for all body heights. The Kayak ERGOMETER is quality engineered by using heavy-duty components. This ergometer could be disassembled in two parts for convenient transportation or storage. Kayak ERGOMETER 6
7 Package Includes KayakErgometer, Science model with app WEBASportHub Operating instructions Requirements KayakErgometer, Science modell Android 5 or bigger unit BLE (bluetooth 4 vers.) 7
8 Step I - Unboxing Take your KAYAK ergometer out of the box and place it on a flat, clean surface. Carefully remove plastic wrapping from the product. Read the warning on top of the ergometer. Unboxing your KAYAK your product out of the box. Place it on clean flat surface and gently remove wrapping. Read the warning 8
9 STEP II Removing parts Remove all the parts from inside the KAYAK ergometer, one by one. 9
10 STEP III Removing PVC bands Cut the PVC bands with the appropriate tool, on the upper side and on the lower side of the Kayak ergometer. There are 4 PVC bands in total that must be cut. The last PVC band is at the bottom and you should hold KAYAK Ergometer to avoid sliding of parts. 10
11 STEP IV Opening KAYAK Carefully hold one side of the Kayak ergometer and pull it in vertical position. Then pull the bottom part of Kayak ergometer and put it in upward position. 11
12 STEP V Opening the toolbox Remove red ribbon that covers screws from both side of the KAYAK ergometer. Open the white box that contains tools and get the blue Allan bolt key. 12
13 STEP VI Removing screws Remove all four screws from all sides of your ergometer. Release the screw from the front side of the KAYAK so that the tube is free for mounting the top part of your ergometer. 13
14 STEP VII Connecting parts Take back part of the ergometer and put it in the front part hole, as shown on picture. 14
15 STEP VIII Connecting parts Set screw on the back of the ergometer in position by using Allan bolt key. Next thing you need to do is to tighten leveling Allan bolts by using Allan key. 15
16 STEP IX Releasing inner parts Release rubber band strains and Allan bolts from the top of your ergometer. Also, you need to remove safety strain from the bottom. 16
17 STEP X Managing inner parts Set this part of your KAYAK Ergometer by using two bolts and Allan key. It should look exactly like the one on the last picture. 17
18 STEP XI Release rubber bands Release rubber band strains, in the middle and at the bottom of the ergometer. BOTTOM ONES MUST BE RELEASED LAST! 18
19 STEP XII - Seat Pull the Kayak Ergometer bench down. Assemble the seat in its place by using PIN. Use safety-β key to secure the seat height. WARNING: NOT INSERTING SAFETY-β KEY CAN CAUSE SERIOUS INJURY! Putting the PIN through a hole on the seat base and hole in seat pole will put the seat in fixed position. Putting the PIN through a hole on the seat pole and trench on a seat base will put seat in twisting position. Seat can now rotate around the seat base. 19
20 20
21 STEP XIII Feet holder Assembly the feet holder by inserting feet holders pins in hole on kayak bench. Using front and back lever tightens the feet holder firmly in wanted position. 21
22 STEP XVI Paddle knots Paddle needs to be tied to a rope at 60cm marker (red rubber mark on the rope). 22
23 STEP XVII Paddle assembling Inserting paddle parts one to another, with simple click, adjusts the length that suit your type of exercise. The long paddle (app 1650mm), middle paddle (app 1575mm), and short paddle (app 1500mm). Congrats! You have successfully assembled your KAYAK Ergometer! 23
24 Adjustment of resistance The unlimited range of resistance is given through air displacement turbine which simulates water fluid dynamics. This air-braking system allows usage of the Kayak ERGOMETER regardless of the age or fitness-level. The load is regulated by the pulling effort. There is additional mechanism for regulation of the fly while drag. The lever regulates the air flow entering the flywheel. By increasing the aperture the air flow, the resistance will be increased. For most exercise and training situations a person will only need to apply the air-braking system. Use the lever on right side of Kayak Ergometer to adjust the air displacement turbine resistance. You can also adjust the resistance by tightening or loosening the elastic cord (tie a knot on desired tension). The combination of an air-braking system and tightening or loosening the elastic cord means that The Kayak ERGOMETER can be used for high cadence with low power at one extreme, and low cadence with high power at the other. 24


25 You can see new style of rope tying. 25


26 Attaching the mobile phone holder Attach metal blade on the phone rear side and put to in the phone cover. 26


27 Download Android application WebaSportHub on GooglePlayStore Start application WebaSportHub, click on SETTINGS in DEVICE field, choose KAYAK, and device will begin with BLUE TOOTH scanning. 27

 28 www.")
28 Check sensor battery level. Start Set Zero (ropes should be placed in start position) 28


29 When you click PROPERTIES you can see measured values. When ropes are placed in the start position, both Distance parameters should be ZERO and Force parameters about 45. These values have been constantly changing during paddling, which can test sensor accuracy. Paddling Workouts recordings 29


30 When you click STOP button you have an opportunity to record or erase workout. 30

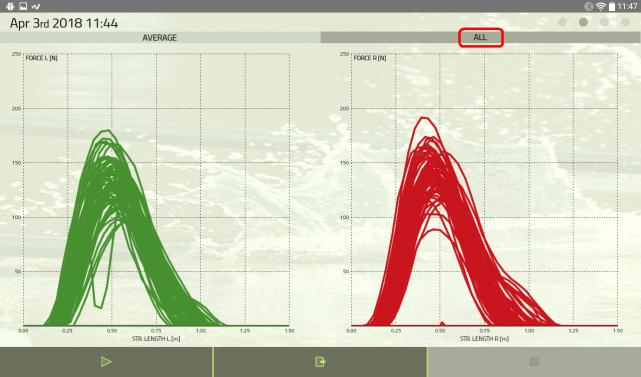

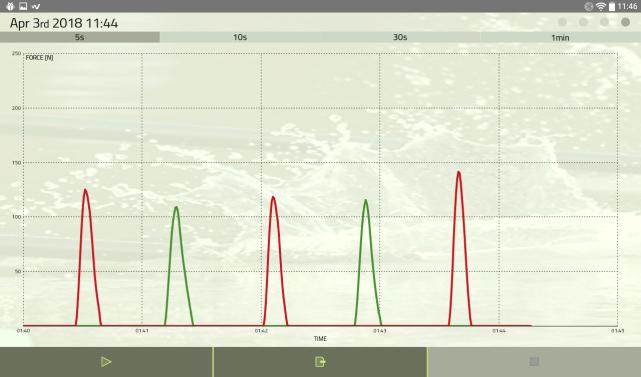

31 Workout review 31
7130 Lancer Rear Drive Magnetic Commercial Indoor Cycling Bike
 7130 Lancer Rear Drive Magnetic Commercial Indoor Cycling Bike Owner s Manual Made in Taiwan INDEX IMPORTANT SAFETY INFORMATION... 1 EXPLODED DRAWING... 2 PARTS LIST... 3 ASSEMBLY INSTRUCTION... 4-9 USER
BELT DRIVE INDOOR CYCLING BIKE SF-B1712
 BELT DRIVE INDOOR CYCLING BIKE SF-B1712 USER MANUAL IMPORTANT! Read all instructions carefully before using this product. Retain owner s manual for future reference. For customer service, please contact:
INDOOR CYCLING BIKE SF-B1110 USER MANUAL
 INDOOR CYCLING BIKE SF-B1110 USER MANUAL IMPORTANT! Read all instructions carefully before using this product. Retain owner s manual for future reference. For customer service, please contact: support@sunnyhealthfitness.com
SUPER SMALL FULLY RECUMBENT BIKE MODELS: SS101
 SUPER SMALL FULLY RECUMBENT BIKE MODELS: SS101 Motivating Kids to Move! Super Small Fully Recumbent Bike Owner s Manual 1 Important Instructions Please read these instructions carefully before using the
BELT DRIVE INDOOR CYCLING BIKE SF-B1712 USER MANUAL
 BELT DRIVE INDOOR CYCLING BIKE SF-B1712 USER MANUAL IMPORTANT! Please retain owner s manual for maintenance and adjustment instructions. Your satisfaction is very important to us, PLEASE DO NOT RETURN
HEAVY DUTY SIT-UP BENCH SF-BH6502 USER MANUAL
 HEAVY DUTY SIT-UP BENCH SF-BH6502 USER MANUAL IMPORTANT: Read all instructions carefully before using this product. Retain owner s manual for future reference. For customer service, please contact: support@sunnyhealthfitness.com
DIP STATION WITH SAFETY CONNECTOR SF-BH6507 USER MANUAL
 DIP STATION WITH SAFETY CONNECTOR SF-BH6507 USER MANUAL IMPORTANT: Read all instructions carefully before using this product. Retain owner s manual for future reference. For customer service, please contact:
TWIST-IN STEPPER SF-S0636 USER MANUAL
 TWIST-IN STEPPER SF-S0636 USER MANUAL IMPORTANT! Please retain owner s manual for maintenance and adjustment instructions. Your satisfaction is very important to us, PLEASE DO NOT RETURN UNTIL YOU HAVE
BELT DRIVE PREMIUM INDOOR CYCLING BIKE SF-B1509 USER MANUAL
 BELT DRIVE PREMIUM INDOOR CYCLING BIKE SF-B1509 USER MANUAL IMPORTANT! Read all instructions carefully before using this product. Retain owner s manual for future reference. For customer service, please
MAGNETIC INDOOR CYCLING BIKE
 MAGNETIC INDOOR CYCLING BIKE SF-B1805 USER MANUAL IMPORTANT! Please retain owner s manual for maintenance and adjustment instructions. Your satisfaction is very important to us, PLEASE DO NOT RETURN UNTIL
RG1200 Service and Repair Manual
 Dive Rite RG 1200 Regulator Service and Repair Manual Page 1 Text and Photography by Pete Nawrocky Copyright ( ) 1999-2000, Lamartek, Inc., dba Dive Rite RG1200 Service and Repair Manual First Stage.........................................
THE HF-300 SERIES. Operating and Service Manual. Series includes all variants of HF-300/301
 THE HF-300 SERIES Operating and Service Manual Series includes all variants of HF-300/301 Issue A July 2015 1 TABLE OF CONTENTS 1. Description... 3 2. Installation... 3 3. Operation... 4 3.1. Spring Loaded...
MAGNETIC MINI EXERCISE BIKE SF-B0418 USER MANUAL
 MAGNETIC MINI EXERCISE BIKE SF-B018 USER MANUAL IMPORTANT! Please retain owner s manual for maintenance and adjustment instructions. Your satisfaction is very important to us, PLEASE DO NOT RETURN UNTIL
CHAIN DRIVE PREMIUM INDOOR CYCLING BIKE SF-B1509C USER MANUAL
 CHAIN DRIVE PREMIUM INDOOR CYCLING BIKE SF-B509C USER MANUAL WARNING! Your indoor cycling bike is not designed for reverse pedaling! Failure to comply with this warning may result in permanent damage to
INSTRUCTION MANUAL. January 23, 2003, Revision 0
 INSTRUCTION MANUAL Model 810A In-Vitro Test Apparatus for 310B Muscle Lever January 23, 2003, Revision 0 Copyright 2003 Aurora Scientific Inc. Aurora Scientific Inc. 360 Industrial Parkway S., Unit 4 Aurora,
Cantilever Brake. Dealer's Manual. ROAD MTB Trekking. City Touring/ Comfort Bike
 (English) DM-RCBR001-00 Dealer's Manual ROAD MTB Trekking City Touring/ Comfort Bike URBAN SPORT E-BIKE Cantilever Brake BR-CX70 BR-CX50 BL-4700 BL-4600 BL-R780 BL-R3000 ST-7900 ST-6700 ST-5700 ST-4600
Magnetic Bike. Model No: AENERGISER BODY WORX. Retain this owner s manual for future reference Read and follow all instructions in this owner s manual
 BODY WORX Magnetic Bike Model No: AENERGISER Retain this owner s manual for future reference Read and follow all instructions in this owner s manual Version A 1 EXPLODE DRAWING -02- PARTS LIST AND TOOLS
MAGNETIC CYCLING TRAINER SF-B0419 USER MANUAL
 MAGNETIC CYCLING TRAINER SF-B049 USER MANUAL IMPORTANT: Read all instructions carefully before using this product. Retain owner s manual for future reference. For customer service, please contact: support@sunnyhealthfitness.com
Foldable Magne c Exercise Bike
 ASSEMBLY INSTRUCTIONS Foldable Magne c Exercise Bike CAUTION! Please make sure the pedals are attached to the correct sides, L to left and R to right. Screw in the right pedal clockwise and the left counter-clockwise.
RS Important Notes. Contact. Bicycle Maintenance Stand instructions manual. Warranty Period : 1 year (from the date of your purchase)
") Warranty Period : 1 year (from the date of your purchase) RS-1700 Bicycle Maintenance Stand instructions manual (ver.1.2 2016/12) For more details, read the attached "Minoura Limited Warranty Policy" card.
Warranty Period : 1 year (from the date of your purchase) RS-1700 Bicycle Maintenance Stand instructions manual (ver.1.2 2016/12) For more details, read the attached "Minoura Limited Warranty Policy" card.
BR-2444 ROWING MACHINE
 BR-2444 ROWING MACHINE Important Safety Information Please keep this manual in a safe place for reference. 1. It is important to read this entire manual before assembling and using the equipment. Safe
THE BP-301 SERIES. Operating and Service Manual. Series includes all variants of BP-301 (LF 0.1Cv / MF 0.5Cv)
") THE BP-301 SERIES Operating and Service Manual Series includes all variants of BP-301 (LF 0.1Cv / MF 0.5Cv) Issue B October 2015 1 TABLE OF CONTENTS 1. Description... 3 2. Installation... 3 3. Operation...
THE BP-301 SERIES Operating and Service Manual Series includes all variants of BP-301 (LF 0.1Cv / MF 0.5Cv) Issue B October 2015 1 TABLE OF CONTENTS 1. Description... 3 2. Installation... 3 3. Operation...
BRAKE WINCH RUP 503-[T/BT] EQUIPMENT FOR LIFTING LOADS. AT 053-[T/BT] xx
![BRAKE WINCH RUP 503-[T/BT] EQUIPMENT FOR LIFTING LOADS. AT 053-[T/BT] xx](/thumbs/88/115945274.jpg "BRAKE WINCH RUP 503-[T/BT] EQUIPMENT FOR LIFTING LOADS. AT 053-[T/BT] xx") Reference number: BRAKE WINCH RUP 503-[T/BT] EQUIPMENT FOR LIFTING LOADS DESIGNATED USE The brake winch RUP 503-[...]T series is a load lifting / lowering device. Device is equipped with safety brake for
Reference number: BRAKE WINCH RUP 503-[T/BT] EQUIPMENT FOR LIFTING LOADS DESIGNATED USE The brake winch RUP 503-[...]T series is a load lifting / lowering device. Device is equipped with safety brake for
THE MF-400 SERIES. Operating and Service Manual. Series includes all variants of MF-400/401
 THE MF-400 SERIES Operating and Service Manual Series includes all variants of MF-400/401 Issue A October 2013 1 TABLE OF CONTENTS 1. Description... 3 2. Installation... 3 3. Operation... 4 4. Special
INDOOR BIKE MANUAL
 INDOOR BIKE 91022 MANUAL 91022 INSTRUCTIONS FOR USE 1) The model 91022 is designed to be used as light commercial use or home use. It has a fixed wheel driven flywheel and should be used under professional
Magnetic-Resistance Rower NS-40503RW. Model NS-40503RW. Retain This Manual for Reference ASSEMBLY & OWNER'S MANUAL
 NOTE: Please read all instructions carefully before using this product Table of Contents Safety Notice Hardware Pack Magnetic-Resistance Rower NS-40503RW Assembly Instruction Parts List Warranty Ordering
INCLINE SLIDE ROWER SF-RW5720 USER MANUAL
 INCLINE SLIDE ROWER SF-RW5720 USER MANUAL IMPORTANT! Read all instructions carefully before using this product. Retain owner s manual for future reference. For customer service, please contact: support@sunnyhealthfitness.com
Final Assembly Instructions Bikes with Threaded Headsets
 Final Assembly Instructions Bikes with Threaded Headsets Thank you for buying your new bicycle from L.L.Bean. Read these instructions carefully before beginning the final assembly. Prior to shipping, our
Santa Fe Cycles Assembly Guide Introduction
 Santa Fe Cycles Assembly Guide Introduction Congratulations on your purchase of your new Santa Fe bicycle. You have purchased a bicycle that has many features and qualities. Please take a few minutes and
Quattrocycle BV. Quattrocycle. User Manual. Last update February Quattrocycle BV Bremkant EJ Middelbeers. User Manual Quattrocycle 1
 Quattrocycle User Manual Last update February 2010 Quattrocycle BV Bremkant 6 5091 EJ Middelbeers User Manual Quattrocycle 1 Table of Contents Page Chapter 1: Introduction 3 Chapter 2: Instructions for
CLASS CYCLE P8000 OWNER'S MANUAL JOHNSON HEALTH TECH. CO., LTD.
 CLASS CYCLE P8000 JOHNSON HEALTH TECH. CO., LTD. No.26, Ching Chuan Rd., Taya Hsiang, Taichung Hsien 428, Taiwan, R.O.C. TEL: +886-4-2566700 FAX: +886-4-2560087 E-mail: sales@johnsonfitness.com http://www.johnsonfitness.com
ES-701 INSTRUCTIONS FOR USE
 BIKE ES-701 MANUAL ES-701 INSTRUCTIONS FOR USE 1) The model ES-701 is designed to be used as a group cycle in fitness studios and health clubs. It has a fixed wheel driven flywheel and should only be used
POWER ASSISTED BICYCLES OWNERS MANUAL
 POWER ASSISTED BICYCLES OWNERS MANUAL WE HAVE INCLUDED A BICYCLE OWNER S MANUAL WHICH YOU SHOULD REFER TO FOR ALL GENERAL CYCLE MAINTENANCE. CONTENTS Page. 3 Unpacking. Page. 3-4 Easy steps to get started.
 www.myrower.com support@myrower.com ASSEMBLY Congratulations on purchasing the MyRower! Please see the following pages for instructions on assembling your MyRower. Bits bag contents: Rail Cross Bolt (90mm)
Final Assembly Instructions Bikes with Threaded Headsets
 Final Assembly Instructions Bikes with Threaded Headsets Thank you for buying your new bicycle from L.L.Bean. Read these instructions carefully before beginning the final assembly. Prior to shipping, our
SG-7R46 SG-7R45 BR-IM41-R CJ-7S40 WARNING CAUTION SERVICE INSTRUCTIONS. Inter-7 Hub. Inter-M Brake Cassette joint NOTE:
 t WARNING It is important to completely understand the operation of your bicycle's brake system. Improper use of your bicycle's brake system may result in a loss of control or an accident, which could
THE BP-690 SERIES. Operating and Service Manual. Series includes all variants of BP-LF/MF-690/691
 THE BP-690 SERIES Operating and Service Manual Series includes all variants of BP-LF/MF-690/691 Issue B April 2015 1 TABLE OF CONTENTS 1. Description... 3 2. Installation... 3 3. Operation... 4 4. Special
KTM OM-2 SPLIT BODY FLOATING BALL VALVES INSTALLATION AND MAINTENANCE INSTRUCTIONS
 Before installation these instructions must be fully read and understood SECTION 1 - STORAGE 1.1 Preparation and preservation for storage All valves should be properly packed in order to protect the parts
Pectoral Machine. User manual E S S E N T I A L S T R E N G T H
 E L E M E N T and the cable E S S E N T I A L S T R E N G T H User manual 1 and the cable and The identification plate of and manufacturer, affixed on the back panel of the weight stack, gives the following
Rudder Kit Assembly Instructions for Quest 13
 Rudder Kit Assembly Instructions for Quest 13 Revised 4/2/2015 78501 Rudder System The Hobie Quest is designed for the addition of an optional rudder system. Rudder systems in boats like this allow you
INSTRUCTION MANUAL FOR USE OF BABY WALKER FLOWER
 The safety of this product and the materials used for its production is guaranteed and certified in test laboratories according to EN standards. INSTRUCTION MANUAL FOR USE OF BABY WALKER FLOWER PLEASE,
Read Instructions carefully before use. Rollator is designed for indoor & outdoor use. Do NOT use as a wheelchair or as a transport chair.
 Charcoal Red Seat Height 500-10191 500-10195 19 500-10211 500-10215 21 500-10241 500-10245 24 User Manual Read Instructions carefully before use. Rollator is designed for indoor & outdoor use. Do NOT use
Final Assembly Instructions Bikes with 16 Wheel Size
 Final Assembly Instructions Bikes with 16 Wheel Size Thank you for buying your new bicycle from L.L.Bean. Read these instructions carefully before beginning the final assembly. Prior to shipping, our expert
USER GUIDE TO POWER ASSISTED BIKES
 USER GUIDE TO POWER ASSISTED BIKES 1 PAGE CONTENTS Page. 3 Unpacking Page. 3-4 Easy steps to get started Page. 5 General Assembly Instructions Page. 6 Aligning H/Bars, Page. 7 Tightening pedals onto Crank
Final Assembly Instructions Bikes with Quill Stems
 Final Assembly Instructions Bikes with Quill Stems Thank you for buying your new bicycle from L.L.Bean. Read these instructions carefully before beginning the final assembly. Prior to shipping, our expert
EZee Glider Manual. Tools needed for Assembly: Wrench (included) Philips Screwdriver (not included) Assembly Instructions
 Philips Screwdriver (not included) Assembly Instructions") EZee Glider Manual Congratulations on your purchase of the EZee Glider! Your glider is designed for years of nearly carefree use by your child. These instructions include how to set up your glider and
EZee Glider Manual Congratulations on your purchase of the EZee Glider! Your glider is designed for years of nearly carefree use by your child. These instructions include how to set up your glider and
BELT DRIVE PREMIUM INDOOR CYCLING BIKE SF-B1509 USER MANUAL
 BELT DRIVE PREMIUM INDOOR CYCLING BIKE SF-B1509 USER MANUAL IMPORTANT! Please retain owner s manual for maintenance and adjustment instructions. Your satisfaction is very important to us, PLEASE DO NOT
ORRA SPINNING REEL INSTRUCTION MANUAL (DRAFT)
") ORRA SPINNING REEL INSTRUCTION MANUAL (DRAFT) a. Congratulations b. Pictures of Components c. Family Info d. How to Fill the Spool with Line e. Handle Assembly f. Anti-Reverse g. Drag Adjustment h. Reel
ORRA SPINNING REEL INSTRUCTION MANUAL (DRAFT) a. Congratulations b. Pictures of Components c. Family Info d. How to Fill the Spool with Line e. Handle Assembly f. Anti-Reverse g. Drag Adjustment h. Reel
Assembly Drawing: W-311B-A01, or as applicable Parts List: W-311B-A01-1, or as applicable Special Tools: , , &
 REDQ Regulators Model 411B Barstock Design Powreactor Dome Regulator OPERATION AND MAINTENANCE Contents Scope..............................1 Installation..........................1 General Description....................1
READ ALL INSTRUCTIONS AND WARNINGS BEFORE USING THIS PRODUCT.
 Drywall Stills DS1830 Max Weight Capacity 225 Lb READ ALL INSTRUCTIONS AND WARNINGS BEFORE USING THIS PRODUCT. This manual provides important information on proper operation & maintenance. Every effort
Assembly instructions nortik scubi 2 Recreational kayak
 Assembly instructions nortik scubi 2 Recreational kayak QR-Code assembly video: Assembly instructions nortik scubi 2 Dear Customer, You have purchased a nortik scubi 2, an innovative hybrid kayak for recreational
3M Liqui-Cel EXF-14x28 and 14x40 Series Membrane Contactor
 Membrane Contactors 3M Liqui-Cel EXF-14x28 and 14x40 Series Membrane Contactor Assembly and Disassembly Instructions 3M.com/Liqui-Cel TABLE OF CONTENTS I. Safety Information 3 II. Required Materials 4
USER S MANUAL QUESTIONS? CAUTION. Model No. FMEX Serial No. Write the serial number in the space above for reference. Serial Number Decal
 Model No. FMEX81110.0 Serial No. Write the serial number in the space above for reference. USER S MANUAL Serial Number Decal QUESTIONS? If you have questions, or if parts are damaged or missing, please
RESCUE LIFTING DEVICE RUP 503-[...] AT 053-[...] xx
![RESCUE LIFTING DEVICE RUP 503-[...] AT 053-[...] xx](/thumbs/90/102827869.jpg "RESCUE LIFTING DEVICE RUP 503-[...] AT 053-[...] xx") EN 1496:2006 / B Reference number: RESCUE LIFTING DEVICE RUP 503-[...] AT 053-[...] xx DESIGNATED USE The rescue lifting device RUP 503-[...] series is a component of rescue system. Using this device the
EN 1496:2006 / B Reference number: RESCUE LIFTING DEVICE RUP 503-[...] AT 053-[...] xx DESIGNATED USE The rescue lifting device RUP 503-[...] series is a component of rescue system. Using this device the
CAUTION: WEIGHT ON THIS PRODUCT SHOULD NOT EXCEED 136KG / 300LBS
 OWNER S MANUAL Thank you for choosing the Sit N Cycle. We take great pride in producing this quality product and hope it will provide many hours of quality exercise to make you feel better, look better
Instruction Manual for ZY-021 Height adjustable Acrylic Backboard with Chain net
 Instruction Manual for ZY-021 Height adjustable Acrylic Backboard with Chain net WARNING: IMPROPER INSTALLATION OR SWINGING ON THE RING MAY CAUSE SERIOUS INJURY OR DEATH Notice to assemblers: All basketball
WEIGHT STACK ATTACHMENT. Assembly Manual (888) FOR YOUR SAFETY READ ALL INSTRUCTIONS CAREFULLY
 FOR YOUR SAFETY READ ALL INSTRUCTIONS CAREFULLY") WEIGHT STACK ATTACHMENT Assembly Manual DF835 (888) 258-0533 FOR YOUR SAFETY READ ALL INSTRUCTIONS CAREFULLY *NOTE IF YOU ARE MISSING HARDWARE OR HAVE ANY FIT UP PROBLEMS PLEASE CONTACT DELTECH FITNESS
WEIGHT STACK ATTACHMENT Assembly Manual DF835 (888) 258-0533 FOR YOUR SAFETY READ ALL INSTRUCTIONS CAREFULLY *NOTE IF YOU ARE MISSING HARDWARE OR HAVE ANY FIT UP PROBLEMS PLEASE CONTACT DELTECH FITNESS
OPERATIONS/PARTS MANUAL FOR PATTERSON'S STRAP WINCH
 Patterson Company 870 Riversea Road Pittsburgh, PA 15233 Phone: 800-322-2018 FAX: 412-322-2785 OPERATIONS/PARTS MANUAL FOR PATTERSON'S STRAP WINCH Please fill in the following blanks and then keep this
Konza District Pinewood Derby Track Parts And Assembly Instructions
 Konza District Pinewood Derby Track Parts And Assembly Instructions - 1 - Pinewood Derby Track Parts List: Box 1 of 3 2 each - Race Track Flat Sections 1 each - Race Track Finish Line Section 1 each -
Flat Fold Highchair INSTRUCTION MANUAL. Designed and manufactured to BS EN 14988: 2012 IMPORTANT:
 Flat Fold Highchair INSTRUCTION MANUAL Designed and manufactured to BS EN 14988: 2012 IMPORTANT: Thank you for choosing our product. Please read and understand these instructions before using this flat
Parts List. 7. Handlebars 8. Grips 9. Handlebar Stem 10. Front Brake 11. Front Wheel 12. Crank 13. Chain
 Woodworm Cruise Parts List 1. Free Wheel with Rear Hub 2. Fenders 3. Fender Stay 4. Quick Release 5. Saddle 6. Seat Post 7. Handlebars 8. Grips 9. Handlebar Stem 10. Front Brake 11. Front Wheel 12. Crank
Falcon 3 145, 170, 195 and Tandem Owner / Service Manual
 Falcon 3 145, 170, 195 and Tandem Owner / Service Manual January 2007 - Second Edition Removing The Sail From The Airframe And Short Packing The Glider Many maintenance and repair procedures will require
E-trike Li Assembly Guide
 PREPARATION 1. Read this assembly manual BEFORE commencing assembly. 2. Carefully remove all the components and packaged hardware from the shipping boxes. 3. Unpack the contents of the large double box
600 / 600FC OWNER'S MANUAL
 PROGRESSION 600 / 600FC OWNER'S MANUAL Issue 2 / Version E - Dec. 10, 1997 Copyright 1997 GAMMA Sports - All Rights Reserved PROGRESSION 600 / 600FC OWNER'S MANUAL TABLE OF CONTENTS PAGE 1... WARRANTY
Drive Belt Instructions
 Drive Belt Safety Do not roll, pry, twist, invert or bend the belt back on itself. Do not zip tie the belt. The acceptable temperature range for your belt drive is -53 C to 85 C. Do not lubricate the belt
IMPORTANT SAFETY NOTICE
 OWNER S MANUAL NOTE: Any photos of the YBIKE or decals in the owner s manual are intended to be used as a reference only, and there may be some differences to the unit you purchased. IMPORTANT SAFETY NOTICE
OPERATIONS/PARTS MANUAL FOR PATTERSON'S WWP40BC BARGE CONNECTOR WINCH
 W. W. Patterson Company 3 Riversea Road Pittsburgh, PA 15233 Phone: 800-322-2018 FAX: 412-322-2785 OPERATIONS/PARTS MANUAL FOR PATTERSON'S WWP40BC BARGE CONNECTOR WINCH Please fill in the following blanks
MAINTANCE MANUAL CNC ROTARY TABLE MODEL: DMNC-5C YUASA INTERNATIONAL.
 MAINTANCE MANUAL CNC ROTARY TABLE MODEL: DMNC-5C YUASA INTERNATIONAL. INDEX DESCRIPTION PAGE (1)SPECIFICATION 2 (2)OUTSIDE DIMENSION LAYOUT 3 (3)INSPECTION REPORT 4 (4)PREPARATION FOR OPERATION 5 4-1.LUBRICATING
SKYBIRD TRAP OWNER S / OPERATOR S MANUAL PARTS AND ASSEMBLY INSTRUCTIONS
 SKYBIRD TRAP PART NO. 40903 OWNER S / OPERATOR S MANUAL PARTS AND ASSEMBLY INSTRUCTIONS WARNING: THIS MACHINE CAN CAUSE SERIOUS INJURY OR DEATH! THOROUGHLY READ INSTRUCTIONS AND SAFETY INFORMATION BEFORE
T130/T131/T147. Economy Basket Stretcher with Lifting Kit
 T130/T131/T147 Economy Basket Stretcher with Lifting Kit User s Manual PLEASE READ THE INSTRUCTIONS CAREFULLY BEFORE USING THE BASKET STRETCHER! ASPLI SAFETY LTD, 209-211 HUNSLET ROAD, LEEDS, LS10 1PF.
T-016 ASSEMBLY MANUAL MODEL ROCK AND ROLL Main Street NE Minneapolis, MN
 MODEL T-016 ASSEMBLY MANUAL ROCK AND ROLL 5280 Main Street NE Minneapolis, MN 55421 1.877.226.7824 www.kurtkinetic.com COMPONENTS Tools Required for Assembly: 17mm Wrench or Adjustable Wrench When unpacking,
SCUBAPRO. Balanced Power Inflator
 SCUBAPRO Balanced Power Inflator USE THIS GUIDE AS A REFERENCE WHEN SERVICING THE BALANCED POWER INFLATOR Important note: The following information is not designed to be a complete training guide for servicing
OPERATING INSTRUCTIONS. Parts List N. Note: Owner and operator MUST read and understand this operating instructions before use this lift table.
 OPERATING INSTRUCTIONS Parts List 770N te: Owner and operator MUST read and understand this operating instructions before use this lift table. Thank you for using this lift table. Your lift table is made
MASTER TRUING STAND TS-3. Optional Dial indicator set with brackets Dial indicator bracket set only
 MASTER TRUING STAND TS-3 3 2 1 3 8 9 4 10 7 6 5 12 13 Optional 1555-1 Dial indicator set with brackets 1556-1 Dial indicator bracket set only 49 11 16 14 15 48 32 31 37 38 20 19 17 18 34 39 21 36 22 33
SPINNER RIDE GETTING STARTED GUIDE. Welcome to a personalized fitness experience for your members
 This addendum accompanies your equipment documentation and is additional information concerning the heart rate features for your equipment and console. Important The heart rate feature is intended for
ASSEMBLY INSTRUCTIONS
 XR 9-2009:new odc 1018 revised 2/17/10 9:11 AM Page 1 ODC XR 9 OUTDOOR DISCOVERY CRAFT ASSEMBLY INSTRUCTIONS Your ODC XR 9 Pontoon Boat comes in two separate cartons consisting of the following parts:
Manual winch MANISTOR 100 and 200
 Manual wall winch Manual winch MANISTOR 100 and 200 Instruction manual UK 173-192.10-3 PRODUCT DEVELOPED AND MANUFACTURED ACCORDING TO NF EN 13157 STANDARD REGISTERED DESIGN To ensure the constant improvement
Chapter 2 Rigging. Cutting Wire Rope. Anchoring Wire Rope to Drum. Winding Wire Rope Onto Drum
 Chapter 2 Rigging Cutting Wire Rope The wire rope must be tightly seized on both sides of the point where the wire rope will be cut, as shown in Figure 2-1. Seize the wire rope with either seizing wire
DeskCycle USER S MANUAL. Ellipse QUESTIONS / PROBLEMS. Order# Support and Contact: See the support link at DeskCycle.com
 DeskCycle Ellipse USER S MANUAL Visit us at www.deskcycle.com for: Usage Tips Calorie Calculator Accessories And More QUESTIONS / PROBLEMS Order# Support and Contact: See the support link at DeskCycle.com
3M Liqui-Cel EXF-10x28 Series Membrane Contactor
 Membrane Contactors 3M Liqui-Cel EXF-10x28 Series Membrane Contactor Assembly and Disassembly Instructions 3M.com/Liqui-Cel TABLE OF CONTENTS I. Safety and Warning 3 II. Assembly Parts 4 III. Part Orientation
RADROVER REAR RACK INSTALLATION MANUAL
 RADROVER REAR RACK INSTALLATION MANUAL WWW.RADPOWERBIKES.COM We are here to help! Please contact us at SUPPORT@RADPOWERBIKES.COM or 1-800-939-0310 if you have questions. REV022216 Welcome Thanks you for
On the Go Swing System Instruction Manual
 On the Go Swing System Instruction Manual WARNING READ ENTIRE MANUAL BEFORE USE. THIS SWING IS NOT A TOY. THIS SWING IS ONLY TO BE USED BY TRAINED PERSONNEL, SUCH AS AN OCCUPATIONAL THERAPIST, PHYSICAL
DM-MBST (English) Dealer's Manual. ROAD MTB Trekking. City Touring/ Comfort Bike. Shifting lever. EZ-FIRE Plus ST-EF500 ST-EF510
 Dealer's Manual. ROAD MTB Trekking. City Touring/ Comfort Bike. Shifting lever. EZ-FIRE Plus ST-EF500 ST-EF510") (English) DM-MBST001-00 Dealer's Manual ROAD MTB Trekking City Touring/ Comfort Bike URBAN SPORT E-BIKE Shifting lever EZ-FIRE Plus ST-EF500 ST-EF510 CONTENTS IMPORTANT NOTICE... 3 TO ENSURE SAFETY...
(English) DM-MBST001-00 Dealer's Manual ROAD MTB Trekking City Touring/ Comfort Bike URBAN SPORT E-BIKE Shifting lever EZ-FIRE Plus ST-EF500 ST-EF510 CONTENTS IMPORTANT NOTICE... 3 TO ENSURE SAFETY...
A. TO PREPARE THE MACHINE FOR USE.
 INSTRUCTION MANUAL FOR THE ML120 STRINGING MACHINE. CONTENTS: A. TO PREPARE THE MACHINE FOR USE. 1. The assembly of frame with console and tooltray. 2. Fixing the lever of the tension unit. 3. Putting
SINGLE SIDED SUR-STILT
 PARTS, ASSEMBLY AND SAFETY MANUAL SINGLE SIDED SUR-STILT PLEASE READ CAREFULLY BEFORE ASSEMBLY OR USE Ver 07.17 TABLE OF CONTENTS About... 03 Warnings and Safety Precau ons... 04 S lt Components and Assembly
Technical Data Sheet TI-F50 Locking Units series KFH
 English translation of German original Locking Units series KF Further important practical advice is given in Operating Manual BA-F50., Rod diameter 18 mm 50 mm øz 8 L 2 6 x 6 0 min. 4x30 KF 18 to KF 32,
FLANGED MULTI-PORT BALL VALVES
 INTRODUCTION This instruction manual includes installation, operation and maintenance information for flanged multi-port ball valves. This manual addresses lever operated ball valves only. Please refer
DM-MARD (English) Dealer's Manual. ROAD MTB Trekking. City Touring/ Comfort Bike REAR DERAILLEUR XTR RD-M9100 RD-M9120
 Dealer's Manual. ROAD MTB Trekking. City Touring/ Comfort Bike REAR DERAILLEUR XTR RD-M9100 RD-M9120") (English) DM-MARD001-00 Dealer's Manual ROAD MTB Trekking City Touring/ Comfort Bike URBAN SPORT E-BIKE REAR DERAILLEUR XTR RD-M9100 RD-M9120 CONTENTS CONTENTS...2 IMPORTANT NOTICE...3 TO ENSURE SAFETY...4
(English) DM-MARD001-00 Dealer's Manual ROAD MTB Trekking City Touring/ Comfort Bike URBAN SPORT E-BIKE REAR DERAILLEUR XTR RD-M9100 RD-M9120 CONTENTS CONTENTS...2 IMPORTANT NOTICE...3 TO ENSURE SAFETY...4
ASSEMBLY GUIDE: Izip & Ezip Electric Bicycles with Rack-Top Mounted Batteries ( RTMB Bicycles )
") ASSEMBLY GUIDE: Izip & Ezip Electric Bicycles with Rack-Top Mounted Batteries ( RTMB Bicycles ) Please Refer to your Owner s Manual for Detailed Setup Instructions Technical & Customer Service: 1-800-377-4532
ASSEMBLY GUIDE: Izip & Ezip Electric Bicycles with Rack-Top Mounted Batteries ( RTMB Bicycles ) Please Refer to your Owner s Manual for Detailed Setup Instructions Technical & Customer Service: 1-800-377-4532
Instructions. Follow All Instructions Before Assembling Or Using This Product
 Instructions Follow All Instructions Before Assembling Or Using This Product IMPORTANT DO NOT RETURN THIS PRODUCT TO THE RETAIL STORE WHERE PURCHASED. CALL TOLL FREE: (800) 492-9334 WARNING: Improper use
On the Go Swing System Instruction Manual
 On the Go Swing System Instruction Manual WARNING READ ENTIRE MANUAL BEFORE USE. THIS SWING IS NOT A TOY. THIS SWING IS ONLY TO BE USED UNDER ADULT SUPERVISION. CONSULT WITH A CHILD S THERAPIST ON HOW
PRO1030 Bi-Directional Assembly Replacement
 PRO1030 Bi-Directional Assembly Replacement 1. Remove both side covers using the Crank and Cover Removal procedure. Fig. 1 2. Disconnect both brake cables (not shown) from the brake (S3611). (Fig. 1) 3.
Thumb Shifter Plus Thumb Shifter
 (English) DM-SL0004-01 Dealer's Manual Thumb Shifter Plus Thumb Shifter Thumb Shifter Plus SL-FT55 SL-TX50 SL-TX30 Thumb Shifter SL-TZ20 IMPORTANT NOTICE This dealer's manual is intended primarily for
SETTING THE HANDLE HEIGHT ON THE ROLLATOR
 Model No: Maximum User Weight: 10910C (Lightweight) 10928C (Heavy duty) 125kg (20st) (Lightweight) 170kg (27st) (Heavy duty) Height of handles: 780-915mm (30.5-36 ) (Lightweight) 790-930mm (31-36.5 ) (Heavy
Operating and maintenance manual Filter and reducing station Series / 1.0
 Operating and maintenance manual Filter and reducing station Series 961 04.2017 / 1.0 Original instructions ARCA Regler GmbH. All rights reserved. Cover picture background: Freepik.com ARCA Regler GmbH
Assembly Instructions & Manual. Configuration subject to change
 Assembly Instructions & Manual Configuration subject to change O R Y X II A S S E M B L Y I N S T R U C T I O N S & M A N U A L IMPORTANT PRECAUTIONS WARNING: To reduce the risk of serious injury, read
ASSEMBLY MANUAL HOBIE CATSY
 ASSEMBLY MANUAL HOBIE CATSY HOBIE CAT EUROPE ZI Toulon Est, BP 50 8078 Toulon cedex 9, France Tel : + (0)9 08 78 78 - Fax : + (0)9 08 99 Email : hobiecat@hobie-cat.net - http://www.hobie-cat.net ASSEMBLY
LAT PULLDOWN MACHINE. Assembly Manual (888) FOR YOUR SAFETY READ ALL INSTRUCTIONS CAREFULLY
 FOR YOUR SAFETY READ ALL INSTRUCTIONS CAREFULLY") DF906 LAT PULLDOWN MACHINE Assembly Manual (888) 258-0533 FOR YOUR SAFETY READ ALL INSTRUCTIONS CAREFULLY *NOTE IF YOU ARE MISSING HARDWARE OR HAVE ANY FIT UP PROBLEMS PLEASE CONTACT DELTECH FITNESS TOLL
DF906 LAT PULLDOWN MACHINE Assembly Manual (888) 258-0533 FOR YOUR SAFETY READ ALL INSTRUCTIONS CAREFULLY *NOTE IF YOU ARE MISSING HARDWARE OR HAVE ANY FIT UP PROBLEMS PLEASE CONTACT DELTECH FITNESS TOLL
TRAILMATE METEOR ASSEMBLY MANUAL
 TRAILMATE METEOR ASSEMBLY MANUAL (DISC BRAKE VERSION) The Trailmate Meteor recumbent has been designed for easy assembly. This means more time to enjoy the smooth ride with single speed, 3 speed coaster
TABLE OF CONTENTS FRAME FEATURES INTRODUCTION
 S3 DISC MANUAL TABLE OF CONTENTS Introduction...1 Frame Features...2 Fork Preparation...3 Small Parts...5 Frame Preparation...6 Brake Housing Installation...7 Mechanical Cable Routing...9 Electric Cable