Hip Block Installation Instructions:
|
|
|
- Juliana Thompson
- 5 years ago
- Views:
Transcription


1 Hip Block Installation Instructions: The instructions that follow are shown for our low profile hip blocks installed in a Storm Chaser M C-1. However, the very same technique can be used for any of our hip block styles in virtually any boat. Low Profile Hip Blocks High Profile Hip Blocks Slalom Hip Blocks 1/23

2 1. Sit in your boat to decide the ideal position for your hip blocks. It s best if your seat is already installed. To make sure they are even, establish a centerline on the front of the cockpit, and measure equidistantly to each side of the cockpit. Use masking tape to mark the position of the front of each hip block. Outside of Rim Center Line Front Of Hip Blocks Inside of Cockpit Measure from the outside of the rim to the inside of the cockpit as shown. Our standard positions are 18 ½ for the Storm Chaser S-M and 18 ¾ for the L-XL version. Use these as a starting point and adjust as necessary. 2/23


3 2. Sand the bottom 1" and flange of the hip blocks so the epoxy micro-ballon mixture will adhere well. Sand side and flange 3/23
 on the side of one hip block and hold it in place until it")

4 3. Tack glue the hip blocks into place. Put a few dots of Super Glue or 1-Minute Epoxy (available at your local hardware store) on the side of one hip block and hold it in place until it bonds to the side of the cockpit. Be sure to hold it in the proper position being careful that the flange is tight against the underside of the deck and the face (which will receive the foam) is vertical. This will temporarily secure the blocks and make it easier to apply reinforcement. Repeat step 3 for the other hip block. Note: Hip Block is attached and in place with only super glue and no other reinforcement. 4/23

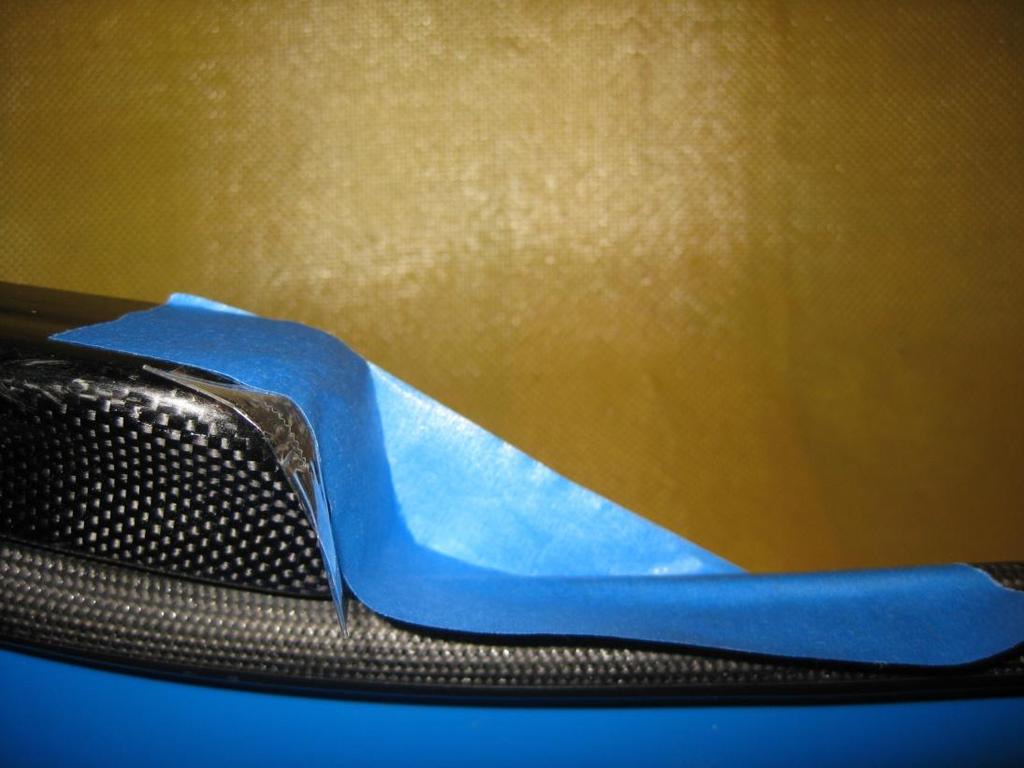
5 Once both hip blocks are temporarily glued into position, you are ready to fill the cockpit rim/hip block gap with epoxy resin and micro-balloons (a.k.a. micro-spheres) or other resin filler. 4. Mask the vertical edges of the blocks and tape the flange inside the boat to create a pocket to receive the micro-balloon/resin mixture and keep it from running out. Standard masking tape, clear packing tape or duct tape will work fine. Create a vertical "tape dam on both ends of each hip block to hold the runny micro-balloon mixture in place until it cures. Be sure the entire pocket is leak proof where it meets the cockpit rim and under the deck otherwise you will have a mess on your hands!! Clear packing tape is good for cosmetic masking 5/23


6 A Hip Block Tack Glued In Place 6/23

7 Masking Underneath A Hip Block 7/23

8 Vertical Tape Dam 8/23


9 Vertical Tape Dam Vertical Tape Dams Mask The Cockpit Rim 9/23


10 Be sure each vertical dam is leak proof here we ve used hot glue - more tape also works 10/23

11 Be sure each vertical dam is leak proof here we ve used hot glue more tape also works. NOTE: The previous pictures were a mixture of left and right hip blocks but you should get the idea: create a dam at both ends of each block and mask the underside well! Be sure everything is tightly sealed and won t start peeling up during the injection process more and stickier tape is always a good choice. Mask off the tops of the blocks and the cockpit rim to keep them free of resin during the work so that they will look nice cosmetically once the blocks are in place. 11/23

12 5. Mix epoxy resin, black pigment and micro-balloons into a thick syrup like consistency. Start with the resin and pigment only. Add micro balloons until you reach a thick, runny consistency. Mix well. Add the appropriate amount of hardener for the quantity of resin you started with and mix well again. 6. Place the mixture in a zip lock bag, clip the corner of the bag, and squeeze the syrup into the pockets you created in Step 4 do both hip blocks. 12/23


13 Keep filling as needed. The mixture will slowly flow into the pocket, with occasional air bubbles rising to the surface keep adding until each pocket is full and no longer settling. 13/23

14 Be sure to level the boat so that the micro balloon mixture settles evenly in the gap between the hip block and the cockpit rim. Although not usually necessary, it s possible that you may need to come back and add a little more micro balloons after the first batch has cured. 14/23


15 The Cured Micro Balloons 15/23

16 7. To make the reinforcement process easier, flip the boat over and raise it up off the ground so that you can work from underneath. To stand: elevate using ladders or ropes. To sit: try using a stool and two tables. 16/23


17 Looking Under The Deck: The Cured Micro Balloons 17/23
18 8. Sand the underside of the deck so that the reinforcing cloth will lay flush and smooth. Examine the cured micro balloons and sand any raised or rough edges where they meet the underside of the deck. If there are voids or gaps where the micro balloons did not fill the pocket adequately, it may be necessary to back fill these before proceeding with the reinforcing cloth. If so, mix a small batch of epoxy resin, black pigment and microballoons into a "peanut butter like" consistency (thicker than before), and fill in any gaps. To ensure good bonding, lightly sand the deck where the reinforcing cloth will be positioned. 9. Cut reinforcement cloth and peel ply for each block. Use two pieces of kevlar for each side. Make the second piece slightly larger than the first piece and cut the peel ply such that it is larger than the second piece (i.e. each piece gets progressively larger than the one before). Carbon fiber cloth can also be used but we do recommend at least one layer of kevlar for toughness. See pictures on the following page. 18/23


19 Kevlar Reinforcing Cloth and Peel Ply Fashioned to Bend 19/23

20 10. Before placing any cloth, wet out the underside of the deck and inside of the hip blocks with epoxy resin. 11. Lay the reinforcing cloth in place and wet out with epoxy resin. Start by placing the smaller reinforcing cloth first. Curve it down into the hip block and wet out. Layer the second piece over the first and curve it down into the hip block. Wet out the second piece. 20/23


21 12. Cover the wet cloth with peel-ply. Once cured, this layer will peel off leaving a smooth finish. 21/23


22 13. Once cured, remove the peel ply and sand any areas that need smoothing. Hip Blocks Installed and Ready For Foam 22/23


23 14. Glue minicell foam onto the vertical walls of your hip blocks and trim to a custom fit. 23/23
Carving a Custom Seat
 Carving a Custom Seat Seat Carving your own seat from mini-cell, high-density foam is really quite simple and has proven to be more comfortable than any commercially produced seat and often more reasonably
Surfboard Repairs Chapter 7
 Surfboard Repairs Chapter 7 The Complete Surfing Guide for Coaches - Bruce "Snake" Gabrielson Repair Problems Boards continuously get bumped, hit rocks, break fins, get dropped, and many other things that
Vacuum Bagging Wings Instruction Manual Purdue University
 Vacuum Bagging Wings Instruction Manual Purdue University Note: Do not leave the vacuum pump running unattended! Revision: Original Release 10/31/15 Vacuum bagged wings are quick to build, light weight,
Soling Building Tips II
 Soling Building Tips II Prepared: Arthur Deane Jan 20, 2002 adeane@ic.net Introduction The following are some lessons learned and experience gained in building a Soling kit. The plan developed is based
General Build Instructions for Mach 1 BT50 and BT55 Single Fin Kits. Needed Items for Assembly
 General Build Instructions for Mach 1 BT50 and BT55 Single Fin Kits 60-80 grit sandpaper Hobby knife Tape measure Scissors CA Super glue 30-minute epoxy 5-minute epoxy Masking tape 1/16 drill bit Needed
Pre-Paint>Fuselage>Empennage>Fit vertical tail fin. Objectives of this task: Materials and equipment required: Fit the spar extender
 Pre-Paint>Fuselage>Empennage>Fit vertical tail fin Objectives of this task: To fit the vertical tail fin to the fuselage, including fitting the static probe, static tube, optional strobe light wiring and
AGM 33 PIKE ALL FIBERGLASS. Specifications Length: 92 Diameter 5.5 Weight: 24 lbs Motor Mount: 75mm Fins: 6-3/16 G10 CP: 68 from nose tip Parts List
 ALL FIBERGLASS AGM 33 PIKE Specifications Length: 92 Diameter 5.5 Weight: 24 lbs Motor Mount: 75mm Fins: 6-3/16 G10 CP: 68 from nose tip Parts List (1) Filament Wound Nose Cone w/ Metal Tip (1) Nose Cone
5. Tailplane assembly
 5. Tailplane assembly Overview This section covers the fitting of your completed tailplanes to the torque tube assembly. Included is the insertion of the TP13 bushes in the inboard rib and the fitting
1/10 th Scale 1956 Ted Jones Classic Hydroplane
 1/10 th Scale 1956 Ted Jones Classic Hydroplane Preparation These plans show outside sheeting of 3/32 balsa laminated with 1/64 birch ply. This makes a light and strong skin for this boat. Optionally you
other tables and stations. A plexiglass sheet was placed on a table top to provide the smooth flat surface to lay up the fiberglass on.
 Fiberglassing After hot wire cutting our four airfoils for testing, it was decided that greater strength was needed. The foam airfoils do not have the required strength to withstand the forces of the wind
Et's Skeg: the full story
 Et's Skeg: the full story Having used pie-slice skegs on mass-market boats with big floppy slots and finding them ok, but not ideal, I researched a bit online looking for a skeg or skeg design for my North
We hope you ll enjoy the Drifter as much as we have! Scott DeTray Model Aero Specifications:
 We are excited to bring you the Drifter RC airboat. You re probably thinking it doesn t fly so what is Model Aero thinking??? We have always liked RC vehicles of all types and have had a fondness for airboats
Use and Installation Instructions
 Use and Installation Instructions This is a step by step guide, providing you with complete instruction for a profession installation of the Armstrong Nautical Products RIB Ladder. Please review the instructions
Dornier Do R 4 Super-Wal
 Dornier Do R 4 Super-Wal Model Aviation Laddie Mikulasko s Dornier Do R 4 Super-Wal Build the multiengine, record-setting seaplane. Article, plans, instructions, and photos by Laddie Mikulasko. Complete
aironaut inflatable kayak made by
 aironaut inflatable kayak made by aironaut by Feathercraft The pump can both inflate and deflate. Green tape indicates inflation connection. Made in Canada. Paddled World Wide. 1. Unfold the kayak and
8-GUN CORVETTE ASSEMBLY INSTRUCTIONS
 8-GUN CORVETTE ASSEMBLY INSTRUCTIONS THE HULL STEP 1 Fasten the Deck to the Hull. Find the hull. This is a large, pink, ship-shaped piece of insulating foam board. This will form the base of your model
Your kit contains the following items. Additional Items You May Need. Pre- cut parts Propeller rigging and rubber Sandpaper Covering sheet
 Your kit contains the following items Pre- cut parts Propeller rigging and rubber Sandpaper Covering sheet The SkyFox offers great glide performance in a rubber powered plane due to its built up wing.
LITTLE TRI construction
 LITTLE TRI construction I have built almost anything that can sail. At the age of 12 my first sail thing, an ice boat. I used skates which had to be mounted on shoes as runners. Big fun, very fast, only
Akcent-2 - Building Instructions
 Akcent-2 Home Pictures Building Instructions Ordering Akcent-2 - Building Instructions Note! The pictures show older kits with "diser" wings. The new kits come with nicer D-box wings. Servo locations are
 Photo Essay: How to Build a Nova Scotian Grand Banks Dory By Jeff Spira Plans available at: http://spirainternational.com/ How to Build a Nova Scotian Grand Banks Dory By Jeff Spira In Lunenburg, Nova
airo-double-naut inflatable kayak made by
 airo-double-naut inflatable kayak made by airo-double-naut by Feathercraft A. B. A. Pivot Foot Pedals for Stern Paddler B. Pump - can be used to inflate and deflate C. C. Rudder and Skeg D. Coaming Rim
S A N S I B E A R S P L I N T 2 0 X
 SANSIBEAR SPLINT 20X This is just a short documentation of one way you can assemble the Cylon/Splint I'm sure the pics will speak for themselves. Good pictures are better than to many words. If you have
SLR Missile Thunderboat
 J M P H O B B Y G R O U P L L C SLR Missile Thunderboat Zippkits R/C Boats BUILDING INSTRUCTIONS 2017 JMP Hobby Group LLC Indiana USA 1 Introduction Thank you for purchasing this kit. We are sure that
RATLINER Assembly Instructions.
 Model Shipways Inc. www.modelexpo-online.com RATLINER Assembly Instructions. Patent Pending 1. Remove center stands and braces from the main rigging frame. 2. The Stands and Braces should press release
MICRO - DLG. This kit should only take 30 minutes to compile, very simple and quick.
 MICRO - DLG This kit should only take 30 minutes to compile, very simple and quick. You will need: Hot Glue ( small tip preferably ) Sharp razor blade Ruler a strip of strong fiber tape Thin nose Pliers
PAY N PAK, 1/12 th Scale, Limited Sport Hydro P Sport Hydro
 1980 82 PAY N PAK, 1/12 th Scale, Limited Sport Hydro P Sport Hydro Introduction: The 1980 turbine Pay N Pak is a good subject for a model race boat. It has a low profile, mild pickle-fork setback, long
Fibreglass, Resin, 5min Araldite, flock. The Strobe mounting point may have to be moved forward.
 Fit Vertical Fin Extension Reference: Drawing Photos Parts Required: Materials Required: 3 Layer Plate Procedure: 1. Mark cutting area on Vertical Fin as per drawing & photos. 2. Make a ¼ hole in the corner
T27 The Classic Beauty of a Timeless Yacht. created by William Lesh
 T27 The Classic Beauty of a Timeless Yacht created by William Lesh Tippecanoe Boats, ltd 2007 Tippecanoe Boats, ltd 2007 T27 Racing Sloop - Radio Control Yacht 4 ft. 26.5 in. Fast Sailing and elegant,
1982 Hydrostream Viking Restoration
 1982 Hydrostream Viking Restoration Part 2c: The Rebuild Daniel W. Rickey Winnipeg, Manitoba Canada daniel@cancercare.mb.ca 2000-09-22 Introduction Part one of this report showed how the shoddy manufacturing
Tailplane retention. All Europa Classic, XS and Motor-glider aircraft
 Tailplane retention Classification: Applicability: Compliance: Mandatory All Europa Classic, XS and Motor-glider aircraft Within 10 flying hours after the date of issue of this bulletin or before next
Exxtacy. Repair and Tuning Manual. Exxtacy Construction Basics
 1 of 20 Exxtacy Repair and Tuning Manual Construction Basics D Cell Repair Rib Repair Tuning Exxtacy Construction Basics The Exxtacy is built with carbon fiber and Kevlar/Aramide honeycomb. The Exxtacy
REPAIR MANUAL. Materials
 REPAIR MANUAL Materials Balsa: Raw material for FST (Future Shape Technology series) and HELIUM rails or parabolic stringers. It is what gives our unique product its excellent performance characteristics.
First Team Sports, Inc. Blast Recreational Volleyball System
 First Team Sports, Inc. Blast Recreational Volleyball System BILL OF MATERIALS A 2 Volleyball Vertical Post K 1 ½ Centerlock Nut B 3 Net Clamp L 2 Carabiner Clip C 1 Pulley Clamp M 1 ½ x 2 Hex Bolt D 4
Installation of Nylon Putting NP50
 Installation of Nylon Putting NP50 1. Layout of Green and Existing Ground Preparation Step 1: Determine the size and shape of your green as well as any chipping stations and/or sand traps. Step 2: Measure
Stevenson Projects Building the Hull Top Deck and Bulkheads
 Stevenson Projects Building the Hull 1. Print out both piece sheets. 2. Cut out one keel piece and glue it to a piece of balsa wood or dense cardboard. Cut out the second keel piece and glue it to the
STUDY GUIDE A Day By Day Course Refreshment Quiz To Ensure That You Make The Most Out Of Your Rod Building Class
 DAY ONE: 1) Why would you want to build your own fishing rod? a. It s fun and rewarding b. You can customize your rod to your needs c. You can save money d. All of the Above 2) The main part of a fishing
INSTALLING YOUR CLC RUDDER
 INSTALLING YOUR CLC RUDDER These instructions are written to help you install the CLC rudder kit on your wooden kayak. The rudder can be fitted to your boat during construction or after completion. Please
Bladerider X8 Assembly Help Notes
 2.1 Remove All Parts & Have Some Tools Handy Remove all items from the box and identify each part as per the packing sheet and check that nothing is missing. If there is something missing, please email
PT 11 trouble-shooting and maintenance.
 PT 11 trouble-shooting and maintenance. Does your rudder not stay down?...your back seat slip off?...your knobs tight and your leather pads loose? Maybe we can help. We have used our PT 11 s hard enough
How to repair a dinged windsurf board
 How to repair a dinged windsurf board VERY Important: before the repair, let the board dry out for at least a day in the hot sun. Be sure to read "preparation" below. Repair of a small (1/2") hole in the
EPP Version Building Notes Updated
 EPP Version Building Notes Updated 12-10-2013 The Zulu covers a wide range of flying conditions: slope soaring in light to strong lift, thermalling, aerobatics, discus launches, and combat; for skill levels
MATERIALS LIST AND AREAS OF PANELS WITH CONSTRUCTION SPECIFICATIONS FOR THE SHUTTLE 28 CATAMARAN
 MATERIALS LIST AND AREAS OF PANELS WITH CONSTRUCTION SPECIFICATIONS FOR THE SHUTTLE 28 CATAMARAN Shuttle 28 Technical details. Sail areas Main 33 m 2 355 sq. ft. Jib 14.3 m 2 154 sq. ft. Mast 4 m 2 43
GRP BOAT BUILDING INSTRUCTIONS 2006
 125 ASSOCIATION VICTORIAN DIVISION INC. GRP BOAT BUILDING INSTRUCTIONS 2006 TABLE OF CONTENTS 1.0 COPYRIGHT 4 2.0 PLAN SET and MEASUREMENT 4 3.0 MATERIALS FOR HULL 4 3.1 Patterns 4 3.2 Foam Panels 4 3.3
PART III BUILDING AN FRP BEACH LANDING BOAT
 PART III BUILDING AN FRP BEACH LANDING BOAT 41 Training Manual on the construction of FRP beach landing boats 10 - BUILDING AN FRP BEACH LANDING BOAT 10.1 PREPARATION The following is a practical guide
2018 ICF Canoe Polo World Championships. Scrutineering Guidelines
 Page1 2018 ICF Canoe Polo World Championships Scrutineering Guidelines ICF Canoe Polo Rules 2017 (the Rules) shall be strictly followed in scrutineering throughout the competition, especially the rules
Basic Install Guide. Parts: 1 P a g e
 Basic Install Guide Parts: 1 P a g e Step One: Remove all panels and components from boxes. Step Two: Carefully unroll your turf. Be sure not to cut the turf when removing from protective plastic. The
Application & Care Reflexite V98 Conformable Graphic Sheeting For EMS Vehicle Graphic Applications RSA2340
 Table of Contents General Information... 2 BEFORE APPLICATION... 2 STEP 1: TEMPLATING... 2 STEP 2: CUTTING... 2 STEP 3: SUBSTRATE PREPARATION... 3 STEP 4: SURFACE CLEANING... 3 STEP 5: APPLICATION TEMPERATURE...
Model Aero Sportster Indroduction
 1 Model Aero Sportster Indroduction We are excited to introduce the Model Aero Sportster! Inspired by classic designs of the past, the Sportster is a relaxing slow flyer, equally at home indoors or outside
Model Aero AT-6 Texan Introduction
 1 Model Aero AT-6 Texan Introduction We are excited to introduce the Model Aero AT-6 Texan! Originally used as an advanced trainer by the U.S. Armed Forces, the AT-6 is a relaxing slow flyer, equally at
Trim Tab Wind Vane for boats with transom mounted rudders
 Trim Tab Wind Vane for boats with transom mounted rudders If your boat has a transom mounted rudder, you can build this self-steering windvane for around $150, using regular wood working tools and some
WHITE WOLF. X-ray View MID POWER MODEL ROCKET KIT BUILDING INSTRUCTIONS KIT SPECIFICATIONS:
 WHITEWOLF-38 PARTS LIST 1 - Nose Cone 1-17" Airframe 1-6" Motor Tube 3 - Aft Fins 3 - Forward Fins 2 - Centering Rings 1-15" Parachute 2 - launch lugs 1-12 Kevlar Shock Cord 1 - Motor Retention >>(screw/washer)
Blazer Marine, Whiplash Sport Hydro
 Blazer Marine, Whiplash Sport Hydro Thank you for choosing to build the Whiplash Sport Hydro. We have spent over 12 years perfecting this design, and finally we are making it available to the world. We
Introduction. Have Fun Pat Morgan patsplanes.com. The cool paper airplane site!
 Folded Designs Introduction Since at least 1909 paper planes have been folded and flown and become addictive to the true fan. I have been folding paper airplanes for over 45 years and designing them for
Creative Arts Photography Dept 35 Section PH. Mounting Your Photographs
 Creative Arts Photography Dept 35 Section PH Mounting Your Photographs Photography non- professional entry rules: - All photos must be taken by exhibitor - Sizes: 8x10 and 8x12 (if you are printing your
JACOMB SPECIAL V S4 Boost Glider
 JACOMB SPECIAL V S4 Boost Glider 1 Introduction: The S4 class of boost glider is a challenging discipline that requires a model to be launched as high as possible and descend as a fixed wing glider, after
Board Glassing Chapter 6
 Board Glassing Chapter 6 The Complete Surfing Guide for Coaches - Bruce "Snake" Gabrielson Glassing Guidelines Like shaping, there is probably any number of ways to successfully glass a blank. Yet there
Pitts Model 12 Wing Leading edge Installation
 Pitts Model 12 Wing Leading edge Installation This procedure is used to install molded plywood leading edges included in the Pitts Model 12 kit. Nine (9) molded leading edge section are require per aircraft;
Trogear Bowsprit Through Hull Installation Manual
 Trogear Marine Products, LLC www.trogear.com info@trogear.com 866-616-2978 Trogear Bowsprit Through Hull Installation Manual Congratulations on your purchase of the Trogear Bowsprit which can be installed
Blazer Marine, Whiplash Sport 40
 Blazer Marine, Whiplash Sport 40 Thank you for choosing to build the Whiplash 40. We have spent over 12 years perfecting this design, and finally we are making it available to the world. We are excited
Construction Chapters Index
 Construction Chapters Index 9 7 8 Chapters Index c. c. c. c. c. c. c7. c8. c9. c0. c. c. c. c. c. c. c7. Balsa Wood Skeleton Strip Planking Hull Fairing Keel Bulb Mould Lead Bulb Casting Keel Construction
Installing ST1300 Fairing Decals
 Installing ST1300 Fairing Decals Caution: Decals are best applied when ambient air temperature is 60 degrees or higher. Do not apply in direct sunlight. Do not allow the decals to get wet while they are
Building a coracle. Let's build a coracle roughly like this:
 Building a coracle Let's build a coracle roughly like this: Modeled loosely as Severn-Ironbridge. Width about 3 1/2' (105 cm), length about 4 1/2' (135 cm), depth about 14" (35 cm). The oval of the gunwale
Appendix A Supplement: Selected Epoxy Techniques
 Appendix A Supplement: Selected Epoxy Techniques This supplement to Appendix A contains information about epoxy that can be used for special techniques not normally applied in the construction of Grain
AVA Building Instructions
 Suggested Assembly Sequence: AVA Building Instructions 1. Insert fittings in rudder and trial fit rudder on boom 2. Attach stab to v-mount and position ahead of rudder ¼, sanding the v-mount as needed.
Portlight Construction
 Portlight Construction Version 2, dated 28 th June 2012 Contents Opening Portlights - Requirements... 2 Opening Portlights Design Parameters... 2 An Opening Portlight Design... 3 Making the Opening Portlight
LoneStar Fiberglass Pools. Do-It-Yourself. Installation Manual
 LoneStar Fiberglass Pools Do-It-Yourself Installation Manual Chris 1/3/2008 Do-It-Yourself The installation of a LoneStar Fiberglass pool is a much simpler task than most people think. What is important
How to Cut Shafts and Glue T-tops on KIALOA Stand-Up Paddles
 How to Cut Shafts and Glue T-tops on KIALOA Stand-Up Paddles Sizing: Determine the size for your paddle by adding 6-10 to your overall height. If you paddle more frequently in the surf, lean towards the
aero naut Order No. 3009/00
 aero naut Order No. 3009/00 Introduction: The model should be assembled following the sequence of the stages of construction described in these instructions. The laser-cut components are individually numbered.
PART II Building the MDV-1
 21 PART II Building the MDV-1 The MDV-1 is a simple, easily driven, seaworthy boat intended for both rowing and power propulsion. Its general-purpose design is suitable for inshore waters around the world.
Gluing Guide QCS Oval & Quick Cuff
 Gluing Guide QCS Oval & Quick Cuff General information SI TECH has an extensive background and history in the development and design of premium drysuit components that dates back to the early 1960 s. This
DRAGONFLITE 95 RESTRICTED CLASS RULES 2016
 DragonFlite Force 95, Restricted Class Rules 2016 2013 Version 1.0 DRAGONFLITE 95 RESTRICTED CLASS RULES 2016 Version 1.0 DF Racing Rules Committee 2016 Introduction The DragonFlite 95 (DF95) project started
BUILDING INSTRUCTIONS
 Z I P P M A N U FA C T U R I N G A Zippkits R/C Boat BUILDING INSTRUCTIONS 2010 Zipp Manufacturing Frankfort, New York 13340 www.zippkits.com Table of Contents Introduction 1 Engine Mounting 30 S E C T
What s Inside. art. coat. tools. outline top. rails. wood blank. bottom
 What s Inside tools wood blank outline top bottom rails art coat What is it? The Alaia is one of the first surfboard designs ever. It is super challenging to surf, but relatively easy and insanely fun
boat owner DIY The best candidates
 DIY boat owner PROJECT STERN REFIT Wanting a scoop stern, this intrepid owner added nearly.9m (3 ) to his 27-footer. Story and photos by Rory Harley Before: Aloha 8.2 with original stern. There are many
How Scott Builds a Fighter Kite, May 2011 Updated Sept 2018
 How Scott Builds a Fighter Kite, May 2011 Updated Sept 2018 MAKE A TEMPLATE 1. Draw half sail plan on 17x22 pad with 4x4 (1/4 inch) grid. Add ¼ inch extra on nose (for reinforcement) and plenty of extra
DIY Shallow Water Anchor Assembly Instructions for Rods, T-grips, Stainless Tips, Stainless Couplers, and the 4-in-1 Paddle
 DIY Shallow Water Anchor Assembly Instructions for Rods, T-grips, Stainless Tips, Stainless Couplers, and the 4-in-1 Paddle All Shallow Water Anchor Parts First, start by laying out and identifying all
DRAGONFLITE 95 RESTRICTED CLASS RULES 2016
 DragonFlite Force 95, Restricted Class Rules 2016 2013 Version 1.2 1.0 DRAGONFLITE 95 RESTRICTED CLASS RULES 2016 Version 1.2 DF Racing Rules Committee 2016 Introduction The DragonFlite 95 (DF95) project
ICYNENE INSTALLATION INSTRUCTIONS
 ICYNENE LD-C-50 INSTALLATION INSTRUCTIONS ICYNENE LD-C-50 is a Low Density completely water blown open-cell spray foam insulation and air barrier material. Completely free of any HFC s and PBDE s, ICYNENE
Landing Skeg Installation
 2010 Landing Skeg Installation Version 1.1 Kennedy Composites 4/22/2010 Kennedy Composites What is a Landing Skeg: A landing Skeg is a plastic cleat installed into the bottom-side at the frontend of a
Main Wing Wood Parts
 Main Wing Wood Parts WR 1-11 TE LE MS1 MS2 ST MS3 Before you start the build, gather all the required main wing components. QTY o MS1 (Main Spar 1) 2 o MS2 (Main Spar 2) 2 o MS3 (Main Spar 3) 2 o ST (Servo
Aegea Assembly Notes:
 Aegea Assembly Notes: The Aegea model is a thermal Duration (TD) model made up of components from Phil Barnes 1 (bagged wing and tail group) and Terry Luckenback 2 (Pretty Mantis fuse). Due to its construction
Seamax Boat Bimini Top User Manual
 Seamax Boat Bimini Top User Manual Size A / B / C 3 BOW Size D / E / F 4 BOW Thanks for your purchase. Seamax Bimini Top has built-in the aluminum eye-end fitting to install on standard oar lock pin (diameter
CONSTRUCTION OF A GUNBOAT A CLASS YACHT by Brian Dill
 CONSTRUCTION OF A GUNBOAT A CLASS YACHT by Brian Dill The Gunboat design is the latest Radio A class from Graham Bantock, optimised to provide the best boat speed below 4 knots and to be as good as possible
SPECIAL THANKS TO THE FOLLOWING PEOPLE FOR THEIR HELP IN THIS PROJECT!
 The Viper Mark VII is the state of the art fighter of the Colonial Fleet. It is sleeker and more modern than the Viper Mark II. The Mk7 is designed for both space and atmospheric environments and is also
Peinert Dolphin. Assembly
 Peinert Dolphin Assembly The Dolphin is easily rigged; there are only four removable parts - the seat, the foot stretcher, the rigger arm, and the fin. Removal and installation of the seat. If the seat
Grain Surfboards Frequently Asked Questions
 Grain Surfboards Frequently Asked Questions Section 1: Grain Boards 1. How does building a Grain board differ from building a foam board? 2. They look more like furniture than surfboards. Are Grain boards
Robotic Yacht. The construction of Birdy II. Paul
 Robotic Yacht The construction of Birdy II Paul Table of Contents Introduction... 3 Construction... 4 Superstructure... 4 Birdy II... 5 Building Frame... 6 Bulkheads... 7 Drawing the Waterline... 7 Keel
Skinning without a Needle: Fastening a skin around a kayak or boat frame, using splines an open-source project? Text and photos by Robert Morris
 Skinning without a Needle: Fastening a skin around a kayak or boat frame, using splines an open-source project? Text and photos by Robert Morris Introduction One of the lovely qualities of the skin-on-frame
First Team Sports, Inc. Stellar Recreational Volleyball System
 First Team Sports, Inc. Stellar Recreational Volleyball System BILL OF MATERIALS A 2 Volleyball Vertical Post K 1 ½ Centerlock Nut B 2 Height Labels L 2 Carabiner Clip C 3 Net Clamp M 1 ½ x 2 Hex Bolt
NEW DESIGNS. Print in Landscape Mode with ¼ inch borders. Hinges (2) degrees. 1 Seating Type Optional
 degrees. 1 Seating Type Optional") 2017 IDEAS NEW DESIGNS Ken Simpson Designs Drawn 06-01-2017 Rev. 07-02-2017 The SPORTSMAN 10'L x 36 W x 15 H 475 pound Capacity Print in Landscape Mode with ¼ inch borders. Hinges (2) 36 30 8 degrees Click
2017 IDEAS NEW DESIGNS Ken Simpson Designs Drawn 06-01-2017 Rev. 07-02-2017 The SPORTSMAN 10'L x 36 W x 15 H 475 pound Capacity Print in Landscape Mode with ¼ inch borders. Hinges (2) 36 30 8 degrees Click
Service Bulletin 70. Subject: Vertical fin cracks. Applicability: All Sportsman aircraft
 Subject: Vertical fin cracks Applicability: All aircraft Issue: Inspection of the vertical fin and aft fuselage bulkheads B and C, repair of vertical fin and bulkheads and reinforcement of vertical fin
The importance of splicing especially for braids made with UHMWPE fibre
 The importance of splicing especially for braids made with UHMWPE fibre Nautilus has installed a high spec strength tester for testing ropes up to 14tonnes. There has been much knowledge gained as we can
18. Tailplane torque-tube
 18. Tailplane torque-tube Step 1 Fu se lage rear bulkhead Remove the three part templates of the rear bulkhead: an A4 size sheet from Annex A (page 5) and two A3 size sheets from Annex F of the manual,
Fiber Optic Lighted Bubbler Spillway Pot (DLP-45) Installation Manual
 Installation Manual") Fiber Optic Lighted Bubbler Spillway Pot (DLP-45) Installation Manual 27.75 23.75 25.50 20.75 Specifications: 8-13 GPM 100 strand fiber - Bubbler 75 strand fiber - Spillway Light Bar 45 ft. fiber tail
Fiber Optic Lighted Bubbler Spillway Pot (DLP-45) Installation Manual 27.75 23.75 25.50 20.75 Specifications: 8-13 GPM 100 strand fiber - Bubbler 75 strand fiber - Spillway Light Bar 45 ft. fiber tail
SEADUCER BOATS GAS SPORT HYDRO
 SEADUCER BOATS GAS SPORT HYDRO COME VISIT US ON THE WEB AT WWW.SEADUCERBOATS.COM 2 - Pkg. Of 440 push rod ends 2 - Pkg. of solder-on rod ends 2 -water outlet fitting 1-1/4" prop nut 1 -.250" x 30" flex
Super Sport. Building Instructions Z I P P M A N U FA C T U R I N G. A Zippkits RC Boat. 46 inch Gas Mono Hull
 SS Z I P P M A N U FA C T U R I N G Super Sport 46 inch Gas Mono Hull A Zippkits RC Boat Building Instructions 2018 JMP Hobby Group LLC Indiana USA (866) 922-9477 www.zippkits.com 1 D E S I G N C U S T
Modeling Asphalt Roads by Steve S. From a blog posting on Model Railroad Hobbyist
 I've been working on a small mockup to test some ideas for asphalt and street trackage. I used 1mm black craft foam on code 100 track. You can go the full width of the rails and not interfere with the
BASIC COROPLAST HULLS FOUR HULLS, all single occupant designs. Choose the one that suites your needs.
 BASIC COROPLAST HULLS FOUR HULLS, all single occupant designs. Choose the one that suites your needs. The build notes for one hull 5 type should 8 apply to all hull types. 1 CUT these 2 lines First 20
Kari-Tek. Kari-Tek. Hydro Skeg Retro-Fitting Instructions. Instructions for retro-fitting of Hydro Skeg
 Kari-Tek Instructions for retro-fitting of Hydro Skeg A good knowledge of fibreglassing will be required to fit the Hydro Skeg successfully. When working with fibreglass and cutting the holes, safety glasses,
Teak & Holly Installation Amtico (Luxury Vinyl Tile) 1968 Chris Craft Commander 35 Cabin Sole Summer 2017 Matt Cowles;
 1968 Chris Craft Commander 35 Cabin Sole Summer 2017 Matt Cowles;") Teak & Holly Installation Amtico (Luxury Vinyl Tile) 1968 Chris Craft Commander 35 Cabin Sole Summer 2017 Matt Cowles; MC1600@yahoo.com I m providing this write-up to document my installation of Amtico
Teak & Holly Installation Amtico (Luxury Vinyl Tile) 1968 Chris Craft Commander 35 Cabin Sole Summer 2017 Matt Cowles; MC1600@yahoo.com I m providing this write-up to document my installation of Amtico