Model 23H Hand Crank Seamer
|
|
|
- Julius Waters
- 6 years ago
- Views:
Transcription


1 OPERATOR'S MANUAL Model 23H Hand Crank Seamer If you are not experienced with your seamer, please read and understand this manual before operating the machine. If you have a question discuss it with your supervisor or contact Dixie Canner Company.
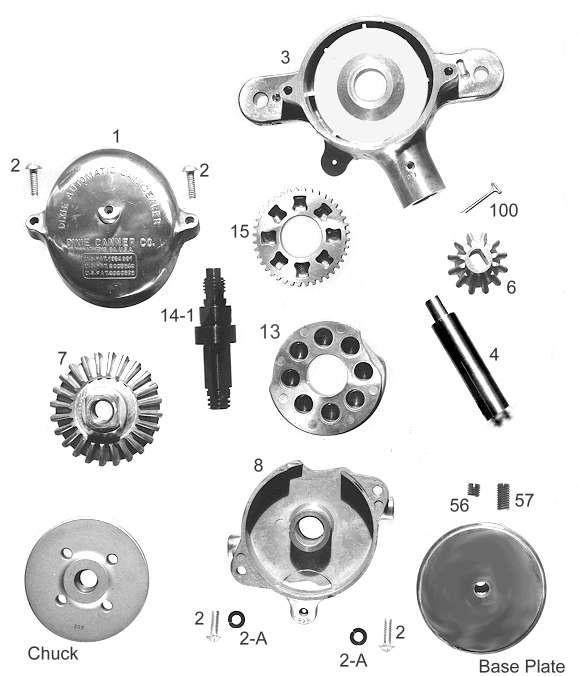
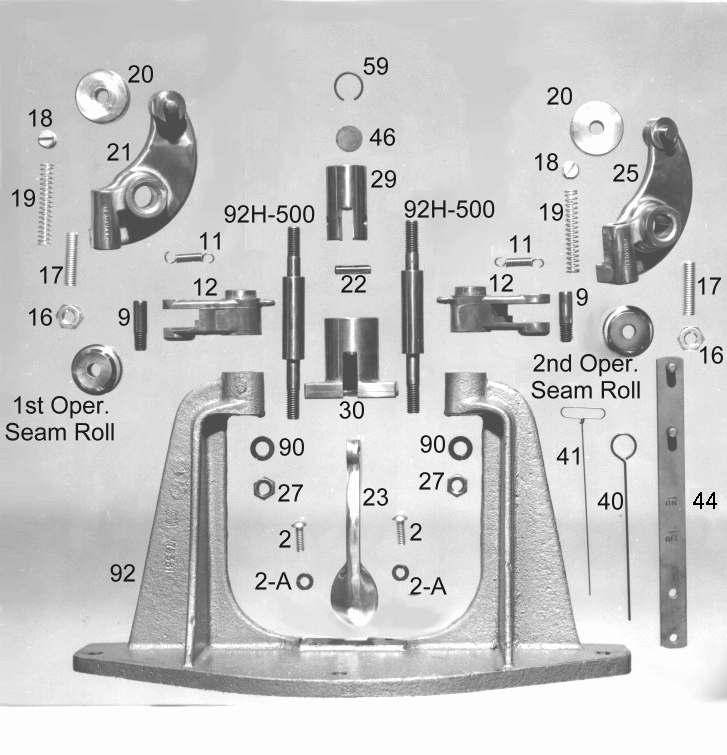
2 INTRODUCTION The Dixie Model 23H Hand Crank Seamer, shown on the front cover, brings together in compact form, the valuable features of larger, more expensive, power driven machines. The Model 23H Hand Crank Seamer is adaptable for containers up to 4¼" diameter and 5" tall. At time of fabrication, extension posts may be used to accommodate containers taller than 5 inches. INSTALLATION 1. Attach seamer firmly to table or bench. 2. Turn hand crank until indicating line on cam roll lever [21] is directly in line with arrow located just above on gear housing [3]. The seaming rolls will then be in their neutral or outermost position in relation to the seaming chuck. OPERATION With base plate in lower position, place filled can with top in place on the baseplate. Lower the can raising lever [23] to raise can into position with the chuck. Turn the hand crank twenty (20) turns in the direction indicated by the arrow. Raise the can raising lever, remove the can and repeat the operation for the next can. CHANGING FROM ONE SIZE CAN TO ANOTHER: Change parts consisting of a chuck, a base plate and a height spacer may be required for each different can diameter, top or style. Also, a different set of seaming rolls may be required for each. Your can manufacturer or supplier may recommend the seam roll profiles for your cans. Dixie stocks or may be able to furnish the seam roll profile needed. Make sure you have the correct change parts available when changing your machine from one can size to another, then proceed as follows: 1. Turn hand crank until seam seam rolls assume their neutral position. (Indicating line on cam roll lever is directly in line with arrow just above gear housing.) 2. Remove screw for housing cover and lift off cover to expose upper end of chuck shaft [14-1]. 3. Loosen lock nuts [16] and loosen set screws [17] until both seam roll levers [12] are back as far as they will go. If needed, change seaming rolls. 4. Change chucks. CAUTION: To prevent damage to the chuck shaft and/or internal gears, use an open end wrench to hold the chuck shaft (remove the housing cover [1] for access) while loosening or tightening the chuck. To remove the chuck, hold the chuck shaft [14-1] with a wrench on the top of the shaft, located under the gear housing cover. Then place the two pins of the chuck wrench [44], provided with your seamer, into two of the four holes located on the bottom of the chuck. (The pins of the chuck wrench will fit into either diagonal or adjacent holes depending on the diameter of the chuck.) To loosen, turn the chuck to the left. Finish removing the chuck by hand. To install a new chuck, hold the chuck shaft with a wrench, as described above, while using your hand to thread the chuck onto the lower end of the chuck shaft. Turn to the right to thread the chuck onto the Bottom View Showing Chuck Top View with Housing Cover Removed 1
3 chuck shaft. Use the chuck wrench, as described above, to tighten snugly. Make certain that the new chuck is properly tightened into position against the shoulder of the chuck shaft. 5. Replace gear housing cover [1]. 6. Install the proper base plate for the can to be closed. Adjust the base pressure and seam rolls as outlined on the following page. NEUTRAL POSITION The machine is in a neutral position when both cam rolls [20] are in their innermost position and both seaming rolls are in their outermost position. The indicating line on cam roll lever should be directly in line with arrow just above gear housing. SEAMING ROLL ADJUSTMENTS: There are twenty (20) revolutions per seaming cycle, ten (10) for each seaming roll. The function of the first operation seam roll is to curl the cover hook and body hook into proper position. The function of the second operation seam roll is to complete the sealing of the can. FIRST OPERATION 1. Put machine in neutral position by positioning the cam roll lever [21] directly in line with arrow on gear housing and hand crank in downward position. 2. Make nine (9) turns of the hand crank in the direction indicated by the arrow. This will bring the first operation seam roll to its innermost position in relation to the chuck. 3. Loosen lock nut [16] and adjust set screw [17] until the first operation seam roll is snugly in position with the chuck. While holding the first operation (larger) gauge wire [40] in position between the chuck lip and the ground profile of the first operation seam roll, tighten the lock nut. DO NOT PLACE WIRE IN GROOVE OF SEAMING CHUCK. The larger diameter gauge wire [40] is the approximate THICKNESS of the first operation seam. Final adjustments may be made after a can is closed and the double seam inspected. 4. Tighten lock nut [16]. Use screwdriver to keep screw [17] from turning when tightening the lock nut. SECOND OPERATION 1. After adjusting first operation roll, give hand crank exactly nine (9) turns in the direction indicated by arrow. This is equivalent to eighteen turns from neutral or starting position and brings the second operation seam roll to its innermost position in relation to the chuck. 2. Loosen lock nut [16]. Place the second operation (smaller) gauge wire [41] in the groove of the second operation seam roll and adjust the screw [17] until the gauge wire fits snugly between the roll and the roughened or knurled edge of the chuck. Move gauge wire back and forth to allow sufficient friction to turn seam roll. DO NOT PLACE WIRE IN GROOVE OF SEAMING CHUCK. The small diameter gauge wire [41] represents the approximate THICKNESS of the second roll seam. Final adjustments may be made after a can is closed and the double seam inspected. 3. Tighten lock nut [16]. Use screwdriver to keep screw [17] from turning when tightening the lock nut. 4. Turn hand crank two more turns to place seamer in neutral again. 5. Close a can, tear down and inspect the double seam. Make final adjustments of the seaming rolls and base plate pressure to produce essential body hook, cover hook, overlap and tightness recommended by the container manufacturer or for a hermetically sealed can. NOTE: If you are unable to obtain the essential measurements recommended or a hermetically seamed container, you may need seam rolls with different profiles. NOTE: When adjusting seam rolls, make sure you start from neutral position. Count carefully number of turns of crank. Be sure seam roll is in its inner-most position 2
4 when inserting gauge wire. Also make certain to place the gauge wire in the groove of the seam roll, NOT in the groove of the chuck. If your seamer shows a tendency to work overly hard, or lock, check adjustments of the seam rolls. CAUTION: To avoid damage to your seamer, make sure that the seam roll is no closer to the chuck than to allow the small gauge wire to pass. BASE PLATE PRESSURE ADJUSTMENTS Proper base plate pressure is required to produce essential body hook and prevent slipping of can during the seaming cycle. Each base plate has an adjusting screw [57] and set screw [56] in its stem for making minute base plate adjustments as follows: SECTIONAL VIEW OF BASE PLATE ASSEMBLY 1. Lift base plate out of plunger [29] and inspect the metal discs [46]. Replace metal discs if there is any sign of undue wear or breakage. To replace the metal discs, first remove remove the plunger housing [30] and disassemble. Through the hole in the bottom of the plunger [29], insert a nail or punch and knock out the metal discs [46] and retainer spring [59]. Replace with new discs and reassemble, making certain that the retainer spring and metal discs are properly seated and that the entire assembly is adequately lubricated (oiled). 2. Insert screwdriver in the hole in the top of the base plate and loosen set screw [56] by turning counter clockwise. 3. Turn adjusting screw [57] in the proper direction to lengthen or shorten effective height of the base plate, as may be required for proper tension (pressure). If you find it necessary to use pliers to turn the adjusting screw, be very careful not to damage threads. 4. Tighten set screw snugly. It may be necessary to hold the end of the adjusting screw firmly while tightening the set screw. 5. Make certain that the base plate assembly is properly lubricated and replace the base plate in the plunger. TESTING THE DOUBLE SEAM Before sealing a large number of cans or when changing from one size to another, ordinary precaution must be used to determine that the seamer is in proper adjustment and a satisfactory seam has been achieved. Can seam inspection should be performed routinely to ensure the seamer is in proper adjustment. Seal a test can and inspect the double seam for droops, vees, tightness or other possible defects. If your can manufacturer has provided you with seam specifications, take measurements of the seam to be sure your seam is within recommended tolerances. Dixie offers a Can Seam Test Kit that will enable you to measure different aspects of the double seam. If you are testing only for an airtight or hermetic seal, various rule-of-thumb methods may be used such as immersion in water to check for air bubbles which may indicate leakage. Please check with your supervisor to determine the seam test method that is proper for your purposes. Refer to instructions for adjusting seam rolls and changing from one size can to another to readjust your seamer as necessary to obtain a correct double seam. MAINTENANCE OF SEAMER With ordinary care, your Dixie seamer should give you excellent trouble free service if the following simple rules are observed. 1. Keep the seamer in proper adjustment at all times. 2. Replace worn parts as needed. 3. Clean thoroughly after each daily use. 4. Apply a few drops of lightweight oil to all moving parts and in all holes plainly marked OIL. At the start of each season and periodically thereafter, remove housing cover [1] and apply grease to gears [6] and [7]. Use fitting on gear housing cover to lubricate (grease) chuck shaft. Use fitting on gear housing [3] to lubricate drive shaft [4]. CHANGE PARTS AND REPAIR PARTS When ordering parts, always furnish both the part number and the name of the part. When ordering change parts for cans, always send six (6) loose tops and can bodies of the size can(s) to be closed. 3
5 REPAIR PARTS AND REBUILDING SERVICE A complete stock of parts is maintained by Dixie Canner Company. Parts may be ordered as needed to replace worn or damaged parts. Your Dixie Double Seamer may be returned to Athens, Georgia for complete rebuilding at a nominal service charge, plus the cost of parts needed. When returning the machine for the rebuilding service, please observe the following: 1. Return the complete machine and include several cans and tops of the exact size and type closed. Properly crate the machine and cans for safe delivery and return shipment, and prepay the shipping cost. 2. Write a letter authorizing the rebuilding service and mention any problem with the machine. Also mention particular instructions concerning return shipment, urgency, and other pertinent instructions. HELPFUL HINTS TROUBLESHOOTING Until the operator is familiar with the mechanics of the seamer and learns to recognize irregularities in the essential requirements of the double seam, the outline below is intended to help notice obvious defects and list some causes that may serve as a guide in correcting minor troubles. MECHANICAL DEFECTS & COMMON CAUSES A. Can slips during seaming operation. 1. Damage or lack of oil in the base plate, lift shaft, or height spacer. 2. Insufficient base plate pressure. 3. Worn or broken metal discs in base plate seat. Remove base plate from plunger and check metal discs [46]. Replace discs if broken or excessively worn. 4. Worn or wrong size chuck. Make sure that the lid fits properly against the chuck; the lid should fit snugly but should not bind. Dixie chucks are custom fabricated to fit the specific end which you submitted when the chuck was ordered. If you have changed lid styles, you may need a new chuck. 5. Seaming rolls binding on screws. B. Machine operates with undue noise or "locks." 1. Machine not properly timed. 2. Broken drive shaft bevel gear. Remove gear housing cover [1] and check drive shaft bevel gear [6]; if broken, replace as follows: a. With machine in neutral position and without turning hand crank, remove cotter key [100], then push drive shaft [4] back toward crank and replace gear. (If hand crank turns during this replacement, timing will be thrown off, making it impossible to adjust seaming rolls.) b. Reposition drive shaft [4]; insert cotter key [100], then replace housing cover. C. Unusually loose seaming rolls. 1. Seaming rolls or seam roll screws worn. Seam rolls should turn freely but without up and down movement or wobble. If undue wear is evident, replace with new screws and/or seam rolls. D. Seaming rolls do not return to neutral position. 1. Seaming roll levers binding. 2. Seaming lever spring weak or broken. 3. Machine not properly timed. E. Machine seems to "labor" or freeze tight. 1. Needs oil. 2. Too much base plate pressure. 3. Seaming rolls too tight. 4. Misalignment of moving parts. DOUBLE SEAM DEFECTS & COMMON CAUSES A. Cut over. Unusually sharp edge at top inside edge of seam. 1. 1st or 2nd operation seam roll set too tight. 2. Worn seam rolls or worn chuck. B. Cut or fractured seam. 1. Seam rolls set too tight. C. Droop or lap in double seam at or near can body side seam. 2. 1st operation seam roll set too loose. 3. Worn 1st operation seam roll. D. Excessive countersink depth. 2. 1st operation seam roll set too loose. 3. Chuck not properly seated in can top. 4. Chuck groove worn. E. False seam. Body hook and cover hook do not overlap. 1. Can top not properly seated on can. 2. Damaged can flange or can top curl. F. Long body hook. G. Long cover hook. 1. 1st operation seam roll set too tight. H. Short body hook. 1. Insufficient base pressure. 2. 1st operation seam roll set too tight. 3. 2nd operation seam roll set too loose. I. Short cover hook. 2. 1st operation seam roll set too loose. 3. Worn 1st operation seam roll. 4. Excessive countersink depth. J. Cover hook or body hook not uniform. 1. Base plate or plunger worn. 2. Chuck or seam rolls out of alignment. K. Droops, vees, wrinkles. 1. Excessive base pressure. 2. 1st operation seam roll too loose or worn. 3. 2nd operation seam roll too tight. 4. Defects in can body or top. 5. Incorrect seam roll profiles. 4
6 5
7 6
DIRECT DRIVE DIXIE DOUBLE SEAMER Model 25D
 OPERATOR'S MANUAL DIRECT DRIVE DIXIE DOUBLE SEAMER Model 25D LUBRICATE DAILY: A. Gears inside gear housing at chuck shaft (1) Oil B. Seam rolls and cam rolls (4) - Oil C. Seam roll levers through gear
OPERATOR'S MANUAL DIRECT DRIVE DIXIE DOUBLE SEAMER Model 10D
 OPERATOR'S MANUAL DIRECT DRIVE DIXIE DOUBLE SEAMER Model 10D OIL DAILY: A. Gears inside gear housing through oil groove in gear housing at cut surface of chuck shaft. (Oil through #517 gear housing cover
OPERATOR'S MANUAL Model 23 or 24 Belt Drive Electric Seamer
 OPERATOR'S MANUAL Model 23 or 24 Belt Drive Electric Seamer Model 23-500 (shown) If you are not experienced with your seamer, please read and understand this manual before operating the machine. If you
OPERATOR'S MANUAL DIRECT DRIVE DIXIE DOUBLE SEAMER. Model 25D
 OPERATOR'S MANUAL DIRECT DRIVE DIXIE DOUBLE SEAMER Model 25D OPERATOR'S MANUAL DIRECT DRIVE DIXIE DOUBLE SEAMER MODEL 25D INTRODUCTION DESCRIPTION Dixie Model 25D series of double seamers are adaptable
Assembling a Can Sealer FNH-00022
 Assembling a Can Sealer FNH-00022 Technical revision in January 2009 by Kristy Long Extension Foods Specialist Cooperative Extension Service University of Alaska Fairbanks Photos by Jeff Fay Extension
IMPORTANT: RECEIVING INSTRUCTIONS:
 Instruction Sheet Sidewinder Mechanical Bender IMPORTANT: RECEIVING INSTRUCTIONS: Visually inspect all components for shipping damage. If any shipping damage is found, notify carrier at once.shipping damage
LIQUIP DRYBREAK COUPLER. API800 Series MAINTENANCE INSTRUCTIONS
 LIQUIP DRYBREAK COUPLER API800 Series MAINTENANCE INSTRUCTIONS API LOADING COUPLER TO API RP1004 June 2015 Issue: F M:\Product-Info\API8xx\6-Service-Maintenance\API800 MAINTENANCE INSTRUCTIONS 40183.doc
BUTTERFLY VALVES Series 800
 BUTTERFLY VALVES Series 800 WARNING Before proceeding read ALL instructions and become familiar with the equipment and associated drawings. Follow ALL applicable safety regulations and codes for pressurized
Auto-Rewind Hose Reels INSTRUCTION MANUAL FOR OXY-LPG MODEL
 Auto-Rewind Hose Reels INSTRUCTION MANUAL FOR OXY-LPG MODEL Introduction Thank you for purchasing a Retracta Auto Rewind Hose Reel. The Retracta range of hose reels are a breakthrough in industrial quality
MAINTENANCE PROCEDURE FOR X 650
 MAINTENANCE PROCEDURE FOR X 650 X 650 25. juli 2005-1/6 MAINTENANCE PROCEDURE FOR X 650 2 ND STAGE WARNING: This maintenance procedure is only for appointed Scubapro technicians that completed a course
7130 Lancer Rear Drive Magnetic Commercial Indoor Cycling Bike
 7130 Lancer Rear Drive Magnetic Commercial Indoor Cycling Bike Owner s Manual Made in Taiwan INDEX IMPORTANT SAFETY INFORMATION... 1 EXPLODED DRAWING... 2 PARTS LIST... 3 ASSEMBLY INSTRUCTION... 4-9 USER
Shifting Lever. Dealer's Manual. RAPIDFIRE Plus SL-M2000 SL-M3010 SL-M4010. Thumb Shifter SL-TZ500. ROAD MTB Trekking. City Touring/ Comfort Bike
 (English) DM-MDSL001-01 Dealer's Manual ROAD MTB Trekking City Touring/ Comfort Bike URBAN SPORT E-BIKE Shifting Lever RAPIDFIRE Plus SL-M2000 SL-M3010 SL-M4010 Thumb Shifter SL-TZ500 CONTENTS IMPORTANT
Service and Repair Manual
 II stage R2 Ice/ Special, II stage R 1 Pro DOWNSTREAM 2 nd STAGE REGULATOR Service and Repair Manual Introduction Safety Precautions...4 General Procedures, Maintenance Schedules...5 Initial Inspection
HEAVY DUTY SIT-UP BENCH SF-BH6502 USER MANUAL
 HEAVY DUTY SIT-UP BENCH SF-BH6502 USER MANUAL IMPORTANT: Read all instructions carefully before using this product. Retain owner s manual for future reference. For customer service, please contact: support@sunnyhealthfitness.com
OWNER'S MANUAL. Copyright 1999 ATS - All Rights Reserved
 OWNER'S MANUAL AL Issue 2 - August 19, 1999 Copyright 1999 ATS - All Rights Reserved OWNER'S MANUAL TABLE OF CONTENTS PAGE 1... WARRANTY PAGE 2... ASSEMBLY INSTRUCTIONS PAGE 4... MOUNTING THE RACQUET PAGE
KTM OM-2 SPLIT BODY FLOATING BALL VALVES INSTALLATION AND MAINTENANCE INSTRUCTIONS
 Before installation these instructions must be fully read and understood SECTION 1 - STORAGE 1.1 Preparation and preservation for storage All valves should be properly packed in order to protect the parts
OWNER'S MANUAL. Copyright 2003 GAMMA - All Rights Reserved
 OWNER'S MANUAL AL Issue 1 - December 2003 Copyright 2003 GAMMA - All Rights Reserved OWNER'S MANUAL TABLE OF CONTENTS PAGE 1... WARRANTY PAGE 2... ASSEMBLY INSTRUCTIONS PAGE 4... MOUNTING THE RACQUET PAGE
CHAPTER 5 REWIND STARTERS
 GENERAL INFORMATION CHAPTER 5 REWIND S Rewind starters used on vertical shaft Tecumseh engines are top mount horizontal pull style or side mount vertical pull style. Horizontal shaft engines use side mounted
RG1200 Service and Repair Manual
 Dive Rite RG 1200 Regulator Service and Repair Manual Page 1 Text and Photography by Pete Nawrocky Copyright ( ) 1999-2000, Lamartek, Inc., dba Dive Rite RG1200 Service and Repair Manual First Stage.........................................
Differential Pressure Regulator Type Type 45-6 (0.1 to 1 bar, DN 15) Mounting and Operating Instructions EB 3226 EN
 Mounting and Operating Instructions EB 3226 EN") Differential Pressure Regulator Type 45-6 Type 45-6 (0.1 to 1 bar, DN 15) Mounting and Operating Instructions EB 3226 EN Edition March 2008 Contents Contents Page 1 Design and principle of operation...................
Differential Pressure Regulator Type 45-6 Type 45-6 (0.1 to 1 bar, DN 15) Mounting and Operating Instructions EB 3226 EN Edition March 2008 Contents Contents Page 1 Design and principle of operation...................
Thumb Shifter Plus Thumb Shifter
 (English) DM-SL0004-01 Dealer's Manual Thumb Shifter Plus Thumb Shifter Thumb Shifter Plus SL-FT55 SL-TX50 SL-TX30 Thumb Shifter SL-TZ20 IMPORTANT NOTICE This dealer's manual is intended primarily for
TBV OPERATION AND MAINTENANCE MANUAL SERIES 2800: FLANGED BALL VALVE. For technical questions, please contact the following:
 TBV OPERATION AND MAINTENANCE MANUAL SERIES 2800: FLANGED BALL VALVE For technical questions, please contact the following: Engineering Department 1537 Grafton Road Millbury, MA 01527 Phone: (508) 887-9400
MAGNETIC INDOOR CYCLING BIKE
 MAGNETIC INDOOR CYCLING BIKE SF-B1805 USER MANUAL IMPORTANT! Please retain owner s manual for maintenance and adjustment instructions. Your satisfaction is very important to us, PLEASE DO NOT RETURN UNTIL
BELT DRIVE INDOOR CYCLING BIKE SF-B1712 USER MANUAL
 BELT DRIVE INDOOR CYCLING BIKE SF-B1712 USER MANUAL IMPORTANT! Please retain owner s manual for maintenance and adjustment instructions. Your satisfaction is very important to us, PLEASE DO NOT RETURN
MAGNETIC CYCLING TRAINER SF-B0419 USER MANUAL
 MAGNETIC CYCLING TRAINER SF-B049 USER MANUAL IMPORTANT: Read all instructions carefully before using this product. Retain owner s manual for future reference. For customer service, please contact: support@sunnyhealthfitness.com
WHEATLEY WHEATLEY SERIES 500 SWING CHECK VALVE. Installation, Operation and Maintenance Manual
 WHEATLEY SERIES 500 SWING CHECK VALVE STANDARD INTEGRAL SEAT & OPTIONAL REMOVABLE SEAT 2" FP - 6" FP 150# - 1500# 8" FP - 12" FP 150# - 900# API 6D and B16.34 2" FP - 4" FP 5000# DRILLING PRODUCTION VALVE
1200B2 Series Service Regulators. Instruction Manual
 00B Series Service Regulators Instruction Manual 00B Series Service Regulators 0 Elster American Meter 00B Series Service Regulators General Information The 00B Series Service Regulators are available
DIP STATION WITH SAFETY CONNECTOR SF-BH6507 USER MANUAL
 DIP STATION WITH SAFETY CONNECTOR SF-BH6507 USER MANUAL IMPORTANT: Read all instructions carefully before using this product. Retain owner s manual for future reference. For customer service, please contact:
Final Assembly Instructions Bikes with 16 Wheel Size
 Final Assembly Instructions Bikes with 16 Wheel Size Thank you for buying your new bicycle from L.L.Bean. Read these instructions carefully before beginning the final assembly. Prior to shipping, our expert
BELT DRIVE INDOOR CYCLING BIKE SF-B1712
 BELT DRIVE INDOOR CYCLING BIKE SF-B1712 USER MANUAL IMPORTANT! Read all instructions carefully before using this product. Retain owner s manual for future reference. For customer service, please contact:
Lectric Cycles Mid-Drive Electric Motor Installation
 Lectric Cycles Mid-Drive Electric Motor Installation This write-up describes the installation of a Lectric Cycles electric motor. The model is the e-rad Mid-Drive 750 Watt conversion kit, installed on
Final Assembly Instructions Bikes with Quill Stems
 Final Assembly Instructions Bikes with Quill Stems Thank you for buying your new bicycle from L.L.Bean. Read these instructions carefully before beginning the final assembly. Prior to shipping, our expert
DelVal Flow Controls Private limited
 DelVal Flow Controls Private limited (A DIVISION OF DelTech CONTROLS LLC, USA) DelVal Series 50/5, 5A/5B Butterfly Valves INSTALLATION, OPERATION AND MAINTENANCE MANUAL ENGINEERING DATA SHEET E.D.S. NO
Apollo Standard Port, Full Port & One Piece Flanged Ball Valves Installation, Operation, & Maintenance Manual
 I854000.D Apollo Standard Port, Full Port & One Piece Flanged Ball Valves Installation, Operation, & Maintenance Manual Introduction This manual presents guidelines for the Installation, Operation and
MUELLER GAS. No-Blo Operations Using D-5. Drilling Machine. Reliable Connections. General Information 2
 operating Instructions manual MUELLER GAS TAble of contents PAGE No-Blo Operations Using D-5 General Information 2 Installing No-Blo Service Tees, Service Stop Tees and Curb Stop Tees 3-8 Reconditioning
AR STYLE FIREARMS OWNER'S MANUAL: OPERATION, HANDLING, DISASSEMBLY / REASSEMBLY & SAFETY INSTRUCTIONS
 AR STYLE FIREARMS OWNER'S MANUAL: OPERATION, HANDLING, DISASSEMBLY / REASSEMBLY & SAFETY INSTRUCTIONS - DO NOT DISCARD THIS MANUAL - READ THIS MANUAL CAREFULLY, PAYING CLOSE ATTENTION TO THE INSTRUCTIONS
Cantilever Brake. Dealer's Manual. ROAD MTB Trekking. City Touring/ Comfort Bike
 (English) DM-RCBR001-00 Dealer's Manual ROAD MTB Trekking City Touring/ Comfort Bike URBAN SPORT E-BIKE Cantilever Brake BR-CX70 BR-CX50 BL-4700 BL-4600 BL-R780 BL-R3000 ST-7900 ST-6700 ST-5700 ST-4600
1.0 - OPENING AND CLOSING THE DOOR
 The purpose of this manual is to provide the user with instructions on how to safely open and close, how to conduct routine maintenance, and how to install the PEI TWINLOCK Closure on a pressure vessel.
Installation Troubleshooting Maintenance Instructions Installation / Start-up
 Model ZW207 Installation Troubleshooting Maintenance Instructions Installation / Start-up NOTE: Flushing of all pipe lines is to be performed to remove all debris prior to installing valve. 1. For making
Installation of Your SprayMaster System
 Installation of Your SprayMaster System 1. At the installation site, remove all equipment from the corrugated box and the polyethylene drum and replace the drum lid. Check the picture to identify each
Santa Fe Cycles Assembly Guide Introduction
 Santa Fe Cycles Assembly Guide Introduction Congratulations on your purchase of your new Santa Fe bicycle. You have purchased a bicycle that has many features and qualities. Please take a few minutes and
Paintball Marker. User s Manual. 530 South Springbrook Road Newberg, OR 97132
 Paintball Marker User s Manual 530 South Springbrook Road Newberg, OR 97132 Component Concepts, Inc., 530 South Springbrook Road, Newberg, OR 97132 Phone: (503) 554-8095 Fax: (503) 554-9370 www.phantomonline.com
Arbor Terminator Press Operation Manual For IDT Connectors Order No Engineering No: AM
 Arbor Terminator Press Operation Manual For IDT Connectors Order No. 11-20-0815 Engineering No: AM7223-140 Description Operation Maintenance Order No: TM-011200815 Release Date: 03-08-12 UNCONTROLLED COPY
LIQUIP DRYBREAK COUPLER. LYNX Series MAINTENANCE INSTRUCTIONS
 LIQUIP DRYBREAK COUPLER LYNX Series MAINTENANCE INSTRUCTIONS API LOADING COUPLER TO API RP1004 February 2016 Issue: DRAFT A Issue: DRAFT - A 02/01/16 Page 1 CONTENTS LYNX Series Datasheet... 3 LYNX Series
DM-RARD (English) Dealer's Manual. ROAD MTB Trekking. City Touring/ Comfort Bike. Rear Derailleur DURA-ACE RD-R9100 ULTEGRA RD-R8000
 Dealer's Manual. ROAD MTB Trekking. City Touring/ Comfort Bike. Rear Derailleur DURA-ACE RD-R9100 ULTEGRA RD-R8000") (English) DM-RARD001-03 Dealer's Manual ROAD MTB Trekking City Touring/ Comfort Bike URBAN SPORT E-BIKE Rear Derailleur DURA-ACE RD-R9100 ULTEGRA RD-R8000 CONTENTS IMPORTANT NOTICE... 3 TO ENSURE SAFETY...
(English) DM-RARD001-03 Dealer's Manual ROAD MTB Trekking City Touring/ Comfort Bike URBAN SPORT E-BIKE Rear Derailleur DURA-ACE RD-R9100 ULTEGRA RD-R8000 CONTENTS IMPORTANT NOTICE... 3 TO ENSURE SAFETY...
DM-RD (English) Dealer s Manual. ROAD Rear Derailleur RD-9000 RD-6800 RD-5800 RD-4700
 Dealer s Manual. ROAD Rear Derailleur RD-9000 RD-6800 RD-5800 RD-4700") (English) DM-RD0003-09 ROAD Rear Derailleur Dealer s Manual RD-9000 RD-6800 RD-5800 RD-4700 CONTENTS IMPORTANT NOTICE...3 TO ENSURE SAFETY...4 LIST OF TOOLS TO BE USED...6 INSTALLATION...8 Chain length...
(English) DM-RD0003-09 ROAD Rear Derailleur Dealer s Manual RD-9000 RD-6800 RD-5800 RD-4700 CONTENTS IMPORTANT NOTICE...3 TO ENSURE SAFETY...4 LIST OF TOOLS TO BE USED...6 INSTALLATION...8 Chain length...
Instruction Manual LIMITED 1 YEAR WARRANTY. Hydraulic Punch Driver Read this material before using this product.
 Instruction Manual Hydraulic Punch Driver 902-483 LIMITED 1 YEAR WARRANTY We make every effort to assure that its products meet high quality and durability standards, and warrant to the original purchaser
1800C and 1800C-HC Series Service Regulators
 1800C and 1800C-HC Series Service Regulators Installation Instructions www.elster-americanmeter.com General Information: The 1800C and 1800C-HC Regulators are available as Full Capacity Internal Relief
WHEATLEY Series 500 Swing Check Valve
 Document Number: TC003001-13 Revision: 02 WHEATLEY Series 500 Swing Check Valve Installation, Operation, and Maintenance Manual TABLE OF CONTENTS BILL OF MATERIALS...3 SCOPE...5 INSTALLATION AND OPERATION
Henry Pratt Diviner Position Indicator. Operation and Maintenance Manual. Job Name: Contractor: Date: Document #:DIVPOSNOM Revision Date: 2/9/11
 Henry Pratt Diviner Position Indicator Operation and Maintenance Manual Job Name: Contractor: Date: Document #:DIVPOSNOM Revision Date: 2/9/11 SAFETY MESSAGES All safety messages in the instructions are
MUELLER A A Non-Adjustable. Vertical Indicator Posts. Reliable Connections. General Information 2. Technical Data 3.
 Installation Instructions manual MUELLER table of contents PAGE A-20808 General Information 2 Technical Data 3 Dimensions 4 A-20809 Non-Adjustable Installation 5-6 Parts 7 Maintenance 8 Vertical Indicator
Hydraulic Punch Drivers
 SERVICE MANUAL 7804SB / 7806SB Quick Draw 7704SB / 7706SB Quick Draw Flex Quick Draw Hydraulic Punch Drivers Serial Codes AHJ and YZ Read and understand all of the instructions and safety information in
Front derailleur. Dealer's Manual DURA-ACE FD-R9100 ULTEGRA FD-R FD ROAD MTB Trekking. City Touring/ Comfort Bike DM-RAFD001-03
 (English) DM-RAFD001-03 Dealer's Manual ROAD MTB Trekking City Touring/ Comfort Bike URBAN SPORT E-BIKE Front derailleur DURA-ACE FD-R9100 ULTEGRA FD-R8000 105 FD-5801 Procedures for cable tension adjustment
Final Assembly Instructions Bikes with Threaded Headsets
 Final Assembly Instructions Bikes with Threaded Headsets Thank you for buying your new bicycle from L.L.Bean. Read these instructions carefully before beginning the final assembly. Prior to shipping, our
SCUBAPRO. Balanced Power Inflator
 SCUBAPRO Balanced Power Inflator USE THIS GUIDE AS A REFERENCE WHEN SERVICING THE BALANCED POWER INFLATOR Important note: The following information is not designed to be a complete training guide for servicing
Combination Breathing Apparatus
 and Combination Breathing Apparatus ULTRAVUE FACEPIECE TAL 502 (L) Rev. 0 MSA 2005 Prnt. Spec. 10000005389 (I) Mat. 10064385 Doc. 10064385 ULTRAVUE FACEPIECE COMPONENTS Item Part No. Description 800509
Type S301 & S302 Gas Regulators INTRODUCTION INSTALLATION. Scope of Manual. Description. Specifications. Type S301 and S302. Instruction Manual
 Fisher Controls Instruction Manual Type S301 & S302 Gas Regulators October 1981 Form 5180 WARNING Fisher regulators must be installed, operated, and maintained in accordance with federal, state, and local
RB70 Automatic Diluent Valve Maintenance Manual. Version 1.1 November 2006 Written by Tino de Rijk. Page 1 of 23
 RB70 Automatic Diluent Valve Maintenance Manual Version 1.1 November 2006 Written by Tino de Rijk Page 1 of 23 Table of Contents 1. Introduction... 3 2. ADV diagram and parts list (Pre June 2006)... 4
DM-RBRD (English) Dealer's Manual. ROAD MTB Trekking. City Touring/ Comfort Bike. Rear Derailleur
 Dealer's Manual. ROAD MTB Trekking. City Touring/ Comfort Bike. Rear Derailleur") (English) DM-RBRD001-00 Dealer's Manual ROAD MTB Trekking City Touring/ Comfort Bike URBAN SPORT E-BIKE Rear Derailleur CLARIS RD-R2000 CONTENTS IMPORTANT NOTICE... 3 TO ENSURE SAFETY... 4 LIST OF TOOLS
(English) DM-RBRD001-00 Dealer's Manual ROAD MTB Trekking City Touring/ Comfort Bike URBAN SPORT E-BIKE Rear Derailleur CLARIS RD-R2000 CONTENTS IMPORTANT NOTICE... 3 TO ENSURE SAFETY... 4 LIST OF TOOLS
BELT DRIVE PREMIUM INDOOR CYCLING BIKE SF-B1509 USER MANUAL
 BELT DRIVE PREMIUM INDOOR CYCLING BIKE SF-B1509 USER MANUAL IMPORTANT! Read all instructions carefully before using this product. Retain owner s manual for future reference. For customer service, please
Nexus. Dealer's Manual. ROAD MTB Trekking. City Touring/ Comfort Bike SG-3R40 SG-3R45 SG-3R75 SG-3R75-A SG-3R75-B SG-3D55 SG-3C41
 (English) DM-SG0005-01 Dealer's Manual ROAD MTB Trekking City Touring/ Comfort Bike URBAN SPORT E-BIKE Nexus SG-3R40 SG-3R45 SG-3R75 SG-3R75-A SG-3R75-B SG-3D55 SG-3C41 SL-3S35-E SL-3S41-E SL-3S42-E SM-BC03
model - CYPRESS DX W
 Contents model - CYPRESS DX W Maintenenace manual Read and Save these instructions Welcome Contents 1 Preparing Nothing makes us happier than seeing people out riding bikes. For over thirty years Giant
Regulators repair and maintenance. XS Compact 2nd stage. January 2014 Rev XSC /3 Ed. C /14 1
 XS Compact 2nd stage January 2014 Rev XSC /3 Ed. C /14 1 XS Compact 2nd stage WARNING! This manual is intended for use by expert technicians who have already received training in equipment repairs and
Fontaine Fifth Wheel Ultra LT Rebuild Procedures
 Fontaine Fifth Wheel Ultra LT Rebuild Procedures Disassembly Assembly Adjustments 800-874-9780 2010 LT-147 January 2010 Dissassembly Cover plate removed for clarity. Refer to exploded view of assembly
DM-MBRD (English) Dealer's Manual. ROAD MTB Trekking. City Touring/ Comfort Bike. Rear Derailleur SLX RD-M7000 DEORE RD-M6000
 Dealer's Manual. ROAD MTB Trekking. City Touring/ Comfort Bike. Rear Derailleur SLX RD-M7000 DEORE RD-M6000") (English) DM-MBRD001-04 Dealer's Manual ROAD MTB Trekking City Touring/ Comfort Bike URBAN SPORT E-BIKE Rear Derailleur SLX RD-M7000 DEORE RD-M6000 CONTENTS IMPORTANT NOTICE... 3 TO ENSURE SAFETY... 4
(English) DM-MBRD001-04 Dealer's Manual ROAD MTB Trekking City Touring/ Comfort Bike URBAN SPORT E-BIKE Rear Derailleur SLX RD-M7000 DEORE RD-M6000 CONTENTS IMPORTANT NOTICE... 3 TO ENSURE SAFETY... 4
VALVES & MEASUREMENT
 VALVES & MEASUREMENT TBV OPERATION AND MAINTENANCE MANUAL SERIES 1100: THREE PIECE BALL VALVE For technical questions, please contact the following: Engineering Department 1537 Grafton Road Millbury, MA
KENNEDY VALVE OPERATION & MAINTENANCE MANUAL
 2 54 ROTATING DISC GATE VALVE OPERATION & MAINTENANCE MANUAL Rel. 5/27/16 1 TABLE OF CONTENTS 3 General 3 Receipt & Inspection 4 Gate Valve Storage & Handling 5 6 Installation 7 Operation 8 Field Testing
PISTOL CALIBER AR STYLE FIREARMS
 PISTOL CALIBER AR STYLE FIREARMS OWNER'S MANUAL: OPERATION, HANDLING, DISASSEMBLY / REASSEMBLY & SAFETY INSTRUCTIONS - DO NOT DISCARD THIS MANUAL - READ THIS MANUAL CAREFULLY, PAYING CLOSE ATTENTION TO
DM-FD (English) Dealer's Manual. Front derailleur FD-M9000 FD-M9020 FD-M9025 FD-M8000 FD-M8020 FD-M8025 FD-M612 FD-M617 FD-M618 FD-M672
 Dealer's Manual. Front derailleur FD-M9000 FD-M9020 FD-M9025 FD-M8000 FD-M8020 FD-M8025 FD-M612 FD-M617 FD-M618 FD-M672") (English) DM-FD0003-04 Front derailleur Dealer's Manual FD-M9000 FD-M9020 FD-M9025 FD-M8000 FD-M8020 FD-M8025 FD-M612 FD-M617 FD-M618 FD-M672 FD-M677 CONTENTS IMPORTANT NOTICE... 3 TO ENSURE SAFETY...
(English) DM-FD0003-04 Front derailleur Dealer's Manual FD-M9000 FD-M9020 FD-M9025 FD-M8000 FD-M8020 FD-M8025 FD-M612 FD-M617 FD-M618 FD-M672 FD-M677 CONTENTS IMPORTANT NOTICE... 3 TO ENSURE SAFETY...
Congratulations! You own an R9 Cobra! A compact, fast handling and powerful crossbow for your serious shooting enjoyment!
 COBRA SYSTEM R9 COBRA SYSTEM R9 CROSSBOW INSTRUCTION MANUAL Congratulations! You own an R9 Cobra! A compact, fast handling and powerful crossbow for your serious shooting enjoyment! The limb set comes
Final Assembly Instructions Bikes with Threaded Headsets
 Final Assembly Instructions Bikes with Threaded Headsets Thank you for buying your new bicycle from L.L.Bean. Read these instructions carefully before beginning the final assembly. Prior to shipping, our
MUELLER. A Wall Type. Indicator Post. Reliable Connections. General Information 2. Technical Data/ Dimensions 3. Installation 4-5.
 Installation Instructions manual MUELLER table of contents PAGE A-20814 Wall Type General Information 2 Technical Data/ Dimensions Installation 4-5 Maintenance 6 Parts 7 Indicator Post! WARNING: 1. Read
Index Table. Model 794. Installation, Operating and Maintenance Instructions
 CLOCKWISE MANUAL MAKING INTO CCW TABLE Index Table Model 794 Installation, Operating and Maintenance Instructions Black & Webster Products Division 545 Hupp Ave. P.O. Box 831, Jackson, Michigan 49204 2009
CLASS CYCLE P8000 OWNER'S MANUAL JOHNSON HEALTH TECH. CO., LTD.
 CLASS CYCLE P8000 JOHNSON HEALTH TECH. CO., LTD. No.26, Ching Chuan Rd., Taya Hsiang, Taichung Hsien 428, Taiwan, R.O.C. TEL: +886-4-2566700 FAX: +886-4-2560087 E-mail: sales@johnsonfitness.com http://www.johnsonfitness.com
Operating Procedures for GripTight 15.5 SDR & IPS Test Plugs
 EST Group DC2518 08/01 REV 3 12/12 Page 1 of 6 Operating Procedures for GripTight SDR & IPS Test Plugs WARNING For proper operation, GripTight plugs must be assembled as shown in Figure 1. Pressure testing
OPERATION MANUAL Please read this Operation Manual carefully before use, and file for future reference.
 English Lubrication Free Air Turbine Handpiece with Water Spray OPERATION MANUAL Please read this Operation Manual carefully before use, and file for future reference. OM-T0286E 001 Thank you for purchasing
ROAD Wheel Set. Dealer's Manual WH-9000-C24-CL WH-9000-C24-TL WH-9000-C35-CL WH-9000-C35-TU WH-9000-C50-CL WH-9000-C50-TU WH-9000-C75-TU
 (English) DM-WH0002-00 Dealer's Manual ROAD Wheel Set WH-9000-C24-CL WH-9000-C24-TL WH-9000-C35-CL WH-9000-C35-TU WH-9000-C50-CL WH-9000-C50-TU WH-9000-C75-TU WH-RS21 WH-RS61 CONTENTS IMPORTANT NOTICE...
TRAILMATE METEOR ASSEMBLY MANUAL
 TRAILMATE METEOR ASSEMBLY MANUAL (DISC BRAKE VERSION) The Trailmate Meteor recumbent has been designed for easy assembly. This means more time to enjoy the smooth ride with single speed, 3 speed coaster
RS(H)10,15 USER MANUAL. Read the complete manual before installing and using the regulator.
10,15 USER MANUAL. Read the complete manual before installing and using the regulator.") RS(H)10,15 USER MANUAL Read the complete manual before installing and using the regulator. WARNING INCORRECT OR IMPROPER USE OF THIS PRODUCT CAN CAUSE SERIOUS PERSONAL INJURY AND PROPERTY DAMAGE. Due to
RS(H)10,15 USER MANUAL Read the complete manual before installing and using the regulator. WARNING INCORRECT OR IMPROPER USE OF THIS PRODUCT CAN CAUSE SERIOUS PERSONAL INJURY AND PROPERTY DAMAGE. Due to
Upgrade Increased Seaming Spindle Bushing Wear Life & Repair Suggestion
 10 Ascot Parkway Cuyahoga Falls, OH 44223 USA 330/923-0491 fax 330/923-8720 www.pneumaticscale.com sales@pneumaticscale.com Upgrade 1363845 Increased Seaming Spindle Bushing Wear Life & Repair Suggestion
Operation Manual Guillotine Cutter RC-5
 Operation Manual Guillotine Cutter RC-5 Technical Specifications General Safety/Operating Instructions Using the Guillotine Cutter/Crimper Blade Change Instructions Maintenance Instructions This is a detailed
200 STRINGING MACHINE
 200 STRINGING MACHINE OWNER S MANUAL Issue 1 - July 2010 Provided by www.gssalliance.com 200 OWNER S MANUAL TABLE OF CONTENTS WARRANTY...PAGE 2 FEATURES...PAGE 3 ASSEMBLY INSTRUCTIONS...PAGE 4 MOUNTING
Front derailleur. Dealer's Manual FD-M9000 FD-M9020 FD-M9025 FD-M8000 FD-M8020 FD-M8025 FD-M612 FD-M617 FD-M618 FD-M672 FD-M677
 (English) DM-FD0003-05 Front derailleur Dealer's Manual FD-M9000 FD-M9020 FD-M9025 FD-M8000 FD-M8020 FD-M8025 FD-M612 FD-M617 FD-M618 FD-M672 FD-M677 CONTENTS IMPORTANT NOTICE... 4 TO ENSURE SAFETY...
SAFETY RULES WARNING: READ THESE SAFETY RULES & OPERATORS MANUAL BEFORE HANDLING YOUR FIREARM
 SAFETY RULES WARNING: READ THESE SAFETY RULES & OPERATORS MANUAL BEFORE HANDLING YOUR FIREARM Never point a firearm at anyone and always keep the muzzle pointed in a safe direction. Always treat all firearms
Atmospheric relief valve type 1100 Installation and maintenance instructions
 SAPAG 1. Description Sapag atmospheric relief valves type 1100 have been selected for installation because of their performance features, reliability and ease of maintenance. They are designed to protect
Have questions? Chat with us live at raleighusa.com or call us at , 8am 5pm PST
 1 2 Have questions? Chat with us live at raleighusa.com or call us at 1-800-251-8435, 8am 5pm PST The bicycle you have purchased is a complex piece of equipment that must be properly assembled and maintained
Installation, Operation and Maintenance Manual for Back Pressure Regulator
 Installation, Operation and Maintenance Manual for Back Pressure Regulator Model 8860 2009 Groth Corporation IOM-8860 Rev. B 12541 Ref. ID: 95565 Page 2 of 13 Table of Contents I. INTRODUCTION 3 II. DESIGN
OPERATING AND MAINTENANCE MANUAL
 CONTENTS PAGE INTRODUCTION 1 Installation Compatibility 1 Required Tools and Materials 1 Preparing Valve and Flanges 1 1.0 INSTALLATION 2 1.1 INSTALLATION OF ALL 2- TO 12-IN. SPAN-TYPE VALVES 2 1.2 INSTALLATION
Rear Drive System SERVICE INSTRUCTION. Specifications SI-R670B
 - SERVICE INSTRUCTION SI-R670B t Rear Drive System Before use, read these instructions carefully, and follow them for correct use. In order to realize the best performance, we recommend that the following
HP-104 & HP-106 Tapping Machine OPERATIONS MANUAL
 30230 Los Alamos Rd. Murrieta, CA 92563 800-279-5659 FAX 951-926-2334 TappingMachines.com HP-104 & HP-106 Tapping Machine OPERATIONS MANUAL & OPERATING INSTRUCTIONS WARNING READ: Before using this product,
500SE SECOND STAGE SERVICE PROCEDURE
 500SE SECOND STAGE SERVICE PROCEDURE This 500SE Service Procedure conveys a list of components and service procedures that reflect the 500SE as it was configured at the time of this writing. CONTENTS TROUBLESHOOTING...
Item N o.: Item N am e:40cm Boys Rival Bike
 Item N o.:42272892 Item N am e:40cm Boys Rival Bike 9 bell 8 grip 30 crash pad 10 brake lever 26 wheel reflector 22 saddle 23 seat post 25 rear reflector 24 quick release 6 handle bar 7 stem 2 top tube
Adjustable. Unloader Valve. O&M Manual. Part #
 Adjustable Unloader Valve O&M Manual Unloader Valve Part #60-020-361 ADVANCED PRESSURE SYSTEMS 701 S. Persimmon St., Suite 85 - Tomball, TX 77375 Toll Free in North America: (877) 290-4277 Phone: (281)
SALCO PRODUCTS, INC. PRESSURE RELIEF VALVE STORAGE, INSTALLATION, OPERATING, MAINTENANCE/TESTING, AND INSPECTION INSTRUCTIONS
 STORAGE INSTRUCTIONS Until it is time to install a new or reconditioned valve on the car, the valve must be kept in its original packaging in order to protect it from dirt and damage. INSTALLATION INSTRUCTIONS
KTM V-PORT CONTROL BALL VALVES INSTALLATION AND OPERATION MANUAL
 Please read through this manual completely before operating the valves SECTION 2 - SPECIFICATIONS The safety of the valves and conformity with your equipment should be checked by the design engineer or
Chapter 2 Rigging. Cutting Wire Rope. Anchoring Wire Rope to Drum. Winding Wire Rope Onto Drum
 Chapter 2 Rigging Cutting Wire Rope The wire rope must be tightly seized on both sides of the point where the wire rope will be cut, as shown in Figure 2-1. Seize the wire rope with either seizing wire
MANUAL SEALLESS STEEL STRAPPING TOOL MODEL A
 OPERATION MANUAL / SPARE PARTS LIST MANUAL SEALLESS STEEL STRAPPING TOOL MODEL A337.0001 13.1912.01 13191201.en/MAS/ 10.02 INDEX PAGE 1 SAFETY INSTRUCTIONS 2 2 WARRANTY CONDITIONS AND LIABILITY 4 3 APPROPRIATE
Front derailleur. Dealer's Manual XTR FD-M9000 FD-M9020 FD-M9025 DEORE XT FD-M8000 FD-M8020 FD-M8025 DEORE FD-M612 FD-M617 FD-M618 SLX FD-M672 FD-M677
 (English) DM-FD0003-06 Dealer's Manual ROAD MTB Trekking City Touring/ Comfort Bike URBAN SPORT E-BIKE Front derailleur XTR FD-M9000 FD-M9020 FD-M9025 DEORE XT FD-M8000 FD-M8020 FD-M8025 DEORE FD-M612
SAPAG. Safety valves, type 5700 Storage, Use, Operation and Maintenance Instructions. IMPORTANT NOTICE
 SAPAG IMPORTANT NOTICE Contents Important notice 1 0 Valve identification 2 1 Storage 2 2 Installation 2 3 Operation 2 4 Maintenance 3 4.1 Dismantling 3 4.2 Inspection 3 4.3 Repair 3 4.4 Assembly 4 4.5
600 / 600FC OWNER'S MANUAL
 PROGRESSION 600 / 600FC OWNER'S MANUAL Issue 2 / Version E - Dec. 10, 1997 Copyright 1997 GAMMA Sports - All Rights Reserved PROGRESSION 600 / 600FC OWNER'S MANUAL TABLE OF CONTENTS PAGE 1... WARRANTY