AMEIDCANANGLER
|
|
|
- Dwight Dennis
- 6 years ago
- Views:
Transcription
1


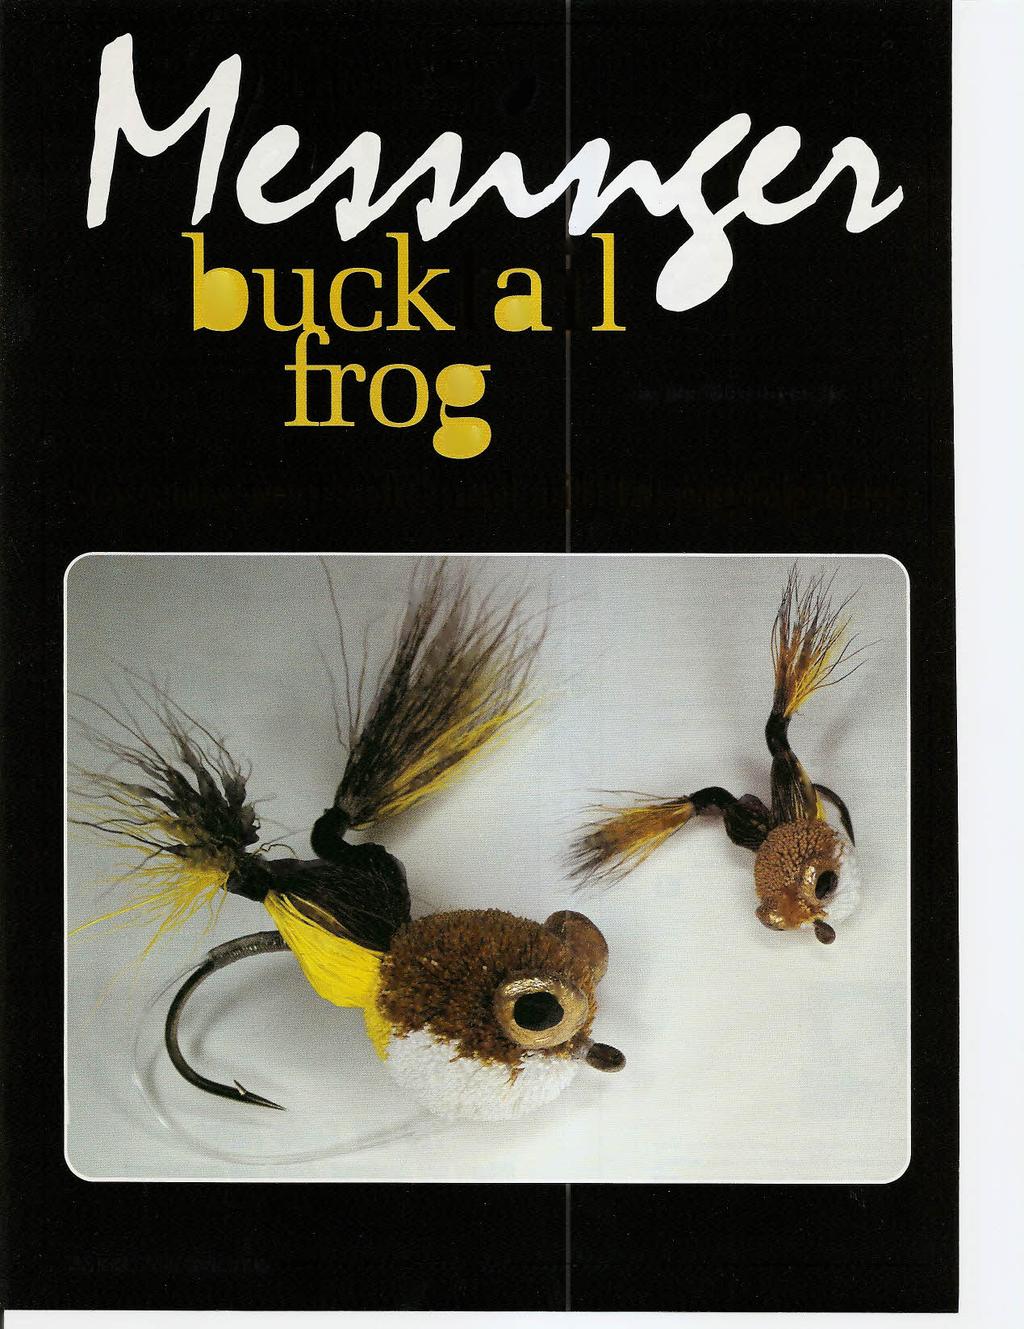
2 The shoreline to our right was covered with trees, brush and rocks. Directly in front of us, the few remaining limbs of a long-ago- fallen sycamore tree reached out into the dark-green depths of the cove. Dad motioned for me to move the boat into a position where he could cast to the near side of the old tree. He made a few false casts, then dropped the little deer-hair frog onto the water, just above the main trunk of the submerged tree. The frog sat there for a few seconds, bobbing in the ripples made by it's touchdown, then Dad stripped in some line, swimming the frog back toward us. From that point, everything seemed to happen in slow motion. The water around the frog swelled with the frog sitting directly on top of the bulge, as the silence of the sleepy covewas shattered by the strike of a big largemouth bass. Dad set the hook, and after what seemed to be an eternity but in reality was probably no more than a few minutes, he brought the bass boatside and lifted it from the water. The scalehe carried in his fishing vest showed that the fish was just shy of eight pounds. I was twelveyears old when this memorable evening of fishing took place and the event marked my first and most vivid experience with a flyrod bass lure that my father had created some thirty-five years earlier. He called the fly the Bucktail Frog. Dad was a professional fly tyer and I had always known the lure but until I saw it take that trophy-size bass, I saw the Bucktail Frog merely as something Dad made and sold to other fishermen. I had never really seen the frog in action in it's true element, but now I viewed the lure from a new perspective. BLONDES & BASS BUGS Inspiration for the frog came to my father through his early bass-fishing experiences. As a boy, he caught his first bass on a live frog that he had snatched from a puddle in a meadow near asmall pond where he fished. So it was not unusual that he would later choose to tie a frog fly for bass. When dad returned home to West Virginia from the U. S. Army after World War I, he began working on an artificial deer-hair frog. He originated the technique he used to tie the frog and it resulted in a very effective imitation of real thing. Although his lure became popularwith anglers throughout this country and beyond, the technique that he created for tying the frog, and other deer-hair patterns to follow, remained a mystery to most tyers. Even those who have carefully dissected the lure in attempts to discover my father's tying technique have been frustrated in their efforts. To the bestof my knowledge, dad never taught anyone, other than a few family members, his tying techniques. I began tying flieswhen I was 5 or 6 years old, but at that age the frog was too complicated for my young hands. Very simple wet flieswere my specialty then. As a teenager, I made several attempts at tying dad's frogs but most were aborted. The unfinished products looked like something the cat coughed up. During my first year in college, I managed to persuade a pretty, blonde classmate into going with me on a fishingtrip to a nearby bassstream. Thiswas no small feat,becausewe both had classes that afternoon, but we somehow managed to get away,catch a few fish and have some fun. My friend was picking through my tackle box, looking at the various lureswhen she noticed the Bucktail Frogswhich, of course, Dad had tied. She commented that they were pretty and asked for one. Naturally, I told her that I tied them, and that the frogs in my tackle box were chewed up from all the fish I had caught on them. So I promised that on my next trip home 1would tie one on a safety pin especially for her. My dad had tied some frogs on safety pins for ladies to pin on their blouse or sweater, so I figured I would do thesame for my blonde fishing companion JULy. AUGUST 1991


3 Because of the unusual techniques used, tying the Messinger frogs has remained a mystery to most tiers. This version, the Bucktail Popper Frog, uses the same legs and celluloid ryes as the standard frogpattern When I returned home, I was at least honest enough to attempt the task myself. I told dad my plan and after making some comment about the frogs "catching more than fish," he agreed to once more offer instruction. He talked me through the thing and, although it was somewhat of an improvement over my earlier attempts, the final product was pretty sorry, it looked nothing like the fly my friend had admired on our fishing trip. Dad said he would save my backside and he tied a frog on a safety pin for me to give to the young lady. I watched intently as he tied the frog and marveled at the ease and simplicity with which he performed his work. When he was done, dad said to tell my friend to send the thank-you card to him. When I returned to school the following week I proudly presented the frog to my friend... and I told her that I tied it. She was pretty impressed. I gave that frog to my friend in May of Just five months later, my father died at the age of seventy-four. Had it not been for my frivolous effort to make an impression on a pretty girl, it is quite possible that the Bucktail Frog, the Irresistible, and several other flies that my father created would have been lost-at least in their original form and method of construction. Although I did not master the skills needed to tie the frog with that last effort Dad made to teach me how to tie it, I did finally understand the technique used to tie the frog as he did. I never saw that girl again after school ended that year, but I will always be grateful to her for inspiring me to spend one last bit of time with my father learning how to tie the Bucktail Frog. After Dad passed away, I worked every day for months trying to tie a frog just like his. Unfortunately, the family members who dad had taught to tie his flies were no longer living or they had forgotten what he taught them. Throughout this period, I would tie a frog, trim it, form the legs, look it over, and then throw it in the waste can. Occasionally,one would turn out good enough for me to put eyes on it and paint them. Most of the frogs made it only as far as the waste can. Finally, after many hours at the fly-tyingdesk, severalwaste cans full of rejects,i was ableto rather consistently produce a frog that I thought might bring a smile of approval to dad's face had he been there to inspect it. AMEIDCANANGLER SPECIAL TECHNIQUES The most ingenious part of the Bucktail Frog is its legs, or more specifically,the method that my father devised to construct them. Most frog flies I have seen tied with deer hair have legs that just dangle behind them, imparting little action to the lure as it moves through the water. The legs are tied with the tips of the hair pointing back, away from the eye of the hook. Dad tied the hair for the legs onto the hook with the tips pointing forward toward the eye, and then he divided the hair into equal amounts and pulled each side back toward the bend of the hook. The method developed by my dad to tie the body is unique and is nothing like the more common hairspinning or hair-stacking methods you may be familiar with. Spinning hair onto a hook allows radial color separation but does not permit lateral separation, while stacking allows lateral color separation. I am not sure when stacking was first used to tie hair, but, to the best of my knowledge, it is a relatively new technique. Dad began tying the Bucktail Frog in the early 1920s when very little instructional information was available about flytying. The method


4 .. Temporary #2 Apply Glue Top View #3 Left Hand it 4 Single Hand Square Knot Technique #5 Insert Pin #7 #8 Trim #6 ( Bend 90 #9 Form Eyes ~ Install Eyes Apply/ Lacquer #10 ~ JULY AUGUST 1991~


5 bucktail trag of tying with deer hair that dad used was a product of his own creativeness. My father's technique allows lateral aswell asradial color separation and produces a fly with exceptional durability. I have some frogs that dad tied at least forty years ago that have been fished and have taken a good number of bass. Other than the colors being somewhat faded, the frogs are in good shape and they fish as well as they did when they were new. TYING INSTRUCTIONS Select a hook with a wide gap, heavy wire, and medium-long shank. I use Tiemco 8089 hooks in sizes 6 and 10, Mustad 3366 hooks in sizes I/O and 1 and Mustad hooks in size 6. Because of their sharpness and rust resistance, I like Tiemco 8089 hooks best. Frogs tied on hooks larger than the sizes just mentioned cast like a meadowlark, and, although I have tied frogs for trout and panfish on hooks as small as size 14, I don't recommend it. The aggravation of tying on small hooks shortens your life by at least three months for each flyyou attempt in those smaller sizes. Step 1. To begin, place the hook in your vise and wrap the shank, beginning near the eye of the hook, with any type of cotton or cottoncovered-polyester medium-weight thread. End the thread wraps directly above the point of the hook. Wind a small bump or raised area at this location, then return the thread to just behind the eye of the hook and tie it offwith a fewwhip-finish knots AMEruCANANGLER and clip the thread. The purpose of these wraps isto add a no-slip surface to the hook shank which prevents the hair from slipping or turning on the hook. Coat the thread wraps with head cement or Dave's Flexament and allow it to dry (see illustration.) Step 2. Hair selection for the legs is critical. Deer tails vary greatly in texture, hair length and stiffness. If the hair used for the legs is stiff and wiry, the legs of the frog won't form properly or have the proper action when fished. Choose medium-length hair with a resilient texture from near the butt of the tail. The amount of hair used for the legs depends on the hook size. For a frog tied on a size I/O Mustad model 3366 hook, use two bunches of hair that are each about the size of a lead pencil. Select a darker color (for example, brown and yellow) for the back of the legsand a lighter color for the underside. Place the lighter color in a hair stacker and even the ends. Remove the hair from the stacker and lay it on asmoothsurface. Next, even up the ends of the darker hair with the stacker, remove it and place it on top of the light colored hair. Try not to roll the hair while picking it up from the work surface. Rolling the hair will cause the colors to integrate. The hair should be twice the length of the hook shank when it is tied on. Grasp the hair with your left hand and tie it onto the hook, using a square knot tied directly on top of the hook shank. The ends of the thread are trimmed, leaving about 28 three inches of both ends remaining. These threads are then placed in with each leg and a temporary tie is made on the legs to keep them out of the way and divided while the body is tied on (see illustration). Step 3. This procedure requires the use of three hands. The hair must be held firmly on top of the hook as it is being tied, while both the tag and standing ends need to be controlled when tying the knot. Becausemost of us aren't equipped with three hands, the only logical option is to use our teeth. Place the spool of thread on a nail driven into a wooden fixture or directly into the tying benchtop: pull off enough thread to accommodate the task and grasp the standing portion of the thread with your teeth. While holding the hair for the legs with your left hand, bring the tag end around the hair and hook shank with your right hand and tie an overhand knot while applying tension to both ends of the thread. Use your neck to add the tension needed to the standing end of the thread. Release the thread and complete the square knot (right over left and left over right) using both hands which are now free. Make sure that the square knot is tied in front of the raised area that was wound on the hook shank. Trim off the butts of the hair, tapering them toward the eye of the hook. Slide the hair forward slightly and add a drop of instant glue to the area around the bump. Carefullyslide the butt ends of the hair back over the bump and into the cement. Allow

 in the jaws in a vertical position with the eye of the hook pointing up.")

6 / the cement to dry. Use a medium viscosity cement such as Zap-A-Gap CA+. The thin stuff will bleed up into the hair and ruin the legs. Divide the hair into two equal amounts and tie each leg with a temporary tie. To tie the body, you'll need a visewith ahead that can be positioned vertically and then be rotated at least 180 degrees. I use a Regal vise, but other vises have this capability. With the vise head positioned vertically, place the hook (with the legs tied on) in the jaws in a vertical position with the eye of the hook pointing up. Use strong cotton-coveredpolyester button-and-carpet thread fortying on the body. Wax the thread with beeswax or a similar fly-tying wax. Place the spool on a nail to your right and pull off about three feet of thread. Place the thread in your teeth at a point about 18" from it's end. With the back of the hook shank facing you, cut off a bunch of dark deer-body hair that's about oneand-a-half times the diameter of a pencil. With your left hand, hold the deer hair tightly up against and parallel to the hook shank. Withyour right hand, bring the tag end of the thread around the hook shank and hair and tieasingleoverhand knot. During this process,hold the hair tightly against the hook with your left hand while applying tension to the standing end of the thread (see illustration). Step 4. Some practice will be necessary to learn to tie the single overhand knot with only one hand. Hold the tag end of the thread between the thumb and index finger of your right hand and place the tag end over top of the standing end. With the middle and ring finger of your right hand, reach through the loop and pick up with tag end. Pull it up snugly. Release the standing end of the thread in your teeth and using both hands, pull the knot up tightly. Make sure the knot is tied right in the middle of the fold of the hair. Now rotate the vise 180 degrees and cross the standing end of the thread over and behind the hook shank to your left. do the same with the tag end, crossing it to your right. Pull both thread ends laterally and downward into the hair. this locks in the knot and compacts the hair.. Place the next bunch of lightcolor hair on the hook, putting it between the two threads as before. Continue building the body in this manner. As more hair is added, some care is needed to work the threads between the colorsto insure a cleanline of color separation. When you reach the eyeofrhehookwith the hair for the body, tie off the thread with either a square knot or surgeon's knot (see illustration). Step 5. You can tie the frog in any colors you wish. The most popular color combination that dad tied and sold was golden brown for the back of the legs and body of the frog, yellow for the underside of the legs and a small portion of the abdomen where the legs meet it, with the remainder of the belly white. Frogs tied with these colors are called JULy meadow frogs. Other color combinations are brown, red and white (bleeding frogs), and brown and white (pond frog). Oddly enough, as far as I know, dad never tied a green frog. A green, yellow and white combination, however, makes a nice looking frog. Remove the frog from the vise to trim it. Proportions are an important part of the frog's design. For the frog to land upright on the water, the belly of the lure should be bulkier than the back. The extra belly weight, especially when wet, helps make the frog fall in an upright position. Use a pair of good serrated scissors to roughly trim the body shape. Begin by trimming the back. Move to the sides and taper them from the midpoint of the body back to the legs and forward to the eye of the hook. This trimming should result in a body that's diamond-shaped when viewed from the top. Turn the frog over and trim the bellyto a round shape. Curved scissors will help to finish the job. Rotate the frog and look at the outline. Even up the body and trim it to shape in this manner (see illustration). Step 6. At some point, you must decide what you intend to do with the lure. If you plan to fish with it, don't be too particular about the trimming process-as long as the proportions are dose, the frog should cast and perform properly. Youshould be able to finish trimming this type of frog using only scissors. If you are tying an exhibition- AUGUST 1991

, place it in the hair and work into the middle of the hair.")

7 the grade frog that won't be fished, more precise trimming may be necessary. To produce a collector's version of the frog, I use a razor blade for the final trimming and shaping of the body. A pair of sharp, small, curved scissors will help you to trim the body around the legs and near the eye of the hook. Cut the temporary tie on one of the legs. Pull the tag end of this thread (with which the legswere tied onto the hook) into the hair, toward the hook eye. Cut the head off a plated-brass sewing pin (straight pin), place it in the hair and work into the middle of the hair. I use plated-brass pins because steel pins rust and they are difficult to bend (see illustration). Step 7. Use size-a rod-winding thread and begin wrapping the leg at a point about % of an inch back from where the legmeets the body,winding away from the body toward the end of the leg. Make this winding about % of an inch long. Tie a square knot to secure the wrap and clip the thread ends. Repeat this process with the other leg (see illustration). Step 8. To do this, I hold the standing end of the thread in my teeth and while holding the leg with my left hand, I wind the tag end with my right hand. After winding both legs, use a pair of needle-nose pliers to bend a right angle in the leg at the wrapped area to form the knee. Also, add a slight upward angle to bends (see illustration). Step 9. Grasp the frog by the knee with your left hand and pull the heavy thread with your right handthis pulls the leg back into the correct position and adds springiness to it. After both legs have been pulled into position, use a small pair of diagonal pliers to snip off the portion of the pins that extend beyond the knee windings. Make sure the legs are in the desired position and clip off the remaining threads (see illustration). Step 10. Applyacoatofblacklacquer to thewindings on the knees. To give a more finished look to the knees, apply several coats of a clear finish, such a Buglaze. This improves the ap-pearance and keeps the thread, pins and winding in place. The upward angle, or dihedral, added to the bend of the legs acts as a horizontal stabilizer and helps the frog to land upright on the water. When the frog is retrieved, the legs make a lifelike kicking motion as the legs are pressed back when the frog is pulled through the water. The legs then spring forward when the movement is stopped, simulating a swimming motion (see illustration). MAKING EYES The final step in completing the Bucktail Frog is the addition of the eyes. I make my own eyes by cutting up a piece of plastic such as the type used for Mustad hook boxes. I cut the plastic into small pieces and place them in a small baby-food jar, then I cover the plastic with acetone and allow it to stand overnight. The result AMEIDCANANGLER is a jelly-like substance that is used to form the eyes. To make the eyes, remove a small amount of the plastic from the jar and roll it into a ball about half the size of a pea. Repeat this process for the second eye and compare the two. If one is larger than the other, snip off a small amount of the larger ball so that it matches it's counterpart. Place a small amount of plastic cement, such as Duco or Fletch Tire, onto the frog's body where the eye will be located. Set the ball of plastic into the cement and with a small, flat stick, work the material into the cement to secure it to the body. Flatten the material with your thumb to form the eye. Repeat the procedure for the other eye.the eyes should extend slightly above the back of the frog. The material will harden in about four hours and it can then be painted. Apply a coat of gold paint to the eyes and allow it to dry. I use a gold latex paint that can be found at most craft stores. After the gold-paint has dried, apply a drop of black lacquer to the center of each eye to form the pupil. I use a 3;16" diameter dowel stick that is pencil length to do this. Dip the flat end of the stick into the lacquer so that only the very end is covered with paint, and lightly touch the end of the stick to the center of the eye. After the pupils have dried, apply a coat of Buglazeto the eyes. This brightens them and protects the painted surface. A bonus to using the plastic material for the eyesis that as it dries, small gas bubbles form in the material


8 A new experimental Bucktail Diver pattern recentlydeteloped by the author takes advantage oftbe Dahlberg Diver style body shape and cemented hair collar that helps to make it dive. I making it buoyant. This adds to the flotation of the lure. VARIATIONS To make a weed guard, before you begin to tie the fly attach a four-inch piece of 20-pound-test hard Mason monofilament to the hook shank at the point where the legs will be tied on. Bring the winding about one third of the way down the bend of the hook and tie it off Wrap the hook shank with thread asdescribed before, omitting the bump. The mono tie-in point prevents the legs from slipping down the bend of the hook. Tie in the weed guard at the eye of the hook after the frog'sbodyhas been trimmed to shape. To make a popping version of the frog, do not trim the hair near the front section of the body.apply Duco cement to the ring of hair that remains after the rest of the body has been trimmed and form the remaining hair into a cup-shaped snout. After the cement has partially dried, trim the upper portion of the cup to form a lip that extends out past the lower part of the cup. A slight outward curve on the upper part of the lip will cause the water to press up against it when the frog is moved rapidly through the water. This lifts the popping snout up and out of the water which makes the pick up for the backcast more quiet and less of a chore. A normal retrieve produces a distinct surface disturbance and popping sound. After the cup has been trimmed and shaped, a few coats of Buglaze applied to the cup will finish the job and enhance the fly's appearance and durability. Dad also tied another popping lure that he called a Bucktail Popper. The body and popping snout are the same as those on the Popper Frog, but in place of the legs, the Bucktail Popper has a deer hair tail and wings that set off to the side of the lure behind the body. The action of this lure isn't asgood as that of the Popper Frog, but it is less wind resistant and somewhat easier to cast. Another deer-hair lure that Dad created for bass fishing was the Nitehummer. This fly imitates a large miller or moth. It has a deer-hair tail, tapered deer-hair body,hair wings, and beard. It is especiallyproductive when fished on moving water and is an excellent lure for smallmouth bass as well as for largemouth, and it isalso an effective steelhead pattern. When retrieved through the water, the body shape and beard create awaking action. Dad first began tying the Nitehummer in the late 1920s. It was the inspiration for his most popular dry flypattern for trout, the Irresistible (see Joe's article SimplyIrresistibleintheMay~une 1991 issueo/americananglerfor information about this classic pattern.-ed.). The Irresistible,tied in smaller sizes,has the same tail,basicbody shape and wings as the Nitehummer. Instead of a beard, the Irresistiblehas hackle. The Bucktail Frog has been around for about seventy years, and it has proven to be an extremely productive topwater bass lure. Fished in and around good bass cover, it can bring spectacular results. It is interesting that the lure has been used to catch bass just about everywhere on this planet that bass exist. It has been fished by and written about by many well-know anglers, such as A. J. McClane, Joe Brooks, Ray Bergman and John Alden Knight. Yet,the only Buckrail Frogs that were produced commercially were tied by my father's own hands. Because of the degree of difficulty and time involved in the construction of the fly, the number of lures that he produced annually was very small. Although dad did not make any special effort to keep his tying techniques a secret, few fly tyers over the years have attempted to learn and duplicate his techniques or patterns. Joe Messinger's Bucktail Frog is one of the very few fly-rod lures in existence today that is truly unique in both it's design and in the methods used to tie it. It represents an important part of fly-fishing history. =Il Joe Messinger, Jr. learned how to tie the Bucktail Frog, Irresistible and other original deer-hair patterns directlyfrom the originator of thoseflies, hisfather. Joe displays and teachesthesetechniques at various seminars and fly-tying get togethers around the country. For those who have a seriousinterest in tying the Bucktail Frog using these original methods, an instructional video tape in which Joe gives step-by-step tying instructions is available for $39.95 from Joe at Rt. 9, Box 119M, Morgantown, WestVirginia Joeand hisfamily live in Morgantown, West Virginia JULy AUGUST 1991
Beginners/Basic Fly Tying Course
 ` Beginners/Basic Fly Tying Course Basic Tools Vise Scissors Hackle Pliers Bobbins Bodkin/Dubbing Pick Hair Stacker Dubbing Wax Head Cement Dispenser Whip Finish Tool Wing Burning Tools Tweezers Half Hitch
Five Minute Flies Saltwater Fly Tying Instruction Manual Part 1 Part 1
 Five Minute Flies Saltwater Fly Tying Instruction Manual Part 1 Part 1 Congratulations, you are starting an endeavor that will serve you well the rest of your life. When you catch your first fish on a
Keep these things in mind when tying your knots:
 FISHING KNOTS Keep these things in mind when tying your knots: https://www.redington.com/new-to-fly-fishing/knot-tying 1. Wet your knot. Before you tighten a knot, lubricate it with saliva or by dipping
Tying Panfish Flies. Ronald A. Howard Jr. 1. Best Time: any time, as a first or second lesson. Best Location: well lighted, comfortable setting
 Tying Panfish Flies Ronald A. Howard Jr. 1 Objectives Participating young people and adults will: 1. Practice basic tying skills on simple flies 2. Practice following patterns 3. Practice manipulating
Basic fly fishing knots Compiled by the guys in Cabela s richfield wisconsin fly shop
 Page 24 Loop to loop connection The preferred & probably the best method of attaching a leader to the built-in loop on a fly line, avoiding wear and tear on the vinyl coated fly line loop. A loop to loop
Dry Flies Featuring Spun Hair
 Dry Flies Featuring Spun Hair Ronald A. Howard Jr. 1 Objectives Participating young people and adults will: 1. Practice spinning deer hair bodies and heads 2. Practice trimming spun hair to shape 3. Practice
The Wobble Bugger by Michael Lack
 The Wobble Bugger by Michael Lack if you can tie a Wooly Bugger, you can tie this fly! Deke Meyers in his book Tying Bass Flies 12 of the Best, listed the Wiggle Bug as an effective bass fly. Admittedly,
Tying Bucktails. Ronald A. Howard Jr. 1. Best Time: Any time. Best Location: Well lighted, comfortable work area. Time Required: 1-3 hours
 Tying Bucktails Ronald A. Howard Jr. 1 Objectives Participating young people and adults will: 1. Practice attaching tying thread to hook in proper location 2. Practice following tying patterns 3. Practice
Federation of Fly Fishers Fly of the Month November LADY McCONNELL
 Federation of Fly Fishers Fly of the Month November 2005 LADY McCONNELL By Bob Bates Here is a pattern that every stillwater angler should have in the fly box. Brian Chan, Kamloops, British Columbia, Canada
Materials List: Fox's Poopah. Body: Vernille, olive, tan, ribbed over. Tying the Poopah
 Fox's Poopah "The Poopah came about in the early 90's (I think 1990) when I was out fishing the Sacramento River and had caddis pupa crawling on my waders and emerging, leaving their shucks on my old neoprenes.
Beginners Fly-Tying Notes
 Beginners Fly-Tying Notes SESSION 1 Tools Bobbin holder Threader (for dental floss!) Bodkin/ Dubbing needle (hat pins!) Vice 1 Check that: the jaws hold the sizes of hooks you want to tie on; and the stem
Federation of Fly Fishers Fly of the Month August 2006 OLIVE WILLY
 Federation of Fly Fishers Fly of the Month August 2006 OLIVE WILLY By Bob Bates About 1995 Swede (aka Allen Peterson) decided that Swede s Fly Shop in Woodenville, Washington needed a signature fly. So
Getting Started with the Articulated Shank (Version 1) Some ideas for tying different types of articulated flies
 Some ideas for tying different types of articulated flies") Getting Started with the Articulated Shank (Version 1) Some ideas for tying different types of articulated flies Getting Started with the Articulated Shank The Articulated Shank is a fly tying material
Getting Started with the Articulated Shank (Version 1) Some ideas for tying different types of articulated flies Getting Started with the Articulated Shank The Articulated Shank is a fly tying material
Nine foot 9wt and 7wt fly rods - I would bring 2 nines and one 7 with perhaps an 8wt as a back-up rod:
 Letter from Bill Sherer I'm sitting in the Bozeman, MT airport waiting for my flight back to Wisconsin, I have been here for 5 days and it's time to get back home. I was here for the Federation of Fly
Ian & Charity Rutter BeadHead Zelon nymph
 Ian & Charity Rutter 865.448.0467 BeadHead Zelon nymph The beadhead Zelon Nymph is a fly that Charity and I have in our fly boxes at all times. We fish this nymph in the Smokies, on East Tennessee tailwaters
Wasp size 2-4. Copyright J:sonSweden AB. Rec. hook Size 10/12
 Wasp size 2-4 Please watch the videos before choosing a specific fly pattern, they explain how to use Detached body pins, Wingburners and Wingmaterials. And how to tie in Wings/Wing-buds and Nymph-legs/Nymph-backs.
1. Double the line and form a loop about 10cms long. Pass it through the eye of the hook. 2. Form an overhand knot on the eye of the hook.
 42 NSW Recreational SALTwater Fishing Guide n 2011 Knots and Rigs KNOTS and RIGS Palomar knot. The palomar knot is quick to tie and forms a strong knot. It is a general-purpose connection used in joining
Step-By-Step Tying Procedure
 Magic Skwala I spend quite a bit of time tying flies. I tie everything from the old standby s to innovative patterns I have found from other tiers on the web and in literature, to my own creations. I have
Rigging it Right. Presented by Ron Barwick Service Manager for Half Hitch Hosted by: Bob Fowler
 Rigging it Right Presented by Ron Barwick Service Manager for Half Hitch ron@halfhitch.com Hosted by: Bob Fowler bob.fowler@marinemax.com (850) 708-1317 marinemax.com www.halfhitch.com 1 The Uni-Knot Strong,
The Dunt Designed by Mr. Murdoch, early 19th century
 Dee Fly - The Dunt It seems like there has been an increased interest in Dee s lately, so I thought I would throw in. I tie and fish a number of different Dee s for both summer and winter run steelhead.
Current Works Guide Service Goblin
 Goblin The Goblin is a pattern that does a good job of imitating two important food sources to fish in the Great Lakes region: the Goby and Sculpin. This large profile fly provides a great silhouette as
Mayfly Dun size 1-3. Use the TyinGuides, they will help you get the correct proportions.
 Mayfly Dun size 1-3 Please watch the videos before choosing a specific fly pattern, they explain how to use Detached body pins, Wingburners and Wingmaterials. And how to tie in Wings/Wing-buds and Nymph-legs/Nymph-backs.
Borchers Emerger Fly Pattern
 Borchers Emerger Fly Pattern This emerger pattern is a variation of the Borcher's Drake, which is most likely in your fly box already. If it isn't, it should be, as should the Borcher's Emerger. As does
Tying Reversed Bucktails
 Tying Reversed Bucktails Ronald A. Howard Jr. 1 Objectives Participating young people and adults will: 1. Practice reading and using fly patterns 2. Practice using fundamental fly tying techniques 3. Practice
Level Three Blue Rope
 Level Three Blue Rope Level Three consists of a combination of six fishing knots that work well in monofilament fishing line, two climbing knots and two knots used to secure heavy loads. Monofilament fishing
Fish Key Holder. Materials: - 18 gauge sheet steel - 1/4" steel rod ( 1.5 feet is enough ) - Rivets. Material cost: $8 ( with plenty of leftovers )
 - Rivets. Material cost: $8 ( with plenty of leftovers )") Fish Key Holder Materials: - 18 gauge sheet steel - 1/4" steel rod ( 1.5 feet is enough ) - Rivets Material cost: $8 ( with plenty of leftovers ) Safety Equipment: - Thick gloves - Goggles - Ear Protection
Fish Key Holder Materials: - 18 gauge sheet steel - 1/4" steel rod ( 1.5 feet is enough ) - Rivets Material cost: $8 ( with plenty of leftovers ) Safety Equipment: - Thick gloves - Goggles - Ear Protection
Fly Tying Tips from Hermann Fisher, Kamloops, Canada As Submitted by Lee Ann Ross
 Fly Tying Tips from Hermann Fisher, Kamloops, Canada As Submitted by Lee Ann Ross How to deal with a crowded head when tying flies: Use a piece of a bicycle inner tube and punch small holes in it. Slip
PREPARING AND CLEARING THE NET (Instructions shown are for right handed throwers. Reverse for left handed)
") PREPARING AND CLEARING THE NET (Instructions shown are for right handed throwers. Reverse for left handed) First of all, begin by finding a smooth grassy area free of sticks and rocks, or better yet, an
PREPARING AND CLEARING THE NET (Instructions shown are for right handed throwers. Reverse for left handed) First of all, begin by finding a smooth grassy area free of sticks and rocks, or better yet, an
Shiel e d Kite t By B y Sam & Ca C rir King Ore r g e o g n o Kite t m e aker e rs s Retr t e r a e t t2013
 Shield Kite By Sam & Cari King Oregon Kitemaker s Retreat 2013 SAIL ASSEMBLY Your pre-cut sail pieces include half-inch seam allowances. This provides enough material to complete a 1/4 inch double rolled
Married Wing Purple/Claret
 Married Wing Purple/Claret I received some new winging material in the mail the other day and thought I'd give it a workout. It was kind of fun putting this fly together because I had no real plan as to
PREPARING AND CLEARING THE NET (Instructions shown are for right handed throwers. Reverse for left handed)
") PREPARING AND CLEARING THE NET (Instructions shown are for right handed throwers. Reverse for left handed) We recommend that you first view our movie of this process at www.perfectcirclenetthrower.com
PREPARING AND CLEARING THE NET (Instructions shown are for right handed throwers. Reverse for left handed) We recommend that you first view our movie of this process at www.perfectcirclenetthrower.com
Evaluation: 1. Can participants on a regular basis cast with a spin-casting reel with little effort 2. Can participants get close to a target.
 Spin-casting Sharon Rushton- Best Time: This lesson can be taught as the first lesson on casting. Depending on the age group and time you have available, you may want to start with the Can-Casting Lesson,
Adding Sculpted Toes to a Cloth Doll Foot
 Adding Sculpted Toes to a Cloth Doll Foot by Sherralyn St. Clair, www.sherralynsdolls.com Many cloth doll patterns leave the doll's foot as a simple rounded shape. I have found that adding sculpted toes
The Fly Tying Bench - February 2011 by Emmitt Simmons
 The Fly Tying Bench - February 2011 by Emmitt Simmons Introduction If you were one of the Frozen Chosen who made the trip to Murfreesboro, Arkansas this past month you certainly have a greater appreciation
Synthetic Intruder Variation SBS
 Synthetic Intruder Variation SBS You can blame Dec for my sudden interest in synthetic materials. We were tying the other day and he whipped out some craft fur. I went into shock and could not believe
Melon-Shaped Egg Basket
 Melon-Shaped Egg Basket GH PRODUCTIONS, INC. The Basket Maker's Catalog Materials are available from your basketry supply store, or contact: GH Productions, Inc. The Basket Maker's Catalog 521 E. Walnut
INDEX
 INDEX Using New Fly & Hook Threader... 1 Clinch Knot...2 Triline Knot...3 Blood Knot (Clinch Style)...4 End Loop/Dropper Loop...6 J.R. Loop Knot (For more bait action)...7 Shank Tie/Snelled Hooks...9 #6
Butcher (full dress fishing fly)
") Butcher (full dress fishing fly) On the final day on a early November trip last year we decided to fish one last run before calling it quits. As I was getting out of the truck I noticed a full dress Butcher
Butcher (full dress fishing fly) On the final day on a early November trip last year we decided to fish one last run before calling it quits. As I was getting out of the truck I noticed a full dress Butcher
BLUEGILL SUNFISH. Tackle Requirements
 BLUEGILL SUNFISH Bluegill may be caught on light tackle, employing spin cast or fly rod applications. You need to have a minimum of 8# test line and insure that you line is fairly new. Old line will break
THE AMERICAN BARN DOOR KITE
 THE AMERICAN BARN DOOR KITE Oregon Kitemaker s Retreat January 2007 Rod Beamguard 4104 NW 112 th Way Vancouver, WA 98685-3578 (360) 574-8050 home (360) 750-9833 office kytfevr@wa-net.com PLANFORM BARN
The history and tying techniques behind one of the sport's standard dry-fly patterns
 The history and tying techniques behind one of the sport's standard dry-fly patterns by Joe Messenger It was during the days when B-17 s, B-24s, Mustangs, and Lightnings roamed the skies over Europe and
Glitter, metallic belly, and stripes (left) and making use of ester egg wrappers (these leech colour with glue, so be careful).
 and making use of ester egg wrappers (these leech colour with glue, so be careful).") Lure Making Part 2 Now the glue is dried yes, it should be dry by now), you can give the lure test swim. Be aware that if it s finely balanced, adding the hooks might change its buoyancy or motion so don
Lure Making Part 2 Now the glue is dried yes, it should be dry by now), you can give the lure test swim. Be aware that if it s finely balanced, adding the hooks might change its buoyancy or motion so don
WORKING WITH WEEDGUARDS
 WORKING WITH WEEDGUARDS Getting the fly fearlessly to where the fish are. An investigation and presentation by Wes Wada FlyFoundry.com MATERIALS LIST Thread: Danville Monocord, black or a 6/0 or 3/0 tying
A BEGINNING COURSE IN THE ART OF FLY TYING by Tom Criswell. PRESENTED BY Missouri Trout Fishermen s Association Kansas City Chapter
 A BEGINNING COURSE IN THE ART OF FLY TYING by Tom Criswell PRESENTED BY Missouri Trout Fishermen s Association Kansas City Chapter Class Schedule FIRST MEETING: A: Discussion of materials and tools B:
Samurai Armor Set: Step by Step
 Samurai Armor Set: Step by Step Pack 6 Stages -5 Contents Stage Pages 7-76 The tasset plates and shoulder pad Stage Pages 77-8 The tassets, helmet and helmet lining Stage Pages 8-86 The tasset plates and
Macrame. Knots and Projects
 BCA160 Macrame Knots and Projects Prepared by the North Dakota 4-H Clothing Committee: Peggy Anderson Merry Green Rachel Vettern Gayle Gette Cindy Swenson Sue Wold Macrame is a creative art that can inspire
Raptor by Steve Childers
 Raptor by Steve Childers Raptor Series Fighter This kite is somewhat difficult to build but well worth the effort. It's performance characteristics are, a good spin rate, excellent tracking, and wind window
Surfboard Repairs Chapter 7
 Surfboard Repairs Chapter 7 The Complete Surfing Guide for Coaches - Bruce "Snake" Gabrielson Repair Problems Boards continuously get bumped, hit rocks, break fins, get dropped, and many other things that
1939 STOUT TROPHY WINNER
 1939 STOUT TROPHY WINNER This model's 36-minute flight won the Stout Trophy and qualified the builder as captain of the American Moffett team. Bob Toft. Has won a second in gas, first in rubber at Nationals.
MAKING A SIMPLE FLEMISH TWIST BOWSTRING #1 by Kirby
 MAKING A SIMPLE FLEMISH TWIST BOWSTRING #1 by Kirby Here is a tutorial on making a flemish bowstring. I don't own a jig so I use my workbench. I put two nails in the bench as pegs, 6 to 8 inches longer
Foam Plate Glider: Sonic Silhouette
 Designed by: Ritchie Kinmont Project #40 Page 1/25 Foam Plate Glider: Sonic Silhouette About this project: The Foam Plate Glider Sonic Silhouette is the first in a series of flying glider projects made
Stand-N-Fish FULL DETAIL INSTALLATION INSTRUCTIONS
 1 Stand-N-Fish FULL DETAIL INSTALLATION INSTRUCTIONS Thank you for purchasing the incredible new Stand-N-Fish Kayak Fishing System. Once installed on your kayak the Stand-N-Fish will take your kayak fishing
Fly Fishing with a Spinning Rod
 Fly Fishing with a Spinning Rod By JD on JUL Y 12, 2009 Fly fishing with spinning gear may sound a bit funky at first, but it s one deadly trout technique! And what s really cool is you can take just about
Pro Bow. .com. the construction. one using to use the. video. The. with. We would. love to hear others. Figure 1
 Pro Bow The Hand www.probowthehand..com Instructions for Small Hand 1 Ribbon Congratulations on your purchase of Pro Bow The Hand. This item truly revolutionizes the construction of bows. Never before
Installation. Striping Kit for 42in and 50in Mowers Model No Installation Instructions. Removing the Mower Deck.
 Striping Kit for 42in and 50in Mowers Model No. 120 7905 Form No. 3368-794 Rev B Installation Instructions Installation Loose Parts Use the chart below to verify that all parts have been shipped. Procedure
FISH NET REPAIR. By Alfred Carlson
 FISH NET REPAIR By Alfred Carlson 2 Contents 1. Contents 2 2. 3-Spot Repair (One Broken mesh) 3 3. V-Shaped Repair (Two Broken meshes ) 23 4. N-Shaped Repair (Three Broken meshes) 33 5. M-Shaped Repair
Make Bruce's High Performance 'F3' Fighter Kite In Less Than 2 Hours For Under $3
 Make Bruce's High Performance 'F3' Fighter Kite In Less Than 2 Hours For Under $3 This article was inspired from a chapter in NORTH AMERICAN FIGHTER KITES, my 400+ page fighter kite book on CD ROM. If
You can use a variety of materials for this kite, such as Tyvek, ripstop nylon, Orcon, paper, or mylar or mylar-like plastic gift wrap films.
 Woody's " Woodtick " Fighter Kite This kite is easy to make and easy to fly. It's performance will allow you to learn all fighter kite flying skills, plus put an ear to ear grin on your face. What more
Building 'TANGLER' The Fighter Kite That Helped Me Win The 2003 Fighter Kite Line-Touch World Cup Championship. Bruce Lambert
 Building 'TANGLER' The Fighter Kite That Helped Me Win The 2003 Fighter Kite Line-Touch World Cup Championship Bruce Lambert kitefighter@yahoo.com The following method of building a fighter kite works
Bengali Babees. Ganesh
 Bengali Babees Ganesh When crocheted with yarn and hook specified, Ganesh measures 14 inches L, 13 inches around the belly, and a sitting height of 10 inches. Crown is 14 inches in diameter and 2 ¼ inches
MAKING A FLEMISH TWIST BOWSTRING by Ron Harris
 MAKING A FLEMISH TWIST BOWSTRING by Ron Harris The techniques I use to make a Flemish Twist bowstring are not necessarily the only way to do it, but it works for me. Making a Flemish Twist string is relatively
Tips for Grooming your Pet Pomeranian
 Tips for Grooming your Pet Pomeranian by Vyctoria Brock www.pomkins.com Please note - This article is for education purpose only, it is not an illustration of grooming for the show ring. Choice of shampoo,
Bright Light Feather Wing
 Bright Light Feather Wing I am still finding little time at the vise, but the new fly tying room is coming along great. My wife just finished painting the trim around the window and door, next comes flooring.
Carving a Custom Seat
 Carving a Custom Seat Seat Carving your own seat from mini-cell, high-density foam is really quite simple and has proven to be more comfortable than any commercially produced seat and often more reasonably
Tying Streamer Flies. Ronald A. Howard Jr. 1. Best Time: Any time after basic bucktails. Best Location: Well lighted, comfortable setting
 Tying Streamer Flies Ronald A. Howard Jr. 1 Objectives Participating young people and adults will: 1. Practice basic streamer styles 2. Practice streamer tying techniques 3. Practice proportion and order
Before You Get Your Feet Wet p. 1 So, You Want to Fish? p. 3 Welcome to the Party p. 4 Fishing U.S.A.: Who We Are p. 5 Basic Equipment, Basic Costs
 Before You Get Your Feet Wet p. 1 So, You Want to Fish? p. 3 Welcome to the Party p. 4 Fishing U.S.A.: Who We Are p. 5 Basic Equipment, Basic Costs p. 7 Why Only 10 Percent of Fishermen Catch 90 Percent
Guided fishing tours in Tasmania
 Hi Folks, back again with a quick newsletter updat Guided fishing tours in Tasmania We've had quite a mild winter, with just a few frosts Newsletter & fishing report as usual and some very nice weather,
Caring Magic. Module Five. Rubber Band Magic
 Caring Magic Module Five Rubber Band Magic This is the fifth of a series of eight modules designed to assist the hearing process and bring fun and enjoyment to young and old. These modules are complimentary
Samurai Armor Set: Step by Step
 Samurai Armor Set: Step by Step Pack 3 Stages 9-12 1 Contents Stage 9 Pages 29-31 The cuirass side and tassets Stage 10 Pages 32-37 The shoulder plate and tassets Stage 11 Pages 39-41 The shoulder plate
Pre-Paint>Fuselage>Empennage>Fit vertical tail fin. Objectives of this task: Materials and equipment required: Fit the spar extender
 Pre-Paint>Fuselage>Empennage>Fit vertical tail fin Objectives of this task: To fit the vertical tail fin to the fuselage, including fitting the static probe, static tube, optional strobe light wiring and
KNOTS OFTEN USED BY FIGHTER KITE MAKERS AND FLYERS
 KNOTS OFTEN USED BY FIGHTER KITE MAKERS AND FLYERS There happens to be quite a few of us who don't know much about knots. We don't know how to tie them and don't know which knot to use in a particular
Bottle Rocket Launcher P4-2000
 WWW.ARBORSCI.COM Bottle Rocket Launcher P4-2000 BACKGROUND: The Bottle Rocket Launcher allows for the exploration of launching rockets using commonly available materials such as plastic soda bottles and
White Wing, "The Hunter" strip wing
 White Wing, "The Hunter" strip wing My wife was unpacking a box from the move (we moved in 2002) the other day and found a bunch of my fishing books. Trout & Salmon Flies of Scotland by Stan Headley was
Introduction to Evolutionary Hoof Care s New Hoof Care Work Stations TM and Evo Hoof Stands TM Also see Video Instructions at
 Introduction to Evolutionary Hoof Care s New Hoof Care Work Stations TM and Evo Hoof Stands TM Also see Video Instructions at www.evohoofcare.com This new generation of hoof support devices will significantly
MASTERS FLY DRESSING SYLLABUS
 1. Background information The following notes are provided as a guide to those individuals preparing to take the Masters level qualification. It must be noted that the Masters level fly dressing is not
Post-Show FLIGHT. After the Show. Traveling Science Shows
 Traveling Science Shows Post-Show FLIGHT After the Show We recently presented a flight show at your school, and thought you and your students might like to continue investigating this topic. The following
Fly Fishing for Trout in Southeast Minnesota Streams
 Fly Fishing for Trout in Southeast Minnesota Streams Fly Fishing for the First Time? Equipment Basics Mid-weight fly rod, 5 or 6 weight, with fly line to match Reel Leader Extra tippet Flies Glasses or
How Scott Builds a Fighter Kite, May 2011 Updated Sept 2018
 How Scott Builds a Fighter Kite, May 2011 Updated Sept 2018 MAKE A TEMPLATE 1. Draw half sail plan on 17x22 pad with 4x4 (1/4 inch) grid. Add ¼ inch extra on nose (for reinforcement) and plenty of extra
CHAPTER 4 ADVANCED GROUND-FIGHTING TECHNIQUES
 (FM 21-150) CHAPTER 4 ADVANCED GROUND-FIGHTING TECHNIQUES After achieving an understanding of the basics of ground fighting, other elements of fighting on the ground are added. These techniques, however,
pompom ANIMALS MAKE Instructions for making birds, butterflies, ladybugs, and hedgehogs. Pompoms
 pompom MAKE ANIMALS Instructions for making birds, butterflies, ladybugs, and hedgehogs. Pompoms Contents 02 H ow to Make Pompoms Using Pompom Makers 06 H ow to Make Semicircular Pompoms Using Pompom Makers
Fishing Rod Building. Coin Collecting DOING PURPOSE PURPOSE. 3. Coin Mints USA Canada
 Try not to move a piece twice in the opening. If you do, it is probably because you did not position the piece properly in the earlier move. Do not develop the queen prematurely. Sometimes advance the
PUT TING SCIENCE TO FLIGHT T E A C H E R S G U I D E
 PUT TING SCIENCE TO FLIGHT T E A C H E R S G U I D E Rocco Fer rario Teacher, American Canyon Middle School Napa, CA 55747 TECH TIPS Building Tips for the Raven Broken wings are a bummer. Unless the dihedral
Featuring Coats Dual Duty XP. Supplies
 Halloween Black Cat Basket Technique: Designed By: Skill Level: Crafting Time: Finished size: Sewing, Fabric Crafting Linda Turner Griepentrog Intermediate An evening 6" (15.24cm) (at base) x 3 1 2" x
OWNER'S MANUAL. Copyright 1999 ATS - All Rights Reserved
 OWNER'S MANUAL AL Issue 2 - August 19, 1999 Copyright 1999 ATS - All Rights Reserved OWNER'S MANUAL TABLE OF CONTENTS PAGE 1... WARRANTY PAGE 2... ASSEMBLY INSTRUCTIONS PAGE 4... MOUNTING THE RACQUET PAGE
Build This World Record Fuselage Model
 Build This World Record Fuselage Model Here You Have Complete Instructions and Plans to Build a Plane of Sure-fire Performance that Established a World Record at the 1932 National Airplane Model Competition
Place a rope coil here
 1 2 3 4 The anchor buoys were made from Sculpey. You could however, carve them from wood but I wanted to continue my experimentation with this material. A buoy from this time period would have ranged from
 64 Loops and loops... Text: Miki Äikäs Photos: Miki Äikäs and Toni Valkonen Connecting fly lines with loops has occasionally caused serious problems at least for me. I have tried every imaginable looping
Bob's Card Models and [Resources]
![Bob's Card Models and [Resources]](/thumbs/89/98525234.jpg "Bob's Card Models and [Resources]") + Bob's Card Models www.bobscardmodels.altervista.org and www.zealot.com [Resources] Sikorsky S-40 (1:72) The Sikorsky S-40 was an American amphibious flying boat built by Sikorsky in the early 1930s for
+ Bob's Card Models www.bobscardmodels.altervista.org and www.zealot.com [Resources] Sikorsky S-40 (1:72) The Sikorsky S-40 was an American amphibious flying boat built by Sikorsky in the early 1930s for
The following lesson is excerpted from
 The following lesson is excerpted from A Fresh Approach to the Snare Drum is the most comprehensive method available that simultaneously provides instruction for rhythm reading, technique fundamentals,
New Hampshire s go-to trout fly takes center stage. by Scott A. Biron
 New Hampshire s go-to trout fly takes center stage by Scott A. Biron GEGE ONLINE / istockphoto.com 4 May / June 2017 week does not go by without a confused angler asking me how to choose the correct fly.
Veterinary Science Handling and Restraining Practicum. Restraint of the Cat for Cephalic IV Catheter Placement
 Career Development Event Last updated: //3 Handling and Restraining Practicum Restraint of the Cat for Cephalic IV Catheter Placement. The student places the cat in sternal recumbency on an 6 examination
ADVENTURES WITH. Both of my grandfathers fished, my dad fished, and. creating unique handles for custom rods. 22 RodMaker
 From RodMaker Magazine Volume 7 Issue #4 WOOD creating unique handles for custom rods ADVENTURES WITH story by Ray Jergensen photos by Les Jergensen 22 RodMaker Both of my grandfathers fished, my dad fished,
RIFLE DRILL. 1. General. Before commencing instruction in rifle drill, it is important that the cadets receive instruction in the parts of the rifle.
 RIFLE DRILL 1. General. Before commencing instruction in rifle drill, it is important that the cadets receive instruction in the parts of the rifle. 2. Rifle Movements. Unless stated otherwise, cadets
Sails. Sails: extract from 'Super-detailing the Cutter Sherbourne' page 1 George Bandurek
 Sails There are many arguments for adding or omitting the sails on a model ship. There is no right answer and I decided to have a combination of set and furled sails on my model of HM cutter Sherbourne
8-GUN CORVETTE ASSEMBLY INSTRUCTIONS
 8-GUN CORVETTE ASSEMBLY INSTRUCTIONS THE HULL STEP 1 Fasten the Deck to the Hull. Find the hull. This is a large, pink, ship-shaped piece of insulating foam board. This will form the base of your model
Chapter Twelve. Starting the rigging process
 Chapter Twelve Starting the rigging process Before I begin describing the rigging process, I must remind folks that it would be a great time to slip that traveler ring onto the bowsprit. I forgot to mention
Steve Farrar: Reflections on Creative Fly-Tying
 MAGAZINE22e.qxd 6/25/2003 10:27 PM Page 178 Steve Farrar: Reflections on Creative Fly-Tying Flies photographs by Paul Schmookler Many of the saltwater flies I tie are based on the same principles and ideas
Scout It Out would like to extend its gratitude to all the sites where the following information had been gathered.
 Rope Work introduces the basic knots that all Scouts and Guides should know. Most of the knots featured here are very useful in Pioneering and should be learnt. This Section does not fully teach the exact
May Blitz Tailspin. Deep Structure Lure Incredible action. Page 4-5 Page 6. Blitz Crappie Jigs
 May 2014 Blitz Blade Environmentally friendly - 100% light zinc alloy Page 3 Blitz Tailspin Deep Structure Lure Incredible action Blitz FireTail Taking the best of the Blitz Blade and the Blitz Tailspin
2 ND 3 RD FOOTBALL STANDARDS GRADE LEVEL STANDARD DESCRIPTION
 FOOTBALL FOOTBALL STANDARDS GRADE LEVEL STANDARD DESCRIPTION PE.2.M.1.7 Move in different directions to catch a variety of objects softly tossed by a stationary partner. 2 ND 3 RD PE.2.M.1.8 PE 2.C.2.2