Finally Down The Middle
|
|
|
- Rudolph Clarke
- 5 years ago
- Views:
Transcription

1 Finally Down The Middle A Complete Guide to Hitting More Fairways using the Magic Move in Golf Written By: Master Teaching Professional Adam Kolloff
2 Table of Contents INTRODUCTION PART 1 The Framework A. Ball Flight B. Clubface Angle C. Swing Path D. Impact Geometry E. Golf s Ultimate Fundamental F. Efficiency Leads to Consistency G. 50% Set Up 50% Technique PART 2 The Set-Up A. Grip B. Stance C. Posture D. Alignment E. Ball Position PART 3 The Full Swing A. Basic Philosophy B. The Right Mental Picture C. The Half Swing D. Technical Principles E. The Magic Move F. Pre Shot Routine 2
3 Introduction In 2009, I felt a sincere obligation to share my opinions about golf. I realized writing blogs about the game was not good enough. I needed to present a template for improvement. My ideas had to be explained in a simple easy-to understand fashion. This book is an organization of my most valuable concepts in golf. There s a lot of misguided information out there. Most of the instruction is commercialized. It targets your appetite by selling equipment that guarantees lower scores and training aids that promise longer drives or more putts made. My hope is to provide experienced based instruction specifically designed to improve your game, not seize your bank account. After graduating from college, I dedicated my life to helping others play better golf. My research into the game stretches back to my first year as a competitor when I was 13. The secrets to golf became my obsession and passion in life. I was committed to finding a swing that consistently launched the ball down the middle. Watching professionals on TV was highly educational. I spent hours every weekend watching golf tournaments studying each player. I loved to watch swing idiosyncrasies and how each player approached the game. I remember going to the course and trying to use the same swings I saw on TV. I thought that was the best way to learn the game. My search for the perfect golf swing intensified when I started college. I spent the majority of my free time reading golf instructional books and magazines. I saved every piece of information I thought could help my game. After a couple years, I began managing a very sizable list of golf tips from various sources that could be applied to every area of my game. After playing professionally for two years in South Florida, my passion for golf instruction re-ignited when I became certified as a teaching professional. My goal was to provide the highest level of instruction to anyone interested in enjoying the game or improving his or her score. I spent several days going through all my old collection of books, magazines, and notes before lessons to refresh my memory of all the information I learned in the past. This certainly got me thinking. I felt driven to organize everything together and share my ideas in a format for readers. I hope this information serves as a guide to new possibilities in your golf game. Golf needs to be enjoyed. Playing your best is so much fun. That s why I ve focused all my energy in sharing my ideas about golf. I ve created specific physical and mental tools designed to enhance your performance. My keys to the game are written in a format that s easy to read. Please take the time to understand these concepts because I believe, without a doubt, it could help your game. 3
4 Part 1 The Framework 4
5 What is the Framework? The framework is an organization of concepts every golfer should be familiar. It explains the factors at work during a typical golf shot. The purpose of the framework is to present a template for how you should think about your golf swing what s going right and/or what s going wrong. Keep in mind as you read this section, there s no need to make swing changes. All you need is an open mind. Ball Flight Ball flight is your greatest teacher. The first step in analyzing your swing is to take a look at your current ball flight a direct indicator of how well you re swinging the club. It s the first thing I ask my students when they come for a lesson. I want to get a sense of what their clubface looks like through impact. Only then can I begin making swing changes. Their ball flight allows me to determine what s best for their swing pattern. Ask yourself these questions, What caused the ball to go where it went? Provide an answer without going deep into technique. Answer the question using impact geometry, factors such as swing path and clubface angle. We will investigate these later, but when you condition your mind to think this way your on the right path to making adjustments on your own. When you strike the ball, your clubface transmits energy to the ball. The ball is launched into the air according to very specific laws. As a golfer, you need to know why. Here s a true test: next time you hit a horrible shot, don t get upset. Study the ball flight and remain objective as possible. Find a scientific answer as to why the ball traveled in the direction it did. The information gathered from each shot is feedback for your swing. If you do not recognize the data correctly you are not thinking the right way. You are probably blaming the wrong areas of your swing and reinforcing bad habits. Every shot provides an opportunity to learn something about your swing. Study every shot and know why the ball went in the direction it did. When you become a student after every shot your on the right path. Our goal is to stay in the fairway. That s why we are going to focus on the direction formula of ball flight. Direction Formula = clubface angle + swing path 5
6 Questions to consider that determine your ball flight. 1. When you hit the ball consistently, where is it going? 2. What is your worst shot? 3. Do you miss the ball in both ways, or only in one direction? 4. Are you missing only with certain clubs? The easier you can identify a common ball flight the better. It s the first step in analyzing your own swing. The pattern you identify with provides all the information you need for making adjustments. Slicers make different adjustments than hookers, so, determining your unique pattern is key. If you experience all the patterns, don t worry; we will be covering all areas. Clubface Angle Clubface angle is the angle of your clubface relevant to your aim line. Your grip has more to do with clubface angle than any other aspect of the swing, but you will be learning this fundamental later. First, let s review the relevant aspects of clubface angle during impact. Key point: A slice or hook is the result of an open or closed clubface relevant to your swing path. Anytime your clubface does not look in the direction of your swing path, the ball will curve. Most amateurs do not think about clubface angle. They quickly blame areas of the swing such as the takeaway, the transition from backswing to downswing, or the weight transfer. Typically, they have nothing to do with the result of their ball flight. You need to ask yourself the question; what was the angle of my clubface during impact? Remember these points when you come up with an answer. A slice occurs only when your clubface is open to the path your clubhead is traveling. A hook occurs when your clubface is closed to the path your clubhead is traveling. Determine your angle first. Make swing changes second. When the ball goes to the right with no curve, called a push, this means your clubface angle was square with an inside to outside swing path. If the ball goes to the left with no curve, called a pull, your clubface angle was square with an outside to inside path. The key to hitting the ball straight is having a square clubface to your swing path. 6
7 Swing Path Swing path is your line of swing. Swing path is the next element in the directional formula. Being aware of your swing path is an important step in recognizing your swing pattern. Swing path is your line of swing through the ball, excluding the angle of your clubface. Imagine having a paintbrush on the bottom of the club. What type of line would you paint? What would the curve look like? Or, if you could watch your swing on video from a birds-eye view and draw the line your clubhead travels throughout the swing, what would it look like? More specifically, what would the line look like through the impact zone? These are questions that will help you determine your unique swing path. Aim and stance play a major role in the direction of your swing path. This is because you commonly swing down a line parallel to our feet and shoulders. If you want to change your swing path, all you do is adjust our aim and stance. But, sometimes your swing path points in different directions depending on your body action and arm swing through the ball. This is where different adjustments need to be made. Here are the three types of swing path you should be familiar with. A. Inside to Outside B. Inside to Inside C. Outside to Inside You have just completed a very important step in recognizing your unique swing pattern. This will be highly valuable when identifying swing flaws and making corrections in your swing. In the next segment, you will be learning how clubface angle and swing path interact through impact. Impact Geometry Impact geometry is the interaction of clubface angle and swing path at impact. Impact geometry illustrates the combination of clubface angle and swing path through the impact zone. Understanding it will make you a better golfer. Your game will never be the same when you learn and understand this concept. Have you ever stopped to think on your own, how did my ball go there? 7
8 I wish people knew the truth about ball flight and impact geometry. I m disappointed by the lack of knowledge when it comes to this aspect. Rarely do I run into anyone who knows exactly what to accomplish in the golf swing. And, if the ball does not travel down the intended line they never know why. My advice is never lose sight of your impact geometry. Determine how your clubface angle and swing path interacted after every swing. Don t get hot tempered and lose focus. Remain objective as possible. Use your knowledge of impact geometry and dissect each shot. It will serve as a major step in your ability to make changes in your swing. We have all had bad days on the course, and, probably experienced every type of shot you can imagine. But, the real exercise is to determine a common tendency a natural swing pattern that produces your most common ball flight. When you identify with a ball flight and then determine your clubface angle and swing path, you re another step closer to self-diagnosing your golf swing. Determining your impact geometry is the most important step when making correct changes in your swing. The two major elements, clubface angle and swing path, is all the information you need. Do you want to hit the ball down the middle every time? Well, this is your focus. Later on we will be discussing important set-up fundamentals that directly affect clubface angle and swing path. Before me go any further let s figure out exactly what we want to accomplish in the swing. The next segment clearly defines our goal. Golf s Ultimate Fundamental Your search ends right here. Golf s ultimate fundamental is all you need to accomplish in the swing. If you can master the concept you never need another lesson right? Well, unfortunately we are all human. So we need to learn a method that efficiently and consistently accomplishes this task. Here it is: deliver a square clubface through the ball down the intended line. This fundamental is paramount when performing each shot. Essentially, this is the backbone of our framework. It keeps our understanding of the game in check and guides our thinking in the right way. Our understanding of the ultimate fundamental is key to holding everything together, so never forget it. Everything you will learn stems from this concept. With the exception of various specialty shots, this is your goal with every swing. This is our framework to build on for making swing changes. I bet your thinking, I ll just guide the club through the ball with my hands. It s the easiest part of the body to control. Well, it s not. Because we have the most feeling in 8

9 our hands, it s more detrimental to our game when we try to steer the swing with our hands. We forfeit our major power source relying on the small muscles of the hands to guide the club. Body action is easier to repeat than hand and wrist action. After being around the game long enough, I can honestly say from experience, you cannot rely on your hands to perform the swing. One negative thought can create just enough tension in your hands and destroy the outcome of your shot. Let s figure out a way to deliver a square club face through the ball down the intended line with the bigger muscles of our body. In Part 3 we will be discussing these details. Golf s ultimate fundamental is the ultimate goal. We want to achieve this every time we swing the club. Every PGA Tour player has a unique swing, but the reason they are so good is because they deliver golf s ultimate fundamental nine times out of ten. They know the importance of this rule. For a better understanding of impact geometry refer to the following diagrams. Each picture identifies a particular swing path with three different ball flights. Remember that your clubface at impact determines which of the three ball flights. 9
10 Efficiency Leads to Consistency The ability to do something well or achieve a desired result without wasted energy or effort. -Encarta World English Dictionary 1999 Microsoft Corporation. All rights reserved. Developed for Microsoft by Bloomsbury Publishing Plc. We need to learn how to swing the club efficiently. We do this by ridding our swing of bad habits and compensations. The result is a more consistent ball flight that you can trust that s the goal. You want to produce a swing without any wasted energy or effort. In this way there is no room for bad habits and compensations. Learning to swing this way will help your performance for the long term. It will create lasting change. By creating an efficient golf swing, your results will be more consistent. Example #1: If we start with a strong grip, your clubface will be shut at the top of the backswing. You will have to create compensation on the way back down in order to reopen the clubface for square contact. Example #2: If your habit is unwinding the shoulders too early on the downswing the common cause of the over-the-top, you created compensation by laying off the clubhead. The hands maneuver the club to the inside in order to prevent the club from crossing the line. 10
11 50% Set Up and 50% Technique Your set up is equally important as the technique. The correct blend of set-up and technique is the most effective approach to playing your best. It will help you achieve golf s ultimate fundamental the delivery of a square clubface through the ball down the intended line. From all my research in golf, I find this system the best approach. Believe me when I tell you, beginners and professionals study this method. It s a surefire way to play consistent golf. We can t neglect the set up. If we can t strictly focus on technique, we are not maximizing our potential for efficiency and consistency. We must incorporate the foundation for our swing. The right blend of set up and technique will allow the golf swing to perform at the highest level. At the most basic level, golf is about controlling two factors, distance and direction. We swing the club in order to send the ball to a certain location at a certain distance. The easier we can control these factors the better we are as golfers. When we learn to blend the set up with technique we are 100% more competent at managing these factors. We will be able to achieve the desired result with more precision. In the chapters following, I am going to explain the correct blend of set-up and swing technique that will help you play better golf. I will show you how it s done the right way, or more importantly, how is it done the wrong way. 11
12 Part 2 THE SET-UP 12
13 What is the Set Up? The set up is everything you do before the swing. It s a foundation for all movement. When you set up correctly you optimize the chance of hitting your target. When you don t set up correctly you limit your chances. Don t allow your set up to work against you. When it works against you it plagues the golf swing with bad habits and compensations the root of all slices and duck hooks. By learning the right set up you save yourself from future slumps. Here are the components of the set up. 1. Grip 2. Stance 3. Posture 4. Alignment 5. Ball Position The Grip It s all about clubface angle The purpose of a good grip is to assist, never prohibit, the delivery of a square clubface through the ball. That means you must start with a neutral grip. Follow these checkpoints in the left hand 1. The grip rests across the second index of the pointer finger and extends along the callus line of the left hand. 13


14 2. Your left thumb is right of center. 3. The V of your left hand points between your right ear and right shoulder. 14


15 Follow these checkpoints in the right hand 1. The club rests across the first index of the ring and middle fingers. 2. The right thumb is left of center. 15

16 3. The V in your right hand points to your right shoulder. You now have two options when connecting the fingers the overlap or interlock grip. Either grip works perfectly well. They both facilitate a proper connection with the club so it s mostly up to you to experiment with both. Get a feel for each grip and determine which one you like the best. 16


17 There are three pressure points in the grip. Keep in mind, you never want to squeeze the club at these locations. They only identify where the most pressure is applied. 1. Back three fingers of the left hand 2. The connection between the left thumb and lifelines of the right hand. 3. Middle two fingers of the right hand Note: Perhaps your hands are wreaking havoc in your swing and you were applying too much pressure between the right pointer finger and right thumb which is a common mistake. Get a feel for these new pressure points. They will help you re-establish a better connection with the club and prohibit unnecessary movement. 17

18 The Grip Drill This drill creates a routine for the grip. You will get into the habit of following all the checkpoints, while maintaining a square clubface. I recommend rehearsing this drill before every shot. Take your time and follow all the checkpoints. By properly placing 18
19 your hands on the club, you optimize the chance of delivering a square clubface to the ball. Concepts To Remember -Setting up with a strong grip tends to release the club earlier on the downswing and return a closed clubface through impact. This is a major cause of hooks and pulls. On the other hand, setting up with a weak grip tends to limit the release on the downswing and return an open clubface through impact. This is a major cause of slices and pushes. Always set up with a neutral grip by following the above information. -A neutral grip is designed to give you a natural connection to the club and provide relief of many swing flaws. -Our hands always want to return to a natural position at impact. That means if we set up unnaturally there will be excess twisting of the clubface. This leads to mid-swing compensations and inconsistent ball flight patterns. -The V is created by the fold in your skin between the thumb and pointer finger in each hand. Each V provides a gauge in your grip. Pretend your looking at yourself from face on when determining the V in each hand. -Hold the club - don t grip the club. You never want to grip the club, because when you grip something it implies squeezing. It will create tension and immobilize a proper wrist hinge. Your grip pressure also needs to easily absorb the shock of impact and never allow the club to slip out of your hands during the swing. -You can hit the golf ball with any grip you want, but unless you learn a neutral grip, you will not have any consistency. The best way to hold the club is natural and easy. It just takes a few minutes a day of practice to safeguard against bad habits. -The way in which you position your hands when addressing the ball will trigger either a chain reaction of solid and powerful moves or a series of power-draining and inconsistent compensations. Stance Your Base of Operations The positioning of your feet prepares the dynamic role of footwork during the swing, especially on the downswing. Angle your front foot degrees open. This will facilitate forward rotation and optimize balance on the follow through. Angle your back foot perpendicular to the ball and target line. This will help restrict the hips from turning too far on the backswing and 19


20 give you a better pivot back to the front foot. Restricting the hips also increases the X factor at the top of the swing. That means there s greater shoulder rotation versus hip rotation. This is how you develop tension in the body and fuel for the downswing. Position your feet shoulder width. This provides an adequate base for the movement of the body. Use the following stance with a 5 iron or anything less. Since longer clubs require a bigger weight transfer take a wider stance. Use the following stance with clubs longer than a 5 iron. 20
21 Concept to Remember: Imagine your feet as gates. Your back foot is the back gate and your front foot is the front gate. You want the back gate closed and the front gate open. You close the back gate to restrict backward hip rotation and you open the front gate to promote forward hip rotation. Posture A Foundation for Rotation Posture is the foundation for all movement. The major checkpoints to correct posture 1. Tilted forward from the hips 2. Weight on the balls of the feet 3. The arms and club shaft form an angle 4. At least 4 inches between belt buckle and butt end of the club. 21

22 The above photograph illustrates the 4 critical areas of posture. If you can learn to develop these you will create a better foundation for movement. Typically, when you are tired, stressed, hungry, or under any other pressure your foundation breaks down. One of these elements gets affected. That s why it s so crucial to be aware of your set up at all times. You always want to set up the same way. When you set up consistently, you can expect consistent results. 22

23 The Posture Drill Concepts to Remember: 23
24 Imagine your standing at the edge of a cliff and a big gust of wind comes by and throws you off balance. How would you react? You would probably bend your knees and lower your center of gravity to brace the wind. This is the posture for the golf swing. Flex your knees just enough to generate a feeling of stability and heaviness in your lower body. This will facilitate the lower body s readiness in the downswing. The one thing I always notice is how rare good posture really is. Most people can position their feet and bend their knees correctly, but when it comes to the back, everyone is slouched over the ball. It s no wonder so many golfers suffer from back problems. Having correct posture makes your rotation more efficient less resistance during the backswing and downswing. The results are more sold contact and added consistency. So stand taller over the ball and keep your back straight. The secret to good posture is comfort. You never want to exaggerate anything such as, hips forward, butt out, chin back, low right shoulder, and so on. They key is feel comfortable and natural over the ball. Do not force anything or contrive your body to a position that creates tension or pain. Good posture sets up a foundation for your swing. It provides a structure for your body to move from. Bad posture infects the entire swing and contributes to poor balance, off center hits, and unnecessary movements. You create good habits with good posture and bad habits with bad posture. Which way do you want to swing? The ultimate goal is provide a good base for your body to move from. Adjusting stance and posture is a great.way to increase your consistency and efficiency in all areas of the game. The result is more accurate ball striking with lasting results. Alignment Proper alignment helps you perform well regardless of how well you re swinging from day to day. Start by visualizing train tracks in the direction you want the ball to go. The inside rail is your feet and shoulder line. The outside rail is the ball and target line. 24


25 Setting your feet and shoulders on the inside rail is your goal with every swing. They must be parallel. It gives your ball the best chance of travelling along the target line. Here s the secret you need to be aware of. The train tracks always converge in the distance. Amateurs don t realize this and aim too far to the left. They think their feet are parallel to the target line, except they didn t understand the law of convergence. Look at the above picture and notice how the train tracks converge. 25

26 If you re still confused imagine yourself standing on actual train tracks. If you looked far into the distance both rails would eventually become one. That s not actually what happens it s only the visual image playing a trick on you. The same is holds true when aligning yourself with the train tracks system on the golf course. Another highly effective technique for correct alignment is the use of an intermediate target. This can be done with any shot on the course. The first thing you want to do is establish your target line a line created between your ball and the target. Next, look no further than ten feet in front of you for an old divot, piece of dirt, or discoloration of grass. It must rest in line with your target. This mark will represent your intermediate target. It s much easier to align your feet and shoulders parallel to a reference point that s within ten feet of your ball, that s why this technique is so effective. Give it a try next time your on the course. Concepts to remember: You can hit a good shot with a poor swing if your aligned correctly, but you cannot hit a good shot with a poor swing if your aligned incorrectly. The bottom line; your alignment is critical to consistent shot making performance. You have a hooking problem with your driver. You have been getting lessons, but you never figured out the real reason for the hook. So you created a bad habit by aiming too far to the right on every shot, especially off the tee. Every time you set-up with your driver you aim at least 20 yards right of the target because you rely on the hook that has plagued you for years. This has been so ingrained in your set-up it feels natural and correct. Your confident your alignment is perfect. The more you do this the more the habit becomes ingrained. You think your aiming exactly on line with the target, except your really aiming 20 yards to the right. This viscous cycle reinforces bad habits in your swing path and clubface angle. The only cure is getting back to square. 26
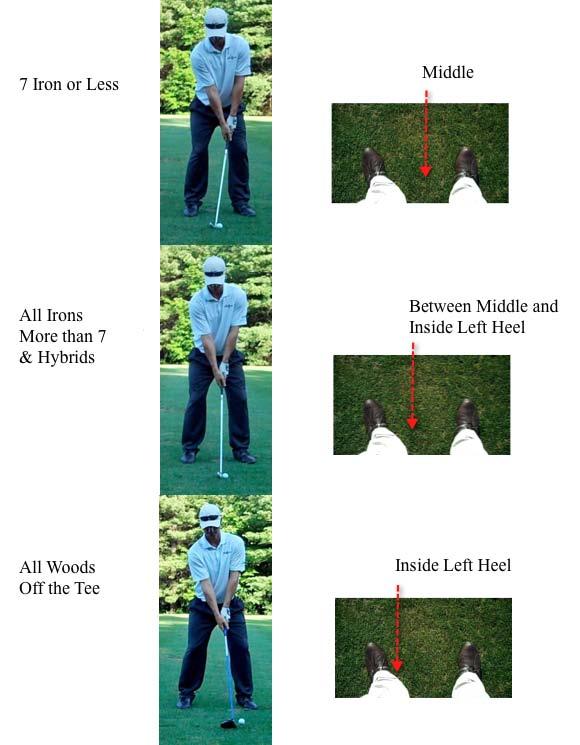
27 You can t fix an alignment problem on your own. Have a friend or instructor stand behind you and tell you where you re feet and shoulders are aiming. Do this over and over again until your set-up is on line. This is the only way to get back on track. If you lined up perfectly for every shot, you would properly condition a swing path down the intended the line. Your swing and clubface angle would improve dramatically. The problem is, most golfers attach themselves to a certain ball flight. Since the majority of shots are slicing, they think the best way to fix the problem is to aim more to the left to compensate for the left to right ball flight. This does not breed consistency. Using alignment to repair a swing flaw is a band-aide fix. That s not the goal. Have you ever been to a professional golf tournament? Have you ever visited the driving range on site? If you ever get a chance to watch some professional players hit balls on the range you will notice how consistent their motion is. Another thing you will notice is how often they use training aids. 4 out of 5 players will practice using some form of training device that works on alignment. Training rods are the most common tools used by top players. It s a simple rod you lay on the ground to get your feet square to the intended line. Guess what, it works wonders. Give it a try, practice like the pros and work on your alignment. If you re thinking, how can I remember to swing down the intended line without a training rod or another device that helps with my alignment your answer is swinging down the line created by your feet. That s why its so critical to set your feet parallel to the target line. If you can accomplish this, you don t even have to look at the target. Just swing down the line you created with your feet. You should practice this on the range for a couple weeks before you use this technique on the course. You want to make sure your alignment is perfect. This also works great for people who have bad vision. They can t see the target as well, so they can relate better to something they can see, which is the line made by your feet. Simply swing down that line. Ball Position Consistent ball position breeds solid contact more than any other area of the set up. There are three different ball positions. 1. Middle of stance with hands forward 2. Between middle and inside left heel with hands above 3. Inside left heel with hands behind Position the ball in the middle of your stance if you re playing a seven iron or anything less. You want to take some earth after the ball so your going to position your hands slightly forward. This will encourage a downward motion through the ball. 27
28 Position the ball between the middle and inside left heel if you re playing with any iron more than a 7 and hybrids. In this case, you re not looking to take a large divot. Instead, you want a level path through the ball that means giving the grass a haircut. To do this you want to position the hands above the club. Position the ball inside left heel if you re playing a wood off the tee. With this shot there is no contact with the ground. Since the ball is resting on a tee you want to make contact as soon as the club begins its upward motion. That s why you position the hands slightly behind. This will optimize trajectory and distance. 28
29 29
30 Part 3 THE FULL SWING 30
31 Basic Philosophy of the Full Swing The golf swing is a series of movements designed to deliver a square clubface through the ball down the intended line. We don t want to make the swing more complicated than it already is. We need to filter out all the useless information and stick to the basics. The best approach is to simplify the major components. Basic Component #1: Body rotation Basic Component #2: Arms swing the club By blending the first and second component we are applying the necessary movements in the full swing. Here s the concept you want to visualize. As the first component (the body) rotates on a horizontal plane, the second component (the arms) swing the club on a vertical plane. Think about your body as the engine, the source of movement that rotates right and left, while your arms, the connecting agents, swing the club in a circular manner up and down. Keep in mind, our body does not rotate on a perfectly horizontal plane nor do the arms swing the club on a perfectly vertical plane. Our posture is inclined at an angle, the swing changes planes, our hips and shoulders rotate at different degrees, we shift our weight, etc. Its confusing with all the dynamics as work. Nonetheless, this model is the best way of simplifying the movements of the full swing. It will improve your understanding and harmonize the necessary elements. 31
32 The Right Mental Picture Basic Component #1 Body Rotation Basic Component #2 Arms swing the club 32
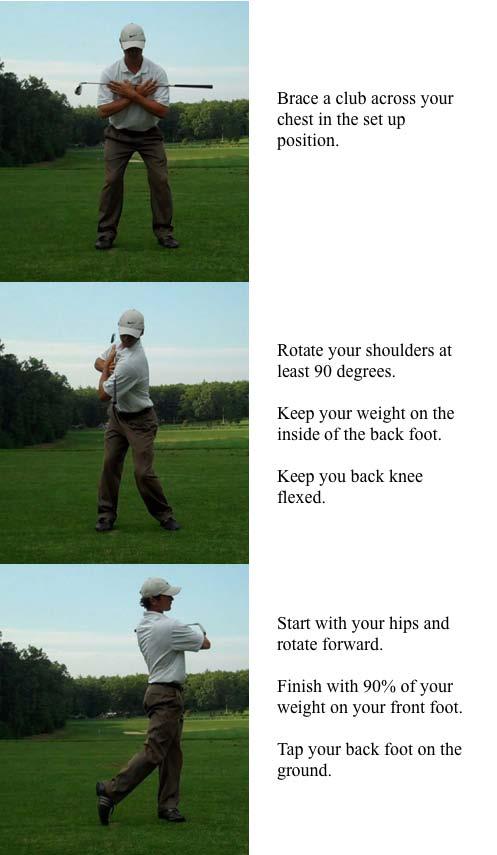
33 Body Rotation Body motion is the engine of the golf swing. Body motion governs all motion. By learning correct body motion you are training the most important component of the golf swing. This drill will improve the necessary building blocks of your swing. If you consistently follow the checkpoints you will be on the right path to correct body motion. The results are better accuracy and longer distance. The basic principle here is using the upper body to govern backward rotation and the lower body to govern forward rotation. When you have these elements working properly your golf swing will perform more efficiently and more effectively under pressure. Remember, body action is easier to repeat than hand and wrist action. The following is an excellent drill for learning correct body motion. Rehearse the drill until you feel comfortable executing all the checkpoints. 33
34 34

35 The following is a critical position of the body motion drill. When your shoulders have rotated 90 degrees, the butt end of the club must never extend to a point on, or inside, the target line. That means it must extend on a line outside the target line. The example below illustrates the correct position outside the target line. It s highly recommended rehearsing this position until it s fully integrated and repeatable in your motion. This is one of the major keys to developing efficient shoulder rotation and coil on the backswing. By rehearsing this drill you will develop coil at the top of the swing a critical element to power and efficiency. Use a mirror or video and practice this drill until you can easily follow all the checkpoints. The Left Arm Since the upper body governs the backswing the left arm is going to play a vital role moving the club away from the ball and positioning the club at the top. The left arm creates width in the swing. It keeps the club away from the body on the takeaway and at the top of the swing a necessary ingredient for creating leverage and a shallow angle of attack through the ball. Without the use of the left arm, the golf swing would resemble a steep chop at the ball, like someone chopping wood. You don t want to look like that. The first 3 ft. on the takeaway the left and right arm play identical roles. Along with the shoulders, they move the club back in one piece in the formation of a triangle. This triangle does not break down until the hands pass the right hip. From this point forward, the role of the left arm is to keep the club away from the body. There s no need to keep 35
36 the left arm straight and rigid that will only produce tension, which could destroy the flow of the backswing. Simply think about keeping the club away from the body with the left arm. As the wrists begin to hinge, the left thumb points to the sky half way back. You want the branding of your glove pointing directly in front of you, not to the sky. As the arms continue traveling upwards, the left arm brings the club to a position above the right shoulder. At this point the left thumb provides support under the shaft. Now, as the weight transfers to the front foot, the shoulders trail behind the hips and the left arm lowers to a position at hip level. Keep in mind; the left arm plays no role in the transition from backswing to downswing. The lower body strictly initiates the downswing. Now with the left arm at waist level, it passively pulls the club down to the impact position. This move is not dominant simply an extra move that helps stabilize face rotation by preventing the right side from releasing the club too early. The following drill is highly effective for learning efficient use of the left arm. Repeat the drill several times in front of a mirror until you are able to follow all the checkpoints. 36
37 37
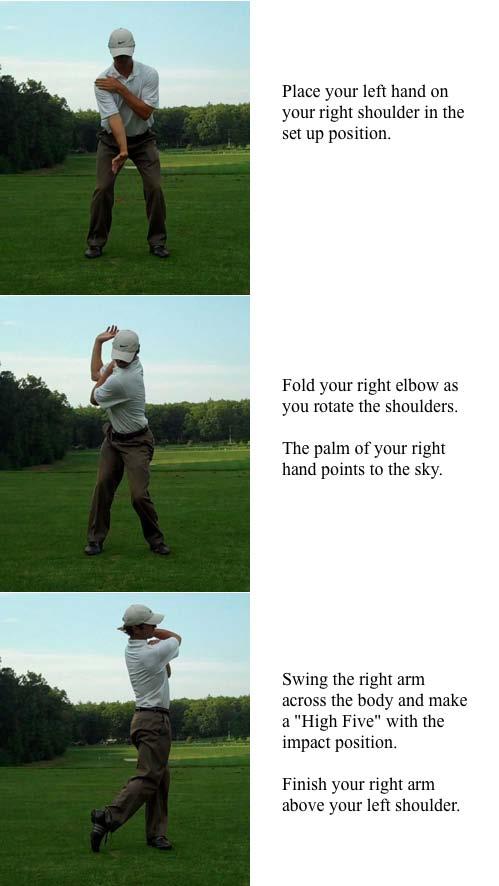
38 This drill will create more efficient use of the left arm from start to finish. Repeat this drill as many times as you like until you feel each move is fully integrated into your swing. There are many benefits of learning the correct use of the left arm. You will create more width, develop more leverage, and a more efficient angle of attack through the ball. The Right Arm The role of the right arm is more complex and two major responsibilities. It helps maintain a connection between the upper torso and the arms and it s responsible for releasing the club at impact and beyond. The first 3 ft. on the takeaway the left and right arm play identical roles. Along with the shoulders, they move the club back in one piece in the formation of a triangle. This triangle does not break down until the hands pass the right hip. From this point forward, the right elbow begins to fold. As the arms continue traveling upwards, the right elbow folds into an L position at the top of the swing. The L position creates a solid connection between the right arm and the right shoulder. This connection plays a critical role in the transition from backswing to downswing. Try this: rehearse the backswing with both arms extended. First, you will notice how difficult this is it just feels unnatural. But more importantly, feel how easily you lose connection with the upper torso. There s too much separation between the upper arm and upper torso. This is something you want to stay away from. An unconnected swing is produces inconsistency. When the shoulders trail the hips on the downswing, the right arm responds as soon as the right shoulder begins to move. This is a critical part of the swing. The right arm lowers to a position at hip level. From this point forward, the right elbow begins to straighten. This marks the beginning of the release. At impact the right arm comes through fully extended and leads the way as the right side releases the club down the line. It s important to emphasize the connection between the upper right arm and upper torso at the top of the swing. To get a better understanding of this connection practice swinging the club with your left arm only. Notice how hard it is to coordinate the sequence of movements on the downswing. The left arm does not respond as well to the unwinding of the shoulders. The result is having the club trail too far behind the body the definition of getting stuck in on the downswing. Since the right arms established a connection with the right shoulder, there s a much better sequence of movements back to the ball. The following drill is highly effective for learning efficient use of the left arm. Repeat the drill several times in front of a mirror until you are able to follow all the checkpoints. 38
39 39

40 This drill will create more efficient use of the right arm from start to finish. Repeat this drill as many times as you like until you feel each move is fully integrated into your swing. There are many benefits of learning the correct use of the right arm. Your downswing will be more synchronized, your timing will improve, the club will release easily through impact, and you will learn to develop more power. Blend the Components Together with a Half Swing The half swing is an excellent drill for combining the components of the swing. You are blending correct body motion, arm motion, and proper application of the clubface. The purpose of the drill is learning how to deliver the club through the ball. After practicing this several times, you will feel more comfortable building up to the full swing. 40
41 41

42 The following is a critical position of the half swing. When your left arm is parallel to the ground, at the 9:00 position, the butt end of the club must never extend outside the target line. That means if your club extends either on the target line or slightly inside, you re in perfect position. The photograph below illustrates a line slightly inside the target line. It s highly recommended rehearsing the half swing until this position is fully integrated and repeatable in your swing. This is one of the major keys for developing an efficient top of swing position. 42

43 Primary Objectives on the Backswing Set the club high and wide at the top On the backswing we blend the rotation of the body and swinging of the arms to set the club in the correct position at the top. Rotation of the body is the horizontal element and the swinging of the arms is the vertical element. The top of the backswing is the result of blending these elements together. The purpose of the backswing is to set up the downswing. We want to swing the club in a manner that does not encourage compensations on the way back down. We accomplish this by creating height and width at the top. That means the arms swing high into the sky while keeping considerable distance between the head and hands. This positions the club for a simple and effective delivery back to the ball and optimizes the swing for power and control. 43
44 Primary Objectives on the Downswing Pivot and clear from the ground up On the downswing we blend of rotation of the body and swinging of the arms in order to deliver the club through the ball down the intended line. Rotation of the body is the horizontal element and the swinging of the arms is the vertical element. The finish position is the culmination of these elements working together. The philosophy on the downswing is from the ground up. We must use the lower body as the engine of the swing that delivers the club. The very first move is a weight transfer to the front foot with the hips. This allows the club to travel from the inside a major element to efficient delivery. Second, we rotate and clear our left side out of the way for the right side to release the club. We don t stop rotating until the belt buckle fights its way back to the target. SECRET: The art of shot making is learning to release the club with the body, not the hands. 44
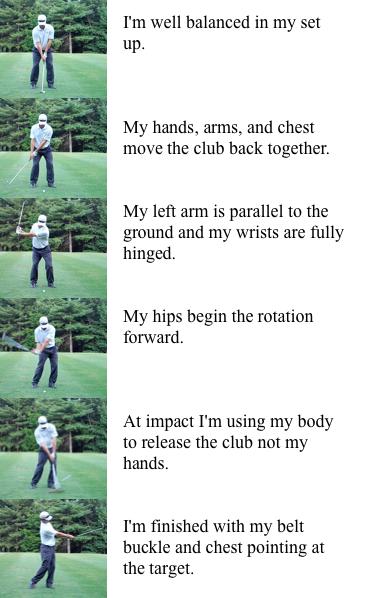
45 Finally Down the Middle Principles of Efficient Motion The principles of efficient motion identify positions in the golf swing that maximize biomechanical efficiency. They are designed to consistently produce a powerful and accurate ball flight. The principles of efficiency are the result of extensive video analysis using JC Video Systems and V1 Pro Technology. For a position to become a principle, it must be consistent with top PGA Tour professionals. The players identified in this study are premier ball strikers and exemplify the principles of efficiency, winning at least 10 professional golf tournaments throughout their career. The principles of efficiency serve as checkpoints in your swing. If you can accomplish each principle, you will find more power and accuracy in your ball flight, guaranteed. For beginners, begin with the 1 st principle and rehearse your swing until it feels repeatable. Once you feel comfortable, move on to the 2 nd principle. Never move forward until each principle is fully integrated and repeatable in your swing. Video is the best way to check your swing for each principle. If you don t have access to a video camera, use a mirror and rehearse your swing in slow motion until you see yourself executing each principle properly. 45

46 #1 The shoulders turn farther than the hips on the backswing. This principle prepares the body for the downswing by developing tension in the body a critical ingredient to efficient power. By building tension between the shoulders and hips, your body simply wants to unwind. All that tension translates into power and the downswing becomes a reflex action. Keep in mind; this principle is not only about power. By turning the shoulders further than the hips it sets up the proper sequence of movements back down to the ball. The hips are poised to begin the downswing with the shoulders trailing behind. They key to this principle is tension. Your objective is two fold; rotate the shoulders as far as they ll go and restrict the hips. A good technique is to keep your back foot perpendicular to the target line. By angling your back foot this way it restricts the hips from rotating as much as the shoulders. To get a better idea how this works rotate the shoulders with the back foot open 45 degrees. Notice how much more the hips rotate. Since you want to restrict the hips from rotating without sacrificing good balance and proper footwork, angle your front foot perpendicular to the target line. Another good technique is to keep your front foot anchored on the ground. By doing so you don t allow the heel to leave the ground, which would allow more room for the hips to rotate. If you want to know what this feels like try rotating the shoulders and allow the front heel to rise 46

47 well off the ground. Notice how much hip rotation you can achieve. What you want to do is the opposite, keep the front heel anchored to the ground. This will restrict the hips. The result is much more tension in the body and more fuel for the downswing. #2 The weight remains on the inside back foot at the top of the swing. Since the first move on the downswing is a weight transfer to the front foot, it s important to have the correct posture at the top of the swing. This will position the body for a repeatable move through the ball. This principle follows the cornerstone of good balance in the golf swing staying on the inside muscles of the feet. When the posture is centered on the inside muscles of the feet, transferring weight and body rotation are highly repeatable. There are no compensations in the body through impact. This principle effectively positions the weight for an efficient transition from backswing to downswing by preventing the upper and lower body from swaying too far on the backswing. It also helps maintain a centered feeling over the ball at the top of the swing. When this is accomplished the weight transfer on the downswing is simple and efficient there s no wasted effort. 47

48 For a better understanding of this concept rehearse the backswing into the outside muscles of the back foot. You will notice how difficult it is to pivot to the front foot it takes longer and has to travel further. That means there s more that could go wrong. The solution is keeping your weight on the inside muscles. This optimizes the first move on the downswing, which is a weight transfer to the front foot. #3 The back knee remains flexed at the top of the swing. Your posture, before the downswing begins, is a critical element of the golf swing. It influences how well you can shift your weight forward and rotate the body. By following this principle at the top of the swing, you can develop more efficient body motion through the ball. The result is more power and accuracy. Having the back knee flexed creates live tension in the legs. It prepares the lower body for the first move on the downswing a weight transfer to the front foot. This principle can be viewed as an extension of the previous principle. When you blend them together there is no wasted effort as the body shifts forward and rotates. A common fault for amateurs is straightening the back knee. When you rotate the shoulders over a straight back leg it s called a mousetrap. Your body doesn t want to move. There is no live tension in the legs and there s too much wasted effort getting to the front side. To safeguard against this terrible habit you must have better weight 48

49 management. As your shoulders rotate on the backswing feel your weight on the balls of the feet. That means the majority of weight is on the front center of the foot. This will help maintain flex in the back knee. By following this principle you create an athletic position at the top of the swing. It effectively prepares the lower body for its dynamic role on the downswing a lateral move to the front foot. The result is more efficient body motion throughout the swing. To monitor your back knee at the top of the swing, position a mirror from down the line view. Make a swing and hold the position at the top. Check your back knee for a slight flex. You don t want to increase or decrease the amount of flex, simply maintain the flex you started with at set up. Don t stop rehearsing the backswing until you feel comfortable with this principle. #4 The lead hip stacks above the lead foot at impact. The most important move in golf is the first move on the downswing. It transitions the club from backswing to downswing and prepares the club before the moment of truth impact. The dynamic role of the downswing can make or break a swing, depending on which part of the body takes responsibility. 49

50 This principle illustrates the weight transfer on the downswing. To recap exactly what happens, the first move on the downswing is a weight transfer to the front. It originates from a combination of pulling with the lead hip and pivoting off the back foot. The result positions the lead hip above the lead foot at impact. This principle is only possible when over 60% of the weight is on the front foot at impact. Try to position your lead hip above the lead foot with your weight centered between both feet and you ll understand. # 5 At impact the hips are more open to the target than the shoulders This principle illustrates the correct use of the body on the downswing. In the above example, Tiger s hips are almost facing down the target line. This is quite incredible. This proves how the hips lead the way on the downswing and they don t stop rotating until the belt buckle fights its way back to the target line. This principle yields lots of power in the golf swing. Utilizing the lower body on the downswing is your key to consistent power off the tee. You will use your body to release the club by incorporating this principle into your swing. a necessary ingredient to consistent shot making. Remember, the downswing starts from the ground up. 50
51 A common mistake is stalling out the hips at impact. That means as the club approaches the ball the hips slow down. When this happens the hands and arms assume responsibility releasing the club a disaster waiting to happen. The hips must never stall out at impact. They don t stop rotating until the belt buckle faces the target. This is the driving force that unwinds the shoulders and pulls the arms and club through impact. You will have no problem integrating this principle into your swing by starting with the right sequence from the top. That means, your hips begin the unwinding process, followed by the shoulders, followed by the arms, followed by the hands. This is the correct sequence as the club gets delivered to the ball. Anytime you fall out of sequence your club travels on an incorrect path back to the ball and good timing is lost. The Magic Move Professional instructors and players have debated a secret for decades. They ve attempted to explain how the best ball strikers in the world hit the ball long and straight, without much effort. Experts call it the magic move the one move that s consistent with every great player. Scratch Golf School believes the magic move in golf is the first move on the downswing the initial transfer from backswing to downswing that sets the club in the correct delivery position before impact. By using the move properly you will see extraordinary results such as more power and accuracy off the tee. Before explaining how the move works, I d like to acknowledge Ben Hogan s Five Lessons and Jim McLean s The Slot Swing. These instructional books have shaped the way I think about the golf swing. I could not have developed such a theory without their extensive work on the subject. If you are in decent physical shape, with no major injuries or limitations, there s no reason why you can t fully integrate this move into your swing. When you integrate the move, you no doubt experience more power and accuracy off the tee. What is the magic move? The magic move is a weight transfer on the downswing with the lower body while maintaining the position of the head. This creates a tilt in the spine angle. As a result, the plane of the downswing flattens out and prepares the club for a delivery from the inside. 51
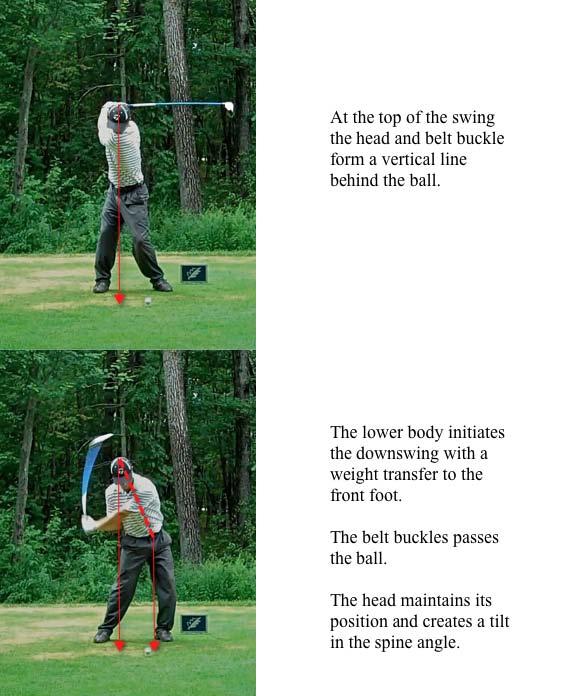
52 52
53 Here s a summary of the magic move 1. The lower body initiates the downswing with a weight transfer to the front foot. 2. The head maintains its position behind the ball. 3. The belt buckle moves to a position either above or passed the ball. 4. There s a tilt in the spine angle. 5. As a result of steps 1-4, the angle of the shaft flattens on the downswing. The Magic Move Drill The following drill shows you exactly how to integrate the magic move into your swing. Rehearse the drill as many times as you like without a ball. Once you feel comfortable with the move, practice with a ball. 53
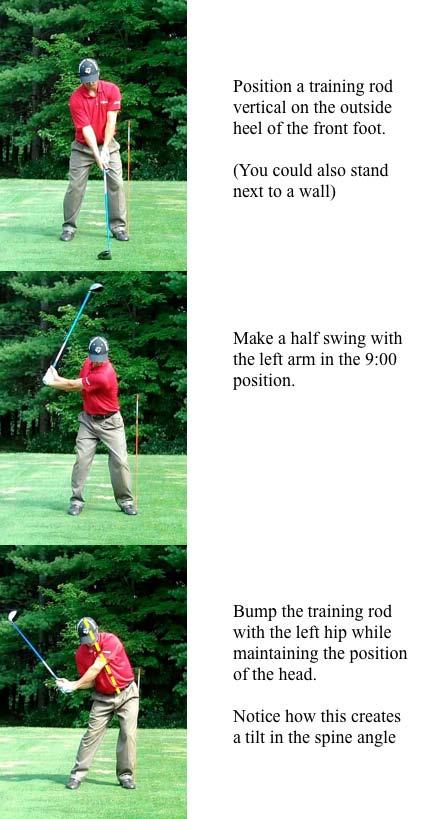
54 54

55 It s important to see how this drill works. That s why using video or a mirror is so useful. After bumping the rod with your hips and maintaining the position of your head, you are able to see the amazing effect of creating tilt flattening the shaft angle. This is how you prepare a delivery from the inside. This is how you eliminate your slice and pull hooks. 55
56 Magic Move Case Study #1 Brandon (13 handicap) Brandon is an avid slicer. He suffers from a common ailment in golf the over the top. His shoulders unwind too early on the downswing and the club travels outside the line of play before impact. 56

57 Brandon s swing pattern is very typical for slicers. The biggest thing he needs to work on is getting his head behind the ball and maintaining that position on the downswing. This will create the backward tilt in his spine the magic move. As a result, the angle of his shaft will flatten on the downswing and he will deliver the club from the inside. He can finally say good-bye to his slice. 57
58 Magic Move Case Study #2 Tom (9 Handicap) Tom moves his body and sets the club in good positions throughout the swing. There s no wonder why he is a good ball striker. However, he finds inconsistency off the tee, missing shots to the left and right. 58

59 Tom has so much lower body movement on the downswing it pulls the head too far forward. As a result, his head slides passed the ball and causes a lot of inconsistency at impact. Tom needs to work on is less lateral movement on the downswing and keeping his head behind the ball. As a result, he will find more consistency off the tee. 59

60 Magic Move Case Study #3 Sean (7 Handicap) Sean has a very powerful golf swing. Because he uses his body so well on the downswing he s able to produce drives over 300 yards. At times, he suffers from an early release with the hands and hits a lot of pull hooks. 60

61 The key step that Sean s missing is leaving his belt buckle behind the ball on the downswing. There are a couple adjustments he could make. First, he could adjust his ball position closer to the middle or he could narrow his stance. This will allow his lower body to move above or pass the ball on the downswing and put him in a better position for impact. As a result, he will not suffer from the early release and hit many pull hooks. 61
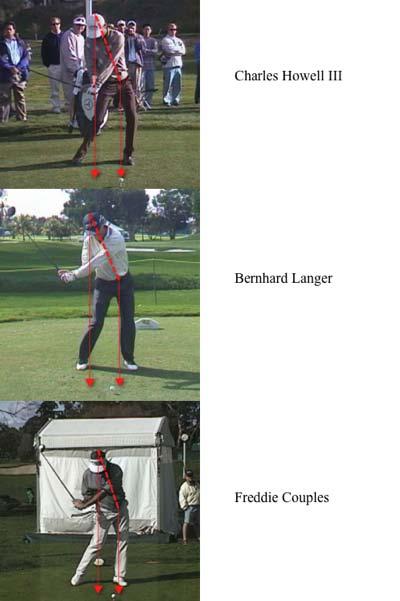
62 A Sample of PGA Tour players with the Magic Move The following is a random sample of PGA Tour players who demonstrate the components of the magic move. They are not the only players on tour that use the move they are only to show you how top players in the world utilize the magic move. Notice how each player s swing is different. Check how they move their lower body, keep their head back, and create tilt. These are the major components of the magic move. Each player will demonstrate slightly different positions, but the fundamentals are the same. 62
63 63
64 64
65 65
66 66
67 The Pre Shot Routine Every professional golfer has a detailed pre shot routine because it focuses the mind and prepares the body for action. The mind can be very powerful. I m sure you ve had experiences when your golf ball has listened to your thoughts. For example, you faced a shot over water and the first thought that came to your mind was, don t hit in the water. So what happened? The ball sailed into the water. Your negative thought was a self-fulfilling prophecy. You convinced yourself of the outcome. By learning the necessary steps of the pre shot routine you will be able to turn down the noise of your mental chatter. You learn to get out of your own way. The key is to focus on what you want to accomplish rather than what you want to avoid. You also need to be very familiar with your own swing. Don t visualize a 275-yard drive if your max is 250-yards. You should be aware of your limitations. The goal of the routine is about developing a positive and precise plan of action before every swing. Don t aim in a general direction. The fairway is not a target you have to concentrate on something more specific that will narrow your focus. This is your key to developing accuracy. Remember, golf is a target sport. Finally, the pre shot routine is no place to think about swing mechanics. You re only allowed to think about the areas of your set up. That means the grip, stance, posture, ball position, and alignment. These are the critical areas of the swing that you will be focusing on during the pre shot routine. 67

68 This is your hole. Step 1. Pick a target Pick a small target in the distance to establish your ball-target line. The target does not have to be within reach, it only needs to provide a reference point when establishing the line of play. 68
69 Step 2. Tee the ball Maximize your chance of hitting the fairway by teeing the ball in the correct location. If you typicall play a cut, tee the ball on the right side of the tee box. If you typically play a draw, tee the ball on the left side of the tee box. NOTE: I m planning on a straight shot to my target that s why I m teeing up in the middle of the tee box. 69
70 Step 3. Grip the club behind the ball You never want to fiddle with your grip over the ball. That s why you need to get it out of the way before you appraoch the ball. Follow all the checkpoints discussed in Part 1. Step 4. Visualize the ball flight Visualize the ball flight traveling from the tee to the middle of the fairway. You want to be specific and see the entire shot. The key is to engage your senses. Take into account the sight, sound, and feeling of the golf shot during the visualization process. 70
71 5. Step in with the right foot and set the club Step in with your right foot first. Square the club face with the initial starting line. Step 6. Take a stance Position the left foot with correct ball position. Move the right foot back in order to create a comfortable width and proper alignment with the feet. Now, the feet are parallel to the ball target line and ready for the first move. 71

72 NOTE: notice how the lines converge in the distance. If you re confused, refer back to the section about the train track system and review the material about the law of convergence. Step 7. Pull the club back in one-piece The first move away from the ball is a one-pice takeaway with the shoulders, arms, and hands. This is how the upper body begins to govern the backswing. 72
Full swing technique is a pillar of a solid overall game. The following 4 core competencies are strong predictors of success in ball striking.
 Full Swing Analysis What are we trying to accomplish? Core Competencies in the Full Swing Full swing technique is a pillar of a solid overall game. The following 4 core competencies are strong predictors
Finally Out of the Sand
 Finally Out of the Sand A Guide to Success in the Bunker Written By: Master Teaching Professional Adam Kolloff www.scratchgolfschool.com Introduction I can't tell you how many people roll their eyes when
Table of Contents. Page 2 of 36
 Table of Contents Introduction... 3 Setup Lessons... 4 The Grip... 4 Ball Positioning... 5 Posture... 7 Alignment... 9 Swing Lessons - Step 1... 11 Swing Lesson - Step 2... 21 The Loop Drill... 24 Standing
The BIG BOOK of Golf Drills
 The BIG BOOK of Golf Drills 1 How to Use This Guide Congratulations on purchasing the Big Book of Golf Drills! This book is designed to use as a reference guide. We do not recommend printing this out as
Fix Your Swing Series. Table of Contents
 Fix Your Swing Series Table of Contents 1. Hit More Fairways 2. Fix Your Setup 3. Fix Your Ball Position 4. Fix Your Takeaway 5. Fix Your Backswing 6. Fix the Top of Your Swing 7. Fix Your Downswing 8.
Welcome Statement. 1. the Plan. 2. the History. 3. the Warm Up. 5. the Setup. 6. the Swing 7. the Glue 8. the Tour Draw Practice Station.
 table of contents.. Welcome Statement. 1 the Plan. 2 the History. 3 the Warm Up. 5 the Setup. 6 the Swing 7 the Glue 8 the Tour Draw Practice Station. 9 the Tour Draw Assessment. 10 Summary. 11 Key Phrases.
The Golf Swing. The Fundamentals
 The Golf Swing The Fundamentals Fundamental #1 Grip & Set-Up The grip and set-up should be viewed as putting parts of a machine together. The right parts connected in the right way will allow the machine
Mark Wood s Full-Swing Basics. 7 Steps to Jump-Start Your Game for 2015
 Mark Wood s Full-Swing Basics 7 Steps to Jump-Start Your Game for 2015 On giving short 30-minute corporate clinics, I am normally speaking with a large group of golfers who are of varying abilities. As
Structure (Down plane)
") By Lauren Russell Structure (Down plane) The body (toes, knees, hips, wrists and shoulders) is aligned parallel to the intended target line. The torso is tilted over the ball from the hips whilst maintaining
By Lauren Russell Structure (Down plane) The body (toes, knees, hips, wrists and shoulders) is aligned parallel to the intended target line. The torso is tilted over the ball from the hips whilst maintaining
How to Swing a Driver
 How to Swing a Driver Instruction set for beginning golfers By Mike Buzzell Pictured: John Daly, also known as Long John, was the first PGA Tour player to average 300 yards per drive. He won two Major
The Pure Point Golf Driver DVD Special Outline Instruction to Focus on
 The Pure Point Golf Driver DVD Special Outline Instruction to Focus on Purpose: This instructional resource was included for your reference. The points outlined in the following sections are what we have
How using Trackman can help coaches produce better results
 WWW.TRACKMANROADSHOW.COM How using Trackman can help coaches produce better results The purpose of this case study is to prove that using Trackman can help coaches produce better results with their students
DRILLS EVER! Practice drills are simple but effective. WAVE BYE TO A FLYING ELBOW Keep the right elbow tucked in at the top of your backswing
 20 BEST DRILLS EVER! Fix golf s common faults in minutes with Adrian Fryer s simple tips WORDS kit alexander Pictures BOB ATKINS Practice drills are simple but effective ways for any golfer to develop
PLAY BETTER GOLF and HAVE MORE FUN
 PLAY BETTER GOLF and HAVE MORE FUN Randy Meyer PGA Table of Contents Chapter Page Teaching Philosophy 1 Philosophy and Approach 3 Swing Fundamentals 2 Pre-swing 4 In-swing 5 Golf Tips 3 Ball position,
The Simple Swing
 The Simple 1-2-3 Swing The Amazing "1-2-3 Swing" Guarantees The Average Golfer Can Break 90 In Less Than a Week! The Amazing "1-2-3 Swing" Guarantees Average Golfers Can Learn To Consistently Hit The Ball
Lesson 3. Golf. Lesson Objectives. Personal Conditioning. Prepare Students... 3 min Explain/Demonstrate/Practice
 Lesson 3 Lesson Objectives Time Page Equipment & Materials Personal Conditioning Lesson 25........................................... 5 min. Prepare Students.................................... 3 min........
The Takeaway. The waggle can be an excellent opportunity to rehearse your takeaway
 The Takeaway Your approach to the ball is the final step over which you have total control. Once you actually start the swing, you need to depend on rhythm, tempo and balance to see you through the swing.
Putting Basics. If You Can Putt You Can Score. Written by: Randy Sparks Purestrike Golf Academy Destin, Florida
 Putting Basics If You Can Putt You Can Score Written by: Randy Sparks Purestrike Golf Academy Destin, Florida Putting Now that you've built your chipping, pitching, and full swing motions, it's time to
The Fundamentals of Putting
 The Fundamentals of Putting Episode 1 - Setup and Aiming A proper setup position is a prerequisite of a good putt. Setup includes body posture, gripping the putter, alignment of body relative to the ball
Instructional Manual
 Instructional Manual TABLE OF CONTENTS MEDICUS Dual 2000 Instructional Manual The Proper Grip 1 Posture, Stance & Alignment 2 Breakpoint 1: Takeaway 3 Breakpoint 2: Toe-up Position 4 Breakpoint 3: Setting
Dr. D. Ryan York, PT, DPT, CGS Doctorate in Physical Therapy Certified Golf Performance Specialist, GOLO Golf University
 Dr. D. Ryan York, PT, DPT, CGS Doctorate in Physical Therapy Certified Golf Performance Specialist, GOLO Golf University Dr. Chad Edwards, PT, DPT, CGFI Doctorate in Physical Therapy Certified Golf Fitness
one-plane swing eliminates push shots & duck hooks On The Cover ou ve read endless advice about swing planes and ball trajectories.
 On The Cover INSTRUCTION ONE-PLANE SWING one-plane swing eliminates push shots & duck hooks ou ve read endless advice about swing planes and ball trajectories. You re mentally drained from trying to figure
Hitting The Driver Made Easy
 Table of Contents Introduction 3 Equipment 4 The Golf Shaft 4 The Golf Grip 5 The Club Head 6 Equipment Summary 7 The Setup And Swing 9 The Grip 10 Ball Position 12 Alignment 12 Posture 14 The Take-Away
by John Bertges PGA Professional / PGTA Master Professional
 by John Bertges PGA Professional / PGTA Master Professional His name may be overused in golf circles today, but Tiger Woods has taught us a lot in reference to the Modern Golf Swing. Many of his accomplishments
Table of Contents. *Available In Full Version Only
 TE LI R VE N O SI Fix Your Swing Series Lite Version Table of Contents 1. Fix Your Slice 2. Fix Your Hook 3. Hit More Fairways 4. Fix Your Setup 5. Fix Your Impact Area 6. Fix Your Fat Shots 7. Fix Your
slice bye bye FIND YOUR FAULT... AND FIX IT! SLICE CURE
 { C O V E R F E A T U R E} bye bye slice It s weak, nasty and robs us of better scores. Send your slice packing for good, by Gareth Johnston words joel tadman PICtures HOWARD BOYLAN { game} SLICE CURE
Carolina Trace Country Club
 Carolina Trace Country Club Short Game School Michael Krick Head Golf Professional Trace Member Table Of Contents Putting 1, 2 Putting Evaluation Matrix 3 Putting Positions 4 Chipping 5, 6 Pitching 7,
The Secrets Of The Swing
 The Secrets Of The Swing brought to you by www.golfclubdistance.org and Amazing Golf Mind Table of Contents 1. The Address 2. The Take Away 3. The Top Of The Backswing 4. The First Move 5. The Downswing
LAWS, Principles, and Preferences.
 LAWS of the Game of GOLF By James E. Coach Robertson From his book The Encyclopedia of Successful GOLF Coaching LAWS, Principles, and Preferences. The Model Golf Swing You can end your search for the one
11 Short Game Drills To Help You Up And Down It From Anywhere!
 Table of Contents Introduction... 3 Chipping... 4 Drill #1 - Wrist Firm (Part 1)... 4 Drill #2 - Wrist Firm (Part 2)... 4 Drill #3 - Chipping Accuracy... 6 Pitching... 8 Drill #1 - Distance Control (Part
By Mark Favell with Al Barkow
 Golfers get into trouble when they try to align their body first, especially their feet, which are the least important element. By Mark Favell with Al Barkow Because golfers stand at the side of the ball
The Three Swings of Wright Balance: Which One Are You?
 The Three Swings of Wright Balance: Which One Are You? Our 25 years of research has yielded the following. In summary we are able to do simple body measurements, provide a student with Stance Widths that
PA RT 1 TOTAL GAME IMPROVEMENT PLAN LONG GAME. Find more fairways, hit more greens and shoot lower scores this summer
 PA RT 1 TOTAL GAME IMPROVEMENT PLAN LONG GAME Find more fairways, hit more greens and shoot lower scores this summer A stronger long game starts here... Learn from TG top-50 coaches and tour pros Welcome
Table of Contents. Introduction Secret # Secret # Secret # Secret # Secret # Conclusion...
 5 Secrets To Maximum Distance Table of Contents Introduction... 3 Secret #1... 4 Secret #2... 5 Secret #3... 7 Secret #4... 7 Secret #5... 9 Conclusion... 11 Page 2 Introduction The 5 secrets I share in
Fix The Flight..Be Your Own Human Trackman
 2017 PGA Player Development Fix The Flight..Be Your Own Human Trackman Application of Jim Hardy s Pluses and Minuses. Krista Dunton www.kristaduntongolf.com Golf Magazine Top 100 Instructor Plane Truth
DRILLS MANUAL & SELF CORRECTION SYSTEM
 DRILLS MANUAL & SELF CORRECTION SYSTEM Symple Swing "The Easy-To-Learn Golf Swing " From Simple Golf LLC Support@SimpleGolf.com Website: www.simplegolf.com Copyright 2005 Simple Golf LLC Symple Swing Drills
00 G O L F T I P S
 00 G O L F T I P S www.golftipsmag.com DROP IN 10 STROKES 10 MINUTES! BY TOM STICKNEY, PGA, WITH RYAN NOLL PHOTOS BY RYAN NOLL It s a new year. It s a new you. It s time to kick those bad swing habits
Swing Trainers. You Can Find At Home. By Kevin Sprecher
 Swing Trainers You Can Find At Home By Kevin Sprecher Golf is a game that requires both innate feel and learned technique. There are distinct drills and exercises to create a swing change and new, more
BY TOM STICKNEY, PGA PHOTOS BY RYAN NOLL
 THE NEW RULES! BY TOM STICKNEY, PGA PHOTOS BY RYAN NOLL YOU THINK YOU KNOW WHAT CAUSES WHAT? Unless you ve been scouring golf instruction blogs and Facebook groups, and reading what many Trackman aficionados
How to Hit a Draw Video Transcription
 How to Hit a Draw Video Transcription Hi, I'm Bobby Eldridge and we're excited about what you're going to learn in this DVD. I have always believed that the draw is essential to your best golf. In the
No one questions that the wider your swing
 HOW TO LENGTHEN & WIDEN YOUR SWING By Brett Taylor with Al Barkow Photos by BW Studios, Courtesy of Eli Ingram, Lit l Links Golf Club No one questions that the wider your swing radius and the longer the
Baseball Hitting Principles Version 2
 Baseball Hitting Principles Version 2 Scott Kluemper 2/17/2013 Scott Kluemper 1 Table of Contents Page Swing Phases 3 Stance 4 Negative Move 10 Positive Move 12 Toe Touch 15 Heel Plant 17 Posture Lines
T H E M O S T I M P O R T A N T L E S S O N O F A L L
 T H E M O S T I M P O R T A N T L E S S O N O F A L L #2 The Grip CHEAT SHEET 1. Minimal compensation for consistency 2. Grip rotation influences club face angle 3. Turn hand right for more hook, Turn
10 Steps to a Better Volley
 10 Steps to a Better Volley Follow these 10 basic steps to immediately improve your volleys. 1. The Grip Use the continental grip. If you don t have a continental grip on your volley you will be forced
LESSON 9 THE SWING PLANE AND THE BODY (Part 1)
") LESSON 9 THE SWING PLANE AND THE BODY (Part 1) A BLOW IN PLANE FACE ON. In our very first lesson we understood the principle of striking a fence post with a hammer; we could make a glancing blow, but the
LESSON 9 THE SWING PLANE AND THE BODY (Part 1) A BLOW IN PLANE FACE ON. In our very first lesson we understood the principle of striking a fence post with a hammer; we could make a glancing blow, but the
BEGINNING PITCHING TIPS BRYC Softball Updated February 4, 2008
 BEGINNING PITCHING TIPS BRYC Softball Updated February 4, 2008 General 1. Work on sound mechanics before anything else. The earlier a player learns the mechanics, the quicker she will progress in learning
Welcome. 1. The Plan. 2. Irons. 3. Wedges Greenside Bunker. 10. Chipping. 13. Putting. 16. Summary. 19. Key Terms and Phrases.
 p: 1 Table of Contents Welcome. 1 The Plan. 2 Irons. 3 Wedges............................................... 7 Greenside Bunker. 10 Chipping. 13 Putting. 16 Summary. 19 Key Terms and Phrases. 20 Stay in
Softball Pitching Mechanics
 Softball Pitching Mechanics When teaching softball pitching mechanics, the best way to avoid injury, develop consistency, and see results is through repetition and attention to detail. Even a slight change
The Better Golfer s Guide to Strength Training
 The Better Golfer s Guide to Strength Training Your golf swing requires 21 different muscles to work together You need to train every one. Michael Wood, CSCS Chief Fitness Officer, Koko FitClub Let s Tee
IMPORTANT COPYRIGHT AND LEGAL INFORMATION
 IMPORTANT COPYRIGHT AND LEGAL INFORMATION This book is the intellectual property of Anthony Procopis of http://www.thetruthaboutputting.com and AAP Enterprises Pty Ltd. This e-book cannot be shared. This
Improving your Putting with the F.P.A
 Improving your Putting with the F.P.A with P.G.A Master Professional One of the biggest misconceptions in amateur golf is that a player should take two putts on each green, now if you are a beginner then
Stance Recap Blocking Positions To the Right:
 Stance Recap We must create the ability to block out of both the primary (no runners on base) and the secondary (runners on base) stances. We have to put ourselves in a position to be able to get our feet
Moorhead Baseball Routines/Hitting Drills
 Moorhead Baseball Routines/Hitting Drills Philosophy How we train: Teach everyday with the goal of our players becoming their own coach. Get them to feel what s going on. Consistent mix of instruction
defenders get specific coaching for their respective positions, goalies require the same attention and guided skill development.
 POWER POINT SLIDES ACTIVITIES NOTES Mini-lecture: Over view- 10 RM- p. 1 1. Provide the following overview of the clinic: Rationale: Goaltending is a critical aspect of team play and requires direct &
PEE WEE AND LIONS RULES AND SKILLS HANDOUT (April 2005) THE RULES
 THE RULES") PEE WEE AND LIONS RULES AND SKILLS HANDOUT (April 2005) THE RULES 1. When the whistle is blown by the coach, stand still, be quiet, and look at the coach; 2. If you want to speak raise your hand and wait
PEE WEE AND LIONS RULES AND SKILLS HANDOUT (April 2005) THE RULES 1. When the whistle is blown by the coach, stand still, be quiet, and look at the coach; 2. If you want to speak raise your hand and wait
GYROSTATIC DELIVERY TECHNIQUE By Macka Jensen
 GYROSTATIC DELIVERY TECHNIQUE By Macka Jensen Knowledge dispels fear 1. INTRODUCTION Gyrostatic technique: The application of these factors in the gyrostatic delivery technique is based on the principle
RORY MCILROY DRIVER SWING SEQUENCE Copyright LUTHER BLACKLOCK 2012
 RORY MCILROY DRIVER SWING SEQUENCE Copyright LUTHER BLACKLOCK 2012 ALL PHOTOGRAPHS COPYRIGHT MARK NEWCOMBE Rory McIlroy s golf swing is one of the most remarkable of modern times; his shot making ability
Name of School Golf Club Program. Student s Manual
 Name of School Golf Club Program Student s Manual Contact Information: Kim Shafer, PGA, LPGA Director, Events-Marketing Golf House Kentucky 502-243-8295, ext. 307 kshafer@kygolf.org First Lesson: Station
Golf 8 Week Training Plan
 Golf 8 Week Training Plan Week #1 1. Welcome and introductions; introduce the game of golf and go over safety procedures: 1 Provide necessary equipment; wear appropriate clothing; protect against sun and
CHIP BEST LIKE THE. Copy Jason Day to get up and down more often TG TOP 50 HUGH MARR FELLOW OF THE PGA
 Mission control: How Day does it His action is designed to harness clubhead speed and face loft, and the distance he hits the ball. Here are its four key principles CHIP LIKE THE BEST Copy Jason Day to
Gravity and Centrifugal Force
 Gravity and Centrifugal Force By Floyd Horgen John Kinsey Jesse Blackwelder Copyright 2013 All Rights Reserved 1 How to order 2 By three of Golf s Top Teachers Floyd Horgen, John Kinsey, and Jesse Blackwelder
Rory McIlroy s swing is the
 By Brian Mogg Waldorf Astoria Golf Academy, Orlando, Fla. (Top 100 since 2005) With David DeNunzio Photography by Angus Murray 4 DRILLS FOR You can t buy McIlroy s talent, but you can steal his best moves
Basic Shooting Skills Principles of Marksmanship. By: Shannon Carlton
 Basic Shooting Skills Principles of Marksmanship By: Shannon Carlton Agenda Introduction Principles of Coaching 5 Principles of Marksmanship Developing a Routine Making Sight Adjustments Sequences Principles
A new, Australian move promises solid contact, a cure for your slice, instant results and less strain on your back. Is this your SWING OF THE FUTURE?
 A new, Australian move promises solid contact, a cure for your slice, instant results and less strain on your back. Is this your SWING OF THE FUTURE? BY PETER CROKER and JEFFREY JOHNSON with Roger Schiffman
Golf s Modern Ball Impact and Flight Model
 Todd M. Kos 2/28/201 /2018 This document reviews the current ball flight laws of golf and discusses an updated model made possible by advances in science and technology. It also looks into the nature of
GOLF SPECIFIC DYNAMIC WARM UP
 GOLF SPECIFIC DYNAMIC WARM UP Golf-related injury is common. The three most common areas injured include: 1. The back 2. The wrists, and 3. The elbows. A golf-specific dynamic warm-up is recommended by
Coach & Goaltenders GOALTENDER BASICS
 Coach & Goaltenders GOALTENDER BASICS STANCE To maximize net coverage and ability to move while maintaining balance. Body Position: Feet Little more than shoulder s width apart, slight ankle bend with
THE FOUNDATION OF THE SHOT
 CHAPTER_2 THE FOUNDATION OF THE SHOT Success in archery depends on consistency and consistency starts with a solid foundation. Fully understanding and being able to apply the fundamentals is the key to
The Fundamentals of Putting
 The Fundamentals of Putting Episode 2 Putter Face and Path Direction The putter face angle at impact and the swing path direction at impact are the critical factors which determine the initial direction
Techniques To Treat Your Pain At Home (512)
") Techniques To Treat Your Pain At Home (512) 288-5322 7010 W. TX-71 Suite 360 Austin TX, 78735 Arm Only Bird Dog Start in the quadruped position (all fours) with arms and thighs perpendicular to the floor.
Techniques To Treat Your Pain At Home (512) 288-5322 7010 W. TX-71 Suite 360 Austin TX, 78735 Arm Only Bird Dog Start in the quadruped position (all fours) with arms and thighs perpendicular to the floor.
Your Complete Guide on how to use your new Golf Improvement System
 Your Complete Guide on how to use your new Golf Improvement System Cure Your Slice Drive Longer Chip Closer Hole More Putts Shoot Lower Scores Introduction Golf is about to get easier! Congratulations
Lesson 3 Part 1 of 2. Demonstrating and Describing the Forehand Drive Components. Purpose: National Tennis Academy
 Lesson 3 Part 1 of 2 Demonstrating and Describing the Forehand Drive Components Purpose: When you complete this lesson you will be able to demonstrate and describe the forehand drive components. This skill
Coaching Principles. 1. Introduce 2. Demonstrate 3. Explain 4. Organize 5. Execute 6. Correct 7. Practice
 5 Pin Bowling Drill Book Updated August 2008 Coaching Principles STEPS IN TEACHING A DRILL 1. Introduce 2. Demonstrate 3. Explain 4. Organize 5. Execute 6. Correct 7. Practice GENERAL PRINCIPLES Drills
Phil Rosengren BetterPitching.com
 Phil Rosengren BetterPitching.com Power Move #1: The Big Shift The Big Shift, or Early Momentum, refers to the initial load-up in your pitching delivery, and it s where most low-velocity pitchers miss
The Old School Power Golf move for more powerful and accurate golf shots
 The Old School Power Golf move for more powerful and accurate golf shots www.powergolf.webs.com Transform your Golf Game forever with Old School Power Golf Harry Vardon who has been called the Grand Father
o Lead o Twinkle o Dance Positions: Closed, Promenade, Fallaway, Counter Promenade, Counter Fallaway, and Facing Position
 Class 3 Overview Waltz Goals Move Like a Champion: Just Say No (#31) New Figures: Box with Underarm Turn (Figure 1B); Simple Twinkle (Figure 5) Key Concepts and Terms o Sway o Rise and fall o Lead o Twinkle
Goaltending Development
 AGES 8 AND UNDER Goaltending Development LESSON WORKBOOK JOE EXTER 2 Goaltending is a combination of sound structural technique and athleticism. It is important for coaches and goaltenders to consistently
Breaking Down the Approach
 Breaking Down the Approach Written by Andre Christopher Gonzalez Sunday, July 31, 2005 One of the biggest weaknesses of the two-legged approach is the inability of the athlete to transfer horizontal momentum
8 Steps To A Modern Forehand Technique
 8 Steps To A Modern Forehand Technique By Tomaz Mencinger FeelTennis.net 2 Thanks for downloading this free report / checklist that contains the short version of the 8 Steps To A Modern Forehand Technique.
ShuttlE. Schools Badminton. Module 5: 10 starter lessons
 ShuttlE Time Schools Badminton Teachers MANUAL Module 5: 10 starter lessons ShuttlE Time Schools Badminton Teachers MANUAL 10 starter lessons Badminton World Federation 2011. First published November
TEACHING MODEL ASSESS PRACTICE. Senior Geezer Focus - How? November, 2010 Cookie Hale P.J. Jones
 Senior Geezer Focus - How? The How is the methodology for coaching skiing; i.e. what you do with your time with your clients, how you communicate and coach skiing. The framework of this time spent coaching
Putting Report Details: Key and Diagrams: This section provides a visual diagram of the. information is saved in the client s database
 Quintic Putting Report Information Guide Putting Report Details: Enter personal details of the client or individual who is being analysed; name, email address, date, mass, height and handicap. This information
Chapter 8 - POSTURE. The following guidelines can be used to develop good postural habits. ! 2010 High Performance Golf
 Chapter 8 - POSTURE Posture is the habitual position that people hold themselves in, whether they are sitting, standing, active or sedentary. The aim of good posture is to maintain the natural curves of
Belton High School Marching Fundamentals 2016
 Belton High School Marching Fundamentals 2016 Fundamentals of Teaching Fundamentals: 1. Say the name of the maneuver (INSTRUCT) 2. State its purpose (INSTRUCT) 3. Demonstrate it slowly, several times,
Force Vectors SHOT PUT MECHANICS
 SHOT PUT MECHANICS The shot put is an individual event that is dominated by big, powerful male and female athletes. There are two techniques for throwing the shot put---the glide and rotation--. Neither
Coaching Principles. STEPS IN TEACHING A DRILL 1. Introduce 2. Demonstrate 3. Explain 4. Organize 5. Execute 6. Correct 7. Practice GENERAL PRINCIPLES
 Alpine Skiing Drill Book Updated August 2008 STEPS IN TEACHING A DRILL 1. Introduce 2. Demonstrate 3. Explain 4. Organize 5. Execute 6. Correct 7. Practice GENERAL PRINCIPLES Coaching Principles Drills
A PRACTICAL GUIDE TO YOUR TRAINING SESSIONS
 A PRACTICAL GUIDE TO YOUR TRAINING SESSIONS WHEN and WHY? Once you have followed the advice in the How to Get Everything Learnt by Opening Day handout you will need to go back and to improve on the basic
KOSCIELISKO POL. Biathlon Shooting Lesson :00 16:30
 KOSCIELISKO POL Biathlon Shooting Lesson 29.09.2011 15:00 16:30 Basic Shooting Skills Positions Basic Shooting Skills Positions Basic Shooting Skills Positions Introduction Dominant Eye Rifle Fitting Prone
Five Key Concepts for Goaltending Hockey Canada s Approach Skating The Goalie Stance (Athletic position) Stick Grip...
 Stick Grip...") s Level 1 Goaltending TABLE OF CONTENTS INTRODUCTION Five Key Concepts for Goaltending... 1 Hockey Canada s Approach... 2 Skating... 3 The Goalie Stance (Athletic position)... 3 Stick Grip... 4 Skating
s Level 1 Goaltending TABLE OF CONTENTS INTRODUCTION Five Key Concepts for Goaltending... 1 Hockey Canada s Approach... 2 Skating... 3 The Goalie Stance (Athletic position)... 3 Stick Grip... 4 Skating
BioSwing. Cameron Strachan & Adam Priester
 BioSwing Cameron Strachan & Adam Priester Melbourne Australia 2012 Contents...1 The Grip...8 The Stance...16 The Take Away...24...34 The Downswing...42 Power Phase...52 Flat Spot Principle...60 Impact...66
FORM WITHOUT FEAR Groundstrokes and Footwork
 FORM WITHOUT FEAR Groundstrokes and Footwork United States Tennis Association 2004 Community Tennis Development Workshop February 6-9, 2004 Las Vegas, Nevada Presented by Bob Love USPTA (Master Professional)
COACHING WINDMILL PITCHERS GETTING STARTED
 COACHING WINDMILL PITCHERS GETTING STARTED INTRODUCTION Coaching pitchers in NOT difficult. All you need is some interest and a little information to understand what you're doing. The interest has to come
GOLF, THE PROPER WAY
 GOLF, THE PROPER WAY BY GEORGE SARGENT, NATIONAL OPEN CHAMPION (Copyright 1910 by The American Golfer, Inc. A good deal has been written at various times by the leading players past and present, and a
6 Steps To Better Golf How to Chunk Your Swing For Great Ballstriking
 6 Steps To Better Golf How to Chunk Your Swing For Great Ballstriking 6-STEP SWING Learn how chunking practice will make you a better ballstriker TEXT & ILLUSTRATIONS BY BRAD BREWER, PGA PHOTOS BY DENIS
The following lesson is excerpted from
 The following lesson is excerpted from A Fresh Approach to the Snare Drum is the most comprehensive method available that simultaneously provides instruction for rhythm reading, technique fundamentals,
New Berlin Athletic Association P.O. BOX New Berlin, WI MINIS BASKETBALL CLINICS
 New Berlin Athletic Association P.O. BOX 51123 New Berlin, WI53151-0123 MINIS BASKETBALL CLINICS Table of Contents 1. OVERVIEW 3 2. DEFENSE..4 2.1. SHUFFLE SLIDE ( )..4 2.2. MIRROR DRILL ( )..5 2.3. CLOSE-OUT
The Golf Grip Instruction Manual
 The Golf Grip Instruction Manual This manual is an overview of how to Hold the golf club. How we Hold the club is commonly referred to as our Grip. There is another use for the word Grip in golf and this
Little League Pitching Mechanics - Simple Instructions For Little League
 Little League Pitching Mechanics - Simple Instructions For Little League Pitchers By Steven Ellis, former Chicago Cubs pitching pro The goal for any Little League coach or parent is to keep the game simple
Basic Shooting Skills Positions. By: Shannon Carlton
 Basic Shooting Skills Positions By: Shannon Carlton Agenda Introduction Dominant Eye Rifle Fitting Prone Position Rifle Fitting Tips Standing Position Sequences Checklists Positions Stable Comfortable