For more information contact: Website:
|
|
|
- Maryann Gardner
- 6 years ago
- Views:
Transcription

1
2 All rights reserved. No portion of this manual may be used, reproduced or transmitted in any form or by any means, electronic or mechanical, including fax, photocopy, recording or any information storage and retrieval system by anyone but the purchaser for their own personal use. This manual may not be reproduced in any form without written permission of the publisher, except by a reviewer who wishes to quote brief passages in connection with a review written for inclusion in a magazine or newspaper and has written approval prior to publishing. For more information contact: Website: info@bodyforgolf.net
3 Table of Contents Introduction Chapter 1 Physical Assessment for Golf Chapter 2...You Play Like You Think Chapter 3..First Class Fundamentals Chapter 4. Biomechanics of a Successful Golf Swing Chapter 5..Discover How to Balance your Way to Lower Scores Chapter 6...The 3 Principles of Performing an Exercise Chapter 7...Posture Perfect: Achieving Better Scores Chapter 8.Stretch Your Way to a Better Swing Chapter 9..Understanding your Ball Flight Chapter 10..One Shot at a Time Chapter 11..How to Design a Golf Specific Fitness Program Chapter 12 Injury Prevention and Rehab Exercises for Shoulder Pain Chapter 13..Six Ways to Improve your Game Now Chapter 14 9 Proven Exercises for Core Power and Stability Chapter 15.Building a Game Plan for Nutrition Chapter 16.Velocity Training for Golf Chapter 17.Plan the Work, Work the Plan Chapter 18.How to Increase your Golfing Power Meet Our Golf Experts
4 Disclaimer This book is not intended for the treatment or prevention of disease, nor as a substitute for medical treatment. Programs mentioned herein should not be adopted by any purchaser without review and consent with your health professional. The authors are not responsible, nor liable for any harm or injury resulting from these programs or the use of the exercises described herein.
5 Chapter 1: Physical Assessment for Golf By Jeff Banaszak Any elite training or golf performance program must begin with a comprehensive physical assessment. Many golfers need to turn to professionals in the medical or conditioning fields to assist with this assessment process. By gathering objective measurements an effective, efficient, and individualized program can be designed to directly improve the athlete s performance as it relates to golf. A properly designed golf-specific fitness program can directly lead to: Extra Distance Improved Accuracy Greater Consistency Reduced Fatigue Fewer Injuries and a Healthier Golf Swing. The key physical elements that must be screened to identify the individual s current level of fitness include flexibility, stability, posture, strength, power, balance and endurance. The results of a physical assessment specific for golf will allow each individual to: Identify the key areas of weakness to be targeted in a golf-conditioning program. Establish a baseline physical status specific to the golf swing Identify potential injury risks due to poor conditioning Identify physical limitations that may lead to potential biomechanical swing faults
6 Basic Golf Fitness Screen This basic screen is an important first step in improving golf performance. If you are currently having problems with injury, consult with a physician or medical specialist (i.e. an athletic trainer and/or physical therapist), before attempting this screen. Remember symptoms present in one area of the body can be indicative of more significant issues elsewhere. For example, Jose Maria Olazabal was hampered with a foot condition for years before the problem was localized into the back. After receiving proper treatment, Olazabal returned to win a second Masters. Identifying a player specific strengths and weakness is essential to properly designing a golf-specific conditioning program. To maximize motivation a golfer needs to see the benefits related to his or her golf swing. If the conditioning program is not specific to helping them support and improve their swing success of the program will be limited. The screening process is very important because there may be many physical causes for each swing fault. For example, the tendency of a golfer to extend their right knee as they rotate into the back swing may be indicative of tightness, weakness, balance problems or poor swing mechanics. Identifying the body s physical limitations as causes of swing faults is the goal of the Basic Golf Fitness Screen. This screen isolates the critical areas involved with the golf swing including wrist flexibility & strength, lower extremity flexibility & strength, rotational capacity & shoulder turn, trunk strength and balance. Note: This screen will be most effective when completed in conjunction with more comprehensive physical assessments completed by the teaching professional and the sport-specific conditioning specialist. Basic Golf Fitness Screen 1) Wrist flexibility & strength 2) Lower extremity flexibility & strength a. Deep Squat Movement
7 b. Functional Reach Test 3) Rotational capacity & shoulder turn a. Rotational Capacity of Trunk b. Shoulder Flexibility 4) Trunk strength 5) Balance a. Static Balance b. Dynamic Balance and Hip Control 1) Wrist Flexibility and Strength Purpose: Proper wrist action is essential to position the club in a powerful position at the top of the back swing that will allow maximum angular velocity to be achieved during the swing motion. Procedure: Stand straight up with your arms at your side and elbow straight. Hold a club in your right hand at the end of the golf grip and slowly move the wrist up and down in the vertical motion. Perform a set of ten repetitions. If you can complete ten repetitions add another club. Add as many clubs as you can until you begin to lose proper form. If the club is too heavy, choke down on the grip to lessen the weight. Each repetition should be completed through a full

8 range-of-motion maintaining the club in its vertical path. Repeat this procedure on the left. Rating Your Results 1- point for one club holding onto the end of the grip or if you must choke down to complete ten repetitions with one club 2- points for two clubs with grip on the end 3- points for three clubs choked up If you score 2 or less, add a wrist flexibility and/or strengthening program. 2) Lower Extremity Flexibility and Strength Purpose: Control of the lower body is essential to maintain proper positioning at ball impact. Without adequate lower extremity flexibility and strength, the golfer is at risk for injury. The deep squat assesses control of movement through the hips, knees and ankles. The functional reach assesses flexibility needed to obtain proper address posture. Test A: Deep Squat Movement Procedure: Take a golf stance shoulder width apart. Hold onto a club and place overhead. Attempt to maintain an upright posture as you complete a maximal deep squat. Assess your ability to maintain heel contact with the floor, proper posture and spine angle while keeping the knees aligned over the feet. Individuals of all ages should be able to squat without elevating heels, matching spine angle to the lower

9 angle, keeping knees positioned over foot and maintaining balance. Any deviations in right and left weight bearing and loading of the extremities should also be noted. Rating Your Results 1-point 2-points 3-points for loss of any of the following: balance, spine angle, heel contact with floor, knee alignment over the feet and a squat depth of thighs less than parallel to the floor. if you only slightly losses spine angle or cannot maintain full heel contact at end range greater than thighs parallel to floor. if the thighs reach parallel or greater, heel remains in contact with floor, spine angle is maintained and matches the angle of the lower leg while keeping the knees aligned over the feet. If you score 2 or less, add a strength and flexibility program for the lower body. Test B: Functional Reach Test Procedure: Sit on the ground with your legs straight and your toes pointing up. Keep both your spine and legs straight as you slowly tilt you upper body forward towards your feet. See how far forward you can go without loosing your spine angle and hunching over.
 Rotational Capacity and Shoulder Turn A.")
10 Rating Your Results 1-point if your body cannot reach vertical 2-points if your trunk can move from vertical up to 45 forward bent 3-points if you can move past 45 If you score 2 or less, add a lower extremity flexibility program. 3) Rotational Capacity and Shoulder Turn A. Rotational Capacity of Trunk Purpose: Proper rotation is imperative for completion of a consistent and effective swing motion. Golfers who are restricted in these rotational movements often compensate and move in other planes of motion creating undue stress on the body which can lead to injury. Golfers must rotate properly while playing golf. Procedure: Sit on the ground. Straighten your left leg outward along the ground. Then place the right foot on the ground outside the left knee. Place your left elbow on the outside of the left knee and see how far you can turn your shoulders. Turn your shoulders clockwise keeping your left leg straight and right
11 foot flat on the ground. This position locks out the movement of the lower body thus allowing us to look at the movement at the torso. Repeat this test on the opposite side. Rating Your Results 1-point if the shoulders cannot reach parallel to the left leg 2-points if the shoulders can reach parallel to the left leg 3-points if the shoulder can turn greater than parallel to the left leg. If you score 2 or less, add a flexibility program for the trunk. B. Shoulder Flexibility Purpose: To assess the flexibility of major muscle groups in the shoulder girdle and upper back as they relate to the swing motion. Maximizing shoulder flexibility will lengthen the arc of motion allowing full swing mechanics. Procedure:
12 Step One: Stand upright in your golf address position. Relax your arms in front of the body as if addressing golf ball. While maintaining your spine position raise your right arm (i.e. shoulder joint) up to a 45º angle at your side then bend your elbow to 90º. Assess your ability to rotate the right arm backwards from this position. Note the final position of the forearm in relation to the midline of the body. Step two: Maintain the right arm position as in step one. Place left arm out in front of your body with the elbow straight and thumb up. Bring left arm across your body towards your right hand noting the ability of the left shoulder to clear the chin. Measure the distance between both hands at the end of your available range-of-motion. Repeat these two steps on the opposite side. Rating Your Results 1-point 2-points 3-points if you cannot rotate the arm to a position even with the midline of the body. if you can achieve the right arm position to midline but are unable to clear the left arm under the chin while moving across the body. if you clear the chin and is able to bring the left hand within 6 inches of the right hand at end range. If you score 2 or less, add a shoulder flexibility program

13 4) Trunk Strength Purpose: Trunk strength is essential to remain stable and balanced while swinging a golf club. Increased trunk strength will maximize power, distance and club head speed while minimizing stress to the spine. To test trunk strength you need to look at their control during both static and dynamic movements. Procedure: Lie flat on the ground. Bend your knees to a 90 position. Place your hands interlocked behind your neck. Rotate your legs towards one side. Tighten and brace your abdominal muscles. Attempt to complete a partial sit-up toward your pant pocket being sure to maintain the distance between the chin and chest avoiding excessive neck forward bending. Observe five repetitions assessing the quality and direction of the motion. This test assesses the dominance of the middle abdominal muscles compared to the oblique or rotational muscle groups. Rating Your Results 1-point 2-points 3-points if you cannot obtain the position relies on neck forward bending to complete the movement or completes less than five repetitions. if you can complete five repetitions but tends to pull toward the middle of their trunk or belt buckle. This indicates dominance of the middle abdominal muscle group. if you consistently pulls up towards their pant pocket for each
 Balance Purpose: Good balance consists of the ability to maintain an athletic stance and to control the body s center of gravity within the base of support as we perform a full golf swing.")
14 repetition therefore isolating the oblique muscles. If you score 2 or less, add an abdominal strengthening program. 5) Balance Purpose: Good balance consists of the ability to maintain an athletic stance and to control the body s center of gravity within the base of support as we perform a full golf swing. Balance is essential for consistent golf performance. Test A: Static Balance Procedure: Stand on one foot with your arms extended straight out to the sides and the other foot approximately 6-8 inches off the ground. See how long you can maintain your balance first with eyes open then add difficulty by closing your eyes. Rating Your Results 1-point 2-points 3-points if you cannot stand with eyes open for at least 30 seconds if you cannot stand with eyes closed for 15 seconds if you can stand with the eyes closed for greater than 30 seconds
15 If you score 2 or less, address balance training in static positions Test B: Dynamic Balance and Hip Control Procedure: Obtain a single leg stance posture maintaining a proper spine angle. Then complete a single leg partial squat to approximately 30 knee bend. Cross the arms over the chest and turn at the shoulders. Assess the athlete s ability to maintain balance and control of motion at the hips. Rating Your Results 1-point 2-points 3-points if the athlete cannot maintain balance, is very unsteady and cannot keep the hips level. if the athlete maintains balance but cannot keep the hips level during the movement. if the athlete can rotate to each direction maintaining hips level. If you score 2 or less, add dynamic balance training.
16 Evaluating the Results Sum the total points of your score utilizing the data collection sheet provided below. Refer to the scoring results table for recommendations on a golf conditioning program based on your results. Data Sheet Test # Description Normal Level Score 1 Wrist flexibility and strength 10 reps with three clubs choked up 2A Deep Squat Movement Maintains heel contact with bend > 90, maintains spine 2B Functional Reach Test Trunk moves from vertical past 45 3A Rotational Capacity of the Shoulders can turn greater Trunk than parallel to left leg 3B Shoulder Flexibility Able to clear shoulder under chin and reach within 6 inches 4 Trunk Strength Complete five reps isolating the oblique abdominals 5A Static Balance Stand with eyes closed for > 30 seconds 5B Dynamic Balance and Hip Rotate each direction and Control hold stable lower body position Total Score = /24
17 Scoring Results: Greater than Less than 12 Birdie: Continue what you are doing! You pass the basic fitness screen. Continue hitting the ball long and straight. Remember to always stretch and warm-up properly before practice and play. Par: Doing well but always room for improvement! Consider starting a golfspecific conditioning program Bogie: Your golf-conditioning level may need work. Consider seeking advice from a conditioning specialist. A comprehensive golf performance program may make a tremendous difference in regards to your consistency and injury prevention. Chapter 2: You Play Like You Think By Jeff Troesch Competitive golf is played mainly on a five-and-a-half-inch course: the space between your ears. Bobby Jones What percentage of your golf game do you believe is mental? Very rarely will a player tell me an answer that is less than 50%. What percentage of your golf time do you devote to training that mental part of your game? Very rarely will a player tell me an answer that is higher than zero. The large gap between what most acknowledge is a significant part of their game and the energy expended to address this part of the game is almost universal. This is not to suggest that if a player believes that her game is 90% mental that she should devote 90% of her time to the training of her mind. What I am suggesting is that she typically would do well to challenge herself to devote more time to that training than she currently does. What follows
18 are some brief points about our thinking process, each of which might be beneficial in understanding and improving the part of the game that is so critical. It All Begins With Thought Most everything that I do with the players with whom I consult has as a foundational base the following simple, but important dynamic: THINKING FEELINGS BEHAVIORS In brief, what this implies is that what we do (behaviors) is influenced by our emotions (feelings) which is first impacted by our thoughts (thinking). A golf example to illustrate: Imagine that you re standing over a four-foot putt. The putt breaks a little right to left, and you re committed to starting the ball on the right edge of the hole. The putt is a little uphill, so you know that you can hit the putt reasonably firmly. OK, let s pause here. If you re thinking exclusively about these factors in advance of striking the ball, you will likely be focused very much on the task of rolling the ball well toward your target (right edge of hole). If that s the case, you ll likely have feelings that are either somewhat neutral and/or feelings of confidence (perhaps preceded by thoughts of I m capable of rolling this ball on that line ). This thought/feeling process will likely engender behavior of you executing a reasonably smooth stroke on the ball (assuming your technique is sound!) and giving yourself a good chance to get the ball in the hole. Now let s make this a little more interesting. Back to where we paused earlier. While you re standing over the ball, you pay attention to the fact that this four-foot putt is for you to make birdie and record your lowest round total ever. In addition, you ve missed similar birdie putts on two of the last three holes you ve played. Does this change things? It completely depends on what you choose to emphasize in your thinking. If you re now thinking about the potential outcome ( I could break 80 for the first time ), or are thinking about your past efforts ( Don t miss another opportunity here ), you are likely to bring on emotions of excitement, doubt, worry, fear, or any number of emotions. These have the potential to influence your behavior such that you respond in ways that affect your tempo, your rhythm, your tension level, and
19 your stroke. I assume it is obvious that you are more likely to get the ball in the hole in the first scenario than in the second. The point that is valuable in all of this is that what you re asking yourself to do did not change from the first scenario to the second! A four-foot putt is a fourfoot putt, irrespective of how you choose to think about it. When a player says, that putt scared the heck out of me, I typically will say something like, what did it do to you? It seemed to me like it was just lying there! The putt itself does not change things, but the change in your thinking has the potential to impact what you re paying attention to, and that can (ultimately) impact behaviors such that you start to associate the circumstance (four-foot putt for birdie) with a negative outcome ( I really struggle with those ). More accurately, most players do not struggle with four-foot putts. They instead struggle in their thinking about fourfoot putts. This is why so many players lament I can make these all day on the putting green, but can t make one on the course. In part, it is because the type and quality of their thoughts change when on the golf course, and in part, it is because they now label themselves as a player who struggles with particular things on the course. When you as a player learn to be aware of and take responsibility for your thoughts, you are well on the way to learning how to greatly improve your approach to this game. Changing your thinking on the course (or off!) is a very simple process simple, but difficult for many. It is simple in that all you have to do is pay greater attention to the quality and types of thoughts, and change them to thoughts that are higher in quality and helpfulness. This is depicted below: Identify incorrect/unhealthy thinking Stop the stream of thoughts/pictures Change to more correct/healthy thinking The bad news is that this is difficult for many, because of the years of ingraining habits of poor thinking and the tendency to spend too little time practicing the new habits of thinking differently. The good news is that this process is completely within your control. Only you
20 have the power to choose the thoughts in your mind, and given how many things in this game are outside of your control, it s nice to know you ve got something that you can completely influence! So if you ve identified some of the thoughts and pictures that are unhealthy for you, what then would be more helpful for you to think? Generally, when on the course, the thinking of the great minds in golf is: Present Process-oriented Positive Patient Let s briefly look at each of these. Present One mistake that many of us make in golf (and in life!) is that we spend a lot of our time thinking about the past or looking into the future. Occasional glimpses into the rear view mirror of our current situation can give us information that can be helpful. Occasional glimpses into the future can help us plan ahead to make the right club selection or the best maneuver to successfully navigate the golf hole. The key here is that this look be only a glimpse rather than a stare or an obsession. I should have done it differently, I can t believe I screwed that up, it was so easy. These are examples of backward looking and backward thinking that can inhibit your ability to execute to the best of your ability RIGHT NOW. It is very difficult, if not impossible to perform at a peak level when you are still focusing on something that has passed. Most of us are not talented or lucky enough to be able to be thinking about the past and still react to the situation at hand in an optimal way. Similarly, others are so caught up in the future that they forget to take care of this moment. What if and I hope I don t thinking characterizes this type of dynamic. I hope I don t hook it into the water I hope I don t run this downhill putt too far past the hole What if my swing breaks down in the last round? What if I miss the cut? Others will future-think about a positive event: If I just par the next three holes I ll break 90 for the first time If I win one of the next three holes I win the match play
21 tournament If I play the back side at even par I ll make the cut. This thinking, while at first appearing positive, is in fact a distraction from being focused in the present. To Be Present means to purposefully bring yourself into the now so that you can put all of your mental energy into executing this task, this moment! When you are on the course and these distracting thoughts come into your mind, refocus by gently bringing your thinking back to the present or by restarting your pre-shot routine. This will help you be as present as possible. Learn from the past, prepare for the future, and perform in the present. Process-oriented One of the great mental challenges when on the golf course is to keep your mind in the task at hand or process. Most players are constantly thinking in terms of results, outcomes, or consequences. In the aforementioned example this would be exemplified by thinking about the birdie opportunity rather than the process of executing a solid four-foot putt. While still performing, the thoughts of winning and succeeding can actually inhibit performance for most people. The model below shows some of the degrees of thinking on the task vs. consequence scale: TASK BEST SHOT OUTCOME/RESULT HOLE OUTCOME/RESULT ROUND OUTCOME/RESULT TOURNAMENT OUTCOME/RESULT CONSEQUENCES OF TOURNAMENT OUTCOME
22 AVOIDING NEGATIVE TOURNAMENT OUTCOME CONSEQUENCES WORST Again referring to the previous example, rather than thoughts of the task and outcome of the shot, the thoughts could deteriorate even further. If I make this birdie, I go to two under par. (Hole result) If I can just make par from there I ll shoot 70. (Round result) That ll be good enough to put me in the Top 10 going into tomorrow. (Tournament outcome/result) If I finish in the Top 25, I m automatically entered into next week s event. (Consequences of tournament outcome) Don t mess up this opportunity to play again next week. (Avoiding negative tournament outcome consequences). This type of thinking is extremely typical of the average-thinking player at all levels. The putt may be made, in spite of poor thinking. However, the player that recognizes this type of thinking while it s happening and puts himself back in the process- ( Of course I d like to play next week, but let s focus here on rolling a good putt toward the right edge )- is the one who will more consistently execute in competition over time. Staying in the process is extremely challenging for most players at every level, as the tendency to think and speak in terms of results is part of the paradigm of the game. Pre-round discussions are rife with consequence and outcome questions, such as What do you think you ll have to shoot to make the cut? or What was the number that won last year s event? Examples of the first questions generally asked of a player in their post-round analysis from others are: What did you shoot? Where did you finish? How many birdies did you make? These questions are not bad or wrong, but are used for illustrative purposes to help you understand that the emphasis placed on outcome by others is very difficult to overcome. When interviewed after victories, you will regularly hear players talking about how they stayed in the process of hitting each shot as well as possible, and that they didn t worry too much about other people, how others were playing, or what number they d have to shoot.
23 Positive There is a psychological theory out there that stipulates that all of our behavior can be put into two basic categories. We either behave to get something we want or we act in order to avoid something that we don t want. Sigmund Freud called this the pleasure/pain principle. We seek pleasure and stay away from pain, whether or not we re conscious of this motivation. This theory, applied to golf psychology, has very real application to you as a player. The players who think the best in the game are those who have a picture in their mind of the type of shot they want to hit. I want to hit a draw, starting on a line toward that tree through the fairway I m going to roll this downhill putt so that it dies right in the hole I m going slow my tempo down so that I can put a smooth swing on the ball Those who think less well, often fill their mind with pictures or words describing what they re trying to avoid. Don t hit it left here Don t blow this by the hole or you might be looking at a three-putt Don t start the club so far inside Stop swinging so darned fast While avoidance motivation can be very powerful, it has fear as its primary influence. Peak performing when confronted with fears is a difficult task to achieve on a consistent basis, no matter what the talent or skill of the player. The challenge for all of us in golf (and life!) is to keep our thoughts and pictures in our minds on the things that we desire. This motivation is healthier for the psyche, easier on the blood pressure, and more likely to produce the results over time that we re working toward. Patient One of the gifts that golf provides is an opportunity to work diligently on our patience. I have worked with athletes from nearly every sport played, and I would have to say that there are few- if any- sports that require the level of patience that golf requires. Whether discussing big picture, long-term items such as the development of your swing, or whether referencing more short-term moments like rebounding after a double bogie, patience is a key element in the thinking of the best players. Impatience can lead to a plethora of maladies, including unrealistic expectations, improper course management strategies, increased tension and tempo, lack of shot commitment, a gathering of incomplete pre-shot information, distraction
24 away from task, and impulsive shot choices. These things and the many more not mentioned here, will inevitably lead to a decrease in enjoyment of the game and is very likely to negatively impact the score of the round of golf in which you are playing. On the other hand, a patient player realizes that in the pursuit of excellence in this game, the progress is generally very slow and is measured in very small increments. Additionally, the patient player will look for opportunities in a round of golf to take calculated risks- within the context of her game plan. She will not be influenced away from her tempo, rhythm, or the consistency of her pre-shot preparation. Nor will she make shot-selection decisions because she s annoyed, irritated, feeling rushed or frustrated by her round or her surroundings. She s taking in objective information, making a fully-informed decision, and committing to her choice. That s patience in action, and that s how the best players train themselves to think. What Do I Do With This Information? The point with this and any information designed to help you with your game is for you to make working on selected elements a priority. Pick one aspect of your mental game that you feel you would be benefited by improving. Set a plan of action for working on that facet of your mental game and create some kind of feedback mechanism to measure how well you progressed. As an example, when I work with a player, I will frequently ask him to rate himself at the end of the round on a couple of different mental game criteria. So, he might measure on a scale how well he stayed in the process rather than the outcome during the round. We typically might break this down on a hole-by-hole basis to see if patterns emerge that will give us some insight into when his mind has a tendency to wander out of the process. This feedback will then create an opportunity for discussion and will be part of the feedback loop that helps him create new goals and areas of focus for the next time out on the course. Your undertaking a similar process will help you narrow the gap between the percentage that you believe your game improvement is mental, and the amount of time that you spend working on it!

25 Chapter 3: First Class Fundamentals By Jennifer Yockey Golf is an individual sport. Your body with all of its uniqueness affects the way that you will hold the golf club and address the golf ball. There is not one way for everyone to follow. Below you will see ways to evaluate yourself in order to put your body in a position that creates repeatable, efficient movement. **Throughout these chapters, the explanations will refer to a right handed golfer unless otherwise noted.** Whether you are an aspiring collegiate or tour player or a weekend warrior, the fundamentals of the golf swing are imperative to consistent success. The way you hold the golf club, posture, and alignment affects all aspects of the golf swing. Since you have complete control over the set-up (more so than when the club gets moving), it is something to pay attention to. GRIP and Your Arm Hang We are not all built the same. Our arm hang, length of arms, torsos and legs affect the way we hold the golf club and the way we stand to the ball. The two knuckle rule is not a standard. As you can see by the three different ways the arms hang below; two knuckles would not be neutral for the person in the first picture or the person in the third picture. Neutral is dependent on your personal arm hang. With your hands hanging naturally at your side, move your hand to the golf club and place it on the handle at the same angle that it was resting at your side. If you arms are
26 turned in, with your knuckles facing out, you will see more knuckles at address than someone who has their palms at their side when just standing. If after you place your hands on the grip (and all other things being equal) you are not moving the ball the way you want, you can correct by placing your hands further to the left or to the right to achieve the optimal ball curvature. Starting off in a position other than neutral will promote compensations in the golf swing that have a tendency to compile and thus make the swing less repeatable. Once you have determined how your left hand should sit on the golf club, your right hand has to match. Since your hands are the only connection to the golf club, it is imperative that they work together. So, once you get your left hand on, place your right hand on so that the right hand faces the left. A good check point is if you were to remove your fingers from the golf club your palms should be facing each other. Furthermore, the lines that are created between your index fingers and thumbs should be running parallel to each other. Again, depending on your arm hang, the lines may point just left of your right shoulder, at your right shoulder or just right of your right shoulder. POSTURE; Athletic and Balanced Once you have your hands on, it is important that your posture is athletic. Balance is the key to efficient, repeatable motion and if you are too much on your heels or too much on your toes at address, your club and body will seek balance throughout the entire swing. Depending on where you start, you will either fall back or forward at the finish if you are not grounded from the beginning. A very easy way to find your center is to get set in your current posture in front of a mirror (you want a side view picture A) With your left hand, take a golf club and place it behind your right shoulder, the shaft should drop down and intersect your knee cap and the middle of your foot. If the shaft is hanging in front of the knee cap (picture B), you torso is leaning too far forward and you could potentially be on your toes. Conversely, if the shaft is hanging behind your knee cap (picture C), you are more than like getting too

27 far back on your heels and you will also notice that your rear-end is sitting outside of your heels. Neither of these positions are athletic and don t promote athletic motion. Again, neutral is your best friend and neutral is in the center of your feet where your arches are. (A) (B) (C)
 rather than left (picture B) or right")

28 ARM HANG- Revisited At address, your arms need to hang directly in front of you. The triangle that is created by your shoulders and arms should sit in front of your body (picture A) rather than left (picture B) or right (picture C). If the triangle is out of position at address, it will be difficult to get it back to the right position at impact. If the triangle is bowed and on the right side of the chest at impact, you will have a tendency to hit it heavy, thin, left and right. This is because your right wrist gets flipped underneath in a scooped position. (picture D) A B


29 C D If the triangle is bowed past impact with the left arm on top of the right, you will also have the tendency to hit it right, heavy or thin. (picture E) E

30 There are other contributing factors to the triangle breaking down, but if you can start with it in front of your body, there will be more of chance you can to return it to a position of consistent impact. ELBOW Position and Arm Hang: When you are facing the mirror in your address position, the triangle should hang in front of your body and the inside of your left elbow should be slightly exposed (visible). Your arms have to rotate in the golf swing and they cannot do it if they are not hanging properly at address. Obviously, if they don t rotate on the way back, they cannot rotate on the way through. This lack of rotation can cause the club to be closed at the top of the back-swing and for the club to work steeply as well. If this happens in the backswing, the downswing will be affected as well as the ball flight. Some ball flights would include heavy, thin and high right shots. Your body type will affect the way that your arms hang. If you have a large chest, the tendency is to get your arms sitting on the sides of your body. This encourages your wrists to get involved when moving the club away rather than being able to move the triangle away. Lastly, with regards to arm hang; your arms should hang naturally from your shoulders and the distance from your body to the butt end of the golf club is generally one hand


31 length. Depending on your arms; if they are long or short compared to your torso, the butt end will point just below the belt buckle, at the belt buckle or just above. You want to avoid excessive bowing or cupping of the wrists at address. A good frame of reference is that when looking in a mirror from a side view, you want to be able to see to lines; one line from the club head to the butt end and another from your hands to your shoulders. It should not be one line. YES NO
32 ALIGNMENT Your feet, knees hips and shoulders should all be going the same way. If you get your body aligned at the target, your club face will be aimed right and more than likely you will hit a pull to get the ball to get back on line. The peril is that the one time you actually get properly aligned, you will make the same pull swing and end up very far left of your target. Alignment can affect the plane of the swing. Take the time to pick out an intermediate target (a target that is in front of your ball- on the same line as your intended target). Place your club down first and then step in with your feet. This sequence will promote better alignment and less miss hits due to poor alignment. The fundamentals, regardless of your level of play are extremely important; aligning yourself slightly left or right can mean the difference between hitting the green or being the in the greenside bunker or hitting the fairway or catching the long rough, hazard or out of bounds. It is one of the simplest ways to eliminate a variable that wreaks havoc with the golf swing. Finally, mirror work is very helpful. Because you don t have the opportunity to see yourself on the golf course, getting comfortable with your set-up and getting what you are feeling and what is real more closely aligned will promote more efficient, repeatable golf swings that will build confidence and lower your scores the fastest. Chapter 4: Biomechanics of a Successful Golf Swing By Jeff Banaszak Golf is an athletic sport that is physically demanding and can lead to injury. The swing motion itself puts tremendous amounts of stress on the body. These demands are greater with the less skilled player versus a professional or elite amateur. A misconception with the general public is that golf is more of a technical sport with little physical demand. To completely understand the importance of improving your physical game a golfer must have a basic understanding of golf s physical motion or
33 biomechanics. By outlining the unique characteristics and physical demands of the golf swing we create a better understanding of how the body moves and how to prevent injury. The golf swing is one of the most studied movements in all of sports. Thousands of articles, books and videos have been written on proper instruction. In this chapter, we will specifically focus on the body movement required to complete a successful swing motion leaving proper technique to the PGA teaching professional. The golf swing has evolved greatly over the past decades. In the 1920 s players, such as Bobby Jones, used a large body turn with a tendency to turn their hips and shoulders the same amount during the swing motion. This swing method, known as the classic golf swing, produced a flatter swing plane with a more upright and relaxed finish. In contrast, the modern golf swing causes a much steeper swing plane by combining a large or maximal shoulder turn with a restricted lower body movement. This tendency creates a significant amount of coiling to occur throughout the spine. The coil can lead to a more powerful swing but also can cause excessive stress especially when not done properly. The modern player also tends to finish with the back more arched than upright. These differences typically make the modern golf swing more stressful to the body than the classic golf swing. The Spine If we look at the human backbone or spine we see that the vertebrae sit or stack on top of one another producing a flexible but strong supporting structure. The spine itself is divided into various regions. There are 7 vertebrae in the neck (cervical), 12 vertebrae in the mid-back (thoracic) and 5 vertebrae in the lower back (lumbar). Beneath the lumbar segments are found the sacrum and coccyx. Each segment is held together by a series of ligaments and muscles that connect to the spine and give it support.
34 For golfers, the spine serves as the flexible connection between the upper and lower body. Proper function of the spine is essential to allow the coiling and uncoiling needed properly link the swing motion and produce power. The spine has a natural S-shape when we stand upright. It is this upright neutral position that needs to be maintained to minimize stress and protect the spine during the swing motion. An excessive S- shape or C-shape to the spine will restrict motion, cause biomechanical swing faults and will leave the golfer at risk for injury. How does the spine move while playing golf? The golf swing is a dynamic movement that consists of a series of rotations and counter rotations that each lead to a significant amount of bending, twisting, sliding and compression forces. During each golf shot the body is exposed to a full rotation away from the target followed by an immediately and intense transfer back as the golfer attempts to strike the ball. Even worse is the speed at which this repetitive stress occurs with full swing mechanics taking between.95 and 1.25 seconds. This repetitive motion even when done with flawless technique can leave the spine at risk for injury. The golf swing, especially the modern golf swing, puts tremendous amount of stress on the back, neck and extremities. Spine motion occurs in three different directions: Forward and backward bending Lateral or side bending Right and left rotation Due to the spine motion described above a golfer will experience the following forces at spine during a normal golf swing: 1) Shear = the sliding force between segments of the spine 2) Compression = downward force between segments 3) Side bending = the right or left bending force on the spine 4) Rotational torsion = amount of twisting between the spine segments
35 Not all spine motions produce the same stress potential or directly lead to injury. Golfers need to be aware of the potential stresses that exist from extreme positions and excessive movements often seen with improper technique. Injuries due to golf are most often associated with repetitive stress of practice and play. Few people could disagree that golf is stressful when: During a typical round of golf the golfer o Walks approximately 4-5 miles o Takes over 100 practice and actual swings o Leans over putts o Bends down times Muscle and joint restrictions can translate stress to vulnerable areas, such as the spine. Proper technique is essential to reduce stress during the golf swing. A golfer who encounters biomechanical swing faults in their swing motion may need, swing technique changes under the guidance of a PGA teaching professional. The following is a description of muscle activity and biomechanics during the golf swing. This information can be used as a guideline to identifying which parts of the body are most critical to a successful golf swing and should be addressed during a golf fitness or conditioning program. Phases of the Golf Swing 1) Address 2) Back swing a. Take-away b. Top of the back swing 3) Downswing 4) Impact 5) Follow-through 1) Address Definition: The position of your body just prior to initiating the golf swing
36 When setting up to the ball the upper body leans forward to bring the club head down to the ground. Ideally, the golfer should bend forward at the hips rather than at the spine. The spine should remain upright in a naturally tall posture maintaining a slightly outward curved mid-back and slightly inward curved low back without excessive roundness in either direction. This spine position combined with the natural relaxed position of the shoulders and arms is called the neutral position. By maintaining the neutral position, throughout the golf swing, a golfer will protect their back and maximize movement potential. The address position places stress on the body due to the forward bending of the trunk over the feet. As the balance point of the trunk shifts over the middle portion of the foot, it causes increased muscle activity of all the posterior or backside muscles located in the hips, trunk and neck. These extensor muscles are responsible for keeping us upright and balanced. Due to the stance position, at address, a slight increase in tension is noted into all the major thigh muscles. This muscle activity is in response to the anticipated movement of the arms that will occur during the next phase of the swing, the back swing. Summary of Address Biomechanics o Shoulders and arms relaxed, in front of body o Spine is in a relaxed neutral position o Slight side bend occurs at the spine due to the right hand being lower on the club o Hips and knees are slightly bent Summary of Muscle Activity o Arms are in a relaxed in front of the body with tension into the forearms, wrist and hands. o Trunk and spine extensors or back muscles are stabilizing to hold the address position. o The major lower extremity muscles are also active and functioning to stabilize. These muscles include the quadriceps or front of the thigh
37 muscles, hip adductors or groin, the hip extensors including the hamstrings and the calves. 2) Back swing Definition: The process of moving the club head from the address position to the top of the arc of the swing. a. Take-away The takeaway, or first part of the back swing, is not particularly stressful with the shoulders and trunk ideally rotating as one stable unit. The trunk and abdominal muscles are most responsible for controlling this movement. These muscle groups are utilized to control stress to the spine by providing stability from the top of the pelvis to the bottom of the ribs. The trunk stabilizers include the abdominal and the back muscles. These muscles tighten together to brace and protect this region of the body. b. Top of the back swing As the club moves to the top of the back swing a number of factors can lead to unnecessary stress. The path of the club directly dictates the direction of stress on the spine. In comparison, the classic swing used a relatively flat path or plane while the modern swing uses a more upright plane. A steeper or more upright plane, consistent with the modern golf swing, causes more stress because the twisting of the upper body occurs vertically while the hips and lower spine twist in a more horizontal direction. This coiling in different directions generates power but can also cause injury. Side bending of the trunk and spine is also stressful. The amount of side bending seen during the golf swing is directly related to the amount of sliding that occurs at the hips as the golfer moves into the back swing. This excessive side bending motion can causes a dipping of the left shoulder and head at the top of the back swing, leading to a common biomechanical swing fault called a reverse pivot. Strong evidence exists that excessive side bending is linked to low back injury.
38 At the top of the back swing we typically see a difference in the amount of rotation between the shoulders and hips. For professional golfers, we often see a 45 hip turn and a 90 or greater shoulder rotation. The difference between these motions can be called the X-factor. An increase in the X-factor can potentially increase distance. Summary of Back swing Biomechanics o Movement during this phase of the golf swing occurs as a dynamic sequence of events Rotation of the head towards the target Counter rotation at the shoulders, mid-back and lumbar spine away from the target (approximately 90 ) Rotation of the lower extremities (approximately 45 ) The hips experience relative rotation towards the target as compared to the trunk above, allowing the golfer to maintain a stable base. The knees will maintain a slightly bent position A weight transfer occurs causing the golfer to load the inner part of the right foot between the ball and heel Summary of Muscle Activity o As we have seen the back swing is a sequence of movements that occur as the golfer rotates the trunk and lifts the club up with the upper extremities. The shoulder muscles are active as the club moves away from the ball. The shoulder girdle will continue to remain active, including the rotator cuff, as the golfer lifts the club. The hand and wrist muscles all work to control the weight of the club as the club is positioned above the head at the top of the back swing. The oblique abdominals and the erector spinae or spine extensors are working to rotate the trunk.
39 The loading side hip internal rotators are active while the target hip external rotators are active. 3) Downswing Definition: The phase of the golf swing when the club is brought from the top of the back swing towards impact. There are many different cues to initiate the downward motion of the golf swing. For some it is the hands while for others it is the hips or trunk. From an injury prevention standpoint, the body must properly link or transfer motion from one part of the body to the next. The ideal sequence in golf is to first transfer motion from the lower body to the trunk or torso then to the shoulders & hands and finally to the club. This will assure that maximal speed occurs at ball impact. It is essential for the abdominal groups to be active during this process to assure a stable posture. Remember, if the spine is out of its neutral position it is vulnerable. Summary of Downswing Biomechanics o The transition at the top of back swing occurs when the direction of swing changes from right to left. This begins the uncoiling phase of the golf swing. This phase is most stressful to the body if combined with poor technique. o The highest forces of side bending, shear and rotation all occur during this phase. o The golfer must properly link the motion during this phase of the golf swing to allow an efficient transfer of energy from one segment of the body to the next. speed. Proper timing or linking of this motion will maximize club head 4) Impact Definition: The phase of the golf swing where ball contact occurs.
40 The majority of golf related injuries occur during this phase of the golf swing. This is due to maximum velocity that is reached as contact is made with the ball. The spine will be most susceptible if they slide towards the target. For golf, sliding stresses are generally considered the most dangerous. Summary of Impact Biomechanics o At Impact the: Head and neck experience a side bending and rotational motion away from the target. Shoulders are brought back to square. Mid and low back experience a side bending motion away from the target combined with a rotational motion towards the target. Lower body is turning with the hips being slightly open towards the target. Summary of Muscle Activity o The greatest muscle activity and tension is produced as the club is brought back to the ball. The shoulder girdle, including the rotator cuff is active. Other active muscles including the serratus anterior that connects the shoulder blade to the rib cage and the pectoral or chest muscles that actively accelerating the arms. The mid-back muscles including the lower trapezius act to stabilizer the shoulder blade. The trunk muscles including the abdominal groups and the erector spinae or spine extensors are active. The hip muscles that are most active include the hip rotators, hip adductors and hip abductors. Hip rotators weakness is common in golf. If the hip adductors and abductors are dominate during this phase, the golfer may lack leg stability and a sliding motion can occur.
41 All leg muscles are active as weight is transferred towards the target. 5) Follow-through Definition: The phase of the golf swing past impact. The follow-through or finish involves a full rotation of the body towards the target. Provided that this rotation occurs with the spine in a straight position, the finish produces minimal stress. A follow-through position consisting of either excessive side bending or arching of the spine (i.e. reverse-c) can lead to pain or injury. Summary of Follow-through Biomechanics o This is the slowing down or decelerating phase of the golf swing o The pelvis and trunk have turned towards the target o The target side hip rotates, straightens and moves towards the midline of the body while the backside hip moves to a neutral position facing the target. o The target side knee straightens while the backside knee remains bent with balance on the toes o The spine maintains a neutral or slightly side bent position away from the target o The shoulders move in reverse of the back swing motion with the club finishing overhead. Summary of Muscle Activity o Ideally, as the club moves through impact it is accelerating. Just past impact the club will immediately begin to decelerate. The muscles that are active during this phase of the golf swing work together providing: 1) Rotation of the body to a balanced finish position. The golfer needs to maintain support, approximately 95% of the golfers body weight, on the target leg as they finish the golf swing. The
42 ability to complete this activity requires strength and balance of the hip and trunk muscles. 2) Deceleration of the body as the golf club is moved to a position over the shoulder. Specific areas of the body that need to addressed during a golf fitness or conditioning program: The Thighs Four different muscles on the front of the thigh collectively called the quadriceps help provide power during the forward swing and acceleration through the ball. hamstrings, the muscles in the back of the thigh, initiate pelvic rotation and allow the transfer of power from the hips to the trunk and arms. The The Hips and Buttock These muscles, especially the largest in the buttock, the gluteus maximus, are most active during the forward swing, generating power. Back Muscles The back muscles have an important function related to proper golf posture. These muscles hold us up and help us maintain our address position. The back muscles are most active during the downswing, as we accelerate through impact. They also help to decelerate the body during the follow through. The lattisimus dorsi, a large back muscle, is critical in starting the hips. The lattisimus dorsi also attaches to the upper arm therefore aiding in the rotation of the arm. The Abdominals May be the most important golf muscles! These muscles are not only aid in posture and balance but also help to brace and protect the spine. The deepest of the four abdominal muscles, the transverse abdominus muscle acts like a girdle to compress the abdominal viscera and stabilize the trunk. This function helps to protect the back from
43 injury. The oblique abdominals are essential to properly rotate the trunk providing power during the forward motion of the golf swing. The oblique muscles, internal and external oblique, are located on the sides of the trunk below the rib cage. The rectus abdominus muscle helps each golfer maintain a forward bent posture through ball impact therefore playing an active role to maximize performance. Chest The pectoral major is the largest chest muscle. This group functions to help pull the arm down through the golf ball providing power as the golfer moves towards the finish. Shoulders The most important shoulder muscles used during the golf swing are the four rotator cuff muscles. These muscles work together to stabilize the shoulder, coordinate the swing and protect the joint. Forearm muscles These muscles lend control and touch during the swing particularly during the short game. References Section 1. Archambault ML, Ferrante HJ, Nix T: BACKtoGOLF: A Sports Medicine Program for Golfers. BACKtoGOLF, Inc., Hosea TM, Gatt CJ, Langrana NA, Zawadsky JP: Biomechanical analysis of the golfer s back. In: Cochern AJ, Ed. Science and Golf, London, Chapman and Hall, Jobe FW, Pink MM: Shoulder Pain in Golf. Clinics in Sports Medicine. 15(1), 55-63, January Lindsay D, Strother R, Walker D: Better Golf through Better Health: The Complete Guide to Health, Fitness and Injury Prevention. FITforeGOLF, Inc., Lindsay D, Strother R, Walker D: Golf Health, Science & Rehabilitation: A Comprehensive Educational Course for Physical Therapists: FITforeGOLF, Inc., Pink M, Perry J, Jobe FW: Electromyographic analysis of the trunk in golfers. Am J Sports Med 21(3), , Rose, GA, Duvall, RV: The Body-Swing connection Seminar Manual: Level 1-3. Advantage Golf, 2002.
44 Chapter 5: Discover How to Balance your Way to Lower Scores By Brian Smith Have you ever had a side hill lie, a downhill lie, or had an awkward stance in the bunker? If you are reading this book, I am sure you have been in situations like the ones mentioned above. Most of these awkward lies produce some of your ugliest shots. A major reason is that you are unable to maintain appropriate balance when hitting these types of shots. Why is balance so important in the golf swing? Is there anything I can do to improve balance? How does balance affect my score? These are all questions we should be asking ourselves when we have an awkward lie. It is amazing to watch the professionals swing the club as hard and as fast as they do, but they are always balanced during their swings. Balance is controlled by 3 physical components; vision, inner ear, and dynamic control from the muscles and the joints. During training, your main focus should be on improving your muscular control when challenged with a balance activity. Remember your goal should be to make each balance drill as golf specific as possible by assuming your golf posture, or performing a drill that mimics a phase of your golf swing. One way to determine your ability to balance is to perform a single leg balance test. Stand on one leg with knee slightly bent and close your eyes for 1 minute. How many times did you have to open your eyes or touch the other foot down? (0-1 touch = Birdie, 2-3 touches = Par, 4-6 touches = Bogey, and 7+ touches = the dreaded Double Bogey) If you didn t score a birdie, I think it is time for you to start using the following 10 exercise drills to start improving your golf balance:
45 1. Single Leg Balance Stand on one leg with knee flexed ~15 degrees and balance. You should be standing in your golf posture as if you are addressing a golf ball. Start with your eyes open, and perform with both legs. Next, perform the same exercise with your eyes closed. The exercise should be timed with a goal of 1 minute. As you have mastered this exercise with your eyes open and eyes closed you can now progress to the next exercise. Purpose: To improve balance while maintaining correct golf address posture on a stable surface. When you close your eyes, you are increasing the training intensity of the muscles, by eliminating the visual input. 2. Shoulder Turn Drill Start by standing on one leg with knee flexed ~15 degrees and balance in your golf address posture. Your eyes will be open and cross your arms over your chest. Next balancing on your right leg, rotate your shoulders as if you are performing your backswing motion then return to address position. Perform 10 repetitions, then repeat on your left leg. Perform on each leg while going from contact position to follow through for 10 repetitions.


46 Purpose: To improve golf balance while simulating the shoulder turn required in your backswing and follow through. 3. Golf Club Drill Start by standing on one leg with knee flexed ~15 degrees and balance with your club at address position. Your eyes will be open for this drill. Take a backswing to a 9 o clock position then return to address focusing on a proper shoulder turn. Perform 10 repetitions then repeat on your left leg. Then perform on each leg while going from contact position to follow through for 10 repetitions. Finally perform 10 repetitions of a full swing. Purpose: To improve balance during backswing, follow through, and a complete swing. 4. Unilateral squat

47 Stand on one leg. Start exercise by flexing your hips and knees lowering to a parallel to floor position or to a box about inches high. Keep weight on the heels and knees aligned over feet. The knee should not extend beyond the toes. Keep your back flat with head slightly up. Then extend the hips and knees returning to starting position. Your goal is to perform 10 repetitions for each leg. To increase challenge hold a golf club directly in front of you in a wrist cock position. Purpose: Unilateral squatting emphasizes core stability and balance of the leg while strengthening the lower leg muscles (primarily the quadriceps, hamstrings, and gluteus) which are responsible for power development. 5. Lateral Reach with foot Place a cone 2 feet to each side of your body. Stand on one leg with knee flexed ~15 degrees and balance maintaining your spine in the appropriate golf posture. Now reach the unsupported leg out away from the body as far as possible toward the cone without touching the ground. The foot/toes should point forward throughout the exercise. Return to the start and repeat 10 times. Switch legs and repeat on the other side.


48 Purpose: To improve dynamic balance avoiding the sway or the slide. This exercise emphasized keeping the hip, knee and ankle in alignment during the golf swing. 6. Crossover reaches Place a cone 2-3 feet off to each side of the body and slightly in front of the body. Stand on the right leg with knee flexed ~15 degrees and slowly reach the left hand to the cone on the right side of the body. Return to upright and then reach the right hand to the cone on the left side of the body. Repeat with 5-10 touches to each side. Purpose: To improve dynamic balance while simulating the motions occurring at the hip joint during your backswing and follow through. When you stand on your right leg and reach with left hand, this is the same hip and knee motion as your backswing. Reaching with your right hand simulates your follow through.

49 7. Medicine ball rotations Start by standing on one leg with knee flexed ~15 degrees and balance on your right leg in your golf address posture. Hold a 2-4 lb medicine ball out directly in front of chest with arms extended in a one piece position. Now rotate your shoulders as if you are performing so that your back is facing your imaginary target line, and then rotate to your follow through with chest facing target. Perform 10 repetitions then repeat on your left leg. Purpose: To improve golf balance while simulating the shoulder turn required in a full golf swing. The use of the medicine ball helps to improve core stability and increases the challenge of the balance drill. 8. Step up rotation Start with a box 6-8 inches high placed in front of you with your arms crossed over your chest. Step up onto the box with right leg and as you step up you will raise your left knee to waist height. Once you are at the top rotate your shoulders to the right. Repeat ten times. Then repeat on left leg, while will rotate shoulders to the left. In order to progress exercise raise the height of the box or add a golf club for your rotation.


 Hold a golf club in front of chest with")


50 (Progression with golf club) Purpose: Improve your backswing balance on your right leg and then follow through balance on your left leg. 9. BOSU Squats with rotation Stand in your golf stance on BOSU (you can also use a foam roller or wobble board.) Hold a golf club in front of chest with a wrist cock position. Next squat to ~70 degrees and at the bottom of the squat rotate your shoulders to the right. Then return to starting position. You will complete 10 squats to the right then 10 to the left.
51 Purpose: Improve your quad strength/ stability during an unstable movement like a swing from a side hill lie. This will improve your ability to maintain knee flexion during a swing avoiding the sway and the slide. 10. Unstable Surface Drills Perform drills 1-6 while balancing on an unstable surface such as foam pad, foam roller, or a disk. Purpose: Improve your ability to perform the golf swing when encountering an awkward lie. Remember these drills will help you maintain balance and help avoid the reverse pivot and the over the top swing error. Just imagine if you are able to improve your balance how your scores will improve. If you are ready to start lowering your scores perform these 10 drills three times per week. Chapter 6: The 3 Principles of Performing an Exercise By Kai Fusser I am often asked for suggestions on some golf specific exercises. In my opinion, there are none. The way I see it, the body has to be trained as a complete chain from your toes up to your fingertips. If there is one weak link, the chain is only as strong as its weakest link. This is true for any sport and especially true for the golf swing. We try our best to produce a specific type of movement in the golf swing with the intention to hit the ball just the way we plan. In doing so, we produce power through the activation of all of the muscles in our body. Since it is one big interconnected system, not one muscle will be left out during the performance of the swing. The club act s as a tool as well as an extension of our limbs for better leverage.
52 We spend a great deal of time, effort and money to select the right club. The club is made up by 3 basic parts; the grip, the shaft and the head. We always make sure that these 3 parts are well connected to each other with no play between the grip and the shaft or the shaft and head, and also that the shaft is straight. The same care has to be taken of our body, considering how big a part it plays as the only source of the production of power and the guidance of the club. To transfer that power to the ball in a controlled manner shows us how important it is to have that chain of body parts optimized in every way. Here are some of the things to consider when setting up the body for proper power production. A solid base to work off (contact to the ground) Alignment of all parts (spine angle) Solid connection between all joints (core, muscles and connective tissue) Synchronization of all moving parts (nervous system) Uninterrupted transfer of power through the body (flow) Our nervous system is our control unit which learns by repetition. What our body does most, it will remember best and therefore repeat when asked. This is the reason we need to take our training seriously and concentrate on every move we do, no matter how easy of an exercise we perform. Each exercise needs to be executed perfectly every time. I believe through the right training, you will see results that contribute 50% by getting mechanically stronger (muscles, connective tissue, flexibility, etc.) and 50% improvement of the nervous system knowing what muscles to fire and at what time. The right firing order is very important because it teaches our individual body parts to move in a synchronized fashion to efficiently create and deliver power. The power generation is similar to an engine. If the firing order of the cylinders is off, the engine runs very rough and the power output is greatly affected. I like to say that all the different exercises we do for different body parts are just a tool to teach our body how to move most efficiently and with better control.
53 This requires concentration while working out. It is also a reason why we should keep our workouts short. I prefer workouts no more than one hour because our nervous system will shut down after that and the learning curve will decline. When we practice our swing we don t just bluntly hit the ball, we concentrate on it and try to perfect it and that s what we need to do during our workouts. I am blessed to have client s like Annika Sorenstam, Karen Stupples, Jung Yeon Lee, as well as some of the greatest athletes from other sports. I also work with some High school and College players wanting to be the best some day. The good thing is that I get to work with them one on one and therefore get their fullest attention and concentration and that s what is needed to get the most out of their training. I constantly remind my clients about their form while going through a motion to hopefully eliminate any off movement. I will nag on them constantly about three things during an exercise: Feel the ground Stay aligned Abs tucked in These are the same 3 principles I would like to teach you to use with every exercise you do. You have to understand they also have to work together just like our body parts. In fact, they are integral to every successful movement. Every time you neglect one principle in any way, you take away some percentage of a 100% perfect move. Depending where you want to be, a few percent will make the difference of being good or being great. Each of these principles has to be activated before every exercise. So, before you start each repetition, utilize each principle to perform one repetition. When you plan on doing 8 repetitions in a set of an exercise, think of doing one repetition (eight times) which means you will activate all 3 principles 8 times per set. The more often you do it, the easier it is for your body to remember. This is where you get a high carry over to your sport.
54 Principle 1: The Base (feel the ground) We know how important a good base is for any sport. Just try standing on some balance pads or on a steep slope in a bunker and instantly you wish for a better connection to the ground. When we move our limbs away from our body we create a load and leverage that will affect our center of gravity. This load wants to pull us over. Just look at a crane. It s easy to see how important the base is the further away and heavier the load, the stronger it has to be. In order to produce power, we need to push against the ground so we can load up our muscles (these are the principles of elastic strain energy and the push pull effect). If you are not well connected to the ground, you miss out greatly on that effect. For more information on this concept, you may enjoy reading about Power Posture by Lee Parore. The rotation during the golf swing creates another load that wants to move our body away from our base. Consider the forces of the drivers head traveling at about 60 mph in the back swing and in an instant you reverse the direction of that force as you turn to your downswing. Off course balance has a great impact on your ability to hold your base. There are countless balance exercises available with exercises tools (balance pad s, gym balls, wobble board s, etc.) or without these tools (one leg exercises, on the toe s, etc.), however, this is discussed in another chapter. I always prefer to perform exercises in a standing position whenever possible. Whether you do a seated row sitting on the floor or on a seated row machine with a bench, that position will not help you to improve your base. Your body will learn how to deal with that force in a sitting position and not standing. So, I d prefer the row standing up (Jockey Row). Your feet will have to handle and distribute the load your nervous system will learn. This way we have a better carry over to our standing sport and our body will
55 remember. In addition to balance, this explains engagement of the core, stabilizing muscles, range of motion and why we should not use any exercise machines so all these crucial elements are partially or completely neglected. So, let s get on your feet and move! Imagine how you would stand if someone would want to push you out of position. You should firmly push your feet against the ground with your knees slightly bent. That s the position you need to be in for any standing exercise, no matter how easy or how hard. You want to feel your feet connected to the ground, balanced between the front and the back of your foot. This will require a little more effort than just standing there. At the same time you don t want to be too straight with your legs because that would take away from your ability to produce power. You want to have a bouncy feeling. Principle 2: The Axis (stay aligned) Our axis, the spine angle, is our second setup point. As our body is centered around our spine, it is important to keep it this way while performing an exercise. The angle of our spine will influence balance, the production and transfer of power, direction control, and injury through compensation. Think of a drive shaft in a car. Ideally we want the shaft to be straight. Any kink will produce extra stress on the connection points (joint s) and will take away power and will not run round and smooth. Much energy gets wasted and the braking point will be reached much earlier. This is very similar to our spine. The power we produce through the use of our lower body, the mid section and upper body has to be transferred along the spine to our target point which is the club. Any deviation off of that straight line will translate into loss of power. If your spine bend s your rotation can not be as controlled and smooth which mean s you never know where exactly your club head will end up. You will also have a hard time staying on your base as the forces on your body are greater and pull you laterally. Many times other parts of our body (i.e. the shoulder) try to compensate for the effect of a bad spine angle. This compensation often
56 result s in an overload of a certain joint or its connective tissue and overuse or injury will occur. It is also important that your shoulders are square and parallel to the floor. If you dip or push down on one shoulde,r the load on your spine will increase on that side and the spine will have to bend. Annika refers to the feeling of turning within a cylinder in Golf Annika s Way, where you can not bend your spine. For your exercises. it is important to use a mirror whenever possible. I have my player s use it all the time. This will help you to check and control your spine angle at all times. As their trainer, I can see the spine angle from several directions through the mirror and can correct them accordingly. A great help can be the crack where 2 mirrors meet. Position yourself right in front of it and line up your nose, belly button, and the center between your feet. Now you can see if you start moving your spine off the line. If you see yourself moving off the line you need to find a way to correct it, or better yet you need to learn how to avoid it in the first place. Good alignment in the spine is achieved by creating and holding a good base, by engaging your core muscles, good balance, keeping your shoulders square and awareness of where your body parts are at any given time during the exercise. All this has to be learned and constant checking in front of the mirror or by a trainer will lead to the ability to control it. Imagine a straight pole going through the center of your body and you are not allowed to break that pole. You need to avoid bending your hips or dipping your shoulders. That is also important during any rotation. It is very easy to bend your upper body or dip your shoulders during a rotational exercise. Again, think about the pole inside you and just rotate around it. I am a proponent of heavy weight exercises and eccentric s (after proper preparation). How should you lift a heavy dumbbell, for example, during a biceps curl where the load
57 is trying to bend your spine to the side? Think again about the pole inside you. Tighten your core and with the help of your legs, move down the pole and up in a pump motion curling as you move upwards through straightening your legs. Some would call that cheating. The difference is that we do this in a safe manner with a straight spine and tight core while distributing the load throughout the whole body. The reality is that in most sports we have to deal with big loads and many times they come unexpected, so we should learn how to handle them through training. The full swing of a driver is fairly violent on our body as well. We are in charge of the dumbbell, the cable pull, the club or any force that we create, don t let it get you off your base! Principle 3: Abs Tucked In The Core has become a popular word. Everywhere we look we find that word. It is widely used by anybody having anything to do with fitness or golf. I will spare you with the anatomy of the core and the hundreds of core exercises available but recommend the readings of Dr. Michael Colgan and Paul Check. I would like to show you how I put the use of the core into application on an everyday basis with my training. Anybody I work with will tell you how often they get to hear from me, abs in, I probably say it more then 100 times a day. In a nutshell, the activation of the core will give you many benefits: It connects your upper and lower body into one powerful unit It transfers power from the bottom to the top of your body and vice versa It creates stability It creates rotational power It protects your spine
58 It keeps your spine angle straight It compact s all the organ s in your mid section and keep s them from wobbling around It defines the center of your body It creates a nice and flat mid section (for that necessary beach look) Now that is an impressive list and there is even more that could be brought up. Many people have lost their ability to engage their core muscles at all or at the right time. Combined with a very weak mid section, these things will often lead to lower back problems. This comes as no surprise today as many of us sit at the desk all day, stumble to the car to get home to find the couch before bed time. Take for example the typical case where you bend over and reach to pick up something heavy out of the trunk of your car. The core is weak and not engaged, your lower back has to take care of the load and that shot of pain in that area will injure you for days, if not longer. We want to engage our core every time before we start moving any of the limbs to protect our spine from the created load and also assure stability in our stance. To do this takes a lot of practice. It has to be done over and over again with every single move we take. Concentration and repetition is the key. We have to train our nervous system to engage the core for us as there is only little time to think while we are in the heat of the action in our sport. Now there are hundreds of ab exercises out there and they will get you a stronger mid section but many of them have a poor carry over to our sport. Therefore it is very important to use and train your core while performing your exercises, provided the exercises are free moving and not restricted by machines. Here is how I like for you to engage your core. Standing in the upright position with your good base and straight spine, pull your belly button in and up, and you should feel some pressure against your lower spine from the stomach wall pushing back. In this position you might also feel that your rib cage has lifted some and the breathing might be a little
59 restricted. That is normal at the beginning as you have to learn how to disassociate your core from the upper body. Try to relax the upper and lower body adjacent to your mid section so they can move freely while your core is tight. This will take some time and practice, but once achieved will make a huge difference in your stability and strength. There are two good ways to practice. First, stand with your back toward the wall with your heels, glutes, shoulders and head resting against the wall. Place one hand behind the small of your back, now draw your belly button in and up against the wall, feel the pressure against your hand. In this position learn to relax the rest of your body and try to breathe relaxed as well. Hold for seconds, let go and rest for seconds, then repeat 4-5 times. The second way is to get into the described position standing away from the wall, again the abs are pulled in and the rest of the body is relaxed. Now rotate your upper body from one side to the other with your arms hanging freely. If you are relaxed, your arms should swing freely in front of you through the rotational forces while your core remains tight throughout. This abs in engagement needs to be started before any movement. I call the belly button the Start button that has to be pushed in before the start of any move, no matter how simple. Remember we want to teach our nervous system to do it automatically every time, so repetition is the key. You don t want to miss any opportunity to learn it. For every exercise that has a change of direction, the core has to be re-tightened. For example, try a simple forward lunge. You set up your body and pull your abs in, then you step forward into the front lunge position. When you begin the push with your front leg to get back to the starting position, you will re-tighten your abs again. This will keep you stable during the whole exercise and it will help produce and transfer power from the upper and lower body to create a strong push back.
60 Again your nervous system has to learn that re-tightening process. However, once it is learned, it can be used in the swing where at the address of the ball your core is set and at the turnaround from the back swing to the down swing will be reset again. That will give you stability and connection through the backswing and at the critical change of direction to the downswing. Obviously we have to perfect this double engagement in order to be free to move and to be able to use it in the golf swing. This is why we train and practice it with every movement. Once you get very efficient and comfortable with the engagement and use of the core and you learn how to let your body work for you, you will be able to locate the center of your body, which is located approx. 1" below your belly button. Think of rolling an egg and a ball next to each other. The eggs center is constantly changing so it will roll inconsistent and all over the place where the balls center will stay consistent and rolls without any extra movement. When your body learns to rotate around that center all movement becomes much more efficient and almost effortless. That is without a doubt the best feeling you can have in a sport. You probably have had that perfect drive, where everything felt just right and there was no strain anywhere on your body or extra effort. We establish a craving for that one perfect feeling. That is what keeps us coming back over and over again. It creates the addiction to our sport. Naturally, I like to use Annika as an example. For 5 years now, we have trained around those principles. Watching her play is a pure pleasure. She has solid contact to the ground, perfect rotation around her spine and her body works together as one unit. This eliminates any unnecessary movement, her swing looks effortless and that makes it very repeatable and therefore consistent.

61 Following are some examples of exercises by some of my players to show you some perfect form. Note that each of these players jumped within one year of training from the middle of the field in driving distance on the LPGA to the top 10. That s what the right training can do for you. Here you can see a perfect setup. Her knees are bent and she is connected to the ground, the spine is aligned, shoulders are square and core is engaged. The side load from the dumbbell did not change that posture. Biceps Curl front view Here you can see how her body is stacked, shoulders over the hips and hips over her feet all aligned.


62 Annika is on the Bongo Board. She is relaxed while training her balance and improving her base. This is a fun training tool. We also toss medicine ball s off of that.

63 Jung Yeon Lee (upcoming Korean Star, shot 60 last an LPGA event in Tucson) Jung Yeon Lee shows perfect form on every exercise. Her ability to concentrate and attention to detail are incredible. Dumbbell Overhead Extension setup front view At this fully extended position, she still keeps her base solid and her spine aligned which requires solid activation of the core.

64 Here is the fully extended side view. Her knees are still slightly bent with perfectly stacked shoulders, hips and feet.
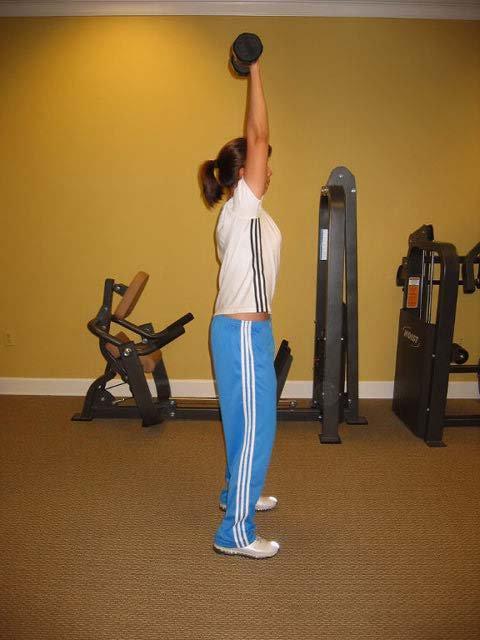
65

66 Karen Stupples ( 2004 British Open Champion) Wood Chop Down setup Here Karen is setup for the Wood Chop Down. It is a perfect exercise to train the 3 Principles. The load from the side through the cable wants to pull you. Resistance comes from the solid base, the activation of the core and therefore a straight spine angle.


67 The rotation is initiated from the core. To resist the increased load due to the rotation, the base has to be strengthened by lowering the center of gravity. As you see, some weight has shifted to the right leg yet the spine is still aligned and the body is stacked. Here Karen is rotating slowly back while still maintaining her posture. The rotation is controlled by the core.

68 Putting it all together! Jung Yeon is setup with perfect posture. Imagine the pole going through the center of her body. She will initiate the rotation by engaging her core.

69 Here she is rotating around the pole while creating a stronger base through sitting down and lowering the center of gravity. She is still stacked and aligned. From that position she initiates the turnaround by again engaging the core to handle the forces created by the change of direction and to produce power.
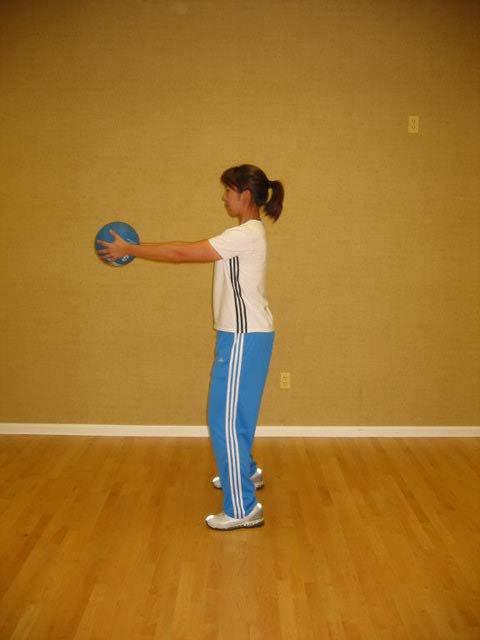
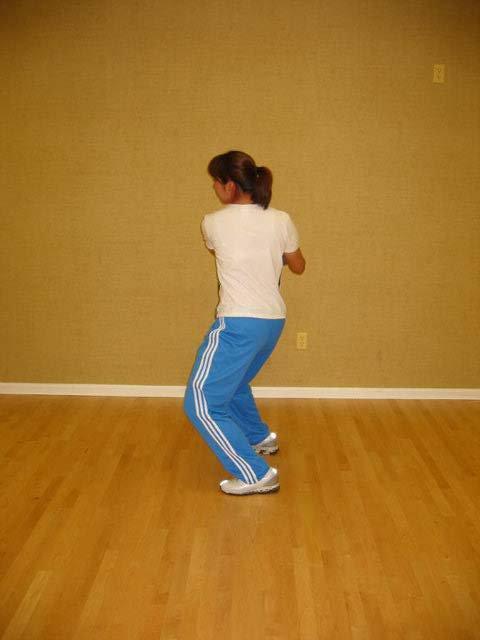
70
71 Chapter 7: Posture Perfect: Achieving Better Scores through Proper Alignment and Low Back Strengthening By Brian Schiff Most golfers are well aware of back pain and the impact it has on their game. Pain in the golfing population is typically acute in nature. Given the force and repetitive nature of the swing it comes as no surprise that people often suffer some sort of problem in their life. Understanding back pain is the first step in handling it should it begin to affect your game. Pain is usually associated with muscle strain, ligament injury, disc injury or even arthritis. Whether acute or chronic, it is essential to manage the pain and symptoms properly to ensure a fast recovery and minimize lost playing time. Most low back pain is mechanical in nature. In other words, it is brought on or perpetuated by faulty positioning, poor posture or common swing flaws. Unfortunately, many beginners never learn how to address the ball properly. As a result, they adopt improper alignment, which usually leads to complimentary swing errors. Over time and repetition, the forces of the swing cause damage to the spine or soft tissue around it. Another contributing factor to faulty swing mechanics is poor flexibility in the trunk or lower extremities. Whether it is hamstring, low back or hip tightness, these issues ultimately affect the set-up and golf swing. Undergoing a thorough biomechanical evaluation is helpful in determining your own limitations. Identifying these areas of concern may allow you to better identify problems with your swing and implement corrective exercise to minimize the problems. In this chapter, I will address basic anatomy of the lower back, common injuries, proper postural alignment and effective strengthening exercises to condition and rehabilitate back injuries.
72 Anatomy The bony anatomy of the lower back consists of 5 lumbar vertebrae, the sacrum and the coccyx (tail bone). The articulation between L5 and the sacrum is a transitional articulation, and much of the stress placed on the lumbar spine occurs at this level. There is a natural C curve in the lumbar spine referred to as lordosis. Some people have excessive lordosis (typical in obese population) while others have a flat back, or very little lordosis. The vertebrae are effectively held together by ligaments and the intervertebral discs. The anterior longitudinal ligament covers and connects the front of the vertebral bodies, while the posterior longitudinal ligament runs along the back of the vertebral bodies. The anterior longitudinal ligament prevents hyperextension of the spine, whereas the posterior longitudinal ligament prevents hyper flexion. The intervertebral discs provide the strongest attachment of the vertebrae. There is a disc between each set of vertebrae, and they are responsible for absorbing much of the load on the spine. Each disc consists of an annulus fibrosis (outer layer) and a nucleus pulposus (inner layer). Think of the disc much like you would a jelly filled doughnut. The annulus is thick and tough. It is resistant to forces in all directions, but surely not invincible. The nucleus is highly elastic and has the ability to absorb axial forces. The disc maintains it height by absorbing water. However, as we age, the disc loses its ability to absorb as much and it eventually shrinks. Aside from losing height, the greater consequence is typically a more fibrous disc that is less resistant to high loads. With regard to muscles, there are three groups in then low back: superficial, intermediate and deep. The superficial and intermediate muscles are considered extrinsic muscles and involved primarily with limb movements and respiration.
73 The deep or intrinsic back muscles are responsible for movements of the vertebral column. For the purposes of this book, only the relevant low back muscles will be included. Extrinsic Muscles Latissimus dorsi extends the shoulders and retracts/internally rotates the humerus (upper arm) Intrinsic Muscles Erector spinae group (consisting of iliocostalis, longissimus and spinalis) these muscles work to extend the spine or straighten a flexed back Multifidus Extends the trunk when working together on both sides of the spine; acting unilaterally, it laterally flexes the trunk and rotates it to the opposite side Rotatores muscles involved in spinal rotation and stabilization Interspinales and Intertransversarii muscles primarily aid in extending the vertebral column While it is not necessary to remember all the names of these muscles, it is important to understand how they work and contribute to your golf game. Incorporating specific exercises designed to target these muscles will provide better stabilization of the spinal structures, prevent injury and improve performance. Later on you will see specific exercises to accomplish this. Proper Spinal Posture and Alignment
74 Posture is something we all need to work on daily. It is only natural for us to fall prey to the effects of gravity, which typically involves slumping or rounding forward. Over time, we naturally develop patterns of tightness and compensations. These lead to swing errors and poor play. The set up is thought of as one of the most important phases of the golf swing. If you don't start correctly it is difficult to perform the ideal swing consistently. A golfer's goal at set up is to achieve the ideal body position to initiate the ideal swing. Achieving the ideal spinal posture of a straight spine will allow the golfer to perform his/her swing with increased rotation (= increased power), decreased spinal forces (less chance of back pain) and increased potential to achieve the proper swing plane (= fewer swing errors) One of the most common poor postures we see on our golf fitness evaluations is a rounded (or flexed) curvature of the lumbar and thoracic spine, due to poor flexibility of the spine and lower trunk. In this poor posture, the golfer will also usually display rounded shoulders often the result of chest/shoulder tightness and weakness of the shoulder blade stabilizers. This rounded posture leads to increased spinal forces and decreased ability to rotate during the backswing. Your golf fitness specialist should assess your golf address posture prior to designing an exercise program as your body is your most important piece of equipment needed for golf. To achieve the ideal set-up posture, you should assume an athletic position with your weight balanced equally and the feet slightly wider than shoulder width. Maintaining a straight spine, you bend forward from the hip joint allowing the knees to flex ~20 degrees (soft knees). It is also important to keep the hips level at address. One way to demonstrate the importance of achieving a straight spine angle at address is by performing the following test: Sit on edge of a hard chair and cross your arms over each other with hands touching shoulders. Sit up as tall as possible and rotate to right (backswing for a right handed golfer) and then to the left. Note how far your shoulders can rotate each direction. Next, round your

75 shoulders forward and round out your upper/lower back while leaning forward with your shoulders over your thighs and rotate again to both directions. Most likely, your backswing and follow through rotation was excessively limited compared to rotating with the ideal posture. Imagine the effect on your golf scores and your body if you are addressing the golf ball with this rounded posture. In addition to the diminished performance, the repetitive nature of the game leads to excessive force transmission along the entire spinal column. How many times do you swing the club in a single round? Improper form and set-up leads to damaging forces on the disc and surrounding spinal structures. Over time, you will be affected by a strain, sprain or disc problem. Examples of Improper Set-up Rounded spine Too upright Stiff knees Ideal Set-up Position
76 So, it should be easy to set-up correctly now that you know the proper posture, right? Well, maybe not. There are many physical reasons why golfers align their bodies improperly. Flexibility and strength imbalances are major reasons, but it is also important to rule out biomechanical causes such as leg length discrepancy, hip rotation, decreased lumbar lordosis, or limited spinal motion. These are afflictions that may affect young and old, but often times are seen in older golfers. For this reason, it is beneficial to receive a thorough biomechanical evaluation from a physical therapist, chiropractor or physician who can effectively work in conjunction with your golf pro and fitness specialist. Provided you have a biomechanical problem, it should be addressed prior to beginning a fitness program. There may be limited remedies aside from traditional exercise, but it will help identify areas of weakness and limitation, making it easier to spot possible swing flaws. In the following section, I will review functional golf strengthening exercises designed to improve faulty posture, increase muscular endurance, reform postural deficits, reduce injury risk and increase golf specific power. These exercises will target the intrinsic and extrinsic muscle groups mentioned earlier.
77 Strengthening The following exercises have been chosen to strengthen the back and produce powerful swings. An appropriate balance between abdominal and low back strength is critical. Most of us neglect our back and poor posture throughout our daily life further stretches and weakens these muscles. Performing these back strengthening exercises will promote improved spinal mobility, more strength and a heightened dynamic flexibility. All of those will lead to a smoother, more powerful golf swing. For the purposes of this book, I will break the exercises into primary and home routines. Primary exercises are best performed in a gym and yield the greatest return if done on a regular basis. However, if you are traveling or do not have access to a health club, the home routine will deliver great benefits as well. Primary Back Exercise Routine Standing DB Rows Assume your natural golf address posture. Maintaining a neutral spine and stabilizing the uninvolved arm on a stable surface, retract the arm and squeeze the shoulder blade in toward the spine. Slowly lower the dumbbell back to the starting position. Perform 2-3 sets of repetitions on both sides. Be sure not to use momentum or lose your proper spine position. Purpose: To strengthen the latissimus, middle trapezius and rhomboid muscles. This technique focuses on muscular endurance for the extensor muscles, while reinforcing proper alignment with movement. In the following section, I will review functional golf strengthening exercises designed to improve faulty posture, increase muscular endurance, reform postural deficits, reduce injury risk and increase golf specific power. These exercises will target the intrinsic and extrinsic muscle groups mentioned earlier. Strengthening

78 The following exercises have been chosen to strengthen the back and produce powerful swings. An appropriate balance between abdominal and low back strength is critical. Most of us neglect our back and poor posture throughout our daily life further stretches and weakens these muscles. Performing these back strengthening exercises will promote improved spinal mobility, more strength and a heightened dynamic flexibility. All of those will lead to a smoother, more powerful golf swing. I recommend beginning with 1-2 sets of the following exercises 2-3 days per week. After 2-4 weeks, you can progress to 3 sets. During the off-season or pre-season, I suggest doing them 3x/week. Once you begin playing consistently, I feel you should do them 1-2x/week to maintain strength and prevent injury. Back Exercise Routine Standing DB Rows Assume your natural golf address posture. Maintaining a neutral spine and stabilizing the uninvolved arm on a stable surface, retract the arm and squeeze the shoulder blade in toward the spine. Slowly lower the dumbbell back to the starting position. Perform 2-3 sets of repetitions on both sides. Be sure not to use momentum or lose your proper spine position. Purpose: To strengthen the latissimus, middle trapezius and rhomboid muscles. This technique focuses on muscular endurance for the extensor muscles, while reinforcing proper alignment with movement.

79 Start Finish Standing straight bar lat pull downs Begin in your natural golf address posture. Keeping the elbows straight, pull the bar down toward the thighs. Return to shoulder height slowly. The elbows should not bend and be careful to avoid swaying. The abs should remain tight throughout the entire movement. It is important to choose a weight that you can control or you will not be able to maintain proper form. Perform 2-3 sets of repetitions. Purpose: To strengthen the latissimus and posterior shoulder muscles. It also emphasizes stability in the core region by virtue of the arms moving up and down. Standing straight bar lat pull downs Begin in your natural golf address posture. Keeping the elbows straight, pull the bar down toward the thighs. Return to shoulder height slowly. The elbows should not bend and be careful to avoid swaying. The abs should remain tight throughout the entire movement. It is important to choose a weight that you can control or you will not be able to maintain proper form. Perform 2-3 sets of repetitions. Purpose: To strengthen the latissimus and posterior shoulder muscles. It also emphasizes stability in the core region by virtue of the arms moving up and down.
80 Low back extension (45 degree machine or stability ball) Begin in a neutral spine position with the legs/feet stable. For beginners, I recommend folding the arms across the chest. More experienced individuals may choose to place the hands behind the head. Slowly lower the upper torso down in an incremental (domino like fashion) until the lower lumbar area has flexed to some degree. Then return to neutral in a deliberate fashion. Pause at the top and repeat times. Perform 2-3 sets. As the exercise becomes easier, you may hold a medicine ball or small weight to increase the difficulty. Again, it is imperative not to move too quickly or use momentum. Purpose: To strengthen the erector spinae muscle group, increase muscle endurance and reinforce proper golf posture. This exercise is extremely helpful in the prevention of chronic low back pain and disc problems. Exercise #2 - Low back extension (45 degree machine) Technique: Begin in a neutral spine position with the legs/feet stable. For beginners, I recommend folding the arms across the chest. More experienced individuals may choose to place the hands behind the head. Slowly lower the upper torso down in an incremental motion (domino like fashion) until the lower lumbar area has flexed to some degree. Then return to neutral in a deliberate fashion. Pause at the top and repeat times. Perform 2-3 sets. As the exercise becomes easier, you may hold a medicine ball or small weight chest level to increase the difficulty. Again, it is imperative not to move too quickly or use momentum. Purpose: To strengthen the major back extensor muscles, increase muscle endurance and reinforce proper golf posture. This exercise is extremely helpful in the prevention of chronic low back pain and disc problems.
81 Low Back extension with spinal rotation Much like the previous exercise, this variation addresses the erector spinae muscle group, but adding the rotational component will activate the rotator and multifidus muscles as well. Begin in the same position as for the low back extension. Lower until the lower lumbar region is flexing (straight plane). As you rise up, you will now rotate to one side by turning one side of the body. For example, pulling the right shoulder back and rotating to the right will work the muscles in much the same way as your backswing (right handed golfer). Lower down and repeat now turning to the left (which will simulate the way the muscles work during follow-through for a right handed golfer). Repeat 5-10 times on each side. Do 2-3 sets. This is a difficult exercise and causes muscle fatigue quickly. As a result, I recommend beginning with the arms folded across the chest and doing 1-2 sets at first. Avoid significant rotation and move according to your range of motion and comfort level. Purpose: To develop improved functional mobility and strength relative to the backswing and follow through motions of your golf swing. This will lead to better turns and improved power. Exercise #3 Low Back Extension with Spinal Rotation (45 degree machine) Technique: Much like the previous exercise, this variation addresses the erector spinae muscle group, but adding the rotational component will activate the rotator and multifidus muscles as well. Begin in the same position as for the low back
82 extension. Lower until the lower lumbar region is flexing (straight plane). As you rise up, you will now rotate to one side by turning one side of the body. For example, pulling the right shoulder back and rotating to the right will work the muscles in much the same way as your backswing (right handed golfer). Lower down and repeat now turning to the left (which will simulate the way the muscles work during follow-through for a right handed golfer). Repeat 5-10 times on each side. Do 2-3 sets. Note: This is a difficult exercise and causes muscle fatigue quickly. As a result, I recommend beginning with the arms folded across the chest and doing 1-2 sets at first. Avoid significant rotation and move according to your range of motion and comfort level. Purpose: To develop improved functional mobility and strength relative to the backswing and follow through motions of your golf swing. This will lead to better turns and improve power. BOSU Swimmer Using a BOSU, begin in a neutral spine position with both feet on the floor and the arms parallel to the floor. The head should be facing down to keep the cervical spine in a neutral position. Now, raise the right arm and left leg up simultaneously through a full range of motion. Pause at the top and lower slowly to neutral. Repeat on the other side by raising the left arm and right leg. Perform 2-3 sets of repetitions on each side.


83 Purpose: To strengthen the erector spinae group and reinforce core stability (on the unstable surface). In addition, the reciprocal arm and leg movement mimics the patterns of flexion and extension of the upper and lower limbs during the golf swing. The key to performing this exercise correctly is focusing on keeping the midsection still, while moving slowly in order to keep constant tension on the muscles throughout the entire movement. BOSU Swimmer Using a BOSU, begin in a neutral spine position with both feet on the floor and the arms parallel to the floor. The head should be facing down to keep the cervical spine in a neutral position. Now, raise the right arm and left leg up simultaneously through a full range of motion. Pause at the top and lower slowly to neutral. Repeat on the other side by raising the left arm and right leg. Perform 2-3 sets of repetitions on each side. Purpose: To strengthen the erector spinae group and reinforce core stability (on the unstable surface). In addition, the reciprocal arm and leg movement mimics the patterns of flexion and extension of the upper and lower limbs during the golf swing. The key to performing this exercise correctly is focusing on keeping the midsection still, while moving slowly in order to keep constant tension on the muscles throughout the entire movement. Start L Arm, R Leg R Arm, L Leg Chapter 8: Stretch Your Way to a Better Swing By Brian Smith

84 In order to answer this question the golfer must first imagine a rubber band. A rubber band is more powerful and more efficient the further it is stretched. Now, think of your golfing body in the same manner. A more flexible body leads to a swing with increased power, increased consistency, and more efficiency. On the other hand, a golf swing performed with decreased mobility leads to many swing faults and increased risk of injury. I recommend a home flexibility routine and an on the course warm up. HOME PROGRAM I recommend performing the golf specific home stretches at least once per day, and prior to all golf matches before your leave for the course. ACTIVE HAMSTRING STRETCH Lay on back with both legs straight Bring one knee toward chest with hip flexed to 90 degrees and knee flexed to 90 degrees Grab behind knee with hands and actively straighten knee feeling stretch in back of thigh. Hold for 5 seconds and repeat 10 times for each leg Purpose: Improves ability to maintain a stable pelvis avoiding a rounded spine posture at address. Results include decreased stress to low back, allowing the golfer to play injury free. PIRIFORMIS STRETCH (pretzel)


85 Lay on back with knees bent then cross one heel over opposite thigh above knee Grabbing behind the thigh of the leg with the foot on ground, bring into 90 degrees hip flexion Hold for 30 seconds and repeat for each leg feeling stretch in crossed leg buttocks region Purpose: Increases mobility of the hip joint resulting in improved rotation during the golf swing. Reduces the stress to the low back during the golf swing. POWER STRETCH Lay on side with hands/elbows together and knees together with hip/knees flexed 90 degrees Take top arm and rotate opposite of legs feeling stretch in trunk, chest region, and top leg hip region. Hold for 5 seconds and repeat 10 times each side Purpose: Improve the x-factor mobility. The increased ability of your upper trunk to rotate on a stable lower body will result in increased power and efficiency of your golf swing.


86 HIP FLEXOR STRETCH Assume a lunge position with lead leg bent 90 degrees at knee and back knee resting on soft surface Lean forward, toward lead leg keeping spine erect Should feel stretch in front of hip and front of thigh. Hold 30 seconds each leg Purpose: Improves ability to maintain a stable pelvis throughout golf swing, and to complete a full backswing and follow through avoiding a slice. TRUNK EXTENSION STRETCH Lay on stomach, place hands under shoulders Perform push up of upper body, extending elbows to straight position. Feel stretch in low back region Hold for 5 seconds repeat 10 times Purpose: Improve mobility of low back resulting in increased ability to maintain

87 proper spine posture at address and during swing. Reduces the risk of low back injury. HIP INTERNAL ROTATION MOBILITY Lay on stomach, prop on elbows and bend knees to 90 degrees with lower leg perpendicular to floor Keeping knees together rotate heels outward feeling in hip region. Hold for 5 seconds and repeat 10 times Purpose: Improve the mobility of the hip joint. Your right hip internally rotates during your backswing, and your left hip internally rotates during your follow through. If you are limited with this motion, you will place increased stresses on your spine and knees. Improved mobility of the hip joint will lead to increased trunk rotation, thus increased power. SOLEUS CALF STRETCH Stand with both knees bent & the leg you are stretching is the back leg Lean into wall until stretch is felt at back of calf & side of calf Hold for 30 seconds and perform both legs


88 Purpose: Improve the flexibility of the ankle joint and the soleus. Tightness will lead to loss of balance, and possible swing fault of a takeaway inside or outside of your swing plane. LAT STRETCH Stand in golf stance with non stretch shoulder at edge of door frame Reach with target arm and grab edge of door frame with elbow extended Lean away from door frame feeling stretch in back, below shoulder. Maintain lower extremity golf posture and hold 30 seconds each side Purpose: Improve the mobility of the posterior shoulder region to allow full extension during your backswing and follow through. ON THE COURSE WARM UP


89 Prior to hitting balls on the range or rushing to the first tee, it is important to spend 5-10 minutes performing a dynamic warm up. A proper warm up has been shown to be the most effective in preparing the golfer for the upcoming round. The benefits include decreased risk of injury, decreased stiffness on the 1 st hole, and increased mobility resulting in decreased swing errors. WINDMILLS Stand with your knees slightly bent and your arms out to your side at shoulder height. Rotate your upper body to the right and back to the left. Complete 15 full repetitions. Next assume your golf posture with your arms still out to side. Rotate to right and left, maintaining your golf spine angle, for 15 repetitions. Purpose: Improve the x-factor mobility. The increased ability of your upper trunk to rotate on a stable lower body will result in increased power and efficiency of your golf swing. LEG SWINGS (FWD and BWD) Stand with the right hand on the side of a golf cart, and keeping the leg straight kick the left leg forward and backward. Then switch legs. Repeat each leg for 15 reps.
 Stand facing the golf cart and use right hand to balance.")


90 Purpose: To effectively loosen up the hamstrings and the hip flexors. LEG SWINGS (IN and OUT) Stand facing the golf cart and use right hand to balance. Keep the right leg straight and kick the leg side to side, then switch legs. Repeat each leg for 15 reps. Purpose: To improve the flexibility of the hip joints, helping to avoid the sway and the over the top move. TRAY POSITION STRETCH Stand with knees slightly flexed with right shoulder closest to golf cart and place right forearm on the back post (This position should look like the top of your backswing.) Next, slowly lean forward with your upper trunk assuming your address position. Hold for 30 seconds and repeat both sides. Purpose: Improve mobility of chest region and the front of the shoulder region. Resulting in increased ability to reach the top of the backswing and follow


91 through, avoiding any limitations that may result in swing faults. Helps reduce shoulder injuries. TRUNK EXTENSIONS Stand with knees slightly bent and hands located at low back/ hip region. Keeping legs in this position bend backwards at low back region. Hold for 5 seconds and repeat for 10 repetitions. Purpose: Improve mobility of low back resulting in increased ability to maintain proper spine posture at address and during swing. Reduces the risk of low back injury. CHANGING EQUIPMENT I believe the most important piece of golf equipment you own to achieve consistency, accuracy, confidence, and better scores is your body. Starting the proper flexibility routine is one of the first steps you should take to improve your golf game. Important Reminders: If possible, perform 5 minute warm up prior to performing stretch routine. Consult with your physician if having recurring pain with golf or with stretch program.
92 Chapter 9: By Jennifer Yockey Understanding your Ball Flight I have students on a daily basis coming to see me to discuss how they want to hit it longer and straighter and would like to be more consistent. When I ask what is ailing them, the response varies. I am pulling it, hooking it, slicing it, etc. I have learned over the years that the majority of the time, the student is truly not in tune with what is actually happening to their golf ball. This does not just apply to the average golfer; it rings true with single digit players as well as professionals. As we discussed in the previous chapter, alignment is important. When you are practicing or playing, you need to pick a target. If you don t pick a target, it will be difficult to make a proper evaluation of your ball flight. With regards to YOUR ball flight if you have always hit a small cut, it is probably not the time to start trying to hit a draw and vice versa. Again, body type, injuries and natural set-up will influence what kind of ball striker you are. Ultimately, we are trying to eliminate one side of the golf course. So, flipping back and forth as to what your go-to shot is going to be is not advisable nor will it lead to a consistent pattern of shots. PATH vs. CLUBFACE The initial direction of the ball is determined by the forward swing path of the golf club through impact. The curvature of the ball flight is the determined by the position of the clubface in relation to the club path. So, if your ball starts left and curves to the right; that is a pull fade. If you ball starts right and curves left that is a push draw. Making a Plan for Consistent Ball Flight
93 Understanding you ball flight is a wonderful way for you to be your own coach. Whether you are playing in the club championship, US Open or a quick 9 holes with your friends, the potential to hit a bad shot is real. In order to not hit two in a row, you can develop a one or two point list that addresses your tendencies. For five rounds keep statistics as to where you are missing your tee shots and approaches with regards to direction. If you were confused as to your tendency it should be a bit more clear after five rounds. Below are some typical flaws that I see that produce weak, inconsistent shot making that can obviously wreak havoc on your score and potentially produce injury. In addition to the flaws addressed are drills to assist you in reducing the shots that typically ruin a potentially good scoring round. PULL FADE- The dreaded over the top/out to in The premise of a good golf swing is that it is efficient and repeatable motion. As I discussed in the previous chapter, your body type, skill level, and previous injury has to be taken in to consideration. Obviously, when writing for the masses, every body type/injury/ and skill level cannot be addressed. That being said, if the above ball flight applies to you and the swing below (path) looks familiar, there is hope!!! The swing below if from the top of the backswing through impact. The backswing is not shown as the purpose is to illustrate the path on the way down. However, the backswing does affect what happens on the downswing.


94 In the third frame, you can see the shaft going through the neck and in the sixth frame, notice the left arm buckling past impact. DRILL:

95 With your seven iron, take ten balls to a lie on the range where the ball is slightly above your feet. When hitting on this kind of lie, it is important to move your hands down on the handle to accommodate for the hill. Before you hit balls, make some swings. Your swing may feel flatter than normal, this is a good sensation to have. When making the swings, take notice that your club is bottoming out in the same place that it started. If you club is still steep (or going through your neck in the downswing) you will hit the ground BEFORE your original address position. DRILL:

96 Compare the second frame in this sequence to the second or third frame in the first sequence. Also take note of the left arm in the 6 th frame. Before the arm was buckling and the elbow was toward the sky. The arm has folded now and the elbow is toward the ground. In this case, the club has the potential to release AND the club is coming more from the inside (frame 3 in the second series vs. frame 4 in the first series). Why do I come over the top? There are many reasons that one would have a steep plane and the club would work over the top or out to in causing a pull and depending on the club face a fade or draw. For the sake of space of time, I will address two. 1. Lack of Arm Rotation 2. Improper Loading at the Top of the Backswing


97 Lack of Arm Rotation In the previous chapter, we spoke about arm hang and how at address, you should be able to see the inner part of your left address if you were facing a mirror. The elbow itself point at the left hip. This is a neutral position and will allow the arm and club to rotate in the backswing. If the arm is already pre-rotated at address, the club and arm will have a tendency to work above the plane in the backswing, be under-rotated and cause the club to work steeply in the downswing. YES NO The drill below can be done with a 5 pound dumbbell or a small medicine ball. A five pound weight is plenty; the weight of the ball will assist with the arm rotation. Arm rotation affects body motion and the way the golf club swings. Again, the more efficient you are, the more repeatable the motion.


98 Below is a before picture when the arms were not getting rotated. Notice the arm hang in the first frame versus the first frame of the above sequence. Furthermore, take notice of the impact position in each of the sequences (frame 5 of both sequences). Take note of the rotation on the left side of impact as well.

99 In the second sequence, you will notice the left arm on top of the right. In the drill sequence, the arms have rotated. Remember, the golf swing is generally a mirror image from one side to the other. If the arms cannot rotate on the backswing, they cannot rotate on the downswing. Many times, this lack of rotation can also cause a hook along with the pull as the club stays closed throughout the golf swing.

100 Improper Loading at the Top of the Backswing As you read in the previous chapter on set-up, the address position can affect the loading in the backswing. If the load is not correct in the backswing, the downswing ends up being a series of compensations to get the club back on the ball. When the right hip gets high and the torso pitches toward the target, it is VERY difficult to get the club back on the ball and the body and club in synchronization on a consistent basis. There were always be an exception, someone who has fabulous timing and be out of synch at the top and make it work. However, the person who has the fewest compensations and can get out of their own way is going to hold up better under pressure as there is less to manufacture. In order to have consistent loading, the set-up is first issue to address. Neutral is best. The triangle in the center of the body and the weight evenly distributed on your feet (50/50 left and right). Past your set-up, narrow your stance. When the stance is narrow, the hips are more able to rotate rather than get high. If the hips rotate, the torso will have a tendency to follow.

101 DRILL: Narrow your stance to force the hips to rotate thus loading the backswing. Improper loading of the backswing can cause several shots; high and right with loss of distance and low left. If the body cannot move, we tend to recruit from the only place that can and that is the arms. The arms, however, are not the engine of the golf swing, the entire core is (which is the key to rotation). An easy way to remember loading is you cannot go left if you haven t gone right. Think of any other sport that you have played in the past; throwing a ball, returning a serve, etc. If you tried to do either of these things in the above fashion, the ball would very rarely be propelled forward with any kind of velocity. The pictures above are exaggerated examples so that you, the reader can truly see how these errors cause inconsistency. It, however, doesn t take much for the body to get out of sequence and if your body motion mimics the pictures in the least, you will have to manufacture something in the downswing in order to get the club back on the ball. The one time that you have poor timing, that can be the difference between shooting under par or breaking 9o or 80 for the first time or even worse, missing the cut.
102 Chapter 10: One Shot at a Time By Jeff Troesch Listen to just about any interview of the winner of a golf tournament, and some reference will be made to playing one shot at a time. This sounds like a great idea, but there are very, very few golfers who thoroughly understand this concept, let alone the fewer who have trained themselves to habitually play one shot at a time. I teach the one shot at a time concept based on a simple diagram: PLAN RECOVER COMMIT EXECUTE Let s look at each of these phases. PLAN RECOVER COMMIT EXECUTE
103 PLAN Commonly referred to as the pre-shot routine, the plan for each shot is a parallel exercise involving physical actions and mental thought processes. The benefit of having a well practiced pre-shot is that it greatly increases the preparation consistency, and decreases some tendencies players get into when feeling under stress, feeling angry, feeling excited, or feeling distracted. In other words, the pre-shot plan reduces the emphasis on feelings when on the golf course and increases the doing part of the game. When players react to their feelings and emotions on the course, what they do in preparation is left somewhat to randomness and chance. They may rush, get excruciatingly slow, miss information, make hasty choices, or suffer a variety of other maladies. For each player with whom I work, they develop a mental checklist that helps them ensure that they re comprehensively taking in information, and going through optimal preparation- irrespective of the circumstance on the course in which they find themselves. The information that helps determine shot selection typically includes: Yardage from target (measuring to lay-up area/front edge of green/pin position, etc.) Wind (downwind/headwind/crosswind) Lie (ball on sitting down in rough/perched up on tuft of grass/sitting on short grass) Slope (ball above/below feet, upslope/downslope) Course conditions (wet/hardpan)
104 Elevation change in shot (uphill or downhill to target) For more advanced players, the specific target, shape of the shot and club selection will flow out of attention to these details. Too often for beginning and high-handicapped players alike, too much emphasis is given to extraneous factors. While hundreds of examples of these factors exist, some might include: what the player s score is; how the playing partners in the group are playing, what the group in front or behind the player is doing in their preparation/pace of play; and who is observing the golfer s shot. While there are times where it is important that players factor in their score before determining shot selection (e.g. final two/three holes in tournament if near the top of the leaderboard), many times this score awareness challenges the player s ability to stay focused on the task of simply hitting a good shot, and increases their emphasis on trying to hit a perfect shot in order to score well. Assuming that the player has adequately factored in all the requisite aspects of the shot and has made a good selection ( I like a slight draw with a 9-iron here to land on the front of the green and roll back to the pin placement ) then the physical process of pre-shot begins. Every player has different criteria for what is optimal here. Generally speaking, my suggestion is that this process be purposeful and consistent. If the player is taking rehearsal swings make sure there is a purpose for them. If the player gets behind the ball and looks down the line, make sure there is a reason. I have a generic physical pre-shot that I teach the players with whom I work, and we modify from this generic model if desired. 1. Take a full-tempo rehearsal swing standing next to the ball 2. Get four to five steps behind the ball and look down the line of the shot o Pick a very specific target to which you are hitting the ball o Visualize the shape of the shot flying through the air
105 o Take a big, deep, cleansing breath o Pick an intermediate target (12-24 inches in front of the ball) to which you will square your clubface 3. Walk into the shot with your eyes fixed on the intermediate target until the clubface is square to the target and your body is appropriately setup to the club 4. While waggling the club, stare at the target and glance at the ball 5. GO! PLAN RECOVER COMMIT EXECUTE COMMIT Many of my contemporaries speak of trusting your swing enough to let it go. Truth be told, very few players Tour players included- trust their swings on a shot by shot basis. In fact, the distrust in their swings is what confounds even those who have spent countless days hitting thousands of golf balls, countless dollars in golf lessons, and countless hours analyzing their swings on video. Additionally, even for those fortunate few who have learned how to trust their swings, there regularly remains a high level of distrust in their shot selection or in the fact that they are going to get the outcome from the shot that they desire. It is for these reasons that I make a distinction between commitment and trust. While I too would love the players with whom I work to trust their swing and shot selection, I do not find trust essential for a player to play outstanding golf. For
106 example, if a player is in between clubs, the dialogue might be something like, Is this a little 7-iron or a hard 8? As this internal dialogue continues, the player might conclude, I m going to go with the little 7-iron. Regularly what happens in this situation is that by the time the player is standing at address ready to strike the ball, she is still thinking about whether or not the 7 or the 8 was the right choice. Often, the player will stay somewhat ambivalent about the choice and will pull the trigger anyway. What happens far too frequently is that the player will make a tentative pass at the ball and will not hit a quality shot- thus confirming that the 7-iron was the wrong play. The truth is, the player might have been able to make a better swing on the ball (with either a 7 or an 8-iron!) had she been fully committed to her choice. This is what the late Payne Stewart was referring to when he was quoted as saying, better to be committed to the wrong choice than uncommitted to the correct one. When reading a putt, from one side it looks like it breaks two cups right to left, while from the other it breaks one cup. Which one is right? To which read will the player commit? I cannot guarantee that one cup or two cups is right, but I can just about guarantee that if the player does commit to either a one or two-cup break, the putt will be struck with authority rather than being jabbed or stroked tentatively- giving it a much more likely chance of going in the hole. Ultimately, when in doubt, making a full commitment gives the player a greater chance of success than being hesitant or waiting to trust it. PLAN RECOVER COMMIT EXECUTE
107 EXECUTE Where I emphasize my work with players is in the planning, commitment, and recovery stages. I leave the execution phase up to the swing instructor! The whole purpose of this chapter is to help the player recognize that effective execution in golf is greatly enhanced through adequate recovery from the previous shot, a thorough plan for the next shot, and complete commitment to the plan before swinging the club or putter. Despite all the time and attention paid to proper swing and stroke technique, it is interesting to me how players react when they recognize that in the course of a 4 to 5 hour round of golf, the actual execution or ball-striking phase of the round takes approximately fifteen minutes (assuming 90 strokes, each taking around ten seconds to execute from set-up to ball-strike). Obviously without adequate ball striking skills and technique, players will typically not play well. But neither will players play up to their potential until and unless they understand, practice, and implement the one-shot-at-a-time model. All the emphasis placed on learning how to execute well will not by itself help a player perform well. PLAN RECOVER COMMIT EXECUTE
108 RECOVER In mental game of golf instruction books and on The Golf Channel, a considerable amount of attention has been given to the benefits of a solid and consistent pre-shot routine. Players, instructors, and mental coaches alike extol the virtues and advantage gained by solid preparation before executing the next golf shot. Less attention has been given to what I believe is an equally important component- the post-shot or recovery phase. Most players recovery is left up to chance and happenstance and consists of a long string of expletives and/or self-deprecating statements save the occasional verbal pat on the back if one happens to hit a good shot. When I suggest to players that they change their post-shot reactions, there is typically some initial misperception that I m suggesting that they eliminate being angry or frustrated if they hit a bad shot. Quite the contrary; I believe that anger and frustration are natural, normal reactions to a poorly hit shot or experience of bad luck. However, the question I ask is, is your anger/frustration mobilizing you to action, or are you allowing it to immobilize you? More simply put, what are you doing about it? The best players in the game get angry in virtually every round they play, but the best players recover from their anger and frustration quickly and move on to the next shot. How do they do this? The number one answer is that they train themselves to monitor their self-talk. Allow yourself a couple of seconds for your initial emotional reaction, then check your own self-talk. In checking for helpful self-talk, a simple guide is this: speak to yourself as you would want your caddie or instructor to speak to you. What would it be like if after you hit a poor shot or missed an easy putt, your caddy or instructor were to say to you, that shot was horrible or what s wrong with you? or you can t make a putt today? I suspect
109 that you would quickly consider firing that person, as their feedback was negative and unhelpful. Instead, what you d want to hear from that person would be phrases like come on, you re OK ; let s make the next one ; stay focused on the next shot ; or better preparation next time. In addition to self-talk management, another strategy in post-round analysis is to monitor whether attention is being paid to things that are controllable or things that are uncontrollable. The things over which you have control as a player are things like: Gathering of preparation elements (i.e. wind check, yardage numbers, etc.) Commitment to game plan Commitment to line of putt or target of shot Commitment to specific shot selection Clarity of the picture in your head before you hit the ball Tempo An acknowledgement of these elements and honest assessment here can be helpful and constructive. Far better to spend precious post-shot time evaluating and improving those things over which you have control, than wasting time and energy on those things over which you don t have control outcome of shot, bad bounce, poor swing execution, etc. You may have some influence over these things, but you do not have complete control over them. Recognize this fact and learn to let this stuff go. If you don t you run the risk of going off on a tangent in your thinking that sidetracks you away from the one-shot-at-a-time model. Another tip that has proven helpful for some players is to take a full-tempo swing in post-shot recovery if you don t like the way the previous swing, chip, or putt felt. This can be valuable in that it reinforces a better feel than the previous swing, and then you can put the club back in your bag. This way, the last swing with every club in your bag was one that you liked!
110 Constructive post-shot recovery also involves maintaining positive, strong body language. Champion golfers look like champions most of the time they are on the course- independent of how they re playing or where they are on the leaderboard. Walking with the head upright and striding purposefully (but not sprinting!), sends a message to yourself and your opponents that you remain someone to be reckoned with on the course at all times. Many great athletes in a variety of sports have spoken of the benefits of acting as if all was OK, even if the circumstances around them didn t dictate this. The other side of this coin is to respond with negative body language- head down, arms folded, walking either too quickly or too slowly. Behaviors such as these create a physiological barrier to being tension-free and create a psychological barrier to being prepared to focus on the next shot with full attention and a positive frame of reference. TAKE A BREAK One last key element to the one-shot model is the necessity to allow yourself to mentally detach from the round in between shots. There are very few if any players capable of sustaining concentration and focus for four hours or more without a break. Thus, it is essential to mentally disengage from the round in order to stay sharp. The challenge is to take this break at the optimal times within your one-shot model. Make sure that you allow yourself a break only when recovery is complete or when you plan is complete. We do not want the break to be taken between commitment and execution, nor do we want it to take place between execution and recovery. Some suggestions of what to do when detaching from the round: pay attention to the nature/scenery around you; chat with your caddy or playing partner(s); hum/sing a song in your head; replay scenes from movies/television shows that you ve enjoyed. Having a fresh mind, prepared for the next shot is necessary in order to unlock the challenges of playing one shot at a time!

111 Chapter 11: How to Design a Golf Specific Fitness Program Just Like the Pros By Susan Hill Some of the key elements of a golf specific fitness program include strength, flexibility, balance and stabilization, muscle integration and power. Each of these elements plays a critical role in the growth and development of a golfer. Many trainers who work with high level athletes spend time assessing their clients in search of relative strengths and weaknesses. Once specific weaknesses in movement patterns are identified, corrective exercises are suggested. Stability (and balance) The most important rule in a golf conditioning program is to work and develop strength from the core region of the body outward. A strong trunk allows forces to be transferred effectively from the legs to the upper body. It also enables the body to withstand those forces without breakdown. Stabilization comes in many forms for the golfer including postural stabilization, trunk stabilization and joint stabilization. Here are some of my favorite exercises. Postural Stabilization Goal: Designed to improve shoulder stability. Builds strength in rotator cuffs and shoulder blade muscles.
 Core Stabilization Level 1 Goal: This movement is designed to strengthen the shoulders, hips and")

112 Instruction: Lie facedown over the top of the ball with abs in the middle Chest should be off the ball and feet are on toes Lift your arms above your head with hands clinched and thumbs up Extend arms up and out as far as you can comfortably (forming a Y at the top) Core Stabilization Level 1 Goal: This movement is designed to strengthen the shoulders, hips and core region of the body in unison. Instruction: Lie facedown in a pushup position Your elbows should be directly beneath your shoulders Push off your feet and elbows into the air Your body should form one line from your ears to your heels Always tuck in your abdominal muscles and keep tension in this area. Do not continue if you feel any pain or discomfort in your low back.

113 Core Stabilization-Level 2 Goal: This movement is designed to strengthen the muscles of the back, abs, legs, shoulders and arms. Instruction: Kneel on the floor, then place forearms on the Swiss ball Make sure spine is in a neutral position and abs are tight Push off the ball with your feet. Elbows are flexed and remain on ball Maintain control and postural awareness Do not lock elbows Core Stabilization-Level 3 Goal: This movement is designed to strengthen the muscles of the back, abs, legs, shoulders and arms. Instruction: Kneel on the floor, then place forearms on the Swiss ball Make sure spine is in a neutral position and abs are tight Push off the ball with your feet so you are touching the ground at your feet only Elbows are flexed and remain on ball Maintain control and postural awareness


114 Slowly raise one leg up from the floor without allowing the back to arch or sag Repeat with opposite leg Strength Strength comes in many forms with regard to the golf swing. Strong back muscles allow the golfer to endure the explosive movements in the swing. Strength in the trunk region or core area of the body produces stability and helps to generate power. Combined muscle strength produces balance and coordination. Strong ligaments and tendons also prevent the joints from going beyond their range of motion. Reverse Pull Ups Goal: This movement is designed to increase strength in your back, shoulders, forearms and biceps. Instruction: Lie underneath a squat rack or Smith machine Grab bar with overhand grip just slightly beyond shoulder width Place feet close together with heels against floor Pull your body straight up into the bar, then return to starting position Safety Considerations: Make sure you stack heavy weights on each side and/or check the stability of the bar prior to performing this exercise. It should not move from its position to ensure your safety.
.")


115 Single Arm Cable Push Goal: This movement is designed to strengthen and integrate your legs, torso and arms. Teaches your body to stabilize against an external load (like golf). Instruction: Set the cable so that the pulley lever is slightly above your shoulders Assume an athletic stance with one foot in front of the other Knees should be slightly bent Hold the elbow at shoulder height Contract the abdominals and push your arm forward so it extends in front of your chest Multi Directional Lunge Goal: This movement is designed to strengthen all the muscles surrounding the hip joint.

116 Instruction: Place a golf club across your back Take a deep breath and pull your belly button in towards your spine Keeping good posture, take a step forward with your left leg Lunge as deeply as you are comfortable or until the back knee is just off the floor Breathe out as you push yourself back up Flexibility Flexibility is the single most important physical characteristic likely to influence your golf swing. A tight body creates restricted motion in the swing and produces injuries as a form of compensation. Keep your body supple so it doesn t become a limiting factor in your performance. Chest Stretch Goal: This movement is designed to stretch out the muscles in the chest Instruction: Place your straight arm on top of a Swiss ball Allow your body to drop forward. Your shoulder blade will be moving closer to your spine Once you feel a stretch, inhale and press your hand into the ball for 5 seconds Relax, then allow your body to drop more forward


117 Rotator Cuff Stretch Goal: This movement is designed to stretch the rotator cuff muscles Instruction: Place your hand and arm over a Swiss ball Allow your body to drop forward. Your shoulder blade will be moving closer to your spine Once you feel a stretch, inhale and press your hand into the ball for 5 seconds Relax, then allow your body to drop more forward Trunk Rotation Goal: This movement is designed to build mobility and strength in your trunk by separating your hips and shoulders. Instruction: Lie down on your back with arms extended at your sides Bend your legs to hip level, then rotate them towards the floor on the opposite side


118 Keep your abs drawn in and shoulders touching the floor on each side Rotate to your comfort zone on each side Power Power training is the last step in training for golf utilizing all of the components you ve developed thus far including core stabilization and endurance, proper set up of the body, flexibility, strength, balance and muscle integration. Power can be further developed by increasing speed of motion on these same sound training principles. Here are a few examples of power training exercises. Cable Woodchop Goal: This movement is designed to prepare the body for the rotational movement in the golf swing. Instruction: Stand with your feet apart about shoulder width Contract your abdominals and hold them tight throughout movement Start with the cable machine at the high position Place both hands on handle and pull downward and across body from high to low


119 Medicine Ball Rotations Goal: This movement is designed to prepare the body for the powerful rotation that takes place in the golf swing. Strengthens the abdominal muscles. Instruction: Sit on the ground and lean back about 1/3 of the way until you feel tightness in your abdominals Keep you feet on the floor and your upper body in good posture Begin with a light medicine ball as you rotate around your body from side to side Keep your abdominal muscles activated throughout the movement and excessively flex your spine Lunge Rotations
120 Goal: This movement is designed to build strength and dynamic flexibility in the legs, hips, and trunk. Instruction: Start with good posture and a light medicine ball (2-6 lbs) Lift your right leg and proceed into a lunge Knee should end in a 90 degree angle with knee directly over the ankle (not over the foot) Rotate your extended arms to your left as you lunge with your left foot. Rotate your extended arms right when you lunge with your right foot. Safety Considerations: You must have adequate flexibility in your spine prior to performing this exercise. The addition of the ball adds a greater load on the spine so make sure you perform a warm up first and you don t extend arms too aggressively. Muscle Integration Functional Training for golf is a system that focuses on training the body the way it will be used when you compete or play. This makes it the most efficient and effective form of training today. Overall, functional training improves athletic ability, enhances performance, reduces injuries while developing golf specific movement patterns. The goal becomes not only the development of more efficient patterns of movement, but endurance patterns as well so the motion has a better chance of being repeated swing after swing.


121 Ball Bridge Goal: This movement is designed to strengthen the low back muscles and glutes. Instruction: Lie down on back with your feet on top of the ball Point toes towards your shins Pull shoulder blades back and down Raise glutes up until you are one line from your shoulders to your feet Slowly lower your body until hips almost touch the ground, then repeat the lift Lying Hip Extensions Goal: This movement is designed to strengthen your core muscles while establishing balance and coordination. Instruction: Sit on a Swiss ball, then walk forward until your head and neck are supported Lift hips up until they re in line with your shoulders and knees Lower your butt towards the floor, then squeeze your glutes and extend back up


122 Goal: This movement is designed to strengthen the glutes as well as improve their firing rate. Instruction: Lie down on a Swiss ball with your head and neck supported by the ball Extend one leg straight out Extend one leg straight out Engage your abdominals and glutes, then slowly drop your hips towards the floor Squeeze glutes and press through bottom of foot to lift yourself back to starting position and repeat. Cross Body Shoulder Pulls Goal: This movement is designed to strengthen the arm muscles during the downswing and follow through.
123 Instruction: Set the cable machine about chest high Grab handle in the hand further away from the cable Palm of hand should be facing the chest and positioned just below the collar Pull the arm across the body Keep your mid section tight and focus on moving the arm only Each of these elements has a place in a golf training continuum. While golfers tend to seek more power early in the training process, power can t be fully developed until a solid base of support and proper core engagement have been established. Here is the training continuum used by many top golf fitness trainers in their program design for their tour professional clients. Power Strength Improve functional golf strength Improve Stability Postural stability, Core stabilization, Improve balance Restore Optimal Flexibility Restore normal flexibility in golf joints like the spine, shoulders, and hips
124 8 Ways to Increase Function as part of your Golf Specific Fitness Routine 1. Specific to golf Get rid of the traditional gym machines which focus on isolating specific muscle groups and require no stabilization work by additional muscle groups. Integrate some old and new fitness tools which allow you to move your body in a more functional setting. These include Cable machines, physio balls, medicine balls, balance disks, traditional dumbbells and don t forget about the power of using your own bodyweight. 2. Increase Core Stability More efficient movement creates more efficient power. Golfers maintain an athletic posture over long periods of time and require both trunk and core stabilization and endurance. By increasing your strength and endurance in the core region of your body, you provide both a solid base of support for rotation in addition to the proper transfer of power throughout the body. 3. Protect from Injury - Learning how to properly engage the core muscles provides a platform of stability and level of protection from injury. In order to keep your body from breaking down and affecting your golf swing, exercises aimed at restoring muscular balance should be a natural part of program design. As you continue to build pillar strength, you also improve your resistance to fatigue. 4. Vary your Planes of Motion during Exercise - A golf fitness program will have varying planes of motion as part of your weekly strength routine. Planes of movement include front to back motions, left to right and rotational exercises. Some good examples include multi-directional lunges and medicine ball wood chops. 5. Progress from Simple to Complex. Begin your exercise program by mastering the simplest forms of exercises first. Progress your golf training design to increase in complexity as your body grows and develops and as you learn proper stabilization of your core region. An example of progression for the legs may be to perform two leg ball squats prior to performing the one leg version.
125 6. Progressive Resistance- Strength should be developed in a progressive manner. In order to get stronger one needs to progressively add resistance over time relative to previous workouts. Strength gains are made slowly, but consistently and you will see the difference in your game in no time. If the absence of progress with your program, you re limiting your potential. Progression also involves varying your speeds of movement as your body becomes more adapted to each exercise. 7. Focus on Quality Time, not Quantity Time spent in the gym has little to do with the quality of your workouts. Always favor a high quality, lower investment time over a lengthy routine with poor quality. A solid 45 minute to 1 hour workout is all it takes to produce a golf body capable of championship performance. 8. Integrate Multiple Elements into Each Exercise Each weekly workout should address all of the important elements for golf including flexibility, core development, balance, strength and power. Integrated training techniques will develop your skills in each of these areas and produce a whole new level of play. Examples of integration include a 5 minute dynamic warm up, roughly 30 minute strength routine, followed by 10 to 15 minutes of stretches. Each workout can be broken down into strength development for several weeks, core stabilization for several weeks, and power development as you move into peak season. Many of the top touring professionals know that winning on the tour today takes much more than a great game of golf. It means understanding every aspect of their physical and mental being and what factors influence their performance. Before any golfer, pro or otherwise, picks up a club, they look at the capability of their body versus the requirements of the swing. Utilize the top 8 tips to create a golf specific program that brings out the best in you and the best in your golf game. Make this golf season your most productive yet!
126 Chapter 12: Injury Prevention and Rehabilitative Exercises for Shoulder Pain By Brian Schiff Many of us will experience shoulder pain of some kind in our life. Have you ever felt a twinge of pain when you raise your arm overhead or behind your back? Maybe you are unable to lie on one side because your shoulder aches. Perhaps you are losing flexibility or range of motion. Or, you may be suffering from grinding in the shoulder joint and associated pain. Regardless of the cause of pain, we know that shoulder dysfunction will dramatically affect your golf game. Typically, pain and inflammation lead to decreased strength and mobility. You see, pain will actually inhibit a muscle s ability to function properly. As a result, you may lose power or simply change your swing pattern to avoid the pain. Whichever is the case, often the result is an errant shot and harmful compensations that may lead to bad swing patterns. Shoulder pain in the golfer is usually associated with rotator cuff tendonitis, bursitis, or arthritis. While golf may not necessarily be the pure cause of the tendonitis/bursitis in each case, the condition may become worse with continued play. The repetitive nature of the sport requires significant work from the rotator cuff musculature. Arthritis usually affects the older population (65 and older). However, this is not to suggest that individuals younger than age 65 do not and will not experience arthritic change and related pain. Treatment of the aforementioned conditions is relatively the same. Typically, rest, ice and activity modification based on pain is the first step. With tendonitis, it is best to avoid vigorous activity in the acute stage (initial hours). After the symptoms begin to subside, you can gradually ease back into activities
127 provided the pain does not worsen or become aggravated with the specific activity. However, it is important to note that you should not try to work through the pain if you have been diagnosed with rotator cuff tendonitis or bursitis. Note that recovery from tendonitis/bursitis may be slow and take weeks or even months. With arthritis, the treatment is much the same. The major difference is that people who suffer from osteoarthritis typically deal with some level of constant or what I term reactionary pain related to their desired activities (i.e. golf). This means they may always experience some mild pain during or after golf. In other words, it may be okay for them to play through it, provided they do not experience moderate to severe discomfort and that it typically resolves within 24 hours. In this case, moderation is the key. Golfers must listen to their body and know when to take a break. Signs of rotator cuff tendonitis/bursitis are: 1. Dull ache in the upper lateral part of the arm (usually below the shoulder) 2. Pain with overhead movements, reaching away from the body or reaching behind the back (i.e. tucking the shirt in or fastening a bra) 3. Pain at night or pain lying on that side 4. Limited range of motion 5. Decreased lifting strength or pain with single arm lifts 6. Pain with backswing or follow through depending on the affected shoulder and golf handedness 7. Pain at impact, especially when hitting a fat shot
128 Signs of arthritis: 1. Generalized aching in the shoulder joint, although may experience similar pattern of pain as in cuff tendonitis 2. Limited range of motion/stiffness 3. Grinding or grating (crepitation) in the joint 4. May experience increased pain in cold weather or periods of higher humidity (rain) 5. Decreased backswing or follow through motion 6. May experience some pain at impact 7. Loss of strength namely due to pain inhibition History of Rotator Cuff Pathology and Arthritis Some people are predestined to have shoulder problems. Why? To a large degree, the shape of the acromion (top of the shoulder blade) plays an important role in the health of the rotator cuff tissue. There are three types of acromion: flat, hook shaped and normal. The flat and hook versions carry a higher risk of possible injury, with the hook style posing the greatest threat. If you have a flat or hook shaped acromion, there is less room for the soft tissue (muscle and tendon) to glide and move during arm motion. Over time, this naturally leads to more friction and wear and tear. This may lead to an eventual tear. Typically, most people experience an acute onset of shoulder pain. It is often related to vigorous repetitive activities or trauma such as lifting, painting, throwing, falling, or jamming the shoulder. This type of pain is generally labeled tendonitis or bursitis.
129 Tendonitis usually responds well to rest, anti-inflammatory medication, ice and rotator cuff specific strengthening. Recovery time may range from 4 weeks to several months, depending upon the compliance of the individual, the onset of symptoms prior to treatment, the age of the individual, and whether or not there are any physical changes in the tendon (structural changes including thickening or scar tissue formation are referred to as tendonosis). X-rays are important as they will reveal any arthritic change. Rotator cuff tears present differently. The hallmark signs of a tear are nocturnal pain, loss of strength, and inability to raise the arm overhead. Also look for a shrug sign, in which the person uses the upper trap to raise the arm because the rotator cuff is not able to depress the humeral head effectively. Rotator cuff tears are most common in men age 65 and older. Tears and/or injury are typically related to degeneration, instability, bone spurs, trauma, overuse, and diminished strength/flexibility related to the aging process. However, youth are also at risk for injury if they are involved in repetitive overhead sports, including swimming, volleyball, baseball, softball, tennis, gymnastics, etc. In regard to osteoarthritis, this is a natural aging process that affects us all differently. Some contend that wear and tear based on our own activity level will accelerate the process. While this may be true in some cases, I would hesitate to tell you that this is a hard fast rule. Furthermore, arthritis in and of itself does not guarantee that you will experience significant pain or any pain at all. With arthritis, bone spurs, calcification, and damaged cartilage lead to a reduction in joint space and pain. Over time, motion and strength become compromised. The key to managing this condition is avoidance of abusive activities (typically high impact, compressive forces) and a moderate strength training program. Ice and anti-inflammatory medication are often prescribed during periods of soreness. Heat may also provide symptomatic relief and aid in loosening up the
130 shoulder. Proper warm-up prior to playing golf is a must every time you hit the links. Comprehensive exercise protocols should include strengthening for the scapular stabilizers and rotator cuff musculature coupled with stretching to reinforce proper posture and alignment. Rounded shoulders or slumping posture actually reduces the space that the rotator cuff occupies, thereby making it more likely that you may suffer from shoulder impingement (leads to rotator cuff pain). Remember when your parents told you to sit up tall? Now, you are beginning to understand that they really did know what they were talking about. Anatomy The rotator cuff consists of four small muscles, which effectively form a sleeve around the shoulder and allow us to raise our arms overhead effectively. These muscles, consisting of the supraspinatus, infraspinatus, teres minor and subscapularis, oppose the action of the deltoid muscle and depress (hold down) the head of the humerus (upper arm) during shoulder elevation to prevent impingement. This allows you to effectively raise your arm and reach in certain ways without experiencing impingement of the soft tissue between the top of the shoulder blade (acromion) and the head of the humerus. Equally important to the proper function of the shoulder is a group of muscles known as scapular stabilizers. These muscles have attachments to the scapula (shoulder blade) and directly contribute to shoulder motion by affecting the path of movement of the shoulder blade. You see, for every 2 degrees of shoulder abduction, (arm movement away from the body in the same plane as the body) there is 1 degree of scapular elevation. The shoulder blade moves in addition to the arm to allow for the great freedom of movement we enjoy. With weakness or injury, this rhythm of movement becomes altered.
131 Scapular stabilizer muscles include: Serratus anterior - protracts or rounds the shoulder blade Upper trapezius - shrugs and upwardly rotates the shoulder blade) Middle trapezius - retracts or pinches the shoulder blade inward Lower trapezius - depresses and downwardly rotates the shoulder blade Rhomboids - retracts or pinches the shoulder blade inward These muscles work synergistically (together) with the rotator cuff to ensure smooth movements without shoulder impingement. In the following section, I will outline specific exercises that are designed to prevent and/or rehabilitate shoulder injuries to the rotator cuff. Keep in mind that these exercises are not meant to serve as a substitute to medical care from a physician or physical therapist if you are currently experiencing shoulder pain. But, they provide a good blueprint for healthy shoulder exercises and should reduce the likelihood of a future injury. Below you will find a list of appropriate scapular stabilizer and rotator cuff exercises. These exercises are designed to improve posture, correct muscular imbalances, and strengthen the rotator cuff. They are not intended to build lean muscle. Keeping strict form and performing these exercises in as safe, pain free range of motion is essential. 1. Prone Horizontal Abduction Raise This strengthens the middle trapezius and rhomboids, which promote good posture. Using a stability ball, raise the arms out away from the body until they are near parallel to the floor. Keep the palms down and pinch the shoulder blades together at
.")
132 the top of the motion. Lower slowly to the starting position. It is also acceptable to do this exercise lying face down on a bench as. Perform 2 sets of 15 repetitions. Start Finish 2. Scaption This strengthens the supraspinatus muscle, the most commonly affected rotator cuff muscle and slowest to heal. Begin in standing with the knees slightly bent (relaxed). Hold the dumbbells in such a way that your thumbs are up or on top of the dumbbells. Keeping the arms approximately degrees forward from being perpendicular or straight out away from the body (scapular plane) and raise the arms up to shoulder height. Pause at the top and slowly lower to the starting position. Keep the elbows straight throughout the entire movement. Avoid any part of the range of motion that causes pain. Perform 2 sets of repetitions.


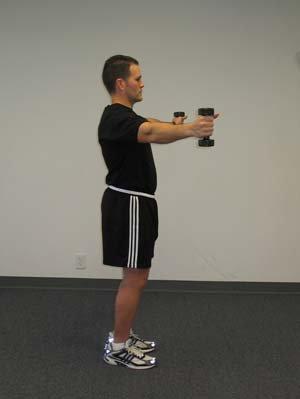
133 Scaption Mid - Position Finish Side View
 with light tension on the tubing.")
134 3. Internal Rotation This strengthens the subscapularis muscle, as well as the chest muscles. In standing with the knees relaxed, hold tubing and begin with the arm positioned at the side (neutral) with light tension on the tubing. Now pull the arm across the body to the stomach, while keeping the elbow at your side. Do not allow the shoulder to rotate forward. Perform 2 sets of repetitions. Start Finish 4. External Rotation (dumbbell) This too strengthens the infraspinatus and teres minor. I prefer this exercise over tubing if you have an inflamed rotator cuff. The reason for this is that the dumbbell provides consistent resistance throughout the range of motion with respect to gravity, whereas, the resistance with tubing actually increases as the muscle becomes less able to generate tension. Even though the tubing eliminates gravity, it still provides a force loading vs. force generation mismatch, which tends to aggravate the rotator cuff. As such, it is generally best to use a light dumbbell in this case.
135 Begin in a side lying position with the elbow at the side of the body and the arm in neutral. Slowly raise the dumbbell through a full pain free range of motion, while keeping the elbow at your side and then slowly return to the starting position. Perform 2 sets of repetitions. Start Finish 5. Standing Diagonal Raise (D2 Flexion) This is a more advanced exercise that strengthens the entire rotator cuff. It also places maximal stress on the cuff as it places it in an overhead position. Begin in standing with relaxed knees and with the palm against the opposite thigh. Slowly raise the dumbbell up and overhead. As the arm elevates, you will allow the forearm to rotate out and the thumb to move from a downward to an upward position (hitchhiking position). Lower slowly to the starting position. Perform 2 sets of repetitions.


136 Start Mid - Position Finish This exercise will simulate backswing and follow through for a right and left handed golfer. Maintaining proper spine angle and set-up is critical with this exercise too. With all of the exercises, it is important to use a lighter weight and focus on higher repetitions. The rotator cuff is an endurance based group of muscles and must be conditioned to work in repetitive situations such as swinging the golf club numerous times (easily close to 200 times in a typical round including practice swings). Pain does not equal gain! So, if you are unable to do these exercises without pain, you should modify them or discontinue them altogether and seek professional medical consultation. As a general guideline, I recommend performing the exercises 3x/week per week in the off-season. Once the golf season begins (at least for those of you in cold weather climates) you can reduce the frequency to 2x/week. However, it is important to include some rotator cuff exercises in your normal fitness routine year round.
137 Chapter 13: Six Ways to Improve your Game Now By Jennifer Yockey Swing mechanics are important; they lead to more consistent ball flight and consistent scoring. However, the game of golf is scoring rather than swinging below are six ways to improve your score right now these drills /exercises will get you focused on scoring today while you work long term on making consistent/efficient body movement for the future. Bunkers Maybe you are new to the game or have had inconsistent success out of a greenside bunker. Here is a great way to practice to build confidence. To assist students with their confidence, I initially use a plank of wood in the bunker to help with the feel of the club gliding through the sand rather than digging. In the bunker, your set- up is the key to your success. Feet should be shoulder width apart and, slightly open to counteract the open face, The club-face needs to be open throughout the shot and by opening the blade prior to putting your grip on, the clubface has a chance of staying open through the hitting area. Acceleration and an open club-face are the key to getting you out of the bunker. In order to develop confidence, try the drill below the next time you have a chance to practice. DRILL: Get the board flush with the sand and at the front of the board, pile a handful of sand. Take your set-up and explode the sand out of the bunker and off the board. This will make some noise but not hurt your golf club or you. After 5 to 10 shots, put a ball on top of the sand that is on the board and feel the same action.
138 Explode the sand out and out comes the ball. After you feel comfortable with those shots, remove the board and place a ball on a pile of sand in the bunker and make 5 to 10 shots. When you are ready, place the ball in the bunker without the help of a pile of sand or the board. Proper technique and confidence will lead to better bunker shots. By progressing through these steps, I know that you will be more confident the next time you hit a ball in to a greenside bunker. Lag Putting Many golfers have a tough time gauging long distance putts. Long putts are difficult as a rule but even more so when not practiced. Set-up is, as always, important. Getting yourself positioned in good posture, grip in the palms and facing each other. Set your sternum slightly behind the ball in order to get a better feel for the line and to allow the putter to swing on plane. In addition to the drill below, make a habit of pacing off your putts during practice and during the round. The more familiar you are with how far 30, 40 and 50 feet actually are, the more likely you are to have success. So, the next time you have 15 minutes, head to the putting green and play the ladder game. DRILL: Place 15 balls the distance you want to work on from the fringe. The goal is to build a ladder from the fringe back to you. Putt the first ball to the fringe, the next just short of the first, etc As you become more proficient, the balls are to be strung closer and closer together. When you miss, begin again. Play three times trying to beat your former score.
139 By building the ladder you are not only working on a specific distance to the fringe but also learning how to die putts in to the hole or in this case closer to the ball you hit previously. Chipping: Low and Rolling VS. High and Soft Having the ability to hit different shots in different situations on the golf course is comparable to the different shots that you would hit on the tennis court or even in baseball The terrain, pin placement, and the firmness of the greens will all play a part in what shot is appropriate. Your set-up will dictate how the ball comes off the club whether it be high and soft or low and rolling. A common error I see is players trying to hit a higher/softer ball but set up with the ball back in their stance and their hands and weight pressed forward. This is certainly one way to keep the ball down and roll but not too effective to get the ball to be higher and softer If doing this with a wedge, you are effectively making it an 8 iron by removing some of the loft of the golf club. So, if you would like to hit the ball higher and softer, change your set-up. Your ball position can be placed anywhere from the middle of your stance to just inside your left heel (if you are a right handed golfer). Your hands hang in the center of your body and your weight distributed equally. Lastly, make sure that the leading edge of the golf club is not digging in to the turf. The club was meant to sit on its back or on the sole rather than on the leading edge. Conversely, if you are trying to hit it lower and have it roll out move the ball back in your stance (just behind middle) and this will automatically get your hands and body weight slightly forward there is no need to get the ball by the right foot
140 and 80% of the weight forward this does not promote consistency but rather digging the club into the ground or thinning the ball across the green. No Pressure!! (Except in your feet) In order to not lose power and force throughout the golf swing, the feet must have continued ground pressure. I see in both tour players and amateurs a loss of power due to the lack of pressure in their right heel at the top of their back swing. By feeling that load or pressure in the right heel at the top of the back swing, one is able to transfer the force from the ground to the golf club and then to the ball. If not firmly planted at address or too much on the toes, proper footwork cannot occur and the transference of force is lost. In addition to the loss of power, the lack of foot pressure also contributes to the over the top move that we all try to avoid which leads to a weak slice and less distance. By getting the proper loading in the back swing, you have more of chance of keeping the club and body in balance and on plane resulting in more consistent ball striking. DRILL: Try this the next time you are on the practice tee: Take some back swings with your left toe up in the air. Feel the amount of pressure you have in your right heel at the top of your back swing. Position yourself in front of a mirror to see the difference. You should feel much more loaded and behind the ball, ready to make a powerful and dynamic downswing. You can make a downswing allowing that left toe to replant. For added affect, turn the golf club upside down and grip it on the shaft just above the club head. You may find that when you load in that right heel, you can
141 hear a definitive swoosh when making the down swing. This feel along with a feel of pressure in your right quadricep and rear-end is a good indication of proper loading. Putting- Less wrists, more triangle Improving one s putting is a quick and effective way to drop one s handicap. Being consistent on the putting green can be achieved by creating a simple and repeatable motion each time. I have observed many of my students using a lot of wrist action during the putting stroke. Poor posture and grip are typically two culprits as to why the wrists get involved in a shot that should be controlled by the back, shoulders and core. The key to proper posture in the putting stroke is getting your arms to hang underneath your shoulders and putting the handle of the putter in the palm of your hands. By doing so, you will be less inclined to be handsy or wristy in the putting stroke. However, if you still are having problems feeling the back, shoulders and core (abdominal area) assisting in making the putter move in a pendulum type motion, try the following drill. DRILL: Take a golf ball and place it between the grip of the putter and the inside of right forearm, just above your wrist. If your wrists break down, the ball will fall out, giving you immediate feedback. Keeping your wrists and hands out of the putting stroke will encourage the shoulder/arms triangle to stay intact, thus creating a simple and efficient putting stroke. This simple drill, with proper execution, will produce a more consistent path with your putter thus resulting in a more consistent ball roll and hopefully, more putts being made.
142 LACK OF CLUBHEAD SPEED So, you want to hit it further. If the club is being controlled in the back swing; you are trying to place it, it cannot travel very quickly. If it is not traveling quickly, there is going to be very little momentum to propel the ball forward. Width in the golf swing is great; however, it has to be coupled with the turning of the torso and the setting or wrist cock in the golf swing in proper sequence. Two drills that are fantastic for synching the body and club as well as increasing club head speed are as follows. You can actually hit balls like this but do it while using a seven iron and place the ball on a tee. If the ball is on a tee, you are more likely to focus on the drill rather than hitting the golf ball. 1. Start Forward 2. Push Down/Pull up 1. Start forward- this is a fantastic drill for momentum and synching up the golf club, arms and torso. Hover your club above the teed up ball. Swing the clubhead forward inches( keeping your torso square to the bal)l and then back over the ball to the top of your backswing and then through to your finish. This is ONE motion and basically you are pushing the golf club forward and getting the club moving rather than starting from a static position.


143 2. To get the club moving earlier off the ball and to get your torso moving as well, get set up to the golf ball and when you move the club away, push down on the handle with your left hand while you are pulling up with the right and make your turn to the top of your backswing. The club gets to the top of your backswing much quicker, with the assistance of your turn, thus creating more swing speed and hopefully, more distance. ** The important part of this drill is that you still have to turn. If you don t turn and just pick the club up, you will lose distance as you have eliminated your power source. The game of golf is truly from 100 yards in. Hitting the driver in play is certainly important but having the ability to score with your short irons and putter is truly where the game is won.
144 Chapter 14: 9 Proven Exercises for Core Power and Stability By Brian Schiff Most golfers know that the key to generating long powerful drives is generating significant club head speed and torque with their swing. Aside from posture, proper swing mechanics, and hand-eye coordination, the critical ingredient is a strong, flexible core. So, what exactly does the core refer to? Most of us readily acknowledge the abs. But, it also refers to the low back and hips. The core region is directly responsible for generating power in your golf swing. Imagine shooting a rubber band. As you pull it back, the band stretches and becomes longer. Once you release the band it rapidly shortens and produces a burst of movement. The golf swing is very similar. During the backswing, the muscles elongate and store energy in preparation for the rapid transfer of power necessary to drive the ball in the downswing and follow through. Just as the band needs to stretch a certain distance to produce the desired shot distance, the spine and core muscles need to elongate enough to produce a full turn in order to generate maximal power. Performing dynamic exercises to strengthen the core in functional planes of movement is necessary to play your best. Core training improves flexibility, strength and stability. In addition, it is essential in reducing low back, hip, shoulder, and elbow problems. You see, if there is a weak segment in your core, the altered swing mechanics typically result in abnormal force transmission to another segment of the body. For example, if you can not perform a full turn in the backswing, you may compensate with a greater shoulder shoulder/upper torso rotation leading to added force in these regions. Over time, this repetitive swing flaw will cause an injury. Proper core training addresses the back, hips and abdominal region. This type of training should be done 2-3 times per week in conjunction with your normal
145 strength training regimen. I am a proponent of a variety of exercises, but I tend to gravitate toward ones that work on golf posture and challenge the body s balance and stability. The use of medicine balls, stability balls, bands, and unstable surfaces add additional challenge but pay big dividends. Form is the most important thing. I always recommend fewer quality reps over excess crunches and poorly executed maneuvers. In this chapter, I will outline nine exercises that I use with my golfers. When done correctly and consistently, these exercises will dramatically increase your muscular strength, endurance and power. I have also found them to be great for relieving chronic diffuse back pain. For the medicine ball exercises, I recommend starting with a lighter weight until you have mastered the form. Remember, many of these exercises will require you to move through a full range of motion, which is ultimately good for increasing or maintaining dynamic flexibility necessary for a productive swing. However, I do not recommend forcing your body to move too far in any direction if it feels awkward or uncomfortable. Over time, you should naturally begin to notice improved range of motion. None of these exercises should create pain or discomfort. Initially, it may be best to incorporate 3-4 of the exercises and gradually build in the others. It is not necessary to do all nine exercises during each workout. Typically, I have clients do them throughout the course of a workout or as a circuit. Do not focus on reps and sets simply learn to master the form on each exercise and let your muscles and fatigue dictate how many you do. At the conclusion of the chapter, I will provide some sample core circuits that you can do based on your experience, conditioning and skill level. Exercise #1 Stability Ball Crunch Technique: Begin lying on the ball with the small of your back resting on the ball (table top position). Your knees should be bent to 90 degrees with the feet flat
146 on the ground. You may fold the arms across the chest or place them behind the head. Next, rise up approximately 45 degrees, concentrating on initiating the movement from the stomach and not leading with the neck. Pause at the top and lower slowly down to the starting position. Perform 2-3 sets of reps. Purpose: To strengthen the upper/lower abdominals (abdominal muscles responsible for flexing the trunk) and improve core stability. Exercise #2 - Low back extension (45 degree machine) Technique: Begin in a neutral spine position with the legs/feet stable. For beginners, I recommend folding the arms across the chest. More experienced individuals may choose to place the hands behind the head. Slowly lower the upper torso down in an incremental motion (domino like fashion) until the lower lumbar area has flexed to some degree. Then return to neutral in a deliberate fashion. Pause at the top and repeat times. Perform 2-3 sets. As the exercise becomes easier, you may hold a medicine ball or small weight t chest level to increase the difficulty. Again, it is imperative not to move too quickly or use momentum. Purpose: To strengthen the major back extensor muscles, increase muscle endurance and reinforce proper golf posture. This exercise is extremely helpful in the prevention of chronic low back pain and disc problems.
147 Exercise #3 Low Back Extension with Spinal Rotation (45 degree machine) Technique: Much like the previous exercise, this variation addresses the erector spinae muscle group, but adding the rotational component will activate the rotator and multifidus muscles as well. Begin in the same position as for the low back extension. Lower until the lower lumbar region is flexing (straight plane). As you rise up, you will now rotate to one side by turning one side of the body. For example, pulling the right shoulder back and rotating to the right will work the muscles in much the same way as your backswing (right handed golfer). Lower down and repeat now turning to the left (which will simulate the way the muscles work during follow-through for a right handed golfer). Repeat 5-10 times on each side. Do 2-3 sets. Note: This is a difficult exercise and causes muscle fatigue quickly. As a result, I recommend beginning with the arms folded across the chest and doing 1-2 sets at first. Avoid significant rotation and move according to your range of motion and comfort level. Purpose: To develop improved functional mobility and strength relative to the backswing and follow through motions of your golf swing. This will lead to better turns and improve power.
 and toes, rise up and hold. Be sure to keep your body in a straight line.")

148 Exercise#4 Plank Technique: Lie face down on the floor with your feet together. Resting your body weight on the forearms (elbows bent to 90 degrees) and toes, rise up and hold. Be sure to keep your body in a straight line. Do not let the low back arch too much and do not stick your backside up in the air. Hold for 30 seconds. Repeat 2-3 sets. Gradually increase time as you are able. Purpose: To strengthen the transverse abdomninus, which reinforces the spinal column and supports the low back. Exercise #5 Stiff-leg Deadlift Technique: Stand with the feet pointed forward and about shoulder width apart. I suggest the grip on the bar be pronated (palms in) or alternating (one palm in
149 and one palm out). Begin in an upright position with the knees slightly flexed. Keeping the knee angle stationary, you slowly lower by flexing at the hips. The bar should remain close to the shins throughout. Stop when you feel the hamstrings stretching and are no longer able to lower further without rounding the back or flexing the knees. Return to the starting position. Do not hyperextend the back. The back should be flat throughout the entire motion. It is helpful to use a mirror to monitor form until you become proficient with this exercise, as it is technically challenging. Perform 2-3 sets of repetitions. You may elect to use dumbbells as well based on your preference and comfort level. Note: If you can not execute this exercise with proper form, I suggest not doing it at all. Done incorrectly, the exercise places undue stress on the lumbar spine and discs. However, when done correctly, it is an excellent way to strengthen the back and hips. Purpose: To effectively strengthen the glutes, hamstrings and low back extensors. In addition, this exercise improves dynamic hamstring flexibility.

150 Exercise #6 Standing Medicine Ball Rotation (Floor & BOSU Progression) Technique: Using a medicine ball (6 10#) begin by getting into your golf address posture. Holding the ball with outstretched arms, rotate the upper torso 90 degrees to one side and then reverse and rotate a full 180 degrees to the other side. The motion should be performed at a slow to moderate pace, while taking care to maintain your posture and produce a fluid movement. The head should remain forward throughout the exercise, much like it does in the golf swing. Purpose: To strengthen the obliques and back rotators utilized in the golf swing. Starting Positions FLOOR
151 BOSU Exercise #7 Diagonal Medicine Ball Chops Technique: Begin by getting into your golf address posture. Using a medicine ball (6-10#) you will essentially chop the ball up and down along a diagonal plane similar to the backswing/downswing motion. After completing a set in this direction, you will perform the same chopping motion in the plane similar to your
152 takeaway/follow through. The motion should be performed in a slow to moderate pace, while striving for fluidity and maintaining good posture. Again, the head remains still. Perform 2-3 sets of repetitions each side. Purpose: To strengthen the hips, abdominals, low back and shoulders. In addition, this exercise aids in improving postural endurance. Backswing/Downswing (right-handed golfer) Takeaway/Follow Through (right handed golfer)
153 Exercise #8 Medicine Ball Russian Twist Technique: Sit on the floor in a reclined position with the knees bent and heels touching the floor. For more advanced exercisers, you may elect to keep the feet up in the air. Holding the medicine ball (6-10#) out away from the body, rotate the arms back and forth 180 degrees in a fluid motion. Keep the head still and facing forward throughout the exercise. The pace should be slow to moderate with emphasis on keeping the trunk still and stable. Perform 2-3 sets of repetitions to each side. Note: This an advanced form of the standing med ball rotation simply because the reclined position provides more resistance to the abdominal muscles by virtue of having to fight gravity in order to maintain the desired posture during the movement. As mentioned earlier, move in your comfortable range of motion. Purpose: To strengthen the upper/lower abs, obliques and spinal rotator muscles.


154 Start Position Rotations


155 Exercise #9 Medicine Ball Plyometric Follow-Through Toss Technique: Begin holding a medicine ball (4-8#) in your golf address posture. Next, perform your ideal golf swing (including path and pace). As you pass the point of impact and transition into follow through, you will release the medicine ball prior to completing your full turn. The goal is to execute the exercise in a smooth fluid movement. Be careful not to overexert yourself and force the ball to fly farther than it would with your natural swing pattern. The ball should simply be an extension of your hands. Allow ample space to release the ball or use a partner who can catch or stop the ball after it hits the floor. Note: It is best to start with a lighter ball and gradually increase the weight as you perfect the form. The release of the ball should not affect your normal finish position. Purpose: To increase strength and power throughout the core muscles, thereby improving your swing power.


156 Set-up Backswing Downswing Follow Through
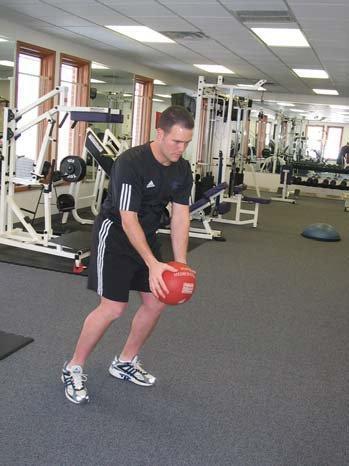
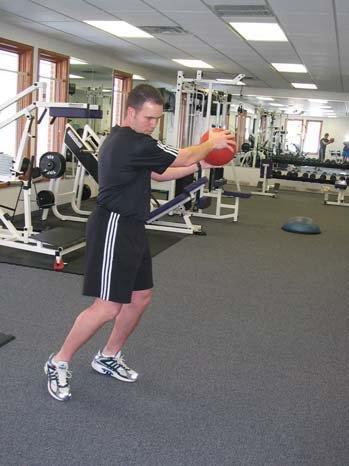
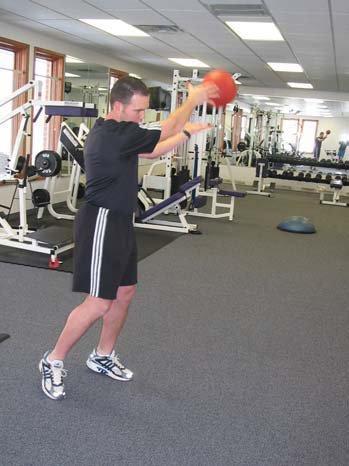
157 Release
158 Chapter 15: Building a Game Plan for Nutrition By Susan Hill Do you desire to decrease your body weight or improve your body composition to play better golf? Perhaps you need to gain weight, not just for the sake of putting on extra pounds, but rather because you know more muscle growth will likely yield a stronger, more fit physique and produce more powerful contact with the ball. What if you re not quite sure whether your weight has anything to do with it, yet you hate the feeling of being fatigued throughout your round and you re certain a good solid nutrition plan can help? Let s build a game plan for your golf nutrition and not leave anything to chance! Throughout a round of 18 holes, golfers combine endurance mixed with bouts of power, so it is important for them to plan their nutritional intake based on three energy demands Immediate, Mid-Distance and Endurance. Immediate This is the type of energy you need for quick explosive strength or short, maximum exertion. Mid Distance Repeated near-maximum exertion describes the level of activity of mid-distance. In mid-distance, the body turns to glycogen as its energy source. Endurance Endurance athletes gain their energy from the oxidization of fatty acids, protein and glucose all that generate energy. Oxygen is needed to break these down and provide a lasting energy source for the endurance athlete. Since the golfer has a combination of immediate, mid-distance and endurance energy requirements, a balanced diet is important to ensure all of those needs are met. If any one of your energy sources are low or you have depleted them through long-term activity, your body experiences muscle fatigue. As a golfer, muscle
159 fatigue results in lost shots by allowing muscle memory to slide, and strength to be lost. You may leave your shot 10 yards short, or you may not be able to generate the spin you want, because there is not enough force exerted on the ball. A Balanced Approach is Best for Golf It goes without saying that proper nutrition is important for all of us. But, if you are serious about shaving valuable strokes off your scorecard, you need to make some tough decisions on seeing your diet through. If you travel for golf, or are on tour, it is important not to fall into the trap of settling for fast food or a quick bag of chips or chocolate bar. You need to be committed to your diet each and every step of the way to make sure you are getting the nutrients you need. 55 to 60% from carbohydrates 15-20% from fats 20-25% from proteins Make sure you are drinking lots of water! So, Where Do Carbs Fit into a Healthy Golf Diet? Carbohydrates are the fuel your body needs to compete. They are broken down into the sugars your body needs to maintain energy levels that allow you to continue your activity. There are two types of carbohydrates your body breaks down as energy: simple and complex. Simple carbs have a very simple chemical structure, while complex carbs are, exactly as the name implies, more complex! Since they're both made of the same elements, the big difference is in how they're digested. Simple carbs are digested more quickly, and complex carbs take longer because of their more complex structure. The simplest form of carbohydrate is glucose, or blood sugar. Simple sugars that are found in foods include sucrose (table sugar), fructose (fruit sugar), and lactose (milk sugar). So foods that contain primarily these simpler forms of
160 carbohydrate are known as simple carbs: white sugar, brown sugar, confectioner's sugar, corn syrup, honey, maple syrup, high-fructose corn syrup, molasses. You should also include fruit juice, milk, yogurt, candy, cookies and pastries in the simple carb listing, because they're made primarily from sugar. Complex carbs typically contain more fiber, and have a more complex chemical structure that takes longer to digest. "Starch" is the common term for complex carbs. Examples are breads, cereals, crackers, rice, pasta, potatoes, corn, peas, lima beans and legumes like chickpeas, garbanzo beans, kidney beans and lentils. Complex carbohydrates are the type of carbohydrates that an athlete needs to maintain physical activity over an extended period of time. Simple carbs are broken down quickly and absorbed into the bloodstream much faster giving you that quick energy boost over a short period of time. As a golfer, especially if you are of a championship caliber, it is essential to have a wide variety of complex carbohydrates to maintain your energy through an 18- hole match or a 72-hole tournament. Complex carbs replenish the glycogen stores in your liver and your muscles, and the glycogen stores in your liver are what your brain uses as its primary energy source. While golf is a physically demanding anaerobic activity, you will always hear people talk about the game being as equally taxing on the mental side. Mentally your brain needs to stay conditioned to tell your body what to do, not to mention calculating distances, swing strength and maintaining focus. This is another reason why eating complex carbohydrates is important for your golf game.
161 Calculate your daily carbohydrate needs: Determine your calorie needs and then multiply by 55%. To estimate your daily caloric needs, take your scale weight and multiply by 10. If you weigh 160 lbs., then an estimate is 1600 calories to maintain your current weight. Add an extra 20 to 40% if you are sedentary, 40 to 60% if you are moderately active, and 60 to 80% if you are very active. Why is Protein Important for Golfers? Our bodies are made up of chains of 21 different amino acids. Some of which our bodies manufacture naturally and some which we cannot manufacture. Protein serves its main function as part of the growth and repair of body tissues as well as repairing the muscle damage that occurs during training. We also need protein to make red blood cells, produce hormones, boost our immune system, and maintain the health of our hair, fingernails, and skin. How much protein we need is at the heart of many debates. However, we can offer some simple guidelines based on your activity level. As you can imagine, protein needs vary depending on whether the golfer is growing, rapidly building new muscle, performing endurance exercise, or dieting. Table 1. Recommended Grams of Protein Per Pound of Body Weight Per Day* RDA for sedentary adult 0.4 Adult recreational exerciser Adult competitive athlete Adult building muscle mass Dieting athlete Growing teenage athlete *To find your daily protein requirement, multiply the appropriate numbers in this table by your weight in pounds.
162 Calculate your daily protein needs: Determine your calorie needs and then multiply by 25 %. To estimate your daily caloric needs, take your scale weight and multiply by 10. If you weigh 160 lbs., then an estimate is 1600 calories to maintain your current weight. Add an extra 20 to 40% if you are sedentary, 40 to 60% if you are moderately active, and 60 to 80% if you are very active. Take 1600 x.25 = 400 calories per day in carbohydrates or 100 grams per day (4 What about Healthy Fats in a Golfer s Diet? One of the most common misconceptions regarding a healthy diet is that fat is not needed. In fact, one of the major functions of dietary fat is to provide a source of energy. Fat is necessary to absorb vitamins A, D, E and K. Fat also helps us to insulate our bodies and provide a cushion to our vital organs. However, there are a number of ways to get healthy fat in our diet for energy purposes and maintenance of health without choosing poor fat choices. There are three main types: saturated, polyunsaturated and monounsaturated. Our bodies only need 15-20% of our daily calories to come from fat in the form of polyunsaturated and monounsaturated fats. These fats include safflower, soy, sunflower, canola and corn oils, in addition to avocados, nuts, and olives. Saturated fats which include whole milk, butte, cheese, and coconut, and solid shortenings shouldn t comprise more than 10 % of your total allowed for fat intake. Trans fat is formed when polyunsaturated or monounsaturated fats change from a liquid to a solid form. This type of fat should be avoided entirely and can be found in cookies, crackers, potato chips, French fries and some margarine, all of which are commonly referred to as hydrogenated fats.
163 Calculate your daily fat needs: Determine your calorie needs and then multiply by 20 %. To estimate your daily caloric needs, take your scale weight and multiply by 10. If you weigh 160 lbs., then an estimate is 1600 calories to maintain your current weight. Add an extra 20 to 40% if you are sedentary, 40 to 60% if you are moderately active, and 60 to 80% if you are very active. Take 1600 x.20 = 320 calories per day in carbohydrates or grams per day (9 Make a commitment to a diet full of carbohydrates, proteins and fats along with a wealth of water and watch your score start to drop! The 6 Principles of Golf Nutrition 1. Eat five or six small meals a day. Whether you refer to it as a meal or a snack, nutrient timing is important and you need to offer your body good balanced nutrition at regular intervals throughout the day. You may even find that eating more often has the added benefit of accelerating your metabolism as well as acts to maintain steady energy levels throughout the day. 2. Combine carbohydrates and protein at every meal. Our bodies tend to operate better with a balance of carbohydrates and protein. It is the combination of these nutrients that helps to stabilize blood sugar levels and provide a steady release of energy throughout the day. 3. Don t forget to use the right portion size. It only takes a handful more calories daily to add an extra 10 or 15 lbs. of body fat each year. Portion size has everything to do with long term weight management. Use the size of your clenched hand to determine appropriate servings of carbohydrates and proteins for your next meal. Use this same approach for each meal and this should put you in an effective calorie range.
164 4. Plan meals ahead of time. One of the most difficult things we face in eating according to a plan is making sure our pantry is well organized and our meals are properly planned. Experiment with different seasonings and meal plans to see what works for you. Then, take the time to prepare those meals or snacks in advance so it becomes a natural and easy process for you. 5. Drink 8 to10 glasses of water every day. Staying well hydrated can serve you well in the heat of a long tournament, through training, or simple recreational rounds when you could just use a little more energy. Remember it only takes a small amount of dehydration to have a dramatic effect on your golf performance. Drink one glass of water with each of your six meals, and a few more throughout the day. If you decide to drink diet soda, coffee or tea, you ll need to drink even more water to compensate for the diuretic effect these have on your body. 6. Focus on consistency, not perfection. Have you ever heard the term paralysis by analysis? Try not to over think the nutrition process. Just keep things simple with your meal plans and goals. Consistency is far more important than laboring over moments in time when you have trouble sticking with it. Don t beat yourself up, everyone has a bad day now and then. Keep your fitness and eating goals in front of you and you ll feel the difference. What Does a Solid Golf Nutrition Plan Look Like When You Put it Together? Meal 1 Meal 2 4 egg whites, scr w/slice fat free cheese 1 slice wheat toast w/1 tbsp peanut butter 1 banana Total Grams Total Cal Total Cal % 4 oz cottage cheese, 2% 1 cup peaches Total Grams Total Cal Total Cal % Pro Carb Fat Cal % 54% 23% % 65% 20%
165 Meal 3 Meal 4 Meal 5 Meal 6 5 oz chicken beast 1 cup cooked rice 1/4 cup black beans 1 cup shredded zucchini 1 Lowfat yogurt 1 cup favorite berries 2 mozarella cheese stick 1 med pear Halibut (4 oz raw) 1/2 cup cooked rice 1 cup veggies Total Grams Total Cal Total Cal % Total Grams Total Cal Total Cal % Total Grams Total Cal Total Cal % Total Grams Total Cal Total Cal % Total Calorie Percentages Total Grams Total Cal Total Cal% % 42% 8% % 66% 13% % 55% 17% % 54% 7% % 56% 14%
166 Meal 1 Meal 2 Meal 3 Meal 4 Meal 5 Meal 6 2 large eggs 2 slices whole wheat bread 1 banana Total Grams Total Cal Total Cal % 9 inch tortilla 3 oz chicken, grilled chopped lettuce and salsa Total Grams Total Cal Total Cal % 15 oz can low vegetable soup 10 crackers 1 oz cheddar cheese Total Grams Total Cal 1 Lowfat yogurt 1 cup favorite berries 1 granola bar Total Grams Total Cal Total Cal % 5 oz ground turkey 1 cup cooked pasta 1/4 red beans 1/2 cup salsa Total Grams Total Cal Total Cal % 5 oz chicken breast 6 oz baked yam 1 cup steamed green beans Total Grams Total Cal Total Cal % Total Calorie Percentages Total Grams Total Cal Total Cal% Pro Carb Fat % 54% 27% % 46% 15% Total Cal % 21% 42% 20% % 62% 9% % 52% 13% % 54% 7% % 55% 16% Cal
167 WHAT TO EAT BEFORE A ROUND OF GOLF The goal of the Pre Round meal is to provide a slow and sufficient energy release that lasts for the next couple of hours as well as to provide great mental concentration. Eat lightly in the two hours leading up to tee time. Food in your digestive system diverts blood away from your brain and muscles, affecting concentration and physical performance. A meal approximately 1 ½ to 2 hours prior to play is ideal. Eat complex carbohydrates, keep protein and fat intakes low since these slow digestion. Eat slowly and chew well. Drink water to be adequately hydrated. Try one to two glasses prior to tee time. Never drastically alter your normal eating patterns prior to competition. Favorite foods may often give you a psychological edge. WHAT TO EAT DURING A ROUND OF GOLF The goal of the golf round meal is to maintain blood sugar levels and avoid dehydration. Take with you a mix of dried fruit and nuts ( known as trail mix ). Eat just small amounts throughout the game to keep energy and concentration levels regulated. Sip water regularly, especially on hot days where you perspire readily. Around 500mL per hour is advisable. Protein bars readily available from health food stores are a convenient snack that can help keep blood sugar levels steady. Avoid the high fat varieties. Try small mouthfuls at regular intervals, before you get hungry.
168 WHAT TO EAT AFTER A ROUND OF GOLF The goal of the Post Round Meal is to replenish any lost nutrients as well as to continue sustaining energy levels and continual hydration. Consume carbohydrate-rich foods and drinks as soon as possible after your round. They will replenish glycogen stores quickly and get the golfer back into performance shape. Fruits, juices, high carbohydrate drinks and pop are examples. Replace fluids that have been lost. For every pound that is lost, drink 2 cups of fluids. Replace any potassium or sodium that has been lost during competition or training by using foods. Fruits and vegetables are excellent sources of potassium. Replace sodium by eating salty foods. If activity has exceeded 2 hours and is vigorous, a sports beverage will be helpful. Return to your normal high carbohydrate diet at your next meal. Sustained energy snacks Apples, grapes, plums, pears, cherries Peanuts Granola Dark flour bread or muffins Yogurt Energy bars Quick energy snacks Raisins, bananas, pineapple, watermelon Rice or rice cakes Carrots Honey Fast-release energy bars
169 Great Golf Snacks to Take with you on the Course Apple Stuffed with Soy Nut Butter Peanut Butter Wrap with Sliced Bananas Apple Slices with Peanut Butter Orange slices with a handful of dry-roasted nuts String Cheese with a handful of Whole-Wheat Crackers String Cheese with a Handful of Almonds Lean Roast Beef Wrap with Small Amount of Ranch Dressing Sliced Apples with Laughing Cow Cheese Wedges Lean Turkey Slices in Wrap with Ranch Dressing and Veggies Veggie Wrap with Almonds Seven Grain Belgian Waffle with a handful of Almonds or Cashews Veggie Wrap with Sliced Avocado Small Cup of Applesauce (prepackaged) with Almonds Low fat Yogurt Balance Bar or similar protein bar Handful of Trail Mix ½ Whole Wheat Bagel with Lean Roast Beef Slices Sliced Pears with Laughing Cow Cheese Wedges Protein Bar with Sliced Apples Frozen Grapes with Laughing Cow Cheese ½ Whole Wheat Bagel with Lean Turkey Slices Pita Bread with Low Fat Cottage Cheese Banana with Peanut Butter Banana with Soy Nut Butter Whole Wheat Tortilla Wrap with Black Beans and Salsa Yogurt with Raisins and Almonds Sliced Turkey and Veggie Pinwheel
170 Protein Bar with Sliced Pears Reference Sources: Clark, Nancy, MS, RD. Nancy Clark s Sports Nutrition Guidebook, 2nd Edition Brookline, MA: Nancy Clark Chapter 16: Velocity Training for Golf By Jeff Banaszak Club head speed or velocity is a key to ball flight distance and is considered a primary mechanical characteristic of the long hitter in golf. From a scientific standpoint, the velocity created as the club travels through the impact zone has the greatest influence on ball flight distance. The greater the club head velocity at impact, the greater the ball velocity, and the greater the flight distance. The club head velocity at impact is directly affected by the forces on the club during the downswing and the time over which those forces act. The difference in the speed at which the ball leaves the clubface at impact is due mostly to the muscular forces the golfer applies to the club more than any other factor! The velocity that is created as the club travels through impact directly influences the distance the ball will be propelled as well as the trajectory and shape of the resulting shot. The bottom line is if we can directly increase club head speed at the point of club to ball impact we can affect distance of the shot. Therefore, velocity training must be recognized an important component when developing a golf-specific training program. For today's golf athlete, especially those playing on the professional tours, club head speed or velocity is a necessary and essential variable for success. There are a number of physical variables which control and determine the velocity a golfer can create. These include proper swing mechanics, flexibility, strength and speed. Training or improving any of these individual variables can directly affect the golfer's ability to increase velocity. A comprehensive training or conditioning program designed to increase club head speed must address all
171 these variables. The benefits of proper golf instruction, flexibility exercises and strength training for golf have all been well documented. The missing link in golf fitness may be training for speed or velocity! The bottom line is if properly implemented with a training professional a velocity training program can equal longer flight distance and lower scores. Here s the formula: Muscle forces applied by the golfer + Club head velocity at impact = Ball velocity = Flight distance. IDEAS YOU NEED TO KNOW! To develop speed a golfer must develop both linear and angular velocity without disrupting normal swing mechanics. Angular velocity is the velocity of the club as it moves through the swing plane and is directly influenced by a golfers ability to maintain lag or the angle between the forearm and club. Linear velocity occurs in a straight line and is influenced by the golfers ability to control lateral or side-to-side movement during the swing. The challenge in golf is to increase angular and linear without disrupting normal swing mechanics. The key to increasing these velocities is to improve the efficiency of the swing. Proper golf technique or mechanics can directly affects this variable. By moving in the correct sequence during the swing motion (i.e. pelvis first, followed by torso, shoulders, hands, and finally the club) velocity of each body segment can be increased and properly coordinated. This is why it is important that during a golf-specific training program the designed exercise program must reinforce the proper swing motion and sequence. A golfer also needs to understand the concepts of sport loading and consider the best way to use the concepts of under-speed and over-speed Training to increase club head velocity. Sport loading makes use of the specificity of exercise concept. Sport loading basically utilizes specific
172 movement patterns that mirror the golf swing with the addition of weight, increased load, or by the subtraction of weight, decreased load, added to the club. If we added more weight or load to the swing it would be called under-speed training because the heavy load causes use to move slower while taking weight away causes over-speed training to occur because we now move faster through the movement. By using your body s nervous and muscular system characteristics either method can make changes in one s ability to increase the power behind your club head to gain velocity and distance. Research in other sports, specifically baseball, suggests that training with a weighted implement within % range above and below the standard weight will result in greater swing velocities than when a standard golf club is used. Training with weighted implements outside these optimal ranges may even adversely affects the timing or sequence mechanics therefore potentially decreasing club head velocity. This is why many trainers today have stopped recommending use of those heavy clubs typically found in golf retail shops before play. The golf swing requires full active range-of-motion! The benefits of a velocity training program may be diminished if exercise occurs through a shortened range-of-motion. A full swing allows for sufficient force to be created over the distance traveled during the backswing and downswing phases of the golf swing. A golfer also needs to establish a functional strength training base before starting velocity training. General resistance training is important to first get your body in shape to train. Velocity or power training requires the connections between your brain and the muscles (i.e. neuromuscular recruitment) to follow a given sequence (i.e. the golf swing). First, remember that strength is a part of the power equation and that without a strength base, you have no power. Second, power is generated through the stretch-shortening cycle which requires an efficient neuromuscular system to respond to rapid changes in direction. Power training subjects the muscles and tendons to an overload during the deceleration
173 (eccentric) phase. Only by building a strength base will you properly prepare the body for this more advanced type of training while preventing injury. Once you have established a training base, the power training must be similar to the actual swing with regard to the movement, tempo, and velocity too assure a proper neuromuscular system response. This is known as specificity of training. This means that your training program must be specific enough to the golf movement, that the muscles used and movement speeds mirror the actual swing mechanics. This will allow you to see direct improvements related to your game! For golf, this type of training does have limitations. If you do not follow the ball flight laws and basic physics (i.e. How center ball contact is with the club face) it will not matter how fast your speed is. RECOMMENDATIONS FOR TODAY S GOLFER Golfers at the games highest level can be defined as powerful! Physical power enables the athlete to practice and master their golf skills. To understand the definition of Power from a scientific standpoint we must look at the Power Equation. Power = Force x Distance/Time Force = Golfer s physical strength Distance = Range-of-motion or flexibility available to maximize full swing mechanics Time = Time to complete the swing motion or the golfers physical ability to produce club head speed at ball impact The Power Equation can be applied to golf. From this equation it is easy to see that all three of these variables STRENGTH, FLEXIBILITY, and SPEED each directly affect a golfer s ability to create POWER! For any golf-specific power program to be complete it must address all three variables.
174 COMPONENTS OF A GOLF SPECIFIC POWER SYSTEM The gym has truly become an essential place for the professional golfer to visit to assure success in their profession. This is the place where science must be applied and the trainer s knowledge of the body is truly tested. The concepts of muscle anatomy, physiology, motor learning and golf are all essential to maximize performance potential. Performance enhancement is not new to professional sports as all four major sports (I.e. baseball, football, basketball & hockey) have utilized trainers, therapist and other medical/conditioning professionals since the early 1970 s. Unfortunately, professional golf has lagged behind! We are excited to introduce and detail these essential training secrets that that will help you build success. There are basically, Three Essential Components to building power. Without addressing all three aspects you will never maximize potential. Please note that no single workout program can replace the skills of a highly skilled conditioning professional. The program enclosed in this section is only suggested regime and may need to be modified to meet your individual needs. Remember to consult your physician before starting a new exercise program. STRENGTH TRAINING FOR GOLF The Three Essential Components 1) Strength Program 2) Flexibility Program 3) Speed Training Program Strength training has only recently been accepted as an important and integral part of a golf-specific conditioning program. The reason for this new acceptance is directly related to the influence of conditioning programs being used at the games highest levels. Golfers on the PGA TOUR, have used strength training to
175 transform their physiques, gain lean muscle mass and produce extraordinary performance results! Training the musculoskeletal system is essential for golf and is directly related to the pure power required for a long drive as well as the fine motor control and coordination required for a delicate chip shot. Strength training also addresses muscle endurance, which will increase the body's ability to sustain performance through all 18-holes. STRENGTH TRAINING TO HELP YOUR GAME Many golfers believe that working with weights can hinder their swings by developing large tight muscles. With proper guidance and technique weight training can help anyone's game. Increased muscle strength can be achieved in several ways including the use of free-weights, weight machines, one's body resistance and resistive bands. Strength training develops overall body control and endurance, which helps the athlete strike the ball more accurately and consistently. Well-conditioned muscles are less prone to injury and recover faster when injured. Strength gains are very rapid during the first few weeks of training. These initial improvements are due to the body becoming familiar with the exercise. Longterm benefits of strength training include increased muscle size, which takes much longer (up to 8 12 weeks) to occur. GUIDELINES FOR STRENGTH TRAINING: a) The exercise must be physically challenging to work. b) Individuals who are unsure of their medical status or their ability to tolerate a strengthening program should consult a medical professional. c) Warm-up prior to training.
176 d) Muscles tend to tighten so stretch before, during, and after strength training.. e) Exercise should be performed slowly with good postural alignment. f) Consider the key training variables including intensity, rest and duration of exercise. g) Use strength training up to 3-times per week with a day of rest between workouts. h) Work larger muscle groups before smaller ones. (I.e. chest before triceps, triceps before forearms, etc.) i) Consult a strength and conditioning specialist or physical therapist to help design a golf-specific program to address your needs. FLEXIBILTY FOR GOLF An important characteristic of good health is the ability to move our joints smoothly throughout a full range-of-motion. It is important to maintain our flexibility to prevent injury, alleviate muscle soreness and enhance athletic performance. The golfer lacking flexibility is continually forced to compensate for range-of-motion restrictions. These compensations directly lead to swing faults, further restrictions or injury. The ideal golf swing is a relaxed and fluid motion. Without adequate flexibility the swing takes on a shortened, choppy or stiff appearance. The golfer who lacks flexibility is under a handicap that can increase scores and the risk for injury. Stretching is an important component of any fitness regime, especially a golfspecific conditioning program. Stretching should be utilized before, during and after practice and play however we are aware that most people will just not take the time. Some individuals may have more success by dedicating specific short session to flexibility training. By stretching 3-4 times per week for just 20 minutes per day, significant changes can be made by individually isolating and lengthening the muscle groups used during the swing motion. The key areas for golf include the back, hips, shoulders and neck.
177 HOW IS A MUSCLE STRETCHED? Muscles are typically stretched by moving the extremity across a joint in the opposite direction that occurs when the muscle contracts. Some golfers have excessive mobility at the joints and are able to move the joints beyond their normal ranges. This is known as hyper mobility. Golfers with hyper mobility should avoid additional stretching at those joints because the joints can become unstable and result in injury. Optimal stretching requires very specific techniques. STRETCHING GUILDELINES: a) If you are unsure about what type of stretching is right for each individual consult a physical therapist or other conditioning specialist for instruction. b) Muscles should be stretched to the point of mild discomfort, but not pain. c) Stretching should be completed before, during and after practice, play or training. d) Each individual is genetically different and the ideal stretching program needs to be personalized to meet that individuals goals. SPEED TRAINING FOR GOLF This is the key addition to your current workout plan! In fact, increasing distance off the tee is the most common reason why a golfer will start a golf-specific conditioning program. In order to hit the ball farther with the same club a golfer must increase club head speed or better coordinate the movement directly leading to better ball contact. There are several ways to increase club head speed: 1) Improving technique PGA/LPGA teaching professionals can help improve timing and release through ball impact. Maintaining the angle between the shaft and the forearm as the golfer approaches the ball has been shown to increase club head speed. 2) Equipment - properly fitted equipment is essential!
178 3) Fitness Program developed must concentrate on the development of speed and power We have all seen baseball player swing a bat while on deck in order to make it easier to accelerate their normal bat when facing a pitcher. As previous discussed, research has shown that ideally the weight of the bat should remain within % of the player normal bat weight. If the weight is either too heavy or too light the muscles behave abnormally and the benefits of the exercise are lost. A simple way to increase the weight of the club by an appropriate weight is to tape a golf ball to the club face or purchase lead tape from a golf retail shop. Simply weight your 5 iron. Based on this weight, figure out what an additional 15 20% weight increase would be. Place the lead tape on the back of the club head until this weight is obtained. Swing the weighted club normally but concentrate on making the club head whoosh as it passes through impact. Ideally, using a 5 iron other than the 5 iron from your normal set would be recommended. The more difficult aspect of the program is to obtain a second club that weights 15 20% less than your standard 5 iron. This can be often be obtained by utilizing a ladies or senior golf shafted 5 iron. An alternative method can be to use your normal 5 iron, holding the club upside down with the grip facing down towards the ground. Once again swing concentrating on making the swoosh noise as the club passes through impact. Recommended Speed Training Program Duration: Optimal time-frame is 12-weeks Frequency: 4 training sessions/week Warm-up sequence: Standard - Heavy - Light Standard Warm-up sequence utilizes dry swings only, 10 repetitions of each. Concentrate on making the swooshing sound through the impact position.
179 Training Program: Complete 15 swings concentrating on the whoosh with your normal 5 iron making ball contact. Do not worry about the ball flight or centerness of contact during this exercise. While performing the above exercise program, try to keep your arms as relaxed as possible. Another important tip is to pay special attention to the angle the club makes with your lead forearm. Numerous research studies have shown that maintaining a large angle between the forearm and shaft deep into the downswing is essential to maximize club head speed. THIS PROGRAM IS VERY SIMPLE BUT EFFECTIVE! PUTTING THE PROGRAM TOGETHER! With this program in hand and the concepts on the table you are now do you take your results directly to the golf course! Once you have the physical tools in place and movements ingrained it is time to reap the benefits with every shot!!! Ideally, you may want to utilize the skills of a PGA/LPGA teaching professionals to help engrain proper technique and maximize technique. For the reason of receiving proper feedback during your training program you may find it beneficial to test your progress. Therefore, it is recommended that your club head speed with a driver be tested before, during and after starting this training program. Many retail stores, golf schools and PGA/LPGA teaching professionals have just such types of devices and would be glad to help you accurately record your club head speed changes. A device such as this can be easily stored in your golf bag and taken out to the range or golf course for testing. References Section 8. Lindsay D, Strother R, Walker D: Better Golf through Better Health: The Complete Guide to Health, Fitness and Injury Prevention. FITforeGOLF, Inc., 1997.
180 9. Lindsay D, Strother R, Walker D: Golf Health, Science & Rehabilitation: A Comprehensive Educational Course for Physical Therapists: FITforeGOLF, Inc., Mclean, J, Banaszak, J, Heinrichs, K, Carbone, J: Jim McLean Power System: Instruction Manual. Swingrite Golf Worldwide, Rose, GA, Duvall, RV: The Body-Swing connection Seminar Manual: Level 1-3. Advantage Golf, Chapter 17: Plan the Work, Work the Plan By Jeff Troesch Failing to prepare is preparing to fail Ladies and Gentlemen, thank you for flying with us today. Your pilot has just informed us that he has no idea to what destination we will be flying. Additionally, in the event of any unforeseen trouble along the way, he has no alternative plan for corrective action and no back-up plan to get us back on track toward our randomly-chosen destination Are you interested in being on this flight? Neither am I. The reality of how some people plan and prepare for their long-term golf development is a lot like this pilot. No plan, no specific destination in mind, little awareness of when they re headed off track, and no method to keep them headed in the right direction. Frequently when I ask about a player s goals their response is, to get better. What does that mean? Better at what? How will you measure it? What is your plan to make this happen? When serious-minded players want to train, the first step in our on-going work is for them to articulate what specific goals they have for their game. It is by explicit design that the many players with whom I work have been successful. Whether preparing for the PGA or LPGA tour, Nationwide tour, college or junior events, or just wanting to lower their handicaps, our players are put into a developmental plan.
181 Creating a specific plan ensures that each player has a specific schedule of training to guide their practice and play so that their development is done with the highest level of efficiency. While a high level of focus, intensity, and specificity might not seem applicable to the non-tournament interested golfer, the truth is that elements of developmental planning are just as effective and helpful for you as it is for elite players. Without immediate access to specialists in the field of athlete development, how do you undertake this type of journey on your own at home? First, make sure you have assessed accurately your strengths and weaknesses as a player. Selfevaluation can be a very valuable tool in helping appreciate where your game is at. Additionally, I suggest that you gather information from the other people in your golf world that you trust. Swing instructors, frequent playing partners, parents, and teammates can all give you insight into how they see your game. The idea here is not that anyone s information is the objective truth, but my experience has been that many players have blind spots related to where they are strong or weak in their game. Getting insight from others can help either validate your own perceptions, or challenge the perceptions that you hold about the facets of your game. Have the people that you trust fill out an evaluation form, and fill one out about your own game as a self-evaluation. The comparison and contrast between how you see your game and how others see it can be very informative. The form that I use with the players with whom work is below:
182 GOLF EVALUATION FORM Golfer: Evaluator: Date: Ratings 1-10: Excellent=10 Average=5 Poor=1 PUTTING 1. Short 2. Long 3. Right to Left 4. Left to Right 5. Downhill 6. Uphill 7. Distance Control 8. Technique 9. Reading Greens CHIPPING 1. Short 2. Long 3. Lob 4. Distance Control 5. Bad Lies 6. Imagination 7. Technique PITCHING 1. Technique 2. Distance Control 3. Low 4. High WOODS 1. On tee box 2. Off fairway BUNKERS 1. Technique 2. Feel 3. Uphill Lies 4. Downhill Lies 5. Sidehill Lies IRONS 1. Short 2. Middle 3. Long PREPARATION 1. Practice Plan 2. Pre-round 3. Pre-shot 4. Pre-putt ATTITUDE CONCENTRATION EFFORT SELF-TALK IMAGINATION TIME MGMT. COURSE MANAGEMENT, ETC. 1. Warm Up 2. Use of Score Card/Yardage Book 3. Yardage Calculation 4. Correct Use of Tee Ground 5. Picking Best Target(s) 6. Playing One Shot At A Time 7. Emotional Control 8. Scrambling Ability 9. Proper Club Selection 10. Constructive Post-Round Analysis Confidence with each of your clubs: 10= highest 1=lowest Driver 3w 5w 7w 2i 3i 4i 5i 6i 7i 8i 9i PW Sand Wedge Lob wedge Other wedge Putter
183 Once the information has been gathered, prioritize the areas upon which you want to work. I suggest you set goals that follow the SMART criteria. I want the goals to be Specific, Measurable, Attainable, Relevant, and Time-referenced. Specific Specify each goal in order to increase the likelihood that you ll be motivated by it. A goal of improving my short game is unlikely to be motivating in that it s difficult to determine the criteria by which you would measure this and to determine whether you ve accomplished your goal or not. Better is to implement a consistent pre-putt routine that I utilize when playing. Measurable Determine how your progress is to be measured. Review your performances and assess or rate how well you did on that goal. In the example above, I would suggest that you rate on a 1-10 scale the consistency of your pre-putt routine after every hole when you re on the course. You might also ask someone else to rate those things that are detectable with the eye. Someone might be able to help you determine, for example, how consistent your physical actions were in your pre-putt routine. Obviously, only you could determine how consistent your thoughts were!
184 Attainable It is important that you set goals for yourself that you believe you can achieve. If you doubt your ability to reach the goal, determine what the doubt is about and figure out how to eliminate the doubt. Again, soliciting the input from a trusted other can help here, as some of us have a tendency to either shoot too low or too high in our goal-setting process. Relevant In order for you to really buy in to your goal, it is important that you understand the relevancy of the goal to the bigger picture goals that you have. In the example above, your bigger goals might involve lowering your handicap. If you recognize that your putting seems to be a part of the problem in your scoring well, there are several factors that might be influencing your putting negatively. Understanding and appreciating the benefits of a consistent pre-putt routine then might be one of the foundational elements that you endeavor to improve. Time-referenced Set a specific time-line by which you want to achieve your goals. Some goals may be short-term in nature and only take a few days or weeks to attain. Longterm goals can be several weeks or months or more, and are typically broken down into short-term increments. Most people work much more diligently when they face a deadline, and this positive pressure may be what it takes to keep you moving in the right direction. If your golf goals meet all five of these criteria, the next step is to find golf information that you can trust. Once you establish the person or persons from whom you will gather the information to plan your training schedule, work with them to establish activities that will guide you toward your goal(s). Working in this way will help you use your limited practice time most productively, and will
185 help you set benchmarks along the way to chart your progress. At any point that you find yourself off course, you will have a flight plan that will help you get back on the path toward your desired destination. That s the kind of flight on which I m interested in flying! Many golfers initially resist the goal-setting process. I won t even attempt to recount the hundreds of excuses I ve heard for why a player doesn t want to set goals. Part of this is embedded in the nature of the game itself. There is a paradigm that surrounds this game that accepts and perpetuates the notion that it s OK to complain and pontificate about how poorly we play. Listen to the discussions around the typical 19 th hole at any golf course in the area. Frequently, golfers are speaking about the components of their game that don t work very well. I couldn t make a putt today. I can t hit my driver for the life of me. I don t know if I ll ever be able to play out of the sand. You think you re bad, let me tell you about my day. When I hear these types of things from the players with whom I work, my first question to them is, what are you doing about it? For the player who is truly interested in addressing these issues, having an action plan is much more beneficial and constructive than simply having a group of friends with whom to commiserate about the weaknesses in our arsenal. Whether it is in our life or our golf game, it is far easier to contemplate doing something than to actually take the necessary steps to get it done. This game is replete with players of all handicap levels who are more inclined toward contemplation than action. I m interested in what you are doing, or are committing to do, rather than what you re complaining about. Thinking and complaining isn t taking action. Even for the vast majority of us who don t have or won t take the time to practice regularly, if we will pledge to work on even one component of our game it can be of tremendous benefit. Choose a path for your golf improvement. You will see that doing something about the deficiencies in your game will give you the real sense that you are working toward making a positive change. That, in and of itself, can increase your confidence on the course.
186 Challenge yourself to create a plan of action for improving your game. Use the following two forms to make a commitment to a plan and to schedule your week accordingly. Then watch as your actions translate into you becoming more proficient in the areas that you ve identified as concerns!
187 GOLF PLAN OF ACTION FOR QUALITY PERFORMANCE DATE: TO BE COMPLETED BY: Technical Goals 1. Activities/Drills Goal Evaluation Mental: Physical: Note: Use the following scale to evaluate the success of achieving your goals: Excellent = 1 Good = 2 Average = 3 Fair = 4 Poor = 5 Additional comments:
188 WEEK OF NAME Mechanical Goals MONDAY TUESDAY WEDNESDAY THURSDAY FRIDAY SATURDAY SUNDAY Play: 9 18 Play: 9 18 Play: 9 18 Play: 9 18 Play: 9 18 Play: 9 18 Play: 9 18 No No No No No No No Full Swing Full Swing Full Swing Full Swing Full Swing Full Swing Full Swing Putting Putting Putting Putting Putting Putting Putting Chipping Chipping Chipping Chipping Chipping Chipping Chipping Pitching Pitching Pitching Pitching Pitching Pitching Pitching Bunkers Bunkers Bunkers Bunkers Bunkers Bunkers Bunkers Mental Goals Activities Activities Activities Activities Activities Activities Activities Physical Goals Activities Activities Activities Activities Activities Activities Activities
189 90 Evaluation 1- Poor 10- Excellent Full Swing Putting Chipping Pitching Bunkers Mental Physical Full Swing Putting Full Swing Putting Full Swing Putting Chipping Chipping Chipping Pitching Bunkers Mental Physical Pitching Bunkers Mental Physical Pitching Bunkers Mental Full Swing Full Swing Full Swing Putting Putting Putting Chipping Chipping Chipping Pitching Pitching Pitching Bunkers Bunkers Bunkers Mental Mental Mental Physical Physical Physical Physical Chapter 18: How to Increase your Golfing Power By Brian Smith Golfers are always looking to increase their ability to hit the ball farther. We all watch the professional continue to increase the distance they are able to hit the golf ball. The pros are hitting wedges into greens, while you are using long irons. Birdies and pars are a lot easier to make when you are using a wedge for your approach shot. Obviously, there are many reasons why pros can hit the ball farther including their instruction, practice habits, and swing efficiency. One reason professionals are able to hit the ball farther is their ability to generate greater swing speed by rotating their trunks faster and creating greater trunk forces. What if you could increase your ability to rotate faster? Well, you can by focusing on power exercises. Every golfer needs to incorporate power development exercises into their exercise routine. Power is defined as force multiplied by distance then this number divided by time. Thus to increase power, you can increase your ability to generate force (strength), increase the distance you are able to rotate, or decrease your time of the golf swing. If you are looking to increase your golfing power you need to use the following 7 power exercises in your golf exercise program.
. The upper body plyometrics will use a medicine ball.")
190 You will be using strength training principles and/ or plyometrics, during the following drills. Plyometric exercises use the pre-stretching of a muscle to initiate a quick and powerful contraction (force). The upper body plyometrics will use a medicine ball. The lower body plyometric drill will include a jump type movement. During the following strength and plyometric power drills you will focus on increasing the range of motion of your trunk rotation, the maintenance of your primary spine angle, and the speed of your movement. Performing these drills correctly and routinely will lead to INCREASED POWER. RUSSIAN TWISTS Sit on buttocks holding on to 2-4 kilogram medicine ball in a one piece arm position with knees bent and focusing on keeping back straight. Now lean your upper trunk back to a ~45 angle while lifting heels off ground. Next rotate shoulders to the right then to the left side focusing on shoulder turn. (This is one repetition) Perform 3 sets of 15 repetitions.

191 Purpose: Improve core strength and stability. Increase trunk rotation strength improving ability to generate power during swing. Also, helps to reduce low back injuries due to increased core stability. DIAGONAL MEDICINE BALL CHOPS Stand in golf posture holding a 2 kilogram medicine ball near left hip. In a one piece takeaway motion rotate upper trunk rotating ball over right shoulder. Next, forcefully contract abdominal region returning to starting position. Repeat 10 repetitions then switch sides for 10 repetitions. Perform for 3 sets each side.
192 Purpose: Increase strength of rotary abdominal and low back muscles. Improves swing power and decreases stress to low back. STANDING MEDICINE BALL ROTATIONS Stand in golf posture with arms extended straight out in front of chest holding medicine ball. Rotate with one piece motion to right then rotate to left side keeping ball parallel to floor. This is 1 repetition and you will want to return to start position. Repeat for 3 sets of 10 repetitions.
193 Purpose: Improves upper trunk range of motion and core rotation strength. (increased power) Mimics motion in golf swing---- leading with lower trunk to cover the golf ball during your swing. Improves upper trunk stabilization with holding medicine ball in an extended position. LATERAL LUNGE WITH GOLF ROTATION Standing in golf address posture, hold golf club in wrist cock position. Next, take a lunge step to right side. You should feel like you are squatting to chair when in the lunge position. As you are in this position, you will perform a shoulder turn to simulate your backswing. Then, you will push explosively with right foot returning to start position. Then repeat to left side. This is 1 repetition. You need to then repeat for 10 repetitions. Remember to keep wrist cock position. Perform 3 sets.

194 Purpose: Increase quad, hip, and hamstring musculature strength. The rotation into the backswing and follow through will improve your core rotation power by increasing strength and range of motion. Maintaining the wrist cock position will improve your forearm and wrist strength. SPEED SKATES Place cones ~3 feet apart. Stand and balance on right leg simulating golf address posture. Next, drive off right leg performing a small jump to left cone landing on left leg in a balance golf address posture. Focus on maintaining your primary spine angle. Repeat back to right cone. You have completed 1 repetition. Perform 3 sets of 10 reps.


195 Purpose: To increase power in lower trunk improving hip/lower trunk drive and weight shift. Speed skates will also improve your overall core stability/ balance and lower trunk stability. MEDICINE BALL CHEST PASSES Standing ~3 feet from wall in golf address position, hold a medicine ball against chest. Explode your arms forward toward wall releasing ball toward wall. The focus is on maintaining your golf posture while you catch the ball. Your goal is to catch the ball and as soon as possible repeat the motion. Repeat for 10 repetitions and perform 3 sets.
196 Purpose: Improve ability to maintain golf posture by increasing strength of core stabilizers. This will lead to an increased ability to generate power in your golf swing. Also, improves forearm and triceps strength resulting in improved ability to maintain one piece position with golf club. MEDICINE BALL ROTATION THROWS Stand in golf posture with left shoulder ~3 feet from wall. Using ~2 kilogram medicine ball rotate to backswing position of ~ 9 o clock. Next, using lower trunk and core muscles rotate toward follow through position releasing ball toward wall. Catch and return to start position. Repeat 10 times, and perform 3 sets.

197 Purpose: Increase trunk rotation power to improve ability to uncoil during swing. Simulates golf swing using hip and leg drive. If changing equipment has not led to extra distance on the golf course, then start using these 7 drills into your golf fitness program 1-2 times per week. Meet Our Experts Susan Hill has earned national certifications as a fitness trainer with several organizations including the National Academy of Sports Medicine, the International Sports Science Association, and the American Council on Exercise.
STRETCHES FOR GOLF. 7 Minutes to Longer Drives and Precision Based Shots SIMPLE GOLF SERIES
 STRETCHES FOR GOLF 7 Minutes to Longer Drives and Precision Based Shots SIMPLE GOLF SERIES 1 TABLE OF CONTENTS Self Tests Phases of the Swing...5 Golf Self Tests...13 On Course Warm Up Winning Warm Up...23
STRETCHES FOR GOLF TABLE OF CONTENTS. 7 Minutes to Longer Drives and Precision Based Shots SIMPLE GOLF SERIES
 STRETCHES FOR GOLF 7 Minutes to Longer Drives and Precision Based Shots TABLE OF CONTENTS SIMPLE GOLF SERIES All rights reserved. No portion of this manual may be used, reproduced or transmitted in any
The BIG BOOK of Golf Drills
 The BIG BOOK of Golf Drills 1 How to Use This Guide Congratulations on purchasing the Big Book of Golf Drills! This book is designed to use as a reference guide. We do not recommend printing this out as
PARTNER With all partner stretches: communicate with partner and use caution!!
 - warm up prior to stretching - isolate the muscle group to be stretched - move slowly and smoothly into stretch - use proper mechanics and correct alignment - breathe normal - slowly come out of stretch
Ab Plank with Straight Leg Raise
 Ab Plank with Straight Leg Raise Position yourself face up with your knees bent at 90 degrees, feet flat on the floor. Your hands should be directly under your shoulders facing forward. While in this position
Dr. D. Ryan York, PT, DPT, CGS Doctorate in Physical Therapy Certified Golf Performance Specialist, GOLO Golf University
 Dr. D. Ryan York, PT, DPT, CGS Doctorate in Physical Therapy Certified Golf Performance Specialist, GOLO Golf University Dr. Chad Edwards, PT, DPT, CGFI Doctorate in Physical Therapy Certified Golf Fitness
Full swing technique is a pillar of a solid overall game. The following 4 core competencies are strong predictors of success in ball striking.
 Full Swing Analysis What are we trying to accomplish? Core Competencies in the Full Swing Full swing technique is a pillar of a solid overall game. The following 4 core competencies are strong predictors
The Golf Swing. The Fundamentals
 The Golf Swing The Fundamentals Fundamental #1 Grip & Set-Up The grip and set-up should be viewed as putting parts of a machine together. The right parts connected in the right way will allow the machine
Techniques To Treat Your Pain At Home (512)
") Techniques To Treat Your Pain At Home (512) 288-5322 7010 W. TX-71 Suite 360 Austin TX, 78735 Arm Only Bird Dog Start in the quadruped position (all fours) with arms and thighs perpendicular to the floor.
Techniques To Treat Your Pain At Home (512) 288-5322 7010 W. TX-71 Suite 360 Austin TX, 78735 Arm Only Bird Dog Start in the quadruped position (all fours) with arms and thighs perpendicular to the floor.
Mindfulness Lesson Plan
 Mindfulness Lesson Plan What is Mindfulness? MEDICAL DISCLAIMER Not all exercises are suitable for everyone and it is recommended that you consult your doctor before beginning this or any exercise program.
Test Name Analysis Assessment Swing Correlation
 Name: Caleb Wong Date: 2/21/14 Overview Because everyone s body is unique, understanding this is critical for safe and proper golf instruction and training. The Titleist Performance Institute (TPI) Physical
Instructional Manual
 Instructional Manual TABLE OF CONTENTS MEDICUS Dual 2000 Instructional Manual The Proper Grip 1 Posture, Stance & Alignment 2 Breakpoint 1: Takeaway 3 Breakpoint 2: Toe-up Position 4 Breakpoint 3: Setting
Structure (Down plane)
") By Lauren Russell Structure (Down plane) The body (toes, knees, hips, wrists and shoulders) is aligned parallel to the intended target line. The torso is tilted over the ball from the hips whilst maintaining
By Lauren Russell Structure (Down plane) The body (toes, knees, hips, wrists and shoulders) is aligned parallel to the intended target line. The torso is tilted over the ball from the hips whilst maintaining
PLAY BETTER GOLF and HAVE MORE FUN
 PLAY BETTER GOLF and HAVE MORE FUN Randy Meyer PGA Table of Contents Chapter Page Teaching Philosophy 1 Philosophy and Approach 3 Swing Fundamentals 2 Pre-swing 4 In-swing 5 Golf Tips 3 Ball position,
S t r e t c h i n g E x e r c i s e s
 Stretches for side of neck: 1. Sit or stand with arms hanging loosely at sides 2. Turn head to one side, then the other 3. Hold for 5 seconds, each side 4. Repeat 1 to 3 times Stretches For the side of
Trauma-Informed Yoga Lesson Plan
 Trauma-Informed Yoga Lesson Plan Triggers MEDICAL DISCLAIMER Not all exercises are suitable for everyone and it is recommended that you consult your doctor before beginning this or any exercise program.
KRIYA LOWER BACK AND HIPS
 KRIYA LOWER BACK AND HIPS 1. Pelvic Grind Left. Place your hands on your knees and begin grinding yourself in a big, smooth circle going to the left. Lift the chest up high as you tilt the pelvis back,
Baseball Training Program
 Baseball Training Program Always consult your physician before beginning any exercise program. The information and advice published or made available through the Orthopaedic and Neurosurgery Specialists,
Chapter 8 - POSTURE. The following guidelines can be used to develop good postural habits. ! 2010 High Performance Golf
 Chapter 8 - POSTURE Posture is the habitual position that people hold themselves in, whether they are sitting, standing, active or sedentary. The aim of good posture is to maintain the natural curves of
The Takeaway. The waggle can be an excellent opportunity to rehearse your takeaway
 The Takeaway Your approach to the ball is the final step over which you have total control. Once you actually start the swing, you need to depend on rhythm, tempo and balance to see you through the swing.
GOLF SPECIFIC DYNAMIC WARM UP
 GOLF SPECIFIC DYNAMIC WARM UP Golf-related injury is common. The three most common areas injured include: 1. The back 2. The wrists, and 3. The elbows. A golf-specific dynamic warm-up is recommended by
Legal Disclaimer You must get your physician s approval before beginning this exercise program.
 1 Legal Disclaimer You must get your physician s approval before beginning this exercise program. These recommendations are not medical guidelines but are for educational purposes only. You must consult
Is Your Gym Program Destroying your Golf Swing?
 Is Your Gym Program Destroying your Golf Swing? By Ramsay McMaster Golf Specific Physical Therapist to PGA Australia, Great Britain and PGA Tour Players Introduction: Many golf professionals and golfers
The Fundamentals of Putting
 The Fundamentals of Putting Episode 1 - Setup and Aiming A proper setup position is a prerequisite of a good putt. Setup includes body posture, gripping the putter, alignment of body relative to the ball
ORIENTATION SEQUENCE
 ORIENTATION SEQUENCE In-Trinity builds strength, deepens flexibility and improves balance, coordination and agility. For the first time, you will access movements never possible before, taking your training
Carolina Trace Country Club
 Carolina Trace Country Club Short Game School Michael Krick Head Golf Professional Trace Member Table Of Contents Putting 1, 2 Putting Evaluation Matrix 3 Putting Positions 4 Chipping 5, 6 Pitching 7,
1. Your anchor: Easy sitting, deep exhales (Sukhasana)
") Airplane yoga: 18 exercises for healthy flying Don't enjoy flying as much as you should? You're tired at your destination? These 18 exercises will set you straight By CNN/Charlotte Dodson 1. Your anchor:
Airplane yoga: 18 exercises for healthy flying Don't enjoy flying as much as you should? You're tired at your destination? These 18 exercises will set you straight By CNN/Charlotte Dodson 1. Your anchor:
T H E M O S T I M P O R T A N T L E S S O N O F A L L
 T H E M O S T I M P O R T A N T L E S S O N O F A L L #2 The Grip CHEAT SHEET 1. Minimal compensation for consistency 2. Grip rotation influences club face angle 3. Turn hand right for more hook, Turn
U.S. Shooting Team Balance, Strength and Stability Workout. Training Work-Out
 U.S. Shooting Team Balance, Strength and Stability Workout Training Work-Out Modified by Dan Durben and Sommer Wood November 2006 from the program originally developed by Amber Darland for the USA Shooting
The Three Swings of Wright Balance: Which One Are You?
 The Three Swings of Wright Balance: Which One Are You? Our 25 years of research has yielded the following. In summary we are able to do simple body measurements, provide a student with Stance Widths that
Shoulder Exercises for Combined Labrum Repair Rehabilitation Protocol
 Shoulder Exercises for Combined Labrum Repair Rehabilitation Protocol The exercises illustrated and described in this document should be performed only after instruction by your physical therapist or Dr.
Dr. D. Ryan York, PT, DPT, CGS. Dr. Chad Edwards, PT, DPT, CGFI
 Dr. D. Ryan York, PT, DPT, CGS Doctorate in Physical Therapy Certified Golf Performance Specialist, GOLO Golf University Dr. Chad Edwards, PT, DPT, CGFI Doctorate in Physical Therapy Certified Golf Fitness
LEVEL 1 SKILL DEVELOPMENT MANUAL
 LEVEL 1 SKILL DEVELOPMENT MANUAL Lesson Manual C A Publication Of The USA Hockey Coaching Education Program The USA Hockey Coaching Education Program is Presented By LESSON C-1 SPECIFIC OBJECTIVES 1. Refine
RJT. Pupil Task Cards: Throwing JUMP THROW RUN
 RJT s: Throwing RUN JUMP THROW s: Introduction Introduction to the s An important part of every child s cognitive development is to encourage them to explore new things and use self-guided learning to
U.S. Shooting Team Balance, Strength and Stability Workout. Shooting Warm-Up
 U.S. Shooting Team Balance, Strength and Stability Workout Shooting Warm-Up Modified by Dan Durben and Sommer Wood from the program originally developed by Amber Darland for the USA Shooting National Rifle
The Secrets Of The Swing
 The Secrets Of The Swing brought to you by www.golfclubdistance.org and Amazing Golf Mind Table of Contents 1. The Address 2. The Take Away 3. The Top Of The Backswing 4. The First Move 5. The Downswing
 Tennis Elbow Solution Copyright 2008. TennisElbowSolution.com. All rights reserved. No portion of this manual or its supporting documents may be used, reproduced or transmitted in any form or by any means,
Coaching Principles. 1. Introduce 2. Demonstrate 3. Explain 4. Organize 5. Execute 6. Correct 7. Practice
 5 Pin Bowling Drill Book Updated August 2008 Coaching Principles STEPS IN TEACHING A DRILL 1. Introduce 2. Demonstrate 3. Explain 4. Organize 5. Execute 6. Correct 7. Practice GENERAL PRINCIPLES Drills
Player Development. Pitching 1
 Pitching Player Development Pitching 1 Delivery Mechanics Checklist: 1. Feet slightly spread on throwing arm side of rubber 2. Body weight positioned over stride leg 3. Torso upright 4. Hips and shoulders
EXERCISE GUIDE STRENGTHEN YOUR CORE
 EXERCISE GUIDE STRENGTHEN YOUR CORE BACK EXTENSION WITH BALL Rest your belly on the ball, feet planted wide apart on the floor behind you and hands resting on your lower back. Peel your chest away from
Basic Shooting Skills Positions. By: Shannon Carlton
 Basic Shooting Skills Positions By: Shannon Carlton Agenda Introduction Dominant Eye Rifle Fitting Prone Position Rifle Fitting Tips Standing Position Sequences Checklists Positions Stable Comfortable
KOSCIELISKO POL. Biathlon Shooting Lesson :00 16:30
 KOSCIELISKO POL Biathlon Shooting Lesson 29.09.2011 15:00 16:30 Basic Shooting Skills Positions Basic Shooting Skills Positions Basic Shooting Skills Positions Introduction Dominant Eye Rifle Fitting Prone
Moorhead Baseball Routines/Hitting Drills
 Moorhead Baseball Routines/Hitting Drills Philosophy How we train: Teach everyday with the goal of our players becoming their own coach. Get them to feel what s going on. Consistent mix of instruction
Chair exercises Sally Ann Belward, Falls Clinical Lead Physiotherapist
 Chair exercises Sally Ann Belward, Falls Clinical Lead Physiotherapist Exercise safety Exercise should be comfortable and fun Ensure participants are sat on a sturdy chair, have comfortable clothing and
The Warrior Upper Body Perfect Handstand Training Manual. All Rights Reserved Copyright 2012, Tyler Bramlett
 The Warrior Upper Body Perfect Handstand Training Manual By Tyler J. Bramlett All Rights Reserved Copyright 2012, Tyler Bramlett www.warriorupperbody.com www.garagewarrior.com No portion of this book may
The Ancient Art of Chi Gong. for. Strength & Flexibility
 The Ancient Art of Chi Gong for Strength & Flexibility The Student/Athlete Educational Foundation, Inc. 12 Manison Street, Suite E Stoneham, MA 02180 781-850-4520 doc@chap.com Abdominal Butterfly (Stretches
The Simple Swing
 The Simple 1-2-3 Swing The Amazing "1-2-3 Swing" Guarantees The Average Golfer Can Break 90 In Less Than a Week! The Amazing "1-2-3 Swing" Guarantees Average Golfers Can Learn To Consistently Hit The Ball
Basic Shooting Skills Principles of Marksmanship. By: Shannon Carlton
 Basic Shooting Skills Principles of Marksmanship By: Shannon Carlton Agenda Introduction Principles of Coaching 5 Principles of Marksmanship Developing a Routine Making Sight Adjustments Sequences Principles
Welcome Statement. 1. the Plan. 2. the History. 3. the Warm Up. 5. the Setup. 6. the Swing 7. the Glue 8. the Tour Draw Practice Station.
 table of contents.. Welcome Statement. 1 the Plan. 2 the History. 3 the Warm Up. 5 the Setup. 6 the Swing 7 the Glue 8 the Tour Draw Practice Station. 9 the Tour Draw Assessment. 10 Summary. 11 Key Phrases.
STEP 1. STANCE. The stance must be a consistent, repeatable and comfortable.
 STEP 1. STANCE The body can be divided into 2 parts the upper body from the hips up and the lower body from the hips down. The upper part of the body must maintain consistent position from shot to shot
S&DMHA Player Development Program Book Four - Goaltending
 S&DMHA Player Development Program Book Four - Compiled by Wayne King to be used as reference for all minor hockey coaches Good goaltending is essential to the success of your team. For individuals to be
IMPORTANT COPYRIGHT AND LEGAL INFORMATION
 IMPORTANT COPYRIGHT AND LEGAL INFORMATION This book is the intellectual property of Anthony Procopis of http://www.thetruthaboutputting.com and AAP Enterprises Pty Ltd. This e-book cannot be shared. This
CHAPTER 4 ADVANCED GROUND-FIGHTING TECHNIQUES
 (FM 21-150) CHAPTER 4 ADVANCED GROUND-FIGHTING TECHNIQUES After achieving an understanding of the basics of ground fighting, other elements of fighting on the ground are added. These techniques, however,
Belton High School Marching Fundamentals 2016
 Belton High School Marching Fundamentals 2016 Fundamentals of Teaching Fundamentals: 1. Say the name of the maneuver (INSTRUCT) 2. State its purpose (INSTRUCT) 3. Demonstrate it slowly, several times,
AUSTRALIAN BASEBALL UMPIRE S MANUAL
 AUSTRALIAN BASEBALL UMPIRE S MANUAL UMPIRE POSITIONS AND SIGNALS 2009 by Australian Baseball All rights reserved. No part of this publication may be reproduced or distributed in any form without prior
Tadasana Variation 7. Thighs back, buttocks in (with two helpers)
") Tadasana Variation 7 Pro ps 2 ropes or belts, Thighs back, buttocks in (with two helpers) 2 helpers This variation produces a similar effect to the previous one but with a different method. Stand in Tadasana
Tadasana Variation 7 Pro ps 2 ropes or belts, Thighs back, buttocks in (with two helpers) 2 helpers This variation produces a similar effect to the previous one but with a different method. Stand in Tadasana
Running and Yoga: Perfect Together
 Running and Yoga: Perfect Together Yoga provides the perfect balance to keep your runner s body healthy. Here are a few reasons why. Adding a few key yoga poses into your workout will not only improve
SUNDAY MONDAY TUESDAY WEDNESDAY THURSDAY FRIDAY SATURDAY **REST**
 At minimum, walk 30 minutes, 5 days a week. Not sure if an exercise is right for you? Test your blood sugar before and after you work out. If your blood sugar is higher afterwards, the exercise is too
Dr. D. Ryan York, PT, DPT, CGS. Dr. Chad Edwards, PT, DPT, CGFI
 Dr. D. Ryan York, PT, DPT, CGS Doctorate in Physical Therapy Certified Golf Performance Specialist, GOLO Golf University Dr. Chad Edwards, PT, DPT, CGFI Doctorate in Physical Therapy Certified Golf Fitness
Level 1 Vault STRETCH JUMP ONTO A RAISED MAT SURFACE (A MINIMUM OF 16 ) AND THEN HANDSTAND FALL TO STRAIGHT LYING POSITION ON THE BACK
 AND THEN HANDSTAND FALL TO STRAIGHT LYING POSITION ON THE BACK") Level 1 Vault The gymnast may perform the vault (both skills) two times. Each phase of the vault is worth 5.0 points with the score of each phase added together. The highest total score of the two vaults
Level 1 Vault The gymnast may perform the vault (both skills) two times. Each phase of the vault is worth 5.0 points with the score of each phase added together. The highest total score of the two vaults
Coach & Goaltenders GOALTENDER BASICS
 Coach & Goaltenders GOALTENDER BASICS STANCE To maximize net coverage and ability to move while maintaining balance. Body Position: Feet Little more than shoulder s width apart, slight ankle bend with
The Classical Circle Dance from Pa Kua Chang. Introduction and Transition 1 Single Palm Change
 1-1 The Classical Circle Dance from Pa Kua Chang The Circle Dance existed before Heaven and Earth. It is the Mother of Creation. And because it lies so close to Creation, how can it lead to destruction?
Try on this 10 minute yoga sequence for size to balance your body and focus your mind.
 Need a little more energy to start your workday right? From: https://www.workandmoney.com/s/10-minute-yoga-routine Try on this 10 minute yoga sequence for size to balance your body and focus your mind.
Yoga for Kids. Sanford Health
 Yoga for Kids What is yoga? Yoga is an activity that involves body and mind awareness, with a focus on posture and breathing. Yoga is designed to bring mental, physical, and emotional health and balance.
by John Bertges PGA Professional / PGTA Master Professional
 by John Bertges PGA Professional / PGTA Master Professional His name may be overused in golf circles today, but Tiger Woods has taught us a lot in reference to the Modern Golf Swing. Many of his accomplishments
A Publication Of The USA Hockey Coaching Education Program The USA Hockey Coaching Education Program is Presented By
 LEVEL 1 SKILL DEVELOPMENT MANUAL Lesson Manual B A Publication Of The USA Hockey Coaching Education Program The USA Hockey Coaching Education Program is Presented By LESSON B-1 SPECIFIC OBJECTIVES 1.
Progression 1
 www.tenniselbowsolution.com 1 Tennis Elbow Solution Copyright 2008. TennisElbowSolution.com. All rights reserved. No portion of this manual or its supporting documents may be used, reproduced or transmitted
Fix Your Swing Series. Table of Contents
 Fix Your Swing Series Table of Contents 1. Hit More Fairways 2. Fix Your Setup 3. Fix Your Ball Position 4. Fix Your Takeaway 5. Fix Your Backswing 6. Fix the Top of Your Swing 7. Fix Your Downswing 8.
Table of Contents. Page 2 of 36
 Table of Contents Introduction... 3 Setup Lessons... 4 The Grip... 4 Ball Positioning... 5 Posture... 7 Alignment... 9 Swing Lessons - Step 1... 11 Swing Lesson - Step 2... 21 The Loop Drill... 24 Standing
UK Yoga Sports Federation
 UK Yoga Sports Federation STANDING HEAD TO KNEE POSE 4 parts 1. Stand with feet together, shift body weight to standing leg (leg closest to the judges) and lock the knee (leg straight and thigh muscle
TRUE TO FORM COMPANION BOOK FROM PAIN TO PERFORMANCE. Dr. Eric Goodman HOW TO USE FOUNDATION TRAINING FOR SUSTAINED PAIN RELIEF AND EVERYDAY FITNESS
 TRUE TO FORM HOW TO USE FOUNDATION TRAINING FOR SUSTAINED PAIN RELIEF AND EVERYDAY FITNESS COMPANION BOOK Dr. Eric Goodman FROM PAIN TO PERFORMANCE. PARt one: Foundation Training Exercises Anchoring...
Warm Ups. Standing Stretches
 Warm Ups Mild warm-ups are a necessity for everyone. The need for warm-ups increases with age as the body becomes less elastic over time. It is recommended that you execute the warm-up routine in this
Golf Stretches and Flexibility Exercises
 43 Thames Street, St Albans, Christchurch 8013 Phone: (03) 356 1353. Website: philip-bayliss.com Golf Stretches and Flexibility Exercises The game of golf may have originated in Scotland. Avid players
Sponsored by WakeMed Rehab and Healthworks
 Sponsored by WakeMed Rehab and Healthworks Welcome to SportFit Golf Welcome to SportFit Golf, our golf-specific conditioning program for golfers of all ages and abilities. Regardless of your handicap,
ACL Base Strength Program Day 1
 ACL Base Strength Program Day 1 Welcome to the Cratos ACL prevention program. This program was written by Physical Therapist and Athletic Trainer, Tasha Mulligan, to serve as a pre-season base strength
The Better Golfer s Guide to Strength Training
 The Better Golfer s Guide to Strength Training Your golf swing requires 21 different muscles to work together You need to train every one. Michael Wood, CSCS Chief Fitness Officer, Koko FitClub Let s Tee
Level 1 Vault STRETCH JUMP ONTO A RAISED MAT SURFACE (A MINIMUM OF 16 ) AND THEN HANDSTAND FALL TO STRAIGHT LYING POSITION ON THE BACK
 AND THEN HANDSTAND FALL TO STRAIGHT LYING POSITION ON THE BACK") Level 1 Vault The gymnast may perform the vault (both skills) two times. Each phase of the vault is worth 5.0 points with the score of each phase added together. The highest total score of the two vaults
Level 1 Vault The gymnast may perform the vault (both skills) two times. Each phase of the vault is worth 5.0 points with the score of each phase added together. The highest total score of the two vaults
The Pure Point Golf Driver DVD Special Outline Instruction to Focus on
 The Pure Point Golf Driver DVD Special Outline Instruction to Focus on Purpose: This instructional resource was included for your reference. The points outlined in the following sections are what we have
Lesson 3. Golf. Lesson Objectives. Personal Conditioning. Prepare Students... 3 min Explain/Demonstrate/Practice
 Lesson 3 Lesson Objectives Time Page Equipment & Materials Personal Conditioning Lesson 25........................................... 5 min. Prepare Students.................................... 3 min........
Sun Salutation Pose #1 Mountain Pose 1
 Sun Salutation Pose #1 Mountain Pose 1 Stand upright with feet together and look straight ahead, hands alongside body and palms forward. Lift abdomen inward and upward. Activate quadriceps and evenly distribute
40 Allied Drive Dedham, MA (office)
") Standing forward flexion Stand facing a mirror with the hands rotated so that the thumbs face forward. Raise the arm upward keeping the elbow straight. Try to raise the arm by hinging at the shoulder as
Standing forward flexion Stand facing a mirror with the hands rotated so that the thumbs face forward. Raise the arm upward keeping the elbow straight. Try to raise the arm by hinging at the shoulder as
AMATEUR HOCKEY ASSOCIATION ILLINOIS, INC. MITE 8 & UNDER AMERICAN DEVELOPMENT MODEL
 Mite 8 & Under American Development Model Week 1 This coach s manual is intended to provide the instructions and tools to conduct the Mite and 8 & Under Illinois Hockey - Skills Challenge. Mite
OrthoBethesda Therapy Services Total Hip Replacement Home Exercise Program
 OrthoBethesda Therapy Services Total Hip Replacement Home Exercise Program General Instructions: Initially perform 10 repetitions of each exercise, 3 times per day. Increase to 20 repetitions, 3 times
Yoga Home Practice Guidebook. Boston Medical Center Veterans Back to Health Trial
 Yoga Home Practice Guidebook Table of Contents Welcome... 1 Study Contact Information... 2 Making the Most Out of Your Yoga Experience... 3 Setting up Your Home Practice... 4 Completing Your Home Practice
Mark Wood s Full-Swing Basics. 7 Steps to Jump-Start Your Game for 2015
 Mark Wood s Full-Swing Basics 7 Steps to Jump-Start Your Game for 2015 On giving short 30-minute corporate clinics, I am normally speaking with a large group of golfers who are of varying abilities. As
Straighten Up is an enjoyable very short spinal health program designed to help you feel and look your best. Basic Rules: 1. Think positively 2.
 Straighten Up is an enjoyable very short spinal health program designed to help you feel and look your best. Basic Rules: 1. Think positively 2. Stand tall in confident Inner Winner posture. 3. Breathe
Kent Canoe Services
 Kent Canoe Services www.thecanoeshop.co.uk Eskimo Rolling (Kayaks) Introduction: Welcome to our article on Eskimo rolling. Years ago eskimo rolling was considered to be an advanced skill only performed
ROWING CANADA AVIRON ROWING TECHNIQUE MOVEMENT PATTERNS IN SWEEP AND SCULLING TECHNIQUE IN CANADA FEBRUARY 28, 2017
 ROWING CANADA AVIRON ROWING TECHNIQUE MOVEMENT PATTERNS IN SWEEP AND SCULLING TECHNIQUE IN CANADA FEBRUARY 28, 2017 INTRODUCTION TECHNIQUE CAN BE DEFINED AS A SPECIFIC SEQUENCE OF MOVEMENTS OR PARTS OF
 Invocation Prayers Index Age : 8-11 yrs 1) Standing: a) Tree pose (Vrukshasana) b) Utkatasana c) Eagle pose (Garudasana) 2) Sitting: a) Mountain pose (Parvatasana) b) Posterior Stretch pose (Paschimotasana)
Teaching Body Contact and Checking
 AGES 16 / 18 AND UNDER Teaching Body Contact and Checking LESSON WORKBOOK KENNY RAUSCH 2 Body checking is a series of different skills which have to be learned, developed and trained. The goal of a body
RULES POSTURE GUIDELINES: ADULT DIVISION COMPULSORY POSTURES
 RULES 2018-2019 POSTURE GUIDELINES: ADULT DIVISION COMPULSORY POSTURES Copyright 2014 International Yoga Sports Federation (IYSF) Second Edition, 2016. All rights reserved. Except for brief quotations
TACTICAL COMBATIVES COURSE STUDY GUIDE
 TACTICAL COMBATIVES COURSE STUDY GUIDE STANDING TECHNIQUES 1. ROUND KICK (All Minor Tasks) 1. Push off on the ball of your trail leg foot, and then step somewhat toward the target and laterally to the
The Mechanics of Modern BREASTSTROKE Swimming Dr Ralph Richards
 The Mechanics of Modern BREASTSTROKE Swimming Dr Ralph Richards Breaststroke is the least efficient of the four competition strokes because a large amount of water resistance is created due to body position
ShuttlE. Schools Badminton. Module 5: 10 starter lessons
 ShuttlE Time Schools Badminton Teachers MANUAL Module 5: 10 starter lessons ShuttlE Time Schools Badminton Teachers MANUAL 10 starter lessons Badminton World Federation 2011. First published November
THE FOUNDATION OF THE SHOT
 CHAPTER_2 THE FOUNDATION OF THE SHOT Success in archery depends on consistency and consistency starts with a solid foundation. Fully understanding and being able to apply the fundamentals is the key to
11 Short Game Drills To Help You Up And Down It From Anywhere!
 Table of Contents Introduction... 3 Chipping... 4 Drill #1 - Wrist Firm (Part 1)... 4 Drill #2 - Wrist Firm (Part 2)... 4 Drill #3 - Chipping Accuracy... 6 Pitching... 8 Drill #1 - Distance Control (Part
Quintic Ball Roll Key Parameters
 Quintic Ball Roll Key Parameters How to interpret the numbers... www.quinticballroll.com 1. Face Angle & Start Direction 2. Clubhead Twist 3. Ball Speed & Pace Control 4. Launch Angle 5. Spin & Roll Key
AEROBIC GYMNASTICS Code of Points APPENDIX II Guide to Judging Execution and Difficulty
 FÉDÉRATION INTERNATIONALE DE GYMNASTIQUE FONDÉE EN 1881 AEROBIC GYMNASTICS Code of Points 2009 2012 DRAFT OCTOBER 2008 APPENDIX II Guide to Judging Execution and Difficulty Page 1 of 80 INTRODUCTION This
KAYAK TECHNICAL TEMPLATE. Scott Oldershaw National Team Coach
 KAYAK TECHNICAL TEMPLATE Scott Oldershaw National Team Coach Revised 09/2009 Introduction This Kayak Technical Template is for coaches involved with athletes preparing for competition at the Canada Games,