British & Indian Armoured Units Of the Burma Campaign: A Painting Guide By R Mark Davies V1.5
|
|
|
- Spencer Nicholson
- 6 years ago
- Views:
Transcription

1 British & Indian Armoured Units Of the Burma Campaign: A Painting Guide By R Mark Davies V1.5 Introduction Field Marshal Bill Slim s XIVth Army is now well-known as the Forgotten Army, even though its deeds are well known by the public at large. However, the XIVth Army s campaign to defend India and then to liberate Burma from the Japanese, remains the Forgotten Wargames Period of World War 2. I think that a very large part of the reason for this is that while the big picture is easily accessible, information on the details of the War Against Japan remain elusive and very difficult for the average wargamer to research. One need only look at the gigantic, yawning disparity between the number of books available on the Normandy Campaign compared to the number available on the Burma Campaign. The lack of books available on the subject is very sad, considering that Slim s final victory against the Japanese was quite possibly one of the greatest British military achievements of all time. From a wargamer s point of view, the campaign presents a wide variety of different tactical situations many of them far removed from the pure jungle warfare that most people might expect. I ve made it my mission therefore, to shed a little light on the campaign, so that wargamers can join me in playing what I consider to be one of the most interesting aspects of World War 2. I ve already made a start the orders of battle and army lists for the XIVth Army, I Burma Corps and Japanese Burma Area Army are already available on the Battlefront: WWII website at along with a number of varied scenarios. Presented here then, is a guide to the paint schemes of the British and Indian armoured units of the campaign. There are still many pieces of the puzzle to discover, but in the meantime I ve given them my best guess. The common misconception is that British and Indian tanks in the Burma Campaign were usually just monotonous Jungle Green, devoid of markings. However, that view usually comes from people who have only looked at dustsmeared and stowage-covered vehicles in black and white photos. In reality these vehicles were often as colourful and interesting in their markings as their comrades in Normandy, though new photos do often throw up more puzzles than answers. Collected here is the sum-total of my knowledge on the subject. I hope it is of use and encourages new players to join the Forgotten Army of Burma wargamers. Please get in touch if you can correct my mistakes or add something new to the document.
2 British & Indian Camouflage Paint Colours British and Indian vehicles in the Far East were painted a single uniform camouflage colour. There were no official disruptive camouflage schemes and to date I have not come across any confirmed examples of locally-adopted disruptive schemes. However, photographs of the 7th Armoured Brigade s Stuarts in 1942 do tend to suggest a banded camouflage in some photos. Some have suggested that this might be the remnants of their previous Middle Eastern camouflage, though records do state that the brigade repainted its vehicles in transit to the Far East. It may therefore be merely a trick of light, dust, damp or poor photographic reproduction. The standard camouflage colours used by the British and Indian Armies were: Middle Bronze Green (a.k.a. Khaki Green No.3 ) This was the standard colour for all British vehicles in the Far East in the late 1930s and early 1940s. The closest match is Humbrol 80, though note that prior to the Japanese attack, vehicles would normally be polished to a gloss, resulting in a deeper, darker tone. A suggested match is Vallejo 895(88). Standard Camouflage Colour (S.C.C.) 13 Jungle Green This colour replaced Middle Bronze Green on British vehicles in the Far East from It was a very drab and muddy green and darker than US Olive Drab. The title Jungle Green was not official and it was significantly different to the Jungle Green dye used in uniform manufacture, which was rather bluish and faded to a greyish tone. S.C.C. 13 was however, used for weapons and personal equipment such as helmets. Mix Humbrol in ratio 4:3:1. A suggested match is Vallejo 893(95). S.C.C. 15 Olive Drab This was introduced in April 1944 and although not officially used in the Far East, vehicles and equipment delivered from the UK or Canada would normally arrive painted in S.C.C. 15 and might not be repainted prior to deployment in the field. The colour was introduced to match US Olive Drab, which it did when fresh, though it faded to green unlike US Olive Drab, which faded to grey. Mix: Humbrol in ratio 5:5:2. A reasonable match is Humbrol in ratio 8:1. A suggested match is Vallejo 924(94). S.C.C. 16 Very Dark Drab This colour was introduced in the Far East in 1944, though according to Dennis Oliver s work, does not appear to have been employed in the field until 1945 and possibly not in operations against the Japanese at all. It was a very dark, dull, dirty brown green. Darker than both S.C.C. 13 and US Olive Drab. It is also sometimes referred to as S.C.C 207 and was recorded as being too dark to be used in the painting of personal equipment. Mix Humbrol in ratio 10:2:1. A suggested match is Vallejo 897(98). US Olive Drab US equipment delivered directly from the USA would normally arrive painted in US Olive Drab and would often find its way into the field still painted in this colour. The closest match is Humbrol 155. A suggested match is Vallejo Brown-Violet 887(93). British & Indian Vehicle Markings Listed on the following pages are the known marking schemes for the British and Indian armoured units in the Burma Campaign, as well as a few semi-educated guesses. By and large they followed the usual British marking regulations regarding placement and style of markings, but there were a few oddities:
, Royal Horse Artillery (25pdr) Battery, 95th Anti-Tank Regiment, Royal Artillery (2pdr) Notes 1.")

3 7th Armoured Brigade (I Burma Corps 1942) Arm of Service Signs for 7th Armoured Brigade HQ 7th Armoured Brigade 7th (Queen s Own) Hussars (Stuart I) 2nd RTR (Stuart I) 414th Field Battery (Essex Yeomanry), Royal Horse Artillery (25pdr) Battery, 95th Anti-Tank Regiment, Royal Artillery (2pdr) Notes 1. The 7th Armoured Brigade was transferred from the Middle East originally destined for Singapore, it was diverted to Burma. Sources conflict regarding paint schemes, though one veteran s memoirs definitely state that the tanks were repainted in Jungle Green (almost certainly Mid Bronze Green, as SCC 13 Jungle Green did not exist in 1942) and the red jerboa formation signs were painted green to match. A photo of a Stuart in Burma with the AoS serial 60 is identified as belonging to 2 RTR in most books, though research has shown this to be incorrect, as the Brigade HQ had 60, with 2 RTR having 62. Note that this system of AoS serials was made obsolete at the end of 1941, though 7th Armoured Brigade had probably not caught up with the latest AoS instruction while in transit to Burma. 2. Although they did not have any AFVs (apart maybe, from the odd Carrier), I have included the attached RA units in the above list. 3. There were many other AFVs involved in the Retreat From Burma the Rolls Royce Armoured Cars of the Burma Auxiliary Force, the Universal Carriers of battalion Carrier Platoons and the Wheeled Armoured Carriers of some of the Indian infantry battalions. However, I have no idea what markings they may (or may not) have had. The few photos I can find of Carriers in Burma circa 1942 do not appear to have any markings. 4. Unusually, 7th Armoured Brigade painted its markings the wrong way round, with the formation sign (the Green Jerboa) on the right-hand side and the AoS marking on the left. Unfortunately I didn t realise this when I painted mine (see photos below)! Squadron Tac-Signs for 7th Armoured Brigade RHQ A Sqn B Sqn C Sqn 7 H 2 RTR Troop numbers were often painted within the squadron tac-sign, in the same colour as the tacsign. The troop numbers were sequential through the regiment, so A Sqn would have 1-4, B Sqn would have 5-8 and C Sqn I have not identified markings for Sqn HQ tanks, though HQ was often used.

4
5 50th Indian Tank Brigade (Indian XV Corps ) Arm of Service Signs for 50th Indian Tank Brigade 19th Lancers 1945 marking HQ 50th Indian Tank Brigade 25th Dragoons (Lee) 146th RAC (9th Duke of Wellington s Regt [West Riding]) (Valentine in 1st Arakan Campaign, then Lee) Indian 19th (King George V s Own) Lancers (Sherman V) 54 or Notes 45 Indian 45th Cavalry (Stuart III) 1. In 1945 the AoS signs were changed from red/yellow to plain red. 2. The markings shown here for 45th Cavalry are conjectural, as I have been unable to confirm the correct markings for the regiment and the gypsy caravan arrangement of stowage in photos makes it impossible to identify markings other than the large Allied Stars on the turret. The regiment may have belonged to a higher organisation and only been on temporary attachment to 50th Tank Brigade and may therefore have been marked accordingly. Indeed, the regiment had previously been the Corps Armoured Recce Regiment for XXXIII Corps prior to its attachment to 50th Tank Brigade in September 1944 (see XXXIII Corps page). Alternatively, the regiment may have been marked as an Armoured Recce Regiment (the standard AoS sign for an Armoured Recce Regiment was blue/green with 45 serial, though I have no evidence to suggest that it was used in India/Burma) th RAC probably used an older AoS serial during their involvement in the First Arakan Camapign of However, I ve no idea what this may have been. 4. In 1945 the 19th Lancers also carried an additional marking alongside the 50th Tank Brigade sign (see above right). Note that the colours of blue and yellow are conjectural. This may have been the sign for the Indian XXXIV Corps (which was created in 1944 to be the XIVth Army reserve formation once XXXIII Corps was committed to the Battle for Imphal), though I have been unable to confirm this. The 19th Lancers at this time also carried unusual squadron tac-signs (see below) and do not appear to have carried AoS signs. Squadron Tac-Signs for 50th Indian Tank Brigade RHQ A Sqn B Sqn C Sqn RHQ A Sqn B Sqn C Sqn 25 D 19 L 146 RAC 19 L (1945) Numbers were painted within the squadron tac-sign which indicated the seniority within the squadron. SHQ would have 1 and the four troops would have 2, 3, 4 or 5. These numbers were painted in the same colour as the tac-sign, except for 19th Lancers in 1945, which painted the numbers in black. The squadron tac-signs were usually painted on the rear-quarters of the turret. 45 C (conjectural)


6 Left: A Lee of 50th Indian Tank Brigade in the Arakan. Below: Lees of 25th Dragoons at Ngakyedauk Pass ( The Admin Box ), 1944.

7 Above: Shermans of B Squadron, 19th Lancers, in the Arakan in Note the non-standard squadron tac-sign and number 1 inside the tac-sign. In this instance, it indicates the 1st Troop of B Squadron, which would probably be the regiment s No. 5 Troop. Right: A Sherman of B Squadron, 19th Lancers near Kangaw in Note that all tanks of the 19th Lancers in 1945 seem to have carried bamboo poles and camouflage nets on the sides of the hull.


8 Left: A Grant Mk I of 50th Indian Tank Brigade on Ramree island in Grant Mk Is, with the larger, British-designed turret, were very rare in Burma and where present, were normally used as command tanks. Note also the Universal Carrier with extended, deep-wading sides for amphibious landing. Right: A Grant Mk I of 50th Indian Tank Brigade, photographed on Ramree Island in Note the Grant Mk Is only appear in photos of 50th Tank Brigade. They are not listed in any equipment or strength returns for XIVth Army.
 (Lee 1 Sqn with XV Corps in Sherman) 150th RAC (10th York & Lancaster Regt) (Lee) Indian 7th Light Cavalry (Stuart III) Notes 1.")
9 254th Indian Tank Brigade (Indian IV Corps ) Arm of Service Signs for 254th Indian Tank Brigade HQ 254th Indian Tank Brigade 3rd Carabiniers (Lee) 149th RAC (7th King s Own Yorkshire Light Infantry) (Lee 1 Sqn with XV Corps in Sherman) 150th RAC (10th York & Lancaster Regt) (Lee) Indian 7th Light Cavalry (Stuart III) Notes 1. I have not identified the 254th Tank Brigade s formation sign in any photos. The sign certainly does not seem to have been used by the Shermans of C Sqn, 149th RAC, which served with XV Corps in the Arakan. However, photos of Lees are often very indistinct and the tanks themselves are plastered in dust, mud and stowage, so it s often difficult enough to make out the huge Allied Stars painted on them, let alone formation signs. 2. The 254th Tank Brigade used a unique system of AoS serials, as shown here, which it seems to have retained until the end of the war. 3. There is one photo showing a Lee of 254th Tank Brigade with the number 10 (presumably an individual vehicle number) painted in white on the upper-front glacis plate (next to the driver s vision-port) and the same number painted on the turret-rear (see photo below) th RAC used X, Y & Z to identify its squadrons, rather than the usual A, B & C. Squadron Tac-Signs for 254th Indian Tank Brigade RHQ A Sqn B Sqn C Sqn RHQ X Sqn Y Sqn Z Sqn 3 Carab 150 RAC 149 RAC 7 LC Numbers were painted within the squadron tac-sign which usually indicated the seniority within the squadron. SHQ would have 1 and the four troops would have 2, 3, 4 or 5. These numbers were painted in the same colour as the tac-sign. The squadron tacsigns were usually painted centrally on the turret side. However, photos of Stuarts from 7 LC show a dark (black?) centre to the tacsigns and the numbers 31, 32 and 37 in white. These were certainly individual tank numbers.


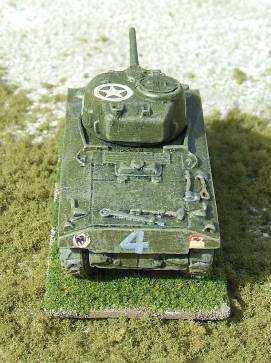
10 Lee tanks of C Squadron, 3rd Carabiniers, Imphal, mm Flames of War models by Battlefront Miniatures, painted by the author
 centre to the squadron tac-sign and the contrasting (white?) number within the tac-sign.")


11 Above: A Stuart III of B Squadron, 7th Light Cavalry, taken at Imphal in March 1944 Note the dark (black?) centre to the squadron tac-sign and the contrasting (white?) number within the tac-sign. There is another photo of a tank with 31 and a C Sqn tank with 37. This clearly is not a troop number, so it is probably an individual tank number. RHQ probably had numbers 1-4 and assuming 15 tanks per sqn, A Sqn had 5-19, B Sqn & C Sqn Above: A Lee of 254th Indian Tank Brigade at Imphal in 1944 Note the number 10 painted roughly (in white?) on the upper glacis and again on the turret rear (the turret here is reversed). This is probably another example of an individual tank number. A Valentine Bridgelayer of 2nd Independent Bridging Troop, RAC, which was attached to HQ 254th Indian Tank Brigade and is marked accordingly. 50th & 255th Indian Tank Brigades also had a troop of such vehicles attached. The model was converted from a Battlefront Valentine by Martin Small and was painted by the author.
 on the side of the 75mm gun sponson.")
12 Above: Lee tanks of 3rd Carabiniers somewhere near Mandalay in Note the 4 Arm-of-Service serial on the rear-right corner of the nearest tank s hull and the very large star painted (badly) on the side of the 75mm gun sponson. This photo clearly shows how muted markings became with a good coating of Burmese dust and grime.


13 Left: Lees of 254th Indian Tank Brigade support Indian infantry during the advance to Rangoon In Note the very large stars painted on the hull-sides. Although not very obvious, the name ANGEL is painted on the side-door of the nearest tank. Right: A Lee of 254th Indian Tank Brigade at Imphal in An individual tank number ( 16 ) is painted in white alongside the driver s port. The dark square visible on the transmission housing is probably where the Arm-of-Service marking or formation sign has been painted out as a camouflage measure. Left: Lees of 254th Indian Tank Brigade at Mandalay in Note the number 14 painted on the turret rear. This could be a troop number or an individual tank number. There does not appear to be a squadron tac-sign, but this may be due a lack of colour contrast to make it stand out on the black & white photo. Note also the one of these tanks retains the commander s cupola.
 painted within, in white.")
 on the side of the hull.")

14 Left: A Lee of C Squadron, 3rd Carabiniers, near Mount Popa in Note the squadron tac-sign painted on the turret, with the troop number ( 12 No.12 Troop) painted within, in white. Right: A Lee of 254th Indian Tank Brigade at Mandalay in Note the large star painted (very badly) on the side of the hull. Note also that this tank has a commander s cupola these were normally removed. Left: A Stuart III of C Squadron, 7th Light Cavalry, supports the 6th Gurkhas in the Irrawaddy Bridgehead, February As in the earlier photograph of a 7th Cavalry Stuart, this tank has an individual tank number ( 37 ) painted within the squadron sign instead of the troop number normally painted on Lees.


15 Left: A Lee named Caledonian of 254th Indian Tank Brigade in Mandalay, Right: A Lee of 3rd Carabiniers near Kalewa in January Note the 4 serial and two-tone Arm-of-Service sign painted centrally on the transmission housing. This tank also retains the commander s cupola. Left: A Lee of 3rd Carabiniers crossing the Irrawaddy in The AoS 4 serial can just be made out on the rear-right of the hull.
 had originally been landed with the British 7th Hussars (7th Armoured Brigade) at Rangoon in 1942 and had fought with that")
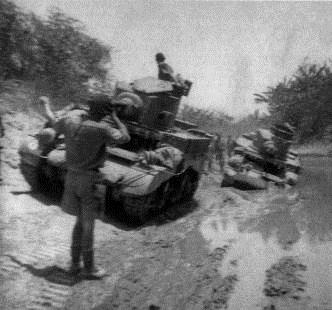
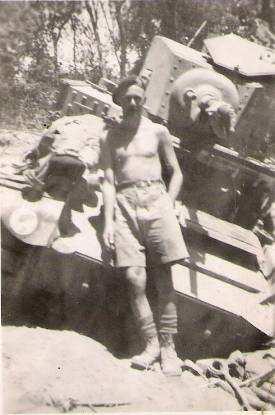
16 Above: A Stuart I Jalopy of the Indian 7th Cavalry, named Curse of Scotland, photographed in This strangely-named tank (a reference to the Bonnie Prince Charles Stuart) had originally been landed with the British 7th Hussars (7th Armoured Brigade) at Rangoon in 1942 and had fought with that regiment during the long retreat to the Chindwin River. It then became the only tank of that brigade to be successfully withdrawn across the Chindwin. Later passed to the Indian 7th Cavalry, it had its turret removed and became the Commanding Officer s mount. In 1945 it came full circle and re-crossed the Chindwin, becoming the only Allied AFV to return to Burma after the retreat of Note the elaborate anti-grenade mesh fitted over the turret opening.
 (Sherman V) Indian 5th (Probyn s) Horse (Sherman V) Indian 9th (Royal Deccan) Horse (Sherman V) Notes 1.")

17 255th Indian Tank Brigade (Indian XXXIII Corps ) Arm of Service Signs for 255th Indian Tank Brigade 50 or or or or 53 HQ 255th Indian Tank Brigade 116th RAC (9th Gordon Highlanders) (Sherman V) Indian 5th (Probyn s) Horse (Sherman V) Indian 9th (Royal Deccan) Horse (Sherman V) Notes 1. The Arm of Service signs for 255th Tank Brigade changed to plain red in 1945, though the change was not universally applied. 2. The motto of the 255th Tank Brigade LARO AUR LARTE RAHO is Urdu for To Strike And Strike Again. 3. One recorded variation for the formation sign of 255th Tank Brigade was carried by 116th RAC, being simply a reversal of the sign s colours to a white bull on a black field: Squadron Tac-Signs for 255th Indian Tank Brigade RHQ A Sqn B Sqn C Sqn 116 RAC 5H 9H As can be seen, the 255th Tank Brigade used a somewhat unique system of squadron tac-signs. Numbers were painted within the squadron tac-sign which indicated the seniority within the squadron. SHQ would have 1 and the four troops would have 2, 3, 4 or 5. These numbers were painted in the same colour as the tac-sign, except for 9th (Royal Deccan) Horse, which painted the numbers in white. The tac-signs were normally painted centrally on the turret sides, though some of 116th RAC and 5th (Probyn s) Horse were photographed with the signs painted on the rearquarters of the turret, while others of 116th RAC had no tac-signs at all.
.")
 painted on the rear of the hull.")
18 Left: A Sherman of B Squadron, 5th (Probyn s) Horse supporting Indian infantry near Meiktila in Note the number painted within the squadron tac-sign, indicating the 3rd Troop of B Squadron (which would probably be the regiment s No. 7 or No.8 Troop). The commander (a Sikh indicated by the turban and beard) is wearing a much paler uniform than the infantry, which suggests that he is wearing Khaki Drill, while the infantry are wearing Jungle Green uniforms. Below: Another Sherman from the same troop at Pyinbongyi, near Rangoon, in Note the large tank number ( 10 ) painted on the rear of the hull. These numbers seem to have been painted in the same colour as the squadron signs (yellow in the case of Probyn s Horse). Note that this tank is lacking the Allied star, which is strange, as the previous photo shows a tank from the same troop, at around the same time, with a star prominently painted on the hull.


19 Above: The crew of a Sherman named CAIRNGORM, of C Squadron, 116th RAC, carry out maintenance near Meiktila in Note the 51 serial on a two-tone Arm-ofService sign, painted on the tank-phone box at the rear-right corner of the hull. The squadron tac-sign is also clearly visible on the turret side, showing the darker red ring inside the white outer ring. There does not appear to be a troop number, but if painted in red paint there might not be enough contrast for it to show up against the Jungle Green. Right: A close-up of Cairngorm.


 Horse, near Meiktila in 1945.")
20 Right: A Sherman of the 9th (Royal Deccan) Horse at Meiktila in Note the two-tone Arm-of-Service sign, which is just visible behind some stowage, having been painted centrally on the upper edge of the transmission housing. The framework welded to the front to the tank was a common feature on Commonwealth tanks in Burma, being a mounting for barbed wire the intention being to make it more difficult for Japanese infantry to climb on board. Left: A Sherman named BIDAR belonging to the RHQ of the 9th (Royal Deccan) Horse, near Meiktila in Right: A Sherman of No.4 Troop, A Squadron, 116th RAC, undergoing maintenance in Note the 51 serial on a two-tone Armof-Service sign, painted on the tankphone box at the rear-right of the hull.

21 Above: A Sherman of 9th (Royal Deccan) Horse crosses a Valentine AVLB-laid bridge near Meiktila in Note the mysterious marking showing 20 on white square. It is thought that this marking relates to the capacity of auxiliary water tanks fitted internally. Although it s very difficult to see, the bridging weight mark ( 30 on a yellow disc) is painted between the 20 marking and the track. The Arm-of-Service sign ( 53 on a yellow-over-red square) is also just visible painted on the central panel of the transmission housing, just to the right of the 20 marking. Note also the stars painted on the deck of the bridge.
 Horse, advances from the Irrawaddy to Meiktila in 1945.")

22 Left: A Valentine Bridgelayer of No.3 Bridging Troop RAC, 255th Indian Tank Brigade, near Meiktila in Right: A column, including Shermans of the 9th (Royal Deccan) Horse, advances from the Irrawaddy to Meiktila in The 53 AoS serial is clearly visible here perhaps on a single colour (red) square rather than the more usual two-tone yellow/red square? Note also the large callsign number painted on the rear of the hull. These seem to have frequently been painted in the same colour as the squadron signs (light blue for the 9th Horse).


23 Sherman V tanks of the 9th (Royal Deccan) Horse at Meiktila, 1945
 Notes 1. The XIVth Army sign took the circular form shown above when painted on vehicles. On uniforms it was in the shape of a shield. 2.")
24 S S XIV XIVth Army Troops Arm of Service Signs for XIVth Army Troops 25 18th Field Regiment (Self-Propelled), Royal Artillery 44 Indian 16th Light Cavalry (Priest & Sherman V) (Daimler & Humber Armoured Cars) Notes 1. The XIVth Army sign took the circular form shown above when painted on vehicles. On uniforms it was in the shape of a shield. 2. The 18th Field Regiment had three batteries of M7 Priest self-propelled 105mm guns and was the only such regiment in XIVth Army. The Observation Post tanks were all Sherman V Battery Commanders OP tanks had the dummy-gunned variant, while the Troop Commander/FOO OP tanks retained their 75mm armament. 3. The vehicles of 18th Field Regiment also carried the usual (complicated) system of Royal Artillery tac-signs, which may be found here. They would not carry armour squadron tac-signs. 4. While the AoS serial for the 16th Light Cavalry is recorded as 44, the colours and design are not known with precision. The colours were presumably the green-over-blue typical of armoured car/recce regiments. However, 44 was normally the serial allocated to a Corps Armoured Car Regiment and as such, would have a white bar above the 44, signifying a Corps asset. My guess is that the white bar here was moved to the bottom, which would signify Army Troops. 5. The 400th Independent Scorpion Squadron RAC, equipped with Valentine Scorpion flail tanks, also served as XIVth Army Troops, but I have been able to find no more information regarding the unit least of all its markings. Squadron Tac-Signs for Un-Brigaded Regiments RHQ 16 LC A Sqn B Sqn C Sqn The squadron tac-sign contained a number indicating the seniority of the Troop within the squadron (normally starting with the SHQ as 1 ). A Priest of 18th Field Regiment photographed in Note the circular version of the XIVth Army formation sign painted on the transmission housing.

25 Above: Lees of the 254th Indian Tank Brigade, supporting 2nd Division, camouflage themselves among trees during their advance from Dimapur to Kohima in The Sherman is an OP tank for the M7 Priest-equipped batteries of 18th Field Regiment. Although it isn t easy to see in this photograph, the circular version of the XIVth Army formation sign is painted centrally on the transmission housing, as seen on the Priest in the previous photo. Left: An M7 Priest of 18th Field Regiment on the Irrawaddy in This Priest has the name DEEPCUT (the name of a garrison in the UK) painted on the side.


26 Left: A Royal Artillery OP Carrier photographed in Exact unit unknown. Note the very large star painted on the side. Right: A battalion of the 6th Rajputana Rifles acquired this Japanese Type 98 SoDa Carrier in The star is the symbol of the Imperial Japanese Army and is not a newly-applied Allied Star! It is not known which Japanese unit owned this vehicle prior to the Rajputanas getting their hands on it.
![Indian IV Corps Troops Arm of Service Signs for Indian IV Corps Troops 44 11th (Prince Albert Victor s Own [Frontier Force]) Cavalry (Daimler](/docs-images/73/68539852/images/27-0.jpg "Armoured Cars) Squadron Tac-Signs for Un-Brigaded Corps Troops RHQ A Sqn B Sqn C Sqn 11 PAVO The squadron tac-sign would normally have either the")
.")
27 Indian IV Corps Troops Arm of Service Signs for Indian IV Corps Troops 44 11th (Prince Albert Victor s Own [Frontier Force]) Cavalry (Daimler Armoured Cars) Squadron Tac-Signs for Un-Brigaded Corps Troops RHQ A Sqn B Sqn C Sqn 11 PAVO The squadron tac-sign would normally have either the Troop number painted within it, or would have a number indicating the seniority of the Troop within the squadron (normally starting with the SHQ as 1 ). I don t have any specific information on the PAVO, but the 16th Light Cavalry used the latter system, showing seniority within each squadron.
 Notes 1. The 3rd Gwalior Lancers armoured cars only took an active combat role during the 1st Arakan Campaign of 1942-43.")
28 Indian XV Corps Troops Arm of Service Signs for Indian XV Corps Troops 44 3rd Gwalior Lancers 41 81st (West African) Reconnaissance Regiment (Armoured Cars & Mounted Cavalry) (Light Reconnaissance Cars & Carriers) Notes 1. The 3rd Gwalior Lancers armoured cars only took an active combat role during the 1st Arakan Campaign of After that, only the Mounted Wing of the regiment was engaged in the Arakan and I doubt the horses carries AoS signs! 2. The XV Corps formation sign symbolised three Roman numeral 5s (Vs), totalling 15, as well as the corps three divisions moving forward. The Vs could also be black and the background could also be square, but when painted on vehicles it took the form shown circular with white Vs. 3. Following the withdrawal of the Armoured Wing of the 3rd Gwalior Lancers, The 81st (West African) Recce Regiment took over the role of XV Corps Recce Regiment in December However, this was only a temporary attachment and the regiment s vehicles retained the formation sign of the 81st (West African) Division, namely Ananse the spider in black, head downwards on a yellow background. The yellow background could be square or circular: Squadron Tac-Signs for Un-Brigaded Regiments RHQ 3 GL A Sqn B Sqn C Sqn Universal Carrier of B Squadron, 81 (West African) Reconnaissance Regiment 15mm model by Skytrex Painted by the author 81(WA) Recce The squadron tac-sign would normally have either the Troop number painted within it, or would have a number indicating the seniority of the Troop within the squadron (normally starting with the SHQ as 1 ). I don t have any specific information for these regiments, but the Indian 16th Light Cavalry used the latter system, showing seniority within each squadron.
 Light Cavalry (Daimler & Humber Armoured Cars) Notes 1.")
. 2.")
29 Indian XXXIII Corps Troops Arm of Service Signs for Indian XXXIII Corps Troops 45 Indian 45th Cavalry 41 2nd Reconnaissance Regiment (Stuart III) (part-mechanised in Carriers) 41 or 44 Indian 8th (King George V s Own) Light Cavalry (Daimler & Humber Armoured Cars) Notes 1. The 45th Cavalry was attached to 50th Tank Brigade from July 1944, but prior to that date had belonged to XXXIII Corps Troops. The AoS sign given is therefore conjectural, being the 45 on green/blue of an Armoured Recce Regiment, with the white bar of Corps Troops. See 50th Indian Tank Brigade page (above). 2. The 2nd Reconnaissance Regiment was the divisional Recce Regiment for British 2nd Infantry Division, which had retained some of its mechanised recce capability when that division was sent to Kohima. The regiment was often used as the de facto XXXIII Corps Recce Regiment, hence its inclusion here. However, the regiment s vehicles retained the AoS serial of 41, indicating an Infantry Division Recce Regiment, as well as the 2nd Division s cross-keys sign: 3. The 8th (KGVO) Light Cavalry arrived in XXXIII Corps as 19th Infantry Division s recce element. However, they were organised as an Armoured Car Regiment rather than as a Recce Regiment, so I am not sure if they used the 41 AoS serial for an Infantry Division Recce Regiment or the 44 serial for an Armoured Car Regiment. Whatever the AoS serial, they carried the formation sign for 19th Indian Division: Squadron Tac-Signs for Un-Brigaded Regiments RHQ A Sqn B Sqn C Sqn 45 C 2 Recce 8 KGVO The squadron tac-sign would normally have either the Troop number painted within it, or would have a number indicating the seniority of the Troop within the squadron (normally starting with the SHQ as 1 ). I don t have any specific information on these regiments, but the 16th Light Cavalry used the latter system, showing seniority within each squadron.


30 Left: Carriers of 2nd Recce Regiment patrol between Kalewa and Shwebo in Note that the only marking visible here is a number 20 in front of the driver. The meaning of this marking is unknown. Right: Members of and unidentified unit of 2nd Division fire a 3-inch mortar from a Universal Carrier in Is this unique? The author has never seen any other examples of a Universal Carrier being used as a self-propelled mortar. Left: A Jeep-mounted patrol of 2nd Recce Regiment in Note the 41 Arm-of-Service serial painted on the far left of the bumper. The other numbers ( A2 ) are a SEAC vehicle registration number.

.")

31 Left: Men of the 1st Queen s Own Cameron Highlanders (5th Brigade, 2nd Division) remove an improvised and ingenious flotation device from their Universal Carrier after crossing the Mu River during the advance to Mandalay in Note the crossed keys formation sign of 2nd Division. Right: Another (overloaded) Carrier patrol of 2nd Recce Regiment pictured in Note the 20 painted on the two nearest Carriers, also seen in another photo of the regiment s Carriers (see above). As in the case of the 20 painted on Shermans, the meaning of this marking is unknown, though it has been suggested that it has something to do with auxiliary water tanks fitted to these vehicles. Left: Men of 2nd Division examine a captured Japanese gun in January In the background are two Universal Carriers fitted with deep-wading screens.
32 Other Indian & British Markings Allied Stars Allied Stars began to appear in the Far East in late 1944, with them being almost universally applied by the time of the Meiktila and Mandalay battles. They were invariably painted much larger than in NW Europe those painted on Lee tanks often reaching the full height of the not insubstantial hull-sides of the Lee! The not-so-tall sides of Carriers often carried clipped stars, as the stencils were clearly too large for the job. When applied, Stars were invariably painted on the sides of the hull (or the turret, in the case of some Stuarts), which was not common in NW Europe and Italy due to the threat of enemy antitank guns. The main threat to British and Indian tanks in Burma was from Allied air power, so the idea was to make the tanks as visible as possible to aircraft, which meant painting stars on the sides as well as on top. However, they do not seem to have been painted on front or rear. The star was meant to be surrounded by a wide ring when painted on upper surfaces (e.g turret-tops, engine decks or tarpaulins) as an air recognition measure. However, it is very difficult to assess how often this was done, as the vast majority of photos were not taken from above. Nevertheless, there are a few photos that show the circled star on turret-tops. Lees are often seen in photos with the left-side star wrapping around the front-left corner, so that it can be partially seen from the front as well as the side. Vehicle Callsigns Vehicle callsigns were often painted on the rear of the tank s hull from 1944 onwards especially in Sherman units. These were invariably a simple system of sequentially numbering the tanks in a squadron, starting with the Squadron Commander as No.1. I have not therefore come across a number higher than 15 in photos. However, some regiments (such as the 7th Light Cavalry) numbered every tank individually, starting with the regiment s CO as No.1. In most regiments they were painted LARGE on the rear of the hull, in white or the regiment s squadron tac-sign colour. However, 254th Tank Brigade seems to have preferred a very small number (about the same size as an AoS serial number), in white, on the hull front and rear (or the turret rear). Bridging Discs As elsewhere in the British Army, all vehicles carried a Bridge Disc on the lower front-left of every vehicle s hull. This was typically a yellow disc, with the vehicle s weight class painted in black. However, low-visibility versions were also known, such as the disc being replaced by a yellow or black ring, or the disc and number being painted in outline only. The weight classes were typically 30 for Shermans, 32 or 33 for Lees, 15 for Stuarts, 4 for CMP 15cwt trucks, 2 for Jeeps and 4 or 5 for Carriers. Vehicles that normally towed trailers or guns would have two numbers one over the other separated by a thin black line: e.g. Jeeps had 3 over 2 and Quads had 8 over 5 (the higher number applied when towing). Unknown Marking One unknown marking was universally applied to all Sherman tanks in the Far East a white square with 20 in black, that was normally painted just above or below the Bridging Disc, with approximately the same dimensions. Dennis Oliver suggests that this was something to do with the extra water tanks that were fitted to Sherman and Lee tanks in the Far East (maybe extra weight when filled?). Tank Names The tank and armoured car regiments of XIV Army were very keen on naming their mounts. In many cases (though not always) the initial letter of the tank name matched the squadron letter. 116th RAC, as an old Highland regiment, took Scottish place names such as Cairntoul and Cairngorm (both C Sqn). Probyn s Horse, as a proud old Indian cavalry regiment, had the names of its old chargers: A Sqn had Anzac, while B Sqn had Banyard and Bluebeard. The Royal Deccan Horse took Indian town names, though with no apparent link to the squadron letter: Bidar (RHQ), Faridkut (A Sqn) and Sagar (C Sqn). An example from 19th Lancers doesn t appear to have any particular relevance Manifesto (A Sqn). Tank names were normally painted on the hull sides, in white or yellow, either halfway along or toward the rear. A Daimler Armoured Car of B Sqn, 16th Light Cavalry had Bols painted on the upper edge of the turret, above the squadron tac-sign. War Department Numbers WD Numbers were universally applied to all British and Indian Army vehicles. Tanks normally had a six-digit number, which was prefixed by T. Carriers also had the T prefix. Self-propelled artillery pieces such as the Priest had the prefix S. Armoured Cars and Scout Cars had the prefix F. Jeeps and cars had M. Light trucks such as the XIV Army workhorses - the CMP 15cwt and the Dodge Weapons Carrier series had Z. Gun tractors had H. Lorries over 1 ton had L. WD Numbers were always painted on the hull sides usually toward the rear or half way along. On softskins they were usually painted on the sides of the bonnet or on the side-doors.
A Note on Indian Army Tank Regiments v.1.0 October 18, Mandeep S. Bajwa & Ravi Rikhye
 A Note on Indian Army Tank Regiments 1947-86 v.1.0 October 18, 2008 Mandeep S. Bajwa & Ravi Rikhye Researchers should be aware that the authors have compiled this list from a few scratched notes and memory.
LESSONS FROM THE FRONT QUESTIONS AND ANSWERS ON FLAMES OF WAR MARCH 2018
 i LESSONS FROM THE FRONT QUESTIONS AND ANSWERS ON FLAMES OF WAR MARCH 2018 During the time that the fourth edition of Flames Of War has been out, players have asked questions about the game. The questions
Bundok and Bayonet Colonial Wargames Rules by Bob Cordery
 Introduction Bundok and Bayonet Colonial Wargames Rules by Bob Cordery Part 1 - The Basic Rules The following Colonial Wargames rules were written for my own personal use and reflect my philosophy that
A Battlefront WW2 Modern Scenario for 2 players and an Umpire
 First Clash Part 1 Ambush at Favorite A Battlefront WW2 Modern Scenario for 2 players and an Umpire Overview World War Three D+48hrs On the afternoon of 25 th June 1984 the Soviet 1 st Guards Tank Division
Rules Update for Warmaster Ancients
 Rules Update for Warmaster Ancients P25 Skirmishers Evading a Charge delete all four paragraphs and replace as follows. Note that this new rule replaces the rules addition Evades from close range become
FIRETEAM Wargame Rules for Modern Combat Operations
 FIRETEAM Wargame Rules for Modern Combat Operations By Rory Crabb Written By Rory Crabb Version 1.0 July 2016 Miniatures from the collection of the author and terrain by Paul Davies 1 FIRETEAM Wargame
This is a picture of a sabretache, a kind of pouch worn by cavalry soldiers as part of their uniform. The sabretache hung on long straps from the
 This is a picture of a sabretache, a kind of pouch worn by cavalry soldiers as part of their uniform. The sabretache hung on long straps from the belt and was originally intended to hold messages and notes.
Stepping Up to Version 3 by Phil Yates
 Stepping Up to Version 3 by Phil Yates With the arrival of Version 3, lots of existing players are asking the obvious question: What s changed?. To answer this question, I ve written this document as a
ARMIES OF THE 18 TH CENTURY
 ARMIES OF THE 18 TH CENTURY I. THE INFANTRY "Napoleon's got a bunch of the toughest, hammered down, ironed out roughnecks you ever saw, from generals down to buck privates. And he just said, "Sic 'em,
COLORS IN THE UKRANIAN CONFLICT
 COLORS IN THE UKRANIAN CONFLICT In 2014 the war in the East of Ukraine began, also known as Antiterrorist Operation ATO. Since then, a huge amount of information, photos, and videos have flooded the internet,
Things that need changing in your rule book. (Errata for PBI)
") Things that need changing in your rule book. (Errata for PBI) This information applies to PBI as published by RFCM/Peter Pig March 2006. Firstly an apology for having to make updates and changes to the
Things that need changing in your rule book. (Errata for PBI) This information applies to PBI as published by RFCM/Peter Pig March 2006. Firstly an apology for having to make updates and changes to the
British Troops in the Middle East
 Troops in Egypt 9/30/39 HQ British Troops in Egypt (BTE) British Troops in the Middle East 1939-1940 In the western desert The Armored Division (Egypt) - 7th Armored Division Heavy Armored Brigade 1st
The Battle of Cox s Corner The Kaladan Valley, Burma, 5-7 March 1944
 The Battle of Cox s Corner The Kaladan Valley, Burma, 5-7 March 1944 A Battlefront: WWII Scenario By R Mark Davies These boys perform all the highly skilled tasks which are necessary in the modern combat
3rd Edition RULES OF PLAY
 Command & Colors Napoleonics 1 Game Design by Richard Borg 3rd Edition RULES OF PLAY 2 Command & Colors Napoleonics The battlefield is a scene of constant chaos. The winner will be the one who controls
This scenario was setup without specific goals though the French were designated to attack and the Allies to defend.
 Fictional 1813 battle for 7-10 players, French & Germans vs Austrians, Russians & Prussians. Developed by David M. Ensteness in 2014 for testing ESR, provided freely for personal, non-commercial use. This
First Contact September 1940 by Dean Lampard
 First Contact September 1940 by Dean Lampard Dawn, almost. 5 months since he had disembarked at Alex and he still couldn t quite believe that night time was so cold. It would be warm soon though and then
Part1 Setting up the Game. Sample file
 Part1 Setting up the Game Setting up the game Necessary equipment All you need to play Polemos American Civil War is: A number of ordinary six-sided dice, numbered 1-6, known hereafter as D6. A ten-sided
LESSONS FROM THE FRONT QUESTIONS AND ANSWERS ON FLAMES OF WAR JUNE 2018
 i LESSONS FROM THE FRONT QUESTIONS AND ANSWERS ON FLAMES OF WAR JUNE 2018 During the time that the fourth edition of Flames Of War has been out, players have asked questions about the game. The questions
Sowchos (Collective Farm) 79
 79") Sowchos (Collective Farm) 79 December 1942 Following the encirclement of the Sixth Army at Stalingrad, the Germans planned to launch the relief effort from the bridgehead at Nizhna Chirskaya, 25 miles
Sowchos (Collective Farm) 79 December 1942 Following the encirclement of the Sixth Army at Stalingrad, the Germans planned to launch the relief effort from the bridgehead at Nizhna Chirskaya, 25 miles
September 3 rd 1939 Battle on the Czech/Polish border (BK28) between 3 rd German Infantry Army and 3 rd Polish Infantry Army.
 between 3 rd German Infantry Army and 3 rd Polish Infantry Army.") September 3 rd 1939 Battle on the Czech/Polish border (BK28) between 3 rd German Infantry Army and 3 rd Polish Infantry Army. Forces involved: dice: 1 infantry = 1 rifle unit of 4 bases 3 grenades = 3
September 3 rd 1939 Battle on the Czech/Polish border (BK28) between 3 rd German Infantry Army and 3 rd Polish Infantry Army. Forces involved: dice: 1 infantry = 1 rifle unit of 4 bases 3 grenades = 3
HOME BEFORE THE LEAVES FALL
 HOME BEFORE THE LEAVES FALL BLACK POWDER RULES AMENDMENTS FOR EARLY WORLD WAR I. BY THE FRIENDS OF GENERAL HAIG What follows are the minor rule amendments we made to play out the Mons campaign in 10mm
To End All Wars. WW1 Miniature Game V1.2
 To End All Wars WW1 Miniature Game V1.2 Introduction: The Western Front in World War I was dominated by a series of trenches cutting its way through the French countryside. Commanders on both sides would
ERES TO YOU FUZZY WUZZY by Bob Cordery
 1. Introduction ERES TO YOU FUZZY WUZZY by Bob Cordery ETYFW relies upon the use of both average dice (AvDs produce more predictable results) and normal dice (D6s produce less predictable results) to reflect
Fields of Blue & Grey
 Fields of Blue & Grey A very different kind of American Civil War rules, that allow the grand sweep of corp level actions to be recreated while still using the regiment as the basic combat element. A simple
LESSONS FROM THE FRONT QUESTIONS AND ANSWERS ON FLAMES OF WAR SEPTEMBER 2018
 i LESSONS FROM THE FRONT QUESTIONS AND ANSWERS ON FLAMES OF WAR SEPTEMBER 2018 During the time that the fourth edition of Flames Of War has been out, players have asked questions about the game. The questions
SETTING UP DEPLOYMENT
 With the squadron commander s Spartan burning furiously on the road next to the church and contact with regiment spotty due to jamming, Captain Moran realized it was up to him to decide when to break contact.
ONE IF BY LAND" - AMERICAN 1:10 SCALE WAR OF INDEPENDENCE RULES by Bob Bergman. Infantry/Cavalry figure 10 men Artillery crew figure 5 men
 ONE IF BY LAND" - AMERICAN 1:10 SCALE WAR OF INDEPENDENCE RULES by Bob Bergman Ground Scale 1 inch = 15 yards One Turn About five minutes Infantry/Cavalry figure 10 men Artillery crew figure 5 men Artillery
THE FIGHTING KOPPIE BRITISH AND ALLIES UNIFORM DETAIL. By Robert Giglio.
 THE FIGHTING KOPPIE BRITISH AND ALLIES UNIFORM DETAIL By Robert Giglio. The British infantry were in the standard red coat, dark blue trousers with red outer seam stripe, sun helmet and leather equipment
napoleon's battles at divisional and onehalf
 napoleon's battles at divisional and onehalf scales I am trying to find a Napoleonic rule-set to play minor, i.e divisional, engagements occurring at the Campaign of Leipzig or in any other Napoleonic
BATTLE FOR 2MM EARTH 1418: The Great War (Version 0.8)
") BATTLE FOR 2MM EARTH 1418: The Great War (Version 0.8) INTRODUCTION The Battle for 2mm Earth rules are suitable for any large combat up until around the end of the 19 th Century. I designed 1418 semi-independently
BATTLE FOR 2MM EARTH 1418: The Great War (Version 0.8) INTRODUCTION The Battle for 2mm Earth rules are suitable for any large combat up until around the end of the 19 th Century. I designed 1418 semi-independently
ARMORED FIGHTING VEHICLE COMBAT:
 ARMORED FIGHTING VEHICLE COMBAT: Due to the recent appearance of armored vehicles on the market, vehicles play an increasingly important role in the 12" action figure world. With slight modification, these
House Rules for Nuts! Final Version Version 1.3 by Jeff Glasco
 1. The basic game uses a 3' x 3' table. This is fine for very dense combat, like in a major urban campaign, but is too small for a larger attack, like a platoon attack. A platoon attack would be on an
Horsepower. Activity Book for Families
 Activity Book for Families Horsepower Over 100 years ago, army horses filled the Irish town of Athy. Look in this picture for different kinds of horses, such as a fine horse for an officer, horses for
LESSONS FROM THE FRONT QUESTIONS AND ANSWERS ON FLAMES OF WAR MARCH 2018
 i LESSONS FROM THE FRONT QUESTIONS AND ANSWERS ON FLAMES OF WAR MARCH 2018 During the time that the fourth edition of Flames Of War has been out, players have asked questions about the game. The questions
% D class, Élan 60% C class Élan 20% B class, Élan. ABILITY Hussars, Chasseurs a Cheval
 1. Revolutionary campaigns (1792-1801) France: an Impulse army. The UNIT TYPE TYPICAL UNIT Les Blancs 1792-3 12-18 30% C class, Brittle 20% B class Les Bleus 1792-3 12-18 30% D class, Brittle 30% D class,
To End All Wars WW1 Miniature Game V1
 To End All Wars WW1 Miniature Game V1 Introduction: The Western Front in World War I was dominated by a series of trenches cutting its way through the French countryside. Commanders on both sides would
Operation Spark The Battle for Marino January 1943 Scenario written by Iain Craven With contributions and play testing by Richard Lawrence
 Operation Spark The Battle for Marino January 1943 Scenario written by Iain Craven With contributions and play testing by Richard Lawrence After a series of costly, and occasionally catastrophic, failed
Norrey and Putot, June 8, 1944 A Flames of War Mega-Game Scenario
 Norrey and Putot, June 8, 1944 A Flames of War Mega-Game Scenario Allied concerns around the Normandy landings were many, but one of the most critical was the potential for a heavy panzer counterattack
King George Commands and We Obey
 King George Commands and We Obey Basing Army Commanders 80mm dia base with a vignette on it, min 3 figures. Divisional Commanders 80mm dia base with a vignette on it, max 2 figures. Brigade Commanders
2011 New Zealand Flames of war Mid-war Doubles tournament
 2011 New Zealand Flames of war Mid-war Doubles tournament Welcome to the 2011 New Zealand Flames Of War Mid-War Doubles Grand Tournament! We look forward to offering you a unique experience that includes
ARE YE FOR KING OR PARLIAMENT?
 ARE YE FOR KING OR PARLIAMENT? A Warmaster Ancients Variant For The Period 1641-52 Written by Jimi Tubman Assisted by the members of the Washington Wargames Club ( http://www.washingtonwargames.co.uk ).
Bathtub Operation Goodwood 18 th July, A Flames of War Grand Battle Scenario
 Bathtub Operation Goodwood 18 th July, 1944 A Flames of War Grand Battle Scenario Operation Goodwood was a major attempt by Field Marshall Montgomery to break through the tough German defenses around Caen.
SkirmishCampaigns: France 40 Battles for the Meuse Across the Meuse - Sedan
 AFTERMATH Despite spirited resistance at several points, the infantry crossed the Meuse and penetrated the French positions in several areas, aided by heavy air and artillery support and combat engineer
Tactical Combat Rules By David Newport
 Tactical Combat Rules By David Newport Tactical Combat is a game covering company and battalion level actions using 20 th century weapons. The game was designed for World War II action, but it handles
Wertingen 8th October, A scenario for
 Wertingen 8th October, 1805. A scenario for Grand Manoeuvre: Black Powder & Blue Steel Napoleonic Miniatures Wargames Rules By Michael Collins. Wertingen 8th October, 1805 Scenario Notes: Austrian player
Glory Days! Introduction. Troop Types and Figures. freewargamesrules.co.uk presents. by Craig Cartmell
 Introduction. freewargamesrules.co.uk presents Glory Days! by Craig Cartmell These are a set of rules for fighting the American Civil War at regimental and brigade level. The smallest unit sizes are infantry
TRENCH RAIDER: World War I Wargaming in Ten Minutes by David Raybin 2014
 TRENCH RAIDER: World War I Wargaming in Ten Minutes by David Raybin 2014 INTRODUCTION Instead of a generic set of WW1 rules I determined to make the rules fit the game scenario rather than the other way
vfconventioncenter com historicon org HISTORICON Valley Forge Convention Center 1210 First Avenue King of Prussia, PA 19406
 Congratulations on qualifying for the Flames Of War 2010 U.S. Nationals! This Tournament is a culmination of a year s worth of gaming and fun in the United States and Canada. We here at Battlefront Miniatures
Initial Set-Up. Officer s Handbook Game Walk-Through
 Officer s Handbook Game Walk-Through O H W - D : 29 M 2018 The game was fought in a North African Desert environment in late 1940 between British and Italian Forces, depicting a hasty engagement where
THE BIG PUSH Big Push Demonstration and Scenario, revised 7/1/2016
 THE BIG PUSH Big Push Demonstration and Scenario, revised 7/1/2016 THE FIGHT FOR THIEPVAL RIDGE By Paul Rohrbaugh Play Area: Rows 7 through 16 inclusive, columns C through I (also inclusive). Scenario
Contents.
 Contents Introduction 1 1. Game Scale 2 2. Troops Statistics 3 Commander Ratings 3 Leadership Bonus Table 3 Troop Quality 4 Unit Combat Value 4 CV & Unit Size Table 5 Unit Designation 5 Valeur et Discipline
FORCES OF VALOR BATTLE TACTICS 2005, Unimax Toys Limited, All Rights Reserved
 FORCES OF VALOR BATTLE TACTICS 2005, Unimax Toys Limited, All Rights Reserved Forces Of Valor, The Game allows you to fight exciting and realistic war games. All you need to play are Forces Of Valor soldiers
Seven Years War. Generals
 Seven Years War By Will McNally Introduction These rules have been written to give an easily playable game which reflects the style of European land warfare during the Eighteenth Century, particularly
Corinth Canal Scenario Pack Historicon
 Corinth Canal Scenario Pack 2016 Historicon July 16, 2016 Race For The Corinth Canal Commonwealth Platoons 1 and 2 represent elements of 2/6 Australian Infantry and start the game in foholes. Commonwealth
Gunzberg, 9th October, A scenario for:
 Gunzberg, 9th October, 1805. A scenario for: Grand Manoeuvre: Black Powder & Blue Steel Napoleonic Miniatures Wargames Rules By Michael Collins. 2. Gunzberg, 9th October, 1805 Scenario Notes: Austrian
French infantry Platoon
 French Special Rules 1940 Gas Guzzler: The Char B1 Bis had huge problems with fuel consumption, to keep the vehicle in the field for a whole day would require it to be refueled at least twice. Any vehicle
Mini-Nap 2 WARGAME RULES FOR THE NAPOLEONIC ERA. Copyright. Trevor Raymond. January 2015 (Exodus 20:15 - Thou shall not steal.")
") Page 1 of 42 The Basics Mini-Nap 2 WARGAME RULES FOR THE NAPOLEONIC ERA Copyright. Trevor Raymond. January 2015 (Exodus 20:15 - Thou shall not steal.") Mini-Nap 2 is a set of rules specifically designed
Page 1 of 42 The Basics Mini-Nap 2 WARGAME RULES FOR THE NAPOLEONIC ERA Copyright. Trevor Raymond. January 2015 (Exodus 20:15 - Thou shall not steal.") Mini-Nap 2 is a set of rules specifically designed
Weathering tips with Laurence Farrugia
 Weathering tips with Laurence Farrugia Some notes taken during (and checked by) Laurence Farrugia weathering demonstration Disclaimer from Laurence This is not the technique, it is a technique I have used
ARMIES OF THE SEVEN YEARS WAR
 ARMIES OF THE SEVEN YEARS WAR The Seven Years War was fought on three continents and involved all of the Great Powers of the day. But at the center of it all was the province of Silesia. Frederick had
British always go first turn. Alternative Movement turns. A Base can move, move or fire, or move and melee
 15mm FAST PLAY (ZULU) COLONIAL RULES ¼ inch EQUALS 6 YARDS or 1 inch equals 24 yards 6.25mm equals 540cm or 2.5cm equals 2160cm Dice D6 British always go first turn. Alternative Movement turns A Base can
Rearguard action near Genappe 17 th June 1815.
 Rearguard action near Genappe 17 th June 1815. Famous battles are a little like the star turns on a variety show bill. They get all the attention and often overshadow other interesting but lesser known
The mission of colonel Marbot.
 The mission of colonel Marbot. The 7th regiment of hussars led by colonel Marbot was a member of the cavalry division of general Jacquinot. On the morning of the 18th of June, this division had its position
Skirmish Action AAR: Ruhr 1945 By Russ Lockwood
 Skirmish Action AAR: Ruhr 1945 By Russ Lockwood This tidy little 1945 scenario for Skirmish Action (SA) comes courtesy of Dennis Shorthouse, whose figures and terrain make for a good-looking WWII table.
War Ain t Fair. By Stephen Luscombe. Fast play ww2 rules incorporating the full vagaries of war. 1.2
 War Ain t Fair Fast play ww2 rules incorporating the full vagaries of war By Stephen Luscombe Stephen@BRITISHEMPIRE.CO.UK 1.2 Introduction Welcome to War Ain t Fair. These are a set of rules designed to
Soviet Infantry Company
 Soviet Infantry Company Soviet Infantry Company 2 Soviet Infantry Company Soviet Special Rules Medical Troops: Despite an apparent disregard for their enlisted men, the Russian army fielded a large cadre
Battalion Commander's Summary
 Command Decision is a platoon-based game using a ground scale and time scale which allows the full play of 20th Century mechanized maneuver combat on a game table. Its emphasis on command, troop quality,
NEW ZEALAND WARS FIGURES CAN FIRE, MOVE THEN, MELEE IN THERE TURN OR MELEE MOVE THEN FIRE
 NEW ZEALAND WARS 25/28 MM FIGURES 1 Figure equal to 1 Figure otherwise 1 to 10 or 1 to 20 Foot/Artilleryman 1 Diameter circle Cavalryman 2x1 Diameter circle No need for bases for Artillery. Decide how
Mini-Nap. RULES FOR CORPS SCALE WARGAMES IN THE NAPOLEONIC ERA USING THE 6mm SCALE
 Mini-Nap RULES FOR CORPS SCALE WARGAMES IN THE NAPOLEONIC ERA USING THE 6mm SCALE Copyright. Trevor Raymond. Version 8: August, 2009 (Exodus 20:15 - Thou shall not steal.") www.runtus.org Page 1 of 25
+HGJHURZ+HOO. PLAYTEST VERSION (02 June 2000) In the future, an updated version may be found at:
 In the future, an updated version may be found at:") AFTERMATH The US 1 st Infantry Division pushed on to expand the beachhead supported by the tanks of the 2 nd Armored. Within days the German 352 nd Division was reduced to a few brave and ragged survivors.
AFTERMATH The US 1 st Infantry Division pushed on to expand the beachhead supported by the tanks of the 2 nd Armored. Within days the German 352 nd Division was reduced to a few brave and ragged survivors.
Napoleonic Battles. Introduction
 Napoleonic Battles Introduction Napoleonic Battles is a series of games that cover the battles and campaigns associated with Napoleon. Each game can be played alone versus the computer, or against a human
The Battle of Cowpens 1781
 The Battle of Cowpens 1781 Battle: COWPENS War: American Revolutionary War Date: 17th January 1781 Place: South Carolina on the border with North Carolina, United States of America Combatants: Americans
The Bridgehead at Villamuriel de Cerrato
 The Bridgehead at Villamuriel de Cerrato Events Leading Up to the Battle When the Marquess of Wellington was forced to abandon the siege of Burgos on 21 October 1812, pursued by General de Division Souham
Surprise at Jay s Mill September 19th, 1863
 Surprise at Jay s Mill September 19th, 1863 Background Near dawn on September 19th, the Union Army of the Cumberland was spread thin. Two divisions of the Fourteenth Corps had finished a night march and
Black Powder House Rules
 Black Powder House Rules Command & Movement Disordered Moves Flank Attacks Woods Skirmishers Skirmish Company Mixed Formation Grande Bandes Infantry Tactics Charge Contact Massed Columns Must Form Square
...& Blenheim Palace. Amendments to Black Powder For battles with model soldiers In the Age of Marlborough
 ...& Blenheim Palace Amendments to Black Powder For battles with model soldiers In the Age of Marlborough Black Powder "Black Powder" rules are copyright Warlord Games, and quoted here purely for the purpose
THE RULES. Wing Scale. 15 minutes per turn 50 men per strength point 1 gun per strength point
 INTRODUCTION The late Greg Novak developed the following variant of Volley & Bayonet for fighting at the Wing scale in the Americas. All Volley & Bayonet rules not modified below remain in force. Paul
THE WAR OF THE SPANISH SUCCESSION PAPERBOYS RULES
 THE WAR OF THE SPANISH SUCCESSION PAPERBOYS RULES This is a little set of rules written to continue the tradition of each Paperboys book having an associated set. Andy Callan s ideas abound here, but Peter
March Toward the Sound of Guns
 March Toward the Sound of Guns Very Fast Napoleonic Rules Version1.1 By Herbert Wong A) Game Scale The game will, for convenience, follow Avalon Hill s Napoleon s Battles game scale; in fact the game works
British Regiments of World War 1 Argyll and Sutherland Highlanders (Princess Louise's) Army Chaplains' Department. Army Cyclist Corps
 Army Chaplains' Department. Army Cyclist Corps") British Regiments of World War 1 Argyll and Sutherland Highlanders (Princess Louise's) Army Chaplains' Department Army Cyclist Corps Army Pay Department and Army Pay Corps Army Service Corps Army Veterinary
British Regiments of World War 1 Argyll and Sutherland Highlanders (Princess Louise's) Army Chaplains' Department Army Cyclist Corps Army Pay Department and Army Pay Corps Army Service Corps Army Veterinary
X Corps: The Somme 1916
 X Corps: The Somme 1916 A Card Wargame of World War I Neal Reid 2016 Published by Vexillia Limited www.vexillia.com Contents 1. Introduction 3 2. Historical Background 3 3. Game Overview 6 4. Setting Up
Advance of the Reich Notes
 Advance of the Reich Notes 1. Scope This game is designed to cover squad-level battles on the Eastern Front from 1941 through the end of 1942. Given this scope, the game becomes at the same time a very
Volley and Bayonet, Road to Glory. American Revolution Period Specific Rules. Jeff Glasco ( 2011)
") Revised July 2011 Volley and Bayonet, Road to Glory American Revolution Period Specific Rules Jeff Glasco ( 2011) Volley and Bayonet is copy written by Frank Chadwick and Greg Novak. Additional rules by
Revised July 2011 Volley and Bayonet, Road to Glory American Revolution Period Specific Rules Jeff Glasco ( 2011) Volley and Bayonet is copy written by Frank Chadwick and Greg Novak. Additional rules by
Notes for Soldiers Weapons Painting 101
 Program Executive Office Soldier Strategic Communications Office Debi Dawson 703-704-2802 debi.dawson@us.army.mil Notes for Soldiers Weapons Painting 101 On 1 April, TACOM Life Cycle Management Command
Symbols of Ireland. Activity Book for Schools 1
 Activity Book for Schools 1 Symbols of Ireland A symbol is something that represents another thing for example, a shamrock stands for Ireland. If you see a shamrock in the exhibition, it will mean that
Attack at Luneville by Roger Burley
 Attack at Luneville by Roger Burley The objective for both the United States and the Germans is the control of Luneville defined for US as 3 buildings for 10 phases and the Germans to prevent this. 1 2
NAPOLEON S INFLUENCE ON WARFARE
 NAPOLEON INFLUENCE ON WARFARE NEW METHOD OF WARFARE 1. THE NATION IN ARM: Wars were no longer fought by small armies of mercenaries but by large armies of drafted soldiers inspired by nationalism. Conscription
Notes for Soldiers M4/M16 Weapon Painting 101. Step One: Gather the materials
 Notes for Soldiers M4/M16 Weapon Painting 101 Presented here are the official Project Manager Soldier Weapons instructions for those Soldiers who have the green light to dress out their M4/M16 with paint
Musket and Pike Users Manual
 1 Musket and Pike Introduction Musket and Pike is a series of games that cover the battles and campaigns associated with the era where muskets and pikes dominated the fighting. Each game can be played
BATTLE OF CHERBOURG THREE CAMPAIGNS FOR MEMOIR '44
 BATTLE OF CHERBOURG THREE CAMPAIGNS FOR MEMOIR '44 On June 6, 1944, thousands of Allied soldiers landed on the beaches of Normandy as part of Operation Overlord. The night before, hundreds of paratroopers
Soviet Forces Leningrad Region 1 January 1942 LENINGRAD FRONT
 Soviet Forces Leningrad Region 1 January 1942 LENINGRAD FRONT 8th Army: Major General A.LO.Bondarev 10th Rifle Division: Colonel I.V.Romantsov 62d Rifle Regiment 98th Rifle Regiment 204th Rifle Regiment
FRENCH AND INDIAN WARS SKIRMISH
 FRENCH AND INDIAN WARS SKIRMISH 25/28 MM FIGURES 1 Figure equal to 1 Figure otherwise 1 to 5,10 15 20 Foot/Artilleryman 15mm frontage Depth 15mm,18mm,20mm depending on figure Cavalryman 25mm frontage Depth
War Diary, Machine Gun Corps, from
 War Diary, Machine Gun Corps, from http://www.powell76.talktalk.net/mametz.htm MAMETZ WOOD DAY 1-7th JULY 1916 Following the early fighting on the Somme the British Army had pressed the German Army back
Each division along the side of the map represents 1 foot (12") North is to the top of the Map. The game starts in dense fog.
 North is to the top of the Map. The game starts in dense fog.") Historical Overview After the Breakout at St. Lo at the end of July 1944, most of the American forces moved through a relatively narrow corridor along the coast a Avaranches. Hitler looked at the map and
Historical Overview After the Breakout at St. Lo at the end of July 1944, most of the American forces moved through a relatively narrow corridor along the coast a Avaranches. Hitler looked at the map and
A Marvellous Victory! Copyright. Trevor Raymond. Version 3: April, 2012 (Exodus 20:15 - Thou shall not steal.")
") A Marvellous Victory! Copyright. Trevor Raymond. Version 3: April, 2012 (Exodus 20:15 - Thou shall not steal.") Page 1 of 28 A Marvellous Victory is a basic set of rules designed for the table-top wargaming
A Marvellous Victory! Copyright. Trevor Raymond. Version 3: April, 2012 (Exodus 20:15 - Thou shall not steal.") Page 1 of 28 A Marvellous Victory is a basic set of rules designed for the table-top wargaming
French armoured forces in 1940 (by Luca Avogaro)
") Introduction French armoured forces in 1940 (by Luca Avogaro) On 10 th may 1940 french armoured vehicles was distributed in 4 DCR (Divisions Cuirassees de Reserve) (Reserve Armoured Divisions), the 4 th
Introduction French armoured forces in 1940 (by Luca Avogaro) On 10 th may 1940 french armoured vehicles was distributed in 4 DCR (Divisions Cuirassees de Reserve) (Reserve Armoured Divisions), the 4 th
Order of Battle for your Company
 Fields Of Fire MISSION BOOKLET Campaign 2: Korea Naktong River, South Korea, August 8 through September 28, 1950 Order of Battle for your Company Formation Unit Steps Experience Company Headquarters CO
THE BACKGROUND GENERAL NOTES ACTIONS MORALE CLASS
 or: The Phantom Crown. Maximilian Rules! - Rules for wargaming the Maximilian Adventure by Mark W. Shearwood These rules originally appeared in Wargames Illustrated 160, (December 000). Many thanks to
The object of the game is to have you figure out the most important places that Civil War commanders needed to control...
 The object of the game is to have you figure out the most important places that Civil War commanders needed to control... This image was taken by Robert Housch in 2012. the obstacles and the terrain faced
To Reach the Po... Elliott (the gamemaster) explained the situation on a white board:
 explained the situation on a white board:") To Reach the Po... On Saturday, 9 May 2015, the Gentlemen Wargamers gathered to play a scenario adapted from Frederick Schneid's Napoleon's Italian Campaigns 1805-1815. In the spring of 1815, as the news
To Reach the Po... On Saturday, 9 May 2015, the Gentlemen Wargamers gathered to play a scenario adapted from Frederick Schneid's Napoleon's Italian Campaigns 1805-1815. In the spring of 1815, as the news
Battle for Normandy Escalation Campaign
 Battle for Normandy Escalation Campaign Summary: The campaign will run for six weeks. Three stages 2 weeks long each. Stage 1: 900 Points Stage 2: 1200 Points Stage 3: 1500 Points You must select an army