Samurai Armor Set: Step by Step
|
|
|
- Lee Potter
- 5 years ago
- Views:
Transcription


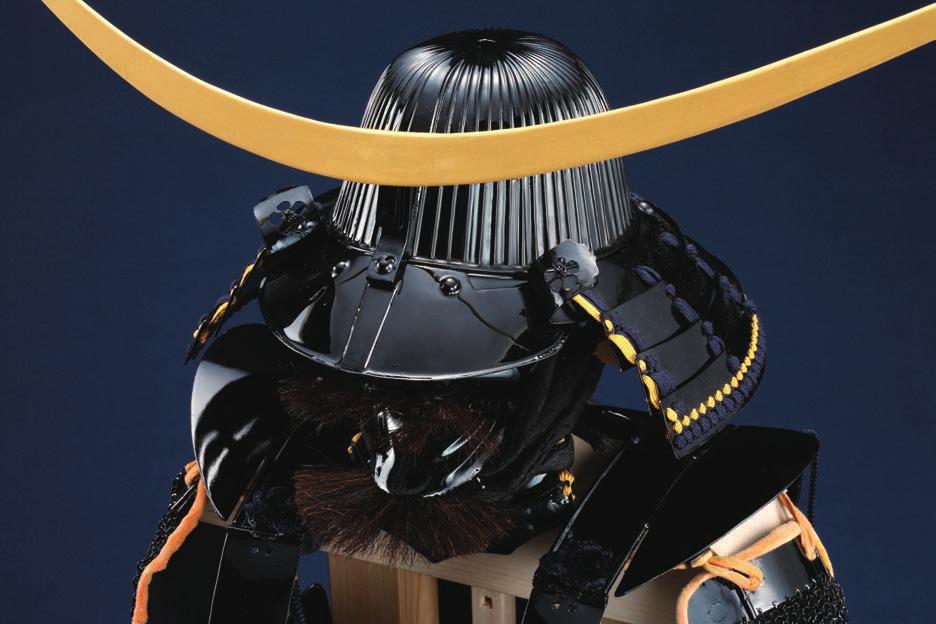
1 Samurai Armor Set: Step by Step Pack 3 Stages

2 Contents Stage 9 Pages The cuirass side and tassets Stage 10 Pages The shoulder plate and tassets Stage 11 Pages The shoulder plate and tassets Stage 12 Pages The armor stand and neck guard Photo credits All photographs copyright DeAgostini Visit our website Editorial and design by Continuo Creative, North Road, London N7 9DP All rights reserved 2013 De Agostini Publishing USA, 915 Broadway, Suite 609, NEW YORK, NY NOT SUITABLE FOR CHILDREN UNDER THE AGE OF 14. THIS PRODUCT IS NOT A TOY AND IS NOT DESIGNED OR INTENDED FOR USE IN PLAY. ITEMS MAY VARY FROM THOSE SHOWN. 2
 Cuirass side (upper) Hinge Pin")
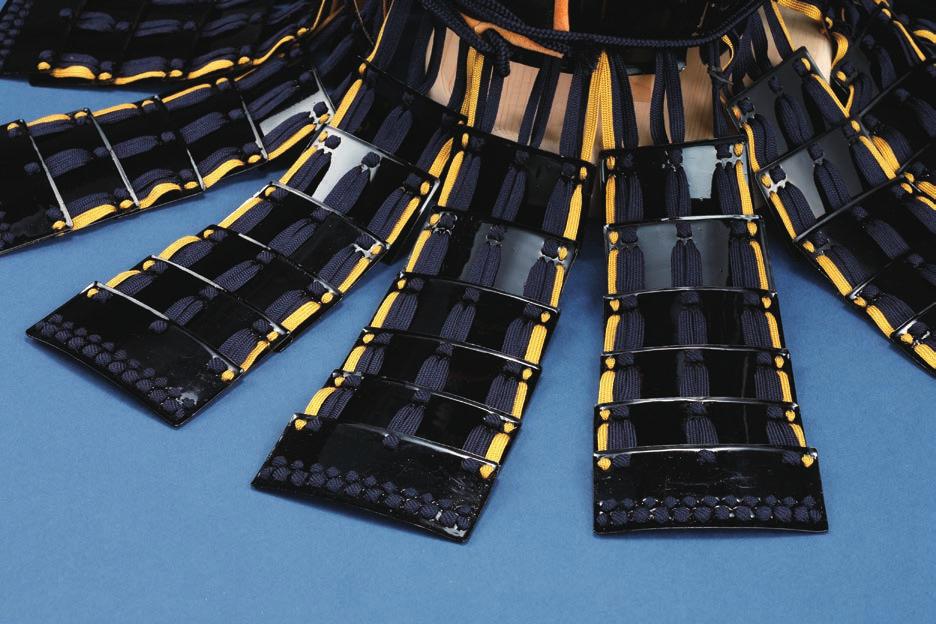
 Tasset plate and backing (third) Tasset plate")


3 Stage 9 The cuirass side and tassets Your parts Cuirass side (main) Cuirass side (upper) Hinge Pin Cord (approx. 20cm) Tasset plate and backing (third) Tasset plate and backing (fourth) Tools & materials Multi-purpose adhesive Toothpick Scissors White glue Masking tape Ruler The tassets 1 Fix the two plate backings onto their corresponding tasset plates. 2 Thread the laces through the back of the third plate. Cross them over, pass through to the back, then back through again to the front. 3 Thread the fourth plate onto the other three, holding the assembly against the check sheet to get the spacing correct. 29


4 The cuirass 1 Test-fit the two cuirass parts together. Apply some adhesive to the upper part of the cuirass, between the holes. (Instant adhesive can be used instead of multipurpose in all cases.) 2 Fit the upper part in place, engaging the holes and projections of both parts. Hold the two pieces in place while the glue dries. You may prefer to use clothespins for this. 3 Apply adhesive both to the front side of the cuirass where the hinge fits and to the hinge, then fit the hinge into place. Hold it there with clothespins while the glue dries. 4 Leave the cuirass side assembly clamped until the adhesive is completely dry. 30


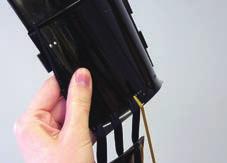
5 5 6 Fray the end of the cord to about 2cm from the end. After fraying, cut diagonally on both sides, about 1cm from the end. Place a small amount of white glue on your fingertip and run the end of the cord through it, 2cm from the end. Tie a knot about 16-17cm from the tip of the cord, then cut the cord past the knot and apply glue to harden it. 13cm Thread the cord through the hole in the pin. 7 8 Then thread the cord through the hole on the front of the side cuirass. Tie a knot 13cm from the end of the pin. Assembled parts 9 Cut off the excess cord beyond the knot, and then apply glue to secure it. 31


 Hinge")


 Yellow lace (70cm approx.")
 Tools & materials Instant adhesive")


6 Stage 10 The shoulder plate and tassets The shoulder plate 1 Hold the two shoulder plates together, aligning the hinges of both. Insert the rod into the hinges from the bottom. Your parts Shoulder plate (inner) Hinge pin Rod Small pin Shoulder plate Fastener Connecting plate Tasset plate and backing (fifth) Tasset plate and backing (sixth) Cord (20cm approx.) Thick cord (40cm approx.) Yellow lace (70cm approx.) Lace (105cm approx.) Tools & materials Instant adhesive Toothpick Scissors Tweezers Glue Masking tape Swab Scotch tape Cutting mat Thread (black) 3 Apply instant adhesive to the circled hole of the connecting plate. 2 If the rod is difficult to insert into the hinges, position the assembly as shown on the left, with the rod in contact with a flat surface, and push down carefully from above. 4 Align the hinges of the shoulder plate assembly and the connecting plate. Insert the small pin from the right (arrowed). Be sure to wipe away any adhesive that comes out of the hinge on the far side. 32


.")


7 5 Fray the end of the cord to about 4cm from the end. 6 After fraying the end, cut it so it appears more rounded, as shown. 8 Pass the cord through the hole on the shoulder plate (circled). 7 Wrap Scotch tape around the frayed end of the cord to shape it into a point. 10 Pass the cord through the back of the shoulder plate assembly in the open hole next to the hole in Step 8. 4cm 9 Thread the pointed end of the cord through the hole on one side of the fastener, and then turn it back into the second hole. 11 Cut the end of the cord off, leaving about 1cm of Scotch tape remaining. Adjust the lengths of the cord so that the two free ends are equal and the looped end is about 4cm from the back of the plate. Turn the assembly over. Apply adhesive in the center When tying the knot, follow the assembly steps and also refer to the diagram on the right. Loop the two ends around, as shown in the first stage of the diagram. 3 Apply adhesive in the center 4 Secure the cord with thread 33


.")


8 13 14 Make sure the two loops are equal in size, then apply adhesive to the contact point, shaded red in stage 1 of the diagram. 15 Cross the two ends over, and pass them through the loops created in the previous step, as in stage 3 of the diagram. When dry, loop the two ends back around, crossing over the center, as shown. Apply adhesive to the red-shaded area in the diagram. 16 Pass the two ends behind and then through the bottom loop Cut about 40cm of black thread, and double it over. Tie the thread in two knots around both of the loose ends of the cord, just below the bottom loop (circled). Apply adhesive to the cords and the thread, securing them in place. When dry, cut the cords just below the thread. The tassets 1 Prepare the fifth and sixth tasset plates, fixing the corresponding backing onto the plates, aligning the holes. 2 Prepare the two laces, so that one end is shaped to a point and the other end is a ball knot, as on Page 9. 34


.")


.")

.")

9 3 Thread the length of lace into the third hole down on the front side of the sixth plate. Pull it all the way through, so the knot is up against the hole. 4 Squash the knot against the plate with your thumb. Then pass the lace back through to the front of the plate. 5 6 Bring the lace up and pass it down through the next hole. Repeat this process all along the third row of the tasset plate. Leave about 5mm at the end of the lace, tie a knot, cut away any excess lace, and apply white glue to the knot, as with the previous sixth tasset plates (Page 9 and 19). 7 8 Prepare another length of lace, and then thread it through the bottom hole of the third column of the sixth plate. Leave about 5mm at the end of the lace on the back side and glue it into place. Thread the lace from the third column, bottom row hole to the fourth column, second row, passing through to the back of the plate. Then pass the lace from the fourth hole (second row) through to the fifth hole (bottom row). 9 Thread the lace along the bottom two rows of the sixth plate, until it passes through the first hole (second row). Refer to page 10 for more detailed instructions on how to do this. 10 Now pass the lace through the adjacent hole in the bottom row, and cross over the lace threaded in Steps 8-9 along the bottom two rows. 35

.")

, and pass the lace")


10 11 Complete this process by passing the lace through the loop between the second hole (bottom row) and the first hole (second row). 12 Pass the lace through the remaining hole and use a toothpick to loosen the lace between the second hole (bottom row) and the third hole (second row), and pass the lace through. 13 Apply some white glue to the underside of the lace, flatten down, and cut away the excess. The cuirass and tassets 1 Attach the fifth plate below the fourth. Check the position against the assembled tassets and the check sheet. 3 Using a cotton swab dampened with water, wet the crossed laces at the bottom of the sixth plate and flatten them with your thumb. 2 Attach the sixth plate in the same way. Tie a ball knot at the end of each, cut away the excess lace, and apply white glue to the knots to secure them in place. 4 Thread the yellow lace through the outer hole of the third row of the first plate. Pull the yellow lace all the way through the hole and secure the knot, as with the previous tassets. 5 Pass the lace down and through the top hole of the second plate, then back through to the back. Continue until you 6 come to the sixth plate. Tie a ball knot at the end of the lace, then cut off the excess and glue in place. 36


11 8 Remove the first cuirass side from the rest of the cuirass assembly. 7 Repeat Steps 4-6 for the other side of the tasset. 9 Prepare a length of blue lace and locate the five holes on the side cuirass. Thread the blue lace through the hole that is second from the left. 10 Pass the lace through the first tasset plates from the back, through the central hole of the top three. Leave a gap of 4cm from the top of the thread to the top of the first tasset Cross the lace over and thread through to the back, then back through to the front. Cross the lace over itself, and thread it through to the back. Pass the lace back up to the cuirass, and through the hole to the left of the one used in Step Prepare a length of yellow lace, as on page 24. Insert the lace through the back of the cuirass, next to the lace from Step 9 and down to behind the first tasset, and then pull it from the back through to the front and down through the hole below. Adjust the length and finish with a ball knot, as before. 13 Pull through until both parts of the lace here are the same length. 14 Repeat this process to lace the tasset to the cuirass. Finish the lace with a ball knot on the back of the cuirass side. 16 Repeat Step 15 on the other side of the tasset. Assembled parts Prepare a length of cord as on Page 22 and thread it through the hinge pin. Insert the pin into the hinge of the shoulder plate. 37
12 38


 Tasset plate and backing (third)")
 Lace (150cm approx.) Cord (20cm approx.")

 Glue The shoulder plate 1 Hold the")


13 The shoulder plate and tassets Stage 11 Your parts Shoulder plate Shoulder plate (inner) Connecting plate Fastener Rod Hinge pin Small pin Tasset plate and backing (first) Tasset plate and backing (second) Tasset plate and backing (third) Thick cord (40cm approx.) Lace (150cm approx.) Cord (20cm approx.) Tools & materials Instant adhesive Masking tape Toothpick Scotch tape Scissors Cutting mat Tweezers Thread (black) Glue The shoulder plate 1 Hold the two shoulder plates together, aligning the hinges of both. Insert the rod into the hinges from the bottom. 2 Apply instant adhesive to the circled hole of the connecting plate. 3 Align the hinges of the shoulder plate assembly and the connecting plate. Insert the small pin from the left. Be sure to wipe away any adhesive that comes out of the hinge on the far side. 4 Fray the cord to about 4cm from one end. After fraying, trim it so that it appears more rounded. 39

.")


14 5 Wrap Scotch tape around the frayed end of the cord to shape it into a point. Pass the cord through the hole on the shoulder plates (circled). 6 Thread the pointed end of the cord through the hole on one side of the fastener and then turn back into the second hole and through to the front of the shoulder plate. 7 8 Adjust the length of the loop so that it is the same as that of the previous shoulder plate. Refer to the diagram in Stage 10. Loop the two ends around, make sure they are equal lengths, then apply adhesive to the contact point Loop the two ends back around, crossing over the center, as shown. Apply adhesive to the contact point. Cross the two ends over, and pass them through the loops created in the previous step. 11 Pass the two ends behind and then through the bottom loop. 13 Apply adhesive to the cords and the thread to secure them in place, and cut off the excess when dry. 12 Cut about 40cm of black thread, and double it over. Tie the thread in two knots around both of the loose ends of the cord, just below the bottom loop. 40


15 The tassets 1 2 Cut the lace into three equal lengths and shape both ends of each length into points. Fix the two plate backings onto their corresponding tasset plates. Thread the three laces Pass the lace furthest 3 through the bottom inner 4 on the right straight holes of the lower row. down, under the second plate and up through the first of the inner holes, as shown. Then pass the remaining lengths of lace through the holes of the same row. 5 6 Cross the laces over, thread through to the back and then back through to the front, as shown. Repeat Steps 4-5 to fit the third tasset plate to the first and second. You may find it useful to have the plate check sheet at hand to check the positions before and after fitting the third one. The shoulder plate pin Prepare a length of cord and Insert the pin into 1 thread it through the hinge pin. 2 the hinge of the shoulder plate, as shown. Assembled parts 41

 Neck guard plate 2 Cross strut Base")


16 The armor stand and neck guard Stage 12 Your parts Central column Side columns x 2 Lace (180cm approx.) Neck guard plate 2 Cross strut Base Sandpaper Tools & materials Toothpick Scissors Glue Ruler The stand 1 Test-fit the cross strut into the circular holes of the two side columns. If you have trouble fitting the pegs into the holes, sand them down, as shown on the right. When they both fit, assemble the three parts together, as shown below. 3 Insert the central column into the hole in the cross strut, noting the correct orientation shown in the photo. 2 Insert the two pegs at the bottom of the side columns into the holes in the base. Adjust the fit if necessary. 42


17 The neck guard plates 1 Cut the lace into nine 20cm lengths. 2 Prepare both ends of each of the lengths of lace, shaping them into a point starting 2cm from the end, as with previous lengths. 3 Locate the three holes behind the wing of the wing plate (neck guard plate 1), and thread one of the lengths of lace through it from the inside. 4 Insert one end of the lace into the hole, third from the front. Pull the two ends through, keeping the two lengths equal. 5 Repeat Steps 3-4 to thread the remaining eight lengths of lace through the paired sets of holes around the plate, as shown. 43


18 6 Thread the two ends of the lace from Step 4 through the central and inner holes at the top row of the second guard plate. 7 As in the previous step, thread the other eight pairs of laces through the corresponding holes on the second plate. Make sure they go through the holes of the upper row (circled) and that you can t see the first plate through the holes. 8 Locate the lace in the center of the plates, at the rear, and pass the lace from the right hole and cross it over into the second hole on the left. 10 Repeat Steps 8-9 for the remaining eight pairs, in the numerical order shown on the right Now take the loose length on the left, cross it over and pull through the second hole on the right. Assembled parts 11 The two plates should now appear as in the photos, with the gap between them slightly wider toward the front. Check that the tops of the plates are parallel when seen from the sides, as shown above. 44

19 45


20 46
Samurai Armor Set: Step by Step
 Samurai Armor Set: Step by Step Pack 6 Stages -5 Contents Stage Pages 7-76 The tasset plates and shoulder pad Stage Pages 77-8 The tassets, helmet and helmet lining Stage Pages 8-86 The tasset plates and
ASSEMBLY INSTRUCTIONS
 ASSEMBLY INSTRUCTIONS Ballpark Classics Baseball Game MLB Edition Figure B Read the instructions completely before beginning g assembly. You will need a Phillips screwdriver. 1. Remove the game from the
RATLINER Assembly Instructions.
 Model Shipways Inc. www.modelexpo-online.com RATLINER Assembly Instructions. Patent Pending 1. Remove center stands and braces from the main rigging frame. 2. The Stands and Braces should press release
Pre-Paint>Fuselage>Empennage>Fit vertical tail fin. Objectives of this task: Materials and equipment required: Fit the spar extender
 Pre-Paint>Fuselage>Empennage>Fit vertical tail fin Objectives of this task: To fit the vertical tail fin to the fuselage, including fitting the static probe, static tube, optional strobe light wiring and
*Heart* Pom-pom rug. 1, 2, 3... go! Zweigart & Sawitzki GmbH & Co. KG Fronäckerstraße Sindelfingen. - more than 3 hours -
 Pom-pom rug *Heart* - more than 3 hours - 1, 2, 3... go! Zweigart & Sawitzki GmbH & Co. KG Fronäckerstraße 50 71063 Sindelfingen Preparation: Arrange the material you need. The Zweigart Twist canvas (Item
Retrofitting Green SkiErg Handles
 Materials Needed 1 replacement cord* 1 Bulldog clip Measuring tape or ruler Scissors *Contains lanolin Procedure Overview Remove the SkiErg from the wall or floor stand Remove cover plates Remove old cord
SGY-PM910H2/HL/LR ChainRing Adapter Installation Manual
 SGY-PM910H2/HL/LR ChainRing Adapter Installation Manual 1 Table of Contents Table of Contents... 2 1 Assembling the Chainring and Installing the Right Transmitter... 3 2 Installation procedure of the adapter
STUDENT HARNESS-RETRACTABLE Y STRAP INSTALLATION
 INSTRUCT 020 REV 2 Page 1 of 11 5/6/2013 STUDENT HARNESS-RETRACTABLE Y STRAP INSTALLATION INSTRUCT 020 REV 2 Page 2 of 11 5/6/2013 Outline: This document covers two major areas: 1. Retrofit instructions
8-GUN CORVETTE ASSEMBLY INSTRUCTIONS
 8-GUN CORVETTE ASSEMBLY INSTRUCTIONS THE HULL STEP 1 Fasten the Deck to the Hull. Find the hull. This is a large, pink, ship-shaped piece of insulating foam board. This will form the base of your model
STEP 1 A. Lay the two Motor Mount Tubes on a flat surface with ends even and Glue them together with White Glue. Allow Glue to set before moving on.
 Prod. No. A51003 Skill Level Three QUEST AEROSPACE, INC PO Box 2409 Pagosa Springs, CO 81147 800-858-7302 Things You ll Need To Assemble this Kit: Pencil and Hobby Knife: White Glue: Aliphatic Resin glue,
Building the Japanese Arrow for target archery
 Building the Japanese Arrow for target archery The purpose of this paper is to help target archers using a Japanese Yumi bow build accurate arrows for target archery. These arrows will have a period appearance
Apple Basket with Swing Handle
 Apple Basket with Swing Handle GH PRODUCTIONS, INC. The Basket Maker's Catalog www.basketmakerscatalog.com Materials are available from your basketry supply store, or contact: Copyright 2000 GH Productions,
Stand-N-Fish FULL DETAIL INSTALLATION INSTRUCTIONS
 1 Stand-N-Fish FULL DETAIL INSTALLATION INSTRUCTIONS Thank you for purchasing the incredible new Stand-N-Fish Kayak Fishing System. Once installed on your kayak the Stand-N-Fish will take your kayak fishing
Trampoline Installation Instructions
 Congratulations on purchasing an Oz Trampolines Product. Following are detailed setup instructions for your trampoline. Please ensure all boxes and parts are present before continuing. Setting Up Your
Experimental Procedure
 1 of 15 9/13/2018, 12:47 PM https://www.sciencebuddies.org/science-fair-projects/project-ideas/sports_p060/sports-science/physics-of-baseball-hit-charts (http://www.sciencebuddies.org/science-fairprojects/project-ideas/sports_p060/sports-science/physics-of-baseball-hit-charts)
Wasp size 2-4. Copyright J:sonSweden AB. Rec. hook Size 10/12
 Wasp size 2-4 Please watch the videos before choosing a specific fly pattern, they explain how to use Detached body pins, Wingburners and Wingmaterials. And how to tie in Wings/Wing-buds and Nymph-legs/Nymph-backs.
Your kit contains the following items. Additional Items You May Need. Pre- cut parts Propeller rigging and rubber Sandpaper Covering sheet
 Your kit contains the following items Pre- cut parts Propeller rigging and rubber Sandpaper Covering sheet The SkyFox offers great glide performance in a rubber powered plane due to its built up wing.
MARIA HF31. SCALE: 1/72 Length: 365 mm width: 85mm height: 295 mm
 MARIA HF31 SCALE: 1/72 Length: 365 mm width: 85mm height: 295 mm HISTORY: Maria HF 31 is a fishing Ewer whose home base was Finkenwerder in northern Germany. Maria HF31 operated in the North Sea for more
ASSEMBLY MANUAL HOBIE CATSY
 ASSEMBLY MANUAL HOBIE CATSY HOBIE CAT EUROPE ZI Toulon Est, BP 50 8078 Toulon cedex 9, France Tel : + (0)9 08 78 78 - Fax : + (0)9 08 99 Email : hobiecat@hobie-cat.net - http://www.hobie-cat.net ASSEMBLY
BMW Motorrad. Installation Instructions. BMW Motorrad Communications System for Schuberth C3
 BMW Motorrad Installation Instructions BMW Motorrad Communications System for Schuberth C3 Order No. 01 29 2 219 831 BMW Motorrad 05/2011 Be sure to read these instructions carefully and completely before
Aliphatic Resin Wood Glue. 18" Fabric Parachute Part #PNC50 Part # Part #11700 Part #J0016. Launch Lug
 ADANCED * What you will need to build the Quest High-Q Hobby Knife * Straight Edge Pencil Aliphatic Resin Wood Sanding Sealer & Brush Spray Paint Parts and exploded view of the Quest High-Q Nose Cone 18"
How Scott Builds a Fighter Kite, May 2011 Updated Sept 2018
 How Scott Builds a Fighter Kite, May 2011 Updated Sept 2018 MAKE A TEMPLATE 1. Draw half sail plan on 17x22 pad with 4x4 (1/4 inch) grid. Add ¼ inch extra on nose (for reinforcement) and plenty of extra
Grandpa's Homemade Rocket for About a Dollar!
 Grandpa's Homemade Rocket for About a Dollar! Grandpa and Granny Co. 2012 The most common items needed: (The number of Rocket parts from each item is before the parts name and its proportionate cost is
REDMAN SUIT ASSEMBLING AND PACKING INSTRUCTIONS
 ASSEMBLING AND PACKING INSTRUCTIONS RedMan Training Gear Train realistically and you train to survive. RedMan Training Gear empowers law enforcement, corrections, military and security professionals to
Vacuum Bagging Wings Instruction Manual Purdue University
 Vacuum Bagging Wings Instruction Manual Purdue University Note: Do not leave the vacuum pump running unattended! Revision: Original Release 10/31/15 Vacuum bagged wings are quick to build, light weight,
Bob's Card Models and [Resources]
![Bob's Card Models and [Resources]](/thumbs/89/98525234.jpg "Bob's Card Models and [Resources]") + Bob's Card Models www.bobscardmodels.altervista.org and www.zealot.com [Resources] Sikorsky S-40 (1:72) The Sikorsky S-40 was an American amphibious flying boat built by Sikorsky in the early 1930s for
+ Bob's Card Models www.bobscardmodels.altervista.org and www.zealot.com [Resources] Sikorsky S-40 (1:72) The Sikorsky S-40 was an American amphibious flying boat built by Sikorsky in the early 1930s for
Shiel e d Kite t By B y Sam & Ca C rir King Ore r g e o g n o Kite t m e aker e rs s Retr t e r a e t t2013
 Shield Kite By Sam & Cari King Oregon Kitemaker s Retreat 2013 SAIL ASSEMBLY Your pre-cut sail pieces include half-inch seam allowances. This provides enough material to complete a 1/4 inch double rolled
600 / 600FC OWNER'S MANUAL
 PROGRESSION 600 / 600FC OWNER'S MANUAL Issue 2 / Version E - Dec. 10, 1997 Copyright 1997 GAMMA Sports - All Rights Reserved PROGRESSION 600 / 600FC OWNER'S MANUAL TABLE OF CONTENTS PAGE 1... WARRANTY
3190A NEO-ANGLE DOOR INSTALLATION INSTRUCTIONS. Series MODEL NO
 NEO-ANGLE DOOR INSTALLATION INSTRUCTIONS Series 30A Please read these instructions carefully to familiarize yourself with the required tools, materials, and installation sequences. The Exploded Diagram
Butler Parachute Systems, Inc
 Butler Parachute Systems, Inc A division of Butler Parachute Systems Group, Inc. TT-600 GEN 1 & 2 TETHERED TANDEM BUNDLE DELIVERY SYSTEM ASSEMBLY MANUAL 1 JUN 2010 INTRODUCTION This manual contains all
Butler Tactical Parachute Systems, LLC
 Butler Tactical Parachute Systems, LLC A division of Butler Parachute Systems Group, Inc. TT-600 TETHERED TANDEM BUNDLE DELIVERY SYSTEM PACKING MANUAL (REVISION A ) Page 1 of 62 INTRODUCTION This manual
pompom ANIMALS MAKE Instructions for making birds, butterflies, ladybugs, and hedgehogs. Pompoms
 pompom MAKE ANIMALS Instructions for making birds, butterflies, ladybugs, and hedgehogs. Pompoms Contents 02 H ow to Make Pompoms Using Pompom Makers 06 H ow to Make Semicircular Pompoms Using Pompom Makers
X-PRESS STAGE SYSTEM OWNER S MANUAL. TOOLS REQUIRED Allen Wrench (provided)
") X-PRESS STAGE SYSTEM BEFORE YOU BEGIN... Read and understand these instructions before operating. Use caution and care for your back when lifting, pushing, pulling, or folding and unfolding these units.
X-PRESS STAGE SYSTEM BEFORE YOU BEGIN... Read and understand these instructions before operating. Use caution and care for your back when lifting, pushing, pulling, or folding and unfolding these units.
THE AMERICAN BARN DOOR KITE
 THE AMERICAN BARN DOOR KITE Oregon Kitemaker s Retreat January 2007 Rod Beamguard 4104 NW 112 th Way Vancouver, WA 98685-3578 (360) 574-8050 home (360) 750-9833 office kytfevr@wa-net.com PLANFORM BARN
Prop Racer System. User Guide V0210
 Prop Racer System User Guide 59718 V0210 Introduction The CO 2 dragster racing activity is popular with older students, but has eluded elementary students due to its complexity. Pitsco s latest race system
ESOCCI RIGGING MANUAL
 ESOCCI RIGGING MANUAL 1 Spray Covers Hull Rear Iako Forward Iako Ama ESOCCI RIGGING MANUAL 2 When training & racing in outrigger canoes, the canoe is your protector on the water and therefore it is imperative
Make Your Own Bundled canes Revision Date: May 2014
 Make Your Own Bundled canes Revision Date: May 2014 Attribution-ShareAlike 4.0 International (CC BY-SA 4.0) Summary: http://creativecommons.org/licenses/by-sa/4.0/ License: http://creativecommons.org/licenses/by-sa/4.0/
Beginners Fly-Tying Notes
 Beginners Fly-Tying Notes SESSION 1 Tools Bobbin holder Threader (for dental floss!) Bodkin/ Dubbing needle (hat pins!) Vice 1 Check that: the jaws hold the sizes of hooks you want to tie on; and the stem
Construction Chapters Index
 Construction Chapters Index 9 7 8 Chapters Index c. c. c. c. c. c. c7. c8. c9. c0. c. c. c. c. c. c. c7. Balsa Wood Skeleton Strip Planking Hull Fairing Keel Bulb Mould Lead Bulb Casting Keel Construction
STUDY GUIDE A Day By Day Course Refreshment Quiz To Ensure That You Make The Most Out Of Your Rod Building Class
 DAY ONE: 1) Why would you want to build your own fishing rod? a. It s fun and rewarding b. You can customize your rod to your needs c. You can save money d. All of the Above 2) The main part of a fishing
WHITE WOLF. X-ray View MID POWER MODEL ROCKET KIT BUILDING INSTRUCTIONS KIT SPECIFICATIONS:
 WHITEWOLF-38 PARTS LIST 1 - Nose Cone 1-17" Airframe 1-6" Motor Tube 3 - Aft Fins 3 - Forward Fins 2 - Centering Rings 1-15" Parachute 2 - launch lugs 1-12 Kevlar Shock Cord 1 - Motor Retention >>(screw/washer)
RUDDER KIT INSTRUCTIONS
 A I N S T R U C T I O N S RUDDER KIT INSTRUCTIONS TARPON 0/40/60/60i The Tarpon series is designed as a high performance sit-on-top kayak tailored for the sport paddler. Our rudder system is designed to
aero naut Order No. 3009/00
 aero naut Order No. 3009/00 Introduction: The model should be assembled following the sequence of the stages of construction described in these instructions. The laser-cut components are individually numbered.
UMBILICAL CORD MODEL FOR UMBILICAL VEIN CATHETERIZATION TRAINING
 UMBILICAL CORD MODEL FOR UMBILICAL VEIN CATHETERIZATION TRAINING A Guide to its Construction and Usage INTRODUCTION Introduction This training model aims to familiarize clinicians with umbilical vein catheterization
NAVIGATOR PROP BUILDING INSTRUCTIONS & PHOTOS
 NAVIGATOR PROP BUILDING INSTRUCTIONS & PHOTOS Science under the ice Ice sheet At regional competitions the ice is simulated by 8 ft x 4 ft ½-inch foam sheeting (Home Depot part #703990 [in store only],
Wing assemblyfinal Master 4/29/04 11:20 PM Page 1. Issued January 1, Sabre Aircraft. Assembly Manual. Sabre 16ss Wing
 Wing assemblyfinal Master 4/29/04 11:20 PM Page 1 Issued January 1, 2002 Sabre Aircraft Assembly Manual Sabre 16ss Wing Wing assemblyfinal Master 4/29/04 11:20 PM Page 2 1. 2. 1. Unzip the cover and remove
Front derailleur. Dealer's Manual DURA-ACE FD-R9100 ULTEGRA FD-R FD ROAD MTB Trekking. City Touring/ Comfort Bike DM-RAFD001-03
 (English) DM-RAFD001-03 Dealer's Manual ROAD MTB Trekking City Touring/ Comfort Bike URBAN SPORT E-BIKE Front derailleur DURA-ACE FD-R9100 ULTEGRA FD-R8000 105 FD-5801 Procedures for cable tension adjustment
VERSA BIKE RACK INSTRUCTIONS
 VERSA BIKE RACK INSTRUCTIONS Models #8, 8 Important This rack is designed for use with a or. receiver hitch. The rack is designed to hold a maximum of two bicycles. Do not use it for anything other than
Rudder Kit Assembly Instructions for Quest 13
 Rudder Kit Assembly Instructions for Quest 13 Revised 4/2/2015 78501 Rudder System The Hobie Quest is designed for the addition of an optional rudder system. Rudder systems in boats like this allow you
Troyer s Gourd Rack 8 unit F R H O P
 B E A D I M-N L Vertical Parts F R H O P Horizontal Parts C G J Updated 11/16 Parts List A: Top of Pole B: Bottom of Pole C: 48 Ground Stake D: Top Perch rods 48 long E: Hub F: Rope Winder w/ attached
Mayfly Dun size 1-3. Use the TyinGuides, they will help you get the correct proportions.
 Mayfly Dun size 1-3 Please watch the videos before choosing a specific fly pattern, they explain how to use Detached body pins, Wingburners and Wingmaterials. And how to tie in Wings/Wing-buds and Nymph-legs/Nymph-backs.
In each step, the needed parts are shown the number right below. Locate all parts for the step.
 Tools Required for Assembly Phillips Screwdriver, Med Needle Nose Pliers Sandpaper (#400 grit) Hobby Knife Scissors CA Instant Glue Rubbing Alcohol Drill Bit 1/16", 1.6mm 5/64, 2mm 1/8, 3mm 5/32, 4mm Before
Basket for Janice. by Beth Hester. GH Productions, Inc. The Basket Maker s Catalog
 Basket for Janice by Beth Hester GH Productions, Inc. The Basket Maker s Catalog Materials are available from your basketry supply store or contact: The Basket Maker s Catalog GH Productions, Inc. 521
Swing Your Partner. by Beth Hester. GH Productions, Inc. The Basket Maker's Catalog
 Swing Your Partner by Beth Hester GH Productions, Inc. The Basket Maker's Catalog Materials are available from your basketry supply store or contact: The Basket Maker's Catalog GH Productions, Inc. 521
Children s University Tasmania Monthly Challenge Make your own Robo Wheel
 Children s University Tasmania Monthly Challenge Make your own Robo Wheel Have you ever spun a Top? A top is a flywheel, a spinning disc that stores energy. Once a flywheel gets going, the stored energy
8MAY15 US RACK, Inc Falcon Drive, Madera, CA
 8MAY15 US RACK, Inc. - 2850 Falcon Drive, Madera, CA 93637-559-661-3050 INSTRUCTIONS for Bedrail-mounted MOTORCYCLE RACK, Model 2001-4TRA WARNING: Do NOT attempt to install or use this rack without following
RehabPro Speed Pulley (M100S & M100FS) User Manual
 User Manual") RehabPro Speed Pulley (M100S & M100FS) User Manual 1. Inspection of Delivery Before unpacking the Pulley please inspect the packaging for shipping damage. Observable damage should be noted prior to signing
RehabPro Speed Pulley (M100S & M100FS) User Manual 1. Inspection of Delivery Before unpacking the Pulley please inspect the packaging for shipping damage. Observable damage should be noted prior to signing
Operation & Instruction Manual
 Operation & Instruction Manual AMS Retriever Pro Mounting Instructions Play Video Diagram Assembly Adjustments Play Video Big Game Retriever Pro Set-up Play Video Assembly/Diagram Adjustments Play Video
Front derailleur. Dealer's Manual SORA FD-R3000 FD-R3030 CLARIS FD-R2000 FD-R2030. ROAD MTB Trekking. City Touring/ Comfort Bike DM-RBFD001-01
 (English) DM-RBFD001-01 Dealer's Manual ROAD MTB Trekking City Touring/ Comfort Bike URBAN SPORT E-BIKE Front derailleur SORA FD-R3000 FD-R3030 CLARIS FD-R2000 FD-R2030 CONTENTS IMPORTANT NOTICE... 3 TO
Santa Fe Cycles Assembly Guide Introduction
 Santa Fe Cycles Assembly Guide Introduction Congratulations on your purchase of your new Santa Fe bicycle. You have purchased a bicycle that has many features and qualities. Please take a few minutes and
Splicing Instructions. Standard Double Braid Eye Splice Type 1 Double Braid Ropes
 Splicing Instructions Standard Double Braid Eye Splice Type 1 Double Braid Ropes Introduction Double Braid Eye Splice This document describes the steps required to perform a Double Braid Eye Splice in
Easter Bunny Pompoms
 Easter Bunny Pompoms When I was younger I remember it taking ages to make pompoms because of constantly passing a ball of yarn through the middle of two cardboard circles. Well this method makes it a lot
SERIES 2 RAMP OWNER S MANUAL TOOLS REQUIRED: BEFORE YOU BEGIN... Read and understand these instructions before beginning a ramp setup.
 SERIES 2 RAMP OWNER S MANUAL BEFORE YOU BEGIN... Read and understand these instructions before beginning a ramp setup. Use caution and care for your back when lifting, pushing, pulling, folding or unfolding
AVA Building Instructions
 Suggested Assembly Sequence: AVA Building Instructions 1. Insert fittings in rudder and trial fit rudder on boom 2. Attach stab to v-mount and position ahead of rudder ¼, sanding the v-mount as needed.
Installation Guide, MPower Echelon Console
 Installation Guide, MPower Echelon Console AC Performance, AC Sport and AC Performance Plus Schwinn Echelon Console (External Routing) 1. Install batteries to console. Mount the console to the bike. 2.
3 Scotch-Weld Polyurethane Reactive Adhesive Applicator Replacement Part Installation Guide
 3 Scotch-Weld Polyurethane Reactive Adhesive Applicator Replacement Part Installation Guide Description: AIR SUPPLY LINE KIT Product ID/Stock No.: 62-9895-0005-3 For use with: 3M Scotch-Weld Polyurethane
1939 STOUT TROPHY WINNER
 1939 STOUT TROPHY WINNER This model's 36-minute flight won the Stout Trophy and qualified the builder as captain of the American Moffett team. Bob Toft. Has won a second in gas, first in rubber at Nationals.
18. Tailplane torque-tube
 18. Tailplane torque-tube Step 1 Fu se lage rear bulkhead Remove the three part templates of the rear bulkhead: an A4 size sheet from Annex A (page 5) and two A3 size sheets from Annex F of the manual,
Universal Anchoring Adapter For Mercedes
 Universal Anchoring Adapter For Mercedes Anchoring Pin & Tube Set (For Most Mercedes Models) Users Manual 006 Chief Automotive Technologies, Inc. Chief s Limited One-Year Warranty & Liability CHIEF'S
Bow and Arrows. Materials Needed: ½ PVC cut to length ¼ Dowels cut to 16 length, need 3 of these 1 Water line cut to 4 length Pencil Eraser
 At Least Bow and Arrows Materials Needed: ½ PVC cut to 40 42 length ¼ Dowels cut to 16 length, need 3 of these 1 Water line cut to 4 length Pencil Eraser Nylon String cut to 36 length 2 pieces Duck Tape
MATCHLESS BULKY PLYER FLYER HEAD
 MATCHLESS BULKY PLYER FLYER HEAD INSTALLATION AND USE FOR WHEELS BUILT BEFORE AND AFTER 1/19/2012 Find out more at schachtspindle.com Schacht Spindle Company 6101 Ben Place Boulder, CO 80301 p. 303.442.3212
H ow To Buil d A Wa ter Rocket
 H ow To Buil d A Wa ter Rocket DESIGN AND DEVELOPMENT Brainstorm The first step in the design of a water bottle rocket is brainstorming. Brainstorming is a problem-solving technique that involves the spontaneous
Instructions. Follow All Instructions Before Assembling Or Using This Product
 Instructions Follow All Instructions Before Assembling Or Using This Product IMPORTANT DO NOT RETURN THIS PRODUCT TO THE RETAIL STORE WHERE PURCHASED. CALL TOLL FREE: (800) 492-9334 WARNING: Improper use
CARL GOLDBERG PRODUCTS, LTD. P.O. Box 818 Oakwood GA Phone # Fax #
 Superfloats 36 ARF WARNING A radio-controlled model is not a toy and is not intended for persons under 16 years old. Keep this kit out of the reach of younger children, as it contains parts that could
Make Bruce's High Performance 'F3' Fighter Kite In Less Than 2 Hours For Under $3
 Make Bruce's High Performance 'F3' Fighter Kite In Less Than 2 Hours For Under $3 This article was inspired from a chapter in NORTH AMERICAN FIGHTER KITES, my 400+ page fighter kite book on CD ROM. If
OWNER'S MANUAL. Copyright 2003 GAMMA - All Rights Reserved
 OWNER'S MANUAL AL Issue 1 - December 2003 Copyright 2003 GAMMA - All Rights Reserved OWNER'S MANUAL TABLE OF CONTENTS PAGE 1... WARRANTY PAGE 2... ASSEMBLY INSTRUCTIONS PAGE 4... MOUNTING THE RACQUET PAGE
How To Build A Water Rocket
 How To Build A Water Rocket DESIGN AND DEVELOPMENT Brainstorm The first step in the design of a water bottle rocket is brainstorming. Brainstorming is a problem-solving technique that involves the spontaneous
Exxtacy. Repair and Tuning Manual. Exxtacy Construction Basics
 1 of 20 Exxtacy Repair and Tuning Manual Construction Basics D Cell Repair Rib Repair Tuning Exxtacy Construction Basics The Exxtacy is built with carbon fiber and Kevlar/Aramide honeycomb. The Exxtacy
Shoreline Cantilever Lift 2500lb Capacity Models: (108" inside width) - Part # (120" inside width) - Part #
 - Part # (120 inside width) - Part #") Shoreline Cantilever Lift 2500lb Capacity Models: 25108 (108" inside width) - Part # 1017402 25120 (120" inside width) - Part # 1017403 1. 2. 3. 4. 5. CAUTION - PUT SAFETY FIRST Before attempting to install
Shoreline Cantilever Lift 2500lb Capacity Models: 25108 (108" inside width) - Part # 1017402 25120 (120" inside width) - Part # 1017403 1. 2. 3. 4. 5. CAUTION - PUT SAFETY FIRST Before attempting to install
KNOTS. Overhand Knot. Page 12 of 32
 Overhand Knot KNOTS The overhand knot is useful for tying cord around a pin to end a macramé project, holding beads in place, and tying your shoes! It also makes a nice variety knot in a macramé design.
Fin Shape Science Experiment Kit
 Kit #00524 Fin Shape Science Experiment Kit Test Different Fin Shapes to Find Out Which One Performs the Best! P/N Description Qty 10079 AT-18/5.4 (Fin Shape Sci Eng. Mount Tube) 1 10118 AT-33/3 (Payload
Flat Fold Highchair INSTRUCTION MANUAL. Designed and manufactured to BS EN 14988: 2012 IMPORTANT:
 Flat Fold Highchair INSTRUCTION MANUAL Designed and manufactured to BS EN 14988: 2012 IMPORTANT: Thank you for choosing our product. Please read and understand these instructions before using this flat
Apex M&P Barrel Fit Guide ALL OF THE FOLOWING OPERATIONS ARE TO BE DONE WITH ABSOLUTELY ZERO LIVE AMMUNITION PRESENT.
 Familiarization Free floating barrels like most polymer frame pistols have, use 6 contact points o Barrel hood The extension of the chamber coming back over the top of a chambered round to make contact
The Mystery Tube. Purpose: The students will be able to. Experience the process of science first-hand. Use a constructed model to test a hypothesis.
 The Mystery Tube Purpose: The students will be able to Experience the process of science first-hand. Use a constructed model to test a hypothesis. Standards Addressed: (Indiana Science Academic Standards)
Model Aero AT-6 Texan Introduction
 1 Model Aero AT-6 Texan Introduction We are excited to introduce the Model Aero AT-6 Texan! Originally used as an advanced trainer by the U.S. Armed Forces, the AT-6 is a relaxing slow flyer, equally at
Kari-Tek. Kari-Tek. Hydro Skeg Retro-Fitting Instructions. Instructions for retro-fitting of Hydro Skeg
 Kari-Tek Instructions for retro-fitting of Hydro Skeg A good knowledge of fibreglassing will be required to fit the Hydro Skeg successfully. When working with fibreglass and cutting the holes, safety glasses,
Please visit our website at and leave your comments.
 We promise our customers the best services and premium quality products with value. MODIFY and its logo are registered trademarks. Please visit our website at www.modify.com.tw and leave your comments.
Brushbot Kit Instructions: Parts
 Brushbot Kit Instructions: Parts or AG13 Googly eyes Additional Tools Needed: Scissors or snips, hot glue gun or some type of glue suitable for plastic (epoxy or super glue should be fine). Brushbot Kit
Instructions for Fun Foam Critter 4/25/2007 BP Hobbies LLC 140 Ethel Road W Suite J Piscataway NJ,
 Instructions for Fun Foam Critter 4/25/2007 BP Hobbies LLC 140 Ethel Road W Suite J Piscataway NJ, 08854 http://www.bphobbies.com Specifications: Wing Span: 20" Length: 20" Flying Weight: 5.5-7.0 oz Controls:
X-6 STRINGING MACHINE OWNER'S MANUAL. Issue 1 - May Copyright 2004 GAMMA Sports - All Rights Reserved
 X-6 STRINGING MACHINE OWNER'S MANUAL Issue 1 - May 2004 Copyright 2004 GAMMA Sports - All Rights Reserved OWNER'S MANUAL GAMMA X-6 TABLE OF CONTENTS PAGE 1... WARRANTY PAGE 2... FEATURES PAGE 3...ASSEMBLY
Model Aero Sportster Indroduction
 1 Model Aero Sportster Indroduction We are excited to introduce the Model Aero Sportster! Inspired by classic designs of the past, the Sportster is a relaxing slow flyer, equally at home indoors or outside
Advisor Pack. Balloons and more! Easy to order at balloons.com
 Advisor Pack Balloons and more! Easy to order at balloons.com balloons.com 4 TALL Introducing & Easy Assembly Lasts for Weeks Variety of Colors No Helium Required Everything s Included! 4 Red & Silver
The Wobble Bugger by Michael Lack
 The Wobble Bugger by Michael Lack if you can tie a Wooly Bugger, you can tie this fly! Deke Meyers in his book Tying Bass Flies 12 of the Best, listed the Wiggle Bug as an effective bass fly. Admittedly,
Changing Out the Rear Hub and Sprocket on a 2012 Morgan Three Wheeler Calum Fraser 17/07/2015
 Intro The early Three Wheelers had the rear sprocket in a stepped arrangement relative to the front sprocket with the belt overhanging the sprocket on the outside face. While this is probably less of a
Surfboard Repairs Chapter 7
 Surfboard Repairs Chapter 7 The Complete Surfing Guide for Coaches - Bruce "Snake" Gabrielson Repair Problems Boards continuously get bumped, hit rocks, break fins, get dropped, and many other things that
INSTRUCTIONS FOR CHAIN LINK INSTALLATION
 INSTRUCTIONS FOR CHAIN LINK INSTALLATION This guide explains how to correctly install our chain link fencing and post system. The guide provides details of which post type you will need for your fence
STATIONARY TRUCK INTERNAL HALYARD V-CLEAT FLAGPOLES FOR QUICK AND PROFESSIONAL INSTALLATION READ ALL INSTRUCTIONS BEFORE PROCEEDING
 9390 South 300 West, Sandy, Utah 84070 801-562-0123 800-782-0500 ColonialFlag.com STATIONARY TRUCK INTERNAL HALYARD V-CLEAT FLAGPOLES FOR QUICK AND PROFESSIONAL INSTALLATION READ ALL INSTRUCTIONS BEFORE
Boat Boat Loader Fitting Instructions
 Aerodynamic & Heavy Duty Roof Rack Systems Australian Made - Australian Owned www.rhinorack.com Boat Boat Loader Fitting Instructions CONTROLLED Balance point 3 Front eye nuts position 3 Transom eye nut
Sails. Sails: extract from 'Super-detailing the Cutter Sherbourne' page 1 George Bandurek
 Sails There are many arguments for adding or omitting the sails on a model ship. There is no right answer and I decided to have a combination of set and furled sails on my model of HM cutter Sherbourne
Ships of the world : Esmeralda : Assembly Instructions
 http://www.canon.com/c-park/ Before starting assembly: Writing the number of each section on its back side before cutting out the sections is highly recommended. (* This way, you can be sure which section