COMMAND AND COLORS NAPOLEONICS PLUS
|
|
|
- Abraham Elliott
- 5 years ago
- Views:
Transcription

1 COMMAND AND COLORS NAPOLEONICS PLUS SCENARIOS Version

2 ÉVORA 29 - July 1808 Historical Background The Spanish Dos de Mayo uprising against the French quickly spread throughout Spain and crossed the border into Portugal. The Portuguese countryside rose against the French and General Junot and his troops in Lisbon had their lines of communications cut with Spain and France. At the end of the July, Junot decided to send General Loison with a force of at least 7,000 men and eight artillery pieces to clear a path to the border fortress of Elvas. On 29 July 1808, Loison's troops reached the outskirts of Évora to find a Portuguese-Spanish force arrayed across their path with 2,000 men and seven artillery pieces. Behind them, manning the ancient walls of Évora was a motley collection of poorly armed townsmen and peasants. The French advanced quickly in three columns. The charging dragoons caused the Spanish hussars to flee. The impact of the infantry charge quickly broke the defenders leaving the town at the mercy of the French, the sacking of which lasted all night and following morning. 2
3 Portuguese-Spanish Army Commander: General Francisco de Paula Leite de Sousa Command Rating: 1 Move First French Army Commander: General Louis-Henri Loison Command Rating: 3 Victory 6 Victory Banners Special Rules The French use British line infantry blocks for the Hanoverian Legion. The Hanoverian Legion is treated as French Line Infantry except that they do not get +1 when in Melee vs Infantry. The French gain Victory Banners in the normal way; one is gained for each enemy leader or each 4 enemy blocks eliminated. However no Victory Banners are gained for eliminating Portuguese Milita. The Portuguese-Spanish gain Victory Banners in a different way; one is gained for each enemy leader or each 2 enemy blocks eliminated. The Portuguese Milita may not voluntarily leave the town of Évora. The Portuguese-Spanish have only two special order cards: 1 x Guerrilla Action & 1 x Rally. Historic Note The battle was not balanced. With 7,000 good French troops against 2,000 inexperienced Portuguese-Spanish there was really no doubt about the outcome once the allies had decided to meet the French outside the walls. The French lost 90 dead and 200 wounded. The whole Portuguese-Spanish army was routed with huge loss. The unusual Victory Banner rules mean that the Portuguese-Spanish army will win if they do better than their historical counterparts. The French must eliminate their enemies with small losses to their own side in order to win the scenario. 3

4 BAILEN - 19 July 1808 Historical Background Large areas of Spain had rebelled against the French invasion. Dupont s French Corps advanced to occupy Cordoba and Sevilla. Most of Dupont s troops were newly formed conscript units. Soon Dupont found himself facing General Francisco de Castaños force of 30,000 men to his front, and harassing guerilla forces that cut his line of communications until a reinforcing French division reopened it. Fearing that his communications would be cut again, Dupont retreated, but did so too slowly, encumbered by a long baggage train. Half of Castaños army under Reding executed a decisive flank march that placed them on high ground at Bailén, squarely across Dupont s line of retreat. Dupont remained unaware of their presence until too late. On July 19th Dupont s advance guard (Chabert s brigade) made contact with Reding s defensive line. Without reconnaisance, Chabert sent his 3,000 infantry and cuirassiers forward against three times their numbers. The attack was driven back. Most of Dupont s corps marched behind the baggage train, making reinforcement difficult. Arriving units were thrown into a second French attack piecemeal, and were again repulsed. Dupont arrived on the field and assumed command. Led by the Marines of the Guard, the third understrength French attack also failed. Adding insult to injury, most of Dupont s Swiss infantry, originally in Spanish service, deserted back to their former employers. With no additional reserves and the rest of Castaños Spanish army moving in behind the French, Dupont surrendered. 4
5 Special Rules The entire Rumblar River is fordable. Both Spanish and French Swiss line infantry units have 5 blocks each. All Swiss infantry units that move and engage in ranged combat battle with one-half the number of blocks rounding down. They melee with one die per block and retreat one hex per flag. When ten blocks of French Swiss infantry are eliminated, all remaining French Swiss units are immediately removed from the battlefield. Their removal will not count towards Victory Banners for the Spanish player. The Leader and four infantry units on the French base edge may not move during the first 6 turns. The French player does not get a LEADERSHIP card. Spanish Army Commander: Theodor von Reding Command Rating: 2 French Army Commander: Pierre-Antoine, comte Dupont de l'étang Command Rating: 2 Move First Victory 7 Victory Banners Historical Note Swiss regiments were highly regarded mercenaries purchased from the Swiss Cantons for service in European armies. The Spanish Swiss regiments were uniformed in blue coats. Napoleon s Swiss regiments were uniformed in red coats. At Bailén, Castaños army had one Swiss regiment, the 3rd Jung Reding. Dupont s French corps had 5 Swiss battalions: One Swiss battalion in French service, and four in the Spanish Swiss regiments 2nd Alt Reding and 6th Preux. When the French occupied Madrid, both regiments were coerced into French service. During the second French attack both of the Reding regiments came face-to-face and blazed away at each other. After the third French attack, the survivors of the 2nd and 6th Swiss regiments bolted en masse over to the Spanish lines. No longer trusted by either side, both regiments were quickly disbanded. Swiss policy about regimental deployment changed after the deadly Swiss against Swiss battle at Bailén. 5

6 ESPINOSA DE LOS MONTEROS - 10/11 November 1808 Historical Background After the escape from Zornoza, Blake s army was still in trouble. Marshal Victor was pressing forward through the mountains and in position to cut off one of Blake s divisions under the command of Pedro Caro, Conde de San Romana, but Blake halted his retreat and turned to join Romana at Espinosa. The 23,000 Spaniards occupied a strong position. Romana s division, composed entirely of regular Spanish regiments, held the Spanish right flank. After defeating the Prussians in 1806, Napoleon demanded and received this division to garrison the Baltic coast area. Upon learning of Napoleon s invasion of Spain, the entire division boarded Royal Navy ships and returned to Spain to fight. On the first day of battle, they repulsed General Villatte s advance division of Victor s corps. When Victor arrived later in the day with the rest of his corps, he launched a second attack on Romana s division, but once again the French were driven back with heavy losses on both sides, including Romana himself, killed leading his troops. Victor was no Napoleon, but he realized the day s attacks had forced Blake to weaken his center and left to shore up Romana s weakened division on the right. The following day Victor ordered Lapisse s division to attack on the Spanish left at Las Peñucas ridge. It was a fortunate decision. General Acevedo s division held this ground, but most of his troops were newly raised, inexperienced and untrained. After a short struggle, the Spanish left flank broke and fled. With Lapisse in firm control of the heights above Espinosa, Victor ordered a general advance and the Spanish army collapsed. After the battle over 8,000 Spaniards drifted away to return home rather than reform with Blake s shattered army at Reinosa. 6
7 Spanish Army Commander: Blake Command Rating: 3 French Army Commander: Victor Command Rating: 3 Move First Victory 7 Victory Banners Special Rules The River Trueba is impassable. The Shallow Stream is fordable. 7
8 MEDELLIN - 28 March 1809 Historical Background General Cuesta s army was retreating in the face of Victor s advance after being forced out of its defensive positions on the Tagus River. On the 27th of March, Cuesta s army was reinforced by the Duke of Albuquerque, and Cuesta decided it was time to fight. Cuesta s plan was to strike both French wings and hope to catch the French army with their backs to the Guadiana River. Victor was outnumbered, but had veteran troops who knew how to win, so he willingly deployed for battle. Victor s plan was to keep withdrawing his flanks closer and closer to the center until a powerful counter-attack could shatter the Spanish line. Cuesta formed his infantry into one long, thin unbroken line since his greatest fear was that French cavalry could destroy his infantry if there were gaps in the line. At first, Cuesta s plan seemed to be working. Lasalle s position on the French left was at risk, but his men held on to their tenuous positions. Spanish infantry formations were also pushing forward against the French batteries on Latour-Maubourg s hill position. Latour-Maubourg flung his cavalry into a counter attack, but the cavalry was forced into a disorganized retreat. As the Spanish infantry threatened to capture the French guns, Latour-Maubourg ordered his reformed cavalry to attack again this time against the Spanish cavalry covering the end of the infantry line. Events now unfolded quickly. The French cavalry charge succeeded and the Spanish cavalry fled the field, exposing the thin Spanish line to a devastating flank attack. Cuesta s left flank dissolved in panic. Lasalle and Villatte, seeing the opportunity, ordered a counter-attack that caught the right flank of the Spanish army between infantry to their front and cavalry to their flanks and rear. The result was a massacre. Entire battalions were destroyed as they tried to stand and fight, and the French cavalry showed no quarter in their pursuit of fugitives. Over 7,500 Spaniards became casualties. In the aftermath, Cuesta s shattered army retreated to Monasterio. Spanish Army Commander: Gregorio de la Cuesta Command Rating: 3 Move First French Army Commander: Marshal Victor Command Rating: 3 Victory 6 Banners 8

9 Special Rules The Spanish player s Command Rating is reduced by 1 for each victory banner lost after the first, until the Command Rating reaches 1. Cuesta started over-confident but panic set in when the Spanish started taking losses. The Spanish player may only form square twice during the battle. The Spanish infantry were not experienced in receiving cavalry which cut them to pieces. The Guadiana and Hortiga Rivers are impassable except at the bridge. 9

10 RIVER COA - 24 July 1810 Historical Background After eliminating the garrison at Ciudad Rodrigo, Marshal André Masséna ordered Marshal Ney s 6th Corps to advance on the fortress of Almeida. Rather than retreat and cross the river as ordered by Wellington, Crauford courted disaster and chose to hold his bridgehead. Crauford and the French both wanted to control the narrow stone bridge which was the only way to cross the Côa for several miles. In the early hours of July 24th, Ney pushed forward his entire force against Crauford s outnumbered Anglo-Portuguese Light Division. The first French attacks by Loison s Division were checked by intense musket and rifle fire. As the fight in the center raged, French light cavalry braved the fire of the guns of Almeida and charged forward, routing the left flank of Crauford s line. With his line in danger of being rolled up, Crauford ordered an immediate retreat to the bridge. The Portuguese Cacadores and guns were first to cross the bridge while several British battalions held the French at bay. Soon these British units also fell back in good order across the river. Desiring a complete victory, Ney launched three disastrous assaults across the stone bridge, but all attempts failed to dislodge the British. That night Crauford withdrew toward Pinhel, leaving Masséna to lay siege to Almeida. 10
11 British Army Commander: Crauford Command Rating: 3 Move First French Army Commander: Marshal Ney Command Rating: 3 Victory 6 Banners Special Rules Any ordered Anglo-Portuguese unit (regardless of strength) that exits the battlefield from the bridge hex will count as a Victory Banner for the British army. Exited leaders do not count for British Victory Banners. Anglo-Portuguese units cannot exit off the bridge hex when forced to retreat due to ranged or melee combat. Units must halt or remain on the bridge hex and lose one block for each retreat hex that cannot be taken. If the unit is eliminated, the French player receives one Victory Banner. The River Coa is impassable except at the bridge. The Fortress of Almeida is treated as a town. In addition, Anglo-Portuguese units on a Fortress of Almeida hex may ignore one flag. Anglo-Portuguese units in Almeida are considered to have all hex sides as front facing. British artillery in Almeida does not deduct one when firing out of a town. French units may not enter Almeida. The two hexes occupied at the start of the scenario by Portuguese Cacadores are steep hills. These function as normal hills except that an infantry or artillery unit on them may ignore one flag. 11
12 BARROSA - 5 March 1811 Historical Background In early 1811, the French were engaged in a no-win siege against the Allies in the port of Cádiz. The French under Marshal Victor were not strong enough to reduce the port without a French sea blockade. After Soult drew off 8,000 of Victor s men for his invasion of Extremadura, the Allies saw an opportunity to raise the French siege using their sea power to land 14,000 British, Spanish and Portuguese troops on the coast south of Cádiz. If Victor remained in his siege lines, he would be trapped between Cádiz and the relief force. If he chose to fight the relief force, it would give the Cádiz garrison the opportunity to sortie and destroy the siege lines. Victor soon learned of the Allied approach. He hoped to ambush the Allied column as they advanced, but the Allies advanced in strength and Graham s British division occupied Barrosa Ridge. Spanish General la Peña gave him a second opportunity, ordering the Spanish and British north now that communication had been established with Cádiz. A rearguard of several Spanish battalions remained on Barrosa Ridge. Victor jumped at the opportunity and ordered Ruffin s division to attack the ridge with Leval s division advancing on his right. At the first sight of the French, the Spanish battalions bolted. Graham received news that the French were attacking and chose to disobey orders. While la Peña entrenched, Graham sent Dilkes Guards brigade to retake the ridge and Wheatley s brigade to attack Leval. Dilkes brigade came into contact with Ruffin s French battalions of infantry and grenadiers still advancing in column. The two forces engaged in a murderous firefight with British line firepower gaining the ascendancy. The gallant Ruffin was killed and his division retreated off the ridge. Meanwhile Wheatley s brigade advanced against Leval s division. Another firefight between a British line and French columns resulted in French defeat. The Allies gave away the victory. Graham urged a new round of attacks to unhinge the French siege line exactly what Victor feared would happen. General la Peña instead ordered a withdrawal back into Cádiz. Marshal Victor could not believe his good fortune and immediately re-established his siege lines. Other than confirming the valor of the soldiers on both sides, the battle had been a colossal waste of life. British Army Commander: Graham Command Rating: 3 French Army Commander: Victor Command Rating: 3 Move First Victory 7 Banners 12

13 Special Rules The 11 Barrosa Ridge hill hexes serve as a Group Victory Banner objective for the side that occupies an absolute majority of these hexes at the start of its turn. Absolute majority means to occupy more of the hill hexes than your opponent. If your side occupies 1 hex and your opponent does not occupy any hill hexes, your side occupies the absolute majority. The Victory Banner is lost when a side no longer has absolute majority. The Victory banner may be gained or lost more than once by each side. At the start of the battle the Spanish player occupies 3 hexes of the hill group and starts the battle with one Victory Banner. The River is not fordable A Spanish leader may only command Spanish units, and Spanish units may only be commanded by a Spanish Leader or Graham. 13
14 ALBUERA - 16 May 1811 Historical Background The Fortress of Badajoz dominated the southern invasion route from Portugal into Spain. The British had invested the fortress, but had few engineers and no siege train to speak of. The French were not idle. Marshal Soult set out toward Badajoz with a relieving force. Beresford, the temporary army commander, marched a force larger than Soult s to the small town of Albuera to meet the French. Beresford placed his army on the ridge behind Albuera, expecting to receive a frontal assault to split his army. Soult, however, formed most of his army behind the high ground opposite the Spanish on the right flank. On the morning of May 16th, General Godinot s brigade attacked Albuera as a diversion, while Soult s main force moved unobserved across the Albuera River and delivered a flank attack upon Blake s Spanish contingent. The first Spanish unit attacked was Zayas s division, a veteran unit under a good commander. Though pounded by superior French forces, the Spaniards held until Stewart s British division arrived. Stewart threw Colborne s British brigade at the French flank and checked French progress, but none of Colborne regiments were in square. French cavalry charged and virtually destroyed three of the four regiments. The rest of Stewart s division went into line behind the embattled Spaniards. The French made a fatal pause to allow a fresh division to come forward. Zayas s survivors drew off under no pressure. Now a solid line of British muskets awaited the French columns that had been successful against Zayas. As the fresh French and British formations met, both did fearful execution to each other at close range, British line fire prevailed, causing the battered columns to retreat. French reserves (Werle s division) advanced toward Stewart s remnants, but help was coming. Sensing disaster, General Cole advanced his British division without orders. His action won the battle, as British line fire triumphed over the French columns, but again at a high cost in British casualties. Soult could see Harvey s fresh Portuguese division advancing, and with no more fresh troops available, ordered a French retreat. Although considered a British victory, when Wellington heard he had lost almost 6,000 irreplaceable British soldiers, he was reported to have said, Another such battle will ruin us." British Army Commander: Beresford Command Rating: 3 French Army Commander: Soult Command Rating: 3 Move First Victory 8 Banners 14

15 Special Rules Albuera town hexes are Victory Banner objective hexes for the French player. If a French unit occupies either town hex at the start of the French player s turn, the French player gains one Victory Banner. As long as the French unit remains on the objective hex, the French player retains the Victory Banner. If it moves or retreats off or is eliminated, the banner is lost. The French player can gain or lose this Victory Banner more than once. The entire Albuera River is fordable. In addition, at all ford hexes, a unit or leader s movement is not stopped. Replace the British Leadership special order card with a Guerrilla Action card. Stewart s Folly. Once per game, at the start of his movement phase, the French player may declare Stewart s Folly. During that turn, the British player may not form square, nor may he play a First Strike command card if he has that card in his hand. A Spanish leader may only command Spanish units, and Spanish units may only be commanded by a Spanish Leader. 15

16 LINDENAU - 16 October 1813 Historical Background Count Ignác Gyulay s Austrians were on the left bank of the Pleisse River, to the west of Leipzig. Although ordered to attack, the main intent of his demonstration was to take pressure off the fighting on the right bank and possibly draw off some French reserves. For Napoleon, Lindenau was the only plausible withdrawal route for his entire army, yet the Allies did not grasp the obvious, and chose not to reinforce Gyulay. At 5AM the Austrians moved against Henri Gratien, Comte Bertrand s prepared French IV Corps. This corps had been in action since August and had been much weakened, but the soldiers now fought like veterans. A short cavalry clash sent the French cavalry screen back, but the Austrian cavalry could not overrun the French earthworks. Around 10AM Austrian artillery was moved into position on the heights and began to bombard the French earthworks, but with little effect. The Austrian infantry, by this time, had pushed the French back to Plagwitz and Lindenau, and for a short time had even gained part of the villages. A renewed French counter attack, supported by reinforcements, expelled the Austrians and drove them back to almost where they had started the battle. Austrian Army Commander: Count Ignác Gyulay Command Rating: 3 Move first 16
17 French Army Command Rating: 2 Commander: Henri Gratien, Comte Bertrand Victory 6 Banners Special Rules Prior to the game commencing, both players may move any or all of their leaders up to their movement allowance. Command cards: o The French start the game with: 1 x Bayonet Charge, 1 x Rally, 1 x Leadership o The Austrians start the game with 1 x Battle Back Revenge, 1 x Bayonet Charge, 1 x Bombard, 1 x Rally, 1 x Leadership o The Cavalry charge cards are removed from the deck. The Allied player gains 1 Temporary Victory Banner each at the start of the turn for occupying Lindenau and the bridge. At the start of each turn prior to playing a Command card, the French player will make a reinforcement roll. Reinforcement roll is with 3 dice. The symbols and number rolled will determine the reinforcement unit that may be placed onto the bridge hex. The bridge hex must not have a unit on it for the reinforcement unit to be placed. Three dice Reinforcement roll: o 2 Infantry symbols = one Line Infantry unit o 3 Infantry symbols = one Light Infantry unit o 2 Cavalry symbols = one Light Cavalry unit o 3 Cavalry symbols = one Heavy Cavalry unit o 2 Artillery symbols = one Foot Artillery unit o 3 Artillery symbols = one Horse Artillery unit The Stream and Pleisse River are fordable. 17

18 QUATRE BRAS - 16 June 1815 Historical Background Napoleon Bonaparte s surprise march placed his army squarely between Blucher s Prussians at Ligny and Wellington s Anglo-Allied army assembling around Brussels. Napoleon concentrated most of his strength against Blucher, but ordered Ney and the II Corps to capture the vital crossroads of Quatre Bras to deny Wellington the chance to reinforce Blucher. Ney procrastinated and his attack did not get underway until two in the afternoon. The delay allowed Wellington to bring fresh allied troops to support the Dutch-Belgians and the Nassau Brigade that were thinly deployed south of the crossroads. The initial French advance was greeted with musket volleys, but the outnumbered Allied troops were forced back. The Allied units in the wood, however, managed to hold. Facing three infantry divisions and a cavalry brigade, the Allied situation was fast becoming desperate, but additional troops kept arriving and Wellington, now in command, directed them to key positions on the battlefield. Ney realized that the numerical balance was shifting in favor of the Anglo-Allies and that he could only capture and hold Quatre Bras by a desperate move. He ordered General Kellermann to lead his cuirassier brigades forward and break through Wellington s line. The cuirassiers managed to reach the crossroads, but were driven back by close range artillery and musket fire. The arrival of the British Guards Division late in the day gave Wellington sufficient strength to launch a counter-attack that forced the French to give up all of their hard fought territorial gains. 18

19 British Army Commander: Initially Prince William of Orange-Nassau and then Field Marshal Arthur Wellesley, Duke of Wellington Command Rating: 3 for the first 6 turns and then 4. French Army Commander: Marshal Ney, Prince de la Moskowa Command Rating: 3 (he would normally be rated better than the Prince of Orange but he just wasn t on form this day!) Move First Victory 8 Banners Special Rules The French player gains 2 Temporary Victory Banners at the start of the turn, if Quatre Bras is occupied. The entire stream is fordable. In addition, a unit or leader's movement is not stopped when moving onto a stream hex. Allied units are Nassau (Green), Brunswick (Black) and Dutch (Brown). Brunswick LC have 4 blocks and count as Lancers until they lose their first block in melee combat. The British replace the Impetuous Cavalry command card with a second First Volley card. The Grand Battery rule may not be used. Reinforcements All reinforcements arrive immediately for both sides when a French unit comes within 5 hexes of the British edge or a British unit (including allies) comes within 3 hexes of the French edge. The British place 2 x GG and 1 x FA anywhere in the orange hexes. The French place 2 x CU and General Kellermann anywhere in the green hexes. Historical Note This scenario has been inspired by William Barnes Wollen's painting: Black Watch at Bay. To this end the French lancers have been added and one of Picton's units upgraded to GR to represent the highlanders. The crossroads was vital so now the French must capture it in order to win. Kellermann's Cuirassiers and Cooke's Foot Guards are no longer available at the start of the battle. 19
20 WATERLOO - 18 June 1815 Historical Background Napoleon retained his strategic brilliance, placing his army squarely between the Prussian and Anglo- Allied armies on June 16th. His tactical genius was fading. He allowed an entire corps to countermarch aimlessly on the 16th, deny him the opportunity for a decisive victory either at Ligny or Quatre Bras. Instead, at the end of the day the beaten Prussians escaped at Ligny and Wellington still held the crossroads at Quatre Bras. On the 17th Napoleon turned his main strength towards the British, after detaching Grouchy with two corps to pursue the retreating Prussians and prevent them from uniting with Wellington. A massive storm drenched the area on the 17th as Napoleon advanced upon the Anglo-Allied army that was deploying for battle in front of Mount Saint Jean. The 18th dawned clear, but the rain-soaked ground still made maneuvering cavalry and artillery difficult, so Napoleon delayed the start of the battle, waiting for the ground to dry. Wellington fielded an Anglo- Allied army of 50,000 infantry, 11,000 cavalry and 150 guns. In front of his line, there were three strong positions; the château of Hougoumont, the hamlet of Papelotte and the farmhouse and orchards of La Haye Sainte. Many of his veteran regiments from Spain had been sent to Canada and the United States to fight the Americans. Napoleon s army consisted of 48,000 infantry, 14,000 cavalry and 250 guns. Many of these troops were veterans of at least one campaign. It was about 11AM before Napoleon gave battle with artillery salvoes and ordered the initial assault against Hougoumont. The battle of Waterloo is well documented, and rather than skim through the account, it is recommended that players take advantage of the numerous sources available and enjoy reading about this epic struggle between two of the greatest commanders in history. British Army Commander: Field Marshal Arthur Wellesley, Duke of Wellington Command Rating: 4 French Army Commander: Napoléon Bonaparte Command Rating: 4 Move First Victory 8 Banners 20

21 Special Rules The Walled Farm terrain hex effect has been updated to allow a unit on a Walled Farm hex to ignore one flag. Hougomont, La Haye Sainte and Papelotte are Walled Farms. The three Walled Farm hexes are Victory Banner objective hexes for the French player. If a French unit occupies an objective hex at the start of the French player s turn, the French player gains a Victory Banner. As long as the unit remains on the objective hex it will count as a French Victory Banner. If it moves off or is eliminated, it no longer counts. Use brown blocks for the Nassau (Green), Brunswick (Black) and Dutch (Brown) units. Use the Portuguese National Unit Reference card for the Allied troops. Line infantry units will retreat 2 hexes for each flag. Reinforcements The Allies player rolls 2 dice at start of each of his turn. For each INF symbol, the timeline for the Prussian arrival, increase by 1. When the timeline reaches 8, the Prussian reinforcements arrive. The Prussian Force consists of 2 x LN, 2 x RI, 2 x LC and one LDR (Blücher). They get 1 Iron Will Card. The Allied player must setup all units and Blücher in any of the white marked hexes of the French right flank. These white hexes are considered to be the Prussian friendly map edge hex. Prussian leaders may only command Prussian units and Prussian units may only be commanded by Prussian leaders. All Prussians which are ordered during the turn they are set up are considered to have moved one hex to enter the board. 21
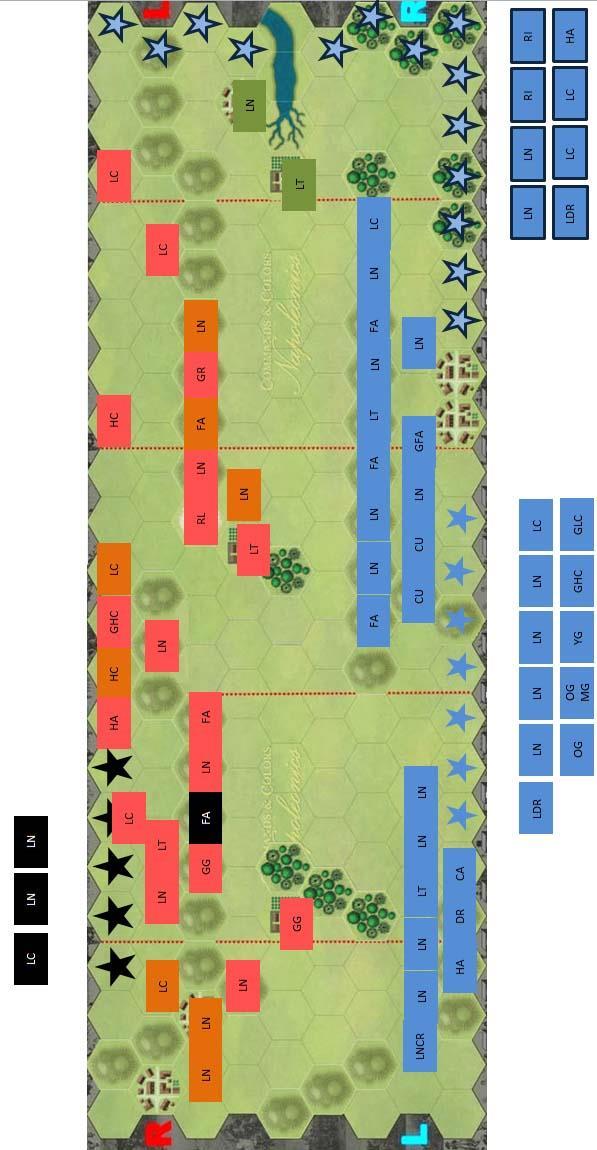
22 BIG WATERLOO - 18 June 1815 British Army Commander: Field Marshal Arthur Wellesley, Duke of Wellington Command Rating: 4 French Army Commander: Napoléon Bonaparte Command Rating: 4 Move First Victory 16 Banners Special Rules Hougomont, La Haye Sainte and Papelotte are Walled Farms which allow a defending unit to ignore one flag. The French player gains 1 Temporary Victory Banner at the start of the turn, for each of the walled farm hexes occupied. Allied units are Nassau (Green), Brunswick (Black) and Dutch (Brown). The stream is fordable. The French player gets one extra CP each turn. The Allied player gets one extra CP each turn to use on non-prussian units and if Blücher is on the table one extra CP each turn to use on Prussian units. Reinforcements & Reserves Prussian The Allies player rolls 2 dice at start of each of his turn. For each INF symbol, the timeline for the Prussian arrival is increased by 1. If the timeline reaches 8, the Prussian reinforcements arrive. The Prussian force consists of 2x LN, 2x RI, 2x LC, 1x HA and 1x LDR (Blücher) and 2 Iron Wills. They will enter on any hex marked with a dark blue star which counts as first hex of movement. On the turn the reinforcements arrive, the Allied player may setup all units and Blücher. They will be automatically ordered. Alternatively the allied player may keep some of the units of table in reserve in which case they enter in the same way as other reserves. French French reserves consist of 4x LN, 1x LC, 1x OG, 1x MG, 1x YG, 1x GHC, 1x GLC and 1x LDR. They will enter on any hex marked with a light blue star. Allied Allied reserves consist of 2x LN and 1x LC. They will enter on any hex marked with a black star. Reserves These may enter the table on any turn. They must be ordered and will enter on a star which counts as their first hex of movement. 22
23 23
24 Hougoumont (18 June 1815) Historical Background At Waterloo, Wellington had little choice but to occupy Hougoumont, for it would prevent the French from gaining the heart of the British position along the ridgeline. In fact, Wellington came close to losing the battle by under garrisoning Hougoumont. Opposite Hougoumont stood General Foy and Jerome Bonaparte with three divisions of the French II Corps. The initial attack began around 11:30 AM. The first assault met resistance, but the French infantry forced their way into the woods. As they came out on the other side, they were forced to fall back from the intense fire from the buildings and walled garden. The second assault gained a small lodgement, but the attackers again were driven back. A third attack breached the gate of the walled farm, and only the heroics of local Guards commander Lieutenant-Colonel James Macdonell and a small force succeeded in closing the gate and wiping out the attackers. Despite the success of the defenders, the crisis was not over yet, for Foy s Division joined the attack around 1 PM and gained the orchard. The Scots Guards then counter attacked from the ridge and drove the French out of the orchard. The orchard was attacked again in the late afternoon, but the British had reinforced the position and the attack again failed. The battle for Hougoumont was all but over by 7 PM. British Army Commander: Field Marshal Arthur Wellesley, Duke of Wellington Command Rating: 4 French Army Commander: Napoléon Bonaparte Command Rating: 4 Move First Victory 8 Banners 24

25 Special Rules The orchard is a Temporary Victory Banner worth 1 banner for the French, when at least 1 orchard hex is occupied by a French unit at the start of the turn. The British player gains 1 Temporary Victory Banner at the start of the turn, if the French do not occupy any of the 3 Hougoumont walled farm or 2 walled garden hexes. The British start the battle with 1 Victory Banner. The French player gains 2 Temporary Victory Banners at the start of the turn, if the British do not occupy any of the 3 Hougoumont walled farm hexes. The French player gains 1 Victory Banner if 3 full strength Allied units do not occupy the British baseline. Remove all cards from the deck that affect cavalry and remove the sappers card. The Grand Battery rule may not be used. When force marching an ordered unit may increase its movement by 2 hexes instead of the normal 1. 25
26 26
27 27
28 28
3rd Edition RULES OF PLAY
 Command & Colors Napoleonics 1 Game Design by Richard Borg 3rd Edition RULES OF PLAY 2 Command & Colors Napoleonics The battlefield is a scene of constant chaos. The winner will be the one who controls
After Action Report, Ocaña
 After Action Report, Ocaña Final Playtest, December 26 th, 2015 The following is an after action report of the Battle of Ocaña, played at TBS Comics in Fort Walton Beach, FL using the rules Commit the
NAPOLEONIC HEX SCENARIO. Battle 0f Talavera 28 July1809. Page 1 of 5
 Battle 0f Talavera 28 July1809 Page 1 of 5 Battle 0f Talavera 28 July1809 French Units Corps Elan Traits Move Joseph/Jourdan Overall Commander 26 Units 10 Morale Victor First Corps Ruffin 1 st Division
The Bridgehead at Villamuriel de Cerrato
 The Bridgehead at Villamuriel de Cerrato Events Leading Up to the Battle When the Marquess of Wellington was forced to abandon the siege of Burgos on 21 October 1812, pursued by General de Division Souham
The Battle of Waterloo
 The Battle of Waterloo CONTENTS page Context....3 Tactics of the battle.....4 C.Wood..6 Context Napoleon s Goal was to capture Brussels and Waterloo was estimated to be about 13 kilometres south of Brussels
COMMANDS AND COLORS NAPOLEONICS PLUS
 COMMANDS AND COLORS NAPOLEONICS PLUS CAMPAIGN RULES Version 3.00 2018-09-20 Contents LEADERS... 3 Leader Casualty Fate... 3 Leader Replacement... 4 Leadership Quality... 4 CAPTURING A THOPHY... 4 GLORY...
Waterloo. Leadership that changed the world. Jürgen Oschadleus MAIPM ILPF PMP 11 November 2015
 Waterloo Leadership that changed the world Jürgen Oschadleus MAIPM ILPF PMP 11 November 2015 Objectives The significance The story The (leadership) lessons The battlefield is a scene of constant chaos.
OPERATIONAL OBJECTIVE ZONES
 OPERATIONAL OBJECTIVE ZONES The nature of combat on the Operational level varied between Open field battles and those fought over built-up and fortified areas. The cohesion of both the defender and attacker
Les Champs de Bataille NAPOLEONIC WARGAME RULES ON THE BATTALION LEVEL WITH GRAND TACTICAL ASPIRATIONS
 Les Champs de Bataille NAPOLEONIC WARGAME RULES ON THE BATTALION LEVEL WITH GRAND TACTICAL ASPIRATIONS SCALES 1 turn = 20 minutes; 1 casting = 60 men; 1" = 40 yards 1 STANDS 3-rank infantry stands (per
% D class, Élan 60% C class Élan 20% B class, Élan. ABILITY Hussars, Chasseurs a Cheval
 1. Revolutionary campaigns (1792-1801) France: an Impulse army. The UNIT TYPE TYPICAL UNIT Les Blancs 1792-3 12-18 30% C class, Brittle 20% B class Les Bleus 1792-3 12-18 30% D class, Brittle 30% D class,
The Battle of Cowpens 1781
 The Battle of Cowpens 1781 Battle: COWPENS War: American Revolutionary War Date: 17th January 1781 Place: South Carolina on the border with North Carolina, United States of America Combatants: Americans
Blucher Spring 1813 Campaign Report SITREP 1A Week 1 and the Battle of Madgeburg
 Blucher Spring 1813 Campaign Report SITREP 1A Week 1 and the Battle of Madgeburg My gaming mates (Ben Earnest, Steve Leopard, Steve Dunn) and I started our Spring 1813 campaign using the Blucher rules
Sowchos (Collective Farm) 79
 79") Sowchos (Collective Farm) 79 December 1942 Following the encirclement of the Sixth Army at Stalingrad, the Germans planned to launch the relief effort from the bridgehead at Nizhna Chirskaya, 25 miles
Sowchos (Collective Farm) 79 December 1942 Following the encirclement of the Sixth Army at Stalingrad, the Germans planned to launch the relief effort from the bridgehead at Nizhna Chirskaya, 25 miles
Marengo. Turn One 0600 Hours 14 June 1800
 Photo 1 T1 by E.R. Bickford Production: Lise Patterson 2011 Decision Games, Bakersfield, CA. Turn One 0600 Hours 14 June 1800 The game opens with the Austrians advancing from their positions across the
Deployment Bailen Rear Guard Re-Fight Initiative Round 1:
 This tutorial is from a single turn in a game of Grand Battles Napoleon and is an example of how the sequence of play and general rule system mechanics work. Although this tutorial describes, in depth,
ARMIES OF THE 18 TH CENTURY
 ARMIES OF THE 18 TH CENTURY I. THE INFANTRY "Napoleon's got a bunch of the toughest, hammered down, ironed out roughnecks you ever saw, from generals down to buck privates. And he just said, "Sic 'em,
ONE IF BY LAND" - AMERICAN 1:10 SCALE WAR OF INDEPENDENCE RULES by Bob Bergman. Infantry/Cavalry figure 10 men Artillery crew figure 5 men
 ONE IF BY LAND" - AMERICAN 1:10 SCALE WAR OF INDEPENDENCE RULES by Bob Bergman Ground Scale 1 inch = 15 yards One Turn About five minutes Infantry/Cavalry figure 10 men Artillery crew figure 5 men Artillery
French Briefing. The Battle of Großbeeren 23rd August, 1813
 French Briefing The Battle of Großbeeren 23rd August, 1813 It is truly difficult to have fewer brains than the Duke of Reggio! - Napoléon Bonaparte (upon hearing of Marechal Oudinot s retreat after Großbeeren)
March Toward the Sound of Guns
 March Toward the Sound of Guns Very Fast Napoleonic Rules Version1.1 By Herbert Wong A) Game Scale The game will, for convenience, follow Avalon Hill s Napoleon s Battles game scale; in fact the game works
Battle of Vittoria. June 21 st, 1813 unit from their command. The two engineer stands of Gazan s Army of the South may
 Introduction: After the great victory at Salamanca and the liberation of Madrid, Wellington was forced to abandon the siege of Burgos and the subsequent retreat found him again in Portugal. During the
The Battle of Waterloo and research on John Lambert, OC. by Christopher Tsang (S) and Koh Ishikawa (V)
 and Koh Ishikawa (V)") The Battle of Waterloo and research on John Lambert, OC by Christopher Tsang (S) and Koh Ishikawa (V) Contents - Background of the Battle of Waterloo Page 3 to 4 How Napoleon rose to power Napoleonic Wars
The Battle of Waterloo and research on John Lambert, OC by Christopher Tsang (S) and Koh Ishikawa (V) Contents - Background of the Battle of Waterloo Page 3 to 4 How Napoleon rose to power Napoleonic Wars
Napoleonic Battles. Introduction
 Napoleonic Battles Introduction Napoleonic Battles is a series of games that cover the battles and campaigns associated with Napoleon. Each game can be played alone versus the computer, or against a human
William Henry Clerke
 William Henry Clerke 13 September 1793 16 February 1861 The Battle of Waterloo WILLIAM HENRY CLERKE OC 1 Table of Contents: Introduction 3 Context of the Battle of Waterloo 3 The Battle of Waterloo 4 William
Black Powder House Rules
 Black Powder House Rules Command & Movement Disordered Moves Flank Attacks Woods Skirmishers Skirmish Company Mixed Formation Grande Bandes Infantry Tactics Charge Contact Massed Columns Must Form Square
Wissembourg 4 th August 1870
 Wissembourg 4 th August 1870 Last Updated: 17th February 2018 This scenario was prepared by Martin Soilleux-Cardwell. It has been updated for Volley & Bayonet: Road to Glory by Keith McNelly. Historical
Free-For-All (Fair Fight)
") Free-For-All (Fair Fight) In highly-mobile engagements it is not uncommon for forces to suddenly find themselves in contact with the enemy. The freewheeling battles that result are little more than all-in
Free-For-All (Fair Fight) In highly-mobile engagements it is not uncommon for forces to suddenly find themselves in contact with the enemy. The freewheeling battles that result are little more than all-in
[DRAFT] SNAPHANCE RULES FOR PIKE AND SHOT BATTLES
![[DRAFT] SNAPHANCE RULES FOR PIKE AND SHOT BATTLES](/thumbs/86/93539375.jpg "[DRAFT] SNAPHANCE RULES FOR PIKE AND SHOT BATTLES") Index Section Subject Page 1.0 Basic Concepts 2 1.1 Command Groups 2 1.2 Stands and Basing 2 1.3 Strength Points [SP] 2 1.4 Game Play 2 2.0 Types of Stands 2.1 Combat Stands 2.2 Support Stands 3.0 Command
Index Section Subject Page 1.0 Basic Concepts 2 1.1 Command Groups 2 1.2 Stands and Basing 2 1.3 Strength Points [SP] 2 1.4 Game Play 2 2.0 Types of Stands 2.1 Combat Stands 2.2 Support Stands 3.0 Command
SNAPHANCE RULES FOR PIKE AND SHOT BATTLES
 Index Section Subject Page 1.0 Basic Concepts 2 1.1 Command Groups 2 1.2 Stands and Basing 2 1.3 Strength Points [SP] 3 1.4 Game Play 3 2.0 Types of Stands 3 2.1 Combat Stands 3 2.2 Support Stands 4 3.0
Fields of Blue & Grey
 Fields of Blue & Grey A very different kind of American Civil War rules, that allow the grand sweep of corp level actions to be recreated while still using the regiment as the basic combat element. A simple
To Reach the Po... Elliott (the gamemaster) explained the situation on a white board:
 explained the situation on a white board:") To Reach the Po... On Saturday, 9 May 2015, the Gentlemen Wargamers gathered to play a scenario adapted from Frederick Schneid's Napoleon's Italian Campaigns 1805-1815. In the spring of 1815, as the news
To Reach the Po... On Saturday, 9 May 2015, the Gentlemen Wargamers gathered to play a scenario adapted from Frederick Schneid's Napoleon's Italian Campaigns 1805-1815. In the spring of 1815, as the news
Pavia: Climax of the Italian Wars
 Pavia: Climax of the Italian Wars by E.R. Bickford Production: Lise Patterson & Chris Dickson 2013 Decision Games Bakersfield, CA. AAR of Pavia: Climax of the Italian Wars Pavia is a little village in
The battle of Pultusk 26 th December 1806
 The battle of Pultusk 26 th December 1806 Umpire Briefing Pultusk is one of those battles that is a real test for wargamers and wargames rules. On the face of it, the French are hopelessly outnumbered.
THE BIG PUSH Big Push Demonstration and Scenario, revised 7/1/2016
 THE BIG PUSH Big Push Demonstration and Scenario, revised 7/1/2016 THE FIGHT FOR THIEPVAL RIDGE By Paul Rohrbaugh Play Area: Rows 7 through 16 inclusive, columns C through I (also inclusive). Scenario
King George Commands and We Obey
 King George Commands and We Obey Basing Army Commanders 80mm dia base with a vignette on it, min 3 figures. Divisional Commanders 80mm dia base with a vignette on it, max 2 figures. Brigade Commanders
Seven Years War. Generals
 Seven Years War By Will McNally Introduction These rules have been written to give an easily playable game which reflects the style of European land warfare during the Eighteenth Century, particularly
THE WAR OF THE SPANISH SUCCESSION PAPERBOYS RULES
 THE WAR OF THE SPANISH SUCCESSION PAPERBOYS RULES This is a little set of rules written to continue the tradition of each Paperboys book having an associated set. Andy Callan s ideas abound here, but Peter
Musket and Pike Users Manual
 1 Musket and Pike Introduction Musket and Pike is a series of games that cover the battles and campaigns associated with the era where muskets and pikes dominated the fighting. Each game can be played
Contents.
 Contents Introduction 1 1. Game Scale 2 2. Troops Statistics 3 Commander Ratings 3 Leadership Bonus Table 3 Troop Quality 4 Unit Combat Value 4 CV & Unit Size Table 5 Unit Designation 5 Valeur et Discipline
Homage to Catalonia: The Relief of Barcelona, December 1808
 Homage to Catalonia: The Relief of Barcelona, December 1808 The French invasion of Spain in 1808 presents some interesting scenarios for historical wargames, involving a great variety of available forces
THE RULES. Wing Scale. 15 minutes per turn 50 men per strength point 1 gun per strength point
 INTRODUCTION The late Greg Novak developed the following variant of Volley & Bayonet for fighting at the Wing scale in the Americas. All Volley & Bayonet rules not modified below remain in force. Paul
Major Battles of the Texas Revolution. The Battle of Gonzales The Battle of the Alamo The Battle of Goliad The Battle of San Jacinto
 Major Battles of the Texas Revolution The Battle of Gonzales The Battle of the Alamo The Battle of Goliad The Battle of San Jacinto The Battle of Gonzales October 2, 1835 1st battle between the Texan colonists
NAPOLEON S INFLUENCE ON WARFARE
 NAPOLEON INFLUENCE ON WARFARE NEW METHOD OF WARFARE 1. THE NATION IN ARM: Wars were no longer fought by small armies of mercenaries but by large armies of drafted soldiers inspired by nationalism. Conscription
Rearguard action near Genappe 17 th June 1815.
 Rearguard action near Genappe 17 th June 1815. Famous battles are a little like the star turns on a variety show bill. They get all the attention and often overshadow other interesting but lesser known
BATTLE OF CHERBOURG THREE CAMPAIGNS FOR MEMOIR '44
 BATTLE OF CHERBOURG THREE CAMPAIGNS FOR MEMOIR '44 On June 6, 1944, thousands of Allied soldiers landed on the beaches of Normandy as part of Operation Overlord. The night before, hundreds of paratroopers
tdoherty Page 1 02/18/05
 La Bataille Revised Infantry Assault and Charge Sequence The reasons for changing the mêlée sequence have been discussed on CSW. It is my view that historically assaults would often degenerate into inconclusive
LAKE TRASIMENUS 217 BC
 KE TRSIMENUS 217 BC Command & Colors: ncients 1 CRTGININ C annibal M M C W W W C C S S Flaminius Steep ills Impassable M M M M ake Trasimenus ake Trasimenus ROMN istorical Background Much of annibal s
Musket and Pike User Manual
 Musket and Pike User Manual 1 Musket and Pike Users Manual Introduction Musket and Pike is a series of games that cover the battles and campaigns associated with the era where muskets and pikes, or sometimes
Mini-Nap. RULES FOR CORPS SCALE WARGAMES IN THE NAPOLEONIC ERA USING THE 6mm SCALE
 Mini-Nap RULES FOR CORPS SCALE WARGAMES IN THE NAPOLEONIC ERA USING THE 6mm SCALE Copyright. Trevor Raymond. Version 8: August, 2009 (Exodus 20:15 - Thou shall not steal.") www.runtus.org Page 1 of 25
WORLD WAR 1 WORLD WAR 1 BATTLES
 WORLD WAR 1 WORLD WAR 1 BATTLES BELL WORK QUESTION WHAT DO YOU THINK WAS THE MOST SIGNIFICANT CONTRIBUTION CANADIANS AT HOME MADE TO THE WAR EFFORT? REVIEW LIBERAL LEADER WILFRID LAURIER CREATED A 'PARTY
Chosen Men Fat. 1. Sequence of play. Base Morale;
 Chosen Men Fat 1. Sequence of play v2.1 CCWG Assign cards to each unit in play then shuffle the deck and turnover the top 2 cards. These units then; 1) Test morale. 2) Perform an action. (Move, Load, Fire,
OVER THE TOP! Using Normal Flames Of War Missions in the Great War. by Mike Haught. Adding Trenches. Great War Table Size
 OVER THE TOP! Using Normal Flames Of War Missions in the Great War by Mike Haught The Great War booklet covers three distinct, almost cinematic, missions. The story of starts with the Big Push, the attacker
A Marvellous Victory! Copyright. Trevor Raymond. Version 3: April, 2012 (Exodus 20:15 - Thou shall not steal.")
") A Marvellous Victory! Copyright. Trevor Raymond. Version 3: April, 2012 (Exodus 20:15 - Thou shall not steal.") Page 1 of 28 A Marvellous Victory is a basic set of rules designed for the table-top wargaming
A Marvellous Victory! Copyright. Trevor Raymond. Version 3: April, 2012 (Exodus 20:15 - Thou shall not steal.") Page 1 of 28 A Marvellous Victory is a basic set of rules designed for the table-top wargaming
Surprise at Jay s Mill September 19th, 1863
 Surprise at Jay s Mill September 19th, 1863 Background Near dawn on September 19th, the Union Army of the Cumberland was spread thin. Two divisions of the Fourteenth Corps had finished a night march and
Glory Days! Introduction. Troop Types and Figures. freewargamesrules.co.uk presents. by Craig Cartmell
 Introduction. freewargamesrules.co.uk presents Glory Days! by Craig Cartmell These are a set of rules for fighting the American Civil War at regimental and brigade level. The smallest unit sizes are infantry
Blucher Rules Battle Scenario Valmy Campaign Graham (Prussians) vs the system.
 vs the system.") Blucher Rules Battle Scenario Valmy Campaign Graham (Prussians) vs the system. Battle of Brabant 19 September 1792 Situation: Having invaded France at the end of August 1792, a coalition force led by the
Blucher Rules Battle Scenario Valmy Campaign Graham (Prussians) vs the system. Battle of Brabant 19 September 1792 Situation: Having invaded France at the end of August 1792, a coalition force led by the
X Corps: The Somme 1916
 X Corps: The Somme 1916 A Card Wargame of World War I Neal Reid 2016 Published by Vexillia Limited www.vexillia.com Contents 1. Introduction 3 2. Historical Background 3 3. Game Overview 6 4. Setting Up
Lines of Battle: Albuera 1811
 Lines of Battle: Albuera 1811 Version 20170313 Copyright David Kershaw 1. Introduction Lines of Battle is a map-based wargame system to simulate Napoleonic-era battles. The game consists of: These rules
...& Blenheim Palace. Amendments to Black Powder For battles with model soldiers In the Age of Marlborough
 ...& Blenheim Palace Amendments to Black Powder For battles with model soldiers In the Age of Marlborough Black Powder "Black Powder" rules are copyright Warlord Games, and quoted here purely for the purpose
SNAPHANCE SCENARIO Franco-Dutch War - Battle of Seneffe 11 August 1674
 Franco-Dutch War - Battle of Seneffe 11 August 1674 Note: the woods on the hilltop are orchards. Page 1 of 5 Franco-Dutch War - Battle of Seneffe 11 August 1674 William of Orange invaded Northern France
The first battle of Polotsk 17 th -18 th August Introduction
 The first battle of Polotsk 17 th -18 th August 1812 Introduction As the French Grand Armee pushed the main Russian forces back towards Moscow, the areas to the flank and rear became more vulnerable, and
THE BACKGROUND GENERAL NOTES ACTIONS MORALE CLASS
 or: The Phantom Crown. Maximilian Rules! - Rules for wargaming the Maximilian Adventure by Mark W. Shearwood These rules originally appeared in Wargames Illustrated 160, (December 000). Many thanks to
Rise of Rome through the Punic Wars. Based on the map above, who do you think would be Rome s main opponent?
 Rise of Rome through the Punic Wars Based on the map above, who do you think would be Rome s main opponent? 753 BC: Rome begins as one of many city states on the Italian Peninsula. 509 BC: Roman Republic
Seven years war Wargames rules Version 2.4 March
 Seven years war Wargames rules Version 2.4 March 2018 1 2 7years wargame rules (version 2.4) (1) Introduction... 4 Troop types... 4 Groups:... 5 (2) Sequence of play... 5 (3) Command and Control... 5 Generals:...
Austerlitz System Rules
 RULEBOOK Design by David Fox Great Battles of the Napoleonic Wars Volume I Austerlitz System Rules 1.0 INTRODUCTION..... 2 2.0 COMPONENTS..... 2 2.1 Game Scale...... 2 2.2 Definitions & Abbreviations.
information will be used as instructional material for further study of our recent
 Marshal Enterprises is pleased to present a recently discovered letter, purportedly in a batch of correspondence from the estate of the Duke of Wurttemberg, which has revealed, first-hand, the experiences
Gettysburg Campaign. June-July Fauquier County in the Civil War. Goose Creek Bridge in Photograph by Garry Adelman.
 Fauquier County in the Civil War Gettysburg Campaign From 1861-1865, Fauquier County s hallowed grounds were the site of twelve battles and countless troop movements, raids, skirmishes, and encampments.
Introduction:... 4 Character Classes;... 4 Weapons:... 4 Organisation:... 4 Actions:... 5 Movement:... 5 Shooting:... 5 To Hit:...
 State of war A.C.W. Skirmish Wargame Rules Tyneside Wargames club Version 1a 1 2 Table of contents Introduction:... 4 Character Classes;... 4 Weapons:... 4 Organisation:... 4 Actions:... 5 Movement:...
Gévora, February 19, 1811
 Gévora, February 19, 1811 The Battle of the Gévora (Gebora, Gevora) was a minor battle of the Peninsular War between Spanish and French armies. It occurred on 19 February 1811, near Badajoz, Spain, where
Old Dessauer. Rules for Tabletop Wargames Set in the Tricorn Era Using 15mm Size Model Soldiers By Wes Rogers
 Old Dessauer Rules for Tabletop Wargames Set in the Tricorn Era Using 15mm Size Model Soldiers By Wes Rogers TABLE OF CONTENTS 1 INTRODUCTION... 1 2 GAME SCALES, DICE AND MEASUREMENTS... 1 3 TROOP TYPES
OLD TROUSERS WARFARE IN THE HORSE & MUSKET ERA
 OLD TROUSERS WARFARE IN THE HORSE & MUSKET ERA BATTALION LEVEL NAPOLEONIC WARFARE Version 2.4 oldgrumbler@hotmailcom Website: http://www.greatbasin.net/~johnkelly/ Old Trousers: Warfare in the Horse &
ARMIES OF THE SEVEN YEARS WAR
 ARMIES OF THE SEVEN YEARS WAR The Seven Years War was fought on three continents and involved all of the Great Powers of the day. But at the center of it all was the province of Silesia. Frederick had
First contact on the Sambre: 15 th June, A small scenario for Republic to Empire by Barry Hilton
 First contact on the Sambre: 15 th June, 1815. A small scenario for Republic to Empire by Barry Hilton Introduction The large engagements of the 100 Days Campaign are challenging to recreate as wargames.
OLD TROUSERS II WARFARE IN THE HORSE & MUSKET ERA
 OLD TROUSERS II WARFARE IN THE HORSE & MUSKET ERA BATTALION LEVEL NAPOLEONIC WARFARE Version 1.0 oldgrumbler@hotmailcom Website: http://www.greatbasin.net/~johnkelly/ Old Trousers: Warfare in the Horse
Norrey and Putot, June 8, 1944 A Flames of War Mega-Game Scenario
 Norrey and Putot, June 8, 1944 A Flames of War Mega-Game Scenario Allied concerns around the Normandy landings were many, but one of the most critical was the potential for a heavy panzer counterattack
Introduction. Playing a Campaign Game
 Introduction Tigers on the Hunt: Kursk is a DLC containing three Campaign Game Scenarios for the Tigers on the Hunt Game (TotH). The Campaign Game Scenarios in this DLC portray three different historical
French Briefing. The Battle of Sacile 16th April, 1809
 French Briefing The Battle of Sacile 16th April, 1809 In one day I will retake all of the territory I have abandoned at the moment. - Eugène de Beauharnais (15th April, 1809) Intelligence Briefing Austrian
Trench Warfare Begins on the Aisne by Col. (later Maj-General) Edward D. Swinton, DSO
 Edward D. Swinton, DSO") Trench Warfare Begins on the Aisne by Col. (later Maj-General) Edward D. Swinton, DSO September 14th, the Germans were making a determined resistance along the River Aisne. Opposition, which it was at
Trench Warfare Begins on the Aisne by Col. (later Maj-General) Edward D. Swinton, DSO September 14th, the Germans were making a determined resistance along the River Aisne. Opposition, which it was at
The Battle of Alcaniz, 23 rd May A scenario for: Grand Manoeuvre: Black Powder & Blue Steel. Napoleonic Miniatures.
 The Battle of Alcaniz, 23 rd May 1809. A scenario for: Grand Manoeuvre: Black Powder & Blue Steel Napoleonic Miniatures Wargames Rules By Michael Collins. The Battle of Alcaniz, 23 rd May 1809. Notes
Napoleonic Avant-garde Battles
 Napoleonic Avant-garde Battles "To be defeated is pardonable, to be surprised--never! " The Turn Command Phase Roll 1d6 for each Brigade commander and CinC. Rolled 1d6 for each Artillery Battery The CinC
Mini-Nap 2 WARGAME RULES FOR THE NAPOLEONIC ERA. Copyright. Trevor Raymond. January 2015 (Exodus 20:15 - Thou shall not steal.")
") Page 1 of 42 The Basics Mini-Nap 2 WARGAME RULES FOR THE NAPOLEONIC ERA Copyright. Trevor Raymond. January 2015 (Exodus 20:15 - Thou shall not steal.") Mini-Nap 2 is a set of rules specifically designed
Page 1 of 42 The Basics Mini-Nap 2 WARGAME RULES FOR THE NAPOLEONIC ERA Copyright. Trevor Raymond. January 2015 (Exodus 20:15 - Thou shall not steal.") Mini-Nap 2 is a set of rules specifically designed
Waterloo - 18 June 1815
 Waterloo - 18 June 1815 What follows is the script used by Giles Orpen-Smellie at the Public Schools Lodges Conference that took place at Wellington College on 30 May 2015. Ladies and Gentlemen Waterloo
Battle RepoRt CReCy 1346
 Battle Report Crecy 1346 Crecy 1346: Battle Report Crecy was by medieval standards a very large battle which probably had a somewhere in the region of 50 000 combatants; however the number of French actually
The Thin Red Line
 The Thin Red Line 1795-1815. Created by Ben Seib Developed by Scott Laird and the Cheltenham Warchiefs and with the help of the Newcastle Occasional Wargamers. 1 Introduction to The Thin Red Line Page
Napoleonic Battlefield Commander
 Napoleonic Battlefield Commander A set of Napoleonic Wargame Rules for Brigade-Size Units using 6mm figures by George Street & John Binmore Part 1 The Game Concepts Introduction This is a set of rules
The Battle Of Ligny 16 June, 1815 A Grande Armée scenario by Lloyd Eaker
 The Battle Of Ligny 16 June, 1815 A Grande Armée scenario by Lloyd Eaker As Napoleon opened his 1815 offensive into Belgium he rapidly began to squander the advantages of interior lines and strategic surprise.
Operation Spark The Battle for Marino January 1943 Scenario written by Iain Craven With contributions and play testing by Richard Lawrence
 Operation Spark The Battle for Marino January 1943 Scenario written by Iain Craven With contributions and play testing by Richard Lawrence After a series of costly, and occasionally catastrophic, failed
napoleon's battles at divisional and onehalf
 napoleon's battles at divisional and onehalf scales I am trying to find a Napoleonic rule-set to play minor, i.e divisional, engagements occurring at the Campaign of Leipzig or in any other Napoleonic
Rome at War Hannibal at Bay Errata and FAQ
 First Edition Rules Rome at War Hannibal at Bay Errata and FAQ Pg 3: Light Cavalry description has a depiction of Light Infantry. 2.21: Change "enemy units" to "any non-leader units". 6.1: After Example,
Black Powder Scenario: Gettysburg, 1863 Southern Flank, Day Two
 Black Powder Scenario: Gettysburg, 1863 Southern Flank, Day Two Arguably the pivotal campaign of the American Civil War, Lee s invasion of the north during 1863 culminated with the battle of Gettysburg.
Volley and Bayonet, Road to Glory. American Revolution Period Specific Rules. Jeff Glasco ( 2011)
") Revised July 2011 Volley and Bayonet, Road to Glory American Revolution Period Specific Rules Jeff Glasco ( 2011) Volley and Bayonet is copy written by Frank Chadwick and Greg Novak. Additional rules by
Revised July 2011 Volley and Bayonet, Road to Glory American Revolution Period Specific Rules Jeff Glasco ( 2011) Volley and Bayonet is copy written by Frank Chadwick and Greg Novak. Additional rules by
Warning! historical campaign battle for the juno beachhead. battle for juno
 historical campaign battle for the juno beachhead This scenario takes place after Canadian troops land on Juno beach and begin to move inland on the 6th of June, 1944. The action takes place over the critical
The Battle Of Raab 14 June 1809 by Chuck Hamack
 1 The Battle Of Raab 14 June 1809 by Chuck Hamack Napoleon had suffered a major set back at the Battle of Aspern-Essling. He was carefully building up his forces for the next battle. He ordered Prince
S&T #260- The Black Prince: Batttles of Navarette & Crecy Navarette, 03 April 1367 By ER Bickford
 Layout: Chris Cummins Photos: ER Bickford Battleplan, Report 005 January 2010 S&T #260- The Black Prince: Batttles of Navarette & Crecy Navarette, 03 April 1367 By ER Bickford The Battle of Najera focuses
French Army of Spain 15 January 1810
 French Army of Spain 15 January 1810 I Corps: Maréchal Victor 1st Division: Général de division Ruffin (120/4,306) 9th Légère Regiment (3) 24th Line Regiment (3) 96th Line Regiment (3) 2nd Division: Général
This scenario was setup without specific goals though the French were designated to attack and the Allies to defend.
 Fictional 1813 battle for 7-10 players, French & Germans vs Austrians, Russians & Prussians. Developed by David M. Ensteness in 2014 for testing ESR, provided freely for personal, non-commercial use. This
The Battle Of La Coruña (Elviña)
") 1 The Battle Of La Coruña (Elviña) 16 th January 1809 A Grande Armée Scenario by Paul Murgatroyd & Eliseo Vilalta-Perdomo, from the Lincoln Miniature Warfare Society The battle of La Coruña (also known
1 The Battle Of La Coruña (Elviña) 16 th January 1809 A Grande Armée Scenario by Paul Murgatroyd & Eliseo Vilalta-Perdomo, from the Lincoln Miniature Warfare Society The battle of La Coruña (also known
PROCONSUL RULES FOR ANCIENT BATTLES
 Index Section Subject Page 1.0 Basic Concepts 2 1.1 Command Groups 2 1.2 Stands and Basing 2 1.3 Strength Points [SP] 2 1.4 Game Play 2 2.0 Command and Control 3 2.1 Moving Commanders 3 2.2 Losing a Commander
2011 New Zealand Flames of war Mid-war Doubles tournament
 2011 New Zealand Flames of war Mid-war Doubles tournament Welcome to the 2011 New Zealand Flames Of War Mid-War Doubles Grand Tournament! We look forward to offering you a unique experience that includes
A Triumph & Glory Game
 Borodino 1 BORODINO A Triumph & Glory Game By Richard Berg RULE BOOK Table of Contents 1.0 Introduction... 2 8.0 Artillery Fire... 8 2.0 Components... 2 9.0 Shock Combat... 9 3.0 Sequence of Play... 3
Command Combat: Civil War The Battle of Bull Run / Manassas July 21, 1861
 Command Combat: Civil War The Battle of Bull Run / Manassas July 21, 1861 Game Design by Jeff McArthur (c) Bandwagon Books, 2011 This scenario is from the Command Combat: Civil War series. To learn more