RIFLE AND RANGE SAFETY
|
|
|
- Morris Walsh
- 6 years ago
- Views:
Transcription
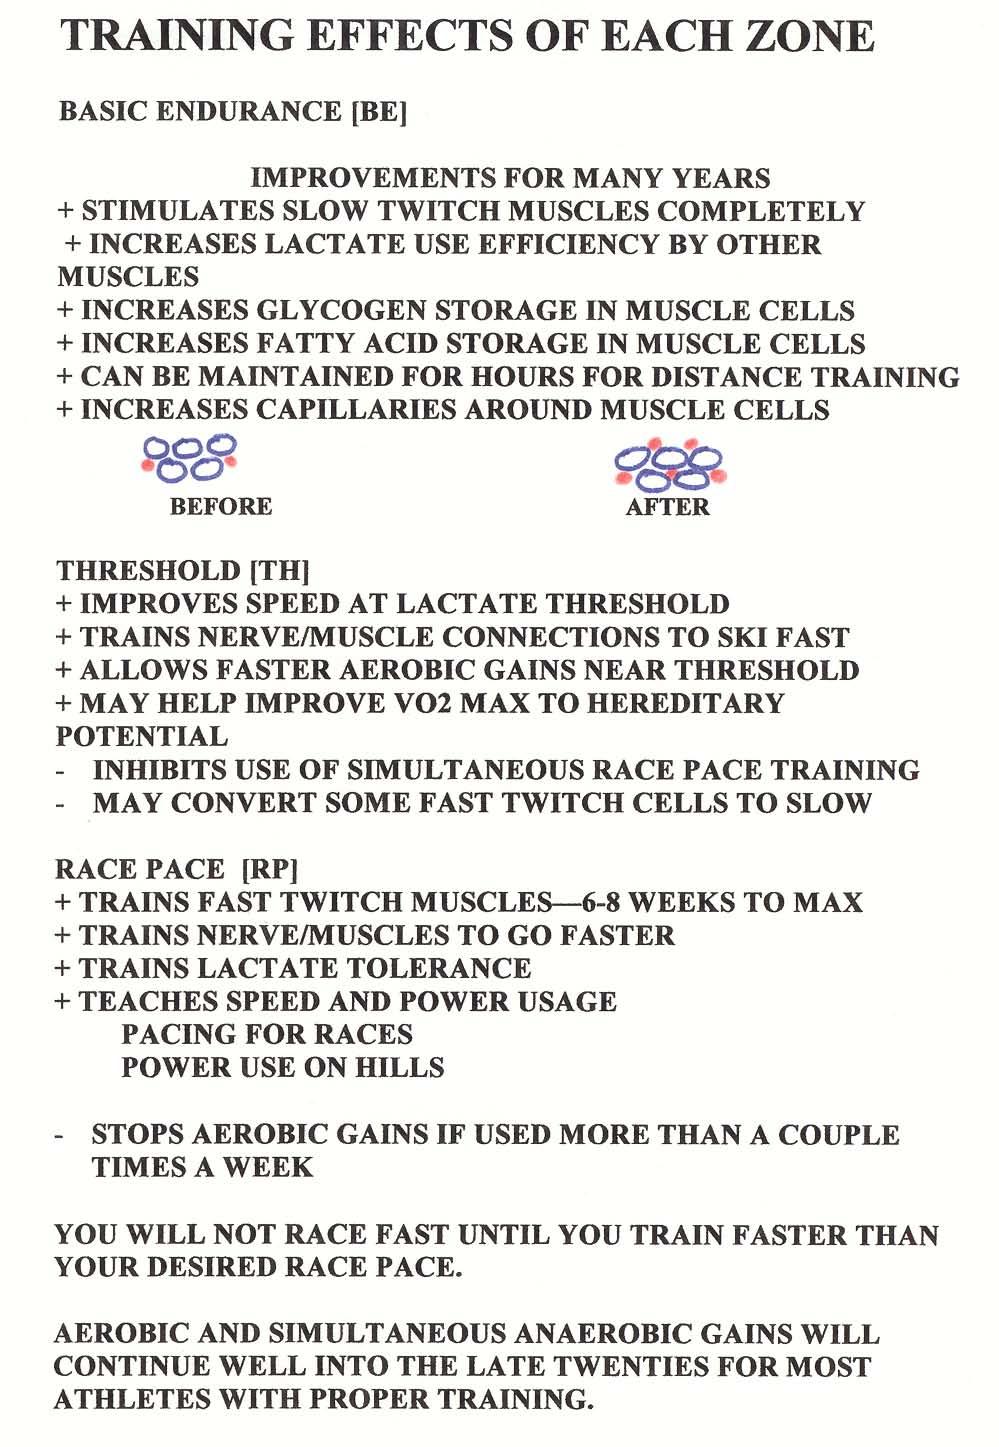
1 RIFLE AND RANGE SAFETY A) Rifle Nomenclature. Barrel end, including snow covers and procedure for opening front cover after loading. (Open bolt, remove magazine, open cover, and reload) Breech area, including checking chamber for empty condition - keeping chamber clean with brass brush - magazine feed, magazine completely in - emptying magazines after shooting and checking before dry-firing - safety switch Stock end B) Three Rules Point the rifle only up or if in firing position, down range, pointing it down is not safe due to number of nearby people. Open the bolt and remove the magazine anytime you are not on the firing point, unless the rifle is going onto your back in training or a race. Keep your finger off the trigger until you are ready to shoot. C) Range Rules Closed range means no rifles or shooters on the firing line. Open range the range can be opened only by the Chief of Range, when it is announced by him/her and when the range flag indicating live fire is raised. Cease Fire is the command given by anyone seeing an unsafe condition downrange. The range is then closed and all rifles are unloaded and all shooters leave the firing points. The Chief of Range can then be the only person to reopen the range. If changing a firing point is required, the shooter must unload the rifle, put it on his/her back, ski to the open point and start the range procedure over. If assistance is required on the firing line, the shooter should raise his/her hand and make a request to a range official, who will then help or get help from the coach. D) Dry-firing Rules Hang dry-firing targets where the background is safe, and not on doors or interior walls. Check the rifle to be certain it and the magazines are empty. Do not use the magazines while dry-firing. AIMING & SHOOTING A) Aiming Proper aiming in Biathlon shooting is controlled by both mechanical requirements and the physiological loads (and the eyes responses to those loads) placed on the body during training and competition. B) Sight Alignment and Sight Picture Sight alignment and sight picture are the two critical mechanical elements to aiming. Correct sight alignment is achieved when the center of the front aperture coincides with the center of the rear aperture. 1

2 C) Accuracy Accuracy is being able to consistently place shots in the same group, and it relies on consistent correct sight alignment and sight picture. Correct sight picture centers the target bull in the front aperture of the previously aligned front and rear sights of the sight alignment. D) Precision Precision is being able to hit the center of the target and it relies on having a consistent and correct sight picture. Although both are important, sight alignment is more critical to hitting the target than sight picture, as seen in the figure below. E) Focus The fact that the eye cannot simultaneously focus on the 3 separate objects is critical to sight picture and sight alignment. Optimum aiming therefore requires that the shooter focus on the front aperture, allowing the rear aperture and the target bull to become somewhat fuzzy. The eye's natural tendency to prefer aligned concentric circles (the rear and front sights plus the target bull) helps to align these out-of-focus circles. In addition, the eyes are designed to work in a binocular fashion. Whenever possible, biathlon aiming and shooting should be accomplished with both eyes open. If needed, the non-dominant eye can be covered with a blinder. A second advantage of keeping both eyes open is that the facial tension caused by squinting, is eliminated. F) Seeing Straight Physiological loads on the body affect visual acuity. Intermediate loads increase visual acuity while no load or a maximal load, such as that of a competition will reduce visual acuity substantially. This is why it is essential that zeroing be confirmed with an elevated, race pace heart rate (see below). In general, physiological loads of a maximal level will raise the impact of shots fired above those of a resting heart rate while an intermediate load will lower them below that of a resting heart rate. It is important for the athlete to experiment and to understand exactly how his/her body reacts to different loads with respect to aiming and shooting and to account for these variations in zeroing and competition. G) Natural Point of Aim The natural point of aim is the place where the rifle points when the athlete is in position and relaxed. It is essential to good biathlon shooting that this point be achieved prior to the first shot of every shooting bout. The best way to check natural point of aim is to achieve good sight alignment and sight picture and then close the eyes for 1-2 breaths. With eyes re-opened, the rifle should be pointing exactly where it was before. If it has moved, adjust the position and repeat the process until the correct natural point of aim is achieved. This is of course easier and more consistent in prone but, with practice, is also effective in standing. H) Target Approach Experimentation has shown that a correct approach (also known as shot patterning ) to the target in the rough aiming phase is an important factor in determining 2
3 whether the target will be hit or missed. This is especially true in prone. A completely vertical approach from the bottom of the target to the top (from "6 o'clock to 12 o clock ) is key to successful prone shooting. Even slight deviation from this approach will reduce the shooting percentage. This is easy to accomplish, however, due to the direct correlation between breathing and rifle movement in prone (if the rifle fits correctly) as the rifle tends to move directly down during inhaling and directly up on exhaling. With a direct approach from the bottom, this allows the shooter to stop the rifle movement at dead center simply by cutting off (or holding) the breath when the rifle reaches that point. The position needs to be adjusted up or down with the hips so that at least ½ of the inhaled volume of air remains in the lungs after the cut-off point. In standing, an approach from 1 or 2 o'clock is recommended (for right handed shooters) because it serves to tighten the shooting stance as the rifle approaches the target. Exhaling is reduced as the rifle is directed down and across the target and the shot is released as soon as the best sight picture is acquired. If the shot is not taken on the first pass, the breathing and aiming sequence should be started again. I) Firing Firing an aimed shot combines all of the elements of rifle fit, position, and aiming, along with the fine motor control required to squeeze the trigger at the appropriate time. The following sequence is for a 4-second shooting sequence (2 breaths between shots). Beginning shooters may start with a 3- or 4-breath cadence. Procedure 1) Close the bolt as you come into position. 2) Breath out. 3) Take up the first stage of the trigger. 4) Breathe in. 5) Rough aiming by bringing the rifle into the desired target approach path. 6) Breath out. 7) Breath in. 8) Breathe out ½-⅔ of capacity and hold breath. 9) Allow fine aiming to occur. 10) Release shot within 1-2 seconds. 11) Follow-through. 12) Repeat. 13) Timing It is important to release the shot within 1-2 seconds of stopping expiration. A longer wait will result in blurring of the vision, disintegration of the hold, and a disruption of the shooting cadence due to the buildup of CO 2 in the lungs and the resulting need to take several quick breaths after over-holding. If the sight picture is not good, take another breath and approach the target again. Particularly in standing, do not chase the target by over-holding. Overholding shots tends to increase the wobble. In addition, the total time required for each shooting bout should be reduced below 1 minute as early in biathlon training as possible. Range times (i.e., stasis) longer than 1 minute following exertion at even intermediate levels will result in larger vaso-vegal (larger heart beat, deeper respiration, etc.) responses of the body, which ultimately cause greater disruption of the shooting position and aiming ability. J) Trigger Control Control of the force and timing of the trigger squeeze is critical to effective shooting. The first stage of the trigger should be taken up rapidly, with a plateau of pressure commencing when the second stage is reached. As the fine aiming process develops correct sight picture, a continuously increasing pressure on the trigger releases the shot. Although the 3
4 finger is accelerating through the squeeze in this last instant, it is not jerking the trigger. If the fine aiming process does not produce a correct sight picture, the trigger finger must also be able to relax as needed to avoid releasing the trigger at the wrong time. Dry firing is an excellent way to practice trigger control. Another useful exercise involves holding the right hand in the shooting position and practicing squeezing the trigger finger without moving the other fingers of the hand. This helps to avoid twisting of the rifle when the trigger is squeezed. Figure from Nitzsche 4
5 RIFLE FITTING A) Rifle Fitting The fit of a rifle is critical to how well the athlete will be able to shoot it. There is no one size fits all rifle for high level biathlon shooting so all adjustments should be made to achieve optimum fit prior to beginning position work or any shooting. This initial set-up may be modified with experience and position solidification but it is an essential foundation for all biathlon shooting training. 18 Steps to Correct Rifle Fit (all instructions for a RH shooter) 1) Length of Pull - Bend the right arm at the elbow at 90 degrees. Place the butt of the rifle in the bend of the elbow with the right rear part of the stock resting against the inside of the forearm. Extend the right hand past the pistol grip (don't grasp it). The trigger finger should just barely reach the trigger (place trigger in center location on rail). Adjust the length of the stock as needed to achieve this position. 2) Hand-stop Position - In a prone position and holding the rifle comfortably as if shooting, the left elbow should be bent at approximately 100 degrees, with the elbow on the ground 0-2 inches left of the centerline of the rifle. Mark the position of the left hand on the fore stock and then place the hand stop there temporarily until 3 and 4, below, is completed. 3) Sling Adjustment - The length of the sling determines how high the upper body rests in the prone position. The arm cuff should be on the upper left arm above the bicep. It should be tightened so that only two fingers can still slide under it. The D-ring should align with the left hand held palm up. Adjustments to the sling should be made with the left hand (the web between the thumb and forefinger) against the hand stop. Adjust the sling so that the left elbow is bent at approximately 100 degrees when in position. With the shoulders level, the upper body should then be free of the ground in prone with the exception of the bottom 1-2 ribs. These should have firm, but not pressing, contact with the ground. Adjust the sling length as needed to accomplish this. 4) Hand stop Adjustment - The location of the hand stop, without changing the sling length, determines how tightly the rifle fits into the right shoulder, or how tight the position is. Moving the hand stop OUT with the sling will TIGHTEN the position and vice versa. The rifle should be snug into the shoulder although not excessively tight. A position that is too tight will result in additional pressure on the sling, which will in turn transmit a heartbeat (and movement) to the rifle. N.B. With young, non-muscular, or extremely flexible athletes, the hand stop and sling adjustment process may just continue to push the left shoulder back. It may never get snug until one of those factors changes. Tighten the sling until the athlete doesn't need to roll the right shoulder forward to find the rifle. Adhesive-backed non-slip material on the butt plate may help to hold the rifle in place. 5) Right Elbow Position - The right elbow should come around and forward to bring the right hand to the pistol grip. The elbow should be placed to the right of the body so that the upper right arm makes a 45 degrees angle with the ground. If the elbow slips out, first recheck the upper body height, then add length to the stock and move the hand stop in by the same amount. If the elbow is held in too close, do the opposite. 5
6 6) Shoulder Height - Check the shoulders to be sure that they are level. Move right elbow in or out to level them, then recheck as in #5. 7) Trigger Finger Position - With the hand grasping the pistol grip, the trigger finger should NOT contact the stock. Adjust the trigger position as need to accomplish this. If the trigger is all the way to the rear and the finger still touches the stock, shorten the length of pull slightly (see #1, above) until the desired finger position is achieved. 8) Rear Sight Placement (Prone) While in position, adjust the rear sight so that the diopter is 2-2½ inches from the eye. If using a rubber eyecup attachment, this will place the rubber eyecup barely off the forehead. 9) Rear Sight Placement (Standing) Confirm that there is white around the front sight hood when looking through the rear sight in the standing position. If not, adjust the sight and/or head position and then re-check as in #8. 10) Butt Hook Placement - In standing position, the butt hook should be adjusted so that it keeps the rifle from dropping below the target line. Sometimes this requires the hook to be installed upside down (possible on Anschütz rifles). 11) Cheek-piece Adjustment - The cheek-piece should fit into the hollow below the right cheekbone, with a moderate roll of skin between the cheek piece and cheekbone. In prone position, aim at a blank white surface. Keep the cheek piece loose and allow it to move into position of proper sight alignment. Move it against the face to check for the perfect alternative that allows repeatable proper sight alignment. The cheek-piece should be aligned along the axis of the rifle, not at an angle to it. Some cheek-pieces may require elevation with spacers or modification to reduce height. The athlete should look straight out of their eye into the sight. They should not be looking out of the corner of the orbit in either direction in order to see through the sights. Check in standing position also. 12) Carrying Harness Position (Winter Only) - In general, the harness should be high in the attachment rail, allowing a low rifle carrying position which keeps the center of gravity lower. Adjust the straps so that they hold the rifle securely but are still easy to get in and out of during training and competition. There is an initial tendency to make them too tight. 13) Trigger Adjustments - DO NOT ADJUST RIFLE TRIGGERS unless you are qualified to do so. They are highly complex and sensitive parts of the rifle and are easily damaged or incorrectly adjusted. The trigger release weight should be 550g and the rear stop should be set so that there is minimal over-travel after the trigger is released. 14) Front Aperture - Experimentation has determined that a 3.5mm aperture provides the greatest margin for error in sight picture when shooting in standing. Specifically, as long as the black aiming mark of the target is completely within the front aperture when the shot is released, even if it is not centered, the target will still be hit. Although the black and white of the concentric circles in the sighting process should be equal in width for best results, may athletes will select a slightly smaller front aperture, although typically no less than a 3.1 or 3.2mm. This may be not a wise choice since fine lines between the black and white make any irregularity more difficult to see. 6
7 15) Confirmation - Once the rifle is completely fitted, shoot with a resting heart rate to establish a group. Then shoot a group with a race-pace heart rate. If the groups are significantly different, move the cheek piece slightly towards the resting HR group and repeat until a balance is achieved. 16) Marking - Mark the position of the harness, hand stop, sling adjustment, rear sight position, etc with a waterproof marker or an inscribed index mark. Be sure to recheck these locations before each training or competition session. 17) Miscellaneous - If the rifle still does not `fit' after completing the above process, the athlete may need some other special adjustment such as sight raiser blocks (long neck or short arms), shaving of the cheek piece (face contour), custom stock (a variety of causes), modification of the pistol grip (extra small or large hands or fingers), application of grip material, etc. 18) Security - Make sure that all screws, bolts, etc. (except the trigger adjustment screws) are firmly tightened once the fitting process is complete. The action screws should be tightened to 26 inch-pounds or about 3-4 newton-meters. Re-check these often, especially after travel or extended period of time without shooting. FINDING A GOOD PRONE POSITION (The following is for a right-handed shooter. Reverse all the notes for a left-handed person.) 1) Approach the firing point carpet at a 45 degrees angle to a line to the target. 2) In position the centerline of the body will be at an angle of degrees to a line to the target. 3) The feet should be spread evenly with the right leg about parallel with the rifle, with the feet flat and toes outboard. 4) The back should be centered on body centerline without torque. 5) The shoulders should be level (see also #10). 6) The right elbow should be out so upper arm is at about a 45 degrees vertical when viewed from behind. The elbow should not feel like it is slipping. (indicated the stock might be too short.) 7
 The left elbow should be solidly placed and used as a pivot point for all adjustments, with the hips moving to bring the rifle onto the target.")
8 7) The left hand is fully against the hand stop with fingers relaxed. The base of the thumb should be visible on the left side of the rifle from a top view. 8) The left elbow should be solidly placed and used as a pivot point for all adjustments, with the hips moving to bring the rifle onto the target. The left elbow should be located 0-2 inches from directly under the rifle and resting on both bones (flat area is better than point of elbow). 9) The sling should be adjusted to allow about 100 of left elbow angle with the arm cuff tight and properly located above the left bicep muscle. The sling should be tight enough to hold the rifle in place without other force applied by the hands. For a small shooter, the Anschütz sling should be replaced with a Larson or Core Sport sling for more comfort. The bottom ribs should in mild contact with the ground. Not pressing, not just brushing. 8
 It should not be over tight as that creates too much tension and reflects too much heartbeat.")
 The rifle should not be canted.")
9 10) The rifle should fit snugly into the right shoulder so it does not have to roll forward to meet the stock. (Adjust the hand stop without changing the sling length) It should not be over tight as that creates too much tension and reflects too much heartbeat. Non-muscular or young athletes often have a loose fit. Do not attempt to tighten beyond the point where the shoulder stops rolling forward. The shoulders should be level and at about a right angle to the centerline of the body. 11) The rifle should not be canted. 12) The trigger finger, using the spot opposite the base of the fingernail, should comfortably reach the trigger without the inside of the finger resting on the stock. 13) The head should drop forward without torque in the neck, and the rear sight should be 2 to 2 1/2 inches from the eye. 14) The cheek-piece should be adjusted so the shooter automatically has a concentric sight picture. Check several times by putting head on rifle w/ eyes closed. 15) When pushed from side to side or back into shoulder by the coach, the rifle should return to the target when the athlete is relaxed. 16) When properly fitted in the prone position, the rifle should rise from below to above the standard height target when exhaling completely. The path should be as close to a 6 o'clock to 12 o'clock path as possible. (A slight variation like 6:30 to 12:30 is ok, but it must cross the center of the target.) Overall, the position should feel comfortable and when the shooter is relaxed and the rifle should stay on the target. 9

 Put the feet on a line to the target, about shoulder width apart, with feet angled out slightly.")
 The knees and legs are straight, but not locked.")
10 FINDING A GOOD STANDING POSITION (The following is for a right-handed shooter. Reverse all the notes for a left-handed athlete.) 1) Approach the carpet at the firing point at right angles to a line to the target. 2) Put the feet on a line to the target, about shoulder width apart, with feet angled out slightly. The weight should be distributed evenly on ball and heel. 3) The knees and legs are straight, but not locked. The weight is from about 50%-50% to 60% on the left and 40% on the right side. 4) The hips should be vertical from behind and pushed forward, slightly, towards the target. 10
 The left elbow is ideally resting on hipbone, just in front of the hipbone [long arm] or on rib cage just in front of the hipbone [short arm]. The left forearm is nearly vertical.")
 The rifle rests between the index and second fingers of left hand and sits heavily on the left thumb under stock right, behind the trigger guard or under the trigger guard depending on the rifle")
 The lower 3 fingers of the right hand should pull rifle into right shoulder.")
11 5) Leaning back, the back muscles are relaxed. The rifle should be on a centerline over the feet from the rear view. 6) The left elbow is ideally resting on hipbone, just in front of the hipbone [long arm] or on rib cage just in front of the hipbone [short arm]. The left forearm is nearly vertical. Left arm then is relaxed. That is critical to good shooting. Control the rifle with the right hand. 7) The rifle rests between the index and second fingers of left hand and sits heavily on the left thumb under stock right, behind the trigger guard or under the trigger guard depending on the rifle (ideal) or rifle sits on finger tips and thumb (short arm). 8) The right arm is lifted up nearly parallel with the ground. This provides a better pocket for the rifle butt to sit in and prevents tipping forward as the shooting proceeds. 9) The lower 3 fingers of the right hand should pull rifle into right shoulder. 10) The rifle is seated high in the right shoulder pocket, and most shooters use a butt hook under the butt arm, which should prevent the rifle from going below the target. 11) The head is dropped straight forward from the shoulders with torque in the neck. Minor canting of the rifle in standing to bring the rifle to the face is acceptable. 12) With the rear sight in the same position as in prone, there should be some white around the front sight hood. 13) Entire position is relaxed!!! Bone on bone and stable on the feet. 14) When breathing in and out the rifle should stay pretty steady vertically [ideal] moving a little (ok) or a lot (short arm on the rib cage). It will go up on inhale and down on exhale. 15) When going through a breathing cycle the rifle should not go below the targets. Adjustments of weight fore and aft or moving the butt hook helps the muzzle stop on the target. Learn the feel of the distribution of weight. 16) Hold on a target with the eyes closed for a few minutes. Open the eyes and check to see which way the rifle drifted. Move one-foot forward and the other back slightly and try 11
 17) Take up the first stage of the trigger and 20-30% of the second stage, approaching the target from the upper right side (12")
12 again. Repeat several times. This position will be your natural position. (Not more than 2 inches max for each foot from a line to the target) 17) Take up the first stage of the trigger and 20-30% of the second stage, approaching the target from the upper right side (12 o'clock to 2 o'clock). Approach slowly exhaling and then hold breathing on the target center. Look at the sight picture. Finish the squeeze smoothly. With a 3.5 mm front sight insert, the shot will hit the 115mm target if the entire bulls eye is completely in the aperture, it does not need to be centered. 12
13 RANGE PROCEDURE - WINTER 1) Athlete should use appropriate pace coming into the range, breathing deeply, checking the arm CUFF on way to point. 2) Check the WIND compared to wind at zero. Check the big flags first, then the wind flags at the shooting point. Pick the point zeroed on if possible. For prone shooting, approach carpet at a 45º angle to a line to the target. 3) Get completely into shooting point. Lay the ski poles along right hand side for prone or between feet for standing. 4) Remove the rifle, open front cover, open bolt, open rear cover while dropping to knees in prone shooting. 5) Insert a loaded magazine, and adjust for wind if needed. Breath deeply. 6) Get into position and hook in sling in prone, go into either shooting position and close bolt. Focus on alpha target for prone (1 st shot) and echo for standing. 7) Check the position and natural point of aim in prone. Breath deeply. Upon complete exhale, the line of sight should come above the target in prone. 8) Take up the first and part of the second stage of the trigger, and go to the first shot. Bolt immediately (0.5 sec) (See The Shot ) 9) Repeat the shot procedure for rest of targets doing a mini-shift to the right for Charlie and Echo targets in prone. If one target in prone or two in standing are missed, pause and reevaluate wind and position. Only shoot once at each target. (Except in a relay race when the 3 extra rounds must be used if targets are still standing) 10) On last shot, do not bolt, but POP out of position at 0.5 sec after the last shot, close snow covers, put rifle on back and pick up the ski poles. 11.) Ski away from the shooting point hard, using only the legs while putting on the ski poles. Time Goals: Poles down to poles up sec prone, sec standing. RANGE PROCEDURE SUMMER 1) Athletes should use appropriate pace coming into the range, breathing deeply, and checking the arm CUFF on way to pick up the rifle. 2) Take the rifle from the rack by the barrel and carry it to the firing point by the barrel only and at the side. 3) Check WIND compared to wind at zero. Check the big flags first, then the wind flags at the shooting point. Pick the point zeroed on if possible. For prone shooting, approach carpet at a 45º angle to a line to the target. 13
14 4) Get completely into the shooting point before manipulating the rifle in any way. 5) Lift the rifle, open the front cover, open the bolt, open the rear cover, and drop to knees in prone shooting. 6) Insert a loaded magazine and adjust for wind if needed. Breath deeply. 7) Get into position and hook in sling in prone, go into either shooting position and close bolt as you come onto target. Focus on Alpha target for prone (1st shot) and Echo for standing for right-handed shooter. 8) Check the shooting position, check natural point of aim in prone with ½ capacity of the lungs. Breath out deeply. Upon complete exhalation, the line of sight should come above the target in prone. 9) Take another breath as you take up the first and part of the second stage of the trigger, and go to the 1 st shot. Bolt immediately (0.5 sec) 10) Repeat the shot procedure for rest of targets doing a mini-shift to the right for Charlie and Echo targets in prone. If one target in prone or two in standing are missed, pause and reevaluate wind and position. Shoot only once at each target. (Except in a relay race when the 3 extra rounds must be used if targets are still standing- then start with the first missed target again) 11) On the last shot, POP out of position at 0.5 sec after last shot, moving the rifle towards you to release sling, open the bolt, remove the magazine, and close snow covers. ZEROING PROCEDURE (Athletes) 1) Normally the minute time allotted to zeroing before a race will be divided into 10- minute blocks and assigned by appointment, often close to the start order. (i.e. Men first or Women depending on who races first.) 2) Be a little ahead of your appointment to zero. Come warmed up, with 4 magazines loaded, and your rifle in good operating order. Inform the coach of any special needs such as wishing to be zeroed a click low. 3) For a serious race, they may want to shoot 5 fouling rounds into the bullet traps before shooting at the assigned target especially if the rifle was cleaned the previous night. In any case athletes should dry fire prone and standing 5-10 shots before live firing. Remember only 10 minutes total is available for the entire process. 4) The coach will assign a paper target. Focus on shooting on the correct one as adjoining targets are often shot up badly and hits cannot be determined. As always, shoot on the correct assigned target board corresponding to your shooting point. 14
15 5) Athletes should shoot carefully and accurately, but not over deliberately. Try to have them provide a good group to be adjusted, so no shading the shot during a wind gust, or change position during the 5 shots should be allowed. The zero will only be as good as the groups that are shot. 6) Make certain the correction is heard, understood and applied correctly. Loosen up the rear sight aperture ring so the blinder does not bind the sight, then retighten. Don't be upset if the correction goes one way on one group and back on the next. Note the wind flags at this point. 7) After several magazines, and subsequent corrections, have athletes confirm, often on a new target assignment. They should take a short hard run at race pace or above to get the heart rate up. Be sure to use the clean target if available. Ask them to confirm a second time if needed, however having them just shoot another magazine or to load up and shoot more in general can create doubts in their minds, and is not a good confidence builder. This depends on the coach, his judgment of conditions, the confirmation group and variations of group locations. Give good and firm instructions. Then note the wind flags at the last shooting and discuss it with the athlete. Find out how many clicks to add for changing conditions and in particular how many to remove if the wind falls off from a hard wind at zero. WINDAGE CORRECTING FOR THE WIND 1) All wind flags on biathlon ranges should meet certain standards for material, weight, and size. That said; each range is different. In general you can expect the following: a side wind will push the bullet sideways quite a bit- most critical wind a tailwind (6 o'clock) wind will lift the bullet slightly a headwind (12 o'clock) will depress the bullet slightly in addition- a strong side wind will generally push the bullet down due to the effects from the wind dropping into the range. in addition certain shooting points near the berms, trees, and buildings will have differing conditions while other points out in the middle will have stronger winds and more impacts. 2) Take sight corrections for wind by correcting into the wind (lean into the wind) if you have a no wind zero. If you have clicks on for wind already you may have to take them off or account for them before you add more. A click is defined as the Anschütz standard rear sight click with 10 per full revolution. A half flag from a side wind is about 2-3 clicks normally, try 2. A full flag from a side wind is about 3-5 clicks normally, try 4. A full flapping flag from a side wind is about 5-7 clicks, try 6 and maybe 2 up if the wind appears to be dropping in. Again on some ranges a 1/2 flag will be a full 4 click wind. 3) When you zero, be sure to note the wind and talk to the athlete about it and how many clicks of windage you have on after confirmation. When they enter the range teach them to start looking at the flags, big ones first to get a sense of the general wind, then the range flags near your shooting lane. They should make the corrections before the first shot. 15
16 Depending on their shooting ability, if they miss one shot or at most, two shoots in prone, have them look up again and check the new wind. Also remind them to learn to feel the wind on their face and recognize significant changes during a single shooting. Some ranges will flip flop once or even twice in 45 seconds. 4) Advanced shooters may learn to shade for minor wind changes, but generally there is have better shooting with sight changes because they know the appearance of the perfect sight picture and will subconsciously adjust to that. 5) During multi-prone stage races, sight corrections may be radioed out and given along the trail. Look the athletes in the eyes and have them confirm visually or verbally when these corrections are given. In addition, information about the wind in general may be passed along. If the range correction is given in clicks based on your last shooting, it is their responsibility to decide whether to take that correction based on your determination that the wind and light conditions the second time in are the same as the first time, AND that they have a solid position, good sight pictures and a smooth bigger squeeze the first shooting. i.e. If they know they pulled their shots to the left, they should add a sight correction to the right just because it is given. Do not give a sight correction before the standing stages unless it is for a second prone in an individual race. (PSPS) 6) While windage is generally not an issue in standing shooting, finding the most sheltered shooting points can be a major influence on results. Have the athletes locate good standing points during the zero and use them if the rules allow. Teach them to wait out the gusts in standing just as in prone to prevent their position from being blown. 7) Remember, on windy days every competitor has to contend with the same conditions. Some will have more luck than others, but generally the shooting results in total will be lower than on calm days. Tell the athletes to keep their mind working and their heart in the race. RIFLE CLEANING 1) Keeping the rifle clean, all the various fasteners tightened, and careful treatment during use will go a long way towards the rifle functioning properly during training and races. Most malfunctions are due to dirty rifles, including deterioration in accuracy. 2) Use good cleaning equipment including - One-piece nylon coated cleaning rod A cleaning bolt to guide the rod Brass brushes with no steel parts A brass jag to run patches Flannel cleaning patches, full size to fit bore tightly A tooth brush (or two- one with a bent handle) A dentist pick High quality powder solvent Preservative oil A lint free rag for wiping, old washcloth 16
17 3) Always remove the bolt and clean the bore from the breech side. The crown (on muzzle end of barrel) is delicate and if scratched will affect all accuracy. 4) Steps every day the rifle is used unless during a race series: Remove the bolt and replace with cleaning bolt to guide the rod Swab bore with powder solvent Wet brass brush with solvent and push it completely through the bore from the breech and pull completely back about 10 times Using a jag and a patch run the patch through from the breech. Repeat several times. Patches can be reused if they are not totally dirty. Wet a patch with oil and swab the bore. Using a dry patch or several, continue to clean until the patch comes out clean. Scrub the bolt face with powder solvent, wipe dry, scrub with toothbrush, and wipe with a light coat of oil. Periodically disassemble the bolt at least partially and clean all interior parts. Coat it with a very light layer of oil. Note: there must be some lubrication on the exterior of the bolt to prevent burring the rubbing surfaces Clean the exterior of the magazines, the interior of the breech and the trigger area with the toothbrush and pick if needed to get into small crevices. Pay particular attention to the sockets that receive the extractors of the bolt that are located on either side of the chamber. Coat all surfaces with a dampening coat of oil, just enough to remove the fingerprints. 5) On race sequence days, it will normally suffice to run several dry patches through the bore and then complete the rest of the sequence. This will result in zero groups on subsequent days very similar to the first day. 6) For more detailed stripping of the bolts on Fortner style rifles and other disassembly and assemble instructions, work with a knowledgeable coach. 7) Do not attempt to adjust the trigger screws, tighten them (other than the clamp that holds the trigger itself in place) or otherwise remove the screws, springs and levers of the trigger group. Do not use any solvents on the trigger mechanism. Blow it off with compressed air or brush it with a soft paintbrush, or get help cleaning and lubing the parts from a competent gunsmith. However, keep the two screws that hold the trigger group to the receiver, and the two screws that hold the magazine well to the receiver tightened. Do not attempt to adjust the location of these parts without competent help. 8) Periodically remove the action from the stock and clean the hidden areas thoroughly using the above methods 9) When replacing the bedding screws be certain the rear screw is not tightening into the bolt area of the receiver. Add a washer if needed. Then tighten both bedding screws to about 3 newton-meters or 25 inch pounds of torque. Use the same amount of torque each time for consistent results. Also consider having the rifle glass bedded to assist in maintaining this relationship and solid bedding of the barrel to the stock. 17
18 10) Check the front sight screws and rear sight clamps for tightness, and check the rear aperture and front collar for tightness. DRY-FIRING Basic dry fire progression drills and shooting drills 1) Sit on the line, rifles pointed down somewhere (not at others) and with rifles in laps, learn to find the trigger stages and learn the squeeze. 2) In the same position, learn breathing sequence and add squeeze. 3) Starting with a rifle on the back (carrying) position, learn to get into prone position and back out again. 4) Starting with a rifle on the back, get into prone position and come up on a target. Breath in and out and watch the rifle rise and fall from 6 o' clock to 12 and back. 5) Get into prone position and start breathing, adding a breath cutoff at the center of the target. Release and repeat over and over (no trigger). 6) Take up the first stage of the trigger (leaning on the second), and go through the breathing routine. Finish the squeeze at the count of a long oneeeeee and bolt on 2 (which comes right after the end of the eeeeee). 7) Hold the prone position for two, five minutes, closing the eyes to see if the target is maintained. 8) Starting with a rifle on the back, learn to get into the standing position. 9) Repeat steps 4-7 as they apply to standing. The target approach is from about 1 o'clock. The rifle will rise on inhale and fall on exhale. 10) Repeat steps 3-9 with live firing. 11) Practice on both one paper target and 5 in a row. Practice getting a natural point of aim on Alpha, shifting on Charlie and on Echo. 12) Find the natural stance in standing, close eyes for two minutes and see which way the drift goes. Adjust the stance back towards the target, up to 2 or 3 inches of one foot ahead of the other. 13) Timed firing or dry-firing for 5 shots. 14) Races to completion. 18
19 DRY-FIRING INTRODUCTION Dry firing is a critical ingredient in all biathlon training plans. This is especially true for those athletes who do not have regular (daily) access to a live firing range. Because it can be done almost anywhere, dry firing is an easy yet effective way to maximize your available time for shooting training. ALWAYS REMEMBER TO CHECK YOUR RIFLE TO ENSURE IT CONTAINS NO LIVE AMMUNITION, DRY FIRE IN A SAFE DIRECTION, AND NEVER USE MAGAZINES WHEN DRY FIRING. These three simple steps will make your dry firing safe and effective. The drills described below are designed to identify and improve/correct deficiencies or errors in trigger control, sight alignment, position, and hold stability. They represent a sequence to be followed for each dry firing session. A gradual progression in the amount of time spent dry firing is recommended. The more it is done, the more benefit comes from it, AS LONG THE SAME HIGH LEVEL OF CONCENTRATION IS MAINTAINED THROUGHOUT THE EXERCISES. Once concentration starts to fail, STOP! The times and repetitions below are for the first sessions. Once comfortable with these amounts, increase them. Dry fire every day, even if you only have time to do one of the drills. 1) Warm-up (2-3 minutes) As with any training, a warm up period is important for dry firing too. Begin by sitting with eyes closed and visualizing two 5-shot sequences each of prone and standing shots. Include all aspects of the perfect shot sequence in each set, including perfect sight alignment, approach to the target, release of the trigger, seeing the plate fall through the sights, and recoil, re-bolting, breathing, etc. After this visualization sequence, sit with eyes closed and bolt your rifle. Feel the first stage, second stage, and release of the trigger. Dry fire ten shots this way. 2) Prone a. Single Bull Drill (Natural Point of Aim/Sight Alignment/Rifle Fit) Get into position and acquire your natural point of aim on the single bull. Close your eyes and breathe normally for 3-5 breaths. Open your eyes and confirm natural point of aim, sight alignment, and position. Make any adjustments necessary and repeat 3-5 times. If you find that your natural point of aim or site alignment changes every time you close your eyes, you may need minor adjustments to your rifle. b. Same as above but take the shot after you open your eyes. Repeat 10 times. (Natural Point of Aim/Sight Alignment/Rifle Fit/Trigger Control). c. Blank Wall Drill (Sight Alignment/Trigger Control) Point at a blank white wall (or the back of the dry fire target). Dry fire ten shots slowly. Concentrate on maintaining site alignment and minimal movement of the sights during trigger release. d. Vertical Bar Drill(Target Approach/Breathing Control) Breathe normally, watching the site picture move up and down the vertical bar, concentrating on a perfect bracketing of the bar (a 6 o'clock approach) on every exhale. Continuous for 1 minute. e. Crossed Bar Drill (Target Approach/Breathing Control/Trigger Control) Breathe normally but cut-off your breath when the sight picture is centered on the Bull at the intersection of the two bars and release the shot. Continuous for 1 minute. 19
20 f. 5-Bull Drill (All) Acquire position, check natural point of aim. Shoot 5 shots in sequence. Concentrate on making each shot perfect but without over-holding. Emphasize smooth movements in recoil, bolting, and follow-through. Emphasize consistent approach to the target and taking the shot on the first pass (standing). AFTER 2 WEEKS OF ABOVE, ADD: g. 5-Bull Drill with Cadence (All plus cadence). As in f. above, but fire sequence at race cadence, incorporating breathing. May also add increased HR by jogging in place, pushups, etc. h. Continuos Cadence on a single bull breathing and dry-firing in your normal race cadence for 5 minutes continuously. Focus on trigger release in coordination with breathing and approach to target (similar to d. and g., above but with single bull). i. One Shot Drill (All/Consistency of Position) Do all of the steps to get into position (except inserting the magazine). Emphasize getting into position quickly, close bolt on last movement, check natural point of aim, and get shot off on next breath, then get out of position quickly (as in a race). Repeat 10 times. Use 5-bull target and set-up on whichever target you normally shoot first. 3) Standing: Do all of the drills above with the following changes and/or additions: k. Use horizontal bar, concentrating on minimizing the vertical oscillation of the sights relative to the bar. Also add the following for Standing: j. Open Box Drill (Hold) Remove the front aperture. Hold on the open box, concentrating on staying within the box while continuing to breathe. 1, 2, 3 minutes continuous. Remember that your hold will never be stationary. The idea is to minimize its wobble. k. Single Bull Drill (Hold) Hold on the single bull while continuing to breathe. 1, 2, 3 minutes continuous. SCOPING/ ZEROING 1) Try to get double paper when zeroing in a race, and limit the number of rounds in one target to Use the 2nd target for confirmation, if possible. If permitted check your zero points for smoothness and level. 2) Use zeroing sheets to help with keeping track of the, rounds and for keeping a record of the zero to go over with the athlete if needed. 3) Use hand signals (like two fingers pointed left) to back up the voice when conveying corrections. Saves bad corrections. 20
21 4) Use wood screw analogy for all Anschütz rifles for sight changes, and woodscrew then the reverse for the Russian Vostoks. Watch the athlete apply the corrections. 5) Have athlete warm up prior to zero. For serious races, shoot 5 "fouling" rounds into bullet traps before starting the actual zero. 6) Ask athlete to shoot at normal cadence, don't let the athlete get too deliberate during the first shootings. 7) The 1 st and/or 2 nd shots may be flyers due to a recent cleaning, nervousness, so try to scope those in particular. Disregard all flyers and mentally locate the center of the remaining group. If not definitive, have the athlete shoot again and take the center of both shootings minus the flyers. 8) About 4 clicks on the Anschütz sight and 3 on the Vokstok sight will move the group from the edge of the bulls eye to the center. Move the sight in the direction you want the group to move. Go easy on adjustments, need 4? Call for 3. 9) Sometimes you won't get movement with a correction. This may be a rear sight too close to the eye or it may be a loose threading in the sight itself. Try "3 left, 1 right and shoot again". 10) If a group drops suddenly or otherwise makes a big jump, check the sights, particularly the rear screw in aperture (diopter). It may be loose. 11) If the rifle suddenly won't fire-check the safety. 12) A full wind flag in a 3 o'clock or 9 o'clock wind is about 4-6 clicks. Try 3. A flapping full flag is 5-7 or more, try 4. A 1/2 flag is 2-3 try 2. A 6 o'clock wind will raise the bullet, a 12 o'clock will push it down. Most hard side winds will also drop the bullet due to the wind dropping into the range over berms, trees, etc. 13) Try to leave the shooters group slightly downwind of the target center when zeroing in a strong wind. Shooters should be trained to pass on shots during gusts, but will shoot when the wind drops below the velocity at the time of zeroing. Thus we need to allow for less wind while still keeping the bullets on the bull s eye. 14) After several groups and corrections to the center of the target or slightly downwind, always call for a hard confirmation. Note the wind and discuss with the athlete at the time of confirmation so they are forced to note the beginning point for any wind corrections that they will be needing during the race. 15) Often a confirmation will be indecisive. Either repeat it, if time allows or have the athlete shoot another magazine. This will help create more of a group to help in your judgment. It is also good to shoot again if the confirmation correction is more than a total of 2 clicks (1 up- 2 right reconfirm). The coach s attitude and demeanor during zeroing is particularly important. You MUST exhibit confidence in yourself and in the athlete in this particularly sensitive period of time right before the race. A comment like "that was great, you had a dime sized group in the x 21
22 ring" will go a long way toward giving the athlete a sense of confidence. Do NOT criticize the athletes shooting or results at this point. BE POSITIVE!! TEACHING PROGRESSIONS IN BIATHLON SHOOTING First year Period of Physical Training Strength April/May BE Development June/July/Aug TH Development Sept-Nov RP Development Dec-Jan Races Dec-March Goals Methods Benchmarks Position perfection Accuracy, and Range Procedure, 3 breath cadence Accuracy, shooting w/ a slightly raised heartbeat, solidify position improve range time Learn to shoot w/ an elevated heart rate solidify range Procedure Solidify shooting with a high heart rate Shoot faster 2 breath cadence Accuracy and Fast shooting Slow fire, mostly paper score 50 rd matches cadence shooting, one Shot drills Slow fire 50 rd matches BE combos, shooting fatigued, short time trials cadence drills, head to Head shooting Shoot fatigued, TH Combos, short Time Trials fall races Head to head shooting Call shots during combos RP combos-fatigued time trials 1/wk head to head races Always revert to slow fire On paper if accuracy suffers Time trials, RP combos score slow fire 50 rds/1/wk ½ Dollar groups 50% standing Solid range procedure Quarter sized groups prone, 50%+ Standing Shooter calls shots ½ Dollar groups prone w/ heart rate 50% standing 1 min prone 50 sec standing ½ Dollar groups 50% standing 50 sec prone 40 sec standing 50% prone 40% standing In races MULTIYEAR GOALS YEAR RACE HITS TIME TO FIRST SHOT 1 st 50% Prone, 40% Standing 2 nd year 75% Prone, 50% Standing 3 rd year 85% Prone, 60% Standing sec 20-25sec sec sec 20-25sec sec RANGE TIME DOWN TO POLE UP CADENCE POLE 1 min Prone, 50 sec Standing 2 Breaths Mostly 50 sec Prone, 40 sec Standing, 2 Breaths, 4 SEC between shots 40 sec Prone, 35 sec Standing, 2 Breaths, 3 Sec between shots Over 3 years % Prone, sec sec Prone, 30-22
23 90% Standing sec 35 sec Standing, 1 or 2 Breaths, 2.5 to 3 sec between shots By the end of the first year the athlete should be proficient in dry-firing, rifle care, rifle disassembly, and handling. He/She should also be totally responsible for the functioning of the rifle and recognize problems, knowing where to go to get help. They should also be competent in shooting insofar as being able to call shots accurately, read wind flags, making adjustment for them, and to accomplish a zero in less than 10 minutes under normal conditions. SHOOTING-ADVANCED COACHING 1) Accuracy Problems - Atmospheric Conditions/ Physiological Conditions Windage This factor is the largest single contributor to missed targets, once a shooter reaches a reasonable proficiency. See section on WINDAGE Temperature Due to a faster chemical reaction and a change in air density a bullet strike will rise with a positive change in temperature. The reverse is true also. Normally, zeroing as near to the start of a race as possible can negate the impact of this effect, but in certain conditions a significant rise in temperature can occur between zero and the first shooting in the race. Assume about one click for each 10 F, correct down for rising temperatures and vice versa. Light A change from a flat light to bright sunshine will cause a difference in the reflection from the target that the eye perceives. It will also decrease the perceived size of the bull leaving whiter ring inside the front aperture. An adjustment in sights of approximately one click towards the newly emerged sun will normally accommodate this effect. If the sun disappears, a click away from its location at zero will adjust for the change. Heart rate A moderate increase in heart rate above resting will cause a clarifying effect with the eyesight, which in turn will drop the strike of bullets below that at a resting state. At maximal heart rates the eyesight deteriorates and the corresponding strike of the bullet will rise above the resting zero point. This effect varies widely between individuals. In addition, the heart rate reflected into rifle movement will cause a spreading of all groups. Loosening an over tight position, approaching the range more slowly, not over holding, cutting off the target approach with a complete breath cutoff, not taking longer than 1 minute to shoot in total, and a relaxed shooting position will all help, but not eliminate this effect. The shooter needs to shoot in a fatigued state, and with a high heart rate enough to learn an acceptable sight picture-not fixed-but an equally uniform white donut while focusing on the front aperture. Eyesight in general Anything that causes changes in eyesight will have an impact. Squinting, closing one eye, eye watering, or other impacts on the eyesight will all move the strike of the bullet. Blinders are a must even for dominant eye shooters. 2) Applications in Problem Solving. How to get a group with a heart rate up. Prone Trigger Squeeze 23
24 This is the most common culprit. The adrenaline effect from racing or even zeroing will increase the shooters perception of time-thus the shooter needs to slow down his perceived trigger squeeze. Relaxation effect As the shot is released, an involuntary relaxation reaction similar to blinking occurs which thus tends to allow the rifle to move towards the natural point of aim. If the rifle is strained onto the target from side to side or up or down, an opposite movement will occur as the shot is release and before it can clear the bore. The shooter needs to learn to find and utilize the natural point of aim. See drills Rifle fit If the position is too low or too high too much body tension will increase the heart rate reflection. If the cheek-piece is not adjusted to allow easy sight alignment, the shooter will tend to use the most natural but unaligned sight alignment when under duress. If a confirmation group consistently is not corresponding logically with the resting zero, consider moving the cheekpiece very slightly towards the resting zero from the confirmation group. If the position is too tight in sling tension and fit in right shoulder, the heart rate will reflect down the sling. Move the hand-stop slightly towards the trigger w/the sling. Right elbow slippage or tension, cuff slippage, loose rifle parts, particularly the rear sight diopter, and similar mechanical problems all need to be eliminated. Canting Canting in prone creates groups to the side and low. Check rifle fit with the eyes closed. Adjust sling and elbow position until rifle is vertical. Open the eyes and hold rifle vertical, have athlete check sight alignment. Adjust cheek-piece as needed to achieve good alignment with rifle held vertical. Over-holding/Under-holding For consistently good groups, prone or standing the movement towards the target needs to be concise and under complete control to allow stopping directly at the right sight picture. Then the eye must register that picture, the eye/hand coordination must adjust it, and the shot must be released-in the shortest possible time. That time will not be less than about 0.6 seconds and not more than about 1.5 sec. Over-holding in particular will cause deterioration in the sight picture and large groups when the shooter is under heavy physiological load. Approach/cutoff/follow-through For consistent shooting the best line of approach is from the bottom, by slowly releasing the last breath, and not introducing any side-to-side motion on the approach. The cutoff needs to be complete and precisely at the correct time, as the aperture encircles the bulls eye. As long as the rifle is moving on the learned approach the brain will not try to adjust it. Once it stops, the eye/hand and brain will all try to adjust the sight picture and if not very close, will over-adjust. Take another breath and re-approach the target. Reading the targets A vertical string. Set up higher on the target. Check for loose rear sight or loose diopter. Check for a slipping cuff. Check cheek-piece for sight alignment. Work on breath cutoff consistency. A horizontal string. Check for position unbalance. Left elbow more under rifle. Jerking on trigger. Cheek-piece is not correct. Wind flags may be heavy and not reflecting actual crosswind velocities. Standing Much of the above applies in standing position also. 24
25 If more than a few misses are below the bulls eye, adjust the position with butt hook changes, left hand changes, and foot pressure distribution so the sights do not go below the line of the bulls eyes. Raising the butt hook will bring the muzzle up regardless of other changes. Foot placement An offset position, with either the rear foot more forward or behind the front foot will be more solid than both directly on a line to the target-particularly in a wind. Generally a slightly open position with the right foot toe about 2 inches in front of the left toe works well. Falling forward This is generally caused by letting the right elbow drop down below approximately 45, and often accompanied by a hunched right shoulder. Watch the shooter from behind and be certain the weight of the rifle is directly over a point between the ball of the forward foot and the heel of the rear foot. Lean back, relax and lift the elbow to compensate. Canting the rifle to bring it back to the head is preferable to leaning way forward. Over-holding/swinging side to side In standing the sight picture will get progressively worse, and the over corrections increase, the longer the hold. The shooter needs to learn to make a single slow pass, cut the breath while stopping on the target, if the bull is in the front aperture, finish the squeeze-and hold on the target in a follow through until it has time to fall in the sights. Side-to-side motions are particularly bad. It is more difficult to stop than a vertical motion with a built in position stop at the target line. Thus fairly vertical approaches work best. Rigid positions-failure to relax-hunching the right shoulder. All introduce muscular tension that tends to shake with a high body load. Bent knees Bent knees will create a position very susceptible to muscle fatigue. Bring the knees back to a locked position then just relax the muscles. They should be back of center. Shooting in the wind Here a staggered stance is much better. Also look for the portion of the range near the berms or buildings where the wind is reduced. Try to shoot between gusts. 3) Problems during Zeroing/Racing Tool kits The coach should have basic rifle tools, a cleaning rod and patches, cold weather ammo, race ammo, and a spare magazine along at the firing line. For large races a team spare rifle is a necessity. Failure to fire Safety on; trigger group loose on receiver; broken firing pin; safety broken; trigger loose, or bolt headspace on Former bolt is out of adjustment. Sights way off Front sight shifted; front sight insert is loose; rear sight diopter loose, or rear sight body loose Group too big [relative to the shooter] Rear diopter loose; failure to tighten after last correction; trigger jerking; bad position with no natural point of aim, or nerves Group moving around Lack of uniform position; rear diopter loose; front sight loose; rear sight loose; or bad cheekpiece position Group moving the wrong way Check how the shooter is applying the corrections; or rear diopter loose Group huge in cold weather 25
26 Swab out bore with dry patch; and change ammo. Try Lapua Arctic Group low on confirmation Do again with a longer harder ski. Then carefully adjust up ward as needed, leaving below resting zero point. Group high on confirmation Adjust downward Wind flags totally inconsistent. The flag towards the targets represents a larger part of the bullet path than the near flag. The bullet is also slower and more susceptible to the wind downrange, thus weigh the downrange flag somewhat more than the near flag. 4) Corrections during the race Only for races with two prone stages unless the shooter is totally off. Minimum of two clicks Give in clicks not direction. Clicks give both direction of change and amount. Trail coach needs to get in athlete's face and to be loud Trail coach needs to write down the corrections and the shooting coach the same Read the paint on fresh targets-looking at the hits as well as the misses. Sometimes just a reminder to watch the wind will be helpful-or some warning that the wind is way up or down. Be prepared to explain to the athlete after the race what was given and why. Discuss the procedure to be followed with the athletes ahead of time with particular emphasis on the shooter recognizing where he thinks he was. If he was to the left and knows it he should not apply a given correction to the right. 5) Range Problems Athlete asks for ammo/rifle/magazine etc The athlete can't speak to the coach, but the coach can anticipate the problem. Athlete must bring in the remains of a broken rifle. Athlete makes request to line official, who in turn comes to the coach, who in turn hands needed items to the line official who hands them to the athlete. Team rifle should be zeroed by an "average" team member and be fit for that person. All other team members should try the rifle and put the sight corrections for each on the stock on tape. Then re-zero the rifle at zero time with the "average' team person. In a pinch- try to take another team members rifle that has completed the race and use that. Some line officials will allow it if the rifle has been through the rifle check that day. Remember to reload some magazines. Try to allow the athlete to finish-and sort it out later. 6) Trouble-shooting Drills Note: Shooting on paper during trouble-shooting is more productive as it limits the athletes feedback. Shoot comparison 5 shot groups at each of the following heart rates on separate paper targets: BE, DE, TH, RP, and Max. Look for the point that the group opens badly, look for the fall then rise of the groups, and determine where additional training is needed. Train closely above effective heart rate-race shoot slightly below. Shoot across paper 4-5 times similar to shooting metal. Compare hits to see if group on one or more targets is an unusual problem with shifted group, scatter, or other. Adjust range procedure with more position shift between targets or more shifts. 26
27 Shoot across targets as above using different natural points of aim. Try Alpha, try Charlie, try without a shift partway across and with one or two. Determine solidest groups on ALL of the targets. Shoot across target with faster cadences. Determine optimum cadence, then train faster, race a bit slower. Distract the shooter. During combos use noise, getting in face, train the shooter to eliminate distractions. "You're going to clean" when on the last shot works good. Force shooting speed by giving a maximum time and stopping the shooter at that point. Watch for break in shooting success level and train in that time envelope. Force cadence with drills called out using two or one breath cycles. Settle eventually on a two or one breath at the shooters preference but at about a 3 second cadence. 7) Rifle Work, Changes and Repairs Note: When dealing with jammed rifles or disassembly and reassemble of bolts, use safety glasses or keep head turned well away from the breech or bolt assembly. Changes to the rifles that might increase accuracy or repair methods. Changing to Allen head bedding screw then tightening them to a uniform torque of 3 Newton meters or 26 in-#s. If the rear bedding screw causes a binding of the bolt, place a washer under the head. Glass pillar bedding. This provides a uniform surface and thus pressure distribution unaffected by humidity and temperature changes with wood stocks. Milling a flat for the front sight set screws. This will help prevent the front sight assembly from pivoting upon an impact. Keep the screws tight in any case. Muzzle crown. If the crown is damaged, or was poorly cut, a re-cutting of the crown will help consistency of shots. Polishing the barrel. Due to leading and fouling from bullet lubricant it is advisable to use a brass brush liberally when cleaning. A quality solvent also assists in this. In addition, a periodic scrubbing with a fine soft lapping compound such as JB bore cleaning compound on a patch after soaking the barrel with solvent will help reestablish the accuracy. Work the area right in front of the chamber particularly well. Ammo. Each rifle has a particular ammo that it likes best. The ammo is produced by lots and given numbers, so generally all ammo in the lot will perform well. During one race event, only ammo from one box should be used for zero and race if possible. For some rifles, a change in ammo for cold weather is needed due to metallurgical reasons, which cause the barrel/ammo combination to spray or shotgun below certain temperatures. The shooter should use the cold weather compatible ammo for all shooting during the competition season. Stainless steel or nitrite steel barrels have generally performed better than the older carbon steel version as they don't contract as much per degree of temp drop. Sights Front sights. A 3.5mm front sight [with thin walls] works well for most everyone as an average between the ideal for easily locating the standing target, getting hits in standing if the bull is in the aperture at all, and a fine white ring around the bull when shooting prone. For more experienced athletes with good eyesight, who are very proficient in standing, a reduction to a 3.3 or 3.2 mm may help improve the prone. Rear sights. The rear diopter can be replaced with different apertures or with an adjustable diopter. This can be changed for different light conditions or when switching for prone to standing. The diopter opening needs to be far enough from the eye to allow the eye to register it. Generally 2-2½ inches is adequate and still provides some halo around the front sight hood in standing. The rear sight diopter [and rubber cup] need 27
28 to be loosened when making sight changes or corrections, if the blinder is wedged between the diopter and the sight body. Failing that, or if the threads are very dirty or corroded, the sight will not move during adjustments. Try cleaning the threads with a tooth brush and light oil while moving the sight block with the adjustment knobs. For a temporary field expediency, move the sight say 4 clicks left and 2 right to get a 2 click left adjustment. Trigger Generally maintain the minimum trigger pull allowable plus maybe 50 grams. [550 grams total]. Do not tighten the trigger to overcome other bad habits, as it will cause a hesitation effect in the trigger pull, wondering when it will release. The athlete needs to have 100% control over the release and learn to deal with that. See the Manuals for adjustments. Also adjust the travel after release to a minimum, then train the shooter to not hit the stop during his/her trigger squeeze. The trigger group on Anschütz rifles is mounted on the receiver with two screws and is adjustable. First the screws need to be kept very tight or they will loosen and the rifle will not fire. (The sear won't hold the firing pin back) If the rifle only weakly indents the casing of the cartridge, it may be a bad firing pin, bad spring, bad head-space, or more likely the trigger group is too far toward the muzzle and the firing pin isn't falling far enough. Move the group slightly to the rear. If the rifle breaks firing pins frequently, or if the last portion of the bolt closing is too stiff, the trigger group may be too far back. Fortner Bolts The Fortner bolt is very complicated, but has two simple adjustments: headspace and locking pressure. If the rifle won't bolt completely, the bolt won't close, remove the bolt and break it down into the 3 parts by unscrewing the double threaded coupling. Then start the threads on the front piece first, followed by the back piece and tighten completely with the tab aligned with the slot as the coupling pulls the two parts together. Tighten completely and the bolt should close. If the bolt closes easily, but the rifle miss-fires periodically, do the above, then back the coupling up several clicks and retry. (This closes down the headspace) If the rifle constantly breaks firing pins, it may be the locking pressure is too high. The thumb piece of the bolt also turns a threaded rod, which moves a block in the back of the bolt, which in turn loosens or tightens a spring. This pressure is transmitted to the thumb piece, and then down the stainless block on the side of the bolt and into the cocking handle. The internal block should just be visible in the front of the inspection slot. 28
29 29
30 30
31 31
32 USBA Membership USBA Level 1 Coach Requirements Level One Coaching clinic-history, rules, coach's philosophy, rifle training, physiology, training methods and ski technique USBA Rifle Safety Certification Completion of Coaches education correspondence course "The Coaching Principles course package includes the Successful Coaching textbook, the study guide, test processing, and diploma." Completion of the USBA Level One Written Examination with a score of 90% or above Approval of the USBA Program Director and a sponsoring Biathlon Coach. 32
33 Terminology Aerobic capacity Anaerobic capacity Capacity analysis CISM Click Concurrent training Condition Concentration Coordination Elevation Eye Relief Front Sight A person s maximum level of oxygen uptake per kilogram of body weight per minute, or the ability to utilize oxygen for the release of energy during moderate and high intensity physical activities. A person s maximum level to sustain an oxygen debt, or the ability to produce energy through a chemical reaction without the use of oxygen during high intensity physical activities. An analysis (testing and evaluation) of an athlete s abilities and capacities that have a meaningful effect on the performance level. Conseil International du Sport Militaire, International Union of Military Sport. One part of a minute in elevation or windage of the rifle sights. Training designed to sustain or improve the physical and psychological factors influencing the combination of biathlon skills, also commonly known as combination training. Physical as well as psychological training state in relation to the demands of the sport or the stress of bodily activity. Fixing or focusing one s thoughts, attention and efforts on a specific given task or idea. The nerve-muscle systems interrelation in the performance of physical movement. The term used of and for the rear sight part which determines the strike of the bullet on a vertical axis. The distance between the eye and the rear sight aperture. The front aperture through which the target is sighted and aligned with the rear sight. 33

34 Intensity Kinesthesia Lactic Acid Rear Sight The amount of stress or energy demand placed on an organism during physical activity, often seen in terms of speed. The sense in one s body that feels the positions of its various parts in relation to one another. A clear syrupy acid produced in the souring of milk and a byproduct of the chemical reactions of the anaerobic energy releasing process, often measured in blood parts per million (mmol). The rear aperture of the rifle sighting system, through which the target is aligned with the front sight. Control of the elevation and windage should be possible in fine gradations of ¼ minute-ofangle per click adjustment. Small Bore Style Technique Training Windage Zero(ing) A rifle barrel for which the caliber or diameter of the bullet shall not exceed 5.6mm (.22), and shall be rim fired (long rifle). A personal form of technique, technique adapted to accommodate one s own abilities. A solution to the task of a coordination of movements. All activity that is designed to increase or maintain the level of athletic performance. The term applied to the rear sight and to the strike of the bullet on a horizontal plane, and usually influenced by wind direction. The term used for a sight setting (or the act of establishing it) which means that the rear sight is set exactly on the point of impact on a target at a given distance under given conditions. 34
Cleaning rod: spring steel, stainless steel or carbon fibre cleaning rod - only use a one-piece rod. Avoid using snakes.
 Telemark Biathlon Where performance and precision come together http://telemarkbiathlon.com Rifle Cleaning Date : July 19, 2013 Anschutz Rifle Manual - Click Here Izhmash 7-3 Rifle Manual - still looking
Basic Shooting Skills Principles of Marksmanship. By: Shannon Carlton
 Basic Shooting Skills Principles of Marksmanship By: Shannon Carlton Agenda Introduction Principles of Coaching 5 Principles of Marksmanship Developing a Routine Making Sight Adjustments Sequences Principles
Shooting Clinic, Alaska Biathlon Anchorage 4 April 2009 Instructor: Richard Barlow Session 3: Fundamentals, Position Details A.
 Shooting Clinic, Alaska Biathlon Anchorage 4 April 2009 Instructor: Richard Barlow Session 3: Fundamentals, Position Details A. Fundamental Steps 1. The sequence of six steps for a well-aimed shot needs
- for example, if you are sitting, stand up: how did you do that? did you have to think about how to do it?
 Shooting Clinic, Alaska Biathlon Anchorage 25 April 2009 Instructor: Richard Barlow Session 6: Dryfiring and Committment, Diary, Rifle Care, Standing Position A. Dryfiring 1. Importance of dryfiring physical
KOSCIELISKO POL. Biathlon Shooting Lesson :00 16:30
 KOSCIELISKO POL Biathlon Shooting Lesson 29.09.2011 15:00 16:30 Basic Shooting Skills Positions Basic Shooting Skills Positions Basic Shooting Skills Positions Introduction Dominant Eye Rifle Fitting Prone
Basic Shooting Skills Positions. By: Shannon Carlton
 Basic Shooting Skills Positions By: Shannon Carlton Agenda Introduction Dominant Eye Rifle Fitting Prone Position Rifle Fitting Tips Standing Position Sequences Checklists Positions Stable Comfortable
MARKSMANSHIP CHECK CARD
 MARKSMANSHIP CHECK CARD Every Marine can learn to be an expert shot. To be one, however, you must first learn thoroughly the principles and techniques of marksmanship and then apply them in a confident
UNITED STATES MARINE CORPS WEAPONS TRAINING BATTALION MARINE CORPS COMBAT DEVELOPMENT COMMAND QUANTICO, VIRGINIA
 UNITED STATES MARINE CORPS WEAPONS TRAINING BATTALION MARINE CORPS COMBAT DEVELOPMENT COMMAND QUANTICO, VIRGINIA 22134-5040 DETAILED INSTRUCTOR GUIDE LESSON TITLE FUNDAMENTALS OF RIFLE MARKSMANSHIP COURSE
LESSON 4: THE FIRST TARGET POSITION - STANDING
 LESSON 4: THE FIRST TARGET POSITION - STANDING PURPOSE This lesson introduces you to the first target position, which is the standing position. the type of clothes that are used in school-age sporter class
LESSON 7: THE PRONE POSITION
 LESSON 7: THE PRONE POSITION PURPOSE This lesson introduces you to the correct technique for firing in the prone position. INTRODUCTION prone sling The prone position has the lowest center of gravity and
The Bianchi Match by Gwyn Roberts 2009
 The Bianchi Cup was first introduced in America in 1979 as a handgun match by John Bianchi and Ray Chapman and was first shot at the Chapman Academy Ranges, outside Columbia, Missouri. It is made up of
1 P a g e. Royal Canadian Sea Cadet Corps Centurion Marksmanship
 1 P a g e Royal Canadian Sea Cadet Corps Centurion Marksmanship 2 P a g e Marksmanship Manual Marksmanship training involves learning to fire the cadet air rifle. You will be taught many lessons about
RIFLE DRILL. 1. General. Before commencing instruction in rifle drill, it is important that the cadets receive instruction in the parts of the rifle.
 RIFLE DRILL 1. General. Before commencing instruction in rifle drill, it is important that the cadets receive instruction in the parts of the rifle. 2. Rifle Movements. Unless stated otherwise, cadets
Coaching Principles. 1. Introduce 2. Demonstrate 3. Explain 4. Organize 5. Execute 6. Correct 7. Practice
 5 Pin Bowling Drill Book Updated August 2008 Coaching Principles STEPS IN TEACHING A DRILL 1. Introduce 2. Demonstrate 3. Explain 4. Organize 5. Execute 6. Correct 7. Practice GENERAL PRINCIPLES Drills
UNITED STATES MARINE CORPS WEAPONS TRAINING BATTALION MARINE CORPS COMBAT DEVELOPMENT COMMAND QUANTICO, VIRGINIA
 UNITED STATES MARINE CORPS WEAPONS TRAINING BATTALION MARINE CORPS COMBAT DEVELOPMENT COMMAND QUANTICO, VIRGINIA 22134-5040 DETAILED INSTRUCTOR GUIDE LESSON TITLE RIFLE SITTING POSITION COURSE TITLE ANNUAL
UNITED STATES MARINE CORPS WEAPONS TRAINING BATTALION MARINE CORPS COMBAT DEVELOPMENT COMMAND QUANTICO, VIRGINIA
 UNITED STATES MARINE CORPS WEAPONS TRAINING BATTALION MARINE CORPS COMBAT DEVELOPMENT COMMAND QUANTICO, VIRGINIA 22134-5040 DETAILED INSTRUCTOR GUIDE LESSON TITLE APPLICATION OF MARKSMANSHIP FUNDAMENTALS
Section Five - Semi Auto Pistols
 Section Five - Semi Auto Pistols Like revolvers, semi auto pistols have parts that are unique to them. In figure 1 below we have pointed out the most common parts to the semi auto handgun and give detailed
Key Terms. balance barrel bolt butt hand guard muzzle port arms sling stacking swivel stock trail arms trigger guard
 Lesson 7 Stationary Movements with the M-1 Rifle Chapter 5 Key Terms balance barrel bolt butt hand guard muzzle port arms sling stacking swivel stock trail arms trigger guard What You Will Learn to Do
UNITED STATES MARINE CORPS WEAPONS TRAINING BATTALION MARINE CORPS COMBAT DEVELOPMENT COMMAND QUANTICO, VIRGINIA INSTRUCTOR GUIDE
 UNITED STATES MARINE CORPS WEAPONS TRAINING BATTALION MARINE CORPS COMBAT DEVELOPMENT COMMAND QUANTICO, VIRGINIA 22134-5040 INSTRUCTOR GUIDE ZERO A RIFLE COMBAT OPTIC (RCO) TO A SERVICE RIFLE 0300-M16-1005
Rifle Marksmanship A. Shot Technique and firing in the Supported Position
 Rifle Marksmanship A Shot Technique and firing in the Supported Position INSTRUCTION (PHASE 1): Supported Position Sight Alignment Breath Control Trigger Control Sight Picture INSTRUCTION (PHASE 2) Sight
2990 Lorne Scots Royal Canadian Army Cadet Corps Rifle Drill
 2990 Lorne Scots Royal Canadian Army Cadet Corps Rifle Drill Page 1 of 27 TABLE OF CONTENTS PARA ITEM PAGE Section 1 BASIC RIFLE DRILL 1.1 INTRODUCTION 3 1.2 ATTENTION 5 1.3 STAND AT EASE FROM ATTENTION
BSA & Youth 60 Minute Rifle Briefing. NO AMMUNITION in the classroom NO EXCEPTIONS!
 BSA & Youth 60 Minute Rifle Briefing NO AMMUNITION in the classroom NO EXCEPTIONS! Orientation Goal To provide beginning shooters with the knowledge, skills, and attitude necessary to shoot a rifle safely.
STEP 1. STANCE. The stance must be a consistent, repeatable and comfortable.
 STEP 1. STANCE The body can be divided into 2 parts the upper body from the hips up and the lower body from the hips down. The upper part of the body must maintain consistent position from shot to shot
UNITED STATES MARINE CORPS WEAPONS TRAINING BATTALION MARINE CORPS COMBAT DEVELOPMENT COMMAND QUANTICO, VIRGINIA
 UNITED STATES MARINE CORPS WEAPONS TRAINING BATTALION MARINE CORPS COMBAT DEVELOPMENT COMMAND QUANTICO, VIRGINIA 22134-5040 DETAILED INSTRUCTOR GUIDE LESSON TITLE FUNDAMENTALS OF RIFLE MARKSMANSHIP COURSE
Fundamentals of Pistol Marksmanship William Joyner
 Fundamentals of Pistol Marksmanship William Joyner www.bullseyepistol.com In preview, I would like to say that shooting excellent scores with a pistol requires no other elements than those described in
FIRST Steps Orientation (Shotgun)
") FIRST Steps Orientation (Shotgun) Welcome & Registration Firearms Instruction, Responsibility & Safety Training Orientation Goal: To introduce the knowledge, skills and attitude necessary to safely own
FIRST Steps Orientation (Shotgun) Welcome & Registration Firearms Instruction, Responsibility & Safety Training Orientation Goal: To introduce the knowledge, skills and attitude necessary to safely own
Delaware Rifle and Pistol Club GUEST TRAINING MANUAL
 Delaware Rifle and Pistol Club GUEST TRAINING MANUAL A word to the Member: Properly introducing new people to the sport is of great importance! Please ensure that your guest has; A Positive experience
BSA 30 Minute Rifle Briefing. NO AMMUNITION in the classroom NO EXCEPTIONS!
 BSA 30 Minute Rifle Briefing NO AMMUNITION in the classroom NO EXCEPTIONS! 1 Orientation Goal To provide beginning shooters with the knowledge, skills, and attitude necessary to shoot a rifle safely under
Armed Officer's Training Manual Nomenclature and Inspection
 Armed Officer's Training Manual Section 8: Nomenclature and Inspection Learning Goal: The student will know the components and understand the operation of the service revolver and semi-automatic pistol.
Objective: Students will discuss and demonstrate individual firing positions and how to determine an individual's natural point of aim (NPA).
.") Positions 1 Objective: Students will discuss and demonstrate individual firing positions and how to determine an individual's natural point of aim (NPA). Positions The Soldier must stabilize their weapon,
Positions 1 Objective: Students will discuss and demonstrate individual firing positions and how to determine an individual's natural point of aim (NPA). Positions The Soldier must stabilize their weapon,
MANUAL OF ARMS FOR THE RIFLE (M-1 GARAND) POSITION OF ORDER ARMS
 POSITION OF ORDER ARMS") MANUAL OF ARMS FOR THE RIFLE (M-1 GARAND) In describing the manual of arms, the term, at balance, refers to a point on the rifle just forward of the trigger housing. Whenever a position is described as
MANUAL OF ARMS FOR THE RIFLE (M-1 GARAND) In describing the manual of arms, the term, at balance, refers to a point on the rifle just forward of the trigger housing. Whenever a position is described as
INSTRUCTION MANUAL CZ 630/631
 INSTRUCTION MANUAL CZ 630/631 Before handling the air rifle read this manual carefully and observe the following safety instructions. Improper and careless handling of the air rifle could result in unintentional
COACHING WINDMILL PITCHERS GETTING STARTED
 COACHING WINDMILL PITCHERS GETTING STARTED INTRODUCTION Coaching pitchers in NOT difficult. All you need is some interest and a little information to understand what you're doing. The interest has to come
Air Pistol Shooting. AFC-IWLA Sills Air Range
 Air Pistol Shooting AFC-IWLA Sills Air Range Overview What is air pistol shooting? Benefits Safety Basics & Fundamentals Shooting at Sills Air Range Shooting at home Useful websites What Is Air Pistol
LESSON 8: THE KNEELING POSITION
 LESSON 8: THE KNEELING POSITION PURPOSE This lesson introduces you to correct technique for firing from the kneeling position If your unit does not have kneeling rolls available, it is easy to make suitable
WEAPONS INSPECTION SEMI-AUTOMATIC. The instructors will inspect each shooter's weapon prior to any firing.
 WEAPONS INSPECTION SEMI-AUTOMATIC The instructors will inspect each shooter's weapon prior to any firing. a. Ensure that all weapons and magazines are cleared of rounds. Check it again. b. Check the BARREL.
LEVEL 1 SKILL DEVELOPMENT MANUAL
 LEVEL 1 SKILL DEVELOPMENT MANUAL Lesson Manual C A Publication Of The USA Hockey Coaching Education Program The USA Hockey Coaching Education Program is Presented By LESSON C-1 SPECIFIC OBJECTIVES 1. Refine
MUSKET MANUAL OF ARMS FOR THE
 MANUAL OF ARMS FOR THE MUSKET 414. This manual differs in so many respects from that of the rifle and rifle musket that it becomes necessary to specify it for the use of infantry troops armed with the
Air Pistol Shooting. AFC-IWLA Sills Air Range
 Air Pistol Shooting AFC-IWLA Sills Air Range Overview What is air pistol shooting? Benefits Safety Basics & Fundamentals Shooting at Sills Air Range Shooting at home Useful websites Information for this
Shot put learn by - doing Basic technique for the Shot Put By: Mark Harsha Portage High School Girls Head Coach
 Shot put learn by - doing Basic technique for the Shot Put By: Mark Harsha Portage High School Girls Head Coach Goal One: Shot grip and placement 1. Holding the shot The shot is held at the base of the
AR STYLE FIREARMS OWNER'S MANUAL: OPERATION, HANDLING, DISASSEMBLY / REASSEMBLY & SAFETY INSTRUCTIONS
 AR STYLE FIREARMS OWNER'S MANUAL: OPERATION, HANDLING, DISASSEMBLY / REASSEMBLY & SAFETY INSTRUCTIONS - DO NOT DISCARD THIS MANUAL - READ THIS MANUAL CAREFULLY, PAYING CLOSE ATTENTION TO THE INSTRUCTIONS
COMMON TRAINING INSTRUCTIONAL GUIDE SECTION 4 EO C PRACTICE FIRING TECHNIQUES PREPARATION
 COMMON TRAINING INSTRUCTIONAL GUIDE SECTION 4 EO C206.03 PRACTICE FIRING TECHNIQUES Total Time: 30 min PREPARATION PRE-LESSON INSTRUCTIONS Resources needed for the delivery of this lesson are listed in
OPERATION AND FUNCTION
 CHAPTER 3 OPERATION AND FUNCTION This chapter discusses the operation of the M249 automatic rifle. This includes loading, unloading, cycle of functioning, adjusting the sight, and using the bipod. 3-1.
Sanborn County Shooting Sports Safety Test Study Guide
 Sanborn County Shooting Sports Safety Test Study Guide Ten Shooting Safety Rules Airguns and BB guns are real guns, not toys. You or others can be killed or seriously injured if these rules are not followed.
Teaching Rifle Positions to New Junior Shooters. NLU # 748 Free 04/13
 Teaching Rifle Positions to New Junior Shooters NLU # 748 Free 04/13 TM Teaching Rifle Positions to New Junior Shooters This booklet offers a reprint of three articles that originally appeared in the CMP
LESSON II: AMMUNITION KNOWLEDGE AND THE FUNDAMENTALS OF PISTOL SHOOTING
 LEARNING OBJECTIVES: IDENTIFY THE DIFFERENT COMPONENTS OF A PISTOL CARTRIDGE EXPLAIN THE FIRING SEQUENCE OF A CARTRIDGE EXPLAIN HOW TO PROPERLY IDENTIFY AND STORE AMMUNITION STATE THE MAJOR TYPES OF CARTRIDGE
Beginner shooting tips
 Beginner shooting tips The new shooter is in a great position to learn the fundamentals of shooting. Being new you are a clean slate where as a person who has been shooting for some time may bring some
UNITED STATES MARINE CORPS WEAPONS TRAINING BATTALION MARINE CORPS COMBAT DEVELOPMENT COMMAND QUANTICO, VIRGINIA
 UNITED STATES MARINE CORPS WEAPONS TRAINING BATTALION MARINE CORPS COMBAT DEVELOPMENT COMMAND QUANTICO, VIRGINIA 22134-5040 DETAILED INSTRUCTOR GUIDE LESSON TITLE RIFLE ZEROING COURSE TITLE DIVISION MATCH
COLT AUTOMATIC PISTOL
 COLT AUTOMATIC PISTOL CALIBER.22 INSTRUCTIONS FOR ASSEMBLY - DISASSEMBLY CLEANING COLT AIUTOMATIC PISTOL IN 6 INCH OR 4}~2 INCH BARREL.22 Long Rifle, rim fire Cartridge Capacity of Magazine, 10 Shots Description
Coaches Handbook. Coaches Handout Page 1
 Coaches Handout 2009 Page 1 General Session 1: How to Warm-up! Players are put through basic warm-ups and exercises that they should perform each week when they come to Tball. Stretching should be the
COMMON TRAINING INSTRUCTIONAL GUIDE SECTION 3 EO C PRACTICE AIMING TECHNIQUES PREPARATION
 COMMON TRAINING INSTRUCTIONAL GUIDE SECTION 3 EO C206.02 PRACTICE AIMING TECHNIQUES Total Time: 60 min PREPARATION PRE-LESSON INSTRUCTIONS Resources needed for the delivery of this lesson are listed in
VR1 Owner s Manual. Vigilance Rifles, Inc Plum Lane Redlands, CA P F
 VR1 Owner s Manual Vigilance Rifles, Inc. 1653 Plum Lane Redlands, CA 92374 P 909.307.8877 F 909.307.8866 www.vigilancerifles.com INTRODUCTION: Vigilance Rifles offers a new line of Semi-Automatic Rifles
M16 R / M1600 R USER S MANUAL WARNING: READ THE INSTRUCTIONS AND SAFETY PRECAUTIONS IN THIS MANUAL CAREFULLY BEFORE USING THIS FIREARM.
 ARMSCOR M16 R / M1600 R USER S MANUAL WARNING: READ THE INSTRUCTIONS AND SAFETY PRECAUTIONS IN THIS MANUAL CAREFULLY BEFORE USING THIS FIREARM. DISCHARGING FIREARMS IN POOLY VENTILATED AREAS, CLEANING
EXERCISE GUIDE STRENGTHEN YOUR CORE
 EXERCISE GUIDE STRENGTHEN YOUR CORE BACK EXTENSION WITH BALL Rest your belly on the ball, feet planted wide apart on the floor behind you and hands resting on your lower back. Peel your chest away from
TM WARNING SUMMARY
 TM 9-005-239-0 WARNING SUMMARY Treat every firearm as if it were loaded. Never accept or take over a firearm from another until you have checked personally to see that it is unloaded or in a completely
Belton High School Marching Fundamentals 2016
 Belton High School Marching Fundamentals 2016 Fundamentals of Teaching Fundamentals: 1. Say the name of the maneuver (INSTRUCT) 2. State its purpose (INSTRUCT) 3. Demonstrate it slowly, several times,
STRIBOG GRAND POWER. The INSTRUCTIONS FOR USE, MAINTENANCE AND SAFETY. 1
 instructions The for use, maintenance STRIBOG and safety hestribog GRAND POWER INSTRUCTIONS FOR USE, MAINTENANCE AND SAFETY www.grandpower.eu 1 The STRIBOG Dear Customer, Thank you for purchasing a semi-automatic
Coaching Principles. STEPS IN TEACHING A DRILL 1. Introduce 2. Demonstrate 3. Explain 4. Organize 5. Execute 6. Correct 7. Practice GENERAL PRINCIPLES
 Alpine Skiing Drill Book Updated August 2008 STEPS IN TEACHING A DRILL 1. Introduce 2. Demonstrate 3. Explain 4. Organize 5. Execute 6. Correct 7. Practice GENERAL PRINCIPLES Coaching Principles Drills
A Publication Of The USA Hockey Coaching Education Program The USA Hockey Coaching Education Program is Presented By
 LEVEL 1 SKILL DEVELOPMENT MANUAL Lesson Manual B A Publication Of The USA Hockey Coaching Education Program The USA Hockey Coaching Education Program is Presented By LESSON B-1 SPECIFIC OBJECTIVES 1.
INSTRUCTION MANUAL CZ 92
 INSTRUCTION MANUAL CZ 92 Before handling the pistol read this manual carefully and observe the following safety instructions. Improper and careless handling of the pistol could result in unintentional
PISTOL CALIBER AR STYLE FIREARMS
 PISTOL CALIBER AR STYLE FIREARMS OWNER'S MANUAL: OPERATION, HANDLING, DISASSEMBLY / REASSEMBLY & SAFETY INSTRUCTIONS - DO NOT DISCARD THIS MANUAL - READ THIS MANUAL CAREFULLY, PAYING CLOSE ATTENTION TO
2672 Hastings & Prince Edward Regiment Royal Canadian Army Cadet Corps. Lee Enfield No.4. Rifle Drill
 2672 Hastings & Prince Edward Regiment Royal Canadian Army Cadet Corps Lee Enfield No.4 Rifle Drill Extracts from A-CR-CCP-053/PT001 March 2005 TABLE OF CONTENTS PARA ITEM PAGE Section 1 BASIC RIFLE DRILL
HOW TO HOLD THE SHOT
 HOW TO HOLD THE SHOT Balance the shot in his hand so it is resting at the point where the fingers are connected to the palm of the hand. Keep their fingers together and allow their thumb to gently rest
Shot Technical Model
 Shot Technical Model Progression related to Multi-Events Development (aged 8/9-12 years) can be referenced to Athletics 365. Further technical information can be found HERE Linear Shot - Whole Sequence
LESSON 13: STATIONARY MOVEMENTS WITH THE M1 RIFLE
 LESSON 13: STATIONARY MOVEMENTS WITH THE M1 RIFLE PURPOSE balance fall in parade rest port arms trail arms upper band (Note: Since there are many similarities between the manual of arms for the M1 and
TO RECEIVE the most benefit from a
 Using Surveying Equipment TO RECEIVE the most benefit from a tool, it must be used properly. In addition, it must be well maintained. In most cases, the user will need some instruction and training regarding
Shooting Mechanics-Position
 Shooting Mechanics-Position If you do not have a good solid position nothing else in position shooting matters. It is impossible to have a building that will last a long time without a strong foundation
Ab Plank with Straight Leg Raise
 Ab Plank with Straight Leg Raise Position yourself face up with your knees bent at 90 degrees, feet flat on the floor. Your hands should be directly under your shoulders facing forward. While in this position
Evaluation: 1. Can participants on a regular basis cast with a spin-casting reel with little effort 2. Can participants get close to a target.
 Spin-casting Sharon Rushton- Best Time: This lesson can be taught as the first lesson on casting. Depending on the age group and time you have available, you may want to start with the Can-Casting Lesson,
The Practical match -
 The first Bianchi Cup competition was held 30 years ago in 1979 at the Chapman Academy Ranges just outside of Columbia, Missouri in the USA. It was specifically designed as a training match to enhance
MARKSMANSHIP FUNDAMENTALS
 CHAPTER 4 MARKSMANSHIP FUNDAMENTALS Many factors contribute to light antiarmor weapon marksmanship. Soldiers who combine these factors well and continue to practice doing so can retain their skills. The
Pistol Opportunities for Juniors II By Gary Anderson, DCM Emeritus
 6 By Gary Anderson, DCM Emeritus Part I of this two-part article (On the Mark, Spring 2015) reviewed junior pistol opportunities in the USA and explained how classical bulls-eye pistol shooting best supports
Player Development. Pitching 1
 Pitching Player Development Pitching 1 Delivery Mechanics Checklist: 1. Feet slightly spread on throwing arm side of rubber 2. Body weight positioned over stride leg 3. Torso upright 4. Hips and shoulders
Morini CM 22M. Technical Data
 Morini CM 22M Technical Data Caliber: Weight: Total Length: Total Height: Total Width: Length of Sight Line: Barrel Length: Number of Riflings: Trigger: 1 st stage weight: 2 nd stage weight: Sight: Sight
Discus Technical Model
 Discus Technical Model Progression related to Multi-Events Development (aged 8/9-12 years) can be referenced to Athletics 365 stages Red, Yellow & Green Whole Sequence Preparation Momentum Building Delivery
OPERATION AND FUNCTIONING
 C1, FM 23-65 * CHAPTER 3 OPERATION AND FUNCTIONING This chapter explains the operation of the MG. It discusses the loading, unloading, and clearing procedures, and the cycle of functioning of the weapon.
OWNER S MANUAL. Read the instructions and warnings in this manual carefully before using this firearm; do not discard this manual.
 OWNER S MANUAL SDP compact Read the instructions and warnings in this manual carefully before using this firearm; do not discard this manual. This instruction manual should always accompany this firearm
WEBLEY Please read this manual before using your airgun
 The Webley OWNER S MANUAL BREAK BARREL AIR RIFLES ALL VMX AND SPECTOR MODELS WEBLEY Please read this manual before using your airgun WARRANTY Each Webley air rifle is fully guaranteed against faulty workmanship
Techniques To Treat Your Pain At Home (512)
") Techniques To Treat Your Pain At Home (512) 288-5322 7010 W. TX-71 Suite 360 Austin TX, 78735 Arm Only Bird Dog Start in the quadruped position (all fours) with arms and thighs perpendicular to the floor.
Techniques To Treat Your Pain At Home (512) 288-5322 7010 W. TX-71 Suite 360 Austin TX, 78735 Arm Only Bird Dog Start in the quadruped position (all fours) with arms and thighs perpendicular to the floor.
TECHNICAL MODELS & PROGRESSIONS FOR THE GLIDE SHOT PUT. Ben Bishop, Lake Park HS
 TECHNICAL MODELS & PROGRESSIONS FOR THE GLIDE SHOT PUT Ben Bishop, Lake Park HS 1 WHEN IS THE GLIDE A VIABLE OPTION? Athletes that rely heavily on strength levels as opposed to other athletic domains,
Discus Technique: Basic Technique A Technical Analysis Grip Fork Gr Purpose: To provide control over Discus is held with Discus is held
 Discus Technique: A Technical Analysis Sandy Fowler University of Michigan Assistant Track & Field Coach Grip Purpose: To provide control over the implement throughout the spin. To provide for a proper
Basketball Ball-Handling Fundamentals and Drills
 INDIVIDUAL DRILLS Basketball Ball-Handling Fundamentals and Drills Learning to become a good ball-handler, and developing a feel for the ball is vitally important in becoming an excellent all-around player.
4. Shooting The first types of shots to which youth players are introduced are:
 4. Shooting The first types of shots to which youth players are introduced are: Lay-Up Set Shot Foul Shot Jump Shot Other shots such as the hook shot, tear drop, runner, etc. may be a bit advanced for
SAFETY RULES WARNING: READ THESE SAFETY RULES & OPERATORS MANUAL BEFORE HANDLING YOUR FIREARM
 SAFETY RULES WARNING: READ THESE SAFETY RULES & OPERATORS MANUAL BEFORE HANDLING YOUR FIREARM Never point a firearm at anyone and always keep the muzzle pointed in a safe direction. Always treat all firearms
LESSON 5: AIMING AND FIRING
 LESSON 5: AIMING AND FIRING enough to fire all shots within the scoring rings of the official competition target. PURPOSE This lesson introduces you to the basic techniques for firing an aimed shot, at
PLAY BETTER GOLF and HAVE MORE FUN
 PLAY BETTER GOLF and HAVE MORE FUN Randy Meyer PGA Table of Contents Chapter Page Teaching Philosophy 1 Philosophy and Approach 3 Swing Fundamentals 2 Pre-swing 4 In-swing 5 Golf Tips 3 Ball position,
NATIONAL PARK SERVICE MANUAL FOR THE HANDLING AND FIRING OF U.S. M1911 and M1911A1 Colt Automatic Pistol,.45 A.C.P. Caliber IN INTERPRETIVE
 NATIONAL PARK SERVICE MANUAL FOR THE HANDLING AND FIRING OF U.S. M1911 and M1911A1 Colt Automatic Pistol,.45 A.C.P. Caliber IN INTERPRETIVE DEMONSTRATIONS 1 PREFACE This manual sets forth the procedures
Kent Canoe Services
 Kent Canoe Services www.thecanoeshop.co.uk Eskimo Rolling (Kayaks) Introduction: Welcome to our article on Eskimo rolling. Years ago eskimo rolling was considered to be an advanced skill only performed
Shoulder Exercises for Combined Labrum Repair Rehabilitation Protocol
 Shoulder Exercises for Combined Labrum Repair Rehabilitation Protocol The exercises illustrated and described in this document should be performed only after instruction by your physical therapist or Dr.
P9S Automatic Pistol Caliber.45 ACP
 P9S AUTOMATIC PISTOL Caliber.45 ACP P9S Automatic Pistol Caliber.45 ACP Instruction Manual HECKLER & KOCH, INC. 2148 Pacific Boulevard Sterling, Virginia 20166-8903 U.S.A. TEL. (703) 450-1900 TELEFAX (703)
OPERATOR S MANUAL FOR AR-24 SERIES PISTOLS
 OPERATOR S MANUAL FOR AR-24 SERIES PISTOLS ArmaLite Incorporated Box 299 Geneseo Illinois U.S.A. 61254 309-944-6939 ArmaLite.com 2006 ArmaLite Inc. This book provides instructions on the operation and
Structure (Down plane)
") By Lauren Russell Structure (Down plane) The body (toes, knees, hips, wrists and shoulders) is aligned parallel to the intended target line. The torso is tilted over the ball from the hips whilst maintaining
By Lauren Russell Structure (Down plane) The body (toes, knees, hips, wrists and shoulders) is aligned parallel to the intended target line. The torso is tilted over the ball from the hips whilst maintaining
Basic Offensive Fundamentals
 Basic Offensive Fundamentals Footwork Developing proper footwork will help with each player s balance and quickness while on the court. Emphasizing the importance of footwork from the beginning of the
LESSON 5: AIMING AND FIRING
 LESSON 5: AIMING AND FIRING PURPOSE appropriate for new shooters who have not yet developed the ability to hold the rifle steady enough to fire all shots within the scoring rings of the official competition
Hammer Technical Model
 Hammer Technical Model Progression related to Multi-Events Development (aged 8/9-12 years) can be referenced to Athletics 365 More technical information can be found HERE IAAF CECS Level II Event Specific
COMMON TRAINING PHASE ONE INSTRUCTIONAL GUIDE SECTION 1 EO M IDENTIFY THE PARTS AND CHARACTERISTICS OF THE DAISY 853C AIR RIFLE PREPARATION
 COMMON TRAINING PHASE ONE INSTRUCTIONAL GUIDE SECTION 1 EO M106.01 IDENTIFY THE PARTS AND CHARACTERISTICS OF THE DAISY 853C AIR RIFLE Total Time: 30 min PREPARATION PRE-LESSON INSTRUCTIONS A complete list
AUSTRALIAN BASEBALL UMPIRE S MANUAL
 AUSTRALIAN BASEBALL UMPIRE S MANUAL UMPIRE POSITIONS AND SIGNALS 2009 by Australian Baseball All rights reserved. No part of this publication may be reproduced or distributed in any form without prior
U.S. M1892 Magazine Rifle (Krag-Jorgensen), Caliber Army
, Caliber Army") U.S. M1892 Magazine Rifle (Krag-Jorgensen), Caliber.30-40 Army The first bolt-action, magazine-fed, smokeless powder rifle adopted by the U.S. Army as a primary shoulder arm in 1892. A model manufactured
U.S. M1892 Magazine Rifle (Krag-Jorgensen), Caliber.30-40 Army The first bolt-action, magazine-fed, smokeless powder rifle adopted by the U.S. Army as a primary shoulder arm in 1892. A model manufactured
BSA 30 Minute Pistol Briefing. NO AMMUNITION in the classroom NO EXCEPTIONS!
 BSA 30 Minute Pistol Briefing NO AMMUNITION in the classroom NO EXCEPTIONS! 1 Orientation Goal To provide beginning shooters with the knowledge, skills, and attitude necessary to shoot a pistol safely
AMATEUR HOCKEY ASSOCIATION ILLINOIS, INC. MITE 8 & UNDER AMERICAN DEVELOPMENT MODEL
 Mite 8 & Under American Development Model Week 1 This coach s manual is intended to provide the instructions and tools to conduct the Mite and 8 & Under Illinois Hockey - Skills Challenge. Mite