The basic warrior stance serves as the foundation for initiating knife techniques and is executed as follows:
|
|
|
- Nickolas Nicholson
- 6 years ago
- Views:
Transcription


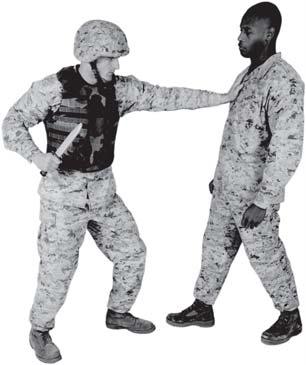
1 Marine Corps Martial Arts Program 2-71 Stance The basic warrior stance serves as the foundation for initiating knife techniques and is executed as follows: The left hand serves as a vertical shield protecting the ribs or the head and neck. The right elbow is bent with the blade pointing forward toward the aggressor s head. This position serves as an index point, from which all techniques are initiated. The weapon should be held at a level between the top of the belt and the chest. The weapon should be kept in close to the body to facilitate weapon retention. Vertical Slash Vertical slashing techniques are used to close with the aggressor and can also be a distraction to the aggressor. When executing a vertical slash, the primary target areas of the body are the limbs or any portion of the body that is presented. ~ Stand facing your aggressor. ~ Thrust your right hand out and bring the weapon straight down on the aggressor. ~ Continue dragging the knife down through the aggressor s body. Maintain contact on the aggressor s body with the blade of the knife. The slashing motion follows a vertical line straight down through the primary target. ~ Return to the modified basic warrior stance. See figure Figure Vertical Slash. Chapter 2: Tan Belt

2 2-72 MCRP 3-02B Vertical Thrust Thrusting techniques are more effective than slashing techniques because of the damage they can cause. However, slashing techniques are used to close with the aggressor in order to get in proximity where a thrusting technique can be used. The thrusting motion follows a vertical line straight up through the primary target. When executing a vertical thrust, the primary target areas of the body are low into the abdomen region or high into the neck. ~ Stand facing your aggressor in the modified basic warrior stance. ~ Thrust your right hand toward the primary target, inserting the knife blade straight into the aggressor. ~ Pull the knife out of the aggressor. ~ Return to the modified basic warrior stance. See figure Figure Vertical Slash. Chapter 2: Tan Belt
3 CHAPTER 3 Gray Belt Gray Belt is the second belt ranking within MCMAP. Within two years of qualifying as a Tan Belt, all Marines are expected to advance to Gray Belt. Gray Belt includes the completion of basic fundamentals and introduction to intermediate fundamentals of each discipline and is the minimum requirement to attend the Martial Arts Instructor Course. The purpose and principles remain the same as outlined in Tan Belt. Prerequisites Training Hours Sustainment Hours Gray Belt Requirements. Recommendation of reporting senior Complete Tan Belt sustainment and integration training Complete MCI [Marine Corps Institute] 0337, Leading Marines Minimum of 20 hours of instruction, excluding remedial practice time and testing Minimum of 5 hours of sustainment, excluding integration training time and practice time for testing


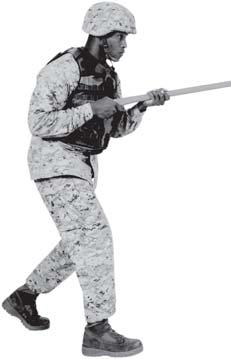
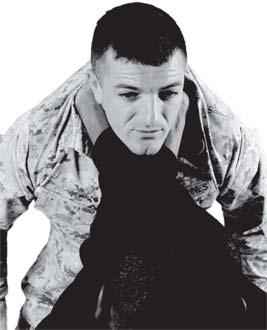
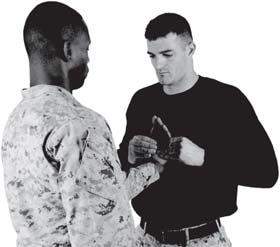
4 3-2 MCRP 3-02B Section I Bayonet Through proper training, Marines develop the courage and confidence required to effectively use a bayonet for protection and to destroy the aggressor. While closing on an aggressor, a disrupt or a thrust can be used with a bayonet. Refer to appendix A for corresponding safeties 1, 2, 8, 9, and 14. Execution Disruption is the technique used to create an opening for the Marine when closing with the aggressor. To create that opening, the Marine will execute a technique to bring the aggressor s weapon offline. Entry is the movement made to get inside the aggressor s defense in order to execute follow-on techniques. A movement can be a step forward or a small step to an oblique to get within striking distance of the aggressor. Rely on hips/torso for generating power. Movement Figure 3-1. Modified Basic Warrior Stance. Movement provides a stable attack platform, allowing the Marine to employ his bayonet techniques on, out maneuver, and overwhelm his aggressor. Approaching is used when you have located an aggressor and you are within 20 to 25 yards from the aggressor. Assume the modified basic warrior stance (see fig. 3-1). Bend your back so that you are hunched over the weapon and your chin is tucked to protect your neck, minimizing your own target area. Bend your knees to have a lower center of gravity and decrease your profile. Moving at a fast pace, walk using your legs to absorb the impact of your steps, and ensure that your upper body is not bouncing around as you move. The bayonet must stay locked on the aggressor. Hand placement is crucial for a bayonet trainer as shown in figure 3-2. Figure 3-2. Hand Placement.

, which may cause the aggressor to hesitate during the engagement and give you the psychological and tactical advantage over him (DO NOT RUN). Figure 3-3. Closing.")


5 Marine Corps Martial Arts Program 3-3 Closing As you reach the critical distance of 5 to 10 feet, you will use a burst of speed to close the final distance between you and the aggressor using your legs to absorb the impact of your steps. Your stride length will not change from when you were approaching the aggressor. To increase your speed, you will vary the turnover rate of your steps (see fig. 3-3), which may cause the aggressor to hesitate during the engagement and give you the psychological and tactical advantage over him (DO NOT RUN). Figure 3-3. Closing. Bayonet s Disrupt and Thrust While Closing Disrupt A disrupt is a technique that intercepts and redirects the aggressor s attack. This redirection opens a path for your blade to enter your aggressor. The disrupt is a parry while closing and thrusting. If you try to parry and then thrust while closing with your aggressor, you will most likely become entangled with the aggressor. To disrupt the aggressor s attack and clear his weapon, your attack must come at a slight angle to his weapon. The resulting collision will redirect the aggressor s weapon and give your blade a clear path to your primary target. Thrust While Closing The straight thrust is performed to disable or kill an aggressor. The thrust is the most deadly offensive technique because it will cause the most trauma to an aggressor. Executing the thrust while closing is even more deadly. Target Areas of the Body Target areas of the body are the aggressor s throat, groin, or face. The aggressor s chest and stomach are also excellent target areas if they are not protected by body armor or combat equipment.
6 3-4 MCRP 3-02B ~ As you close on a static aggressor, disrupt the aggressor s weapon by attacking at a slight angle. Contact is made with the bayonet end of the rifle against the barrel or bayonet of the aggressor s weapon. ~ Redirect or guide the aggressor s weapon away from your body by exerting pressure against the aggressor s weapon with your weapon. It is only necessary to redirect the aggressor s weapon a few inches, enough so that the weapon misses your body. This will give your blade a clear path to your primary target. ~ Thrust the blade end of the weapon directly toward the target by thrusting both hands forward. ~ Retract the weapon and continue moving forward. See figure 3-4. Note: Do not allow students to make contact with one another. See appendix A, safety 7.


7 Marine Corps Martial Arts Program 3-5 Figure 3-4. Bayonet s.
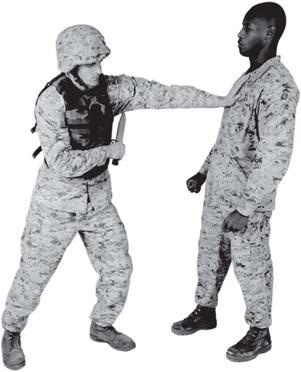
8 3-6 MCRP 3-02B Section II Upper Body Strikes The upper body strikes stun the aggressor or set him up for follow-on finishing techniques. The hands, the forearms, and the elbows are the unarmed individual weapons of the arms. These weapons provide a variety of techniques that can be used in any type of close combat situation. This section will cover the chin jab/palm heel strike, knife hand strikes, and elbow strikes. Refer to appendix A for corresponding safeties 1, 2, 3, and 4. Chin Jab/Palm Heel Strike The chin jab/palm heel strike can immediately render an aggressor unconscious and cause extensive damage to the neck and spine. Striking Surface The striking surface is the palm s heel of the hand. Target Area of the Body The primary target area is the bottom of the aggressor s chin. ~ Begin in the basic warrior stance. ~ Bend your right wrist back at a 90-degree angle with your palm facing the aggressor and your fingers pointing up. ~ Extend your hand into a flat position with your fingers bent and joined at the second knuckle. ~ Keep your right arm bent and close to your body. ~ Move forward, to close with the aggressor. You may have to grab the aggressor s elbow or the back of his neck with your left hand to maintain control of him. ~ Keeping your right arm bent and close to your side, thrust the palm of your hand directly up under the aggressor s chin. ~ At the same time, rotate your right hip forward to drive your body weight into the attack to increase the power of the strike. ~ Push off on the ball of the right foot to direct your body weight into the attack from low to high. ~ The attack should travel up the centerline of the aggressor s chest to his chin. Contact should be made on the aggressor s chin with the heel of your palm. Follow through the primary target area with your hand and body momentum. ~ Rapidly return back to the basic warrior stance. See figure 3-5.

9 Marine Corps Martial Arts Program 3-7 Figure 3-5. Chin Jab/Palm Heel Strike. Knife Hand Strikes Knife hand strikes are used when the primary target area is narrow, for example, to allow for strikes on the neck between body armor and a helmet. The knife hand strike can be executed from one of three angles: outside/forward, inside/reverse, and vertical. Outside/Forward Knife Hand Strike The outside/forward knife hand strike is used when the primary target area is narrow and to attack soft target areas of the body such as the sides of the neck. Results of the attack can stun the aggressor allowing you to conduct follow-on techniques. Striking Surface The striking surface is the meaty portion of the hand between the bottom of the little finger and the wrist. Target Area of the Body The primary target area for the knife hand strike is the neck. ~ Assume the basic warrior stance. ~ Execute a knife hand by extending and joining the fingers of your right hand and placing your thumb next to your forefinger (like saluting). ~ Bring your right hand back over your right shoulder and rotate your right hip and right shoulder backwards.
 into the aggressor while rotating your right hip and shoulder forward. ~ Rotate your wrist so that your palm is up.")


10 3-8 MCRP 3-02B ~ Your arm is bent at approximately a 45- to 90-degree angle. Your elbow should be lower than your shoulder. ~ Thrust your knife hand forward (horizontally) into the aggressor while rotating your right hip and shoulder forward. ~ Rotate your wrist so that your palm is up. Contact should be made on the aggressor with the knife-edge of the hand. ~ Follow through the primary target area with your hand and rapidly return to the basic warrior stance. See figure 3-6. Figure 3-6. Outside/Forward Knife Hand. Inside/Reverse Knife Hand Strike The inside/reverse knife hand strike is primarily used after performing the outside forward knife strike to attack soft target areas of the body. Results of the attack can stun the aggressor, allowing you to conduct follow-on techniques. The striking surface is narrow, allowing strikes on the neck between the body armor and the helmet. Striking Surface The striking surface is the cutting edge of the hand, which is the meaty portion of the hand below the little finger extending to the top of the wrist.
. ~ Bring your right hand over your left shoulder.")
11 Marine Corps Martial Arts Program 3-9 Target Area of the Body The primary target area for the knife hand strike is the neck. ~ Assume the basic warrior stance. ~ Execute a knife hand by extending and joining the fingers of your right hand placing your thumb next to your forefinger (like saluting). ~ Bring your right hand over your left shoulder. At the same time, rotate your right shoulder and hip forward. ~ Thrust your knife hand forward (horizontally) onto the aggressor while rotating your right hip and shoulder backwards. ~ Rotate your wrist so that your palm is down. Contact should be made on the aggressor with the knife-edge of the hand. ~ Follow through the primary target area with your hand and rapidly return to the basic warrior stance. See figure 3-7. Figure 3-7. Inside/Reverse Knife Hand. Vertical Knife Hand Strike The vertical knife hand strike is primarily used to target the back of the neck and attacking soft tissue areas of the body.


12 3-10 MCRP 3-02B Striking Surface The striking surface is the meaty portion of the hand between the bottom of the little finger and the wrist. Target Area of the Body The primary target area of the body is the back of the neck. ~ Assume the basic warrior stance. ~ Execute a knife hand by extending and joining the fingers of your right hand and placing your thumb next to your forefinger (like saluting). ~ Bring your right hand back over your right shoulder and rotate your right hip and right shoulder backwards. ~ Your arm is bent at approximately a 45- to 90-degree angle. Drop your knife hand downward (vertically) onto the aggressor while dropping your body weight and rotating your right hip and shoulder forward. ~ Palm should be facing inboard. Follow through the primary target area with your hand. ~ Rapidly return back to the basic warrior stance. See figure 3-8. Figure 3-8. Vertical Knife Hand. Elbow Strikes Elbow strikes such as the rear horizontal elbow strike and the vertical elbow strike (low to high), are used at close range to inflict a great amount of damage due to the leverage and the transfer of your body weight.


13 Marine Corps Martial Arts Program 3-11 The Rear Horizontal Elbow Strike The rear horizontal elbow strike is primarily effective when being attacked from the rear. The strike is used to stun the aggressor and allow for follow-on techniques. Striking Surface The striking surface is 2 inches above or below the point of the elbow, depending on your angle of attack, the aggressor s attack angle, and the position of the aggressor. Target Area of the Body The primary target area of the body is the aggressor s body at the level of your elbow. ~ From the basic warrior stance, look over your shoulder to acquire your primary target. ~ Thrust your right elbow horizontally backwards toward the aggressor while taking a slight step backwards to generate power. The right forearm is parallel to the deck, with the palm facing the deck. ~ Take a step backwards, in order to bring yourself within striking range of the aggressor. Rotate your left hip forward and your right shoulder backwards to generate additional power. ~ Follow through with the strike through the primary target area. ~ Rapidly return to the basic warrior stance. See figure 3-9. Figure 3-9. Rear to Horizontal Elbow Strike. Vertical Elbow Strike (High to Low) The vertical elbow strike is primarily effective if the aggressor is bent over to where you can attack the back of the neck. This can stun the aggressor and allow for follow-on techniques.


.")
14 3-12 MCRP 3-02B Striking Surface The striking surface is 2 inches above the point of the elbow on the triceps. Target Areas of the Body The primary target areas of the body are any soft parts of the body that are accessible. ~ Assume the basic warrior stance. ~ Bend your right elbow, keeping your fist close at your ear with your elbow at shoulder level. ~ Drop your elbow vertically downward toward the aggressor. ~ Keep your elbow bent throughout the movement. Rotate your right shoulder and hip forward at the same time dropping your body weight by bending at the knees to generate additional power. ~ Follow through the primary target area with the strike. ~ Rapidly return to the basic warrior stance. See figure Figure Vertical Elbow Strike (High to Low). Actions of the Aggressor Chin Jab/Palm Heel Strike The striking pad is held with both hands holding the straps as shown in figure The aggressor extends his top hand to allow you to execute the technique on the top part of the striking pad.

 The striking pad is held with both arms out in")


15 Marine Corps Martial Arts Program 3-13 Outside/Reverse and Inside/Forward Knife Hand The striking pad is held close to the body and the bagman turns 45- to 90-degree angle in order to accommodate the angle of the strike shown in figure Vertical Knife Hand and Vertical Elbow Strike (High to Low) The striking pad is held with both arms out in front like you are carrying a lunch tray. Both hands grab the far strap/handle. Rear Horizontal Elbow Strike The striking pad is held with one arm through the center straps and the other holding the top strap to protect the head as shown in figure While holding the striking pad the aggressor stands directly behind you as you execute the elbow strikes. Figure Chin Jab/Palm Heel Strike. Figure Outside/Reverse and Inside/Forward Knife Hand. Figure Rear Horizontal Elbow Strike.
16 3-14 MCRP 3-02B Section III Lower Body Strikes The purpose of lower body strikes is to stop an aggressor s attack or create an opening in his defense to launch an attack. Lower body strikes include kicks, knee strikes, and stomps. The lower extremities, groin, and targets below your own waistline are the primary target areas. Never kick high as this jeopardizes your balance and leaves you more vulnerable to a counterattack. Kicks such as the horizontal knee strike, the sidekick, and the axe stomp can be performed with either the lead leg or rear leg. Kicks with the rear leg have greater power because the hips are rotated into the attack. However, the rear leg is further away from the aggressor allowing him a greater reaction time. Refer to appendix A for corresponding safeties 1, 2, 3, and 4. Horizontal Knee Strike Knee strikes are excellent weapons of the body during the grappling stage or during close range fighting. Striking Surface The striking surface is the front of the leg, two inches above the knee. If you are unable to separate your hips from your aggressor, the inside of the knee may be utilized as an alternate striking surface. Target Areas of the Body If the aggressor is upright, the inside or outside of the thigh are often the primary target areas. ~ From the basic warrior stance, grab the aggressor s neck or gear with both hands, without interlacing your fingers. If you interlace your fingers, your aggressor can pull back or reach behind your head and break the fingers. ~ Pull the aggressor down and at the same time raise your right knee driving it up forcefully into the aggressor. Pulling the aggressor down and thrusting the leg horizontally into the aggressor with your hips generating power. Follow through the primary target area with your knee ensuring to strike the aggressor two inches above the knee. ~ Return to the basic warrior stance. See figure Side Kick The side kick is executed when the aggressor is on either side of you. Striking Surface The striking surface is the outside cutting edge of your boot.


17 Marine Corps Martial Arts Program 3-15 Target Area of the Body Figure Horizontal Knee Strike. The target area of the body is the aggressor s knee. ~ From the basic warrior stance look to the right and raise your right knee waist high. Thrust your right foot to your right side toward the aggressor. ~ You will have to shift your body weight to your left leg to maintain your balance. ~ Follow through the target area with your foot and leg. ~ Rapidly return to the basic warrior stance. See figure Figure Side Kick.


18 3-16 MCRP 3-02B Axe Stomp The axe stomp is performed when the aggressor is on the deck in a prone position and you are standing. Striking Surface The striking surface is the cutting edge of your heel. Target Area of the Body The primary target area is the aggressor s head. ~ From the basic warrior stance, raise the right knee above knee level, keeping your right leg slightly bent. ~ Shift your body weight to your left leg to maintain balance. The higher the leg is raised, the more power that can be generated; however, ensure you can maintain your balance. ~ Forcefully drive the cutting edge of your right heel down onto your aggressor and bend your left knee to drop your body weight into the strike. ~ Keep your right knee slightly bent to avoid hyperextension. At the same time, bend your left knee slightly to drop your body weight into the strike. ~ Return to the basic warrior stance. See figure Figure Axe Stomp.


19 Marine Corps Martial Arts Program 3-17 Actions of the Aggressor Horizontal Knee Strike The striking pad is held with one arm through the center straps and the other holding the top strap as shown in figure Hold the striking pad tight to your body to avoid injury to your extremities. Keep the striking pad low and well in the range of your thighs, which are the primary target areas. Figure Horizontal Knee Strike. Side Kick Use your hand to hold the top strap on the striking pad. Hold it along the back of your leg so all impacts go in the direction of your knee bending. The strikes should never go against the knee during practice, even with a striking pad (see fig. 3-18). Figure Side Kick.
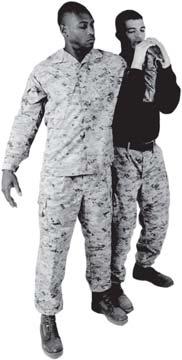
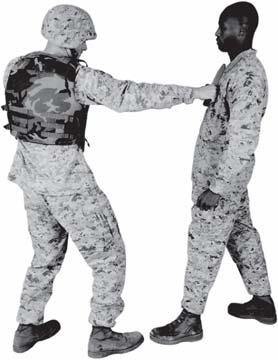
20 3-18 MCRP 3-02B Section IV Front Choke The purpose of a choke is to render your aggressor unconscious or gain control of a close combat situation through less than lethal force. Chokes are performed by either closing off the airway to the lungs, thereby preventing oxygen from reaching the heart, or by cutting off the blood flow to the brain. When executed properly, a blood choke takes between 8 to 13 seconds for the aggressor to lose consciousness. The air choke is least preferred because it takes longer to render the aggressor unconscious. Refer to appendix A for corresponding safeties 1, 2, 6, 10, 11, 12. The front choke is a blood choke performed when you and your aggressor are facing each other. The front choke employs the aggressor s collar to execute the choke. ~ Begin by facing the aggressor. ~ With your right hand, grab the back of the aggressor s right collar, ensure that your palm is facing up. ~ Keeping the collar tight in your right palm. Reach under your right arm with your left hand and grab the back of the aggressor s left collar, making certain that your palm is facing up, forming an X with your wrists. Attempt to make your thumbs touch. ~ Grab the collar with your elbows facing down, curl your wrist inward and pull down toward your chest. Your left radius bone will cut off the aggressor s left carotid artery. Your right radius bone will cut off the aggressor s right carotid artery. ~ Make sure that you apply pressure on the carotid arteries and not on the trachea. See figure 3-19.


21 Marine Corps Martial Arts Program 3-19 Figure Front Choke.
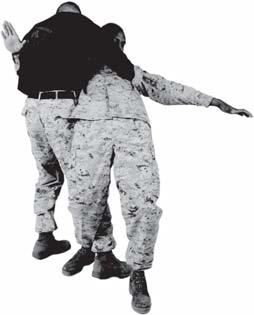
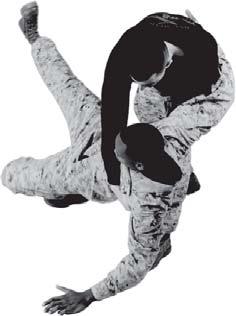
22 3-20 MCRP 3-02B Section V Hip Throw The purpose of the hip throw is to bring an aggressor to the deck gaining the tactical advantage in a fight. If an aggressor is moving toward you to attack, a hip throw can be used to take him to the deck while you remain standing. A hip throw is particularly effective if the aggressor is moving forward or pushing you. Execution of the hip throw uses the aggressor s forward momentum. Refer to appendix A for corresponding safeties 1, 2, 6, 13, and 15. There is a minimum of 10 fit ins for each throw during sustaining (see fig. 3-20). Completion of steps 1 through 9 would be considered one fit in. To execute a proper fit in, you should stop the technique just before the execution of throwing the aggressor to the deck. Fit in ~ Stand facing your aggressor. ~ With your left hand, grasp the aggressor s right wrist. ~ Step forward with your right foot on the inside of the aggressor s right foot. The back of your heel should be next to the center or the toe of aggressor s right foot. ~ Step back with your left foot, rotating on the ball of your right foot. The back of your heel should be next to the aggressor s toe. Your knees should be bent. ~ At the same time, rotate at your waist, and hook your right hand around the back of the aggressor s body anywhere from his waist to his head, depending on your size. If the aggressor is shorter than you, it may be easier to hook your arm around his head. Hand placement should allow you to control the aggressor and pull him in close to you. ~ Your backside and hip should be up against the aggressor. ~ Rotate your hip up against the aggressor. Your hips must be lower than the aggressor s. Use your right hand to pull the aggressor up on your hip to maximize contact. ~ Pull the aggressor s arm across your body and, at the same time, slightly lift the aggressor off of the deck by bending at the waist, straightening your legs, and rotating your body to your left. If the aggressor cannot be easily lifted, your body positioning is not correct. ~ Practice these steps as many times as necessary until you determine the proper body positioning. ~ Practice the steps again and, this time, continue this action to force the aggressor around your hip and on to the deck. See figure If an aggressor is moving toward you to attack you, a hip throw can be used to take the aggressor to the deck while you remain standing. A hip throw is particularly effective if the aggressor is moving toward you or pushing you. Execution of the hip throw uses the aggressor s forward momentum.


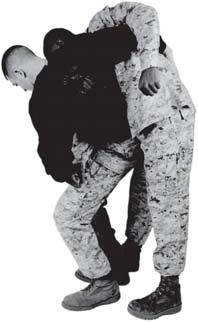
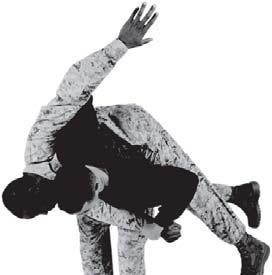
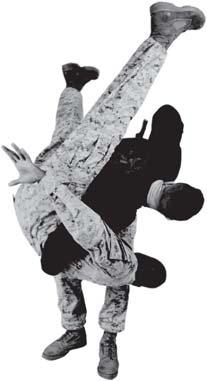
23 Marine Corps Martial Arts Program 3-21 Figure Hip Throw.
24 3-22 MCRP 3-02B Section VI Counters to Strikes The purpose of counters to strikes is to counter the aggressor s attack with the counter to the lead hand punch or the counter to the lead leg kick in order to gain a tactical advantage. Refer to appendix A for corresponding safeties 1, 2, 3, 6, 10, 11, 12, 13, and 15. Counter to Lead Hand Punch This counter is used when the aggressor throws a lead hand punch. ~ Begin with the aggressor extending his left hand in a lead hand punch. ~ Execute a forward-right angle of movement moving toward the aggressor. Movement is always made to the outside of the aggressor s attacking arm. ~ At the end of the movement, the left foot is forward with the toe pointing toward the aggressor. ~ At the same time, raise your left arm and block or deflect the aggressor s attacking arm. Block the punch with the meaty portion of your hand, your palm, or the meaty portion of the forearm. ~ Leave your left arm against the aggressor s right arm while stepping forward and to the left at approximately a 45-degree angle to close with the aggressor. ~ Follow through by applying pressure against the aggressor s arm to redirect the strike and, simultaneously, throw the aggressor off balance. ~ Continuing to step forward will position you to strike an exposed area on the aggressor. ~ Counter with a strike to the aggressor s exposed target areas. See figure 3-21.


25 Marine Corps Martial Arts Program 3-23 Figure Counter to Lead Hand Punch.


26 3-24 MCRP 3-02B Counter to Lead Leg Kick The counter to a lead kick is used when the aggressor executes a front kick with his left leg. ~ Begin with the aggressor extending his lead leg into a front kick. ~ Step forward using a forward-right angle of movement moving in toward the aggressor. Movement is always to the outside of the aggressor s striking leg. ~ At the end of the movement, the left foot is forward with the toe pointing toward the aggressor. At the same time, raise your left arm and block or deflect the aggressor s leg. ~ Block the kick with the meaty portion of your hand, your palm, or the meaty portion of the forearm. Move out of the way of the strike it is better than bending down to block the kick. ~ Continuing to step forward will position you to strike an exposed area on the aggressor. ~ Counter with a strike to the aggressor s exposed target areas. See figure Figure Counter to Lead Leg Kick.


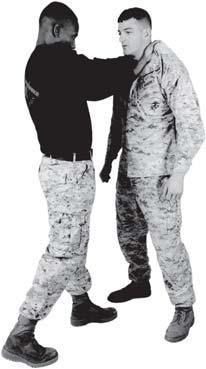
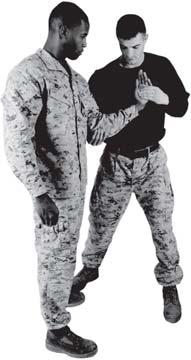
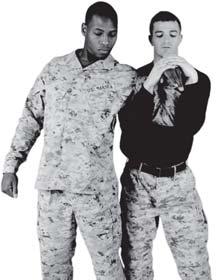
27 Marine Corps Martial Arts Program 3-25 Section VII Counters to Chokes and Holds The purpose of counters to chokes and holds is to be able to remove you from the choke and hold in order for you to counterattack and regain the tactical advantage. This section will cover the counter to the front choke, counter to the front headlock, and the counter to the front bear hug. Refer to appendix A for corresponding safeties 1, 2, 3 6, 10, 11, 12, 13, and 15. Counter to Front Choke The counter to the front choke is used when the aggressor approaches from the front and places both hands around your neck to choke you. ~ Begin with the aggressor facing the student and placing both hands around the student s neck. ~ The aggressor should place his thumbs on the student s throat and fingers along the side of the student s neck without applying pressure. ~ With your left hand, strike and grasp the aggressor s right forearm where the elbow bends and apply downward pressure on the radial nerve with your fingers. The radial nerve is located along the inside of the forearm along the radius bone. ~ This action will loosen the aggressor s grip so that you can clear your airway. With your right hand, execute a chin jab/palm heel strike to the aggressor s chin. The chin jab will be delivered between your aggressor s arms. ~ At the same time, generate power into the strike by executing a forward movement bringing your left foot to the outside of the aggressor s right foot and rotating your hips into the strike. See figure Figure Counter to Front Choke.
28 3-26 MCRP 3-02B Counter to Front Headlock The counter to a front headlock is used when the aggressor approaches from the front and puts his right arm around your neck, bending you forward and locking your head against his hip. ~ Begin by having the student bend forward at the waist. ~ The aggressor faces the student and places his right arm around the student s neck, his forearm across the student s throat. ~ With both hands, grasp the aggressor s wrist and forearm, pull him down to clear your airway. Maintain control of the aggressor s wrist throughout the move. Once the airway is clear, tuck your chin to protect your airway and to prevent the aggressor from re-applying the choke. ~ Move your right hand and arm across the aggressor s torso. ~ With your left foot, step forward and to the left at a 45-degree angle. Your left foot should be past your aggressor s right foot and out far enough to bring your right foot through and execute a sweep with your right foot against the aggressor s right leg. At the same time, push against the aggressor s chest with your right arm and shoulder to off balance and generate more power for the sweep. See figure 3-24.


29 Marine Corps Martial Arts Program 3-27 Figure Counter to Front Headlock.
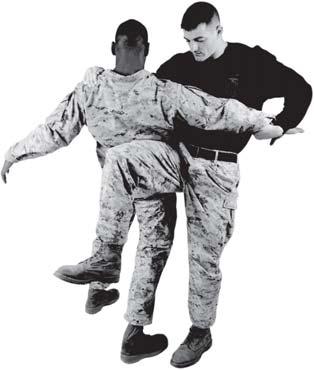
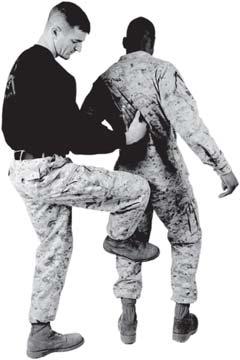
30 3-28 MCRP 3-02B Counter to Front Bear Hug The counter to a front bear hug is executed when the aggressor approaches from the front and puts both of his arms around your body, trapping your arms to your sides. ~ Drop your body weight by bending at your knees and then spread your feet to maintain your balance. At the same time, thrust your shoulders straight up and slightly flare your elbows while raising your hands. ~ With your right hand, grasp the upper portion of the aggressor s torso; with your left hand grasp the lower torso on the aggressor s left side. ~ With your left foot, step forward and to the left at a 45-degree angle to the outside of the aggressor s right leg, keeping your left leg bent. Ensure that you step deep enough to off balance the aggressor. ~ This movement will begin to off balance the aggressor sending him backwards. Continue to push and pull on the aggressor to keep him off balance. ~ Drive your right arm and shoulder forward and, at the same time, bring your right leg forward and sweep the aggressor s right leg making calf-on-calf contact, bringing him to the deck. See figure 3-25.


31 Marine Corps Martial Arts Program 3-29 Figure Counter to Front Bear Hug.
32 3-30 MCRP 3-02B Section VIII Unarmed Manipulation The purpose of unarmed manipulations is to teach individuals how to operate within the continuum of force, particularly in support of peacekeeping- or humanitarian-type missions. The wristlock come-along, the takedown from a wristlock come-along, takedown from a wristlock come-along and double flexi cuff, escort position, and escort position takedown and single flexi cuff are all forms of unarmed manipulations. In these situations, Marines must act responsibly and handle situations without resorting to deadly force. Unarmed restraints and manipulation techniques can be used to control an aggressor. Refer to appendix A for corresponding safeties 1, 2, 6, 10, and 13. Wristlock Come-Along ~ With your right hand, execute a basic wristlock. Incorporate your left hand in a two-handed wristlock in order to gain more control. ~ While maintaining pressure on the wrist with your right hand, step forward and to the right and pivot around so that you and the subject are standing next to one another. At the same time, release your right hand and quickly reach under the subject s left arm from behind and grab his hand. ~ Your palm and fingers of both hands should be on top of the subject s hand, which is palm side down and your thumbs are across his palm. The subject s elbow should be pointed straight down, with his arm controlled between your forearm and biceps. ~ With your left hand, apply downward pressure on the subject s wrist. ~ While maintaining downward pressure on the subject s wrist, release your left hand and grab his elbow. ~ Apply pressure on the subject s elbow and rotate his elbow up while bringing his wrist down and his hand around to the center of his back. ~ Maintain inward and upward pressure on the subject s wrist and elbow throughout to control him. See figure 3-26.


33 Marine Corps Martial Arts Program 3-31 Figure Wristlock Come-Along.
34 3-32 MCRP 3-02B Takedown From a Wristlock Come-Along and Double Flexi Cuff A takedown is a method used to bring a subject to the deck in order to gain further control of him. This technique is used as a continuation of the wristlock come-along against a subject that is noncompliant. ~ From the basic wristlock come-along, maintain downward pressure on the wrist with your right hand and remove your left hand and place it just above the elbow joint. With your right hand, pull down on the wrist while at the same time use your left hand to pull up on the elbow keeping pressure with the right hand on the wrist, bring the arm into the back. ~ With your right foot, push down on the subject s calf or Achilles tendon. ~ While maintaining control of the subject s wrist and elbow, apply a slow, steady pressure to bring the subject to the deck. ~ Kneel down with both knees on either side of his arm, placing your knees on the subject s back. Apply inward pressure with your knees to lock the subject s arm in place. ~ Tell the subject to put his other hand in the middle of his back. Bring the subject s controlled hand to the center of his back. See figure 3-27.


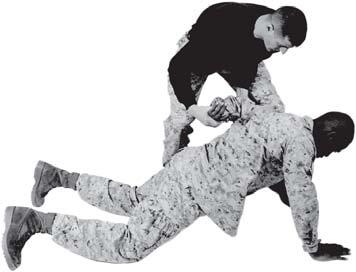
35 Marine Corps Martial Arts Program 3-33 Figure Takedown from a Wristlock Come-Along and Double Flexi Cuff.


36 3-34 MCRP 3-02B ~ Apply the flexi cuffs by grasping the flexi cuffs with your outside hand in the center of the cuffs with the loops pointing up. Place the cuff with the pinky side up on the subject s controlled wrist. Ensure you maintain pressure on the subject s wrist by controlling the subject s hand. ~ Using the proper verbal commands, instruct the subject to place his free hand in the center of his back, look away, and cross his ankles. Take your outside hand and slip it through the free cuff. ~ Break down the arm naturally and grab the subject s hand as if you are shaking hands with your outside hand. Slip the cuff on after the shake is complete and properly secure the cuff. See figure Figure Applying Double Flexi Cuffs.


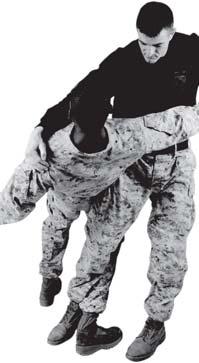
37 Marine Corps Martial Arts Program 3-35 Escort Position The escort position is used, when necessary, to transport a subject from one location to another. ~ Begin facing the aggressor. Grab the aggressor s right wrist with your right hand and step forward-left. Turn so that you are facing the same direction as the aggressor. Ensure that the aggressor s right palm is facing away from your torso. ~ Grab the aggressor s right biceps with your left hand. Your thumb can be used in his armpit on his brachial plexus tie-in for enhanced pain compliance. ~ Position the aggressor s right arm diagonally across your torso, keeping his wrist against your right hip. You should be standing to the right of and behind the aggressor. A limited amount of control is achieved by using your chest to place pressure on the aggressor s elbow. See figure Figure Escort Position.


38 3-36 MCRP 3-02B Escort Position Takedown and Single Flexi Cuff This technique is used as a continuation of the escort position against a noncomplaint subject. ~ From the escort position with the subject to your left, lock the subject s arm straight across your body while rotating his wrist either inboard or outboard away from your body. ~ The wrist should be rotated in a direction that will prevent the subject from bending his elbow. ~ Rotating your torso away from the subject will allow you to further maintain leverage on the armbar. ~ With your left hand or forearm, apply downward pressure above the subject s elbow where the triceps meet, utilizing a straight armbar takedown. See figure Figure Escort Position Takedown and Single Flexi Cuff.


39 Marine Corps Martial Arts Program 3-37 ~ Apply the flexi cuffs by grasping the flexi cuff with your outside hand. Place the cuff on the subject s controlled wrist and grasp the flexi cuff with the ring or pinky finger. Ensure that you maintain pressure on the subject s wrist by controlling the subject s hand. ~ Using the proper verbal commands instructing the subject to place his free hand in the center of his back. Take your outside hand and slip it through the free cuff. See figure Figure Applying Single Flexi Cuffs.
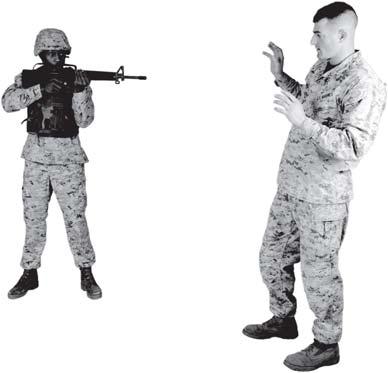
40 3-38 MCRP 3-02B Section IX Armed Manipulation The purpose of armed manipulation is to ensure that Marines operate within the continuum of force utilizing weapon retention techniques. Weapon retention techniques are used when a Marine is carrying a weapon in a port-arm position and an aggressor attempts to remove the weapon from his grip. Refer to appendix A for corresponding safeties 1, 2, 8, 9. Aggressor Grabs With Both Hands (Pushing) ~ Begin with the aggressor grabbing your weapon and pushing on it. ~ Utilize the aggressor s momentum and movement by pivoting the body to the left while stepping back with the left foot. ~ Throw the person to the deck with a quick jerking movement by lowering the muzzle and swinging the butt of the weapon up, no higher than the shoulders. ~ Quickly return to a defensive posture. See figure 3-32.


41 Marine Corps Martial Arts Program 3-39 Figure Aggressor Grabs with Both Hands (Pushing).
42 3-40 MCRP 3-02B Aggressor Grabs With Both Hands Pulling (Stationary) ~ Begin with the aggressor grabbing the weapon and pulling on it. ~ Step on the aggressor s foot and push forward to off balance him. This action will drive him to the deck where he can be further controlled. CAUTION During training it is essential that you let up on your training partner s foot as soon as his balance breaks. Staying with the foot down on the aggressor s foot as he falls to the deck could cause the ankle or foot to break. ~ Quickly return to a defensive posture. See figure 3-33.


43 Marine Corps Martial Arts Program 3-41 Figure Aggressor Grabs with Both Hands Pulling (Stationary).
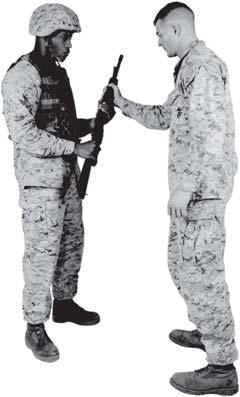
44 3-42 MCRP 3-02B Aggressor Grabs With Both Hands Pulling (Moving) ~ Begin with the aggressor grabbing the weapon and pulling on it while moving backwards. ~ Extend the weapon outward from the body to gain distance. ~ Quickly pull the aggressor inward tight to the body and execute a leg sweep on the aggressor s right leg. This action will drive the person to the deck where he can be further controlled. ~ When the aggressor releases the weapon, pull the rifle into his shoulder to the ready weapons carry aiming at the aggressor. See figure Aggressor Grabs Over Handed With Strikes ~ While you are standing at modified port-arms, the aggressor grabs your handguards with the right hand, palm side down. Attempt a counter to the over/under hand grab. ~ If unsuccessful, slide your left hand up the handguards; trap the aggressor s finger with your thumb, holding his hand in place with bone pressure on that single digit. ~ Attempt to rotate the barrel placing it parallel with the aggressor s forearm. ~ If the technique does not work, step forward with the right foot and execute a strike with the toe of the weapon to the aggressor s lead leg. Strikes are to be made to the inside (femoral nerve) or outside (peroneal nerve) of the thigh. ~ Complete the counter to the over hand grab technique by stepping back and returning to the basic warrior stance. While maintaining bone pressure on that single digit, rotate the barrel placing it parallel to the aggressor s forearm. Drop your body weight. You can step forward or back in accordance with the aggressor s actions in order to drop body weight.


.")
45 Marine Corps Martial Arts Program 3-43 Figure Aggressor Grabs with Both Hands Pulling (Moving).


46 3-44 MCRP 3-02B ~ Dropping your body weight causes downward pressure to the aggressor s elbow. It will either cause him to release the weapon or act similarly to an armbar. ~ When the aggressor releases the weapon, pull the rifle into your shoulder to the ready weapons carry aiming at the aggressor. See figure Figure Aggressor Grabs Over Handed with Strikes.
47 Marine Corps Martial Arts Program 3-45 Aggressor Grabs Under Handed With Strikes ~ While you are standing at modified port-arms the aggressor grabs your handguards with your left hand, palm side up. Attempt a counter to the over/under hand grab. ~ Slide your left hand up the handguards and trap the aggressor s closest finger above the knuckle with your thumb so that he cannot release his grip. Apply bone pressure on the aggressor s finger to initiate pain compliance. ~ While maintaining pressure on the aggressor s hand, attempt to execute the counter to underhand grab by lowering the muzzle and raising the buttstock of the weapon no higher than the aggressor s shoulder. ~ If the technique does not work, step forward with the right foot and execute a strike with the toe of the weapon to the aggressor s lead leg. Strikes are to be made to the inside (femoral nerve) or outside (peroneal nerve) of the thigh. ~ Stepping back with your left foot, pivot on your right, and throw the aggressor past your left side. ~ These actions cause the aggressor to release his grip on the weapon or drive him to the deck where he can further be controlled. ~ When the aggressor releases the weapon, pull the rifle into his shoulder to the ready weapons carry aiming at the aggressor. See figure 3-36 on page 3-46.


48 3-46 MCRP 3-02B Figure Aggressor Grabs Under Handed with Strikes.
49 Marine Corps Martial Arts Program 3-47 Section X Knife s The purpose of knife techniques is to cause enough damage and massive trauma to stop an aggressor by executing the forward thrust, reverse thrust, forward slash, reverse slash, or bulldogging. Thrusting techniques are more effective than slashing techniques because of the damage they can cause. Slashing techniques are used to close with an aggressor. Slashing techniques distract the aggressor or cause enough damage to allow you to close with him and apply more damaging techniques. Targets are usually the limbs or any portion of the body that is presented in proximity where a thrusting technique can be used. Refer to appendix A for corresponding safeties 1, 2, 3, and 14. Forward Thrust The primary objective when fighting with a knife is to insert the blade into an aggressor to cause extensive damage and trauma. A forward thrust follows a linear line straight into the aggressor s neck (high thrust) or abdominal region (low thrust). ~ Stand facing your aggressor. Thrust your right hand toward the target, palm side down, inserting the knife blade straight into the aggressor. ~ Once the knife is inserted, twist the blade inward, rotating your palm up. This enables the cutting edge of the blade to be in a position to further cut the aggressor in a follow up action. ~ Drop your right elbow and bring the knife to the opposite side of the aggressor s body from where it was inserted. Turn the blade and cut your way out rather than pulling the knife straight out, this causes more damage and trauma to the aggressor. If the aggressor is wearing body armor, it may be difficult or impossible to bring the knife diagonally across his body.


50 3-48 MCRP 3-02B ~ At the same time, rotate your hips and shoulders downward to bring your body weight down on the aggressor. ~ Return to the basic warrior stance. See figure Figure Forward Thrust. Forward Slash Slashing techniques are used to close with an aggressor. Slashing techniques distract the aggressor or cause enough damage to allow you to close with your aggressor. Targets are usually
 or abdominal region (low slash). ~ Stand facing your aggressor.")


 or the abdominal region a (low thrust). ~ Stand facing your aggressor.")
51 Marine Corps Martial Arts Program 3-49 the limbs or any portion of the body that is presented. A forward slash is a horizontal, forehand stroke across the target areas of either the neck (high slash) or abdominal region (low slash). ~ Stand facing your aggressor. Extend your right hand to make contact on the aggressor with the knife blade. ~ Rotate your palm up to make the blade contact the aggressor. Do not move your arm outside the box, shoulder-width across from your neck to your waistline. ~ Continue dragging the knife across the aggressor s body, from your right to your left, in a forehand stroke. Maintain contact on the aggressor s body with the blade of the knife. ~ The movement ends with your forearm against your body and the knife at your left hip with its blade oriented toward the aggressor. ~ Return to the basic warrior stance. See figure Figure Forward Slash. Reverse Thrust The reverse thrust follows a linear line straight into the aggressor s neck a (high thrust) or the abdominal region a (low thrust). ~ Stand facing your aggressor. Bend your right arm, crossing your arm to the left side of your body. ~ Thrust your right hand toward the target, palm side up, inserting the knife blade straight into the aggressor. ~ Once the knife is inserted, twist the blade by rotating your palm down. This enables the cutting edge of the blade to be in a position to further cut the aggressor in a follow up action.


52 3-50 MCRP 3-02B ~ Bring the knife to the opposite side of the aggressor s body from where it was inserted. Keep the knife inserted; do not remove it. ~ Turn the blade and cut your way out rather than pulling the knife straight out, this causes more damage and trauma to the aggressor. If the aggressor is wearing body armor, it may be difficult or impossible to bring the knife diagonally across his body. ~ This action can be taken when thrusting to the aggressor s neck or abdomen region. At the same time, rotate your hips and shoulders downward to bring your body weight to bear on the attack. ~ Return to the basic warrior stance. See figure Figure Reverse Thrust.


53 Marine Corps Martial Arts Program 3-51 Reverse Slash Slashing techniques are used to close with an aggressor. Slashing techniques distract the aggressor or cause enough damage to close with your aggressor. Targets are usually the limbs or any portion of the body that is presented. A reverse slash is a horizontal, forehand stroke, across the target areas of either the neck (high slash) or abdominal region (low slash). ~ Stand facing your aggressor. ~ Bend your right arm, crossing your arm to the left side of your body. Extend your right hand to make contact on the aggressor with the knife blade. ~ Rotate your palm down to place the blade in contact with the aggressor. Do not move your arm outside of the box, shoulder-width across from your neck to your waistline. ~ Continue dragging the knife across the aggressor s body, from your left to your right, in a backhand stroke. Maintain contact on the aggressor s body with the blade of the knife. ~ Return to the basic warrior stance. See figure Figure Reverse Slash.
54 3-52 MCRP 3-02B Bulldogging Bulldogging is used to incorporate knife techniques such as thrusting and slashing with movement and open hand strikes. ~ Assume the modified basic warrior stance. ~ Maintaining a low silhouette, move forward in a normal walking motion. While moving forward perform a thrusting or a slashing technique. ~ After each knife strike, use a strike to the face to stun and distract the aggressor. This is done with an open hand strike with the lead hand. ~ Follow up the lead hand strike with one of the thrusting or slashing techniques. ~ Have the students practice this combination in sequence while moving forward for a series of repetitions. See figure 3-41.


55 Marine Corps Martial Arts Program 3-53 Figure 3-41.Bulldogging.
56 3-54 MCRP 3-02B Section XI Weapons of Opportunity In any unarmed close combat situation, a Marine can rely on his body as a weapon by executing the straight thrust, the vertical strike, or a forward strike. In addition, weapons of opportunity enable each individual Marine the creative and innovative ability to utilize any object on the battlefield in order to inflict maximum damage to any aggressor. A Marine should be ready and able to use anything around him to serve as a weapon. This may mean throwing sand or liquid in an aggressor s eyes to temporarily impair his vision so that fatal damage can be done to his head with a rock, e-tool, helmet, or anything that is readily available to the Marine. In a confrontation, a Marine must use whatever it takes to win or face the very real possibility of losing his life. The principles of employment of weapons of opportunity will depend upon the type of weapon used. Depending upon the shape of the weapon, many of the techniques that are used for employing rifle and bayonet, knife, or baton can be adapted for use with a weapon of opportunity. In cases where this does not apply, the basic principles of angles of attack, stance, movement, and target areas are still applicable. Refer to appendix A for corresponding safeties 1, 2, 3 4, and 14. Straight Thrust The straight thrust technique is effective for executing a frontal attack; it can also be executed as a quick poke to keep a subject away from you, puncture the aggressor s abdominal area, break the aggressor s bones along the rib cage, or cause damage to the aggressor s head or neck. ~ Place your weapon in a two-handed carry. Place your left hand palm side up on the front portion of the weapon, with the rear hand locked into the hip. The weapon should be pulled slightly up with the lead hand. ~ Move forward, pushing off with your rear foot to close the distance and generate power. At the same time, thrust your weapon into your aggressor with both hands. The weapon is held either horizontal to the deck or at a slight upward angle, depending on your target area. ~ Return to the modified basic warrior stance. See figure 3-42.

57 Marine Corps Martial Arts Program 3-55 Figure Straight Thrust. Vertical Strike The vertical strike is effective for executing a frontal attack (high to low). ~ Begin at the modified basic warrior stance. ~ Rotate your right forearm straight down at the elbow to bring the weapon down on the aggressor. At the same time, forcefully rotate your hips and shoulders toward the aggressor. ~ Shift your body weight to your left foot while pushing off on the ball of your right foot. Drop your body weight into the aggressor from high to low by slightly bending at your back and bending at the knees.


58 3-56 MCRP 3-02B ~ Follow through with the strike by allowing the weight of the weapon to go through the target area of the body. ~ Rapidly returning to the modified basic warrior stance. See figure Figure Vertical Strike. Forward Strike The forward strike is effective when executing a frontal attack at a 45-degree angle or horizontally. ~ Begin at the basic warrior stance. ~ With your left foot, step forward in the direction of the strike. Movement is always made toward the direction of the strike. At the end of the movement, the left foot should be forward with the toe pointing toward the aggressor. ~ Rotate your forearm to the right at the elbow to bring the weapon down onto the aggressor. At the same time, forcefully rotate your hips and shoulders toward the aggressor.


59 Marine Corps Martial Arts Program 3-57 ~ Follow through with the strike by allowing the weight of the weapon to go through the target area of the body. ~ Rapidly returning to the modified basic warrior stance. See figure Figure Forward Strike. Reverse Strike The reverse strike is effective when executing a frontal attack at a 45-degree angle or horizontally. ~ Begin at the modified basic warrior stance. ~ Execute a forward strike. Your right hand should be near your left shoulder and the weapon extended over your left shoulder. Rotate your forearm to the right at your elbow to bring the weapon down on to the aggressor.


60 3-58 MCRP 3-02B ~ At the same time, forcefully rotate your hips and shoulders toward the aggressor. Follow through with the strike by allowing the weight of the weapon to go through the target area of the body. ~ Rapidly returning to the modified basic warrior stance. See figure Figure Reverse Strike.
61 Marine Corps Martial Arts Program 3-59 Section XII Ground Fighting The purpose of ground fighting is to provide techniques that allow you to get back to your feet as quickly as possible by executing the counter to the mount position and the counter to the guard position. Refer to appendix A for corresponding safeties 1, 2, 6, and 10. Counter to Mount Position The counter to the mount position is executed if you are lying on your back on the ground and the aggressor is mounted on top of you. The aggressor has the tactical advantage. ~ Begin by lying on your back with the aggressor mounted on top of you. ~ Grab the aggressor s gear or clothing on his upper torso and pull him down close to you, while thrusting your hips upward. This will set the aggressor off balance and cause him to extend his arms in front of him and place his hands on the ground to regain his balance. ~ With your right arm, over hook your aggressor s arm, from the inside around to the outside, above his elbow. ~ Draw your elbow in wrapping it around the aggressors elbow, bending it, bringing him down close to you. CAUTION At this point in training, have the aggressor turn his left hand palm side up in order to remove the risk of injury to his wrist. ~ Drive the knuckles of your right hand into his chest. ~ With your right foot, hook the aggressor s left leg or ankle. This prevents the aggressor from using his leg to prevent you from rolling him over. ~ With your left hand, strike the aggressor s side and continue to push him over and roll him off of you to your right side. At the same time, raise your hips and push off with your left leg to assist in rolling the aggressor on his back. Maintain control of the aggressor s hooked arm. ~ Avoid being pulled into the aggressor s guard while continuing to maintain control of his over hooked arm, this can be done by bridging at a 45-degree angle over your right shoulder.


62 3-60 MCRP 3-02B ~ Go to a squatting position and maintain your aggressor on his side. Keep pressure on the aggressor s hip with your left knee and using your hands, palm-to-palm or figure-four, to apply pressure against the aggressor s left elbow. This action may cause severe shoulder damage. Arching your back as you rise will assist in breaking the aggressor s arm. ~ Return to the basic warrior stance. See figure Figure Counter to Mount Position. Counter to Guard Position The counter to the guard position is executed if the aggressor is lying on his back on the ground and you are kneeling on the ground between his legs with his wrapped around you.


63 Marine Corps Martial Arts Program 3-61 ~ Begin with the aggressor lying on his back on the deck. You are in his guard. ~ With your elbows, strike the aggressor s legs at the femoral nerve on the inside of the thigh to drive and separate his legs. ~ With your right fist, strike the aggressor s groin. ~ At the same time, hook your left arm underneath the aggressor s right knee from the inside, ensure your upper body is staying low and your chin is tucked. ~ Quickly throw the aggressor s right leg over your head with your left arm, as you move to your left, and return to the basic warrior stance. See figure Figure Counter to Guard Position.
64 THIS PAGE INTENTIONALLY LEFT BLANK.
65 CHAPTER 4 Green Belt Green Belt is the third belt ranking within MCMAP. Within two years of qualifying as a Gray Belt, all Marines are expected to advance to Green Belt. Green Belt includes completion of intermediate fundamentals. Purpose, principles, and movement remain the same as outlined in Gray Belt. Prerequisites Training Hours Sustainment Hours Green Belt Requirements. Recommendation of reporting senior Complete Gray Belt sustainment and integration training Appropriate level PME complete Minimum of hours, excluding remedial practice time and testing Minimum of 8 hours of sustainment, excluding integration training time and practice time for testing
66 4-2 MCRP 3-02B Section I Bayonet s When using bayonet techniques you will approach, close, and thrust in order to disable or kill an aggressor. When executing bayonet techniques, all movement begins and ends with the basic warrior stance. Refer to appendix A for corresponding safeties 1, 2, 4, 7, 8, 9, and 14. Fundamentals Mindset When engaging in combat, mindset will be the determining factor of success or failure, regardless of technical proficiency. Anyone can train in a martial skill, but few have the mind and will to use their skills to kill or injure. Mindset is often the mental trigger in the defining moment that forces you to commit to an aggressor with the goal of injury or death. Holding the Rifle When executing bayonet techniques, the rifle is held in a modified basic warrior stance. All movement initiates and ends with the basic modified warrior stance: With the right hand, grasp the pistol grip with the trigger finger kept straight and off of the trigger. With the left hand, grasp the handguards of the rifle underhanded. Lock the buttstock of the rifle against the hip with the right forearm. Always execute movements with the bayonet blade at the waistline. The aggressor has a greater chance of blocking your attack if you bring the blade in a wide sweeping movement to the aggressor. Your attacks should close with the aggressor, coming straight to your target. Always keep the bayonet end of the rifle oriented toward the aggressor. Movement Movement is used to get from one place to another when the threat of contact with the aggressor is imminent. The principles of angles of approach and movement taught in the Tan Belt fundamentals class apply to movement with the rifle and bayonet: Assume the modified basic warrior stance. Execute movement in the specified direction for one step. Once all of the students have become familiar with all of the movements, they will all execute multiple steps in unison. Chapter 4: Green Belt
67 Marine Corps Martial Arts Program 4-3 Executing Turns There will be times when it is necessary to turn during an engagement. This is especially true when engaging with multiple attackers. To execute a turn Turn both right and left while keeping the rifle locked into position and the blade oriented to the front. Ensure that you are turning at the torso and not using your arms to move the weapon from left to right. Move in a straight line while scanning the area from right to left and left to right by turning your torso and keeping the bayonet oriented in the direction of vision. Change the direction of movement to the right by pivoting off of the ball of your left foot as it hits the deck and step with the right foot in the new direction of movement. Ensure that the rifle remains locked into position with the bayonet oriented in the direction of movement. Change the direction of movement to the left by pivoting off of the ball of your right foot and step with your left foot in the new direction of movement. Ensure that the rifle remains locked into position with the bayonet oriented in the direction of movement. Approaching Approaching is used when you have located an aggressor and you are within 20 to 25 yards from the aggressor. To approach Assume the modified basic warrior stance. Bend your knees so that you have a lower center of gravity and so that your profile is decreased. Bend at your waist so that you are hunched over the weapon and your chin is tucked to protect your neck, minimizing target area. Move at a fast walk using your legs to absorb the impact of your steps. Ensure that your upper body is not bouncing around as you move and the bayonet stays locked on the aggressor. Closing Closing is done when you are actively engaged with an aggressor at approximately 5 to 10 feet. Closing is executed to gain the psychological and tactical advantage over the aggressor. To close Assume the modified basic warrior stance. Bend your knees so that you have a lower center of gravity and so that your profile is decreased. Bend at your waist so that you are hunched over your weapon and your chin is tucked to protect your neck, minimizing target area. As you reach the critical distance of 5 to 10 feet, you will use a burst of speed to close the final distance between you and the aggressor using your legs to absorb the impact of your steps. Ensure that the upper body is not bouncing around as you move. Ensure that the bayonet stays locked on the aggressor. This could cause the aggressor to hesitate during the engagement, which can give you the psychological and tactical advantage. Chapter 4: Green Belt
68 4-4 MCRP 3-02B Execute a Disrupt and a Thrust While Closing With a Moving Aggressor A disrupt is used as a defensive technique to redirect or deflect an attack in preparation for executing a thrust or other appropriate offensive bayonet techniques. A disrupt is a slight redirection of an aggressor s linear attack followed on by a thrust. The straight thrust is performed to disable or kill an aggressor and is the most deadly offensive technique. The straight thrust will cause the most trauma to an aggressor and is the primary offensive bayonet technique. During training, when performing a disrupt and a thrust while closing with a moving aggressor, have the students execute the movement slowly using another person as the aggressor. When training, have the students execute movement slowly using another Marine as the aggressor. Target Areas of the Body The primary target areas of the body are the aggressor s throat, groin, or face. The aggressor s chest and stomach are also excellent target areas if they are not protected by body armor or combat equipment. ~ As you close on a moving aggressor, disrupt the aggressor s weapon by attacking at a slight angle. Contact is made with the bayonet end of the rifle against the barrel or bayonet of the aggressor s weapon. ~ Redirect or guide the aggressor s weapon away from your body by exerting pressure against the aggressor s weapon with your weapon. You only need to redirect the aggressor s weapon a few inches, enough so that the weapon misses your body. This will give your blade a clear path to your target. ~ Thrust the blade end of the weapon directly toward the target by thrusting both hands forward. Retract the weapon and continue moving forward. See figure 4-1. Buttstroke Offline The buttstroke is used to weaken an aggressor s defenses, to cause serious injury, or to set him up for a killing blow. The strike is executed with the heel of the buttstock of the rifle. It is best executed after a thrust, but if executed as the initial movement, it should be followed by a slash and/or thrust. Target Areas For lethal applications, the head, neck, and unprotected torso are the primary target areas of the body. In a nonlethal situation, the arms, shoulders, and the meaty portion of the legs can be target areas. Chapter 4: Green Belt
69 Marine Corps Martial Arts Program 4-5 Striking Surface The strike is executed with the toe of the buttstock of the rifle. Figure 4-1. Disrupt and Thrust While Closing with a Moving Aggressor. Chapter 4: Green Belt


70 4-6 MCRP 3-02B ~ Have the student execute movement slowly using another Marine as an aggressor. ~ Execute your approach and close on the aggressor. ~ While closing, execute a straight thrust. This thrust is interrupted by the aggressor s weapon (e.g., front-sight assemblies catching on each other). ~ Once the aggressor s weapon has been interrupted, move forward-right while executing a horizontal or vertical buttstroke. Note: Interruption is defined as your weapon being entangled or knocked offline toward your left side. ~ Return to the modified basic warrior stance by moving forward and follow-on with a slash and a straight thrust. Refer to Appendix A for appropriate safeties. See figure 4-2. Figure 4-2. Buttstroke Offline. Chapter 4: Green Belt
UNITED STATES MARINE CORPS Martial Arts Center of Excellence The Basic School Marine Corps Combat Development Command Quantico, Virginia 22134
 UNITED STATES MARINE CORPS Martial Arts Center of Excellence The Basic School Marine Corps Combat Development Command Quantico, Virginia 22134 DETAILED OUTLINE KNIFE TECHNIQUES INTRODUCTION (3 MIN) 1.
FUNDAMENTALS OF CLOSE COMBAT
 CHAPTER 1 FUNDAMENTALS OF CLOSE COMBAT This chapter describes all techniques for a right-handed person. However, all techniques can be executed from either side. The Marine is depicted in camouflage utilities.
11 Kyu Preparatory Techniques prior to commencing study of the Fighting Techniques
 CADET 11 Kyu 11 th KYU Preparatory Techniques prior to commencing study of the Fighting Techniques STANCES: Attention Ready Left Lead Fighting Stance Right Lead Fighting Stance Straddle Stance (Horse Riding)
CHAPTER 4 ADVANCED GROUND-FIGHTING TECHNIQUES
 (FM 21-150) CHAPTER 4 ADVANCED GROUND-FIGHTING TECHNIQUES After achieving an understanding of the basics of ground fighting, other elements of fighting on the ground are added. These techniques, however,
TACTICAL COMBATIVES COURSE STUDY GUIDE
 TACTICAL COMBATIVES COURSE STUDY GUIDE STANDING TECHNIQUES 1. ROUND KICK (All Minor Tasks) 1. Push off on the ball of your trail leg foot, and then step somewhat toward the target and laterally to the
KRAV MAGA LEVEL 1 CURRICULUM
 KRAV MAGA LEVEL 1 CURRICULUM I. Fighting Stance a. This is the posture the defender takes preparing for a confrontation b. Foot Positions 1. Assuming defender is right handed, he should stand with his
KRAV MAGA LEVEL 1 CURRICULUM
 KRAV MAGA LEVEL 1 CURRICULUM Technique Breakdown I. Fighting Stance a. This is the posture the defender takes preparing for a confrontation b. Foot Positions 1. Assuming defender is right handed, he should
Stanford Kenpo Karate Association BLUE BELT. Version 10/2008 by T. Shem
 BLUE BELT Kenpo Blue Belt Requirements Techniques Supplemental Techniques 1. Thousand Mallets Crossing Swords A 2. Driving the Spike Chinese Eclipse 3. Siege of the Temple Ox Cart B 4. Tangled Wings --
Marine Corps Martial Arts
 MCRP 3-02B Marine Corps Martial Arts U.S. Marine Corps 18 February 1999 www.carburetor-manual.com Would you like some Free Manuals? http://carburetor-manual.com/free-shop-manual-club-t-13.html Also visit
Senior BLACK Belt Curriculum Your Senior BLACK curriculum will take approximately 18 months or 200 classes.
 A black belt is a white belt who never quit. Senior BLACK Belt Curriculum Your Senior BLACK curriculum will take approximately 18 months or 200 classes. Senior BLACK Belt Techniques 1) All WHITE Belt Techniques
Krav Maga Yellow Belt Curriculum
 Krav Maga Yellow Belt Curriculum Prerequisites for advancement: 50 beginner-level class hours, Yellow Belt midterm, and instructor approval Target time: approximately 4-6 months Straight Punch Straight
Appendix 1. Strikes with the Stick and Cane
 Appendix 1. Strikes with the Stick and Cane I have always found jointlocks and takedowns with the stick and cane to be far more interesting than the strikes, most of which are obvious, even to beginners.
Yellow Belt Grading Requirements - Details
 Yellow Belt Grading Requirements - Details Stance and movement: Horse Stance Looking for: Feet shoulder width apart or wider. Knees above feet. Feet face forwards. Thighs ideally parallel with ground.
GROUND COMBATIVES TRAINING STEP-BY-STEP INSTRUCTION MANUAL PICTORAL ANNEX FOR EXISTING TSP S
 GROUND COMBATIVES TRAINING STEP-BY-STEP INSTRUCTION MANUAL PICTORAL ANNEX FOR EXISTING TSP S Stand Up In Base - This is the most basic technique. It allows the Student to stand up in the presence of an
1. POST: Options FRAME: Options 1-3
 Name: Date: Class Number: Score: /10 GO / NO-GO UNITED STATES ARMY COMBATIVES COURSE Basic Combatives Course Technical Evaluation 1. POST: Options 1-3 Performance Steps (Must pass 5 of 7) GO NO-GO Student
Hyung Standards: Sam-Il through Moon-Moo
 General Comments: Always pivot on the ball of the foot. When you pivot on your heel you immobilize your hip. Sam-Il Double middle block starts with both fists at shoulder level. High double forearm block
LEVEL 1 SKILL DEVELOPMENT MANUAL
 LEVEL 1 SKILL DEVELOPMENT MANUAL Lesson Manual C A Publication Of The USA Hockey Coaching Education Program The USA Hockey Coaching Education Program is Presented By LESSON C-1 SPECIFIC OBJECTIVES 1. Refine
MSD RYU INTERNATIONAL CLOSE COMBAT KRAV MAGA CURRICULUM
 MSD RYU INTERNATIONAL CLOSE COMBAT KRAV MAGA CURRICULUM YELLOW BELT LEVEL 1 There are no prerequisites or fitness level requirements to start. I. Stance A. Neutral Stance B. Fighting Stance II. Movement
6 th Kup - 5 th Kup (Green belt - blue tab)
") 6 th Kup - 5 th Kup (Green belt - blue tab) Long stance - Double knife-hand strike : Hammer-fist strike : Back-fist strike : Spear-Hand Punch : Back stance Single fist guarding block : Double fist guarding
6 th Kup - 5 th Kup (Green belt - blue tab) Long stance - Double knife-hand strike : Hammer-fist strike : Back-fist strike : Spear-Hand Punch : Back stance Single fist guarding block : Double fist guarding
SDTS Certification Grade Exam 7: Weapons Offensive Tactics (SDTS Module Combatives Module 9, 11)
") SDTS Certification Grade Exam 7: Weapons Offensive Tactics (SDTS Module Combatives Module 9, 11) Fight with the weapon All weapons are designed to work with your hand to hand training Grip strength and
SDTS Certification Grade Exam 7: Weapons Offensive Tactics (SDTS Module Combatives Module 9, 11) Fight with the weapon All weapons are designed to work with your hand to hand training Grip strength and
2990 Lorne Scots Royal Canadian Army Cadet Corps Rifle Drill
 2990 Lorne Scots Royal Canadian Army Cadet Corps Rifle Drill Page 1 of 27 TABLE OF CONTENTS PARA ITEM PAGE Section 1 BASIC RIFLE DRILL 1.1 INTRODUCTION 3 1.2 ATTENTION 5 1.3 STAND AT EASE FROM ATTENTION
Green Belt Requirements
 Green Belt Requirements Techniques 1. Dancing Cat 2. Gun Attack A, B 3. Slashing Claws 4. Snapping the Vines 5. Rickshaw 6. Fallen Warrior A 7. Striking the Gong 8. Wielding the Torch 9. Soaring Eagle
A Publication Of The USA Hockey Coaching Education Program The USA Hockey Coaching Education Program is Presented By
 LEVEL 1 SKILL DEVELOPMENT MANUAL Lesson Manual B A Publication Of The USA Hockey Coaching Education Program The USA Hockey Coaching Education Program is Presented By LESSON B-1 SPECIFIC OBJECTIVES 1.
Copyright 2001 Dr. Ted Gambordella
 INTRODUCTION Tonfa tactics Perhaps no other weapon in karate is as practical, powerful, and versatile as the tonfa, yet no other weapon is so little known and used. Why? I feel that the reasons are twofold.
Introduction To Boxing! The Basics. Stretching Stance Footwork Power Punches Defense Hand wrapping
 Introduction To Boxing! The Basics Stretching Stance Footwork Power Punches Defense Hand wrapping Stretching (A Boxer should always stretch 5-10 mins. Before training..) 2 Arm & Chest Stretches Elbow Pull
Warm Ups. Standing Stretches
 Warm Ups Mild warm-ups are a necessity for everyone. The need for warm-ups increases with age as the body becomes less elastic over time. It is recommended that you execute the warm-up routine in this
How to Make a Proper Fist
 How to Make a Proper Fist Bend your index finger so that the first knuckle touches the second knuckle of your thumb, tucking in the fold of skin that is between your thumb and index finger. Then fold your
How To Start And WIN Any Fight!
 by Grandmaster Dr. Ted Gambordella First Punches That Never Fail Everything You Need To Know To Win Every Fight...You Ever Start! Neck Breaking Kicks That End It Period! Chokes & Throws Ground Finishes
Junior BLACK Belt Curriculum Your Junior BLACK curriculum will take approximately 18 months or 200 classes.
 A black belt is a white belt who never quit. Junior BLACK Belt Curriculum Your Junior BLACK curriculum will take approximately 18 months or 200 classes. Junior BLACK Belt Techniques 1) All WHITE Belt Techniques
YELLOW BELT CURRICULUM
 YELLOW BELT CURRICULUM 1. Stance a. Neutral stance b. Fighting Stance 2. Movement a. Forward, Back, Left, Right b. Shadow Boxing c. Movement while on the ground d. Basic Takedown Defense (sprawl) 3. Punches
RIFLE DRILL. 1. General. Before commencing instruction in rifle drill, it is important that the cadets receive instruction in the parts of the rifle.
 RIFLE DRILL 1. General. Before commencing instruction in rifle drill, it is important that the cadets receive instruction in the parts of the rifle. 2. Rifle Movements. Unless stated otherwise, cadets
Preparatory Techniques prior to commencing study of the Fighting Techniques
 White Belt with Red Stripe Preparatory Basic Techniques Preparatory Techniques prior to commencing study of the Fighting Techniques STANCES: Attention Ready Left Lead Fighting Stance Right Lead Fighting
Basic Combatives Course Handbook. July
 Basic Combatives Course Handbook July 2017 1 TABLE OF CONTENTS React to Contact....6 Grappling Over Weapons. 7 Post, Frame, Hook with Head Control..13 Option 3...21 Basic Stand-Up Fighting Techniques...29
AMATEUR HOCKEY ASSOCIATION ILLINOIS, INC. MITE 8 & UNDER AMERICAN DEVELOPMENT MODEL
 Mite 8 & Under American Development Model Week 1 This coach s manual is intended to provide the instructions and tools to conduct the Mite and 8 & Under Illinois Hockey - Skills Challenge. Mite
FREE-STYLE KENPO KARATE AS TAUGHT BY
 LEE S KENPO KARATE Prancing Deer Curriculum Block #2 Belt Requirements AMERICAN FREE-STYLE KENPO KARATE AS TAUGHT BY Master LOGAN LEE Prancing Deer Techniques: Chinese Thumb Screw Hidden Fist Plucking
LEVEL 1 SKILL DEVELOPMENT MANUAL
 LEVEL 1 SKILL DEVELOPMENT MANUAL Lesson Manual D A Publication Of The USA Hockey Coaching Education Program The USA Hockey Coaching Education Program is Presented By 1. Proper Stance: LESSON D-1 SPECIFIC
UNITED STATES MARINE CORPS
 UNITED STATES MARINE CORPS INTERSERVICE NONLETHAL INDIVIDUAL WEAPONS INSTRUCTOR COURSE MARINE CORPS DETACHMENT 686 Minnesota Ave Fort Leonard Wood, Missouri 65473 STUDENT OUTLINE Train the Application
Hyung Standards: Chon-Ji through Choong-Moo
 There are three steps in learning a hyung: 1 Learn the steps 2 Perfect the stances and techniques 3 Apply the attacks and blocks, fight for your life. Ready Stance fists start in front of shoulder and
Belton High School Marching Fundamentals 2016
 Belton High School Marching Fundamentals 2016 Fundamentals of Teaching Fundamentals: 1. Say the name of the maneuver (INSTRUCT) 2. State its purpose (INSTRUCT) 3. Demonstrate it slowly, several times,
PARTNER With all partner stretches: communicate with partner and use caution!!
 - warm up prior to stretching - isolate the muscle group to be stretched - move slowly and smoothly into stretch - use proper mechanics and correct alignment - breathe normal - slowly come out of stretch
1 & 3 Step Sparring Techniques
 1 & 3 Step Sparring Techniques These instructions are for reference only to help with your personal training outside of class. They are not a replacement for instruction or training received in class.
Requirements for Red Belt
 Requirements for Red elt Part I: Kicking Techniques Front Kick Side Kick Impact target with the balls of the feet. Foot pivoted 15-35 degrees. Impact target with the blade of the foot. Toes slightly pointed
Ab Plank with Straight Leg Raise
 Ab Plank with Straight Leg Raise Position yourself face up with your knees bent at 90 degrees, feet flat on the floor. Your hands should be directly under your shoulders facing forward. While in this position
U.S. Shooting Team Balance, Strength and Stability Workout. Training Work-Out
 U.S. Shooting Team Balance, Strength and Stability Workout Training Work-Out Modified by Dan Durben and Sommer Wood November 2006 from the program originally developed by Amber Darland for the USA Shooting
OVERVIEW FOR STUNTS FLYER BODY POSITIONS
 TCI MODULE 6 Stunts Level 1 Page 1 of 11 OVERVIEW FOR STUNTS FLYER BODY POSITIONS *** NOTE *** For instruction purposes, we will assume regular flyer positions in this manual. That is, it is assumed that
MANUAL OF ARMS FOR THE RIFLE (M-1 GARAND) POSITION OF ORDER ARMS
 POSITION OF ORDER ARMS") MANUAL OF ARMS FOR THE RIFLE (M-1 GARAND) In describing the manual of arms, the term, at balance, refers to a point on the rifle just forward of the trigger housing. Whenever a position is described as
MANUAL OF ARMS FOR THE RIFLE (M-1 GARAND) In describing the manual of arms, the term, at balance, refers to a point on the rifle just forward of the trigger housing. Whenever a position is described as
Grandmaster Dr. Ted Gambordella
 The Complete Book of Wrist Locks By Grandmaster Dr. Ted Gambordella Everything you need to know about Wrist Locks. By Grandmaster Dr. Ted Gambordella 1 I have always loved to do wrist locks since I first
TAN BELT. Revised 2015 UNITED STATES MARINE CORPS MARTIAL ARTS CENTER OF EXCELLENCE THE BASIC SCHOOL GILBERT ROAD QUANTICO, VIRGINIA 22134
 UNITED STATES MARINE CORPS MARTIAL ARTS CENTER OF EXCELLENCE THE BASIC SCHOOL 24191 GILBERT ROAD QUANTICO, VIRGINIA 22134 TAN BELT Revised 2015 https://vcepub.tecom.usmc.mil/sites/trngcmd/tbs/tbsmace TABLE
10 th Kup White Belt. The Basics
 10 th Kup White Belt Starting Tae Kwon Do as a white belt often feels rather daunting, especially when there are so many students around you that appear to make all the moves seem effortless. Just remember
S&DMHA Player Development Program Book Four - Goaltending
 S&DMHA Player Development Program Book Four - Compiled by Wayne King to be used as reference for all minor hockey coaches Good goaltending is essential to the success of your team. For individuals to be
U.S. Shooting Team Balance, Strength and Stability Workout. Shooting Warm-Up
 U.S. Shooting Team Balance, Strength and Stability Workout Shooting Warm-Up Modified by Dan Durben and Sommer Wood from the program originally developed by Amber Darland for the USA Shooting National Rifle
Yellow Belt Requirements
 Yellow Belt Requirements Techniques 1. Capturing Paws A 2. Sharpening the Blade A, B 3. Escape of the Lamb A 4. Chopping Bamboo A 5. Evading the Samurai A 6. Grasping Honor B 7. Entering the Shrine A 8.
Techniques To Treat Your Pain At Home (512)
") Techniques To Treat Your Pain At Home (512) 288-5322 7010 W. TX-71 Suite 360 Austin TX, 78735 Arm Only Bird Dog Start in the quadruped position (all fours) with arms and thighs perpendicular to the floor.
Techniques To Treat Your Pain At Home (512) 288-5322 7010 W. TX-71 Suite 360 Austin TX, 78735 Arm Only Bird Dog Start in the quadruped position (all fours) with arms and thighs perpendicular to the floor.
The Golf Swing. The Fundamentals
 The Golf Swing The Fundamentals Fundamental #1 Grip & Set-Up The grip and set-up should be viewed as putting parts of a machine together. The right parts connected in the right way will allow the machine
The Complete Book of One Steps
 By Grandmaster Dr. Ted Gambordella All the Basic One Steps You need from White to Green Belt. By Grandmaster Dr. Ted Gambordella 1 Since I began my martial arts training over 35 years ago. I have found
Sun Salutation Pose #1 Mountain Pose 1
 Sun Salutation Pose #1 Mountain Pose 1 Stand upright with feet together and look straight ahead, hands alongside body and palms forward. Lift abdomen inward and upward. Activate quadriceps and evenly distribute
Movement Chart for Bassai Dai Page 1 of 7
 Movement Chart for Bassai Dai Page 1 of 7 Kata available on video and DVD from your sensei. tart 1 Ichi 2 i tart in parallel stance facing north. Move your left leg in towards your right and bring your
Key Terms. balance barrel bolt butt hand guard muzzle port arms sling stacking swivel stock trail arms trigger guard
 Lesson 7 Stationary Movements with the M-1 Rifle Chapter 5 Key Terms balance barrel bolt butt hand guard muzzle port arms sling stacking swivel stock trail arms trigger guard What You Will Learn to Do
2672 Hastings & Prince Edward Regiment Royal Canadian Army Cadet Corps. Lee Enfield No.4. Rifle Drill
 2672 Hastings & Prince Edward Regiment Royal Canadian Army Cadet Corps Lee Enfield No.4 Rifle Drill Extracts from A-CR-CCP-053/PT001 March 2005 TABLE OF CONTENTS PARA ITEM PAGE Section 1 BASIC RIFLE DRILL
AAC CADET INSTRUCTOR S HANDBOOK. CEREMONIAL DRILL, SMLE.303 and 7.62 mm SLR
 AAC CADET INSTRUCTOR S HANDBOOK CEREMONIAL DRILL, SMLE.303 and 7.62 mm SLR 2010 THIS PAGE INTENTIONALLY BLANK i PREFACE Aim 1. The aim of this publication is to provide Cadets with the information to conduct
 www.theselfdefenseco.com Training System Manual MODULE TWO ADVANCED METHODS OF STRIKING INTRODUCTION MODULE TWO: ADVANCED METHODS OF STRIKING In this module we ll cover some of the more advanced striking
YELLOW BELT CURRICULUM
 YELLOW BELT CURRICULUM Stances/Movement A. Fighting Stance B. Neutral Stance C. Movement: Forward, Back, Left, Right D. Shelling with Movement #1-#6 1. Left Foot Forward 2. Right Foot Forward 3. Left Foot
Teaching Progression and the Fine Points For Contact In The Underhand Pass (Service Reception and Defense) Step 1: Catch & Throw
 Step 1: Catch & Throw") Teaching Progression and the Fine Points For Contact In The Underhand Pass (Service Reception and Defense) Step 1: Catch & Throw - Players can be in pairs or if working individually then the coach can
Teaching Progression and the Fine Points For Contact In The Underhand Pass (Service Reception and Defense) Step 1: Catch & Throw - Players can be in pairs or if working individually then the coach can
MUSKET MANUAL OF ARMS FOR THE
 MANUAL OF ARMS FOR THE MUSKET 414. This manual differs in so many respects from that of the rifle and rifle musket that it becomes necessary to specify it for the use of infantry troops armed with the
TAI CHI SHORT HAND FORM CLASSICAL YANG STYLE Updated 10/03/ updates available from
 TAI CHI SHORT HAND FORM CLASSICAL YANG STYLE Updated 10/03/2017 - updates available from www.taichichuan.org.uk During my 17 years learning of tai chi with Tony I have developed the following notes, both
Empi. Preparation. The kata proper starts in yoi (`ready' or `attention') stance.
 stance.") Preparation. The kata proper starts in yoi (`ready' or `attention') stance. Bring your heels together with your toes touching. Place your right fist across your body with the knuckles pressed into the
Preparation. The kata proper starts in yoi (`ready' or `attention') stance. Bring your heels together with your toes touching. Place your right fist across your body with the knuckles pressed into the
Dao Form from Lung Hu Shaun Master Weng 12 Moves
 Dao Form from Lung Hu Shaun Master Weng 12 Moves The Principles of Qigong 1) Adjust your psychology 2) Adjust your movements 3) Adjust your breath WARMUP 1. Opening and closing the chest arms out; Opening
40 Allied Drive Dedham, MA (office)
") Standing forward flexion Stand facing a mirror with the hands rotated so that the thumbs face forward. Raise the arm upward keeping the elbow straight. Try to raise the arm by hinging at the shoulder as
Standing forward flexion Stand facing a mirror with the hands rotated so that the thumbs face forward. Raise the arm upward keeping the elbow straight. Try to raise the arm by hinging at the shoulder as
Basic Movement Patterns Locomotor Skills 1.3
 Basic Movement Patterns Locomotor Skills 1.3 Jumping Forward & Sideways & Landing Extending Arms upward upon takeoff Arms Reach Full Extension about head height at lift off Extending the Hips, Knees, and
Crowd Control. Course Law Enforcement II
 Course Law Enforcement II Unit XI Crowd Control Essential Question How does a police officer effectively handle a hostile crowd? TEKS 130.294(c) (11)(A)(B) Prior Student Learning Use of Force Estimated
Movement Assessment & Enhancement Session
 C H A P T E R F O L L O W - U P I M P A C T M O V E M E N T S R O U T I N E Movement Assessment & Enhancement Session E X P E R I E N C E Y O U R G R E A T N E S S C H A P T E R F O L L O W - U P I M P
OFFENSIVE SKILLS FOOTBALL SKILLS-SUCCESSFUL OFFENSE TAKING A SNAP GRIPPING THE BALL QUARTERBACKS STANCE
 OFFENSIVE SKILLS S E C T I O N I I I QUARTERBACKS STANCE Stand up straight with feet even, shoulder width. Have weight even on each foot, toes pointing straight ahead. Bend knees, keep back straight and
Defense Against Multiple Opponents (36)
") th Dan Requirements th Degree black Belt / General Requirements Successful completion of all requirements for th degree black-belt signifies master-level. All candidates for th degree black-belt must:
th Dan Requirements th Degree black Belt / General Requirements Successful completion of all requirements for th degree black-belt signifies master-level. All candidates for th degree black-belt must:
LESSON 13: STATIONARY MOVEMENTS WITH THE M1 RIFLE
 LESSON 13: STATIONARY MOVEMENTS WITH THE M1 RIFLE PURPOSE balance fall in parade rest port arms trail arms upper band (Note: Since there are many similarities between the manual of arms for the M1 and
FM P r e f a c e
 *FM 21-150 i ii iii Preface This field manual contains information and guidance pertaining to rifle-bayonet fighting and hand-to-hand combat. The hand-to-hand combat portion of this manual is divided into
Black Belt KBK Kickboxing Syllabus. Line Work -Punches (Conducted With Bouncing Movement)
") Line Work -Punches (Conducted With Bouncing Movement) 1. Jab, Cross Punch 2. Backfist, Reverse Punch 3. Hook Punch (Lead Arm), Uppercut (Back Arm) 4. Step Through Jab, Cross Punch 5. Step Through Backfist,
Line Work -Punches (Conducted With Bouncing Movement) 1. Jab, Cross Punch 2. Backfist, Reverse Punch 3. Hook Punch (Lead Arm), Uppercut (Back Arm) 4. Step Through Jab, Cross Punch 5. Step Through Backfist,
Shot Put - Glide Technique by Rob Lasorsa, M-F Athletic
 Shot Put - Glide Technique by Rob Lasorsa, M-F Athletic SHOT PUT GLIDE TECHNIQUE *ALL MOVEMENTS CONSIDER A RIGHT HANDED THROWER* GRIP, CARRY, RELEASE GRIP CARRY THROW INTO THE GROUND KNEELING THROW #1
Aviation Rescue Swimmer School
 Aviation Rescue Swimmer School Releases and Escapes LT 3.2 JANUARY 2004 1 Enabling Objectives List procedural steps for rescue swimmer head hold releases and escapes in accordance with NWP 3-50.13 series.
Dan Gun. Meaning Of Dan Gun Dan gun is named after the Holy Dan Gun, the legendary founder of Korea in the year 2333BC. Dan Gun
 8 th Kup Yellow Belt Dan Gun Meaning Of Dan Gun Dan gun is named after the Holy Dan Gun, the legendary founder of Korea in the year 2333BC Dan Gun Number of Moves: 21 Ready Posture: Parallel Ready Stance
INDEX. Created January 8, 1956 Explanation July 15, 1987 Revised December 1, 1992 Printed April 1999
 INDEX Created January 8, 1956 Explanation July 15, 1987 Revised December 1, 1992 Printed April 1999 * PICTURES HAVE BEEN TAKEN FROM SHOMEN EXCEPT WHERE DESIGNATED. I. Bowing, Handling of Weapons, Key Points
Why study..., Women and the..., Children..., Spirit of teaching... Tie the belt, Courtesy, Basis for Promotion, and Passive Guard Position
 TABLE OF CONTENTS ACKNOWLEDGEMENTS...9 FORWARD...10 REFLEECTIONS...12 INTRODUCTION...14 CHAPTER 1...17 Historical overview By Nancy R. Bakemeier CHAPTER 2...33 Why study..., Women and the..., Children...,
MHBYW Dynasty Program
 MHBYW Dynasty Program Level 3: Red Skill Properly Executed? Comment Staggered/Square Stance Yes No Motion Yes No Starting Positions Neutral Yes No Top Yes No Bottom Yes No Four Defensive Stops Yes No Head,
Shoulder Exercises for Combined Labrum Repair Rehabilitation Protocol
 Shoulder Exercises for Combined Labrum Repair Rehabilitation Protocol The exercises illustrated and described in this document should be performed only after instruction by your physical therapist or Dr.
Copyright 2001 Dr. Ted Gambordella
 INTRODUCTION This book has been written as a training and information manual for people and students who may find that they have to defend themselves in the street from attack by those who may have such
Sprinting. Relevant Knowledge** Overall Level. Assessment Criteria. Learning Outcomes
 Sprinting 1. coordinate their limbs. 2. be familiar with the starter s order.. swing their arms in rhythm. 1. coordinate their limbs. 2. swing their arms in rhythm.. react accurately to signals.. master
STUDENT OUTLINE INSTRUCTING DRILL MOVEMENTS (BLOCK 1) DI-2001D DRILL INSTRUCTOR SCHOOL M0681E2 04/29/2015
 DI-2001D DRILL INSTRUCTOR SCHOOL M0681E2 04/29/2015") STUDENT OUTLINE INSTRUCTING DRILL MOVEMENTS (BLOCK 1) DI-2001D DRILL INSTRUCTOR SCHOOL M0681E2 04/29/2015 APPROVED BY DATE 1. LEARNING OBJECTIVES: a. TERMINAL LEARNING OBJECTIVES: (1) Without the aid of
STUDENT OUTLINE INSTRUCTING DRILL MOVEMENTS (BLOCK 1) DI-2001D DRILL INSTRUCTOR SCHOOL M0681E2 04/29/2015 APPROVED BY DATE 1. LEARNING OBJECTIVES: a. TERMINAL LEARNING OBJECTIVES: (1) Without the aid of
THROWING SKILLS RUN JUMP THROW
 RUN JUMP THROW CHAPTER 7: KEY IDEAS Throwing activities can be divided into the following sub-groups: pushing activities which lead to shot put pulling activities which lead to javelin throw slinging activities
Movement Chart for Seiunchin Page 1 of 7
 Movement Chart for eiunchin Page 1 of 7 shoulder-width divisions Kata available on video and DVD from your sensei. tart 1 Ichi 2 i tart in parallel stance facing north. Bring your heels together. Bow.
UK Yoga Sports Federation
 UK Yoga Sports Federation STANDING HEAD TO KNEE POSE 4 parts 1. Stand with feet together, shift body weight to standing leg (leg closest to the judges) and lock the knee (leg straight and thigh muscle
UNITED STATES MARINE CORPS WEAPONS TRAINING BATTALION MARINE CORPS COMBAT DEVELOPMENT COMMAND QUANTICO, VIRGINIA
 UNITED STATES MARINE CORPS WEAPONS TRAINING BATTALION MARINE CORPS COMBAT DEVELOPMENT COMMAND QUANTICO, VIRGINIA 22134-5040 DETAILED INSTRUCTOR GUIDE LESSON TITLE RIFLE SITTING POSITION COURSE TITLE ANNUAL
Synchronised Swimming Skill Level 2
 1 2 3 4 5 6 7 8 9 10 11 12 Synchronised Swimming Skill Level 2 The must be a Basic, or Advanced Name. Date Contents 1. Travelling eggbeater with trailing arm vertical. 2. Kick, pull, kick over for 10 metres.
Kime no Kata. Tsukkomi (Dagger Thrust to Stomach) Kirikomi (Downward Slash) Nuki kake (Sword Unsheathing) Kirioroshi (Downward Cut)
 Kirikomi (Downward Slash) Nuki kake (Sword Unsheathing) Kirioroshi (Downward Cut)") Kime no Kata Kime no Kata 1 of 12 Most of the following descriptions are taken from Kodokan Judo, Jigoro Kano, published by Kodansha International Tokyo & New York, page 146 and from pages 173 to191. Kime
Kime no Kata Kime no Kata 1 of 12 Most of the following descriptions are taken from Kodokan Judo, Jigoro Kano, published by Kodansha International Tokyo & New York, page 146 and from pages 173 to191. Kime
Seven Star Women s Kung Fu Basics Handout
 Seven Star Women s Kung Fu Basics Handout THREE PRIMARY TARGETS 1. Eyes 2. Throat 3. Knees ALL TARGETS LISTED FROM THE HEAD DOWN 1. Forehead 2. Occipital Bone 3. Zygomatic Temporal Nerve (Temple) 4. Bridge
Shot put learn by - doing Basic technique for the Shot Put By: Mark Harsha Portage High School Girls Head Coach
 Shot put learn by - doing Basic technique for the Shot Put By: Mark Harsha Portage High School Girls Head Coach Goal One: Shot grip and placement 1. Holding the shot The shot is held at the base of the
Coaching Points. SAFE LANDING When landing on one leg it is important to teach the players which foot they should be landing on.
 Footwork and Movement Skills Coaching Points INITIAL STANCE Forms the starting point for most attacking and defending skills. Feet shoulder-width apart Shoulders back and down Knees slightly flexed Knees
RJT. Pupil Task Cards: Throwing JUMP THROW RUN
 RJT s: Throwing RUN JUMP THROW s: Introduction Introduction to the s An important part of every child s cognitive development is to encourage them to explore new things and use self-guided learning to
Baseball Training Program
 Baseball Training Program Always consult your physician before beginning any exercise program. The information and advice published or made available through the Orthopaedic and Neurosurgery Specialists,
Field Hockey BC Coach Education and Mentorship Technical Skills
 Field Hockey BC Coach Education and Mentorship Technical Skills Robin D Abreo Provincial Development Coach Field Hockey British Columbia Tel: 604-730-7220 robin@fieldhockeybc.com www.fieldhockeybc.com
Shot Technical Model
 Shot Technical Model Progression related to Multi-Events Development (aged 8/9-12 years) can be referenced to Athletics 365. Further technical information can be found HERE Linear Shot - Whole Sequence
Chung Yong Hapkido Kup Grade Syllabus
 2009 Chung Yong Hapkido Kup Grade Syllabus This document outlines the basic requirements for students to progress from white belt to red belt. An exam to prove a student s proficiency should be undertaken