MAN-TO-MAN COMBAT WITH ARCHAIC WEAPONS
|
|
|
- Timothy Paul
- 5 years ago
- Views:
Transcription
1
2 MAN-TO-MAN COMBAT WITH ARCHAIC WEAPONS I. INTRODUCTION Flavius Marcellus, youngest centurion of the Legion, was angry. They had been in this forest for three days. The German barbarians weren't showing themselves, except to pick off an occasional scout. And now Honorius was overdue from sentry duty. If that old fool was dozing off again, there'd be trouble. As he stepped into the little glade, Flavius saw movement at the other end. Honorius? No! He sensed, rather than saw, the shaggy clothing - and the ready bow. His soldier's reflexes launched him into a charge. Burdened as he was by helmet and greaves, he could probably get that barbarian before... An arrow snapped. Flavius felt pain, but not much; thank the Gods for his armor. He moved in, weaving to spoil the archer's aim. A second arrow missed. As Flavius neared, the barbarian moved to put his back to a tree. His third arrow went off as the Roman swung his sword. It struck, but the armor stopped it. Flavius' own swing went wild, but his opponent was forced to abandon his bow. Now the German tribesman had come up with an enormous broadsword, and the two were trading hacks. Slowed by his armor and shield, Flavius despaired of striking his agile opponent. Nevertheless, he did, wounding the barbarian badly. The bleeding German tried to sidestep, but Flavius cut him off. Somehow, the tribesman's desperate stroke hit home. Glancing off the shield and through armor, the broadsword bit into Flavius' side. Giddy from the shock, he abandoned the attack for a few seconds, content to parry and wait. The swords clashed and sparked. Then, suddenly, it ended. Flavius' short sword went under the German's wild slash and bit deeply. The unarmored savage staggered back; Flavius followed quickly and struck again. The barbarian collapsed, either dead or too badly wounded to stand. Flavius was hurt, but well able to walk. In the bushes he saw what was left of Honorius - but he was all right. He had revenge for his man... and maybe a prisoner. He bent over the savage... MELEE is a game of man-to-man combat with archaic weapons. It can be used to simulate combat between single opponents or small groups in any period. Players create figures and send them into combat against a variety of opponents. Selection of weapons and armor, the strength and dexterity of the fighters, and the tactics the players choose will combine to tell which figures will survive. Successful fighters in-crease their strength and dexterity by gaining experience; losers die. The narrative above was taken from an actual game. The COMBAT EXAMPLE takes the same fight and shows, using the Melee rules and dice rolls, how Flavius bested his adversary. MELEE can also be used as a tactical aid to the various, fantasy role-playing games. Players will find that the Melee system meshes easily with most rules, allowing tactical combat to be worked out in a logical manner. The Melee system lets game masters regularize movement and attacks on a small scale, taking one of the biggest headaches out of fantasy gaming. MELEE is basically a two-player game, but solitaire and multi-player games are possible. Each player may control any number of figures; the only limit to the possible scenarios is your imagination.
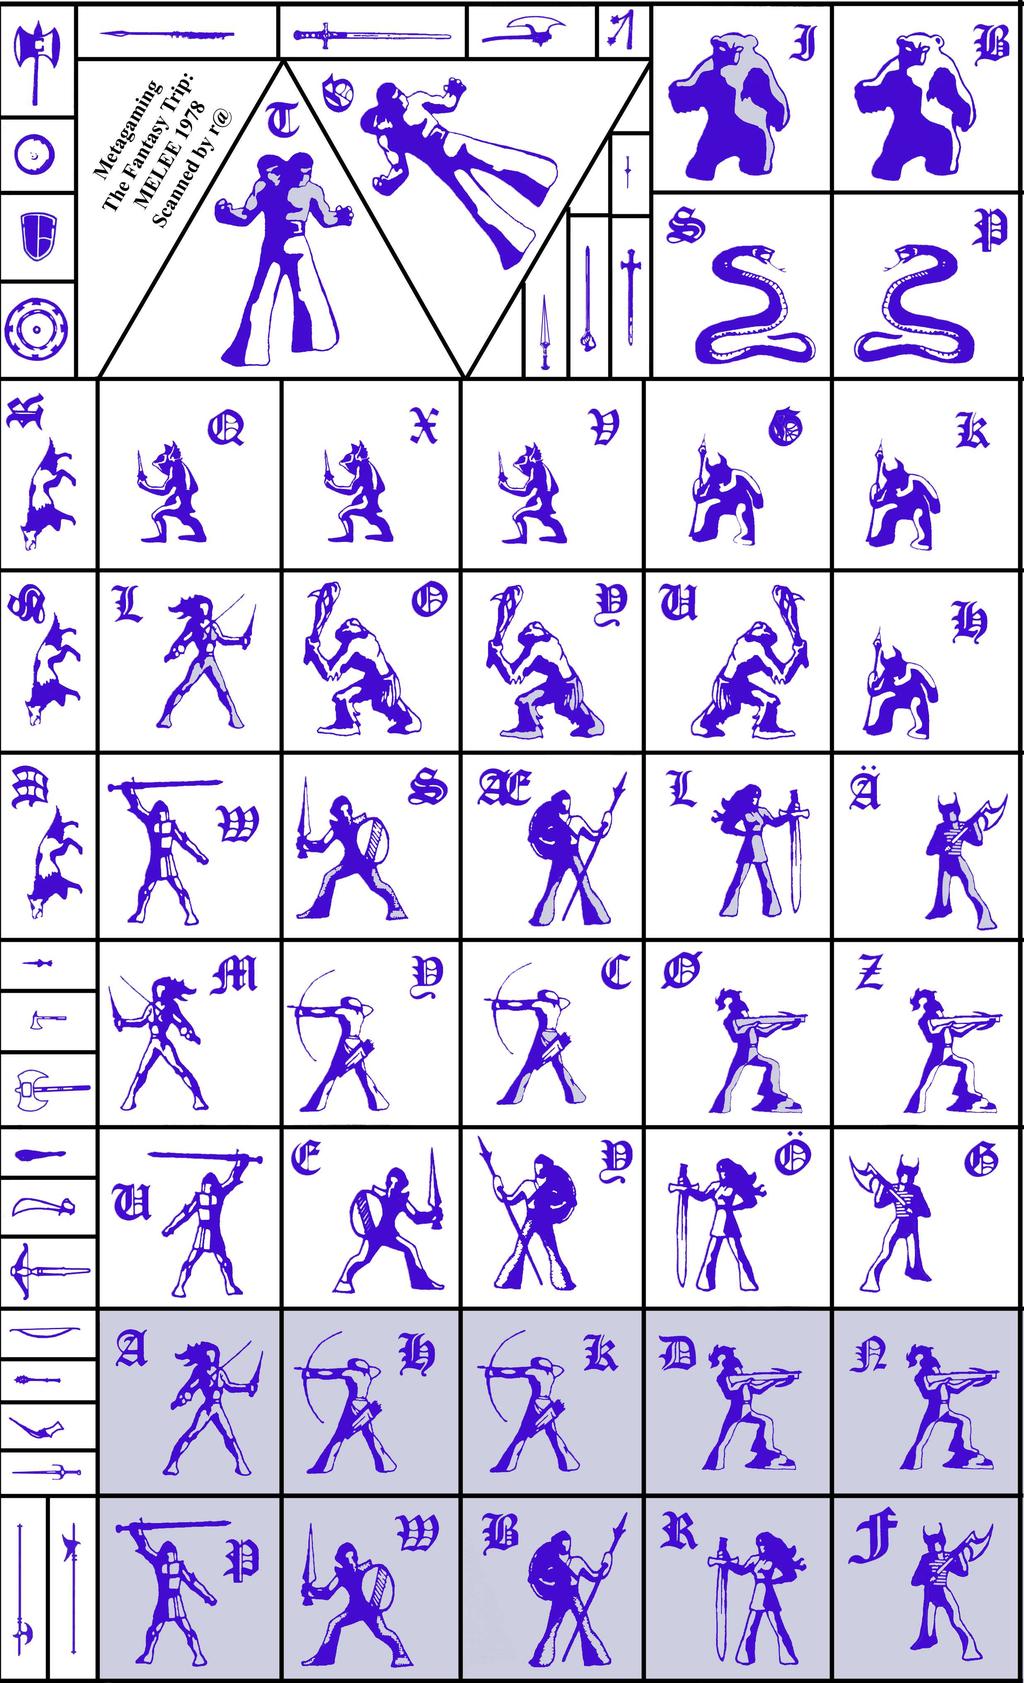
3 II. COMPONENTS This MELEE game should contain the following components: (1) This rule booklet. (2) One 8 1/4" x 14" arena map, divided into hexagons ("hexes") to govern movement, and larger black-bordered "megahexes" to govern missile weapon fire. (3) One counter sheet, which may be cut apart into 68 counters representing men, animals, monsters, and dropped weapons. You will also need pencils, dice, scratch paper, and a straightedge. Miniature figures are not necessary, but add interest. III. CREATING A FIGURE MELEE is a game of man-to-man combat, in which one of the most important factors is the ability of the individual fighters. Each counter in Melee represents a "figure" with its own capabilities, determined by the player before the game begins. A fighter's basic attributes are Strength (ST) and Dexterity (DX). When a figure is first created, the player determines its ST and DX as follows: A human figure starts with 8 ST, 8 DX, and 8 extra points to be allotted as the player chooses. Thus, each figure begins with a total of 24 points - 13 to ST and 11 to DX, or any other combination adding to 24. Neither ST nor DX may begin at less than 8 for a human figure. (Animals and monsters go by other rules, which will be discussed later.)
4 STRENGTH governs: (1) How many hits a figure can take. "Hits" represent combat damage. The hits a figure takes are subtracted from its ST; when ST reaches 1 a figure collapses and cannot fight, and when ST reaches zero, that figure is dead. (2) What weapons a figure can use. Each weapon (shown on the WEAPON TABLE) has a ST number. Only a figure whose strength BEGINS at or above that number can use that weapon. (Reduction of ST during a fight does NOT affect weapon use.) (3) How well the figure does in unarmed combat (see HAND-TO-HAND COMBAT). DEXTERITY governs: (1) How likely a figure is to hit an enemy it attacks. (2) How easily a figure can disengage from an enemy. (3) How quickly a figure can strike. Dexterity is ADJUSTED for several factors, such as armor, wounds, etc. When these rules refer to DX, the ADJUSTED DX is what is meant. A figure with a high basic DX may have a very small chance of hitting if its ADJUSTED DX is low - and a clumsy figure can improve its chances by getting a positive DX adjustment. A table of DX adjustments is given under ATTACKS. Once a figure's 24 beginning points are divided between ST and DX, they cannot be shifted. However, a figure who gains experience by surviving combat may gain strength and dexterity, and in time become much more powerful - see EXPERIENCE. Once a figure's ST and DX have been determined, the player should decide what armor, if any, the figure will wear, and what weapons and/or shield he or she will carry. A figure may carry only two weapons (plus a dagger) at a time; a shield counts as a weapon. See ARMOR AND SHIELDS. They can provide protection, but reduce DX and movement allowance (MA). The weapons a figure chooses, of course, govern how much damage it can do. A figure's ST and DX must be considered carefully when weapons are chosen; a strong but clumsy fighter will use arms and tactics totally different from those of a dexterous but weak one. A record sheet or card should be made up for each figure, as in the example below: Ragnar is a Viking. He wears leather, which takes 2 hits per attack. He also carries a Large shield which takes 2 hits per attack, although it is usually slung on his back because he needs both hands for his spear. His card is complicated because he has two adjusted DX (in parentheses after his basic DX). The first is 11, which is his adjusted DX without the shield; the second is 10, which is his DX when he uses the shield. He can withstand 2 hits per attack without loss of ST due to his leather armor; when he uses the shield he can take 4 hits/attack. His ST is 11, which is just enough to let him carry the spear. When Ragnar goes into combat, the hits he takes should be shown as tally marks next to his ST; if he survives, the hits he took can be erased, since he will take time to recover before another fight. A figure may not put on or take off armor during a combat, but it may pick up or drop weapons as long as it never carries more than two (plus a dagger) at once. Between combats, a figure may freely change weapons and armor. Giving each figure a name and background adds interest, especially when miniature figures are being used as counters. Once each player's figures are ready, you may begin the combat. IV. TURN SEQUENCING AND OPTIONS MELEE is played in turns, representing about five seconds each. During each turn, each figure may execute one "option" from the list below. Each option may include movement, attack, defense, or some combination. The options available to a figure will depend on whether or not it is engaged, disengaged, or in hand-to-hand combat. An engaged figure is one that is adjacent to an enemy figure, in one of that figure's front hexes.
5 NOTHING in Melee happens simultaneously. Each movement or attack may affect the next one. Each turn goes through these stages: (1) Roll for initiative. Each player rolls a die. The winner may choose either to move his figure(s) first that turn, or to have the other player(s) move their figure(s) first. (2) Movement. The first player to move chooses ONE option for EACH of his/her figures, and executes the MOVEMENT part (if any) of that option for each figure. How far each figure may move depends on its movement allowance (MA) and the option chosen. (3) The second player then chooses options and moves all his figures the same way. (If there are more than two players, the third, fourth, and so on then pick options and move.) (4) All attacks are carried out. No figure may attack unless it chose an option including the word "attack." Figures attack in the order of their ADJUSTED DX, highest first; ties are resolved each turn by a die roll. When figures are firing two arrows per turn, they fire their second arrows (again in order of adjdx) AFTER all figures have made their first attack. If a figure is killed or takes 8 or more hits in one turn BEFORE its time to attack comes, it does not get to attack that turn. (5) If any figure inflicted hits (except with a missile or thrown weapon) on an enemy, and took no hits itself, it may retreat that enemy one hex in any direction and EITHER advance to the hex vacated by the enemy OR stand still (thus possibly becoming disengaged). (6) Counters for thrown or dropped weapons are placed in the appropriate hexes, and counters for slain or unconscious figures are flipped upside down. If both sides still have figures able to fight, begin the next turn. OPTIONS An OPTION is a set of actions. A figure may execute ONE option each turn, and MAY NOT mix actions from different options. The options available to a figure depend on whether it is engaged, disengaged, or in HTH combat at the moment its turn to MOVE comes. During a turn, a player may change his mind about a figure's option, as long as (a) that figure has not yet acted, and (b) that figure did not move too far to allow it to take the new option. OPTIONS FOR DISENGAGED FIGURES A figure which is NOT engaged with an enemy when its turn to move comes may perform any ONE of the following options: (a) MOVE up to its full MA. (b) CHARGE ATTACK. Move up to 1/2 its MA and attack with any weapon except a missile weapon. (A figure can never attack if it moved more than 1/2 its MA.) (c) DODGE. Move up to 1/2 its MA while dodging. (d) DROP. Move up to 1/2 its MA and drop to a prone or kneeling position. (e) READY NEW WEAPON. Move up to 2 hexes, re-sling (NOT drop) its ready weapon and/or shield, and ready a new weapon and/or shield, OR pick up and ready a dropped weapon and/or shield in the hex where movement ends. (f) MISSILE WEAPON ATTACK. Move up to 1 hex and fire a missile weapon. (g) STAND UP. Rise from prone, kneeling, or knocked-down position during movement phase; take NO other action. A figure MUST take a turn to stand up before attacking, running, etc. OPTIONS FOR ENGAGED FIGURES A figure which is engaged with an enemy WHEN ITS TURN COMES TO MOVE may perform any ONE of the following options: (h) SHIFT AND ATTACK. Shift one hex (or stand still) and attack with any nonmissile weapon. (i) SHIFT AND DEFEND. Shift one hex (or stand still) and defend. (j) ONE-LAST-SHOT MISSILE ATTACK. If the figure had a missile weapon ready BEFORE it was engaged, it may get off one last shot. The missile weapon MUST be dropped next turn. (This option reflects the fact that you can almost always release an arrow at a charging enemy.) (k) CHANGE WEAPONS. Shift one hex (or stand still) and drop ready weapon (if any), and ready a new NONMISSILE weapon. (An engaged figure cannot ready or reload a missile weapon.) (l) DISENGAGE. See explanation of DISENGAGING.
6 (m) ATTEMPT HAND-TO-HAND ATTACK. During the movement phase, the figure stands still or shifts; when its turn to attack comes, it moves onto the hex of any adjacent enemy, and attempts to hit with bare hands or (if it was ready) its dagger. (n) STAND UP. Same as (g) above. (o) PICK UP DROPPED WEAPON. "Bend over" (not moving), drop your ready weapon and/or shield (if any), and pick up and ready a dropped weapon in your hex. OPTIONS FOR FIGURES IN HAND-TO-HAND COMBAT (p) HTH ATTACK. Attempt to hit an opponent in the same hex with bare hands or, if dagger is readied, with the dagger. (q) ATTEMPT TO DRAW DAGGER. (r) ATTEMPT TO DISENGAGE. Disengaging while in HTH combat is not automatic; it requires a die roll. V. MOVEMENT Figures begin the game in any of the 4 entrance hexes (starred) at opposite ends of the arena. Each figure has a movement allowance (MA) of a certain number of hexes. An unarmored human has an MA of 10 - that is, he can move 10 hexes per turn. Armor reduces MA; leather armor = MA 8, chain mail = MA 6, and plate armor also = MA 6. MAs for nonhumans are given under NONHUMAN FIGURES. SHIFTING Only disengaged figures have options which let them move their full MA. An engaged figure may move only one hex during movement, and must stay adjacent to all figures to which it is engaged; this is called a "shift" in the list of options. Figures in HTH combat may not move at all until they successfully disengage. Moving onto other figures. Normally, only one figure occupies a hex; a figure may never move through a standing or kneeling figure. A figure may move into a hex with a fallen (unconscious or dead) figure and stop, or move into another figure's hex for HTH combat and stop. A figure may "jump over" an unconscious, dead, or prone figure at a cost of 3 from its MA. Whenever a figure moves into a hex with another figure (except for HTH), it immediately rolls 3 dice against its adjdx, as though it were trying to hit something. If this "saving roll" is missed, the figure falls down in that hex. A FIGURE MUST STOP ITS MOVEMENT when it enters any front hex of an enemy figure, thus becoming engaged. See FACING. VI. FACING Each figure faces one side of its hex, as shown by the direction the counter is turned. A player may change the facing of a figure whenever it MOVES, and may always change its facing at the end of its movement turn, even if it stayed in the same hex. A figure on the ground, or one bending over to pick up a weapon, is considered to face "rear" in all six directions; it has no front. However, a prone or kneeling archer has normal "front" hexes for purposes of determining where he/she may fire. Example: Astrid is facing the hex directly "above" her in the diagram. The three hexes marked "f" are her front hexes; the "s" hexes are her side hexes; the "r" hex is her rear hex. Facing determines which figures are engaged. A figure is ENGAGED if it is in an ENEMY's front hex. If a figure is behind an enemy, the front figure is engaged, but the rear one is not. Facing also determines which figures may be attacked. ONLY AN ENEMY IN ONE OF YOUR THREE FRONT HEXES MAY BE ATTACKED. For missile and thrown weapons, only figures "in front" of you may be attacked, as shown below. In this diagram, Tark is not engaged. Bjorn is engaged (he is in Rolf's front hex), but Rolf is not engaged (he is in Bjorn's rear hex). Karl and Astaroth are both engaged; each is in one of the other's front hexes. Jon and Grath are not engaged; they are not enemies.
7 The unshaded hexes are "in front of" Tark. He can fire missile weapons, or throw weapons, only at figures in these hexes. Attacking from an enemy's side hex adds +2 to your DX; attacking from his rear adds +4. See ATTACKS, below. VII. ATTACKS An "attack" is an attempt to hit an enemy. There are several types of attacks: regular, thrown-weapon, missile-weapon, and HTH. In order to attack (except HTH), a figure must have a READY WEAPON. A figure has one weapon and/or shield (specified by the player) ready when it enters the arena. A weapon stays ready after an attack, unless it is thrown or dropped (except a crossbow, which takes time to reload). In order to change weapons, a figure chooses option (c) or (k) to ready a new weapon. This takes up a turn; the new weapon can be used on the NEXT turn. A shield, like a weapon, is "ready" or not. An unready shield is slung on the figure's back. REMEMBER: A figure may not attack during a given turn unless it chose one of the options whose title includes the word "attack." Figures which change weapons, stand up, move more than 1/2 their MA, disengage, etc., CANNOT attack that turn. Only one figure may be attacked per turn (exception: a figure which fires two arrows can fire at two different targets). ROLLING FOR A HIT When an attack is made, the attacker rolls three dice to see whether he hit the enemy. To hit, a figure must roll its ADJUSTED DX or LESS on 3 dice. Thus, a figure with adjdx 8 must roll 8 or less. Adjustments to DX are as follows: ATTACKER'S ARMOR, SHIELD, ETC. Leather armor -2 Chainmail -3 Plate armor -6 Large shield (when ready) -1 Main-gauche as shield only -2 Main-gauche as 2nd weapon -4 FACING Attacking from enemy's side +2 Attacking from enemy's rear +4 NOTE: Missile weapon attacks don't get DX adds for facing! WOUNDS A figure that took 5 or more hits last turn is DX -2. A figure reduced to ST 3 or less is DX -3. THROWN WEAPON RANGE -1 DX for every HEX distance to the target. MISSILE WEAPON RANGE No penalty if target is in same megahex or 1 or 2 MH distant. -1 if target is 3 or 4 MH distant. -2 if target is 5 or 6 MH distant
8 - and so on, in bigger arenas. OTHER ADJUSTMENTS Crossbowman lying prone +1 Pole weapon user standing still, against charging enemy +2 Missile/thrown attack against figure sheltering behind body -4 Adjustments are figured before each attack. The adjdx represents the chance to hit the enemy, as stated above. Attacks come off in order of adjdx counting everything BUT missile and thrown weapon range; a distant target makes you less accurate but no slower. The roll to hit is adjdx or less on 3 dice, as stated above. BUT: A roll of 3 always hits, regardless of DX, and does triple damage. A roll of 4 always hits, regardless of DX, and does double damage. A roll of 5 always hits, regardless of DX. A roll of 16 always misses, regardless of DX. A roll of 17 always misses, and the attacker drops that weapon in his own hex. (A thrown weapon drops in the target hex instead.) A roll of 18 always misses, and the attacker's weapon is broken. ROLLING FOR DAMAGE When an attacker rolls his DX or less on 3 dice, he hits the enemy. How much damage he does is determined by another dice roll. How many dice are rolled depends on the attacker's weapon, as shown on the WEAPON TABLE. For instance, a broadsword gets 2 dice. If a figure attacks with a broadsword and hits, he then rolls 2 dice. The result is the number of hits the enemy takes (although his armor will take some of those hits for him). Some weapons have pluses and minuses. A small ax gets 1+2, which means you roll 1 die and add 2 to the result. If you hit with a small ax and roll 3, the enemy takes 5 hits. A dagger gets 1-1; if you roll a 3, the enemy only takes 2 hits. ARMOR AND SHIELDS Armor and shields take hits for you, thus protecting you. For instance, plate armor takes 5 hits/attack. If your enemy attacks with a broadsword (2 dice) and rolls 7, you should take 7 hits - but your armor stops 5 of these, and you only check off 2 hits. If a figure in plate is hit by 3 different attacks in one turn, the armor takes 5 from each attack. Shields work just the same way, except that if a shield is "ready" it protects against attacks from the 3 front hexes, and if it is not ready, it protects against attacks from the rear hex (and does not subtract from your DX). A left-hand dagger, or main-gauche, acts as a shield to parry 1 hit/attack (non-missile weapons only) from your front hexes. POLE WEAPONS The javelin, spear, halberd, and pike axe are "pole weapons." A figure which chargeattacks (option b) with a pole weapon does double damage if it hits. A figure which uses a pole weapon against a charge-attacking enemy also does double damage if it hits. If a figure with a pole weapon stays in the same hex on the turn an enemy charges him, he gets +2 DX with his pole weapon against that enemy. If he changed facing, he does not lose the +2 DX. THE LEFT-HAND DAGGER A fighter may use a main-gauche, or left-hand dagger, with any other one-handed weapon. It may be used in two ways: (1) On any turn the fighter uses it only as a shield, it stops one hit from any non-missile attack, and adjusts his DX by -2. (2) On any turn he uses it as a shield AND weapon, it still stops one hit from any non-missile weapon. It also lets him make TWO attacks that turn (against the same enemy); one with the main-gauche and one with the other weapon. BOTH attacks are at DX -4.
9 A main-gauche gets 1-1 in HTH combat. A fighter may NOT use two daggers, or a maingauche and dagger, in HTH combat. SHIELD-RUSH ATTACKS The "shield-rush" (slamming your shield into your foe in order to knock him over) is an important tactic in some kinds of combat. The shield-rush is considered an attack for all purposes; that is, you can strike with the shield as a charge attack or regular attack. If you rush with the shield, you may not also strike with a weapon. In order to make a shield-rush, you must have a shield (either large or small) ready. Make your attack by rolling as usual. If you fail to make your "to hit" roll, nothing happens. If you DO make your roll, your ENEMY must now make a saving roll to stay afoot. To stay afoot after being hit with a shield rush, your foe must make a saving roll against his adjdx. If the figure who hit him is AS STRONG or STRONGER, this is a regular 3-die roll. However, if the figure who hit him is WEAKER, only TWO dice are rolled.
10 WEAPON TABLE Weapon Dice ST Notes Dagger* in HTH combat. Main-Gauche See MAIN-GAUCHE rules. Rapier 1 9 Club* 1 9 Hammer* Cutlass Shortsword Mace* Small ax* Broadsword 2 12 Morningstar handed sword Battleaxe 3 15 Pole Weapons Javelin* See POLE WEAPON rules. Spear * Halberd Pike axe Missile Weapons Thrown rock A figure can always pick up a rock. Sling Small bow shots/turn if adjdx = 15+ Horse bow shots/turn if adjdx = 16+ Longbow shots/turn if adjdx = 18+ Light crossbow 2 12 Fires every other turn, or every turn if adjdx = 14+ Heavy crossbow 3 15 Fires every 3rd turn, or every other turn if adjdx = 16+ * This weapon may be thrown - see THROWN WEAPONS. This is a two-handed weapon. If the fighter has a shield, it must be slung on his/her back while the weapon is ready. ARMOR Plate armor takes 5 hits/attack; wearer's MA = 6; -6 to DX. Chainmail takes 3 hits/attack; wearer's MA = 6; -3 to DX. Leather armor takes 2 hits/attack; wearer's MA = 9; -2 to DX. No armor: MA = 10, no hits stopped, no DX penalty. SHIELDS Large shield takes 2 hits/attack (to front); -1 to DX. Small shield takes 1 hit/attack (to front); no DX penalty Main-gauche parries 1 hit/attack; -2 DX, or -4 if used as weapon. REMEMBER: A FIGURE MAY CARRY ONE DAGGER OR MAIN-GAUCHE, AND TWO OTHER WEAPONS. A SHIELD COUNTS AS A WEAPON. Since it is fairly easy to roll your adjdx or less on two dice, a shield rush by a weaker figure is not too dangerous. (A roll of 12, though, is an automatic fall. On 3 dice, a 16, 17, or 18 is an automatic fall.) A figure which fails to roll its adjdx or less immediately falls down.
11 When comparing strengths for a shield-rush, use original ST, not wounded ST. Also, note that a rush against a figure more than twice your ST will have no effect. Shield-rushing a giant is pointless... The shield-rush NEVER puts hits on a foe; it ONLY floors him. THROWN WEAPONS Some weapons may be thrown (see WEAPON TABLE). A thrown-weapon attack is treated exactly like a regular attack, but there is a DX adjustment of -1 for every hex of distance to the target. A target 3 hexes away is attacked at -3 DX. It is possible for other figures to block the path of a thrown weapon, If a line drawn from the center of the attacker's hex to the center of the target hex passes through any hex containing a standing figure, that figure is "in the way." A line passing along the edge of a hex does NOT go through that hex. When a weapon is thrown, the attacker must FIRST "roll to miss" each figure between him and his target. The attacker makes his DX roll as usual, but if he rolls his adjdx or below, he MISSES, and the weapon flies past; otherwise, it hits. You may not "roll to miss" an enemy. When you are "rolling to miss," a 14 becomes an automatic hit, a 15 is a double-damage hit, and a 16 is a triple-damage hit. 17 means the weapon drops in that hex; 18 means it breaks. When a thrown weapon hits, it falls to the ground in that hex. It' a thrown weapon misses its intended target, it continues along the line drawn between the attacker's hex and the target hex for 10 hexes past the target hex. Roll for each standing figure whose hex the line passes through (rolling to hit or to miss, as appropriate), until the weapon hits, goes 10 hexes, or strikes a wall and stops. Whether the attacker is trying to hit or to miss, his DX is always adjusted by -1 for each hex distance to the figure rolled for. A may throw a weapon at B (DX -2) or C (DX -3), To throw at D, he must roll to miss B (DX -2) before rolling to hit D (DX -3). He may throw at E (DX -2), but if he misses, must then roll to hit (or miss) F (DX -3). If he misses F, he must roll for G (DX -4). If he wanted to hit G, he would have to roll and miss both E and F. He CANNOT throw at H, who is in the shaded area BEHIND him. MISSILE WEAPONS Generally, only a disengaged figure may attack with a missile weapon (option f). However, a figure with a missile weapon ready can get off one shot if suddenly engaged (option j), but must then drop the missile weapon on the next turn. Missile weapon fire calls for a DX adjustment based on the number of MEGAHEXES (MH) distance to the target. If the target is in the same MH or is 1 or 2 MH distant, there is no DX adjustment. If the target is 3 or 4 MH distant, DX is -1. If the target is 5 or 6 MH distant, DX is -2. Otherwise, missile weapons follow the same line-of-flight rules as do thrown weapons. The target must be in front of the attacker, and the attacker must roll to miss any standing figure in the way. A missile which misses its target continues until it hits a wall or a figure; roll as above to hit (or miss) each figure its line of flight passes through, making new DX adjustments as necessary. A roll of 17 or 18 on any target but the first breaks the ARROW but does not affect the bow. Missile weapons never get adds for the target's facing. The DX adjustments for missile and thrown weapon distance are NOT considered when determining which figure attacks first. Crossbows normally fire every 2nd or 3rd turn (depending on user's DX and type of bow - see WEAPONS TABLE). Reloading a crossbow comes under the "ready a weapon" option for all purposes.
12 Prone and kneeling fire. Crossbows may be fired from a prone position. Any bow may be fired from a kneeling position. A crossbow may be reloaded by a prone or kneeling figure; no other weapon may be readied by a prone or kneeling figure. A crossbowman lying prone gets a +1 DX adjustment. Sheltering directly behind fallen bodies. Any figure may lie prone or kneel in a hex directly behind a sheltering body. A missile/thrown weapon attack then has a chance of hitting that body instead. Any figure making a missile or thrown weapon attack against a "sheltering" figure suffers a -4 DX adjustment. In a situation where it matters (i.e., the "body" was still alive), the archer must make a second roll - rolling his adjdx to try to MISS - if and only if he misses his original target. HITTING YOUR FRIENDS An attacker must "roll to miss" when his missile or thrown weapon passes through the hex of a figure he does not want to hit (see THROWN WEAPONS). In the same way, he must "roll to miss" a friendly figure when he strikes at an enemy in the friendly figure's hex and misses. This can happen when a standing figure tries to hit an enemy on the ground in HTH combat, and misses. He may then roll, one by one, to see if he hits other enemy s hex. If he misses them all, he must roll, one by one, to MISS each friendly figure in that hex. He stops rolling when he hits one figure, or misses them all. Figures in HTH combat never hit their friends in the same HTH combat. Only standing figures striking "into the pile" must roll. HAND-TO-HAND COMBAT A figure may move ONTO an enemy figure's hex, initiating HTH combat, if (a) the enemy has his back to the wall, or is lying down, prone, or kneeling, or (b) the enemy has a lower MA, or (c) the attacker comes in from the rear, or (d) the enemy agrees to HTH combat. Initiating HTH combat is considered an attack. A disengaged figure picks option (b) to initiate HTH combat; he moves onto the enemy's hex during movement and attacks during combat. An engaged figure picks option (in), stands still or shifts, and enters an enemy hex and attacks during COMBAT. If the attacker had his dagger ready already, he may use it in HTH combat. Otherwise, he drops his ready weapon and shield in the hex he started from and attacks bare-handed. When a figure is attacked HTH, it immediately rolls one die to determine its defense against the HTH attack, as follows: On a roll of 1 or 2, the defender drops his ready weapon and/or shield (unless ready weapon is a dagger) and fights bare-handed. Both figures fall to the ground in the defender's hex. On a roll of 3 or 4, the defender drops his ready weapon and/or shield, but has time to ready his dagger if he has one. He will be able to use it in his next attack. Both figures fall to the ground in the defender's hex. On a roll of 5, the defender does not drop his weapon, and the attacker immediately backs up to the hex from which he entered the defender's hex. HTH combat does not take place.
13 On a roll of 6, the defender does not drop his weapon, and AUTOMATICALLY gets a hit on the attacker (even if the defender had already attacked that turn!) The attacker must retreat one hex as above. HTH combat does not take place. (if the attacker jumped the defender from behind, ignore a 6 and roll again.) Since figures in HTH combat are on the ground and/or grappling with their foe(s), they always get the +4 "rear hex" DX adjustment. During the combat phase, HTH combat is rolled for like any other combat. A dagger gets 1+2, a main-gauche gets 1-1, bare hands against a stronger enemy get 1-4, bare hands against an enemy of the same strength get 1-3, and bare hands against a weaker enemy get 1-2. A figure engaged in HTH combat may try to draw and ready its dagger (if it has one) by picking option (q). On a roll of 1, 2, or 3, the dagger was drawn and readied; otherwise, nothing happened. MULTIPLE HTH COMBAT When two figures are rolling around fighting, any other figure can move onto that hex and join the brawl, using option (b) or (m), without rolling to see if the attempt is successful. If two or more figures are fighting one enemy, the lone fighter's strength is compared to the total enemy strengths to see how many dice he gets. If he is stronger than all put together, he gets 1-2, etc... When there are two or more figures on the same side in a HTH brawl, all figures on a side get 1-3. Figures on the ground in HTH combat can ONLY attack the enemies they are in HTH combat with. They may attempt to disengage according to the disengagement rules on page 18. If a standing figure attacks an enemy who is down in HTH combat with other figures, and misses, he then rolls for each other enemy in the HTH combat, and then for each friend, until he hits someone. Example: Two goblins have engaged Ragnar in HTH combat. He can only attack them (he must pick one or the other), and they can both only attack him. Bjorn comes up with his sword and hacks at one of the goblins. His DX for that attack will be +4 (because the goblin is on the ground, it counts as a rear attack), plus Bjorn's other DX adjustments, if any. If Bjorn misses the goblin, he rolls again - same DX adjustments - to see if he hit the other goblin. If he misses again, he rolls - same adjustments to see if he hit Ragnar. See HITTING YOUR FRIENDS. If a missile or thrown weapon is aimed at a pile of figures in HTH combat, FIRST roll to see if it hit, and then roll RANDOMLY to see WHO it hit. It is not a good idea to fire arrows into a brawl... DISENGAGING Disengaging is the action of moving away from a figure(s) that has you engaged. A figure which selects the "disengage" option stands still or shifts during its movement phase. When its turn to attack comes, instead of attacking, it moves one hex in any direction. You MAY move onto another figure to attempt HTH combat that same turn. Note that an enemy with a DX higher than yours will be able to strike at you on the turn you disengage, since his attack phase comes before yours. An enemy with a lower DX will not have a chance to strike at you if you disengage away from him. A figure engaged with more than one enemy may disengage from some while remaining engaged with others, but may NEVER attack on the turn it disengages. A kneeling, prone, or fallen figure cannot disengage; it must first stand up. DISENGAGING FROM HTH COMBAT A figure in HTH combat may not automatically disengage, but must pick option (r), the attempt to disengage. During the movement phase it does not move, since figures in HTH remain in the same hex. During its attack phase, it does not attack, but rolls 1 die instead. If its DX is superior to the enemy's, it needs a 1, 2, or 3; if its DX is the same or less, or if there are more than one enemies, it needs a 1. A figure which disengages from HTH combat immediately stands up and moves to any adjacent, empty hex.
14 DEFENDING AND DODGING The "dodge" option (for disengaged figures) and the "defend" option (for engaged figures) have exactly the same effect. A figure which dodges or defends will never do any damage to the enemy., However, a figure attempting to hit a dodging figure (with a missile or thrown weapon) or a defending figure (with any other type of attack) must roll its adjdx on FOUR dice, rather than three, to hit. There are no automatic hits; a roll of 20 or better is a miss. A figure may NOT defend without a non-missile weapon ready, to parry with. Any disengaged figure may dodge. FORCING RETREAT A figure which hit an enemy figure (missile or thrown weapon hits, or hits taken by the enemy's armor, don't count) and is NOT hit itself, may force the enemy to retreat one hex at the end of the turn. The victorious player moves the enemy figure one hex in any direction, into any hex which is vacant or contains only a fallen figure. He may then choose EITHER to stay still OR to move into the hex from which the enemy retreated. If there is no vacant or fallen-figure hex adjacent to the foe, you cannot force a retreat. REACTIONS TO INJURY A figure which takes 5 or more hits in one turn has its DX adjusted -2 for the NEXT turn ONLY. A figure which takes 8 or more hits in one turn IMMEDIATELY falls down. If it has not already attacked, it may not attack that turn. It may do nothing NEXT turn except stand up (or stay down). If it is in HTH combat it may do NOTHING next turn. A giant loses 2 DX for 9 hits in one turn, and falls down on 16. Any figure whose ST is reduced to 3 or less has an extra -3 DX for the remainder of the game. Any figure whose ST is reduced to 1falls unconscious, and any figure whose ST is reduced to 0 dies. DROPPED WEAPONS A dropped weapon counter should be placed in a hex where (a) a thrown weapon lands, (b) a figure is standing when it drops its weapon to ready a new one (engaged figures MUST drop their ready weapon to ready a new one; disengaged figures may re-sling their ready weapon as they ready a new one), or (c) a figure drops its weapon when it rolls a 17 on the "to hit" roll. The counter for a dead or unconscious figure is assumed to include a dropped weapon counter for each weapon it was carrying when it fell. When a dropped weapon is picked up, the counter is removed. VIII. NONHUMAN FIGURES In order to simulate fantasy combat or gladiatorial contests, you may wish to use nonhuman figures in Melee. MONSTERS AND BEASTS A BEAR has a MA of 8. It normally does 2+2 damage, or 3 dice in HTH combat. Its fur acts as armor, taking 2 hits/attack. Suggested ST = 30 (this is a BIG bear). Suggested DX = 11. A WOLF has a MA of 12. Its bite does 1+1 damage, and its fur stops 1hit/attack. Suggested ST = 10 (more for dire wolves); suggested DX = 14. A GIANT SNAKE has MA = 6. Its bite does 1+1 damage. It is very hard to hit; -3 off your DX for any attack on it. Suggested ST = 12; suggested DX = 12. Its side hexes are considered front hexes for all purposes, because it can strike so quickly. Other animal figures can be set up along similar lines.
15 A GIANT (say, 9-12 feet tall) occupies 3 hexes; see sketch for which sides are "front." His MA is 10 unless he is in armor; count the number of hexes his FRONT moves. His ST will be AT LEAST 24; it might be 40 or 50 if he's a tough one. His DX will be low rarely more than 9, even without armor. A giant uses big weapons, Re a spiked club worth (1+1) for every 10 ST he starts with. A giant gets 2-1 in HTH combat. A GARGOYLE (see cover) has DX = 11, ST = 20. Its stony flesh stops 3 hits/attack, and its rocklike hands do 2 dice damage in regular or HTH combat. It uses no weapons. Its MA is 8 on the ground, 16 if flying. It lands to attack, but may land ON you for HTH... An ORC is just like a human figure - except evil. A HOBGOBLIN fights like a man, but its ST and DX total to only 20, with a minimum of only 6 each. A GOBLIN also fights like a man, but is even smaller; minimum ST and DX 4 each, totaling only 18. FANTASY FIGHTERS An ELF is like a man, except his MA without armor is 12. In leather, he moves 10. His movement in other armor is the same as a man's. Minimum ST = 6; minimum DX = 10; total = 24. A DWARF is also like a man, except min DX = 6, min ST = 10; total = 24, Dwarves do an extra +1 damage when they hit with hammers or axes. A HALFLING has ST and DX adding to 20. Min ST = 4; min DX = 12. Halflings get an extra +3 DX adjustment with missile or thrown weapons, and do an extra +1 damage when they hit with them. IX. EXPERIENCE Figures which survive combat gain experience, which can increase their strength and dexterity. The experience a fighter gains depends on the type of combat, and whether the enemy was superior or inferior in total attributes (ST + DX). In multi-figure combats, the AVERAGE superiority is considered. COMBAT TO THE DEATH. Continues until all on one side are slain. 50 experience points (EP) to each survivor, or 70 if the enemy averaged more than 3 superior in ST + DX. ARENA COMBAT. Continues until all on one side are dead OR escape from the "door" from which they entered. Unconscious figures may not be slain. Winners get 30 EP; defeated survivors get 20 EP (unless they ran away unhurt, in which case they lose 10 EP). If one side averaged 3 or more weaker in total attributes, survivors on that side get 10 extra EP each. PRACTICE COMBAT. No missile weapons. All weapons are blunted and do 1/2 damage. A figure drops out when its ST goes to 3 or less. (It is possible to get killed in practice - but difficult.) Those still on their feet when one side is eliminated get 10 EP each. Others get nothing but bruises. When a figure gets 100 EP, he/she may "trade them in" for one additional point added to EITHER basic ST OR basic DX. There is no limit to how high a fighter can raise his or her attributes, with enough experience. X. COMBAT EXAMPLE The combat described in the introduction actually took place in MELEE. Here's how it happened
16 Both Flavius and Wulf are beginning figures, with ST and DX totaling 24 each. Flavius is a legionary; he carries a gladius (shortsword) and shield; his Roman armor counts as chainmail. The armor and large shield adjust his DX to 8, and stop 5 hits/attack. Wulf is a Germanic tribesman; he wears no armor, so his basic and adjusted DX are the same. TURN 1. The two enter from opposite sides of the board. Flavius wins the initiative roll. Seeing that his enemy has a bow, he runs toward him his full MA -6 hexes. Wulf moves up 1. Flavius cannot attack, but Wulf can fire, and does. He rolls 9 on 3 dice, which is less than his DX of 10, so he hits (Flavius was close enough that there was no DX adjustment for range). A longbow does 1+2 damage. Wulf rolls 1 die, getting a 5, so Flavius takes 7 hits. His armor and shield stop 5 - so only 2 hits are marked against Flavius. TURN 2. Wulf wins the initiative roll, and tells Flavius to go first. Flavius decides to move 1/2 his MA (3 hexes) and dodge. Wulf backs up 1. Flavius cannot attack. Wulf can fire again. Since Flavius dodged, Wulf has to roll on FOUR dice to see if he hits. He rolls a 16, which is not nearly good enough, so he misses. TURN 3. Wulf wins the initiative roll again, and tells Flavius to move first. This lets Flavius run the 5 hexes to where Wulf is standing - so Wulf is engaged when his chance to move comes. Wulf shifts one hex so his back won't be to the wall. Flavius can't attack; he moved more than 1/2 his MA. Wulf can fire his bow one last time, since he wasn't engaged at the start of the turn. He rolls an 8 on 3 dice, which hits - but when he rolls for damage, he only rolls a 2, for 4 hits. Flavius' armor stops that much, so he is unhurt. TURN 4. Wulf wins the initiative. He tells Flavius to go first. Flavius chooses not to move; Wulf shifts again, drops the bow (he has to) and readies his two-handed sword. This time Wulf cannot attack - but Flavius can. He needs an 8 or under on 3 dice. He rolls a 16, which misses. (A 17 would have meant he dropped his sword.) TURN 5. The players agree to forget about initiative; they simply want to hack at each other. Since Wulf's adjusted DX is higher, he normally gets first hack. He rolls a 13, which misses. Flavius rolls an 8, which hits. His shortsword does 2-1 damage. He rolls 2 dice and gets a 7, so Wulf takes 6 hits. Since Wulf has no armor, all 6 hits count. Wulf is badly hurt. Flavius doesn't bother to force a retreat. TURN 6. Wulfs DX is -2 this turn, because of the injury last turn, so his adjdx is 8 - the same as Flavius'. They roll to see who strikes first; Wulf wins. He rolls a 4, which is a hit with double damage. His sword is a 3-1 weapon; he rolls 3 dice, and gets a 6. 6 minus 1 is 5, which is doubled: 10 hits on Flavius. The armor and shield take 5; Flavius takes the other 5. Now he, too, is badly hurt. TURN 7. The players don't bother with initiative. Wulf's DX is back up to 10, but Flavius' is so it is only 6 this turn. Flavius knows his chance to hit is bad, so he picks option (i) and defends. This means Wulf must roll 10 or less on FOUR dice. He fails. Flavius, of course, has no chance to hit, since he is defending. TURN 8. Both figures now have their DX back to normal. They ignore initiative and hack at each other. Wulf, with the better DX, hacks first; he rolls a 13, which misses. Flavius rolls a 6 to hit. He rolls two dice for his shortsword and gets a 7 - so he puts 6 more hits on Wulf. Wulf has now taken 12 hits. 13 will knock him out, and 14 will kill. Flavius retreats him one hex and follows. TURN 9. Wulf's injured DX is only 5 (-2 for taking 5 hits last turn, and -3 more because his ST is down to 2. Flavius rolls a 7, which hits; since his sword will do at least 1 damage, Wulf is a goner.
17
18
GURPS : COMBAT. Maneuvers
 GURPS : COMBAT Turn Sequence Combatant with highest Basic Speed goes first, then the one with the next-highest Basic Speed and so on. If tied, the one with the highest DX goes first. If still tied, roll.
Brimstone and Iron. Heroic Combat System.
 Brimstone and Iron. Brimstone and Iron was originally an attempt to unify the rules of Warhammer Fantasy Battle, Warhammer Skirmish and Mordheim. I ve dropped that idea since Games Workshop change the
Feudal Skirmish and Tourney Rules
 Feudal Skirmish and Tourney Rules Al Hewitt, Ric Willey, Neil Houltby, and Tony Morley Initiative Throw d20, highest has initiative and can move first. If a figure is contacted by a higher initiative figure
Weapons in Rick's Campaign
 Weapons in Rick's Campaign 2001 New Material Richard Smith = Version 1.2.3 Daggers Dam HTH Min ST Cost Kg Notes Stilleto * 1d 5 1d 1 2 $ 7 0.06 Very easy to conceal Dagger * 1d 3 1d 5 10 0.1 A standard
STEP-BY-STEP RSBM THE FIGHTERS
 STEP-BY-STEP RSBM In RSBM all matches are to the death. There s a points system (gasp) that allows you to create and rate your gladiators. There s a Fame system to allow your gladiator to get better as
TRAVEL & EQUIPMENT. Standard Price List. Land Travel. Table 5A : Daily Sea Weather. Table 5B : Sailing Table. Table 1D : Encumbrance Values
 TRAVEL & EQUIPMENT Land Travel 1 day of travel on foot = 20 miles 1 day of travel on horseback = 30 miles Difficult terrain = halve all distances Table 5A : Daily Sea Weather D10 Weather Conditions 1-2
GBH Great Battles Handbook
 GBH Great Battles Handbook Last revision: March 2005. Designed by Edgar Leo. 1. Some Terms Used xd10 = Numeric value between x and ten times x, resulting from throwing x ten sides dice (0 is 10). Military
Original concept from:
 Original concept from: http://home.earthlink.net/~duanevp/dnd/building%20d&d/buildingdnd17.htm. The A.D.D.I.C.T. Short Form I. Check for Surprise A. The DM can determine that surprise exists (or does NOT
QUICK REFERENCE SHEETS
 QUICK REFERENCE SHEETS 1 QUICK REFERENCE SHEETS Survivor Action Point Table Actions AP Cost Walking (3 ) 1 Turning more than 180 degrees 1 Spotting 1 Running (6 ) 1 Diving (1 ) 2 Crawling (1 ) 1 Going
COMBAT CARDS. The Easy Way to Assess Your Choices STEVE JACKSON GAMES. An e23 Game Aid for GURPS from Steve Jackson Games
 COMBAT CARDS The Easy Way to Assess Your Choices Combat is the most chaotic situation in any roleplaying game. So many targets, so many opportunities... so many options. Half the trick in figuring out
CLOSE COMBAT MANEUVERS All close combat maneuvers are at Point Blank Range, which modifies the difficulty by 1
 CLOSE COMBAT MANEUVERS All close combat maneuvers are at Point Blank Range, which modifies the difficulty by 1 Charging Attack/Knock-Back [modified house rule]: Decide whether to inflict Damage or shove
Combat Skills. Dodge: Great Weapons Warrior has a 6+ ward save vs. Great Weapons. (Ward saves stack. - A natural 1 always fails to save.
 Combat Skills Weapons Training: Close Warrior can use all close combat weapons, not just those on his list. This skill does not grant proficiency with shields. Dodge: Great Weapons Warrior has a 6+ ward
QRS QUICK REFERENCE QUICK REFERENCE SHEETS. Shooting Modifiers table. Survivor Action Point Table. Hand-to-Hand Modifiers Table
 QRS QUICK REFERENCE SHEETS Shooting Modifiers table Survivor Action Point Table Actions AP Cost Target Modifier Walking (3 ) Per AP to aim (max APs / +4 modifier) + Turning more than 80 degrees Target
Attacks of Opportunity (Part Two) By Skip Williams
 By Skip Williams") Rules of the Game: All About Attacks of Opportunit... 1 of 5 Rules of the Game Home > Games > D&D > Articles Attacks of Opportunity (Part Two) By Skip Williams 11/02/2004 Printer Friendly Email A Friend
Rules of the Game: All About Attacks of Opportunit... 1 of 5 Rules of the Game Home > Games > D&D > Articles Attacks of Opportunity (Part Two) By Skip Williams 11/02/2004 Printer Friendly Email A Friend
Reference Revised Combat Rules
 Revised Combat Round Reference Revised Combat Rules I. Check for Surprise a. Roll 1d10 (see Surprise Modifiers) with a 1, 2, or 3 meaning surprise. Determine Initiative (once for given encounter) a. Each
Mutants & Masterminds Combat Cheat Sheet (PL 6)
") Actions Mutants & Masterminds Combat Cheat Sheet (PL 6) Adapted from Mutants & Masterminds, Second Edition Brandon Blackmoor, 2009-07-12 The types of actions your hero can perform during a round are standard
Actions Mutants & Masterminds Combat Cheat Sheet (PL 6) Adapted from Mutants & Masterminds, Second Edition Brandon Blackmoor, 2009-07-12 The types of actions your hero can perform during a round are standard
Rome at War Hannibal at Bay Errata and FAQ
 First Edition Rules Rome at War Hannibal at Bay Errata and FAQ Pg 3: Light Cavalry description has a depiction of Light Infantry. 2.21: Change "enemy units" to "any non-leader units". 6.1: After Example,
Modified D20 System for Wild Pig Comics. Congratulations soldier! You have been given control of a 40 ton fighting machine, known as
 Modified D20 System for Wild Pig Comics WELCOME TO THE FUTURE OF COMBAT Congratulations soldier! You have been given control of a 40 ton fighting machine, known as a Mech. It is a complex machine when
PROCONSUL SCENARIO Dacia 87CE
 Dacia 87CE Page 1 of 5 Dacia 87CE The Kingdom of Dacia [present day Romania] frequently launched raids across the Danube into Roman territory. On several occasions the Romans tried to bring them to heel.
A Splendid Victory! Copyright. Trevor Raymond. Version 3: May, 2012 (Exodus 20:15 - Thou shall not steal.")
") A Splendid Victory! Copyright. Trevor Raymond. Version 3: May, 2012 (Exodus 20:15 - Thou shall not steal.") Page 1 of 28 A Splendid Victory is a basic set of rules designed for the table-top wargaming
A Splendid Victory! Copyright. Trevor Raymond. Version 3: May, 2012 (Exodus 20:15 - Thou shall not steal.") Page 1 of 28 A Splendid Victory is a basic set of rules designed for the table-top wargaming
Intro. Basics. Pilots. Fighters
 Intro Black Skies Generic Star Fighter Combat Rules Quick and simple rules intended to create a fast moving star fighter game, where out thinking your opponent is as important as out shooting him. Games
Close Combat Weapons
 Close Combat Weapons Weapon Base Damage ST/DX Reach Maneuvers ENC AP/ HP Cost Battle Axe 1H 10% 1d6+2 11/9 2 Slash, Stun 2 4/8 100 Battle Axe 2H 10% 1d8+2 9/9 2 Slash, Sunder 2 4/8 100 Broadsword 5% 1d8+1
Pit Fighter. Pit Fighter is a game that allows two or more players
 Pit Fighter by Jervis Johnson Brutal warriors are forced to take up arms against each other in lethal hand-to-hand fighting, often to the pleasures of the baying crowd. Pit Fighter is a game that allows
WEAPONS WEAPON CATEGORIES
 WEAPONS WEAPON CATEGORIES Weapons are grouped into several interlocking sets of categories. These categories pertain to what training is needed to become proficient in a weapon s use (simple, martial,
Night Goblins v.1.5. Warband Special Rules. Warband Special Rules. Gork Complex Night Goblin warbands have +2 Ld to all Rout Tests they have to take.
 - Night Goblins v.1.5 Gork Complex Night Goblin warbands have +2 Ld to all Rout Tests they have to take. Animosity At the start of each of your own turns (i.e. not opponent s), roll a D6: On (2-6) nothing
Critical Bullet and Melee Hit Chart 2
 Critical Bullet and Melee Hit Chart 2 Expect to be injured in our line of work. Bullet wounds can be most serious, but blade weapons can sometimes be just as deadly. This chart expands upon the previous
PROCONSUL RULES FOR ANCIENT BATTLES
 Index Section Subject Page 1.0 Basic Concepts 2 1.1 Command Groups 2 1.2 Stands and Basing 2 1.3 Strength Points [SP] 2 1.4 Game Play 2 2.0 Command and Control 3 2.1 Moving Commanders 3 2.2 Losing a Commander
3rd Edition RULES OF PLAY
 Command & Colors Napoleonics 1 Game Design by Richard Borg 3rd Edition RULES OF PLAY 2 Command & Colors Napoleonics The battlefield is a scene of constant chaos. The winner will be the one who controls
Official Errata and FAQs, Version 1.3
 Official Errata and FAQs, Version 1.3 This document presents amendments to the rules of and our responses to players frequently asked questions. When changes are made, the version number will be updated
HIVE OF THE DEAD ADVANCED RULES
 HIVE OF THE DEAD ADVANCED RULES The Adventure Sheet The Adventure Sheet is where you can keep track of your Statistics, Equipment, Ammunition and other information relevant to your adventure. You are free
A Game of Gladiatorial Combat By, Mike Vasile, Jim Welch and Scott Clark
 Version 1.1 A Game of Gladiatorial Combat By, Mike Vasile, Jim Welch and Scott Clark Copyright 2001, Michael A. Vasile, Scott Clark and James Welch Acknowledgements: Many thanks to Walt Kordon, whose
Legends of the Ancient World
 Artwork: Minor Brothers; Design: George Dew; Design Team: Scott Chisholm, Darryl Cook, Grayson Dew, Brian & Chris Hudgins, Jerry Meyer Jr., David O. Miller, Rick Nichols, Robert Purnell, Robert W. Purnell,
Legends of the Untamed West
 Artwork: Minor Brothers; Design: George Dew; Design Team: Scott Chisholm, Darryl Cook, Grayson Dew, Brian & Chris Hudgins, Jerry Meyer Jr., David O. Miller, Rick Nichols, Robert Purnell, Robert W. Purnell,
CHARLES THE BOLD SCENARIO
 Scottish War of Independence - Battle of Falkirk 1298 Page 1 of 5 Battle of Falkirk 22 July 1298 In 1296 Edward I of England declared himself overlord of Scotland deposing the Scottish king. Rebellion
THE BASIC GAME. Construction INTRODUCTION. Winning the Game
 SBG300 TM THE BASIC GAME INTRODUCTION MetalKrushers is a game in which each player controls a Krusher in a futuristic arena. In the basic game, players are familiarized with the Arena Rules, which stress
FORCES OF VALOR BATTLE TACTICS 2005, Unimax Toys Limited, All Rights Reserved
 FORCES OF VALOR BATTLE TACTICS 2005, Unimax Toys Limited, All Rights Reserved Forces Of Valor, The Game allows you to fight exciting and realistic war games. All you need to play are Forces Of Valor soldiers
Armoured Scenarios. Heavy Scenarios. Counting Coup Woods Battle. Capture the Flag + Counting Coup. Capture and Control. MIC: Sir Griffin ap Bedwyr
 The armoured scenarios are subject to change at the event. The order and number fought will be determined by the MIC, taking into account the number of fielded armies. At the end of Day One, there will
T-404-LOKA, Final Project
 T-404-LOKA, Final Project GUMMS Bjarmi Árdal Bergsteinsson Finnbogi Darri Guðmundsson Guðný Björk Gunnarsdóttir Óskar Ögri Birgisson Þorgeir Auðunn Karlsson 2013 BSc Computer Science Instructor: Birgir
FIRETEAM Wargame Rules for Modern Combat Operations
 FIRETEAM Wargame Rules for Modern Combat Operations By Rory Crabb Written By Rory Crabb Version 1.0 July 2016 Miniatures from the collection of the author and terrain by Paul Davies 1 FIRETEAM Wargame
AXE/MACE (DX-5, Flail-4, other Axe/Mace-3 or Two-Handed Axe/Mace-3) May not attack and parry in the same turn.
 May not attack and parry in the same turn.") COMBINED WEAPONS PRICE LIST MELEE WEAPONS combined tables GURPS Marketplace AXE/MACE (DX-5, Flail-4, other Axe/Mace-3 or Two-Handed Axe/Mace-3) May not attack and parry in the same turn. Axe cut sw+2 1
COMBINED WEAPONS PRICE LIST MELEE WEAPONS combined tables GURPS Marketplace AXE/MACE (DX-5, Flail-4, other Axe/Mace-3 or Two-Handed Axe/Mace-3) May not attack and parry in the same turn. Axe cut sw+2 1
Hambone Barca vs. Miles Gloriousus GAME RULES By George Sivess
 Hambone Barca vs. Miles Gloriousus GAME RULES By George Sivess Two of my favorite Ancient Generals, Hambone Barca (the illegitimate and slightly less capable son of Hamilcar), and Miles, the star of A
ASLSK Basic Infantry Tactics
 Basic Infantry Tactics ASLSK Basic Infantry Tactics Daniel F. Savarese Last Updated: 2005-03-04 Copyright 2004, 2005 Daniel F. Savarese 1 The original Squad Leader rule book contained a section at the
Chief: Each warband must have one Chief, no more, no less! Woodsmen: Your warband may include any number of Woodsmen
 WOODSMEN DE ARTOIS Large tracts of Brettonia are covered by forest and woodland. These are owned by the Lords and Barons who let them to tenants to work. The people of the forests are more independent
Make Me An Army. Amazons:
 Make Me An Army Army Lists, to go with Irregular Miniatures 6mm Fantasy Wargames Figures. These army lists are designed for use with the Fire At Will, Men rules (also available in this site under the Fantasy
ATTRIBUTES & DERIVED STATS HINDRANCES GEAR
 NAME: RACE: RANK: XP: PERSONAL INFO ICONIC FRAMEWORK ATTRIBUTES & DERIVED STATS HINDRANCES AGILITY SMARTS SPIRIT CHARISMA PARRY PACE STRENGTH VIGOR SKILLS GEAR SKILL DIE ITEM STRAIN WT EDGES & ADVANCES
Brimstone and Iron. Some Alternate Weapon Rules for Warhammer Fantasy.
 Brimstone and Iron. Some Alternate Weapon Rules for Warhammer Fantasy. This page originally started off as some house rules for some of the weapons in Warhammer. The following rules suggestions can be
WELCOME TO THE ARENA! BATTLEMECHS
 WELCOME TO THE ARENA! MechWarrior : Solaris VII gives you a different way to play with your MechWarrior miniatures. Solaris VII uses many but not all of the concepts and components common to MechWarrior:
Ascendancy LRP Basic Rules
 Ascendancy LRP Basic Rules Basic Rules Random Chance Normally if characters are performing an action suitable for their Skills and Talents they will automatically succeed. However, in order to simulate
Errata to the Second Printing
 Errata to the Second Printing Savage World, Great White Games, the GWG shark, and the Pinnacle logo are 2009 Great White Games, LLC; DBA Pinnacle Entertainment Group. 1 First Strike The text for the First
Combat Options. Timothy J. Miller April 4, 2000
 Combat Options Timothy J. Miller April 4, 2000 Combat Options is a set of independant rules modules relating to Fudge combat. Any of these rules can be used separately, or in any combination. Each option
Rules Update for Warmaster Ancients
 Rules Update for Warmaster Ancients P25 Skirmishers Evading a Charge delete all four paragraphs and replace as follows. Note that this new rule replaces the rules addition Evades from close range become
Telengard Fighter s Handbook
 Telengard Fighter s Handbook 2/11/2011 Fighter Level Progression Experience Level Hit Dice Attack bonus (d8) 0 1 1 +1 2,000 2 2 +1 4,000 3 3 +2 8,000 4 4 +3 16,000 5 5 +4 32,000 6 6 +5 64,000 7 7 +6 120,000
COMMANDS AND COLORS NAPOLEONICS PLUS
 COMMANDS AND COLORS NAPOLEONICS PLUS CAMPAIGN RULES Version 3.00 2018-09-20 Contents LEADERS... 3 Leader Casualty Fate... 3 Leader Replacement... 4 Leadership Quality... 4 CAPTURING A THOPHY... 4 GLORY...
Race. In D&D, race refers to any intelligent humanoid species
 Race Race In D&D, race refers to any intelligent humanoid species Dwarf Elf Halfling Human Gnome Half-Elf Half-Orc Tiefling Race Select a race now and record it near the top of your character sheet Common:
Pig Wars Late Medieval Variant
 Pig Wars Late Medieval Variant 1337 to 1485 Introduction Pig Wars LMV is a variant of Tod Kershner s Pig Wars Dark Age skirmish rules that covers the period of the Hundred Years War to the end of the Wars
House Rules for Nuts! Final Version Version 1.3 by Jeff Glasco
 1. The basic game uses a 3' x 3' table. This is fine for very dense combat, like in a major urban campaign, but is too small for a larger attack, like a platoon attack. A platoon attack would be on an
RULES. A: A targeted squad receives corner cover when the imaginary line of the attacking unit s line of sight passes through
 R e a d t h i s FAQ t h o r o u g h ly a n d k e e p i t s e c u r e i t m ay s av e l i v e s RULES Q: In what situations will a squad benefit from corner cover? A: A targeted squad receives corner cover
RULE BOOK. Warfare in the Middle Ages
 RULE BOOK Warfare in the Middle Ages Table of Contents 1.0 Introduction... 2 2.0 The Components... 2 3.0 Sequence of Play... 4 4.0 Activation and Continuity... 4 5.0 Movement... 4 6.0 Facing... 5 7.0 Zones
Munera Sine Missione, Exagoni Libero Rules for Gladiatorial Combat. Adapted by Phil West
 Munera Sine Missione, Exagoni Libero Rules for Gladiatorial Combat. Adapted by Phil West These rules are an adaption of Munera Sine Missione (v2.1) by Alan Saunders, 2002-2012, which were based on We Who
Ship to Ship Combat (fast start rules) Optional Rules for Dungeons and Dragons 3.5
 Optional Rules for Dungeons and Dragons 3.5") Introduction Ship to Ship Combat (fast start rules) Optional Rules for Dungeons and Dragons 3.5 This is a paired down version of my full ship to ship combat rules. The main difference is that we are not
Introduction Ship to Ship Combat (fast start rules) Optional Rules for Dungeons and Dragons 3.5 This is a paired down version of my full ship to ship combat rules. The main difference is that we are not
vargarcompany.org Updated
 1. Combatants are to maintain control over their tempers AT ALL TIMES. 2. Combatants are never to attempt to inflict injury upon their opponents. Leave your personal grudges at home. 3. All weapons present
TRENCH RAIDER: World War I Wargaming in Ten Minutes by David Raybin 2014
 TRENCH RAIDER: World War I Wargaming in Ten Minutes by David Raybin 2014 INTRODUCTION Instead of a generic set of WW1 rules I determined to make the rules fit the game scenario rather than the other way
Tactical Combat Rules By David Newport
 Tactical Combat Rules By David Newport Tactical Combat is a game covering company and battalion level actions using 20 th century weapons. The game was designed for World War II action, but it handles
Dungeons & Dragons 3.5 Edition Index Equipment
 Dungeons & Dragons 3.5 Edition Index Equipment http://www.crystalkeep.com/d20/rules Collected by Chet Erez (cerez@crystalkeep.com) August 27, 2003 Note: Changes from 3 rd Edition and 3.5 Edition are marked
RULE BOOK. Warfare in the Middle Ages
 RULE BOOK Warfare in the Middle Ages Table of Contents 1.0 Introduction... 2 2.0 The Components... 2 3.0 Sequence of Play... 3 4.0 Activation and Continuity... 4 5.0 Movement... 4 6.0 Facing... 5 7.0 Zones
A Marvellous Victory! Copyright. Trevor Raymond. Version 3: April, 2012 (Exodus 20:15 - Thou shall not steal.")
") A Marvellous Victory! Copyright. Trevor Raymond. Version 3: April, 2012 (Exodus 20:15 - Thou shall not steal.") Page 1 of 28 A Marvellous Victory is a basic set of rules designed for the table-top wargaming
A Marvellous Victory! Copyright. Trevor Raymond. Version 3: April, 2012 (Exodus 20:15 - Thou shall not steal.") Page 1 of 28 A Marvellous Victory is a basic set of rules designed for the table-top wargaming
Musket and Pike Users Manual
 1 Musket and Pike Introduction Musket and Pike is a series of games that cover the battles and campaigns associated with the era where muskets and pikes dominated the fighting. Each game can be played
Below are explained your statistics and how to engage in combat.
 Rules This is a gamebook in which you are the main character, and in which you will make the decisions that decide your fate. Whether or not the mission succeeds is ultimately up to your choices, and a
1978 Dawn Associates, All Right Reserved
 Index 1.0 Introduction 2.0 Game Equipment 3.0 Setting Up for Play 4.0 Sequence of Play 5.0 Human Movement 6.0 Shooting Zombies 7.0 Zombie Movement 8.0 Zombie Attacks 9.0 Hidden Zombies 10.0 Berserk Zombies
Viking Class D&D 5e. Sample file. Created by Luke Nicholson and Tom. Design by Luke Nicholson & Tom
 Viking Class D&D 5e Created by Luke Nicholson and Tom Viking Class D&D 5e A daring mountain dwarf stares coldly into a horde of lifeless undead, he wipes the sweat of his forehead and yells a war cry before
TFT Rules Expansion. By Bill Seurer
 TFT Rules Expansion By Bill Seurer TFT House Rules...1 Skills/Talents...1 Skill Points...1 Learning New Talents...1 New and Changed Skills...2 Magic...5 Spell Points...5 Magic Items...9 Equipment...10
BURN IT DOWN GRISLY REMINDER DEAD DROP REVENGE PATROL CLAIM TERRITORY CALL TO GLORY OBJECTIVE
 GRISLY REMINDER BURN IT DOWN Reveal this Objective when an enemy model is killed by a Melee Attack. Give the model that killed it 1 Head Counter. While in contact with an Objective Marker, this model may
Legends of Time and Space
 Artwork: Minor Brothers; Design: George Dew; Design Team: Scott Chisholm, Darryl Cook, Grayson Dew, Brian & Chris Hudgins, Jerry Meyer Jr., David O. Miller, Rick Nichols, Robert Purnell, Robert W. Purnell,
Game Design: Chris Taylor. Developed By: Chris Taylor. Art & Graphics: Vinh Ha and Nick Hayes. Science-Fiction Wargame #4
 Science-Fiction Wargame #4 Game Design: Chris Taylor Developed By: Chris Taylor Art & Graphics: Vinh Ha and Nick Hayes (c) 2013 Chris Taylor and Victory Point Games (VPG); s vs. Zombies is VPG s name for
Age of the Trebuchet. Introduction. Contents
 Draft number 2 6 th October 2005 Special thanks to Dave Smith (lotrhithero), Paul Mullis(Osbad), Richard Heath (Yith) and Tony Barnes for comments on Draft 1. For those of you who saw Draft, there a number
The Red, White & Blue Battle at Lone Wolf Paintball West in Metamora, MI will
 Details: The Red, White & Blue Battle at Lone Wolf Paintball West in Metamora, MI will feature three separate teams Red, White & Blue fighting for supremacy in a full-day battle spanning over all of the
Children of Mordheim. Warband Special Equipment. Warband Special Rules
 Children of Mordheim Warband Special Rules Born and raised The children of Mordheim end each battle with the Streetwise skill regardless of who survived. Streetwise (+1/-1) If this warrior was deployed
Alignment: Any. Hit Die: d8.
 Archer Of history s most persistent necessities, none has colored the art of death more strikingly than the ability to kill from afar. While this innovative concept came in many forms, no method was as
GAME INSTRUCTIONS This instruction book summarizes rules for all games in the Filsinger Games line including Champions of the Galaxy and Legends of
 GAME INSTRUCTIONS This instruction book summarizes rules for all games in the Filsinger Games line including Champions of the Galaxy and Legends of Wrestling Card Game. All our games are actually two games
Game System Sampler I and II The Gladiatorial Arena Magic and Missiles in the Gladiatorial Arena
 GameSys t em Sampl er Game System Sampler I and II The Gladiatorial Arena Magic and Missiles in the Gladiatorial Arena Page 1 of 32 Authors Andrew D. Kozak Vito J. Pandolfo Banner Art Ryan Pancoast Illustrations
Solthurner Fechtbuch Rare Dagger Techniques from an Anonymous Manual Copyright 2001 Pete Kautz
 Solthurner Fechtbuch Rare Dagger Techniques from an Anonymous Manual Copyright 2001 Pete Kautz What is the Solthurner Fechtbuch? So-named for the Archive in Solothurn, Switzerland where it was found, this
L2 +2 Ranged when using bows or crossbows.
 Archer Exchanging the need of force for precision, these warriors are skillful at the art of dispatching enemies at a distance. Though other warriors may boast of the ability to slay their foe in a single
A GUIDE TO SLOWPITCH SOFTBALL. 1: The Basic Game. 2: The Playing Area
 A GUIDE TO SLOWPITCH SOFTBALL 1: The Basic Game Slowpitch Softball is played by two teams of ten players each. The teams take it in turns to bat and field. The batting team is called the OFFENSIVE team
Grandville Umpire Rules Quiz Answers 2014
 Question 1 You are the plate umpire. The batter hits the ball which bounces in front of the plate and rolls in fair territory up the first base line. Before the pitcher or catcher touch it, the ball spins
Zombie Daze Scenario: Day 17: Air Strike
 Scenario: Day 17: Air Strike Objective: Get the civilians out alive or dye trying! Maximum Turns: 8 Dedication: I'd like to thank all the play testers: Scott Clinton, Ken Nickel, Randy Fant, Alex Beckman,
Official Errata and FAQs, Version 1.4
 Official Errata and FAQs, Version 1.4 This document presents amendments to the rules of and our responses to players frequently asked questions. When changes are made, the version number will be updated
ONE IF BY LAND" - AMERICAN 1:10 SCALE WAR OF INDEPENDENCE RULES by Bob Bergman. Infantry/Cavalry figure 10 men Artillery crew figure 5 men
 ONE IF BY LAND" - AMERICAN 1:10 SCALE WAR OF INDEPENDENCE RULES by Bob Bergman Ground Scale 1 inch = 15 yards One Turn About five minutes Infantry/Cavalry figure 10 men Artillery crew figure 5 men Artillery
Napoleonic Battles. Introduction
 Napoleonic Battles Introduction Napoleonic Battles is a series of games that cover the battles and campaigns associated with Napoleon. Each game can be played alone versus the computer, or against a human
SNAPHANCE RULES FOR PIKE AND SHOT BATTLES
 Index Section Subject Page 1.0 Basic Concepts 2 1.1 Command Groups 2 1.2 Stands and Basing 2 1.3 Strength Points [SP] 3 1.4 Game Play 3 2.0 Types of Stands 3 2.1 Combat Stands 3 2.2 Support Stands 4 3.0
D&D 3.5 Equipment 1. Off hand. Primary hand. Both hands Light STR ½ STR 1 STR 1 One-Handed STR ½ STR 1 STR 1½ Two-Handed (needs both hands) STR 1½
 STR 1½") D&D 3.5 EQUIPMENT This is a summary of Chapter 7 (Equipment) in the D&D 3.5 Player s Handbook (PHB). I have compared it with the corresponding chapter in the 3.0 PHB (second printing, with the official
D&D 3.5 EQUIPMENT This is a summary of Chapter 7 (Equipment) in the D&D 3.5 Player s Handbook (PHB). I have compared it with the corresponding chapter in the 3.0 PHB (second printing, with the official
To End All Wars WW1 Miniature Game V1
 To End All Wars WW1 Miniature Game V1 Introduction: The Western Front in World War I was dominated by a series of trenches cutting its way through the French countryside. Commanders on both sides would
Mini-Nap 2 WARGAME RULES FOR THE NAPOLEONIC ERA. Copyright. Trevor Raymond. January 2015 (Exodus 20:15 - Thou shall not steal.")
") Page 1 of 42 The Basics Mini-Nap 2 WARGAME RULES FOR THE NAPOLEONIC ERA Copyright. Trevor Raymond. January 2015 (Exodus 20:15 - Thou shall not steal.") Mini-Nap 2 is a set of rules specifically designed
Page 1 of 42 The Basics Mini-Nap 2 WARGAME RULES FOR THE NAPOLEONIC ERA Copyright. Trevor Raymond. January 2015 (Exodus 20:15 - Thou shall not steal.") Mini-Nap 2 is a set of rules specifically designed
Introduction:... 4 Character Classes;... 4 Weapons:... 4 Organisation:... 4 Actions:... 5 Movement:... 5 Shooting:... 5 To Hit:...
 State of war A.C.W. Skirmish Wargame Rules Tyneside Wargames club Version 1a 1 2 Table of contents Introduction:... 4 Character Classes;... 4 Weapons:... 4 Organisation:... 4 Actions:... 5 Movement:...
COMITATUS Warfare in the Dark Ages AD
 COMITATUS Warfare in the Dark Ages AD 250-1100 Scenario 1 The Battle of Daras AD 50 Historical Background The young East Roman General Belisarius, in his first major command, was sent to defend the city
BATTLE MEDITATION FORCE POWER TREE FORCE ABILITY BATTLE MEDITATION BASIC POWER RANGE CONTROL MAGNITUDE STRENGTH RANGE MAGNITUDE RANGE DURATION
 Prerequisites: Force Rating 2 + BATTLE MEDITATION BATTLE MEDITATION BASIC POWER The Force user directs allies in battle, making them more effective as a coordinated unit. The user may spend to add one
Iroquois Warband. Special Rules. All Iroquois are subject to the following special rules.
 Iroquois Warband Coming from the New World, usually under the patronage of Old World interests, particularly the Marienburgers, the Iroquois are a Confederation of Human Tribes living in a slightly primitive
Table of Contents. Introduction 1 Character Creation 2 Equipment 3 Adventuring 6 Combat 8 Bestiary 12
 The Gothic Age Table of Contents Introduction 1 Character Creation 2 Equipment 3 Adventuring 6 Combat 8 Bestiary 12 elcome to THE GOTHIC AGE, a role-playing game Wset in the Holy Roman Empire of the 15th
Hobgoblin Horde. By Dave StyrofoamKing Joria
 Hobgoblin Horde By Dave StyrofoamKing Joria Long ago, Hobgoblins are known solely as cowardly thieves, with no strength or ambition until the first Hobgobla-Khan. A lowly Chieftain from a small tribe,
Table of Contents INTRODUCTION...3 THE BASICS...4
 LEGAL INFORMATION Permission to copy, modify and distribute the Open Gaming Content of this document, known as Animalball Melee is granted solely through the use of the Open Gaming License, Version 1.0a.
Chosen Men Fat. 1. Sequence of play. Base Morale;
 Chosen Men Fat 1. Sequence of play v2.1 CCWG Assign cards to each unit in play then shuffle the deck and turnover the top 2 cards. These units then; 1) Test morale. 2) Perform an action. (Move, Load, Fire,