The South African National Archery Association. Long Term Development Program. Page 1
|
|
|
- Dorcas Small
- 5 years ago
- Views:
Transcription


1 The South African National Archery Association Long Term Development Program Page 1

2 The Long Term Development Program The South African National Archery Association (SANAA) Long Term Development Program (LTDP) is designed to transform the sport of archery and unleash the full sporting potential by providing a road map for those interested in the sport through a structured process of training for both the individual and coach. By working through the Long Term Development Program it creates a system that enables the identification and development of the sporting potential of all South Africans and ensures a fundamental transformation in sport and nation building through an effective and integrated talent identification and development program embracing all sectors of the population. The LTDP is suitable for all, including the youth, para-archery, women, schools and rural communities. The LTDP aims to have the novice archer progress to the formal competition field in a two year period at which point the Gold Squad monitoring system is triggered to evaluate the progress of the archer. A clear talent identification process is in place in the form of the Gold Squad Policy document that tracks the ongoing process of the archer for selection for national and international teams. The Gold Squad criteria for team selection, which includes the archers national ranking, is evaluated from time to time depending on world trends and the four-year Olympic cycle. Further information is available at During the 2-5 year cycle, support for high performance athletes are provided in a number of ways, including medical and scientific support, coaching and further development and equipment. After the 5 year cycle the highperformance program is integrated into the overall plan. This program has been designed in conjunction with World Archery to give every South African the opportunity to learn archery from the very basics to the point that the archer is ready to compete in formal competitions. It achieves this through seven programs, each having specific goals and requiring the archer to be evaluated on each step before proceeding to the next program. The Pathway Program The Long Term Development Program follows on the SA National Archery Associations the Give-it-a-Go pathway program where you will learn the basic terms and concepts of the sport of archery. The Give-it-a-Go program is designed as an introduction to the sport and can take anywhere from a few hours to a few weeks to master. World Archery Feathers & Arrows This manual is a guide for beginner archers and their Level 1 archery coaches. It has been designed for the coach to help novices in archery and in evaluating their progress. We encourage you to use the World Archery Level 1 Coaching manual and/or audio-visual document. For the beginner, this guide presents the curriculum of each of the seven levels of the World Archery FITA Beginner Awards Program. It will help you to develop your general shooting skills, knowledge of archery and performance. Your progress will be encouraged and rewarded with the World Archery FITA Beginner Award pins. After the completion of the Entry level program, it is recommended that you take part in World Archery and South African sanctioned tournaments. By doing this you will be eligible to win other World Archery and South African National Archery Association (SANAA) awards specific to each archery discipline. The Program at a glance The program has been designed to be implemented in both Indoor and Outdoor disciplines. Up to seven awards lead the novice from a very short shooting distance - 6 to 10 meters, which is dependent on age, to the shortest Indoor distance - 18 meters, but on a bigger target face than the FITA official one for this distance, and even further - close to first FITA Outdoor distance on an 80 cm target face, which is 30 meters. Page 2

3 The main goal of the World Archery Beginners Awards program is the archer s education as a whole. This process is not only based on score, as skills and general knowledge are also assessed. Goals World Archery has produced the program to guide the beginners in assessing their progress during the time spent covering the entry level program before competing in official tournaments. Evaluation principles To get any of the World Archery FITA Beginner Awards from World Archery, you have to reach a minimum level of Score Skills development Knowledge and technical ability. Score Your performance is evaluated at reduced shooting distances and number of shots. 15 arrows are shot at an 80 cm target face. See the evaluation form for the correct shooting distance for each award level. Skills Development The achievement of a good score is only a consequence of well implemented skills, as described in the World Archery level 1 Coaching Manual. For each development level, some skills are expected to be acquired. Their assessment is based on some key elements described in the World Archery Entry Level 1 Coaching Manual. If you need help in evaluating these skills, please feel free to consult this reference manual. We strongly recommend that you collaborate with an archery coach for help with your training. Knowledge & Technical Ability Learning archery is not restricted to learning the steps of the shooting sequence. Novices also have to; Know and obey the safety rules; Know the specific terminology; Look after their equipment i.e. To brace the bow, to maintain and repair the equipment (arrows, string, arrowrest etc) and; Learn the rules. In this manual you will find the information that you are expected to know at each stage of your training. Obtaining Awards The following are entitled to order the World Archery FITA Beginner Awards from the SANAA office: SANAA Provincial Associations in good standing; Accredited Clubs SANAA Coaches Types of Awards Two sets of beginners Awards are available: Feathers This set is for the youngest beginners (under 12 years old) and for some disabled novices. It is up to the coach (or person in charge of the entry level) to decide on the archer s readiness before applying for these awards. SANAA does not ask for any proof of age or level of disability. Arrows This set is designed for those from 13 years and older. All awards have a pin design so that they can be displayed on the quiver, lapel or cap. Page 3

4 Recommended examination guidelines for both awards. The guidelines are in place to develop a schedule of specific sessions for challenging the FITA Beginners awards. This requires a minimum attendance to the Entry Level practice sessions to be eligible to take part in an evaluation session. For example: Every two months a specific session for challenging the FITA Beginners awards is scheduled; The evaluation session is only open to those who have attended at least 7 practice sessions. In order to obtain a FITA Beginners award, those who have attended less than 7 practice sessions will have to: Complete their 7 practice sessions Wait until the next specific session to apply for a FITA Beginners award. To allow the beginners who have failed some elements of the evaluation to re-apply for these items only, the beginner must retrain on all the modules failed. The reassessment and evaluation cannot be redone until the full program is successfully completed. The novice must begin the process by applying for the Red Feather or the White Arrow respectively, as these are the first awards. Starting at any other level would make it difficult to evaluate the skills, knowledge and techniques that were supposed to have been learnt previously. An overview of the Feather Awards Goal Setting. Goal: After the World Archery FITA Gold Feather I will challenge the World Archery FITA Arrow Awards, starting with the White Arrow at 10 meters Page 4

5 An overview of the World Archery FITA Arrow Awards Goal: Now I am able to attend some local tournaments shot at short distances. Page 5
. Target height: 80 cm to 1 meter for the centre of the target face from the floor.")
 is worth one hit. Alternatively, a 40 cm target face can be used where the scoring zone covers the 1 to 10 ring and scores 1 point.")
6 Recommended guidelines for the Feathers 1. Score Evaluation Where: Indoor or Outdoor. Warm-up: Not limited. Up to the coach Target face: 80cm spot target face (6 to 10 ring). Alternatively, a full 40cm target face can be used (tougher to aim at). Target height: 80 cm to 1 meter for the centre of the target face from the floor. Arrows per end: 3 Number of ends: 5 Time per end: Unlimited. No. of arrows: 15, which is half a 30 arrow round. Scoring: A simplified scoring system is proposed to allow self-scoring. An arrow inside or touching the peripheral line (of the 6 zone) is worth one hit. Alternatively, a 40 cm target face can be used where the scoring zone covers the 1 to 10 ring and scores 1 point. 12 hits are required. An example of a blank scorecard An example of a completed scorecard 2. Skills evaluation. Each level of the development program has a different skill level. You will be evaluated on these skills and will have to demonstrate these skills before proceeding onto the next level. See the Chapter Skills of the program related to the level that you are challenging. 3. Knowledge & Technical Ability Evaluation Like the skills evaluation, you will be examined on the knowledge and technical ability. Once you have demonstrated that you have acquired and learnt the knowledge and technical ability, you can then proceed to the next stage. See the Chapter Knowledge and Technical Ability of the program related to the level you are challenging. Page 6
 Objective: Consistency and spatial relationship to the target, achieving optimal stability.")

7 The Red Feather Performance From a shooting distance of 6 meters you must achieve a minimum of 12 hits, out of 15 arrows (5 ends of 3 arrows) shot at an 80cm target spot (6 to 10 zones). Skills Your shooting technique should include the following: Position of feet (Stance) Objective: Consistency and spatial relationship to the target, achieving optimal stability. Form: Feet parallel on the shooting axis, set at approximately shoulder width. Rationale: This gives archers the opportunity to repeat actions easily and accurately. It provides sound support to the pull and push action in the flight plane. It gives consistent direction to the body in the flight plane. It avoids back problems and it enables safe and correct arrow nocking. Stance is how you stand on the shooting line. Safe & Proper Arrow Loading Objective: Identical placement on the bow. The action must be performed in a safe manner to protect the archer, other archers, and equipment. Form: Hold the arrow by the nock, place the arrow on the rest, correctly turn the arrow, and nock it onto the string. Rationale: Taking hold of the arrow in front of the vanes becomes more difficult to nock and the fletching could be damaged if the hand slips during nocking process. The arrow rest cannot endure strong vertical pressure. If nocking is done incorrectly, it could damage the arrow rest. Arrows with four vanes are also successfully used at entry level. Page 7


 You must straddle the line or have both feet on the line, before loading the")
8 Pulling the arrow out of the quiver. Arrow loading. Nocking the arrow Knowledge and Technical Ability You must know the following the subjects below: Bow Safety Releasing the bow without an arrow on the string could cause breakage and injury. When the end is over, put the bow on the bow stand or rack located in the equipment lane. Bow stands located behind the waiting line are ideal when the bows are not being used during the training session. Finger pressure damaging the arrow Equipment to be stored in the equipment lane. Portable communal bow stand When shooting few arrows at a shorter distance than usual (i.e. for an exercise), you can lay your bow on the floor/ ground 3 m behind the other archers. If so, once you return to the regular shooting distance, your bow is stored on a rack behind the waiting line or on the floor. Arrow nocking safety: The arrow should be placed on the string only when you are standing on the shooting line and once a clear signal has been given (meaning that everyone is behind the shooting line) You must straddle the line or have both feet on the line, before loading the arrow. Safe arrow retrieval. } } When approaching the targets, care must be taken not to walk into arrows sticking into the ground or target. Pick up all arrows that have fallen short of the target, regardless of their owner. Nocks are very sharp and can cause injury Page 8


9 Care must be taken when drawing arrows out of the target. Always see that no one is directly behind the person pulling the arrows. Arrows can come out of a target suddenly and the nock may hurt anyone who is too close. Bending over in front of the target is dangerous; you should wait next to the target when arrows are being pulled by someone else. For pulling an arrow out of the target, press the palm of one hand flat around the arrow. With the other hand, grab the arrow shaft close to the target face and pull it out along the shaft axis without bending the arrow. While pulling an arrow out of the grass, do NOT pull the arrow up! You could bend or break the arrow shaft. Move the grass out of the way of the fletching, especially if it is made of natural feathers. Now pull the shaft back along the axis of the arrow shaft and along the grass. Only when the point is emerging from the grass can you raise the arrow up. Bow assembly: Your coach will teach you how to assemble and disassemble the limbs on/from the riser correctly (if you use a take-down bow). The tips of the limbs of an unbraced assembled Recurve bow face the target (not towards you). On most of the bows, (due to a former FITA rule), you will find that the internal part (facing you) of the top limbs is blank, while the limb specifications (height and weight) are written in the internal part of the bottom limb. The technical specifications of the limbs are written on the internal part of the bottom limb. Page 9
10 Red Feather award Evaluation Form Date: PERFORMANCE Shooting distance Name: 6 meters 12 hits SKILLS Feet position (Stance) Safe and proper arrow loading KNOWLEDGE & TECHNICAL SKILLS Required minimum score Achieved Not yet achieved Key elements (What should be done) Achieved Not yet achieved Number of hits (result) Feet each side of the shooting line # Feet at shoulder width apart # Line of feet square to the shooting line # Feet parallel # Implemented with bow vertical References to the FITA level 1 coaching manual. #3.2 Point 5 & # No finger pressing the arrow on rest # Arrow properly rotated cock feather away from bow window) Required knowledge s or technical skills Achieved Not yet achieved # Comments/References Bow safety No dry fire (dry loosing) #3.3. Point 2 Arrow loading safety Safe arrow retrieval/ collection Bow assembling Set the bow in equipment lane after shooting the end Load the arrow on the bow only when everyone is behind the shooting line. To be done only when both feet are set each side of the shooting line. Walk carefully to target (do not run Watch your step) Stand to the side of the target (not behind arrows) Properly pull the arrow out of the target (or grass). Know how to properly assemble and disassemble the limbs on/from the riser. # Step 7 - #11.3 #9.2 #3.2 Point 2 #3.2 Two first points #3.3 Point 8 #3.2 Point 12 # Step 8 This assessment can be removed if there is no take down bow TOTAL 16 positive evaluations are required Granted or not yet granted Check the box whether the skill or knowledge has been achieved of not achieved. Then total the number for each column. 16 positive evaluations are required to pass the evaluation. If the required score is not obtained, continue this program until the skills is obtained. Name & Signature of evaluator Page 10
.")
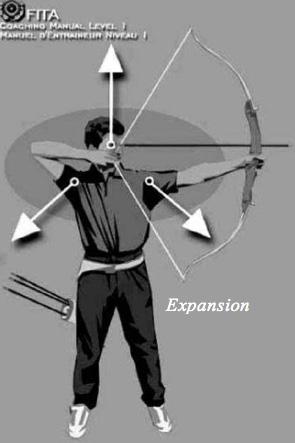
11 The Gold Feather Performance From a shooting distance of 8 meters, you must achieve a minimum of 12 hits out of 15 arrows (5 ends of 3 arrows) shot at a 80cm target spot (6 to 10 zones). Skills Body setting (from before drawing until full draw). Objective: To provide a stable foundation permitting a similar repetition of upper body actions, as well as optimal general balance each time you shoot. It should also allow re-positioning the aiming eye at the same stable spot in the space. We can imagine the aiming eye at the top of the main pyramid (your coach will instruct you about the pyramids). Form: While gripping the string and the bow (see the 2 previous steps of the shooting sequence), most of the archers are bent over. There are several ways to move from a bent position to an upright one and set a good body base to engage and execute the shot. Below are some of them: Page 11
, any swaying movement from front/back is reduced.")

12 1. Legs Form: Up-side-down V, symmetrical to the vertical axis going through the summit. Weight is placed equally on both feet. Rationale: The body weight should be distributed equally on both legs. Because body weight is slightly forward (toward toes), any swaying movement from front/back is reduced. As shown on page 20, the string leg participates in the production of the push while the bow leg contributes to the pull. The two efforts strengthen your vertical body axis and generate a downward pressure, providing a solid foundation for upper body work and good stability. For the shooting process, the pelvis is usually tilted (flat lower back), thus only the upper body requires positioning. Flat chest powerful core muscles and body weight equally shared on both feet. Your weight is distributed equally on both feet in an upside down V formation. Page 12
 as the spine is stretched up with the shoulders in the same plane as the hips. The shoulders are lowered and chest is flattened.")

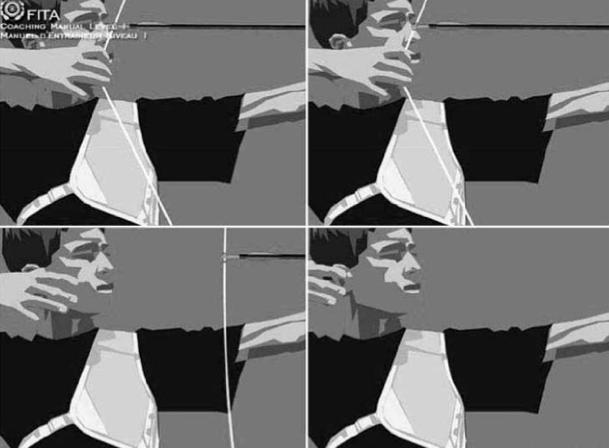
13 2. The Upper Body Objective: Initially the torso, shoulders and head are positioned close to their final position. Form: Turn or tilt the pelvis backwards (flat lower back) as the spine is stretched up with the shoulders in the same plane as the hips. The shoulders are lowered and chest is flattened. A slight stretching in the trapezius muscles is often felt. Turn head toward the target (whilst maintaining the stretching up action) until nose is pointing directly towards the target. Rationale: Stretching up the head and spine assures an erect vertical stance. Tilting the pelvis, flattening the chest and dropping the shoulders lowers the centre of gravity, making the body more stable; furthermore it transfers energy from the upper body to the lower body, making the archer more relaxed. Shoulders and head are close to their final position, thus minimizing movement during the draw. 3. Body setting (end of draw) Objective: Draw the bow without disturbing the pre-set position achieved through the preliminary elements. This body maintenance lasts until after the shot. Draw mode is in the shooting plane. Form: Always stay in control. Sudden movements are minimal, or non-existent. Desired movements diminish in speed as they near the face, but do not stop! The torso is almost immobile. If no pre-draw has been achieved, only a slight rotation of the chest exists, leading the shoulders from the shooting plane. The body is vertical or remains at a slight inclination toward the string leg. The shoulders remain lowered. The head remains in place and extended up; it should not move toward the string during the last few centimetres of drawing. The arrow always remains parallel to the ground. The string moves straight to the face within the shooting plane. Draw made in the shooting plane A balance between the production of traction and repulsion (pull & push) forces must be introduced during the draw. As the following illustrations demonstrate, the pull and push efforts are supported by the legs. The top and bottom parts of the body remain in place during the draw and end of draw. Page 13


14 String (right) leg assists the push effort Bow (left) leg assists the pull effort. Rationale Because the foundation is hardly disturbed and the movement is simple, control is easily achieved and duplicated. Striving for symmetry will avoid the balance being upset. The production of effort is not centralized, but dispersed. It facilitates achieving symmetry, reduces the effect of local fatigue and minimizes the risk of injury. The major muscles are used to generate this production. Full drawing effort is attained as soon as the speed of the draw decreases on approaching the face, allowing the control to be maintained. Because the beginning of the draw is faster, the archer saves energy. Knowlede and Technical Ability Bow bracing: Your coach should have your bow strung before the start of the first two or three practice sessions. Stringing and unstringing of the bow will probably be taught to you at the third or fourth session when you will be more familiar with the equipment. Here are safe and highly recommended methods for the bow and the archer. A loop stringer is inexpensive and easy to use. It makes the task of stringing the bow almost effortless. Like any other stringing method, it is necessary to check the exact string position before taking the bow stringer pressure off the upper limb tip. Place a small piece of carpet or rubber on hard and rough ground to prevent limb tip damage. Using a string loop and 2 feet: Using a string loop and 1 foot: Page 14


15 Finally, the fixed bow stringer is another excellent device for stringing the bow. It is made of 2 pieces of padded cylindrical metal and is attached to a wall or pole. A bow stringer like the one above may be purchased from any archery shop. You may initially find it difficult to use properly, but this does improve with experience. Shooting direction: Under no circumstances should anyone shoot if someone is on the field near the targets. Arrows may glance off the targets or veer from their intended path. The shooting line should be straight, not staggered. When in a group where archers do not shoot from the same distance, the safest method is having the targets at different distances and all the archers on the same shooting line. Safety and etiquette on the shooting line: You can only draw your bow back on the shooting line. You should not draw the bow with the bow hand higher than the drawing hand and you should not draw diagonally (toward a target that is not straight ahead). Don't talk on the line or distract other archers during the shooting of the end; Only the coach may make a comment about an archer who is shooting; nevertheless encouraging remarks are welcome at any time; If your bow or arrow falls in front of the shooting line, you must wait until the archers on either side have finished shooting before retrieving your equipment. Any arrow which cannot be retrieved without moving feet from the shooting line should be retrieved after shooting has stopped. Page 15
16 Evaluation form for Gold Feather Candidates Date: PERFORMANCE Shooting distance Name: 8 meters 12 hits SKILLS Body Setting (before drawing and at full draw) Body Setting (end of draw) Required minimum score Achieved Not yet achieved Key elements (What should be done) Achieved Not yet achieved Number of hits (result) Vertical Body # Balance on 2 feet # Spine & shoulders making a cross shape # Let the string hand land on face (chin &/or lips do not reach forward to the string) KNOWLEDGE Required knowledge Achieved Not yet achieved References to the FITA level 1 coaching manual. # Bow bracing Able to brace their own bow # Shooting direction Safety and etiquette on the shooting line Only draw towards the a clear target butt from the shooting line (not toward anyone or the sky) Do not disturb (touch or talk to) other shooting archers. How to retrieve an arrow that dropped on the ground Comments/References #3.2 Chapters 2 & points 2 & 3 #3.2 Bullet 3 #3.5Bullets 1&2 #3.2 Bullet 11 TOTAL 9 positive evaluations are required Granted or not yet granted Check the box whether the skill or knowledge has been achieved of not achieved. Then total the number for each column. 9 positive evaluations are required to pass the evaluation. If the required score is not obtained, continue this program until the skills is obtained. Name & Signature of evaluator Page 16
 Target face: 80 cm (the full sized target face) Target height: 1 meter to 1.")
17 The Arrows Recommended Evaluation Guidelines for the Arrows Award Score Evaluation (for the Arrow awards) Where: Indoor or Outdoor. Warm-up: No more than 4 ends (recommendation only) Target face: 80 cm (the full sized target face) Target height: 1 meter to 1.3 meter for the centre of the target face Arrows per end: 3 Number of ends: 5 Time per end: 2 minutes. No of arrows: 15 (half a 30 arrow round) Scoring: As per the World Archery Indoor and Outdoor scoring rules Skills Evaluation (for the arrow awards) Each Arrow award has a different level of skill which you would need to acquire in order to progress to the next level. See the section on Skills for the program related to the level that you are challenging. Knowledge and Technical Ability Evaluation (for the Arrow awards) Like the skills evaluation, the knowledge and technical ability would have to be demonstrated before you would be able to proceed to the next award. See the section on Knowledge and Technical Ability for the program related to the level that you are challenging. White arrow candidates - please check your current level! There are three possible scenarios: You have not earned any Feather awards yet, but your coach suggests that you challenge the White Arrow (for beginners of 12 years old or more). In preparing for this level, you must complete the chapters Skills and Knowledge & Technical Ability of the programs for the Red Feather, Gold Feather and White arrow awards. Your evaluator will use form C1. You only have the Red Feather award. You should complete the Feather awards program with the Gold Feather (suggested to most of the youngest ; i.e. under 12 years old). Only after getting the Gold Feather will you be allowed to apply for the White Arrow award. You already have the Gold Feather award. You may now progress to the White Arrow. Your evaluator will use form C2. Page 17
18 White Arrow Curriculum for the World Archery FITA White Arrow Award Performance Shooting distance: Minimum required score: 10 meters 115 points Skills Your shooting sequence should include the following: Feet position: For candidates having earned no FITA Feather awards yet, see chapter on Skills of the Red Feather curriculum. Arrow loading: For candidates having earned no FITA Feather awards yet, see chapter on Skills of the Red Feather curriculum. Body setting (before drawing and full draw): For candidates having earned no FITA Feather awards yet, see Gold Feather Body setting (end of draw): For candidates having earned no FITA Feather awards yet, see Gold Feather Page 18

19 Raising the bow Objective: Perform the preliminary movements with as little unnecessary motion and initial positioning disruption as possible. This initial positioning must allow for an effective draw. Form Synchronized raising of the two hands towards the target until both hands are at nose level. Throughout the process: The bow shoulder must stay as low as possible; The upper body (shoulders, chest and centre of gravity) is maintained in its lowest position; The arrow must be moved up to the shooting plane with the head and spine still extended; The pelvis remains tilted (if this position is chosen). Toward the end of the process: Both hands are moved up to the same level; the arrow is parallel to the ground. At the end of the process: The arrow is at the nose/eyes level; The string shoulder is lower than the arrow axis; The string wrist is in line with the string forearm. A slight backward inclination of the torso toward the string foot is acceptable, but a straight body is recommended. Rationale: The movement is simple and easy to repeat. It is a safe preposition for the draw, even if an arrow slides out of the beginner's fingers. The elements already in place are hardly disturbed and are finalized following the action. The forces exerted on the upper limbs facilitate the low positioning of the shoulders. The body's inclination toward the string foot counter balances the weight of the bow and moves the archer s centre of gravity towards the target (the use of bows with light mass weight will reduce this inclination). Knowledge and Technical Ability you must know the following: Bow safety: See chapter Knowledge &/or Technical Ability of the Red Feather curriculum. Arrow loading safety: As above. Safe arrow recuperation: As above. Bow preparation: As above. But see also chapter Knowledge &/or Technical Ability of the Gold Feather curriculum. Shooting direction: See chapter Knowledge &/or Technical Ability of the Gold Feather curriculum. Safety and etiquette on the shooting line: As above. Page 19


20 Scoring: You should be able to identify the arrows value. You should know how to complete a scorecard for a complete round/distance Arrow. The value of each arrow scored must be entered on the scorecard in descending order as called out by the archer to whom the arrows belong. Other archers on that target will check the value of each arrow called out and, in the case of a disagreement, will call the assigned judge who will make the final decision. Example of a blank scorecard (for Arrow round only): Example of a completed scorecard (for Arrow round only): Page 20
21 Evaluation form for White Arrow Candidates (C1) FOR CANDIDATES WHO HAVE EARNED NO FEATHER AWARDS YET. Date: PERFORMANCE Shooting distance 10m Name: Required minimum score Achieved * *Not yet achieved 115 points Skills Key elements (what should be done) Achieved* *Not yet achieved Feet position (Stance) Safe and proper arrow loading Body setting (Before drawing and at full draw) Feet Feet each side of the shooting line # Feet at shoulder width apart Line of feet square to the shooting line Feet parallel Reference to FITA Level 1 Coaching Manual Implemented with bow vertical #3.2 Bullet 5 & # No finger pressing the arrow on rest # Arrow properly rotated (cock feather away from bow window) Vertical body Balance on 2 feet # # & # & Spine and shoulders making a cross shape. # & Body setting (end of draw Let the string hand land on face (chin &/or lips do not reach forward to the string) # Raising Synchronized hands # Raise hands while keeping the shoulders down Hands at same height and at nose or eye level once raised Arrow parallel to the floor once raised KNOWLEDGE Required knowledge or technical skills. Achieved* *Not yet achieved Comments &/or references Bow safety No dry fire (dry loosing) #3.3. Bullet 2 Place the bow in the equipment lane after end # Step 7 - #11.3 #9.2 Arrow loading safety Load the arrow on the bow only when the Field of play is empty and; To be done only when both feet are set each side of the shooting line. #3.2 Bullet 2 #3.2 Two first bullets Page 21
22 Safe arrow retrieval Walk carefully to target (do not run Watch his/her step) Stand to the side of the target (not behind arrows) Properly pull the arrow out of the target (or grass). #3.3 Bullet 8 #3.2 Bullet 12 # Step 8 Bow preparation Know how to properly assemble and disassemble the limbs on/from the riser This evaluation can be skipped if no take down bow is available Shooting direction Can brace his or her bow # Only draw towards the a clear target butt from the shooting line (not toward anyone or the sky) #3.2 Chapter 2 and Bullets 2 & 3 Safety and etiquette on the shooting line Do not disturb (touch or talk to) other shooting archers How to retrieve an arrow that dropped on the floor #3.2 Bullet 3 #3.5Bullets 1&2 #3.2 Bullet 11 Scoring Be able identify the arrows value. FITA C&R Appendix 1 Book 2 Can complete a scorecard for a complete round FITA C&R # & Appendix 3 Book 2 TOTAL 30 positive evaluations are required ** Awarded or Not awarded yet Name & Signature of evaluator Page 22
23 Evaluation form for White Arrow Candidates (C2) FOR CANDIDATES WHO HAVE EARNED THE GOLD FEATHER AWARD. Date: PERFORMANCE Shooting distance 10m SKILLS Name: Required minimum score 115 Points Key elements (What should be done) Achieved * Achieved * *Not yet achieved *Not yet achieved Number of hits (result). Raising Synchronized hands # Raise hands while keeping the shoulders down Hands at same height and at nose or mouth level once raised Comments &/or references to the FITA Level 1 Coaching manual Arrow parallel to the floor once risen KNOWLEDGE &/or KNOW-HOW Required knowledge or know-how s Achieved * *Not yet achieved Comments &/or references Scoring Be able identify the arrows value. FITA C&R Appendix 1 Book 2 Can complete a scorecard for a complete round FITA C&R # & Appendix 3 Book 2 TOTAL 7 positive evaluations are required ** Awarded or Not awarded yet Name & Signature of evaluator Page 23
. Objective: Body and equipment stability for effective aiming.")
24 Black Arrow Curriculum for the World Archery FITA Black Arrow Award Performance Shooting distance: 14 meters Minimum required score: 115 points SKILLS Your shooting sequence should include the following: Draw process. See chapter Top Body of the Skills from the Gold Arrow curriculum. Full draw (the hold). Objective: Body and equipment stability for effective aiming. Holding the bow at full draw without collapsing from the bow's weight. Form: The torso is immobile. The body is in an up-right position. The chest and shoulders exert a constant pressure towards the ground while seeking to spread out the shoulders. Spine and head are erect. A balance must be found between the push and pull forces. These efforts are supported by the legs, causing a slight compression of the abdominal area. The constants are: The spacing between the arrow and the bow shoulder, in the horizontal plane; The distance between the chin and bow shoulder; The height difference between the arrow and the bow shoulder (hence vertical plane); The height of the shoulders; The bow's vertical position; The torso and the head. Rationale: Reduces the spring effect of the bow and may cause the archer to collapse. Draws in the chest, facilitating string displacement. Page 24


25 Avoids asymmetrical form. The production effort is not centralized, but dispersed, facilitating symmetrical form, Reducing local fatigue and minimizing the risk of injury. Moreover, major muscles are trained to generate this production. Stretching the spine helping to stay erect and vertical. Flattening the chest and lowering the shoulders below the centre of gravity, making the body more stable. The combination of the above actions contributes to maintaining the draw length and helps to keep the head and the aiming eye at a constant level. This is why good muscle tone is necessary to avoid injury. Learning tools It would be difficult to list all the usable archery teaching tools since their usefulness varies depending on the theme and teaching method used. However, below are two tools that we suggest you try: A bow strung with an elastic string to give the archer a chance to execute an action with greater ease. It is possible to release the string without harming the bow. A mirror, to see your form during execution, or your position in comparison to the demonstration. If using a portable mirror, work with the grouping illustrated above. It allows two archers to alternate. One archer shoots an arrow while watching in the mirror while the other gets ready. If grouping a left-hander with a righthander is not possible, additional travel, as shown in the illustration above, is required. Shooting rhythm and shooting lines Try not to organize two distinct lines, since this would involve too much downtime between lines. Promote shooting in one line to maximize the time allocated to your practice. If several lines are needed, do something when you are not shooting. For example, choose a partner and hold the mirror so that the other can see his/her reflection, then change roles (see the above illustrations). Page 25
. Even though this situation should be avoided, it does occasionally happen.")
26 Shooting rhythm and equipment rotation If your club does not have a set of equipment for each beginner, then two archers have to share the same equipment and shoot at different times, forming lines A and B (even C, if three beginners share the same equipment kit). Even though this situation should be avoided, it does occasionally happen. When there are not enough arrows for everyone in the class, it is preferable for the shooter to retrieve the arrows, using the opportunity to see the arrow grouping at first hand, while allowing the other archer the chance to prepare to shoot. In all other situations (one bow for two archers, for instance), it is preferable for all the archers to shoot before retrieving the arrows. In this way, everyone goes to the targets together. Shooting line and target face changes To save time during practice, keep shooting line movements to a minimum. Try to regroup the exercises near the targets, and all shots at the designated distances. Lines marked on the ground guarantee easy, quick, and safe archer alignment. Mark a second line 3 m to 5 m behind the shooting line, creating a secure zone. You should stay behind it when you have finished shooting. Target faces should not be handled too often because of the time lost in putting them up and taking them down. Moving Your Equipment Bow stands are usually placed behind the shooting line. When shooting at a shorter distance than usual, these stands will/may not be so close; you will therefore be allowed to lay your bow on the floor, 3 m behind the shooting line. Archer groupings There are some basic grouping rules to take into consideration when practicing in pairs: By similar height in order to work at your height; By level of performance or development, allowing understandable exchanges for both of you. By age, if the two above criteria allow it; Local social sensitivities should be considered. Page 26
27 Knowledge and Technical Ability Equipment terminology You should know the names designating the various parts of your equipment. During the evaluation you will have to name five parts or components of the following: 1. Recurve bow In archery, the shape of the bow is usually taken to be the view from the side. It is the product of the complex relationship of material stresses, designed by a bowyer. This shape, viewing the limbs, is designed to take into account the construction materials, the performance required, and the intended use of the bow. The unqualified phrase recurve bow or just a recurve in modern archery circles usually refers to a typical modern recurve bow, as used by archers in the Olympics and many other competitive events. It employs advanced technologies and materials. The limbs are usually made from multiple layers of fibreglass, carbon and/or wood on a core of carbon foam or wood. The riser (the centre section of the bow) is generally separate and is constructed from wood, carbon, aluminium alloy or magnesium alloy. The term riser is used because, in a onepiece bow, the centre section rises from the limbs in a taper to spread the stress. Several manufacturers produce risers made of carbon fibre (with metal fittings) or aluminium with carbon fibre. Risers for beginners are usually made of wood or plastic. The synthetic materials allow economic, predictable manufacture for consistent performance. The greater mass of a modern bow is in itself an aid to stability, and therefore to accuracy 2. Arrow Page 27
28 3. Compound Bow Arrow safety and checking: When shooting, an arrow may not fully penetrate the target and may hang loose from the point, lying down along the target face. If shooting continues before the arrow is retrieved other arrows may hit this arrow, causing damage to either the hanging arrow or the one that strikes it. The striking arrow may also ricochet off the hanging arrow. Arrows should always be straight. Usually small dents in aluminium arrows do not affect a beginner s accuracy. Check by eye down the shaft, or rotate and note wobble or vibration. Rolling the shaft along a table can also be used to check whether an arrow is straight or not. Page 28


29 Always check shafts for damage such as splits, chips or compression lines as these make the arrows dangerous and inaccurate. If there are no splits in a wooden or aluminium shaft, a shaft straightening tool can be used. Straightening can be done by hand, but requires much experience. Be careful because sometimes a shaft can break during the process. Page 29
30 Evaluation form for the Black Arrow Candidates (Form D) Date: Name: Shooting distance for score evaluation Required minimum score Achieved * *Not yet achieved Final number of hits. 14m 115 points SKILLS Key elements (What should be done) Achieved * *Not yet achieved References to the FITA Level 1 Coaching manual Draw process Done with two hands always at the same level (or arrow always parallel to floor) # Draw in shooting plane Main action (What is happening at full draw). Stationary arrow point (no draw creeping) - or better - arrow point constantly moving back # Consistent distances between arrow and bow shoulder (vertically and horizontally). Visual attention Can observe himself (or herself) in a mirror while releasing #9.1 teaching tools and end of #9.2 Subjects 3 evaluations Required knowledge or knowhow s Achieved * *Not yet achieved Comments &/or references Equipment terminology Can name 5 parts or components of the bow. C&R Appendix 2 Book 2 Arrow safety and checking Know what to do in the case of a hanging arrow on the target. #3.4 Point 1 Can check the straightness of an aluminium arrow or the integrity of a carbon arrow. # TOTAL 9 positive evaluations are required ** Awarded or not yet awarded Name & Signature of evaluator Page 30

31 The Blue Arrow Curriculum for the FITA Blue Arrow Award Performance Shooting distance: 18 meters Minimum required score: 115 points Skills :Your shooting sequence should include the following: String hand: String Hook Objective: Consistent finger positioning on the string, around the arrow. Form: The fingers grip the string between the two upper joints. The palm of the hand is relaxed and the back of the hand is flat. In most of the unsighted methods, three fingers are used and positioned beneath the arrow. In the shaft aiming method (straight line), the space between the nock and the forefinger is about two to three fingers, depending on facial bone structure & size of string fingers. The three fingers share the workload equally. Afterwards, the back of the hand remains as vertical as possible, not curled-up, with the wrist as flat as possible. The interior of the forearm remains relaxed. Consequently, the hand is in the same axis, or vertical plane as the forearm and arrow. With a proper string hook, the back of the hand and the wrist are flat. (Example for sight use). Rationale: A deep string grip in the fingers allows the muscles of the string hand, arm and forearm to relax from the string side. Once this relaxation has been achieved, there will be less disturbance on the string which will then release cleanly from the fingers. Page 31
 - a simple visual alignment of the arrow shaft on the centre of the")
; Need to worry about applying a vertical finger pressure on the arrow (upward or downward) with the string")
32 Facial marks: Straight line: Simplification of the quadrilateral to a simple line (see further down in this chapter). There will be no Need to repeat the facial marks at full draw (see triangle and quadrilateral methods described further down) - a simple visual alignment of the arrow shaft on the centre of the target is enough. Eye positioning in reference with the shooting plane (hence no need for string alignment); Need to worry about applying a vertical finger pressure on the arrow (upward or downward) with the string fingers. The arrow is positioned by two reference points. Arrow point, by visual placement on the target. Arrow nock, through contact of the string hand on the face. To ensure the triangle is reproduced, the archer has to: Maintain a constant draw; Place the eye for string alignment. In the triangle method, the aiming eye positioning (for string alignment) is mandatory. Page 32


33 Quadrilateral: The arrow is positioned by two reference points: The arrow point, by visual placement of a sight on the target. Hence a sight should be Introduced when teaching this method; The arrow nock, through tactile placement of the string hand on the face. Furthermore, to ensure the repetition of the quadrilateral method, the archer must maintain: The bow in the vertical plane, or constantly canted by the same amount; Maintain a constant draw; Place the eye for string alignment. Arrow-String forearm alignment: Objective: To find the optimum body position needed for a minimum of effort and a maximum of stability during the full draw. Form: Your string forearm should be in the vertical plane, in line with the arrow as much as possible. Rationale: Physically, this is the position requiring the least effort. Furthermore, it allows you to keep the muscles of the string arm, forearm and wrist relaxed. This relaxation of the arm facilitates the use of the muscles located in the back and behind the string shoulder. Attention to the feel of the shot: In order to enhance your physical (or kinesthetic) perception of the above objective, we recommend that you shoot from a very close distance (about 3 meters) from the bare buttress with your eyes closed. Shooting at an empty buttress (noting to aim at 9) also ease the physical perceptions. Knowledge and Technical Ability Bow knowledge: You should be able to give the overall description of 3 types of bow. The following gives a general description of the Recurve, Compound and Standard bow. Recurve: A bow of any type provided it subscribes to the accepted principle and meaning of the word bow as used in target archery, that is, an instrument consisting of a handle (grip), riser (not shoot-through type) and two flexible limbs each ending in the tip with a string nock. The bow is braced for use by a single string attached directly between the two string nocks and in operation is held in one hand by its handle (grip) while the fingers of the other hand draw, hold back and release the string. Compound: A compound bow, which may be of a shoot-through type, is one where the draw is mechanically varied by a system of pulleys and /or cams. The bow is braced for use by bowstring(s) attached directly between the two string nocks of the bow limbs, or attached to the bow cables, as may be applicable to the particular design. Standard bow: The bow will be of a simple design, either a take-apart type (with wooden or metal riser, not shoot-through type) or of one-piece construction. In both types of bow the limbs will be of wood and /or fibreglass construction. Page 33


 4.")
34 Arrow repair and Arrow nocks repair. 1. Remove the remaining part of the broken nock, if any. For an easy removal you can slightly warm the remaining plastic part of the nock with a flame. 2. Clean the area where the new nock will fit with 91% isopropyl alcohol. Beforehand, you can use a fine sand paper on the cone of the aluminium shaft. On carbon and aluminium shafts you can clean the area that will receive the new nock. 3. Put a drop of glue on the area where the new nock will fit. (See picture on the right.) 4. Place the nock in the shaft and rotate it to spread the glue. 5. Orientate the groove of the nock square to the leading vane. (See picture on the right.) Page 34
35 Evaluation form for Blue Arrow Candidates (Form E) Date: Shooting distance for score evaluation Name: Required minimum score Achieved* *Not yet achieved Final number of hits. 18m SKILLS String hand 115 points Key elements (What should be done) Flat back of hand (no knuckles pointed out) 3 fingers are used for gripping the string Vertical back of hand Consistent grip Achieved * *Not yet achieved References to the FITA Level 1 Coaching manual # a Facial marks Are consistent # Provide decent alignment between arrow and string forearm. Can align the string. Feeling attention Can shoot with eyes closed #9.5 third step Subjects 3 evaluations Bows knowledge Required knowledge or knowhow s Can give the overall description of 3 types of bow. Achieved * *Not yet achieved Arrow repairs Know how to replace a nock # TOTAL Name & Signature of evaluator 11 positive evaluations are required Comments &/or references C&R #4.3 related book and articles ** Awarded or Not awarded yet Page 35

.")

36 The Red Arrow Curriculum FOR THE World Archery FITA RED ARROW AWARD Performance Shooting distance: 22 meters Minimum required score: 115 points Skills Your shooting sequence should include the following: Bow hand and arm. Objective: Consistent bow hand contact with bow grip; To apply minimum tension to the bow grip with your bow hand; To allow sufficient string clearance during the shot (this later objective will be better described in the Gold Arrow curriculum). Form: Fingers are relaxed, a bit folded they do not grip, or choke the bow. The wrist is flexed. The V between forefinger and thumb is centred on the forearm axis. The bow pushes on the centre of the V made by the thumb axis and the life line. The main pressure zone is at about 1 to 2.5 cm lower than the V point. The other side of the palm from the life line should not press on the centre of the grip. Page 36


37 To ensure that the bow forearm is straight but not stretched. The bow elbow is fixed, not bent. The elbow point must be turned outwards, not towards the ground. Rationale: The bow hand grip requires very little muscle contraction, thus promoting relaxation. The more relaxed the archer is, the better he can perform and be less likely to produce a counter axis pressure on the bow. Form: Upon the string release, the string hand immediately moves backwards, along the shooting plane. It moves along either the jaw (in the Straight line and Triangle methods) or neck (in the quadrilateral method). The string hand stops at a vertical axis passing by and usually against the string ear. The area where the string hand ends is called the back end. The string arm ends in the shoulders axis. The bow forearm is straight but not stretched. The bow elbow is fixed, not bent. The elbow point must be turned outwards, not towards the ground. Rationale: Because the muscles of the back part of the string shoulder and of the back continue to contract, the entire string arm follows its backward motion that was implemented during the full draw. Release The Bow Arm Rationale: The deviation of the bow arm towards your back is mainly due to the continuous action of the posterior muscles of the bow shoulder. The forward motion of the bow arm towards the target is due to the continuous push/pull effect produced during the full draw by the whole body. THE BOW HAND: Objectives: Continue all muscle activity immediately after release during arrow propulsion period (i.e. Follow through ). Ensure that your bow hand and fingers are passive to allow release of the arrow without any force on the riser which could create torque on the bow. This, in turn, would affect the arrow flight just after release. Form: When the bow is propelled forwards after the release, your wrist stretches forward due to the pull of the sling. Then when the bow cants forward and down, the wrist flexes downwards. Page 37

38 Example of a bow hand that has been kept relaxed until the end of the shot. The use of a sling helps a lot to achieve this. Rationale: The bow presses on your relaxed hand and wrist. When the pressure is removed and the bow moves forward, the hand remains totally relaxed and follows the motions of the bow. Knowledge and Technical Ability Archery disciplines. Outdoor Target Archery: The World Archery FITA Outdoor Target Archery rounds may be shot by both the Recurve and Compound categories in separate divisions. In the Olympic Games only the Recurve category may compete. The FITA Standard Round may only be shot by athletes of the World Archery Standard Bow category. The World Archery FITA Outdoor Target Archery Round consists of 36 arrows from each of the following distances shot in this order: meters for Cadet Women; 70,60,50,30 meters for Women, Cadet Men, Junior Women and Master Men & Women; 90,70,50,30 meters for Men, Junior Men. Or in the order: 30,40,50,60 meters for Cadet Women; 30,50,60,70 meters for Women, Cadet Men, Junior Women and Masters Women; 30,50,60,70 meters for Men, Junior Men and Masters Men. The 122cm target face is used for the 90, 70, 60m (and 50m for Cadet Women) distances and the 80cm face shall be used for the 50 (other than Cadet Women), 40 and 30m distances. The 80cm multiple centre set-up may be used at 30m. The 80cm triangular triple centre set-up is mandatory at World Archery Championships. The licence to shoot in competitions is included in your membership to the South African National Archery Association. The minimum requirement to be awarded a Feathers and Arrows achievement award is the associate class of membership. For further information visit Indoor Target Archery: FITA Indoor Target Rounds may be shot by both the Recurve and Compound categories in separate divisions. The 25 meter FITA Indoor Round consists of 60 arrows on a 60cm diameter faces or the 60cm triple centre setup, for all classes. The 18 meter FITA Indoor Round consists of 60 arrows on a 40cdm diameter daces or 40cm triple faces for all classes. The combined FITA Indoor Round consists of the above two rounds shot in succession in the order listed above. Field Archery: } } The FITA Field Archery Rounds may be shot by the Bare-bow, Recurve and Compound categories, in separate divisions. Page 38

39 The FITA Field Round consists of any number of between targets which are divisible by four (4), with three (3) arrows to be shot per target. These targets will be arranged along a course with such difficulties in aiming and shooting as the terrain presents and the spirit and traditions of the discipline require. The distances for target butts are set 5 meters to 50 meters for Bare-bow and 10 meters to 60 meters for Recurve and Compound bows. The course may be marked or unmarked and be shot with any number of walk-ups or fan targets. The FITA Arrowhead Round consists of any number of targets between targets which are divisible by four (4), that is, two complete FITA Field Rounds. The rounds may be shot on marked and unmarked courses or one of each. Arrow repair: Removing points (or/and inserts) When removing a metal point (insert and point in one piece) or an insert and point in two pieces, you must: 1. Lightly heat the exposed end of the point for 3-5 seconds over a small gas flame. CAUTION: Do not overheat the component or the shaft. 2. Immediately grip the point with a pair of pliers. 3. Twist and pull out the point (and insert, if any). 4. If the point or insert cannot be removed, reheat for 3-5 seconds and try to remove again. 5. Repeat step 4 until adhesive softens enough to remove the component. Installing points and insert in the shaft Material needed for installation: 91 % isopropyl alcohol paper towels. - Cotton swabs. Hot-melt (especially made for archery) Torch or burner. The instructions that follow can be used for one piece points or for aluminium inserts with a screwed-in point. 1. After cutting your shaft to length as described, follow the point installation procedure carefully to prevent overheating the point. Overheating points can destroy the shaft's epoxy bond between the carbon and the aluminium tube (in an aluminium/carbon shaft), or shorten the endurance of the aluminium in this area (if there is an aluminium shaft) or destroy the epoxy bond that glues the carbon fibres (in a carbon arrow). For gluing the points and inserts, use hot-melt adhesive. 2. Clean approximately two inches inside the point end of the shaft using a cotton swab dipped in 91 % alcohol. Repeat the process until a fresh cotton swap is free of cutting dust residue or other contaminants. 3. Let the shaft dry thoroughly before bonding. 4. Carefully heat a stick of hot-melt adhesive over a small gas flame, then apply a ring of hot adhesive to the inside of the point-end of the shaft. 5. The melting point of hot-melt adhesive is low enough that the shaft will not be damaged during installation and high enough to keep the point securely bonded during the frictional heating caused when the arrow penetrates the target mat. Arrow points can come out in the target mat if lower melting temperature hot-melt adhesives are used. 6. Hold the end of the point with your fingers. (Do not hold with pliers because it is then possible to overhead the point.) Heat the exposed portion of the point shank or insert until you feel it getting warm. It should be just hot enough. Hot-melt the adhesive. 7. Heat the hot-melt adhesive and apply a generous layer of adhesive to the shank of the point or insert. 8. Without delay, while the adhesive is still fluid, push the point and/or insert into the shaft with rotating motion until the point flange sits against the end of the shaft. To assure an even distribution of adhesive, rotate the point 2 more revolutions after it has reached the shaft. 9. Do not apply heat directly to the shaft. 10. Do not overheat the points. If the point becomes too hot to hold in your fingers, it is too hot to put in the shaft. Set the point on a non-combustible surface until cool. Page 39


40 Do not force a point and/or insert into a shaft. If it does not sit fully, reheat the point immediately for 2-3 seconds and try pushing it in again. With a paper towel quickly wipe off excess adhesive while it is still hot. Do not apply heat directly to the shaft of any type of arrow because it could destroy the carbon fibres and change the endurance of the aluminium in this area. Do not overheat the points, because this could also cause damage in the shaft. If the head of the shaft is damaged on the point side, you may be able to use this arrow again, if its initial length before the problem was long enough. If so, it is advisable to cut all your arrows down to the new length. Fletching a shaft Feathers or vanes can be replaced with a fletching jig. Without this device it is difficult to keep the vane straight on the shaft until the glue is dry. Most archery dealers re fletch arrows, which is less expensive than buying new ones. Ideally your club should own a fletching jig. Page 40
41 Evaluation form for the World Archery Red Arrow Candidate (Form F) Date: Shooting distance for score evaluation 22m SKILLS Name: Required minimum score Achieved* *Not yet achieved 115 points Key elements (What should be done) Achieved* *Not yet achieved Final number of hits. References to the FITA Level 1 Coaching manual Release Along jaw or neck. # Backwards motion generated by the follow-up contraction of the back and posterior string shoulder muscles Bow hand Consistent bow hand on grip # b Relaxed bow hand allowing the use of a sling Bow arm Elbow properly orientated # b Subjects 2 evaluations Archery disciplines knowledge Arrow reparation TOTAL Name & Signature of evaluator Stationary upon release or moving a little toward the back due the follow-up contraction of the back and posterior bow shoulder muscles. Required knowledge or knowhow s Can give the overall description of 3 archery disciplines. Know how to fit and glue a point, and fletch an arrow 9 positive evaluations are required Achieved* *Not yet achieved # b & #10 Exercises Bowhand & Test for finger relaxation #9.5 Comments &/or references FITA C & R #4.1 et #4.5 # ** Awarded or Not yet awarded Page 41

42 The Gold Arrow Curriculum for the World Archery FITA Gold Arrow Award Performance Shooting distance: 26 meters Minimum required score: 115 points Skills Your shooting sequence should include the following: String clearance Objective: Allow a free path for the string during arrow flight. Form: See the two tests below. You will have to successfully pass one of these tests. Rationale: Any string shock during the propelling step would: Make the repetition of the push axis and the propelling intensity difficult; Reduce the amount of kinetic energy transmitted to the arrow. Page 42
.")
.")
.")
43 Test at the bow arm level. With no hand on the string, raise your bow and check where your string is located on your armguard or forearm. About half an inch forwards of this spot affix a piece of adhesive tape which is raised about 2 mm in the middle (bridge shape). The bridge of tape should be affixed vertically, across your bow forearm/armguard, or if you prefer, parallel to the string. Mark the side of the tape closest to the string with a pen (this should be done before sticking the tape on the armguard). This mark will help to identify if the string hits the tape while pushing the arrow or during its way back. Shoot one arrow with this adhesive tape in place - make sure you do not flatten out the bridge-tape before the draw! After the shot, examine the tape and analyze the hit (if any). If you come to the conclusion that the string clearance is too poor, ask to your coach to help you improve it. Test at the bow side chest level. Either watch yourself in a mirror, or, with the help of an assistant, observe where the string touches your chest at full draw, if at all. About half inch forwards of this spot affix a piece of adhesive tape that has a bridge shape 2 mm raised in the middle. See picture on the left. The most critical point is the edge (hem or trim) of the chestguard surrounding your bow shoulder. The bridge of tape should be affixed parallel to the string on your chest-guard. Shoot one arrow with this tape in place do not flatten out the bridge part before the draw. After the shot, analyse the hit (if any). Follow-through Objective: Continue all on-going activities not only the physical ones, but also the visual and mental ones - while releasing the string. Form: The shot must take the observer by surprise; no tell-tale signs of the impending shot must be seen. The body, face and gaze remain impassive before, during, and slightly after the action. Your face should remain the same, before, during and after the release. Sequence: Consistently repeat these shooting steps (seen below from left to right). Page 43


44 Your face should remain the same, before, during and after the release Page 44

45 Releasing Page 45


46 Knowledge and Technical Ability Tournament registration process: You should know the registration process (of your club) for a local tournament; if not, find out about this from other club members. Arrow setting Affixing arrow rests: The use of an arrow rest is important as it reduces the area of the bow the arrow touches, creating the least amount of friction when the arrow begins to move as it is released. There are arrow rests made from wire or plastic. The arrow rest should be glued onto the window directly above the pivot point of the handle and should be aligned squarely and perpendicular to the string. There should be a space of at least 15 mm between the arrow shaft and the window shelf Making the nocking point Nock locators may be added in two ways: A manufactured nock-set is available. Quite often it is made from metal and clamped on to the string with special pliers. Another method is to use standard heavy thread with fletching cement to form a small neat ring around the serving. This knot must be firm and uniform. Apply another thin coat of glue over the entire nock locator and then leave it to dry. The nock locators may be above and below the nock. After shooting about 30 arrows, re-measure the brace height. It has most likely decreased. Adjust the nocking point if necessary. Brace height: The bracing height of the bow should be within the bow manufacturers specified tolerances. If necessary the string can have twists added to it to increase the bracing height, or conversely, have some twists removed to lower the bracing height. Page 46
47 Evaluation form for Gold Arrow Candidates (Form G) Date: Shooting distance for score evaluation Name: Required minimum score Achieved * *Not yet achieved Final number of hits. 26m SKILLS String clearance 115 points Key elements (What should be done) Successful string clearance test (bridge of tape for instance) Achieved* *Not yet achieved References to the FITA Level 1 Coaching manual #10 String clearance Follow-through Impassive face upon release # Sequence Subjects 2 evaluations Tournament registration process Arrow setting TOTAL Name & Signature of evaluator Impassive aiming upon release Repeat the shooting steps with consistency Consistent shooting time (+/- 10 seconds) Required knowledge or knowhow s Know the registration process (of the club) at a local tournament. Know how to affix an arrow-rest and make a nocking point. 8 positive evaluations are required Achieved* *Not yet achieved Chapter 2 & various exercises of chapter 10. Comments &/or references #11.3.4& ** Awarded or Not yet awarded The South African National Archery Association PO Box Orange Grove info@sanaa.org.za The South African National Archery Association (SANAA) is affiliated to World Archery who developed this program and which has been adopted as the official development program of the association. Awards can be obtained from the SANAA office. Page 47


48 The South African National Archery Association. Page 48
FITA BEGINNERS MANUAL. Black. Arrow
 Black Arrow 35 CURRICULUM FOR THE FITA BLACK ARROW AWARD. PERFORMANCE: Shooting distance: 14 meters Minimum required score: 115 points SKILLS Your shooting sequence should include the following: Draw process:
FITA BEGINNER MANUAL
 FITA BEGINNER MANUAL Introduction: This FITA BEGINNER MANUAL is a guide for beginner archers and their Level 1 archery Coaches. To the Beginner Archers: Congratulations for taking Archery! The FITA Beginners
FITA BEGINNER MANUAL
 FITA BEGINNER MANUAL Introduction: This FITA BEGINNER MANUAL is a guide for beginner archers and their Level 1 archery Coaches. To the Level 1 Archery Coaches: Thank you for promoting archery! This guide
Archery Fundamentals
 Archery Fundamentals Objectives Common bow types and their basic parts Basic parts of an arrow and its usage Safe practices for archers Responsible shooter Good shooting form Know Your Bow and Arrows Modern
St George s Archery Club BEGINNERS COURSE SESSION RUNNING ORDER PLANNER
 St George s Archery Club BEGINNERS COURSE SESSION RUNNING ORDER PLANNER SESSION ONE Lead SESSION THREE Lead Bow Selection Freestyle Shot Refresher Arrow Selection Warm-up Bracers & safety check Adjusting
ARCHERY & SCOUTING. PRESENTATION POINTS: Equipment & Safety Personal Safety Facility Safety 10 steps to good shooting
 ARCHERY & SCOUTING PRESENTATION POINTS: Equipment & Safety Personal Safety Facility Safety 10 steps to good shooting Kathleen Millar, CAE, OCT NCCP Level 4 Coach EQUIPMENT SAFETY Stringing & Unstringing
*The steps described are for the right-handed person; adjustments will need to be made for a lefthander.
 archery study guide history The origin of archery is unknown; however, archery has been an activity with varied objectives for human beings since the beginning of recorded history. The successful use of
STEP 1. STANCE. The stance must be a consistent, repeatable and comfortable.
 STEP 1. STANCE The body can be divided into 2 parts the upper body from the hips up and the lower body from the hips down. The upper part of the body must maintain consistent position from shot to shot
OzBow Archery Instruction Program (the pathway to Olympic participation)
") OzBow Archery Instruction Program (the pathway to Olympic participation) The OzBow Archery Instruction Program is the second step in the Archery Australia Pathway Program. This program provides the participants
OzBow Archery Instruction Program (the pathway to Olympic participation) The OzBow Archery Instruction Program is the second step in the Archery Australia Pathway Program. This program provides the participants
CHAPTER 3 - FOOT DRILL. 1. During the initial stages of training in foot drill, instruction is to be given in open order.
 CHAPTER 3 - FOOT DRILL BASIC FOOT DRILL 1. During the initial stages of training in foot drill, instruction is to be given in open order. 2. Exercises are to be taught first by numbers and when proficient,
FITA Coach s Manual. CLOUT ARCHERY Module. Intermediate Level
 FITA Coach s Manual CLOUT ARCHERY Module Intermediate Level FITA Coaching Manual Intermediate Level Module Contents CLOUT ARCHERY The Clout Round Description 2 Some Rules 3 Aiming 3 Shooting Form 4 Shooting
Structure (Down plane)
") By Lauren Russell Structure (Down plane) The body (toes, knees, hips, wrists and shoulders) is aligned parallel to the intended target line. The torso is tilted over the ball from the hips whilst maintaining
By Lauren Russell Structure (Down plane) The body (toes, knees, hips, wrists and shoulders) is aligned parallel to the intended target line. The torso is tilted over the ball from the hips whilst maintaining
Introduction to Basic Archery
 Introduction to Basic Archery Archery includes a complex set of activities, from backyard target shooting to formal or field competitions, from family fun to bow hunting and bow fishing, or even the Olympic
Woodruff Archery Merit Badge Requirements Packet
 Scout Name: Troop #: MB Period: Requirement 1: Woodruff Archery Merit Badge Requirements Packet a. State and explain the Range Safety Rules: (1). Three safety rules when on the shooting line. (2). Three
THE FOUNDATION OF THE SHOT
 CHAPTER_2 THE FOUNDATION OF THE SHOT Success in archery depends on consistency and consistency starts with a solid foundation. Fully understanding and being able to apply the fundamentals is the key to
FITA Coach s Manual. RECURVE BOW SHOOTING FORM Module. Intermediate Level
 FITA Coach s Manual RECURVE BOW SHOOTING FORM Module Intermediate Level FITA Coaching Manual Intermediate Level Module RECURVE BOW SHOOTING FORM The centre line of the body when assuming the stance The
Page 1 of 6. Important Safety Rules for Parents Supervising Family Archery
 WARNING DANGEROUS PROJECTILE: A mishandled arrow or bowstring may result in serious injury or even death. Parental Supervision Required. Bows and arrows are not toys. Page 1 of 6 Failure to follow Instructions
GETTING STARTED with AAAR
 GETTING STARTED with AAAR Instinctive shooting employs the use of your anchor (rear sight), your dominant eye, and the point of the arrow (front sight) to develop a point-of-aim view. Without bow and arrow,
Woodruff Archery Merit Badge Requirements Packet
 Scout Name: Troop #: MB Period: Requirement 1: Woodruff Archery Merit Badge Requirements Packet a. State and explain the Range Safety Rules: (1). Three safety rules when on the shooting line. (2). Three
Belton High School Marching Fundamentals 2016
 Belton High School Marching Fundamentals 2016 Fundamentals of Teaching Fundamentals: 1. Say the name of the maneuver (INSTRUCT) 2. State its purpose (INSTRUCT) 3. Demonstrate it slowly, several times,
LESSON 4: THE FIRST TARGET POSITION - STANDING
 LESSON 4: THE FIRST TARGET POSITION - STANDING PURPOSE This lesson introduces you to the first target position, which is the standing position. the type of clothes that are used in school-age sporter class
2990 Lorne Scots Royal Canadian Army Cadet Corps Rifle Drill
 2990 Lorne Scots Royal Canadian Army Cadet Corps Rifle Drill Page 1 of 27 TABLE OF CONTENTS PARA ITEM PAGE Section 1 BASIC RIFLE DRILL 1.1 INTRODUCTION 3 1.2 ATTENTION 5 1.3 STAND AT EASE FROM ATTENTION
LEVEL 1 SKILL DEVELOPMENT MANUAL
 LEVEL 1 SKILL DEVELOPMENT MANUAL Lesson Manual C A Publication Of The USA Hockey Coaching Education Program The USA Hockey Coaching Education Program is Presented By LESSON C-1 SPECIFIC OBJECTIVES 1. Refine
The BIG BOOK of Golf Drills
 The BIG BOOK of Golf Drills 1 How to Use This Guide Congratulations on purchasing the Big Book of Golf Drills! This book is designed to use as a reference guide. We do not recommend printing this out as
SUN GOD ARCHERY at UCSD: NTS Shot Cycle
 3 PILLARS OF THE SHOT CYCLE SUN GOD ARCHERY at UCSD: NTS Shot Cycle 1) Barrel of the gun Bow hand pressure point, front shoulder, and back shoulder alignment 2) Holding Being braced "inside the bow" Analogy:
RIFLE DRILL. 1. General. Before commencing instruction in rifle drill, it is important that the cadets receive instruction in the parts of the rifle.
 RIFLE DRILL 1. General. Before commencing instruction in rifle drill, it is important that the cadets receive instruction in the parts of the rifle. 2. Rifle Movements. Unless stated otherwise, cadets
Instructional Manual
 Instructional Manual TABLE OF CONTENTS MEDICUS Dual 2000 Instructional Manual The Proper Grip 1 Posture, Stance & Alignment 2 Breakpoint 1: Takeaway 3 Breakpoint 2: Toe-up Position 4 Breakpoint 3: Setting
Chapter Eight: Athletes' Equipment
 Chapter Eight: Athletes' Equipment 8. 8.1 General 8.1.1 For all specifications relating to athletes equipment such as Recurve, Compound and Barebow Recurve, refer to current World Archery Rules and any
Flight Shooting Equipment
 Flight Shooting Equipment 1. FLIGHT BOW The Flight Bow rules below are to be used in tandem with the World Archery Rule Book Flight Rules (Please refer to article 33.5.7.2 in Book 5). i) The Flight Bow
Techniques To Treat Your Pain At Home (512)
") Techniques To Treat Your Pain At Home (512) 288-5322 7010 W. TX-71 Suite 360 Austin TX, 78735 Arm Only Bird Dog Start in the quadruped position (all fours) with arms and thighs perpendicular to the floor.
Techniques To Treat Your Pain At Home (512) 288-5322 7010 W. TX-71 Suite 360 Austin TX, 78735 Arm Only Bird Dog Start in the quadruped position (all fours) with arms and thighs perpendicular to the floor.
THROWING SKILLS RUN JUMP THROW
 RUN JUMP THROW CHAPTER 7: KEY IDEAS Throwing activities can be divided into the following sub-groups: pushing activities which lead to shot put pulling activities which lead to javelin throw slinging activities
Discus Technique: Basic Technique A Technical Analysis Grip Fork Gr Purpose: To provide control over Discus is held with Discus is held
 Discus Technique: A Technical Analysis Sandy Fowler University of Michigan Assistant Track & Field Coach Grip Purpose: To provide control over the implement throughout the spin. To provide for a proper
Be g i n n i n g s. Ar c h e r y B E S T. A Step-by-Step Instructional Guide for Teaching Olympic Style Archery to New Archers
 B E S T (Biomechanically Efficient Shooting Technique) Be g i n n i n g s in Ar c h e r y A Step-by-Step Instructional Guide for Teaching Olympic Style Archery to New Archers B E S T (Biomechanically
Page 1. Tuning. for. T4T Copyright 1993 T4BB Copyright All Rights Reserved. Barebow. By Rick Stonebraker
 Page 1 Tuning T4T Copyright 1993 T4BB Copyright 2018 for All Rights Reserved By Rick Stonebraker Barebow Page 2 FOREWORD This manual is a guide to basic barebow tuning and only addresses the most common
AUSTRALIAN BASEBALL UMPIRE S MANUAL
 AUSTRALIAN BASEBALL UMPIRE S MANUAL UMPIRE POSITIONS AND SIGNALS 2009 by Australian Baseball All rights reserved. No part of this publication may be reproduced or distributed in any form without prior
The Grip: Place the shot comfortably on the base of the hand with the thumb down and the four fingers balancing the shot.
 The Javelin By Mark Mirabelli, Throwing Specialist - www.mmtrackandfield.com If I could use one word to express success in all three styles of throwing the shot put I would have to say the word drill.
SEMI 4-H Target Archery Tournament
 SEMI 4-H Target Archery Tournament TARGET ARCHERY EVENT RULES Event Divisions Unsighted Divisions Compound, Long, or Recurve bows without sights or bowmarks. Beg. Unsighted Bow Ages 9-11 Jr. Unsighted
Much of this information can be found in the JOAD handbook here.
 What is JOAD Junior Olympic Archery Development or JOAD for short (pronounced 'joe-add') is part of national program designed to encourage children's participation in archery. It offers kids a chance to
Instructions for How to Teach the Level 2 Course - Day 2
 Instructions for How to Teach the Level 2 Course - Day 2 WWW.USARCHERY.ORG a program of in partnership with F O U N D A T I O N S Instructions for How to Teach the Level 2 Course - Day 2 INTRODUCTION
Ab Plank with Straight Leg Raise
 Ab Plank with Straight Leg Raise Position yourself face up with your knees bent at 90 degrees, feet flat on the floor. Your hands should be directly under your shoulders facing forward. While in this position
Rules of Hurdling. Distance Between Hurdles
 The Hurdle Events Introduction Brief discussion of rules, safety practices, and talent demands for the hurdles. Examine technical and training considerations for the hurdle events. 100 Meter Hurdles for
PARTNER With all partner stretches: communicate with partner and use caution!!
 - warm up prior to stretching - isolate the muscle group to be stretched - move slowly and smoothly into stretch - use proper mechanics and correct alignment - breathe normal - slowly come out of stretch
GYROSTATIC DELIVERY TECHNIQUE By Macka Jensen
 GYROSTATIC DELIVERY TECHNIQUE By Macka Jensen Knowledge dispels fear 1. INTRODUCTION Gyrostatic technique: The application of these factors in the gyrostatic delivery technique is based on the principle
Basic Shooting Skills Positions. By: Shannon Carlton
 Basic Shooting Skills Positions By: Shannon Carlton Agenda Introduction Dominant Eye Rifle Fitting Prone Position Rifle Fitting Tips Standing Position Sequences Checklists Positions Stable Comfortable
ANNEXURE TO THE LEVEL 1 INSTRUCTION MANUAL
 ANNEXURE TO THE LEVEL 1 INSTRUCTION MANUAL Table of Contents BASIC IFAA RULES GOVERNING THE BOW... 2 IFAA APPROVED BOWS:... 2 DRAW WEIGHT AND ARROW SPEED:... 2 WARANTY AND MAINTENANCE OF EQUIPMENT... 2
Teaching Rifle Positions to New Junior Shooters. NLU # 748 Free 04/13
 Teaching Rifle Positions to New Junior Shooters NLU # 748 Free 04/13 TM Teaching Rifle Positions to New Junior Shooters This booklet offers a reprint of three articles that originally appeared in the CMP
TAI CHI SHORT HAND FORM CLASSICAL YANG STYLE Updated 10/03/ updates available from
 TAI CHI SHORT HAND FORM CLASSICAL YANG STYLE Updated 10/03/2017 - updates available from www.taichichuan.org.uk During my 17 years learning of tai chi with Tony I have developed the following notes, both
Made in the USA OWNER S MANUAL
 Made in the USA OWNER S MANUAL Service and Repair Information Your local archery retailer should be your first resource for service and repair. The retail establishment where you purchased your bow has
Beginner Developing (RUN School Rabbits) Practising (RUN School Run) Emerging (Athletes) ATHLETE
 Practising (RUN School Run) Emerging (Athletes) ATHLETE") various s in response to instructions 2 Use backward to forward arm swing to increase ing distance 3 Identify preferred take off leg fast led approach with limited run up: 10-12 strides Achieve optimum
various s in response to instructions 2 Use backward to forward arm swing to increase ing distance 3 Identify preferred take off leg fast led approach with limited run up: 10-12 strides Achieve optimum
York County Bowmen. Archery School. This manual belongs to:
 York County Bowmen Archery School This manual belongs to: Safety First! Safety rules are NOT foolproof. Apply common sense at all times. If in doubt, DON T SHOOT! Personal Safety Range Safety Before shooting,
KOSCIELISKO POL. Biathlon Shooting Lesson :00 16:30
 KOSCIELISKO POL Biathlon Shooting Lesson 29.09.2011 15:00 16:30 Basic Shooting Skills Positions Basic Shooting Skills Positions Basic Shooting Skills Positions Introduction Dominant Eye Rifle Fitting Prone
The Fundamentals of Putting
 The Fundamentals of Putting Episode 1 - Setup and Aiming A proper setup position is a prerequisite of a good putt. Setup includes body posture, gripping the putter, alignment of body relative to the ball
Level 1 Conditioning and Stretching
 Base Training Exercise Techniqe/Purpose Top Training Exercise Technique/Purpose Base Stance with Overhead Press or Overhead Hold: Base stands in base stance and presses weight up and down. Base Keeps back
LESSON 7: THE PRONE POSITION
 LESSON 7: THE PRONE POSITION PURPOSE This lesson introduces you to the correct technique for firing in the prone position. INTRODUCTION prone sling The prone position has the lowest center of gravity and
Other options if your program is large and you can afford various sizes: 54" for 8-12yr; 62" for 11-15yr; 66" for intermediates, 68" young adult/adult
 Bow Most beginner programs use a 62" 15-18 lb draw recurve bow, which is suitable for youth (or beginner adults, if the program is mixed). A recurve, 3-part take down bow, makes transportation easier,
Shoulder Exercises for Combined Labrum Repair Rehabilitation Protocol
 Shoulder Exercises for Combined Labrum Repair Rehabilitation Protocol The exercises illustrated and described in this document should be performed only after instruction by your physical therapist or Dr.
PLAY BETTER GOLF and HAVE MORE FUN
 PLAY BETTER GOLF and HAVE MORE FUN Randy Meyer PGA Table of Contents Chapter Page Teaching Philosophy 1 Philosophy and Approach 3 Swing Fundamentals 2 Pre-swing 4 In-swing 5 Golf Tips 3 Ball position,
MODERN ARCHERY Compound Bow
 MODERN ARCHERY Now, into chapter four, the newest bow in this series, the Compound Bow. Again, this is a development of the Composite Bow, but what a significant development it is. The changes compared
Teaching Progression and the Fine Points For Contact In The Underhand Pass (Service Reception and Defense) Step 1: Catch & Throw
 Step 1: Catch & Throw") Teaching Progression and the Fine Points For Contact In The Underhand Pass (Service Reception and Defense) Step 1: Catch & Throw - Players can be in pairs or if working individually then the coach can
Teaching Progression and the Fine Points For Contact In The Underhand Pass (Service Reception and Defense) Step 1: Catch & Throw - Players can be in pairs or if working individually then the coach can
defenders get specific coaching for their respective positions, goalies require the same attention and guided skill development.
 POWER POINT SLIDES ACTIVITIES NOTES Mini-lecture: Over view- 10 RM- p. 1 1. Provide the following overview of the clinic: Rationale: Goaltending is a critical aspect of team play and requires direct &
Alcona 4-H Tournament Archery Rules
 Alcona 4-H Tournament Archery Rules Divisions Unsighted Divisions for contestants with bows without sights or bow marks and who do not use a release aid. Open Divisions for contestants using a manually
2672 Hastings & Prince Edward Regiment Royal Canadian Army Cadet Corps. Lee Enfield No.4. Rifle Drill
 2672 Hastings & Prince Edward Regiment Royal Canadian Army Cadet Corps Lee Enfield No.4 Rifle Drill Extracts from A-CR-CCP-053/PT001 March 2005 TABLE OF CONTENTS PARA ITEM PAGE Section 1 BASIC RIFLE DRILL
Book 4 Field & 3D Archery Rules
 Book 4 Field & 3D Archery Rules Page 1 / 12 Chapter 22 Athletes Equipment This article lays down the type of equipment athletes are permitted to use when shooting in World Archery competitions. It is the
Shooting Clinic, Alaska Biathlon Anchorage 4 April 2009 Instructor: Richard Barlow Session 3: Fundamentals, Position Details A.
 Shooting Clinic, Alaska Biathlon Anchorage 4 April 2009 Instructor: Richard Barlow Session 3: Fundamentals, Position Details A. Fundamental Steps 1. The sequence of six steps for a well-aimed shot needs
Juniors BB Curriculum. Baserunning Curriculum (Juniors Level)
") Juniors BB Curriculum 1. Baserunning 2. Catcher 3. Batting 4. Infield 5. Outfield 6. Pitcher Objectives: Baserunning Curriculum (Juniors Level) Learn to take extra bases on a batted ball or an error Focus
Juniors BB Curriculum 1. Baserunning 2. Catcher 3. Batting 4. Infield 5. Outfield 6. Pitcher Objectives: Baserunning Curriculum (Juniors Level) Learn to take extra bases on a batted ball or an error Focus
The following lesson is excerpted from
 The following lesson is excerpted from A Fresh Approach to the Snare Drum is the most comprehensive method available that simultaneously provides instruction for rhythm reading, technique fundamentals,
PEE WEE AND LIONS RULES AND SKILLS HANDOUT (April 2005) THE RULES
 THE RULES") PEE WEE AND LIONS RULES AND SKILLS HANDOUT (April 2005) THE RULES 1. When the whistle is blown by the coach, stand still, be quiet, and look at the coach; 2. If you want to speak raise your hand and wait
PEE WEE AND LIONS RULES AND SKILLS HANDOUT (April 2005) THE RULES 1. When the whistle is blown by the coach, stand still, be quiet, and look at the coach; 2. If you want to speak raise your hand and wait
MODERN GLOSSARY OF TERMS AND TECHNICAL INFORMATION PREPARATORY
 MODERN GLOSSARY OF TERMS AND TECHNICAL INFORMATION PREPARATORY Alternate straight kicks Lying down on the floor, side of body towards front, head in line with body. Hands flat on floor and not touching
Naval Special Warfare Combat Side Stroke Guide
 Naval Special Warfare Combat Side Stroke Guide Combat Side Stroke First Draft 1 MAR 2014 CONTENTS CHAPTER 1 COMBAT SIDE STROKE 1.1 OBJECTIVE 1.2 STROKE DESCRIPTION 1.3 BODY POSITION 1.4 PULL ARM 1.4.1
ORIENTATION SEQUENCE
 ORIENTATION SEQUENCE In-Trinity builds strength, deepens flexibility and improves balance, coordination and agility. For the first time, you will access movements never possible before, taking your training
A Publication Of The USA Hockey Coaching Education Program The USA Hockey Coaching Education Program is Presented By
 LEVEL 1 SKILL DEVELOPMENT MANUAL Lesson Manual B A Publication Of The USA Hockey Coaching Education Program The USA Hockey Coaching Education Program is Presented By LESSON B-1 SPECIFIC OBJECTIVES 1.
MTSU Drumline Audition guidelines and criteria 2011
 MTSU Drumline Audition guidelines and criteria 2011 Thank you for your interest in the MTSU Band of Blue Drum line! We take great pride in the Band of Blue and are really looking forward to a terrific
Traditional Archery Academy
 Crows Head Archery offers a wide range of Traditional Longbows, Recurves, Arrows, Quivers and Bow Building Supplies. If you are looking for a high quality Traditional Bow and great customer service, then
Beginners Course. This is just a quick document that gives you a bit of information prior to starting the beginners course.
 Welcome to our Beginners Course This is just a quick document that gives you a bit of information prior to starting the beginners course. If you could please read through this prior to the first lesson.
Copyright All Rights Reserved. By Rick Stonebraker.
 Page 1 of 17 Copyright 2000 All Rights Reserved By Rick Stonebraker http://www.texasarchery.org FOREWORD Page 2 of 17 An important part of archery is the equipment. The skill of the archer is also important
BBSA/IFBBSA CRITERIA MEN S CLASSIC BODYBUILDING
 BBSA/IFBBSA CRITERIA MEN S CLASSIC BODYBUILDING 2019 MEN S CLASSIC BODYBUILDING This discipline recognized by the IFBB to be included into the Senior Men World Championship Internationally. Classic Bodybuilding
AMATEUR HOCKEY ASSOCIATION ILLINOIS, INC. MITE 8 & UNDER AMERICAN DEVELOPMENT MODEL
 Mite 8 & Under American Development Model Week 1 This coach s manual is intended to provide the instructions and tools to conduct the Mite and 8 & Under Illinois Hockey - Skills Challenge. Mite
 Page 1 of 5 FAQ 3D Archery Various FAQ in view of the adapted FITA 3D Rules as per 1.4.2012 Book 2, Events Which distance for which 3D targets in a competition course? See Book 2, Chapter 9, Field of Play
The Simple Swing
 The Simple 1-2-3 Swing The Amazing "1-2-3 Swing" Guarantees The Average Golfer Can Break 90 In Less Than a Week! The Amazing "1-2-3 Swing" Guarantees Average Golfers Can Learn To Consistently Hit The Ball
USA BASKETBALL PLAYER DEVELOPMENT CURRICULUM INTRODUCTORY LEVEL. 40 USA Basketball Youth Development Guidebook
 USA BASKETBALL PLAYER DEVELOPMENT CURRICULUM INTRODUCTORY LEVEL 40 USA Basketball Youth Development Guidebook 41 INTRODUCTORY LEVEL BALL HANDLING & DRIBBLING GENERAL OVERVIEW: Ball-handling and dribbling
Basic Quarterback Training
 Basic Quarterback Training This tip provided by Todd Kreuger, Football Tools For Active.com Repetition is the key to becoming a good quarterback. Below are some of the most important techniques a high
Page 1 Introduction. Fast and slow twitch muscle fibres are. Page 2 The Sprint Start. Page 4 - Sprints. Page 5 - Middle Distance
 Name: Below are some terms for you to research. Once you have found out what each term means write a short paragraph explaining why you perform better in some events than you do others. Page 1 Introduction
40 Allied Drive Dedham, MA (office)
") Standing forward flexion Stand facing a mirror with the hands rotated so that the thumbs face forward. Raise the arm upward keeping the elbow straight. Try to raise the arm by hinging at the shoulder as
Standing forward flexion Stand facing a mirror with the hands rotated so that the thumbs face forward. Raise the arm upward keeping the elbow straight. Try to raise the arm by hinging at the shoulder as
Shot put learn by - doing Basic technique for the Shot Put By: Mark Harsha Portage High School Girls Head Coach
 Shot put learn by - doing Basic technique for the Shot Put By: Mark Harsha Portage High School Girls Head Coach Goal One: Shot grip and placement 1. Holding the shot The shot is held at the base of the
Key Terms. balance barrel bolt butt hand guard muzzle port arms sling stacking swivel stock trail arms trigger guard
 Lesson 7 Stationary Movements with the M-1 Rifle Chapter 5 Key Terms balance barrel bolt butt hand guard muzzle port arms sling stacking swivel stock trail arms trigger guard What You Will Learn to Do
AEROBIC GYMNASTICS Code of Points APPENDIX II Guide to Judging Execution and Difficulty
 FÉDÉRATION INTERNATIONALE DE GYMNASTIQUE FONDÉE EN 1881 AEROBIC GYMNASTICS Code of Points 2009 2012 DRAFT OCTOBER 2008 APPENDIX II Guide to Judging Execution and Difficulty Page 1 of 80 INTRODUCTION This
Randolph College Softball 2008 Summer Program
 Randolph College Softball 2008 Summer Program Week 1 Week 2 Endurance: 1 mile run 4x per Endurance: 1.25 mile run 4x per Core workout: 4x per Core workout: 4x per Week 3 Week 4 Endurance: 1.5 mile run
Technical Service and Warranty Manual
 Technical Service and Warranty Manual T hank you for selecting a Champion Bow. We feel confident you will be pleased with the performance and durability we build into each and every bow we manufacture.
LEVEL 1 SKILL DEVELOPMENT MANUAL
 LEVEL 1 SKILL DEVELOPMENT MANUAL Lesson Manual D A Publication Of The USA Hockey Coaching Education Program The USA Hockey Coaching Education Program is Presented By 1. Proper Stance: LESSON D-1 SPECIFIC
Evaluation: 1. Can participants on a regular basis cast with a spin-casting reel with little effort 2. Can participants get close to a target.
 Spin-casting Sharon Rushton- Best Time: This lesson can be taught as the first lesson on casting. Depending on the age group and time you have available, you may want to start with the Can-Casting Lesson,
S&DMHA Player Development Program Book Four - Goaltending
 S&DMHA Player Development Program Book Four - Compiled by Wayne King to be used as reference for all minor hockey coaches Good goaltending is essential to the success of your team. For individuals to be
OWNER S MANUAL. Made in the USA
 Made in the USA OWNER S MANUAL SERVICE & REPAIR INFORMATION Your local archery retailer should be your first resource for service and repair. The retail establishment where you purchased your bow has knowledgeable
PRO BANDS TRAINING GUIDE
 PRO BANDS TRAINING GUIDE Thank you for choosing SKLZ Pro Bands. We are dedicated to providing you with the best tools and instruction possible to help you unleash your athletic potential. If there is anything
Basic Shooting Skills Principles of Marksmanship. By: Shannon Carlton
 Basic Shooting Skills Principles of Marksmanship By: Shannon Carlton Agenda Introduction Principles of Coaching 5 Principles of Marksmanship Developing a Routine Making Sight Adjustments Sequences Principles
Chair exercises Sally Ann Belward, Falls Clinical Lead Physiotherapist
 Chair exercises Sally Ann Belward, Falls Clinical Lead Physiotherapist Exercise safety Exercise should be comfortable and fun Ensure participants are sat on a sturdy chair, have comfortable clothing and
Cervical and Shoulder Girdle Stretches
 Cervical and Shoulder Girdle Stretches Exercise 1: Scalene Stretch Sit straight up in a chair with your shoulders relaxed. Keep your gaze straight ahead at eye level and your chin pointed down slightly.
The Takeaway. The waggle can be an excellent opportunity to rehearse your takeaway
 The Takeaway Your approach to the ball is the final step over which you have total control. Once you actually start the swing, you need to depend on rhythm, tempo and balance to see you through the swing.
KRIYA LOWER BACK AND HIPS
 KRIYA LOWER BACK AND HIPS 1. Pelvic Grind Left. Place your hands on your knees and begin grinding yourself in a big, smooth circle going to the left. Lift the chest up high as you tilt the pelvis back,
1 P a g e. Royal Canadian Sea Cadet Corps Centurion Marksmanship
 1 P a g e Royal Canadian Sea Cadet Corps Centurion Marksmanship 2 P a g e Marksmanship Manual Marksmanship training involves learning to fire the cadet air rifle. You will be taught many lessons about
Full swing technique is a pillar of a solid overall game. The following 4 core competencies are strong predictors of success in ball striking.
 Full Swing Analysis What are we trying to accomplish? Core Competencies in the Full Swing Full swing technique is a pillar of a solid overall game. The following 4 core competencies are strong predictors