A12-mounting check and retrofitting a Rohloff SPEEDHUB A12 hub into 12mm Thru-axle frames. DT / Maxle / Syntace X12 / Shimano e-thru 12
|
|
|
- Alexia Chandler
- 5 years ago
- Views:
Transcription


1 A12-mounting check and retrofitting a Rohloff SPEEDHUB A12 hub into 12mm Thru-axle frames DT / Maxle / Syntace X12 / Shimano e-thru 12
2 Table of contents 1. Retrofitting a Rohloff SPEEDHUB A12 hub into 12mm Thru-axle frames (DT / Maxle / Syntace X12 / Shimano e-thru 12) /148mm mm mm... 1 Process for Ordering... 2 A12 SPEEDHUB - Dropout test kit The 10 step process for bicycle retailers Checking which axleplates and adapters are required For 142/148mm and 177mm frame spacings... 4 For a 197mm frame spacing... 5 Process:... 5 Flush mounting of the Axleplate Rohloff A12 SPEEDHUB system frame compatibility test... 7 Powder coating on bicycle frames Dropout material thickness OK Dropout material thickness is too thin Dropout material is too thick Determining the Thru Axle, Selecting the test components...12 DT/Maxle Thru Axle...12 Test components - DT Maxle...13 Shimano e-thru Test components - Shimano e-thru Syntace X12 (V1)...16 Test components - Syntace X12 (V1)...17 Syntace X12 (V2)...18 Test components - Syntace X12 (V2) Fitment Test - DT/Maxle Thru-axle systems...20 Disc brake side (left-hand): Dropout thickness - Min. play test - 0.5mm...21 Disc brake side (left-hand): Dropout thickness - Max. play test - 1.0mm...22 Sprocket side (right-hand): Dropout thickness - Min. play test 0.5mm...23 Sprocket side (right-hand): Dropout thickness - Max. play test - 1.0mm Fitment test - Shimano e-thru 12 Thru-axle system...25 Disc brake side (left-hand): Dropout thickness - Min. play test - 0.5mm...26 Disc brake side (left-hand): Dropout thickness - Max. play test - 1.0mm...27 Sprocket side (right-hand): Dropout thickness - Min. play test - 0.5mm...28 Sprocket side (right-hand): Dropout thickness - Max. play test - 1.0mm Fitment test Syntace X12 (V1) Thru-axle system...30 Disc brake side (left-hand): Dropout thickness - Min. play test - 0.5mm...31
3 Disc brake side (left-hand): Dropout thickness - Max. play test - 1.0mm...32 Sprocket side (right-hand): Dropout thickness - Min. play test - 0.5mm...33 Sprocket side (right-hand): Dropout thickness - Max. play test - 1.0mm Fitment test - Syntace X12 (V2) Thru-axle system...35 Disc brake side (left-hand): Dropout thickness - Min. play test - 0.5mm...36 Disc brake side (left-hand): Dropout thickness - Max. play test - 1.0mm...37 Sprocket side (right-hand): Dropout thickness - Min. play test - 0.5mm...38 Sprocket side (right-hand): Dropout thickness - Max. play test - 1.0mm Second Measurement process using Measurement Gauge (Cylinder/Bolt)...41 DT / Maxle Dropout thickness measurement...41 DT / Maxle: - Disc Brake side left-hand side...41 DT / Maxle: - Sprocket side right-hand side...42 Syntace V1: - Disc Brake side left-hand side...43 Syntace V1: - Sprocket side right-hand side...44 Syntace V2 Dropout thickness measurement (thread cut into right-hand dropout)...45 Syntace V2: - Disc Brake side left-hand side...45 Syntace V2: - Sprocket side right-hand side...46 Shimano e-thru Dropout thickness measurement...47 Shimano e-thru: - Disc Brake side left-hand side...47 Shimano e-thru: - Sprocket side right-hand side...48 Order form...49
4 1. Retrofitting a Rohloff SPEEDHUB A12 hub into 12mm Thru-axle frames (DT / Maxle / Syntace X12 / Shimano e-thru 12) Options: The A12 SPEEDHUB models are available only as disc brake versions with the following O.L.D.s: 142/148mm (untested in tandems & thus unauthorized for tandem application use) 32 or 36 spoke, Silver, red or black anodized finish. Article code is determined via the torque anchoring system. Either: - via the International Standard (IS2000) disc brake mount (A12 DB OEM2) using a Speedbone or Monkeybone 160/180 - via the Postmount disc brake mount (A12 DB PM) using a PM Bone The PM Bone simultaneously functions as an adapter from mm or mm. The next largest brake rotor must therefore always be used. 177mm (untested in tandems & thus unauthorized for tandem application use) 32 spoke only, Black anodized finish only. Article code is determined via the torque anchoring system. Either: - via the International Standard (IS2000) disc brake mount (A12 DB OEM2 XL) using a Speedbone or Monkeybone 160/180 - via the Postmount disc brake mount (A12 DB PM XL) using a PM Bone The PM Bone simultaneously functions as an adapter from mm or mm. The next largest brake rotor must therefore always be used. 197mm (untested in tandems & thus unauthorized for tandem application use) 32 spoke only, Black anodized finish only (A12 DB OEM2 XXL) Article code is determined via the torque anchoring system. Either: - via the International Standard (IS2000) disc brake mount Using a Monkeybone /180 - via the Postmount disc brake mount Using a Fatbone 180 (for frames with a 160mm brake rotor) or Using a Fatbone 203 (for frames with a 180mm brake rotor) The Fatbone simultaneously functions as an adapter from mm or mm. The next largest brake rotor must therefore always be used. 1 ROHLOFF-A12-BEIDE_MESSMETHODEN-EN DOCX
5 Process for Ordering Modern dropouts are constructed with very few standardized dimensions. The result thereof is unfortunately a complex number of steps that must be undertaken in order to safely mount an A12 SPEEDHUB model. The axle type as well as the dropouts of each individual frame must be painstakingly checked with precision in order to calculate the quantity and type of mounting hardware required to safely integrate an A12 SPEEDHUB model into the frame. These tests as well as the later mounting of the SPEEDHUB itself must be completed by a qualified bicycle workshop that are able to accept liability for the accuracy of their measurements. Any mistakes made during the frame/axle testing stage can result in damage to the A12 SPEEDHUB axle or the frame dropouts themselves. In addition, any component failure can, as always, result in possible accidents and injuries to the cyclist. A12 SPEEDHUB models are not available online separately. Only frame kits and complete bicycles are permitted for online sales where the fitter will already have accepted liability for the correct hardware choice and quality control by test mounting the A12 SPEEDHUB into the frame. A12 SPEEDHUB - Dropout test kit We have prepared a dropout test kit to ease the calculation of mounting hardware required. When required, our service partners/distributors will be able to supply this kit in order to check the frame compatibility. The complete kit will need to be returned after completion along with the relevant test protocol. The retailer may then order the A12 SPEEDHUB version together with the correctly calculated hardware required and will then finally mount this into the frame. The exact order in which the hardware is used must be noted so that the cyclist can ensure these are refitted identically after the wheel is removed. Failure to use the hardware correctly when refitting the wheel will result in a loss of warranty as well as possible accidents and injuries to the cyclist. Conversion of an existing CC or TS SPEEDHUB to the new A12 axle will require numerous other internal components to match new tolerances and thus results in almost the same cost as a new hub. This is not financially viable and as such not a service we offer. 2 ROHLOFF-A12-BEIDE_MESSMETHODEN-EN DOCX
6 2. The 10 step process for bicycle retailers 1. Order the test kit - Article No Make a note of bicycle brand and model name as well as the production year on the order form (Attention this information is vital in order to complete a databank that may possibly eliminate the necessity of this test procedure for future sales). 3. Select the required axleplate and adapter/bone. Check the correctly positioned axleplate lies flush against the inside dropout face without interference from weld beads, stay material or disc brake mount. Note the required axleplate, adapter and brake rotor (brand and size) on the order form. Should the axleplate not lie flush against the dropout material, or should the adapters not be compatible with the frame/dropout form, then we regret that we are unable to offer any SPEEDHUB model that is compatible with this frame. Further testing will not be necessary. 4. Read the functional explanation of the A12 SPEEDHUB axle system carefully and attempt to understand all points noted within. 5. Calculate which axle system is currently used by your 12mm thru axle frame. Remove the relevant test components for that system from the test kit and place them to one side ready for steps 6 and Test the left-hand (disc brake side) dropout first. Note the required reduction sleeve and spacers or custom sleeve on the order form. Should a custom reduction sleeve be required, this will be machined and shipped to order which may incur some minor delays. Test the right-hand (sprocket side) dropout next. Note the required reduction sleeve and spacers or custom sleeve on the order form. Should a custom reduction sleeve be required, this will be machined and shipped to order which may incur some minor delays. 7. Test both dropouts using the measurement gauge and note the results on a copy of the form. 8. Select the correct spoke length using our ERD/Spoke-length list and include this info on the order form. 9. or Fax the completed order form plus measurement gauge forms to your local distributor. 10. Return the test kit. 3 ROHLOFF-A12-BEIDE_MESSMETHODEN-EN DOCX
 disc")


7 3. Checking which axleplates and adapters are required. For 142/148mm and 177mm frame spacings Axleplate required for: Frames with an International Standard (IS2000) disc brake mount A12 OEM2 (142/148/177mm) Art. No Frames with Postmount disc brake mount A12 PM Art. No Adapter required for: Frames with an International Standard (IS2000) disc brake mount using an IS2000 brake calliper Speedbone Art. No Frames with an International Standard (IS2000) disc brake mount using a Postmount brake calliper Monkeybone 160 Art. No 8553 for 160mm brake rotors Monkeybone 180 Art. No for 180mm (& larger) brake rotors Frames with a Postmount disc brake mount using a Postmount brake calliper PM Bone Art. No The PM Bone functions as an adapter from 160 to 180mm rotor or from a 180 to 203mm rotor. The next largest brake rotor will therefore always be required when using this component. 4 ROHLOFF-A12-BEIDE_MESSMETHODEN-EN DOCX
 disc brake mount using a Postmount caliper Monkeybone-10 160, Art. No.")


8 For a 197mm frame spacing Axleplate required: A12 OEM2 (197mm) Art. No Adapter required for: Frames with an International Standard (IS2000) disc brake mount using a Postmount caliper Monkeybone , Art. No for 160mm brake rotors or Monkeybone , Art. No for 180mm brake rotors Frames with a Postmount disc brake mount using apostmount brake caliper FAT Bone 180 Art. No The FAT Bone 180 functions as an adapter from a 160 to 180mm rotor. A 180mm brake rotor will therefore always be required when fitted to a frame which usually requires a 160mm calliper. or FAT Bone 203 Art. No The FAT Bone 203 functions as an adapter from a 180 to 203mm rotor. A 203mm brake rotor will therefore always be required when fitted to a frame which usually requires a 180mm calliper. Process: Remove the demo axleplate and adapter required from the test kit. Connect both these components together and lie against the frame in their usual mounted position to check for clearance and to make sure these components fit without any interference. Should the axleplate not lie flush against the dropout material, or should the adapters not be compatible with the frame/dropout form, then we regret that we are unable to offer any SPEEDHUB model that is compatible with this frame. 5 ROHLOFF-A12-BEIDE_MESSMETHODEN-EN DOCX
 measures 40mm diameter (blue).")
. It is vital to ensure the axleplate lies completely flush against the inside dropout face.")

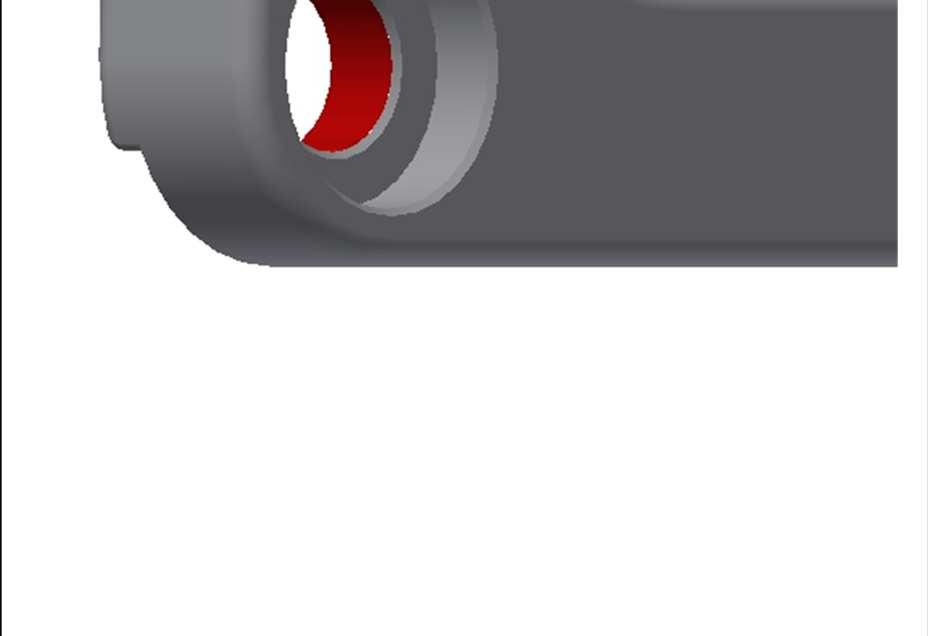
9 Flush mounting of the Axleplate All SPEEDHUB models anchor the output torque of the hub to the left-hand (disc brake) side of the frame through the use of an adjustable and interchangeable axleplate. Contrary to regular hub axles, which make contact with the dropout with just a 19mm diameter lock-nut, the axle contact area on this side of a SPEEDHUB (the axleplate) measures 40mm diameter (blue). In addition, each axleplate is designed with a 19mm diameter axle stud (green) for ease locating the hub in the dropout and will require enough dropout/frame clearance to accommodate the area transferring the output torque to the adapter/frame (yellow). It is vital to ensure the axleplate lies completely flush against the inside dropout face. Make sure weld beads and stay material is not located underneath the axleplate. Failure to do so will result in the SPEEDHUB sitting incorrectly in the dropout and thus hindering the brake rotor running parallel through the brake calliper. The yellow section of the selected axleplate must therefore lay completely parallel to the dropout material whereby it doesn t matter if this yellow area actually touches the dropout material or not. The yellow section of the axleplate will lie in a different position against the dropout surface, depending upon the desired direction of cable routing selected. 6 ROHLOFF-A12-BEIDE_MESSMETHODEN-EN DOCX
 on sprocket side (V1) 3. Syntace X12 with internal threaded M12x1 sprocket side dropout (V2) 4.")
10 4. Rohloff A12 SPEEDHUB system frame compatibility test The Rohloff A12 SPEEDHUB units are designed to fit into 142mm, 148mm, 177mm and 197mm spaced bicycle frames currently running one of the following 12mm thru axles. 1. DT/Maxle 2. Syntace X12 with clamped threaded bush (M12x1) on sprocket side (V1) 3. Syntace X12 with internal threaded M12x1 sprocket side dropout (V2) 4. Shimano 12mm e-thru The axle currently used with that particular frame will no longer be required as the Rohloff A12 axle system uses special reduction sleeves to reduce the 12mm diameter axle hole in the dropout to just 7mm. Specially manufactured M7x1x30 bolts are then inserted through the reduction sleeves and dropouts and finally threaded into the internally tapped SPEEDHUB A12 axle. To ensure these bolts do not loosen while in use, Nord-lock washers are additionally added behind each bolt head. ATTENTION: Only original Rohloff A12 bolts in combination with OEM Nord-lock washers may be used. Nord-lock washers have a limited lifespan and must be replaced every 4 times they are used in order to ensure bolts do not loosen when in use. The measurements of the reduction sleeves, bolts and Nord-lock washers have been carefully selected to offer the largest range of compatibility with the currently available 142mm, 148mm, 177mm and 197mm thru-axle frames. Alongside the various different axle styles available, the only other variable that may hinder hub/frame compatibility remains the thickness of the dropout material itself. The thickness of the dropout material is not standardised and as such the bicycle mechanic fitting the A12 SPEEDHUB Model will be required to complete a few test procedures to calculate if the A12 SPEEDHUB will fit and if so, what hardware is required. An A12 SPEEDHUB model is only compatible with a bicycle frame when a gap of 0.5mm to 1.0mm is available between the reduction sleeve (black) and the SPEEDHUB axleplate (blue). The use of micro washers can, to a certain degree, be used to ensure compatibility across a wider range of dropout thicknesses. The dropout test will enable the bicycle mechanic to calculate this. Only via the correct completion of this test will it be possible to ensure the safe integration of a Rohloff SPEEDHUB A12 model in your frame of choice. 7 ROHLOFF-A12-BEIDE_MESSMETHODEN-EN DOCX
11 The 3 possible issues and their respective consequences are listed below to help illustrate the importance of completing the dropout test carefully. 1. Dropout material thickness is compatible with the reduction sleeves = OK. 2. Dropout material too thin for the reduction sleeves or bolts. The A12 Rohloff SPEEDHUB versions cannot be secured within the dropouts, the wheel wobbles and leads to accidents and injuries for the cyclist. The bolt screws too far into the axle, clamping the shifting shaft leading to shifting issues and excessive oil loss because of damage. 3. Dropout material too thick for the reduction sleeves or bolts. The A12 Rohloff SPEEDHUB versions cannot be secured using enough bolt threads. Bolts will work loose and internal axle threads can be damaged which may lead to accidents and injuries for the cyclist. An incorrectly completed dropout test and/or mounting of an A12 SPEEDHUB model could result in the wheel being inadequately secured within the frame which in turn may lead to damage to the SPEEDHUB itself and/or injuries to the cyclist. It is imperative therefore that the dropout test and final mounting of the SPEEDHUB be completed with the utmost accuracy. Powder coating on bicycle frames Many bicycle frames nowadays are powder coated on both sides of the dropouts. The dropout test can still be completed on frames with thick powder coating. It is important to check the condition of the powder coating on the dropouts however when using an A12 SPEEDHUB model. Multiple removal and mounting of the SPEEDHUB may cause the thick powder coating to flake. If this occurs, micro shim must be added to compromise for the reduced dropout thickness. Following an inspection:- the thick powder coating has fully flaked away from the clamp area either on the inner or outer dropout face: Add 1x micro shim to the outside of the dropout must be located between the reduction sleeve and dropout or reduction sleeve and spacer (if applicable). Following an inspection:- the thick powder coating has fully flaked away from the clamp area on both the inner and outer dropout face: Add 2x micro shims to the outside of the dropout must be located between the reduction sleeve and dropout or reduction sleeve and spacer (if applicable). 8 ROHLOFF-A12-BEIDE_MESSMETHODEN-EN DOCX
 is located between the reduction sleeve (black) and the axleplate (blue).")
 insertion depth into the axleplate (blue) is thus achieved.")
12 1. Dropout material thickness OK The dropout material thickness measures between 0.5mm and 1.0mm more than the length of the standard A12 reduction sleeve. This 0.5mm-1-0mm gap (green) is located between the reduction sleeve (black) and the axleplate (blue). The bolt (yellow) clamps the reduction sleeve (black) and the axleplate (blue) against the dropout to ensure the SPEEDHUB is safely and securely fastened in position. The optimum bolt (yellow) insertion depth into the axleplate (blue) is thus achieved. This optimum depth achieves the maximum thread contact area whilst ensuring adequate clearance (green) between bolt (yellow) and A12 SPEEDHUB shifting shaft (gray). Only now is it possible to mount the A12 SPEEDHUB model safe and securely within the dropouts of the selected bicycle frame. 9 ROHLOFF-A12-BEIDE_MESSMETHODEN-EN DOCX
 located between the reduction sleeve (black) and the A12 SPEEEDHUB axleplate (blue) is exceeded.")
 only being able to clamp the reduction sleeve (black) against the axleplate (blue).")
13 2. Dropout material thickness is too thin The dropout material is thinner than the reduction sleeves. A gap has formed between the reduction sleeve (black) and the dropout which cannot be closed. The required gap (red) located between the reduction sleeve (black) and the A12 SPEEEDHUB axleplate (blue) is exceeded. The required gap (red) located between the bolt (yellow) and the A12 SPEEDHUB shifting shaft (gray) is not present. This results in the bolt (yellow) only being able to clamp the reduction sleeve (black) against the axleplate (blue). The reduction sleeve (black) and Axleplate (blue) are not clamped against the dropout. The ability remains for the entire unit to move laterally within the dropout. The rear wheel is not secured safely in position! In addition the bolt (yellow) enters the axleplate (blue) too far. The missing gap between bolt (yellow) and A12 SPEEDHUB shifting shaft (gray) is depleted (red). This results in a shifting malfunction (possible complete blockage) within the A12 SPEEDHUB model. Use of a longer, non OEM bolt will also result in the same issue as written above. It is therefore imperative that only the original, OEM Rohloff supplied bolts are used along with the Nord-Lock washers supplied. 10 ROHLOFF-A12-BEIDE_MESSMETHODEN-EN DOCX
 and the axleplate (blue). The reduction sleeve is unable to support the bolt (yellow) adequately. The bolt may break.")
 or axleplate (blue) to fail.")

14 3. Dropout material is too thick. The dropout material is more than 1mm thicker than the length of the reduction sleeves. A gap (red) of more than 1.0mm is created between the reduction sleeve (black) and the axleplate (blue). The reduction sleeve is unable to support the bolt (yellow) adequately. The bolt may break. In addition, the contact area between bolt (yellow) and axleplate (blue) is greatly reduced. The forces applied to the bolt in use could, even with the correct tightening torque, cause the thread of the bolt (yellow) or axleplate (blue) to fail. The safe and secure mounting of an A12 SPEEDHUB model is not possible. Bolt or axleplate thread failure can easily lead to accidents resulting in injuries to the cyclist and damage to the SPEEDHUB. Use of a shorter, non OEM bolt will also result in the same issue as written above. It is therefore imperative that only the original, OEM Rohloff supplied bolts are used along with the Nord-Lock washers supplied. 11 ROHLOFF-A12-BEIDE_MESSMETHODEN-EN DOCX

 - M12x1.75 thread or M12x1.")
15 5. Determining the Thru Axle, Selecting the test components DT/Maxle Thru Axle Determine thread pitch M12x1,75 thread or M12x1.5 thread Flat surface area Disc Brake side (left-hand) - 12mm diameter hole - Flat surface area Sprocket side (right-hand) - M12x1.75 thread or M12x1.5 thread Tapped directly into dropout 12 ROHLOFF-A12-BEIDE_MESSMETHODEN-EN DOCX
 6 Micro-shims 12x18x0.5 Disc brake side (left): Extended A12 reduction sleeve (orange) Sprocket side (right): Extended M12x1.")
16 Test components - DT Maxle Disc brake side (left): A12 reduction sleeve (red) Sprocket side (right): M12x1.75 A12 threaded reduction sleeve (blue) Sprocket side (right): M12x1.5 A12 threaded reduction sleeve (black) 6 Micro-shims 12x18x0.5 Disc brake side (left): Extended A12 reduction sleeve (orange) Sprocket side (right): Extended M12x1.75 A12 threaded reduction sleeve (gray) Sprocket side (right): Extended M12x1.5 A12 threaded reduction sleeve (light green) A12 Dropout gauge 0.5/ ROHLOFF-A12-BEIDE_MESSMETHODEN-EN DOCX


17 Shimano e-thru 12 M12x1 thread Flat surface area Disc Brake side (left-hand) - 12mm diameter hole - Flat surface area Sprocket side (right-hand) - 12mm diameter hole - Flat surface area 14 ROHLOFF-A12-BEIDE_MESSMETHODEN-EN DOCX
 Sprocket Side (right-hand):")
 A12 Dropout")
18 Test components - Shimano e-thru 12 Disc brake side (lefthand): A12 spacer (turquoise) - Disc brake side /Sprocket side left-hand and right-hand: Rohloff A12 reduction sleeve (red) Sprocket Side (right-hand): A12 spacer (brown) 6 Micro-shims 12x18x0.5 Disc brake side /Sprocket side leftand right-hand: Extended A12 reduction sleeve (orange) A12 Dropout gauge 0.5/ ROHLOFF-A12-BEIDE_MESSMETHODEN-EN DOCX
 - Conical surface area Sprocket side (right-hand) Version")
 16")
19 Syntace X12 (V1) Conical surface area M12x1 thread Disc Brake side (left-hand) - Conical surface area Sprocket side (right-hand) Version 1 - Clamped M12x1 bush (no longer required) - Bush replaced with A12 reduction sleeve (yellow) 16 ROHLOFF-A12-BEIDE_MESSMETHODEN-EN DOCX
20 Test components - Syntace X12 (V1) Disc brake side (left-hand): A12 conical spacer (dark green) Disc brake side (left-hand): A12 reduction sleeve (red) Sprocket Side (right-hand): A12 reduction sleeve (yellow) 6 Micro-shims 12x18x0.5 Disc brake side /Sprocket side - left- and right-hand: Extended A12 reduction sleeve (orange) A12 Dropout gauge 0.5/ ROHLOFF-A12-BEIDE_MESSMETHODEN-EN DOCX
 Version 2 - M12x1 thread tapped directly into dropout 18 ROHLOFF-A12-BEIDE_MESSMETHODEN-EN-07032017.")
21 Syntace X12 (V2) Conical surface area M12x1 thread Disc Brake side (left-hand) - Conical surface area Sprocket side (right-hand) Version 2 - M12x1 thread tapped directly into dropout 18 ROHLOFF-A12-BEIDE_MESSMETHODEN-EN DOCX
 6 Micro-shims 12x18x0.")
22 Test components - Syntace X12 (V2) Disc brake side (left-hand): A12 conical spacer (dark green) Disc brake side (left-hand): A12 reduction sleeve (red) Sprocket side (right-hand): M12x1 A12 threaded reduction sleeve (pink) 6 Micro-shims 12x18x0.5 Disc brake side /Sprocket side - left- and right-hand: Extended A12 reduction sleeve (orange) Sprocket side (right-hand): Extended A12 M12x1 threaded reduction sleeve (gold) A12 Dropout gauge 0.5/ ROHLOFF-A12-BEIDE_MESSMETHODEN-EN DOCX

 A12 M12x1.")

 or A12 5 (black) threaded reduction")
23 6. Fitment Test - DT/Maxle Thru-axle systems Disc brake side Left-hand dropout Sprocket side Right-hand dropout A12 Reduction sleeve (red) A12 M12x1.75 threaded reduction sleeve (blue) or A12 M12x1.5 threaded reduction sleeve (black) Fit A12 M12x1.75 (blue) or A12 M12x1.5 (black) threaded reduction sleeve accordingly. 20 ROHLOFF-A12-BEIDE_MESSMETHODEN-EN DOCX

 dropout.")
24 Disc brake side (left-hand): Dropout thickness - Min. play test - 0.5mm A12 Dropout gauge. 0.5mm side in use 1 1a 1b Zero lateral play Lateral play. Dropout too thin Fit a 0.5mm micro shim between dropout and reduction sleeve. Lateral play Zero lateral play 0.5mm test result = OK. Proceed to max. play test 1.0mm 0.5mm test result = OK. Testing of the left-hand dropout is complete. Max. play test 1.0 not necessary. Note number of required micro shims in the order form. Proceed to min. play test 0.5mm for sprocket side (right-hand) dropout. 21 ROHLOFF-A12-BEIDE_MESSMETHODEN-EN DOCX
 with all six 0.5mm micro shims. Lateral play Zero lateral play Test result = OK.")
 dropout.")
25 Disc brake side (left-hand): Dropout thickness - Max. play test - 1.0mm A12 Dropout gauge. 1.0mm side in use 2 2a 2b Lateral play Zero lateral play. Dropout too thick Fit extended A12 reduction sleeve (orange) with all six 0.5mm micro shims. Lateral play Zero lateral play Test result = OK. Testing of the left-hand dropout is complete. Proceed to min. play test 0.5mm for sprocket side (right-hand) dropout. Test result = OK. Custom reduction sleeve required. Note number of remaining micro shims on the order form. Proceed to max. play test 1.0mm for sprocket side (right-hand) dropout. Remove one micro shim and repeat the process. 22 ROHLOFF-A12-BEIDE_MESSMETHODEN-EN DOCX
 threaded reduction sleeve fully into the dropout and then back-off one full rotation. Slowly screw the A12 M12x1.75 (blue) or A12 M12x1.")
26 Sprocket side (right-hand): Dropout thickness - Min. play test 0.5mm 3 3a A12 Dropout gauge. 0.5mm side in use Screw the A12 M12x1.75 (blue) or A12 M12x1.5 (black) threaded reduction sleeve fully into the dropout and then back-off one full rotation. Slowly screw the A12 M12x1.75 (blue) or A12 M12x1.5 (black) threaded reduction sleeve into the dropout Movement of A12 dropout gauge in arrowed direction noticeable. Dropout too thin Zero movement of A12 dropout gauge in arrowed direction noticeable. 0.5mm test result = OK. Proceed to max. play test 1.0mm 3b Fit a 0.5mm micro shim between dropout and the A12 M12x1.75 (blue) or A12 M12x1.5 (black) threaded reduction sleeve Screw the threaded reduction sleeve fully into the dropout and then back-off one full rotation. Slowly screw the A12 M12x1.75 (blue) or A12 M12x1.5 (black) threaded reduction sleeve into the dropout Movement of A12 dropout gauge in arrowed direction noticeable. 3c Movement of A12 dropout gauge in arrowed direction for the first time not noticeable. 0.5mm test result = OK. Testing of the righthand dropout is complete. Max. play test 1.0 not necessary. Note number of required micro shims in the order form. 23 ROHLOFF-A12-BEIDE_MESSMETHODEN-EN DOCX
 threaded reduction sleeve fully into the dropout and then back-off one full rotation. 4 Slowly thread the A12 M12x1.75 (blue) or A12 M12x1.")
 or extended A12 M12x1.5 (light green) threaded reduction sleeve into the dropout.")
 or A12 M12x1.5 (light green) threaded reduction sleeve with all six 0.")
27 Sprocket side (right-hand): Dropout thickness - Max. play test - 1.0mm A12 Dropout gauge. 1.0mm side in use 4a 4c Screw the A12 M12x1.75 (blue) or A12 M12x1.5 (black) threaded reduction sleeve fully into the dropout and then back-off one full rotation. 4 Slowly thread the A12 M12x1.75 (blue) or A12 M12x1.5 (black) threaded reduction sleeve into the dropout. Movement of A12 dropout gauge in arrowed direction noticeable. Zero movement of A12 dropout gauge in arrowed direction noticeable. Dropout too thick 4b Slowly screw the extended A12 M12x1.75 (gray) or extended A12 M12x1.5 (light green) threaded reduction sleeve into the dropout. Movement of A12 dropout gauge in arrowed direction noticeable for the first time. Zero movement of A12 dropout gauge in arrowed direction noticeable. Remove one micro shim and repeat the process. Test result = OK. Testing of the right-hand dropout is complete. Screw the extended A12 M12x1.75 (gray) or A12 M12x1.5 (light green) threaded reduction sleeve with all six 0.5mm micro shims, fully into the dropout and then backoff one full rotation. Test result = OK. Custom reduction sleeve required. Note number of remaining micro shims on the order form. Testing of the right-hand dropout is complete. 24 ROHLOFF-A12-BEIDE_MESSMETHODEN-EN DOCX

 A12 reduction sleeve (red) A12")
 25")
28 7. Fitment test - Shimano e-thru 12 Thru-axle system Disc brake side Left-hand dropout Sprocket side Right-hand dropout A12 reduction sleeve (red) A12 reduction sleeve (red) A12 left-hand spacer (turquoise) A12 right-hand spacer (brown) 25 ROHLOFF-A12-BEIDE_MESSMETHODEN-EN DOCX
 and the spacer (turquoise). Lateral play Zero lateral play 0.")
 dropout.")
29 Disc brake side (left-hand): Dropout thickness - Min. play test - 0.5mm A12 Dropout gauge. 0.5mm side in use 1 1a 1b Zero lateral play Lateral play. Dropout too thick Fit a 0.5mm micro shim between the A12 reduction sleeve (red) and the spacer (turquoise). Lateral play Zero lateral play 0.5mm test result = OK. 0.5mm test result = OK. Proceed to max. play test 1.0mm Testing of the left-hand dropout is complete. Max. play test 1.0 not necessary. Note number of required micro shims in the order form. Proceed to min. play test 0.5mm for sprocket side (right-hand) dropout. 26 ROHLOFF-A12-BEIDE_MESSMETHODEN-EN DOCX
 with all six 0.")


30 Disc brake side (left-hand): Dropout thickness - Max. play test - 1.0mm A12 Dropout gauge. 1.0mm side in use 2 2a 2b Fit extended A12 reduction sleeve (orange) with all six 0.5mm micro shims between it and the spacer (turquoise). Lateral Play Zero lateral play Lateral play Zero lateral play. Dropout too thick Test result = OK. Custom reduction sleeve required. Test result = OK. Testing of the left-hand dropout is complete. Proceed to min. play test 0.5mm for sprocket side (right-hand) dropout. Note number of remaining micro shims on the order form. Proceed to min. play test 0.5mm for sprocket side (right-hand) dropout. Remove one micro shim and repeat the process. 27 ROHLOFF-A12-BEIDE_MESSMETHODEN-EN DOCX


 and the spacer")

31 Sprocket side (right-hand): Dropout thickness - Min. play test - 0.5mm A12 Dropout gauge. 0.5mm side in use 3a 3 0.5mm test result = OK. Lateral play. Dropout too thin Zero lateral play Proceed to max. play test 1.0mm 3b 3c 0.5mm test result = OK. Testing of the right-hand dropout is complete. Fit a 0.5mm micro shim between the A12 reduction sleeve (red) and the spacer (brown). Lateral play Zero lateral play Max. play test 1.0 not necessary. Note number of required micro shims in the order form. 28 ROHLOFF-A12-BEIDE_MESSMETHODEN-EN DOCX


. Test result = OK. Custom reduction sleeve required.")
32 Sprocket side (right-hand): Dropout thickness - Max. play test - 1.0mm A12 Dropout gauge. 1.0mm side in use 4a 4c 4 Lateral play Zero lateral play. Dropout too thick Lateral play Zero lateral play 4b Remove one micro shim and repeat the process. Test result = OK. Testing of the right-hand dropout is complete. Fit extended A12 reduction sleeve (orange) with all six 0.5mm micro shims between it and the spacer (brown). Test result = OK. Custom reduction sleeve required. Note number of remaining micro shims on the order form. Testing of the right-hand dropout is complete. 29 ROHLOFF-A12-BEIDE_MESSMETHODEN-EN DOCX

 A12 reduction sleeve (red) A12")
 30")
33 8. Fitment test Syntace X12 (V1) Thru-axle system Disc brake side Left-hand dropout Sprocket side Right-hand dropout A12 reduction sleeve (red) A12 reduction sleeve (red) A12 left-hand conical spacer (dark green) A12 right-hand spacer (yellow) 30 ROHLOFF-A12-BEIDE_MESSMETHODEN-EN DOCX
 and the spacer (green).")

34 Disc brake side (left-hand): Dropout thickness - Min. play test - 0.5mm A12 Dropout gauge. 0.5mm side in use 1 1a 1b Fit a 0.5mm micro shim between the A12 reduction sleeve (red) and the spacer (green). Zero lateral play Lateral play Dropout too thin Lateral play Zero lateral play 0.5mm test result = OK. Proceed to max. play test 1.0mm 0.5mm test result = OK. Testing of the left-hand dropout is complete. Max. play test 1.0 not necessary. Note number of required micro shims in the order form. Proceed to min. play test 0.5mm for sprocket side (right-hand) dropout. 31 ROHLOFF-A12-BEIDE_MESSMETHODEN-EN DOCX
 with all six 0.")


35 Disc brake side (left-hand): Dropout thickness - Max. play test - 1.0mm A12 Dropout gauge. 1.0mm side in use 2 2a 2b Fit extended A12 reduction sleeve (orange) with all six 0.5mm micro shims between it and the conical spacer (green). Lateral play Zero lateral play Lateral play Zero lateral play. Dropout too thick Test result = OK. Testing of the left-hand dropout is complete. Proceed to min. play test 0.5mm for sprocket side (right-hand) dropout. 0.5mm test result = OK. Testing of the left-hand dropout is complete. Max. play test 1.0 not necessary. Note number of required micro shims in the order form. Proceed to min. play test 0.5mm for sprocket side (right-hand) dropout. Remove one micro shim and repeat the process. 32 ROHLOFF-A12-BEIDE_MESSMETHODEN-EN DOCX

 and the spacer (yellow).")
36 Sprocket side (right-hand): Dropout thickness - Min. play test - 0.5mm A12 Dropout gauge. 0.5mm side in use 3a 3 0.5mm test result = OK. Proceed to max. play test 1.0mm Lateral play Dropout material too thin Zero lateral play 3b 3c 0.5mm test result = OK. Testing of the right-hand dropout is complete. Max. play test 1.0 not necessary. Fit a 0.5mm micro shim between the A12 reduction sleeve (red) and the spacer (yellow). Lateral play Zero lateral play Note number of required micro shims in the order form. 33 ROHLOFF-A12-BEIDE_MESSMETHODEN-EN DOCX


. Test result = OK. Custom reduction sleeve required.")
37 Sprocket side (right-hand): Dropout thickness - Max. play test - 1.0mm A12 Dropout gauge. 1.0mm side in use 4a 4c 4 Lateral play Zero lateral play. Dropout too thick Lateral play Zero lateral play 4b Remove one micro shim and repeat the process. Test result = OK. Testing of the right-hand dropout is complete. Fit extended A12 reduction sleeve (orange) with all six 0.5mm micro shims between it and the spacer (yellow). Test result = OK. Custom reduction sleeve required. Note number of remaining micro shims on the order form. Testing of the right-hand dropout is complete. 34 ROHLOFF-A12-BEIDE_MESSMETHODEN-EN DOCX


 A12")
 35")
38 9. Fitment test - Syntace X12 (V2) Thru-axle system Disc brake side Left-hand dropout Sprocket side Right-hand dropout A12 reduction sleeve (red) A12 M12x1 threaded reduction sleeve (pink) A12 lefthand conical spacer (dark green) 35 ROHLOFF-A12-BEIDE_MESSMETHODEN-EN DOCX
 and the spacer (green). Lateral play Zero lateral play 0.5mm test result = OK. Proceed to max.")
 dropout.")
39 Disc brake side (left-hand): Dropout thickness - Min. play test - 0.5mm A12 Dropout gauge. 0.5mm side in use 1 1a 1b Zero lateral play Lateral play Dropout too thin Fit a 0.5mm micro shim between the A12 reduction sleeve (red) and the spacer (green). Lateral play Zero lateral play 0.5mm test result = OK. Proceed to max. play test 1.0mm 0.5mm test result = OK. Testing of the left-hand dropout is complete. Max. play test 1.0 not necessary. Note number of required micro shims in the order form. Proceed to min. play test 0.5mm for sprocket side (right-hand) dropout. 36 ROHLOFF-A12-BEIDE_MESSMETHODEN-EN DOCX
. Lateral play Zero lateral play Lateral play Zero lateral play. Dropout too thick Test result = OK.")
 dropout. Remove one micro shim and repeat the process.")
40 Disc brake side (left-hand): Dropout thickness - Max. play test - 1.0mm A12 Dropout gauge. 1.0mm side in use 2 2a 2b Fit extended A12 reduction sleeve (orange) with all six 0.5mm micro shims between it and the conical spacer (green). Lateral play Zero lateral play Lateral play Zero lateral play. Dropout too thick Test result = OK. Testing of the left-hand dropout is complete. Proceed to min. play test 0.5mm for sprocket side (right-hand) dropout. Test result = OK. Custom reduction sleeve required. Note number of remaining micro shims on the order form. Proceed to min. play test 0.5mm for sprocket side (right-hand) dropout. Remove one micro shim and repeat the process. 37 ROHLOFF-A12-BEIDE_MESSMETHODEN-EN DOCX

41 Sprocket side (right-hand): Dropout thickness - Min. play test - 0.5mm A12 Dropout gauge. 0.5mm side in use 3a 3 Slowly screw the A12 M12x1 threaded reduction sleeve into the dropout 0.5mm test result = OK. Proceed to max. play test 1.0mm Screw the A12 M12x1 threaded reduction sleeve fully into the dropout and then backoff one full rotation. Movement of dropout gauge in arrowed direction noticeable. Dropout too thin Zero movement of A12 dropout gauge in arrowed direction noticeable. 3b Fit a 0.5mm micro shim between dropout & A12 M12x1 (pink) threaded reduction sleeve. Screw the threaded reduction sleeve fully into the dropout & then back-off 1 full rotation. Slowly screw the A12 M12x1 threaded reduction sleeve into the dropout Movement of dropout gauge in arrowed direction noticeable. 3c Movement of A12 dropout gauge in arrowed direction for the first time not noticeable. 0.5mm test result = OK. Testing of the right-hand dropout is complete. Max. play test 1.0 not necessary. Note number of required micro shims in the order form. 38 ROHLOFF-A12-BEIDE_MESSMETHODEN-EN DOCX


42 Sprocket side (right-hand): Dropout thickness - Max. play test - 1.0mm A12 Dropout gauge. 1.0mm side in use 4a 4c 4 Slowly screw the A12 M12x1 threaded reduction sleeve into the dropout Movement of dropout gauge in arrowed direction noticeable Zero movement of A12 dropout gauge in arrowed direction noticeable. Dropout too thick Slowly screw extended A12 M12x1 threaded reduction sleeve (gold) into the dropout Movement of A12 dropout gauge in arrowed direction noticeable for the first time. Zero movement of A12 dropout gauge in arrowed direction noticeable. Screw the A12 M12x1 threaded reduction sleeve fully into the dropout and then back-off one full rotation 4b Remove one micro shim and repeat the process. Test result = OK. Testing of the right-hand dropout is complete. Fit a 0.5mm micro shim between dropout and the extended A12 M12x1 (gold) threaded reduction sleeve Screw the threaded reduction sleeve fully into the dropout and then back-off one full rotation. Test result = OK. Custom reduction sleeve required. Note number of remaining micro shims on the order form. Testing of the right-hand dropout is complete. 39 ROHLOFF-A12-BEIDE_MESSMETHODEN-EN DOCX
43 Second Measurement process using Measurement Gauge (Cylinder/Bolt) DT / Maxle Dropout Thickness Measurement Process Syntace V1 Dropout Thickness Measurement Process (threaded bush clamped into right-hand dropout) Syntace V2 Dropout Thickness Measurement Process (thread tapped into right-hand dropout) Shimano e-thru Dropout Thickness Measurement Process 40 ROHLOFF-A12-BEIDE_MESSMETHODEN-EN DOCX


44 10. Second Measurement process using Measurement Gauge (Cylinder/Bolt) DT / Maxle Dropout thickness measurement DT / Maxle: - Disc Brake side left-hand side The measurement cylinder must always be positioned against the outer dropout face / the measurement bolt must always be positioned against the inside dropout face. DT / Maxle dropouts are measured without any additional components. Press the measurement cylinder against the outer face of the dropout and thread the measurement bolt into it by hand. Measure the complete length of the mounted measurement tool with a Vernier Caliper as illustrated. Note the result below rounded to two decimal places. Note result here:. mm Frame Brand & Model: Frame number: We regret it is not be possible to mount a SPEEDHUB should the measurement equate to >57.5mm. We regret it is not be possible to mount a SPEEDHUB should the measurement equate to <47,0mm. 41 ROHLOFF-A12-BEIDE_MESSMETHODEN-EN DOCX
45 DT / Maxle: - Sprocket side right-hand side The measurement cylinder must always be positioned against the outer dropout face / the measurement bolt must always be positioned against the inside dropout face. DT / Maxle dropouts are measured without any additional components. Press the measurement cylinder against the outer face of the dropout and thread the measurement bolt into it by hand. Measure the complete length of the mounted measurement tool with a Vernier Caliper as illustrated. Note the result below rounded to two decimal places. Note result here:. mm Note thread pitch: M12 x Frame Brand & Model: Frame number: We regret it is not be possible to mount a SPEEDHUB should the measurement equate to >57.5mm. We regret it is not be possible to mount a SPEEDHUB should the measurement equate to <47,0mm. 42 ROHLOFF-A12-BEIDE_MESSMETHODEN-EN DOCX
 over the measurement cylinder.")
46 Syntace V1 Dropout thickness measurement (threaded bush in right-hand dropout) Syntace V1: - Disc Brake side left-hand side The measurement cylinder must always be positioned against the outer dropout face / the measurement bolt must always be positioned against the inside dropout face. Place the Syntace A12 Conical spacer (green) over the measurement cylinder. Then press the measurement cylinder (with green conical spacer) against the outer face of the dropout and thread the measurement bolt into it by hand. Measure the complete length of the mounted measurement tool with a Vernier Caliper as illustrated. Note the result below rounded to two decimal places. Note result here:. mm Frame Brand & Model: Frame number: We regret it is not be possible to mount a SPEEDHUB should the measurement equate to >57.5mm. We regret it is not be possible to mount a SPEEDHUB should the measurement equate to <51,0mm. 43 ROHLOFF-A12-BEIDE_MESSMETHODEN-EN DOCX
 over the measurement cylinder.")
47 Syntace V1: - Sprocket side right-hand side The measurement cylinder must always be positioned against the outer dropout face / the measurement bolt must always be positioned against the inside dropout face. Place the Syntace A12 spacer (yellow) over the measurement cylinder. Then press the measurement cylinder (with yellow spacer) against the outer face of the dropout and thread the measurement bolt into it by hand. Measure the complete length of the mounted measurement tool with a Vernier Caliper as illustrated. Note the result below rounded to two decimal places Note result here:. mm Frame Brand & Model: Frame number: We regret it is not be possible to mount a SPEEDHUB should the measurement equate to >57.5mm. We regret it is not be possible to mount a SPEEDHUB should the measurement equate to <51,0mm. 44 ROHLOFF-A12-BEIDE_MESSMETHODEN-EN DOCX
48 Syntace V2 Dropout thickness measurement (thread cut into right-hand dropout) Syntace V2: - Disc Brake side left-hand side The measurement cylinder must always be positioned against the outer dropout face / the measurement bolt must always be positioned against the inside dropout face. Place the Syntace A12 Conical spacer (green) over the measurement cylinder. Then press the measurement cylinder (with green conical spacer) against the outer face of the dropout and thread the measurement bolt into it by hand. Measure the complete length of the mounted measurement tool with a Vernier Caliper as illustrated. Note the result below rounded to two decimal places Note result here:. mm Frame Brand & Model: Frame number: We regret it is not be possible to mount a SPEEDHUB should the measurement equate to >57.5mm. We regret it is not be possible to mount a SPEEDHUB should the measurement equate to <51,0mm. 45 ROHLOFF-A12-BEIDE_MESSMETHODEN-EN DOCX

49 Syntace V2: - Sprocket side right-hand side The measurement cylinder must always be positioned against the outer dropout face / the measurement bolt must always be positioned against the inside dropout face. Press the measurement cylinder against the outer face of the dropout and thread the measurement bolt into it by hand. Measure the complete length of the mounted measurement tool with a Vernier Caliper as illustrated. Note the result below rounded to two decimal places Note result here:. mm Note thread pitch: M12 x Frame Brand & Model: Frame number: We regret it is not be possible to mount a SPEEDHUB should the measurement equate to >57.5mm. We regret it is not be possible to mount a SPEEDHUB should the measurement equate to <47,0mm. 46 ROHLOFF-A12-BEIDE_MESSMETHODEN-EN DOCX
 over the measurement cylinder.")

50 Shimano e-thru Dropout thickness measurement Shimano e-thru: - Disc Brake side left-hand side The measurement cylinder must always be positioned against the outer dropout face / the measurement bolt must always be positioned against the inside dropout face. Place the Shimano A12 spacer (blue) over the measurement cylinder. Then press the measurement cylinder (with blue spacer) against the outer face of the dropout and thread the measurement bolt into it by hand. Measure the complete length of the mounted measurement tool with a Vernier Caliper as illustrated. Note the result below rounded to two decimal places. Note result here:. mm Frame Brand & Model: Frame number: We regret it is not be possible to mount a SPEEDHUB should the measurement equate to >57.5mm. We regret it is not be possible to mount a SPEEDHUB should the measurement equate to <47,0mm. 47 ROHLOFF-A12-BEIDE_MESSMETHODEN-EN DOCX
 over the measurement cylinder.")

51 Shimano e-thru: - Sprocket side right-hand side The measurement cylinder must always be positioned against the outer dropout face / the measurement bolt must always be positioned against the inside dropout face. Place the Shimano A12 spacer (brown) over the measurement cylinder. Then press the measurement cylinder (with brown spacer) against the outer face of the dropout and thread the measurement bolt into it by hand. Measure the complete length of the mounted measurement tool with a Vernier Caliper as illustrated. Note the result below rounded to two decimal places. Note result here:. mm Frame Brand & Model: Frame number: We regret it is not be possible to mount a SPEEDHUB should the measurement equate to >57.5mm. We regret it is not be possible to mount a SPEEDHUB should the measurement equate to <47,0mm. 48 ROHLOFF-A12-BEIDE_MESSMETHODEN-EN DOCX
52 Order form Customer: Contact Person Customer #: Telefone Date Data Bicycle Frame: Brand Model Year of Manufacture Frame Number Disc brake mount IS2000 PM Disc diameter without adaptors 140mm 160mm 180mm Eccentric bottom bracket adjustable dropouts Chain tensioner standard derailleur hanger direct mount derailleur hanger chain drive Gates Carbon drive Order 1x Rohloff SPEEDHUB A12 O.L.D. (width) 142mm 32-hole 36-hole silver black red 148mm 32-hole 36-hole silver black red 177mm (32-hole, black 197mm (32-hole, black) Chain Tensioner: yes no Axleplate A12 OEM2 (142/148/177) A12 PM (142/148/177) A12 OEM2 (197) Torque anchoring adapter: Monkeybone160 (Art.#8553) Monkeybone180 (Art.#8554) PM Bone (Art.#8555) Monkeybone-10/160 (Art.# ) Monkeybone-10/180 (Art.# ) FAT-Bone180 (Art.#8556) Fat-Bone203 (Art.#8557) Brake System: SPEEDHUB will be used without a disc brake SPEEDHUB will be used with a disc brake. Please ship corresponding brake rotor with hub Disc brake rotor diameter mm Disc brake brand & model Axle system (of tested frame, please tick test components required) DT/Maxle: Disc Brake side (left-hand) Red reduction sleeve (8592) Orange reduction sleeve (8592S) Sprocket side (right-hand) Blue threaded reduction sleeve M12x1.75 (8593) Black threaded reduction sleeve M12x1.5 (8599) Gray threaded reduction sleeve M12x1.75 (8593S) Light-green threaded reduction sleeve M12x1.5 (8599S) Number of micro shims required Number of micro shims required Number of micro shims required Number of micro shims required Number of micro shims required Number of micro shims required Shimano e-thru 12: Disc Brake side (left-hand) Red reduction sleeve (8592) + turquoise spacer (8596) Orange reduction sleeve (8592S) + turquoise spacer (8596) Sprocket side (right-hand) Red reduction sleeve (8592) + brown spacer (8597) Orange reduction sleeve (8592S) + brown spacer (8597) Number of micro shims required Number of micro shims required Number of micro shims required Number of micro shims required Syntace X12-V1: Disc Brake side (left-hand) Red reduction sleeve (8592) + green conical spacer (8594) Number of micro shims required Orange reduction sleeve (8592S) + green conical spacer (8594) Number of micro shims required Sprocket side (right-hand) Red reduction sleeve (8592) + yellow spacer (8595) Orange reduction sleeve (8592S) + yellow spacer (8595) 49 ROHLOFF-A12-BEIDE_MESSMETHODEN-EN DOCX Number of micro shims required Number of micro shims required Syntace X12-V2: Disc Brake side (left-hand) Red reduction sleeve (8592) + green conical spacer (8594) Number of micro shims required Orange reduction sleeve (8592S) + green conical spacer (8594) Number of micro shims required Sprocket side (right-hand) Pink threaded reduction sleeve (8598) Gold threaded reduction sleeve (8598S) Number of micro shims required Number of micro shims required Please return this complete dropout measurement kit only after receipt of an order confirmation or direct response from the Rohloff AG.
FREQUENTLY ASKED QUESTIONS ANSWERED! MOUNTING TO MY BIKE
 FREQUENTLY ASKED QUESTIONS ANSWERED! MOUNTING TO MY BIKE Will a Rohloff hub work on my bike? It is likely that the Rohloff hub will work on your bike as there are number of different hub configurations,
Rohloff AG Wholesale price-list valid from 10/2017 WHOLESALE Art.-No. Article PRICE MSRP incl. 19% tax in EURO Rohloff SPEEDHUB 500/14
 ohloff AG Wholesale price-list ohloff SPEEDHUB 500/14 To enable the ohloff SPEEDHUB 500/14 to be mounted in most bikes, we offer: -three axle types (CC quick release / TS bolt-on / A12 Thru axle) -two
TABLE OF CONTENTS INTRODUCTION
 R3 DISC MANUAL TABLE OF CONTENTS Introduction... 1 Frame Features... 2 Fork Preparation... 3 Small Parts... 5 Frame Preparation... 6 Brake Housing Installation... 7 Mechanical Cable Routing... 9 Electric
TABLE OF CONTENTS FRAME FEATURES INTRODUCTION
 S3 DISC MANUAL TABLE OF CONTENTS Introduction...1 Frame Features...2 Fork Preparation...3 Small Parts...5 Frame Preparation...6 Brake Housing Installation...7 Mechanical Cable Routing...9 Electric Cable
FRAME FEATURES TABLE OF CONTENTS INTRODUCTION
 R3 MANUAL TABLE OF CONTENTS Introduction...1 Frame Features...2 Fork Preparation...3 Small Parts...5 Frame Preparation...6 Mechanical Cable Routing...7 Electric Cable Routing...9 Seatpost Assembly & Installation...11
BICYCLE ASSEMBLY INSTRUCTIONS. dutchcycles.com.au. Distribution Centre
 BICYCLE ASSEMBLY INSTRUCTIONS dutchcycles.com.au Distribution Centre Shed 68, 400-422 Somerville Road, Tottenham, VIC 3012 email: service@dutchcycles.com.au BICYCLE COMPONENTS KEY INTRODUCTION CONGRATULATIONS
2018 MTB Components. Frame Fit Specifications. GEN Rev C 2018 SRAM, LLC
 2018 MTB Components Frame Fit Specifications GEN.0000000005544 Rev C 2018 SRAM, LLC General Notes All dimensions are in millimeters unless otherwise noted. Images in this document are not to scale. Your
R3 RIM MANUAL EN. Version 1 I
 R3 RIM MANUAL EN Version 1 I 07.02.2017 TABLE OF CONTENTS Introduction...1 Frame Features...2 Fork Preparation...3 Small Parts...5 Frame Preparation...6 Mechanical Cable Routing...7 Electric Cable Routing...9
MASTER TRUING STAND TS-3. Optional Dial indicator set with brackets Dial indicator bracket set only
 MASTER TRUING STAND TS-3 3 2 1 3 8 9 4 10 7 6 5 12 13 Optional 1555-1 Dial indicator set with brackets 1556-1 Dial indicator bracket set only 49 11 16 14 15 48 32 31 37 38 20 19 17 18 34 39 21 36 22 33
BRONZE BUSHING REPLACEMENT PROCEDURE DN345 & NL450C
 1 BRONZE BUSHING REPLACEMENT PROCEDURE V.2 12/3/2014 DN345 & NL450C 2 Safety Instructions Removing Walking Beams 3 1. Position spreader on a flat concrete surface capable of supporting weight of spreader
RADON 237A: ASSEMBLY GUIDE. Revision Valid for MY2017 Radon
 RADON 237A: ASSEMBLY GUIDE Revision 3.0-05-29-2017 - Valid for MY2017 Radon RADON 237A: Table of Contents 1. Tools Needed and First Aid Kit... 3 2. Sizing Chart... 4 3. Seat Post Collar Assembly... 5 4.
FRAME FEATURES TABLE OF CONTENTS INTRODUCTION. A guide to your Cervélo C Series frame.
 C SERIES MANUAL TABLE OF CONTENTS Introduction...1 Frame Features...2 Fork Preparation...3 Small Parts...5 Frame Preparation...6 Brake Housing Installation...7 Mechanical Cable Routing...9 Electric Cable
REPLACING THE FRONT RIM OF CROSSMAX SLR DISC, CROSSMAX SL DISC 07 AND CROSSMAX ST DISC WHEELS
 022 TECHNICALMANUAL07 WHEEL BUILDING REPLACING THE FRONT RIM OF CROSSMAX SLR DISC, CROSSMAX SL DISC 07 AND CROSSMAX ST DISC WHEELS 1 spoke wrench M40652 1 spoke wrench for aerodynamic spokes M40567 (for
HUB SET (DISC BRAKE)
") (English) DM-MAHB001-00 Dealer's Manual ROAD MTB Trekking City Touring/ Comfort Bike URBAN SPORT E-BIKE HUB SET (DISC BRAKE) XTR HB-M9110 FH-M9110 FH-M9125 HB-MT900 FH-MT900 E-THRU Axle 12 mm SM-AX75 SM-AX76
(English) DM-MAHB001-00 Dealer's Manual ROAD MTB Trekking City Touring/ Comfort Bike URBAN SPORT E-BIKE HUB SET (DISC BRAKE) XTR HB-M9110 FH-M9110 FH-M9125 HB-MT900 FH-MT900 E-THRU Axle 12 mm SM-AX75 SM-AX76
DM-FD (English) Dealer's Manual. Front derailleur FD-M9000 FD-M9020 FD-M9025 FD-M8000 FD-M8020 FD-M8025 FD-M612 FD-M617 FD-M618 FD-M672
 Dealer's Manual. Front derailleur FD-M9000 FD-M9020 FD-M9025 FD-M8000 FD-M8020 FD-M8025 FD-M612 FD-M617 FD-M618 FD-M672") (English) DM-FD0003-04 Front derailleur Dealer's Manual FD-M9000 FD-M9020 FD-M9025 FD-M8000 FD-M8020 FD-M8025 FD-M612 FD-M617 FD-M618 FD-M672 FD-M677 CONTENTS IMPORTANT NOTICE... 3 TO ENSURE SAFETY...
(English) DM-FD0003-04 Front derailleur Dealer's Manual FD-M9000 FD-M9020 FD-M9025 FD-M8000 FD-M8020 FD-M8025 FD-M612 FD-M617 FD-M618 FD-M672 FD-M677 CONTENTS IMPORTANT NOTICE... 3 TO ENSURE SAFETY...
Cantilever Brake. Dealer's Manual. ROAD MTB Trekking. City Touring/ Comfort Bike
 (English) DM-RCBR001-00 Dealer's Manual ROAD MTB Trekking City Touring/ Comfort Bike URBAN SPORT E-BIKE Cantilever Brake BR-CX70 BR-CX50 BL-4700 BL-4600 BL-R780 BL-R3000 ST-7900 ST-6700 ST-5700 ST-4600
9-speed super narrow. chain such as. CN-7701 / CN-HG93 8- / 7- / 6-speed narrow. chain such as CN-HG50 / CN-IG51
 - Technical Service Instructions SI-5VH0B t RD-M600 Rear derailleur General Safety Information WARNING The ST-M600 DUAL CONTROL lever is used for both gear shifting and braking operations. Make sure that
DM-RCWH (English) Dealer's Manual. ROAD MTB Trekking. City Touring/ Comfort Bike. Wheel Set. WH-RX31 SM-AX x12 SM-AX x12
 Dealer's Manual. ROAD MTB Trekking. City Touring/ Comfort Bike. Wheel Set. WH-RX31 SM-AX x12 SM-AX x12") (English) DM-RCWH001-00 Dealer's Manual ROAD MTB Trekking City Touring/ Comfort Bike URBAN SPORT E-BIKE Wheel Set WH-RX31 SM-AX720-100x12 SM-AX720-142x12 CONTENTS IMPORTANT NOTICE... 3 TO ENSURE SAFETY...
(English) DM-RCWH001-00 Dealer's Manual ROAD MTB Trekking City Touring/ Comfort Bike URBAN SPORT E-BIKE Wheel Set WH-RX31 SM-AX720-100x12 SM-AX720-142x12 CONTENTS IMPORTANT NOTICE... 3 TO ENSURE SAFETY...
Special instruction of installation for SAINT FH-M800/RD-M800 and FH-M805/RD-M805
 Technical Service Instructions SI-5VB0E t RD-M805 / RD-M800 Rear derailleur Special instruction of installation for SAINT FH-M800/RD-M800 and FH-M805/RD-M805 A hub axle is an essential component for the
FRONT DERAILLEUR - CURRENT RANGE
 FRONT DERAILLEUR - CURRENT RANGE (since 2015) (since 2018) (since 2017) (since 2018) WARNING! This technical manual is intended for use by professional mechanics. Anyone who is not a qualified professional
DM-RARD (English) Dealer's Manual. ROAD MTB Trekking. City Touring/ Comfort Bike. Rear Derailleur DURA-ACE RD-R9100 ULTEGRA RD-R8000
 Dealer's Manual. ROAD MTB Trekking. City Touring/ Comfort Bike. Rear Derailleur DURA-ACE RD-R9100 ULTEGRA RD-R8000") (English) DM-RARD001-03 Dealer's Manual ROAD MTB Trekking City Touring/ Comfort Bike URBAN SPORT E-BIKE Rear Derailleur DURA-ACE RD-R9100 ULTEGRA RD-R8000 CONTENTS IMPORTANT NOTICE... 3 TO ENSURE SAFETY...
(English) DM-RARD001-03 Dealer's Manual ROAD MTB Trekking City Touring/ Comfort Bike URBAN SPORT E-BIKE Rear Derailleur DURA-ACE RD-R9100 ULTEGRA RD-R8000 CONTENTS IMPORTANT NOTICE... 3 TO ENSURE SAFETY...
DM-MBRD (English) Dealer's Manual. ROAD MTB Trekking. City Touring/ Comfort Bike. Rear Derailleur SLX RD-M7000 DEORE RD-M6000
 Dealer's Manual. ROAD MTB Trekking. City Touring/ Comfort Bike. Rear Derailleur SLX RD-M7000 DEORE RD-M6000") (English) DM-MBRD001-04 Dealer's Manual ROAD MTB Trekking City Touring/ Comfort Bike URBAN SPORT E-BIKE Rear Derailleur SLX RD-M7000 DEORE RD-M6000 CONTENTS IMPORTANT NOTICE... 3 TO ENSURE SAFETY... 4
(English) DM-MBRD001-04 Dealer's Manual ROAD MTB Trekking City Touring/ Comfort Bike URBAN SPORT E-BIKE Rear Derailleur SLX RD-M7000 DEORE RD-M6000 CONTENTS IMPORTANT NOTICE... 3 TO ENSURE SAFETY... 4
TECHNICAL SUPPORT DOCUMENT FULL SUSPENSION MODELS C7 C9 WARRANTY SMALL PARTS FRAME SPEC/SERVICING
 2016-2018 FULL SUSPENSION MODELS C7 C9 WARRANTY SMALL PARTS FRAME SPEC/SERVICING 2016-2018 FULL SUSPENSION MODELS C7 C9 PG.i WARRANTY INFORMATION COMPLETE BIKES ONE YEAR LIMITED WARRANTY NORCO Bicycles
NITROGEN DISC 286A: ASSEMBLY GUIDE
 NITROGEN DISC 286A: ASSEMBLY GUIDE Valid for MY2019 Nitrogen Disc 286A Revision 1.0-07-26-2018 NITROGEN DISC 286A: Table of Contents 1. Tools Needed and First Aid Kit...3 2. Frameset inspection...4 3.
Frame passort Noah Fast Disc type 7E3 Englisch ~ Last update: 09/10/2018 ~
 Frame passort Noah Fast Disc type 7E3 Englisch ~ Last update: 09/10/2018 ~ INDEX 0. UPDATES... 3 1. GENERAL... 3 1.1. PART CODES... 3 2. MATERIAL... 3 3. WEIGHT... 3 3.1. FRAME... 3 3.2. FORK... 3 4. GEOMETRY...
ELECTRON PRO 245A: ASSEMBLY GUIDE. Revision Valid for MY2017 Electron Pro
 ELECTRON PRO 245A: ASSEMBLY GUIDE Revision 2.0 04-19-2017 Valid for MY2017 Electron Pro ELECTRON PRO 245A: Table of Contents 1. Tools Needed and First Aid Kit...3 2. Specifications...4 3. Configurations...5
Hub set (Disc brake)
") (English) DM-MBHB001-02 Dealer's Manual ROAD MTB Trekking City Touring/ Comfort Bike URBAN SPORT E-BIKE SLX HB-M7000 HB-M7010 HB-M7010-B FH-M7000 FH-M7010 FH-M7010-B Hub set (Disc brake) E-THRU Axle 12
(English) DM-MBHB001-02 Dealer's Manual ROAD MTB Trekking City Touring/ Comfort Bike URBAN SPORT E-BIKE SLX HB-M7000 HB-M7010 HB-M7010-B FH-M7000 FH-M7010 FH-M7010-B Hub set (Disc brake) E-THRU Axle 12
DM-RD (English) Dealer s Manual. ROAD Rear Derailleur RD-9000 RD-6800 RD-5800 RD-4700
 Dealer s Manual. ROAD Rear Derailleur RD-9000 RD-6800 RD-5800 RD-4700") (English) DM-RD0003-09 ROAD Rear Derailleur Dealer s Manual RD-9000 RD-6800 RD-5800 RD-4700 CONTENTS IMPORTANT NOTICE...3 TO ENSURE SAFETY...4 LIST OF TOOLS TO BE USED...6 INSTALLATION...8 Chain length...
(English) DM-RD0003-09 ROAD Rear Derailleur Dealer s Manual RD-9000 RD-6800 RD-5800 RD-4700 CONTENTS IMPORTANT NOTICE...3 TO ENSURE SAFETY...4 LIST OF TOOLS TO BE USED...6 INSTALLATION...8 Chain length...
Nexus. Dealer's Manual. ROAD MTB Trekking. City Touring/ Comfort Bike SG-3R40 SG-3R45 SG-3R75 SG-3R75-A SG-3R75-B SG-3D55 SG-3C41
 (English) DM-SG0005-01 Dealer's Manual ROAD MTB Trekking City Touring/ Comfort Bike URBAN SPORT E-BIKE Nexus SG-3R40 SG-3R45 SG-3R75 SG-3R75-A SG-3R75-B SG-3D55 SG-3C41 SL-3S35-E SL-3S41-E SL-3S42-E SM-BC03
Front derailleur. Dealer's Manual FD-M9000 FD-M9020 FD-M9025 FD-M8000 FD-M8020 FD-M8025 FD-M612 FD-M617 FD-M618 FD-M672 FD-M677
 (English) DM-FD0003-05 Front derailleur Dealer's Manual FD-M9000 FD-M9020 FD-M9025 FD-M8000 FD-M8020 FD-M8025 FD-M612 FD-M617 FD-M618 FD-M672 FD-M677 CONTENTS IMPORTANT NOTICE... 4 TO ENSURE SAFETY...
ELECTRON PRO: ASSEMBLY GUIDE. Revision Valid for MY2017 Electron Pro
 ELECTRON PRO: ASSEMBLY GUIDE Revision 1.0 10-20-2016 Valid for MY2017 Electron Pro ELECTRON PRO: Table of Contents 1. Tools Needed and First Aid Kit...3 2. Specifications...4 3. Configurations...5 4. Geometry...7
1 - TECHNICAL SPECIFICATIONS
 REAR DERAILLEUR - CURRENT RANGE (since 2015) (since 2017) (since 2018) This technical manual is intended for use by professional mechanics. Anyone who is not a qualified professional for bicycle assembly
Front derailleur. Dealer's Manual XTR FD-M9000 FD-M9020 FD-M9025 DEORE XT FD-M8000 FD-M8020 FD-M8025 DEORE FD-M612 FD-M617 FD-M618 SLX FD-M672 FD-M677
 (English) DM-FD0003-06 Dealer's Manual ROAD MTB Trekking City Touring/ Comfort Bike URBAN SPORT E-BIKE Front derailleur XTR FD-M9000 FD-M9020 FD-M9025 DEORE XT FD-M8000 FD-M8020 FD-M8025 DEORE FD-M612
Rear Drive System SERVICE INSTRUCTION. Specifications SI-R670B
 - SERVICE INSTRUCTION SI-R670B t Rear Drive System Before use, read these instructions carefully, and follow them for correct use. In order to realize the best performance, we recommend that the following
R5 RIM MANUAL EN. Version 1 I
 R5 RIM MANUAL EN Version 1 I 28.04.2017 TABLE OF CONTENTS Introduction...1 Frame Features...2 Fork Preparation...3 Small Parts...5 Frame Preparation...6 Mechanical Cable Routing...7 Electric Cable Routing...9
DM-MARD (English) Dealer's Manual. ROAD MTB Trekking. City Touring/ Comfort Bike REAR DERAILLEUR XTR RD-M9100 RD-M9120
 Dealer's Manual. ROAD MTB Trekking. City Touring/ Comfort Bike REAR DERAILLEUR XTR RD-M9100 RD-M9120") (English) DM-MARD001-00 Dealer's Manual ROAD MTB Trekking City Touring/ Comfort Bike URBAN SPORT E-BIKE REAR DERAILLEUR XTR RD-M9100 RD-M9120 CONTENTS CONTENTS...2 IMPORTANT NOTICE...3 TO ENSURE SAFETY...4
(English) DM-MARD001-00 Dealer's Manual ROAD MTB Trekking City Touring/ Comfort Bike URBAN SPORT E-BIKE REAR DERAILLEUR XTR RD-M9100 RD-M9120 CONTENTS CONTENTS...2 IMPORTANT NOTICE...3 TO ENSURE SAFETY...4
Lectric Cycles Mid-Drive Electric Motor Installation
 Lectric Cycles Mid-Drive Electric Motor Installation This write-up describes the installation of a Lectric Cycles electric motor. The model is the e-rad Mid-Drive 750 Watt conversion kit, installed on
Dealer's Manual ROAD MTB Trekking City Touring/ URBAN SPORT E-BIKE Comfort Bike Front derailleur ALIVIO Non-Series
 (English) DM-MDFD001-02 Dealer's Manual ROAD MTB Trekking City Touring/ Comfort Bike URBAN SPORT E-BIKE Front derailleur ALIVIO FD-M4000 FD-M4020 Non-Series FD-MT400 CONTENTS IMPORTANT NOTICE... 3 TO ENSURE
Rocky Mountain Instinct / Pipeline Alloy Frame Assembly Guide. Date: April 7, 2017
 Rocky Mountain Instinct / Pipeline Alloy Frame Assembly Guide Date: April 7, 2017 1 Table of Contents Front Triangle Preparation... 4 Parts Needed... 4 Instructions... 4 Chain Stay Preparation... 6 Parts
SCALE CARBON SCOTT 2011 BIKE OWNERS MANUAL
 SCOTT 2011 BIKE OWNERS MANUAL H SCOTT SPORTS SA 17 RTE DU CROCHET 1762 GIVISIEZ SWITZERLAND 2009 SCOTT SPORTS SA, ALL RIGHTS RESERVED SCOTT-SPORTS.COM CONTENT Scale Carbon Concept P. 004 Geometry Scale
Front derailleur. Dealer's Manual DURA-ACE FD-R9100 ULTEGRA FD-R FD ROAD MTB Trekking. City Touring/ Comfort Bike DM-RAFD001-03
 (English) DM-RAFD001-03 Dealer's Manual ROAD MTB Trekking City Touring/ Comfort Bike URBAN SPORT E-BIKE Front derailleur DURA-ACE FD-R9100 ULTEGRA FD-R8000 105 FD-5801 Procedures for cable tension adjustment
ALTERNATOR RACKS 135, 170 & 190 INSTRUCTIONS
 Figure A Item # Description Quantity 1 Alternator Rack 1 1 3 4 11 5 10 8 2 Lower Mount Kit (see detail) 2 3 16mm M5 Swivel-Mount Bolt 2 4 M7 Washer 2 5 M6 Lock Nut 2 6 Lock Washer 2 7 Swivel Mount 2 8
SCALE CARBON SCOTT 2013 BIKE OWNERS MANUAL
 SCALE CARBON SCOTT 2013 BIKE OWNERS MANUAL SCOTT SPORTS SA 17 RTE DU CROCHET 1762 GIVISIEZ SWITZERLAND 2011 SCOTT SPORTS SA, ALL RIGHTS RESERVED SCOTT-SPORTS.COM H content Scale Carbon Concept... P. 004
X-TRAIL ALLOY 650B. frame passport
 X-TRAIL ALLOY 650B frame passport Type: 7E1 last update: 13/09/2017 INDEX 0. UPDATES... 3 1. GENERAL... 3 1.1. Description... 3 1.2. Part codes... 3 2. MATERIAL... 3 3. WEIGHT... 3 3.1. Frame... 3 3.2.
Fenix SLX disc. frame passport
 Fenix SLX disc frame passport type: 7E2 last update: 05/10/2017 INDEX 0. UPDATES... 3 1. GENERAL... 3 1.1. Description... 3 1.2. Part codes... 3 2. MATERIAL... 3 3. WEIGHT... 3 3.1. Frame... 3 3.2. Fork...
Shifting Lever. RAPIDFIRE Plus 11-speed
 (English) DM-SL0005-04 Shifting Lever Dealer's Manual RAPIDFIRE Plus 11-speed MTB XTR SL-M9000 DEORE XT SL-M8000 CONTENTS IMPORTANT NOTICE... 3 TO ENSURE SAFETY... 4 LIST OF TOOLS TO BE USED... 7 INSTALLATION...
SPEEDHUB 500/14. english
 Version 207_02 english Germany: Rohloff AG Mönchswiese, D-34233 Fuldatal / Germany Tel. +49 (0)56-50 80 0, Fax +49 (0)56-50 80 5 www.rohloff.de Contact details for all Rohloff distributors can be found
Using Your Bike Friday : Folding Rear Rack
 Using Your Bike Friday : Folding Rear Rack Green Gear Cycling, Inc. 3364 W. 11th Ave. Eugene, OR 97402 800-777-0258 USA & Canada +1-541-687-0487 Int l +1-541-687-0403 Fax www.bikefriday.com info@bikefriday.com
2015 FARGO FRAMESHEET
 2015 FARGO FRAMESHEET RETAILER: This framesheet MUST BE provided to the end user. At Salsa, we believe that a sense of adventure makes life better. The bicycle can be so much more than just a bike; it
E-trike Li Assembly Guide
 PREPARATION 1. Read this assembly manual BEFORE commencing assembly. 2. Carefully remove all the components and packaged hardware from the shipping boxes. 3. Unpack the contents of the large double box
E-116 Assembly Guide
 E-116 Assembly Guide Table of Contents Overview of the assembly.... 2 1. Cable housing installation.... 3 2. Front brake installation.... 4 3. Rear brake installation... 5-6 4. Seatpost installation....
2015 MUKLUK FRAMESHEET
 RETAILER: This framesheet MUST BE provided to the end user. At Salsa, we believe that a sense of adventure makes life better. The bicycle can be so much more than just a bike; it s a path to new places,
Have questions? Chat with us live at raleighusa.com or call us at , 8am 5pm PST
 1 2 Have questions? Chat with us live at raleighusa.com or call us at 1-800-251-8435, 8am 5pm PST The bicycle you have purchased is a complex piece of equipment that must be properly assembled and maintained
SCOTT BIG ED / BIG JON USER MANUAL
 SCOTT BIG ED / BIG JON USER MANUAL All rights reserved 2017 SCOTT Sports SA Distribution: SSG (Europe) Distribution Center SA, P.E.D. Zone C1, Rue du Kiell 60, 6790 Aubange, Belgium v6.3/040717 SCOTT Sports
X-TRAIL ALLOY. frame passport
 X-TRAIL ALLOY frame passport Type: 7DF last update: 18/10/2016 INDEX 0. UPDATES... 3 1. GENERAL... 3 1.1. Description... 3 1.2. Part codes... 3 2. MATERIAL... 3 3. WEIGHT... 3 3.1. Frame... 3 3.2. Fork...
R5 DISC MANUAL EN. Version 1 I
 R5 DISC MANUAL EN Version 1 I 30.04.2017 TABLE OF CONTENTS Introduction...1 Frame Features...2 Fork Preparation...3 Small Parts...5 Frame Preparation...6 Brake Housing Installation...7 Mechanical Cable
DM-GN (English) Dealer's Manual. General Operations
 Dealer's Manual. General Operations") (English) DM-GN0001-20 Dealer's Manual General Operations CONTENTS IMPORTANT NOTICE... 7 TO ENSURE SAFETY... 8 REAR DERAILLEUR 9 TO ENSURE SAFETY... 10 REAR DERAILLEUR FOR MTB/TREKKING... 12 Installation
(English) DM-GN0001-20 Dealer's Manual General Operations CONTENTS IMPORTANT NOTICE... 7 TO ENSURE SAFETY... 8 REAR DERAILLEUR 9 TO ENSURE SAFETY... 10 REAR DERAILLEUR FOR MTB/TREKKING... 12 Installation
NOAH FAST. frame passport
 frame passport Type: 7DC last update: /08/05 INDEX 0. UPDATES... 3. GENERAL... 3.. Description... 3.. Part codes... 3. MATERIAL... 3 3. WEIGHT... 3 3.. Frame... 3 3.. Fork... 3 4. GEOMETRY... 4 5. CABLE
Rear Drive System SERVICE INSTRUCTIONS SI-R920A WARNING. Note Always be sure to use the sprocket set bearing the same group
 - SERVICE INSTRUCTIONS SI-R90A t Rear Drive System Before use, read these instructions carefully, and follow them for correct use. WARNING Use neutral detergent to clean the chain. Do not use alkali-based
TECHNICAL SUPPORT DOCUMENT 2018 CARBON MODELS 650B / 29 WARRANTY SMALL PARTS FRAME SPEC/SERVICING
 2018 CARBON MODELS 650B / 29 WARRANTY SMALL PARTS FRAME SPEC/SERVICING 2018 CARBON MODELS 650B / 29 PG.i WARRANTY INFORMATION OWNERSHIP REGISTER YOUR BIKE The original owner must register his / her new
DM-RBRD (English) Dealer's Manual. ROAD MTB Trekking. City Touring/ Comfort Bike. Rear Derailleur
 Dealer's Manual. ROAD MTB Trekking. City Touring/ Comfort Bike. Rear Derailleur") (English) DM-RBRD001-00 Dealer's Manual ROAD MTB Trekking City Touring/ Comfort Bike URBAN SPORT E-BIKE Rear Derailleur CLARIS RD-R2000 CONTENTS IMPORTANT NOTICE... 3 TO ENSURE SAFETY... 4 LIST OF TOOLS
(English) DM-RBRD001-00 Dealer's Manual ROAD MTB Trekking City Touring/ Comfort Bike URBAN SPORT E-BIKE Rear Derailleur CLARIS RD-R2000 CONTENTS IMPORTANT NOTICE... 3 TO ENSURE SAFETY... 4 LIST OF TOOLS
BackCountry ebikes 2019 MULE Assembly
 BackCountry ebikes 2019 MULE Assembly Required Tools: Cutting Pliers (to cut box poly strapping and heavy bike banding) Scissors (to remove bubble wrap) Allen wrenches (3mm, 4mm, 5mm, 6mm) Wrenches (10mm,
Wheel s owner manual
 Wheel s owner manual 1 2 Congratulations on Your new KRU wheels. Please read these instructions carefully and follow them to ensure correct use. An improper installation or wrong application of the instructions
DH-9downhill nine. TECHNICAL guide. Table of Contents. Assembly Instructions. Exploded Views
 DH-9downhill nine TECHNICAL guide Table of Contents Assembly Instructions Exploded Views 2 5 TOOLS of thetrade yeti style > DEAD BLOW HAMMER > ADJUSTABLE WRENCH > 5MM T HANDLE > 4MM T HANDLE > 6MM ALLEN
SCOTT ADDICT DISC/GRAVEL/CX USER MANUAL
 SCOTT ADDICT DISC/GRAVEL/CX USER MANUAL All rights reserved 2017 SCOTT Sports SA Distribution: SSG (Europe) Distribution Center SA, P.E.D. Zone C1, Rue du Kiell 60, 6790 Aubange, Belgium v6.3/040717 WWW.SCOTT-SPORTS.COM
OPERATOR S MANUAL SPREADER. CSS, VNQ [For Combine Harvester AW82V] Original instructions
![OPERATOR S MANUAL SPREADER. CSS, VNQ [For Combine Harvester AW82V] Original instructions](/thumbs/90/102423265.jpg "OPERATOR S MANUAL SPREADER. CSS, VNQ [For Combine Harvester AW82V] Original instructions") OPERATOR S MANUAL SPREADER CSS, VNQ [For Combine Harvester AW82V] en Original instructions Introduction Introduction Please read this operator s manual before using your spreader. We would first like to
OPERATOR S MANUAL SPREADER CSS, VNQ [For Combine Harvester AW82V] en Original instructions Introduction Introduction Please read this operator s manual before using your spreader. We would first like to
Have questions? Chat with us live at raleighusa.com or call us at , 8am 5pm PST
 1 2 Have questions? Chat with us live at raleighusa.com or call us at 1-800-251-8435, 8am 5pm PST The bicycle you have purchased is a complex piece of equipment that must be properly assembled and maintained
CRANKSET 1 - TECHNICAL SPECIFICATIONS. 44,5 mm 8 mm
 CRANKSET THIS TECHNICAL MANUAL IS INTENDED FOR USE BY PROFESSIONAL MECHANICS. Anyone who is not professionally qualified to assemble bicycles should not attempt to install and operate on the components
LEAP ASSEMBLY MANUAL. Rev 1A
 LEAP ASSEMBLY MANUAL Rev 1A in the box BE MOVED Congratulations on purchasing an Xtracycle Leap DIY Cargo Bike Kit, and being one of the visionaries using the Leap to create your dream cargo- or passenger
Santa Fe Cycles Assembly Guide Introduction
 Santa Fe Cycles Assembly Guide Introduction Congratulations on your purchase of your new Santa Fe bicycle. You have purchased a bicycle that has many features and qualities. Please take a few minutes and
SPEEDHUB 500/14. "Quicker than the surf" France The atmosphere at the "Tour de France" was exhilarating and working with the
 SPEEDHUB 500/14 "Quicker than the surf" France 1994. The atmosphere at the "Tour de France" was exhilarating and working with the teams and mechanics was exciting too. Our Rohloff S-L-T 99 chan has proven
comfort without compromising on performance and to fit your various needs on touring,
 Congratulations on your purchase of Goal-26X. Goal-26X is made to enhance comfort without compromising on performance and to fit your various needs on touring, shopping and communicating. Let s have fun
Parts List. 7. Handlebars 8. Grips 9. Handlebar Stem 10. Front Brake 11. Front Wheel 12. Crank 13. Chain
 Woodworm Cruise Parts List 1. Free Wheel with Rear Hub 2. Fenders 3. Fender Stay 4. Quick Release 5. Saddle 6. Seat Post 7. Handlebars 8. Grips 9. Handlebar Stem 10. Front Brake 11. Front Wheel 12. Crank
Rocky Mountain Instinct / Pipeline Frame Assembly Guide. Date: March 31, 2017
 Rocky Mountain Instinct / Pipeline Frame Assembly Guide Date: March 31, 2017 1 Table of Contents Front Triangle Preparation... 4 Parts Needed... 4 Instructions... 4 Chain Stay Preparation... 6 Parts Needed...
Reinforced connecting pin. Silver. 6.5mm. Black. 7.1mm
 - SERVICE INSTRUCTIONS SI-R70C t Rear Drive System Before use, read these instructions carefully, and follow them for correct use. WARNING Use neutral detergent to clean the chain. Do not use alkali-based
Thumb Shifter Plus Thumb Shifter
 (English) DM-SL0004-01 Dealer's Manual Thumb Shifter Plus Thumb Shifter Thumb Shifter Plus SL-FT55 SL-TX50 SL-TX30 Thumb Shifter SL-TZ20 IMPORTANT NOTICE This dealer's manual is intended primarily for
INTENDED USE OF THIS MANUAL
 Table of Contents 1 INTRODUCTION... 2 2 INTENDED USE OF THIS MANUAL... 2 3 PRECAUTION... 2 4 TAKING CARE OF YOUR COMPOSITE BICYCLE... 3 5 OVERDRIVE 2 HEADSET INSTRUCTION... 4 6 COMPOSITE FRONT FORK...
frame passport X-fire DISC X-FIRE DISC frame passport Type: 7DD last update: 11/10/2017 X-FIre DISC frame passport 1
 X-FIRE DISC frame passport Type: 7DD last update: /0/207 X-FIre DISC frame passport INDEX 0. UPDATES... 3. GENERAL... 3.. Description... 3.2. Part codes... 3 2. MATERIAL... 3 3. WEIGHT... 3 3.. Frame...
Fenix SL Disc. frame passport
 frame passport type: 7E1 last update: 05/10/2017 INDEX 0. UPDATES... 3 1. GENERAL... 3 1.1. Description... 3 1.2. Part codes... 3 2. MATERIAL... 3 3. WEIGHT... 3 3.1. Frame... 3 3.2. Fork... 3 4. GEOMETRY...
Front derailleur. Dealer's Manual SORA FD-R3000 FD-R3030 CLARIS FD-R2000 FD-R2030. ROAD MTB Trekking. City Touring/ Comfort Bike DM-RBFD001-01
 (English) DM-RBFD001-01 Dealer's Manual ROAD MTB Trekking City Touring/ Comfort Bike URBAN SPORT E-BIKE Front derailleur SORA FD-R3000 FD-R3030 CLARIS FD-R2000 FD-R2030 CONTENTS IMPORTANT NOTICE... 3 TO
DP Spare parts list. Demolition pulverizer. DP 2800 s/n DEQ Construction Tools GmbH No
 DP 2800 Spare parts list Demolition pulverizer DP 2800 s/n DEQ139266-2018 Construction Tools GmbH No. 3390719501 2018-01-01 General information This spare parts list applies to the following: Part number
Rocky Mountain Element Technical Manual. Rev B
 Rocky Mountain Element Technical Manual Rev B 1 Table of Contents Materials Required... 3 Suspension Pivot Torque Guide... 4 Small Parts Torque Guide... 5 Assembly Instructions... 6 1) Bearing Installation...
SG-7R46 SG-7R45 BR-IM41-R CJ-7S40 WARNING CAUTION SERVICE INSTRUCTIONS. Inter-7 Hub. Inter-M Brake Cassette joint NOTE:
 t WARNING It is important to completely understand the operation of your bicycle's brake system. Improper use of your bicycle's brake system may result in a loss of control or an accident, which could
TECHNICAL SUPPORT DOCUMENT 2018 CARBON MODELS 650B / 29 WARRANTY SMALL PARTS FRAME SPEC/SERVICING
 2018 CARBON MODELS 650B / 29 WARRANTY SMALL PARTS FRAME SPEC/SERVICING 2018 CARBON MODELS 650B / 29 PG.i NORCO BICYCLES NEW PURCHASE CONSUMER WARRANTY PROGRAM - EFFECTIVE ON ALL 2017 MODEL YEAR BICYCLES
Shifting Lever. Dealer's Manual. RAPIDFIRE Plus SL-M2000 SL-M3010 SL-M4010. Thumb Shifter SL-TZ500. ROAD MTB Trekking. City Touring/ Comfort Bike
 (English) DM-MDSL001-01 Dealer's Manual ROAD MTB Trekking City Touring/ Comfort Bike URBAN SPORT E-BIKE Shifting Lever RAPIDFIRE Plus SL-M2000 SL-M3010 SL-M4010 Thumb Shifter SL-TZ500 CONTENTS IMPORTANT
SI-F971A. 9-speed super narrow chain such as CN-7700 / CN-HG92 8- / 7- / 6-speed narrow chain such as CN-HG50 / CN-IG51
 SERVICE INSTRUCTIONS SI-F971A Front Drive System Before use, read these instructions carefully, and follow them for correct use. WARNING Use neutral detergent to clean the chain. Do not use alkali-based
INSTRUCTION GUIDE TRANSITION CARBON (ALL MODELS)
") INSTRUCTION GUIDE TRANSITION CARBON (ALL MODELS) THIS INSTRUCTION GUIDE CONTAINS IMPORTANT INFORMATION. PLEASE READ CAREFULLY AND STORE IN A SAFE PLACE. Congratulations! The Specialized bicycle you have
INSTRUCTION GUIDE TRANSITION CARBON (ALL MODELS) THIS INSTRUCTION GUIDE CONTAINS IMPORTANT INFORMATION. PLEASE READ CAREFULLY AND STORE IN A SAFE PLACE. Congratulations! The Specialized bicycle you have
Front Hub/Freehub(standard)
") (English) DM-HB0002-06 Dealer's Manual Front Hub/Freehub(standard) Downhill/Freeride Trekking HB-M820 HB-M640 FH-M820 FH-M825 FH-M828 FH-M640 FH-M645 FH-M648 HB-T675 HB-M8000 HB-M8010 FH-T675 MTB FH-M8000
(English) DM-HB0002-06 Dealer's Manual Front Hub/Freehub(standard) Downhill/Freeride Trekking HB-M820 HB-M640 FH-M820 FH-M825 FH-M828 FH-M640 FH-M645 FH-M648 HB-T675 HB-M8000 HB-M8010 FH-T675 MTB FH-M8000
E-118 Assembly Guide
 E-118 Assembly Guide Table of Contents Overview of the assembly.... 2 1. Fork installation.... 3-4 2. Cable housing installation.... 5 3. Handlebar installation... 6 4. Front brake installation.... 7-8
DM-SL (English) Dealer's Manual. REVOSHIFT Shifter SL-RS47 SL-RS45 SL-RS36 SL-RS35 SL-RS34 SL-RS25
 Dealer's Manual. REVOSHIFT Shifter SL-RS47 SL-RS45 SL-RS36 SL-RS35 SL-RS34 SL-RS25") (English) DM-SL0002-03 Dealer's Manual REVOSHIFT Shifter SL-RS47 SL-RS45 SL-RS36 SL-RS35 SL-RS34 SL-RS25 IMPORTNT NOTICE This dealer's manual is intended primarily for use by professional bicycle mechanics.
(English) DM-SL0002-03 Dealer's Manual REVOSHIFT Shifter SL-RS47 SL-RS45 SL-RS36 SL-RS35 SL-RS34 SL-RS25 IMPORTNT NOTICE This dealer's manual is intended primarily for use by professional bicycle mechanics.
Mounting instruction TS RL TS RC. THE PASSION PEOPLE
 Mounting instruction TS RL TS RC H L H L H L TS 165 TS 190 165 mm 6.5 in 38 mm 1.5 in 190 mm 7.5 in 51 mm 2.0 in TS 200 TS 215 200 mm 7.9 in 51/56 mm 2.0/2.2 in 215 mm 8.5 in 63 mm 2.5 in A C A B A = B
DM-WH (English) Dealer's Manual. MTB Wheel Set. Non-Series WH-MT68 WH-MT66 WH-MT35 WH-MT15
 Dealer's Manual. MTB Wheel Set. Non-Series WH-MT68 WH-MT66 WH-MT35 WH-MT15") (English) DM-WH0005-02 Dealer's Manual MTB Wheel Set Non-Series WH-MT68 WH-MT66 WH-MT35 WH-MT15 CONTENTS IMPORTANT NOTICE... 3 TO ENSURE SAFETY... 4 INSTALLATION... 6 Tire size...6 List of tools to be
(English) DM-WH0005-02 Dealer's Manual MTB Wheel Set Non-Series WH-MT68 WH-MT66 WH-MT35 WH-MT15 CONTENTS IMPORTANT NOTICE... 3 TO ENSURE SAFETY... 4 INSTALLATION... 6 Tire size...6 List of tools to be
PPM-8240 JEEP XJ REAR SPRING HANGER BRACKET Version 1.1
 SYNERGY MFG. 870 INDUSTRIAL WAY, SAN LUIS OBISPO, CA (805) 242-0397 PPM-8240 JEEP XJ REAR SPRING HANGER BRACKET Version 1.1 GENERAL NOTES: These instructions are also available on our website; www.synergymfg.com.
FRONT DERAILLEUR 10/11x3
 FRONT DERAILLEUR 10/11x3 1 - TECHNICAL SPECIFICATIONS 52 52 2 - COMPATIBILITY WARNING! Different combinations from those included in the table could cause the malfunction of the drivetrain and result in
RS Important Notes. Contact. Bicycle Maintenance Stand instructions manual. Warranty Period : 1 year (from the date of your purchase)
") Warranty Period : 1 year (from the date of your purchase) RS-1700 Bicycle Maintenance Stand instructions manual (ver.1.2 2016/12) For more details, read the attached "Minoura Limited Warranty Policy" card.
Warranty Period : 1 year (from the date of your purchase) RS-1700 Bicycle Maintenance Stand instructions manual (ver.1.2 2016/12) For more details, read the attached "Minoura Limited Warranty Policy" card.
X-RIDE DISC. frame passport
 X-RIDE DISC Type: 7Dd last update: /0/207 INDEX 0. UPDATES... 3. GENERAL... 3.. Description... 3.2. Part codes... 3 2. MATERIAL... 3 3. WEIGHT... 3 3.. Frame... 3 3.2. Fork... 3 4. GEOMETRY... 4 5. CABLE
DM-TRRD (English) Dealer's Manual. ROAD MTB Trekking. City Touring/ Comfort Bike. Rear Derailleur DEORE XT RD-T8000 DEORE RD-T6000
 Dealer's Manual. ROAD MTB Trekking. City Touring/ Comfort Bike. Rear Derailleur DEORE XT RD-T8000 DEORE RD-T6000") (English) DM-TRRD001-01 Dealer's Manual ROAD MTB Trekking City Touring/ Comfort Bike URBAN SPORT E-BIKE Rear Derailleur DEORE XT RD-T8000 DEORE RD-T6000 CONTENTS IMPORTANT NOTICE... 3 TO ENSURE SAFETY...
(English) DM-TRRD001-01 Dealer's Manual ROAD MTB Trekking City Touring/ Comfort Bike URBAN SPORT E-BIKE Rear Derailleur DEORE XT RD-T8000 DEORE RD-T6000 CONTENTS IMPORTANT NOTICE... 3 TO ENSURE SAFETY...
CYCLONE T-2500 USER MANUAL REGISTER WARRANTY ONLINE: AND RECEIVE A FREE TRAINING VIDEO DOWNLOAD MODEL
 MODEL T-2500 USER MANUAL CYCLONE RISER RING AND BIKE NOT INCLUDED WITH TRAINER 2015 KINETIC BY KURT ALL RIGHTS RESERVED REGISTER WARRANTY ONLINE: WWW.KURTKINETIC.COM/WARRANTY AND RECEIVE A FREE TRAINING
Drive Belt Instructions
 Drive Belt Safety Do not roll, pry, twist, invert or bend the belt back on itself. Do not zip tie the belt. The acceptable temperature range for your belt drive is -53 C to 85 C. Do not lubricate the belt
Dual Pivot Caliper Brake
 (English) DM-RBBR001-01 Dealer's Manual ROAD MTB Trekking City Touring/ Comfort Bike URBAN SPORT E-BIKE Dual Pivot Caliper Brake SORA BL-R3000 BR-R3000 CLARIS BL-R2000 BR-R2000 Brake cable BC-1051 CONTENTS