A Panzer Grenadier game Version 1.4
|
|
|
- Allyson Hutchinson
- 5 years ago
- Views:
Transcription


1 A Panzer Grenadier game Version Historical Introduction Scenarios
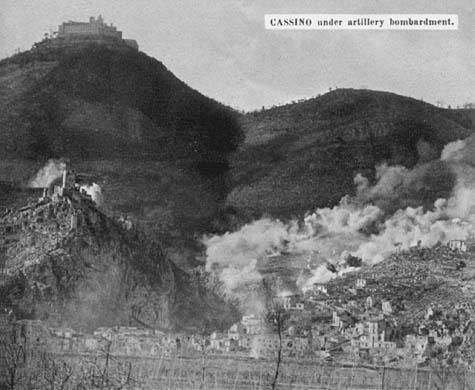
2 Cassino 44 Gateway to Rome. Historical overview In early 1944 the monastery of Monte Cassino stood at the centre of a substantial German line of fortifications, named the Gustav Line. The Gustav Line stretched across Italy from coast to coast incorporating mountainous terrain and the Rapido, Garilgliano and Sangro Rivers. Hitler had ordered the defenses to be of fortress strength and it consisted of extensive minefields, barbed wire, camouflaged pillboxes and complex fire plans designed to repel any attempt to breach it. The German army had fought a skillful rearguard action as the allies slowly advanced up the spine of Italy buying time for the completion of the Gustav Line. The Allies paid a high price for every kilometer of Italian soil, as soon as they got the upper hand in one location the Germans would withdraw and set up another a few kilometers further on. By January 12 th the Allied forces of the US 5 th Army had struggled up to within a few kilometers of the Gustav Line. In January the Cassino sector of the Gustav Line was manned by units of the German 44 th Infantry Division, stationed on the Massif. 211 th Grenadier Regiment of the 71 st Infantry division, defending the slopes around the monastery, Castle Hill and Cassino town. 129 th & 104 th Panzer Grenadier Regiments from 15 th Panzer Grenadier Division manned the defenses in the Liri Valley. The Allied forces in the area consisted of the USII Corps made up of the 36 th Texan Division and the 34 th Red Bull Division. As the Allied armies prepared to face the Gustav Line s formidable defenses the difficulty of breaching this fortress was becoming increasingly evident. The Gustav Line crossed the Italian mainland at one of its narrowest points; there were only three routes that the Allies could realistically advance north along. The route along the Adriatic coast was very narrow and the British 8 th army advance had already been checked at the town of Ortona. The southern route was also narrow and did not allow sufficient space for the Allies to use their advantage of amour and materials. The remaining route was along Highway 6 through the Liri Valley. The Liri Valley would allow the Allies to use their numerical advantage in tanks and transport to their advantage but it was also where the Gustav Line was its strongest. In the Liri Valley the Gustav Line crossed the valley at its narrowest point, barely 10 miles across. Flowing through the Valley was the Rapido River. Although the Rapido was only around 30ft wide it was very fast flowing with steep sides and in winter it regularly burst its banks water logging the surrounding farmland. Elevated above the Liri Valley commanding perfect views for miles around was the Benedictine monastery of Monte Cassino. Monte Cassino was reputed to have been founded by Saint Benedict himself in 529. After being destroyed by an earthquake in 1349 it had been rebuilt with walls up to twenty feet thick and it resembled a fortress. Directly below the monastery was the small town of Cassino through which Highway 6 ran. The First Battle of Cassino 20 th January 12 th February The Allies aware of the strength of the Gustav Line decided to undertake an amphibious landing behind it to the north at the small fishing village of Anzio. In order to ensure that the landings were successful the US 5 th army would attack the Gustav Line and advance up the Liri Valley to draw German troops way from the proposed landing area. The French Expeditionary Force attacked to the north of Cassino through the mountains and the British X Corps attacked to the south across the Garigliano River. The major assault would be by the USII Corps across the Rapido around the village of Sant Angelo in the Liri Valley. The French and British attacks made some initial progress but were soon halted after meeting strong resistance. The 36 th Texan Division, of the US II Corps, attacked across the Rapido on the night of the 20 th January. Scenario 1 represents the efforts of the 141 st Infantry Regiment, 36 th Texan Division, in their attempts to cross the Rapido north of Sant Angelo. After two days of fighting the attack of the 36 th was called off. The US attack had been nothing short of a disaster, casualties were terrible. The complete lack of success of this major offensive can be summed up by the German reports at the time who considered it nothing more than a minor spoiling attack. It was not until the Germans started clearing the area and discovered
3 the number of dead and wounded GI s that they realised the attack was intended to have been a major assault. Scenario 2 represents the final elimination of the US beachhead across the Rapido on the night of the 22 nd January. Note: The US forces in the first two scenarios have a lower morale than regular US forces this reflects the lack of coordination in the attack, and the general feeling amongst the troops that the crossing could not conceivably succeed. The Anzio landings took place on the 22 nd January. The earlier attacks by the US 5 th Army on the Gustav Line had not caused the German commanders to commit many of their reserves and the Germans quickly contained the beachhead at Anzio. The pressure was on in the Cassino sector to draw German troops away from the Anzio beachhead. This time the 34 th Red Bull division was chosen to try and breach the Gustav Line. On the 24 th January they attacked north of Cassino town towards the abandoned Italian Barracks. Scenario 3 represents the initial attack towards the Barracks by the 133 rd Regiment of the 34 th Red Bull Division. It took several attempts before the US troops had a secure bridgehead across the Rapido. Scenario 4 represents the second attempt of the 133 rd to gain the Barracks. On the 29 th of January the whole of the 168 th US infantry Regiment with close support from 756 th Tank Battalion was committed and within a few days Points 56 and 213 along with the village of Cairo was in US hands. Scenario 5 represents the successful assault of the 168 th Regiment. The Germans now decided to reinforce the Cassino area with elements from the 1 st Parachute Division and the 90 th Panzer Grenadier Division. On the Massif the 135 th US Regiment took up the running from the now exhausted 168 th. Colle Maiola was taken and by the 3 rd February Point 771 on Monte Castellone had fallen. Scenario 6 represents the 135 th s attack on Point 771. The US soldiers on Monte Castellone attempted to push along the ridge to Colle Sant Angelo but were halted by the German 132 nd Grenadier Regiment. On the 7 th February the rested 168 th regiment was once again called upon to launch a major offensive, this time towards the monastery itself. Scenario 7 represents the attack of the 168 th across the Massif towards Mont Cassino. At the same time the 135 th launched an attack towards the Albaneta Farm area to stop the Germans from launching any flanking attacks on the 168 th as they advanced towards the monastery. As the 135 th prepared to attack, the Germans launched a major counter attack towards Snakeshead Ridge and it was all the 135 th could do just to hang on to their starting positions. Scenario 8 represents the counter attack of the German 361 st Panzer Grenadiers on Snakeshead Ridge. Both attacks cancelled each other out and after an exhausting day of fighting both sides withdrew almost to their starting positions. Scenario 9 combines scenarios 7 & 8 together to represent the fighting of the 7 th February. The Germans were frustrated by not capturing Point 593 on the 7 th of February and on the 10 th launched an attack that eventually seized it from the Americans. Scenario 10 represents the 361 st Panzer Grenadiers successful assault on Point 593. On the 11 th of February the US forces launched their last assault on the Massif; this was pretty much a carbon copy of the previous attacks and was again unsuccessful. Scenario 11 represents the last US assault on the Massif. On the 12 th February Major General Ryder, commander of 34 th Division, called off the assault and ordered his troops to dig-in, and so ended the American attempt to capture Monte Cassino. Both sides had suffered horrendous casualties, the 34 th US infantry Division had lost 49% of their rifle company personnel (318 killed, 1641 wounded, 392 missing). Accurate figures for German casualties are harder to ascertain but there was no doubt that the Germans had also taken considerable casualties. The Second Battle of Cassino 15 th 18 th February Following the failure of the USII corps to capture Monte Cassino a new Allied formation was formed to take over from them. Designated the II New Zealand Corps it consisted of the 2 nd New Zealand Division, the 4 th Indian Division & the 78 th British Division. The Germans also made some changes to their defending formations. On the Massif the 44 th Infantry Division, heavily mauled by the US assault was withdrawn. The 200 th Panzer Grenadier Regiment joined its sister Regiment the 361 st on the Massif. The 1 st Regiment and a single battalion from the 3 rd Regiment of the 1 st Parachute Division, along with a Para MG battalion took up positions around the monastery and lower slopes of the Massif. The 104 th and 129 th Panzer Grenadier Regiments remained in the Liri Valley and the 211 th in Cassino town.
4 The Indian 4 th Division relieved the battered US units on the Massif. The Indian & British troops were amazed at the conditions that the American soldiers had had to endure, and many remarked on the vacant expression of many of the American GI s as they slowly made their way down the mountain to their rest areas. The Indian forces had been given erroneous information from the American staff officers and much of the area they thought they were taking over was now actually in the hands of the Germans, including Point 593, which was supposed to be the jump off point for the Indian attack on the monastery. Lieutenant General Freyberg, commander of the New Zealand II Corps, was convinced that the Germans were using the monastery for observation and asked for it to be bombed. Both sides had agreed not to occupy the monastery and a military exclusion zone had been established around it. Allied command eventually agreed to the request. The bombing of the monastery has been a controversial issue ever since. The Allies did leaflet the monastery before the bombing but evidence that the Germans were using the monastery for military purposes is still scant. On the 15 th February 142 heavy and 114 medium bombers destroyed the monastery; this was followed by an extended artillery barrage. By mid afternoon it should have been time for the Indian Division to attack but Point 593 was still under German control and it was not until nightfall that a single company attacked towards Point 593 and was hastily repulsed. All the advantage of the bombing raid had been squandered and the German paratroopers quickly moved into the ruined monastery and turned it into a formidable fortress. In the Valley below, the New Zealanders planned to attack along the railway line and capture the railway station. Engineers would follow this attack and bridge the Rapido and repair the breaches in the railway embankment deliberately created by the Germans. The embankment could then be used to channel amour across the Rapido and break out into the Liri Valley. The 28 th Maori Battalion was chosen to lead the assault. The Maoris succeeded in taking the Railway Station but elements of the 361 st Panzer Grenadier Regiment denied them the Hummocks. Scenario 12 represents the night-time Maori attack on the Railway Station defended by the 3 rd Battalion of the 361 st Panzer Grenadier Regiment. The New Zealand engineers managed to repair all but one large breach in the embankment and as dawn broke all work by the engineers was halted due to accurate German mortar & artillery fire from the Massif. The Maoris had not been able to bring up any heavy weapons or anti-tank guns but were ordered to hang on until nightfall. The New Zealand artillery kept up a smoke screen to protect the Maoris from long range fire from the Massif. The smoke also masked the movement of the Germans troops as they assembled to assault the Railway Station. German attacks intensified all day. By late afternoon the Germans launchrd a major counter attack this time supported by tanks, the Maoris were forced back across the Rapido. Scenario 14 represents the 211 th counter attack supported by tanks on the Maoris at the Station. On the 18 th February the 7 th Indian Brigade was at last ready to launch their delayed attack on the Massif. The 4/6 Rajputana Rifles, with support from 1 st Royal Sussex attacked towards Point 593 and Albaneta Farm. The 1/2 & 1/9 Gurkha Rifles were to capture Points 444 & 445 and the monastery itself. The defending Germans of the 361 st Panzer Grenadier Regiment and 1 st Parachute Regiment gave little ground and when they were pushed back they quickly regrouped and launched several counter attacks. By daylight the Indian brigade were back at their start lines with little to show for their efforts but high casualties. Scenario 13 represents 7 th Indian Brigade s attack on the Massif. The failure of the New Zealand Corps to capture the monastery marked the end of the second battle of Cassino. On the 16 th of February the Germans launched a major offensive against the Anzio beachhead. After four days of intense fighting the German attack was repulsed. The Third Battle of Cassino 15 th March 23 rd March By the time of the third battle of Cassino, plans were already in place for Operation Diadem, the major offensive that would eventually breach the Gustav Line. However the Allies wanted to keep the pressure on the Germans in the Cassino sector and so the New Zealand II Corps was again asked to launch an attack. The Third battle would begin with the destruction of the town of Cassino by a huge bombing raid. The New Zealanders with tank support would follow soon after into Cassino Town. The 4 th Indian Division would attack through Point 175 and Castle Hill and on to Monte Cassino. Before the attack could
5 be launched the weather turned and for three weeks it rained delaying the battle as the Liri Valley was too wet to allow the planned armoured breakthrough. During this time both sides made some changes to the forces in the Cassino area. The 78 th British Division arrived and took up positions in the Liri Valley. For the Germans, the rest of the 1 st Parachute Division arrived and the 211 th Grenadier regiment was withdrawn. By the 15 th March the weather had been dry enough for the attack to begin and all that morning bombs fell reducing the town of Cassino to rubble. The 25 th New Zealand Regiment supported by tanks of the 19 th Armored Brigade advanced from the Barracks to the northern end of the town. Allied artillery kept the northern end of the town under a barrage until the New Zealanders reached the outskirts. It was expected that little German resistance would be met and what few survivors remained would be disorientated and would quickly succumb to the attacking force. At the start of the bombing 2 nd Battalion of 3 rd Parachute Division had just over 300 men in the town and five StugIIIG s, after the bombing around 160 men were buried under the rubble and four of the Stugs were destroyed. However the men of the Parachute Division were truly elite troops and quickly they scrabbled from their cellars and bunkers and set about defending the town. The New Zealanders were surprised by the speed at which the Paratroopers recovered and soon the advance slowed. The bombing of the town had been so successful that no roads existed and the cratered landscape made it all but impossible for the New Zealanders tanks to enter the town at all. It was not until several hours later that the arrival of engineers allowed any tanks to progress into the shattered town of Cassino. Scenario 15 represents the attack of the New Zealand 25 th Battalion and the 19 th Armored Regiment against the town of Cassino. Later in the day the 24 th & 26 th New Zealand battalions were also committed to the town but still progress was extremely slow. The one highlight of the day was the capture of Castle Hill by a company from 25 th Battalion. But even this success was not capitalized on. 1/4 th Essex Regiment of 5 th Indian Brigade were awaiting a signal to take over the Castle and move onto the Massif itself, however no pre arranged signal had been agreed upon and it was not until midnight that the Essex finally made it into the Castle. This gave the Germans plenty of time to dig-in troops between the Castle and the monastery. By the 17 th march the New Zealanders had captured the western side of the town and the Railway Station. The Germans alarmed by the capture of the Railway Station launched the dismounted Parachute motorcycle battalion to capture it back. The attack of the motorcycle battalion stands out as one of the most inept actions of the whole campaign and very uncharacteristic of the Parachute troops. The Parachute Battalion charged across the open ground forded the Gari which in some places was up to their necks, on leaving the river they were caught in their own mortar barrage. The defending New Zealanders quickly picked off the advancing Paratroopers with accurate small arms fire. The Paratroopers eventually turned and fled, only 19 soldiers made it back to their own lines. Scenario16 represents the attack of the dismounted paratroop motorcycle company on the Railway Station. On the 19 th March the Allied commanders were surprised to discover that elements of the 1/9 th Gurkhas who had been missing for several days had in fact made it onto Hangman s Hill. The Hill was so named because on it stood a support for a cable car that used to run from the Station to the monastery. The remaining support looked like a gallows when viewed from a distance. In the early hours of the 19 th March elements of the 4/6 Rajputana Rifles attempted to re-supply the Gurkhas on Hangman s Hill. The Germans were well aware what was happening and launched their own spoiling attack to deny the Gurkhas their much needed supplies. Scenario 17 represents the attempt by the Rajputanas to supply the Gurkhas. Only a few soldiers made it to the Gurkhas and the Allied commanders decided it was too dangerous to attempt the mission again and the Gurkhas were then resupplied from the air. As dawn broke on the 19 th the Germans launched a major attack to recapture Castle Hill, some paratroopers even made it to the walls of the Castle and had to be beaten off in desperate hand to hand combat. Once the Allies were alerted intensive mortar fire was called down on the attackers and eventually the Germans called off the attack. Scenario 18 represents the attack of 1 st Battalion, 4 th Parachute Division on the Castle.
6 The Allies had planned a major offensive for the 19 th of March; however the events around Castle Hill and the town of Cassino had delayed the projected infantry attack towards the monastery from the town. In support of the attack the Indian engineers had in secret improved sections of a mule track that ran from Cairo village to the monastery so that armour could use it, this was named Cavendish Road. It seems that no one informed the tanks that were preparing to attack that the infantry attack had been delayed and so around mid-day a force of 15 US Shermans, 12 US and 5 Indian Honeys and 3 US M7 Priests launched an attack on the Massif. The Germans were amazed to see tanks on the Massif. However they soon regained their composure and quickly knocked out the leading tanks. As other tanks moved off the track to move around the wrecks some lost tracks and became immobilised. Some of the US Shermans tried to attack towards Phantom Ridge but the gradient was too steep. The tanks fired at enemy positions but without supporting infantry they unable to completely eliminate the enemy strongpoints. The tanks continued to advance but fire from Point 593 and Albaneta Farm was too intense and they had to withdraw. Scenario19 represents the Allied tank assault on the Massif. The 22 nd of March saw the last major attack by the New Zealanders at Cassino. The attack in the town supported by tanks achieved little the paratroopers were firmly entrenched as ever in the south-west corner of the town and slopes above. Scenario 20 represents the last attack of the third battle of Cassino by the New Zealanders. The Fourth Battle of Cassino Operation Diadem 11 th May 5 th June During the third battle preparations were already underway for a major offensive codenamed, Operation Diadem. This involved a major reorganization of the Allied units facing the Gustav line. The formations facing the Gustav Line near the Adriatic were moved to the Cassino sector, leaving just enough forces to hold the line. The majority of the US 5 th & British 8 th armies were concentrated on a front of barely 20 miles running from the sea to Cassino. The New Zealand II Corps was disbanded and control of the Cassino sector passed to the British 8 th Army. Taking over on the Cassino Massif were the Polish II Corps. In the Liri Valley were the British XIII Corps. The Germans had also reorganized. In the Liri Valley the 115 th Panzer Grenadier Regiment, 305 th Infantry Division and a Parachute MG Battalion formed Kampfgruppe Bode. The 1 st Parachute Division still manned the Massif and to the north were the 5 th Mountain Division. Late on the evening of the 11 th May Operation Diadem began with an artillery barrage all along the front. Nearest the coast the US II Corps advanced, to their right the French Expeditionary Corps attacked through the Aurunci Mountains. In the Liri Valley the Indian 8 th Division attacked across the Rapido near the village of Sant Angelo. Scenario 21 represents the efforts of the 17 th Infantry Brigade of the Indian 8 th Division as they attempted to cross the Rapido. Just south of Cassino town the British 4 th Division also attacked across the Rapido. On Cassino Massif the Poles launched their attack to gain the high ground and link up with Highway Six. General Anders, commander of the Polish II Corps, did not want to commit his forces in penny packets as in previous attacks. He also wished to avoid assaulting the monastery directly. His plan was to capture the high ground behind the monastery therefore isolate it; his forces could then link up with the British forces in the valley below. In the early hours of the 12 th May the Polish Brigades attacked towards Point 593, Albaneta Farm and the high ground beyond. Scenarios 23 & 24 represent the Polish attacks on the Massif during the 12 th May. Scenario 25 combines scenario 23 & 24 into one large scenario. The Poles made some progress but not the breakthrough hoped for. The British crossed the Rapido just south of Cassino town. Their crossing was into the strongest defenses of the Gustav Line within easy observation from the monastery. The British found the crossing very difficult and as soon as dawn broke they were subject to numerous counter-attacks, including some by German tanks. Scenario 22 represents one of the German counter-attacks against the British bridgehead. Scenario 26 represents the first 14 hours of Operation Diadem all along the area depicted by the game map. The Polish II Corps wanted to renew their attack but was advised to wait for the British in the Liri Valley to make more progress so the units could
7 meet up at Highway Six. The Indians captured the Village of Sant Angelo on the 13 th. Scenario 27 represents the capture of Sant Angelo by 8 th Indian division supported by Canadian tanks. at Cassino are difficult to find but estimates for the whole Cassino/Rome campaign, including Anzio, were around 105,000 Allied Casualties and somewhere in the region of 80,000 Germans. On the 15 th of May the British introduced the 78 th Division into the Liri Valley in order to boost their flagging advance; they were immediately launched into combat to capture the Pignataro- Cassino road. Scenario 29 Represents the Elements of the 6 th Inniskilling Fusiliers & 5 th Northamptonshire Regiments with armour support advance towards the Pignataro-Cassino road. Also on the 15 th the 8 th Indian Division captured the village of Pignataro. Scenario 28 represents the 3/8 Punjab Regiment with support from the 14 th Canadian Armoured Regimen s attack on the village of Pignataro. The advances in the valley were the trigger for the Poles to resume their attack. Early on the 17 th the 5 th Kresowa Division attacked towards Colle Sant Angelo. Scenario 30 represents the Polish assault on Colle Sant Angelo. Shortly after the Kresowa attack the Carpathians attacked towards Point 593 and Albaneta Farm. Scenario 31 represents the Carpathian assault on Point 593 and Albaneta Farm. The capture of Point 593 led to a series of desperate German counterattacks to recapture it this marked the last attack of the paratroopers on the Massif. Scenario 33 represents the last attack of the paratroopers on Point 593. The Polish attack came very close to breaking through the German defences but could not quite manage it. Scenario 32 depicts the Polish II Corps attack on the Massif during the 17 th May; it combines the actions in scenarios 30 & 31. By now Operation Diadem was making progress in other areas of the front. The Americans had made substantial progress along the coast. The French had broken through the Mountains to the south of Cassino. The German positions on the Cassino Massif were at risk of being cut off so on the night of the 17 th the Germans withdrew to another line of fortification named the Hitler Line a few miles further up the valley. On the morning of the 18 th May a detachment of the Polish 12 th Podolski Lancers entered the abandoned monastery and raised the Polish flag. It had taken five months and the combined firepower of two Allied armies to breach the Gustav Line. Accurate figures for the casualties
8 Farmland: The spotting rules for farmland vary from those of regular fields in Panzer Grenadier. For units in a Farmland hexes Spotting range is 5 hexes. It is not limiting terrain. This means that LOS is blocked after it has passed through five farmland hexes. For units in a hill/farmland hex the spotting range is doubled to 10 hexes for spotting in farmland hexes at a lower elevation. For units in a Mountain hex Spotting range is unlimited into farmland hexes. This means that as long as no intervening Mountain hex blocks LOS a unit in a Mountain hex can see units in any Farmland hex on the board. Farmland has no effect on Direct fire, Assault or Bombardment. Farmland Spotting Table From To Spotting Range Farmland Farmland 5 hexes Farmland/Hill Lower 10 hexes Farmland hex Mountain Farmland Unlimited Woods: Standard Panzer Grenadier rules are used for Woods. No unit in a woods hex can be spotted by enemy units more than 3 hexes away. Woods block LOS for units in non-mountain hexes, units in Mountain hexes can see past all wood hexes in the Liri Valley. Mountain Hexes The elevation changes on the Cassino map represent approximately m. The following rules are used to simulate the mountain environment. Mountains have the following special LOS rules: In order to determine if mountain hexes block LOS for units on different elevation levels use the standard method outlined in 8.4. (although designed for elevation changes of 20m the formula works for greater elevation changes just as well.) Any unit in a Mountain hex has LOS to all Liri Valley hexes unless blocked by an intervening elevation as in 8.4 or other spotting limitations such as rain, fog or night. Any unit in any lower elevation hex (including other Mountain hexes) considers a Mountain hex as Limiting terrain. Any unit tracing a LOS from a Mountain hex to a same level or lower Mountain hex has a spotting range of 5 hexes. Mountain Spotting Table From To Spotting Range Mountain Hex Mountain Hex Mountain Hex Farmland or Hill Same level or lower Mountain Hex Higher level Mountain Hex Farmland or Hill Mountain Hex 5 hexes Limiting Terrain Unlimited Limiting Terrain Movement cost: Foot movement for a Mountain hex costs 1.5 MP. Foot movement to cross a Mountain elevation line to a higher elevation is all MPs. Units with a movement cost of less than 3 become disrupted. Foot movement using a track costs 1 MP. Crossing a track elevation change 2 MP. Motorised vehicles cannot enter any mountain hex, unless on a road (not track). Mechanised units found moving on the massif very difficult. To represent this every time a mech. unit wishes to move roll a D move 1 hex. 3-5 can t move and mark as activated. 6 immobilised: can t move, mark as activated, lose a step. Mechanised units may not cross a Mountain elevation change. Mechanised units can enter a track hex at the cost of 4MP; and they do not need to roll for movement loss. Mechanised units can only cross an elevation line if it is on a track (exc. The Monastery road), this costs all its movement allowance. Tracks on the massif were very narrow. If a wreck is placed on a track hex, it negates the movement benefits of the
9 track. Any Mechanised units moving through a track hex that contains a wreck must use the Mountain hex penalties. Wrecks can be removed as in rule The road to the Monastery costs motorised and mechanised units 3 MPs to enter per hex. Mountain Movement Table Foot Mot. Mech. Mountain Hex 1.5 NA All (Special) Crossing All (if less NA NA mountain elevation change than 3MP unit becomes disrupted) Mountain Road Hex Track Hex 1 NA 4 Crossing track elevation change 2 NA All Mountain hexes have the following effect on combat: Direct Fire None +1 target at lower elevation* -1 target at higher elevation* Bombardment Assault none -1 defender for first round of combat if defender on higher elevation Anti-tank none * This modifier is also used for fire from farmland to a mountain hex and visa-versa. All units that begin a scenario in a mountain hex can be Dug-in. Units can dig-in on any Mountain hex as per 16.2 (these actually represent sangar like structures.) Entrenchments can be placed in Mountain hexes. Anti-tank guns and artillery may be setup in Mountain hexes, mechanised units may setup on friendly Mountain track hexes, if the owning player can trace an uninterrupted line of friendly track hexes to the valley floor (Level 0 hex) Cliffs: these represent extreme gradients that require climbing. Units at the base of a cliff can only be spotted and fired upon by adjacent units, and units that do not trace their LOS across the target s cliff hex edge. To climb a cliff: Foot units must start their activation adjacent to the cliff hex side. Foot units with a movement allowance of 3 or more may attempt to climb a cliff. This takes 2 turns. On the units first activation place a climb counter on top of the unit. On the Units next activation remove the climb counter and move the unit onto its target hex. If a good order leader is present the unit can move into a hex to join or initiate an assault. Units under a climb counter are very vulnerable to direct fire gaining a +2 Direct Fire modifier (see cliff LOS rules above.) Units activated when under a climb counter can decide whether to continue to climb or descend. To descend remove the climb counter. When a unit no longer has a climb counter on it, it has reached the bottom of the cliff and may take other actions. Units disrupted whilst climbing may continue to climb or descend. If the target hex at the top or bottom of the climb is occupied by an enemy the disrupted units are not allowed to enter it, they must ascend/descend and try to regain good order before another attempt is made. Units demoralised whilst climbing must return to the hex they began the climb from when activated. No unit may attempt to Rally while under a climbing counter. Towns and Villages The town of Cassino and its surrounding villages consisted of solidly built buildings, with thick walls and cellars. The towns and villages had very narrow streets making use of tanks difficult. For aesthetic reason the towns and villages on the map are shown with some outlying individual buildings these have no effect on game play. The following special rules are used for all towns and villages on the map: Assaults in town and village hexes can not gain the +1 modifier for undemoralized closed-top AFV s and infantry. AFVs in town and village hexes without supporting infantry have a +2 assault modifier against them.
10 Cassino Town: Cassino town was heavily fortified by the Germans with many basements reinforced with prefabricated steel supports. These additional rules are used for the Town of Cassino. All hexes of Cassino town give the defenders in an assault First Fire. German Fallschirmjager units may exit an assault hex without the free shot of rule against them. The town was very heavily bombed on the morning of the 15 th March. This effectively destroyed the town and made all roads nearly impassable to vehicles. Any scenario set after mid-day on the 15 th of March uses the following additional rules: No motorised vehicle can enter Cassino until the hex has been cleared by an engineer unit (Campaign game). The stacking limit for vehicles in a non-cleared Cassino hex is 1. (there is no modification for foot units.) Any mechanised unit wishing to enter a Cassino town hex must roll 1D6. 1 = unit may move a single hex. 2-5 = unit may not move and is marked as activated. 6 = unit is immobilised; it takes a step-loss and is marked as activated. A single engineer may assist a single mechanised unit. If both units activate together subtract 1 from the above die roll. Wrecks are not left in uncleared Cassino town hexes. The ability to clear Cassino town hexes to allow freedom of movement for vehicles are part of the campaign rules and is not normally available during a scenario. The Monastery & Castle Hill: The Monastery and Castle Hill have the same characteristics as entrenchments. In addition the Monastery has an increased foot stacking limit of 4, there are no additional penalties for this. Continental Hotel: This hotel was a key defensive position for the Germans. The Hotel is considered to have inherent entrenchment characteristics. The Germans also have emplaced a Panzer IV in the entrance to this building. Use a Panzer IV tank counter but it may not leave the hotel hex. Hotel des Roses, Barons Palace & Railway Station: These isolated buildings are considered to have inherent dug-in properties. Units occupying the Railway Station cannot claim the railway embankment modifier. Hangman s Hill & marked summits: Hangman s Hill and the summits indicated by the white triangles are considered to have inherent dug-in properties. Hangman s Hill and marked summits block LOS for units on the same elevation. Summary of Defensive benefits of map locations Monte Cassino Entrenchment. Stacking limit of 4 for foot. Castle Hill Entrenchment Continental Hotel Entrenchment. Immobilized PzIV, does not affect stacking limit. Hotel des Roses Dug-in properties Baron s Palace Railway Station Hangman s Hill Dug-in properties Massif Points Blocks same level LOS Rivers: The Rapido and Gari rivers are relatively narrow and so do not occupy a hex but rather run along a hex edge. For aesthetic reasons the rivers appear to meander a little but for game purposes they are considered to follow the closest hex edge. Rapido River: The Rapido is a small fast flowing river. Due to the difficulties of crossing, the following crossing rules are used for the Rapido: Units can only cross with the assistance of an engineer unit. An engineer unit wishing to assist units in crossing the Rapido must first move adjacent to the river and announce it is preparing a crossing. The following turn it may assist other units in crossing. Any units assaulting across the Rapido suffer a -2 column shift on the first assault round. If the engineer unit becomes disrupted or demoralised it can no longer assist units in crossing. The status of the other units in the hex are unaffected by the status of the engineers. It costs foot units 2MP to cross the river, Mechanised units 4MP and motorised units 7MP.
11 The Rapido has different crossing numbers depending on location and weather. Rapido Jan, Feb, Mar. April, May Crossing South of the Foot 9, Foot 10, Gari River North of the Gari River Mot 4, Mech 3 Foot 11, Mot 6, Mech 5 Mot 6, Mech 5 Foot Auto, Mot 7, Mech 6 Bridging the Rapido In the campaign game the Allied players may wish to bridge the Rapido River. To construct a bridge an engineer must spend 20 turns on its construction. The 20 turns do not need to be continuous but do have to be completed within the space of one battle. If the bridge is not completed in a campaign day then any progress is lost. Only good order engineers adjacent to the river can spend turns building a bridge. The German player can use indirect fire on the hexes either side of the bridge to attack it (includes both completed bridges and those under construction.) The bridge has a -1 bombardment modifier. During construction any bombardment result of M1 or more adds an extra turn to the construction of the bridge. A completed bridge can take 2 steps and is damaged by X results only. At the end of a battle if an allied bridgehead is not viable (ie. Enemy unit within 5 hexes) motorised and/or mechanised units west of the Rapido are cut-off west of the river. If a bridge is captured or destroyed all allied units west of the Rapido River are cut-off. In future battles all cut-off units are always set up before any other units. They are set up west of the Rapido and not within two hexes of the Front line. If the minimum requirements for a bridgehead are not met at the end of a battle (ie. bridgehead across the Rapido on the west bank is less than 6 adjacent farmland hexes, with at least one hex adjacent to the river.) all forces west of the Rapido are trapped. In future battles all trapped units are always set up before any other units. They are set up west of the Rapido, and not within two hexes of the Front line, in addition all trapped units suffer a reduction in their morale value by 1. During the battle as soon as the bridgehead is re-established the -1 morale modifier is removed. The Flooded Rapido: The Germans destroyed a dam blocking the Rapido and flooded a large area of the surrounding farmland. Depending on the weather and time of year, the flooded area will be considered either, Flooded or Waterlogged Flooded Foot units cost +1MP. Motorised units may not enter. Mechanised units can enter but each time they move into a Flooded hex roll a D move 1 hex. 3-4 can t move and mark as activated. 5-6 immobilised: can t move, mark as activated, lose a step. Waterlogged Foot units no additional movement cost. Motorised units may not enter. Mechanised units roll a D move 1 hex. 3-6 can t move and mark as activated. Each mechanised unit that moves with an engineer unit gains a -1 to the die roll. Waterlogged Flooded Foot: +0MP Foot: +1MP Mot: NA Mot: NA Mech: Roll a dice Mech: Roll a dice 1-3 move 1 hex 1-2 move 1 hex 3-6 can t move marked as 3-4 can t move marked as activated activated 5-6 immobilised, lose step, can t move, mark as activated. -1 to die roll if Mech. activated with engineer. Gari River: This is a minor river. Gustav Line The Germans had heavily mined the east bank of the Rapido and covered it with barbed wire. The area was also covered by sophisticated fire plans. This area is mined with a factor of 2 for foot units and 1 for all others. The barbed wire also adds 2 MP to all foot movement. All German direct fire and Bombardment attacks gain a +1 modifier for fire into these hexes. The mines can be cleared by engineers as (clearing 1 minefield factor will leave only 1 foot factor in the hex. Clearing 2 factors will leave the hex totally cleared of mines and wire). Mines 2 factor for foot. 1 factor for all others. Barbed wire +2 MP for Foot. Direct fire +1 German fire only Bombardment +1 German fire only At night due to the complex German fire plans in place on the Gustav Line, German units have an effective sighting range of two when observing units in a Gustav Line hex. Infantry anti-tank capability (from BN) In any assault with a full-strength RIF, INF, GREN, PARA, MTN, MAOR, GURK, ENG,
12 PNR or SAP may attempt to fire their anti-tank weapons at enemy vehicles engaged in the assault. Roll 1 dice for each full-strength unit that is neither demoralized nor disrupted. On a 6 for allied and 5 or 6 for German, the unit fires an AT weapon at an enemy vehicle in the same hex. This AT fire is conducted with the assault combat and all results applied simultaneously (unless one side has a first fire bonus). AT value for this fire is 6, and does not satisfy any flank shot criteria. The only modifier is the +1 if the enemy vehicle is unsupported by infantry. Horseshoe Ridge, Hummock & Farmland hills: These act as a standard Panzer Grenadier hills. Railway: The railway is built on a low embankment. This blocks same level LOS for units tracing a LOS across it. Units in a railway hex can claim a -1 Direct Fire & -1 Assault modifier. This modifier can only be claimed for fire from one side of the embankment each turn. If fired upon from the other side of the embankment the modifier cannot be claimed. Mud When Mud is specified in a scenario or campaign and a vehicle wishes to move in a farmland or flooded farmland hex roll a dice. Deduct the dice roll from the vehicles movement allowance for this turn. Strongpoints (from Airborne) many strongpoint counters are included in the game. These represent prepared defensive positions like pillboxes, machine gun nests, etc. Some scenarios state which strongpoint counters to use, if it does not, strongpoint counters are drawn randomly keeping them hidden from the Allied player. They are placed on the board with the generic strongpoint side face up. The strongpoints combat values (if any) remain hidden from the allied player until it is spotted by Allied units, or fires at them. At that point, flip the counter so the combat value is showing. If unoccupied, remove from play. Strongpoints have no defensive benefit to other units in the same hex. If demoralized, a strongpoint that fails to recover is eliminated (14.33). They do not count for stacking or for the three units stacked in a hex column modifier for bombardment and direct fire. Strongpoints receive first fire benefits. An eliminated strongpoint counts as one step lost for initiative purposes. The armoured strongpoint represented by the 9-4 (Armour 0) counters are armoured MG copulas. These are generally immune to small arms fire. Treat these strongpoints as AFV s for all fire resolution purposes, using rule 11.0 Anti-tank fire. Friendly Fire: Due to the difficulty of accurately placing fire on the steep slopes of the Cassino Massif, the +1 modifier in rule 9.52 for German and Allied fire is not applicable for fire directed at Mountain hexes. This effectively means that friendly units adjacent to a bombardment attack will be hit on a die roll of 1 or 2. Units in farmland hexes adjacent to Mountain hexes will also be affected by this rule. Flamethrower equipped engineers: Some engineers are equipped with flamethrowers, these units have regular direct fire values as well as a flame value of 11-0 (numbers in red.) The units have no flame value on their reduced side. The flame value not direct fire value is used in assaults. Flares: During night battles the German player can fire flares to illuminate adjacent hexes. Any German leader can fire flares on a die roll of 1-5 on a single dice. This does not count as an activation but may only be attempted by each leader once per Action segment. If successful place a flare counter in any adjacent hex. Enemy units under a flare counter can be targeted by friendly units outside the night spotting range. At the end of the turn remove all flares. Force Cohesion (optional): The battles of Cassino are characterised by such intense fighting that they often left one or both sides of the combatants totally exhausted. To reflect this use the following rule. When a German or allied force in a scenario lose two initiative steps the reduced morale value of each side is reduced by 1. When four initiative steps are lost the full-strength morale value is reduced by 1. If a side begins the scenario with an initiative of 3 or less, continue to record unit step loses for the purpose of this rule, even if these go into the negative. Force Cohesion Initiative lost Starting 2+ lost 4+ lost German Grenadier 8/7 8/6 7/6 German Mountain 8/8 8/7 7/7 German 9/8 9/7 8/7
13 Paratroopers US Infantry 7/6 7/5 6/5 initially Rapido crossing Allied Infantry & 8/6 8/5 7/5 Armour Maoris 8/7 8/6 7/6 Gurkhas 8/8 8/7 7/7 Tactical Assault Combat (optional): The following optional rule allows players to simulate some of the nuances of assault combat within a hex. It attempts to create a more detailed narrative of the combat and the actions that are taking place within a single hex. Procedure: Conduct the first round of an assault as normal. At the end of that assault phase the player who scored the highest result on the Assault Combat Chart, regardless of the later outcome of morale checks or step losses, gains a tactical assault advantage. Mark the hex with a +1 counter for the side earning the advantage. Example of play: On the first turn of an assault the following results from the Assault Table are shown: The US player has rolled a M1 check on the Germans, and the Germans have rolled a M check on the US. As the US player has a better result than the Germans the US gain a +1 advantage counter. If both players have the same result on the Assault Combat Chart then no advantage is gained by either. Hierarchy of results from the Assault Combat Chart are as follows from lowest to highest: No effect - M - M1 - M On the next and subsequent rounds of Assault combat the side with any tactical assault advantage gains column shifts equal to the number on the advantage counter. After each round of assault combat the player who has the better result on the Assault Combat Chart (remember this is not affected by later results of morale checks) either gains a tactical assault advantage or reduces their opponents advantage. Use the following track to identify what tactical advantage has been gained, move one space along the track for towards the side that earned the advantage. If no side achieves an advantage during an assault combat round the tactical advantage remains unchanged: Example of play: When an assault is first started the tactical advantage is at 0. Example: Axis Player has a +1 advantage but in the next assault round the Allied player gains an advantage. Moving along the track one from Axis +1 towards Allied Advantage the result is 0. The marker is removed and any tactical advantage that the Axis player had has been lost. The maximum tactical assault advantage for different terrain hexes vary: Terrain Farmland Flooded Farmland Road Railway Mountain Town Building Gustav Line Fortification Barracks Maximum tactical assault modifier If an assaulting player gains the maximum tactical assault advantage against a dug-in enemy the enemy is assumed to have been driven out of their original positions and they lose the dug-in first fire advantage. Dug-in status is removed and cannot be regained (there is no effect on entrenchments.) As long as the assault continues in the same hex, regardless of units entering and exiting the assault the marker remains in place. Only when one side is solely present in the assault hex is the marker removed. Removed markers have no further effect on play even if that hex is subsequently assaulted again.
14 Random Events Table 2. The German player randomly draws 1 aircraft 3. Sniper! The German player selects one Allied leader within five hexes of any German unit with a direct fire value and rolls two dice. On a result of 9 or more the leader is eliminated. 4. Artillery An extra 1x12 barrage is available this turn for German player. 5. Clear path One German unit may move an extra hex this turn OR choose to become dug-in if in an eligible hex. Campaign weather modifiers 6. No event for 7 result Clear Weather change*: Overcast +0 Day: Rain +2 1 = No change. 2-3 = Rain, reduce maximum spotting distance to 5 for this turn. 4-5 = Heavy Rain, reduce maximum spotting distance to 3 for this turn. 5 = Persistent Rain, reduce maximum spotting distance to 5 for 1D6 turns. On all Level 3+ Mountain hexes fog/snowstorm descends, at the start of each turn roll 1D6, the result on the dice is the maximum spotting distance for this turn. Condition exists until a 6 is rolled. 6 = Persistent Heavy Rain, reduce maximum spotting distance to 3 for 1D6 turns. On all Level 3+ Mountain hexes fog/snowstorm descends, at the start of each turn roll 1D6, the result on the dice is the maximum spotting distance for this turn. Condition exists until a 6 is rolled. Night: 1-2 Uninterrupted clear sky, increase spotting distance by 1 for 1D6 turns. 3-4 Clear sky, increase spotting distance by 1 this turn. 5-6 Rain, all Direct Fire has a -1 column shift also reduce spotting distance by 1 this turn (Spotting range cannot be less than 1). 6 Heavy sudden snowstorms no actions for any units on Level 3+ Mountain hexes. No unit may enter a 3+ Mountain hex. No artillery fire or aircraft attacks on Level 3+ Mountain hexes. *Additional weather change results immediately supersede exiting condition. 8. No event 9. Clear path One Allied unit may move an extra hex this turn. 10. Artillery An extra 1x20 barrage is available this turn for Allied player. 11. Sniper! The Allied player selects one German leader within five hexes of any Allied unit with a direct fire value and rolls two dice. On a result of 9 or more the leader is eliminated. 12. The Allied player randomly draws 2 aircraft
THE BIG PUSH Big Push Demonstration and Scenario, revised 7/1/2016
 THE BIG PUSH Big Push Demonstration and Scenario, revised 7/1/2016 THE FIGHT FOR THIEPVAL RIDGE By Paul Rohrbaugh Play Area: Rows 7 through 16 inclusive, columns C through I (also inclusive). Scenario
To End All Wars. WW1 Miniature Game V1.2
 To End All Wars WW1 Miniature Game V1.2 Introduction: The Western Front in World War I was dominated by a series of trenches cutting its way through the French countryside. Commanders on both sides would
GRAND TACTICAL SERIES RULES v1.1
 GRAND TACTICAL SERIES RULES v1.1 Table of Contents 1.0 Introduction 3 1.1. A note about the rules 3 1.2. A summary description of the game 3 2.0 How to read the counters 4 3.0 The time scale 4 4.0 The
To End All Wars WW1 Miniature Game V1
 To End All Wars WW1 Miniature Game V1 Introduction: The Western Front in World War I was dominated by a series of trenches cutting its way through the French countryside. Commanders on both sides would
A Difficult Affair II (Kursk, July 1943)
") A Difficult Affair II (Kursk, July 1943) ".. probably dummy positions." Unknown air liaison officer with Panzer Division Grossdeutschland. On the afternoon of July 4th 1943, as preparation for the great
A Difficult Affair II (Kursk, July 1943) ".. probably dummy positions." Unknown air liaison officer with Panzer Division Grossdeutschland. On the afternoon of July 4th 1943, as preparation for the great
BATTLE FOR 2MM EARTH 1418: The Great War (Version 0.8)
") BATTLE FOR 2MM EARTH 1418: The Great War (Version 0.8) INTRODUCTION The Battle for 2mm Earth rules are suitable for any large combat up until around the end of the 19 th Century. I designed 1418 semi-independently
BATTLE FOR 2MM EARTH 1418: The Great War (Version 0.8) INTRODUCTION The Battle for 2mm Earth rules are suitable for any large combat up until around the end of the 19 th Century. I designed 1418 semi-independently
Global Command Series. Fortifications v1.0. A Global War 2 nd Edition 3d Printed Expansion Historical Board Gaming
 Overview Global Command Series Fortifications v1.0 A Global War 2 nd Edition 3d Printed Expansion Historical Board Gaming This set features rules for many different types of fortifications, sold separately
Introduction. Playing a Campaign Game
 Introduction Tigers on the Hunt: Kursk is a DLC containing three Campaign Game Scenarios for the Tigers on the Hunt Game (TotH). The Campaign Game Scenarios in this DLC portray three different historical
Operation Spark The Battle for Marino January 1943 Scenario written by Iain Craven With contributions and play testing by Richard Lawrence
 Operation Spark The Battle for Marino January 1943 Scenario written by Iain Craven With contributions and play testing by Richard Lawrence After a series of costly, and occasionally catastrophic, failed
OVER THE TOP! Using Normal Flames Of War Missions in the Great War. by Mike Haught. Adding Trenches. Great War Table Size
 OVER THE TOP! Using Normal Flames Of War Missions in the Great War by Mike Haught The Great War booklet covers three distinct, almost cinematic, missions. The story of starts with the Big Push, the attacker
E. VI CORPS ASSUMES THE DEFENSIVE
 E. VI CORPS ASSUMES THE DEFENSIVE The continuance of the Fifth Army attack on Cassino prevented XIV Panzer Corps from sending more than its mobile reserve of the Hermann Goering Panzer Division and 104th
OPERATIONAL OBJECTIVE ZONES
 OPERATIONAL OBJECTIVE ZONES The nature of combat on the Operational level varied between Open field battles and those fought over built-up and fortified areas. The cohesion of both the defender and attacker
Musket and Pike Users Manual
 1 Musket and Pike Introduction Musket and Pike is a series of games that cover the battles and campaigns associated with the era where muskets and pikes dominated the fighting. Each game can be played
FORCES OF VALOR BATTLE TACTICS 2005, Unimax Toys Limited, All Rights Reserved
 FORCES OF VALOR BATTLE TACTICS 2005, Unimax Toys Limited, All Rights Reserved Forces Of Valor, The Game allows you to fight exciting and realistic war games. All you need to play are Forces Of Valor soldiers
Each division along the side of the map represents 1 foot (12") North is to the top of the Map. The game starts in dense fog.
 North is to the top of the Map. The game starts in dense fog.") Historical Overview After the Breakout at St. Lo at the end of July 1944, most of the American forces moved through a relatively narrow corridor along the coast a Avaranches. Hitler looked at the map and
Historical Overview After the Breakout at St. Lo at the end of July 1944, most of the American forces moved through a relatively narrow corridor along the coast a Avaranches. Hitler looked at the map and
"Chopping Wood " Battle on the Raate Road, Dec39-Jan40. by Steve Keyer of Two Tin Soldiers
 "Chopping Wood " Battle on the Raate Road, Dec39-Jan40 by Steve Keyer of Two Tin Soldiers Historical perspective This scenario represents the reduction of a small Russian "motti". In old Finnish, the term
Sowchos (Collective Farm) 79
 79") Sowchos (Collective Farm) 79 December 1942 Following the encirclement of the Sixth Army at Stalingrad, the Germans planned to launch the relief effort from the bridgehead at Nizhna Chirskaya, 25 miles
Sowchos (Collective Farm) 79 December 1942 Following the encirclement of the Sixth Army at Stalingrad, the Germans planned to launch the relief effort from the bridgehead at Nizhna Chirskaya, 25 miles
Napoleonic Battles. Introduction
 Napoleonic Battles Introduction Napoleonic Battles is a series of games that cover the battles and campaigns associated with Napoleon. Each game can be played alone versus the computer, or against a human
The Battle of Messines
 N E W Z E A L A N D E R S A T M E S E N T H E B AT T L E O F M E S S I N E S 7 J U N E 1 9 1 7 The Battle of Messines The West Belgian village of Mesen forms part of New Zealand s history, remembered on
Tactical Combat Rules By David Newport
 Tactical Combat Rules By David Newport Tactical Combat is a game covering company and battalion level actions using 20 th century weapons. The game was designed for World War II action, but it handles
House Rules for Nuts! Final Version Version 1.3 by Jeff Glasco
 1. The basic game uses a 3' x 3' table. This is fine for very dense combat, like in a major urban campaign, but is too small for a larger attack, like a platoon attack. A platoon attack would be on an
Order of Battle for your Company
 Fields Of Fire MISSION BOOKLET Campaign 2: Korea Naktong River, South Korea, August 8 through September 28, 1950 Order of Battle for your Company Formation Unit Steps Experience Company Headquarters CO
3rd Edition RULES OF PLAY
 Command & Colors Napoleonics 1 Game Design by Richard Borg 3rd Edition RULES OF PLAY 2 Command & Colors Napoleonics The battlefield is a scene of constant chaos. The winner will be the one who controls
WORLD WAR 1 WORLD WAR 1 BATTLES
 WORLD WAR 1 WORLD WAR 1 BATTLES BELL WORK QUESTION WHAT DO YOU THINK WAS THE MOST SIGNIFICANT CONTRIBUTION CANADIANS AT HOME MADE TO THE WAR EFFORT? REVIEW LIBERAL LEADER WILFRID LAURIER CREATED A 'PARTY
Free-For-All (Fair Fight)
") Free-For-All (Fair Fight) In highly-mobile engagements it is not uncommon for forces to suddenly find themselves in contact with the enemy. The freewheeling battles that result are little more than all-in
Free-For-All (Fair Fight) In highly-mobile engagements it is not uncommon for forces to suddenly find themselves in contact with the enemy. The freewheeling battles that result are little more than all-in
Bathtub Operation Goodwood 18 th July, A Flames of War Grand Battle Scenario
 Bathtub Operation Goodwood 18 th July, 1944 A Flames of War Grand Battle Scenario Operation Goodwood was a major attempt by Field Marshall Montgomery to break through the tough German defenses around Caen.
ONE IF BY LAND" - AMERICAN 1:10 SCALE WAR OF INDEPENDENCE RULES by Bob Bergman. Infantry/Cavalry figure 10 men Artillery crew figure 5 men
 ONE IF BY LAND" - AMERICAN 1:10 SCALE WAR OF INDEPENDENCE RULES by Bob Bergman Ground Scale 1 inch = 15 yards One Turn About five minutes Infantry/Cavalry figure 10 men Artillery crew figure 5 men Artillery
X Corps: The Somme 1916
 X Corps: The Somme 1916 A Card Wargame of World War I Neal Reid 2016 Published by Vexillia Limited www.vexillia.com Contents 1. Introduction 3 2. Historical Background 3 3. Game Overview 6 4. Setting Up
Warning! historical campaign battle for the juno beachhead. battle for juno
 historical campaign battle for the juno beachhead This scenario takes place after Canadian troops land on Juno beach and begin to move inland on the 6th of June, 1944. The action takes place over the critical
III Corps: The Somme 1916
 III Corps: The Somme 1916 A Card Wargame of World War I Neal Reid 2016 Published by Vexillia Limited www.vexillia.com Contents 1. Introduction 3 2. Historical Background 3 3. Setting Up The Game 6 Acknowledgements
Musket and Pike User Manual
 Musket and Pike User Manual 1 Musket and Pike Users Manual Introduction Musket and Pike is a series of games that cover the battles and campaigns associated with the era where muskets and pikes, or sometimes
Historical Overview ".. probably dummy positions." Unknown air liaison officer with Panzer Division Grossdeutschland.
 Historical Overview ".. probably dummy positions." Unknown air liaison officer with Panzer Division Grossdeutschland. On the afternoon of July 4th 1943, as preparation for the great offensive, the German
FIRETEAM Wargame Rules for Modern Combat Operations
 FIRETEAM Wargame Rules for Modern Combat Operations By Rory Crabb Written By Rory Crabb Version 1.0 July 2016 Miniatures from the collection of the author and terrain by Paul Davies 1 FIRETEAM Wargame
Stepping Up to Version 3 by Phil Yates
 Stepping Up to Version 3 by Phil Yates With the arrival of Version 3, lots of existing players are asking the obvious question: What s changed?. To answer this question, I ve written this document as a
BATTLE OF CHERBOURG THREE CAMPAIGNS FOR MEMOIR '44
 BATTLE OF CHERBOURG THREE CAMPAIGNS FOR MEMOIR '44 On June 6, 1944, thousands of Allied soldiers landed on the beaches of Normandy as part of Operation Overlord. The night before, hundreds of paratroopers
TRENCH RAIDER: World War I Wargaming in Ten Minutes by David Raybin 2014
 TRENCH RAIDER: World War I Wargaming in Ten Minutes by David Raybin 2014 INTRODUCTION Instead of a generic set of WW1 rules I determined to make the rules fit the game scenario rather than the other way
LESSONS FROM THE FRONT QUESTIONS AND ANSWERS ON FLAMES OF WAR MARCH 2018
 i LESSONS FROM THE FRONT QUESTIONS AND ANSWERS ON FLAMES OF WAR MARCH 2018 During the time that the fourth edition of Flames Of War has been out, players have asked questions about the game. The questions
King George Commands and We Obey
 King George Commands and We Obey Basing Army Commanders 80mm dia base with a vignette on it, min 3 figures. Divisional Commanders 80mm dia base with a vignette on it, max 2 figures. Brigade Commanders
A Triumph & Glory Game
 Borodino 1 BORODINO A Triumph & Glory Game By Richard Berg RULE BOOK Table of Contents 1.0 Introduction... 2 8.0 Artillery Fire... 8 2.0 Components... 2 9.0 Shock Combat... 9 3.0 Sequence of Play... 3
Norrey and Putot, June 8, 1944 A Flames of War Mega-Game Scenario
 Norrey and Putot, June 8, 1944 A Flames of War Mega-Game Scenario Allied concerns around the Normandy landings were many, but one of the most critical was the potential for a heavy panzer counterattack
THE RULES. Wing Scale. 15 minutes per turn 50 men per strength point 1 gun per strength point
 INTRODUCTION The late Greg Novak developed the following variant of Volley & Bayonet for fighting at the Wing scale in the Americas. All Volley & Bayonet rules not modified below remain in force. Paul
ASLSK Basic Infantry Tactics
 Basic Infantry Tactics ASLSK Basic Infantry Tactics Daniel F. Savarese Last Updated: 2005-03-04 Copyright 2004, 2005 Daniel F. Savarese 1 The original Squad Leader rule book contained a section at the
Battalion Commander's Summary
 Command Decision is a platoon-based game using a ground scale and time scale which allows the full play of 20th Century mechanized maneuver combat on a game table. Its emphasis on command, troop quality,
War Diary, Machine Gun Corps, from
 War Diary, Machine Gun Corps, from http://www.powell76.talktalk.net/mametz.htm MAMETZ WOOD DAY 1-7th JULY 1916 Following the early fighting on the Somme the British Army had pressed the German Army back
Modified D20 System for Wild Pig Comics. Congratulations soldier! You have been given control of a 40 ton fighting machine, known as
 Modified D20 System for Wild Pig Comics WELCOME TO THE FUTURE OF COMBAT Congratulations soldier! You have been given control of a 40 ton fighting machine, known as a Mech. It is a complex machine when
Seven Years War. Generals
 Seven Years War By Will McNally Introduction These rules have been written to give an easily playable game which reflects the style of European land warfare during the Eighteenth Century, particularly
SkirmishCampaigns: France 40 Battles for the Meuse Across the Meuse - Sedan
 AFTERMATH Despite spirited resistance at several points, the infantry crossed the Meuse and penetrated the French positions in several areas, aided by heavy air and artillery support and combat engineer
September 3 rd 1939 Battle on the Czech/Polish border (BK28) between 3 rd German Infantry Army and 3 rd Polish Infantry Army.
 between 3 rd German Infantry Army and 3 rd Polish Infantry Army.") September 3 rd 1939 Battle on the Czech/Polish border (BK28) between 3 rd German Infantry Army and 3 rd Polish Infantry Army. Forces involved: dice: 1 infantry = 1 rifle unit of 4 bases 3 grenades = 3
September 3 rd 1939 Battle on the Czech/Polish border (BK28) between 3 rd German Infantry Army and 3 rd Polish Infantry Army. Forces involved: dice: 1 infantry = 1 rifle unit of 4 bases 3 grenades = 3
The Battle of Ortona 20 December 1943
 20 December 1943 Britton Publishers Page 1 History (December 20, 1943 to December 28, 1943) was a small yet extremely fierce battle fought between German Fallschirmjäger, and assaulting Canadian forces
Les Champs de Bataille NAPOLEONIC WARGAME RULES ON THE BATTALION LEVEL WITH GRAND TACTICAL ASPIRATIONS
 Les Champs de Bataille NAPOLEONIC WARGAME RULES ON THE BATTALION LEVEL WITH GRAND TACTICAL ASPIRATIONS SCALES 1 turn = 20 minutes; 1 casting = 60 men; 1" = 40 yards 1 STANDS 3-rank infantry stands (per
Brigade Level Combat - Western Front 1916 Version
 Brigade Level Combat - Western Front 1916 Version 9-9-2006 This is the combat resolution system for a command post game about commanding brigades and divisions in WW1 particularly focussed on 1916. The
tdoherty Page 1 02/18/05
 La Bataille Revised Infantry Assault and Charge Sequence The reasons for changing the mêlée sequence have been discussed on CSW. It is my view that historically assaults would often degenerate into inconclusive
Illustrated AAR: The First Day Scenario
 R E D W I N T E R Illustrated AAR: The First Day Scenario Created July 2010 Here is a recent game of the 5 turn First Day scenario using Joel Toppen's new VASSAL module. Counter art by Michael Evans. Playtest
Skirmish Action AAR: Ruhr 1945 By Russ Lockwood
 Skirmish Action AAR: Ruhr 1945 By Russ Lockwood This tidy little 1945 scenario for Skirmish Action (SA) comes courtesy of Dennis Shorthouse, whose figures and terrain make for a good-looking WWII table.
Things that need changing in your rule book. (Errata for PBI)
") Things that need changing in your rule book. (Errata for PBI) This information applies to PBI as published by RFCM/Peter Pig March 2006. Firstly an apology for having to make updates and changes to the
Things that need changing in your rule book. (Errata for PBI) This information applies to PBI as published by RFCM/Peter Pig March 2006. Firstly an apology for having to make updates and changes to the
RULES. A: A targeted squad receives corner cover when the imaginary line of the attacking unit s line of sight passes through
 R e a d t h i s FAQ t h o r o u g h ly a n d k e e p i t s e c u r e i t m ay s av e l i v e s RULES Q: In what situations will a squad benefit from corner cover? A: A targeted squad receives corner cover
Richard Borg. Rules & Scenarios
 Richard Borg Rules & Scenarios INTRODUCTION The Command and Colours WWI THE GREAT WAR game rules allow players to portray important engagements throughout WWI history. The battles, in the scenario section,
APPENDIX E TARGET ANALYSIS AND MUNITIONS EFFECTS
 APPENDIX E TARGET ANALYSIS AND MUNITIONS EFFECTS This appendix implements QSTAG 224. E-1. OBSERVER RESPONSIBILITIES As the eyes of the artillery and mortars, the observer has two major responsibilities
BATTLE FOR THE BRIDGEHEAD BEYOND OMAHA. Campaign Scenarios for Rules of Engagement. Sample file
 BATTLE FOR THE BRIDGEHEAD BEYOND OMAHA Campaign Scenarios for Rules of Engagement the 29th Infantry division and Us rangers beyond Omaha beach june 6th - 8th, 1944 BATTLE FOR THE BRIDGEHEAD BEYOND OMAHA
Selina was awarded a pension follow her husband s death:
 1 P a g e Private 7392 Edward Bentley 16 th Battalion, Manchester Regiment Killed in Action 9 th July 1916 Remembered on the Thiepval Memorial to the Missing (Pier 13A and 14C) I have used published accounts,
A Battlefront WW2 Modern Scenario for 2 players and an Umpire
 First Clash Part 1 Ambush at Favorite A Battlefront WW2 Modern Scenario for 2 players and an Umpire Overview World War Three D+48hrs On the afternoon of 25 th June 1984 the Soviet 1 st Guards Tank Division
Battle for Normandy Escalation Campaign
 Battle for Normandy Escalation Campaign Summary: The campaign will run for six weeks. Three stages 2 weeks long each. Stage 1: 900 Points Stage 2: 1200 Points Stage 3: 1500 Points You must select an army
Fields of Blue & Grey
 Fields of Blue & Grey A very different kind of American Civil War rules, that allow the grand sweep of corp level actions to be recreated while still using the regiment as the basic combat element. A simple
Historical Overview. Map/Terrain Notes. Each division along the side of the map represents 1 foot (12")
") Historical Overview The 101st Airborne Division was tasked to seize four key causeway exits for the troops landing in force at Utah Beach. Like so many plans, theirs went awry. The transport pilots flying
Historical Overview The 101st Airborne Division was tasked to seize four key causeway exits for the troops landing in force at Utah Beach. Like so many plans, theirs went awry. The transport pilots flying
Bathtub Operation Luttich (Mortain) 7 th August, A Flames of War Grand Battle Scenario
 7 th August, A Flames of War Grand Battle Scenario") Bathtub Operation Luttich (Mortain) 7 th August, 1944 A Flames of War Grand Battle Scenario Operation Luttich was Hitler s desperate gamble to seal off the penetration made by the American forces during
Bathtub Operation Luttich (Mortain) 7 th August, 1944 A Flames of War Grand Battle Scenario Operation Luttich was Hitler s desperate gamble to seal off the penetration made by the American forces during
Initial Set-Up. Officer s Handbook Game Walk-Through
 Officer s Handbook Game Walk-Through O H W - D : 29 M 2018 The game was fought in a North African Desert environment in late 1940 between British and Italian Forces, depicting a hasty engagement where
Trench Warfare Begins on the Aisne by Col. (later Maj-General) Edward D. Swinton, DSO
 Edward D. Swinton, DSO") Trench Warfare Begins on the Aisne by Col. (later Maj-General) Edward D. Swinton, DSO September 14th, the Germans were making a determined resistance along the River Aisne. Opposition, which it was at
Trench Warfare Begins on the Aisne by Col. (later Maj-General) Edward D. Swinton, DSO September 14th, the Germans were making a determined resistance along the River Aisne. Opposition, which it was at
Glory Days! Introduction. Troop Types and Figures. freewargamesrules.co.uk presents. by Craig Cartmell
 Introduction. freewargamesrules.co.uk presents Glory Days! by Craig Cartmell These are a set of rules for fighting the American Civil War at regimental and brigade level. The smallest unit sizes are infantry
Rome at War Hannibal at Bay Errata and FAQ
 First Edition Rules Rome at War Hannibal at Bay Errata and FAQ Pg 3: Light Cavalry description has a depiction of Light Infantry. 2.21: Change "enemy units" to "any non-leader units". 6.1: After Example,
French infantry Platoon
 French Special Rules 1940 Gas Guzzler: The Char B1 Bis had huge problems with fuel consumption, to keep the vehicle in the field for a whole day would require it to be refueled at least twice. Any vehicle
PLAY BOOK Table of Contents GMT Games, LLC
 PLAY BOOK Table of Contents 20.0 Examples of Play... 2 21.0 Linking Scenarios into a Grand Campaign... 19 22.0 Key Differences from Red Winter... 20 23.0 Tips and Strategies... 21 24.0 Unit Abbreviations...
After Action Report, Ocaña
 After Action Report, Ocaña Final Playtest, December 26 th, 2015 The following is an after action report of the Battle of Ocaña, played at TBS Comics in Fort Walton Beach, FL using the rules Commit the
2011 New Zealand Flames of war Mid-war Doubles tournament
 2011 New Zealand Flames of war Mid-war Doubles tournament Welcome to the 2011 New Zealand Flames Of War Mid-War Doubles Grand Tournament! We look forward to offering you a unique experience that includes
Lock N Load Tactical v4.1 Starter Kit
 Lock N Load Tactical v4.1 Starter Kit 1 Contents Introduction... 3 Community & Support...3 1.0 General Concepts... 4 1.1 Scale & Counters...4 1.2 Dice...4 1.3 Stacking...4 1.4 Hexes...5 1.5 Morale...5
LESSONS FROM THE FRONT QUESTIONS AND ANSWERS ON FLAMES OF WAR SEPTEMBER 2018
 i LESSONS FROM THE FRONT QUESTIONS AND ANSWERS ON FLAMES OF WAR SEPTEMBER 2018 During the time that the fourth edition of Flames Of War has been out, players have asked questions about the game. The questions
Wissembourg 4 th August 1870
 Wissembourg 4 th August 1870 Last Updated: 17th February 2018 This scenario was prepared by Martin Soilleux-Cardwell. It has been updated for Volley & Bayonet: Road to Glory by Keith McNelly. Historical
To begin OMOG requires a few things.
 Omog (One Man One Gun) is a game for toy soldiers and any available space. It can be played on a desktop, a coffee table, a countertop or other surface. The game itself is simple, easy to learn and easy
Corinth Canal Scenario Pack Historicon
 Corinth Canal Scenario Pack 2016 Historicon July 16, 2016 Race For The Corinth Canal Commonwealth Platoons 1 and 2 represent elements of 2/6 Australian Infantry and start the game in foholes. Commonwealth
MEDAL OF HONOR RECIPIENTS
 MEDAL OF HONOR RECIPIENTS 20 Sergeant Rodger W. Young Company B, 148th Infantry July 31, 1943 - New Georgia, Solomon Islands For distinguishing himself conspicuously by gallantry and intrepidity above
War Ain t Fair. By Stephen Luscombe. Fast play ww2 rules incorporating the full vagaries of war. 1.2
 War Ain t Fair Fast play ww2 rules incorporating the full vagaries of war By Stephen Luscombe Stephen@BRITISHEMPIRE.CO.UK 1.2 Introduction Welcome to War Ain t Fair. These are a set of rules designed to
BATTLEFIELDS OF THE GREAT WAR
 BATTLEFIELDS OF THE GREAT WAR Paris The Western Front 1914-1918 Battle of Ypres Battle of Ypres 1915: April 22 to 24, 1915 Location: Near Ypres, Belgium Canadian Troops: 1st Canadian Division Results:
The Setting. Counter Attack at Ste Mere Eglise
 The Setting The Dulles War-gaming Club, sponsored by Britton Publishers, met to play-test Counter Attack on Ste Mere Eglise. This is a 25mm WWII skirmish scenario written by Steve Fliss using the Final
Command Combat: Civil War The Battle of Bull Run / Manassas July 21, 1861
 Command Combat: Civil War The Battle of Bull Run / Manassas July 21, 1861 Game Design by Jeff McArthur (c) Bandwagon Books, 2011 This scenario is from the Command Combat: Civil War series. To learn more
Chosen Men Fat. 1. Sequence of play. Base Morale;
 Chosen Men Fat 1. Sequence of play v2.1 CCWG Assign cards to each unit in play then shuffle the deck and turnover the top 2 cards. These units then; 1) Test morale. 2) Perform an action. (Move, Load, Fire,
The Thin Red Line
 The Thin Red Line 1795-1815. Created by Ben Seib Developed by Scott Laird and the Cheltenham Warchiefs and with the help of the Newcastle Occasional Wargamers. 1 Introduction to The Thin Red Line Page
SNAPHANCE RULES FOR PIKE AND SHOT BATTLES
 Index Section Subject Page 1.0 Basic Concepts 2 1.1 Command Groups 2 1.2 Stands and Basing 2 1.3 Strength Points [SP] 3 1.4 Game Play 3 2.0 Types of Stands 3 2.1 Combat Stands 3 2.2 Support Stands 4 3.0
Marengo. Turn One 0600 Hours 14 June 1800
 Photo 1 T1 by E.R. Bickford Production: Lise Patterson 2011 Decision Games, Bakersfield, CA. Turn One 0600 Hours 14 June 1800 The game opens with the Austrians advancing from their positions across the
Austerlitz System Rules
 RULEBOOK Design by David Fox Great Battles of the Napoleonic Wars Volume I Austerlitz System Rules 1.0 INTRODUCTION..... 2 2.0 COMPONENTS..... 2 2.1 Game Scale...... 2 2.2 Definitions & Abbreviations.
QUICK REFERENCE SHEETS
 QUICK REFERENCE SHEETS 1 QUICK REFERENCE SHEETS Survivor Action Point Table Actions AP Cost Walking (3 ) 1 Turning more than 180 degrees 1 Spotting 1 Running (6 ) 1 Diving (1 ) 2 Crawling (1 ) 1 Going
LESSONS FROM THE FRONT QUESTIONS AND ANSWERS ON FLAMES OF WAR JUNE 2018
 i LESSONS FROM THE FRONT QUESTIONS AND ANSWERS ON FLAMES OF WAR JUNE 2018 During the time that the fourth edition of Flames Of War has been out, players have asked questions about the game. The questions
AAR-Last Stand Outside Mogilev by Roger Burley
 AAR-Last Stand Outside Mogilev by Roger Burley Late in the afternoon of June 26, Feldwebel Kiebler got reports from his MMG team, situated on the third floor of the village s large inn, that the Russians
PROCONSUL RULES FOR ANCIENT BATTLES
 Index Section Subject Page 1.0 Basic Concepts 2 1.1 Command Groups 2 1.2 Stands and Basing 2 1.3 Strength Points [SP] 2 1.4 Game Play 2 2.0 Command and Control 3 2.1 Moving Commanders 3 2.2 Losing a Commander
Bundok and Bayonet Colonial Wargames Rules by Bob Cordery
 Introduction Bundok and Bayonet Colonial Wargames Rules by Bob Cordery Part 1 - The Basic Rules The following Colonial Wargames rules were written for my own personal use and reflect my philosophy that
THE CARAVANSERAI. The Caravanserai version /2004 1
 THE CARAVANSERAI This game has been designed as an extension kit to the OUTREMER/CROISADES sister games. The kit includes a new map (The Caravanserai), new counters for camels, this set of rules and additional
Operation Hubertus - The Assault on the Red House 11 th November 1942
 I don't want a second Verdun, and prefer instead to do the job with small assault groups. Adolf Hitler, speaking at the Munich rally to commemorate the 1923 Beerhall Putsch, 8 th November 1942. Operation
The Battle of Cowpens 1781
 The Battle of Cowpens 1781 Battle: COWPENS War: American Revolutionary War Date: 17th January 1781 Place: South Carolina on the border with North Carolina, United States of America Combatants: Americans
The Pre War Artillery Revolution
 Slide 1 Slide 2 The Pre War Artillery Revolution The war of 1914-18 was an artillery war. Artillery was the battle winner, artillery was what caused the greatest loss of life, the most dreadful wounds
Surprise at Jay s Mill September 19th, 1863
 Surprise at Jay s Mill September 19th, 1863 Background Near dawn on September 19th, the Union Army of the Cumberland was spread thin. Two divisions of the Fourteenth Corps had finished a night march and
[DRAFT] SNAPHANCE RULES FOR PIKE AND SHOT BATTLES
![[DRAFT] SNAPHANCE RULES FOR PIKE AND SHOT BATTLES](/thumbs/86/93539375.jpg "[DRAFT] SNAPHANCE RULES FOR PIKE AND SHOT BATTLES") Index Section Subject Page 1.0 Basic Concepts 2 1.1 Command Groups 2 1.2 Stands and Basing 2 1.3 Strength Points [SP] 2 1.4 Game Play 2 2.0 Types of Stands 2.1 Combat Stands 2.2 Support Stands 3.0 Command
Index Section Subject Page 1.0 Basic Concepts 2 1.1 Command Groups 2 1.2 Stands and Basing 2 1.3 Strength Points [SP] 2 1.4 Game Play 2 2.0 Types of Stands 2.1 Combat Stands 2.2 Support Stands 3.0 Command
ERES TO YOU FUZZY WUZZY by Bob Cordery
 1. Introduction ERES TO YOU FUZZY WUZZY by Bob Cordery ETYFW relies upon the use of both average dice (AvDs produce more predictable results) and normal dice (D6s produce less predictable results) to reflect