CHAPTER 2 MECHANICAL TRAINING
|
|
|
- Scot Franklin
- 5 years ago
- Views:
Transcription
1 CHAPTER 2 MECHANICAL TRAINING Section 1. DISASSEMBLY AND ASSEMBLY 6. General. The purpose of this chapter is to enable the user to understand how to disassemble and assemble the submachinegun, how it functions, and how to care for it properly. In understanding functioning of the submachinegun, the soldier is better prepared to reduce malfunctions and stoppages as they occur. In learning the loading, firing, unloading, and safety checks, the individual acquires greater knowledge and thus develops confidence in the weapon. The first steps in understanding functioning are to learn the nomenclature and how to disassemble and assemble the weapon. 7. Nomenclature. Nomenclature should be taught to the user to simplify and assist future instruction. In the disassembly/assembly procedures, the titles of the tasks involved are the names of the parts. The soldier should read and say the task to be performed aloud and thus learn the nomenclature. 8. Disassembly, General. a. The soldier is permitted to disassemble only certain parts of the submachinegun not because he cannot learn to disassemble all of them, but because unnecessary disassembly causes extra wear. Also, disassembly and assembly of some parts require tools that are not normally available in troop units. b. The left column of the following chart shows those parts that may be disassembled by the soldier. The center column indicates those parts that the unit armorer may remove, including the parts disassembled by the soldier. The right column shows those parts that only ordnance personnel may disassemble. 8
2 9. Guides To Follow in Disassembly and Assembly. These guides should be followed when disassembling and assembling the subrnachinegun. a. Follow the step-by-step explanation in disassembling the submachinegun. b. Do not attempt to disassemble or assemble the weapon against time. c. If it is necessary to apply force, do it carefully so that none of the parts are damaged. d. As the weapon is disassembled, line up the parts in the order of their removal. This procedure helps in assembly of the weapon, which is done in reverse order of disassembly. 10. Field Disassembly. The soldier must learn field disassembly (removal of the groups) so well that he can perform this operation in the dark. The submachinegun can be field disassembled without special tools. Parts of the weapon are used instead of tools. 11. Procedure for Field Disassembly. a. Before disassembling the submachinegun, make sure that the weapon is clear (para 31). Press in on the magazine catch, and remove the magazine. Raise the cover, pull the bolt to the rear, and inspect the chamber. Allow the bolt to go forward by squeezing the trigger. Close the cover. Note. To pull back (retract) the bolt on the M3, pull the retracting handle to the rear. To pull back the bolt on the M3A1, insert a finger into the cocking slot on the bolt and pull the bolt to the rear. b. To disassemble the submachinegun, follow the procedure illustrated in figures 5 through 15. 9
3 10
4 11
5 12

6 13
7 14
8 15
9 16
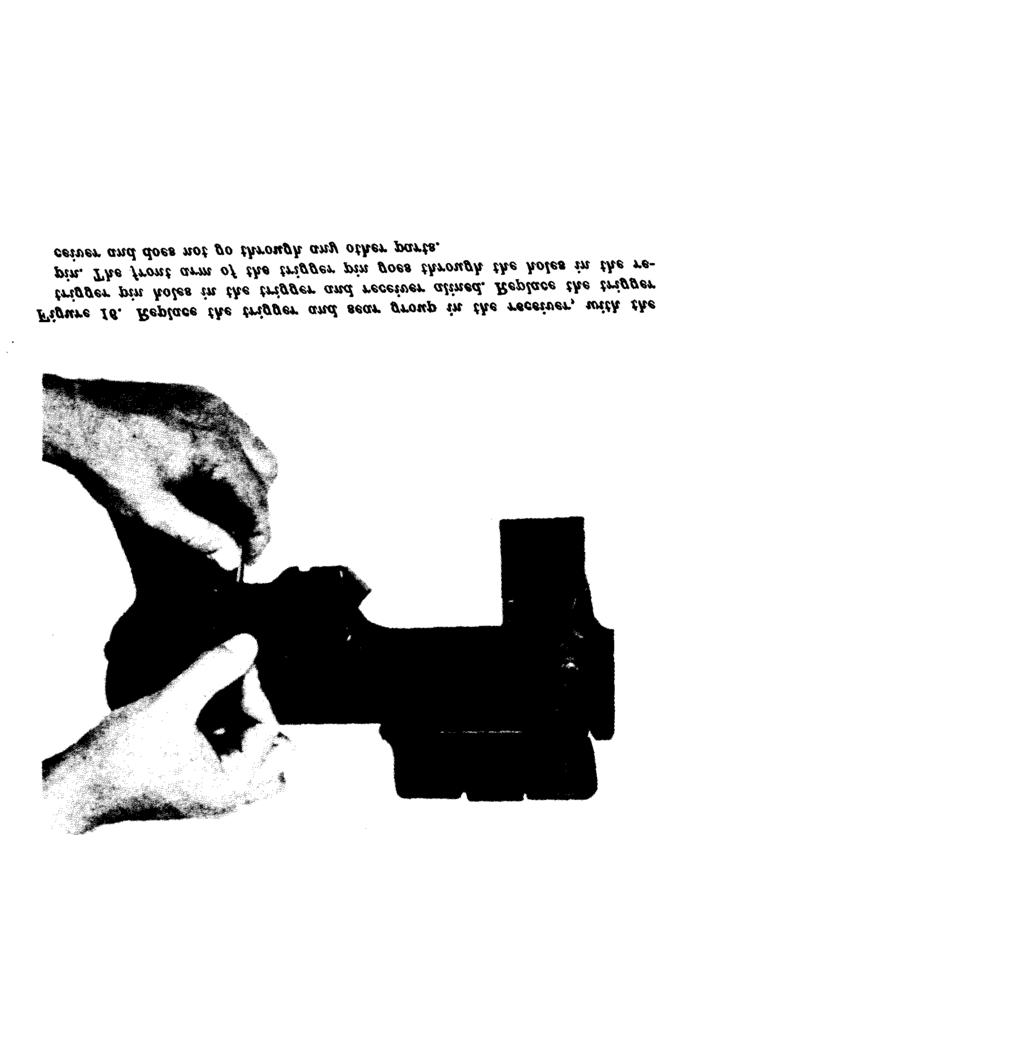
10 12. Procedure for Assembly After Field Disassembly. a. The first steps in assembling the submachinegun are illustrated in figures 16 and 17. b. Replace the bolt and guide rod group into the receiver with the retaining plate to the rear and the sear notch down. Close the cover. Depress the barrel ratchet, and replace the barrel by screwing the barrel collar all the way down until it is snug against the receiver. Replace the magazine catch assembly. Place the front projection on the housing assembly into its recess in the magazine guide. Press the rear end of the housing into place; make certain that it is properly seated. Insert the forward end of the trigger guard in its slot in the housing assembly, and rotate it to the rear (fig 18). Do not use force in this operation. Press the rear end of the trigger guard until it snaps into its slot in the pistol grip. Press in on the stock catch, and replace the stock
11 18
12 19
.")
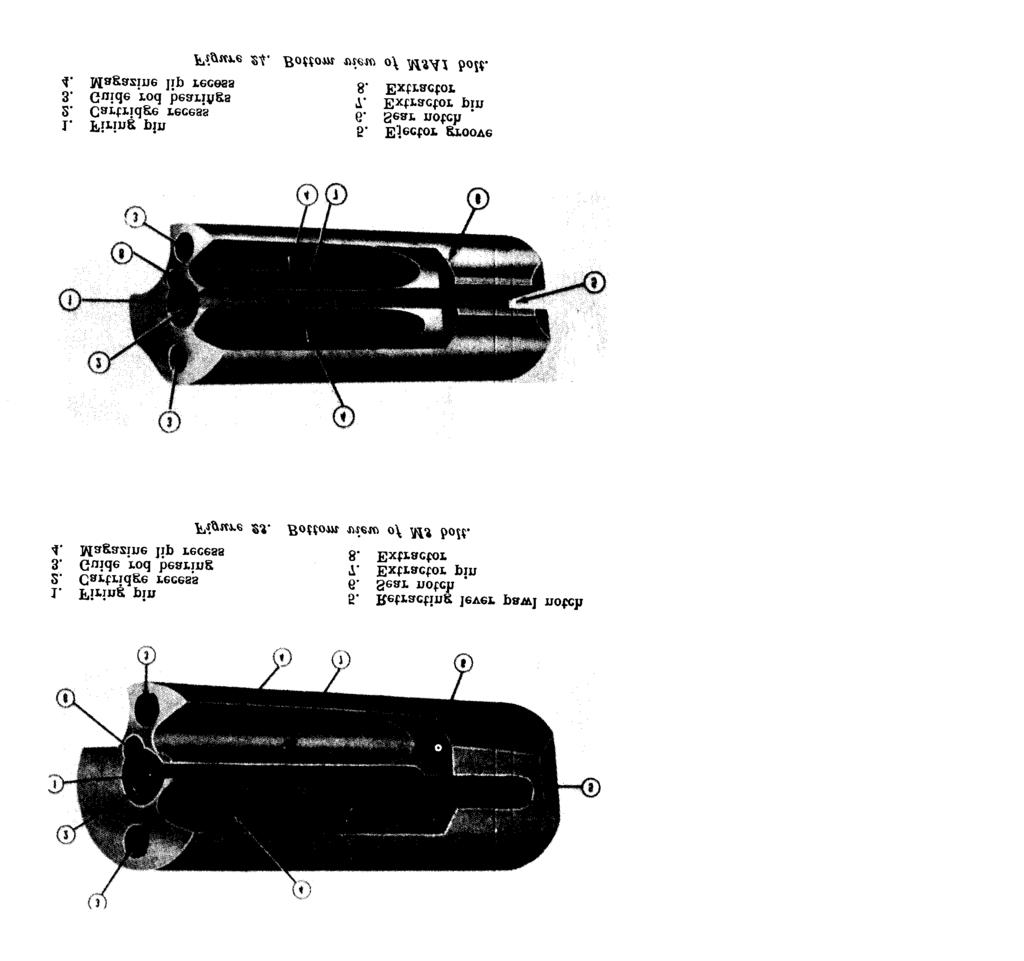
13 13. Disassembly of Groups (Detailed Disassembly). a. Magazine (fig 19). Lift the tab in the base plate by inserting a screwdriver in the hole. Remove the base plate, placing the fingers over the bottom of the magazine to prevent the magazine spring from flying out. Remove the magazine spring and the magazine follower. b. Bolt and Guide Rod Group (fig 20 thru 24). Compress the driving springs, and remove the guide rod retaining clip. Remove the guide rod locating plate. Remove the bolt and driving springs from the guide rods. Do not remove the guide rod retaining plate from the two guide rods (this is done by ordnance personnel only). The extractor is removed for replacement only (this should be done by the unit armorer). To remove the extractor, drift out the extractor pin (from the small end, located on the bottom of the bolt). Place the rim of a dummy cartridge under the lip of the extractor, and lift it out. c. Trigger and Sear Group (fig 25). Drift out the connector pin. Remove the sear. Unfasten the trigger spring from the connector (do not remove it from the trigger). 20
14 21
15 22
16 23
17 24

18 14. Assembly of the Groups. a. Magazine. Replace the magazine follower and the magazine spring, with the loop toward the front of the magazine. Compress the magazine spring into the magazine body, and replace the magazine base. Press the tab back into its original position. b. Bolt and Guide Rod Group. Replace the extractor so that the notch and hole for the extractor pin in the bolt are alined. Firmly seat the extractor pin, and stake it in place. Place the driving springs on the guide rods. Compress the driving springs, and place the bolt on the guide rods with the firing pin away from the guide rods retaining plate. Replace the guide rod locating plate and the guide rod retaining clip. c. Trigger and Sear Group. Fasten the trigger spring to the connector. Place the sear on the connector, with the sear nose up and to the rear. Replace the connector pin. 15. Operation Check. After the weapon has been assembled, it should be checked to insure that it has been correctly assembled. 25
19 a. Pull the bolt to the rear sharply. It should be engaged and held to the rear by the sear. b. Close the cover, and squeeze the trigger. The bolt should not move forward. c. Open the cover, and squeeze the trigger. The bolt should move forward. d. With the trigger held to the rear, pull the bolt to the rear and release it. The bolt should not be held to the rear by the sear, but should move forward. Section II. HOW THE SUBMACHINEGUN FUNCTIONS 16. General. a. By disassembling and assembling the submachinegun, the soldier becomes familiar with the parts. The next step is to learn how these parts function. If the soldier understands how the submachinegun works, he will be able to keep it in operating condition and reduce any stoppage which might occur during firing. This knowledge will give the soldier confidence in his weapon. b. Each time a cartridge is fired, the parts inside the submachinegun function in a given order. This is known as the cycle of operation (functioning). c. The cycle of operation of small arms is broken down into eight basic steps. However, in the subrnachinegun, two of these steps locking and unlocking do not occur. The 6 basic steps of the cycle of operation of the submachinegun are listed below in the proper sequence, although more than 1 step may occur at the same time. (1) Feeding the placing of a cartridge in the receiver, in front of the bolt, so it can be chambered. This action takes place in the magazine only. (2) Chambering moving the cartridge forward until it is properly seated in the chamber. (3) Firing the striking of the primer of the cartridge by the firing pin to ignite the cartridge. (4) Extracting-removal of the empty cartridge case from the chamber. (5) Ejecting removal of the empty cartridge case from the receiver. (6) Cocking retraction of the bolt far enough so that it 26

20 will pick up a new cartridge and, as it moves forward, will have enough energy to fire the new cartridge. 17. Functioning of the Submachinegun, General. As the bolt is moved back to a cocked position, the driving springs are compressed, and the ear engages the sear notch of the bolt. When the trigger is pressed, the sear releases the bolt, which is driven forward by the driving springs. During this forward movement, the bolt pushes a cartridge from the magazine into the chamber. The bolt continues forward and fires the cartridge. When the cartridge is fired, the chamber pressure forces the bullet out of the muzzle of the barrel. At the same time, this pressure overcomes the forward movement of the bolt and starts it to the rear. By the time the bolt and empty cartridge case have moved to the rear far enough to open the rear end of the chamber, the bullet has left the barrel, and the chamber pressure has decreased. (In the submachinegun, the chamber pressure is relatively low and the bolt is relatively heavy; this eliminates the need for the steps of locking and unlocking. ) During the rearward movement of the bolt, the empty cartridge case is extracted and ejected, the driving springs are compressed, and the top round in the magazine moves up against the lips of the magazine (fig 26). The rearward movement of the bolt is stopped by the compressed driving springs or when it contacts the guide rod retaining plate. 27
21 18. Operation of the Trigger and Sear Group. a. When the trigger is pressed, it rotates around the rear arm of the trigger pin and forces the connector forward. This rotates the sear from the sear notch in the bottom of the bolt. This allows the bolt to move forward under the action of the expanding driving springs. b. If the trigger is held to the rear, the nose of the sear cannot engage the sear notch. The bolt will continue to move forward and backward, firing the weapon automatically until the trigger is released. c. If the trigger is released, the nose of the sear engages in the sear notch in the bottom of the bolt, and holds the bolt in its rearward or cocked position. The trigger spring furnishes the spring action to the sear. The front arm of the trigger pin is a stop for the sear and prevents it from rotating forward when it engages the bolt. 19. Feeding. a. When a loaded magazine is placed in the weapon, the magazine catch holds the magazine in position. The top cartridge is held against the lips of the magazine through the action of the magazine spring and follower. When the bolt moves forward, it removes the round from the magazine. b. When the bolt moves to the rear and clears the top of the magazine, the next cartridge is placed against the lips of the magazine by the action of the magazine spring and follower. 20. Cambering. The bolt, moving forward under the action of the expanding driving springs, pushes the top cartridge out of the magazine. The lips of the magazine aid to aline the cartridge with the chamber. As the bolt continues forward, the cartridge is pushed into the chamber by the front of the bolt and the extractor. The base of the cartridge protrudes slightly from the chamber when the cartridge is fully seated. 21. Firing. After the cartridge is chambered, the bolt continues to move forward. The extractor springs out to the side and snaps into the extracting groove of the cartridge. At the same time, the fixed firing pin in the center of the cartridge recess of the bolt strikes the primer of the cartridge, firing the cartridge. At the instant of firing, the cartridge is inclosed in the chamber by the cartridge 28
22 recess of the bolt, and the rim of the cartridge is engaged by the extractor. 22. Extracting. a. When the cartridge is fired, the gas pressure forces the bullet out of the muzzle and the empty cartridge case out of the chamber, pushing the bolt to the rear. The extractor holds the base of the cartridge case against the bolt. The bolt continues moving to the rear, carrying the empty cartridge case with it. Extraction is completed when the front of the cartridge case clears the rear of the chamber. b. If the cartridge is not fired, the extractor will remove it from the chamber when the bolt is manually pulled to the rear. 23. Ejecting. As the bolt moves to the rear, the empty cartridge case is held by the extractor. The base of the cartridge strikes the fixed ejector. The extractor serves as a pivot point for the cartridge, which is deflected out of the ejection opening of the receiver. The extractor and ejector are both needed to complete the ejection. 24. Cocking. As the bolt moves to the rear, the driving springs are compressed. If the trigger has been released, the nose of the sear will move up. As the bolt moves forward, the sear nose will engage in the sear notch and hold the bolt to the rear in a cocked position. If the trigger has not been released, the bolt will continue forward and the cycle of operation will be repeated. Caution. If the gun is accidentally dropped, the bolt may be jarred far enough to the rear to clear the top cartridge in the magazine, but not far enough for the sear nose to engage in the sear notch. When this happens, the bolt will chamber and fire the cartridge as it goes forward. 25. Operation of the Housing Assembiy. a. On the M3, when the retracting handle is pulled to the rear, the retracting lever pawl rises into the pawl notch in the bottom of the bolt. As the retracting handle is moved farther to the rear, the retracting lever pawl pushes the bolt to the rear until the bolt is engaged by the sear and held in a cocked position. b. On the M3A1, the firer retracts the bolt with his finger. The retracting mechanism has been eliminated. 29
23 26. Operation of Safety Lock. a. When the bolt is forward and the cover is closed, the safety lock on the cover engages in the safety lock recess in the bolt. This prevents movement of the bolt. b. When the bolt is to the rear and the cover is closed, the safety lock enters the cocking slot of the M3A1 bolt, or the notch on the front top portion of the M3 bolt, forces the bolt back off the sear, and holds it to the rear. Closing the cover is called locking the piece. Section III. OPERATION 27. General. Before firing the submachinegun, the firer must know how to fill the magazine; must know how to load, fire, and unload the weapon; and must observe safety precautions. These points are covered in this section. 28. To Fill Magazine. a. Place the magazine loader on top of the magazine, then place the base of the magazine on a firm surface. Push down on the loader to depress the magazine follower. Insert a cartridge, base first, into the magazine. Lift the loader, and push the cartridge all the way into the magazine. Push down on the loader, depressing the cartridge and magazine follower. Repeat the operation (fig 27) until the magazine is full. b. To use the stock as the hand loader (fig 28), place the butt of the stock over the magazine and use the same procedure as with the magazine loader. 29. To Load Submachinegun. To load the submachinegun, pull the bolt sharply to the rear (cock), close the cover (lock), insert the magazine, and push it upward until the magazine catch clicks into the magazine notch (load). 30. To Fire Submachinegun. a. To fire the gun, raise the cover and manipulate the trigger. b. The gun has no mechanism for semiautomatic fire. However, it is possible to fire single shots by proper manipulation of the trigger, pressing it and then quickly releasing it. It takes practice for a firer to become proficient at firing single shots. 30
. d.")
24 c. When firing long bursts, the weapon has a tendency to move to the right. The firer can control this tendency by always taking a correct firing position (para 69). d. When the magazine has been emptied, the bolt will close on the empty chamber. Cock and lock the weapon before inserting another loaded magazine. 31

25 32
26 31. To Unload Submachinegun (Clearing). Remove the magazine, and raise the cover. If the bolt is forward, pull it to the rear. Inspect the chamber (look and feel). Press the trigger and allow the bolt to go forward, then close the cover. 32. Safety Precautions, General. Safety cannot be overemphasized. The submachinegun has no mechanical means of locking the trigger. The insertion of a loaded magazine loads the gun. If the cover is open and the bolt cocked, pressure on the trigger will fire the gun. If an unlocked gun is dropped, it may fire whether the bolt is cocked or not. The safety precautions to observe in handling the submachinegun are: a. Never consider the weapon to be safe unless it has been properly cleared. b. Never playfully or carelessly point the weapon at anyone. c. Load the weapon only when ready to fire. d. Unlock the loaded weapon only when it is raised for firing. e. Never leave any obstruction in the muzzle or bore. Section IV. MALFUNCTIONS, STOPPAGES, AND IMMEDIATE ACTION 33. General. A malfunction is a failure of the weapon to function satisfactorily. A stoppage is any unintentional interruption in the cycle of operation. If the submachinegun stops firing through no fault or intention of the firer, or an attempt to fire is made and the weapon does not fire, then a stoppage has occurred. The firer must be able to reduce a stoppage and continue firing. In combat, lives and the success of a mission may depend on the soldier s ability to reduce a stoppage quickly and continue to deliver accurate fire. Immediate action is the prompt action taken by the firer to reduce a stoppage. 34. Malfunctions. a. Failure To Function Freely. Sluggish operation of the gun is usually due to excessive friction caused by dirt, lack of proper lubrication, burred or bent guide rods, or a dent in the receiver. b. Uncontrolled Automatic Fire (Runaway Gun). Uncontrolled automatic fire is fire that continues after the trigger has been released. This may be caused by the following:
27 (1) A worn sear nose. (2) A worn sear notch on the bolt. (3) A weak or broken trigger spring. In case of uncontrolled automatic fire, keep the gun pointed at the target and press the magazine catch to release the magazine. 35. Stoppages. a. Stoppages are classified in accordance with the six steps in the cycle of operation of the submachinegun (para 16 c ). Stoppages are usually the result of worn parts or improper care of the gun. A knowledge of how the gun functions enables the soldier to classify and correct the stoppage. Listed below are the classes of stoppages which might occur. (1) Failure to feed. The top cartridge in the magazine is not positioned up and in front of the bolt. Most stoppages of the submachinegun are failures to feed caused by a defective or dirty magazine. (2) Failure to chamber. The top cartridge from the magazine is not seated in the chamber. (3) Failure to fire. The cartridge is chambered but does not fire. (4) Failure to extract. If the cartridge fires, the chamber pressure will usually push the empty cartridge case out of the chamber. If the cartridge case is not completely removed from the chamber and the bolt is retracted, then there is a failure to extract. This stoppage seldom occurs. (5) Failure to eject. The empty cartridge case is not ejected from the receiver. (6) Failure to cock. If the bolt is retracted and is not held by the sear, or if, during firing, the bolt does not move to the rear far enough to clear the top cartridge in the magazine, the gun has a failure to cock. b. Common Stoppages. The two most common stoppages are: (1) Failure to feed usually caused by a defective magazine, (2) Failure to fire-usually caused by defective ammunition. c. Causes of Stoppages. The following chart lists common causes of various stoppages. 34
28 d. Prevention of Stoppages. Periodic inspection and proper care and cleaning will reduce the possibility of the submachinegun having a stoppage. 36. Immediate Action. a. As the first step in reducing a stoppage, remove the magazine, retract the bolt, and inspect the chamber to insure that it does not contain a live cartridge, or any other obstruction. If there is no obstruction, close the cover, replace the magazine, open the cover, and attempt to fire. If the gun still does not fire, check to see whether a live cartridge has chambered; if it has not, remove the magazine and insert a new magazine. b. If there is a live cartridge or other obstruction lodged in the chamber, cock the gun and hold the cover down firmly; remove the barrel; then clear the chamber by using the stock to push the obstruction out of the barrel. Under combat conditions, when time is short, omit the step of removing the barrel. Section V. CARE AND CLEANING 37. General. The submachinegun will function under conditions that would cause some automatic weapons to fail. However, its continued 35
29 dependability and accuracy depend on its receiving proper care and cleaning. The chamber and bore, receiver, and moving parts must be kept clean and very lightly oiled. The same care must be given the magazines. 38. Cleaning, Materials, Lubricants, and Rust Preventives. a. Cleaning Materials. (1) Cleaning compound, solvent (rifle bore cleaner), is used to clean the bore and the face of the bolt after firing. It dissolves corrosive primer salts and removes primer fouling, powder ash, and carbon. This cleaner has preservative properties and provides temporary protection against rust. Caution. Rifle bore cleaner is usable at temperatures of minus 20 Fahrenheit and higher. When it is below that temperature, it must be thawed and shaken well before it is used. Do not mix water with rifle bore cleaner. This destroys its preservative qualities and impairs its value as a cleaner. (2) Hot or cold water may be used to clean the bore when rifle-bore cleaner is not available. Hot, soapy water is preferable. One-quarter pound of soap dissolved in 1 gallon of water makes a desirable solution. After using the solution, dry the barrel thoroughly and apply a thin coat of oil. (3) Volatile mineral spirits paint thinner and drycleaning solvent are noncorrosive solvents used for removing grease, oil, or light rust-preventive compounds from weapons. Apply them with rags to large parts, and use them as a bath for small parts. Caution. These solvents are highly flammable. Do not smoke when using them. Continuous contact with them will dry the skin and may cause irritation. (4) Decontaminating agents are used under special conditions to remove chemical agents (para 45). b. Lubricants. (1) Medium preservative lubricating oil is a highly refined, nonhardening mineral oil containing a rust-inhibiting additive. It forms a relatively heavy film that resists direct action of salt spray. This makes it useful for coating all parts of a weapon before amphibious operations. It should be used in preference to special preservative lubricating oil only when the weapon is exposed to salt water, high humidity, or high temperatures. This oil should not be used in temperatures below freezing. (2) Special preservative lubricating oil is a thin oil used for lubricating at normal and below-normal temperatures, and for 36
30 providing temporary protection against rust. When this oil is used, moving parts of weapons must be checked frequently to make sure that they have an adequate film of lubricant. (3) Engine oil SAE 10 may be used when preservative lubricating oils cannot be obtained. In cold weather, any heavy oil will cause sluggish operation, and may prevent the submachinegun from functioning properly. Engine oil does not have the rust-preventive properties of preservative lubricating oils. When engine oil is used, the weapon must be inspected, cleaned, and reoiled frequently. c. Rust Preventive. Medium rust-preventive compound can be used to protect the submachinegun for a long period of time when it is boxed for storage. 39. Care and Cleaning Before Firing. Before the submachinegun is fired, the following stops should be taken to make sure that it will function properly: a. Field disassemble the weapon. b. Clean the bore and chamber with a clean, dry patch. Note. Do not apply oil to bore or chamber before firing. c. Clean all parts thoroughly. d. Use a lightly oiled cloth, apply a light coat of lubricating preservative oil to all parts that do not come in contact with the ammunition. e. Assemble the weapon. f. Wipe excess oil from the receiver. g. Clean the magazines, and place a light film of oil on their outer surfaces. 40. Care and Cleaning During Firing. a. During lulls in firing, lubricate the guide rods, oil the sear pin, and trigger pin. Use the stylus of the oiler to apply oil from the oiler. b. If time permits, during a lull in firing, disassemble the submachinegun and oil the sear, sear notch, connector pin, connector rivet, and the grooves in the bottom of the bolt. 41. Care and Cleaning After Firing. The weapon must be cleaned as soon as practicable on the day of firing in the following manner: 37
31 a. Disassemble the groups. b. Clean all parts with dry, clean cloth, using rifle bore cleaner if necessary. Inspect all parts, and apply a light film of oil. c. Clean the bore and chamber, using the following procedure: (1) Saturate a patch with rifle bore cleaner, and run it back and forth through the bore. (2) Repeat the operation 2 or 3 times with clean patches saturated with bore cleaner. (3) Run dry patches through the bore until they come out dry and clean. (4) Inspect the bore for cleanliness. If it is not free of oil residue, repeat the cleaning process. If the residue cannot be removed by the use of patches, the bore brush should be used. (5) Clean the chamber with rifle bore cleaner applied to a patch on the chamber cleaning brush. (6) Dry the chamber, and inspect it for cleanliness. (7) After the bore and chamber are cleaned dry them and apply a light coat of oil. d. Assemble the weapon. e. Perform an operation check (para 15). f. Inspect periodically. 42. Care and Cleaning During Combat. a. There is no basic difference in the care and cleaning of the submachinegun during range firing and during combat. However, when the weapon is being fired each day, rifle bore cleaner may be left in the bore and chamber each night. b. To obtain the maximum efficiency from the submachinegun: (1) Before firing, carefully check the bore and chamber for obstructions. (2) Keep the bore and chamber free from oil and dirt when firing. (3) Never leave a patch, plug, or other obstruction in the chamber or bore. Neglect of this precaution may result in serious injury. (4) Oil the guide rods frequently to insure smooth operation of the gun, (5) In emergencies, when the prescribed lubricants are not available, use any clean light mineral oil such as engine oil. 38
32 43. Preparation for Storage. Medium preservative lubricating oil is the most suitable oil for short-term protection. It is effective for storage over periods of 2 to 6 weeks, depending on climatic conditions. However, submachineguns in short-terms storage must be inspected every 4 or 5 days and reoiled if necessary. For longer periods of storage, submachineguns are protected with medium rust-preventive compound. This compound is a semisolid material. It will preserve the weapon for a period of approximately 1 year, depending on climatic and storage conditions. a. The weapon must be cleaned and prepared for storage with great care. The bore, receiver, and other parts of the gun should be thoroughly cleaned and completely dried with rags. In damp climates, particular care must be taken to see that the rags are dry. After a metal part is dried, it should not be touched with bare hands. All metal parts should then be coated with either medium preservative lubricating oil or medium rust-preventive compound, depending on the length of storage required. The best way to apply rust-preventive compound to the bore and chamber is to dip a clean bore brush into the compound and then run it through the bore 2 or 3 times. When the weapon is placed in storage, the bolt should be in the forward position. b. Guns should be stored in wooden packing boxes which are provided with wooden supports for the stocks and muzzles of the guns. These supports should be coated with medium rust-preventive compound. Guns should be handled with oily rags while being placed in storage. Under no circumstances should a submachinegun be placed in storage in a cloth or other cover, or with a plug in the bore; this will cause the weapon to rust. The sling should be removed from the weapon and wrapped in oil paper coated with medium rust-preventive compound. 44. Cleaning Weapons Received From Storage. Submachineguns removed from storage will be coated with either preservative lubricating oil or rust-preventive compound. Weapons received from ordnance storage will usually be coated with rust-preventive compound. Use drycleaning solvent or volatile mineral spirits paint thinner to remove the compound or oil. Failure to thoroughly clean the driving spring recesses in the bolt may cause a malfunction or stoppage at below normal temperatures, since the rust-preventive compound will congeal during cold weather. After using solvent, dry all parts by wiping them with a dry cloth, Then apply a thin film of special preservative lubricating oil. 39
33 45. Care and Cleaning in Connection With a CBR Attack. a. If a chemical, biological, or radiological attack is anticipated, the following action is taken: Apply oil to all outer metal surf aces of the submachinegun and accessories. Do not apply oil to ammunition. If the weapon is not to be used, cover the weapon, accessories, and ammunition with protective coverings and place them under natural cover. Ammunition should be kept in its containers as long as possible. b. After a CBR attack, determine by means of detectors whether or not the equipment is contaminated. A complete suit of protective clothing, including protective gloves and a gas mask, must be worn during decontamination. If the contamination is too great, it may be necessary to discard the equipment. Detailed information on decontamination is contained in FM and TM Care and Cleaning Under Unusual Climatic Conditions. a. Cold Climates. It is necessary that the moving parts will solidify and cause sluggish operation or complete failure. (1) Before firing in temperatures below 0 Fahrenheit, disassemble the gun and clean all parts of the gun and magazine thoroughly. Oil them very lightly by rubbing them with a cloth dipped in special preservative lubricating oil. Leave the bore and chamber free of oil. (2) When the gun is brought indoors, allow it to come to room temperature; then disassemble it, wipe it completely dry of any moisture, clean it, and oil it lightly with special preservative lubricating oil. (3) If the gun has been fired, the bore should be immediately swabbed out with an oily patch. When the weapon reaches room temperature, clean and oil it as prescribed in paragraph 41. b. Tropical Climates. Where temperature and humidity are high, or during rainy seasons, thoroughly inspect the weapon daily and keep it lightly oiled when not in use. Remove the groups at regular intervals and, if necessary, disassemble them for cleaning, drying, and oiling. Be careful to see that all unexposed parts, as well as exposed surfaces, are kept clean and oiled with special or medium preservative lubricating oil. c. Hot, Dry Climates. (1) In hot, dry climates, where sand and dust are likely to get into the mechanisms and bore, the weapon should clean daily, or oftener if necessary. Groups should be bled to insure thorough cleaning. 40 be wiped disassem-
34 (2) When the weapon is used under sandy conditions, lubricants should be wiped from exposed and noncritical operating surfaces. This will prevent sand or dust from sticking to the lubricants and forming an abrasive which can damage the moving parts. (2) When the weapon is used under sandy conditions, lubricants should be wiped from exposed and noncritical operating surfaces. This will prevent sand or dust from sticking to the lubricants and forming an abrasive which can damage the moving parts. (3) Immediately after use in sandy terrain, the weapon should be cleaned and lubricated with special preservative lubricating oil. (4) During sand or dust storms, the gun should be kept covered. It should be cleaned immediately after the storm. Section VI. REPAIR PARTS AND ACCESSORIES 47. Repair Parts. a. The parts of any submachinegun may in time become unserviceable through breakage or wear resulting from usage. For this reason, extra parts are provided for replacement of parts most likely to fail. Sets of repair parts must be kept complete at all times; when a part is used, it should be replaced in the set as soon as possible. Repair parts are kept clean and lightly oiled to prevent rust. Parts must always be ready for immediate use. b. Extra 30-round magazine are also issued with the gun. The number of magazines issued per gun, and the allowance of repair parts, are prescribed in appropriate supply publications. 48. Accessories. Accessories include the tools required to disassemble and assemble the submachinegun, cleaning and preserving materials, sling, repair parts envelope, oiler, flash hider, magazine loader, and similar items. They must be used for no other purpose than that for which they are intended. Section VII. AMMUNITION 49. General. a. The soldier armed with the submachinegun must be familiar with the types of ammunition used in the weapon, ways of identifying each type of ammunition, and how to care for, handle, and use it
35 b. A complete round of submachinegun ammunition consists of all the components necessary to fire the weapon once. The components are a cartridge case, bullet, propellant powder, and primer. 50. Classification of Ammunition. Contents of original ammunition boxes or containers can be identified by markings on the box. These markings indicate the number of cartridges in the container, caliber, type, code symbol, and lot number. Types, uses, and means of identification of ammunition used in submachinegun are: a. Cartridge, Caliber.45, Ball, M1911, Used against personnel and light materiel targets. The ball bullet consists of a metal jacket surrounding a lead alloy core. The bullet tip is unpainted. b. Cartridge, Caliber.45, Blank, M9. Used to simulate fire and for salutes. This cartridge can be fired single shot only. It can be identified by the absence of a bullet and by its tapered mouth. c. Cartridge, Caliber.45, Dummy, M1931. Used for training personnel in the operation of loading and unloading the submachinegun, and for testing weapons. This cartridge can be identified by the empty primer pocket and two holes in the cartridge case. d. Cartridge, Caliber.45, Tracer, M26. Used for observation of fire. Secondary uses are for incendiary effect and for signaling. The bullet consists of three parts: a copper-plated or gliding metal-clad steel jacket, a slug of lead hardened with antimony, and a tracer mixture in the rear portion of the jacket. The bullet is painted red for a distance of approximately inch from the tip. e. Cartridge, Cailiber.45, High Density Shot, XM261. Used against personnel. It employs 16 spheres encased in a sabot similar in shape to the ball bullet. 51. Ammunition Lot Number. Ammunition is assigned a lot number at the time of manufacture. It is marked on all packing containers and entered on all records pertaining to that ammunition. It must be included in all reports on condition and functioning of the ammunition and all reports of accidents in which the ammunition is involved. Therefore, it is important to retain the lot number with the cartridges after they are removed from their original containers. If cartridges 42
36 cannot be identified by ammunition lot number they are automatically placed in grade 3. Grade 3 ammunition is unserviceable and will not be fired, but will be turned to the ammunition supply point. 52. Care, Handling, and Preservation of Ammunition. a. Small arms ammunition is generally safe to handle, However, do not allow ammunition boxes to become broken or damaged. Repair broken boxes immediately. Transfer original markings to the new parts of the box. b. Do not open ammunition boxes until the ammunition is used. Ammunition removed from airtight containers, particularly in damp climates, is likely to corrode and become unserviceable. c. Use care when opening wooden ammunition boxes; they can be continued in use as long as they are serviceable. d. Protect ammunition from mud, sand, dirt, and water. If it appears wet or dirty, wipe clean with a dry cloth immediately. Wipe off light corrosion as soon as it is discovered. Cartridges with a heavy coat of corrosion must be turned in to the ammunition supply point. e. Do not oil or polish cartridges. f. Do not expose ammunition to direct rays of the sun for any length of time. If the powder is heated, excessive pressure will be developed when the weapon is fired. This condition will affect accuracy and operation of the weapon. g. Do not attempt to fire cartridges that have dents, scratches, loose bullets, or corroded cases. If a cartridge is defective, turn it in. Do not throw away or attempt to destroy defective ammunition. h. Do not strike the primer of a cartridge; it may ignite the cartridge and cause injury. 53. Storage of Ammunition. a. Small arms ammunition is not an explosive hazard; however, under poor storage conditions it may become a fire hazard. b. Small arms ammunition should be stored away from all sources of extreme heat. c. Whenever practicable small arms ammunition should be stored under cover. If necessary to leave ammunition in the open, it should be placed on dunnage at least 6 inches above the ground. 43
37 It should be covered with a double thickness of tarpaulin or suitable canvas. The cover should be placed so that it gives maximum protection yet allows free circulation of air. Suitable trenches should be dug to prevent water from flowing under the ammunition. 54. Precautions in Firing Ammunition. Precautions concerning the firing and handling of ammunition in the field prescribed in AR , TM , and TM must be observed. Precautions particularly applicable to small arms ammunition include the following: a. No small arms ammunition will be fired until it has been positively identified by ammunition lot number and grade. b. Before firing, the firer must be sure that the bore of the pistol is free from any foreign matter. Firing a pistol with any obstruction in the bore will result in damage to the weapon and may cause injury to the firer. 55. Hangfire. a. A hangfire is a delay in the functioning of the propelling charge or explosive train. The amount of delay is unpredictable, but in most cases will be from a fraction of a second to several seconds. Thus, a hangfire cannot immediately be distinguished from a misfire. There is a danger in immediately assuming that a failure to fire is a misfire when in fact it is a hangfire. For this reason, always wait 5 seconds before pulling the bolt to the rear after a failure to fire. Caution. During this time, keep the submachinegun pointed at the target. b. Use of ammunition in any lot that has experienced a hangfire is suspended and a report given to the ammunition supply point. The ammunition in the affected lot will be turned in and replaced with serviceable ammunition. 44
CHAPTER 2 MAINTENANCE
 CHAPTER 2 MAINTENANCE This chapter addresses the proper care of the machine gun to ensure its overall effectiveness and efficient functioning. The information includes the gunner's knowledge in disassembly
2-1. CLEARING PROCEDURES
 CHAPTER 2 MAINTENANCE Proper maintenance contributes to weapon effectiveness as well as unit readiness. This chapter discusses the maintenance aspects of the M249 AR to include inspection; cleaning and
OPERATION AND FUNCTIONING
 C1, FM 23-65 * CHAPTER 3 OPERATION AND FUNCTIONING This chapter explains the operation of the MG. It discusses the loading, unloading, and clearing procedures, and the cycle of functioning of the weapon.
AR STYLE FIREARMS OWNER'S MANUAL: OPERATION, HANDLING, DISASSEMBLY / REASSEMBLY & SAFETY INSTRUCTIONS
 AR STYLE FIREARMS OWNER'S MANUAL: OPERATION, HANDLING, DISASSEMBLY / REASSEMBLY & SAFETY INSTRUCTIONS - DO NOT DISCARD THIS MANUAL - READ THIS MANUAL CAREFULLY, PAYING CLOSE ATTENTION TO THE INSTRUCTIONS
Figure 2-1. SAFE ( S ) position.
 position.") CHAPTER 2 OPERATION AND FUNCTION This chapter includes clearing, disassembly and assembly, loading, operating precautions, and cycle of operation. 2-1. CLEARING Clear the MK 19 differently in a firing
CHAPTER 2 OPERATION AND FUNCTION This chapter includes clearing, disassembly and assembly, loading, operating precautions, and cycle of operation. 2-1. CLEARING Clear the MK 19 differently in a firing
CHAPTER 1. DESCRIPTION AND COMPONENTS This chapter describes the weapon and the types of ammunition in detail and provides a table of general data.
 CHAPTER 1 DESCRIPTION AND COMPONENTS This chapter describes the weapon and the types of ammunition in detail and provides a table of general data. 1-1. DESCRIPTION The M249 AR is a gas-operated, air-cooled,
PISTOL CALIBER AR STYLE FIREARMS
 PISTOL CALIBER AR STYLE FIREARMS OWNER'S MANUAL: OPERATION, HANDLING, DISASSEMBLY / REASSEMBLY & SAFETY INSTRUCTIONS - DO NOT DISCARD THIS MANUAL - READ THIS MANUAL CAREFULLY, PAYING CLOSE ATTENTION TO
INSTRUCTION MANUAL CZ 92
 INSTRUCTION MANUAL CZ 92 Before handling the pistol read this manual carefully and observe the following safety instructions. Improper and careless handling of the pistol could result in unintentional
OPERATION AND FUNCTION
 CHAPTER 3 OPERATION AND FUNCTION This chapter discusses the operation of the M249 automatic rifle. This includes loading, unloading, cycle of functioning, adjusting the sight, and using the bipod. 3-1.
INTRODUCTION TO THE SERVICE RIFLE AND MAINTENANCE
 INTRODUCTION TO THE SERVICE RIFLE AND MAINTENANCE 1 OVERVIEW DISASSEMBLY MAINTENANCE ASSEMBLY 2 TERMINAL LEARNING OBJECTIVE Given a service rifle, Common Combat Sling, and cleaning gear maintain a service
CZ 40 P - INSTRUCTION MANUAL
 Before handling the pistol read this manual carefully and observe the following safety instructions. Improper and careless handling of the pistol could result in unintentional discharge and could cause
OPERATOR S MANUAL FOR AR-24 SERIES PISTOLS
 OPERATOR S MANUAL FOR AR-24 SERIES PISTOLS ArmaLite Incorporated Box 299 Geneseo Illinois U.S.A. 61254 309-944-6939 ArmaLite.com 2006 ArmaLite Inc. This book provides instructions on the operation and
STRIBOG GRAND POWER. The INSTRUCTIONS FOR USE, MAINTENANCE AND SAFETY. 1
 instructions The for use, maintenance STRIBOG and safety hestribog GRAND POWER INSTRUCTIONS FOR USE, MAINTENANCE AND SAFETY www.grandpower.eu 1 The STRIBOG Dear Customer, Thank you for purchasing a semi-automatic
SAR-15 RIFLE OWNERS MANUAL
 SAR-15 RIFLE OWNERS MANUAL SIONICS WEAPON SYSTEMS Our mission is to manufacture quality firearms made with pride in the USA. We are able to do accomplish this by using only the best American made parts.
INSTRUCTION MANUAL CZ 75 TS
 INSTRUCTION MANUAL CZ 75 TS CZ 75 TS - INSTRUCTION MANUAL Before handling the pistol read this manual carefully and observe the following safety instructions. Improper and careless handling of the pistol
INSTRUCTION MANUAL CZ 750
 INSTRUCTION MANUAL CZ 750 Before handling the firearm read this manual carefully and observe the following safety instructions. Improper and careless handling of the firearm could result in unintentional
AR /.223, 300 BLK, 22 Nosler,.224 Valkyrie. Covers. and. rifle models INSTRUCTION MANUAL
 AR-15 5.56/.223, 300 BLK, 22 Nosler,.224 Valkyrie Covers TM, TM and, TM rifle models INSTRUCTION MANUAL WARNING: BEFORE USING THIS FIREARM, READ AND FOLLOW THESE INSTRUCTIONS Safety First Thank you for
COLT AUTOMATIC PISTOL
 COLT AUTOMATIC PISTOL CALIBER.22 INSTRUCTIONS FOR ASSEMBLY - DISASSEMBLY CLEANING COLT AIUTOMATIC PISTOL IN 6 INCH OR 4}~2 INCH BARREL.22 Long Rifle, rim fire Cartridge Capacity of Magazine, 10 Shots Description
INSTRUCTION MANUAL CZ 75 Champion
 INSTRUCTION MANUAL CZ 75 Champion CZ 75 CHAMPION - INSTRUCTION MANUAL Before handling the pistol read this manual carefully and observe the following safety instructions. Improper and careless handling
OWNER S MANUAL. Read the instructions and warnings in this manual carefully before using this firearm; do not discard this manual.
 OWNER S MANUAL SDP compact Read the instructions and warnings in this manual carefully before using this firearm; do not discard this manual. This instruction manual should always accompany this firearm
Instruction manual CZ 75
 Instruction manual CZ 75 Before handling the pistol read this manual carefully and observe the following safety instructions. Improper and careless handling of the pistol could result in unintentional
REC7 DI OPERATOR S MANUAL
 EC7 D REC7 DI OPERATOR S MANUAL TABLE OF CONTENTS 2 2 4 5 6 6 6 8 8 10 11 12 12 13 13 15 18 20 22 USE OF THIS MANUAL SAFETY GUIDELINES WARRANTY AND SERVICE NOTES FUNCTIONS AND FEATURES BREAK IN PROCEDURE
M16 R / M1600 R USER S MANUAL WARNING: READ THE INSTRUCTIONS AND SAFETY PRECAUTIONS IN THIS MANUAL CAREFULLY BEFORE USING THIS FIREARM.
 ARMSCOR M16 R / M1600 R USER S MANUAL WARNING: READ THE INSTRUCTIONS AND SAFETY PRECAUTIONS IN THIS MANUAL CAREFULLY BEFORE USING THIS FIREARM. DISCHARGING FIREARMS IN POOLY VENTILATED AREAS, CLEANING
ODEL 95 OPERATOR S MANUAL
 ODEL 95 MODEL 95 OPERATOR S MANUAL TABLE OF CONTENTS 2 2 3 5 6 6 6 7 7 8 8 11 11 12 12 19 20 22 24 26 MANUFACTURER S DISCLAIMER USE OF THE MANUAL SAFETY GUIDELINES WARRANTY AND SERVICE DESCRIPTION OF FIREARM
Cleaning rod: spring steel, stainless steel or carbon fibre cleaning rod - only use a one-piece rod. Avoid using snakes.
 Telemark Biathlon Where performance and precision come together http://telemarkbiathlon.com Rifle Cleaning Date : July 19, 2013 Anschutz Rifle Manual - Click Here Izhmash 7-3 Rifle Manual - still looking
VR1 Owner s Manual. Vigilance Rifles, Inc Plum Lane Redlands, CA P F
 VR1 Owner s Manual Vigilance Rifles, Inc. 1653 Plum Lane Redlands, CA 92374 P 909.307.8877 F 909.307.8866 www.vigilancerifles.com INTRODUCTION: Vigilance Rifles offers a new line of Semi-Automatic Rifles
FM 23-5 U. S. RIFLE, CALIBER.30, M1 BASIC FIELD MANUAL WAR DEPARTMENT. U.S ARMY MILITARY HISTORY ilntiut CARLISLE BARRACKS, PA W00O
 FM 23-5 WAR DEPARTMENT BASIC FIELD MANUAL U. S. RIFLE, CALIBER.30, M1 U.S ARMY MILITARY HISTORY ilntiut CARLISLE BARRACKS, PA 17013-W00O FM 23-5 *C 1 BASIC FIELD MANUAL U. S. RIFLE, CALIBER.30, M1 CHANGES
AR15/ BCA 10 RIFLE OWNER S MANUAL
 AR15/ BCA 10 RIFLE OWNER S MANUAL THIS IS NOT A SAFETY MANUAL. IF YOU NEED ASSISTANCE WITH THE SAFE HANDLING OF THIS, OR ANY FIREARM, PLEASE CONTACT A CERTIFIED FIREARMS INSTRUCTOR OR SCHOOL. Fundamental
MODEL 1400 E USER S MANUAL WARNING: READ THE INSTRUCTIONS AND SAFETY PRECAUTIONS IN THIS MANUAL CAREFULLY BEFORE USING THIS FIREARM.
 ARMSCOR MODEL 1400 E USER S MANUAL WARNING: READ THE INSTRUCTIONS AND SAFETY PRECAUTIONS IN THIS MANUAL CAREFULLY BEFORE USING THIS FIREARM. DISCHARGING FIREARMS IN POORLY VENTILATED AREAS, CLEANING FIREARMS
Be sure the cam pin is installed in the bolt group. If it isn t, your rifle can still fire and will explode causing injury.
 Responsibility This manual provides instructions on the operation and maintenance of the Barrett model M468 rifle. Read and understand it carefully before you try to use your rifle. Your safety, and that
Chapter 11 Small Arms Weapons
 Review Questions Chapter 11 Small Arms Weapons 1. On an M16 rifle, where is the magazine release button located? 1. Right side of the weapon, top front of the trigger guard 2. Right side of the weapon,
Barrel Assembly. Field Stripping
 WARNINGS: Carry out safety check before handling the weapon. The weapon is heavily oiled for shipping. Clean and lubricate before firing. These procedures given apply only to the US Ordnance QCB version.
NATIONAL PARK SERVICE MANUAL FOR THE HANDLING AND FIRING OF U.S. M1911 and M1911A1 Colt Automatic Pistol,.45 A.C.P. Caliber IN INTERPRETIVE
 NATIONAL PARK SERVICE MANUAL FOR THE HANDLING AND FIRING OF U.S. M1911 and M1911A1 Colt Automatic Pistol,.45 A.C.P. Caliber IN INTERPRETIVE DEMONSTRATIONS 1 PREFACE This manual sets forth the procedures
OWNER S MANUAL FOR OA SERIES FIREARMS
 OWNER S MANUAL FOR OA SERIES FIREARMS 620-626 Old Pacific Hwy SE Olympia, WA 98513 (360) 459-7940 WARNING To avoid accidental firing, BE SURE WEAPON IS CLEAR. Failure to do so could result in serious injury
AR-15 Rifle Operator Maintenance
 AR-15 Rifle Operator Maintenance These procedures cover how to Clean, Inspect and Lubricate the AR15 Rifle NOTICE: This is not a replacement for the manufacturer s manual. If you do not have the owners
Thank you for buying Bushmaster
 AZ 16010 Before disassembling, loading, or using this firearm, please Read, Understand, and Follow all the instructions in this manual, regarding proper handling and safe use!! Caution: If unfamiliar with
UNITED STATES MARINE CORPS WEAPONS TRAINING BATTALION MARINE CORPS COMBAT DEVELOPMENT COMMAND QUANTICO, VIRGINIA INSTRUCTOR GUIDE
 UNITED STATES MARINE CORPS WEAPONS TRAINING BATTALION MARINE CORPS COMBAT DEVELOPMENT COMMAND QUANTICO, VIRGINIA 22134-5040 INSTRUCTOR GUIDE CORRECTIVE ACTION WITH A SERVICE RIFLE 0300-M16-1003 0300-M16-1017
SERVICE RIFLE AND PISTOL AND MARKSMANSHIP
 CHAPTER 3 SERVICE RIFLE AND PISTOL AND MARKSMANSHIP As a Seabee, you make important contributions to the Naval Construction Force (NCF) activities. You are important as an individual as well as a Seabee.
NOTICE FEATURES BACKGROUND
 ,/ NOTICE Claims will not be honored for damage, injury or, death resulting from the intentional or accidental discharge of this firearm, or from it's function when used for purposes or subjected to treatment
Armed Officer's Training Manual Nomenclature and Inspection
 Armed Officer's Training Manual Section 8: Nomenclature and Inspection Learning Goal: The student will know the components and understand the operation of the service revolver and semi-automatic pistol.
CHAPTER 1 US ARMY HANDGUNS
 CHAPTER 1 US ARMY HANDGUNS 1-1. PISTOL, SEMIAUTOMATIC, 9-MM, M9 The M9 pistol is a 9-mm semiautomatic, magazinefed, recoil-operated, double-action weapon chambered for the 9-mm cartridge. The magazine
BFG-50A RIFLE OPERATOR S MANUAL WARNING! READ THIS MANUAL CAREFULLY BEFORE USING THIS FIREARM
 BFG-50A RIFLE OPERATOR S MANUAL WARNING! READ THIS MANUAL CAREFULLY BEFORE USING THIS FIREARM CONTENTS SAFETY...3 Safety Alert Symbol and Signal Words...3 TECHNICAL DATA...6 IDENTIFICATION...7 Model and
ARAK-21 OPERATOR SAFETY AND INSTRUCTION MANUAL
 ARAK-21 OPERATOR SAFETY AND INSTRUCTION MANUAL NOTICE: The ARAK-21 Upper Assembly itself is not considered a Firearm under federal law or the National Firearms Act. The ARAK-21 Upper Assembly mounted on
BROWNING AUTOMATIC RIFLE, CALIBER.30, M1918A2 WITH BIPOD
 FM 23-15 WAR DEPARTMENT BASIC FIELD MANUAL BROWNING AUTOMATIC RIFLE, CALIBER.30, M1918A2 WITH BIPOD L -~~~~~~~~~~~~~~~~~~~~~~~~ FM 23-15 BASIC FIELD MANUAL BROWNING AUTOMATIC RIFLE CALIBER.30, M1918A2
Disassembly, Assembly, and Cleaning of M16A4/M4
 Table of Contents iii Disassembly, Assembly, and Cleaning of M16A4/M4 By: George Carter Chris Talbott Jeremy Tinker Table of Contents Introduction... vii Disassembly... 3 Clearing the Magazine... 3 Retaining
CLEANING HANDGUNS TOOLS YOU WILL NEED
 CLEANING HANDGUNS CLEANING HANDGUNS If you take pride in your firearm, then you know how important it is to properly maintain your weapon. With good, consistent care, you not only make your gun look good
INSTRUCTION MANUAL CZ 452/453
 INSTRUCTION MANUAL CZ 452/453 Before handling the firearm read this manual carefully and observe the following safety instructions. Improper and careless handling of the firearm could result in unintentional
Before handling the pistol read this manual carefully and observe the following safety instructions. CONTENTS
 Before handling the pistol read this manual carefully and observe the following safety instructions. Improper and careless handling of the pistol could result in unintentional discharge and could cause
Smallbore rifle CZ99 PRECISION..22 Long Rifle.22 Win. Mag. R.F..17 Hornnady Mag. R.F.
 Smallbore rifle CZ99 PRECISION.22 Long Rifle.22 Win. Mag. R.F..17 Hornnady Mag. R.F. Fig. 1 22. Long Rifle, Model CZ 99 PRECISION 22 Long Rifle 22 Long Rifle for Sound Moderator 22 Win. Mag. R. F. 17
Before handling the firearm read this manual carefully and observe the following safety instructions. CONTENTS
 Before handling the firearm read this manual carefully and observe the following safety instructions. Improper and careless handling of the firearm could result in accidental discharge and cause injury,
KEEP YOUR 1911 WORKING UNTIL 2111 THE DEFINITIVE GUN-CARE GUIDE
 KEEP YOUR 1911 WORKING UNTIL 2111 THE DEFINITIVE GUN-CARE GUIDE TABLE OF CONTENTS 2 3 4-5 INTRODUCTION MAINTENANCE SCHEDULE PRODUCTS 8-10 11-12 13 LUBRICATION MAGAZINE MAINTENANCE CONCLUSION 6-7 CLEANING
1. Barrel - through which bullet is given velocity and density of flight; concentrate gas to propel the bullet; mental tube of weapon.
 FUNDAMENTALS OF ARMAMENTS 1. Armament - branch of ordnance that deals with SAW, Artillery and FCI. 2. Small Arms Weapons - diameter of 30mm and below usually fir by hand, shoulder, crew-served weapons.
CETME. SPECIAL PURPOSE ASSAULT MACHINEGUN 5.56x45 DESCRIPTIVE HANDBOOK
 , CETME SPECIAL PURPOSE ASSAULT MACHINEGUN 5.56x45 DESCRIPTIVE HANDBOOK , SPECIAL PURPOSE ASSAULT MACHINEGUN 5.56x45 DESCRIPTIVE HANDBOOK Patent Pending ,. SPAM 5.56x45 INDEX I. Technical characteristics................................
P9S Automatic Pistol Caliber.45 ACP
 P9S AUTOMATIC PISTOL Caliber.45 ACP P9S Automatic Pistol Caliber.45 ACP Instruction Manual HECKLER & KOCH, INC. 2148 Pacific Boulevard Sterling, Virginia 20166-8903 U.S.A. TEL. (703) 450-1900 TELEFAX (703)
1. TABLE OF CONTENT. 9.4 Preserving Exploded drawing of K22 with components Component list of K22 model Warranty...
 1. TABLE OF CONTENT 1. Table of content...2 2. Records of firearm s owner...3 3. Basic description...5 4. Technical specifications...6 5. Serial number of pistol...7 6. Main parts of pistol...8 7. Basic
INSTRUCTION MANUAL CZ 630/631
 INSTRUCTION MANUAL CZ 630/631 Before handling the air rifle read this manual carefully and observe the following safety instructions. Improper and careless handling of the air rifle could result in unintentional
FRONT BOLT ACTION ASSAULT SHOTGUN
 SPECIFICATIONS: CATEGORY........... IMPROVISED; NOTE: CAN BE MANUFACTURED COMMERCIALLY CALIBRE............ 410 TO 12 GAUGE; ADAPTABLE CAPACITY............... 8 TO 10 ROUNDS,.410 CAL. OPERATION..........
INSTRUCTION MANUAL FOR. Models featured include: LF556, LF300, LF308, and LF6.5.
 INSTRUCTION MANUAL FOR Models featured include: LF556, LF300, LF308, and LF6.5. READ THIS MANUAL THOROUGHLY, PARTICULARLY THE WARNINGS, BEFORE USING THIS FIREARM Copyright 2016 Live Free Armory. All rights
Ed Brown Products, Inc.
 Ed Brown Products, Inc. P.O. Box 492, Perry, MO 63462 - (573)-565-3261 - FAX (573)565-2791 Internet Address: www.edbrown.com email: edbrown@edbrown.com Ed Brown 1911 Owner s Manual WARNING: YOU MUST READ
MECH-TECH SYSTEMS CCU MODEL FOR GLOCK PISTOLS
 MECH-TECH SYSTEMS CCU MODEL FOR GLOCK PISTOLS Operation & Maintenance Manual Read and understand this manual before attempting to use this product. If you have any questions call: 1-866-433-2122 www.mechtechsys.com
OWNER S MANUAL 817 BOLT ACTION .17 HMR BOLT ACTION RIFLE WITH DETACHABLE MAGAZINE. distributed by IMPORTANT SAFETY WARNINGS NOTE THE SYMBOL:
 TM OWNER S MANUAL 817 BOLT ACTION.17 HMR BOLT ACTION RIFLE WITH DETACHABLE MAGAZINE IMPORTANT SAFETY WARNINGS NOTE THE SYMBOL: THESE SAFETY WARNINGS ARE FOR YOUR PROTECTION AS WELL AS THE SAFETY OF OTHERS.
SHF R50 SHF S50 Safety Harbor Firearms, Inc. PO Box 563 Safety Harbor, FL Ph: Fax:
 SHF R50 SHF S50 Safety Harbor Firearms, Inc. PO Box 563 Safety Harbor, FL 34695-0563 Ph: 727-726-2500 Fax: 727-797-6134 www.safetyharborfirearms.com 1 ^ WARNING Risk of serious injury or death. Failure
-
 Operator s manual SM-95202 Brügger & Thomet AG P.O. Box 42 3608 Thun Switzerland Fon +41 33 334 67 00 Fax +41 33 334 67 01 info@brugger-thomet.ch www.brugger-thomet.ch TABLE OF CONTENTS SAFETY instructions
INSTRUCTION MANUAL CZ 550 Medium, Magnum
 INSTRUCTION MANUAL CZ 550 Medium, Magnum Before handling the firearm read this manual carefully and observe the following safety instructions. Improper and careless handling of the firearm could result
TABLE OF CONTENTS READ FIRST
 TABLE OF CONTENTS READ FIRST PAGE INTRODUCTION............................. 1 NOTICES.................................. 1 WARNINGS................................ 2 PRECAUTIONS WHEN USING THIS FIREARM......
SAFETY RULES WARNING: READ THESE SAFETY RULES & OPERATORS MANUAL BEFORE HANDLING YOUR FIREARM
 SAFETY RULES WARNING: READ THESE SAFETY RULES & OPERATORS MANUAL BEFORE HANDLING YOUR FIREARM Never point a firearm at anyone and always keep the muzzle pointed in a safe direction. Always treat all firearms
TABLE of CONTENTS. Safety 4. Introduction 6. Description 6. Storage 6. Components 7. Unloading and Inspection 8. Disassembly 10. Care and Cleaning 12
 1911 Pistol Manual 2 TABLE of CONTENTS Safety 4 Introduction 6 Description 6 Storage 6 Components 7 Unloading and Inspection 8 Disassembly 10 Care and Cleaning 12 Loading and Firing 13 Troubleshooting
Before handling the firearm read this manual carefully and observe the following safety instructions. CONTENTS
 Before handling the firearm read this manual carefully and observe the following safety instructions. Improper and careless handling of the firearm could result in accidental discharge and cause injury,
 (Mechanical Malfunctions) STOP SHOOTING IMMEDIATELY AND UNLOAD YOUR FIREARM if your firearm develops: a mechanical malfunction; binding or stoppage; spitting powder/gas; a punctured cartridge primer; a
trigger magazine release
 Made in Germany www.umarexusa.com slide gas vent hammer barrel bushing recoil spring plug slide stop trigger safety trigger guard magazine release grip Government 1911 A1 S Cal. 9 mm P.A.K. (Blank Firing)
ENR Enterprises, LLC. ENR 15 Manual
 ENR Enterprises, LLC ENR 15 Manual Table of Contents Disclaimer of Liability 2 Warnings: Dangerous Procedures 3 General Safety Warnings 4 Main Features and Overview 6 Rifle Clearing Before Use 7 Safety
Defender Series Owner s Manual
 4904 Hwy 98/PO Box 67 Comer, GA 30629 (866) 803-0000 Fax (706-783-5800) Defender Series Owner s Manual MPA1SST & MPA20SST/DMG Carbines MPA10T & MPA10SST Pistols MPA30T & MPA30SST/DMG Pistols When you purchased
AR-15 CLEANING PROCEDURE. By: Joshua Blackwell, Eunice Perez-Rios, and Taylor Westfall
 AR-15 CLEANING PROCEDURE By: Joshua Blackwell, Eunice Perez-Rios, and Taylor Westfall Table of Contents iii Table of Contents... iii Introduction... v Disassembly... 3 Cleaning and Lubricating Your Rifle...
M mm Semiautomatic Rifle
 M4-5.56 mm Semiautomatic Rifle What is the FM concerning the M4 Rifle? FM 3-22.9 What is the first thing you should do when you handle a weapon? Make sure you clear it Name the five phases in Basic Rifle
TECHNICAL MANUAL OPERATOR S MANUAL, CARTRIDGE, 40-MM: TACTICAL CS, M651 (NSN )
") TM 3-1310-243-10 TECHNICAL MANUAL OPERATOR S MANUAL, CARTRIDGE, 40-MM: TACTICAL CS, M651 (NSN 1310-00-849-2083) HEADQUARTERS, DEPARTMENT OF THE ARMY JANUARY 1975 WARNING Observe all the safety precautions
TM 3-1310-243-10 TECHNICAL MANUAL OPERATOR S MANUAL, CARTRIDGE, 40-MM: TACTICAL CS, M651 (NSN 1310-00-849-2083) HEADQUARTERS, DEPARTMENT OF THE ARMY JANUARY 1975 WARNING Observe all the safety precautions
M1 Garand Operation and Maintenance Guide for Veteran and Civilian Service Organizations, Law Enforcement, and National Cemeteries
 M1 Garand Operation and Maintenance Guide for Veteran and Civilian Service Organizations, Law Enforcement, and National Cemeteries 12 December 2012 Prepared by Armament Research, Development, and Engineering
TM WARNING SUMMARY
 TM 9-005-239-0 WARNING SUMMARY Treat every firearm as if it were loaded. Never accept or take over a firearm from another until you have checked personally to see that it is unloaded or in a completely
CZ52 Detail Strip, Disassembly, and Assembly Instructions Lonestar Fabrication & Design
 CZ52 Detail Strip, Disassembly, and Assembly Instructions 2008 Lonestar Fabrication & Design These instructions may be freely distributed and copied providing this page is included, and providing they
Before handling the firearm read this manual carefully and observe the following safety instructions. CONTENTS
 Before handling the firearm read this manual carefully and observe the following safety instructions. Improper and careless handling of the firearm could result in accidental discharge and cause injury,
If you do not understand any of the material in this manual or have any questions, contact Mossberg International directly or a qualified gunsmith.
 TM OWNER S MANUAL 817 BOLT ACTION.17 HMR BOLT ACTION RIFLE WITH DETACHABLE MAGAZINE IMPORTANT SAFETY WARNINGS NOTE THE SYMBOL: THESE SAFETY WARNINGS ARE FOR YOUR PROTECTION AS WELL AS THE SAFETY OF OTHERS.
OPERATION AND SAFETY MANUAL
 OPERATION AND SAFETY MANUAL Anderson Manufacturing Models AM-10 and AM-15 Weapons All Available Calibers WARNING: BEFORE USING THIS FIREARM, READ AND FOLLOW THESE INSTRUCTIONS 1743 Anderson Blvd. Hebron,
5.56 mm Rifle T223. General Description and Data Operating Instructions. Service upon receipt of materiel. 5 III Operation under usual conditions
 POMM 9-1005-279-12 June 1965 TABLE OF CONTENTS Chapter l Introduction 5.56 mm Rifle T223 Paragraphs Page 1 Section I Chapter 2 II General Description and Data Operating Instructions 1,2 1 3-5 2 4 Section
Ultra 87 Pump Action Shotgun Instruction Manual
 Ultra 87 Pump Action Shotgun Instruction Manual Congratulations on your purchase of the Ultra 87 shotgun. With proper care and handling it will give you long, reliable service. It is important that you
INSTRUCTION MANUAL. Slavia 630/631
 INSTRUCTION MANUAL Slavia 630/631 Before handling the air rifle read this manual carefully and observe the following safety instructions. Improper and careless handling of the air rifle could result in
slide takedown lever magazine release
 Made in Germany www.umarexusa.com manual safety extractor slide gas vent hammer trigger lock trigger P22 S guide rod takedown lever slide stop magazine release Cal. 9 mm P.A.K. (Blank Firing) OPERATING
AUTOLOADING HUNTING RIFLE version VEPR-1V cal..223 Rem CERTIFICATE ВПО-125 ПС
 AUTOLOADING HUNTING RIFLE version VEPR-1V cal..223 Rem CERTIFICATE ВПО-125 ПС 2 The certificate contains description of the autoloading hunting rifle version "VEPR-1V in.223 Rem caliber (conventional name
USER MANUAL Tisas Pistols
 USER MANUAL Tisas Pistols ZiG M45 (.45 ACP Single Action) ZiG PC1911 (.45 ACP Single Action) ZiG PCS1911 (.45 ACP Single Action) ZiG PCS9 (9 x19 Single Action) Zenith Firearms Come Shoot the Quality WARNING
AK63D SEMI-AUTO RIFLE
 Owner s Manual AK63D SEMI-AUTO RIFLE Cal. 7.62X39MM Congratulations on your purchase of the AK63D Semi-Auto Rifle. With proper care and handling, it will give you long, reliable service. The AK63D is a
Production Date of prod. Manufacturer number
 Brno Czech Republic Production number Date of prod. Manufacturer 2 Pos. Item name Part no. Pos. Item name Part no. 1 Magazine 5 1207.0001 47 Tripping lever 1207.0140 2 Rod 1207.0002 48 Seat - assembly
M1600 SEMI-AUTOMATIC RIFLE USER S MANUAL WARNING: READ THE INSTRUCTIONS AND SAFETY PRECAUTIONS IN THIS MANUAL CAREFULLY BEFORE USING THE FIREARM.
 M1600 SEMI-AUTOMATIC RIFLE USER S MANUAL WARNING: READ THE INSTRUCTIONS AND SAFETY PRECAUTIONS IN THIS MANUAL CAREFULLY BEFORE USING THE FIREARM. SEPTEMBER 2016 ROCK ISLAND ARMORY USER S MANUAL M1600 SEMI-AUTOMATIC
INSTRUCTION MANUAL. CZ 858 Tactical
 INSTRUCTION MANUAL CZ 858 Tactical Before handling the firearm read this manual carefully and observe the following safety instructions. Improper and careless handling of the firearm could result in unintentional
Kentucky Long Rifle.50 BMG Model: BA M-N-M Tactical. Users Guide
 Kentucky Long Rifle.50 BMG Model: BA M-N-M Tactical Users Guide Metals-N-More Bowling Green, KY 42101 Telephone 270-781-3642 Fax 270-781-3766 Email Info@Kentucky50.Com www.kentucky50.com INTRODUCTION Congratulations
CONTENTS INTRODUCTION. WARNING: This manual contains important warnings that must be understood before using this firearm.
 CONTENTS Safety Rules...............................Page 2 Operation................................Page 5 Major Components.........................Page 6 Assembly.................................Page
NATIONAL ARMORY LLC Manufacturing Division 1315 SW 1 st Court Pompano Beach Florida NATIONAL ARMORY LLC.
 U NATIONAL ARMORY LLC Manufacturing Division NATIONAL ARMORY LLC. WARNING BEAR AR15 Read and understand this manual before using this firearm or any firearm as your life depends on it. Make sure to follow
BARREL MANUAL & WARRANTY
 BARREL MANUAL & WARRANTY Congratulations on the purchase of your PROOF Research barrel. At PROOF Research we re committed everything else on the market and instill lifelong devotion in our customers. Please
PAP M85 NP SEMI-AUTO PISTOL
 Owner s Manual PAP M85 NP SEMI-AUTO PISTOL Cal. 5.56X45MM (.223) Congratulations on your purchase of the PAP M85 NP Semi-Auto Pistol. With proper care and handling, it will give you long, reliable service.
Montana Firearms Group Montana Rifle Company Model 1999 INSTRUCTION MANUAL
 Montana Firearms Group Montana Rifle Company Model 1999 INSTRUCTION MANUAL Important Instructions for Model 1999 Montana Action Bolt Rifle Receiver Montana Rifle Company 3172 MT Hwy 35 Kalispell, MT 59901
RAD MRAD BREECH CONVERSION KIT INSTRUCTIONS
 RAD MRAD BREECH CONVERSION KIT INSTRUCTIONS TABLE OF CONTENTS 2 2 4 5 5 6 USE OF THIS MANUAL SAFETY GUIDELINES WARRANTY AND SERVICE CONTENTS PURPOSE OF BREECH CONVERSION KIT INSTRUCTIONS BREECH CONVERSION
N-PAP & O-PAP M70 DF SEMI-AUTO RIFLES
 Owner s Manual N-PAP & O-PAP M70 DF SEMI-AUTO RIFLES Cal. 7.62X39MM Congratulations on your purchase of the PAP M70 DF Semi-Auto Rifle. With proper care and handling, it will give you long, reliable service.