German. Infantry Motorized Infantry Armored Infantry Bicycle Ost Infantry Medical Engineer Bicycle Engineer
|
|
|
- Clementine Bennett
- 6 years ago
- Views:
Transcription
1 VERSION 2.0
 Company HQ Regiment HQ Battalion HQ Horse Drawn Wheeled Units Opel Blitz Citroën 23 Citroën 45 Renault AGR Renault AHN Fiat SPA 38R Fiat 626 Bianchi Miles Matford F917-WS Schwimmwagen Typ")
2 Symbol and Picture Legend German Leg Units Infantry Motorized Infantry Armored Infantry Bicycle Ost Infantry Medical Engineer Bicycle Engineer Motorized Engineer Armored Engineer Sniper Nachhut (platoon) Company HQ Regiment HQ Battalion HQ Horse Drawn Wheeled Units Opel Blitz Citroën 23 Citroën 45 Renault AGR Renault AHN Fiat SPA 38R Fiat 626 Bianchi Miles Matford F917-WS Schwimmwagen Typ 166 Kfz 1 VW Typ 82 Kubelwagen Sd.Kfz 221 Sd.Kfz 222 Sd.Kfz 231/8 rad Sd.Kfz 233/8 rad Sd.Kfz 234/2 Puma Tracked Units Sd.Kfz 251/1 Sd.Kfz 251/1 II Sd.Kfz 251/7 Sd.Kfz 251/9 Sd.Kfz 251/10 Sd.Kfz 250/1 Sd.Kfz 250/4 Sd.Kfz 250/5 Sd.Kfz 250/7 Sd.Kfz 250/9 SPW S307(f) Pionier SPW S307(f) 7.5 cm Pak 40 L/46 SPW S304(f) SPW U304(f)-2cm Flak Ausf. SPW S307(f) Panzerwerfer Ausf. SWS 8cm Reihenwerfer Ausf. S307(f) Sd.Kfz 10/4 Sd.Kfz 10/5 Sd.Kfz 7/1 2cm Flakvierling 38 Sd.Kfz 7/2 Sd.Kfz 10 Sd.Kfz 7 Sd.Kfz 8 Sd.Kfz 9 FAMO Sd.Kfz 11 Zkw 304(f) Zkw S307(f) Pz.Kpfw IV Ausf. C Pz.Kpfw IV Ausf. D Pz.Kpfw IV Ausf. G Pz.Kpfw IV Ausf. H Flakpanzer IV Möbelwagen Hummel Jagdpanzer IV StuG III Ausf. G Marder III Ausf. M Flakpanzer 38(t) Ausf. M
 15cm sfh13/1 (Sf) Ausf. LrS(f) Marder I 10.5cm LeFH 18(Sf) Ausf. 39H(f) 7.5cm PaK 40 auf 39H(f) Pz.")


 Para RG (platoon) Wheeled")

3 Symbol and Picture Legend sig 38(t) Grille Ausf. H LeFH 18/2 Wespe 10.5cm LeFH 18(Sf) Ausf. LrS(f) 15cm sfh13/1 (Sf) Ausf. LrS(f) Marder I 10.5cm LeFH 18(Sf) Ausf. 39H(f) 7.5cm PaK 40 auf 39H(f) Pz.Kpfw VI Tiger Ausf. E Pz.Kpfw V Panther Ausf. G Gun Units Flak Towed Flak AT Gun Towed AT Gun Mortar Towed Infantry Gun Medium Howitzer Towed Howitzer Towed Artillery Towed Nebelwerfer Howitzer in open field emplacements Howitzer under casemates (partially completed) Field Guns under casemates Howitzer under casemates Howitzer in open prepared emplacements Field Guns in open field positions Gun Number Legend Western Allied Leg Units Infantry Heavy Weapons Engineer Armored Infantry Parachute Infantry Glider Infantry Airborne Engineer Commandos Bicycle Commandos Rearguard (platoon) Para RG (platoon) Wheeled Units Bedford QL 4x2 3 Ton AEC Matador 4x4 Tractor Morris Quad Scammell TRMU Willys jeep Staghound T17 E1 Humber Mk IV 6x4 Gun Tractor Tracked Units Bren Carrier MkII Wasp Flame Carrier Armored Bulldozer White Halftrack M5A1 Tetrarch Stuart Mk III Stuart Mk V Sherman Mk II Sherman Mk III Sherman DD (Skirts Lowered) Sherman DD (Skirts Raised) Sherman VC Firefly


4 Symbol and Picture Legend Sherman Crab Churchill AVRE Centaur Mk IV Cromwell Mk IV Sexton MkII M12 155mm M10 Achilles M10 Wolverine M10 Naval Units Revenge Class Battleship Dido Class Cruiser C Class Destroyer Landing Craft LC, Support LC, Rocket Gun Units Mortar Bicycle Mortar Light Artillery Medium Artillery Heavy Artillery Light AT Gun Medium AT Gun Heavy AT Gun Other Units Bailey Bridge Spitfire Mk IX Bf 109 G Artilleriefährprahm Type C Flakship Bunker The 79th Armoured Division Originally, the 79th Armoured Division was to be displayed in various types of spendable points instead of actual companies. Because of this, Niko drew several of the vehicles and even though I changed how the 79th works, here are the various types of Funnies in the 79th Armoured Division. Churchill AVRE Churchill AVRE Bobbin Churchill AVRE Fascine Churchill AVRE Small Box Girder Churchill ARK Churchill AVRE Bullshorn Plough Churchill Double Onion Sherman V Crab
5 The Greatest Day Table of Contents Components Series Rules Changes Night and Weather Night Weather Terrain In-Hex Features Hexside Features Roads and Railroads Bridges Rubble Ferries (Optional) Paradrops and Glider Landings When to Drop Where to Drop Stragglers Dinghies The Naval Invasion System NIS Definitions & Descriptions German Defense of the Beach Overlay Effects of an Uncleared Beach; Clearing a Beach; and Removing the Beach Overlay Assault Forces The Landing Subroutine The Mulberry The Naval Sequence of Play (NSoP) NIS Procedures Roadblocks and Rearguards (Sperren and Nachhuten) Random Events Events Piggyback Mode Starting in Piggyback Mode Exiting Piggyback Mode Restrictions on Piggyback Mode Piggyback Mode and Combat Special Historical Events Variable Troop Quality Land Mines Mine Placement Effect of Mines Removing Mines Deployment Limits Divisional Trucks/Jeeps Independent Formation Attachment Auto-Command Units Abandoned Transport German Special Rules German Phone Lines German Named Heroes Bocage German Tank Recovery Allied Special Rules Allied Air Power Night Turn Restrictions on the Commonwealth Army Royal Marine Commandos Allied Named Heroes th Armoured Division th Armoured Division Brigade Composition C Squadron/Inns of Court Assault during the Night Turn of 0700 June Bibliography...46 Credits Headquarters Drive, Suite 8, Millersville, MD
6 This landing is but the opening phase of the campaign in Western Europe. Great battles lie ahead. I call upon all who love freedom to stand with us. Keep your faith staunch our arms are resolute together we shall achieve victory. General Dwight D. Eisenhower Components Series Rulebook Summary and Flow Chart Booklet Exclusive Rulebook Scenario Book Fifteen Player Aid Cards Turn Record Chart and Weather Table Two Identical Combat Result Tables Two Identical Terrain Effects Charts Four 22" by 34" Map Sheets (3 of which are back-printed) Eight 8½" by 11" Map Sheets Sixteen 5/8" Counter Sheets Four ten sided dice (2 x white, 1 x red, 1 x blue) Map Errata On the Nemesis scenario map and should be Strongpoints. There are two hex numbers. The southern one should be hex Hex should not have a white outline; it is a Marsh hex. Grand Tactical Series Rules Version Series Rules Changes There have been a few changes in GTS since The Devil s Cauldron, Where Eagles Dare and No Question of Surrender. The major changes apply to the Artillery, Assault and Activation systems. There are some other small things as well but you won t feel out of place in the GTS world if you learn these. The updated GTS Series Rules 2.0 should be used with this, and future, games. Welcome to the The Greatest Day: Sword, Juno, and Gold sidebar. Here you ll read game rules examples and explanations, designer s notes, historical comments and player s hints. You can tell which is which by the color of the box in which the text is written. Rules and text examples are in gray. Boxes in red indicates those are for Designer s notes. Boxes in green indicates player s tips and hints on play. Lastly, historical notes and commentary are printed in blue. First off, to introduce those that are contributing here: Adam Starkweather has been designing and developing wargames for the last 12 years and designed both GTS and The Greatest Day. Mike Curtis is a retired Fire Chief and is now working as an analyst. Mike was a major playtester for the game. Bill Speer works as a game designer on projects that range topically from the Civil War to World War Two. Bill was also a major playtester for the game. Vincent Lefavrais is a Normandy native librarian. Vincent was the Axis researcher for the game. David Hoskins is an IT manager and was the primary Allied researcher for the game Multi Man Publishing, Inc.

7 The Greatest Day Exclusive Rules The following are the exclusive rules for use with The Greatest Day: Sword, Juno, and Gold Beaches game. This is the first in a series of three games on all of the D-Day landings at company level, covering the first 8 days. The next game in the series will be The Greatest Day: Utah Beach, which will cover the landings at that beach as well as the 101st and 82nd Airborne Division operations. Lastly, we will publish The Greatest Day: Omaha Beach. This game will cover that famous beach and the advance inland, as well as providing linking rules for all three games. 1.0 Night and Weather 1.1 Night The night turn begins the turn after the 2100 turn in this game. There is no movement penalty for night anymore. The maximum Line of Sight distance at Night is 3 hexes (if both storm and night, 2 hexes). All Combat Strengths are reduced by 2 at night (reduced by 3 if both night and storm). All 6th Airborne Division and all 12.SS-Panzer-Division Units gain a +3 benefit on their Assault values (only) during night. Thus, combined with the night reduction, the Assault value of these units is net +1 at night. 1.2 Weather Only the weather states of Clear, Overcast and Storm can occur on the Weather table. Once determined, the weather stays the same for the entire day. Here is a summary of each of the weather states influence in the game: Clear: no changes; 18 Fighter Bombers are available to the Allied Player (see 17.1) Overcast: Like clear except that only 10 Fighter-Bombers are available to the Allied Player (see 17.1) Storm: Maximum Line of Sight distance is 4 hexes (if night and storm, it is reduced to 2 hexes). All movement costs for Units not in Column are doubled; there is no effect on Units in Column. The Allied Player does not receive any Fighter-Bombers for the day (see 17.1). All Fire ratings are reduced by 2 (if both Storm and Night they are reduced by 3) 2.0 Terrain There are two basic types of terrain in The Greatest Day: Sword, Juno, and Gold Beaches; in-hex terrain and hex-side terrain features. Note that some values have changed from earlier games in the system. The Terrain Effects Chart included with the game has all movement costs as well as other aspects of specific terrain listed. 2.1 In-Hex Features In-hex terrain is described in full below. Each in-hex type is defined by the color of the dot in the center of the hex (and for Woods, City and Fortified hexes, the color of the hexsides). For example, if a hex has a green center dot, then it is a woods hex. White hex vertices have often been added to make Woods hexes a bit easier to see. Some hexes contain water features that have no effect. In other hexes, the water features do have an effect, and this is indicated by an impassable portion (gray) in the hex. Play note: The map was drawn for realism so the terrain in certain hexes may not be obvious but the hex dot defines the type of terrain even if that particular type of terrain isn t the prominent type displayed in the hex. As an example of how Units move into hexes with rivers, they can move from to However, Units cannot move from to since the Unit would have to go over a grayed out portion of a hex. If the players are unable to agree on movement between other hexes they should roll a die or just ask me and I accept bribes. You will all notice the rather odd placement of the HMS Rodney in a sea of 7th Armoured Division Units. We found out late in the design after the counters have been made, that the B/11 Hussars didn t join the battle during the time frame of the game. So I had one spot that we didn t need. Now it is months later and I m writing the historical notes for the events and remembered a great story about the HMS Rodney. I look for the counter and it WAS NOT in the game counters. Thank heaven I had an easy place to put it. Whew! Here is an example of clear terrain. This is hex You can see that there is little to influence movement or Line of Sight. Another example of clear is hex You can see very little defensive benefit here. 403 Headquarters Drive, Suite 8, Millersville, MD
8 Here are the woods in hex Just a small one hex woods. Vehicles would not be able to go through that and it would take troops on foot some time to get through. Here is an example of a village - this is the small hamlet of Maromme in hex While offering some cover, this will not inhibit vehicles dramatically. This is Meuvaines, a town in hex More cover than in a village and difficult for vehicles to deploy. 8 The in-hex terrain types are as follows: Clear (2.1.1) Woods (2.1.2) Brushwoods (2.1.3) Village (2.1.4) Town (2.1.5) City (2.1.6) Fortified (2.1.7) Marsh (2.1.8) Beach (2.1.9) Hedgerow (2.1.10) Hills (2.1.11) Impassable (2.1.12) Clear Clear terrain has a white dot in the center of its hex and represents ground in which there is little or no cover. It is not blocking terrain and it does not modify the Fire Rating of Units firing into the hex Woods Woods terrain has a green dot in the center of its hex and represents ground in which there is extensive forest cover. We added white hex vertices to the woods hexes to make woods easier to see. Wheeled and Tracked Units cannot enter or exit a woods hex unless they are in Column and traveling along a Road (in which case they pay the Road movement cost). Woods are Blocking Terrain, and modify the Fire Rating of Units firing into the hex by -2. This modifier is ignored if the Fire Rating of the firing Unit is black, brown, orange, green or yellow. A Wheeled or Tracked Unit in a Woods hex may not leave Column Brushwoods A Brushwoods hex is treated just as a Woods hex in all respects and has the same green dot in its hex. The distinction is provided for historical interest only. Use the matrix for woods for effects Village Village terrain has a light brown dot in the center of its hex and represents a small number of buildings that would provide limited cover. Villages are not Blocking Terrain and modify the Fire Rating of Units firing into the hex at Unarmored Units by Town Town terrain has a brown dot in the center of its hex and represents significantly more buildings that provide cover and limit fields of fire. Towns are Blocking Terrain. A Town hex modifies the Fire Rating of Units firing into it by -2 against Unarmored targets and -1 against Armored targets. Wheeled and Tracked Units cannot enter or leave a Town hex unless in Column but they may exit Column in a Town hex. Note that to leave the hex, such Units will have to reenter Column City City terrain has a black dot in the center of its hex and represents many buildings, often constructed of concrete, that provide excellent cover and greatly limit fields of fire. City hexes also have a white border around their hexes to see them more easily. Cities are Blocking Terrain and modify the Fire Rating of Units firing into them by -3 against Unarmored targets and -2 against Armored targets. City hexes may be rubbled (see 2.5). Wheeled and Tracked Units cannot enter a City hex unless in Column and a Wheeled or Tracked Unit in a City hex may never leave Column Fortified Fortified terrain has the same symbol as a City hex but has a gray border around the hex in addition to the city symbol. Fortified hexes represent strong concrete buildings that offer great cover. Fortified hexes are Blocking Terrain and modify the Fire Rating of Units firing into them by -4 against Unarmored targets and -3 against Armored targets. Fortified hexes may be rubbled (see 2.5). Wheeled and Tracked Units cannot enter a Fortified hex unless in Column and a Wheeled or Tracked Unit in a Fortified hex may not leave Column Multi Man Publishing, Inc.


9 2.1.8 Marsh Marsh terrain has a blue dot in its center and represents marshy, waterlogged terrain. Marsh is not Blocking Terrain and modifies the Fire Rating of Units firing into the hex by +1 against Unarmored targets and 0 against Armored targets. Wheeled and Tracked Units cannot enter or exit a Marsh hex unless they are in Column and traveling on a Road (hence paying the Road movement cost) and may not leave Column in a Marsh hex Beach Beach terrain has an orange dot in its center and represents sandy, open terrain but also covered with invasion obstacles. A Beach hex is not Blocking Terrain and modifies the Fire Rating of Units firing into the hex by +1 against Unarmored targets and 0 against Armored targets. Beach hexes are present only on the Beach Overlays and the area they cover. All other Beach hexes on the map are impassable terrain. When the Overlay is removed when a Beach is cleared, all Beach hexes on that Overlay are no longer passable hexes. German Units may not enter Beach hexes Hedgerow Hedgerow terrain has a yellow circle with an aqua colored dot in its center and represents dense cultivated brush that provides superior cover and fields of fire. Hedgerow is Blocking Terrain and modifies the Fire rating of Units firing into the hex by -2 against Unarmored targets and -1 against Armored targets. Units in a hedgerow may only be seen from an adjacent hex. Direct Fire attacks against Units in a Hedgerow hex may only be made from an adjacent hex. Fire Zones do not project into a Hedgerow hex unless the projecting unit is adjacent. Thus, for example, a unit in a Hedgerow cannot be subjected to Opportunity Fire unless the unit seeking to use Opportunity Fire is adjacent. Hedgerow is special stuff and allows the Germans to enter a defensive position called Bocage that is unhealthy for Allied troops nearby. This is covered in German Special Rule Artillery Parks may not be placed in Hedgerows Hills Hill terrain has a black triangle within a circle and is named Hill #. These positions offer excellent lines of sight and were like magnets to the forces during this campaign. In addition, they offered excellent height advantages. Hills are Blocking Terrain. A Hill modifies the Fire rating of a Unit firing into the hex by -1 against Unarmored targets and -2 against Armored targets. This is in addition to any in-hex or hexside terrain modifier but does not apply against Indirect Fire attacks. A Unit in a Hill hex has a maximum daylight LOS range of 13 hexes and may trace LOS and fire through 3 blocking hexes or hexsides Impassable Impassable terrain is gray and/or a hex with no dot. If an entire hex is impassable, it is entirely gray, or does not have a center circle; it cannot be entered by any Unit. If only part of a hex is impassable, the impassable portion is gray, meaning that no Unit can enter and/or leave the hex by passing over the impassable portion. An exception to this is if a Road or ferry is used to pass through impassable terrain, in which case a Unit using the Road or ferry legally can move through the impassable hex portion. Impassable hex portions are most commonly seen in hexes containing rivers. Impassable terrain has no effect on Line of Sight or fire combat. Here is Bayeux today in hex as an example of a city hex. Restricted for movement by vehicles and good cover. A special circumstance to note - if the LOS is traced exactly along a ridge or a crest hexside, the LOS is blocked. Note that this is a change from the first edition of the SJG Exclusive Rules that stated the opposite for crests. This is an excellent example of a fortified hex. This is Abbaye d Ardenne in hex Basically very similar to a city hex with additional concrete fortification. Abbaye d Ardenne is also an OP because of the commanding view it allows. 2.2 Hexside Features Hexside features are ones that have been abstracted and made to conform to a hex grid superimposed on the map. These features are considered to run across the length of the hex side if they are more than 50% the length of the side even if the symbol ends before the actual grid ends. 403 Headquarters Drive, Suite 8, Millersville, MD
 Ridges (2.2.2) Streams (2.2.3) Rivers (2.2.4) 2.2.1 Crests Crests are rises and falls in the ground large enough to block line of sight.")
10 Here is the marsh in hex A nightmare for vehicles to try and traverse and infantry would be vulnerable to fire. Here is hex viewed from , a beach hex at close to low tide. Just a few steps backward and you ll see what remains today of Wn 27. The hexside terrain types are as follows: Crests (2.2.1) Ridges (2.2.2) Streams (2.2.3) Rivers (2.2.4) Crests Crests are rises and falls in the ground large enough to block line of sight. They are most often caused by contours in the ground. If a Line of Sight crosses a Crest hexside, that Line of Sight is blocked. The only exception to this is if either the spotting Unit or the spotted Unit is adjacent to the Crest hexside and no more than one Crest hexside has been crossed when drawing a Line of Sight between the two Units. (So, yes, LOS is blocked between two non-adjacent Units, both of which are adjacent to Crest hexsides; and in that case each Crest hexside counts as blocking terrain.) A Line of Sight may not be traced along a Crest hexside. Crest hexsides have no effect on movement or fire combat (other than LOS) Ridges Ridges are sharp rises in the ground that influence movement, combat, and Line of Sight. A Ridge hexside blocks Line of Sight unless (as with Crests) the Ridge hexside is part of the firing Unit s hex or the target Unit s hex. And, as with Crests, a Line of Sight may not be traced along a Ridge hexside. The Fire Rating (but not the Assault value) of a Unit firing into a hex across a Ridge hexside is modified by -1 against an Unarmored target and -2 against an Armored target. This is in addition to any in-hex terrain modifier but applies only to Direct Fire and Opportunity Fire; it does not apply to Indirect Fire attacks. Leg Units can cross a Ridge hexside, in Column or not, by expending all of their movement allowance. They must start adjacent to the Ridge hexside and perform a Movement Action move the Leg Unit one hex over the Ridge hexside. Wheeled and Tracked Units may only cross Ridge hexsides if in column and moving along a Road. A roadblock on either side of the Ridge hexside will prevent use of the Road to cross the Ridge Streams Streams are thin blue lines that run along hexsides. A Leg Unit that enters a hex across a stream without using a road pays 2 additional movement points if the Unit is not in Column, or 1 additional movement point if the Unit is in Column. Wheeled and Tracked Units may not cross streams except when using a Road (and must of course be in Column to do so). Note that the Roads that cross streams have map graphics showing bridges, but these are not considered bridges in game terms (i.e., they are not controlled, cannot be wired, cannot be blown - except those special Inns of Court guys - see 16.8) and are treated just like Roads. Only the seven bridges that have their own counter are Bridges in game terms. The placement of Rubble markers do not block units (including Vehicle Units) from crossing cross Streams, but a Roadblock placed on either side of the Stream hexside will prevent use of the Road to cross the Stream until the Roadblock is removed Rivers Rivers are wide blue lines, and can only be crossed at bridges. If a single hex contains terrain on both sides of a river, one side will be marked as impassable, and the terrain of the other side will determine the terrain type of the overall hex. A Unit can enter such a hex providing it does not do so via a hexside portion that has impassable terrain. Rivers have no effect on Line of Sight. As an optional rule, Rivers can be crossed using Ferries (see 2.6). 2.3 Roads and Railroads Roads and railroads are special man-made features and are treated somewhat differently from other terrain. The following rules cover these various types: Roads (2.3.1) Railroads (2.3.2) Raised Roads/Railroads (2.3.3) Embankment Roads/Railroads (2.3.4) Sunken Roads/Railroads (2.3.5) Connecting Roads/Railroads (2.3.6) Multi Man Publishing, Inc.


11 2.3.1 Roads Roads allow Units in Column to move faster. Any Unit in Column that enters a hex along a road can do so for ½ movement point. The Unit can decide not to use the road and instead pay the base terrain cost, as indicated by the circle in the center of the hex. A Unit not in Column, or not entering or exiting the hex along a road, must pay the base terrain cost. Where two roads share the same hex but do not cross, a Unit must pay the base terrain cost to go from one road to the other. The roads have no effect on Line of Sight. Play note: The capitalized word Road is a defined term in these rules that includes railroads, raised roads, and so on. The uncapitalized word road means the specific terrain type that is a road Railroads Railroads allow Units in Column to move faster. Any Leg Unit in Column that enters a hex along a railroad can do so for ½ movement point. A Wheeled Unit in Column pays 2 movement points, and a Tracked Unit in Column pays 1 movement point. The Unit can decide not to use the railroad and instead pay the base terrain cost, as indicated by the circle in the center of the hex. A Unit not in Column, or not entering or exiting the hex along a railroad, must pay the base terrain cost. Where two railroads share the same hex but do not cross, a Unit must pay the base terrain cost to go from one railroad to the other. Railroads have no effect on Line of Sight Raised Roads/Railroads 2.3.3(1) Raised Roads/Railroads Generally Raised Roads/Railroads (white roads; white railroads) are elevated roads and are treated exactly the same in the rules. Note: there aren t many here in this part of Normandy. Raised Roads/ Railroads are elevated roads and railroad tracks that pose a significant hindrance to movement and also block Line of Sight (2) Restrictions on Column Movement A Unit in Column can enter a hex with a Raised Road or Railroad if there is no road block in the Raised Road/Railroad hex, and the Unit enters the Raised hex through a hexside that the Raised Road/Railroad touches. Similarly, a Unit in Column can only leave the Raised Road/Railroad hex through a hexside that the same Raised Road/Railroad touches. This means that if there are two Raised Roads/Railroads running through the same hex and they do not cross, you must remember which one the Unit is on, because it cannot jump from one to the other (3) Restrictions on Vehicle Units A Vehicle Unit cannot exit Column formation while in a Raised Road/Railroad hex. If the Vehicle Unit is forced to retreat, it must follow the Raised Road/ Railroad and if it cannot do so, it is eliminated. A Vehicle Unit suffers a terrain modifier of +2 when fired on, in addition to the +2 modifier for being in Column. If a Unit dismounts from its Organic Transport while it is on a Raised Road/ Railroad, the vehicles are lost. Place an abandoned transport Marker on the Unit after it dismounts. Note that Vehicle Units not in Column can never enter a hex with a Raised Road/Railroad (4) Restrictions on Leg Units A Leg Unit that is not in Column can enter a hex with a Raised Road/Railroad from any hexside (even if there is a road block in the hex), but it must pay double the terrain cost of the other terrain in the hex; when not in Column the Leg Unit can leave the Raised Road/Railroad hex by any hexside. If fired on when not in Column, the Leg (and immobile) Unit suffers the +2 terrain modifier for the Raised Road/Railroad, and also benefits (or suffers) from the terrain modifier of the hex s original terrain. A Leg Unit not in Column in a Raised Road/Railroad hex may get in Column for 1 movement point. A Leg Unit may get off a Raised Road/Railroad by exiting Column formation; this Hedgerow is the terrain most people think of when they think of Normandy. While the US Armies had perhaps the most difficult time with this terrain type, all Allied armies had to overcome it. Dense and often cultivated, this is hex , Chateau de Maromme. Hills are like super OPs. You have the LOS advantage of OPs coupled with the firing advantage of Strongpoints. You even get a defensive bonus as well. These are some of the most important hexes on the map. Here is the famous Hill 112 in hex A famous German quote He who controls Hill 112, controls Normandy. 403 Headquarters Drive, Suite 8, Millersville, MD


12 Crests are changes in the height of the land and can often be very subtle. Here is the crest that crosses the hexside between and You can see how the LOS is suddenly interrupted by the change in elevation. Ridges are far more dramatic and inhibiting. Here is the ridge that crosses the hexside between and Lastly, here is an example sunken railroad - this one is in hex costs one movement point or the Leg Unit must take a Cohesion Hit. Once the Leg Unit is not in Column, it may leave the Road/Railroad hex by any hexside. If a Leg Unit in Column is forced to retreat from the Raised Road/Railroad hex, it must follow the Raised Road/Railroad and if it cannot, the Leg Unit is eliminated. A Leg Unit in Column in a Raised or Road/Railroad hex suffers a terrain modifier of +2 when fired on, in addition to the +2 modifier for being in Column (5) Raised Roads/Railroads and Line of Sight Raised Roads/Railroads create a special Line of Sight situation. A Raised Road/ Railroad is Blocking Terrain, but only if the Line of Sight actually passes through the Raised Road/Railroad graphic. For this purpose a Raised Road/Railroad in the same hex as a target Unit or a firing Unit is never blocking terrain. In addition a Line of Sight can pass through a hex with a Raised Road/Railroad as long as it does not cross the Raised Road/Railroad Embankment Roads These are the yellow Roads/Railroads on the map. These work exactly like regular Raised Roads/Railroads in all respects and are presented for historical interest only Sunken Roads 2.3.5(1) Sunken Roads Generally Sunken Roads or Railroads are the red Roads/Railroads; they are depressed road and railroad tracks that pose a significant hindrance to movement but, unlike the raised road types, do not block Line of Sight (2) Restrictions on Column Movement A Unit in Column can enter a hex with a Sunken Road/Railroad if there is no road block in the Sunken Road/Railroad hex, and the Unit enters the Sunken Road/Railroad hex through a hexside that the Sunken Road/Railroad touches. Similarly, a Unit in Column can only leave the Sunken Road/Railroad hex through a hexside that the same Sunken Road/Railroad touches. This means that if there are two Sunken Roads/Railroads running through the same hex and they do not cross (such as ), you must remember which one the Unit is on, because it cannot jump from one to the other (3) Restrictions on Vehicle Units A Vehicle Unit cannot exit Column formation while in a Sunken Road/Railroad hex. If the Vehicle Unit is forced to retreat, it must follow the Sunken Road/ Railroad and if it cannot do so, it is eliminated. A Vehicle Unit gains a terrain modifier of -3 when fired on, in addition to the +2 modifier for being in Column (for a net of -1). If a Unit dismounts from its Organic Transport while it is on a Sunken Road/Railroad, the vehicles are lost. Place an abandoned transport Marker on the Unit after it dismounts. Note that Vehicle Units not in Column can never enter a hex with a Sunken Road/Railroad (4) Restrictions on Leg Units A Leg Unit that is not in Column can enter a hex with a Sunken Road/Railroad from any hexside (even if there is a road block in the hex), but it must pay double the terrain cost of the other terrain in the hex; when not in Column the Leg Unit can leave the Sunken Road/Railroad hex by any hexside. If fired on when not in Column, the Leg (and immobile) Unit gains a -2 terrain modifier for the Sunken Road, and also benefits (or suffers) from the terrain modifier of the hex s original terrain. A Leg Unit not in Column in a Sunken Road/Railroad hex may get in Column for 1 movement point. A Leg Unit may get off a Sunken Road/Railroad by exiting Column formation; this costs one movement point or the Leg Unit must take a Cohesion Hit. Once the Leg Unit is not in Column, it may leave the Sunken Road/Railroad hex by any hexside. If a Leg Unit in Column is forced to retreat from the Sunken Road/ Railroad hex, it must follow the Sunken Road/Railroad and if it cannot, the Leg Unit is eliminated. A Leg Unit in Column in a Sunken Road/Railroad hex gains a terrain modifier of -2 when fired on, in addition to the +2 modifier for being in Column. Sunken Roads/Railroads do not block Line of Sight in any way Multi Man Publishing, Inc.


13 2.3.6 Connecting Roads Connecting Roads are depicted in purple. They may be any type of road or railroad, and certain rules refer to them. There is no additional game effect of a road being purple. 2.4 Bridges Bridges in the game are all named on the map, and have a marker to show whether they are wired or not. There are seven such Bridges in The Greatest Day: Sword, Juno, and Gold Beaches. Note that the graphics on the map for roads that cross over streams are not considered bridges for the purposes of the following rules. Any Unit in Column in a hex with a bridge hexside suffers an additional terrain modifier of +2 and ignores the hex s original terrain Crossing Bridges A Unit must be in Column to cross a bridge, and the cost is the same as for normal movement. This means only one Unit can Assault across a bridge, and if a Unit not in Column is forced to run away, it cannot do so across a bridge Road Blocks and Bridges Road blocks cannot be placed in any hex that has a bridge hexside Railroad Bridges Vehicles cannot cross railroad bridges unless the railroad bridge is improved. To improve a railroad bridge, an engineer Unit must pass a Troop Quality Check in one of the two hexes sharing the railroad bridge hexside (this is an Engineer Action, so no Command Points can be spent on it, the engineer Unit can t be in Column, it triggers Opportunity Fire, and Men at Work markers can be placed). There is only one of these in this game the Railroad Bridge at Bures-sur-Dives. If a Unit with Organic Transport crosses a railroad bridge that hasn t been improved, the Unit forever loses its transport capabilities, and an abandoned transport marker is placed on the Unit as a reminder Line of Sight and Bridges Bridges block Line of Sight in the same way as Raised Roads (see 2.3.3(5)) Control of Bridges Why do you even want to control a bridge? Well, you can t demolish it unless you wire it and you can t wire it unless you control it. See below for the demolition rules. Either you control a bridge, or your enemy controls the bridge, or neither of you controls the bridge, in which case the bridge is contested. If you want to control a bridge, one of your Units must have been the last to enter both of the two hexes that share the bridge hexside, and neither of these two hexes can be in an enemy Fire Zone. Note that it doesn t have to be the same Unit that enters the hexes, and the Unit doesn t have to stay in the hex, nor do you have to move the Unit or Units through during the same activation. You can keep track of this with blank chits if you wish Bridge Demolition You can only demolish a bridge if you first wire it for demolition. There are two ways a bridge is wired for demolition. The first is if the scenario rules tell you it is, in which case the rules will also say which side wired it. Remember, only the side that wired a bridge can demolish it. The second way a bridge can be wired is by one of your engineer Units. To do this: You must control the bridge (see above). Your engineer Unit must begin its Action in one of the two hexes that share the bridge hexside. Your engineer Unit must pass a Troop Quality Check (no Command Point for an automatic pass here; the Unit cannot be in Column; a Men at Work marker may be placed in case of failure); this is an Engineer Action so it can trigger Opportunity Fire. Just a word of caution before you read on: just as most people really shouldn t know how sausages or congressional bills are made, you ll likely not want to know how I design new concepts and rules for games. To design some new procedure, I read a bunch so I know what happened and without any actual design work done, I schedule a playtest to test out the new rules. I sit a guy down and we start playing - and yes, I just make it up as I do it and show it to the poor gamer. If he asks a question, I mentally fill in a blank and casually answer him as if I knew all along. We play it out and I see him work it out and adjust and shift as I need to - and voila, the Club Route garden hose concept from Where Eagles Dare or the Drop table and procedure from The Greatest Day are complete and ready to go. It will change very little after that one play. Honestly, this is how it works best for me. I can t for the life of me sit in front of a map alone and design some new concept. And I promise, the testing gamer never knew what happened. The 1st Battalion of Royal Hampshire Regiment is indeed abbreviated Hants in the British Army. Players will notice that there is a sharp drop off in Fire Rating when some Allied Units take a step loss. Sharp eyed gamers will also notice the tank on the counter changes as well. These Units were all equipped with a squadron of Fireflies. Since these were no harder to kill but a lot more deadly to the Germans, the Germans would knock the Fireflies out first. That is why you see such a change when these Units take a step loss. 403 Headquarters Drive, Suite 8, Millersville, MD

 The British Airborne player has hopefully done this. His rally point is close to his troops yet forward to move south.")
14 Airborne Drop Example of Play Let s drop the 7th Para Battalion of the 5th Para Brigade and see how all this works. First off, place the rally point and the drop stick. Careful on your rally point placement. You will often be starting the war from these so you need them close to where you want to be but not so far out that a random German will just walk over them and you ll lose all of your stragglers and maybe entire battalions. Airborne Drop Example of Play (cont.) The British Airborne player has hopefully done this. His rally point is close to his troops yet forward to move south. Rolling on the Drop Table on the 6th AB Division Display, the Allies roll a 4 - getting a 1*(D) result. All Units in the stick are reduced by a step and each gets a delay marker. In addition, you add your new stragglers to the the General Records Track. You add two stragglers for each Unit that received a 1* result (total of 6) and one for each (D) result - a total of 9. If your engineer Unit passes the Troop Quality Check the bridge is wired for demolition. Flip the marker on the bridge to the wired side. Once you have a bridge wired you may try to destroy it. This is an Engineer Action. You may attempt this whenever you have an Active friendly Unit adjacent to one of the hexsides of a wired bridge. Roll a die. You need to roll a 6 or less if there are no enemy Fire Zones on either hex adjacent to the Bridge hexside and a 5 or less if there is one. Place a destroyed Bridge marker if you are successful. If you fail, the Bridge is now considered not wired and must be wired again before demolition is attempted again. Normally, you need an engineer to wire a bridge but there is an exception to this. The 6th Airborne was so scattered in its drop that small groups of engineers below the scale of the game would travel with the Paras. So for this circumstance (and only this circumstance), paratroop infantry (not glider) Units are assumed to have some engineers with them at all times for bridge wiring (only). The Troop Quality for a paratroop infantry Unit to wire a bridge is 3 if two-step, 2 if one-step and 1 if a rearguard. Men at Work does apply here as well Bridge Building Only the Allied Player may build bridges over streams or rivers in the game. To do so, the Allied player must move a Bailey Bridge Unit to a hex adjacent to a river or stream and dismount the Unit. There needn t be a demolished bridge in the hex side to be bridged any river or stream hexside can be bridged. The Bailey Bridge Unit is there for good now and may never move again. In subsequent activations, the Bailey Bridge Unit (using its dismounted side) has to pass a TQ check to build the bridge. The Bailey Bridge Unit can t be in Column (note that the Unit is considered a Leg Unit after it dismounts), it might trigger enemy Opportunity Fire, and Men at Work markers can be placed. If you fail the first check, place a Men at Work marker on the Bailey Bridge Unit so you remember both to apply the modifier on the next attempt and that the bridge isn t in place yet. If the bridge is built, take the Men at Work marker off the Bailey Bridge Unit. The Bailey Bridge Unit now acts as a bridge, but unlike a normal bridge, it is a Unit and may be targeted by enemy fire. If the Bailey Bridge Unit becomes Suppressed or takes a Cohesion Hit, it cannot act as a bridge until it Rallies. If the Bailey Bridge Unit is eliminated, remove it from play. 2.5 Rubble City and Fortified hexes may be reduced to Rubble. If an artillery (orange, brown, or black fire rating) attack rolls a 0 when attacking a City or Fortified hex, place a Rubble counter on that hex. If the hex has an OP or Strongpoint, that OP or Strongpoint is no longer considered to exist in the hex. Similarly any Road in the hex no longer exists (but, as noted in Rule 2.2.3, a Stream may still be crossed even if Rubble markers have been placed adjacent; the same applies to Rivers). Additionally, add one to the defensive terrain value of the hex. Note also that the cost to enter a rubbled hex is increased (see the Terrain Effects Chart). Engineers may clear Rubble by being in the Rubble hex, performing an Engineer action and passing a Troop Quality Check. Men at Work does apply. Any OP or Strongpoint are still considered destroyed even if the Rubble has been cleared. Use the back of the Rubble counter to show this. 2.6 Ferries (Optional) Engineer Units can ferry other Units across an otherwise impassible water hexside in a destroyed Bridge hexside. Only hexes that are adjacent to Destroyed Bridge hexsides can be used to ferry units. Only Leg units can use a ferry Creating a Ferry You can create a ferry in either hex adjacent to the hex vertex in which the there is a destroyed bridge counter (where a named bridge used to exist). An engineer Unit and a Unit to be ferried must begin an activation in the applicable hex. Announce that your engineer Unit wants to be a ferry [insert your inappropriate joke here]. This is an Engineer Action. The engineer Unit now rolls a Troop Quality Check (a Command Point cannot be spent here) and may be Opportunity Fired if applicable. The engineer Multi Man Publishing, Inc.

 can move into the hex across the vertex that has a destroyed bridge marker. This is a movement action.")
15 is done for the activation phase regardless of success or not. If it passes, the Unit also with the engineer may now move over the destroyed bridge hexside and into the adjacent hex. Men at Work does apply here. The Unit being ferried during the creation of the ferry is not considered active and must be in column Using Ferries Remember that only Leg Units may use a ferry. A friendly Unit in Column that begins its activation in a hex containing an engineer Unit that has successfully rolled it s Troop Quality Check (or in the hex across the vertex from such an engineer unit) can move into the hex across the vertex that has a destroyed bridge marker. This is a movement action. Units that have Wheeled or Tracked Organic Transport may use a ferry but they must abandon their vehicles to do so. Place an abandoned transport marker on the Unit to show that it can never again use Organic Transport. Being ferried consumes the Unit s entire movement allowance. Only one Unit may use the ferry per Activation.. You cannot use a Command Point to Ferry a Unit (so no Second Action case be used to conduct the movement action required to ferry a Unit). The hex the Unit is being ferried into must not contain enemy Units. 3.0 Paradrops and Glider Landings Play note for veterans of The Devil s Cauldron and Where Eagles Dare: We have had to change some of the paradrop rule for The Greatest Day because of the nature of night landings. Notably, drops are much more dangerous but there is also now a recovery method to get back lost steps for troops dropped at night. Also, since all drops happened on the first day and the weather was known for that day, we have done away with the variable timing of drops. 3.1 When to Drop See the reinforcement schedule for when 6th Airborne Units scheduled as reinforcements drop. The Units actually drop when the 6th Airborne Division Activation chit is drawn. If the 6th Airborne Division Activation chit is the last one in the cup on the 2100 turn, the chit is not used as the first chit for the night turn. Draw randomly instead. Drop the units the next daylight turn that the 6th Airborne Division Activation chit is drawn. 3.2 Where to Drop The map has the following four airborne zones designated by shading and by letter. DZ/LZ K: hexes , , , , , , , , , DZ/LZ N: hexes , , , , , DZ/LZ V: hexes , , , , , , , DZ/LZ W: hexes , , , , , (DZ/LZ means an airborne zone can function as either a drop zone for parachute troops or a landing zone for glider troops.) A Unit or Units that drop in the same hex on the same turn are defined as a stick. 3.3 How to Drop A. Place rally points Rally points are placed in any Village or Town hex within 5 hexes of the Battalion s DZ/LZ. B. Place Arriving Airborne Units Place each arriving stick in any hex of the designated DZ/LZ that does not contain other Units. Units can drop in Column, or not (observing the stacking limits), and can drop mounted. A drop does not trigger Opportunity Fire. C. Place Glider/Paradrop Markers I really wanted to avoid the roll for scatter, roll for distance thing you see in most games having a para drop in Normandy. They seemed so contrived. Also, I was struck when reading histories of men, miles off where they should be, walking by moonlight deep in enemy territory, desperate to find their units. I wanted that feel to be here as well. And yes, I thought of Radey s just drop them from 2 feet but couldn t get it to work. I have to get that in a game someday. Remember that Rearguards are free force multipliers. You can lose them and get them at will with no ill effects. Use them well. Where Are the Carpiquet Airfield Flak Defenses? On D-Day morning, the village and airfield of Carpiquet were home to a dozen Flak sections of 2cm and 3.7cm guns from Flak-Abteilungen 266, 835 and 996. By 1400 this same day, all of them had evacuated the area, threatened by the advance of the Canadian forces moving out from Juno. In the coming days, they would be deployed behind the front lines to provide antiaircraft protection to the 7. Armee, so they have been left out of the game. However, leichte Flak-Abteilung 996 made it in the OOB, since Generalleutnant Richter ordered it to the northern outskirts of Caen by 1300 on D-Day; at this point, he needed every unit he could get his hands on to bolster the defenses in case of a British breakthrough. Once the 21. Pz.Div. had arrived on the line, this Flak-Abteilung was sent to the rear, like the others. I have named all the Drop Zones as DZ/LZ even though the distinction doesn t matter here. However,with keeping an eye towards the later games in the Normandy series and the possibility of players wanting variants for choosing their own drop zones, the label is to let you know that both paratroops and glider troops are able to land in these drop zones. After Drop One, a glider/paradrop marker is placed on top of each Unit that is dropped (not on each stick- on each Unit in each stick). Units placed in Drop One do not receive a glider/paradrop marker. See Headquarters Drive, Suite 8, Millersville, MD

16 Example of Play (cont.) Back to the example and at some point in the future, the 6th AB DivAct comes out of the cup. It is time to try and recover some of those 7th Para Battalion stragglers. Now we roll some dice. We are rolling again and again until we either exceed the current straggler number or roll a nine. Rolled an 8. One straggler recovered, stragglers reduced to 8. Rolled a 7. One straggler recovered, stragglers reduced to 7. Rolled a 3. One straggler recovered, stragglers reduced to 6. Rolled a 9. No straggler recovered and we have the 9 penalty - you lose a straggler anyway. So down to 5 for the next time the DivAct comes out of the mug. If we had rolled a 7 or 8, we d stop rolling but at least the straggler number wouldn t have been reduced. So with three points to spend and knowing the points are gone if not used, let s spend some points like a drunken sailor on leave. Here is what s currently in the Stragglers Box for the example: D. Roll on the Drop Table and Immediately Apply the Results See rule for the Drop Table. Note that Units placed in Drop One do roll on the Drop Table The Drop Table All Units that drop must have their fate decided with a die roll on the Drop Table. Roll for Units in Drop One at the start of play. Roll for Units in subsequent drops as they drop. The Drop Table has various results, which include elimination, creation of Rearguards, Step Loss, activation delays, and no effect. Make one die roll on the Drop table for each stick, adding together all of the modifiers that apply to arrive at one die roll modifier; apply the result according to the results explanation. Drop Table Modifiers - 6 if it is the Second Drop - 8 if it is the Third Drop +1 for each German Unit inside the Drop Zone +2 During a Day turn only, if at least one German Unit with an anti-air value projects a Fire Zone into the DZ/LZ. This range is the 8 hex AA range as per rule Drop Table Die Roll Paratroops Glider 0 NE NE * 1 3 1*(D) 1* 4 1*(D) 1* 5 1*(DD) 1*(D) 6 R 1*(DD) 7 R(D) R 8 R(DD) R(D) 9 R(DD) R(D) 10 E R(DD) 11+ E E Drop Table Results Explanation NE No Effect 1 One Unit in the stick loses a step (First drop only: add 1 to the corresponding Battalion Straggler Track) 1* All Units in the stick lose a step (First drop only: add 2 to the corresponding Battalion Straggler Track for each Unit that lost a step) D Place a glider/paradrop marker on every Unit in the stick in addition to any already placed (First drop only: add 1 for each Unit in the stick to the corresponding Battalion Straggler Track) DD Place two additional glider/paradrop markers on every Unit in the stick in addition to any already placed (First drop only: add 2 for each Unit in the stick to the corresponding Battalion Straggler Track) Multi Man Publishing, Inc.

17 R Replace all Units in the stick with Rearguards (First drop only: add 3 for each Unit in the stick to the corresponding Battalion Straggler Track); if no Rearguards are available, or at the Allied player s choice, treat as E; place the replaced Units in the Straggler box on the 6th Airborne Divisional Display E All Units in the stick are eliminated (First drop only: add 4 for each Unit eliminated to the corresponding Battalion Straggler Track); place the eliminated Units in the Straggler box on the 6th Airborne Divisional Display Play note: in cases where a result on a white- or black-striped Unit calls for an addition to the corresponding Battalion Straggler Track, select any Battalion that is dropping in the same LZ/DZ Glider/Paradrop Markers Each Each glider/paradrop marker on a Unit takes the Unit one Action to remove. Removing a glider/paradrop marker is an Action but does not trigger Opportunity Fire. A Unit with a glider/paradrop marker on it may perform no other Actions, except Rally if it is Suppressed. A Suppressed Unit must Rally from the Suppression before it can remove its glider/paradrop marker. Note that the restriction against performing the same Action twice in a row as a Second Action does apply to removing a glider/ paradrop marker. Units under a glider/paradrop marker cannot use SRPs. 3.4 Stragglers Historical Note: During the night drop on June 5th, the 6th Airborne was spread out over a wide area. Very few of the troops arrived where they were supposed to and it took time to gather the paratroopers into coherent units. This rule addresses this. It is also how the Divisional Jeeps, the 22nd Ind Para Company, and the Glider Pilots enter the game, as these Units begin the game in the Straggler box Straggler Generation; Only on the First Drop for 3rd and 5th Para;Tracking Stragglers; Rally Points Stragglers are generated from results on the Drop Table. Stragglers are only generated on the First Drop, and only the 3rd and 5th Para Brigades accumulate Stragglers. Stragglers are tracked by battalion on the 6th Airborne Division Display, and each battalion has its own straggler marker. The 6th Airborne Division Display also has a box for Units that are replaced by rearguards or suffer elimination on the Drop Table; these Units are eligible to return to play per rule Stragglers generated by units not part of a battalion (white-stripe and black-stripe) units may be added to the straggler total of any battalion that dropped in the same DZ. Each battalion of the 3rd and 5th Para Brigade has a rally point. The rally point governs straggler recovery as explained below. If a German Unit ever enters a hex with a rally point, the rally point marker is permanently removed and that battalion s stragglers are lost and no more recovery rolls are made Straggler Recovery Each time the 6th Airborne Division Activation chit is picked from the Mug, the Allied player may, before he begins performing Actions with his Active Units, roll for straggler recovery for each battalion that still has a rally point according to the following procedure. Pick a battalion and roll for it. If the roll is: (i) Equal to or less than the number on the corresponding Battalion Straggler Track, one Straggler Recovery Point (SRP; see below) is generated and the Battalion Straggler Track is reduced by one. Another roll may be made for this battalion. (ii) Nine, reduce the Battalion Straggler Track by one and no more rolls for this battalion are possible until the next 6th Airborne Division Activation. (iii) Greater than the number on the corresponding Battalion Straggler Track, the Battalion Straggler Track is not reduced but no more rolls for this battalion are possible until the next 6th Airborne Division Activation. In the 6th Airborne Stragglers box, we have two Glider Pilot Units, an engineer and two Division Jeeps. We also have three units that are on the map that have been reduced. The engineer (onestep worth) and the jeeps will cost 2 points each to buy (the engineer would be placed on the 7th Para rally point and the jeep would go in the Available Divisional Jeeps box if bought). If a Unit comes in at the rally point, it can do actions right away. We ll spend 2 points to get the Engineer placed on the rally point and one point on one of the reduced companies. C Para company is flipped to its 2 step side (when it activates) - if it was farther away, it could move to within 3 hexes when active, use a straggler to replace its lost step and keep moving. The 286 Fld Pk, RE Unit is placed on the 7th Battalion rally point and is able to perform any legal action this DivAct. So who am I and what got me to this place and time in wargaming? I guess to talk about that, I need to talk a bit about how I came to game and how I learned to stop worrying and love the Monster Game. I started gaming in 1971 when a physicist that was dating my mother took me to a physics class at NYU. I was 11 at the time and after the class was over, we came back to my apartment and he pulled out AH s Stalingrad. I had a great time but wanted more - and growing up in NYC, I became a regular visitor to SPI on 23rd Street. I suspect I bought many things from Jon Gautier although it would be decades later until we actually met. Anyway, in the SPI versus Avalon Hill debate, I was firmly in the SPI camp. And I loved the games big too. I consider the first monster game to be USN. It was impossible to play to the end but I loved it and wanted more. So then came games of War in Europe, War in the Pacific and Next War. As I mentioned in my Devil s Cauldron comments, when I played Highway to the Reich to try and rekindle those glorious days from the 70s, I was too jaded to enjoy it. The rules were terrible and even the graphics, that I loved so much back in the day, seemed garish and dated. While I mentioned Highway to the Reich because it was relevant to Devil s Cauldron, just prior to that, there was, yes, an attempt to play Atlantic Wall that went no better. Making GTS in rebellion to bad games was actually more of a continual and accumulating experience with older, poorly made games. Thus this one on D-Day had to be made too. 403 Headquarters Drive, Suite 8, Millersville, MD
18 Mais où est donc passée la 2ème Compagnie? Yes, there is no 2./Ost 642 Unit in KG Krug (716. Infanterie-Division)... and no, it s not errata. This company was historically disbanded on May 30, probably to bring the other three companies of Ost- Bataillon 642 up to strength, since the battalion totaled only 459 men at the end of May. Before then, 2./Ost 642 had been billeted in Amfreville (24.017), and it is often erroneously shown as still deployed there on D-Day. An explanation for this recurrent mistake might be the fact that, around dawn on D-Day, the remnants of Lt. Col. Terence Otway s 9th Parachute Bn, back from their assault on Merville Battery, were caught in a fierce skirmish with German and Russian soldiers in Le Hauger and Le Plein these were members of Ost-Bataillon 642 HQ, located at Le Hauger (23.016). As with The Devil s Cauldron there are a few vital chokepoints in this game. Protect these well. Get those engineers working to fully entrench the Pegasus and Horsa bridges and the areas around them as soon as possible. You can add many turns to their defense with a lot of digging. The same applies to the other side. German players, protect access routes over ridges or in key defensive positions as quickly and effectively as possible. You won t see the threat until it is too late. Engineers are some of the most important Units in the game and are often under-utilized. It took a little while to explain what Dinghies were to Niko. You can see a little more info about the dinghies on page 86 of Bernage s Red Devils of Normandy. (iv) Zero, one Straggler Recovery Point (see below) is generated and another roll for this battalion may be made. Important note: Depending on the results of the rolls, it is possible for the Allied player to make multiple rolls for the same battalion. The Allied play never has to make a roll and can choose to stop rolling at any time. Once you are done rolling to recover stragglers and recorded the changes on the 6th Airborne General Markers track, you now proceed to using the Straggler Points to recover strength to Units How Stragglers Return to the Game 3.4.3(1) Timing of SRP Use Generation of SRPs occurs after the 6th Airborne Division Activation chit is pulled but before Units begin performing Actions. SRPs generated are spent during the Divisional Activation, at any time the Allied player wishes, in any combination (2) How to Spend SRPs; Use of Rally Points; Battalion Restrictions SRPs can be spent on Units on the map to bring two-step Units that have been reduced to one step back to full strength; in order to receive SRPs, such Units must be within 3 hexes of their battalion rally point. Terrain, weather and enemy Units have no effect on this type of SRP expenditure. SRPs can also be used to bring Units from the Divisional Display Straggler box to the battalion rally point. SRPs generated by a battalion may only be spent on Units of that battalion or on any black-striped or white-striped Units. SRPs must be used in the turn they are generated and may not be saved for later turns. SRPs from different battalions may not be combined (for example, you cannot use SRPs from two different battalions to flip a white-stripe engineer to full strength) (3) SRP Exchange Equivalents 1 SRP: returns a one-step paratroop infantry or glider infantry Unit from the Straggler box to the battalion rally point. 1 SRP: flips a one-step paratroop infantry or glider infantry Unit on the map back to its full strength (two-step) side. 2 SRPs: returns a one-step non-paratroop, non-glider infantry (e.g., engineer, AT gun) Unit from the Straggler box to the battalion rally point. 2 SRPs: flips a one-step non-paratroop, non-glider infantry (e.g., engineer, AT gun) Unit on the map back to its full strength (two-step) side (4) Straggler Recovery: Special Cases A. More than one SRP can be spent on a given Unit during an Activation to bring it from the Straggler box to the map at reduced strength and then to bring it back to full strength. B. Units from the Straggler box may be placed on the rally point mounted or in Column. C. Units placed on the rally point from the Straggler box are eligible to perform an Action pursuant to the Division Activation at any point during the Division Activation. D. SRPs may be spent to bring a two-step Unit back to full strength before, during or after that Unit s Division Activation. This means, for example, that a Unit may move to within 3 hexes of its rally point, receive a SRP for a step, and then continue moving. E. SRP expenditure and Unit placement on a rally point does not trigger Opportunity Fire Multi Man Publishing, Inc.

19 F. Units eliminated in combat may not be brought back using the SRP mechanism. However, if a two-step Unit loses a step in combat, an SRP may be spent to bring it back to full strength pursuant to this rule. 3.5 Dinghies Your odds of taking Pegasus are pretty good in this game since the chancy stuff has already happened (the Glider Landing was spot on and it is here too). But fear not, if you roll poorly and fail and you lose the chit draw race, you have one last way to try and take Pegasus Bridge. B Company of 7 Para had canvas Dinghies with it to use as a last resort. You have them too. Dinghies allow B Company, and only B Company, to cross a major water obstacle. Just start next to a Canal hexside and when active, this company may spend all of its movement allowance to move across the obstacle to the other side. Once you do this twice (move across the obstacle), the Dinghies are removed from play. The Dinghies always have the same step strength as B Company so they can always move the company across whether it is one or two steps. If B Company is in the Straggler box, the Dinghies wait there with them and if B Coy comes back into the game, the Dinghies are placed with them. Rearguards can t carry dinghies. The instant the Allies control Pegasus Bridge, the Dinghies are immediately removed from play for the rest of the game. 4.0 The Naval Invasion System Overview of the Naval Invasion System (NIS) The Greatest Day series is the first in the GTS family that has an opposed amphibious landing and, as such, these additional rules are needed to simulate the landing of Allied troops into France. The Naval Invasion System (NIS) simulates the ocean transport and amphibious landing of troops on a hostile shore, the defense of that shore, and the naval gunfire support given to the invading troops. Whenever possible, rules and concepts were ported directly from the GTS Series Rules, but it was also necessary to craft entirely new rules and also to modify some existing series rules. Whenever an existing GTS rule or defined (i.e., capitalized) term is used in the NIS, follow the GTS rule exactly as written unless otherwise noted. This will be harder than it sounds, because you will be applying the existing GTS rules in a totally different context Organization of the NIS Rules This section 4.0 and section 4.1 provide an overview, definitions and some descriptions of key aspects of the NIS. Sections 4.2 through 4.6 present the entire NIS in a traditional case format. Section 4.7 is the Naval Sequence of Play (NSoP). Section 4.8 then presents almost every aspect of the NIS as a series of step-by-step procedures. So depending on how you prefer to learn, you could read sections carefully and use 4.8 as a guide; or you could jump right into play by reading just 4.0 and 4.1 and then following 4.7 and 4.8, and use sections for specific questions. 4.1 NIS Definitions & Descriptions A Beach is one of the five code-named beaches in the game: Utah, Omaha, Gold, Juno or Sword. Each Beach has its own Beach Overlay A Sub-Beach is a division of one of the Beaches. For example, Gold Beach has two Sub-Beaches: Jig and King A Beach hex is a hex terrain type such as Clear or Town The Beach Overlays The Greatest Day NIS uses several small maps, called Beach Overlays, which begin the game on top of the larger game maps for all five beaches that were invaded in the campaign. Three of the Beach Overlays (Gold, Juno and Sword) are used in this game. The Beach Overlays exist to regulate certain game functions that are specific to the initial landings, in particular the landing of Units onto the Beach hexes and the German defenses intended to stop the landings. Once certain Amphibious Landing Example of Play At Queen Sub-Beach, we have B/13/18 KRH (a DD tank w/leader), 77/5 AR, RE (a Funny ) and the 2 E Yorks battalion landing at the start of the 0700 turn. Two German strongpoints (Wn 18 and Stp 20 (Cod)) await them. Both have barrage markers on them as ships have already fired. To continue to set the stage, the Naval chit is in play and the Germans stand at the ready with beach defenses at 4 Gaps, 5 Obstacles, 5 Resistance Nests, and a Sea State of 7. Most often, you ll bring your DD tanks in first. Let s do that here as well. The 13/18 KRH (and Leader) attempts to swim ashore at hex DD tanks when swimming ashore have to brave the Sea State to see in what condition they land - and the table can be very harsh. With a Sea State of 7, and firing on the Armor Piercing row there is a 20% chance of an outright elimination. Our brave boys roll a 1 and are Suppressed. Not wanting to give up the big advantage of DD tanks (more on that in a moment), the 3rd Infantry Division commander spends a precious Command Point to convert the suppression to a cohesion hit. Thank goodness you brought a Leader with the first Unit landed. They are in Command. 403 Headquarters Drive, Suite 8, Millersville, MD

20 conditions have been met, mostly with respect to reducing the Beach Defenses, a Beach is considered Cleared, and the corresponding Beach Overlay is removed from play and all Beach hexes become out of play for all players. The invading player s reinforcements are simply placed on a reinforcement hex near the shore, their landing now handled behind the scenes. By the way, the skirt side of the DD tanks has no game function. You can use either side of the counter in play. It is included for historical interest only. I flip them to their non-skirt side as soon as they land. To get in the mood to play, you might want to catch the movie Storming Juno. There are some nice shots of DD tanks landing. 20 The Beach Overlays are printed with all kinds of information that regulates the attack and defense of the beaches; they also depict the so-called Sub-Beaches, which further regulate and restrict the landing and movement of invading troops. The Beach Overlays include informational tracks representing abstractions of beach defenses, such as obstacles and machinegun nests, the state of the sea, and boxes in which to place the assaulting Units, including amphibious tanks, landing craft and the troops on board the landing craft The Three Naval Display Each Naval Display is used to organize the ships that are offshore supporting the landing, and the troops that are not yet aboard the landing craft bound for the Beaches (troops that are already aboard the landing craft and headed for the Beaches are moved to Landing Wave boxes on the Beach Display). Think of the troops on the Naval Display and the Beach Overlays as forming a conga line from England, to the ships, to the landing craft, to the beaches Ships Ships are Units that operate on the Naval Display rather than on the game map and their movement and activation is handled differently from land Units (see 4.4.2) Landing Craft types (a) Landing Craft, Rocket (LCR) LCRs are single-use markers which may bombard Units on shore during Step 2 of the NSoP on the June 6, 0700 turn only (see 4.4.5). Once fired, LCRs are removed from play. No modifiers apply to their fire. (b) Landing Craft, Support (LCS) LCSs operate in the Close Range box of the Naval Display. They may fire at Units on shore and at German Beach Defenses (see 4.4.6). They remain in play until the Beach Overlay is removed. These Units may only fire at targets they self-spot and they fire when Naval Ships fire at the shore. No negative modififers apply to their fire. (c) Landing Craft Landing Craft are used to transport Units from the Landing Display onto the Beach Overlays. These are more like markers and there is an unlimited number available to the Allied Player. If you run short of these (but you shouldn t), you may make more as needed. When these are reused, they are always at 2-step strength. Any previous losses are ignored. Landing Craft belong to specific Divisions. During the landing sequence, Landing Craft may be attacked by Beach Obstacles (see 4.2.1), Resistance Nests (see 4.2.2) and regular Opportunity Fire (see 4.2.3). Landing Craft can convert an S result to a C result by passing a Troop Quality Check or spending an available Command Point (no leader is necessary). A suppressed Landing Craft can still land its passengers. Passengers landed by a Landing Craft on a Beach Overlay acquire all damage taken by the Landing Craft prior to their landing, howsoever inflicted. For example, if a Landing Craft takes a Step Loss and a Suppression, each and every passenger of that Landing Craft lands with a Step Loss and a Suppression. After each landing sequence has been completed, the Landing Craft markers are removed from the Beach Overlay and are available to be reused The Naval Chit Practically the entire NIS starts and ends with this baby. The Naval Chit is always the first chit in play on the June 6, 0700 turn. After the first time it is played on the June 6, 0700 turn, the Naval Chit is placed back into the draw cup. After the June 6, 0700 turn, the Naval Chit is automatically placed into the draw cup in Step G of the Sequence of Play on every turn except night turns Multi Man Publishing, Inc.


21 The Naval Chit kicks off the whole NIS sub-game, which includes loading troops from ships to landing craft; landing tanks and troops onto the beaches; the efforts of the sea itself, beach obstacles, and defenders to destroy and otherwise discomfit the invading troops; and the efforts of the invading troops and their supporting warships to destroy beach obstacles and defenders in order to bust off the beach. Once all the beaches are secure, i.e., all the Beach Overlays are removed, the Naval Chit procedure is greatly reduced. 4.2 German Defense of the Beach Overlay In addition to the German Units defending the Beaches, all of which move and fight normally unless otherwise noted herein, the Germans have at their disposal Beach Defenses that are abstract representations of natural and man-made obstacles and weapons. Beach Defenses are abstracted either because they would be too cumbersome to simulate explicitly or because what they represent is below the scale of the game. Each Beach Overlay has tracks for each type of Beach Defense for that Beach. The tracks show the current number for each type of Beach Defense; for some Beach Defenses, the number can be used to attack Allied Units. For all Beach Defenses, the number also represents, if you will, a life points number that can be attacked, and reduced, by Allied Units. Once a Beach Defense is reduced to 0, it can no longer attack. Reducing all of the Beach Defenses on a Beach Overlay to 0 is one of the requirements for removing the Beach Overlay. The types of Beach Defenses, all described in detail below, are: Beach Obstacles; Resistance Nests; and Gaps. Lumped in here with the Beach Defenses is also the Sea State, which represents the effect of a sometimes angry sea on amphibious tanks. While the Sea State does attack Allied Units, it cannot be attacked or reduced, nor does it affect the removal of the Beach Overlay. Also covered here is German Opportunity Fire as it pertains to defense of the Beach Overlay; the usual Opportunity Fire rules apply with some exceptions as to timing and modifiers Beach Obstacles on the Beach Overlay Beach Obstacles are a type of Beach Defense representing mines and steel or wooden emplacements mounted in the sand on the various Beaches to prevent Allied units from landing safely. The Beach Obstacles start level is listed on each individual Beach Overlay. As long as the Beach Obstacles track number on a Beach Overlay is greater than 0, the Beach Obstacles on that Beach Overlay will attack every Landing Craft that is landed on a Beach Hex on the same Beach Overlay. The attack is resolved as a Direct Fire attack on the White line of the Combat Results Table against the Landing Craft (an armored target) with Fire Strength equal to the current Beach Obstacles level. No modifiers apply to this attack. If, when resolving a Beach Obstacle attack, a 0 is rolled, in addition to applying the combat result, the Allied player must place a Drift 2 marker on the Landing Craft. The Landing Craft is now considered on the Beach hex and, as a black-stripe unit, may be activated as part of a Division or Formation Action. As soon as the Landing Craft removes its Drift marker, it immediately unloads its passengers (subject to any opportunity fire) and, if not suppressed, conducts fire before departing. Place a Drift 2 marker on each unloaded unit. It takes a movement action to remove a level of Drift and it takes two actions to completely remove the marker; this does not trigger Opportunity Fire but does trigger a Resistance Nest attack (4.2.2(2)). A Unit with a Drift 1 or 2 marker on it may take no other Action apart from Rally from Suppression until the Drift marker is removed Resistance Nests on the Beach Overlay Resistance Nests represent two things: mines and small concentrations of German forces that are below the scale of the game. The starting level for Resistance Nests is listed on each individual Beach Overlay. Resistance Nests attack under two distinct circumstances: a) against attempted landings, and b) against Units that have landed. In all cases, Resistance Nest attacks are made before any Opportunity Fire. Originally, I was going to try and add a simple landing system to the game. But as I went through it and saw the possible tension that could be added, I decided to add this as almost a separate mini-game. Too many of the Normandy landings in games were just die rolling exercises or simple landing procedures. I decided more was better, at a significant expense in playing time for that 0700 turn. I hope most of you approve. Juno had small arms fire equal to Omaha - and Sword was a nightmare of congestion. In a game of this level, I thought you should have some player skill apply to this part of the game. I know the landing rules seem pretty complex but trust me, once you get them down, they will be easy to use. Here is the big advantage of DD tanks swimming ashore; they don t have to expend an action to land (and no Op Fire!) so a DD Tank can perform one action - and a second one immediately after (if you spend a command point and it is a different action). All others have to use their first action to physically land on the beach. The DD tanks are ready to rock and roll without a Command Point spent. That second possible action would be great on a beach with a bit more room - like Juno or Gold. Amphibious Landing Example of Play (cont.) Note that the DD tank hasn t actually done an action yet - so there is no Op Fire possible by the two German defenders. The DD tank uses his first action to fire at the German Beach Defenses. This is a Fire action. But before this action is done, because the Allied player has decided to do an action, the German Resistance Nests get to fire. This is a 5 small arms attack. Modifiers are -3 for defense - so the Germans need a 1 or 0 to get a hit, and they miss with a roll of Headquarters Drive, Suite 8, Millersville, MD
, the 10.")
22 The Grenadier companies of the 716. and 352. ID that manned the coastal strongoints are not depicted as Unit counters, since they were pretty much destroyed in the early phases of the Allied assault. The Nachhut units can be thought of as small groups of survivors from these garrisons who managed to withdraw to the hinterland. These companies are the 2./736 (manning Stp 08 and Wn 10), the 10./736 (crewing Wn 18, Stp 20 Cod, and Wn 21 Trout), the 9./736 (in Wn 24, Wn 26, and Wn 27), the 5./736 (Wn 28 and Wn 28b), the 6./736 (in charge of Wn 29, Wn 30, and Wn 31), the 7./736 (staffing Wn 33 and Wn 34), the 1./Ost 441 (in Wn 33a), the 3./Ost 441 (crewing Wn 35 and Wn 36), the 1./916 and 3./916 (manning Wn 37, Wn 38, Wn 39, Wn 40, Wn 41, Stp 42, Wn 43, and Wn 44), and 1./726 (in Stp 55 and Wn 56). The 1./Ost 642 (Stp 02), 3./736 (in Wn 03) and 1./736 (in charge of Stp 05) are exceptions to this, and are depicted as Units, because their positions weren t attacked on D-Day and they were freed of their coastal defense duties later in the day, when the III./ Gren.Rgt. 744 took over the area east of the Orne River estuary. Amphibious Landing Example of Play (cont.) It s payback time and the Allies finish their action, a fire attack on the German Resistance Nests. They roll a 4 attacking the Resistance Nests. Looking at the tables, this is modified to a 5 (for the cohesion hit) and reduces the Resistance Nests by 1 - reducing them to 4 on the Beach Overlay. While the DD tank would love to fire again, you can t do two actions of the same type in one impulse. With nowhere to move and not being able to rally due to being in an enemy Fire Zone, the DD tank is done for the impulse. Let s land another. Next to land is the 77/5 AR, RE (a Funny tank) in hex The Unit is in a Landing Craft and is placed in its landing hex. First it must be attacked by Beach Obstacles. We need to see in what sort of shape the Landing Craft are in when they arrive at the beach (1) Resistance Nest Attacks against Landings (a) Pre-Landing Resistance Nest Attack against Landing Craft Whenever a Landing Craft leaves a Landing Wave box and is placed on a Beach hex to land its passengers, the German player may choose to attack the Landing Craft with the Resistance Nests on that Beach Overlay if the Resistance Nests track number on that Beach Overlay is greater than 0. This attack takes place immediately after the Beach Obstacle attack but before the Landing Craft unloads its passengers. The attack is resolved as a Direct Fire attack on the Red line of the Combat Results Table against the Landing Craft (an armored target) with a Fire Strength equal to the current Resistance Nest level. The only modifiers that apply are for mass and the defense rating of the Landing Craft. Count the mass of the Landing Craft and any other Units in the hex, but do not count the mass of the Landing Craft s passengers. (b) Post-Landing Resistance Nest Attack against Just-Landed Units If the German player chose not to make a Resistance Nest attack against the Landing Craft, he may make a Resistance Nest attack against one of the Landing Craft s passengers immediately after it is unloaded onto the Beach hex. The current Resistance Nest number is used to attack the Unit on the Red line of the Combat Results Table. The following Direct Fire modifiers apply: mass, terrain and Defense Rating. Count the mass of all Units in the hex, but do not count the mass of the Landing Craft (2) Resistance Nest Attacks against Landed Units As long as the Resistance Nest number on a Beach Overlay is greater than 0, a Resistance Nest attack is made against every Unit on that Beach Overlay that is activated (note that this includes DD Tanks). The attack occurs after the Unit is activated but before it performs its action. The current Resistance Nest number is used to attack the activated Unit on the Red line of the Combat Results Table. This is treated as a normal Direct Fire attack and all Direct Fire modifiers apply. The result of a Resistance Nest attack is treated exactly as any other direct fire attack German Opportunity Fire on the Beach Overlay German Units may conduct normal Opportunity Fire against Allied Units under the following circumstances, with any exceptions to normal Opportunity Fire rules noted: (a) Pre-Landing Opportunity Fire against Landing Craft Whenever a Landing Craft leaves a Landing Wave box and is placed on a Beach hex to land its passengers, the German player may choose to attempt Opportunity Fire against the Landing Craft with any eligible Units. This occurs after the Landing Craft has been placed on a beach hex but before the Landing Craft s passengers have landed, and after any Resistance Nest attacks on the Landing Craft. The Landing Craft is an armored target; the +2 Fire Zone to Fire Zone modifier does not apply. Landing Craft passengers are not counted for the mass modifier but any other Units in the hex are. (b) Post-Landing Opportunity Fire against Just-Landed Units If the German player chose not to attempt Opportunity Fire against a Landing Craft, he may attempt Opportunity Fire against one of the Landing Craft s passengers immediately after it is unloaded on the Beach hex. The +2 Fire Zone to Fire Zone modifier does apply, as do all other Opportunity Fire modifiers. For the mass modifier, count the mass of all Units in the hex, but do not count the mass of the Landing Craft. (c) Normal Opportunity Fire In addition to the above, all other normal Opportunity Fire rules apply on the Beach Overlay. The result of Opportunity Fire on the Beach Overlay is treated normally. In particular, Landing Craft can convert an S result to a C result by passing a Troop Quality Check or spending a Command Point (no leader is necessary) Multi Man Publishing, Inc.

23 4.2.4 Gaps on the Beach Overlay The Gaps that are printed on each Beach Overlay, and the corresponding Gaps number track, are an abstraction of how difficult it is for the Allies to fight their way off the Beach and move inland. The Gaps themselves are physically represented on each Beach Overlay as arrows pointing to a hexside. As the Gaps number on a Beach Overlay is reduced, the Allies gradually gain mobility through one or more Gap hexsides. (a) Effect of Gaps Number Greater Than 2 When the Gaps Number on a Beach Overlay is greater than 2, no Allied Units may move or assault from any Beach hex to any non-beach hex. The Gap hexsides on the Beach Overlay are closed for all Units except Commandos or Rangers (see (b) below). (b) Movement of Commandos and Rangers Through Gaps Commando and Ranger Units may attempt to move through a closed Gap hexside. To do this the Unit must begin an activation adjacent to the Gap hexside, be in Column, and declare a movement Action. The German player rolls one die, comparing the result with the current Gaps Number, and another die, comparing the result with the current Resistance Nests number. If either or both die rolls are less than or equal to their target number, the Unit is eliminated. If both rolls are greater than the target, the Unit is placed on the opposite side of the Gap hexside and its action is over. It is eligible to perform a Second Action as usual. A successful move over a Gap hexside per this rule does not alter the Gap status. (c) When the Gaps Number Becomes 2 When the Gaps Number on a Beach Overlay is reduced to 2, the German player immediately places a Gap Open marker on a Gap hexside of his choice on the same Sub-Beach as the Unit that caused the Gaps number reduction. (d) When the Gaps Number Becomes 1 or 0 When the Gaps Number on a Beach Overlay is reduced to 1, and again when it is reduced to 0, the Allied player immediately places a Gap Open marker on a Gap hexside of his choice on the same Sub-Beach as the Unit that caused the Gaps number reduction. If all of the Gap hexsides on that Sub-Beach already have Gap Open markers, no marker is placed. (e) Effect of a Gap Open marker A Gap Open marker on a Gap hexside allows Allied Units in column to move and assault through that hexside. (f) Opening all the Gaps. The first time that the Naval Chit is drawn after the Gaps number on a Beach Overlay has been reduced to 0, all Gap hexsides on that Beach Overlay are considered open. Flip the corresponding track marker to indicate all Gaps are now open. Allied Units in column may now move and assault through all Gap hexsides on the Beach Overlay The Sea State on the Beach Overlay The Sea State number on a Beach Overlay affects only DD Tanks that are in the process of landing. The Sea State roll is made immediately after a DD Tank is placed on a beach hex from a Landing Wave box. It is resolved as a Direct Fire attack on the Blue (Armor-Piercing) line of the Combat Results Table against an armored target with Fire Strength equal to the current Sea State number. No modifiers of any kind (including defense strength) apply. Results are applied immediately Firing at Beach Defenses on the Beach Overlay With the exception of the Sea State number, the other German Beach Overlay defenses Beach Obstacles, Resistance Nests and Gaps must all be reduced to 0 by the Allies before the Beach is secured and the Beach Overlay can be removed. (In the short term, of course, the Allies also wish to reduce the various Beach Defenses to reduce casualties and increase mobility.) Reducing the Beach Defenses to 0 is accomplished by firing at them; they are not fired at individually, however, but as a whole, and the results are applied according to the Firing at Beach Defenses section of each Naval Display. This is a 5 (the Beach Obstacles value) Dual Purpose attack. No modifiers ever apply to this attack. 2 is rolled. The Landing Craft is suppressed - which also means all of its passengers are suppressed as well. Funnies are great to attack German Beach Defenses so we don t want to be suppressed here. The Allied player spends a Command Point to convert that suppression to a cohesion hit. The passengers also have a cohesion hit. 403 Headquarters Drive, Suite 8, Millersville, MD
24 Since Landing Craft must unload, the game rules go through this as a procedure - unload, Resistance Nests fire, Op Fire happens, Landing Craft fire back, etc. In GTS terms, you are dismounting which is an action - thus Resistance Nests fire. If it is a dismount and thus a Movement action in a Fire Zone, that causes Op Fire, etc. Note that Beach Defenses never benefit from the Fire Zone to Fire Zone modifier. Each beach has its own personality and goals. Gold is the easiest but Juno (with all of its small arms fire) and Sword (with its lack of depth and congestion) require some thought as to how to attack. On Sword, you really want to get those gaps open so the follow up troops aren t piling up making great artillery targets and continual review of the overstacking rules. On the other hand with Sword, you have nasty Beach Obstacles too - those Commandos are completely wiped out if you get a 1 on the Obstacle roll when they come in. Get that Beach Obstacle number below 4 at all costs! Amphibious Landing Example of Play (cont.) Here we are after landing but just before the landing craft is about to open its doors and let its passengers out. The Germans are about to let loose with fire. When you fire at Landing Craft, just like when you fire at dismounting troops, you can choose in which state (mounted or dismounted) you want to fire at them. So the Resistance Nests can fire at the Landing Craft before it unloads or at the Funny after it comes out of the craft, German player s choice. They have a 4 Resistance Nest value to use (reduced from 5 by the DD tanks that just landed). This is an easy choice since everything is equal except the defensive values. They are both armored, in the same terrain (beach), and since the Landing Craft doesn t count towards stacking, they have the same 2 step mass. We ll fire at the -1 defensive value Landing Craft instead of the -4 defensive value Funny. Note that the Funny could dismount in Column (thus giving an additional Any non-suppressed Unit on a Beach that is eligible to perform an Action may fire at the Beach Defenses. This counts as a Fire Action. The Allied player simply announces that a particular Unit will attack the Beach Defenses. This announcement first triggers a Resistance Nest attack (4.2.2(2)) if the Resistance Nest number on that Beach Overlay is greater than 0. Note that this Action does not trigger Opportunity Fire. Some Allied landing craft may also fire at German Beach Defenses under this rule. See the specific rules for the timing of such attacks (4.4.6, 4.5.4(6)) (1) Firing at Beach Defenses Procedure If the Allied Unit survived any Resistance Nests attack and is unsuppressed, it may fire at the Beach Defenses. The Allied player rolls a die, applying the modifiers below, and consults the Firing at Beach Defenses section on the Naval Display, which is organized by the type of Unit that is firing, to wit: any Unit of the 79th Armoured Division; any Engineer Unit; any other Tank Unit (i.e., Royal Marine Armoured Support, regular tanks or DD Tanks); any Landing Craft; and all other Units not in the other groups. Note that the results are applied as written, so the usual GTS rule that a 0 always hits and a 9 always misses does not apply here. The following modifiers apply to die rolls when Firing at Beach Defenses. Note that modified rolls of greater than 9 are treated as 9. A. The firing Unit has one step: +1 B. The firing Unit has 1 Cohesion Hit: +1 C. The firing Unit has 2 Cohesion Hits: +2 Modifier A is cumulative with modifier B and modifier C, so, for example, a onestep unit with two Cohesion Hits would add 3 to its die roll. Modifiers B and C are exclusive of each other (2) Firing at Beach Defenses Results A. Miss Miss. The attack has no effect. B. Reduce Nests by X X=the amount by which the Resistance Nest number on the firing Unit s beach Overlay is reduced. C. Reduce Obstacles or Gaps by X X=the amount by which the Beach Obstacles number or the Gaps number on the firing Unit s Beach Overlay can be reduced according to the Allied Player s choice. If X is 2, the possibilities are: 2 Beach Obstacles; or 2 Gaps; or 1 Beach Obstacle and 1 Gap. D. Reduce Any by X X=the amount by which the Resistance Nest number, or the Beach Obstacles number, or the Gaps number on the firing Unit s Beach Overlay can be reduced according to the Allied Player s choice. If X is 2, the possibilities are: 2 Beach Obstacles; or 2 Gaps; or 2 Resistance Nests; or 1 Beach Obstacle and 1 Gap; or 1 Beach Obstacle and 1 Resistance Nest; or 1 Gap and 1 Resistance Nest Multi Man Publishing, Inc.

25 Notes: Results achieved after a particular Beach Defense number is 0 are lost and may not be used against a different Beach Defense. Don t forget to follow rule whenever the Gaps number is reduced. 4.3 Effects of an Uncleared Beach; Clearing a Beach; and Removing the Beach Overlay The Uncleared Beach Before a beach is cleared: No Allied Units or Leaders may leave that Beach Overlay. All Allied reinforcements enter play only on the draw of the Naval Chit and according to the Naval Chit procedure (4.7.1) Clearing a Beach A Beach is cleared the instant the following all apply: The Resistance Nest value is 0 The Beach Obstacles value is 0 The Gaps value is 0 There are no German Units (including Wn or Stp) within 3 hexes of any reinforcement hexes on that Beach Overlay There are no Allied Units in any Beach hex on that Beach Overlay Optionally, a beach may not be considered cleared prior to the 1100 turn of June 6 Immediately after the above conditions are met, the Beach Not Cleared! marker on that Beach Overlay is flipped over to its Beach Cleared! side Effects of a Cleared Beach No Allied Unit may enter a Beach hex on a Beach Overlay with a cleared Beach. At the very beginning of the turn after a Beach is cleared, the Beach Overlay for that cleared Beach is removed from play. Any Units on the Beach Overlay are simply transferred to the corresponding hexes on the map. All normal (i.e., non-naval chit) game rules are now in play on the map where the Beach Overlay was just removed. In particular: 1. Allied Units now enter play by being placed in their respective Reinforcement hex (or hexes) and normal GTS reinforcement rules apply going forward. 2. Units on the Naval Display that are in that Beach s Landing Wave boxes, Loading Onto Landing Craft boxes, and En Route from England boxes are placed in their corresponding Reinforcement boxes on the Divisional Display. 3. The landing and loading sequences (4.7.5) are ignored for this Beach. 4.4 Assault Forces General Description Each Naval Display is divided into various segments, including boxes for the various naval assault forces, each of which is assigned a letter designation (e.g. Assault Force G); the assault force boxes are subdivided into range boxes. All ships live in an Assault Force Range box on the Naval Display; a ship is considered part of the assault force whose range box the ship occupies (ships can shift boxes and sometimes change assault force see below). Each Assault Force has one Assault Force Marker that is always on the Beach Overlay (or the game map after the Beach Overlay is gone). Each Assault Force Range box contains a number that represents the range from that box to the Assault Force Marker for that assault force. All of this governs which ships can fire at which targets. Ships are always considered In Command. +2) but if the German decides to fire before unloading, he won t know which choice will be made. It is still a better shot even if the Funny is in Column. However, the German rolls a 4 and misses because of the -1 DRM for the defensive value. As with Resistance Nest Fire, the German player has the option of performing Opportunity Fire either against the Landing Craft or against its passengers after they land. Let s assume that the German decides not to perform Op Fire against the LC. The Funny now unloads from the Landing Craft (dismounts). The Allies, knowing that fire on the Beach Defenses is not affected if a Unit is In Column and knowing the stacking issues soon to come, decides to unload the Funny In Column. Because the German performed Resistance Nest Fire against the LC, he can t do so again against the Funny. However, he didn t perform Op Fire against the LC, so he can attempt to do so now against the Funny after it has landed. Unfortunately for the Germans, the Stp 20 unit blows his TQC and so there s no Op Fire. After performing Op Fire the Landing Craft gets a shot before it is removed from the map. The Allies choose to fire at the German Beach Defenses and roll a 2. There is no Company Bonus for this fire - that is accounted for in the +1 mod for one step Units. The Resistance Nest Value is reduced again and is now at 3. The Landing Craft is now removed from play. The Allied player spends a Command Point to perform a second action and while it can t be a Move Action, it can be anything else. Since an Action has been declared (although the Allied player doesn t have to say what it is), the Resistance Nests may now fire. Now at a 3 value and a -4 for defense, the Germans need an unlikely 0 to hit. They roll an 8. Next up, the Funny s action. It will take a Fire Action (surprise) and go after the German Beach Defenses. They are suffering from a +1 modifier due to their Cohesion Hit. 403 Headquarters Drive, Suite 8, Millersville, MD

26 An excellent roll by the Funny forces the Allied player to make a tough decision. He d like to get those Beach Obstacles down for follow up landing waves but this is Sword with its terrible congestion and if he reduces the Gaps by two, the German player will be forced to place a gap. It is a start. That s what the Allied Player does. The Gaps marker goes down by two - and the German Player places a gap. It must go on either the gap between hexes and or in the gap between and The German won t make it easy and places it on / The Allied Player will at least need to assault to get off the beach. With a job well done and a deserved pat on the back for a gap opened, the Funny is now done for the activation. It is time for the 2 E Yorks battalion to land. The Allied player places the 4 companies under a Landing Craft in hex First, they have to brave the Beach Obstacles Moving Ships on the Naval Display All ships have as their movement allowance, either a letter, which corresponds to an assault force, or an asterisk, which denotes a wild card. If a ship has a letter, it must stay with its assault force, but if it has an asterisk, it may be with any assault force. During Step 7 of the NSoP, ships may be moved about on the Naval Display. Lettered ships can be moved to any range box within their assault force, and asterisked ships can be placed in any range box of any assault force on any Naval Display. Play note: once all Coastal Battery Units have been eliminated, there is no reason to have any ships in the long or medium range boxes Moving Assault Force Markers Each assault force has one associated Assault Force Marker which is in turn assigned to a particular Beach. During Step 7 of the NSoP, the Allied Player may move Assault Force Markers within the limitations of this paragraph. Each Assault Force Marker must stay in its assigned Sector and can be placed in a non-dotted hex or water area adjacent to a dotted hex along the coast, or, if the Beach Overlay is still in place, in a Beach hex adjacent to a dotted non-beach hex along the coast. For example, the Juno Sector and/or Gold Sector Assault Force Marker may be placed in hex (just off the map) or (also just off the map) since these two hexes are both adjacent to playable (i.e., dotted) hexes in their sectors Ships Firing at Shore Targets Ships on the Naval Display may fire at shore targets during Step 2 of the NSoP. To fire at a shore target, a ship must be in range of the target and able to spot the target. (a) Determining Ship to Target Range To determine a ship s range to a target, count the number of hexes from the target to the Assault Force Marker for the ship s assault force, then add the range number for the ship s Assault Force Range box; if this number is equal to or less than the ship s range, the target is in range. (Note that a ship can never determine range using an Assault Force Marker belonging to a different assault force, but range from a target to an Assault Force Marker can be traced from one Beach Overlay to another.) (b) Ships Self-Spotting Targets Ships are able to self-spot against any Wn or Stp target that is in range (as determined above), and in the Line of Sight of a Beach hex on a Beach that is not yet cleared (put another way, you can t spot from a Beach hex that isn t on a Beach overlay). In addition, a ship can always self-spot against a Coastal Battery (a Unit with a black Fire value) that is in range of the ship without spotting. (c) Ships Spotting Targets Using Spotters Any In Command Unit can spot for any ship in any Naval Display. The spotting Unit must have a Line of Sight to the target, and the target must be in range of the ship (as determined above). The universal contact number for ships is 6. If 6 or less is rolled, the ship may fire at the target, otherwise, the ship may not fire and is done for this Naval Chit. Note that ships have to roll for contact every time they fire (unless they are self-spotting, of course); ships never stay in-contact with spotter Formations the way artillery does. If a ship is eligible to fire at a target, it conducts normal Indirect Fire. Ships with two steps may roll for Company Bonus Landing Craft, Rockets (LCRs) Firing at Shore Targets LCRs may fire at Units on shore during Step 2 of the NSoP on the June 6, 0700 turn only. Once fired, LCRs are removed from play. LCRs must self-spot to fire, they do not receive a company bonus. Just roll on the appropriate row on the Combat Results Table; the only modifiers used are positive Direct Fire modifiers no negative modifiers apply. Barrage markers are never placed. LCRs have a * as a range to remind you that they can fire at any target they can self-spot. Note that LCRs can only fire at Units, not at German Beach Defenses Multi Man Publishing, Inc.
.")

27 4.4.6 Landing Craft, Support (LCSs) Firing at Shore Targets LCSs may fire at Units on shore during Step 3 of the NSoP. LCSs must self-spot to fire and may also choose to fire at the German Beach Defenses on the same Beach Overlay (see rule for the conduct of such an attack). LCS fire at German Beach Defenses as a Landing Craft. LCSs live in the Close Range box on the Beach Overlay and remain in play until the Beach Overlay is removed. Note that LCSs have a * as a range to remind you that they can fire at any target they can self-spot or at the Beach Defenses but never at any other targets German Coastal Batteries Coastal Batteries are the German Units with black Fire Values. With a few exceptions, Coastal Batteries are just like orange Fire Value artillery Units. The black Fire Value is there as a reminder that during Step 3 of the NSoP, any Coastal Battery Unit that is not under a barrage marker or adjacent to an enemy Unit may fire at any in-range ship on the Naval Display or at any in-range landing craft that is in a Landing Wave box. Step 3 of the NSoP is the only time Coastal Batteries can fire at Ships or Landing Craft in a Landing Wave box. Coastal Batteries may never fire at Landing Craft on the Naval Display. The NSoP Step 3 fire is a special function that does not affect the normal Activation of Coastal Batteries as Units at other times. The rules of this section apply only to this special function. (a) Coastal Batteries Range to Ships and Landing Craft To determine the range from a Coastal Battery to a ship, count the number of hexes from the Coastal Battery to the ship s Assault Force Marker and add to that the range number from the range box the ship occupies. The range from a Coastal Battery to a landing craft that is in a Landing Wave box is the number of hexes from the Coastal Battery to the Assault Force Marker on the same Beach Display as the Landing Wave box. (b) Resolving Coastal Battery Fire During Step 3 of the NSoP Coastal Battery fire against ships and landing craft is handled as normal Indirect Fire with the following additions and changes: 1. All ships are armored targets. 2. The only modifier applicable to ships is their defensive modifier. 3. Any Effective Fire (defined as: a failed S?, S, C, 1 or E) against a ship eliminates the ship from play. 4. Any Effective Fire (defined as: a failed S?, S, C, 1 or E) against a landing craft removes the landing craft (landing craft counters are recycled) and eliminates the landing craft s passengers from play. 5. This special type of fire does not create a barrage marker. Example: The Mont Fleury Bty is in hex and the Assault Force Marker for Assault Group G is in hex (although the battery could fire at another Assault Group just count to that Assault Force Marker instead). It is the first turn so there are a bunch of British in the Landing Wave box, Destroyers in the Short Range box and Cruisers in the Medium Range box. The Landing Craft (Rockets) have already fired and have been removed so they can t be fired at. It is 5 hexes from the Battery to the Assault Force Marker for Assault Group G and the range for the Battery is 41. The Battery could fire at any Landing Craft currently in the Landing Wave box of Gold Beach (range is 5), the Destroyers (range is 15) or the Cruisers (range is 25) or, if there were ships in the Long Range box, at those too (range would be 35). 4.5 The Landing Subroutine Generally During NSoP Step 4 the Allied player may land all of his Units in Landing Wave boxes on to Beach hexes. There are two types of Units that are landed: Units that are loaded onto Landing Craft and DD Tanks. Different rules apply to the landing of Landing Craft and DD Tanks, but the basic procedure is for the Allied player to choose any Landing Craft or DD Tank, land it, suffer the wrath of the German defenders, complete all possible Actions, and then move on to the next Landing We ll return to the brave Yorkshiremen in a moment but since we are there in the rules to the right, here s a quick example on how to determine range when firing from shore to ship or ship to shore. I ve moved the Marefontaine battery to a new hex to save some graphic room. She is firing on HMS Ajax in the Medium Range box of the Assault Force G Naval Display. The coastal battery figures range by tracing to the Assault Force marker and then adding the range to the box on the display. Here it is 4 hexes to the marker - and then you add 20 more for the Medium Range box. The range to target for the Marefontaine battery is thus 24 hexes. The Ajax is out of range and may not be fired on by the battery. While surely out of this battery s range but just to show how you find the range to other display, if the Assault Force J marker was in hex and Marefontaine wanted to fire on a ship in the Long Range box of the Assault Force J Naval display, it must trace 16 hexes to the Assault Force J marker and then add 30 more to reach the Long Range box: a total of 46 hexes. Amphibious Landing Example of Play (cont.) Back to our brave Tommies trying to get ashore and risking their Beach Obstacle attack. The Beach Obstacle value still stands at 5 - and there is a 20% chance of the Landing Craft losing a step (and all 4 battalions inside losing a step too). 403 Headquarters Drive, Suite 8, Millersville, MD

28 Craft or DD Tank. The Allied player may do this in any order he wishes, without regard to Beaches, Sub-Beaches or sectors. The Germans roll a 2 and get a Suppressed result. As it is more efficient to try and rally one Landing Craft now than to try and rally 4 Units after they unload, the Allies attempt to convert the S result to a Cohesion Hit. The Allies could spend a Command Point but he is going to try his luck but the Allies miss the TQC roll with a roll of 4. Note that while all of these Units are in command from Brig Palmer who landed earlier (27 Armoured Brigade is attached to 3rd Division so he is a leader in the 3rd Division for all purposes and the Landing Craft is an independent Unit), all 3rd Division Troop Quality Ratings are reduced by one until the beach has been cleared. The Landing Craft s TQ is reduced from 4 to 3. Just missed the TQC. The Allied player must unload the Landing Craft so an action is declared and the Resistance Nests may now fire. The sequencing here is very important. The German Player can perform Resistance Nest Fire once and Op Fire (from the Stp 20 Cod unit) once, either against the Landing craft before it unloads or against its passengers after they unload. But any fire against the LC has to be performed first. He would rather fire his Resistance Nest attack after the battalion unloads and Op Fire at the Landing Craft before it has unloaded. But let s run through the possibilities. Note that there is no stacking limit in any box on the Naval Display nor in the Landing Wave boxes on the Beach Overlays List of Landing Wave Boxes and Their Corresponding Eligible Beach Hexes The following is a list of the Beach hexes that may be landed on from each Landing Wave box. Note the landing hexes are color-coded on the map for ease of play. Note that when the landing rules refer to eligible hexes, these are the hexes referred to: Sword Beach: Queen White: ; Queen Red: ; ; Juno Beach: Mike Green: , Mike Red: , Nan Green: , , , Nan White: , , , Nan Red: , , Gold Beach: Jig Green: , , Jig Red: , , King Green: , King Red: , , Beach Landings, Leaders and Command The scenario rules will tell you to place Leaders with their commands. It does not matter where you put Leaders until NSoP Step 3, when Units are placed in the Landing Wave boxes on the Beach Overlays. At this time, Leaders must be stacked with some Unit of their Command. Once stacked with a Unit, the Leader stays with the Unit while the Unit is landed on a Beach hex and while the Unit performs any Actions during the NSoP. After the Leader has landed during the NSoP, normal GTS Leader rules are in effect. A Leader in a Landing Wave box is considered to have no Command Range. So until a Leader is landed on a Beach, all of his Units are considered Out of Command. Once the Leader is on the Beach, normal GTS Command rules are in effect. The practical effect of this rule is that landed Units will be Out of Command on the Beach until their Leader is landed and they are within his Command Range. A Leader in a landing craft with a Drift marker is considered on the map and able to command Units. Note that a leader with a Unit eliminated in Combat during a landing is moved to another Unit of his command (owning player s choice) anywhere on the Beach Overlay or Naval Display Landing Craft Operations 4.5.4(1) Landing Craft Generally Landing Craft counters are reusable markers, not Units, although Landing Craft do perform some Unit functions, notably Direct Fire. Landing Craft markers are used to land Units other than DD Tanks; once used or eliminated they are removed from play and are available for later use (2) Loading Leaders and Units on to Landing Craft During NSoP Step 5, Units are moved from the Loading into Landing Craft boxes on the Naval Display to the Landing Wave boxes on the Beach Overlays. Once in the Landing Wave boxes, Units are loaded onto the Landing Craft by placing a Landing Craft marker on one or more of the Units. Each Landing Craft is loaded Multi Man Publishing, Inc.
29 with either one Independent Unit (i.e., with a black or white stripe) or all the Units of the same battalion. Leaders can be placed with any Units of their command (3) Landing Craft, Landings and Combat Landing Craft and their passengers land on any eligible Beach hex (see 4.5.2) during NSoP Step 4 by moving them from their Landing Wave box to the Beach hex. This landing triggers attacks by German Beach Defenses (4.2.1 & 4.2.2) and Opportunity Fire (4.2.3). If a Landing Craft is eliminated, all its passengers are eliminated. If a Landing Craft suffers a combat result (a passed S? is not a combat result), each and every one of its passengers suffers the same combat result. A Suppressed Landing Craft may land its passengers. Eliminated Landing Craft are removed from play and are available for future use. Note that all Landing Craft have two Steps (4) Effect of Unloading on Column and Mounted Status Units that dismount from Landing Craft may do so in Column if normal stacking rules are observed, although such Units will suffer the adverse Column fire modifier if they are attacked after they unload. Units that dismount from Landing Craft may do so mounted if they possess organic transport (5) Landing Craft Returning Fire After a Landing Craft has landed its passengers, and before it is removed from the Beach hex, it may fire at the German Beach Defenses on the same Beach Overlay (4.2.6) or at any Wn, Spt, or Coastal Battery in range to which it has a Line of Sight (6) Landing Craft Removal and Reuse Once the landing procedure has been completed, the Landing Craft is removed from play and is available for reuse (7) Just-Landed Units: Actions and Enemy Reactions Units that have just been landed from Landing Craft may be the object of attacks from German Resistance Nests (4.2.2(1)) and Opportunity Fire (4.2.3(b)). A Unit that has landed and survived any post-landing attacks may perform a non-movement Action for the cost of one Command Point as long as it is In Command. This Action triggers a Resistance Nest attack (4.2.2(2)) that is performed after the Command Point is spent but before the Unit performs the Action DD Tank Landings 4.5.5(1) DD Tanks Generally DD Tanks are amphibious tank Units that swim ashore (or so one hopes). Note that our DD Tanks have both a skirt up and a skirt down side. This is purely for aesthetic interest and has no effect on play. You may use either side of the counter at any time. We like to swim them ashore using the skirts up side and then, once they hit a Beach hex, flip them to their skirt down side (2) Landing DD Tanks & Leaders; Sea State Roll A DD Tank Unit that is in a Landing Wave box on a Beach Overlay may land on any eligible Beach hex (4.5.2) during NSoP Step 4 by moving it from its Landing Wave box to the Beach hex. This landing triggers a Sea State roll (4.2.5). If the DD Tank survives the Sea State Roll it is placed on the Beach hex. The DD Tank may not land in column. If a Leader is stacked with the DD Tank, it lands with it and stays with it throughout the following steps (3) Just-Landed DD Tanks: Actions and Enemy Reactions A just-landed DD Tank that is not Suppressed may perform an Action. If it does perform an Action, the DD Tank must first survive a Resistance Nest attack (4.2.2(2)), followed by any Opportunity Fire (4.2.3) according to normal Opportunity Fire rules. Following performance of an Action, a just-landed DD Tank that is In Command and not Suppressed may perform a Second Action according to normal Second Action rules (including expenditure of a Command Point, of course). If it does perform a Second Action, the DD Tank must again survive a Resistance Nest attack (4.2.2(2)), followed by any Opportunity Fire according to normal Opportunity Fire rules. First, let s see what would happen if the German fires the Nests and the Op Fire at the Landing Craft before it unloads. This is a small arms attack using the Nest s current value of 3. There is a -1 defensive modifier and it is against an armored target. Not a very strong attack. Note that Fire Zone to Fire Zone modifiers do not apply to German Beach Defenses attacks. The Op Fire attack, however, is much better. It s not certain that the Stp 20 will pass its TQC for this Op Fire but if it does, it is a 6 Fire Rating, +2 for Fire Zone to Fire Zone, -1 for the Barrage, -1 for the Defense Rating. A total of 6 Dual Purpose attack. A very nice attack that will impact on all 4 companies with one roll. There s a 10% chance of killing all 4 companies with a single roll. On the other hand, the German could fire the Nests at the stack after it unloads. This is a 3 Small Arms attack against one company but modified by +1 for Beach Terrain and +3 for the 10 steps in the hex. A 7 Fire Strength. A nice shot as well. The Op Fire against the unloaded units is still excellent (assuming the Stp passes his TQC) at base of 6, +1 for the beach, +2 for Fire Zone to Fire Zone and +3 for mass - a fire strength of 8 (12 but 8 is the best you can get). However, he can only fire at one Unit in the stack. So in this case it would probably be best for the German to perform the Op Fire against the Landing Craft before it unloads and then perform the Resistance Nest Fire after the LC has unloaded. 403 Headquarters Drive, Suite 8, Millersville, MD
 NSoP Step 5 In Step 5 of the NSoP all the Units from the Loading into Landing Craft boxes are moved to the corresponding Sub-Beach Landing Wave boxes on the Beach Overlay.")
30 4.5.6 NSoP Steps 5 and 6: Getting Units to the Beach It s best to think of the Units on board ships between England and the Normandy beaches as forming a conga line on the Naval Display and the Beach Overlays (1) NSoP Step 5 In Step 5 of the NSoP all the Units from the Loading into Landing Craft boxes are moved to the corresponding Sub-Beach Landing Wave boxes on the Beach Overlay. Once in the Landing Wave Boxes, Units are loaded onto Landing Craft by having a Landing Craft marker placed on one or more Units. Each Landing Craft is loaded with either one Independent Unit (i.e., black or white stripe) or all the Units of the same battalion. Leaders can be placed with any Units of their command (2) NSoP Step 6 In Step 6 of the NSoP, all Units in the En Route from England boxes are moved into the corresponding Loading into Landing Craft boxes. At this time, the Allied player may choose from available Sub-Beaches where to place Units. 4.6 The Mulberry On the 1100 turn of June 9, the Mulberry under construction is placed in hex Starting with the 0700 turn of June 12, the Allied Player may roll for construction. On a 1, the Mulberry is flipped to its operational side and is now functioning. There is no game effect but the Allied player should say something interesting to his German opponent. Should a German Unit enter hex at any time on or after the 0700 turn of June 8, the game ends and the Germans win an immediate victory. Defend this hex well. This hex is not considered a Reinforcement hex and Germans may move within 3 hexes of the Mulberry. To finish off the example, after this Resistance Nest and Op Fire has concluded, the troops will be out of their Landing Craft. The Landing Craft is Suppressed so it will not be able to fire before it is removed and the first action by the E Yorks has concluded. They may do a non-movement action (like Rally) as their second action if they pay more Command Points. Assuming all fire was ineffective against the Yorkshire boys, we are here and the Allies choosing the next landing to take place during the Naval activation. 4.7 The Naval Sequence of Play (NSoP) Follow the steps below when the Naval Chit comes into play. 1. Check Gaps Markers (4.2.4(f)). Check the Gaps Number markers on each Beach Overlay. If any Gaps number is 0, flip the Gaps marker for that Beach Overlay over from its All Gaps Not Open to its All Gaps Open side; remove the Gaps Number marker from play; remove Gap Open markers as well. 2. Ships Fire at Shore. Follow the Naval Bombardment Procedure (NSoP Step 2) (4.8.1). 3. Shore Fires at Ships. Follow the Coastal Battery Defensive Fire Procedure (NSoP Step 3) (4.8.2). 4. Landing of Units. Follow the Beach Landing Procedure (NSoP Step 4) (4.8.3). 5. Loading Box to Landing Wave Box. Follow the Landing Forces Transport & Loading Procedure (NSoP Step 5) (4.8.4). 6. En Route Box to Loading Box. Follow the Landing Forces Transport & Loading Procedure (NSoP Step 6) (4.8.4). 7. Move Assault Force Markers (4.4.3). The Allied Player may move each Naval Assault Force marker to another hex in a non-dotted hex or water area adjacent to a dotted hex along the coast, or, if the Beach Overlay is still in place, to a beach hex adjacent to a dotted non-beach hex along the coast. (NSoP Step 7). 8. Move Ships (4.4.2). The Allied Player may move any of his ships on his Naval Displays. Ships with a letter movement capability may be moved anywhere within their Assault Group on their Naval Display. Ships with an asterisk movement capability may be moved to any Assault Group (NSoP Step 8). 9. If it is the June turn and this is the first play of the Naval Chit, put the chit back in the mug. If not, place it aside with the other played chits. 10. Draw the next chit and resume non-naval Chit procedure. Note that once there are no more Beach Overlays in play, steps 1, 4, 5 and 6 are ignored Multi Man Publishing, Inc.
 (LCS) on his Naval Displays. If is 0700 on June 6, he may fire his Landing Craft (Rockets) (LCR). 2.")
31 4.8 NIS Procedures You should be able to jump into the NIS by following the NSoP (4.7) and using the below procedures, with reference to rules as necessary Naval Bombardment Procedure 1. The Allied player may fire, in any order, the ships and Landing Craft (Support) (LCS) on his Naval Displays. If is 0700 on June 6, he may fire his Landing Craft (Rockets) (LCR). 2. To fire a ship, the Allied Player picks a ship on his Naval Display to fire with. a. The Allied player picks a valid target in the firing ship s range to fire at. To calculate range, find the Assault Force Marker that is serving the firing ship s Assault Group and count the number of hexes from the Assault Force Marker counter to the target. Add this number to the range value printed in the firing ship s range box on the Naval Display to determine the final range. b. If the target is a Coastal Battery, the Allied Player now takes the shot, treating it as Indirect HE fire according to GTS rules. c. If the Beach Overlay being supported by the firing ship s Assault Group is still in play, and the target is an Wn or Stp unit in a hex that is in the line of sight of any Beach hex on that Beach Overlay, the Allied Player now takes the shot, treating it as Indirect HE fire according to GTS rules. d. If neither of the conditions in b or c apply, the Allied player must find a Unit to spot for the firing ship, rolling for contact against the universal ship contact number of 6. Roll a 6 or less, contact is made and the Allied Player may take the shot, otherwise, move on to the next ship. Contact must be rolled anew each time a ship fires. e. Landing Craft, Support (LCS) are treated like Direct Fire Units and may only fire as long as their associated Beach Overlay is in play. To fire an LCS the Allied player picks an LCS on the Naval Display and decides whether to fire at the German Beach Defense Track or at an enemy Unit. If firing at the German Beach Defense Track, the Allied Player simply rolls on that table (4.2.6(2)). To fire at a Unit the Unit must be in range and Line of Sight (all LCS are considered to be in the close range box on the Naval Display). 3. If it is the 0700 turn on June 6, and the first time the Naval Chit is in play, the Allied player may fire Landing Craft, Rockets (LCR) on the Naval Display. a. The procedure is the same as for LCS fire except that no negative fire modifiers of any kind apply, no company bonus is available, and no barrage markers are placed. LCR have a * as a range to remind you that they can fire at any target they can self-spot but never at any other targets or Beach Defenses b. LCR are removed from play after they fire or, if they do not fire, before going to the next step in the Naval Chit procedure Coastal Battery Defensive Fire Procedure 1. Coastal Batteries are the German Units with black Fire Values. The German Player may use any of his Coastal Batteries to fire at any Landing Craft or DD Tanks that are in the Landing Wave boxes on any Beach Overlay, or at any ships on any Naval Display. All targets must be in range. Play note: Coastal Batteries have Fire Zones and therefore their range is reduced to one if they are under a barrage marker or have an enemy Unit adjacent to them. 2. Calculate the range from the Coastal Battery to the target by counting the number of hexes from the Coastal Battery to the Assault Force Marker on the same Beach Overlay as the target. This is the range to any target in a Landing Wave box. For ship targets, add on the range corresponding to the range box the ship occupies. Make one of your primary objectives in attacking the German Defenses reducing the Beach Obstacles value to less than 4 before your Commandos arrive. A 1 result on the Beach Obstacle roll (a 4 or 5 rolled on the CRT) is really an E result, and while your two step Landing Craft will be reduced to one step, far more importantly you ll lose all of your one-step Commandos loaded in that Landing Craft in one roll. While the example above all looks pretty complex, if you were actually playing it, the above would only take a few minutes to actually play. Of course, there are a lot of Units to land. New players should play the various Storming scenarios a few times before tackling the campaign game. While not really about the rules section we are in here, we have a little space below to have Vincent write about one of the interesting decisions we made about the game historically. After playing a lot of Avalon Hill s Longest Day, players may miss having all those flak units to cover your front. Not so here. In addition, while 88s certainly could have been pressed into service if an emergency demanded it, we decided to make using 88s in the front line very inadvisable. Here is why. 88s as Indirect HE artillery? What the...? Adam once told me that the interest for him in designing wargames resided in bringing something new to gamers, in expressing familiar topics through differing lenses. If a game only did the same things that others had done before him, well, there was no point. 403 Headquarters Drive, Suite 8, Millersville, MD
32 With this in mind, let s introduce what might be one of the big controversial design decisions in The Greatest Day: the depiction of German 88 Flak guns as Indirect HE (Orange) Units, and not Dual Purpose (White) Units. Since the actual events, a LOT has been written about the Battle of Normandy (and WW2). Some of this mass of writing has even entered legendary status, i.e. it is now almost universally accepted as truth without giving it too much of a second thought. In my opinion, 88 Flak guns were terrific tank killers and thus were often used in an antitank capacity is one of these pieces of conventional wisdom. I never even gave a thought about questioning this until I came across a number of points made about this very topic by Niklas Zetterling in his book (see Bibliography). These points, supported by some items I later came across in my own research, won me over to his assertion, that the 88mm Flak gun was mostly not employed in an antitank role by the Germans in Normandy. Zetterling s demonstration revolved around a comparison of the antitank performance of the 8.8cm Flak 36 antiaircraft gun and the mainstream 7.5cm Pak 40 purpose-built, dedicated antitank gun: Given the confined nature of the Normandy battlefield, the range advantage of the Flak 36 over the Pak 40 was rarely a factor; in the same vein, its better penetration was rarely needed, the Pak 40 being powerful enough to knock out relatively easily the whole inventory of Allied tank models deployed in Normandy (Churchill excepted). Overall, the Flak 36 did not have a big advantage that would have made it a much better antitank weapon than the Pak 40. What it had, though, were two serious drawbacks in a defensive fight against an opponent with superior numbers: it was huge, and thus much harder to conceal than the Pak 40, as well as being an easier target; and, when in a firing position, it was effectively immobile, whereas the Pak 40 could at least be manhandled to a nearby location if need be, thus increasing its survival chances. To sum it up, the Pak 40 was perfectly able to play its antitank role against Allied armor, and, arguably, better under most circumstances than the Flak Take the Coastal Battery shot using the Black line on the Combat Results Table. The only modifiers that apply are ship defensive ratings. Ships are armored target types. 4. Any combat result other than S? eliminates the target (and all its passengers if it is a Landing Craft). A failed S? has the same result Beach Landing Procedure 1. The Allied Player must now land all Units in Landing Wave boxes on eligible Beach hexes (4.5.2). The Allied Player may land Units in any order he wishes, one Landing Craft or DD Tank at a time before proceeding to the next one. Landing Craft use the Landing Craft Landing Procedure (4.8.3(1)). DD tanks use the DD Tank Landing Procedure (4.8.3(2)). 2. Once all Landing Craft and DD Tanks have landed, proceed to step 5 of the NSoP (1) Landing Craft Landing Procedure 1. The Allied Player chooses any Landing Craft in any Landing Wave box and places it on any eligible sub-beach Beach hex (4.5.2). A Leader stacked with the Landing Craft goes along for the ride. 2. If the current Beach Obstacles number is greater than 0, roll for the effect of Beach Obstacles and apply the results (4.2.1). 3. If the Landing Craft is eliminated, all of its passengers are also eliminated move on to the next landing. Note that eliminated Landing Craft are recycled for later use. 4. If the Resistance Nest number on the Beach Overlay is greater than 0, the German player may fire at the Landing Craft with his Resistance Nests (4.2.2(1)). 5. Apply the result of any Resistance Nest attack to the Landing Craft. If the Landing Craft is eliminated, all of its passengers are also eliminated move on to the next landing. Note that eliminated Landing Craft are recycled for later use. 6. The German player may conduct Opportunity Fire against the Landing Craft with any eligible Units (4.2.3(a)). 7. Apply the result of any Opportunity Fire to the Landing Craft. If the Landing Craft is eliminated all of its passengers are also eliminated move on to the next landing. Note that eliminated Landing Craft are recycled for later use. 8. Land the Landing Craft s passengers by placing them on top of the Landing Craft. A Suppressed Landing Craft may land its passengers. Apply all combat results suffered by the Landing Craft to each of its landed passengers. The Allied player may land each passenger in Column or not and/or mounted or not in any combination. Normal stacking rules apply. 9. If the German player did not make a Resistance Nest attack against the Landing Craft he may now make a Resistance Nest attack against any one Unit that just landed (4.2.2(2)). 10. If the German player did not make an Opportunity Fire attack against the Landing Craft he may now make an Opportunity attack against any one Unit that just landed (4.2.3(b)). 11. The Landing Craft may now fire at the German Beach Defense track or at any German Unit to which it has a Line of Sight. If firing at the German Beach Defense Track, the Allied Player simply rolls on that table (4.2.6(2)). 12. Remove the Landing Craft marker (but leave the landed Units on the Beach). The Landing Craft marker is now available for reuse. 13. The Allied player may now activate one or more of the just-landed Units, one at a time (or, if assaulting, as a stack), if they are In Command (remember that Leaders in the Landing Wave boxes have a Command Range of 0) Multi Man Publishing, Inc.
). c. If the Unit survives it may perform any non-movement Action. 14. Move to the next DD Tank or Landing Craft in any Landing Wave box and repeat the steps as applicable. 4.8.")
33 Follow the steps below for each Unit. When finished, move on to the next landing. a. The Allied Player first expends a Command Point for the Unit he wishes to activate. b. If the Resistance Nest number on the Beach Overlay is greater than 0, the German Player now performs a Resistance Nest attack on the activated Unit (4.2.2(2)). c. If the Unit survives it may perform any non-movement Action. 14. Move to the next DD Tank or Landing Craft in any Landing Wave box and repeat the steps as applicable (2) DD Tank Landing Procedure 1. The Allied Player chooses any DD Tank in any Landing Wave box and places it on any eligible sub-beach Beach hex (4.5.2). A Leader stacked with the DD Tank goes along for the ride. The DD Tank may not land in column. 2. The Allied Player now rolls against the Sea State number (4.2.5) and applies the result to the DD Tank. 3. If the DD Tank survived the Sea State roll and is not suppressed, the Allied Player may choose to perform one Action with it by proceeding to the next step; otherwise, move to the next DD Tank or Landing Craft in any Landing Wave box and repeat the steps as applicable. 4. Resolve Resistance Nest fire (4.2.2(2)) against the DD Tank. 5. A surviving, unsuppressed DD Tank may now perform any Action. This Action is subject to normal Opportunity Fire rules. 6. Following performance of this action, the DD Tank is eligible, assuming it survived any Opportunity Fire, is not suppressed, and is In Command, to perform a Second Action at the cost of one Command Point. If the Allied Player chooses to have the DD Tank perform this Second Action, proceed to the next step, otherwise, proceed to the next DD Tank or Landing Craft landing. 7. Resolve Resistance Nest fire (4.2.2(2)) against the DD Tank. 8. Assuming it survived the Resistance Nest attack and is not suppressed, the DD Tank now performs its Second Action. This Action is subject to normal Opportunity Fire rules. 9. Proceed to the next DD Tank or Landing Craft landing Landing Forces Transport & Loading Procedure (NSoP Step 5) 1. The Allied Player now transfers all Units in the Loading into Landing Craft boxes on the Naval Display into any Sub-Beach Landing Wave box on the corresponding Beach Overlay; the Allied Player then places a Landing Craft marker on top of each newly-placed stack as noted in the reinforcement schedule. 2. The Allied Player now transfers all Units in the En Route from England boxes onto the corresponding Loading into Landing Craft boxes of the Naval Display Procedure for Cleared Beaches 1. At the moment all of these conditions are met on a Beach Overlay, that Beach is cleared: A. The Resistance Nest value is 0 B. The Beach Obstacle value is 0 C. The Gaps value is 0 D. There are no German Units (including Wn and Stp) of any type within 3 hexes of any reinforcement hexes on the Beach Overlay What the Flak 36 had for it, though, was its ability to fire indirect artillery support (both HE and smoke shells) at ranges of up to 15 km, i.e. from the same German rear-area positions where they were set up to provide antiaircraft cover. The overall dearth of German artillery pieces and ammo compared to the Allies made the Flak 36 very valuable in this capacity. My research uncovered several testimonies of this fact, one being Hubert Meyer s history of the 12. SS-Pz.Div., the other being the post-war report written in captivity by Generalleutnant Pickert (commander of III. Flak-Korps) about his unit in Normandy, which describes the procedures set up to facilitate quick and efficient artillery support, while mentioning that such support represented a good deal of the Korps activity. (Upon arrival south-west of Caen on June 9, the Flak-Korps had been deployed in the rear area of I. SS-Pz.Korps with the following mission statement: Supporting the Army [...] against enemy air and ground attacks in the area close to the front, with emphasis laid on defense against enemy air attacks. Main basic principle: strict concentration of forces, no commitment in less than regimental strength. No fragmentation at Army request. ) Considering these two points, one can posit that the Flak 36s were too precious as artillery pieces for the Germans to bring them on the front lines and use them routinely as antitank pieces. (And that is without even broaching the fact that their antiaircraft capabilities were much needed against the myriad Allied aircraft flying over Normandy...) That doesn t mean they didn t do it, of course; but it looks more to have been done as a stopgap measure, rather than regular practice. As an example, Heeres-Flak-Abteilung 311 from the Pz.Lehr was first committed on the front lines on June 18 against a British push on Tilly-sur-Seulles; the fact that the division had been in combat since June 7 without the Flak guns being committed despite several days of very heavy fighting is a telling point, in my book. One last thing to ponder on this topic: Over the 75+ days of the Normandy campaign, the Wehrmacht and Waffen-SS claimed 3,663 Allied tanks destroyed; III. Flak-Korps claimed only Headquarters Drive, Suite 8, Millersville, MD
34 The 987 Field Artillery Battalion is the only American ground Unit in The Greatest Day: Sword, Juno, and Gold Beaches. It is colored differently just for nationalistic reasons. This Unit is a 50th Infantry Division Unit in all respects Note that GTS Series rule which says that immobile Units (Units with No as their movement allowance) may not build IPs doesn t apply to rearguards that have a movement allowance. Rearguards that can move can indeed build IPs. Learning to use Roadblocks and rearguards is vital to good GTS play. You can delay a massive force with just a few Units and well placed Roadblocks and Rearguards. Rearguards are also free force multipliers. If you lose them, they just come back with no ill effect to your troops. Use them very aggressively and since they can move now (at least the Allied ones), and have ranged fire (the German ones), they are far more effective than before. The number one priority for the Allies was to link up the beaches. With gamers having far better knowledge of what is happening and the German capability, players won t have the same urgency. This event is to provide some of that. Rolling this several times early on won t destroy the Allies but if they clear the beaches and still haven t linked up, the price becomes steeper. E. There are no Allied Units in any beach hex on the Beach Overlay F. Optionally, it is no earlier than the 1100 turn of June 6th. 2. The moment a beach is cleared, do the following: A. Flip the Beach Not Cleared! marker on the Beach Overlay to its Beach Cleared! side. B. Allied Units may NOT enter a beach hex on a Beach Overlay that shows a Beach Cleared! marker. C. Move all Units in the En Route from England box bound for the cleared beach, any Units in the applicable Loading into Landing Craft boxes, and all Units in Landing Wave boxes for the cleared beach into the applicable Reinforcement Box on the Division Display. D. As an optional rule, a beach can be cleared no earlier than the 1100 turn of June 6th; if using this rule, note that Units in the Landing Display boxes will arrive as reinforcements the 1300 turn. 3. At the beginning of every game turn while there are still Beach Overlays in play, take the following steps for each Beach Overlay showing a Beach Cleared! marker: A. Remove from play all of the Beach Overlay informational markers (e.g., Beach Obstacles, Beach Cleared!, etc.) B. Use a piece of scrap paper to record the locations of all remaining game pieces on the Beach Overlay. C. Remove the Beach Overlay from play. D. Place the removed game pieces onto their respective positions on the map. 5.0 Roadblocks and Rearguards (Sperren and Nachhuten) Sperre (plural Sperren) and Nachhut (plural Nachhuten) are the German words for Roadblock and Rearguard and are treated exactly the same in the rules. They are created in the same way as in the Series Rules for Roadblocks and Rearguards. The number of Roadblocks and Rearguards available to a player is limited by the scenario instructions and is an absolute limit. Rearguards lost in combat may be reused again later in the game. Place any rearguards eliminated in any way from the map back into the Available Rearguards box on their Division Display. They may be continually reused throughout the game. As an exception to the Series Rules, some Rearguards and Nachhuten now have movement allowances and can have Fire Rating strengths and ranges. They may move and activate like any other units. 6.0 Random Events During step 6 of the sequence of play (when you put the eligible chits into the mug to be drawn this turn), put the Event! chit into the Mug. If the Event! chit is the last one left in the mug at the end of the turn, it is not the first chit in play but rather you draw randomly to see which chit is first. Random Events occur when the Event! Chit is drawn from the Mug. Roll one die to see what happens: 6.1 Events Roll of 0: Historical Event Historical Events are events that occurred during the actual campaign but the timing of them could have varied. You do two things when this Event occurs. Check the connection between the divisions and perform one historical event. If all events listed here have occurred, then treat this event as either Allied NCO Shows Initiative or German NCO Shows Initiative. Roll a die to randomly determine which of those two occurred Multi Man Publishing, Inc.
. If you can t, reduce all Allied Division Troop Quality values by 1.")
35 First, whenever this event is rolled, check Connecting Road A and see if you can trace from one end of the map to the other without any German mines or Units on any hex of the Road (from to ). If you can t, reduce all Allied Division Troop Quality values by 1. Once the Connecting Road is clear of all German mines and Units, raise the Troop Quality of all Allied Divisions by 1. Units are never reduced by more than 2 TQ nor increased more than 1 TQ from their printed TQ values. Ignore any results that would go beyond those modifications. After this event has occurred at least once before in the game (in other words, this is the second time you have rolled a 0 for an Event!) and Connecting Road A is now clear, apply the same to Connecting Road B and see if it is clear from one end of the map to the other (from to ). If it is not, immediately subtract 1 from all Allied Division s Troop Quality until cleared. Once cleared, raise all Allied Divisions Troop Quality by one (and only one for each cleared event). This can occur multiple times during the game if the connecting Road B is contested or cleared multiple times. Secondly, in addition to the above, when you roll a 0 for the second time (thus the first one doesn t trigger a Historical Event - the second rolled 0 and each one thereafter, does trigger a Historical Event. Each of the following happens once and in the presented order. There is a maximum of one Historical Event listed below per Game Day. Just ignore the Historical Event if one has already happened this Game Day. Historical Event One: 46 Royal Marines Commando Brigade was held offshore as the Allied Commanders awaited developments after the landing. It is released. Place Units A, B, X, Y, Z, S of 46 RM Cdo in any Reinforcement hex of the 50th, 3rd Canadian or 3rd Division when this Event occurs. They may move normally when the Royal Marines Chit is pulled. If a beach hasn t been cleared, place the Commando Units in the Loading Into Landing Craft box of any Sub-Beach (Allied Player s Choice). Historical Event Two: As the Allies moved ashore, many individuals and squads of the 716.Infanterie-Division retreated in disarray. These Units eventually recovered to form up again. Some forces were given to the 21.Panzer-Division while others were organized into a division pool. Immediately add 8 Nachhuten to the 21.Panzer- Division Display and 4 Divisional Trucks to the 716.Infanterie-Division Display. Historical Event Three: As the Allied Supply situation eased, many trucks that were busy moving up supplies were released, allowing the Allied Infantry to partially motorize. Immediately add 6 Divisional Trucks to each of the 3rd Division, the 3rd Canadian Division and the 50th Division Displays. Historical Event Four: The Luftwaffe, wary of German frontline commanders wasting their precious 88s, were at first hesitant to release these Units to the front. They eventually relented and now release all Units of Flak 2, Flak 3 and Flak 4 to the Normandy Front. Each of these Units must be attached to any German Division (as the German Player wishes) and are immediately placed in 12.SS-Panzer-Division Reinforcement Hex B. Historical Event Five: The Allied supply situation dramatically improved as the days went on - this is their reward. If Connecting Roads A and B are clear (no German Units or Minen on any hex of the two Connecting Roads, increase the Troop Quality of 3rd Division, 3rd Canadian Division and 50th Division by 1. If this does not apply, there is no event and this is still the next Event in line. Add 5 Divisional Trucks to the 51st Infantry Division Display. Historical Event Six: The 2nd Panzer Division entered the map area on the 13th and was vital to the successful defense of Villers-Bocage. This event triggers the arrival on the map of the vanguard of this Panzer Division. When this event happens, the German player may place all Units of KG Brassert onto Lehr Reinforcement hex C and attach the KG to any division. They may move the next time the Division to which they are attached has its Division Activation drawn. Historical Event Seven: Werfer-Brigade 7 was moved towards the Front on June 10 but not committed until June 16th. They were just 10 kilometers away and could have been committed. Immediately attach Werfer 83 and Werfer 84 to either the Historically, the 46 RM Commando entered at Nan White at 0900 on June 7 and came under command of 1st Corps. They were immediately sent to attack a German position at Le Petit Enfer (hex ). This battery of the assault gun battalion of the 21. Pz.Div. appears on the German June 5 situation map of the Gold Juno Sword area... but is not depicted on the June 1 divisional Gliederung, making the exact nature of its equipment something of a mystery. The additional fact that it is scarcely referred to in D-Day histories made it somewhat of a mystery unit and, yes, a pain in the backside. I tried various theories about it. That it had the same assault gun complement (i.e., four self-propelled 7.5cm Pak 40 AT guns and six selfpropelled 10.5cm lefh 16 howitzers, all on ex-french Hotchkiss H-39 chassis) as the other batteries of the battalion; but then, where did these assault guns come from? Or that this 5th Battery had been raised by allocating the vehicles of the battalion over five batteries, instead of four. Or that it was in the process of being raised, as I read in several instances. Or... But then, in a report on the 21. Pz.Div s engagement against US troops in France (part of the NARA WW2 Foreign Studies), I came across an overview of the division s organization at the moment of the landings by its commander Generalleutnant Edgar Feuchtinger. This 5th Battery was explicitly mentioned, equipped with the same self-propelled multi-barrelled mortars as the 10./ Pz.Gren. Rgt. 125 and 10./ Pz.Gren. Rgt Problem solved! 403 Headquarters Drive, Suite 8, Millersville, MD
36 One of my favorite stories about the naval bombardment was from the obituary of the fire controller for both the Rodney and Roberts. He was given the order to lob a 16 shell every few minutes at a bridge almost 20 miles away to prevent the Germans from crossing. I wish I had more information about that; I suspect it is a great story. During the month of June, 1944 the Allied Navy suffered losses of 24 warships and 35 merchantmen sunk, and a further 120 vessels damaged. Most of the losses were from mines. When playing the Sword sector, prioritize getting those Commandos into the Orne Bridgehead sector as quickly as possible. These are the only major relief forces for the Airborne until the 51st Infantry Division arrives in over 5 days. If things become desperate for the Airborne, you won t see it until it is too late. Getting those Commandos there is Job 1.5 (after clearing the beach). Ah, the lost rule. I love the concept and refuse to let it die but no rule causes more issues with gamers than the lost rules. I hope I got them right now - but I ll keep trying if I didn t. Let me know. A fun rule. You ll find your bacon saved on more than one occasion by a lucky appearance of a hero. They can also ruin your day too if you re on the other side of them. 12.SS-Panzer-Division or the 21.Panzer-Division (German Player s Choice) and place all Units of these Formations in 21.Panzer-Division Reinforcement Hex B. Roll of 1: Allied NCO Shows Initiative Add 4 Command Points to any one Allied Division in play (Allied Player s choice) Roll of 2: German NCO Shows Initiative Add 4 Command Points to any one German Division in play (German Player s choice) Roll of 3: Allied Naval Strike Any two Allied Ships (Allied Player s Choice) may bombard any German Unit or Units within range and that can be spotted by any in command Allied Unit. Just pick a Unit or Units and fire away. Roll of 4: German Navy Attacks! Roll a die - if you roll an even number: an Allied Ship has struck a mine. Randomly choose an Assault Force (either G, J, S, or C) by a die roll. The German Player may choose any ship on the Naval Display in this Assault Force and eliminate it from the game. If there are no ships in that Assault Force, there is no effect. If you roll an odd number: E-Boats have intercepted the Allied Supply chain. Immediately reduce the Troop Quality for all Divisions in one Deployment Sector by 1 (German Player s choice of sector). Roll of 5: Allied Bomber Strike If it is not a Night or Storm weather turn, place up to 3 rubble counters in any City hex. The hex chosen must be at least 5 hexes from any Allied Unit The Allied Player places the first one, the German the next one, and the Allied player the last one. The latter two must be placed adjacent to another rubble hex. If no such hex exists, no Rubble counter is placed. If the hex chosen has a German Unit in it, attack the German Unit with a 6 white attack (no modifiers apply). If it is a Night or Storm turn, treat as Roll of 1 (Allied NCO Shows Initiative). Roll of 6: Some Allied Troops are lost The German Player may choose any Unit or stack of Units in any hex and immediately move them 5 hexes from their current position. This hex must not be in a German Fire Zone and must be a hex that the Allied Unit could move to legally (assuming no German Units on the board). Place a Lost marker on the Unit or Units. This Unit (or Units) may not activate again until an Allied Unit moves adjacent to it. Once and immediately when that happens, remove the Lost marker and the Unit may activate normally when the Unit is active on a following impulse. Roll of 7: Some German Troops are lost The Allied Player may choose any Unit or stack of Units in any hex and immediately move them 5 hexes from their current position. This hex must not be in an Allied Fire Zone and must be a hex that the German Unit could move to legally as currently deployed (assuming no Allied Units on the board); so, for example, a unit in an Entrenchment, or a unit that is dismounted and unable to move unless mounted, could not be chosen. Place a Lost marker on the Unit or Units. This Unit (or Units) may not activate again until an German Unit moves adjacent to it. Once and immediately when that happens, remove the Lost marker and the Unit may activate normally when the Unit is active on a following impulse. Roll of 8 or 9: Rare Event - roll on the table below: Special Events DIE ROLL 0: Allied Hero The Allied Player may place an Allied Hero counter on any unit. This unit has all the modifiers on the Hero marker (+2 Fire, +2 Assault, +1 Troop Quality, and -2 on Defense, and zero movement). Remove any Cohesion Hits and/or Suppressions that might be on this Unit. This Unit is now an Auto-Command Unit (see 14.0) in all ways. You may not spend any Command Points on this Unit and you have to pass a Troop Quality Check to do a second action if applicable. You Multi Man Publishing, Inc.
.")

37 may guarantee any roll against Troop Quality by immediately expending the Hero counter (taking it off the Unit). 1: German Hero The German Player may place a German Hero counter on any unit. This unit has all the modifiers on the Hero marker (+2 Fire, +2 Assault, +1 Troop Quality, and -2 on Defense, and zero movement). Remove any Cohesion Hits and/or Suppressions that might be on this Unit. This Unit is now an Auto-Command Unit (see 14.0) in all ways. You may not spend any Command Points on this Unit and you have to pass a Troop Quality Check to do a second action if applicable. You may guarantee any roll against Troop Quality by immediately expending the Hero counter (taking it off the Unit). 2: German Commander is Seriously Wounded/Killed in Action Roll a die: 0-3: Panzer-Lehr-Division 4-6: 12.SS-Panzer-Division 7-9: 21.Panzer-Division Remove all Dispatch Points on the Display for that division and halve the Command Points (round down the total so if 9 were on the chart, there are now 4). 3: Allied Commander is Seriously Wounded/Killed in Action Roll a die: 0-5: 3rd Infantry Division 6-7: 3rd Canadian Division 8-9: 50th Infantry Division Randomly choose one Brigade (don t forget that attached Brigades count here too) from that Division and that Division has Leader KIA placed on its Brigade Leader. You may not spend any Command Points on any Units of this Brigade until the end of the next Night turn. Remove the marker when the last chit of the Night turn has been played. 4: German Atrocity (12th SS caught in the act) All Units of the 3rd Canadian Division have their Troop Quality raised by 1 (move the TQ marker on the Division Display up by one). 5: The French French citizens mob the liberating Allied troops. The German player may place a French!! marker in any town or city hex that isn t in a German Fire Zone. That hex and the six hexes adjacent to that hex have their movement costs doubled until the beginning of the next 0700 turn. 6: Allied Brigadier has a great plan to attack something The Allied Player may add 4 Dispatch Points to any one Division (Allied Player s choice) 7: German Officer has a sneaky plan to do something really sneaky The German Player may add 4 Dispatch Points to any one Division (German Player s choice) 8: French Passive Resistance All German Reinforcements in any one Reinforcement Hex (Allied Player s Choice) are delayed until the next Night Turn. Place an Interdicted Night Arrival marker on those reinforcements to note the effect. This is to simulate the French misleading the Germans by giving them the wrong directions. Losing commanders was a disaster for both sides in this campaign. The Allies, most famously, lost Brigadier Cunningham, of the 9th Infantry Brigade, 3rd Infantry Division, almost the moment he stepped on to French soil. The 9th foundered without leadership for almost the entire first day of the invasion. The German drive to the sea later that first afternoon was to the immediate right flank of the 9th - and they sat and did nothing. For the German leadership, the constant threat of sudden air attack was omnipresent. Erich Marcks, an Iron Cross holder and commander of the artillery was killed by an air delivered 20mm projectile on June 12. An incident made famous when dramatized in the movie The Longest Day. The battle between the Canadians and the 12SS Division reached a hatred rarely seen outside of the Russian Front. The most famous massacre of Canadians took place at Abbaye d Ardenne (hex ) on the evening of June 7. Eleven Canadians from the North Nova Scotia Highlanders and the 27th Armoured Brigade were executed in cold blood. The next night, 7 more were shot in the back of the head. More were to follow. The Canadians of the Regina Rifle Regiment found the mass grave when they liberated the abbey on July 8. Kurt Meyer, the commander of the regiment that committed these crimes, was sentenced to death on December 28, This sentence was commuted to life less than a month later. He was released in September, 1954 and died a free man in Headquarters Drive, Suite 8, Millersville, MD
38 I don t seem to get many questions on the piggyback rules which have been around for many years. Although as a general observation, I don t see it utilized enough in games. It s a powerful tool particularly here with the Allies who are slow to motorize. So how about an unrelated historical note from David? Each of the four batteries in the 20th Anti-Tank Regiment, Royal Artillery was equipped with eight towed 6-pdr and four M10 SP guns, but for the landings, the M10 s were brigaded together into a single unit. The M10 s landed between 8am and 9am on Sword Beach, but their finest hour came in the afternoon of D-Day when they advanced with the 2 KSLI to the west of the Hillman position and, on reaching Periers Ridge, defended it against a counter-attack by Panzer IV s of the 22nd Panzer Regt. and one from Vincent as well. The Panther Battalion of the Panzer-Lehr-Division On D-Day, the Panther battalion of the Panzer-Lehr-Division (I./ Pz.Lehr-Rgt. 130) was loaded on a number of trains strung out between Paris and Magdeburg, en route to the Eastern Front. To compensate for the loss of this powerful unit, the division was assigned the Panther battalion of the 3. Pz.Div. (I./ Pz.Rgt. 6) in its stead. The Panthers of Pz.Rgt. 6 would fight under the Panzer- Lehr s command in Normandy and beyond, remaining attached until November. 9: German Air Strike If it is not currently Night and the weather isn t Storm, the German Player may place 4 Fighter markers on any Allied Units anywhere on the map and, after placing them, he may attack the Allied Unit underneath. More than one Fighter may be placed in any hex. Conduct this as a normal 4 red attack (with all applicable modifiers). If it is currently a Night or Storm turn, treat as Special Event Piggyback Mode Infantry Units without Organic Transport may piggyback ride on Vehicle Units of their Formation. 7.1 Starting in Piggyback Mode To mount up Piggyback, the two Units must start in the same hex and it takes an entire movement action by both units to Piggyback. When a Unit starts in Piggyback mode, the two Units move as one, but only when the Vehicle Unit is activated. 7.2 Exiting Piggyback Mode During the Vehicle (not the Infantry) Unit s activation, the two Units can exit Piggyback mode if the Vehicle Unit expends half of its printed movement allowance. The Infantry Unit is then dismounted and the Vehicle Unit completes its activation. The now dismounted Infantry Unit may not be in Column. Dismounting is a Movement Action performed by the Vehicle Unit and does trigger Opportunity Fire. The Opportunity Firing player gets to decide when to shoot, i.e., before or after the dismounting. If the Opportunity Fire takes place after dismounting, only the Infantry Unit is the target, otherwise the Vehicle Unit is the target and Rule 7.4 applies. The Infantry Units being carried in Piggyback mode are never active. When the active Vehicle Unit dismounts the inactive Infantry Unit, the Infantry Unit cannot perform any Actions until its next Activation. The active Vehicle Unit may perform a Second Action if eligible, after the Infantry Unit dismounts. 7.3 Restrictions on Piggyback Mode One Infantry Unit can Piggyback on one Vehicle Unit at a time. A Vehicle Unit cannot carry an Infantry Unit unless the Vehicle Unit has at least as many Steps as the Infantry Unit. Vehicle and Infantry Units in Piggyback mode together count as the number of steps in the Vehicle Unit only for stacking purposes, but both count against the mass modifier. Infantry Units in Piggyback mode can perform no Actions. While in piggyback mode the Vehicle Unit cannot perform any Action other than move and dismounting the Infantry Unit (note that this restriction prohibits Assault and Opportunity Fire). Infantry Units with Organic Transport can never Piggyback. 7.4 Piggyback Mode and Combat When fired on by Direct or Indirect Fire (and airstrikes), Units in Piggyback mode both count for the mass modifier. Both the Infantry Unit and the Vehicle Unit suffer the same fire combat die roll as if they were fired on separately, i.e., just apply the roll first to one and then to the other. Any terrain modifiers or marker modifiers for the Vehicle Unit also apply to the Infantry Unit. If either Unit takes a fire result (remember that passing an S? is no effect), the Infantry Unit must dismount (this does not trigger Opportunity Fire) immediately, and the combat results are then applied. This mandatory dismount ends the Activation of the Vehicle Unit. If the dismount causes overstacking in the hex, eliminate the Infantry Unit. The Infantry Unit may not be in Column when it dismounts. If the Units are Assaulted, the Infantry Unit must dismount (and this does not trigger Opportunity Fire) when the Assault is declared, and then the Assault procedure is performed as normal. If this dismount causes overstacking, eliminate the Infantry Unit Multi Man Publishing, Inc.

39 If the Vehicle Unit in Piggyback mode is the target of Indirect Fire, and this causes a mandatory dismount, the Infantry Unit suffers the result of the Indirect Fire die roll along with the Vehicle Unit but does not also take the S? result that other Units in the hex have to take. 8.0 Special Historical Events There are occasional events that happen on the reinforcement schedule. These occur at the very start of the turn before anything else is done. 9.0 Variable Troop Quality Divisions can have all of their Units Troop Quality affected either positively or negatively through various events and actions. This is tracked on each Division s Display. Troop quality is never more than 2 down nor ever more than 1 higher than a Unit s printed TQ. If called on to reduce or increase it more than this, ignore the TQ change result Land Mines Game note: Mines in the game are not just actual mines but also represent setting up fields of fire, registering artillery and such to create a more comprehensive defensive position. In addition, many positions that start the game are given higher defensive values to cover the use of mines not represented by markers. Note that the number of Minefield markers is not limited by the countermix. You may make more if needed Mine Placement Land Mines may be placed by Engineers and placing them is an Engineer Action. There is no roll to place them. Just declare that action and place a Minefield marker in the hex the Engineer occupies. Only one Minefield marker may be in a hex. They can be placed in any hex the Engineer can legally enter. Mines only affect the enemy player. You may freely move through your own Mines Effect of Mines A Unit must stop when entering a hex containing a Minefield marker. If it wishes to leave the hex in a later movement, assault or retreat out of such a hex, it must pass a Troop Quality check to do so (and then pass any other Troop Quality checks needed). If the Unit fails, it stays in the hex and is Suppressed. You may not spend a Command Point to ensure passing this check. Assaulting a hex with a minefield in it subtracts 2 from the defender s defense strength for the Bravery Check roll (only). If, however, you have a Sherman Crab in the Assaulting force, only 1 is subtracted from the Defender s defense strength. Note that only the hex being assaulted is the only one that receives this benefit. If you use a defense value of a Unit not in the hex being assaulted, the defense strength is not modified even if the Unit s defense strength used for the Bravery Check also contains a Minefield marker Removing Mines To remove a Minefield marker, move an Engineer or a Sherman Crab Unit into the hex and in a subsequent activation, declare an Engineer Action. If the Engineer or Sherman Crab is a 2-step unit, remove the Minefield marker if the Engineer action is completed. If a 1-step Engineer or Sherman Crab, a 6 or less is needed to remove the Minefield marker. If the Engineer or Sherman Crab passes, remove the Mine marker. If the Engineer or Sherman Crab fails the check, it is not suppressed and Men at Work does apply. If either leaves a hex containing a Minefield marker, they too must pass a Troop Quality Check or be suppressed. Note that the effect of many Mines has been factored into the Defense Values of many of the German Units and Beach Defenses at the start of play Deployment Limits There are four Sectors on the map that influence play. These are named, for convenience, the Orne Bridgehead sector, the Sword Beach Sector, the Juno Beach Sector and the Gold Beach Sector but these sectors apply to both the Allies and the Germans. The lines that divide these sectors are drawn on the map. An example of one of these lines is hexside / Several Divisions and Navy Units are assigned to one of these sectors and this fact is listed on their Divisional Display or reinforcement entry. A game clarification: Troop Quality changes that would reduce the base Troop Quality to less than -2 or more than +1 are ignored when they occur. Minefields Example of Play We re on Juno Beach and the Allies have 2 companies of the Queen s Own Rifles supported by a Sherman Crab assaulting a German minefield position held by some very unhappy Germans that are supported by 6 AT guns to their left. Assaulting the hex requires a bravery check (and not an additional check because of the minefield - just one is needed). The minefield would normally subtract two from the Defense Value of the Unit(s) being assaulted but because of the presence of the Sherman Crab this benefit is only minus one here, hence the defender is considered to have a Defense Value of 0 for purposes of the bravery check. The Sherman will need to roll a 2 or less to pass and continue the assault (7 TQ assaulting, +0 for its armor (+2 for its Defense Value, modified to 0 for being In Column the Column marker is not shown for clarity) but -5 for the Defense Value of the AT guns in a city exerting a Fire Zone on the attacker s hex.) The two infantry companies each need a 0 (base TQ of 5, +0 for Sherman s defense, -5 for the AT guns). Note that the minefield modifier applies only to Units actually in the minefield hex being assaulted - not for Units projecting a Fire Zone into the assaulter s hex. In this case it makes no difference because the AT Guns have a superior Defense Value to that of the defending 8./II./Gren 736 Unit. 403 Headquarters Drive, Suite 8, Millersville, MD

40 The two-hex overlap is to help add some multi-player tension. Negotiations and deals between the players (kept and not kept) are encouraged. If gamers are playing a 2-player or a traditional team multi-player game, disregarding the overlap and making the lines the actual divider is best. Just for historical interest, the line between Juno Sector and Gold Sector is actually a Corps boundary. These demarcations were very much a part of the campaign and often dominated strategy and vulnerabilities and are not a game fudge. These Units represent division truck pools and, for the Airborne, jeeps released from other duties. In addition, during the early days of the Normandy campaign, they are also the start of the slow motorization of the Allied divisions as the campaign progresses. New players to the game often hold off using Rule 13.0 when they play. While the PITA is a little high, it is an important tool for the Allies. While the Germans tended to mix and match companies into task forces, the Allies grouped their forces by battalion. I have always been a fan of rules that encourage each side to run their army differently and that is one of the reasons for this rule. You see this rule in Devil s Cauldron but with the far more capricious sudden change in composition of Group Hot and Group Cold late in the Market-Garden campaign. If they are not assigned, they may go anywhere on the map without restriction. If within their assigned sector, they operate normally, but if they are more than 2 hexes outside of their sector, they are considered out of command for all game purposes, including activation. No sectors extend below the XX.035 hexrow. The sector restrictions do not apply south of this hexrow. In addition, starting with the beginning of the Night turn of June 6, Allied Units may not enter any hex south of the XX.030 hexrow until both Connecting Roads A and B are completely clear of enemy Units and Fire Zones at the same time. Once this happens and for the rest of the game (regardless of whether the Germans can later block the road), Allied Units may enter any hex south of the XX.030 hexrow (although the sector restriction still exists north of the XX.035 hexrow). Allied Units found south of the XX.030 hexrow at the start of the night turn of June 6 are eliminated. Multiplayer Games: Included are four Direct Command markers for each side and 4 Naval Activation Chits, to allow up to 8 players to play the game as a multi-player game. Each player takes a deployment zone (or more) and plays against his opposite opponent. Just use up to four mugs instead of one and, at the start of the turn, randomly determine from which mug the last chit will be drawn. For the Royal Marines, put that chit in the Sword Beach Sector mug and when it comes out, the Royal Marines Command is played as the next activation in the other sectors. Same is true for the 716.Infanterie-Division except place that chit in the Juno Sector mug. For the Event! chit, place it into the Gold Beach Sector mug and when it is drawn, determine the Event and apply it as necessary before the next activation. When the game is played with several players, you play to win for your command, and not your side. Agreements between associated Commands (kept and broken) are encouraged. It is certainly possible for a command to win the game and yet be on the side that lost overall historically. For theater wide assets (such as Air Power and the few ships that can deploy to many sectors), if the players can t agree on how to distribute these, the 3rd Infantry Division, then the 50th Division, then the 3rd Canadian Division (depending on which commands are in play) makes the final decisions (although all assets must be distributed). For the Germans, the order of decision making goes 12SS, Lehr, 21Pz - depending on which commands are in play Divisional Trucks/Jeeps There is a series of Units labeled Divisional Trucks or Jeeps and these appear at the start of play or as reinforcements. These are kept off the map on their respective Division Displays until used. If In Command, a Leg Unit of the owning Division may use these assets. As an Action the Leg Unit may mount just as if it had Organic Transport (and Leg Units with Organic Transport may use Divisional Trucks or Jeeps). Take an available Divisional Truck or Jeep from the Unit s Division Display and place the Divisional Truck or Jeep on top of the Unit now mounted in the trucks. The Divisional Truck/Jeep is a white-striped Unit and the Unit loaded in it is inactive while it is loaded into the Divisional Truck/Jeep. When the loaded Unit dismounts, remove the Divisional Truck/Jeep from the map and put it back on its Division Display; it is kept off map until used again. The Unit may not be active during the activation it dismounts. any Divisional Trucks/Jeeps are eliminated or abandoned while in play, these assets are removed from the game; otherwise, even if they suffered a step loss while in play, they return to the display at full strength and they can be reused an unlimited number of times. Divisional Trucks/Jeeps can only be placed on Units that are currently active but haven t performed any actions yet. If you place a Truck/Jeep on a one-step unit, the Truck/Jeep is also placed as a one-step Truck/Jeep. You never make change with Trucks/Jeeps. If you pull a Truck/Jeep off the Division Display and place it on a onestep Unit, you don t leave a one-step Truck/Jeep on the Display. Zero-step units may never use Divisional Trucks/Jeeps. The counter mix is an absolute limit and players may not create more Multi Man Publishing, Inc.
41 13.0 Independent Formation Attachment There are several Formations on both sides in the game that are Independent and are not organic to any Division. These Formations must always be attached to a Division. You can tell which Formations are Independent by the base color of the Units. The reinforcement schedule will state to which Division these Formations are attached as they enter play. The Divisional Display has a box that shows this attachment. Just place the Attached marker provided for each Independent Formation in the attachment box; that Formation is considered part of that Division in every way. To attach an already attached formation to another Division, when the Division to which the Independent Formation is currently attached has its Division Activation chit in play but before any Units have been activated, pick up the Attachment marker and place it on the Formation Attached section of the receiving Division Display on its pending side. Note there are maximum limits for all divisions as to how many Independent Formations they may have attached and that number is both attached and pending attachments. To flip an Attachment marker from its pending side, when the receiving Division s Division Activation chit is in play, roll a die at the start of the Division Activation; if the roll is equal to or less than 4, the Formation is now fully part of its new division. Flip the marker over to its attached side. While the marker is on its Pending side, no Units of the attaching Formation may perform any actions whatsoever. Note that once you start the process and have an attached formation pending transfer, you have to continue the process until it attaches. You may not stop the process and move it to another Division during Step F of the Sequence of Play Auto-Command Units Auto-Command Units have a red Troop Quality value. You may never spend Command Points nor use Dispatch Points on these Units. These Units are always considered in Command (see Commandos for an exception: rule ) and may activate only at certain times as follows: For all Commandos: All Commando Units are active when the Royal Marines chit is pulled from the Mug. This is treated exactly like a Formation Activation Chit and all Commando Units are active and may perform any action. They may perform a Second Action by being in Command and passing a Troop Quality Check. For all Royal Navy Ships and Landing Craft: All Ships and Landing Craft Markers are active when the Naval chit is pulled. These Units all follow the Naval Sequence of Play as listed in 4.0. Note that Landing Craft are considered constituent units of various Divisions. Thus, if they have left a Landing Wave box and possess a drift marker, they may also be activated when a Division Chit is drawn or when a Division s Formation is active (to remove drift and land units), and have their Troop Quality adjusted as required by Rule 9.0. All other Units with a red Troop Quality value are active when the Direct Command for their Side is pulled from the Mug. This includes units assigned to a Division arriving as reinforcements that Turn. Each of these Units may perform one Action of any type without any payment of Command Points. Units arriving as reinforcements must enter the map, and are not bound by the Fire Zone restrictions of a Division Activation Abandoned Transport Whenever a Unit with Organic Transport enters a hex that the transport side could not legally enter, either in Column or not, place an Abandoned Transport Marker on that Unit. It has forsaken its organic transport for the rest of the game German Special Rules 16.1 German Phone Lines The 736th Regiment of the 716th Division had extensive phone lines laid down to make communications easier for its far flung forces. This is labeled on any Units and the Leader with a telephone symbol. 736 Regiment Leader Krug may command all Wn Units and all Coastal Batteries anywhere on the map that also have the telephone symbol. These Units are in command for all applicable rules. In addition, any 736 Units. You can find the Air Defense strength squeezed elegantly under the Fire Rating on some exceptional German Air Defense Just to clarify, Royal Marines are only active when the Royal Marines chit is in play and the Royal Navy ships and Landing Craft markers are only active when the Naval chit is in play. They are not also active when the Direct Command Chit is in play. This rule is a change from GTS 1.1 and is now more universal to cover some odd situations that can happen in GTS 1.1. Players who find the cutting of phone lines too capricious for such an important impact on game play, may consider automatically cutting them when the Naval chit comes out on the 0900, June 6 turn. However, the bombardment was very much a hit or miss affair and there was no aiming for phone lines here - it was just blind luck that it happened when it did. 403 Headquarters Drive, Suite 8, Millersville, MD

42 To be specific on the timing of how a hero is placed, you place the hero marker when you decide to do anything with a specific Unit. If a Formation activation is pulled, you activate other Units until you come to the Unit you want to benefit from the hero marker, place the hero marker - and all of the effects of the hero begin. Note that you only get the 4 activations for Wittmann. You don t get any additional actions for the chit in play. Lastly, something to remember, a Bravery Check is not a TQC and thus is not automatically passed when Wittmann is in play. Bocage Example of Play A Nachhut was created in (a hedgerow hex) and when next active, the German player places it in Bocage. Later in the game, an Allied Tank Destroyer Unit moves within 2 hexes. It cannot fire on the Unit in bocage as it can t see it until adjacent. the German Unit may fire on the TD as it closes the range. Don t forget you can barrage a hex even if there are no seen Units in the hex. So if the Allied player wanted to barrage the Nachhut, he could fire and (unless rolling a 9) can place a barrage - but no damage is possible to the Nachhut. 42 Regiment Units stacked with one of these Units that has not had its lines cut (Wn or Stp Units) is also considered in command. The Phone Lines to 716th Division Units with a phone symbol on any Beach Overlay (only) can be cut starting with the 0900 turn of June 6th. These lines are cut when an Allied Naval Unit with an Orange Fire rating rolls a 0 when bombarding any hex on an overlay. If this happens, the phone lines have been cut to the beach that suffered the bombardment. If the phones are cut, Wn Units need to be within Leader Krug s range to be in command. Coastal Batteries and all telephone symbol Units not on an overlay can never have their phones cut. If any Units are on an overlay and their Phone Lines have been cut, when the overlay is removed a Phone Lines Cut marker is placed on them. At the start of the 0700 turn on June 8th, all phone lines are considered cut and the Units must trace command normally. The above rules also apply to KG Korfos of the 352d Division, and KG Hartmann of the 346th Division. Note that, absent use of an optional rule permitting earlier entry, the KG Hartmann leader does not enter until the 0700 turn of June 8th. Hartmann is considered off map, but still in command of 346th Division units with a telephone symbol, prior to his entry German Named Heroes These markers are single-use markers. You use them for their effect and they are removed. The effect is immediate and they may be played at any time during movement or after a die roll has been made as applicable. Michael Wittmann is the only German Hero in The Greatest Day: Sword, Juno, and Gold Beaches but he is a good one to have. When the German chooses to use Wittman, choose one company of the s.ss-pz.101 that has just become active but before this Unit has performed any actions. Place Leader Wittmann on this Unit. He becomes a Leader for all game purposes until removed. Additionally, remove all cohesion hits and suppressions that might be on the Unit. This Unit may now, immediately, take 4 consecutive actions of any type (the same action again and again (and again) is allowed). Throughout this one activation, the German Tiger Company with which Whittmann is stacked, automatically passes any Troop Quality check it makes (but, as it is not a Troop Quality check, most roll for Bravery Checks normally). In addition, Wittmann has a Command range on his counter. He may Command any and all Units of the s.ss-pz.101 Battalion within this range without restriction as long as he is in play. Use the Command Points from the Division to which his Formation is attached as needed. Wittmann is available for use when the s.ss-pz.101 enters the map. Remove Wittmann at the conclusion of the Turn in which he is introduced into play Bocage Only German Units may enter Bocage (this is the state of Bocage and not a hedgerow terrain hex). To enter Bocage, a German Unit that is in any hedgerow hex, and not in an Allied Fire Zone, must perform an Engineer Action. No Troop Quality check is required, and a Bocage marker is placed on the Unit. That Unit now has all the benefits of the marker in addition to any effects of the hedgerow hex. IPs and Entrenchments may be built for and by Units in Bocage. To leave Bocage (if the unit has a movement allowence greater than zero), move the German Unit normally out of the hedgerow hex (there is no movement point cost to exit Bocage). The Bocage marker is removed when the Unit leaves the hex at no additional movement cost (and, differently from other fortification markers, the moving Unit is considered to be under the Bocage Marker for all Opportunity Fire directed against it as it leaves the hex and enters another hex) German Tank Recovery The Germans were far better at recovering damaged tanks and vehicles during the campaign and this rule is to show how this works in the game. The Germans may recover a lost step from any vehicle Unit with a Black stripe by performing a Rally action. This action is not automatic but needs to pass a Troop Quality check to be successful (Men Rallying does apply). In addition, the Unit may not be in 2015 Multi Man Publishing, Inc.

43 an enemy Fire Zone, must be In Command and may not be Suppressed but it may have Cohesion Hits. Just keep the same number of Cohesion Hits currently with the Unit but flip the Unit back to full strength if successful. A Command Point may be spent to pass the check. Completely eliminated Units may never recover steps and are gone for good Allied Special Rules 17.1 Allied Air Power The Allies get a set number of Fighter Bomber counters to use each day depending on the current weather. Note that these are for use over the entire day not per turn. Clear: 18 Fighter Bombers Overcast: 10 Fighter Bombers Storm: No Fighter Bombers The Allied player may use these in two general ways. At the start of the 0700 turn of June 7, during phase 2 of the Sequence of Play, and every 0700 turn thereafter, he may place up to 8 of the available Fighter Bombers in the Air Support section on each Allied Divisional Display, and he may place up to 4 (2 if the weather is Overcast) of them on interdiction on the Sword Beach and Cabourg Naval Display. Any Fighter Bombers placed on a Divisional Display may be used when that Division s Divisional Activation chit is drawn and may attack any German Unit which an incommand Unit of that Allied Division has a Line of Sight to. Just place the number of Fighter Bomber markers you wish to use when the Divisional Activation is first drawn on the chosen target(s) and, after they have all been placed, attack a German Unit in that hex with a 7 White Fire Rating attack. All normal modifiers to Direct Fire apply, including barrage markers. Note that the allotment is for the entire day not per turn. Planes can never fly at night and planes not used are lost. The Allied player may place as many as 4 Fighter Bombers (up to 2 on Overcast days) from his allotment for a day in the Interdiction box of the Sword Beach and Cabourg Naval Display. When the German places his reinforcements when a Division Activation chit comes out of the Mug, there is a chance they may not enter this turn. The Allied Player may roll for each Reinforcement Hex. If he rolls equal to or less than the number of Fighter Bombers he has on Interdiction, those German Units do not enter this turn but have to wait until the next Night turn to enter. This applies to all the German Units entering at that Reinforcement Hex and you roll for each Reinforcement Hex that has Germans entering the map. Note that since Planes don t fly at Night, all reinforcements may always enter during a Night turn. Air Defense: the Germans have the opportunity to make a Fighter Bomber abort its strike mission before it completes its attack. The following terrain has an inherent Air Defense Value in the hex and any hex adjacent to it. You may only make one roll but may choose the best Terrain to fire from for that Fighter Bomber Attack. A hex loses its inherent Air Defense Value if an Allied Unit is within 2 hexes of the hex in question. You may not attack Air Units on Interdiction with Air Defense in any way. Fortified: 5 City: 4 Town: 2 In addition, the Germans have some Units with an Air Defense value (shown in a blue square below the Fire rating). This value has a range of 8 hexes. Each Unit within range may fire in addition to the one allowed Terrain Air Defense roll. If the German rolls the Air Defense value or less with a D10, the Fighter Bomber has aborted its mission and does not attack. It is considered used for the day and may not fly again. Markers (such as barrage), range, and terrain (for Units with an Air Defense Value) do not affect air defense rolls. The Flak Company of Panzerjäger-Abteilung 716: Guns or No Guns? In published OOBs, 3./Pz.Jg. Abt. 716 is almost always described as possessing no Flak guns on D-Day; this agrees with the 716. Infanterie-Division Gliederung dated May 1, which indeed depicts no guns in the company. But I have a strong suspicion that this is one of the few instances where the Gliederung should not be taken as gospel. Several factors make me think this way: In the post-war report on his division s fight on D-Day, Wilhelm Richter includes a crude order of battle that specifically mentions the company as being equipped with 12 self-propelled 2cm Flak guns; the German June 5 situation map I have at my disposal for the Sword/Juno area depicts three unnumbered sections of self-propelled AA guns around the Baie de Sallenelles, at the mouth of the Orne River/Caen Canal; and lastly, over the course of my research on the campaign, I have come across a picture showing British paratroopers relaxing on a captured SdKfz 10/4 AA halftrack on June 6 or 7. These three facts fully justify in my view the inclusion of this company in the game. s.ss-pz.abt.101 When they began their lengthy road march to the Normandy front during the night of June 6/7, the three tank companies of s.ss- Pz.Abt. 101 each comprised 14 Tiger Is. Besides fighter- bomber attacks, numerous mechanical failures plagued the steel monsters en route: thrown tracks, gearbox breakdowns, and transmission failures combined to drop tank after tank in the battalion s wake. In the late evening of June 12, when the 1st and 2nd Companies settled in the northeast vicinity of Villers-Bocage, they were down to 8 and 6 Tigers, respectively. It would take days for the disabled Tigers to trickle back to the battalion. Thus, the 1./s.SS-Pz. 101 Unit counter barely rates 2 steps in the GTS system, while 2./ s.ss-pz. 101 is definitely depicted as a 1- stepper. As for the 3rd Company, after a lengthy detour through the Paris area, it regrouped piecemeal near Évrecy, south of Hill 112, during June 14. It might arrive sooner in the campaign game, though, as you know the saying: The more Tigers, the merrier! Or something like that. 403 Headquarters Drive, Suite 8, Millersville, MD
 The Allied player may not purchase any Formation Activation Chits for any Commonwealth unit to")
44 The Commandos rule can be a little tricky - here s an example to show you how they work Night Turn Restrictions on the Commonwealth Army (but not 6th Airborne Division or Commando Units) The Allied player may not purchase any Formation Activation Chits for any Commonwealth unit to play during a night turn. If one of those chits is drawn as the last chit on a 2100 turn it is wasted and not played during the night turn (and the first chit in play for that night turn is the first chit drawn from the mug) Royal Marine Commandos The Royal Marines Chit The Royal Marines Chit is always placed in the Mug every turn and is treated as if it was a Formation Activation for Commandos. When it is drawn, all Commando Units are active. This is the only time they are active Commando Command Limits Commandos are Auto-Command Units and follow the Auto-Command Rules (see 14.0). In addition, Commandos are In Command only if they are within 2 hexes of any single selected Commando Unit of the same color stripe when the Royal Marines chit is drawn. Out-of-Command Commando Units have 1 deducted from their Fire strength, 1 deducted from their Assault Strength and 3 deducted from their TQ rating. OOC Commandos may not roll against their Troop Quality to perform a second action. Commandos OOC stay OOC until the next time the Royal Marines chit is drawn 47 RM Commandos had the vital job of Operation Aubery - the securing of Port-en- Bessin. They landed at 0930 so let s pick up the story on the 1100 turn as they assemble for the march to the west at Asnelles. Eventually, the Royal Marines chit is pulled from the mug. Lots of Units now are active but let s concentrate on the 47. Remember, this is the only time Commandos are active. They are never active at any other time (like a Direct Command for example). The easiest way we ve found to do the command rules is when they are active, pick one Commando Unit and all within 2 hexes are in command - any Unit not within 2 hexes is out of command - and you place an OOC marker on them. We have just started our march so everyone is within 2 hexes - and everyone is in command. All get one activation - and then, immediately after that Unit finishes its activation, it may try and do another. Here, more than most, the order is important. Once one 17.4 Allied Named Heroes These markers are single-use markers. You use them for their effect and they are removed. The effect is immediate and may be played at any time during movement or after a die roll has been made as applicable. Stanley Hollis is the only Allied Hero in The Greatest Day: Sword, Juno, and Gold Beaches. You may use him by placing him on any Unit of the 6th Green Howards Battalion whenever that Unit is active. Immediately remove all cohesion hits and/ or suppressions that might be on that Unit. The Unit automatically passes any Troop Quality checks made during this activation (note, however, that a Bravery Check is not a Troop Quality check) and, at any time in its activation, may choose one German Unit (Wn sites are good if you want to be historical) it is currently adjacent to and demand its surrender. The German Unit must take an immediate Troop Quality check (no spending Command Points here) and, if it fails the check, the Unit is eliminated and removed from play. At the end of the Unit s activation, Hollis is removed from play th Armoured Division This is my first spirit of the rule rule. Let s see if this works. The Americans had unexpected success in clearing the Caumont Gap on June 12 and this allowed the 7th Armoured to make flanking move off-map. This can include any Units of the 7th Armoured Division. On the 1100 turn or later on June 12, any 7th Armoured Units may exit the map at hex and re-enter the map at hex four or more turns later. The Allied player may choose which turn they reenter as long as it s the fourth turn or later. This is kept secret from the German player. To exit the map, when the Units are active, just enter the hex and spend one more movement point. All Units that will move off map must exit on the same turn. Units that enter the map, enter as if in a column extending off the map (second guy entering pays 1 extra movement point to enter hex and so on) and may do so when they are active (4 or more turns later). Units must enter in Column formation. When they enter, reduce the 7th Armoured Division Troop Quality by 1 (they didn t fight very well). Here s the tricky part, I didn t want to write a bunch of rules making this secret and limiting the German response. To you German Players out there, keeping a reserve is fine, lining up Tigers in the entering hex is not. Oh, and try to act surprised when you see those 7th Armoured guys coming onto the map Multi Man Publishing, Inc.

45 th Armoured Division These Units are identified by a symbol on their counter. Except for rolling on another table against the German Beach Defense Track, these Units are part of their division in every way and are regular Units Brigade Composition Some Commonwealth Divisions have boxes on their Division Displays for each of their Brigades. These Divisions may vary the composition of their Brigades during the game. During Step F of the Sequence of Play, the Commonwealth Player may move a Battalion from one Brigade to another. To do this, check to make sure all Units of the attaching Battalion are within the command range of the Leader of the Brigade to which it is attaching. If so, place the attaching Battalion s attachment marker on its Pending side with its new Brigade. Note that all brigades have a maximum number of attached Battalions and this number is for both Pending and attached Battalions. To flip off its pending side, when the receiving Brigade s Division s Division Activation chit is in play, roll a die at the start of the Division Activation; if the roll is equal to or less than 5, the Battalion is now fully part of its new Brigade. While the Battalion s attachment marker is on its Pending side, no Units of the Battalion may perform any Actions whatsoever. Note that once you start to move a Battalion, you must go through with the attachment. You can t stop the process until it completes. On each applicable Division Display, there are holding boxes for the Division s Brigades. The set-up will tell you when Battalions start in Brigades. Simply place the Battalion marker provided for this in the Brigade box and that Battalion is part of that Brigade for all game purposes. The stripe colors have been provided for the at-start Brigade assignments but only for ease of play. A yellow-striped Battalion in a redstriped Leader s Brigade box is as much a part of that Brigade as any red-striped Unit. Each Brigade box on the Division Display indicates the maximum number of Battalions that may be in that Brigade. A Brigade may attach all of its Battalions (and thus have no Battalions left in its Brigade) if all other restrictions are met. A leader with no Units under his command is placed in his Brigade Composition box and has no effect of play. He can immediately return to play when Battalions are assigned to his Brigade. Just place him on any Unit of his Brigade when the Units are transferred to his Brigade Composition box C Squadron/Inns of Court Historical Note: this Unit had a special mission. It was to race behind enemy lines and blow bridges over the Orne to impede German reinforcements coming onto the battlefield. They were matched up with 73rd Field, RE and together went off to the races to find targets. Things didn t go as planned as they had trouble getting off the beaches after being accidentally attacked by a friendly tank, then, after reorganizing and trying again on day two, they were strafed by USAF Thunderbolts but have a go yourself and see what happens. C/Inns of Ct Unit is always In Command and may pass Troop Quality checks in lieu of spending command points (just like Commandos). They can also blow any bridge in the game (not just named ones). Just end up adjacent to one, perform an Engineer Action and roll the die 0 and it s blown. Place a Bridge Destroyed marker on the Bridge and it doesn t exist any more. If you roll a 6-9, well, any number of unfortunate things are considered to have happened and the Unit is eliminated. If you roll a 1-5, nothing happens. As an added incentive (and to give a reason for the space being spent on this Unit), if you manage to blow a bridge over the Orne (the Orne extends from to ), reduce the 21st Panzer-Division Troop Quality by one. Blow another one over the same river and you can reduce the 12th SS Panzer-Division Troop Quality by one but that s all you get. Good luck. Unit is done (or a stack of Units), and you move on to another Unit or stack of Units, you can t go back and do a second activation. So the race to Porten-Bessin is on and we get this far at the end of the Royal Marines chit. Everyone got into column and rushed off and when the Royal Marines chit comes out again on the 1300 turn, this is where the Units are. You must pick one Unit in the 47 Commando and all within 2 hexes are in command. Here are two possible choices. Choose B/47 if you want maximize your Units advance but leave Units out of command. Or choose Z/47 if you want to maximize the number of your Units you keep in command. 403 Headquarters Drive, Suite 8, Millersville, MD


46 I asked David and Vincent what they would recommend for someone wanting to learn more about the campaign in The Greatest Day and this is what they offered as a beginner s library. For those looking for a general overview of the campaign, I would strongly suggest reading Overlord: D-Day and the Battle for Normandy by Max Hastings. Getting more specific and focusing on one beach, Juno Beach and Holding Juno, both by Mark Zuehlke, give a Canadian-centric history for the whole timeframe of the GTS game, and their experiences are typical of the Allied divisions in the campaign. British Armour in the Normandy Campaign by John Buckley, is not a history of the campaign, but it sheds a different light on the problems faced by the Allied tank brigades and combined arms operations in Normandy. 46 Optional Rule: These guys were known to put German officers on their hoods to act as human shields. Perhaps this contributed to their poor karma in this campaign but if players wish added realism, the Allied player may throw his die at the German player when he rolls to blow a bridge. Subtract one from your die roll if you hit the German Player Assault during the Night Turn of 0700 June 5 For the night turn of June 5 (only), to reflect surprise, do not include terrain or defense values when calculating the roll needed to pass a Bravery Check made by the 6th Airborne Division. Bibliography Agte, Patrick, Tiger: le bataillon de chars lourds de la Leibstandarte :front de l Est, Normandie, Ardennes, Hongrie. Heimdal, Altenburger, Andreas, Lexikon der Wehrmacht < Anderson, Richard C., Jr., Cracking Hitler s Atlantic Wall:The 1st Assault Brigade Royal Engineers on D-Day. Stackpole, Balkoski, Joseph, Beyond the Beaches:The 29th Infantry Division in Normandy. Stackpole, Benamou, Jean-Pierre, Bataille de Caen: 6 juin au 15 août Heimdal, Bernage, Georges, Diables rouges en Normandie: 5-6 juin Heimdal, Bernage, Georges, Gold Juno Sword. Heimdal, Bernage, Georges, Le Mur de l Atlantique face au débarquement: 6 juin Heimdal, Bernage, Georges, Objectif Saint-Lô: 7 juin-18 juillet Heimdal, Bernage, Georges, Omaha Beach: 6 juin Heimdal, Bernage, Georges, The Panzers and the Battle of Normandy: June 5th July 20th, Heimdal, Bernage, Georges, Les Panzers face au débarquement: 6-9 juin Heimdal, Bernage, Georges, Red Devils in Normandy: 6th Airborne Division:5-6 June, Heimdal, Bernage, Georges, Jean-Pierre Benamou, Bernard Crochet, François de Lannoy, Laurent Mari, and Ronald MacNair, Overlord: conception, préparation, réalisation :Jour J en Normandie. Heimdal, Bernage, Georges, Jean-Pierre Benamou, Laurent Mari, and Ronald McNair, Bataille de Normandie: 11 Juin-29 Août Heimdal, Bernage, Georges and Frédérick Jeanne, Trois jours en enfer. Heimdal, Bernage, Georges and François de Lannoy, Les divisions de l Armée de Terre allemande: Heer Heimdal, Blanchard, W.J., Jr., Our Liberators: The Combat History of the 746th Tank Battalion During World War II. Fenestra, Booth, Terrence, Handbook of WWII German Military Symbols and Abbreviations Helion, Bouchery, Jean, From D-Day to VE-Day: The British Soldier :Volume 2, Organisation, Armament, Tanks, and Vehicles. Histoire & collections, Buckley, John, British Armour in the Normandy Campaign Routledge, Carpentier, Vincent, Un fleuve pour la liberté:de Sword Beach à la Dives. OREP, Chant, Christopher, Order of Battle:Operation Overlord:Gold & Juno Beaches, 6 June Ravelin, Chant, Christopher, Order of Battle: Operation Overlord:Sword Beach & The British 6th Airborne Division, 6 June Ravelin, Chazette, Alain, Les batteries de côte en Normandie : du Havre à Cherbourg. Histoire & fortifications, Chazette, Alain, Le Mur de l Atlantique en Normandie. Heimdal, Chazette, Alain, Benjamin David, Alain Destouches, Arthur Le Roux, Cédric Lemonnier, Bernard Paich, and Jacques Tomine, Atlantikwall: Gold Juno Sword. Histoire & fortifications, Multi Man Publishing, Inc.


47 Chazette, Alain, Alain Destouches, Jacky Laurent, Bernard Paich, and Jacques Tomine, Atlantikwall: mythe ou réalité. Histoire & fortifications, Chazette, Alain, Alain Destouches, and Bernard Paich, Atlantikwall: le mur de l Atlantique en France Heimdal, Clark, Lloyd, Battle Zone Normandy: Orne Bridgehead. Sutton, Clay, Ewart Waide, The Path of the 50th: The Story of the 50th (Northumbrian) Division in the Second World War, Gale & Polden, D Este, Carlo, Decision in Normandy: The Unwritten Story of Montgomery and the Allied Campaign. Dutton, Dorosh, Michael A., CD, canadiansoldiers.com < Drew, Richard, atlantikwall.co.uk: WW2 Defences from < Dunphie, Christopher and Garry Johnson, Battleground Europe: Normandy: Gold Beach: Inland from King June Pen & Sword, Élie, Patrick, D-Day: état des lieux < Flaherty, John, The Atlantik Wall in Normandy. < htm> Ford, Ken, Battle Zone Normandy: Juno Beach. Sutton, Ford, Ken, Battle Zone Normandy: Sword Beach. Sutton, Forrester, Charles James, Montgomery and his Legions : A Study of Operational Development, Innovation and Command in 21st Army Group, North-West Europe, Ph.D. thesis, University of Leeds, Fortin, Ludovic, Les chars britanniques en Normandie. Histoire & collections, Forty, George, Battle Zone Normandy:Villers-Bocage. Sutton, Foulds, Tony, In Support of the Canadians: A British Anti-Tank Regiment s First Five Weeks in Normandy. Canadian Military History, Volume 7, Number 2, Spring 1998 (pp ). Frank, Paul, Einsatz der 346. Infanterie-Division an der Invasionsfront ( bis ). National Archives and Records Administration, USA, 1954., Gliederung der 2. Panzer-Division dated 1 June 1944., Gliederung der 21. Panzer-Division dated 5 June 1944., Gliederungen der Panzer-Lehr-Division dated 9 May 1944 and 1 June 1944., Gliederung der 12. SS-Panzer-Division Hitlerjugend dated 1 June 1944., Gliederung der 352 Infanterie-Division dated 1 May 1944., Gliederung der 716 Infanterie-Division dated 1 May 1944., Gliederung der schnelle Brigade 30 dated 1 April 1944., Gliederung der Werfer-Brigade 7 dated 1 July Hargreaves, Richard, The Germans in Normandy. Stackpole, Harrison, Gordon A., Cross-Channel Attack. Center of Military History, US Army, Hastings, Max, Overlord:D-Day, June 6, Simon & Schuster, Hogg, Ian V., British & American Artillery of World War Two. Stackpole, Hogg, Ian V., German Artillery of World War Two. Stackpole, Holm, Michael, The Luftwaffe, < Isby, David C. (ed.), Fighting in Normandy:The German Army from D-Day to Villers- Bocage. Greenhill, Jacquet, Stéphane, La bataille de Tilly-sur-Seulles. Heimdal, Kilvert-Jones, Tim, Battleground Europe: Normandy: Sword Beach: British 3rd Infantry Division/27th Armoured Brigade. Pen & Sword, 2001., Kriegsgliederung der Fest.Pi.Stäbe Fest.Pi.Batl. und Bau-Pi.Batl. im Bereich des A.O.K. 7 dated 12 March 1944., Kriegsgliederungen des A.O.K. 7 dated 5 May 1944, 18 May 1944, 13 June 1944, and 17 June Lannoy, François de, 21st Army Group: Normandie Heimdal, Latham, H.B., Brigadier, Letter to F.W. Young: Order of Battle of the Second British Army for the Assault Landings in Normandy 6-7th June Lefèvre, Éric, Panzers in Normandy: Then and Now. After the Battle, I d suggest starting with one great overview of the campaign and then use the bibliography here to dive into more specific topics that you find of interest. The best single volume of the campaign is, in my opinion, Anthony Beevor s D-Day: The Battle for Normandy. A few final historical comments from David and Vincent. I wish I had more room - I have more I could have added... Stanley Hollis was born in Yorkshire and was working as a truck driver when war broke out. By the time he landed in Normandy as a Company Sergeant Major with the 6th Green Howards he was already a veteran of Dunkirk and the North Africa campaign. During the landings on Gold Beach he cleared two pillboxes with hand grenades and a Sten gun, taking several dozen prisoners, but also getting a minor head wound in the process. Later in the day he single-handedly attacked a field gun position: when his hand grenade failed to explode (he realized he had forgotten to pull the pin), he assumed the occupants would be taking cover anyway and charged in with a Bren gun. He was the only Victoria Cross recipient for the operations on D-Day. 403 Headquarters Drive, Suite 8, Millersville, MD


48 My suggestions are to look for the Battleground: Europe series of books on the battles. These are inexpensive and provide great detail. These are Sword Beach by Kilvert-James, Juno Beach by Tim Saunders, Gold Beach: Inland from King by Dunphie and Johnson, Gold Beach-Jig by Saunders, Pegasus Bridge Merville Battery by Shilleto. A great place to start. The detail given for the financial investment can t be beat. David s recommendation earlier of the Canadian experience by Zuehlke is also very much worth looking into as a microcosm of the total Allied Normandy experience. 48 Lindsay, Martin and M.E. Johnston, History of 7th Armoured Division, June 1943 July BAOR, Lucas, John, The Silken Canopy: A History of the Parachute. Airlife, Luck, Hans von, Panzer Commander: The Memoirs of Colonel Hans von Luck. Praeger, Lüttwitz, Heinrich von, Einsatz der 2. Panzer-Division in der Normandie. National Archives and Records Administration, USA, Meyer Hubert, The 12th SS:The History of the Hitler Youth Panzer Division: Volume One. Stackpole, Meyer Hubert and Georges Bernage, 12. SS-Panzer-Division Hitlerjugend. Heimdal, Nevenkin, Kamen, Fire Brigades: The Panzer Divisions J.J. Fedorowicz, Perrigault, Jean-Claude, 21. Panzer-Division. Heimdal, Perrigault, Jean-Claude, La Panzer-Lehr-Division: le choc des armées alliées brise l arme d élite de Hitler :Normandie Lorraine Ardennes. Heimdal, Pickert, Wolfgang, Das III. Flakkorps in der Normandie-Schlacht (Mai-14 September 1944). National Archives and Records Administration, USA, Porter, David, I SS Panzer Corps at Villers-Bocage: 13 July [sic] Amber, Prime, Christophe, Omaha Beach: 6 juin Tallandier, Reichert, Josef, Einsatz der 711. Infanterie-Division an der Invasionsfront ( ). National Archives and Records Administration, USA, Reynolds, Michael, Steel Inferno: I SS Panzer Corps in Normandy. Da Capo, Richter, Wilhelm, Kampf der 716. Division in der Normandie vom National Archives and Records Administration, USA, Ripley, Tim, Steel Rain: Waffen-SS Panzer Battles in the West Brown Partworks, 2001., The Royal Artillery: < Saunders, Tim, Battleground Europe: Normandy: Gold Beach Jig: Jig Sector and West June Pen & Sword, Saunders, Tim, Battleground Europe: Normandy: Juno Beach: Canadian 3rd Infantry Division June Pen & Sword, Saunders, Tim, Commandos & Rangers: D-Day Operations. Pen & Sword, Shilleto, Carl, Battleground Europe: Normandy: Pegasus Bridge, Merville Battery. Pen & Sword, Shilleto, Carl, Battleground Europe: Normandy: Pegasus Bridge & Horsa Bridge. Pen & Sword, Stanton, Shelby L., World War II Order of Battle: An Encyclopedic Reference to US Army Ground Forces from Battalion through Division, Stackpole, Staudinger, Walter, Führung der Artillerie des I. SS-Panzer-Korps vom bis Anfang August National Archives and Records Administration, USA, Steiger, A.G., The German Defences in the Courseulles-St. Aubin Area of the Normandy Coast. Historical Section, Army HQ, Canada, Tout, Ken, A Fine Night for Tanks: The Road to Falaise. Sutton, Trew, Simon, Battle Zone Normandy: Gold Beach. Sutton, Verney, Gerald Lloyd, The Desert Rats: The History of the 7th Armoured Division, 1938 to Hutchinson, Weigley, Russell F., Eisenhower s Lieutenants: The Campaign for France and Germany, Indiana University Press, Williams, Ethan Rawls, LCDR, USN, 50 Div in Normandy: A Critical Analysis of the 50th (Northumbrian) Division on D-Day and in the Battle of Normandy. Master s thesis, US Army Command and General Staff College, Zetterling, Niklas, Normandy 1944: German Military Organization, Combat Power and Organizational Effectiveness. J.J. Fedorowicz, Ziegelmann, Fritz, Die Geschichte der 352. Infanterie-Division ( ). National Archives and Records Administration, USA, Ziegelmann, Fritz, Auszug aus dem Fernsprechmeldebuch der 352. I.D. (Landungstag). National Archives and Records Administration, USA, Ziegelmann, Fritz, 352. Infanterie-Division (7. Juni 44). National Archives and Records 2015 Multi Man Publishing, Inc.
49 Administration, USA, Ziegelmann, Fritz, (352. Infanterie-Division) Die Kämpfe am National Archives and Records Administration, USA, Ziegelmann, Fritz, (352. Infanterie-Division) Die Kämpfe am National Archives and Records Administration, USA, Ziegelmann, Fritz, (352. Infanterie-Division) Die Kämpfe am National Archives and Records Administration, USA, Ziegelmann, Fritz, (352. Infanterie-Division) Der Kampf nördl. St-Lô ( ). National Archives and Records Administration, USA, Zuehkle, Mark, Juno Beach:Canada s D-Day Victory: June 6, Greystone, Credits Series Designer: Adam Starkweather Game Designer: Adam Starkweather Series Developer: Nick Richardson Game Developers: David Hoskins and John Clifford Graphic Artist: Niko Eskubi Flow Charts and Rules Summary Writer: Dick Vohlers VASSAL Module Designer: Brent Easton VASSAL Support Team: Mike Curtis, Cavan Cunningham, Gerry Palmer, Ty Snouffer Axis Forces Research: Vincent Lefavrais Allied Forces Research: Carl Fung, David Hoskins Series Rules Writer: Jon Gautier Exclusive Rules Writer: Jon Gautier, Adam Starkweather Rules Graphics: Antonio Pinar Rules Index: Bill Speer Rules Proofreaders: John Clifford, Dick Vohlers, Bill Speer, Tom Holliday, Jon Gautier, David Hoskins Playtesters: Bill Ramsay, Tom Sobczak, Ty Snouffer, Andrew Brazier, Chris Dodd, Carlos Lourenco, Robert Makowsky, Gordon Christie, Kirk Lambrecht, Mike Gebert, Pete Abrams, Ross Mortell, Tom Holliday, John Clifford, Carl Fung, Davin McHenry, Kent Henson, Marc Guerette, Sam Harper, Peter Bartlett, Jim Brown, Morgan Brown, Mike Curtis, Mike Riley, Bill Speer, Dick Vohlers, Joe Guilbert, David Drake, Chip Coffey, Frank Scarci, Mike Dubose, John Reich, Scott Hofner, Bill Williams, Lance Jones, John Wade, Rick Fehrenbacher, Aric Fehrenbacher, Rick Kurtz, Riccardo de Girolami, Bill Quoss, Chris Easter, Ron Renard, Joe Chacon, and Steve McBee Printer Liaison: Chas Argent Photography: Bill Speer and Vincent Lefavrais Time Management Consultant: Sonia Starkweather Special Thanks: Eric Lee Smith, Allison Hungate Wood, Brian Youse, Perry Cocke, Eric Miller and to all listed above THANK YOU Allied Commandos TQ Ratings Composed of volunteer troops, the British Commandos were lightly equipped units, at first trained for coastal raiding operations in Germanoccupied territories, then from 1943 on mainly for assault duties. All the Commandos depicted in The Greatest Day are Auto-Command Units, which represents their autonomous nature. Even though all their members had followed the same training regimen at the Achnacarry Commando course, the Commandos on D-Day were of several breeds, which is shown by their varying TQ Ratings: TQ 7: 3 Cdo, 4 Cdo, 6 Cdo, 10 Cdo, and 41 RM Cdo all had a long history and combat experience, having been variously engaged in Norway, on the Faeroes, at Dieppe, along the French and Dutch coastlines, in North Africa, in Sicily, and in Italy. TQ 6: 45 RM Cdo, 46 RM Cdo, and 47 RM Cdo had all been formed in August 43, but had not seen action before the D-Day landing. TQ 5: Formed in March 44, 48 RM Cdo was totally inexperienced and suffered 50% casualties while unsuccessfully trying to reduce its D-Day objective, Wn 26 at Langrunes. What you are holding in your hand and what is hopefully sitting on your table is the best product I can make. From its presentation and appearance, to what happens when you push units around, I can t do better. But there are also thousands of hours of work by all the great people in the credits section and this wouldn t be the game it is without them. If I have one great skill, it is finding people of great talent and somehow getting them to volunteer their time in ridiculous amounts. I do want to specifically thank a few people that went way above and beyond what I asked of them. Jon Gautier for his countless hours on the rules suffering one change after another. John Clifford and Dick Vohlers for their tireless and countless proofreading of the rules. Vincent Lefavrais and Dave Hoskins for their hundreds of hours researching the the OOBs and terrain. And to my 8 week old daughter, Sonia, for essential lessons in time management. 403 Headquarters Drive, Suite 8, Millersville, MD
50 Campaign Game Map Deployment Zones Gold Beach Deployment Zone Juno Beach Deployment Zone Sword Beach Deployment Zone Orne Bridgehead Deployment Zone 50th ID 7th AD 3rd Can ID 51st ID 3rd ID 6th AB (to 0700, 6/11) 51st ID (from 0700, 6/11) Pz Lehr 352 ID 12SS 21 Pz (KGs Rauch/Oppeln) 21 Pz (KG Luck) 346/711 Deployment Zone Zone Reminders: The 716.Infanterie-Division may enter any any sector. 21.Panzer-Division Units not not in in KG Rauch or or KG Luck may enter either the Orne Bridgehead or Sword Beach Sector without restriction. The 51st Infantry Division is is assigned the the Juno Beach Sector until until the the turn turn of June 11th at at which time it it switches to to the the Orne Bridgehead Sector. No Allied Unit may enter remain a hex in a south hex south of the of xx.035 the xx.30 hex hex row row until starting Connecting with the Road night B is of clear June of 6 all until German Connecting Units and Roads German A and Fire B are Zones. clear of all German Units and German Fire Zones. All German Units may enter any hex south of the xx.035 without restriction. All German Units may enter any hex south of the xx.030 without restriaction Any Units more than 2 hexes from their assigned Sector are considered Out of Any Command Units for more all than purposes. 2 hexes from their assigned Sector are considered Out of Command for all purposes. (See Rule 11.0) (See Rule 11.0)
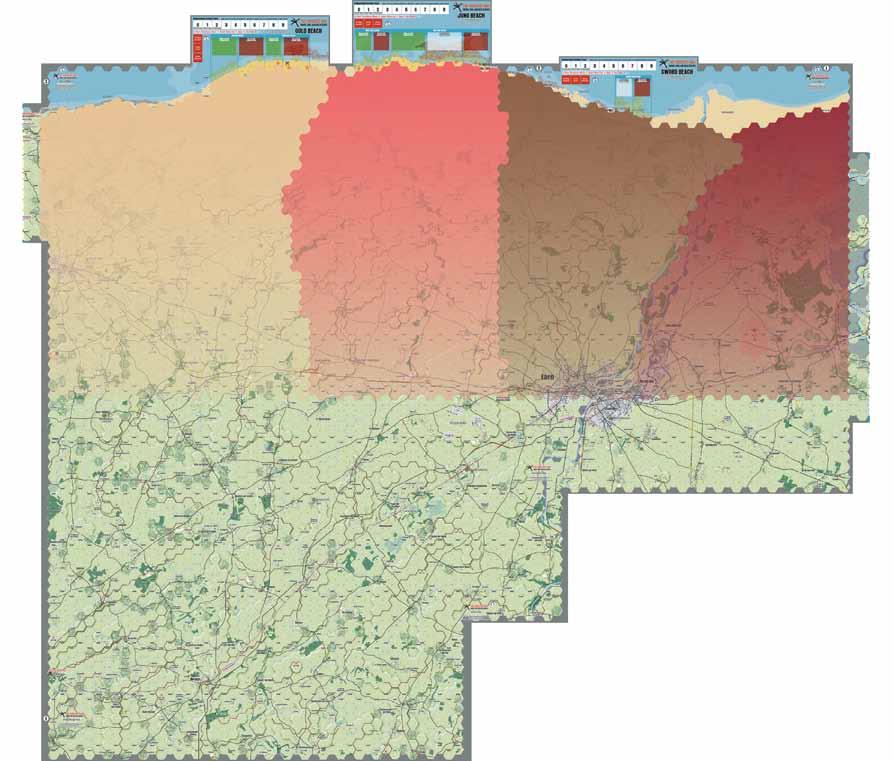
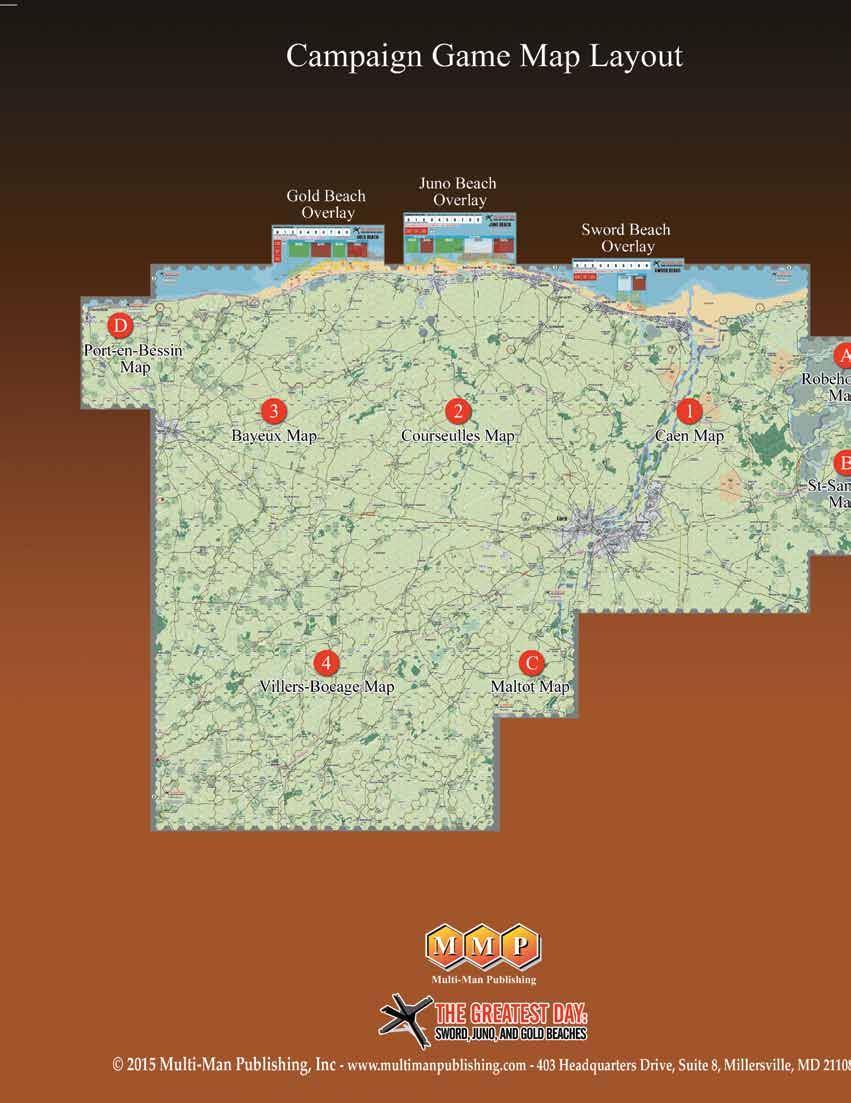
51
GRAND TACTICAL SERIES RULES v1.1
 GRAND TACTICAL SERIES RULES v1.1 Table of Contents 1.0 Introduction 3 1.1. A note about the rules 3 1.2. A summary description of the game 3 2.0 How to read the counters 4 3.0 The time scale 4 4.0 The
PLAY BOOK Table of Contents GMT Games, LLC
 PLAY BOOK Table of Contents 20.0 Examples of Play... 2 21.0 Linking Scenarios into a Grand Campaign... 19 22.0 Key Differences from Red Winter... 20 23.0 Tips and Strategies... 21 24.0 Unit Abbreviations...
Tactical Combat Rules By David Newport
 Tactical Combat Rules By David Newport Tactical Combat is a game covering company and battalion level actions using 20 th century weapons. The game was designed for World War II action, but it handles
BATTLE FOR 2MM EARTH 1418: The Great War (Version 0.8)
") BATTLE FOR 2MM EARTH 1418: The Great War (Version 0.8) INTRODUCTION The Battle for 2mm Earth rules are suitable for any large combat up until around the end of the 19 th Century. I designed 1418 semi-independently
BATTLE FOR 2MM EARTH 1418: The Great War (Version 0.8) INTRODUCTION The Battle for 2mm Earth rules are suitable for any large combat up until around the end of the 19 th Century. I designed 1418 semi-independently
Each division along the side of the map represents 1 foot (12") North is to the top of the Map. The game starts in dense fog.
 North is to the top of the Map. The game starts in dense fog.") Historical Overview After the Breakout at St. Lo at the end of July 1944, most of the American forces moved through a relatively narrow corridor along the coast a Avaranches. Hitler looked at the map and
Historical Overview After the Breakout at St. Lo at the end of July 1944, most of the American forces moved through a relatively narrow corridor along the coast a Avaranches. Hitler looked at the map and
Bathtub Operation Goodwood 18 th July, A Flames of War Grand Battle Scenario
 Bathtub Operation Goodwood 18 th July, 1944 A Flames of War Grand Battle Scenario Operation Goodwood was a major attempt by Field Marshall Montgomery to break through the tough German defenses around Caen.
House Rules for Nuts! Final Version Version 1.3 by Jeff Glasco
 1. The basic game uses a 3' x 3' table. This is fine for very dense combat, like in a major urban campaign, but is too small for a larger attack, like a platoon attack. A platoon attack would be on an
FIRETEAM Wargame Rules for Modern Combat Operations
 FIRETEAM Wargame Rules for Modern Combat Operations By Rory Crabb Written By Rory Crabb Version 1.0 July 2016 Miniatures from the collection of the author and terrain by Paul Davies 1 FIRETEAM Wargame
Napoleonic Battles. Introduction
 Napoleonic Battles Introduction Napoleonic Battles is a series of games that cover the battles and campaigns associated with Napoleon. Each game can be played alone versus the computer, or against a human
Musket and Pike Users Manual
 1 Musket and Pike Introduction Musket and Pike is a series of games that cover the battles and campaigns associated with the era where muskets and pikes dominated the fighting. Each game can be played
FORCES OF VALOR BATTLE TACTICS 2005, Unimax Toys Limited, All Rights Reserved
 FORCES OF VALOR BATTLE TACTICS 2005, Unimax Toys Limited, All Rights Reserved Forces Of Valor, The Game allows you to fight exciting and realistic war games. All you need to play are Forces Of Valor soldiers
Stepping Up to Version 3 by Phil Yates
 Stepping Up to Version 3 by Phil Yates With the arrival of Version 3, lots of existing players are asking the obvious question: What s changed?. To answer this question, I ve written this document as a
Austerlitz System Rules
 RULEBOOK Design by David Fox Great Battles of the Napoleonic Wars Volume I Austerlitz System Rules 1.0 INTRODUCTION..... 2 2.0 COMPONENTS..... 2 2.1 Game Scale...... 2 2.2 Definitions & Abbreviations.
3rd Edition RULES OF PLAY
 Command & Colors Napoleonics 1 Game Design by Richard Borg 3rd Edition RULES OF PLAY 2 Command & Colors Napoleonics The battlefield is a scene of constant chaos. The winner will be the one who controls
LESSONS FROM THE FRONT QUESTIONS AND ANSWERS ON FLAMES OF WAR MARCH 2018
 i LESSONS FROM THE FRONT QUESTIONS AND ANSWERS ON FLAMES OF WAR MARCH 2018 During the time that the fourth edition of Flames Of War has been out, players have asked questions about the game. The questions
THE BIG PUSH Big Push Demonstration and Scenario, revised 7/1/2016
 THE BIG PUSH Big Push Demonstration and Scenario, revised 7/1/2016 THE FIGHT FOR THIEPVAL RIDGE By Paul Rohrbaugh Play Area: Rows 7 through 16 inclusive, columns C through I (also inclusive). Scenario
Sowchos (Collective Farm) 79
 79") Sowchos (Collective Farm) 79 December 1942 Following the encirclement of the Sixth Army at Stalingrad, the Germans planned to launch the relief effort from the bridgehead at Nizhna Chirskaya, 25 miles
Sowchos (Collective Farm) 79 December 1942 Following the encirclement of the Sixth Army at Stalingrad, the Germans planned to launch the relief effort from the bridgehead at Nizhna Chirskaya, 25 miles
Historical Overview. Map/Terrain Notes. Each division along the side of the map represents 1 foot (12")
") Historical Overview The 101st Airborne Division was tasked to seize four key causeway exits for the troops landing in force at Utah Beach. Like so many plans, theirs went awry. The transport pilots flying
Historical Overview The 101st Airborne Division was tasked to seize four key causeway exits for the troops landing in force at Utah Beach. Like so many plans, theirs went awry. The transport pilots flying
JUNE 1944 A MEMOIR 44 CAMPAIGN
 OPERATIONS NEPTUNE AND OVERLORD JUNE 1944 A MEMOIR 44 CAMPAIGN By summer 1944 the tide had well and truly turned against the powers. Stalin s Red Army was in the process of dismantling Hitler s war machine
Norrey and Putot, June 8, 1944 A Flames of War Mega-Game Scenario
 Norrey and Putot, June 8, 1944 A Flames of War Mega-Game Scenario Allied concerns around the Normandy landings were many, but one of the most critical was the potential for a heavy panzer counterattack
Global Command Series. Fortifications v1.0. A Global War 2 nd Edition 3d Printed Expansion Historical Board Gaming
 Overview Global Command Series Fortifications v1.0 A Global War 2 nd Edition 3d Printed Expansion Historical Board Gaming This set features rules for many different types of fortifications, sold separately
War Ain t Fair. By Stephen Luscombe. Fast play ww2 rules incorporating the full vagaries of war. 1.2
 War Ain t Fair Fast play ww2 rules incorporating the full vagaries of war By Stephen Luscombe Stephen@BRITISHEMPIRE.CO.UK 1.2 Introduction Welcome to War Ain t Fair. These are a set of rules designed to
THE RULES. Wing Scale. 15 minutes per turn 50 men per strength point 1 gun per strength point
 INTRODUCTION The late Greg Novak developed the following variant of Volley & Bayonet for fighting at the Wing scale in the Americas. All Volley & Bayonet rules not modified below remain in force. Paul
Fields of Blue & Grey
 Fields of Blue & Grey A very different kind of American Civil War rules, that allow the grand sweep of corp level actions to be recreated while still using the regiment as the basic combat element. A simple
ONE IF BY LAND" - AMERICAN 1:10 SCALE WAR OF INDEPENDENCE RULES by Bob Bergman. Infantry/Cavalry figure 10 men Artillery crew figure 5 men
 ONE IF BY LAND" - AMERICAN 1:10 SCALE WAR OF INDEPENDENCE RULES by Bob Bergman Ground Scale 1 inch = 15 yards One Turn About five minutes Infantry/Cavalry figure 10 men Artillery crew figure 5 men Artillery
BATTLE OF CHERBOURG THREE CAMPAIGNS FOR MEMOIR '44
 BATTLE OF CHERBOURG THREE CAMPAIGNS FOR MEMOIR '44 On June 6, 1944, thousands of Allied soldiers landed on the beaches of Normandy as part of Operation Overlord. The night before, hundreds of paratroopers
Musket and Pike User Manual
 Musket and Pike User Manual 1 Musket and Pike Users Manual Introduction Musket and Pike is a series of games that cover the battles and campaigns associated with the era where muskets and pikes, or sometimes
Skirmish Action AAR: Ruhr 1945 By Russ Lockwood
 Skirmish Action AAR: Ruhr 1945 By Russ Lockwood This tidy little 1945 scenario for Skirmish Action (SA) comes courtesy of Dennis Shorthouse, whose figures and terrain make for a good-looking WWII table.
Order of Battle for your Company
 Fields Of Fire MISSION BOOKLET Campaign 2: Korea Naktong River, South Korea, August 8 through September 28, 1950 Order of Battle for your Company Formation Unit Steps Experience Company Headquarters CO
OPERATIONAL OBJECTIVE ZONES
 OPERATIONAL OBJECTIVE ZONES The nature of combat on the Operational level varied between Open field battles and those fought over built-up and fortified areas. The cohesion of both the defender and attacker
Things that need changing in your rule book. (Errata for PBI)
") Things that need changing in your rule book. (Errata for PBI) This information applies to PBI as published by RFCM/Peter Pig March 2006. Firstly an apology for having to make updates and changes to the
Things that need changing in your rule book. (Errata for PBI) This information applies to PBI as published by RFCM/Peter Pig March 2006. Firstly an apology for having to make updates and changes to the
Warning! historical campaign battle for the juno beachhead. battle for juno
 historical campaign battle for the juno beachhead This scenario takes place after Canadian troops land on Juno beach and begin to move inland on the 6th of June, 1944. The action takes place over the critical
STUART MCCORQUODALE & DARRYL MORTON WITH MARK MAINWARING
 IRON CROSS BY STUART MCCORQUODALE & DARRYL MORTON WITH MARK MAINWARING INTRODUCTION Command Tokens 2 Morale Markers 2 Unit Composition 3 Scale 3 Gaming Areas 3 Terrain 3 GAME RULES Command Tokens 4 Initiative
LESSONS FROM THE FRONT QUESTIONS AND ANSWERS ON FLAMES OF WAR SEPTEMBER 2018
 i LESSONS FROM THE FRONT QUESTIONS AND ANSWERS ON FLAMES OF WAR SEPTEMBER 2018 During the time that the fourth edition of Flames Of War has been out, players have asked questions about the game. The questions
Tactical Combat Series: Omaha The Gamers, Inc. All Rights Reserved.
 The Gamers, Inc. Tactical Combat Series: Omaha 1991. The Gamers, Inc. All Rights Reserved. Tactical Combat Series Game Number 3 Stock #2-03 Game Design: David A. Powell Series Design: Dean N. Essig Graphic
Seven Years War. Generals
 Seven Years War By Will McNally Introduction These rules have been written to give an easily playable game which reflects the style of European land warfare during the Eighteenth Century, particularly
A Triumph & Glory Game
 Borodino 1 BORODINO A Triumph & Glory Game By Richard Berg RULE BOOK Table of Contents 1.0 Introduction... 2 8.0 Artillery Fire... 8 2.0 Components... 2 9.0 Shock Combat... 9 3.0 Sequence of Play... 3
Glory Days! Introduction. Troop Types and Figures. freewargamesrules.co.uk presents. by Craig Cartmell
 Introduction. freewargamesrules.co.uk presents Glory Days! by Craig Cartmell These are a set of rules for fighting the American Civil War at regimental and brigade level. The smallest unit sizes are infantry
Bathtub Operation Luttich (Mortain) 7 th August, A Flames of War Grand Battle Scenario
 7 th August, A Flames of War Grand Battle Scenario") Bathtub Operation Luttich (Mortain) 7 th August, 1944 A Flames of War Grand Battle Scenario Operation Luttich was Hitler s desperate gamble to seal off the penetration made by the American forces during
Bathtub Operation Luttich (Mortain) 7 th August, 1944 A Flames of War Grand Battle Scenario Operation Luttich was Hitler s desperate gamble to seal off the penetration made by the American forces during
Rome at War Hannibal at Bay Errata and FAQ
 First Edition Rules Rome at War Hannibal at Bay Errata and FAQ Pg 3: Light Cavalry description has a depiction of Light Infantry. 2.21: Change "enemy units" to "any non-leader units". 6.1: After Example,
Battle for Normandy Escalation Campaign
 Battle for Normandy Escalation Campaign Summary: The campaign will run for six weeks. Three stages 2 weeks long each. Stage 1: 900 Points Stage 2: 1200 Points Stage 3: 1500 Points You must select an army
Mini-Nap. RULES FOR CORPS SCALE WARGAMES IN THE NAPOLEONIC ERA USING THE 6mm SCALE
 Mini-Nap RULES FOR CORPS SCALE WARGAMES IN THE NAPOLEONIC ERA USING THE 6mm SCALE Copyright. Trevor Raymond. Version 8: August, 2009 (Exodus 20:15 - Thou shall not steal.") www.runtus.org Page 1 of 25
vfconventioncenter com historicon org HISTORICON Valley Forge Convention Center 1210 First Avenue King of Prussia, PA 19406
 Congratulations on qualifying for the Flames Of War 2010 U.S. Nationals! This Tournament is a culmination of a year s worth of gaming and fun in the United States and Canada. We here at Battlefront Miniatures
SkirmishCampaigns: France 40 Battles for the Meuse Across the Meuse - Sedan
 AFTERMATH Despite spirited resistance at several points, the infantry crossed the Meuse and penetrated the French positions in several areas, aided by heavy air and artillery support and combat engineer
RULES. A: A targeted squad receives corner cover when the imaginary line of the attacking unit s line of sight passes through
 R e a d t h i s FAQ t h o r o u g h ly a n d k e e p i t s e c u r e i t m ay s av e l i v e s RULES Q: In what situations will a squad benefit from corner cover? A: A targeted squad receives corner cover
Operation Spark The Battle for Marino January 1943 Scenario written by Iain Craven With contributions and play testing by Richard Lawrence
 Operation Spark The Battle for Marino January 1943 Scenario written by Iain Craven With contributions and play testing by Richard Lawrence After a series of costly, and occasionally catastrophic, failed
LESSONS FROM THE FRONT QUESTIONS AND ANSWERS ON FLAMES OF WAR JUNE 2018
 i LESSONS FROM THE FRONT QUESTIONS AND ANSWERS ON FLAMES OF WAR JUNE 2018 During the time that the fourth edition of Flames Of War has been out, players have asked questions about the game. The questions
King George Commands and We Obey
 King George Commands and We Obey Basing Army Commanders 80mm dia base with a vignette on it, min 3 figures. Divisional Commanders 80mm dia base with a vignette on it, max 2 figures. Brigade Commanders
Battalion Commander's Summary
 Command Decision is a platoon-based game using a ground scale and time scale which allows the full play of 20th Century mechanized maneuver combat on a game table. Its emphasis on command, troop quality,
A Battlefront WW2 Modern Scenario for 2 players and an Umpire
 First Clash Part 1 Ambush at Favorite A Battlefront WW2 Modern Scenario for 2 players and an Umpire Overview World War Three D+48hrs On the afternoon of 25 th June 1984 the Soviet 1 st Guards Tank Division
To End All Wars. WW1 Miniature Game V1.2
 To End All Wars WW1 Miniature Game V1.2 Introduction: The Western Front in World War I was dominated by a series of trenches cutting its way through the French countryside. Commanders on both sides would
WARHAMMER 40,000 HOUSE RULES EDITION V1.3
 WARHAMMER 40,000 HOUSE RULES EDITION V1.3 THE TURN UNIT ACTIVATIONS Before the game begins the players must each place an appropriate number of tokens (with markings or colours specific to that player)
Corinth Canal Scenario Pack Historicon
 Corinth Canal Scenario Pack 2016 Historicon July 16, 2016 Race For The Corinth Canal Commonwealth Platoons 1 and 2 represent elements of 2/6 Australian Infantry and start the game in foholes. Commonwealth
tdoherty Page 1 02/18/05
 La Bataille Revised Infantry Assault and Charge Sequence The reasons for changing the mêlée sequence have been discussed on CSW. It is my view that historically assaults would often degenerate into inconclusive
A Difficult Affair II (Kursk, July 1943)
") A Difficult Affair II (Kursk, July 1943) ".. probably dummy positions." Unknown air liaison officer with Panzer Division Grossdeutschland. On the afternoon of July 4th 1943, as preparation for the great
A Difficult Affair II (Kursk, July 1943) ".. probably dummy positions." Unknown air liaison officer with Panzer Division Grossdeutschland. On the afternoon of July 4th 1943, as preparation for the great
ASLSK Basic Infantry Tactics
 Basic Infantry Tactics ASLSK Basic Infantry Tactics Daniel F. Savarese Last Updated: 2005-03-04 Copyright 2004, 2005 Daniel F. Savarese 1 The original Squad Leader rule book contained a section at the
Bolt Action Errata. Bolt Action rulebook
 Bolt Action Errata We have compiled a list of errata for Bolt Action dealing with the various rules questions that have arisen including corrections of points values. We have not thought it worthwhile
LESSONS FROM THE FRONT QUESTIONS AND ANSWERS ON FLAMES OF WAR MARCH 2018
 i LESSONS FROM THE FRONT QUESTIONS AND ANSWERS ON FLAMES OF WAR MARCH 2018 During the time that the fourth edition of Flames Of War has been out, players have asked questions about the game. The questions
Konflikt 47. errata & FAQ ERRATA PAGE 81: FANATICS PAGE 66: TESLA PAGE 101: WALKERS ASSAULTING INFANTRY AND ARTILLERY PAGE 68: MEASURE RANGE AND MOVE
 Konflikt 47 errata & FAQ 3 Nov 2016 PAGE 66: TESLA ERRATA Add the following sentence at the end of the second paragraph: Tesla weapons do not suffer a reduction in Pen values at long range. PAGE 68: MEASURE
+HGJHURZ+HOO. PLAYTEST VERSION (02 June 2000) In the future, an updated version may be found at:
 In the future, an updated version may be found at:") AFTERMATH The US 1 st Infantry Division pushed on to expand the beachhead supported by the tanks of the 2 nd Armored. Within days the German 352 nd Division was reduced to a few brave and ragged survivors.
AFTERMATH The US 1 st Infantry Division pushed on to expand the beachhead supported by the tanks of the 2 nd Armored. Within days the German 352 nd Division was reduced to a few brave and ragged survivors.
Historical Overview ".. probably dummy positions." Unknown air liaison officer with Panzer Division Grossdeutschland.
 Historical Overview ".. probably dummy positions." Unknown air liaison officer with Panzer Division Grossdeutschland. On the afternoon of July 4th 1943, as preparation for the great offensive, the German
"Chopping Wood " Battle on the Raate Road, Dec39-Jan40. by Steve Keyer of Two Tin Soldiers
 "Chopping Wood " Battle on the Raate Road, Dec39-Jan40 by Steve Keyer of Two Tin Soldiers Historical perspective This scenario represents the reduction of a small Russian "motti". In old Finnish, the term
`One Rule for you.. (Part Three) The third part of a series comparing the results achieved using two popular sets of rules for the same scenarios.
 The third part of a series comparing the results achieved using two popular sets of rules for the same scenarios.") `One Rule for you.. (Part Three) The third part of a series comparing the results achieved using two popular sets of rules for the same scenarios. In Part 1 of this article I set out the reasons for bothering
`One Rule for you.. (Part Three) The third part of a series comparing the results achieved using two popular sets of rules for the same scenarios. In Part 1 of this article I set out the reasons for bothering
THE WAR OF THE SPANISH SUCCESSION PAPERBOYS RULES
 THE WAR OF THE SPANISH SUCCESSION PAPERBOYS RULES This is a little set of rules written to continue the tradition of each Paperboys book having an associated set. Andy Callan s ideas abound here, but Peter
ERES TO YOU FUZZY WUZZY by Bob Cordery
 1. Introduction ERES TO YOU FUZZY WUZZY by Bob Cordery ETYFW relies upon the use of both average dice (AvDs produce more predictable results) and normal dice (D6s produce less predictable results) to reflect
To End All Wars WW1 Miniature Game V1
 To End All Wars WW1 Miniature Game V1 Introduction: The Western Front in World War I was dominated by a series of trenches cutting its way through the French countryside. Commanders on both sides would
14. HIT / MISS DETERMINATION
 Briefing 1. Hit/miss determination is the procedure used to determine if a target is hit when a weapon fires. This rule is the core of the game in many ways, since hits determine which units can be damaged
GREEN, VETERAN AND ELITE
 35100A It is the 31st century, a time of endless wars that rage across human-occupied space. As star empires clash, these epic wars are won and lost by BattleMechs, 30-foot-tall humanoid metal titans
TRENCH RAIDER: World War I Wargaming in Ten Minutes by David Raybin 2014
 TRENCH RAIDER: World War I Wargaming in Ten Minutes by David Raybin 2014 INTRODUCTION Instead of a generic set of WW1 rules I determined to make the rules fit the game scenario rather than the other way
A Splendid Victory! Copyright. Trevor Raymond. Version 3: May, 2012 (Exodus 20:15 - Thou shall not steal.")
") A Splendid Victory! Copyright. Trevor Raymond. Version 3: May, 2012 (Exodus 20:15 - Thou shall not steal.") Page 1 of 28 A Splendid Victory is a basic set of rules designed for the table-top wargaming
A Splendid Victory! Copyright. Trevor Raymond. Version 3: May, 2012 (Exodus 20:15 - Thou shall not steal.") Page 1 of 28 A Splendid Victory is a basic set of rules designed for the table-top wargaming
napoleon's battles at divisional and onehalf
 napoleon's battles at divisional and onehalf scales I am trying to find a Napoleonic rule-set to play minor, i.e divisional, engagements occurring at the Campaign of Leipzig or in any other Napoleonic
Richard Borg. Rules & Scenarios
 Richard Borg Rules & Scenarios INTRODUCTION The Command and Colours WWI THE GREAT WAR game rules allow players to portray important engagements throughout WWI history. The battles, in the scenario section,
Attack at Luneville by Roger Burley
 Attack at Luneville by Roger Burley The objective for both the United States and the Germans is the control of Luneville defined for US as 3 buildings for 10 phases and the Germans to prevent this. 1 2
The Thin Red Line
 The Thin Red Line 1795-1815. Created by Ben Seib Developed by Scott Laird and the Cheltenham Warchiefs and with the help of the Newcastle Occasional Wargamers. 1 Introduction to The Thin Red Line Page
AT ANY COST: METZ 1870
 AT ANY COST: METZ 1870 ERRATA, CLARIFICATIONS AND FAQ ERRATA TEC The TEC Indicates the shifts as
Chosen Men Fat. 1. Sequence of play. Base Morale;
 Chosen Men Fat 1. Sequence of play v2.1 CCWG Assign cards to each unit in play then shuffle the deck and turnover the top 2 cards. These units then; 1) Test morale. 2) Perform an action. (Move, Load, Fire,
BATTLE FOR THE BRIDGEHEAD BEYOND OMAHA. Campaign Scenarios for Rules of Engagement. Sample file
 BATTLE FOR THE BRIDGEHEAD BEYOND OMAHA Campaign Scenarios for Rules of Engagement the 29th Infantry division and Us rangers beyond Omaha beach june 6th - 8th, 1944 BATTLE FOR THE BRIDGEHEAD BEYOND OMAHA
Rules of Play. GMT Games, LLC P.O. Box 1308, Hanford, CA
 Rules of Play GMT Games, LLC P.O. Box 1308, Hanford, CA 93232-1308 www.gmtgames.com 2 Last Hundred Yards ~ Rules of Play Introduction...3 1.0 Counter Definitions...3 2.0 Game Terms and Definitions...4
A Hard Day s Fighting Lingevres June 14, 1944
 A Hard Day s Fighting Lingevres June 14, 1944 This account is based on the Lingevres scenario, created by Prof Pender and found on the Battlefront Scenarios page. It is divided into two phases, the original
OVER THE TOP! Using Normal Flames Of War Missions in the Great War. by Mike Haught. Adding Trenches. Great War Table Size
 OVER THE TOP! Using Normal Flames Of War Missions in the Great War by Mike Haught The Great War booklet covers three distinct, almost cinematic, missions. The story of starts with the Big Push, the attacker
Modified D20 System for Wild Pig Comics. Congratulations soldier! You have been given control of a 40 ton fighting machine, known as
 Modified D20 System for Wild Pig Comics WELCOME TO THE FUTURE OF COMBAT Congratulations soldier! You have been given control of a 40 ton fighting machine, known as a Mech. It is a complex machine when
COMMANDS AND COLORS NAPOLEONICS PLUS
 COMMANDS AND COLORS NAPOLEONICS PLUS CAMPAIGN RULES Version 3.00 2018-09-20 Contents LEADERS... 3 Leader Casualty Fate... 3 Leader Replacement... 4 Leadership Quality... 4 CAPTURING A THOPHY... 4 GLORY...
Introduction. Playing a Campaign Game
 Introduction Tigers on the Hunt: Kursk is a DLC containing three Campaign Game Scenarios for the Tigers on the Hunt Game (TotH). The Campaign Game Scenarios in this DLC portray three different historical
Brigade Level Combat - Western Front 1916 Version
 Brigade Level Combat - Western Front 1916 Version 9-9-2006 This is the combat resolution system for a command post game about commanding brigades and divisions in WW1 particularly focussed on 1916. The
This Accursed Civil War Five Battles of the English Civil War
 This Accursed Civil War Version 1.2 1 This Accursed Civil War Five Battles of the English Civil War Edgehill 1642 1st Newbury 1643 Marston Moor 1644 2nd Newbury 1644 Naseby 1645 RULEBOOK Version 1.2 (May
SETTING UP DEPLOYMENT
 With the squadron commander s Spartan burning furiously on the road next to the church and contact with regiment spotty due to jamming, Captain Moran realized it was up to him to decide when to break contact.
March Toward the Sound of Guns
 March Toward the Sound of Guns Very Fast Napoleonic Rules Version1.1 By Herbert Wong A) Game Scale The game will, for convenience, follow Avalon Hill s Napoleon s Battles game scale; in fact the game works
Black Powder House Rules
 Black Powder House Rules Command & Movement Disordered Moves Flank Attacks Woods Skirmishers Skirmish Company Mixed Formation Grande Bandes Infantry Tactics Charge Contact Massed Columns Must Form Square
Illustrated AAR: The First Day Scenario
 R E D W I N T E R Illustrated AAR: The First Day Scenario Created July 2010 Here is a recent game of the 5 turn First Day scenario using Joel Toppen's new VASSAL module. Counter art by Michael Evans. Playtest
HOME BEFORE THE LEAVES FALL
 HOME BEFORE THE LEAVES FALL BLACK POWDER RULES AMENDMENTS FOR EARLY WORLD WAR I. BY THE FRIENDS OF GENERAL HAIG What follows are the minor rule amendments we made to play out the Mons campaign in 10mm
RAAF Radschool Association Magazine Vol 46 Page 8 The People I meet!!
 The People I meet!! I was in Geraldton last year, just cruising around minding my own business, as one does, when I was accosted by these 3 "gorgeous girls" who insisted on having their photo taken with
Hardtack Plug-In American Civil War Rules for Stargrunt II by Allan Goodall
 Hardtack Plug-In American Civil War Rules for Stargrunt II by Allan Goodall August 2002 Copyright 2002 by Allan Goodall Table of Contents Table of Contents...i Introduction...1 Acknowledgements...1 Additional
Les Champs de Bataille NAPOLEONIC WARGAME RULES ON THE BATTALION LEVEL WITH GRAND TACTICAL ASPIRATIONS
 Les Champs de Bataille NAPOLEONIC WARGAME RULES ON THE BATTALION LEVEL WITH GRAND TACTICAL ASPIRATIONS SCALES 1 turn = 20 minutes; 1 casting = 60 men; 1" = 40 yards 1 STANDS 3-rank infantry stands (per
Bring in the heavies: the amerika expansion set
 1 Bring in the heavies: the amerika expansion set The following rules will help you incorporate these new units into your AMERIKA game. Feel free to pick and choose which ones to use so long as all players
September 3 rd 1939 Battle on the Czech/Polish border (BK28) between 3 rd German Infantry Army and 3 rd Polish Infantry Army.
 between 3 rd German Infantry Army and 3 rd Polish Infantry Army.") September 3 rd 1939 Battle on the Czech/Polish border (BK28) between 3 rd German Infantry Army and 3 rd Polish Infantry Army. Forces involved: dice: 1 infantry = 1 rifle unit of 4 bases 3 grenades = 3
September 3 rd 1939 Battle on the Czech/Polish border (BK28) between 3 rd German Infantry Army and 3 rd Polish Infantry Army. Forces involved: dice: 1 infantry = 1 rifle unit of 4 bases 3 grenades = 3
Bloody Berets A Scenario for Troops, Weapons and Tactics.
 Bloody Berets A Scenario for Troops, Weapons and Tactics. This scenario is based on Operation Market Garden, and the difficulties of 1 Para at the Arnhem Bridge. It is unusual for a TW&T game in that it
Introduction:... 4 Character Classes;... 4 Weapons:... 4 Organisation:... 4 Actions:... 5 Movement:... 5 Shooting:... 5 To Hit:...
 State of war A.C.W. Skirmish Wargame Rules Tyneside Wargames club Version 1a 1 2 Table of contents Introduction:... 4 Character Classes;... 4 Weapons:... 4 Organisation:... 4 Actions:... 5 Movement:...
Volley and Bayonet, Road to Glory. American Revolution Period Specific Rules. Jeff Glasco ( 2011)
") Revised July 2011 Volley and Bayonet, Road to Glory American Revolution Period Specific Rules Jeff Glasco ( 2011) Volley and Bayonet is copy written by Frank Chadwick and Greg Novak. Additional rules by
Revised July 2011 Volley and Bayonet, Road to Glory American Revolution Period Specific Rules Jeff Glasco ( 2011) Volley and Bayonet is copy written by Frank Chadwick and Greg Novak. Additional rules by
Mini-Nap 2 WARGAME RULES FOR THE NAPOLEONIC ERA. Copyright. Trevor Raymond. January 2015 (Exodus 20:15 - Thou shall not steal.")
") Page 1 of 42 The Basics Mini-Nap 2 WARGAME RULES FOR THE NAPOLEONIC ERA Copyright. Trevor Raymond. January 2015 (Exodus 20:15 - Thou shall not steal.") Mini-Nap 2 is a set of rules specifically designed
Page 1 of 42 The Basics Mini-Nap 2 WARGAME RULES FOR THE NAPOLEONIC ERA Copyright. Trevor Raymond. January 2015 (Exodus 20:15 - Thou shall not steal.") Mini-Nap 2 is a set of rules specifically designed
Advanced Tactics Gold College
 Advanced Tactics Gold College Welcome to Advanced Tactics Gold College. A number of lessons are presented that will help the novice player with his strategy and tactics. Probably most of these lessons