O W N E R S M A N U A L
|
|
|
- Gervais Hunt
- 6 years ago
- Views:
Transcription

1 O W N E R S M A N U A L MCMILLAN TAC -50 MCMILLAN TAC -50 A1 MCMILLAN TAC -50 A1-R2 S H O O T T O W I N

2 Congratulations. You are now the owner of the finest firearm that technology, craftsmanship and art can build. Please take a few minutes and get acquainted with the proper operation of your new firearm. 1
3 PART 1 EQUIPMENT INTRODUCTION Purpose 4 Description 4 PART 2 PREPARATION FOR USE Safety Rules 6 Know Your Firearm 6 New Rifle Break-In Procedures 8 PART 3 ASSEMBLY OF THE MCMILLAN TAC -50 Rifle System 9 Bipod 10 PART 4 DESCRIPTION OF RIFLE SYSTEM CONTROLS Safety Lever 11 Removal of the Bolt Assembly 12 Installation of the Bolt Assembly 12 PART 5 BARREL GROUP Barrel Inspection Procedure 13 Removal of Obstruction from Inside the Barrel 13 PART 6 CLEANING OF THE.50 CAL RIFLE BARREL Removing and Installing the Muzzle Brake 14 Cleaning Procedure 14 PART 7 OPERATING PROCEDURES Loading the Magazine and Chamber 17 Loading Single Cartridge Only 18 Unloading Unfired Rounds from the Rifle 19 2 TABLE OF CONTENTS
4 PART 8 CARE AND CLEANING PROCEDURES Lubrication 19 Cleaning the Receiver and Trigger Assembly 20 Cleaning the Bolt Assembly 21 PART 9 TRIGGER ADJUSTMENTS AND BOLT MAINTENANCE PROCEDURES Trigger Adjustments 22 Bolt Maintenance 22 PART 10 HOW TO OBTAIN PARTS AND SERVICE FROM MCMILLAN FIREARMS MANUFACTURING To Order Parts 24 Repair Services 24 PART 11 ADDENDUM TAC -50 A1 and TAC -50 A1-R2 26 PART 12 PARTS LIST AND GAUGES Parts List 27 Gauges 29 Schematic of TAC -50 Rifle 30 PART 13 SUPPORT KITS Cleaning Kit McMillan.50 Cal. 31 Parts Kit McMillan.50 Cal. 31 3
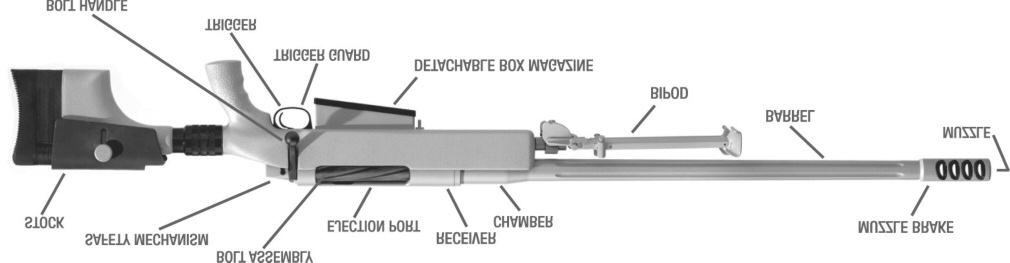
5 PART 1 EQUIPMENT INTRODUCTION PURPOSE The McMillan TAC -50 Tactical Rifle System provides professionally trained personnel with the capability to effectively perform the tasks of a tactical marksman for combat and internal security operations. The rifle system can also be used in both advanced regional and national marksmanship competitions by civilians and professionals. DESCRIPTION The McMillan TAC-50 Tactical Rifle System is a heavy barrel, manually operated bolt action, detachable box magazine system with five shot capacity. It is fitted with a TAC-50 McMillan Fiberglass Stock, equipped with a detachable butt, spacer system, and adjustable cheek rest. The system utilizes a Remington type trigger set to 3.5 lbs, with an optional Jewell trigger upgrade. The 29" barrel is a match grade fluted chrome-moly barrel (stainless steel optional) with a 1 in 15 twist. All metal parts are finished with a matte corrosion resistant polymer finish with nickel/teflon* on the bolt assembly. The McMillan TAC-50 Tactical System is capable of shooting sub-moa in the hands of qualified marksmen with applicable match ammunition. *Teflon is a Dupont trade name. PTFE is generic. 4
6 5
7 PART 2 PREPARATION FOR USE SAFETY RULES WARNING: READ THESE BASIC SAFETY RULES Learn how to handle your rifle safely. Failure to follow these rules can result in serious personal injuries or death. Only you can prevent accidents. KNOW YOUR FIREARM To use it correctly and safely, read and follow the instructions in this manual. 1. Treat ALL firearms as if they are loaded. 2. Never point your firearm at anything you are not willing to destroy. 3. Keep your finger off the trigger until your sights are on target and you are ready to fire. 4. Be sure of your target! Know what is in front of and behind the target. 5. Never make changes to/or alter any parts in your rifle, especially the trigger. Use only original McMillan rifle parts. 6. Make yourself safe at all times by wearing eye protection, such as shooting glasses or impact resistant sunglasses, when shooting. Wear ear protection, such as ear plugs or earmuffs, if not both. Repeated exposure to shooting noise can cause permanent hearing loss. 7. Take care of your rifle system and keep the barrel and muzzle brake clean and free of obstruction. Keep the rifle clean and have 6
8 it checked periodically to verify and maintain proper function. Any worn, missing, or damaged parts may cause an unsafe condition resulting in possible injury or death. 8. Use only ammunition that exactly matches the type marked on your firearm. Handloads can be dangerous. McMillan is not responsible for any accidents or damage caused by handloads or improperly loaded ammunition. If for any reason the bolt closes with difficulty or increased effort, DO NOT FIRE THE RIFLE! If fired, the bolt may become stuck and require excessive means to open, causing possible damage to the rifle. 9. Never load a firearm until you are in a location where it is safe to fire and you are ready to shoot. 10. Know the range of your firearms! Remember, centerfire bullets can travel out to 5.5 miles. 11. If a firearm fails to fire, keep it pointed in a safe direction, wait one minute and carefully unload, avoiding exposure to the breech. If the firearm discharges, but the report or recoil seems weak, unload and ensure there are no barrel obstructions. 12. Unload your firearm whenever you are not shooting. Never carry or store a loaded firearm in a building or vehicle. Unload your firearm before climbing up or over a fallen obstacle, fence, or slippery area. 13. Store your firearm and ammunition safely, especially away from children. Lock unloaded firearms and ammunition securely in separate locations. 7
9 CAUTION: Never drink alcoholic beverages before or during shooting. NEW RIFLE BREAK-IN PROCEDURES For the best results and longest life of your rifle barrel, we suggest the following break-in procedure. 1. Thoroughly clean the barrel before shooting. We recommend a good quality bronze brush (never use stainless steel brushes as they can damage the bore), coated cleaning rod, bore guide, brass jag, and soft clean patches. As for solvents, for initial cleaning we prefer a good copper fouling remover. Note that ammonia type fouling removers are caustic and can cause damage if left on surfaces. Follow all warning labels on any solvent or cleaners used. 2. Always clean the barrel from the chamber end towards the muzzle. With the bore guide in place, start by pushing a patch wet with solvent through the bore, followed by twenty (20) strokes of a solvent soaked bronze brush. Dry patch the barrel until patches come out clean. Once the barrel is clean and dry, the rifle is now ready for the first shot. 3. WARNING: Before firing the rifle, make sure that the barrel and the muzzle brake are clean and free of any obstruction, and NEVER fire the rifle without the muzzle brake. 4. Fire one round and reclean the bore as stated in step 2. In order to break in the barrel correctly it is critical to remove all traces of fouling. After the initial bore cleaning has been completed, run 8
10 several patches soaked in copper fouling remover completely through the barrel. Dry patch after each wet patch. Once there is no trace of copper in the bore and the patches come out clean and dry, fire the next round. Repeat this procedure for the first rounds. 5. When you have completed this initial single shot sequence, you may proceed to the next step. Shoot two (2) shots and clean, for a total of twenty (20) rounds. At no time should the barrel be allowed to get so hot that you cannot hold it comfortably in your hands. 6. CAUTION: Do not use any kind of abrasive cleaner in the bore of your rifle. 7. To continue to get the best accuracy and longest life from your custom barrel, we recommend that you clean the barrel every shots. PART 3 ASSEMBLY OF THE MCMILLAN TAC-50 RIFLE SYSTEM 1. Your McMillan TAC-50 Tactical Rifle System can be broken down into two major components: the stock assembly and the action/barrel assembly. 2. Remove the stock and make sure there is no grit, dust, or any foreign matter in the recoil lug recess or bedding (action) area. This is absolutely critical to achieve accuracy. 9
11 3. Carefully inspect the action/barrel assembly and check that it is clean and free of any foreign matter. 4. Gently place the action/barrel assembly into the stock. Be careful not to damage or chip the bedding material in the recoil lug area. 5. Use the 5/16 x 24 hex head screws supplied to fasten the. action/barrel to the stock assembly. NOTE: The screws are marked on the end with a letter (i.e., F for front, R for rear). 6. With the action/barrel assembly in place, use a torque wrench to tighten the screws to inch-pounds. Always tighten the front screw first (the screw closest to the muzzle). This is accomplished when the handle clicks, indicating the torque setting has been reached. 7. Insert the complete bolt assembly into the rear of the action. Ensure that the bolt stop clicks into the guide track in the bolt body. 8. Once the bolt is past the bolt release, you will have to depress the magazine follower to allow the bolt to go into battery. BIPOD 1. Remove the bipod from the case/packing carton. 2. Ensure that it is clean and free of any foreign matter, especially in the latches and spigot area. 3. Loosen the 3/8" bipod clamp bolt so the bipod clamp will slip over the bipod spigot. 10

12 4. Tighten the bipod clamp bolt. The bipod should not come off the spigot and should tilt from side to side. This unique feature of the McMillan M2 Bipod allows the shooter to maintain a perfect perpendicular reticle even though the ground may be uneven. PART 4 DESCRIPTION OF RIFLE SYSTEM CONTROLS SAFETY LEVER 1. The safety lever provides protection against accidental or unintentional discharge under normal usage when properly engaged. 2. To engage the safety, move the SAFETY safety lever to the rear (SAFE) position. 3. Always move the safety lever to the rear (SAFE) position before handling, loading, or unloading the rifle. 4. When you are ready to fire the rifle, move the safety lever to the forward (FIRE) position. 5. Avoid touching the trigger when moving the safety lever. 11

13 BOLT ASSEMBLY REMOVAL OF THE BOLT ASSEMBLY 6. Point the rifle in a safe direction. 7. Move the safety lever to the rear (SAFE) position. 8. Avoid touching the trigger while moving the safety lever. 9. Raise the bolt handle. 10. Pull the bolt all the way to the rear. 11. Depress the bolt stop release. 12. As you depress the bolt stop release, slide the bolt from the BOLT STOP RELEASE rifle. The butt stock may have to be removed for clearance. INSTALLATION OF THE BOLT ASSEMBLY 13. Point the rifle in a safe direction. 14. Move the safety lever to the rear (SAFE) position. 15. Align the lugs on the bolt at 12 and 6 o clock. NOTE: The magazine follower must be depressed to allow the bolt to enter the receiver. 16. Slide the bolt assembly into the receiver approximately halfway and rotate it until the bolt stop/guide clicks into its track. 17. To lock the bolt assembly into position, push the bolt handle down. 12
14 PART 5 BARREL GROUP BARREL INSPECTION PROCEDURE The inside of the barrel must be clean and free of obstructions. 1. Point the rifle in a safe direction. 2. Move the safety lever to the rear (SAFE) position. 3. Raise the bolt handle. 4. Pull the bolt all the way to the rear. 5. Remove any ammunition from the chamber and/or magazine. 6. Remove the bolt. 7. Look through the barrel from the chamber end to the muzzle. TO REMOVE AN OBSTRUCTION FROM INSIDE THE BARREL 8. Use the correct size cleaning rod. 9. Push the cleaning rod from the chamber end all the way through the barrel until the rod comes out of the muzzle. Verify the muzzle brake is free of patches and other debris. 10. If an object cannot be easily pushed out of the barrel with a cleaning rod, return the rifle to McMillan. NEVER try to remove an object from the barrel by loading another cartridge and firing. 13
15 PART 6 CLEANING OF THE.50 CAL RIFLE BARREL MOLY COATED OR COPPER JACKETED BULLETS Clean the rifle after 30 to 40 rounds in order to maintain benchrest accuracy. REMOVING AND INSTALLING THE MUZZLE BRAKE 1. The rifle can be cleaned with the muzzle brake on or off. 2. To remove the muzzle brake, use a 12-inch or 300mm adjustable wrench with two layers of masking tape on the jaws. Clamp barrel in padded vise just behind the brake. You may have to use a wood mallet and/or nylon hammer, and give a sharp rap on the end of the wrench to break it loose. The brake is installed with standard right-hand threads. 3. To reinstall the muzzle brake, put 2 or 3 drops of gun oil on the barrel threads. For the last 1/4 turn, use the adjustable wrench and give it a fast turn to properly tighten the muzzle brake. For Pinch Clamp muzzle brakes, screw brake on to barrel until it stops. Back brake off until level and tighten cross-bolt to inch-pounds. (Check the muzzle brake for looseness every 50 rounds, then tighten as necessary.) CLEANING PROCEDURE 4. Ensure the rifle is unloaded. 5. Remove the magazine, buttstock, and bolt from the rifle. 6. Ensure the muzzle is lower than the action. 14
16 7. Roll one patch all the way around the brass jag. The cotton patch should be 4"x6" for maximum effect. Wet the patch with solvent. Roll the cleaning rod with the wet patch in the chamber and neck area. 8. Unroll approximately 2" of the wet patch, leaving the other 2/3rds on the jag. Push the remaining wet patch through the bore and remove it at the muzzle. 9. Install the bore guide in the receiver. Replace the brass jag with the phosphor bronze brush, wet it with solvent and run it through the barrel and out the muzzle. Once the brush is forward of the muzzle, pull the brush back through the bore and out of the chamber. Do this a total of ten (10) times. After the tenth time, reapply the bore solvent and run the brush back through another ten (10) times. (Up and back is one time.) NOTE: NEVER reverse the brush while inside the bore. 10. Replace the bronze brush with the brass jag and roll a 4"x4" patch on to the jag. Dry patch the bore until the patches come out clean and dry. 11. Roll a 4"x4" patch onto the jag. Wet the patch with copper fouling remover and push it through the bore and out the muzzle. Remove the old patch. Repeat once more and clean up with dry patch. The wet patches can be worked back and forth with short 4"-6" strokes to increase effectiveness. Repeat this process until all copper fouling is removed. Once all fouling has been removed from the barrel, remove the bore guide and dry patch the chamber, neck, and bore until clean and dry. 15
17 WARNING: Ammonia-based solvents should never be left in the barrel for more than 5 minutes, as they could permanently etch the bore. NOTE: Do not ever use any type of copper fouling remover on bronze brushes. It will attack them the same as fouling in the bore. Copper remover may be used with a nylon brush for heavily fouled barrels. 12. Wrap a 4" square patch around the jag. Wet the patch with bore solvent (not copper remover) and run it through the bore, followed by one or two dry patches. Copper fouling removers will leave the bore dry and totally stripped of any oil. Many standard bore cleaners/solvents have some traces of oil that will stay in the bore. 13. The barrel should now be clean and the rifle ready to fire or store. NOTE: For barrels using moly coated bullets, additional cleaning may need to be done to remove the moly fouling. 14. To remove moly fouling, wrap the brass jag with a dry patch. Install bore guide into receiver. Apply a bore paste to the patch and work the patch down the bore in the same manner as the copper remover. Repeat as necessary but do not over do. Once all moly fouling is removed, dry patch bore until patches come out clean. Excessive or improper use of abrasives can shorten service life and/or cause loss of accuracy. 15. Repeat steps 7 through 10 twice to remove any residue paste from the chamber and barrel. 16


18 NOTE: To perform step 14 the muzzle brake must be removed. Moly will build up on the rifling and will not come out with normal cleaning. It will prevent a rifle from firing at its peak, thus the reason to perform step 14. PART 7 OPERATING PROCEDURES LOADING THE MAGAZINE AND CHAMBER 1. Point the rifle in a safe direction. 2. Move the safety lever to the rear (SAFE) position. 3. Raise the bolt handle. 4. Pull the bolt all the way to the rear. 5. Insert the required number of cartridges into the magazine. 6. Insert one cartridge into the chamber. 7. Using your finger, depress the cartridges in the magazine, and slowly slide the bolt forward so the bolt rides over the top cartridge in the magazine. 8. Finish closing the bolt on the cartridge you inserted into the chamber. THE RIFLE IS NOW LOADED 9. To fire the rifle, move the safety lever to the forward (FIRE) position. 17
19 THE RIFLE IS READY TO FIRE LOADING SINGLE CARTRIDGE ONLY 10. Point the rifle in a safe direction. 11. Move the safety lever to the rear (SAFE) position. 12. Raise the bolt handle. 13. Pull the bolt all the way to the rear. 14. Insert one cartridge through the loading/ejection port and into the magazine. 15. Push the bolt forward and chamber the cartridge. Lock the bolt closed. 16. If you choose to insert the round directly into the chamber, the magazine follower must be depressed to allow the bolt to move forward. Once depressed the bolt may be closed over the chambered round. WARNING: Always check the cartridge for the correct headstamp which matches the rife. NEVER force the bolt closed on a cartridge. If extra effort is ever needed to close the bolt, stop. Open the bolt, remove and discard the round. Failure to do so may result in damage to the firearm and injury or death to the shooter. THE RIFLE IS NOW LOADED 17. To fire the rifle, move the safety lever to the forward (FIRE) position. THE RIFLE IS READY TO FIRE 18
20 UNLOADING UNFIRED ROUNDS FROM THE RIFLE 18. Point the rifle in a safe direction. 19. Move the safety lever to the rear (SAFE) position. 20. Depress the magazine release latch and remove the magazine from the rifle. 21. Raise the bolt handle. 22. Put one hand over the top of the ejection port. 23. Slowly pull the bolt to the rear with your other hand to remove the cartridge from the chamber. 24. Take hold of the cartridge and remove it from the rifle. NOTE: If the cartridge you are trying to remove slides into the chamber, normally the cartridge will slide back out by elevating the muzzle. If the cartridge remains in the chamber, push the bolt all the way forward and depress the bolt handle, locking the cartridge into the chamber and repeat steps 18 through 24. PART 8 CARE AND CLEANING PROCEDURES LUBRICATION 1. Wipe the rifle down with a clean soft cloth. A thin coat of light oil may be applied to all steel surfaces. Apply gun grease (non melting grease, not heavy oil) at the rear of the locking lugs located at the front of the bolt, and the cocking cam located at the rear-underside. Keep grease from getting into the trigger as this may create an unsafe condition. Do not over lube. 19
21 2. When the rifle is to be stored, it should be carefully cleaned and thoroughly oiled. A soft 1" paint brush may be used to clean dust and dirt from hard to reach areas. The bore should be coated with a very light layer of oil. Avoid over oiling the bore as it will work its way down into the acton. 3. When the rifle is to be reused, all excess lubrication must be removed. The chamber and the bore must be thoroughly cleaned and wiped dry. NOTE: NEVER use WD-40 on any part of the rifle. WD-40 is a water displacing oil and will dry out, leaving a sticky varnish behind. CLEANING THE RECEIVER AND TRIGGER ASSEMBLY 4. Move the safety lever to the rear (SAFE) position. 5. Remove the bolt assembly. 6. Turn the rifle upside down. 7. Remove the two action screws. 8. Carefully lift the stock away from the receiver and trigger assembly. NOTE: Clean the receiver and trigger assembly as a unit with a degreaser. Do not leave any degreaser on coated surfaces any longer than necessary. 9. Wipe the receiver down with a light coat of oil. Let stand for 15 minutes, then wipe or blow off all excess lubricant with a clean rag or air. 20
22 10. Before replacing the bolt, make sure the barrel is free from obstructions. Grease bolt as per step After cleaning the trigger assembly, check to be sure there are no cartridges in the rifle, close the bolt, move the safety lever to the forward (FIRE) position, and pull the trigger. The firing pin must fall. Repeat at least 5 times. WARNING: If the firing pin does not remain cocked, when the bolt is closed smartly, return the rifle to McMillan. 12. Cleaning should also be performed after long term storage, or after being subjected to rain, sleet, dust, snow, sand, mud or saltwater. CLEANING THE BOLT ASSEMBLY 13. Remove the bolt assembly from the rifle. 14. Use a good quality solvent and a rag to wipe down the bolt body. Ensure that all fouling and residue are removed. 15. With a good quality bristle brush and solvent scrub the bolt face and remove all fouling and loose brass from the bolt face. 16. Lift the extractor upward and clean under the extractor notch with the brush and solvent. 17. Dry thoroughly and lubricate bolt body with a small amount of gun oil. 18. Activate the ejector and the extractor and ensure they move freely without sticking. 21


23 19. If the ejector or the extractor sticks, return the rifle to McMillan. 20. A light film of grease should be applied behind the bolt locking lugs. DO NOT OVER GREASE. This will facilitate smooth bolt movement and less grease will be needed as the rifle is broken in. PART 9 TRIGGER ADJUSTMENTS AND BOLT MAINTENANCE PROCEDURES TRIGGER ADJUSTMENTS The McMillan TAC-50 rifle comes supplied with an adjustable trigger assembly. It can be adjusted and maintained safely only by McMillan. BOLT MAINTENANCE 1. Remove the bolt from the receiver. 2. Hold the bolt in your left hand with the bolt handle towards you, bolt face to the left, cocking piece housing to the right, and with the cocking piece facing up. 3. Holding the bolt firmly in your left hand, grasp the cocking piece housing with your right hand, and give the cocking piece housing a 1/8 turn away from you (clockwise). This unlocks the firing pin assembly from the bolt. 22


24 4. While still holding the bolt in your left hand, pull the firing pin assembly out to the right. Then lay the bolt body aside. 5. Remove all grease, dirt, powder residue, and solvents from the firing pin assembly and inside bolt body. 6. To reinstall the firing pin assembly, first apply grease at both locking tabs located on the cocking piece housing. Grasp the bolt with your left hand with TABS the back of the bolt facing to the right. Install the firing pin assembly into the back of the bolt while aligning housing tabs with the notches in the bolt body. When aligning the tabs, the cocking piece should be positioned to the right of the cocking cam and notch (LH models will be to the left). With the palm of your right hand, firmly press the firing pin assembly in until it bottoms out on the rear of the bolt. Once fully depressed, rotate the firing pin assembly counter clockwise. 7. You will feel the firing pin assembly lock in place. 8 Grease the locking lugs and cocking cam of the bolt. Install bolt in receiver making certain the bolt stop/guide has clicked into its track in the bolt body. 23
25 PART 10 HOW TO OBTAIN PARTS AND SERVICE FROM MCMILLAN FIREARMS MANUFACTURING TO ORDER PARTS 1. Fax completed order to To order by phone call toll free: Please have the following information ready before you call. Firearm model and serial number. Part description and quantity. Part descriptions can be found on the parts listing page in this manual. Your complete mailing address (P.O. Box and street address) including zip code, telephone number and address. Method of payment: MasterCard or Visa card number and expiration date. Prepayment may be made by check or money order. A quote may be made to you over the phone. (Sorry, no C.O.D.s.) WARNING! USE ONLY McMILLAN PARTS IN McMILLAN FIREARMS. REPAIR SERVICES 1. Contact McMillan Firearms Manufacturing if your firearm needs servicing. Please call our toll free number , Mon-Fri., 7:00 a.m. to 4:00 p.m. Mountain Standard time. 2. If shipment of your firearm is required, please: Record the serial number of your firearm before sending it to us. 24
26 Remove all accessories from the firearm to prevent loss or damage. Pack your firearm for safety and to prevent damage in shipping and handling in a firearms box. Enclose a letter with the firearm detailing the model name or number of your firearm and serial number along with a full description of the problem. Be sure to include your full name and address (P.O. Box and Street Address), including zip code, daytime telephone number and address. Ship your firearm by either United Parcel Service (UPS) or Parcel Post (US Post Office). McMILLAN is not responsible for damage or loss during shipment, so you may elect to purchase insurance from your carrier. SHIP TO McMillan Firearms Manufacturing Attn: Rifle Service Division/Repairs N 19th Ave. Suite 12 Phoenix, Arizona WARNING! DO NOT SEND LIVE AMMUNITION IN YOUR FIREARM OR IN THE SAME BOX WITH THE FIREARM. THIS IS A VIOLATION OF FEDERAL LAW. IF YOU FEEL YOU MUST SEND AMMUNITION, PLEASE SEND THEM IN A SEPARATE PACKAGE AND INCLUDE NAME, ADDRESS (WITH ZIP CODE) TELEPHONE NUMBER, MODEL AND SERIAL NUMBER OF YOUR FIREARM. 25
27 PART 11 ADDENDUM TAC-50 A1 AND TAC-50 A1-R2 NOTE: THE MAGAZINES FROM THE TAC-50 AND THE TAC-50 A1/A1-R2 ARE NOT INTERCHANGEABLE MAGAZINE SYSTEM 1. Release the magazine from the rifle by pressing forward on the magazine release lever located at the front of the trigger guard. 2. The magazine should drop freely. INSTALLING MAGAZINE 1. With the bolt opened and to the rear, insert the magazine into magazine well and press up until an audible click is heard and the magazine release lever is engaged properly. 2. Pull down on the magazine to ensure proper locking. TAC-50 A1-R2 - REMOVING THE BUTTSTOCK 1. Locate the quick release pin on the right side of the rife stock just behind the trigger. 2. Depress the pin detent while pulling the bail outward and removing the pin from the rifle. 3. Pull the buttstock rearward until clear. 26
28 INSTALLING THE BUTTSTOCK 1. Insert the buttstock into the rear of the fore stock, once fully inserted rotate the buttstock until the locating pin is set and the stock will not rotate. 2. Install the quick release pin from right side of the stock until detent button fully protrudes. To ensure proper seating, pull on the bail of the pin. The pin should not release from the stock. 3. Fold quick release pin bail into recess. PART 12 PARTS LIST AND GAUGES PARTS LIST PART NUMBER DESCRIPTION McMillan TAC-50,.50 Cal Tactical Repeater Rifle T50-10XX Receiver - Stripped (Specify) T50-200X Bolt - Stripped T Extractor T Extractor Spring T Extractor Actuating Pin T Ejector T Ejector Spring T Ejector Retaining Pin T Magazine Assembly T Magazine Box 27
29 PART NUMBER DESCRIPTION T Magazine Follower T Magazine Follower Spring (x3) T Spring Retainer Plate T Magazine Box Bottom Cover, Aluminum T Magazine Box Bottom Cover Screw (x2) T Magazine Latch Housing T Magazine Latch Housing Screw (x2) T Magazine Latch Lever T Magazine Latch Lever Spring T Magazine Latch Lever Pivot Pin T Firing Pin T Firing Pin Spring T Firing Pin Lock Screw (x2) T Cocking Piece T50-265X Cocking Piece Housing (Specify) T Bolt Stop T Bolt Stop Spring T Bolt Stop Pivot Pin ACC-005X McMillan Steel Scope Base Specify 0, 30, 45, or 60 MOA ACC-0058 Scope Base Screws (Set of 6) T Recoil Lug T Recoil Lug Pin T50-41X0 Trigger Guard (Specify) T50-400X Action Screw (Fitted-Specify) 28
30 PART NUMBER DESCRIPTION T50-125X Trigger Safety Lever (Specify) T50-120X Trigger (Specify) T Trigger Pin (x2) T50-325X Muzzle Brake T50-30XX Barrel (Specify) ACC-0400 McMillan M2 Bipod T TAC-50 Stock Complete T TAC-50 Stock, Forend Assembly T TAC-50 Stock, Butt Assembly T Spacer System Assembly T Spacer 1/2" T Spacer 1/4" T Recoil Pad T Saddle Cheekpiece T Saddle Lock Screw T Flush Mount Swivel Cup ACC-06XX Flush Cup Swivel Gauges ACC-0720 Firing Pin Protrusion Gauge Min..075 Max.080 ACC-1156 Barrel Plug Gauge Set.4980 (GO)/.5015 (NO GO) ACC-1153 Headspace Gauge Set (GO)/ (NO GO) ACC-1150 TAC-50 Tool Kit 29
31 30 TAC -50
32 PART 13 SUPPORT KITS CLEANING KIT McMillan.50 CAL. PART NUMBER DESCRIPTION ACC-1050 ACC-1051 ACC-0808 McMillan.50 Cal. Cleaning Kit Standard McMillan.50 Cal. Cleaning Kit Competition Bore Guide PARTS KIT McMillan.50 CAL. T Extractor Kit T Ejector Kit T Bolt Stop Kit T Firing Pin Kit 31
33 A WORD ON THE MAINTENANCE AND CARE OF YOUR MCMILLAN FIREARM DON T ALTER OR MODIFY YOUR RIFLE AND HAVE IT SERVICED REGULARLY. Your firearm has been designed to operate according to certain factory specifications. You ll jeopardize your safety and that of others around you by attempting to alter its trigger, mechanical safety or other mechanisms. So never alter or modify your firearm in any way. Like any mechanical device, a firearm is subject to wear. It must be maintained and periodically serviced to assure optimum safety and performance. Only McMillan Firearms Manufacturing should service, repair or modify your McMillan firearm. Consult your instruction book for instructions on how to send your firearm to McMillan. McMillan recommends that you have your firearm professionally serviced annually. You should also have your firearm professionally serviced after prolonged storage, or if there is ever any question pertaining to the proper functioning characteristics of your firearm. Proper cleaning and lubrication are also important to firearm maintenance and are necessary to assure accuracy, safety and reliability. Before cleaning, always make sure that your gun is completely unloaded. And always clean the barrel from the chamber end to the muzzle when possible. Contact: McMillan Firearms Manufacturing, LLC., N 19th Ave. Suite 10, Phoenix, Arizona or phone
34 FIREARM OWNER S RECORD Model Serial # Date Purchased Purchased From Price Paid Remember to complete and return the Firearm Warranty Registration Card in order to obtain full benefit of your limited warranty. 33
35 TO LEARN HOW MUCH CONFIDENCE A COMPANY HAS IN ITS PRODUCTS, READ ITS WARRANTY. 100% Guaranteed Satisfaction Every McMillan rifle carries an Unconditional Lifetime Warranty against manufacturing defects. This does not include normal wear and tear of the firearm including barrel life, internal components and damages resulting in operator misuse. If a problem occurs with the firearm, which is covered under warranty, the defective item will be repaired or replaced. OR If for any reason you are not 100% satisfied wi th your McMillan rifle, return it within 30 days of purchase in good condition for a full refund or exchange. Items that are purchased but are not manufactured by McMillan, such as scopes and cases, are not covered under the McMillan warranty. Visit our website at: McMillan Firearms Manufacturing, LLC N 19th Ave. Suite 10, Phoenix, Arizona phone fax Copyright 2010 McMillan Firearms Manufacturing, LLC.
MCMILLAN TAC -50 S H O O T T O W I N
 O W N E R S M A N U A L MCMILLAN TAC -50 S H O O T T O W I N Congratulations. You are now the owner of the finest firearm that technology, craftsmanship and art can build. Please take a few minutes and
MCMILLAN TAC -SERIES G30 TACTICAL RIFLE S H O O T T O W I N
 O W N E R S M A N U A L MCMILLAN TAC -SERIES G30 TACTICAL RIFLE S H O O T T O W I N Congratulations. You are now the owner of the finest firearm that technology, craftsmanship and art can build. Please
Cleaning rod: spring steel, stainless steel or carbon fibre cleaning rod - only use a one-piece rod. Avoid using snakes.
 Telemark Biathlon Where performance and precision come together http://telemarkbiathlon.com Rifle Cleaning Date : July 19, 2013 Anschutz Rifle Manual - Click Here Izhmash 7-3 Rifle Manual - still looking
AR STYLE FIREARMS OWNER'S MANUAL: OPERATION, HANDLING, DISASSEMBLY / REASSEMBLY & SAFETY INSTRUCTIONS
 AR STYLE FIREARMS OWNER'S MANUAL: OPERATION, HANDLING, DISASSEMBLY / REASSEMBLY & SAFETY INSTRUCTIONS - DO NOT DISCARD THIS MANUAL - READ THIS MANUAL CAREFULLY, PAYING CLOSE ATTENTION TO THE INSTRUCTIONS
Sterling Shotguns. Field and Target Models. Owner s Manual
 Sterling Shotguns Field and Target Models Owner s Manual If you have any questions about the safe use of a Big Horn Armory firearm, call us at 307-586-3700 or write us at P.O. Box 940, Cody Wyoming 82414.
SAFETY RULES WARNING: READ THESE SAFETY RULES & OPERATORS MANUAL BEFORE HANDLING YOUR FIREARM
 SAFETY RULES WARNING: READ THESE SAFETY RULES & OPERATORS MANUAL BEFORE HANDLING YOUR FIREARM Never point a firearm at anyone and always keep the muzzle pointed in a safe direction. Always treat all firearms
MODEL 1400 E USER S MANUAL WARNING: READ THE INSTRUCTIONS AND SAFETY PRECAUTIONS IN THIS MANUAL CAREFULLY BEFORE USING THIS FIREARM.
 ARMSCOR MODEL 1400 E USER S MANUAL WARNING: READ THE INSTRUCTIONS AND SAFETY PRECAUTIONS IN THIS MANUAL CAREFULLY BEFORE USING THIS FIREARM. DISCHARGING FIREARMS IN POORLY VENTILATED AREAS, CLEANING FIREARMS
PISTOL CALIBER AR STYLE FIREARMS
 PISTOL CALIBER AR STYLE FIREARMS OWNER'S MANUAL: OPERATION, HANDLING, DISASSEMBLY / REASSEMBLY & SAFETY INSTRUCTIONS - DO NOT DISCARD THIS MANUAL - READ THIS MANUAL CAREFULLY, PAYING CLOSE ATTENTION TO
SHF R50 SHF S50 Safety Harbor Firearms, Inc. PO Box 563 Safety Harbor, FL Ph: Fax:
 SHF R50 SHF S50 Safety Harbor Firearms, Inc. PO Box 563 Safety Harbor, FL 34695-0563 Ph: 727-726-2500 Fax: 727-797-6134 www.safetyharborfirearms.com 1 ^ WARNING Risk of serious injury or death. Failure
ODEL 95 OPERATOR S MANUAL
 ODEL 95 MODEL 95 OPERATOR S MANUAL TABLE OF CONTENTS 2 2 3 5 6 6 6 7 7 8 8 11 11 12 12 19 20 22 24 26 MANUFACTURER S DISCLAIMER USE OF THE MANUAL SAFETY GUIDELINES WARRANTY AND SERVICE DESCRIPTION OF FIREARM
HATFIELD. Continuing the Tradition SEMI-AUTOMATIC SHOTGUN INSTRUCTION MANUAL
 HATFIELD Continuing the Tradition SEMI-AUTOMATIC SHOTGUN INSTRUCTION MANUAL READ THE INSTRUCTIONS AND WARNINGS IN THIS MANUAL CAREFULLY BEFORE USING THIS FIREARM SAFETY HANDLING RULES 1.Always keep the
REC7 DI OPERATOR S MANUAL
 EC7 D REC7 DI OPERATOR S MANUAL TABLE OF CONTENTS 2 2 4 5 6 6 6 8 8 10 11 12 12 13 13 15 18 20 22 USE OF THIS MANUAL SAFETY GUIDELINES WARRANTY AND SERVICE NOTES FUNCTIONS AND FEATURES BREAK IN PROCEDURE
ENR Enterprises, LLC. ENR 15 Manual
 ENR Enterprises, LLC ENR 15 Manual Table of Contents Disclaimer of Liability 2 Warnings: Dangerous Procedures 3 General Safety Warnings 4 Main Features and Overview 6 Rifle Clearing Before Use 7 Safety
If you do not understand any of the material in this manual or have any questions, contact the Product Service Center or a qualified gunsmith.
 Bolt Action Rifle Patent No. 7823315 B2 and Patents Pending Note: This manual is only a supplement to your firearm s owner s manual. It only addresses the FLEX System and its accessories. IMPORTANT SAFETY
OWNER S MANUAL. Read the instructions and warnings in this manual carefully before using this firearm; do not discard this manual.
 OWNER S MANUAL SDP compact Read the instructions and warnings in this manual carefully before using this firearm; do not discard this manual. This instruction manual should always accompany this firearm
Kentucky Long Rifle.50 BMG Model: BA M-N-M Tactical. Users Guide
 Kentucky Long Rifle.50 BMG Model: BA M-N-M Tactical Users Guide Metals-N-More Bowling Green, KY 42101 Telephone 270-781-3642 Fax 270-781-3766 Email Info@Kentucky50.Com www.kentucky50.com INTRODUCTION Congratulations
AR /.223, 300 BLK, 22 Nosler,.224 Valkyrie. Covers. and. rifle models INSTRUCTION MANUAL
 AR-15 5.56/.223, 300 BLK, 22 Nosler,.224 Valkyrie Covers TM, TM and, TM rifle models INSTRUCTION MANUAL WARNING: BEFORE USING THIS FIREARM, READ AND FOLLOW THESE INSTRUCTIONS Safety First Thank you for
Ultra 87 Pump Action Shotgun Instruction Manual
 Ultra 87 Pump Action Shotgun Instruction Manual Congratulations on your purchase of the Ultra 87 shotgun. With proper care and handling it will give you long, reliable service. It is important that you
M16 R / M1600 R USER S MANUAL WARNING: READ THE INSTRUCTIONS AND SAFETY PRECAUTIONS IN THIS MANUAL CAREFULLY BEFORE USING THIS FIREARM.
 ARMSCOR M16 R / M1600 R USER S MANUAL WARNING: READ THE INSTRUCTIONS AND SAFETY PRECAUTIONS IN THIS MANUAL CAREFULLY BEFORE USING THIS FIREARM. DISCHARGING FIREARMS IN POOLY VENTILATED AREAS, CLEANING
STRIBOG GRAND POWER. The INSTRUCTIONS FOR USE, MAINTENANCE AND SAFETY. 1
 instructions The for use, maintenance STRIBOG and safety hestribog GRAND POWER INSTRUCTIONS FOR USE, MAINTENANCE AND SAFETY www.grandpower.eu 1 The STRIBOG Dear Customer, Thank you for purchasing a semi-automatic
CONTENTS INTRODUCTION. WARNING: This manual contains important warnings that must be understood before using this firearm.
 CONTENTS Safety Rules...............................Page 2 Operation................................Page 5 Major Components.........................Page 6 Assembly.................................Page
Owner s Manual WASR TYPE SPORTING RIFLES Cal. 7.62x39MM
 Owner s Manual WASR TYPE SPORTING RIFLES Cal. 7.62x39MM Congratulations on your purchase of the WASR Rifle. With proper care and handling, it will give you long, reliable service. The WASR is a semi-automatic
KHANSHOTGUNS. Thank you for choosing KHANSHOTGUNS coachgun
 Thank you for choosing KHANSHOTGUNS coachgun Your coachgun represents a piece of rich history of quality firearms design and manufacture. During the manufacturing process, we have endeavored to incorporate
INSTRUCTION MANUAL CZ 92
 INSTRUCTION MANUAL CZ 92 Before handling the pistol read this manual carefully and observe the following safety instructions. Improper and careless handling of the pistol could result in unintentional
SAR-15 RIFLE OWNERS MANUAL
 SAR-15 RIFLE OWNERS MANUAL SIONICS WEAPON SYSTEMS Our mission is to manufacture quality firearms made with pride in the USA. We are able to do accomplish this by using only the best American made parts.
Owners Manual MAX-10/45 Upper Receiver. Rev. A. NFA Warning. LAGE Manufacturing, L.L.C. 916 E. Baseline Rd. STE #113 Mesa, AZ 85204
 Owners Manual MAX-10/45 Upper Receiver NFA Warning LAGE Manufacturing, L.L.C. 916 E. Baseline Rd. STE #113 Mesa, AZ 85204 CM109mk2-300 Rev. A This upper receiver is designed to be used with the M-10/45
VR1 Owner s Manual. Vigilance Rifles, Inc Plum Lane Redlands, CA P F
 VR1 Owner s Manual Vigilance Rifles, Inc. 1653 Plum Lane Redlands, CA 92374 P 909.307.8877 F 909.307.8866 www.vigilancerifles.com INTRODUCTION: Vigilance Rifles offers a new line of Semi-Automatic Rifles
3. Keep your finger off the trigger while operating the action and at all other times until you are ready to shoot.
 1 GUN SAFETY RULES Observe these rules of safe gun handling. 1. Always keep the muzzle pointed in a safe direction. Watch the muzzle at all time: never point a gun, accidentally or intentionally, at any
SEMIAUTOMATIC SHOTGUN OWNER'S MANUAL
 SEMIAUTOMATIC SHOTGUN OWNER'S MANUAL ARMSAN@ARMSAN.COM TECHNICAL DATA Caliber :12 gauge / 20 gauge / 28 gauge Operation: Semi-Automatic, Gas Operated System Barrel Length: 20 (51cm), 24 (61cm), 26 (66cm),
ARAK-21 OPERATOR SAFETY AND INSTRUCTION MANUAL
 ARAK-21 OPERATOR SAFETY AND INSTRUCTION MANUAL NOTICE: The ARAK-21 Upper Assembly itself is not considered a Firearm under federal law or the National Firearms Act. The ARAK-21 Upper Assembly mounted on
INSTRUCTION MANUAL DEADLINE MADE IN CANADA
 INSTRUCTION MANUAL DEADLINE MADE IN CANADA 2 ABOUT The Deadline action is specifically designed for long range, precision shooting. Its components are made using the cutting edge of technology and subject
CLEANING HANDGUNS TOOLS YOU WILL NEED
 CLEANING HANDGUNS CLEANING HANDGUNS If you take pride in your firearm, then you know how important it is to properly maintain your weapon. With good, consistent care, you not only make your gun look good
Owner s. Manual. Instruction Book for: Models 798 & 799 Bolt Action Centerfire Rifles IMPORTANT!
 Owner s Instruction Book for: Models 798 & 799 Bolt Action Centerfire Rifles Manual IMPORTANT! READ ALL INSTRUCTIONS AND WARNINGS IN THIS BOOK BEFORE USING THE FIREARM. PAGE 2...THE TEN COMMANDMENTS OF
Operation Manual Spring Operated Break-Barrel & Under-Lever Pellet Rifles
 WARNING: This gun can cause serious injury or death. Read and follow the instructions carefully. Do not load a pellet into the gun until you are ready to shoot. If you do load a pellet and then decide
RAD MRAD BREECH CONVERSION KIT INSTRUCTIONS
 RAD MRAD BREECH CONVERSION KIT INSTRUCTIONS TABLE OF CONTENTS 2 2 4 5 5 6 USE OF THIS MANUAL SAFETY GUIDELINES WARRANTY AND SERVICE CONTENTS PURPOSE OF BREECH CONVERSION KIT INSTRUCTIONS BREECH CONVERSION
1911 Pistol. owner s Manual
 1911 Pistol owner s Manual IMPORTANT! This manual contains operating, care, and maintenance instructions. To assure safe operation, any user of this firearm must read and understand this manual before
INSTRUCTION MANUAL CZ 75 TS
 INSTRUCTION MANUAL CZ 75 TS CZ 75 TS - INSTRUCTION MANUAL Before handling the pistol read this manual carefully and observe the following safety instructions. Improper and careless handling of the pistol
MRAD. Operator s Manual. (Multi-Role Adaptive Design) PO Box 1077 Murfreesboro, TN USA / / FAX /
 PO Box 1077 Murfreesboro, TN USA / / FAX /") MRAD (Multi-Role Adaptive Design) Operator s Manual PO Box 1077 Murfreesboro, TN 37133 USA / 615.8962938 / 615.896.7313 FAX / mail@barrett.net 03-23-11 P# 12925 Use of this manual Before you handle the
MRAD (Multi-Role Adaptive Design) Operator s Manual PO Box 1077 Murfreesboro, TN 37133 USA / 615.8962938 / 615.896.7313 FAX / mail@barrett.net 03-23-11 P# 12925 Use of this manual Before you handle the
VANGUARD SERIES 2 OWNERS MANUAL
 VANGUARD SERIES 2 OWNERS MANUAL INTRODUCTION Thank you for buying a Weatherby firearm, and welcome to the family. We realize that you had many products to choose from and hope you feel as we do, that you
AES10B SEMI-AUTO RIFLE W/ CARRYING HANDLE & METAL FOLDING BUTTSTOCK & BIPOD
 Owner s Manual AES10B SEMI-AUTO RIFLE W/ CARRYING HANDLE & METAL FOLDING BUTTSTOCK & BIPOD Cal. 7.62x39MM Congratulations on your purchase of an AES10B Semi-Auto Rifle. With proper care, maintenance and
AR-15 Rifle Operator Maintenance
 AR-15 Rifle Operator Maintenance These procedures cover how to Clean, Inspect and Lubricate the AR15 Rifle NOTICE: This is not a replacement for the manufacturer s manual. If you do not have the owners
INSTRUCTION MANUAL CZ 630/631
 INSTRUCTION MANUAL CZ 630/631 Before handling the air rifle read this manual carefully and observe the following safety instructions. Improper and careless handling of the air rifle could result in unintentional
O.F. MOSSBERG & SONS, INC.
 100848 Flex 2/15/18 11:57 AM Page 1 Patent No. 7823315 B2 B2 and and Patents Pending Note: This manual is only a supplement to your firearm s owner s manual. It only addresses the FLEX System and its accessories.
BFG-50A RIFLE OPERATOR S MANUAL WARNING! READ THIS MANUAL CAREFULLY BEFORE USING THIS FIREARM
 BFG-50A RIFLE OPERATOR S MANUAL WARNING! READ THIS MANUAL CAREFULLY BEFORE USING THIS FIREARM CONTENTS SAFETY...3 Safety Alert Symbol and Signal Words...3 TECHNICAL DATA...6 IDENTIFICATION...7 Model and
Thank you for buying Bushmaster
 AZ 16010 Before disassembling, loading, or using this firearm, please Read, Understand, and Follow all the instructions in this manual, regarding proper handling and safe use!! Caution: If unfamiliar with
P9S Automatic Pistol Caliber.45 ACP
 P9S AUTOMATIC PISTOL Caliber.45 ACP P9S Automatic Pistol Caliber.45 ACP Instruction Manual HECKLER & KOCH, INC. 2148 Pacific Boulevard Sterling, Virginia 20166-8903 U.S.A. TEL. (703) 450-1900 TELEFAX (703)
- SAFETY - FIRST AND FOREMOST
 - SAFETY - FIRST AND FOREMOST FIREARMS ARE DANGEROUS WEAPONS, WHICH CAN CAUSE SERIOUS INJURY OR DEATH. WHEN USING ANY FIREARM, SAFETY MUST BE YOUR FIRST AND CONSTANT CONCERN. READ AND UNDERSTAND THE FOLLOWING
MECH-TECH SYSTEMS CCU MODEL FOR GLOCK PISTOLS
 MECH-TECH SYSTEMS CCU MODEL FOR GLOCK PISTOLS Operation & Maintenance Manual Read and understand this manual before attempting to use this product. If you have any questions call: 1-866-433-2122 www.mechtechsys.com
OLYMPIC ARMS, INC. MPR SUPPLEMENTAL OWNER S MANUAL
 OLYMPIC ARMS, INC. MPR 308-15 SUPPLEMENTAL OWNER S MANUAL READ THIS MANUAL COMPLETELY BEFORE OPERATING YOUR RIFLE. FAILURE TO DO SO MAY RESULT IN DAMAGE TO YOUR RIFLE, INJURY OR DEATH TO THE SHOOTER OR
INSTRUCTION MANUAL CZ 750
 INSTRUCTION MANUAL CZ 750 Before handling the firearm read this manual carefully and observe the following safety instructions. Improper and careless handling of the firearm could result in unintentional
SAAMI. Semi-Automatic Assault Shotgun Owner s Manual. Tel. : Fax
 Head Quarter Beyşehir Organize Sanayi Bölgesi Bayavşar Mah. 4959 Sk. No.24-42700 Beyşehir - Konya / TURKEY Tel. : +90 332 524 60 32-34 - Fax +90 332 524 62 4 - info@deryaarms.com SAAMI SPORTING ARMS AND
KHANSHOTGUNS. Thank you for choosing KHANSHOTGUNS 20 Gauge over & under shotgun
 Thank you for choosing KHANSHOTGUNS 20 Gauge over & under shotgun Your over & under shotgun represents a piece of rich history of quality firearms design and manufacture. During the manufacturing process,
Weatherby SIDE-BY-SIDE SHOTGUN OWNER'S MANUAL. WEATHERBY is a registered trademark of Weatherby, Inc
 Weatherby SIDE-BY-SIDE SHOTGUN OWNER'S MANUAL WEATHERBY is a registered trademark of Weatherby, Inc TEN COMMANDMENTS OF FIREARMS SAFETY Prevention is the solution to hunting and shooting casualties. Every
INSTRUCTION MANUAL. Slavia 630/631
 INSTRUCTION MANUAL Slavia 630/631 Before handling the air rifle read this manual carefully and observe the following safety instructions. Improper and careless handling of the air rifle could result in
Owners Manual MAX-10/9 mk2 Upper Receiver. LAGE Manufacturing, L.L.C. 916 E. Baseline Rd. STE #113 Mesa, AZ Rev. A
 Owners Manual MAX-10/9 mk2 Upper Receiver LAGE Manufacturing, L.L.C. 916 E. Baseline Rd. STE #113 Mesa, AZ 85204 CM109mk2-300 Rev. A NFA Warning This upper receiver is designed to be used with the M-10/9
Owner s Manual Golani Semi-Auto Sporter Rifle, Cal. 5.56mm
 Owner s Manual Golani Semi-Auto Sporter Rifle, Cal. 5.56mm Congratulations on your purchase of a Golani Semi-Auto Sporter Rifle. With proper care and handling it will give you long, reliable service. We
AK63D SEMI-AUTO RIFLE
 Owner s Manual AK63D SEMI-AUTO RIFLE Cal. 7.62X39MM Congratulations on your purchase of the AK63D Semi-Auto Rifle. With proper care and handling, it will give you long, reliable service. The AK63D is a
trigger magazine release
 Made in Germany www.umarexusa.com slide gas vent hammer barrel bushing recoil spring plug slide stop trigger safety trigger guard magazine release grip Government 1911 A1 S Cal. 9 mm P.A.K. (Blank Firing)
OWNER S MANUAL 12 GA, 20 GA,.410 GA
 OWNER S MANUAL General Warnings Be certain this owner s manual is available for reference and is kept with this firearm if transferred to another party. If the manual is lost or misplaced, contact American
Owner s Manual. STERLING TYPE I, TYPE II & TYPE III SEMI-AUTO RIFLES Cal. 9x19MM (TYPE I & TYPE II) Cal. 7.62x25MM (TYPE III)
 Cal. 7.62x25MM (TYPE III)") Owner s Manual STERLING TYPE I, TYPE II & TYPE III SEMI-AUTO RIFLES Cal. 9x19MM (TYPE I & TYPE II) Cal. 7.62x25MM (TYPE III) COLEFIRE MAGNUM SEMI-AUTO PISTOL Cal. 7.62x25MM Congratulations on your purchase
Owner s Manual STERLING TYPE I, TYPE II & TYPE III SEMI-AUTO RIFLES Cal. 9x19MM (TYPE I & TYPE II) Cal. 7.62x25MM (TYPE III) COLEFIRE MAGNUM SEMI-AUTO PISTOL Cal. 7.62x25MM Congratulations on your purchase
distributed by MOSSBERG INTERNATIONAL, INC. P.O. BOX GRASSO AVENUE, NORTH HAVEN, CT PHONE (800)
") OWNER S MANUAL 20 GAUGE AUTOLOADING SHOTGUN IMPORTANT SAFETY WARNINGS NOTE THE SYMBOL THESE SAFETY WARNINGS ARE FOR YOUR PROTECTION AS WELL AS THE SAFETY OF OTHERS. DISREGARDING INFORMATION IN THIS MANUAL
OWNER S MANUAL 20 GAUGE AUTOLOADING SHOTGUN IMPORTANT SAFETY WARNINGS NOTE THE SYMBOL THESE SAFETY WARNINGS ARE FOR YOUR PROTECTION AS WELL AS THE SAFETY OF OTHERS. DISREGARDING INFORMATION IN THIS MANUAL
INTRODUCTION. Good Shooting! -1-
 INTRODUCTION Thank you for buying a Weatherby firearm, and welcome to the family. We realize that you had many products to choose from and hope you feel as we do, that you purchased the finest quality
TABLE of CONTENTS. Safety 4. Introduction 6. Description 6. Storage 6. Components 7. Unloading and Inspection 8. Disassembly 10. Care and Cleaning 12
 1911 Pistol Manual 2 TABLE of CONTENTS Safety 4 Introduction 6 Description 6 Storage 6 Components 7 Unloading and Inspection 8 Disassembly 10 Care and Cleaning 12 Loading and Firing 13 Troubleshooting
CONNECTICUT VALLEY ARMS 5988 PEACHTREE CORNERS EAST NORCROSS, GA FORM 108 REV.05/09
 CONNECTICUT VALLEY ARMS 5988 PEACHTREE CORNERS EAST NORCROSS, GA 30071 www.cva.com FORM 108 REV.05/09 OWNER S INSTRUCTION AND SAFETY MANUAL FOR ELITE STALKER WARRANTY INFORMATION FOR PIVOT-ACTION RIFLES
AR15/ BCA 10 RIFLE OWNER S MANUAL
 AR15/ BCA 10 RIFLE OWNER S MANUAL THIS IS NOT A SAFETY MANUAL. IF YOU NEED ASSISTANCE WITH THE SAFE HANDLING OF THIS, OR ANY FIREARM, PLEASE CONTACT A CERTIFIED FIREARMS INSTRUCTOR OR SCHOOL. Fundamental
BERGARA PREMIER AND CUSTOM SERIES RIFLES
 Our barrels make the difference INSTRUCTION AND SAFETY MANUAL FOR BERGARA PREMIER AND CUSTOM SERIES RIFLES PS-MAN INTRODUCTION Congratulations on the purchase of your Bergara Premier Series or Bergara
OWNER S MANUAL MCMILLAN ALIAS RIFLE LINE SHOOT TO WIN
 OWNER S MANUAL MCMILLAN ALIAS RIFLE LINE SHOOT TO WIN Congratulations. You are now the owner of the fi nest fi rearm that technology, craftsmanship and art can build. Please take a few minutes and get
KEL-TEC PLR-22 Pistol and SU-22 Rifle
 KEL-TEC PLR-22 Pistol and SU-22 Rifle SAFETY, INSTRUCTION & PARTS MANUAL STATEMENT OF LIABILITY This firearm may be classified as a dangerous weapon and is surrendered by KEL-TEC CNC INDUSTRIES INC. with
BLACKPOWDER PRODUCTS, INC 1685 BOGGS ROAD SUITE 300 DULUTH, GA FORM 109V2 REV. 01/
 BLACKPOWDER PRODUCTS, INC 1685 BOGGS ROAD SUITE 300 DULUTH, GA 30096 www.cva.com FORM 109V2 REV. 01/13 31051 OWNER S INSTRUCTION AND SAFETY MANUAL FOR SCOUT V2 THIS PAMPHLET CONTAINS INFORMATION CRITICAL
If you do not understand any of the material in this manual or have any questions, contact the Product Service Center or a qualified gunsmith.
 OWNER S MANUAL 464 LEVER ACTION CENTERFIRE LEVER ACTION RIFLE IMPORTANT SAFETY WARNINGS NOTE THE SYMBOL: THESE SAFETY WARNINGS ARE FOR YOUR PROTECTION AS WELL AS THE SAFETY OF OTHERS. DISREGARDING INFORMATION
CZ 40 P - INSTRUCTION MANUAL
 Before handling the pistol read this manual carefully and observe the following safety instructions. Improper and careless handling of the pistol could result in unintentional discharge and could cause
Owner s Manual 1960 SEMI-AUTO RIFLE W/ WOOD STOCK & MILLED RECEIVER. Cal. 7.62x39MM
 Owner s Manual 1960 SEMI-AUTO RIFLE W/ WOOD STOCK & MILLED RECEIVER Cal. 7.62x39MM Congratulations on your purchase of a Polish 1960 Semi-Auto Rifle. With proper care, maintenance and handling, it will
Defender Series Owner s Manual
 4904 Hwy 98/PO Box 67 Comer, GA 30629 (866) 803-0000 Fax (706-783-5800) Defender Series Owner s Manual MPA1SST & MPA20SST/DMG Carbines MPA10T & MPA10SST Pistols MPA30T & MPA30SST/DMG Pistols When you purchased
slide takedown lever magazine release
 Made in Germany www.umarexusa.com manual safety extractor slide gas vent hammer trigger lock trigger P22 S guide rod takedown lever slide stop magazine release Cal. 9 mm P.A.K. (Blank Firing) OPERATING
N-PAP & O-PAP M70 DF SEMI-AUTO RIFLES
 Owner s Manual N-PAP & O-PAP M70 DF SEMI-AUTO RIFLES Cal. 7.62X39MM Congratulations on your purchase of the PAP M70 DF Semi-Auto Rifle. With proper care and handling, it will give you long, reliable service.
OPERATOR S INSTRUCTIONS for the ARMALITE AR-30 RIFLE
 P.O. Box 299 Geneseo IL 61254 Tel 309-944-6939 fax 309-944-6949 armalite@geneseo.net OPERATOR S INSTRUCTIONS for the ARMALITE AR-30 RIFLE August 10, 2002 I. INTRODUCTION Description: Figure 1, The AR-30
IMPORTANT SUPPLEMENTARY INSTRUCTIONS FOR Model1886 TAKEDOWN LEVER ACTION RIFLE
 Licensee IMPORTANT SUPPLEMENTARY INSTRUCTIONS FOR Model1886 TAKEDOWN LEVER ACTION RIFLE These are special instructions for the Winchester Model 1886 Takedown version only. These instructions must be used
OPERATOR S MANUAL FOR AR-24 SERIES PISTOLS
 OPERATOR S MANUAL FOR AR-24 SERIES PISTOLS ArmaLite Incorporated Box 299 Geneseo Illinois U.S.A. 61254 309-944-6939 ArmaLite.com 2006 ArmaLite Inc. This book provides instructions on the operation and
USER MANUAL TEDNA Shotguns. Over & Under Side by Side Semi-Automatic
 USER MANUAL TEDNA Shotguns Over & Under Side by Side Semi-Automatic Zenith Firearms www.zenithfirearms.com Come shoot the quality. Zenith Firearms, an American importer of high quality fi.rearms.and.accessories,.is.a.proud.distributor.of.
CHAPTER 2 MAINTENANCE
 CHAPTER 2 MAINTENANCE This chapter addresses the proper care of the machine gun to ensure its overall effectiveness and efficient functioning. The information includes the gunner's knowledge in disassembly
Owner s Manual M-76 SPORTER RIFLE Cal. 8x57MM
 Owner s Manual M-76 SPORTER RIFLE Cal. 8x57MM Congratulations on your purchase of the M-76 Sporter Rifle. With proper care and handling, it will give you long, reliable service. The M-76 is a semi-automatic
OWNER S MANUAL 817 BOLT ACTION .17 HMR BOLT ACTION RIFLE WITH DETACHABLE MAGAZINE. distributed by IMPORTANT SAFETY WARNINGS NOTE THE SYMBOL:
 TM OWNER S MANUAL 817 BOLT ACTION.17 HMR BOLT ACTION RIFLE WITH DETACHABLE MAGAZINE IMPORTANT SAFETY WARNINGS NOTE THE SYMBOL: THESE SAFETY WARNINGS ARE FOR YOUR PROTECTION AS WELL AS THE SAFETY OF OTHERS.
AKMS SEMI-AUTO RIFLE W/ FOLDING STOCK
 Owner s Manual AKMS SEMI-AUTO RIFLE W/ FOLDING STOCK Cal. 7.62x39MM Congratulations on your purchase of an AKMS rifle featuring an underfolding metal stock. With proper care, maintenance and handling,
IMPORTANT SUPPLEMENTAL INSTRUCTIONS FOR WINCHESTER LEVER-ACTION RIFLE
 IMPORTANT SUPPLEMENTAL INSTRUCTIONS FOR WINCHESTER MODEL 1895 TAKEDOWN LEVER-ACTION RIFLE These are special instructions for the Winchester Model 1895 Takedown Rifle only. These instructions must be used
OWNER S MANUAL 464 LEVER ACTION CENTERFIRE LEVER ACTION RIFLE IMPORTANT SAFETY WARNINGS NOTE THE SYMBOL:
 OWNER S MANUAL 464 LEVER ACTION CENTERFIRE LEVER ACTION RIFLE IMPORTANT SAFETY WARNINGS NOTE THE SYMBOL: THESE SAFETY WARNINGS ARE FOR YOUR PROTECTION AS WELL AS THE SAFETY OF OTHERS. DISREGARDING INFORMATION
MARLIN Model: 882SS -22 WMR - (22 Magnum) * Now Called Model 982S
 * Now Called Model 982S") Page 1 of 16 MARLIN Model: 882SS -22 WMR - (22 Magnum) * Now Called Model 982S Bolt action rifle. 22 Win. Magnum Rim Fire; nickel-plated 7-shot clip magazine; 22" Micro-Groove barrel; stainless steel barrel,
Page 1 of 16 MARLIN Model: 882SS -22 WMR - (22 Magnum) * Now Called Model 982S Bolt action rifle. 22 Win. Magnum Rim Fire; nickel-plated 7-shot clip magazine; 22" Micro-Groove barrel; stainless steel barrel,
IMPORTANT SAFETY WARNINGS NOTE THE SYMBOL:
 18092 464 Lever Action 2/15/18 11:59 AM Page 1 OWNER S MANUAL 464 LEVER ACTION CENTERFIRE LEVER ACTION RIFLE IMPORTANT SAFETY WARNINGS NOTE THE SYMBOL: THESE SAFETY WARNINGS ARE FOR YOUR PROTECTION AS
OWNER S MANUAL READ THIS MANUAL BEFORE USING YOUR NEW AIRGUN
 OWNER S MANUAL READ THIS MANUAL BEFORE USING YOUR NEW AIRGUN FX SUPER SWIFT Table of Contents Warranty Specifications General Instructions Operating Instructions Trigger Adjustments Care & Maintenance
PA 3-1 CHROME SHOTGUN USER S MANUAL WARNING: READ THE INSTRUCTIONS AND SAFETY PRECAUTIONS IN THIS MANUAL CAREFULLY BEFORE USING THE FIREARM.
 PA 3-1 CHROME SHOTGUN USER S MANUAL WARNING: READ THE INSTRUCTIONS AND SAFETY PRECAUTIONS IN THIS MANUAL CAREFULLY BEFORE USING THE FIREARM. SEPTEMBER 2016 ROCK ISLAND ARMORY USER S MANUAL PA 3-1 CHROME
AR Style Tactical Carbine
 Wilson Combaf AR Style Tactical Carbine Operation and Maintenance Manual WARNING Every gun is ALWAYS loaded! NEVER let the muzzle cover anything which you are not willing to destroy! Keep your finger OFF
Owner s Manual Addendum (36310, 36311)
") FN15 DMR Owner s Manual Addendum (36310, 36311) We are pleased that you have chosen an FNH USA FN 15 Designated Marksman Rifle (DMR). The FN 15 DMR shares the same reliability, durability, quality and
FN15 DMR Owner s Manual Addendum (36310, 36311) We are pleased that you have chosen an FNH USA FN 15 Designated Marksman Rifle (DMR). The FN 15 DMR shares the same reliability, durability, quality and
SPM COACH SHOTGUN. Owner s Manual. 12 Ga., 20 Ga. &.410 Ga. IMPORTANT! READ ALL INSTRUCTIONS AND WARNINGS IN THIS BOOKLET BEFORE USING THIS FIREARM.
 Owner s Manual SPM COACH SHOTGUN 12 Ga., 20 Ga. &.410 Ga. Congratulations on your purchase of the SPM Coach Shotgun. With proper care and handling, it will give you long, reliable service. We specifically
INSTRUCTION MANUAL FOR. Models featured include: LF556, LF300, LF308, and LF6.5.
 INSTRUCTION MANUAL FOR Models featured include: LF556, LF300, LF308, and LF6.5. READ THIS MANUAL THOROUGHLY, PARTICULARLY THE WARNINGS, BEFORE USING THIS FIREARM Copyright 2016 Live Free Armory. All rights
3. Keep your finger off the trigger while operating the action and at all other times until you are ready to shoot.
 1 GUN SAFETY RULES Observe these rules of safe gun handling. 1. Always keep the muzzle pointed in a safe direction. Watch the muzzle at all time: never point a gun, accidentally or intentionally, at any
FOR 500, 505, 510, 535, 590 AND 835
 12173 English_Layout 1 3/5/18 3:38 PM Page 1 OWNERS MANUAL FOR 500, 505, 510, 535, 590 AND 835 PUMP ACTION SHOTGUNS IMPORTANT SAFETY WARNINGS - NOTE THE SYMBOL THESE SAFETY WARNINGS ARE FOR YOUR PROTECTION
MP532 AIR RIFLE INSTRUCTION MANUAL
 MP532 AIR RIFLE INSTRUCTION MANUAL European American Armory Corp. 3855 North U.S. Highway One Cocoa, Florida 32927 (407) 639-4842 This manual was downloaded from www.eaacorp.com E-mail: eaacorp@bv.net
DIRECTIONS OF USE. Version for printout TITAN 3 TITAN 6. Rößler Waffen GmbH
 DIRECTIONS OF USE Version for printout TITAN 3 TITAN 6 Rößler Waffen GmbH Ing. Walther Simmer-Weg 11 A-6330 Kufstein Tel.: +43 (0) 5372 90810 Fax: +43 (0) 5372 90811 office@jagd-shop.at www.jagd-shop.at
Before handling the firearm read this manual carefully and observe the following safety instructions. CONTENTS
 Before handling the firearm read this manual carefully and observe the following safety instructions. Improper and careless handling of the firearm could result in accidental discharge and cause injury,
Henry Mini Bolt.22. Instruction Manual For All H005 Series Rifles. Made in America
 Henry Mini Bolt.22 Instruction Manual For All H005 Series Rifles Important: Study this instruction manual carefully before you handle this firearm. Made in America IS A REGISTERED TRADEMARK OF THE HENRY
-
 Operator s manual SM-95202 Brügger & Thomet AG P.O. Box 42 3608 Thun Switzerland Fon +41 33 334 67 00 Fax +41 33 334 67 01 info@brugger-thomet.ch www.brugger-thomet.ch TABLE OF CONTENTS SAFETY instructions