CROSSBOWS TYRO. Recurve Crossbow OWNER S MANUAL
|
|
|
- Cameron Casey
- 6 years ago
- Views:
Transcription


1 CROSSBOWS TYRO Recurve Crossbow OWNER S MANUAL

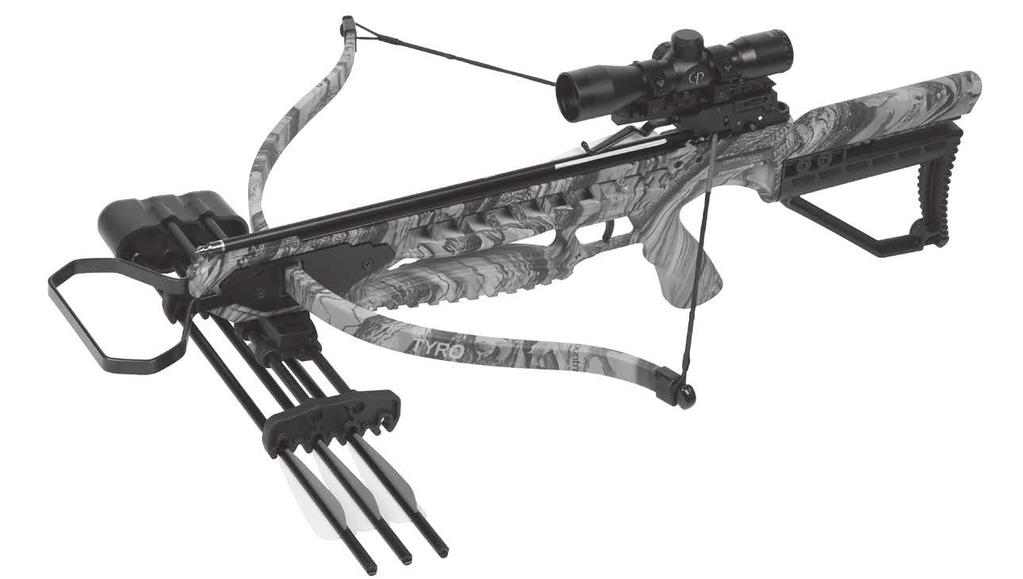
2 READ ALL INSTRUCTIONS AND WARNINGS BEFORE USING If you have any questions about this product or need some help, do not return the product to the store before talking with CenterPoint Hunting and Outdoors. Feel free to visit us at centerpointhunting.com, or speak with one of our friendly customer service ( ) representatives Monday through Friday between the hours of 8AM and 4:30PM EST. 2. LEARNING THE PARTS OF THE CROSSBOW Learning the names of the parts of the crossbow will help you to understand the owner s manual. (Fig1) RECOMMENDED FOR ADULT USE ONLY. MISUSE OR CARELESS USE MAY RESULT IN SERIOUS INJURY OR DEATH. READ ALL INSTRUCTIONS BEFORE USING. ALWAYS KEEP HAND, THUMB AND FINGERS BELOW FLIGHT TRACK. FAILURE TO DO SO MAY CAUSE SERIOUS INJURY. BUYER AND USER HAVE THE DUTY TO OBEY ALL LAWS ABOUT THE USE AND OWNERSHIP OF THIS CROSSBOW. THIS PRODUCT CONTAINS ONE OR MORE CHEMICALS KNOWN TO THE STATE OF CALIFORNIA TO CAUSE CANCER AND BIRTH DEFECTS (OR OTHER REPRODUCTIVE HARM). 1. SAFETY FIRST A. Target Safety ALWAYS treat the crossbow as though it is loaded and ready to fire. ALWAYS treat the crossbow with the same respect you would a firearm. ALWAYS store the crossbow unloaded and away from children. ALWAYS check to see if the crossbow is ON SAFE and unloaded when getting it from another person or from storage. ALWAYS keep the crossbow pointed in a SAFE DIRECTION. ALWAYS keep the crossbow ON SAFE until you are ready to shoot. ALWAYS keep finger off the trigger and out of the trigger guard until ready to shoot. ALWAYS be sure of your target and what is beyond. ALWAYS check your archery backstop for wear before and after such use. All target backstops are subject to wear and will eventually fail. Replace your target backstop if the surface is worn or damaged. NEVER cock or load the crossbow until you are ready to shoot. NEVER point the crossbow at any person. NEVER point the crossbow at anything you do not intend to shoot. B. Crossbow Safety ALWAYS check the crossbow thoroughly for worn, damaged, loose or missing parts prior to shooting. ALWAYS check your rope cocking device thoroughly for worn, damaged, loose or missing parts prior to shooting. ALWAYS inspect your arrows/bolts regularly. Damaged arrows/bolts may cause serious injury. Any nicked, dented, split, or splintered bolts should be discarded immediately. ALWAYS keep hands, fingers and thumbs below the travel path of the bow string and cables. ALWAYS be sure the crossbow limbs are clear from striking tree limbs and other obstacles before shooting. ALWAYS wear safety glasses with any type of archery product. NEVER dry fire the crossbow other than to initially install the bow string. Shooting without an arrow/bolts will cause damage to your crossbow and could cause injury to the shooter. NEVER use underweight arrows/bolts. This has the same effect as dry-firing a crossbow and may cause damage to the crossbow and injury to the shooter. NEVER shoot any projectile in the crossbow except for arrows/bolts recommended by CenterPoint Hunting and Outdoors for the specific crossbow. Shooting other than recommended bolts could result in injury or damage to the crossbow (see specification chart for bolt information). NEVER draw your crossbow beyond the maximum draw length or damage to the limbs, cables and strings could occur. NEVER use your hand or the rope cocker to uncock the crossbow as it may cause serious injury to the user or damage to the crossbow NEVER attempt to disassemble or tamper with the crossbow. Special tools are required for working on the crossbow. Contact an established archery shop for assistance. Using anything other than an established archery shop or modifying the function of the crossbow in any way may render the crossbow unsafe and will void the warranty. Fig 1 A. Stringer B. Plastic Tip (2) C. Quiver Mount Screws (2) & Hex Wrenches (2) D. Medium Hex Wrench E. Large Hex Wrench F. Cocking Stirrup G. Press Pad- (3 Parts) H. Limb Screw (1) I. Metal Riser Plate (2) J. Bow String K. Arrows/Bolts (4) L. Arrows/Bolts Retention Spring M. Safety N. Stock O. Butt P. Quiver Mounts Q. Fore Grip R. Limb S. Quiver T. Rail Lube U. Sight Bridge V. Rope Cocker 3. OPERATING THE SAFETY CAUTION: Like all mechanical devices, a crossbow safety can fail. Even when the safety is ON SAFE, you should continue to handle the crossbow in a safe manner. A. To put the Crossbow ON SAFE NOTE: The safety automatically is engaged and the safety switch moves to the ON SAFE position when the crossbow is cocked in a normal manner (see Section 5. COCKING THE CROSSBOW). 1. Make sure the crossbow is pointed in a SAFE DIRECTION. 2. Slide the safety switch from the FIRE position to the ON SAFE position. (Fig. 2) 3. The crossbow is ON SAFE when Fig 2 the safety switch is moved all the way back under the WHITE dot. B. To Take the Crossbow OFF SAFE NOTE: If attempting to cock the Crossbow and the safety switch is ON SAFE, you will need to use the Cocking Preparation Switch to move the safety switch from the ON SAFE position to the FIRE position in order for the crossbow to accept the string when cocked. Follow the instructions on cocking and loading the crossbow (see Sections 5 & 6). CAUTION: Only use the cocking preparation switch during the normal cocking procedure to move the safety switch from the on safe position to the fire position (see section 5- cocking the crossbow) and when stringing the crossbow for the first time (see section 4c attaching the bow string). SAFE Fig 3 FIRE


.")

. 4.")

 (Fig. 7A). 2.")
. 4.")
.")
 the stringer loop.")


3 The only time the cocking preparation switch should be used after the crossbow is cocked is for the initial stringing of the crossbow (section 4c). Do not use the cocking preparation switch after the crossbow is cocked, other than for the initial stringing of the crossbow. Use of the cocking preparation switch, while the crossbow is in the cocked position, will turn off the anti-dry fire mechanism. 1. Make sure the crossbow is pointed in a SAFE DIRECTION. 2. Locate the safety switch on the side of the stock. 3. Slide the safety switch from the ON SAFE position to the FIRE position. (Fig. 3) 4. The crossbow is OFF SAFE and ready to FIRE when the safety switch is moved all the way forward under the RED dot ( FIRE ). IMPORTANT: After the crossbow is cocked, the user should ONLY move the safety switch from the ON SAFE position to the FIRE position if an arrow/bolt is loaded. 4. ASSEMBLING THE CROSSBOW A. Inserting and Securing the Limb 1. Attach a plastic tip on each end of the limb. Make sure to attach the tips straight and push in securely (Fig. 4). Tap on a solid surface to seat all the way onto the limb. Fig 5A Fig 4 2. Insert one of the small square plastic press pads against the back part of the limb slot. 3. Slide the limb through the limb slot in front of the rubber piece. Lining up the white lines on the limb with the edges of limb slot (Fig. 5A 5C). 4. Stack the metal press pad on top of the other rubber press pad and insert them into the limb slot in front of the limb; with the metal press in front. 5. Make sure the press pad stays secure. Make sure the name and warning stickers are upright and readable. 6. Insert and tighten the limb screw using the LARGE hex, realigning the lines as needed. DO NOT OVERTIGHTEN (Fig. 6). B. Attaching the Stirrup 1. Remove the top screw on the metal riser plate on both sides of the stock with a screw driver (not included) (Fig. 7A). 2. Loosen the bottom two screws on the metal riser plate on both sides of the stock. Fig 7A 3. Slide the stirrup between the stock and the metal riser plate until the stirrup holes line up with the top holes in the metal riser plate (Fig. 7B). 4. Push the plate back into place and tighten all the screws on both sides (Fig. 7C). C. Attaching the Bow String Fig 5B Fig 5C 3. With a foot firmly grounded in the stirrup, pull the stringer upwards until it locks securely into the trigger mechanism (Fig. 9). Note: for easier cocking effort, use the included rope cocker for pulling up on the stringer; see Section 5, cocking the crossbow. Fig As you do this, the crossbow automatically goes to the ON SAFE position. 5. Attach the crossbow string loop over each limb tip by inserting through (under) the stringer loop. BE SURE that the crossbow stringer is fully looped over both sides of the plastic tip as shown in Fig With foot firmly grounded in Fig 12 the stirrup, while holding the cocking preparation switch in the upward position, slide the safety switch to the OFF SAFE or FIRE position (Fig. 11). 7. Pull the trigger to release the stringer. 8. Remove the stringer from the limb tip. (Fig. 12). Fig 11 Fig 13 D. Fine tune the limb position and mark your string for center. FIG 14 NOTE: It is important to cock the crossbow centered each time to get the best accuracy possible out of the crossbow, especially if cocking by hand and not utilizing the rope cocker. 1. Use a tape measure to check the distance from the limb tip to where the string crosses the flight rail. This measurement should be the same on each side (Fig. 13). 2. If it needs to be adjusted, loosen the limb screw and position the limb in the center position. Be sure to retighten the limb screw securely. 3. For even more consistent accuracy, mark the string on both sides of the flight rail so that you can verify it is cocked straight each shot. Fig 6 FIG 15 FIG 16 E. Adjusting the Butt Stock Length 1. Remove the two screws on the left side of the butt stock 2. Adjust the stock back or forward. 3. Retighten the two screws. F. Attaching Quiver to Stock Assembly Fig 7B Fig 7C 1. Attach the stringer rope to each Fig 8 Fig 9 limb tip as shown in (Fig. 8). 2. Make sure your crossbow is in the OFF SAFE or FIRE position; if your crossbow is in the ON SAFE position, go to section 5 for instructions on how to put it in the OFF SAFE or FIRE position FIG 17 Screw quiver mount onto the bottom of the stock (Fig 14). Tighten using the medium hex wrench. Slide the quiver into the quiver mount and lock in place with locking lever. Ensure quiver is locked and secure. G. Attaching the Scope or Red Dot sight 1. The optic included with this product may vary based on model number. See owner s manual included with your optic for details on mounting and sighting in. 5. COCKING THE CROSSBOW YOUR CROSSBOW FUNCTIONS BEST WHEN USING THE ROPE COCKING DEVICE DESIGNED FOR YOUR CROSSBOW. USE OF OTHER ROPE COCKERS WITH DIFFERENT ROPE LENGTHS AND HOOK DESIGN MAY BE UNSAFE TO THE USER AND MAY DAMAGE YOUR CROSSBOW. CAUTION: DO NOT cock or load the crossbow unless in a safe area and in a position to load and shoot safely. Be sure to apply the lube wax to the string including the center serving and the flight track before cocking

. Release the cocking preparation switch. 2.")
4 It is easy to cock the bow off center when manually pulling it back. Your best option is to use the rope cocking device each time you shoot for the most consistent shooting possible. NOTE: TO COCK THE CROSSBOW, THE SAFETY MUST BE IN THE OFF SAFE or FIRE POSITION. AS YOU COCK THE CROSSBOW, THE SAFETY WILL ENGAGE TO THE ON SAFE POSITION. 1. Ensure that the crossbow is in the OFF SAFE or FIRE position. If the Safety is ON SAFE, push and hold the cocking preparation switch upward. While holding the cocking preparation switch up, slide the safety switch from the ON SAFE position to the OFF SAFE or FIRE position (refer to Fig. 11). Release the cocking preparation switch. 2. Place the cocking stirrup on the ground and place a foot securely inside. 3. Place the center of the cocking rope in the rope groove. (Fig. 15) 4. Place the hooks of the cocking rope onto the crossbow string on each side of the flight rail. For the maximum pull force, place the cocking hooks up, not hooks down. (Fig. 16) 5. Pull both t-handles simultaneously, smoothly drawing the crossbow string back under the bolt retention spring and into the string opening of the trigger mechanism. (Tension will keep the cocking hooks against the rail if done properly (Fig. 17). 6. Continue drawing until the main string clicks into place and safety switch moves to the ON SAFE position. 7. Relax the tension slightly to ensure the trigger latch has fully captured the crossbow string. 8. Once cocked, remove the rope cocker hooks from the crossbow string. 9. The crossbow is now cocked and ready for loading an arrow/bolt. DO NOT USE YOUR HAND OR THE ROPE COCKER TO UNCOCK THE CROSSBOW AS IT MAY CAUSE SERIOUS INJURY TO THE USER OR DAMAGE TO THE CROSSBOW. 6. LOADING THE CROSSBOW 1. Verify the crossbow safety is ON SAFE. 2. Point the crossbow in a SAFE DIRECTION. 3. Be sure to use only arrows/bolts that are the recommended weight and size. (See SPECIFICATION CHART for arrow/bolt information) 4. Place the arrow/bolt so that the cocking vane (the odd colored vane), is down in the flight groove (Fig. 18) 5. Slide the arrow/bolt back to the trigger assembly, under the arrow/ bolt retention spring, until the arrow/bolt nock rests fully on the string. Fig 18 (Fig. 18) 6. After following these steps and reading the entire manual, including the section on reviewing safety procedures, your crossbow is now loaded and ready to fire. KEEP THE CROSSBOW IN THE SAFE POSITION UNTIL YOU ARE ACTUALLY READY TO SHOOT. THEN PUSH THE SAFETY FORWARD TO THE FIRE POSITION. KEEP FINGERS AND THUMB BELOW THE TRAVEL PATH OF THE BOW STRING. FAILURE TO DO SO COULD RESULT IN SERIOUS INJURY. 7. AIMING THE CROSSBOW Always point the crossbow in a SAFE DIRECTION. Always keep fingers and thumb below the travel path of the bow string (Fig. 19) You and others with you should always wear shooting glasses to protect your eyes. With the crossbow pointed down range, shoulder the crossbow, and place your hand on the stock with your fingers and thumb positioned on the fore grip, below the travel path of the string (Fig. 19) Do not shoot at hard surfaces or at the surface of water. The arrow/bolt may bounce off or ricochet and hit someone or something you had not intended to hit. Always choose the target carefully. THINK about what you will hit if you miss the target. CORRECT HOLD Fig 19 INCORRECT HOLD NEVER PUT YOUR HANDS IN THIS POSITION 8. SIGHTING IN THE CROSSBOW The optic included with this product may vary based on model number. See owner s manual included with your optic for details on mounting and sighting in. A. Adjusting the sight bridge Note: The Tyro features an adjustable sight bridge. Out of the box, the sight bridge is in the flat (level) position and the set screw on the top of the rail is tightened down to lock it in place. We recommend that you keep the sight bridge in the flat (level) position, this will ensure that you are not inadvertently moving the position of the base. If more up or down adjustment is needed to sight in your Tyro: 1. Loosen the set screw on top of the picatinny rail. 2. Turn the adjustment dial on the side of the trigger pack left towards the U to move your point of impact up. 3. Turn the adjustment dial on the side of the trigger pack right towards the D to move your point of impact down. 9. FIRING With the crossbow pointed in a SAFE DIRECTION and hands in the proper position release the safety by pushing the safety all the way forward ( FIRE ) (see section 5B). Pull the trigger. 10. DE-COCKING the CROSSBOW DO NOT USE YOUR HAND OR THE ROPE COCKER TO UNCOCK THE CROSSBOW AS IT MAY CAUSE SERIOUS INJURY TO THE USER OR DAMAGE TO THE CROSSBOW. You should not cock or load the crossbow unless you are in a safe area and in a position to shoot safely. ALWAYS identify the target and beyond the target prior to shooting. If for some reason you must de-cock the crossbow, DO NOT DRY FIRE IT. Load an old arrow/bolt and fire into a safe target after following the instructions in this manual. Dry firing can cause serious injury or damage to the crossbow. 11. MAINTAINING THE CROSSBOW NEVER dry fire the crossbow other than to initially install the bow string. Shooting without an arrow/bolts will cause damage to your crossbow and could cause injury to the shooter. DO NOT MODIFY OR ALTER THE CROSSBOW. Attempts to modify the crossbow in any way inconsistent with this manual may render the crossbow unsafe to use, cause serious injury or death, and will void the warranty. If you drop the crossbow, check to see that it works properly before you use it again. If anything seems changed, like a shorter or weaker trigger pull, this may mean broken parts. Always check the crossbow thoroughly for worn, damaged, loose or missing parts prior to shooting. Call customer service for assistance before using the crossbow again. Periodically place a light coat of silicon based lubricant on all metal parts to prevent rust and corrosion. We also recommend lube wax (included) to reduce fraying and wear. Apply a small amount of lube wax every shots to the rail. Paying close attention to where the string comes in contact with the rail. Do not over lubricate the center section of the crossbow string as this may cause a buildup of lubricant in the trigger mechanism. Keep the flight track and the string serving waxed to reduce friction. Always check and replace frayed or worn strings and cables. Change strings when they become worn or frayed. Contact an established archery shop to change the strings. Changing strings requires experience and a bow press which can found at an established archery shop. Inspect all arrows/bolts for wear, damage, or nicks before using. If any wear damage or nicks are found dispose of the arrows/bolts properly. Always store your crossbow in a cool, dry place. Do not expose your crossbow to excessive heat such as leaving it in an automobile trunk on a hot day or storing it next to a furnace vent.
5 Specifications Draw Weight 175 lbs. Color Camo FPS Up to 245 Mass Weight 5.0 lbs. Stock Composite Length Adjustable, Limb Compression Fiberglass Width 26 String Length 26.5 Bolt Weight 420 grains System Single Limb, Recurve Arrow/Bolt Size 16 Trigger Auto Safety; Anti-Dry Fire LIMITED WARRANTY FOR CENTERPOINT CROSSBOW Your CenterPoint crossbow is warranted to be free of defects in materials and workmanship for 1 year. This warranty is not transferable and as such is limited to the original owner. Bow limbs are warranted for 1 year from date of purchase. All other parts are warranted for 1 year from date of purchase. CenterPoint scopes have a separate warranty. This warranty does not cover damages due to fair wear and tear, failure to provide routine maintenance, and does not include strings or accessories. In the event of a defect under this warranty, we will, at our option, repair or replace the product; provided, however, our inspection indicates that an original defect exists. CenterPoint reserves the right to replace any product which is no longer available with a product of comparable value and function. If CenterPoint determines the repair is not covered under the warranty guidelines, there could be a charge to you for the repair. This is a limited warranty and does not cover damages caused by misuse, improper handling or installation or maintenance provided by someone other than a CenterPoint Authorized Service Station. This limited warranty does not include consequential damages, incidental damages, or incidental expenses, including damage to property or any other expense. CenterPoint disclaims any implied warranties, including the implied warranties of merchantability and fitness. Some states do not allow the exclusion or limitation of incidental or consequential damages, or allow limitations on implied warranties so the above limitations or exclusions may not apply to you. To the extent any provision of this warranty is prohibited by federal, state or municipal law, which cannot be preempted, it shall not be applicable. This warranty gives you specific legal rights, and you may also have other rights, which vary from state to state and country to country. STOP BEFORE YOU RETURN THIS PRODUCT TO THE STORE Save on gas and avoid the trip back to the store. Contact our Customer Service/Technical Support representatives for information and trouble-shooting help at or visit our web site at centerpointhunting.com. WARRANTY CLAIMS/ REPAIR SERVICE If your product needs repair, DO NOT ATTEMPT TO DISASSEMBLE IT! Any disassembly or modification not performed by a Centerpoint Authorized Service Station will void the warranty. U.S. Customers - Contact CenterPoint Customer Service or us at centerpointhunting.com. You will be instructed where and how to send your CenterPoint product in for repair/replacement under warranty or referred an authorized service center. CenterPoint Crosman Corporation Attn: Warranty Dept Route 5 & 20 Bloomfield, NY Include with your product a copy of your receipt and a brief description of the problem. Be sure to indicate your name, mailing address, address and telephone number. Allow 2-4 weeks for product repair/replacement. We recommend you use a method of shipping that provides you with a tracking number and insurance options. CenterPoint is not liable for any merchandise damaged, lost or stolen during shipping to and from CenterPoint. Canadian Customers - Contact the Gravel Agency, in Quebec at Outside U.S. Customers: Please contact your point of purchase dealer/distributor. If you do not know your dealer/distributor, contact our International Dept. for assistance at or us at centerpointhunting.com. CenterPoint is a trademark of Crosman Corporation in the United States. Tyro is a trademark of Crosman Corporation in the United States Crosman Corporation OM CROSSBOWS CenterPoint Hunting and Outdoors Crosman Corporation 7629 Routes 5 & 20 Bloomfield, NY United States of America centerpointhunting.com Made in Taiwan AXRT
CROSSBOWS XR175. Recurve Crossbow OWNER S MANUAL
 CROSSBOWS XR175 Recurve Crossbow OWNER S MANUAL READ ALL INSTRUCTIONS AND WARNINGS BEFORE USING If you have any questions about this product or need some help, do not return the product to the store before
CROSSBOWS XR175. Recurve Crossbow OWNER S MANUAL
 CROSSBOWS XR175 Recurve Crossbow OWNER S MANUAL READ ALL INSTRUCTIONS AND WARNINGS BEFORE USING If you have any questions about this product or need some help, do not return the product to the store before
Recurve Crossbow OWNER S MANUAL
 PRIMAL Recurve Crossbow OWNER S MANUAL READ ALL INSTRUCTIONS AND WARNINGS BEFORE USING If you have any questions about this product or need some help, do not return the product to the store before talking
SNIPER. Compound Crossbow OWNER S MANUAL
 SNIPER Compound Crossbow OWNER S MANUAL READ ALL INSTRUCTIONS AND WARNINGS BEFORE USING If you have any questions about this product or need some help, do not return the product to the store before talking
SPECIALIST 370. Compound Crossbow OWNER S MANUAL
 SPECIALIST 370 Compound Crossbow OWNER S MANUAL READ ALL INSTRUCTIONS AND WARNINGS BEFORE USING If you have any questions about this product or need some help, do not return the product to the store before
ARCHERY KRONOS. Compound Bow OWNER S MANUAL
 ARCHERY KRONOS Compound Bow OWNER S MANUAL READ ALL INSTRUCTIONS AND WARNINGS BEFORE USING If you have any questions about this product or need some help, do not return the product to the store before
ASSEMBLY INSTRUCTIONS FOR EMPIRE TERMINATOR / RECON HYBRID RECURVE CROSSBOW LINE
 OWNER S INSTRUCTION & SAFETY MANUAL ASSEMBLY INSTRUCTIONS FOR EMPIRE TERMINATOR / RECON HYBRID RECURVE CROSSBOW LINE PRESENTED BY SA SPORTS LLC. IMPORTANT! Read the following Instructions carefully before
Congratulations! You own an R9 Cobra! A compact, fast handling and powerful crossbow for your serious shooting enjoyment!
 COBRA SYSTEM R9 COBRA SYSTEM R9 CROSSBOW INSTRUCTION MANUAL Congratulations! You own an R9 Cobra! A compact, fast handling and powerful crossbow for your serious shooting enjoyment! The limb set comes
Beeman Precision Airguns Spring-Piston Air Rifles P1, P3, P11
 Beeman Precision Airguns Spring-Piston Air Rifles P1, P3, P11 User Instruction Manual V1 10/17 CONTENTS Rules of safe shooting...3 Cocking & Loading... 4 Safety... 4 Sight Adjustment...5 Trigger Adjustment...5
READ THESE INSTRUCTIONS CAREFULLY BEFORE OPERATING YOUR PSE CROSSBOW. FANG SERIES CROSSBOW DISTRIBUTED BY: OWNER S GUIDE
 TOXIC & ENIGMA CROSSBOW OWNER S GUIDE READ THESE INSTRUCTIONS CAREFULLY BEFORE OPERATING YOUR PSE CROSSBOW. FANG SERIES CROSSBOW DISTRIBUTED BY: OWNER S GUIDE READ THESE INSTRUCTIONS CAREFULLY BEFORE OPERATING
Not a toy. Adult supervision required. Misuse or careless use may cause serious injury or death. May be dangerous up to 500 yards (457 meters).
.") Owner s manual www.umarex-usa.com CO2 repeater rifle cal..177 (4.5mm) pellet cal..22 (5.5mm) pellet Not a toy. Adult supervision required. Misuse or careless use may cause serious injury or death. May
Owner s manual www.umarex-usa.com CO2 repeater rifle cal..177 (4.5mm) pellet cal..22 (5.5mm) pellet Not a toy. Adult supervision required. Misuse or careless use may cause serious injury or death. May
HUBEN K1 Pre-charged Pneumatic Air Rifle Owner s Manual
 HUBEN K1 Pre-charged Pneumatic Air Rifle Owner s Manual 5135 Naiman Parkway, Cleveland, OH 44139 l 216-220-1180 Record the serial number of your airgun... READ THIS MANUAL AND THE WARNINGS AND SAFETY PROCEDURES
Beeman Precision Airguns R-Series Air Rifle Owner s Manual
 Beeman Precision Airguns R-Series Air Rifle Owner s Manual WARNING Not a toy. Adult supervision required. Misuse or careless use may cause serious injury or death. Contents Rules of safe shooting... 3
CROSSBOWS SAFETY INFORMATION. FIRestorm ASSEMBLY INSTRUCTIONS and OWNERS MANUAL. Outdoors. Outdoors. Please keep for future reference
 SAFETY INFORMATION FIRestorm ASSEMBLY INSTRUCTIONS and OWNERS MANUAL NOT A TOY. ADULT SUPERVISION REQUIRED l MISUSE OR CARELESS USE MAY CAUSE INJURY OR DEATH l THE RANGE OF THIS CROSSBOW COULD BE DANGEROUS
CROSSBOWS SAFETY INFORMATION. Blaze II ASSEMBLY INSTRUCTIONS and OWNERS MANUAL. Outdoors. Outdoors. Please keep for future reference
 SAFETY INFORMATION Blaze II ASSEMBLY INSTRUCTIONS and OWNERS MANUAL NOT A TOY. ADULT SUPERVISION REQUIRED l MISUSE OR CARELESS USE MAY CAUSE INJURY OR DEATH l THE RANGE OF THIS CROSSBOW COULD BE DANGEROUS
Made in the USA OWNER S MANUAL
 Made in the USA OWNER S MANUAL Service and Repair Information Your local archery retailer should be your first resource for service and repair. The retail establishment where you purchased your bow has
IZH 53M air pistol owner s manual
 IZH 53M air pistol owner s manual 18370 S. Miles Rd Warrensville Heights, OH 44128 216-220-1180 Record the serial number of your airgun... BASIC SAFETY RULES 1. Never point your airgun at anyone or allow
IZH 60/61 air rifle owner s manual
 IZH 60/61 air rifle owner s manual IZH 61 IZH 60 5135 Naiman Parkway Solon, OH 44139 216-220-1180 Record your gun s serial number:... Follow the warnings and safety procedures shown here and throughout
user manual SC73003 WARNING:
 user manual SC73003 WARNING: WHO WE ARE Southern Crossbow is built on the idea of integrating age-old American resourcefulness and perseverance with modern equipment. These one-of-a-kind, tactical crossbows
Tactical Sniper air rifle & carbine
 Tactical Sniper air rifle & carbine User instruction manual Fill pressure: 200 bar (approximately 2,900 psi) Rev 4/17 Contents Rules of safe shooting... 3 Filling your rifle... 4-5 Loading the magazine...
OWNER S MANUAL
 OWNER S MANUAL WWW.EXCALIBURCROSSBOW.COM FULL DRAW LATCH [F.D.L.] TRU-FIT STOCK SLIDING CATCH PRO-SHOT TRIGGER CHARGER CRANK Thank you for purchasing an Excalibur crossbow. We are confi dent that your
READ ALL INSTRUCTIONS AND WARNINGS BEFORE USING THIS AIRGUN.
 INTERNATIONAL Model 94 Air Rifle Safety & Operation Manual READ ALL INSTRUCTIONS AND WARNINGS BEFORE USING THIS AIRGUN. m WARNING: This air rifle is not a toy and can cause serious injury or death. CAUTION:
OWNER'S MANUAL
 OWNER'S MANUAL www.umarex-usa.com MODELS Beretta 92FS and 92FS Match Caliber.177 (4.5 mm) Pellet CO2 Air Pistol patented Not a toy. Adult supervision required. Misuse or careless use may cause serious
Not a toy. Adult supervision required. Misuse or careless use may cause serious injury or death. May be dangerous up to 350 yards (320 meters).
.") Owner's Manual www.umarex-usa.com CP99 CO2 Air Pistol.177 cal. (4.5 mm) Pellet patented Not a toy. Adult supervision required. Misuse or careless use may cause serious injury or death. May be dangerous
Owner's Manual www.umarex-usa.com CP99 CO2 Air Pistol.177 cal. (4.5 mm) Pellet patented Not a toy. Adult supervision required. Misuse or careless use may cause serious injury or death. May be dangerous
Puncher PCP Models. User Instruction Manual. Fill pressure: 200 bar (approximately 2,900 psi) Ver: 8/17
 Ver: 8/17") Puncher PCP Models User Instruction Manual Fill pressure: 200 bar (approximately 2,900 psi) Ver: 8/17 2 Contents Rules of safe shooting...3 Safety...4 Filling the rifle... 5-6 Loading the rifle... 7-8
Puncher PCP Models User Instruction Manual Fill pressure: 200 bar (approximately 2,900 psi) Ver: 8/17 2 Contents Rules of safe shooting...3 Safety...4 Filling the rifle... 5-6 Loading the rifle... 7-8
.177 Cal. CO2 BB Tactical Rifle
 HELLRAISER.177 Cal. CO2 BB Tactical Rifle User Instruction Manual For ages 16 and older with adult supervision V1 10/17 CONTENTS Rules of safe shooting...3 Specifications... 4 Learning parts of your airgun...
user manual SC73001 WARNING:
 user manual SC73001 WARNING: WHO WE ARE Southern Crossbow is built on the idea of integrating age-old American resourcefulness and perseverance with modern equipment. These one-of-a-kind, tactical crossbows
MATRIX and MICRO Series OWNER S MANUAL
 MATRIX and MICRO Series OWNER S MANUAL WWW.EXCALIBURCROSSBOW.COM Thank you for purchasing an Excalibur crossbow. We are confident that your new crossbow will bring years of enjoyment and enhance your hunting
IZH 46M air pistol owner s manual
 IZH 46M air pistol owner s manual 18370 S. Miles Rd. Warrensville Heights, OH 44128 216-220-1180 Record the serial number of your airgun... Follow the warnings and safety procedures shown here and throughout
Windy City II. User instruction manual WARNING: Fill pressure: 200 bar (approximately 2,900 psi)
") Windy City II User instruction manual Rules of safe shooting... 2 Filling the rifle... 3-4 Loading the magazine... 5-6 Inserting the magazine... 7 Adjusting the trigger... 7-8 Safety... 9 Warranty... 10
Windy City II User instruction manual Rules of safe shooting... 2 Filling the rifle... 3-4 Loading the magazine... 5-6 Inserting the magazine... 7 Adjusting the trigger... 7-8 Safety... 9 Warranty... 10
MODEL Government 1911 and 1911 Compensator
 Owner's Manual www.umarex-usa.com MODEL Government 1911 and 1911 Compensator Caliber.177 (4.5 mm) Pellet CO 2 Air Pistol patented WARNING: Not a toy. Adult supervision required. Misuse or careless use
This bow is strictly intended for recreational use only.
 Your Kinetic Stylized bow is warranted to be free of defects in materials and workmanship for the lifetime of the original owner when purchased from an Authorized Retailer. This warranty includes all bow
OWNER S MANUAL. Made in the USA
 Made in the USA OWNER S MANUAL SERVICE & REPAIR INFORMATION Your local archery retailer should be your first resource for service and repair. The retail establishment where you purchased your bow has knowledgeable
RULES FOR SAFE FIRING:
 EN THIS AIRGUN IS INTENDED FOR USE BY THOSE YEARS OF AGE OR OLDER. ADULT SUPERVISION REQUIRED. SOFT-AIR-PISTOL PPK/S BLOW BACK RULES FOR SAFE FIRING:. Get to know the single parts of your new soft-air
User Instruction Manual
 User Instruction Manual PRE-CHARGED PNEUMATIC PCP Air Rifle With Built-In Pump Ver 1, 9/18 CONTENTS Rules of safe shooting...3 Warnings...4 Parts of your Aspen air rifle...5 Operating the safety...6 Trigger...6
OWNER S MANUAL. MISSIONCROSSBOWS.COM 919 River Road, Sparta, WI 54656
 OWNER S MANUAL MISSIONCROSSBOWS.COM 919 River Road, Sparta, WI 54656 SAFETY RULES & INSTRUCTIONS WARNING SAFE USE OF YOUR MISSION CROSSBOW IS YOUR PERSONAL RESPONSIBILITY AND THE FAILURE TO FOLLOW ALL
THIS IS AN ADULT AIRGUN AND ACCORDING TO ASTM STANDARDS, IT IS EXEMPT FROM HAVING A SAFETY.
 Owner's Manual 586 and 686 Series CO2 Air Revolver cal..177 (4.5 mm) Pellet Pat. applied for This airgun is recommended for adult use only. Careless use may cause serious injury or death. Dangerous within
This bow is strictly intended for recreational use. only.
 Your Kinetic Mirage bow is warranted to be free of defects in materials and workmanship for the lifetime of the original owner when purchased from an Authorized Retailer. This warranty includes all bow
Operation Manual Spring Operated Break-Barrel & Under-Lever Pellet Rifles
 WARNING: This gun can cause serious injury or death. Read and follow the instructions carefully. Do not load a pellet into the gun until you are ready to shoot. If you do load a pellet and then decide
MODEL Beretta 92FS. Caliber.177 (4.5 mm) Pellet CO 2 Air Pistol. Operating instructions 3-15
 Pellet CO 2 Air Pistol. Operating instructions 3-15") MODEL Beretta 92FS Caliber.177 (4.5 mm) Pellet CO 2 Air Pistol Operating instructions 3-15 CONTT 1 Safety instructions 2 Description of Parts 3 Operation WARNING: NOT A TOY. ADULT SUPERVISION REQUIRED.
MODEL Beretta 92FS Caliber.177 (4.5 mm) Pellet CO 2 Air Pistol Operating instructions 3-15 CONTT 1 Safety instructions 2 Description of Parts 3 Operation WARNING: NOT A TOY. ADULT SUPERVISION REQUIRED.
MXB-360 Parts Identification Diagram
 MXB-360 Parts Identification Diagram Carefully review all of the crossbow components below so you are familiar with this information as it relates to the safety and operation of your crossbow. BIAS Rail
trigger magazine release
 Made in Germany www.umarexusa.com slide gas vent hammer barrel bushing recoil spring plug slide stop trigger safety trigger guard magazine release grip Government 1911 A1 S Cal. 9 mm P.A.K. (Blank Firing)
OPERATING INSTRUCTIONS
 OPERATING INSTRUCTIONS for X-2 CO 2 FIRED PROJECTOR www.pneudart.com inc Please read this owner's manual carefully before operating your projector. This manual contains valuable information to ensure that
MXB Cro bow Owner s Manual
 MXB Cro bow Owner s Manual MXB Parts Identification Diagram Carefully review all of the crossbow components below so you are familiar with this information as it relates to the safety and operation of
ISSC M22. User instruction manual. 16. Repair Service. BRAND: ISSC.177 (4.5 mm) Steel BBs DESCRIPTION:
 Steel BBs DESCRIPTION:") 16. Repair Service If your air pistol needs repair, we recommend that you take or send it to Air Venturi. International customers should contact their distributors. DO NOT ATTEMPT TO DISASSEMBLE IT! Your
16. Repair Service If your air pistol needs repair, we recommend that you take or send it to Air Venturi. International customers should contact their distributors. DO NOT ATTEMPT TO DISASSEMBLE IT! Your
SAFETY FIRST LIMITED LIFETIME WARRANTY
 LIMITED LIFETIME WARRANTY Your Kinetic Rave bow is warranted against defects in materials and workmanship to the original owner. When purchased at an authorized retailer, for the life of the original owner.
MP532 AIR RIFLE INSTRUCTION MANUAL
 MP532 AIR RIFLE INSTRUCTION MANUAL European American Armory Corp. 3855 North U.S. Highway One Cocoa, Florida 32927 (407) 639-4842 This manual was downloaded from www.eaacorp.com E-mail: eaacorp@bv.net
slide takedown lever magazine release
 Made in Germany www.umarexusa.com manual safety extractor slide gas vent hammer trigger lock trigger P22 S guide rod takedown lever slide stop magazine release Cal. 9 mm P.A.K. (Blank Firing) OPERATING
MECH-TECH SYSTEMS CCU MODEL FOR GLOCK PISTOLS
 MECH-TECH SYSTEMS CCU MODEL FOR GLOCK PISTOLS Operation & Maintenance Manual Read and understand this manual before attempting to use this product. If you have any questions call: 1-866-433-2122 www.mechtechsys.com
BB AIR EXTERMINATOR REVOLVER
 ITEM NO. B1419 air gun BB AIR EXTERMINATOR REVOLVER HANDLING & INSTRUCTIONS MANUAL ignite-blackops.com Manufactured & Distributed by 2013 Bear River International, LLC Frisco, TX 75034 All Rights Reserved
Technical Service and Warranty Manual
 Technical Service and Warranty Manual T hank you for selecting a Champion Bow. We feel confident you will be pleased with the performance and durability we build into each and every bow we manufacture.
Sterling Shotguns. Field and Target Models. Owner s Manual
 Sterling Shotguns Field and Target Models Owner s Manual If you have any questions about the safe use of a Big Horn Armory firearm, call us at 307-586-3700 or write us at P.O. Box 940, Cody Wyoming 82414.
WILDCAT C5 Veloci-Speed Synthetic Systems. Manual Includes the Following:
 WILDCAT C5 Veloci-Speed Synthetic Systems Manual Includes the Following: Safety Guidelines Assembly Guides Trouble Shooting General Information Warranty Information Care and Maintenance congratulations,
If you do not understand any of the material in this manual or have any questions, contact the Product Service Center or a qualified gunsmith.
 Bolt Action Rifle Patent No. 7823315 B2 and Patents Pending Note: This manual is only a supplement to your firearm s owner s manual. It only addresses the FLEX System and its accessories. IMPORTANT SAFETY
SIG ASP20 BREAK BARREL AIR RIFLE OWNERS MANUAL: HANDLING AND SAFETY INSTRUCTIONS
 SIG ASP20 BREAK BARREL AIR RIFLE OWNERS MANUAL: HANDLING AND SAFETY INSTRUCTIONS READ THE INSTRUCTIONS AND WARNINGS IN THIS MANUAL CAREFULLY BEFORE USING THIS AIR RIFLE. DO NOT DISCARD THIS MANUAL. THIS
NOT A TOY. ADULT SUPERVISION REQUIRED. MISUSE OR CARELESS USE MAY CAUSE SERIOUS INJURY OR DEATH.DANGEROUS UP TO 350 YARDS (320 METER).
.") Caution: NOT A TOY. ADULT SUPERVISION REQUIRED. MISUSE OR CARELESS USE MAY CAUSE SERIOUS INJURY OR DEATH.DANGEROUS UP TO 350 YARDS (320 METER). This air rifle is primarily intended for adult use. However,
Caution: NOT A TOY. ADULT SUPERVISION REQUIRED. MISUSE OR CARELESS USE MAY CAUSE SERIOUS INJURY OR DEATH.DANGEROUS UP TO 350 YARDS (320 METER). This air rifle is primarily intended for adult use. However,
OPERATION INSTRUCTIONS MODE D EMPLOI MANUAL DE INSTRUCCIONES
 Semi-automatic CO 2 airgun.177 cal (4.5 mm) 30 88 g.177 (4,5 mm) ACCESSORY RAIL b u i l t - n i OPERATION INSTRUCTIONS MODE D EMPLOI MANUAL DE INSTRUCCIONES CAUTION ATTENTION ATENCIÓN Please read this
OWNER S MANUAL. Pre-Charged Pneumatic Airgun BP caliber Pellet Air Rifle BP caliber Pellet Air Rifle
 PERFORMANCE Many factors affect velocity, including brand of projectile and weight of projectile. Your Marauder has been designed for quiet shooting. However when using light weight pellets the sound barrier
Best Performance WALTHER air rifles for sporting and recreation.
 Best Performance WALTHER air rifles for sporting and recreation. WARNING: AN AIR RIFLE THAT IS NOT OPERATING PROPERLY MAY BE DANGEROUS. IT SHOULD BE KEPT SAFELY FROM USE BY ANYONE UNTIL REPAIRED OR DESTROYED.
WALTHER LGU WARNING: AIR RIFLE cal. 4,5 mm (.177) cal. 5,5 mm (.22) Operating instructions 2-11
 cal. 5,5 mm (.22) Operating instructions 2-11") WALTHER LGU AIR RIFLE cal. 4,5 mm (.177) cal. 5,5 mm (.22) Operating instructions 2-11 WARNING: NOT A TOY. ADULT SUPERVISION REQUIRED. MISUSE OR CARELESS USE MAY CAUSE SERIOUS INJURY OR DEATH. MAY BE DANGEROUS
WALTHER LGU AIR RIFLE cal. 4,5 mm (.177) cal. 5,5 mm (.22) Operating instructions 2-11 WARNING: NOT A TOY. ADULT SUPERVISION REQUIRED. MISUSE OR CARELESS USE MAY CAUSE SERIOUS INJURY OR DEATH. MAY BE DANGEROUS
Remington 700. Disclaimer Limited Warranty Satisfaction Guarantee Installation Instructions
 Remington 700 Disclaimer Limited Warranty Satisfaction Guarantee Installation Instructions WARNING: Failure to properly install your trigger and ensure proper safety functionality could result in an unsafe
R SERIES R9/R15 INSTRUCTION MANUAL
 R SERIES R9/R15 INSTRUCTION MANUAL 10.2017 Use of non-ravin components and accessories, including non-ravin arrows and nocks or non-ravin strings and cables, may cause the system to not operate as designed,
2014 Technical Manual
 2014 Technical Manual TUNING AND TECHNICAL INFORMATION FOR THE ENERGY 32, ENERGY 35, SPIRIT AND TOUR COMPOUND BOWS DISCLAIMER OF LIABILITY: Elite Archery is not liable for any personal injury, death or
Monster Windy City Leopard
 Monster Windy City Leopard User instruction manual Windy City Monster Leopard Fill pressure: 200 bar (approximately 2,900 psi) Contents Rules of safe shooting... 3 Filling the rifle... 4 Loading the rifle...
User Instruction Manual
 User Instruction Manual 320 fps 18rounds 12gram VELOCITY BBs CO2 CARTRIDGE GRIP SAFETY BLOWBACK John Wayne 1911 CO2,.177 Cal. (4.5mm) Air Pistol Contents Safety Instructions...3 Learning the Parts of Your
To Prevent Damage to the Crossbow and to Protect Your Warranty, USE ONLY Parker or RED HOT Arrows with CAPTURE NOCKS.
 MADE IN AMERICA CROSSBOW OWNER S MANUAL To Prevent Damage to the Crossbow and to Protect Your Warranty, USE ONLY Parker or RED HOT Arrows with CAPTURE NOCKS. DO NOT ATTEMPT TO OPERATE OR SHOOT THIS PRODUCT
STRIBOG GRAND POWER. The INSTRUCTIONS FOR USE, MAINTENANCE AND SAFETY. 1
 instructions The for use, maintenance STRIBOG and safety hestribog GRAND POWER INSTRUCTIONS FOR USE, MAINTENANCE AND SAFETY www.grandpower.eu 1 The STRIBOG Dear Customer, Thank you for purchasing a semi-automatic
trigger trigger guard
 Made in Germany www.umarexusa.com gas vent hammer cylinder ejector rod cylinder release grip Smith & Wesson Chiefs Special S Cal. 9 mm R.K. (Blank Firing) OPERATING INSTRUCTIONS trigger trigger guard USA
DISASSEMBLING & REASSEMBLING CARTRIDGE INSTALLING SEATPOST ON BIKE
 INTRODUCTION BILL OF MATERIALS SPECIFICATIONS & TOOLS PROCEDURES DISASSEMBLING & REASSEMBLING CARTRIDGE INSTALLING SEATPOST ON BIKE OPERATION OF SEATPOST GIANT LIMITED WARRANTY 1 INTRODUCTION Congratulations
CROSSBOW OWNER S MANUAL
 CROSSBOW OWNER S MANUAL To Prevent Damage to the Crossbow and to Protect Your Warranty, USE ONLY Parker or RED HOT Arrows with CAPTURE NOCKS. DO NOT ATTEMPT TO OPERATE OR SHOOT THIS PRODUCT UNTIL YOU HAVE
Congratulations, you are the proud owner of the finest production crossbow in the world!
 Congratulations, you are the proud owner of the finest production crossbow in the world! Please follow all safety, assembly and troubleshooting instructions contained in this manual. It is extremely important
R SERIES R10/R20 INSTRUCTION MANUAL
 R SERIES R10/R20 INSTRUCTION MANUAL 10.2017 Use of non-ravin components and accessories, including non-ravin arrows and nocks or non-ravin strings and cables, may cause the system to not operate as designed,
SKYBIRD TRAP OWNER S / OPERATOR S MANUAL PARTS AND ASSEMBLY INSTRUCTIONS
 SKYBIRD TRAP PART NO. 40903 OWNER S / OPERATOR S MANUAL PARTS AND ASSEMBLY INSTRUCTIONS WARNING: THIS MACHINE CAN CAUSE SERIOUS INJURY OR DEATH! THOROUGHLY READ INSTRUCTIONS AND SAFETY INFORMATION BEFORE
2017 Technical Manual
 2017 Technical Manual TUNING AND TECHNICAL INFORMATION OPTION 6, OPTION 7, TEMPO, EMERGE, IMPRESSION, REVOL IMPULSE 31, IMPULSE 34, ENERGY 35, VICTORY, VICTORY 37 DISCLAIMER OF LIABILITY: Elite Outdoors
Congratulations, you are the proud owner of the finest production crossbow in the world!
 Congratulations, you are the proud owner of the finest production crossbow in the world! Please follow all safety, assembly and troubleshooting instructions contained in this manual. It is extremely important
INTRODUCTION BILL OF MATERIALS SPECIFICATIONS & TOOLS PROCEDURES OPERATION OF SEATPOST GIANT LIMITED WARRANTY
 INTRODUCTION BILL OF MATERIALS SPECIFICATIONS & TOOLS PROCEDURES OPERATION OF SEATPOST GIANT LIMITED WARRANTY 1 INTRODUCTION Congratulations on the purchase of your new GIANT CONTACT SWITCH seatpost. This
IZH61 AIR RIFLE INSTRUCTION MANUAL
 IZH61 AIR RIFLE INSTRUCTION MANUAL European American Armory Corp. 1426 West King Street Cocoa, FL 32922 (321) 639-4842 www.eaacorp.com E-mail: eaacorp@eaacorp.com Copyright EAA Corp. 9/98 EAA MODEL: IZH61
WARNING: PCP PELLET RIFLE Cal. 4,5 mm (.177) Cal. 5,5 mm (.22) Operating instructions 2-9
 Cal. 5,5 mm (.22) Operating instructions 2-9") PCP PELLET RIFLE Cal. 4,5 mm (.177) Cal. 5,5 mm (.22) Operating instructions 2-9 WARNING: NOT A TOY. THIS AIRGUN IS DESIGNED FOR USE BY EXPERIENCED SHOOTERS 18 YEARS OF AGE OR OLDER AND IS INTENDED FOR
PCP PELLET RIFLE Cal. 4,5 mm (.177) Cal. 5,5 mm (.22) Operating instructions 2-9 WARNING: NOT A TOY. THIS AIRGUN IS DESIGNED FOR USE BY EXPERIENCED SHOOTERS 18 YEARS OF AGE OR OLDER AND IS INTENDED FOR
IZH46 AIR PISTOL INSTRUCTION MANUAL
 IZH46 AIR PISTOL INSTRUCTION MANUAL European American Armory Corp. 3855 North U.S. Highway One Cocoa, Florida 32927 (407) 639-4842 This manual was downloaded from www.eaacorp.com E-mail: eaacorp@bv.net
Page 1 of 6. Important Safety Rules for Parents Supervising Family Archery
 WARNING DANGEROUS PROJECTILE: A mishandled arrow or bowstring may result in serious injury or even death. Parental Supervision Required. Bows and arrows are not toys. Page 1 of 6 Failure to follow Instructions
ALL LOCAL LAWS ABOUT THE OWNERSHIP AND THE USE OF THIS AIRGUN. USA
 OWNER S MANUAL READ ALL INSTRUCTIONS AND WARNINGS IN THIS MANUAL BEFORE USING THIS AIRGUN. Congratulations and thank you for purchasing your new STOEGER pellet airgun. WARNING This airgun is not a toy.
Owners Manual MAX-10/45 Upper Receiver. Rev. A. NFA Warning. LAGE Manufacturing, L.L.C. 916 E. Baseline Rd. STE #113 Mesa, AZ 85204
 Owners Manual MAX-10/45 Upper Receiver NFA Warning LAGE Manufacturing, L.L.C. 916 E. Baseline Rd. STE #113 Mesa, AZ 85204 CM109mk2-300 Rev. A This upper receiver is designed to be used with the M-10/45
WINCHESTER MODEL WINCHESTER MODEL 70 45
 WINCHESTER MODEL 70 35 WINCHESTER MODEL 70 45 HIGH POWERED AIRGUN User instruction manual Read this manual and the warnings and safety procedures prior to handling this product. THIS AIRGUN IS NOT A TOY
O.F. MOSSBERG & SONS, INC.
 100848 Flex 2/15/18 11:57 AM Page 1 Patent No. 7823315 B2 B2 and and Patents Pending Note: This manual is only a supplement to your firearm s owner s manual. It only addresses the FLEX System and its accessories.
Kentucky Long Rifle.50 BMG Model: BA M-N-M Tactical. Users Guide
 Kentucky Long Rifle.50 BMG Model: BA M-N-M Tactical Users Guide Metals-N-More Bowling Green, KY 42101 Telephone 270-781-3642 Fax 270-781-3766 Email Info@Kentucky50.Com www.kentucky50.com INTRODUCTION Congratulations
CR20 S WARNING: Air rifle cal..177 (4.5 mm) Operating instructions 2-12
 Operating instructions 2-12") CR20 S Air rifle cal..177 (4.5 mm) READ THIS OWNER S MANUAL COMPLETELY. This airgun is not a toy. Treat it with the same respect you would a firearm. Always carefully follow the safety instructions found
CR20 S Air rifle cal..177 (4.5 mm) READ THIS OWNER S MANUAL COMPLETELY. This airgun is not a toy. Treat it with the same respect you would a firearm. Always carefully follow the safety instructions found
Congratulations, you are the proud owner of one of the finest production crossbow in the world!
 Congratulations, you are the proud owner of one of the finest production crossbow in the world! Please follow all safety, assembly and trouble shooting instructions contained in this manual. It is extremely
Model 1720T.177 Caliber Pre-Charged Pneumatic Airgun OWNER S MANUAL READ ALL INSTRUCTIONS AND WARNINGS IN THIS MANUAL BEFORE USING THIS AIRGUN
 Model 1720T.177 Caliber Pre-Charged Pneumatic Airgun OWNER S MANUAL READ ALL INSTRUCTIONS AND WARNINGS IN THIS MANUAL BEFORE USING THIS AIRGUN Crosman Corporation 7629 Routes 5 & 20 Bloomfield, NY 14469
602 STRINGING MACHINE OWNER'S MANUAL
 PROGRESSION 602 STRINGING MACHINE OWNER'S MANUAL AL Issue 1- April 2000 Copyright 2000 GAMMA Sports - All Rights Reserved PROGRESSION 602 STRINGING MACHINE TABLE OF CONTENTS PAGE 1... WARRANTY PAGE 2...
Copyright Trek Bicycle Corporation 2005 All rights reserved
 i ii iii Aero Brake Levers Owner s Manual Table of contents Read this manual before you ride... 1 Introduction... 2 Inspect your brake levers regularly... 2 Adjusting aero brake levers... 2 Lubricating
stormrider Instructions for Use Version 08/2017
 stormrider EN Instructions for Use Version 08/2017 INTRODUCTION DESCRIPTION SAFETY INSTRUCTIONS TECHNICAL DATA HANDLING & OPERATION CARE & MAINTENANCE TROUBLESHOOTING DESCRIPTION Front Sight Barrel Rear
OWNERS MANUAL. Model Shown with optional Primary Mooring Cleats. Portable Mooring System SAFETY OPERATION MAINTENANCE PARTS
 OWNERS MANUAL Model 2400 Shown with optional Primary Mooring Cleats. Portable Mooring System SAFETY OPERATION MAINTENANCE PARTS CAUTION: Before using your new Pier Tender, read rules for Safety, Operation,
2018 PRODUCT CATALOG
 PRODUCT CATALOG Spectre 375 Mil-spec AR-Style butt stock is fully adjustable for length and cheek position Quad limbs with CNC-machined cam system String suppressors reduce noise and vibration Durable,
WEBLEY Please read this manual before using your airgun
 The Webley OWNER S MANUAL BREAK BARREL AIR RIFLES ALL VMX AND SPECTOR MODELS WEBLEY Please read this manual before using your airgun WARRANTY Each Webley air rifle is fully guaranteed against faulty workmanship
CONTENTS SAFE HANDLING OF GUNS
 EN CONTENTS SAFE HANDLING OF GUNS 1 2 3 4 SAFETY INSTRUCTIONS CARE DESCRIPTION OF PARTS OPERATION READ THIS OWNER S MANUAL COMPLETELY. This airgun is not a toy. Treat it with the same respect you would
SHF R50 SHF S50 Safety Harbor Firearms, Inc. PO Box 563 Safety Harbor, FL Ph: Fax:
 SHF R50 SHF S50 Safety Harbor Firearms, Inc. PO Box 563 Safety Harbor, FL 34695-0563 Ph: 727-726-2500 Fax: 727-797-6134 www.safetyharborfirearms.com 1 ^ WARNING Risk of serious injury or death. Failure
Assembly Instructions For your Faux Bow Pro (FBP)
") Owner s Manual Assembly Instructions For your Faux Bow Pro (FBP) Please take the time to read your instructions carefully and to familiarize yourself with all the parts. Assembly is very easy once you
Owner s Manual Assembly Instructions For your Faux Bow Pro (FBP) Please take the time to read your instructions carefully and to familiarize yourself with all the parts. Assembly is very easy once you
Custom SX/TX. PepperBall User Manual
 Custom SX/TX PepperBall User Manual WARNING THIS LAUNCHER IS NOT A TOY AND IS INTENDED FOR USE BY MILITARY, LAW ENFORCEMENT, CORRECTIONAL OFFICERS, PRIVATE SECURITY GUARDS, BAIL ENFORCEMENT AGENTS AND
User Instruction Manual
 User Instruction Manual 4500 psi Air Compressor Ver 2, 1.18 Contents Parts Included...3 Assembly Instructions...3-5 Operation Instructions...6-7 Oil Change Intervals...8 Air Filter Replacement...9 Setting
600 / 600FC OWNER'S MANUAL
 PROGRESSION 600 / 600FC OWNER'S MANUAL Issue 2 / Version E - Dec. 10, 1997 Copyright 1997 GAMMA Sports - All Rights Reserved PROGRESSION 600 / 600FC OWNER'S MANUAL TABLE OF CONTENTS PAGE 1... WARRANTY