INSTRUCTION MANUAL ARX100_Manual_ indd 1 6/25/13 4:19 PM
|
|
|
- Rosemary Phelps
- 5 years ago
- Views:
Transcription
1 INSTRUCTION MANUAL ARX100_Manual_ indd 1
2 2 ARX100_Manual_ indd 2
3 ALWAYS KEEP THIS MANUAL WITH YOUR FIREARM. INCLUDE IT WITH THE RIFLE WHEN IT CHANGES OWNERSHIP OR WHEN IT IS LOANED OR PRESENTED TO ANOTHER PERSON. CAUTION: The Manufacturer and/or its Local Official Distributors assume no responsibility for product malfunction or for physical injury or property damage resulting in whole or in part from criminal or negligent use of the product, improper or careless handling, unauthorized modifications, use of defective, improper, hand-loaded, reloaded or remanufactured ammunition*, customer abuse or neglect of the product, or other influences beyond the manufacturer s direct and immediate control. * See page 20 Ammunition. WARNING: Always ensure that the safety is fully engaged (if present) until ready to fire. A safety, which is not fully engaged, will not prevent firearm discharge. WARNING: ALL FIREARMS HAVE LETHAL POTENTIAL. READ THE BASIC SAFETY RULES CAREFULLY AND UNDERSTAND THEM FULLY BEFORE ATTEMPTING TO USE THIS FIREARM. In addition to the Basic Safety Rules, there are other Safety Rules pertaining to the loading, unloading, disassembly, assembly and use of this firearm, located throughout this manual. WARNING: READ THE ENTIRE MANUAL CAREFULLY BEFORE USING THIS FIREARM. MAKE SURE THAT ANY PERSON USING OR HAVING ACCESS TO THIS FIREARM READS AND UNDERSTANDS ALL OF THIS MANUAL PRIOR TO USE OR ACCESS. WE RECOMMEND THE USE OF ORIGINAL BERETTA SPARE PARTS AND ACCESSORIES. THE USE OF OTHER MANUFACTURER S SPARE PARTS AND ACCESSORIES COULD CAUSE MALFUNCTIONS AND/OR BREAK- AGES THAT WILL NOT BE COVERED BY THE BERETTA WARRANTY. 3 ARX100_Manual_ indd 3
4 CONTENTS BASIC SAFETY RULES 6 11 SAFETY INSPECTION 12 LOCKING THE BOLT TO THE REAR FEATURES AND OPERATION Description 16 Functioning of the ARX Features Data and Technical Characteristics 19 AMMUNITION 20 OBSTRUCTION CHECK 21 LOADING AND FIRING Dry Firing and Dummy Rounds 22 Loading and Unloading the Magazine Loading Unloading 26 Firing ARX100_Manual_ indd 4
5 FIELD STRIPPING Disassembly Reassembly MAINTENANCE STORAGE 42 CONFIGURING YOUR ARX General Configuration Sight Adjustment 49 Adjusting the Rear Sight 49 Adjusting the Front Sight Post 50 TROUBLESHOOTING 51 Diagram & Parts list ARX100_Manual_ indd 5

6 BASIC SAFETY RULES WARNING: PLEASE READ THIS MANUAL BEFORE HANDLING YOUR FIREARM. WARNING: FIREARMS CAN BE DANGEROUS AND CAN POTENTIALLY CAUSE SERIOUS INJURY, DAMAGE TO PROPERTY OR DEATH, IF HANDLED IMPROPERLY. THE FOLLOWING SAFETY RULES ARE AN IMPORTANT REMINDER THAT FIREARM SAFETY IS YOUR RESPONSIBILITY. 1. NEVER POINT A FIREARM AT SOMETHING THAT IS NOT SAFE TO SHOOT. Never let the muzzle of a firearm point at any part of your body or at another person. This is especially important when loading or unloading the firearm. When you are shooting at a target, know what is behind it. Some bullets can travel over a mile. If you miss your target or if the bullet penetrates the target, it is your responsibility to ensure that the shot does not cause unintended injury or damage. 2. ALWAYS TREAT A FIREARM AS IF IT WERE LOADED. Never assume that a firearm is unloaded. The only certain way to ensure that a firearm has the chamber(s) empty is to open the action and visually examine the chamber(s) to see if a round is present. 6 ARX100_Manual_ indd 6
7 Removing or unloading the magazine will not guarantee that a firearm is unloaded or cannot fire. Firearms can be checked by cycling the action or removing all rounds and by then opening and inspecting the action so that a visual inspection of the chamber for any remaining rounds can be made. 3. STORE YOUR FIREARM SO THAT CHILDREN CANNOT GAIN ACCESS TO IT. It is your responsibility to ensure that children or other unauthorized persons do not gain access to your firearm. To reduce the risk of accidents involving children, unload your firearm, lock it and store the ammunition in a separate locked location. Please note that devices intended to prevent accidents - for example, cable locks, chamber plugs, etc, - may not prevent use or misuse of your firearm by a determined person. Firearm storage in a steel gun safe may be more appropriate to reduce the likelihood of intentional misuse of a firearm by an unauthorized child or person. 7 ARX100_Manual_ indd 7


8 4. NEVER SHOOT AT WATER OR AT A HARD SURFACE. Shooting at the surface of water or at a rock or other hard surface increases the chance of ricochets or fragmentation of the bullet or shot, which can result in the projectile striking an unintended or peripheral target. 5. KNOW THE SAFETY FEATURES OF THE FIREARM YOU ARE USING, BUT REMEMBER: SAFETY DEVICES ARE NOT A SUBSTITUTE FOR SAFE HANDLING PROCEDURES. Never rely solely on a safety device to prevent an accident. It is imperative that you know and use the safety features of the particular firearm you are handling, but accidents can best be prevented by following the safe handling procedures described in these safety rules and elsewhere in the product manual. To further familiarize yourself with the proper use of this or other firearms, take a Firearms Safety Course taught by an expert in firearms use and safety procedures. 6. PROPERLY MAINTAIN YOUR FIREARM. Store and carry your firearm so that dirt or lint does not accumulate in the working parts. Clean and oil your firearm, following the instructions provided in this manual after each use to prevent corrosion, damage to the barrel or accumulation of fouling which can prevent use of the gun in an emergency. Always check the bore and chamber(s) prior to loading to ensure that they are clean and free from obstructions. Firing with an obstruction in the barrel or chamber can rupture the barrel and injure you or others nearby. In the event you hear an unusual noise when shooting, stop firing immediately, engage the manual safety and 8 ARX100_Manual_ indd 8
,")
9 unload the firearm. Make sure the chamber and barrel are free from any obstruction, like a bullet stuck inside the barrel due to defective or improper ammunition. 7. USE PROPER AMMUNITION. Only use factory-loaded, new ammunition manufactured to industry specifications: CIP (Europe and elsewhere), SAAMI (U.S.A.). Be certain that each round you use is the proper caliber or gauge and loading for the particular firearm. The caliber or gauge of the firearm is clearly marked on the barrel(s) of shotguns or rifles and on the slide or barrel of pistols. The use of reloaded or remanufactured ammunition can increase the likelihood of excessive cartridge pressures, case-head ruptures or other defects in the ammunition that can cause damage to your firearm and injury to yourself or others nearby. 8. ALWAYS WEAR PROTECTIVE GLASSES AND HEARING PROTECTION WHEN SHOOTING. The chance that gas, gunpowder or metal fragments will blow back and injure a shooter who is firing a gun is rare, but the injury that can be sustained in such circumstances can be severe, including the possible loss of eyesight. A shooter must always wear impact resistant shooting glasses when firing any firearm. Earplugs or other high-quality hearing protectors help reduce the chance of hearing damage from shooting. 9. NEVER CLIMB A TREE, FENCE OR OTHER OBSTRUCTION WITH A LOADED FIREARM. Open the action and empty the chamber(s) of your firearm and engage the manual safety before climbing or descending a tree or before climbing a fence or jumping over a ditch or other obstruction. Never pull or push a loaded firearm toward 9 ARX100_Manual_ indd 9


10 yourself or another person. Always unload a firearm, visually check to see that the loading mechanism and chamber are unloaded and the magazine is unloaded or removed. Open the action before handing it to another person. Never take a firearm from another person unless it is visually checked to confirm it is unloaded, and the action is open. 10. AVOID ALCOHOLIC BEVERAGES OR JUDGMENT/REFLEX IMPAIRING MEDICATION WHEN SHOOTING. Do not drink and shoot. If you take medication that can impair motor reactions or judgment, do not handle a firearm while you are under the influence of the medication. 11. NEVER TRANSPORT A LOADED FIREARM. Unload a firearm before putting it in a vehicle (chamber empty, magazine empty). Hunters and target shooters should load their firearm only at their destination, and only when they are ready to shoot. If you carry a firearm for self-protection, leaving the chamber unloaded can reduce the chance of an unintentional discharge. 12. LEAD WARNING. Discharging firearms in poorly ventilated areas, cleaning firearms, or handling ammunition may result in exposure to lead and other substances known to cause birth defects, reproductive harm, and other serious physical injury. Have adequate ventilation at all times and wash hands thoroughly after exposure. 10 ARX100_Manual_ indd 10
11 WARNING: It is YOUR responsibility to know and abide by Federal, State and Local laws governing the sale, transportation and use of firearms in your area. WARNING: This firearm has the capability of taking your life or the life of someone else! Always be extremely careful with your firearm. An accident is almost always the result of not following basic firearm safety rules. Especially for U.S. consumers: For information about Firearm Safety Courses in your area, please visit the National Rifle Association s web site at 11 ARX100_Manual_ indd 11

12 SAFETY INSPECTION Warning: Never assume a firearm is unloaded. Always keep the barrel pointed in a safe direction. Never point a firearm at yourself or another person. Warning: Do not put your finger on the trigger or inside the trigger guard until ready to shoot. Warning: Never take from or give a firearm to another person unless the action is open and the firearm has been inspected to insure it is unloaded. To check to make sure your Beretta ARX100 is unloaded pull the bolt handle back and inspect the ejection port and chamber. The rifle is unloaded when no cartridge is visible in the chamber, receiver or magazine. If the rifle is loaded refer to the unloading instructions on page 26. LOCKING THE bolt the rear Warning: Never assume a firearm is unloaded. Always keep the barrel pointed in a safe direction. Never point a firearm at yourself or another person. 12 ARX100_Manual_ indd 12


13 Warning: Never take from or give a firearm to another person unless the action is open and the firearm has been inspected to insure it is unloaded. 1. To lock the bolt carrier assembly open remove the magazine by pressing the magazine release button located on the right or left side of the receiver and pull the magazine down and out of the rifle. An alternant method of removing the magazine is to press up on the lower magazine release button located on the bottom of the trigger guard just behind the magazine well until the magazine is released then pull the magazine down and out of the rifle. 13 ARX100_Manual_ indd 13


14 2. Pull back the bolt handle with one hand while applying upward pressure to the right or left bolt catch lever, located just in front of the trigger guard with the other hand, until the bolt assembly has been pulled back far enough to allow the bolt catch to engage the bolt carrier. Then allow the bolt carrier to rest against the bolt catch locking the bolt carrier assembly in the open position. The lower magazine release button can also be used to lock the bolt carrier assembly in the open position. To use the lower magazine release button retract the bolt handle with one hand while applying upward pressure to the lower magazine release button with the other hand. When the bolt carrier assembly has been pulled back far enough to allow the bolt catch to engage the bolt carrier, allow the bolt carrier to rest against the bolt catch, locking the bolt carrier assembly in the open position. 14 ARX100_Manual_ indd 14


15 An alternate method of locking the bolt carrier assembly open is to insert an unloaded magazine and retract the bolt handle until the magazine follower pushes the bolt catch up, locking the bolt carrier assembly to the rear. 15 ARX100_Manual_ indd 15


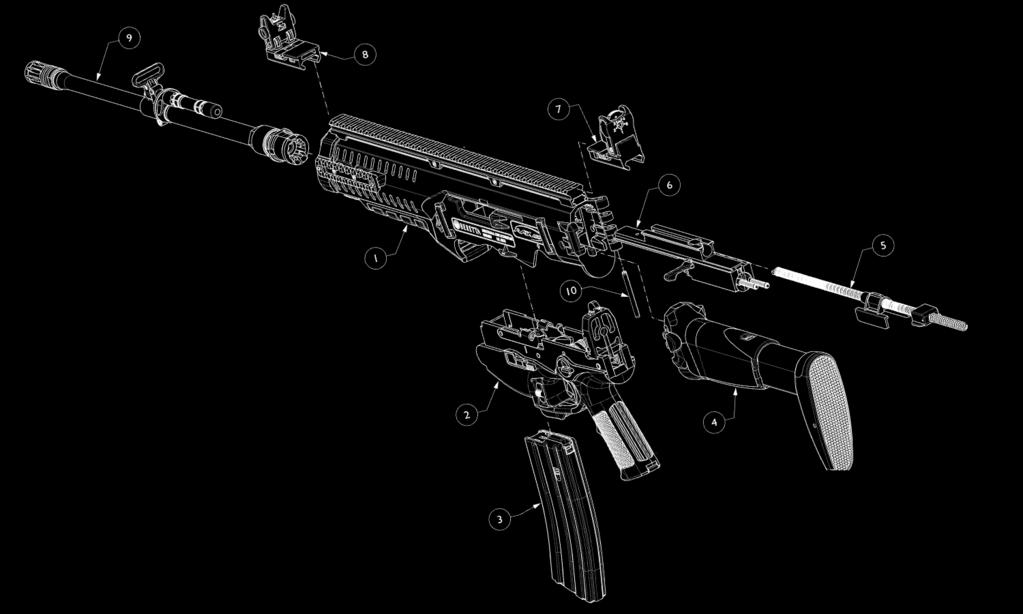
16 Notice: The bolt carrier assembly will remain locked in the open position when the magazine is removed. Notice: The bolt carrier assembly will close if the bolt handle is pulled to the rear if a LOADED magazine is inserted. Notice: The bolt carrier assembly will close if the bolt handle is pulled to the rear if NO magazine is inserted. DESCRIPTION EJECTOR SELECTOR STOCK REAR SIGHT BOLT CARRIER ASSEMBLY TOP RAIL FRONT SIGHT SIDE RAIL BARREL STOCK ADJUSTMENT BUTTON SAFETY TRIGGER BOLT CATCH LEVER BOTTOM MAGAZINE RELEASE BUTTON BOTTOM RAIL FOREND COVER BARREL RELEASE MAGAZINE RELEASE MAGAZINE BARREL ASSEMBLY SAFE FIRE BARREL EXTENTION GAS SYSTEM BARREL FLASH HIDER The Beretta ARX100 is a semiautomatic rifle that is designed to survive extreme environmental conditions and provide a modern, completely ambidextrous rifle that can be readily adapted to fit the largest number of users and be configured to suit situational requirements. 16 ARX100_Manual_ indd 16
17 THE FUNCTIONING OF THE ARX100 When the trigger is pulled the hammer is released and travels forward striking the firing pin, the firing pin travels forward under inertia striking the primer of a loaded cartridge. The primer detonates igniting the powder. The powder burns creating a gas that pushes the bullet down the barrel, when the bullet passes the gas port (a hole drilled through the barrel for the purpose of venting gas from the barrel into the gas system) gas passes through the port, into the gas block, through the shank of the piston and into the cylinder. The cylinder then moves back and contacts the bolt carrier transferring energy to the bolt carrier. The bolt carrier then moves back causing the bolt to rotate, disengaging the bolt lugs from the barrel extension. Then the bolt carrier and bolt continue rearward under inertia extracting the case from the chamber, ejecting it through the left or right ejection port depending on the ejection selector setting and cocking the hammer. After the fired case has been ejected, the bolt carrier is stopped and is returned forward by the recoil spring. A cartridge is striped from the top of the magazine and chambered as the bolt returns forward. When the bolt reaches its full forward position the continued forward motion of the bolt carrier rotates the bolt, locking it into the barrel extension, making the rifle ready for the next shot. When the last round is fired from the magazine, the magazine follower engages the bolt catch and locks the bolt carrier assembly in the open position. FEATURES Beretta gas piston system The Beretta ARX100 uses a fixed piston moving cylinder gas system that was designed to need minimal maintenance. Quick change barrel The barrel of the ARX100 can be removed and installed in a few seconds without tools. 17 ARX100_Manual_ indd 17
18 Selective right or left hand ejection The ARX100 is designed so that the rifle can be made to eject to the right or left without changing parts or disassembly. To change the ejection the shrouded ejector selector is pushed from right to left to eject to the left and from left to right to eject to the right with the bolt forward/closed. The selector is shrouded to prevent accidental changing of the ejection and can be actuated with the tip of a bullet or a punch. Reversible bolt handle The bolt handle of the ARX100 can be moved from one side of the receiver to the other without tools or disassembly. Ambidextrous controls The ARX100 is provided with completely ambidextrous controls including the safety selector levers, magazine release buttons, left and right bolt catch levers and the lower magazine release button that can be operated with either hand. Collapsible and folding stock The stock of the ARX100 is adjustable for length of pull and folds along the right side of the receiver. The rifle can be operated and fired with the stock folded. Sling attachment points The ARX100 is provided with six sling attachment points to allow for any sling configuration that may be desired. Sight and accessory rails 18 The ARX100 is equipped with Picatinny rail along the full length of the top of the upper receiver and on the right, left and bottom front of the forend. The rear portion of the bottom of the forend is equipped with a Beretta specific rail mounting system. The Picatinny rails will accept ARX100_Manual_ indd 18
19 Mil-Std 1913 Picatinny and Weaver compatible sights, optics mounts, and accessories. The rear portion of the bottom rail is designed to accept Beretta specific specialized accessories. An ergonomic cover is available to cover this section of the rail when it is not in use. Pistol grip storage compartment The pistol grip of the ARX100 contains a storage compartment that can be used to store cleaning equipment, batteries, or other small parts and accessories. Pinless, tool-free field striping The ARX100 has been designed so that no pins are removed and no tools are needed to disassemble the rifle for normal maintenance. Date AND TECHNICAL Characteristics Model: ARX100 Caliber: (5.56 mm NATO as supplied) Magazine Capacity: 30 round standard (depends on market configuration) Rifling Pitch: General Operation: Locking System: Sights: Overall Length: Barrel Length: Overall Width: Grip Width: Overall Height: Sight Radius: Weight unloaded: 1:7 as supplied Gas operated piston Rotary Locking Bolt Removable front and rear flip up sights 26.5 stock folded and collapsed stock extended Max 6.8 Lbs 19 ARX100_Manual_ indd 19
20 AMMUNITION Warning: Beretta specifically disclaims responsibility for any damage or injury occurring with, or as the result of using faulty, improper, hand-loaded, reloaded or remanufactured ammunition. Serious damage, injury even death, may result from the use of ammunition that is not suitable for use in this firearm, from firing against a bore obstruction and propellant overloads. Use of improper ammunition, such as listed previously will void the manufacturer s warranty. Use only commercially manufactured ammunition made in accordance with CIP (Europe and elsewhere) or SAMMI (USA) standards. Be certain that the ammunition is the appropriate caliber and loading for your rifle and barrel and is clean, dry and in good condition. The appropriate caliber and loading are marked on the barrel. Note: The Beretta ARX100 is intended for use with cartridges that are designed for use in semiautomatic rifles. There are some commercial loadings available that may not cycle the action completely. Warning: The barrels for the ARX100 are interchangeable. Always check the barrel to verify the chambering of the barrel currently installed. Never attempt to chamber or fire a cartridge in a barrel that is not chambered for that cartridge. Serious damage, injury or even death, may result from the use of ammunition that is not suitable for use in the barrel installed on the rifle. 20 ARX100_Manual_ indd 20

21 Obstruction check Warning: Always point your rifle in a safe direction. Never point a firearm at yourself or another person. Warning: Never fire a rifle with an obstructed barrel. This can cause a catastrophic failure destroying the rifle and injuring the shooter and anyone near by. Note: Remove the barrel from the receiver or remove the bolt carrier assembly to inspect the barrel. 1. Follow the disessembly instructions in the field stripping section (pages 28-35) and remove the barrel. 2. Look through the barrel to make sure there are no obstructions or debris. If there is something in the barrel push it out with a cleaning rod. If the blockage can not be easily pushed out, the rifle must be taken to a competent gunsmith and the obstruction removed before the rifle can be fired. 3. Reassemble the rifle as instructed in the field stripping reassembly section (pages 35-41). 21 ARX100_Manual_ indd 21
22 DRY FIRING & DUMMY ROUNDS Dry firing is defined as firing a firearm with no ammunition in the chamber. Long term dry firing of your Beretta ARX100 will reduce the life of the firing pin. Snap Caps (Inert chamber inserts that allow a firearm to be dry fired without damage to the firing pin.) are available for those who wish to practice firing without live ammunition. Dummy Rounds with empty primer pockets are suitable for loading/unloading practice and for function testing but do not protect the firing pin tip during dry firing. LOADINg and firing Caution: Beretta assumes no liability for any injury or property damage resulting from improper or careless handling or intentional or accidental firing of the rifle. Warning: Always keep the barrel pointed in a safe direction. Never point a firearm at yourself or another person. Warning: Before loading the firearm become familiar with the loading procedures without the use of ammunition. Never handle a loaded firearm until you become familiar with the operating procedures. Warning: Always check the barrel for obstructions before loading the firearm (page 21). Warning: Always keep your finger out of the trigger guard and away from the trigger until you are prepared to fire. Warning: Load the chamber only when ready to fire. Warning: Know your target and what is behind it. If you miss your target or the bullet penetrates the target it is you responsibility to ensure that the bullet dose not cause unintended injury or damage. 22 ARX100_Manual_ indd 22

 position or the action left open until ready to shoot. The safety is a mechanical device AND IS NOT A REPLACEMENT FOR SAFE GUN HANDLING.")
23 Warning: The shooter and all bystanders should wear protective eye wear and hearing protection during shooting. Prolonged exposure to gun fire without hearing protection will permanently damage your ability to hear. Debris and hot gasses generated during firing can damage your eyes without proper eye protection. Caution: The safety should be left in the ON (S) position or the action left open until ready to shoot. The safety is a mechanical device AND IS NOT A REPLACEMENT FOR SAFE GUN HANDLING. Warning: The rifle is able to fire any time a round is in the chamber and the safety is in the OFF (1) position. Loading the magazine NOTE: Magazine Compatibility. The ARX100 uses NATO/STANAG standard magazines. Other commercial magazines may work but should be tested for fit and function before use. To load the magazine place a round on top of the magazine between the feed lips with the front of the cartridge facing the front of the magazine and press the cartridge down between the feed lips until the cartridge is retained. Make sure that the back of the cartridge is against the back of the magazine and repeat the process until the desired number of rounds have been loaded or the magazine has been loaded to full capacity. 23 ARX100_Manual_ indd 23


24 Note: Do not load more than the indicated maximum number of rounds into a magazine. An overloaded magazine may not function properly. Unloading the magazine To unload the magazine grasp the magazine in one hand, with the cartridges pointing forward and push the rounds forward and out of the magazine. loading rifle with the magazine Insert a loaded magazine into the magazine well and push it into place until the magazine catch snaps into place retaining the magazine in the rifle. Pull back and release the bolt handle, or press the right or left bolt catch levers downward to release the bolt carrier assembly if the bolt carrier assembly is locked to the rear. This will chamber a round. 24 ARX100_Manual_ indd 24


25 Caution: Keep fingers away from the ejection port when closing the bolt carrier assembly. Closing your fingers in the ejection port can cause injury to your fingers. Loading Rifle without a magazine A round can be loaded directly into the barrel by inserting a cartridge into the chamber and allowing the bolt carrier assembly to close. Note: The first method loading from magazine should be preferred over the second. The second method is only intended to be used if a magazine is unavailable. 25 ARX100_Manual_ indd 25


26 Unloading To unload your Beretta ARX100 press the magazine release on the right or left side of the receiver or the lower magazine release button on the bottom of the trigger guard and remove the magazine from the rifle. Pull the bolt handle to the rear until the loaded cartridge is extracted from the chamber and ejected from the gun. Note: Visually check that there is no ammunition in the magazine or chamber. 26 ARX100_Manual_ indd 26
27 Firing Warning: Always keep the firearm pointed in a safe direction. Never point a firearm at yourself or another person. Warning: Always keep your finger away from the trigger until you are prepared to fire. Warning: Never take from or give a firearm to another person unless the action is open and the firearm has been inspected to insure it is unloaded. Warning: Load the chamber only when ready to fire. Warning: The safety should be left in the on (S) position until ready to fire. Warning: Know your target and what is behind it. If you miss your target or the bullet penetrates the target it is your responsibility to ensure that the bullet dose not cause unintended injury or damage. To fire your ARX100 load it as described in the loading section then move the safety to the off (1) position, place your finger on the trigger and pull the trigger to the rear. The gun will fire. The action will cycle feeding a round from the magazine into the chamber. The rifle is now ready to fire again. When the last round has been fired the bolt will lock in the open position. Warning: If while firing the trigger is pulled and the firearm does not immediately fire keep the firearm pointed in a safe direction in the event a hang-fire occurs. A hang-fire is when there is a delay in a cartridge s ignition. 27 ARX100_Manual_ indd 27
28 With the rifle pointed in a safe direction wait one full minute. After one minute has elapsed, eject the cartridge and carefully inspect it. Immediately refer to a Beretta customer support representative, Beretta authorized service center or qualified gunsmith if the firing pin indent on the cartridge s primer is light, off center or doses not exist. Warning: If while firing you hear a change in the sound of a fired cartridge or feel a change in the amount of recoil, or detect any other irregularity, cease firing immediately and keep the firearm pointed in a safe direction. A squib load may have occurred. A squib occurs when a cartridge fires, but with insufficient force to drive the projectile out of the barrel. This can result in a dangerous bore obstruction. With the gun pointed in a safe direction completely unload the firearm by following the unloading instructions, (pages 26) and follow the instructions in the obstruction inspection section (page 21). Warning: Do not attempt to reuse or fire ammunition that did not fire the first time. Dispose of unfired or damaged ammunition properly, per the ammunition manufacturer s recommendation. Field stripping Warning: make sure the rifle is unloaded before disassembly, if it is not, follow the unloading instructions on page 26. Note: Field stripping is the minimal level of disassembly required to clean and maintain your rifle. Further disassembly is not required or recommended unless a part needs to be replaced. 1. Press the magazine release button on the right or left side of the receiver or the lower magazine release button on the bottom of the trigger guard and remove the magazine from the rifle. Then close the bolt carrier assembly by pulling the bolt handle back and releasing it or by depressing the left or right bolt catch levers. 28 ARX100_Manual_ indd 28


29 2. Depress the stock latch button and fold the stock to the right exposing the retaining plate visible through the back of the receiver. 29 ARX100_Manual_ indd 29


30 3. Rotate the safety lever up past the safety position to the disassembly position, this will allow the retaining plate to be pressed in releasing the lower receiver from the upper receiver. 4. Pull down on the lower receiver while holding the safety lever in the disassembly position and depressing the retaining plate through the back of the receiver and remove the lower receiver from the upper receiver. 5. Pull the bolt handle back until it aligns with the marks on the left and right sides of the receiver. Pull out on the bolt handle this will keep the bolt from moving forward and allow the bolt handle to pivot around its pin. 30 ARX100_Manual_ indd 30


31 6. Rotate the bolt handle until it is aligned with the length of the bolt and pull the bolt carrier assembly out the back of the receiver. 31 ARX100_Manual_ indd 31


32 7. Depress the barrel release levers on both sides of the receiver and pull the barrel forward and out of the receiver. Note: The barrel can not be removed if the bolt is closed. 8. Remove the recoil spring from the bolt carrier by pressing forward on the recoil spring assembly, then rotate the recoil spring guide 90. And pull the recoil spring assembly out the back of the bolt carrier. 32 ARX100_Manual_ indd 32

 and")


33 9. Remove the bolt from the bolt carrier by rotating the bolt handle to the right or left side (do not push the bolt handle into the bolt) and pull the bolt back through the bolt carrier rotating it to allow the bolt cam to follow the cam path and remove it from the carrier. 33 ARX100_Manual_ indd 33


.")
34 10. Remove the firing pin from the bolt by pressing in on the firing pin and pulling the bolt cam pin out of the bolt. Then pull the firing pin and spring out the back of the bolt. The rifle is now field striped. Note: The barrel can be removed without disassembling the rest of the rifle. To remove the barrel without disassembling the rest of the rifle pull the bolt handle back until the handle aligns with the marks on the receiver and pull it out and rotate the handle into the ejection port so that the bolt carrier assembly is locked in place. Then remove the barrel as stated in step seven (page 32). 34 ARX100_Manual_ indd 34


35 Caution: Do not allow the bolt carrier assembly to slam forward with the barrel removed, this can damage the receiver. Reassembly 1. Slide the firing pin spring over the firing pin and slide the firing pin and spring into the bolt. Press the firing pin into the bolt enough to allow the cam pin to be installed into the bolt. The cam pin will retain the firing pin. 35 ARX100_Manual_ indd 35


36 2. With the bolt handle moved to the left or right side, slide the bolt into the bolt carrier from the back with the cam pin aligned with the cam pin path until the bolt sticks out the front of the carrier then rotate the bolt handle to align with the length of the bolt. 36 ARX100_Manual_ indd 36


37 3. Slide the recoil spring assembly into the back of the carrier at a 90 angle to the orientation that it is in during function until the front of the recoil spring guide protrudes from the front of the carrier and rotate the guide 90 (the guides on the recoil spring buffer should be at the bottom to allow it to align with the recesses in the receiver).the recoil spring assembly will be retained in the bolt carrier. 4. Slide the barrel into the receiver and press it into place. The barrel is seated when the barrel release levers snap up locking the barrel in place. Pull forward on the barrel after it is seated to make sure it is retained. 37 ARX100_Manual_ indd 37


38 5. Slide the bolt carrier assembly into the back of the receiver until it stops and rotate the bolt handle to the left or right side of the receiver and press the bolt handle into the bolt. This will lock the bolt handle in place and allow the bolt carrier assembly to continue forward. Press the bolt handle forward until the bolt is seated and has rotated into the locked position. 38 ARX100_Manual_ indd 38


39 6. Rotate the safety selector lever to the disassembly position, depress the retaining latch on the back of the lower receiver and allow the safety to pivot back to the on position while holding the retaining plate forward. The retaining plate will be held slightly forward by the safety selector lever allowing it to clear the back of the upper receiver when it is installed. 7. Slide the front of the lower receiver into the recess provided for it in the upper receiver and rotate the lower receiver up into the upper receiver until the retaining plate latches into the top of the upper receiver. 39 ARX100_Manual_ indd 39


40 Note: The bolt carrier must be completely forward to allow the retaining plate to pass the recoil spring guide. Note: The hammer should be cocked when installing the lower receive into the upper 40 ARX100_Manual_ indd 40

 and wipe off all accessible surfaces with an oiled cloth, use a Nylon brush if necessary to remove stuck on fouling. 2. Clean the barrel using a commercial bore cleaning solvent following the manufactures recommendations.")
41 8. Move the stock into the desired position and check the function of the bolt and safety to make sure that they are functioning correctly and smoothly. The rifle is now reassembled. Maintaining your Beretta ARX100 The Beretta ARX100 is designed to be easily maintained. The rifle only needs to be disassembled to the field stripped level for cleaning and routine maintenance. Additional disassembly is not recommended for normal maintenance. 1. Disassemble your Beretta ARX100 to the field stripped level (pages 28-35) and wipe off all accessible surfaces with an oiled cloth, use a Nylon brush if necessary to remove stuck on fouling. 2. Clean the barrel using a commercial bore cleaning solvent following the manufactures recommendations. Remove all the solvent when the cleaning is complete and apply a light coat of preservative oil. 3. Lightly oil the extractor/ejectors and cam pin path in the bolt carrier group. 41 ARX100_Manual_ indd 41


42 4. Reassemble the rifle (pages 35-41) Storage Warning: Always store your firearms where they can not be accessed by children or unauthorized persons. To best preserve your Beretta ARX100 it should be cleaned after each use and stored oiled and in a dry place. Be cautious of storing your rifle in a padded case because the padding may draw moisture from the surrounding environment and over an extended period of time this can cause damage to the finish of your rifle. 42 ARX100_Manual_ indd 42


43 Configuring Your ARX100 General Configuration The ARX100 is designed to adapt to your needs. This section is designed to help you determine the best way to configure your rifle for the task at hand. *Accessories shown are not included* Caution: Ensure rifle is unloaded. The ARX100 is fully ambidextrous so the first thing that you must decide is which shoulder you wish to fire it from. Normally it is desirable to have the fired cartridge case ejected away from your face this would be to the right for right hand use and to the left for left hand use. To change the ejection from one side to the other the bolt assembly must be closed. Then the ejection selector located at the back of the receiver can be moved to select right or left ejection. The Selector is surrounded by a boss to protect it from unintentional movement. The selector is designed to be actuated by a bullet tip or a punch. To select right side ejection push the selector from left to right and for left side ejection push the selector from right to left. 43 ARX100_Manual_ indd 43


44 Next, determine how you want to operate the bolt handle. Some people prefer to operate the bolt handle with the trigger hand and others prefer to use the off hand. To reverse the bolt handle pull the bolt handle back to the mark shown on the sides of the receiver and pull out on the bolt handle this will lock the bolt carrier assembly in place and allow the bolt handle to rotate on its pin. Rotate the bolt carrier handle to the desired side and push it back into the bolt assembly. This will lock the bolt handle into place and release the bolt carrier assembly causing it to close. Caution: When pressing the bolt handle back into position keep your fingers away from the ejection port. Closing your fingers in the ejection port can cause injury to your fingers. 44 ARX100_Manual_ indd 44


45 If you wish to use a sling, the ARX100 provides six mounting points to give you many carrying options. Beretta recommends following the instructions provided with the sling to optimize carrying comfort and access. The Stock of the ARX100 is adjustable for length of pull and can be folded to the right side of the receiver to make the rifle even more compact. The stock should be adjusted to a length that allows proper use of the sighting solution that you are using on your rifle taking into consideration the clothing that will be worn when using the rifle. To adjust the length of the stock depress the stock adjustment button located just above the sling attachment point opposite the butt plate and slide the stock to the desired setting, release the adjustment button and allow the locking mechanism to lock the stock in place. The rifle can also be fired with the stock folded. 45 ARX100_Manual_ indd 45


46 Note: If you wish to fire the rifle with the stock folded the bolt handle is much easier to operate when located on the left side of the receiver. The ARX100 is designed with quick interchangeable barrels. If you decide to use a different barrel than the one originally provided with your rifle read and understand the instructions provided with that barrel prior to instillation. Some barrels may have special ammunition requirements and others may not be legal to install in some jurisdictions or without proper licensing. Note: You are responsible for knowing and abiding by all applicable laws and regulations. 46 Your ARX100 is designed to function with sights and accessories that are compatible with Picatinny and Weaver type rails, follow the manufacturers recommendations when installing accessories. Check to make sure that the accessories do not interfere with each other or the function of the rifle. ARX100_Manual_ indd 46


47 The bottom of the forend is provided with a rail system. The front portion of the rail system is standard Picatinny rail but the rear section is designed to be used with Beretta specific accessories. An ergonomically shaped rail cover is normally supplied with the rifle to cover this section when the rail is not in use. To remove the rail cover, pull up on the back of the rail cover slightly and slide it forward and off the forend. To reinstall the rail cover, slide the rail cover over the accessory rail and pull it back until the tab at the back of the rail cover snaps into the recess in the receiver. 47 ARX100_Manual_ indd 47


48 The grip of the ARX100 contains a storage compartment that can be used to store cleaning supplies, tools, small parts, batteries or accessories. To access the compartment press in on the button located on the bottom right side of the grip using a bullet tip or similar shaped tool and pull down on the ledge at the bottom back of the grip. The grip cap will pull out of the bottom of the grip exposing the compartment. 48 ARX100_Manual_ indd 48

49 Sight Adjustment WARNING: Always be certain that the firearm is unloaded and the empty chamber indicator installed. Adjusting THE REAR SIGHT The aiming device consists of a five position rear sight and a front sight adjustable both in elevation and for windage. Both the rear sight and the front sight are flip-up type. The five positions are corresponding to the following distances and diopter diameters: Position 1 firing distance 100 meters diameter of diopter 2 millimeters. Position 2 firing distance 200 meters diameter of diopter 2 millimeters. Position 3 firing distance 300 meters diameter of diopter 1.5 millimeters. Position 4 firing distance 400 meters diameter of diopter 1.3 millimeters. Position 6 firing distance 600 meters diameter of diopter 1.3 millimeters. 49 ARX100_Manual_ indd 49

50 adjusting THE FRONT SIGHT POST The Front Sight can be adjusted for both windage and elevation. The windage is adjusted by the windage screw on the right side of the front sight post. Use a tool or a standard flat screwdriver to adjust the windage. By turning the windage screw clockwise the point of impact is adjusted to the right. Turning counter-clockwise the point of impact is adjusted to the left. The elevation is adjusted by turning the Front Sight Post itself. It is also click-adjustable. Use the supplied tool to adjust the elevation. By turning the post clockwise the point of impact moves up, by turning it counter-clockwise it moves down. 50 ARX100_Manual_ indd 50
51 TROUBLESHOOTING WARNING: Do not attempt to make repairs to any firearm without proper knowledge or training. Do not alter the firing mechanism or use substitute parts in the firing mechanism not made by Beretta. Any necessary alterations or adjustments to the operating mechanism should be performed by the Manufacturer or by its Local Official Distributor or Authorized Repair Center. WARNING: Do not attempt to alter the internal parts of your rifle s firing mechanism. Altering internal parts can cause a unsafe condition. WARNING: Altering the internal parts of your rifle s firing mechanism voids the manufacturer s warranty. If you are having a problem with the operation or maintenance of your Beretta ARX100 please contact Beretta USA either online at or by telephone at Beretta ( ). 51 ARX100_Manual_ indd 51
52 SERIAL NUMBER: DATE PURCHASED: PURCHASE PRICE: DEALER INFORMATION: The illustrations and descriptions given in this brochure are intended as a general guide only, and must not be taken as binding. The Company, therefore, reserves the right to make, at any moment and without prior notice, any changes it thinks necessary to improve its models or to meet any requirements of manufacturing or commercial nature. Beretta USA Corp Beretta Drive Accokeek, MD Beretta 52 ARX100_Manual_ indd 52
53 53 ARX100_Manual_ indd 53
54 54 ARX100_Manual_ indd 54
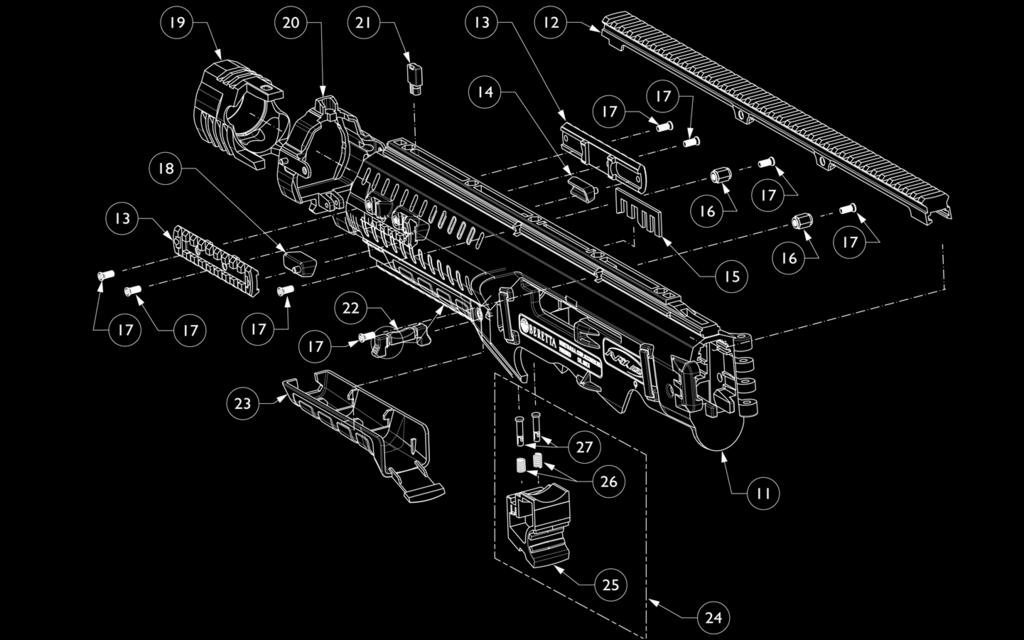
55 No. DESCRIPTION CODE QTY 1 UPPER RECEIVER UD8A GROUP 2 LOWER RECEIVER UD8A GROUP 3 MAGAZINE 30 RNDS C STOCK ASSEMBLY C8A RECOIL SPRING GROUP C8A BOLT CARRIER UNIT UD8A REAR SIGHT C8A FRONT SIGHT C8A BARREL ASSEMBLY 16 UD8A STOCK CARRIER PIN C UPPER RECEIVER UD7A UPPER PICATINNY RAIL C5E SIDE PICATINNY RAIL C5E RIGHT PICATINNY RAIL C5F109 1 SPACER 15 CONTROL PIN CAM C5D HEXAGONAL INSERT C PICATINNY RAIL C SCREW 18 LEFT PICATINNY RAIL C5F108 1 SPACER 19 BARREL FRONT GUIDE C POLYMER FRONT RING C5F BARREL FRONT GUIDE C5E833 1 LATCH 22 BARREL CROSSBOLT C COVER C5D BARREL CROSSBOLT C8A015 1 BODY ASM 25 BARREL CROSSBOLT C5D141 1 BODY 26 BARREL CROSSBOLT C SPRING 27 BARREL CROSSBOLT C5D146 2 SPRING GUIDE 28 BOLT CARRIER AS- UD8A SEMBLY 29 BOLT CARRIER UD5A CONTROL PIN C5D COCKING HANDLE C5E ARX100_Manual_ indd 55

56 56 ARX100_Manual_ indd 56
57 32 CONTROL PIN SPRING C5D BOLT HEAD ASSEMBLY UD8A BOLT HEAD UD5A CAM PIN C5D FIRING SPRING PIN C FIRING PIN C5E EXTRACTOR/EJECTOR C8A062 2 ASSEMBLY 39 EXTRACTOR/EJECTOR C5E EXTRACTOR/EJECTOR C SPRING 41 SPACER C5E EXTRACTOR BUSH C5E SEEGER RING C5E LOWER RECEIVER UD8A ASSEMBLY 45 LOWER RECEIVER UD5A TAKEDOWN PLATE PIN C5D TAKEDOWN PLATE C5D084 1 SPRING 48 EJECTOR SELECTOR C5D TAKEDOWN PLATE UD5A SPRING BOLT RELEASE UD8A BUTTON ASM 51 SIDE BOLT RELEASE UD5A BUTTON 52 BOLT RELEASE BUT- UD5A TON 53 BOLT CATCH SPRING C BOLT RELEASE C BUTTON SPRING 55 INDEX PIN C5F FIRE SELECTOR SPRING C FIRE SELECTOR LEFT UD5A MAGAZINE RELEASE C5D676 1 LEVER 59 MAGAZINE RELEASE C ASSEMBLY 60 HAMMER PIN C TRIGGER PIN C BOLT CATCH C5D ARX100_Manual_ indd 57

58 58 ARX100_Manual_ indd 58
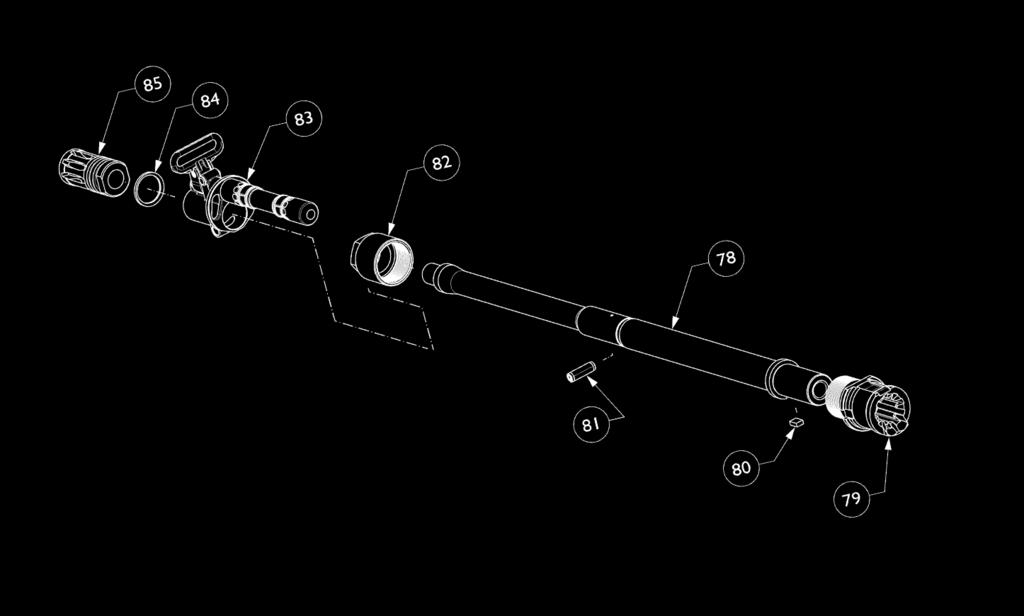
59 63 MAGAZINE CATCH C5D017 1 SPRING 64 HAMMER C5E HAMMER SPRING LEFT C5D HAMMER BODY C5E HAMMER CROSS PIN C HAMMER SPRING C5D082 1 RIGHT 69 DISCONNECTOR UD5A DISCONNECTOR C SPRING 71 TRIGGER SPRING C5D TRIGGER TUBE UD5A TRIGGER C DROP SAFETY C5D DROP SAFETY SPRING C5D FIRE SELECTOR RIGHT UD5A FIRE SELECTOR PIN C BARREL 16 UD5A BARREL EXTENSION C5F BARREL COTTER C GAS PISTON PIN C BARREL NUT C5D BARREL GUIDE AS- C8B030 1 SEMBLY 84 CRUSH WASHER UD5A FLASH HIDER UD5A GRIP BOTTOM COVER UD5A ARX100_Manual_ indd 59
60 Beretta USA Corp Beretta Drive Accokeek, MD Tel. (301) UD6A0391 ARX100_Manual_ indd 60
REC7 DI OPERATOR S MANUAL
 EC7 D REC7 DI OPERATOR S MANUAL TABLE OF CONTENTS 2 2 4 5 6 6 6 8 8 10 11 12 12 13 13 15 18 20 22 USE OF THIS MANUAL SAFETY GUIDELINES WARRANTY AND SERVICE NOTES FUNCTIONS AND FEATURES BREAK IN PROCEDURE
STRIBOG GRAND POWER. The INSTRUCTIONS FOR USE, MAINTENANCE AND SAFETY. 1
 instructions The for use, maintenance STRIBOG and safety hestribog GRAND POWER INSTRUCTIONS FOR USE, MAINTENANCE AND SAFETY www.grandpower.eu 1 The STRIBOG Dear Customer, Thank you for purchasing a semi-automatic
Cal..22 L.R. Instruction Manual
 Cal..22 L.R. Instruction Manual ALWAYS KEEP THIS MANUAL WITH YOUR FIREARM. INCLUDE IT WITH THE FIREARM WHEN IT CHANGES OWNERSHIP OR WHEN IT IS LOANED OR PRESENTED TO ANOTHER PERSON. Notice: The Manufacturer
HATFIELD. Continuing the Tradition SEMI-AUTOMATIC SHOTGUN INSTRUCTION MANUAL
 HATFIELD Continuing the Tradition SEMI-AUTOMATIC SHOTGUN INSTRUCTION MANUAL READ THE INSTRUCTIONS AND WARNINGS IN THIS MANUAL CAREFULLY BEFORE USING THIS FIREARM SAFETY HANDLING RULES 1.Always keep the
OWNER S MANUAL. Read the instructions and warnings in this manual carefully before using this firearm; do not discard this manual.
 OWNER S MANUAL SDP compact Read the instructions and warnings in this manual carefully before using this firearm; do not discard this manual. This instruction manual should always accompany this firearm
ALL LOCAL LAWS ABOUT THE OWNERSHIP AND THE USE OF THIS AIRGUN. USA
 OWNER S MANUAL READ ALL INSTRUCTIONS AND WARNINGS IN THIS MANUAL BEFORE USING THIS AIRGUN. Congratulations and thank you for purchasing your new STOEGER pellet airgun. WARNING This airgun is not a toy.
AR STYLE FIREARMS OWNER'S MANUAL: OPERATION, HANDLING, DISASSEMBLY / REASSEMBLY & SAFETY INSTRUCTIONS
 AR STYLE FIREARMS OWNER'S MANUAL: OPERATION, HANDLING, DISASSEMBLY / REASSEMBLY & SAFETY INSTRUCTIONS - DO NOT DISCARD THIS MANUAL - READ THIS MANUAL CAREFULLY, PAYING CLOSE ATTENTION TO THE INSTRUCTIONS
ENR Enterprises, LLC. ENR 15 Manual
 ENR Enterprises, LLC ENR 15 Manual Table of Contents Disclaimer of Liability 2 Warnings: Dangerous Procedures 3 General Safety Warnings 4 Main Features and Overview 6 Rifle Clearing Before Use 7 Safety
INSTRUCTION MANUAL CZ 92
 INSTRUCTION MANUAL CZ 92 Before handling the pistol read this manual carefully and observe the following safety instructions. Improper and careless handling of the pistol could result in unintentional
SHF R50 SHF S50 Safety Harbor Firearms, Inc. PO Box 563 Safety Harbor, FL Ph: Fax:
 SHF R50 SHF S50 Safety Harbor Firearms, Inc. PO Box 563 Safety Harbor, FL 34695-0563 Ph: 727-726-2500 Fax: 727-797-6134 www.safetyharborfirearms.com 1 ^ WARNING Risk of serious injury or death. Failure
ARAK-21 OPERATOR SAFETY AND INSTRUCTION MANUAL
 ARAK-21 OPERATOR SAFETY AND INSTRUCTION MANUAL NOTICE: The ARAK-21 Upper Assembly itself is not considered a Firearm under federal law or the National Firearms Act. The ARAK-21 Upper Assembly mounted on
TABLE of CONTENTS. Safety 4. Introduction 6. Description 6. Storage 6. Components 7. Unloading and Inspection 8. Disassembly 10. Care and Cleaning 12
 1911 Pistol Manual 2 TABLE of CONTENTS Safety 4 Introduction 6 Description 6 Storage 6 Components 7 Unloading and Inspection 8 Disassembly 10 Care and Cleaning 12 Loading and Firing 13 Troubleshooting
SAAMI. Semi-Automatic Assault Shotgun Owner s Manual. Tel. : Fax
 Head Quarter Beyşehir Organize Sanayi Bölgesi Bayavşar Mah. 4959 Sk. No.24-42700 Beyşehir - Konya / TURKEY Tel. : +90 332 524 60 32-34 - Fax +90 332 524 62 4 - info@deryaarms.com SAAMI SPORTING ARMS AND
PISTOL CALIBER AR STYLE FIREARMS
 PISTOL CALIBER AR STYLE FIREARMS OWNER'S MANUAL: OPERATION, HANDLING, DISASSEMBLY / REASSEMBLY & SAFETY INSTRUCTIONS - DO NOT DISCARD THIS MANUAL - READ THIS MANUAL CAREFULLY, PAYING CLOSE ATTENTION TO
M16 R / M1600 R USER S MANUAL WARNING: READ THE INSTRUCTIONS AND SAFETY PRECAUTIONS IN THIS MANUAL CAREFULLY BEFORE USING THIS FIREARM.
 ARMSCOR M16 R / M1600 R USER S MANUAL WARNING: READ THE INSTRUCTIONS AND SAFETY PRECAUTIONS IN THIS MANUAL CAREFULLY BEFORE USING THIS FIREARM. DISCHARGING FIREARMS IN POOLY VENTILATED AREAS, CLEANING
SAFETY RULES WARNING: READ THESE SAFETY RULES & OPERATORS MANUAL BEFORE HANDLING YOUR FIREARM
 SAFETY RULES WARNING: READ THESE SAFETY RULES & OPERATORS MANUAL BEFORE HANDLING YOUR FIREARM Never point a firearm at anyone and always keep the muzzle pointed in a safe direction. Always treat all firearms
Kentucky Long Rifle.50 BMG Model: BA M-N-M Tactical. Users Guide
 Kentucky Long Rifle.50 BMG Model: BA M-N-M Tactical Users Guide Metals-N-More Bowling Green, KY 42101 Telephone 270-781-3642 Fax 270-781-3766 Email Info@Kentucky50.Com www.kentucky50.com INTRODUCTION Congratulations
P9S Automatic Pistol Caliber.45 ACP
 P9S AUTOMATIC PISTOL Caliber.45 ACP P9S Automatic Pistol Caliber.45 ACP Instruction Manual HECKLER & KOCH, INC. 2148 Pacific Boulevard Sterling, Virginia 20166-8903 U.S.A. TEL. (703) 450-1900 TELEFAX (703)
Sterling Shotguns. Field and Target Models. Owner s Manual
 Sterling Shotguns Field and Target Models Owner s Manual If you have any questions about the safe use of a Big Horn Armory firearm, call us at 307-586-3700 or write us at P.O. Box 940, Cody Wyoming 82414.
ODEL 95 OPERATOR S MANUAL
 ODEL 95 MODEL 95 OPERATOR S MANUAL TABLE OF CONTENTS 2 2 3 5 6 6 6 7 7 8 8 11 11 12 12 19 20 22 24 26 MANUFACTURER S DISCLAIMER USE OF THE MANUAL SAFETY GUIDELINES WARRANTY AND SERVICE DESCRIPTION OF FIREARM
CARE AND MAINTENANCE OF YOUR FBS12 SHOTGUN 1) NEVER ALTER OR MODIFY YOUR SHOTGUN
 NEVER ALTER OR MODIFY YOUR SHOTGUN") CARE AND MAINTENANCE OF YOUR FBS12 SHOTGUN 1) ALTER OR MODIFY YOUR SHOTGUN This shotgun was produced under specific manufacturer guidelines and should not be changed under ANY circumstances. Altering the
CARE AND MAINTENANCE OF YOUR FBS12 SHOTGUN 1) ALTER OR MODIFY YOUR SHOTGUN This shotgun was produced under specific manufacturer guidelines and should not be changed under ANY circumstances. Altering the
Ultra 87 Pump Action Shotgun Instruction Manual
 Ultra 87 Pump Action Shotgun Instruction Manual Congratulations on your purchase of the Ultra 87 shotgun. With proper care and handling it will give you long, reliable service. It is important that you
trigger magazine release
 Made in Germany www.umarexusa.com slide gas vent hammer barrel bushing recoil spring plug slide stop trigger safety trigger guard magazine release grip Government 1911 A1 S Cal. 9 mm P.A.K. (Blank Firing)
MODEL 1400 E USER S MANUAL WARNING: READ THE INSTRUCTIONS AND SAFETY PRECAUTIONS IN THIS MANUAL CAREFULLY BEFORE USING THIS FIREARM.
 ARMSCOR MODEL 1400 E USER S MANUAL WARNING: READ THE INSTRUCTIONS AND SAFETY PRECAUTIONS IN THIS MANUAL CAREFULLY BEFORE USING THIS FIREARM. DISCHARGING FIREARMS IN POORLY VENTILATED AREAS, CLEANING FIREARMS
Before handling the firearm read this manual carefully and observe the following safety instructions. CONTENTS
 Before handling the firearm read this manual carefully and observe the following safety instructions. Improper and careless handling of the firearm could result in accidental discharge and cause injury,
Owner s Manual. STERLING TYPE I, TYPE II & TYPE III SEMI-AUTO RIFLES Cal. 9x19MM (TYPE I & TYPE II) Cal. 7.62x25MM (TYPE III)
 Cal. 7.62x25MM (TYPE III)") Owner s Manual STERLING TYPE I, TYPE II & TYPE III SEMI-AUTO RIFLES Cal. 9x19MM (TYPE I & TYPE II) Cal. 7.62x25MM (TYPE III) COLEFIRE MAGNUM SEMI-AUTO PISTOL Cal. 7.62x25MM Congratulations on your purchase
Owner s Manual STERLING TYPE I, TYPE II & TYPE III SEMI-AUTO RIFLES Cal. 9x19MM (TYPE I & TYPE II) Cal. 7.62x25MM (TYPE III) COLEFIRE MAGNUM SEMI-AUTO PISTOL Cal. 7.62x25MM Congratulations on your purchase
Owner s Manual 1960 SEMI-AUTO RIFLE W/ WOOD STOCK & MILLED RECEIVER. Cal. 7.62x39MM
 Owner s Manual 1960 SEMI-AUTO RIFLE W/ WOOD STOCK & MILLED RECEIVER Cal. 7.62x39MM Congratulations on your purchase of a Polish 1960 Semi-Auto Rifle. With proper care, maintenance and handling, it will
CZ 40 P - INSTRUCTION MANUAL
 Before handling the pistol read this manual carefully and observe the following safety instructions. Improper and careless handling of the pistol could result in unintentional discharge and could cause
 (Mechanical Malfunctions) STOP SHOOTING IMMEDIATELY AND UNLOAD YOUR FIREARM if your firearm develops: a mechanical malfunction; binding or stoppage; spitting powder/gas; a punctured cartridge primer; a
Be sure the cam pin is installed in the bolt group. If it isn t, your rifle can still fire and will explode causing injury.
 Responsibility This manual provides instructions on the operation and maintenance of the Barrett model M468 rifle. Read and understand it carefully before you try to use your rifle. Your safety, and that
INSTRUCTION MANUAL FOR. Models featured include: LF556, LF300, LF308, and LF6.5.
 INSTRUCTION MANUAL FOR Models featured include: LF556, LF300, LF308, and LF6.5. READ THIS MANUAL THOROUGHLY, PARTICULARLY THE WARNINGS, BEFORE USING THIS FIREARM Copyright 2016 Live Free Armory. All rights
1. TABLE OF CONTENT. 9.4 Preserving Exploded drawing of K22 with components Component list of K22 model Warranty...
 1. TABLE OF CONTENT 1. Table of content...2 2. Records of firearm s owner...3 3. Basic description...5 4. Technical specifications...6 5. Serial number of pistol...7 6. Main parts of pistol...8 7. Basic
NATIONAL ARMORY LLC Manufacturing Division 1315 SW 1 st Court Pompano Beach Florida NATIONAL ARMORY LLC.
 U NATIONAL ARMORY LLC Manufacturing Division NATIONAL ARMORY LLC. WARNING BEAR AR15 Read and understand this manual before using this firearm or any firearm as your life depends on it. Make sure to follow
AR /.223, 300 BLK, 22 Nosler,.224 Valkyrie. Covers. and. rifle models INSTRUCTION MANUAL
 AR-15 5.56/.223, 300 BLK, 22 Nosler,.224 Valkyrie Covers TM, TM and, TM rifle models INSTRUCTION MANUAL WARNING: BEFORE USING THIS FIREARM, READ AND FOLLOW THESE INSTRUCTIONS Safety First Thank you for
If you do not understand any of the material in this manual or have any questions, contact the Product Service Center or a qualified gunsmith.
 Bolt Action Rifle Patent No. 7823315 B2 and Patents Pending Note: This manual is only a supplement to your firearm s owner s manual. It only addresses the FLEX System and its accessories. IMPORTANT SAFETY
Defender Series Owner s Manual
 4904 Hwy 98/PO Box 67 Comer, GA 30629 (866) 803-0000 Fax (706-783-5800) Defender Series Owner s Manual MPA1SST & MPA20SST/DMG Carbines MPA10T & MPA10SST Pistols MPA30T & MPA30SST/DMG Pistols When you purchased
slide takedown lever magazine release
 Made in Germany www.umarexusa.com manual safety extractor slide gas vent hammer trigger lock trigger P22 S guide rod takedown lever slide stop magazine release Cal. 9 mm P.A.K. (Blank Firing) OPERATING
Owner s Manual WASR TYPE SPORTING RIFLES Cal. 7.62x39MM
 Owner s Manual WASR TYPE SPORTING RIFLES Cal. 7.62x39MM Congratulations on your purchase of the WASR Rifle. With proper care and handling, it will give you long, reliable service. The WASR is a semi-automatic
USER MANUAL Tisas Pistols
 USER MANUAL Tisas Pistols ZiG M45 (.45 ACP Single Action) ZiG PC1911 (.45 ACP Single Action) ZiG PCS1911 (.45 ACP Single Action) ZiG PCS9 (9 x19 Single Action) Zenith Firearms Come Shoot the Quality WARNING
INSTRUCTION MANUAL CZ 75 TS
 INSTRUCTION MANUAL CZ 75 TS CZ 75 TS - INSTRUCTION MANUAL Before handling the pistol read this manual carefully and observe the following safety instructions. Improper and careless handling of the pistol
Not a toy. Adult supervision required. Misuse or careless use may cause serious injury or death. May be dangerous up to 500 yards (457 meters).
.") Owner s manual www.umarex-usa.com CO2 repeater rifle cal..177 (4.5mm) pellet cal..22 (5.5mm) pellet Not a toy. Adult supervision required. Misuse or careless use may cause serious injury or death. May
Owner s manual www.umarex-usa.com CO2 repeater rifle cal..177 (4.5mm) pellet cal..22 (5.5mm) pellet Not a toy. Adult supervision required. Misuse or careless use may cause serious injury or death. May
SAR-15 RIFLE OWNERS MANUAL
 SAR-15 RIFLE OWNERS MANUAL SIONICS WEAPON SYSTEMS Our mission is to manufacture quality firearms made with pride in the USA. We are able to do accomplish this by using only the best American made parts.
CONTENTS INTRODUCTION. WARNING: This manual contains important warnings that must be understood before using this firearm.
 CONTENTS Safety Rules...............................Page 2 Operation................................Page 5 Major Components.........................Page 6 Assembly.................................Page
N-PAP & O-PAP M70 SEMI-AUTO RIFLES
 Owner s Manual N-PAP & O-PAP M70 SEMI-AUTO RIFLES Cal. 7.62X39MM Congratulations on your purchase of the PAP M70 Semi-Auto Rifle. With proper care and handling, it will give you long, reliable service.
SEMI-AUTO RIFLE (AK STYLE)
") Owner s Manual SEMI-AUTO RIFLE (AK STYLE) Congratulations on your purchase of an AK-Style Semi-Automatic Rifle. With proper care and handling, it will give you many years of long, reliable service. Confirm
Owner s Manual SEMI-AUTO RIFLE (AK STYLE) Congratulations on your purchase of an AK-Style Semi-Automatic Rifle. With proper care and handling, it will give you many years of long, reliable service. Confirm
Beeman Precision Airguns Spring-Piston Air Rifles P1, P3, P11
 Beeman Precision Airguns Spring-Piston Air Rifles P1, P3, P11 User Instruction Manual V1 10/17 CONTENTS Rules of safe shooting...3 Cocking & Loading... 4 Safety... 4 Sight Adjustment...5 Trigger Adjustment...5
Owner s Manual Golani Semi-Auto Sporter Rifle, Cal. 5.56mm
 Owner s Manual Golani Semi-Auto Sporter Rifle, Cal. 5.56mm Congratulations on your purchase of a Golani Semi-Auto Sporter Rifle. With proper care and handling it will give you long, reliable service. We
INSTRUCTION MANUAL CZ 75 Champion
 INSTRUCTION MANUAL CZ 75 Champion CZ 75 CHAMPION - INSTRUCTION MANUAL Before handling the pistol read this manual carefully and observe the following safety instructions. Improper and careless handling
Owner s Manual FIREARMS SAFETY IS THE SOLE RESPONSIBILITY OF THE SHOOTER. ALWAYS TREAT ALL FIREARMS AS IF THEY WERE LOADED AT ALL TIMES!
 CENTURION 39 SPORTER RIFLE Owner s Manual Cal. 7.6x39MM 00% American Made! Congratulations on your purchase of the Centurion 39 Sporter Rifle. With proper care and handling, it will give you long, reliable
BFG-50A RIFLE OPERATOR S MANUAL WARNING! READ THIS MANUAL CAREFULLY BEFORE USING THIS FIREARM
 BFG-50A RIFLE OPERATOR S MANUAL WARNING! READ THIS MANUAL CAREFULLY BEFORE USING THIS FIREARM CONTENTS SAFETY...3 Safety Alert Symbol and Signal Words...3 TECHNICAL DATA...6 IDENTIFICATION...7 Model and
A. Safety Information and Warnings... 2 B. Overview Description... 4 Nomenclature... 4 Specifications... 4 Ammunition... 5 Sling Mounting...
 TABLE OF CONTENTS A. Safety Information and Warnings... 2 B. Overview Description... 4 Nomenclature... 4 Specifications... 4 Ammunition... 5 Sling Mounting... 5 C. Operating Instructions Safety... 6 Loading
-
 Operator s manual SM-95202 Brügger & Thomet AG P.O. Box 42 3608 Thun Switzerland Fon +41 33 334 67 00 Fax +41 33 334 67 01 info@brugger-thomet.ch www.brugger-thomet.ch TABLE OF CONTENTS SAFETY instructions
PAP M90 NP SEMI-AUTO RIFLE
 Owner s Manual PAP M90 NP SEMI-AUTO RIFLE Cal. 5.56X45MM (.223) Congratulations on your purchase of the PAP M90 NP Semi-Auto Rifle. With proper care and handling, it will give you long, reliable service.
INSTRUCTION MANUAL FOR THE FREEDOM ARMS MODEL 2008 SINGLE SHOT HANDGUN
 INSTRUCTION MANUAL FOR THE FREEDOM ARMS MODEL 2008 SINGLE SHOT HANDGUN Manufacturing the World s Finest Handguns. Freedom Arms, Inc. 314 Hwy 239 Freedom, WY 83120 (307) 883-2468 web site: www.freedomarms.com
PAP M85 NP SEMI-AUTO PISTOL
 Owner s Manual PAP M85 NP SEMI-AUTO PISTOL Cal. 5.56X45MM (.223) Congratulations on your purchase of the PAP M85 NP Semi-Auto Pistol. With proper care and handling, it will give you long, reliable service.
HATSAN ARMS COMPANY. Serious. Solid. Impact. SPEEDFIRE SERIES MULTI SHOT AIR RIFLE INSTRUCTION MANUAL
 HATSAN ARMS COMPANY Serious. Solid. Impact. SPEEDFIRE SERIES MULTI SHOT AIR RIFLE INSTRUCTION MANUAL PLEASE READ THIS MANUAL BEFORE USING YOUR AIR GUN CONTENTS PAGE BASIC PARTS OF YOUR GUN 3 SPECIFICATIONS
Colt Advanced Law Enforcement Carbines
 OPERATOR S MANUAL FOR: Colt Advanced Law Enforcement Carbines LE6940 LE6944 LE6943 LE6945CQB & LE6946CQB COPYRIGHT 2010 COLT DEFENSE LLC ALL RIGHTS RESERVED Information contained in this publication is
AK63D SEMI-AUTO RIFLE
 Owner s Manual AK63D SEMI-AUTO RIFLE Cal. 7.62X39MM Congratulations on your purchase of the AK63D Semi-Auto Rifle. With proper care and handling, it will give you long, reliable service. The AK63D is a
INSTRUCTION MANUAL DEADLINE MADE IN CANADA
 INSTRUCTION MANUAL DEADLINE MADE IN CANADA 2 ABOUT The Deadline action is specifically designed for long range, precision shooting. Its components are made using the cutting edge of technology and subject
N-PAP & O-PAP M70 DF SEMI-AUTO RIFLES
 Owner s Manual N-PAP & O-PAP M70 DF SEMI-AUTO RIFLES Cal. 7.62X39MM Congratulations on your purchase of the PAP M70 DF Semi-Auto Rifle. With proper care and handling, it will give you long, reliable service.
G22 Cal..22l.r. Self loading rifle USA SAFETY & INSTRUCTION MANUAL. Patent pending
 USA front sight sight base rear sight manual safety upper part of stock spacer butt plate muzzle trigger cocking lever magazine ejection port spare magazine stock Self loading rifle G22 Cal..22l.r. Patent
OPERATOR S MANUAL FOR AR-24 SERIES PISTOLS
 OPERATOR S MANUAL FOR AR-24 SERIES PISTOLS ArmaLite Incorporated Box 299 Geneseo Illinois U.S.A. 61254 309-944-6939 ArmaLite.com 2006 ArmaLite Inc. This book provides instructions on the operation and
IMPORTANT SUPPLEMENTARY INSTRUCTIONS FOR Model1886 TAKEDOWN LEVER ACTION RIFLE
 Licensee IMPORTANT SUPPLEMENTARY INSTRUCTIONS FOR Model1886 TAKEDOWN LEVER ACTION RIFLE These are special instructions for the Winchester Model 1886 Takedown version only. These instructions must be used
INSTRUCTION MANUAL CZ 750
 INSTRUCTION MANUAL CZ 750 Before handling the firearm read this manual carefully and observe the following safety instructions. Improper and careless handling of the firearm could result in unintentional
KEL-TEC PLR-16 Pistol
 KEL-TEC PLR-16 Pistol SAFETY, INSTRUCTION & PARTS MANUAL STATEMENT OF LIABILITY This pistol may be classified as a dangerous weapon and is surrendered by KEL-TEC CNC INDUSTRIES INC. with the understanding
Ed Brown Products, Inc.
 Ed Brown Products, Inc. P.O. Box 492, Perry, MO 63462 - (573)-565-3261 - FAX (573)565-2791 Internet Address: www.edbrown.com email: edbrown@edbrown.com Ed Brown 1911 Owner s Manual WARNING: YOU MUST READ
AKMS SEMI-AUTO RIFLE W/ FOLDING STOCK
 Owner s Manual AKMS SEMI-AUTO RIFLE W/ FOLDING STOCK Cal. 7.62x39MM Congratulations on your purchase of an AKMS rifle featuring an underfolding metal stock. With proper care, maintenance and handling,
RAD MRAD BREECH CONVERSION KIT INSTRUCTIONS
 RAD MRAD BREECH CONVERSION KIT INSTRUCTIONS TABLE OF CONTENTS 2 2 4 5 5 6 USE OF THIS MANUAL SAFETY GUIDELINES WARRANTY AND SERVICE CONTENTS PURPOSE OF BREECH CONVERSION KIT INSTRUCTIONS BREECH CONVERSION
KHANSHOTGUNS. Thank you for choosing KHANSHOTGUNS coachgun
 Thank you for choosing KHANSHOTGUNS coachgun Your coachgun represents a piece of rich history of quality firearms design and manufacture. During the manufacturing process, we have endeavored to incorporate
TOP BREAK SINGLE ACTION REVOLVER
 History Repeats Itself S.p.A. 1875 S.A. Schofield TOP BREAK SINGLE ACTION REVOLVER INSTRUCTION MANUAL 1875 S.A. SCHOFIELD 15 421 18 149 147 7 420 152 3 574 645 635 2 646 436 115 178 241 638 637 215 187
KEL-TEC PLR-22 Pistol and SU-22 Rifle
 KEL-TEC PLR-22 Pistol and SU-22 Rifle SAFETY, INSTRUCTION & PARTS MANUAL STATEMENT OF LIABILITY This firearm may be classified as a dangerous weapon and is surrendered by KEL-TEC CNC INDUSTRIES INC. with
Armed Officer's Training Manual Nomenclature and Inspection
 Armed Officer's Training Manual Section 8: Nomenclature and Inspection Learning Goal: The student will know the components and understand the operation of the service revolver and semi-automatic pistol.
Before handling the firearm read this manual carefully and observe the following safety instructions. CONTENTS
 Before handling the firearm read this manual carefully and observe the following safety instructions. Improper and careless handling of the firearm could result in accidental discharge and cause injury,
Index USE MAINTENANCE... 1 SPARE PARTS... 23
 M4 LINE 1 Index USE MAINTENANCE... 1 Basic safety rule... 2 Introduction... 4 Corrosion warranty... 4 Operation... 5 Cartridge drop lever operation... 5 Assembly (from packaged gun)... 6 Use... 7 Gun safety
SEMIAUTOMATIC SHOTGUN OWNER'S MANUAL
 SEMIAUTOMATIC SHOTGUN OWNER'S MANUAL ARMSAN@ARMSAN.COM TECHNICAL DATA Caliber :12 gauge / 20 gauge / 28 gauge Operation: Semi-Automatic, Gas Operated System Barrel Length: 20 (51cm), 24 (61cm), 26 (66cm),
MP532 AIR RIFLE INSTRUCTION MANUAL
 MP532 AIR RIFLE INSTRUCTION MANUAL European American Armory Corp. 3855 North U.S. Highway One Cocoa, Florida 32927 (407) 639-4842 This manual was downloaded from www.eaacorp.com E-mail: eaacorp@bv.net
Model 1911 Series Pistols SAFETY & INSTRUCTION MANUAL
 REGENT Model 1911 Series Pistols 01 SAFETY & INSTRUCTION MANUAL READ AND UNDERSTAND THE INSTRUCTIONS AND WARNINGS IN THIS MANUAL CAREFULLY, BEFORE USING THIS FIREARM. FAILURE TO READ THESE INSTRUCTIONS
MINI DRACO SEMI-AUTO PISTOL
 Owner s Manual MINI DRACO SEMI-AUTO PISTOL Cal. 7.62X39MM Congratulations on your purchase of the Mini Draco Semi-Automatic Pistol. The Mini Draco is chambered for the 7.62x39mm cartridge. With proper
OPERATION AND FUNCTION
 CHAPTER 3 OPERATION AND FUNCTION This chapter discusses the operation of the M249 automatic rifle. This includes loading, unloading, cycle of functioning, adjusting the sight, and using the bipod. 3-1.
PW87 LEVER ACTION SHOTGUN
 Owner s Manual PW87 LEVER ACTION SHOTGUN 12 Ga. Congratulations on your purchase of the PW87 Lever Action Shotgun. With proper care and handling, it will give you long, reliable service. We specifically
YES CORRECT WRONG. KSG-TACTICAL Specifications Operating System Pump Action Capacity (Dual Magazines)
") YES CORRECT NO WRONG KSG-TACTICAL Specifications Operating System Pump Action Capacity (Dual Magazines) 4+4+1, 3 shells 5+5+1, 2.75 shells Chamber 12-gauge 3.00 (76 mm) Barrel Length 13.7 (410 mm) Length
YES CORRECT NO WRONG KSG-TACTICAL Specifications Operating System Pump Action Capacity (Dual Magazines) 4+4+1, 3 shells 5+5+1, 2.75 shells Chamber 12-gauge 3.00 (76 mm) Barrel Length 13.7 (410 mm) Length
Owner s Manual AK SEMI-AUTO RIFLE. Cal. 5.45x39MM
 Owner s Manual AK SEMI-AUTO RIFLE Cal. 5.45x39MM Congratulations on your purchase of an AK Semi-Auto Rifle. With proper care, maintenance and handling, it will give you long, reliable service. The AK is
OWNER S MANUAL TO BE USED FOR AUTO-ORDNANCE M1 CARBINE
 OWNER S MANUAL TO BE USED FOR AUTO-ORDNANCE M CARBINE Maker of the world famous "TOMMY GUN" Manufactured by KAHR ARMS Worcester, MA As the owner of a firearm, you must undertake the full-time responsibility
Henry Mini Bolt.22. Instruction Manual For All H005 Series Rifles. Made in America
 Henry Mini Bolt.22 Instruction Manual For All H005 Series Rifles Important: Study this instruction manual carefully before you handle this firearm. Made in America IS A REGISTERED TRADEMARK OF THE HENRY
VR1 Owner s Manual. Vigilance Rifles, Inc Plum Lane Redlands, CA P F
 VR1 Owner s Manual Vigilance Rifles, Inc. 1653 Plum Lane Redlands, CA 92374 P 909.307.8877 F 909.307.8866 www.vigilancerifles.com INTRODUCTION: Vigilance Rifles offers a new line of Semi-Automatic Rifles
DRACO SEMI-AUTO PISTOL
 Owner s Manual DRACO SEMI-AUTO PISTOL Cal. 7.62X39MM Draco Mini Draco Micro Draco Congratulations on your purchase of the Draco Semi-Automatic Pistol. With proper care and handling, it will give you many
SPM COACH SHOTGUN. Owner s Manual. 12 Ga., 20 Ga. &.410 Ga. IMPORTANT! READ ALL INSTRUCTIONS AND WARNINGS IN THIS BOOKLET BEFORE USING THIS FIREARM.
 Owner s Manual SPM COACH SHOTGUN 12 Ga., 20 Ga. &.410 Ga. Congratulations on your purchase of the SPM Coach Shotgun. With proper care and handling, it will give you long, reliable service. We specifically
TM WARNING SUMMARY
 TM 9-005-239-0 WARNING SUMMARY Treat every firearm as if it were loaded. Never accept or take over a firearm from another until you have checked personally to see that it is unloaded or in a completely
Owner s Manual RAS47 SEMI-AUTO RIFLE. Cal. 7.62X39MM
 Owner s Manual RAS47 SEMI-AUTO RIFLE Cal. 7.62X39MM 100% AMERICAN MADE! Congratulations on your purchase of the 100% American Made RAS47 Semi-Automatic Rifle. With proper care and handling, it will give
MECH-TECH SYSTEMS CCU MODEL FOR GLOCK PISTOLS
 MECH-TECH SYSTEMS CCU MODEL FOR GLOCK PISTOLS Operation & Maintenance Manual Read and understand this manual before attempting to use this product. If you have any questions call: 1-866-433-2122 www.mechtechsys.com
AR15/ BCA 10 RIFLE OWNER S MANUAL
 AR15/ BCA 10 RIFLE OWNER S MANUAL THIS IS NOT A SAFETY MANUAL. IF YOU NEED ASSISTANCE WITH THE SAFE HANDLING OF THIS, OR ANY FIREARM, PLEASE CONTACT A CERTIFIED FIREARMS INSTRUCTOR OR SCHOOL. Fundamental
NOTICE FEATURES BACKGROUND
 ,/ NOTICE Claims will not be honored for damage, injury or, death resulting from the intentional or accidental discharge of this firearm, or from it's function when used for purposes or subjected to treatment
- SAFETY - FIRST AND FOREMOST
 - SAFETY - FIRST AND FOREMOST FIREARMS ARE DANGEROUS WEAPONS, WHICH CAN CAUSE SERIOUS INJURY OR DEATH. WHEN USING ANY FIREARM, SAFETY MUST BE YOUR FIRST AND CONSTANT CONCERN. READ AND UNDERSTAND THE FOLLOWING
Instruction manual CZ 75
 Instruction manual CZ 75 Before handling the pistol read this manual carefully and observe the following safety instructions. Improper and careless handling of the pistol could result in unintentional
3. Keep your finger off the trigger while operating the action and at all other times until you are ready to shoot.
 1 GUN SAFETY RULES Observe these rules of safe gun handling. 1. Always keep the muzzle pointed in a safe direction. Watch the muzzle at all time: never point a gun, accidentally or intentionally, at any
1911 Pistol. owner s Manual
 1911 Pistol owner s Manual IMPORTANT! This manual contains operating, care, and maintenance instructions. To assure safe operation, any user of this firearm must read and understand this manual before
IZH61 AIR RIFLE INSTRUCTION MANUAL
 IZH61 AIR RIFLE INSTRUCTION MANUAL European American Armory Corp. 1426 West King Street Cocoa, FL 32922 (321) 639-4842 www.eaacorp.com E-mail: eaacorp@eaacorp.com Copyright EAA Corp. 9/98 EAA MODEL: IZH61
INSTRUCTION MANUAL CZ 630/631
 INSTRUCTION MANUAL CZ 630/631 Before handling the air rifle read this manual carefully and observe the following safety instructions. Improper and careless handling of the air rifle could result in unintentional
OWNER S MANUAL FOR OA SERIES FIREARMS
 OWNER S MANUAL FOR OA SERIES FIREARMS 620-626 Old Pacific Hwy SE Olympia, WA 98513 (360) 459-7940 WARNING To avoid accidental firing, BE SURE WEAPON IS CLEAR. Failure to do so could result in serious injury
CZ99 PRECISION RIFLES
 Owner s Manual CZ99 PRECISION RIFLES Cal..22LR,.22WMRF &.17HMR Congratulations on your purchase of a CZ99 Precision Rifle. With proper care and handling, it will give you long, reliable service. We specifically