Apex M&P Barrel Fit Guide ALL OF THE FOLOWING OPERATIONS ARE TO BE DONE WITH ABSOLUTELY ZERO LIVE AMMUNITION PRESENT.
|
|
|
- Lorin Floyd
- 5 years ago
- Views:
Transcription
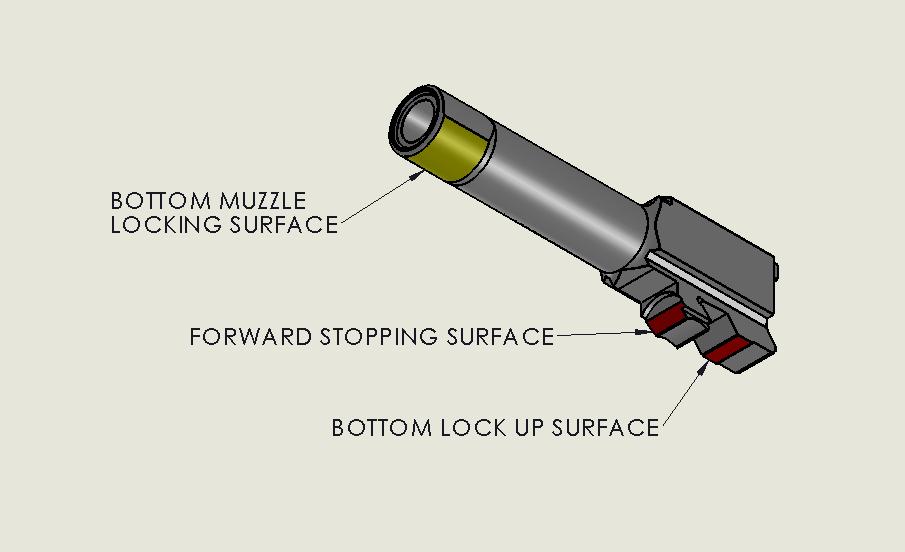
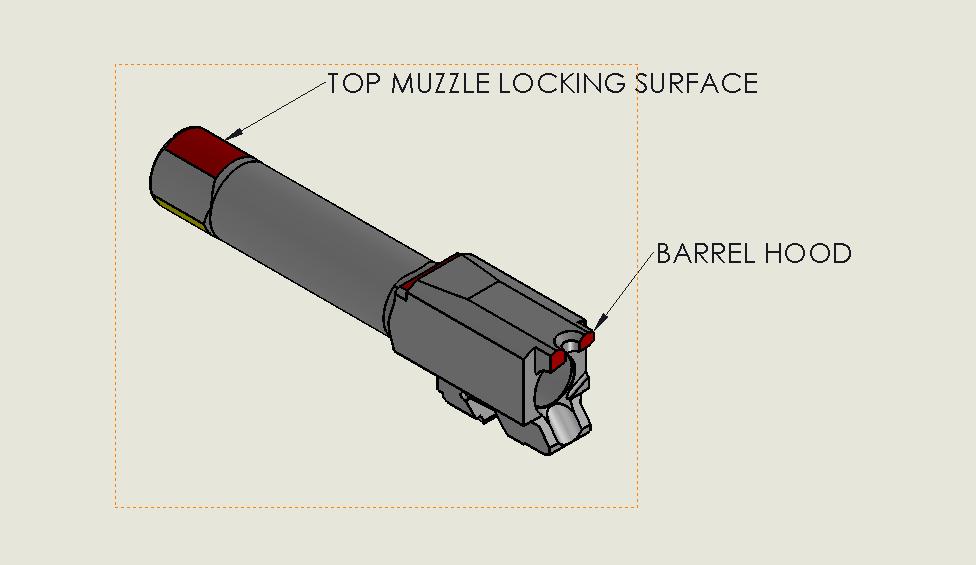
1 Familiarization Free floating barrels like most polymer frame pistols have, use 6 contact points o Barrel hood The extension of the chamber coming back over the top of a chambered round to make contact with the breech face (Page 7) o Bottom Muzzle Locking Surface - 4 o clock to 8 o clock at the end of the muzzle, just behind the muzzle This surface should NEVER be altered (Page 6) o Top Muzzle Locking Surface - 10 o clock to 2 o clock approximately.200 from the end of the muzzle (Page 7) o Bottom Lock-up Surface - Flat face at the rear under the chamber (Page 6) o Top Lock-up Surface Flat top of the barrel just in front of the chamber, this surface determines how high the barrel sits in the slide (Page 6) o Forward stopping surface Angled surface directly behind the half-moon shaped pocket for the recoil guide rod This surface RARELY needs to be altered (Page 6) Tools needed 6 Fine metal cutting file with at least 1 safe edge Recommended width.5 to.85 o Equalling type file with #2 or finer teeth. (Limited QTY directly available from Apex) 600 and 1200 grit sand paper 320 grit Emery cloth Barrel Alignment Gauge 9mm (Brownells PN: ) Apex Barrel Fitting Jig (Optional) Dykem marking fluid or permanent marker (Optional) Technique Using a hand file to remove metal can be a challenge, here are some tips to help. General Info Standard files cut when pushed away from the user, files that cut while pulling toward the user are known as Draw Files and are NOT very common. With each pass of the file, lift the file, return it to your start position and place it back down. o Pulling a file back across the surface of a work piece will dull the teeth very quickly. Page 1 of 9
2 Flat Surfaces Place the file flat on the surface you intend to modify, rock the file side to side to get a feel for where it sits flat, repeat this in the front to back orientation before filing. Start filing by using light pressure, check the surface after the first stroke to make sure it s flat and re-check flatness continually as you take material off. Round Surface at the Muzzle Hold your barrel in one hand with the muzzle end resting on the edge of your work surface, set the file on the end of the surface you want to cut and check flatness side to side by rocking the file side to side and holding the file against the surface. To remove material, roll the barrel slowly toward you while you push the file away, make sure to use uniform light pressure passes to take material off the surface evenly, only removing material between the 10 and 2 o clock positions. Installation Process Before you begin, take a photo of or make note of where the rear of the slide sits when the barrel is installed and the gun is fully in lock up. Check the muzzle end of the barrel o With the factory barrel removed, attempt to install the Apex barrel with minimal pressure o The muzzle of most Semi Drop-in barrels should not go all the way through the end of the slide when attempting this o If the barrel does not go far enough forward for the chamber to fall into place and allow the barrel hood to contact the breech face, the Top Muzzle Locking Surface needs to be altered THREADED BARRELS o If you re fitting a threaded barrel, you will need to add a bevel to the end of the major barrel diameter, located where it drops off for the O-Ring at the top across approximately the 10 o clock to 2 o clock positions. See photo on page 7. o Best practice is to wrap the threads with some thick target tape to protect them from damage while filing. Page 2 of 9
3 Fit the Top Muzzle Locking Surface o Using a fine metal file, gradually take material off of the Top Muzzle Locking Surface keeping it as uniformly round as possible. Cut small amounts and check the fit frequently. o You re trying to get the muzzle of the barrel to go through the muzzle of the slide from the inside without forcing it. o At this point, do not polish the fitted surfaces, you may need to refit this surface, you will be instructed to polish it later. Check the Barrel Hood width in the breech face o With the muzzle end of the barrel installed into the slide, bring the barrel back to attempt to engage the barrel hood into the breech face of the slide. o If the back end of the barrel hood makes contact with the breech face, you do not need to remove material from the sides of the barrel hood. Fit the Barrel hood width to the slide o If the barrel hood width needs to be altered to allow the end of the barrel hood to touch the slide, take even amounts off each side of the barrel hood until the barrel hood touches the breech face. Final polish the fitted surfaces o After fitting the barrel hood width, use emery cloth and successively finer sand paper to final polish the surfaces to remove filing marks and scratches. o We recommend wrapping your file in sand paper for the best results. Check barrel hood length o The barrel hood should be just long enough to allow the barrel to lock up into the slide and fall out via gravity if the recoil spring is not installed. o If the barrel sticks in the slide, the barrel hood length needs to be trimmed. Fit the barrel hood length o Cut the barrel hood length as flat as possible so the barrel drops out of the slide via gravity. o The barrel should have less than.002 of movement forward and back in the slide once fitted. Ideally both sides of the barrel hood will contact the breech face uniformly. Final polish the fitted surface o After fitting the barrel hood length, use emery cloth and successively finer sand paper to final polish the surfaces to remove filing marks and scratches. Check for and correct barrel springing effect o With the barrel in place in the slide, put a finger over the junction where the front of the chamber and slide meet, you will be using your finger to detect the slightest movement of the barrel in this step. Page 3 of 9
4 o Use the thumb of your other hand to press the chamber end of the barrel into the slide, when you release the pressure on your thumb, pay attention to the finger on the front of the chamber to detect if the barrel is springing itself out of the slide. Final fit the top muzzle locking surface if necessary o If the barrel is springing out of the slide, the top muzzle locking surface needs to be modified slightly to reduce the springing effect. Ideally, you want the barrel to rest with the top lock-up surface and top muzzle locking surface contacting at the same time with no additional force being applied to the barrel Final polish the top muzzle locking surface o After final fitting the top muzzle locking surface, use emery cloth and successively finer sand paper to polish the fitted section to remove filing marks and scratches. Check firing pin to bore alignment Using a barrel alignment gauge, check that the firing pin hole is concentric with the bore. The tip of the gauge should pass straight into the firing pin hole without any interruption or drag. If it does not go in or is difficult to press into the firing pin hole, the top lock-up surface may need to be fit. Be aware that the extractor may be in the way for this and it is recommended that the extractor be removed to make the alignment pin more visible. If necessary fit the top lock-up surface o Use the fine metal file to take the top lock-up surface down little by little until the barrel alignment gauge goes in smoothly. We recommend one light pass with the file at a time between checks with the gauge. Final polish the top lock-up surface o use emery cloth and successively finer sand paper to polish the fitted surface to remove file marks Check bottom lock-up surface of the barrel on the frame o Use Dykem or permanent marker to color the bottom lock-up surface of the barrel and the angled surface further toward the rear of the barrel Doing this will allow easy identification of the surfaces that need to be modified o Install the barrel into the slide with the recoil guide rod and spring in place. o Install the slide onto the frame rails and attempt to lock the slide back. o If the slide does not go on the frame all the way, you will need to remove material off the bottom lock-up surface Fit the bottom lock-up surface o Check the marks in the ink or Dykem applied to your barrel after attempting to fit the barrel. You ll notice some material removed or smudged where the barrel came in Page 4 of 9
5 contact with the locking block. If you find smudges on the angle at the back of the bottom lock-up surface, that will indicate roughly how much material you need to remove. o Using the metal file, remove material from the bottom lock-up surface of the barrel Take light cuts and check the fit to the slide after every few swipes with the file. o As you progress, you will need to reapply Dykem or ink to the surface to see where you re making contact. o Once the slide is on the frame, lock the slide to the rear and rotate the locking block back into the locked up position. o Ease the slide forward and note how much pressure it takes to press into full battery. o If it takes more than 2lbs of forward pressure to lock the slide into battery, you will need to remove more material from the bottom lock-up surface. You should notice marks in the Dykem or ink, those denote the high spots, when filing, try to take material off the highest spots first. Final polish the bottom lock-up surface of the barrel o Use emery cloth and successively finer sand paper to polish the bottom lock-up surface of the barrel to remove all file marks and other surface imperfections. Check the forward stopping position of the slide and barrel o Using your note or photo from the start of these instruction, check where the back of the slide sits with the new barrel installed compared to the factory barrel. o No change - If the difference appears to be minimal, there is no need to alter the forward stopping position of the barrel. If you measured the surfaces and find.010 or less difference before and after the install, there is no need to make any changes. o Visible difference - If the slide is visibly sitting further to the rear than it was before the barrel was installed, you will want to remove some material from the forward stopping position. CAUTION IF THE FRAME AND SLIDE DID NOT LINE UP PERFECTLY BEFORE, DO NOT ATTEMPT TO FIT THIS SURFACE TO MAKE THEM LINE UP. Doing so, will alter the position of the striker block to the trigger bar and create timing issues. Fit the forward stopping position o Using the metal file, take small amounts of material off the forward stopping position until the barrel and slide line up on the frame as they did before install. Final polish the forward stopping position o Use emery cloth and successively finer sand paper to polish the fitted surface to remove filing marks and scratches. Page 5 of 9

6 Page 6 of 9

7 Page 7 of 9

8 Using the Apex Barrel Fitting Jig to fit the Barrel Hood length Page 8 of 9
9 Using the Apex Barrel Fitting Jig to fit the Bottom Lock-up Surface Page 9 of 9
CHAPTER 2 MAINTENANCE
 CHAPTER 2 MAINTENANCE This chapter addresses the proper care of the machine gun to ensure its overall effectiveness and efficient functioning. The information includes the gunner's knowledge in disassembly
Armed Officer's Training Manual Nomenclature and Inspection
 Armed Officer's Training Manual Section 8: Nomenclature and Inspection Learning Goal: The student will know the components and understand the operation of the service revolver and semi-automatic pistol.
CZ52 Detail Strip, Disassembly, and Assembly Instructions Lonestar Fabrication & Design
 CZ52 Detail Strip, Disassembly, and Assembly Instructions 2008 Lonestar Fabrication & Design These instructions may be freely distributed and copied providing this page is included, and providing they
COLT AUTOMATIC PISTOL
 COLT AUTOMATIC PISTOL CALIBER.22 INSTRUCTIONS FOR ASSEMBLY - DISASSEMBLY CLEANING COLT AIUTOMATIC PISTOL IN 6 INCH OR 4}~2 INCH BARREL.22 Long Rifle, rim fire Cartridge Capacity of Magazine, 10 Shots Description
Section Five - Semi Auto Pistols
 Section Five - Semi Auto Pistols Like revolvers, semi auto pistols have parts that are unique to them. In figure 1 below we have pointed out the most common parts to the semi auto handgun and give detailed
OPERATION AND FUNCTIONING
 C1, FM 23-65 * CHAPTER 3 OPERATION AND FUNCTIONING This chapter explains the operation of the MG. It discusses the loading, unloading, and clearing procedures, and the cycle of functioning of the weapon.
SAFETY RULES WARNING: READ THESE SAFETY RULES & OPERATORS MANUAL BEFORE HANDLING YOUR FIREARM
 SAFETY RULES WARNING: READ THESE SAFETY RULES & OPERATORS MANUAL BEFORE HANDLING YOUR FIREARM Never point a firearm at anyone and always keep the muzzle pointed in a safe direction. Always treat all firearms
MECH-TECH SYSTEMS CCU MODEL FOR GLOCK PISTOLS
 MECH-TECH SYSTEMS CCU MODEL FOR GLOCK PISTOLS Operation & Maintenance Manual Read and understand this manual before attempting to use this product. If you have any questions call: 1-866-433-2122 www.mechtechsys.com
M16 R / M1600 R USER S MANUAL WARNING: READ THE INSTRUCTIONS AND SAFETY PRECAUTIONS IN THIS MANUAL CAREFULLY BEFORE USING THIS FIREARM.
 ARMSCOR M16 R / M1600 R USER S MANUAL WARNING: READ THE INSTRUCTIONS AND SAFETY PRECAUTIONS IN THIS MANUAL CAREFULLY BEFORE USING THIS FIREARM. DISCHARGING FIREARMS IN POOLY VENTILATED AREAS, CLEANING
M&P Trigger Work. The S&W M&P may be one of the easiest guns ever to do trigger work on.
 M&P Trigger Work The S&W M&P may be one of the easiest guns ever to do trigger work on. M&P Trigger Job Make sure the gun is unloaded. Follow normal field striping procedures. What needs to be changed
LESSON II: AMMUNITION KNOWLEDGE AND THE FUNDAMENTALS OF PISTOL SHOOTING
 LEARNING OBJECTIVES: IDENTIFY THE DIFFERENT COMPONENTS OF A PISTOL CARTRIDGE EXPLAIN THE FIRING SEQUENCE OF A CARTRIDGE EXPLAIN HOW TO PROPERLY IDENTIFY AND STORE AMMUNITION STATE THE MAJOR TYPES OF CARTRIDGE
AR STYLE FIREARMS OWNER'S MANUAL: OPERATION, HANDLING, DISASSEMBLY / REASSEMBLY & SAFETY INSTRUCTIONS
 AR STYLE FIREARMS OWNER'S MANUAL: OPERATION, HANDLING, DISASSEMBLY / REASSEMBLY & SAFETY INSTRUCTIONS - DO NOT DISCARD THIS MANUAL - READ THIS MANUAL CAREFULLY, PAYING CLOSE ATTENTION TO THE INSTRUCTIONS
-
 Operator s manual SM-95202 Brügger & Thomet AG P.O. Box 42 3608 Thun Switzerland Fon +41 33 334 67 00 Fax +41 33 334 67 01 info@brugger-thomet.ch www.brugger-thomet.ch TABLE OF CONTENTS SAFETY instructions
BSA 30 Minute Pistol Briefing. NO AMMUNITION in the classroom NO EXCEPTIONS!
 BSA 30 Minute Pistol Briefing NO AMMUNITION in the classroom NO EXCEPTIONS! 1 Orientation Goal To provide beginning shooters with the knowledge, skills, and attitude necessary to shoot a pistol safely
MAYHEM MAYHEM OWNERS MANUAL. Paintball Guns International. Manufactured by
 MAYHEM MAYHEM OWNERS MANUAL Manufactured by Paintball Guns International Table of Contents Specifications...................... 2 Parts diagram and Listing............. 3 Description of Marker Operation.......
U STAND INSTALLATION INSTRUCTIONS
 U STAND INSTALLATION INSTRUCTIONS Thank you for purchasing the incredible new U STAND by Stand N Fish. Once installed on your kayak the U STAND will enhance your kayak fishing enjoyment to a whole new
Basic Pistol Test Study Guide
 1. The three major components of a pistol are: a. barrel, action and grip b. frame, barrel and action c. barrel, frame and hammer d. cylinder, frame and barrel Basic Pistol Test Study Guide 2. A cylinder
Barrel Assembly. Field Stripping
 WARNINGS: Carry out safety check before handling the weapon. The weapon is heavily oiled for shipping. Clean and lubricate before firing. These procedures given apply only to the US Ordnance QCB version.
Drive Belt Instructions
 Drive Belt Safety Do not roll, pry, twist, invert or bend the belt back on itself. Do not zip tie the belt. The acceptable temperature range for your belt drive is -53 C to 85 C. Do not lubricate the belt
HISTORY DESIGN SAFETY
 GLOCK 17 HISTORY The Glock 17, designed by Gaston Glock, was adopted by the Austrian Army as its service pistol in 1982. As an Austrian engineer with no prior firearms design experience, this was Glock
The P-Rod Double by The Airgun Lab Installation Instructions Revision F 08/01/2016 page 1 of 18
 Installation Instructions Revision F 08/01/2016 page 1 of 18 Safety Warning, Terms and Conditions: Each P-Rod Double kit has been designed, manufactured, and tested to function with a standard Benjamin
P9S Automatic Pistol Caliber.45 ACP
 P9S AUTOMATIC PISTOL Caliber.45 ACP P9S Automatic Pistol Caliber.45 ACP Instruction Manual HECKLER & KOCH, INC. 2148 Pacific Boulevard Sterling, Virginia 20166-8903 U.S.A. TEL. (703) 450-1900 TELEFAX (703)
Kalibrgun Cricket series Regulated Airspace Increaser (RAI) with gauge, installing instruction by AS
 with gauge, installing instruction by AS") Kalibrgun Cricket series Regulated Airspace Increaser (RAI) with gauge, installing instruction by AS First I must thank you for buying RAI. RAI is designed to use in the Kalibrgun Cricket series and nowhere
Kalibrgun Cricket series Regulated Airspace Increaser (RAI) with gauge, installing instruction by AS First I must thank you for buying RAI. RAI is designed to use in the Kalibrgun Cricket series and nowhere
CONTENTS INTRODUCTION. WARNING: This manual contains important warnings that must be understood before using this firearm.
 CONTENTS Safety Rules...............................Page 2 Operation................................Page 5 Major Components.........................Page 6 Assembly.................................Page
Table of Contents. Rules of Safe Shooting 3. Getting Started 4. Charging the Rifle 5. Loading 6. Safety 7. Looking After Your FX 8.
 GLADI8OR Owner s Manual Table of Contents Rules of Safe Shooting 3 Getting Started 4 Charging the Rifle 5 Loading 6 Safety 7 Looking After Your FX 8 Lubrication 8 Power Adjustment 9 Adjusting The Trigger
;\- ,.. SAFETY WARNING: Failure to obey a safety warning may result In Injury to you or. T to others. T LOADED AND THE SAFETY IS IN THE
 ,.. SAFETY WARNING: Failure to obey a safety warning may result In Injury to you or T to others. '-"f"oi:ti,., WARNING INSTRUCTIONS FOR THE MODEL 1400 CAUTION-ALWAYS KEEP THE T MUZZLE POINTED IN A SAFE
INSTRUCTION MANUAL CZ 92
 INSTRUCTION MANUAL CZ 92 Before handling the pistol read this manual carefully and observe the following safety instructions. Improper and careless handling of the pistol could result in unintentional
M*CARBO Hi-Point Carbine Trigger Spring Kit Download or Print Instructions Contact: Page 1
 Download or Print Instructions Contact: help@mcarbo.com Page 1 Step 1: Clear your Firearm - Check the chamber, bolt face and magazine well. Step 3: Using the Hi-Point disassembly tool break the bolt loose
INTRODUCING THE NEW APX TOP SAFETY THE ULTIMATE STRIKER PISTOL FROM BERETTA.
 INTRODUCING THE NEW APX THE ULTIMATE STRIKER PISTOL FROM BERETTA. The new Beretta APX semiautomatic pistol, utilizing a removable, serialized chassis frame, can be easily modified with replaceable grip
Shooters Ridge 10/22 Magazine Troubleshooting Guide (Questions and answers apply to all SR 10/22 magazines unless noted)
") Shooters Ridge 10/22 Magazine Troubleshooting Guide (Questions and answers apply to all SR 10/22 magazines unless noted) BACKGROUND This troubleshooting guide is designed to help consumers with any problems
Shooters Ridge 10/22 Magazine Troubleshooting Guide (Questions and answers apply to all SR 10/22 magazines unless noted) BACKGROUND This troubleshooting guide is designed to help consumers with any problems
22-17 Partner. Owner s Manual. 624 Old Pacific Hwy SE Olympia, WA Tel (800) Fax (360) Available Rifle Kit
 Fax (360) Available Rifle Kit") Available Rifle Kit Complete Upper Receiver Kit 624 Old Pacific Hwy SE Olympia, WA 98513 Tel (800) 228-3471 Fax (360) 491-3447 Owner s Manual 22-17 Partner Warnings & Operation Do not attempt to fire the
Available Rifle Kit Complete Upper Receiver Kit 624 Old Pacific Hwy SE Olympia, WA 98513 Tel (800) 228-3471 Fax (360) 491-3447 Owner s Manual 22-17 Partner Warnings & Operation Do not attempt to fire the
SHOTGUN PISTOL. easing the cocking handle slowly to its rest position. Note: bolt cannot be cocked if safety is applied.
 SHOTGUN PSTOL SPECFCATONS: CATEGORY............. HANDMADE - MPROVSED CALBRE......................... 410 TO.12 GAUGE CAPACTY........ SNGLE SHOT - DOUBLE BARREL VARANTS POSSBLE TYPE OF OPERATON.....................
CLEANING HANDGUNS TOOLS YOU WILL NEED
 CLEANING HANDGUNS CLEANING HANDGUNS If you take pride in your firearm, then you know how important it is to properly maintain your weapon. With good, consistent care, you not only make your gun look good
STRIBOG GRAND POWER. The INSTRUCTIONS FOR USE, MAINTENANCE AND SAFETY. 1
 instructions The for use, maintenance STRIBOG and safety hestribog GRAND POWER INSTRUCTIONS FOR USE, MAINTENANCE AND SAFETY www.grandpower.eu 1 The STRIBOG Dear Customer, Thank you for purchasing a semi-automatic
Name Date Period. Unit 16 Test Review
 Name Date Period Unit 16 Test Review 1. What are the 2 main categories of firearms? How do they differ? Technically, 1. handguns (pistols and revolvers held in hand with shorter barrels) and 2. long guns
Paintball Marker. User s Manual. 530 South Springbrook Road Newberg, OR 97132
 Paintball Marker User s Manual 530 South Springbrook Road Newberg, OR 97132 Component Concepts, Inc., 530 South Springbrook Road, Newberg, OR 97132 Phone: (503) 554-8095 Fax: (503) 554-9370 www.phantomonline.com
OWNER S MANUAL READ THIS MANUAL BEFORE USING YOUR NEW AIRGUN
 OWNER S MANUAL READ THIS MANUAL BEFORE USING YOUR NEW AIRGUN FX SUPER SWIFT Table of Contents Warranty Specifications General Instructions Operating Instructions Trigger Adjustments Care & Maintenance
HISTORY DESIGN SAFETY
 GLOCK 17 HISTORY The Glock 17, designed by Gaston Glock, was adopted by the Austrian Army as its service pistol in 1982. As an Austrian engineer with no prior firearms design experience, this was Glock
OWNER S MANUAL. Read the instructions and warnings in this manual carefully before using this firearm; do not discard this manual.
 OWNER S MANUAL SDP compact Read the instructions and warnings in this manual carefully before using this firearm; do not discard this manual. This instruction manual should always accompany this firearm
Installing N-Strike Recon CS-6 Stage 1 and Stage 2 Performance Kits
 Installing N-Strike Recon CS-6 Stage 1 and Stage 2 Performance Kits The Nerf N-Strike Recon CS-6 is a currently available blaster that is relatively easy to modify. The guys at Orange Mod Works have produced
OPERATOR S MANUAL ATP [ADAPTIVE TRAINING PISTOLS]
![OPERATOR S MANUAL ATP [ADAPTIVE TRAINING PISTOLS]](/thumbs/84/89700789.jpg "OPERATOR S MANUAL ATP [ADAPTIVE TRAINING PISTOLS]") OPERATOR S MANUAL ATP [ADAPTIVE TRAINING PISTOLS] ATP TABLE OF CONTENTS Use of this manual...2 Safety Guidelines... 2-3 Specifications...4 Charging Gas...5 Loading BBs...6 Loading Magazine...7 Loading
OPERATOR S MANUAL ATP [ADAPTIVE TRAINING PISTOLS] ATP TABLE OF CONTENTS Use of this manual...2 Safety Guidelines... 2-3 Specifications...4 Charging Gas...5 Loading BBs...6 Loading Magazine...7 Loading
PISTOL CALIBER AR STYLE FIREARMS
 PISTOL CALIBER AR STYLE FIREARMS OWNER'S MANUAL: OPERATION, HANDLING, DISASSEMBLY / REASSEMBLY & SAFETY INSTRUCTIONS - DO NOT DISCARD THIS MANUAL - READ THIS MANUAL CAREFULLY, PAYING CLOSE ATTENTION TO
NOTICE FEATURES BACKGROUND
 ,/ NOTICE Claims will not be honored for damage, injury or, death resulting from the intentional or accidental discharge of this firearm, or from it's function when used for purposes or subjected to treatment
Monsoon repair/service helper. To high: Shoot a couple of shots until you get under 210bar, if it is higher than 210bar it will
 Monsoon repair/service helper 1. Pressure: Min 180bar Max 210bar To low: Charge with air To high: Shoot a couple of shots until you get under 210bar, if it is higher than 210bar it will Not be able to
OLYMPIC ARMS, INC. MPR SUPPLEMENTAL OWNER S MANUAL
 OLYMPIC ARMS, INC. MPR 308-15 SUPPLEMENTAL OWNER S MANUAL READ THIS MANUAL COMPLETELY BEFORE OPERATING YOUR RIFLE. FAILURE TO DO SO MAY RESULT IN DAMAGE TO YOUR RIFLE, INJURY OR DEATH TO THE SHOOTER OR
On the Go Swing System Instruction Manual
 On the Go Swing System Instruction Manual WARNING READ ENTIRE MANUAL BEFORE USE. THIS SWING IS NOT A TOY. THIS SWING IS ONLY TO BE USED BY TRAINED PERSONNEL, SUCH AS AN OCCUPATIONAL THERAPIST, PHYSICAL
WORLD CHAMPION. SMALL BORE RIFLE.22 l.r. MANUAL. Technical Innovations
 SMALL BORE RIFLE.22 l.r. MANUAL Technical Innovations Technical Innovations -General information Page 2 -Bedding Page 3 -Three locking lugs Page 4 -Safety / dry fire switch Page 4 -Firing pin Page 4 -Firing
Defender Series Owner s Manual
 4904 Hwy 98/PO Box 67 Comer, GA 30629 (866) 803-0000 Fax (706-783-5800) Defender Series Owner s Manual MPA1SST & MPA20SST/DMG Carbines MPA10T & MPA10SST Pistols MPA30T & MPA30SST/DMG Pistols When you purchased
Kentucky Long Rifle.50 BMG Model: BA M-N-M Tactical. Users Guide
 Kentucky Long Rifle.50 BMG Model: BA M-N-M Tactical Users Guide Metals-N-More Bowling Green, KY 42101 Telephone 270-781-3642 Fax 270-781-3766 Email Info@Kentucky50.Com www.kentucky50.com INTRODUCTION Congratulations
VR1 Owner s Manual. Vigilance Rifles, Inc Plum Lane Redlands, CA P F
 VR1 Owner s Manual Vigilance Rifles, Inc. 1653 Plum Lane Redlands, CA 92374 P 909.307.8877 F 909.307.8866 www.vigilancerifles.com INTRODUCTION: Vigilance Rifles offers a new line of Semi-Automatic Rifles
1.0 - OPENING AND CLOSING THE DOOR
 The purpose of this manual is to provide the user with instructions on how to safely open and close, how to conduct routine maintenance, and how to install the PEI TWINLOCK Closure on a pressure vessel.
Owner s Manual Addendum (36310, 36311)
") FN15 DMR Owner s Manual Addendum (36310, 36311) We are pleased that you have chosen an FNH USA FN 15 Designated Marksman Rifle (DMR). The FN 15 DMR shares the same reliability, durability, quality and
FN15 DMR Owner s Manual Addendum (36310, 36311) We are pleased that you have chosen an FNH USA FN 15 Designated Marksman Rifle (DMR). The FN 15 DMR shares the same reliability, durability, quality and
M*CARBO Mosin Nagant 91/30 Trigger Spring Kit Download or Print Instructions Contact: Page 1
 Download or Print Instructions Contact: help@mcarbo.com Page 1 Step 1: Clear your Firearm - Check the chamber, the bolt face and magazine well. 1. 2. 3. 4. 5. 6. 7. 8. Step 2: Gather Parts and Tools Needed
INSTRUCTION MANUAL CZ 630/631
 INSTRUCTION MANUAL CZ 630/631 Before handling the air rifle read this manual carefully and observe the following safety instructions. Improper and careless handling of the air rifle could result in unintentional
Sterling Shotguns. Field and Target Models. Owner s Manual
 Sterling Shotguns Field and Target Models Owner s Manual If you have any questions about the safe use of a Big Horn Armory firearm, call us at 307-586-3700 or write us at P.O. Box 940, Cody Wyoming 82414.
Owners Manual MAX-10/45 Upper Receiver. Rev. A. NFA Warning. LAGE Manufacturing, L.L.C. 916 E. Baseline Rd. STE #113 Mesa, AZ 85204
 Owners Manual MAX-10/45 Upper Receiver NFA Warning LAGE Manufacturing, L.L.C. 916 E. Baseline Rd. STE #113 Mesa, AZ 85204 CM109mk2-300 Rev. A This upper receiver is designed to be used with the M-10/45
 (Mechanical Malfunctions) STOP SHOOTING IMMEDIATELY AND UNLOAD YOUR FIREARM if your firearm develops: a mechanical malfunction; binding or stoppage; spitting powder/gas; a punctured cartridge primer; a
FIRESTORM. Assembly Instructions. Electric Upgrade Kit for the Autococker. Designed & Manufactured by PGI
 FIRESTORM Electric Upgrade Kit for the Autococker Assembly Instructions Designed & Manufactured by PGI Table of Contents Introduction 1 Safety 1 Parts Diagram 2 Parts Diagram Listing 2 Getting Started
Operator s Manual. All-Terrain Wheelchair
 Operator s Manual All-Terrain Wheelchair By Brandon Calavan Ana Groff Steve Benn Dylan Rinker Sebastian Pineo Team 1 Faculty Advisor: John Enderle Teaching Assistant: Sarah Brittain Client: Melody Kettle
Appendix 5 NRA INSTRUCTOR TRAINING PROGRAM PRE-COURSE QUALIFICATION PISTOL
 NRA TRAINING COUNSELOR GUIDE Appendix 5: NRA Instructor Training Program Pre-Course Qualification Pistol Appendix 5 NRA INSTRUCTOR TRAINING PROGRAM PRE-COURSE QUALIFICATION PISTOL The NRA Instructor Training
Figure 2-1. SAFE ( S ) position.
 position.") CHAPTER 2 OPERATION AND FUNCTION This chapter includes clearing, disassembly and assembly, loading, operating precautions, and cycle of operation. 2-1. CLEARING Clear the MK 19 differently in a firing
CHAPTER 2 OPERATION AND FUNCTION This chapter includes clearing, disassembly and assembly, loading, operating precautions, and cycle of operation. 2-1. CLEARING Clear the MK 19 differently in a firing
INSTRUCTION MANUAL CZ 75 TS
 INSTRUCTION MANUAL CZ 75 TS CZ 75 TS - INSTRUCTION MANUAL Before handling the pistol read this manual carefully and observe the following safety instructions. Improper and careless handling of the pistol
HATFIELD. Continuing the Tradition SEMI-AUTOMATIC SHOTGUN INSTRUCTION MANUAL
 HATFIELD Continuing the Tradition SEMI-AUTOMATIC SHOTGUN INSTRUCTION MANUAL READ THE INSTRUCTIONS AND WARNINGS IN THIS MANUAL CAREFULLY BEFORE USING THIS FIREARM SAFETY HANDLING RULES 1.Always keep the
KHANSHOTGUNS. Thank you for choosing KHANSHOTGUNS coachgun
 Thank you for choosing KHANSHOTGUNS coachgun Your coachgun represents a piece of rich history of quality firearms design and manufacture. During the manufacturing process, we have endeavored to incorporate
SAFETY & INSTRUCTRONS MANUAL 1. USE DIRECTIONS 1.1 Make sure the magazine is completely empty and that no round is loaded into the chamber. 1.
 SAFETY & INSTRUCTRONS MANUAL 1. USE DIRECTIONS 1.1 Make sure the magazine is completely empty and that no round is loaded into the chamber. 1.2 If the hammer (44) is in the full cock or half cock position,
On the Go Swing System Instruction Manual
 On the Go Swing System Instruction Manual WARNING READ ENTIRE MANUAL BEFORE USE. THIS SWING IS NOT A TOY. THIS SWING IS ONLY TO BE USED UNDER ADULT SUPERVISION. CONSULT WITH A CHILD S THERAPIST ON HOW
LAW ENFORCEMENT & MILITARY PISTOLS
 1 LAW ENFORCEMENT & MILITARY PISTOLS Top-quality weapons for armed forces and police use. Today WALTHER is one of the leading manufacturers of weapons for police and military use. They have the highest
Armorer s Handgun Sight Tool
 Armorer s Handgun Sight Tool Product #710905 Instructions #1054680 Rev. B 2 Top Knobs Height Adjustment Screw Adjustment Wheel Front Pusher Block Top Carriage Assembly 2 Front Pusher Block Screws Bottom
DIRECTIONS OF USE. Version for printout TITAN 3 TITAN 6. Rößler Waffen GmbH
 DIRECTIONS OF USE Version for printout TITAN 3 TITAN 6 Rößler Waffen GmbH Ing. Walther Simmer-Weg 11 A-6330 Kufstein Tel.: +43 (0) 5372 90810 Fax: +43 (0) 5372 90811 office@jagd-shop.at www.jagd-shop.at
Cleaning rod: spring steel, stainless steel or carbon fibre cleaning rod - only use a one-piece rod. Avoid using snakes.
 Telemark Biathlon Where performance and precision come together http://telemarkbiathlon.com Rifle Cleaning Date : July 19, 2013 Anschutz Rifle Manual - Click Here Izhmash 7-3 Rifle Manual - still looking
Southern Eagles Soaring
 Southern Eagles Soaring N56LS Standard Cirrus Disassembly / Assembly Procedure. Version 2, 2017 You landed out so what now? First, hopefully you made arrangements with someone who has a hitch on their
MARINE CORPS INSTITUTE INSPECTION AND REPAIR OF THE M9 PISTOL
 MARINE CORPS INSTITUTE INSPECTION AND REPAIR OF THE M9 PISTOL MARINE BARRACKS WASHINGTON, DC Table of Contents Page Contents... Navigation Instructions... i iii Chapter 1 Disassembly and Assembly of the
RULES FOR SAFE FIRING:
 EN THIS AIRGUN IS INTENDED FOR USE BY THOSE YEARS OF AGE OR OLDER. ADULT SUPERVISION REQUIRED. SOFT-AIR-PISTOL PPK/S BLOW BACK RULES FOR SAFE FIRING:. Get to know the single parts of your new soft-air
2-1. CLEARING PROCEDURES
 CHAPTER 2 MAINTENANCE Proper maintenance contributes to weapon effectiveness as well as unit readiness. This chapter discusses the maintenance aspects of the M249 AR to include inspection; cleaning and
RIFLE DRILL. 1. General. Before commencing instruction in rifle drill, it is important that the cadets receive instruction in the parts of the rifle.
 RIFLE DRILL 1. General. Before commencing instruction in rifle drill, it is important that the cadets receive instruction in the parts of the rifle. 2. Rifle Movements. Unless stated otherwise, cadets
2014 GUNSMITHING PRICE LIST
 2014 GUNSMITHING PRICE LIST PROHASKA S PRECISION SHOOTING 606 E BREWSTERST APPLETON WI 53911 920-257-7142 WWW.PROHASKAS.COM PROHASKA S PRECISION SHOOTING CAN ACCOMMODATE OTHER GUNSMITHING JOBS NOT LISTED
Pistol Gunsmithing Pricelist
 Mechanical Repairs P-001 General Pistol Repair / Clean & Inspect $75.00 / Hr P-024 Pistol Machining (Drilling, Tapping, Porting, Etc.) $110.00 / Hr P-025 Pistol Trigger Work (Semi-Auto) $160.00 P-026 Pistol
Glock 19 (Gen 4) Review - Why It's One Of The Best Compact Pistols In The World!
 Review - Why It's One Of The Best Compact Pistols In The World!") Glock 19 (Gen 4) Review - Why It's One Of The Best Compact Pistols In The World! First, Check Out This Video Review: The Glock 19 has become a bit of a legendary handgun... It's been incredibly popular
Glock 19 (Gen 4) Review - Why It's One Of The Best Compact Pistols In The World! First, Check Out This Video Review: The Glock 19 has become a bit of a legendary handgun... It's been incredibly popular
OPERATING INSTRUCTIONS
 OPERATING INSTRUCTIONS for X-2 CO 2 FIRED PROJECTOR www.pneudart.com inc Please read this owner's manual carefully before operating your projector. This manual contains valuable information to ensure that
Lectric Cycles Mid-Drive Electric Motor Installation
 Lectric Cycles Mid-Drive Electric Motor Installation This write-up describes the installation of a Lectric Cycles electric motor. The model is the e-rad Mid-Drive 750 Watt conversion kit, installed on
CZ 40 P - INSTRUCTION MANUAL
 Before handling the pistol read this manual carefully and observe the following safety instructions. Improper and careless handling of the pistol could result in unintentional discharge and could cause
Miniball Coulomb Excitation Target Chamber
 Miniball Coulomb Excitation Target Chamber Nigel Warr May 2011 Contents 1 The Coulomb Excitation Target Chamber 2 2 Mounting 2 3 The Heidelberg collimator 5 4 CD insert 5 5 Selecting targets 6 6 Getting
CONTENTS. Basic Shotgun Knowledge Caring for Your Shotgun Safe Shotgun Handling Shotgun Shooting Fundamentals Firing Your First Shot
 CONTENTS Basic Shotgun Knowledge Caring for Your Shotgun Safe Shotgun Handling Shotgun Shooting Fundamentals Firing Your First Shot Basic Shotgun Knowledge Objectives Understand parts of a shotgun and
INTRODUCTION TO THE SERVICE RIFLE AND MAINTENANCE
 INTRODUCTION TO THE SERVICE RIFLE AND MAINTENANCE 1 OVERVIEW DISASSEMBLY MAINTENANCE ASSEMBLY 2 TERMINAL LEARNING OBJECTIVE Given a service rifle, Common Combat Sling, and cleaning gear maintain a service
Instruction manual for FX Gladiator. Instruction manual for FX Gladiator
 Page 1 USER S MANUAL AND--- --- SAFETY INSTRUCTIONS Page 2 1. WARRANTY The carries a One Year Warranty against faulty workmanship and defective materials. Contact the dealer from wich you purchased the
600 / 600FC OWNER'S MANUAL
 PROGRESSION 600 / 600FC OWNER'S MANUAL Issue 2 / Version E - Dec. 10, 1997 Copyright 1997 GAMMA Sports - All Rights Reserved PROGRESSION 600 / 600FC OWNER'S MANUAL TABLE OF CONTENTS PAGE 1... WARRANTY
LESSON 7: THE PRONE POSITION
 LESSON 7: THE PRONE POSITION PURPOSE This lesson introduces you to the correct technique for firing in the prone position. INTRODUCTION prone sling The prone position has the lowest center of gravity and
Pistol Maintenance: Key Lubrication Points
 usacarry.com http://www.usacarry.com/pistol-maintenance-key-lubrication-points/? utm_source=getresponse&utm_medium=email&utm_campaign=usacarry&utm_content=pistol+maintenance:+key+lubrication+points Pistol
1911A1 45 Cal Teardown
 1911A1 45 Cal Teardown 1911A1/1911R1 Sidearm and Clones Written By: Wraithvenge ifixit CC BY-NC-SA www.ifixit.com Page 1 of 14 INTRODUCTION The 1911 Pistol, unquestionably the greatest sidearm ever made.
INSTRUCTION MANUAL CZ 75 Champion
 INSTRUCTION MANUAL CZ 75 Champion CZ 75 CHAMPION - INSTRUCTION MANUAL Before handling the pistol read this manual carefully and observe the following safety instructions. Improper and careless handling
COMMON TRAINING PHASE ONE INSTRUCTIONAL GUIDE SECTION 2 EO M CARRY OUT SAFETY PRECAUTIONS ON THE CADET AIR RIFLE PREPARATION
 COMMON TRAINING PHASE ONE INSTRUCTIONAL GUIDE SECTION 2 EO M106.02 CARRY OUT SAFETY PRECAUTIONS ON THE CADET AIR RIFLE Total Time: 30 min PREPARATION PRE-LESSON INSTRUCTIONS A complete list of resources
Caliber Sled Wheels Assembly Instructions for PN and 13579
 Caliber Sled Wheels Assembly Instructions for PN 13576 and 13579 Caution: Read all instructions before assembling or using Sled Wheels. Follow the steps in order. Only use Sled Wheels as intended, following
Air Pistol Shooting. AFC-IWLA Sills Air Range
 Air Pistol Shooting AFC-IWLA Sills Air Range Overview What is air pistol shooting? Benefits Safety Basics & Fundamentals Shooting at Sills Air Range Shooting at home Useful websites What Is Air Pistol
Installation Procedure for your Disco Double Kit, by Airgun Lab, LLC.
 Disco Double Installation Instructions Copyright Airgun Lab LLC Rev D January 2016 page 1 of 6 Installation Procedure for your Disco Double Kit, by Airgun Lab, LLC. Step 1, gather tools. Tools required
TM WARNING SUMMARY
 TM 9-005-239-0 WARNING SUMMARY Treat every firearm as if it were loaded. Never accept or take over a firearm from another until you have checked personally to see that it is unloaded or in a completely
MAINTENANCE PROCEDURE FOR X 650
 MAINTENANCE PROCEDURE FOR X 650 X 650 25. juli 2005-1/6 MAINTENANCE PROCEDURE FOR X 650 2 ND STAGE WARNING: This maintenance procedure is only for appointed Scubapro technicians that completed a course
3. Keep your finger off the trigger while operating the action and at all other times until you are ready to shoot.
 1 GUN SAFETY RULES Observe these rules of safe gun handling. 1. Always keep the muzzle pointed in a safe direction. Watch the muzzle at all time: never point a gun, accidentally or intentionally, at any
HoldUp Plus2. Safety Kit included: See additional instructions for installation. REAR WHEEL TRAY. BASE (1x) lock WASHER (1x) KEY (2x) SAFETY CLIP (1x)
 lock WASHER (1x) KEY (2x) SAFETY CLIP (1x)") HoldUp Plus2 InsTAll This product on 2" hitch version of the HoldUp Front WHEEL TRAY assembly (1x) REAR WHEEL TRAY assembly (1x) wrench (1x) BASE (1x) bolt (8X) Lock WASHER (8X) Washer (8x) KEY (2x) SAFETY
HoldUp Plus2 InsTAll This product on 2" hitch version of the HoldUp Front WHEEL TRAY assembly (1x) REAR WHEEL TRAY assembly (1x) wrench (1x) BASE (1x) bolt (8X) Lock WASHER (8X) Washer (8x) KEY (2x) SAFETY
Texan & TexanSS Rifle Safety & Operation Manual
 Texan & TexanSS Rifle Safety & Operation Manual WARNING This airgun is recommended for adult use only. Careless use may result in serious injury or accidental death. Dangerous within a minimum of 1 mile
INSTRUCTION MANUAL. Slavia 630/631
 INSTRUCTION MANUAL Slavia 630/631 Before handling the air rifle read this manual carefully and observe the following safety instructions. Improper and careless handling of the air rifle could result in