INSTRUCTIONS FOR THE 7FT REVOLVER 3-IN-1 MULTIGAMES TABLE
|
|
|
- Georgina Clark
- 5 years ago
- Views:
Transcription
1
2
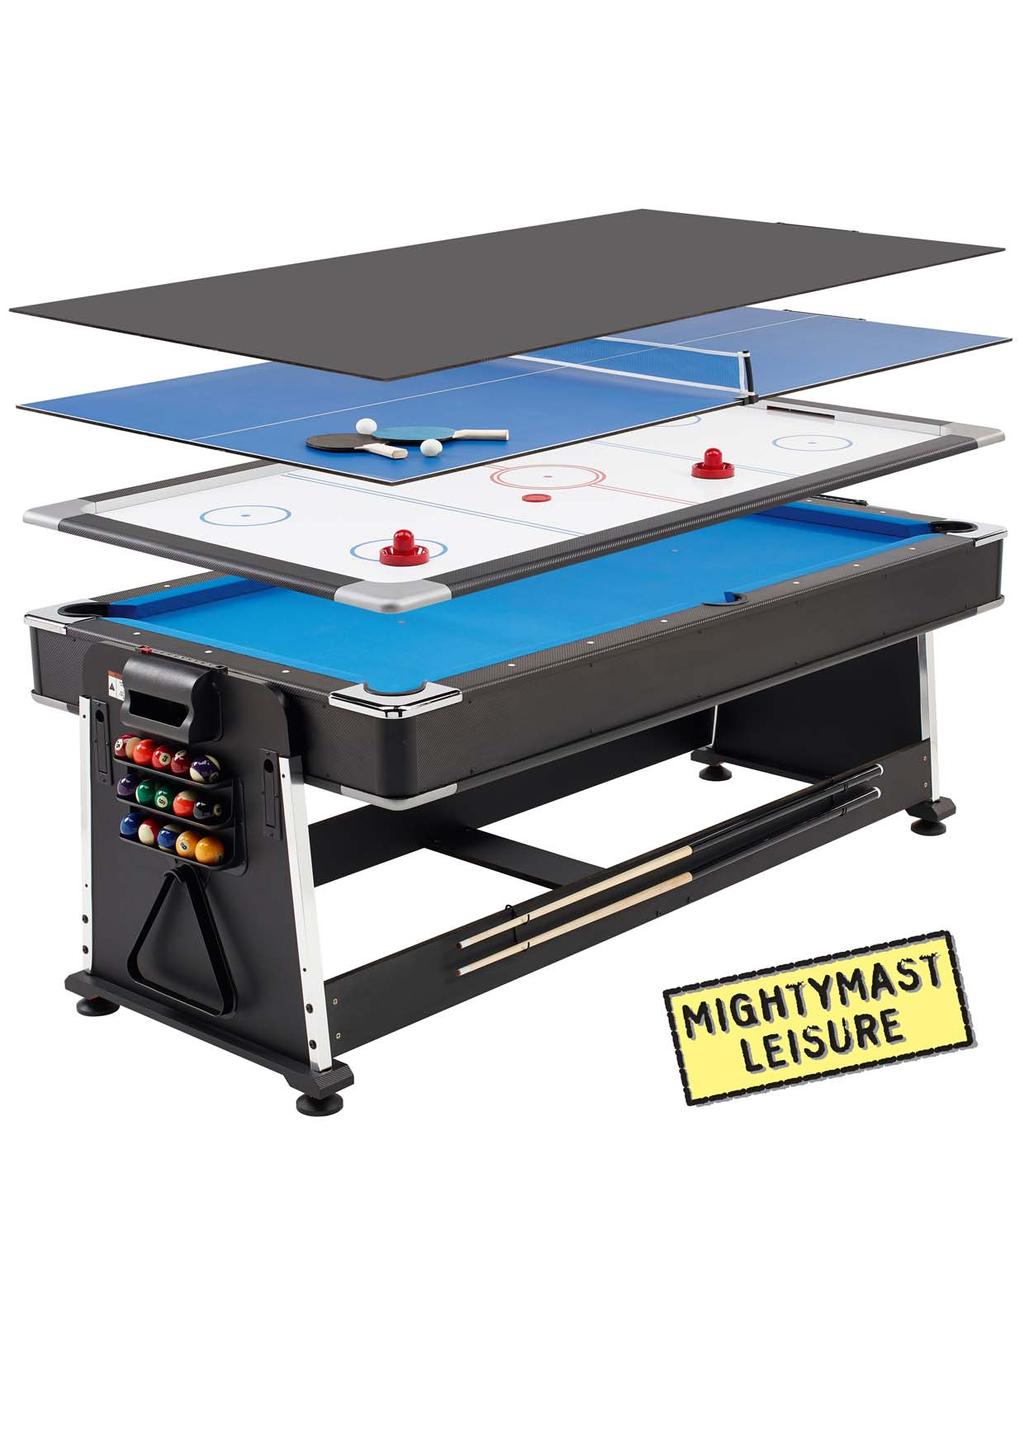
3 INSTRUCTIONS FOR THE 7FT REVOLVER 3-IN-1 MULTIGAMES TABLE Please keep these instructions for future reference. Adult assembly required. This table is not a toy & is intended for use by or under the supervision of adults. Tools required Philips Screwdriver not included Standard (flat head) Screwdriver not included Allen Key included Note: electric screwdrivers may be helpful during assembly however please set a low torque & use extreme caution. Assembly Tips Make sure you understand the following before you begin to assemble your games table. 1. READ THIS MANUAL all the way through before beginning assembly. 2. Some drawings or images in the manual may not look exactly like your product. 3. You will need a second adult to assist with this assembly (ideally 4 adults needed for lifting). 4. Save all packing materials until the parts have been inspected & the table is assembled. Unpack the pieces 1. Lay the box on a flat surface (the floor). You may want this near your area of assembly. 2. Unpack the boxes & parts bags. Inspect & count the parts. The Parts Identifier page can be used to record your results. 3. Some parts on the Parts Identifier page are pre-assembled. 4. If any parts are missing please contact Mightymast Leisure immediately. 5. Note that some parts are stored inside the table top. 1
4 ASSEMBLY Step 1 1. Lift the air hockey top off the pool table & lay aside somewhere safe for now. Either carefully lay it on the floor or up against a wall. Be careful not to damage the air hockey fan motor. 2. Remove all accessories & boxes from inside the pool table top. 3. Now replace the air hockey top back onto the pool table & at the same time thread the fan motor cable through the hole in the side of the table. Be careful not to pinch the cable. 4. Use #15 screws to attach both the air hockey & pool tops together in the marked places around the sides of the table see diagram below: Step 2 5. Screw the four leg levellers #27 into the two pedestal supports # Next place the two pedestals #12 into the recess of the two pedestal supports #13 & secure them with screws #8 see diagram below: 2
5 Step 3 7. Attach the two latches #24 to the outside of each pedestal using screws #3. 8. Important to ensure the latches are attached in identical positions around the leg platform please make sure each latch is seated firmly on the bottom of the latch-receiving slot. See diagram below: Step 4 9. Attach the two side rails #14 to the inside of the two pedestals #12 using the #11 barrel nuts, #4 hex bolts & #5 washers. Hand tighten only at this stage. 10. Attach rail A #35 to both side rails #14 using #2 washers, #33 bolts & #34 barrel nuts. 11. Hang the two #31 pool cue holders over one of the #14 side rails. 12. Do not tighten the fixings at this point. See diagram below: 3
6 Step Place the complete table top onto the leg assembly. Ideally this requires four adults each lifting one corner of the table top, then carefully lowering it onto the leg assembly ensuring both rotational bolts #32 slot into the groove in the top of the two pedestals # Important: before lifting the table top make sure the rotational bolts are unscrewed wide enough to just fit into the groove on top of the pedestals. Do not over-unscrew. 15. Firmly tighten all nuts & bolts on the leg assembly which were left only hand-tightened in Step 4. See diagram below: Step Now attach the two puck catchers #6 to the outside of both pedestals using screws # Plastic tray A #25 & plastic tray B #26 can also be screwed to the outside of the pedestals using screws #7. The holes have already been pre-drilled to show which end the different trays should be placed. See diagram below: 4
7 Step Lay the table tennis pitch #9 onto the table top & attach the net by sliding parts #28 onto the side of the pitch see diagram below. If still attached, peel off the protective paper film from the reverse side of the table tennis pitch to reveal the black exterior finish. NOTE: The reverse side of the table tennis top is also the protective lid for this table when not in use. 5
8 USING THE TABLE To rotate the table Caution this should only be performed by an adult as the rotating table may pinch body parts if not careful. Pull out the two table latches on both ends. Slowly rotate the table. If the edge of the table top catches on any part of the leg assembly when rotating then a small adjustment will need to be made to the leg assembly to make it square to the table top. Do this by lifting one leg off the floor at a time & by applying pressure to rotate the frame slightly so that it is more square to the table top. If the pool table side is not level then first try to rectify this by using the leg levellers on each leg. Much of the table can easily be levelled using this method. Push the table latches back in. Note that the table top cannot be rotated if the table tennis pitch is being stored underneath by resting it on the side rails. It must be removed first before rotation & can be replaced afterwards. If the fan does not work Check the toggle switch on the cable is pressed on. Alternatively check the fuse in the plug top. Important Safety & Operating Instructions 1. Caution this table is not a toy & is intended for use by or under the supervision of adults. Adults should review safety guidelines with children to avoid possible risk of electric shock or other injuries. 2. Power sources the hockey game should be operated only from 240V AC. 3. The power cable should be routed so that it is not likely to be walked on or pinched by items placed upon or against it. 4. Ventilation openings in the game are provided for the exhaust air to create a cushion effect. The openings on the air blower are for the intake air. Keep clear of the air blower when it is on. Do not put your hand or other objects near the intake openings. To ensure reliable operation of the game & protect it from overheating these openings must not be blocked or covered. 5. This product is intended for indoor use only. Please do not sit, climb or lean on the table. Do not drag the table when moving it in order to avoid damaging the legs. Please use just furniture spray polish to clean the exterior surfaces. Air Hockey Game Rules The object of the game is to be the first player to score 10 goals against the opponent. A coin toss is used to determine which player starts with the puck (serve). The player winning the coin toss gets the puck & begins play by striking the puck with their pusher onto the opponent s side. Players can strike the puck anywhere on their half of the playing surface. Players cannot cross the centreline to strike the puck. If a goal is scored when a player strikes the puck over the centreline it does not count. A player may stand anywhere around the table on their side of the centreline. Players may not stand past that line. When the puck contacts any part of the centreline either player may strike the puck to score. A goal is scored when the puck enters & drops inside the opponent s goal. The player scored upon receives possession of the puck for the next serve. If the puck stops in the goal & has tilted into the goal drop it counts as a goal. If the puck stops in the goal & has not tilted into the goal, it does not count as a 6
 All 15 balls are racked with the 8-ball in the middle (many players also alternate stripes & solids at the end of the bottom row). The balls are broken wide open.")
9 goal. Players can remove the puck out of the goal with their hands or pusher. If the puck rebounds out of the goal the point does not count. The first player to score 10 points is declared the winner. Pool (8-Ball) All 15 balls are racked with the 8-ball in the middle (many players also alternate stripes & solids at the end of the bottom row). The balls are broken wide open. No matter what happens on the break the shooter still has their choice of playing stripes or solids. The first player to sink a striped or solid ball is committed to those balls for the remainder of the game. After a player has pocketed all their stripes or solid balls they may shoot at the 8 ball. The shooter must call the pocket for the 8 ball. If they miss the game continues. Once the 8 ball is legally pocketed a winner is declared. Table Tennis Opponents flip a coin & the winner may choose either end of the table or the right to serve or receive first. If they choose an end at which to play the other player has the choice of serving or receiving first. Each match shall consist of the best two out of three games with the winning player reaching 21 points first or being ahead by two after the score reaches 20 all in each game. The serve changes from one player to the other every time five points are scored, except when the score becomes tied At this time the serve changes & continues to change after each point until one player scores two consecutive points, thus winning the game. The serve must be made from behind the end line. The server puts the ball into play by tossing it into the air from the palm of one hand & striking it with the paddle (held in the other hand) so that it hits their own court. The ball must go over the net & hit the receiver s court. The receiver must return the ball over the net so that it hits the server s court. Play continues until one player fails to make a legal return. The opponent then scores a point. Environmental Protection Waste electrical products should not be disposed of with household waste. Please recycle where facilities exist. Check with your Local Authority or retailer for recycling advice. For sales & service please contact: Mightymast Leisure Ltd, 58 Bentwaters Park, Rendlesham, Woodbridge, Suffolk. IP12 2TW. UK Tel: +44 (0) Fax: +44 (0) info@mightymast.com 7
Item # in1 Rotating Table. Inch BILLIARDS AIR HOCKEY TABLE TENNIS
 Item # 45-6066 3-in1 Rotating Table 3 BILLIARDS AIR HOCKEY TABLE TENNIS 84 Inch ! WARNING: Rotating game should be done under adult supervision. Rotating table may cause a pinching hazard for young children
4-in-1 Rotating Table
 Item # 45-6065 4-in-1 Rotating Table Air Powered Hockey, Billiards, Table Tennis, Football If you have any problems with your new product, DO NOT RETURN IT TO THE STORE! Please contact us at 1-866-815-4173,
84 3-in-1 Rotating Table Air Powered Hockey, Billiards, Table Tennis
 Item# 45-6708 84 3-in-1 Rotating Table Air Powered Hockey, Billiards, Table Tennis Please keep this instruction manual for future reference If you have any problems with your new product, please contact
Item # in-1 Swivel Table. Inch BILLIARDS AIR HOCKEY TABLE TENNIS
 Item # 45-6066 3-in-1 Swivel Table 3 BILLIARDS AIR HOCKEY TABLE TENNIS 84 Inch Limited 90-Day Triumph Sports USA, Inc. Warranty All Triumph Sports USA, Inc. (TSU) games have a limited 90-day from date
ASSEMBLY INSTRUCTIONS FOR THE SHOOTOUT HOOPS GAME
 1 ASSEMBLY INSTRUCTIONS FOR THE SHOOTOUT HOOPS GAME Please keep these instructions for future reference. Adult assembly required. Tools / Parts required This product requires 3x AA batteries (not included).
FAX:
 We strive to ensure that our products are of the highest quality and free of manufacturing defects or missing parts. However, if you have any problems with your new product, DO NOT RETURN IT TO THE STORE,
PHOENIX MMXI 7 FOOT 3 IN 1 BILLIARD TABLE
 Phoenix MMXI 3 in 1 Billiard Table PHOENIX MMXI 7 FOOT 3 IN 1 BILLIARD TABLE Replacement Parts Order direct at or call our Customer Service department at (800) 5-7593 ext. 113 8 am to 4:30 pm Central Standard
Please have your date code when inquiring about parts.
 We strive to ensure that our products are of the highest quality and free of manufacturing defects or missing parts. However, if you have any problems with your new product, D O NOT RETURN IT TO THE STORE,
INFERNO 20-IN-1 MULTI-GAME TABLE ASSEMBLY INSTRUCTIONS
 INFERNO 20-IN-1 MULTI-GAME TABLE ASSEMBLY INSTRUCTIONS NG1017M3 THANK YOU! Thank you for purchasing this product. We work around the clock and around the globe to ensure that our products maintain the
SAVE THESE INSTRUCTIONS DEALER/INSTALLER: GIVE TO HOMEOWNER OCEAN BLUE ABOVE GROUND POOL LADDERS
 SAVE THESE INSTRUCTIONS DEALER/INSTALLER: GIVE TO HOMEOWNER OCEAN BLUE ABOVE GROUND POOL LADDERS ASSEMBLY AND INSTALLATION MANUAL FOR A-FRAME AND INPOOL LADDERS A-FRAME Part No. 400100 PROUDLY MADE IN
MAVERICK FOOSBALL TABLE
 MAVERICK FOOSBALL TABLE Replacement Parts Order direct at or call our Customer Service department at (800) 225-7593 8 am to 5 pm Central Standard Time July 2010 UPC Code 7-19265-53446-4 Staple your receipt
poo ltab
 I MizeraKl Pool We strive to ensure that our products are of the highest quality and free of manufacturing defects or missing parts. However, if you have any problems with your new product, DO NOT RETURN
FT500GF Dat e Code: 2 - FT500GF - - MW Purchase Date: PLEASE RETAIN THIS INSTRUCTION MANUAL FOR FUTURE REFERENCE. All Rights Reserved
 We strive to ensure that our products are of the highest quality and free of manufacturing defects or missing parts. However, if you have any problems with your new product, D O NOT RETURN IT TO THE STORE,
PARK AVENUE 7' POOL TABLE WITH TABLE TENNIS & BENCHES ASSEMBLY INSTRUCTIONS
 PARK AVENUE 7' POOL TABLE WITH TABLE TENNIS & BENCHES ASSEMBLY INSTRUCTIONS NG2530PR THANK YOU! Thank you for purchasing this product. We work around the clock and around the globe to ensure that our products
7 FOOT POOL TABLE WITH TABLE TENNIS TOP ASSEMBLY INSTRUCTIONS
 7 FOOT POOL TABLE WITH TABLE TENNIS TOP ASSEMBLY INSTRUCTIONS NG1023 THANK YOU! Thank you for your purchase of our product. We work around the clock and around the globe to ensure that our products maintain
F1 Ace Sport 2-in-1 Baby walker
 F1 Ace Sport 2-in-1 Baby walker INSTRUCTIONS: Read the instructions carefully before use and keep them for future reference. The child may be hurt if you do not follow these instructions. BS EN 1273:2005.
TOURNAMENT ICE. 8Ft-Gold Standard Manual Score Home Air Hockey Game Assembly Instructions / Manual
 TOURNAMENT ICE 8Ft-Gold Standard Manual Score Home Air Hockey Game Assembly Instructions / Manual Thank you for purchasing a Gold Standard Games product. All of us at Gold Standard Games want you to be
TO ORDER PARTS. Visit our website before returning to store. Assembly, instructions and Rules
 www.sportcraft.com TO ORDER PARTS Visit our website before returning to store 1-1-36-934 Assembly, instructions and Rules 313 Waterloo Valley Road / Budd Lake, NJ 07828 / www.sportcraft.com _ratulations!
Flat Fold Highchair INSTRUCTION MANUAL. Designed and manufactured to BS EN 14988: 2012 IMPORTANT:
 Flat Fold Highchair INSTRUCTION MANUAL Designed and manufactured to BS EN 14988: 2012 IMPORTANT: Thank you for choosing our product. Please read and understand these instructions before using this flat
A-FRAME RESIN IN & OUT FLIP UP LADDER
 A-FRAME RESIN IN & OUT FLIP UP LADDER NE1222 NOTE FOR SAFETY PURPOSES ALL LADDERS SHOULD BE SECURED BY ATTACHING THEM TO THE TOP LEDGE OF THE POOL. (See step 13 for details) In order for the ladder to
Final Assembly Instructions Bikes with Quill Stems
 Final Assembly Instructions Bikes with Quill Stems Thank you for buying your new bicycle from L.L.Bean. Read these instructions carefully before beginning the final assembly. Prior to shipping, our expert
FOOSBALL ASSEMBLY, INSTRUCTIONS AND RULES PL
 FOOSBALL ASSEMBLY, INSTRUCTIONS AND RULES 56007 PL Waterloo Valley Road / Mt. Olive, NJ 07828 / www.sportcraft.com / (800) 526-0244 / Fax: (97) 47-54 MODEL # 56007 PL Congratulations on owning a new KT
1500 Follow Spot Yoke
 1500 Follow Spot Yoke Rev 1.1 2004 City Theatrical, Inc. Getting Started with the City Theatrical Follow Spot Yoke Congratulations on the purchase of your City Theatrical Follow Spot Yoke. The City Theatrical
 www.myrower.com support@myrower.com ASSEMBLY Congratulations on purchasing the MyRower! Please see the following pages for instructions on assembling your MyRower. Bits bag contents: Rail Cross Bolt (90mm)
Final Assembly Instructions Bikes with Threaded Headsets
 Final Assembly Instructions Bikes with Threaded Headsets Thank you for buying your new bicycle from L.L.Bean. Read these instructions carefully before beginning the final assembly. Prior to shipping, our
Santa Fe Cycles Assembly Guide Introduction
 Santa Fe Cycles Assembly Guide Introduction Congratulations on your purchase of your new Santa Fe bicycle. You have purchased a bicycle that has many features and qualities. Please take a few minutes and
MAINTENANCE PROCEDURE FOR X 650
 MAINTENANCE PROCEDURE FOR X 650 X 650 25. juli 2005-1/6 MAINTENANCE PROCEDURE FOR X 650 2 ND STAGE WARNING: This maintenance procedure is only for appointed Scubapro technicians that completed a course
GRAVITY BIKE RACK ASSEMBLY & OPERATING INSTRUCTIONS
 GRAVITY BIKE RACK 94479 ASSEMBLY & OPERATING INSTRUCTIONS Due to continuing improvement, actual product may differ slightly from the product described herein. 3491 Mission Oaks Blvd., Camarillo, CA 93011
HOME ASSEMBLY INSTRUCTIONS
 HOME ASSEMBLY INSTRUCTIONS This Papillionaire Bicycle now belongs to you. It will take you to work, wait patiently outside your local cafe, and carry your groceries home. This is the start of your long-term
222 Schwinn Recumbent Exercise Bike Parts List Full Size Hardware Chart Product Illustration Assembly Instructions
 222 Schwinn Recumbent Exercise Bike Parts List Full Size Hardware Chart Product Illustration Assembly Instructions FITNESS SAFEGUARDS AND WARNINGS Before starting any exercise program, consult with your
MODEL #7100X A-FRAME LADDER
 SAVE THESE INSTRUCTIONS DEALER/INSTALLER: GIVE TO HOMEOWNER MODEL #7100X A-FRAME LADDER LADDER MUST BE ATTACHED TO POOL FRAME... DO NOT USE WITH INFLATABLE POOLS ASSEMBLY AND INSTALLATION MANUAL The Anti-Entrapment
Thank you for purchasing the Hollander II Bike from Made.com
 Thank you for purchasing the Hollander II Bike from Made.com Please take time to identify the hardware as well as the individual components of this product. As you unpack and prepare for assembly, place
Troyer s Gourd Rack 8 unit F R H O P
 B E A D I M-N L Vertical Parts F R H O P Horizontal Parts C G J Updated 11/16 Parts List A: Top of Pole B: Bottom of Pole C: 48 Ground Stake D: Top Perch rods 48 long E: Hub F: Rope Winder w/ attached
FOLD AND ROLL PLAYBACK TABLE TENNIS TABLE
 OWNER'S MANUAL FOLD AND ROLL PLAYBACK TABLE TENNIS TABLE MODEL NOs. T8268 T8168 Thank you for buying our product. We try hard to ensure that our products are of high quality and free of problems, such
-- SGP (NOVA TEAM SQUARE)
") -- SGP-100 -- (NOVA TEAM SQUARE) Installation Instructions Call Jaypro Sports Equipment at 1-800-243-0533 during regular business hours for technical support. www.jaypro.com Rev-B Page 1 of 9 JAYPRO SPORTS
-- SGP-100 -- (NOVA TEAM SQUARE) Installation Instructions Call Jaypro Sports Equipment at 1-800-243-0533 during regular business hours for technical support. www.jaypro.com Rev-B Page 1 of 9 JAYPRO SPORTS
#59114 Rola 2-Bike Rack Carrier (Shown Assembled) (A) (C) (B)
 (A) (C) (B)") Use for Parts: #59114 Rola -Bike Rack System #59115 Rola 1-Bike Add-On TOOLS REQUIRED 10mm or 13/3 Socket & Wrench #59114 Rola -Bike Rack Carrier (Shown Assembled) Tray Attachment Hardware: (3) Plastic
Use for Parts: #59114 Rola -Bike Rack System #59115 Rola 1-Bike Add-On TOOLS REQUIRED 10mm or 13/3 Socket & Wrench #59114 Rola -Bike Rack Carrier (Shown Assembled) Tray Attachment Hardware: (3) Plastic
Quadair. Air Hockey Table Owners Manual. Assembly operation and care instuctions. Serial # Distributed By. Sales Person. Technical Service #
 Version 12.1.11 Quadair Air Hockey Table Owners Manual Assembly operation and care instuctions. Serial # Distributed By Sales Person Technical Service # QUADAIR PATENTED WORLDWIDE Forward First, we would
SAVE THESE INSTRUCTIONS
 SAVE THESE INSTRUCTIONS DEALER/INSTALLER: GIVE TO HOMEOWNER MODEL #8100X OUTSIDE SAFETY LADDER 48" TO 54" FOR USE WITH CONFER PLASTICS IN POOL STEPS LADDER MUST BE ATTACHED TO POOL FRAME... DO NOT USE
Inside Front cover This page will remain blank.
 Owner s Manual Inside Front cover This page will remain blank. 1 Table of Contents Parts of the AirCAT...3 Assembling the AirCAT...4 Attaching the wheels to the stand...4 Attaching the battery box to the
Side-of-Pole Mount for 1 Module (SPM1) For Module Type C
 For Module Type C") Module Type Width Length C 22-27 56-63 Side-of-Pole Mount for 1 Module (SPM1) For Module Type C ASSEMBLY INSTRUCTIONS step-by-step assembly and installation Version 1, Rev A PCN 022212-1 Side-of-Pole Mount
Module Type Width Length C 22-27 56-63 Side-of-Pole Mount for 1 Module (SPM1) For Module Type C ASSEMBLY INSTRUCTIONS step-by-step assembly and installation Version 1, Rev A PCN 022212-1 Side-of-Pole Mount
engineered products Foldable Topside Creeper Safety First VIDEO INSTRUCTIONS ARE AVAILABLE ON OUR WEBSITE AT:
 engineered products Foldable Topside Creeper Please read and understand all safety advisories and operating instruction in this manual to ensure safe and productive operation of your new Topside Creeper.
Kirra Entertainment Unit Assembly Instructions
 irra ntertainment Unit Thank you for your purchase. lease follow the instructions below for correct assembly. dowel x x 0 wedge x C bolt x locking nut x x F G slide x rail long x N wheel slide rail H I
Car Baby Walker 2-in-1 Baby walker
 Car Baby Walker 2-in-1 Baby walker INSTRUCTIONS: Read the instructions carefully before use and keep them for future reference. The child may be hurt if you do not follow these instructions. EN 1273:2005.
INSTALLATION INSTRUCTIONS
 INSTALLATION INSTRUCTIONS KIT CONTENTS: PART NUMBER: DESCRIPTION: E361SXA300 ROOF MOUNT BICYCLE CARRIER B9 TRIBECA Short Carriage Bolt Long Carriage Bolt 3x Over-Molded Wrench Button Head Screw 2x Washer
C - SERIES. Height Adjustable Portable Goal Supports. Installation & Owner s Instructions C1000 C2000. Made in the USA
 C - SERIES Height Adjustable Portable Goal Supports C1000 C2000 Installation & Owner s Instructions Made in the USA This manual explains the proper installation, operation, and maintenance of your Schutt
VISIT THE LIFETIME WEB SITE: **For U.S. and Canada Customers ONLY:** IF ASSISTANCE IS NEEDED,
 MODEL #73729 WARNING Failure to comply with any of the warnings in these instructions may result in serious personal injuries such as cuts, broken bones, nerve damage, paralysis, brain injury, or death.
FOLD AND ROLL PLAYBACK TABLE TENNIS TABLE
 OWNER'S MANUAL FOLD AND ROLL PLAYBACK TABLE TENNIS TABLE MODEL NOs. T8269 T8169 Thank you for buying our product. We try hard to ensure that our products are of high quality and free of problems, such
Side-of-Pole Mount for 1 Module (SPM1) For Module Types A & B
 For Module Types A & B") Side-of-Pole Mount for 1 Module (SPM1) For Module Types A & B ASSEMBLY INSTRUCTIONS step-by-step assembly and installation Version 1, Rev A PCN 080311-2 SP3363-1 Side-of-Pole Mount for 1 Module (SPM1)
Side-of-Pole Mount for 1 Module (SPM1) For Module Types A & B ASSEMBLY INSTRUCTIONS step-by-step assembly and installation Version 1, Rev A PCN 080311-2 SP3363-1 Side-of-Pole Mount for 1 Module (SPM1)
INSTALLATION INSTRUCTIONS
 KIT CONTENTS: INSTALLATION INSTRUCTIONS PART NUMBER: DESCRIPTION: E361SXA302 roof MOUNT BICycle CARRIER SINGLE Short Carriage Bolt 1x Long Carriage Bolt 3x Over-Molded Wrench 1x Button Head Screw 2x Washer
TIME GUIDELINES FOR MASTERS Race to Match Time Average Game 7 60 minutes 8 minutes ADDITIONAL TIME GUIDELINES. 8-Ball Game Rules
 Pool Etiquette To help make your day of League play enjoyable, as well as enhance the enjoyment of those around you, please observe basic guidelines of etiquette. Treat your opponent as you would like
2,500/4,000 LB Easy Riser Vertical Cable Feighner Lift
 2,500/4,000 LB Easy Riser Vertical Cable Feighner Lift CAUTION - PUT SAFETY FIRST 1. Before attempting to install or operate this lift, study and fully understand the proper operating procedures and safety
ASSEMBLY INSTRUCTIONS
 ASSEMBLY INSTRUCTIONS Ballpark Classics Baseball Game MLB Edition Figure B Read the instructions completely before beginning g assembly. You will need a Phillips screwdriver. 1. Remove the game from the
E-trike Li Assembly Guide
 PREPARATION 1. Read this assembly manual BEFORE commencing assembly. 2. Carefully remove all the components and packaged hardware from the shipping boxes. 3. Unpack the contents of the large double box
Mini Glider Manual. Your Glider comes partially assembled. The front wheel and the handlebars require assembly.
 Mini Glider Manual Congratulations on your purchase of the Mini Glider! Your glider is designed for years of nearly carefree use by your child. These instructions include how to set up your glider and
TOYOTA TACOMA 2005 TOW HITCH Preparation. Part Number: PT
 Preparation Part Number: PT791 04050 Kit Contents 1 1 Hitch Center Section 2 1 LH Frame bracket 1 RH Frame Bracket 4 2 Auxiliary Bracket Hardware Bag Contents 1 6 Hex Head Bolt, M12 x 1.2 (black) 2 6 Nut,
On the Go Swing System Instruction Manual
 On the Go Swing System Instruction Manual WARNING READ ENTIRE MANUAL BEFORE USE. THIS SWING IS NOT A TOY. THIS SWING IS ONLY TO BE USED BY TRAINED PERSONNEL, SUCH AS AN OCCUPATIONAL THERAPIST, PHYSICAL
VERTICAL SURFBOARD CARRIER READ ME! IMPORTANT WARNING!
 VERTICAL SURFBOARD CARRIER ENG RRAC09 30 min READ ME! Thank you for purchasing a Front Runner Vertical Surfboard Carrier. Before you start, take a moment to familiarize yourself with this Fitting Instruction
On the Go Swing System Instruction Manual
 On the Go Swing System Instruction Manual WARNING READ ENTIRE MANUAL BEFORE USE. THIS SWING IS NOT A TOY. THIS SWING IS ONLY TO BE USED UNDER ADULT SUPERVISION. CONSULT WITH A CHILD S THERAPIST ON HOW
Booster Pump PB4-60 Replacement Kits
 Booster Pump PB4-60 Replacement Kits FOR YOUR SAFETY - This product must be installed and serviced by a contractor who is licensed and qualified in pool equipment by the jurisdiction in which the product
deluxe toilet safety support
 deluxe toilet safety support Model 97388 Cleaning, Assembly, And Operation Instructions Diagrams within this manual may not be drawn proportionally. Due to continuing improvements, actual product may differ
12 Foot Shuffleboard Table
 ASSEMBLY INSTRUCTIONS 12 Foot Shuffleboard Table Thank you for your purchase of this Harvil Product! We work around the clock and around the globe to ensure that Harvil products maintain the highest possible
Trampoline & Enclosure Assembly Instructions
 Trampoline & Enclosure Assembly Instructions Safe user weight 330 lbs (150 kg) Version 718702 The information in this document is subject to change without notice. Copyright Springfree Trampoline Inc.
ASSEMBLY INSTRUCTIONES
 ASSEMBLY INSTRUCTIONES www.quebecbillard.com PARTS IDENTIFIER 1 2 3 4 5 Side Apron-A Side Apron-B Playfield Center Support Left Leg 6 7 8 9 10 11 Right Leg End Apron Leg End Panel Leg Side Panel 12 13
Read Before Operating!
 Read Before Operating! IMPORTANT OPERATING INSTRUCTIONS THE DEUCE PITCHING MACHINE THROWS REAL REGULATION BALLS; HOWEVER, THE ACCURACY OF THE DEUCE DEPENDS ON THE QUALITY, HARDNESS AND TYPE OF BALLS YOU
Model: LG IP CL ADULT SUPERVISION REQUIRED
 420969 Model: LG IP CL 313 Regina Avenue Rahway, NJ 07065-4891 732-574-1500 GENERAL Before you start, check to see that you have the correct number of parts. Use the packing list on the next page. Carefully
CONFER ABOVE GROUND CURVE STEP / ABOVE GROUND CURVE STEP SYSTEM ASSEMBLY AND INSTALLATION MANUAL
 SAVE THESE INSTRUCTIONS DEALER/INSTALLER: GIVE TO HOMEOWNER CONFER ABOVE GROUND CURVE STEP / ABOVE GROUND CURVE STEP SYSTEM ASSEMBLY AND INSTALLATION MANUAL Model CCX-AG Note: 40 lbs. of sand required!
Model PSI Compressor with 3-Gallon Air Tank 12VDC
 Model 6350 150 PSI Compressor with 3-Gallon Air Tank 12VDC IMPORTANT: It is essential that you and any other operator of this product read and understandd the contents of this manual before installing
Pectoral Machine. User manual E S S E N T I A L S T R E N G T H
 E L E M E N T and the cable E S S E N T I A L S T R E N G T H User manual 1 and the cable and The identification plate of and manufacturer, affixed on the back panel of the weight stack, gives the following
T-016 ASSEMBLY MANUAL MODEL ROCK AND ROLL Main Street NE Minneapolis, MN
 MODEL T-016 ASSEMBLY MANUAL ROCK AND ROLL 5280 Main Street NE Minneapolis, MN 55421 1.877.226.7824 www.kurtkinetic.com COMPONENTS Tools Required for Assembly: 17mm Wrench or Adjustable Wrench When unpacking,
EZee Glider Manual. Tools needed for Assembly: Wrench (included) Philips Screwdriver (not included) Assembly Instructions
 Philips Screwdriver (not included) Assembly Instructions") EZee Glider Manual Congratulations on your purchase of the EZee Glider! Your glider is designed for years of nearly carefree use by your child. These instructions include how to set up your glider and
EZee Glider Manual Congratulations on your purchase of the EZee Glider! Your glider is designed for years of nearly carefree use by your child. These instructions include how to set up your glider and
Vac Bagger Wheelhorse 42 and 48 Mowers for Classic Garden Tractors
 Form No. -80 Vac Bagger Wheelhorse and 8 Mowers for Classic Garden Tractors Model No. 790 000000 & Up Operator s Manual Domestic English (EN) Contents Page Introduction................................
Side-of-Pole Mount for 1 Modules (SPM1) For Module Types E, F, G, & H ASSEMBLY INSTRUCTIONS. step-by-step assembly and installation
 For Module Types E, F, G, & H ASSEMBLY INSTRUCTIONS. step-by-step assembly and installation") Side-of-Pole Mount for 1 Modules (SPM1) For Module Types E, F, G, & H ASSEMBLY INSTRUCTIONS step-by-step assembly and installation Version 1, Rev A SP3348-1 PCN 022212-2 Side-of-Pole Mount for 1 Module
Side-of-Pole Mount for 1 Modules (SPM1) For Module Types E, F, G, & H ASSEMBLY INSTRUCTIONS step-by-step assembly and installation Version 1, Rev A SP3348-1 PCN 022212-2 Side-of-Pole Mount for 1 Module
To Purchase This Item, Visit BMI Gaming (800)
") How to play the game How to play the game The object of the game is to reach the Game Goal before your opponent. HOW TO START: - A coin toss decides who starts the game. The winner of the coin toss also
How to play the game How to play the game The object of the game is to reach the Game Goal before your opponent. HOW TO START: - A coin toss decides who starts the game. The winner of the coin toss also
ASSEMBLY GUIDE: Izip & Ezip Electric Bicycles with Rack-Top Mounted Batteries ( RTMB Bicycles )
") ASSEMBLY GUIDE: Izip & Ezip Electric Bicycles with Rack-Top Mounted Batteries ( RTMB Bicycles ) Please Refer to your Owner s Manual for Detailed Setup Instructions Technical & Customer Service: 1-800-377-4532
ASSEMBLY GUIDE: Izip & Ezip Electric Bicycles with Rack-Top Mounted Batteries ( RTMB Bicycles ) Please Refer to your Owner s Manual for Detailed Setup Instructions Technical & Customer Service: 1-800-377-4532
HoldUp Plus2. Safety Kit included: See additional instructions for installation. REAR WHEEL TRAY. BASE (1x) lock WASHER (1x) KEY (2x) SAFETY CLIP (1x)
 lock WASHER (1x) KEY (2x) SAFETY CLIP (1x)") HoldUp Plus2 InsTAll This product on 2" hitch version of the HoldUp Front WHEEL TRAY assembly (1x) REAR WHEEL TRAY assembly (1x) wrench (1x) BASE (1x) bolt (8X) Lock WASHER (8X) Washer (8x) KEY (2x) SAFETY
HoldUp Plus2 InsTAll This product on 2" hitch version of the HoldUp Front WHEEL TRAY assembly (1x) REAR WHEEL TRAY assembly (1x) wrench (1x) BASE (1x) bolt (8X) Lock WASHER (8X) Washer (8x) KEY (2x) SAFETY
First Team Sports, Inc. Blast Recreational Volleyball System
 First Team Sports, Inc. Blast Recreational Volleyball System BILL OF MATERIALS A 2 Volleyball Vertical Post K 1 ½ Centerlock Nut B 3 Net Clamp L 2 Carabiner Clip C 1 Pulley Clamp M 1 ½ x 2 Hex Bolt D 4
SERIES 2 RAMP OWNER S MANUAL TOOLS REQUIRED: BEFORE YOU BEGIN... Read and understand these instructions before beginning a ramp setup.
 SERIES 2 RAMP OWNER S MANUAL BEFORE YOU BEGIN... Read and understand these instructions before beginning a ramp setup. Use caution and care for your back when lifting, pushing, pulling, folding or unfolding
CABLE REPAIR PROCEDURE 2100 Series, 2000 Series & Eventer
 August 2005 CABLE REPAIR PROCEDURE 2100 Series, 2000 Series & Eventer 2000 SERIES 2100 SERIES EVENTER 7514 Alabonson Rd. Houston, Texas 77088 281-999-6900 281-999-6966 (fax) 51A Caldari Rd., #16 Concord,
INSTRUCTION MANUAL. January 23, 2003, Revision 0
 INSTRUCTION MANUAL Model 810A In-Vitro Test Apparatus for 310B Muscle Lever January 23, 2003, Revision 0 Copyright 2003 Aurora Scientific Inc. Aurora Scientific Inc. 360 Industrial Parkway S., Unit 4 Aurora,
Final Assembly Instructions Bikes with Threaded Headsets
 Final Assembly Instructions Bikes with Threaded Headsets Thank you for buying your new bicycle from L.L.Bean. Read these instructions carefully before beginning the final assembly. Prior to shipping, our
Freedom8 ShoeBox Compressor Manual
 Freedom8 ShoeBox Compressor Manual Warning!! This product is not a toy! Use or misuse can cause severe injury or death! Use only with adult supervision. This unit is only to be used with tanks, hoses and
WHERE TO INSTALL THIS MIRROR
 ROUND LED MIRRORS 3003-L-60 3005-L-60 BEFORE YOU START, HERE IS SOME IMPORTANT INFORMATION. 1) General Information Please inspect this product upon delivery. Any missing parts or manufacturing defects
Grow to Pro Basketball
 7208c-0920.qrk /2/02 : PM Page 1 Grow to Pro Basketball Model Number: 7208 Product features and decoration may vary from the photograph above. Please keep this instruction sheet for future reference, as
TECHNICAL INFORMATION
 TECHNICAL INFORMATION Models No. TD0101, TD0101F Description Impact Driver L PRODUCT P 1/ 14 CONCEPT AND MAIN APPLICATIONS Models TD0101 and TD0101F are cost-competitive 100N.m-class impact driver developed
IMPORTANT SAFETY INSTRUCTIONS. PLEASE READ AND SAVE THESE INSTRUCTIONS BEFORE SETUP AND USE. KEEP THESE INSTRUCTIONS IN A SAFE PLACE FOR FUTURE
 31562 Spray N Splash ELEPHANT POOL IMPORTANT SAFETY INSTRUCTIONS. PLEASE READ AND SAVE THESE INSTRUCTIONS BEFORE SETUP AND USE. KEEP THESE INSTRUCTIONS IN A SAFE PLACE FOR FUTURE REFERENCE. FOR AGES 3+
Gerber Sabre 404 and 408 Installation Instructions
 1 TITLE: Gerber FastFact # Supplied by: Last Modified: Summary: Gerber Sabre 404 and 408 Installation Instructions 5002 Gerber Service November 13, 2001 This document provides the installation and set-up
I.H.S INSTALLATION INSTRUCTIONS
 I.H.S INSTALLATION INSTRUCTIONS TOOLS REQUIRED The following tools will be required for installation of your I.H.S. system. Item Qty Needed 9/16 Open End Wrench 2 3/4 Open End Wrench 1 1/2 Open End Wrench
Thank you for purchasing a Porta-Dock product! *Please read and follow these instructions step by step*
 PG 1 OF 9 PORTA-DOCK, INC. 74A ABL/APW 1056 & 44A FLB APW 1056 PORTA-LIFT Thank you for purchasing a Porta-Dock product! *Please read and follow these instructions step by step* STEP 1. Separate and group
310 SERIES TILT-TO-LOAD ROTATOR. The Specialist In Drum Handling Equipment
 OPERATOR S MANUAL FOR MORSE TILT-TO-LOAD DRUM ROTATOR SAFETY INFORMATION: While Morse Manufacturing Co. drum handling equipment is engineered for safety and efficiency, a high degree of responsibility
BackCountry ebikes 2019 MULE Assembly
 BackCountry ebikes 2019 MULE Assembly Required Tools: Cutting Pliers (to cut box poly strapping and heavy bike banding) Scissors (to remove bubble wrap) Allen wrenches (3mm, 4mm, 5mm, 6mm) Wrenches (10mm,
BABY ROCKER WITH TOY BAR
 BABY ROCKER WITH TOY BAR IMPORTANT: KEEP THIS BOOKLET IN A SAFE PLACE FOR FUTURE REFERENCE. www.britax.com.au Series AX910 WARNINGS ALWAYS FOLLOW THE MANUFACTURERS INSTRUCTIONS. READ ALL INSTRUCTIONS CAREFULLY
Marine 6-Boat Free-Standing Racks SKU: Updated November 2011
 Marine 6-Boat Free-Standing Racks SKU: 30-061 Updated November 011 Contains: Marine -Boat Free-Standing Racks (SKU 1-003) Marine 3 rd Boat Expansion Racks (SKU 1-0303) Marine Back Legs (SKU -001) 3 Sets
Spray N Splash JUNGLE FUN POOL
 23188 Spray N Splash JUNGLE FUN POOL IMPORTANT SAFETY INSTRUCTIONS. PLEASE READ AND SAVE THESE INSTRUCTIONS BEFORE SETUP AND USE. KEEP THESE INSTRUCTIONS IN A SAFE PLACE FOR FUTURE REFERENCE. FOR AGES
LITERIDER 2&3 IMPORTANT WARNING. 2Bike (1x) Bolt (1x) Nut (1x) Small Hex Wrench (1x)
 Bolt (1x) Nut (1x) Small Hex Wrench (1x)") LITERIDER 2&3 3 Bike (1x) Bolt (1x) Flat Washer (2x) Nut (1x) Large Hex Wrench (1x) 2Bike (1x) wrench (1x) Small Hex Wrench (1x) keys (2x) Long Strap (1x) 2-Zip Strips (6x) 3-Zip Strips (9x) Wheel strap
LITERIDER 2&3 3 Bike (1x) Bolt (1x) Flat Washer (2x) Nut (1x) Large Hex Wrench (1x) 2Bike (1x) wrench (1x) Small Hex Wrench (1x) keys (2x) Long Strap (1x) 2-Zip Strips (6x) 3-Zip Strips (9x) Wheel strap
User s Manual. Model SWTC800. CAUTION: Adult Assembly Required
 User s Manual Model SWTC800 CAUTION: Adult Assembly Required Model SWTC800...3...4...4...5...6.........8...9...10-11 Part Identification Chart... 12 Exploded Drawing and Parts List...13-14 Ordering Replacement
COPY. **For U.S. and Canada Customers ONLY:** IF ASSISTANCE IS NEEDED,
 MODEL #73729 WARNING Failure to comply with any of the warnings in these instructions may result in serious personal injuries such as cuts, broken bones, nerve damage, paralysis, brain injury, or death.
INDOOR CYCLING BIKE SF-B1110 USER MANUAL
 INDOOR CYCLING BIKE SF-B1110 USER MANUAL IMPORTANT! Read all instructions carefully before using this product. Retain owner s manual for future reference. For customer service, please contact: support@sunnyhealthfitness.com
Instruction Manual for ZY-021 Height adjustable Acrylic Backboard with Chain net
 Instruction Manual for ZY-021 Height adjustable Acrylic Backboard with Chain net WARNING: IMPROPER INSTALLATION OR SWINGING ON THE RING MAY CAUSE SERIOUS INJURY OR DEATH Notice to assemblers: All basketball
MARINE CORPS INSTITUTE INSPECTION AND REPAIR OF THE M9 PISTOL
 MARINE CORPS INSTITUTE INSPECTION AND REPAIR OF THE M9 PISTOL MARINE BARRACKS WASHINGTON, DC Table of Contents Page Contents... Navigation Instructions... i iii Chapter 1 Disassembly and Assembly of the
PF30 Inspection & Maintenance Manual
 PF30 Inspection & Maintenance Manual Version 1.4 (September 2011) 1 Contents 1. Warning!!!!!!!!!! 3 2. Terminology! Figure 1: POWERFAN PF30 and Drope!!!! 4! Figure 2: POWERFAN PF30 with belt guard retracted!!