INTERNATIONAL ASSOCIATION OF ATHLETICS FEDERATIONS. Run! Jump! Throw! The Official IAAF Guide to Teaching Athletics
|
|
|
- Silvester Gray
- 6 years ago
- Views:
Transcription
1 INTERNATIONAL ASSOCIATION OF ATHLETICS FEDERATIONS Run! Jump! Throw! The Official IAAF Guide to Teaching Athletics
2
3 INTERNATIONAL ASSOCIATION OF ATHLETICS FEDERATIONS Run! Jump! Throw! The Official IAAF Guide to Teaching Athletics IAAF Coaches Education and Certification System
4 The International Association of Athletics Federations 2009 Any section of this book may be photocopied for non-profit teaching purposes within educational institutions or coach education settings provided that the original IAAF source is visibly and prominently quoted. Apart from these specific permissions, no part of this book may be included in any publication, magazine, newsletter, journal or stored in a retrieval system or transmitted in any form, or by any means, electronic, mechanical, photocopying, recording or otherwise without the prior written permission of the International Association of Athletics Federations. Source publication Run! Jump! Throw!, IAAF 1996 Authors: Harald Müller and Wolfgang Ritzdorf Editor: Bill Glad This edition edited and authored by Peter Thompson Technical Photosequences: Charles Gozzoli High Resolution Photo Images: Getty Images Graphic Design and Layout by Britta Sendlhofer, Descartes Publishing Printed by Warners Midlands plc, The Maltings, Manor Lane, Bourne, Lincolnshire PE10 9PH, UK
5 Run! Jump! Throw! The Official IAAF Guide to Teaching Athletics CONTENTS President s Message 1 Foreword 1 Acknowledgements 2 RUN Fundamentals of Running 5 Sprints 11 Crouch Start 21 Middle and Long Distance Running 33 Relays 45 Hurdles 61 Steeplechase 73 Race Walking 83 JUMP Fundamentals of Jumping 97 Long Jump 103 Triple Jump 115 High Jump 125 Pole Vault 137 THROW Fundamentals of Throwing 153 Javelin 161 Shot - Linear 177 Shot - Rotational 191 Discus 207 Hammer 223 Run, Jump & THROW Combined Events 241
6

7 FOREWORD 1 President s message I am very pleased to welcome the publication of the latest edition of Run! Jump! Throw! - the official IAAF guide to teaching athletics. I am convinced that this book, which has already served the sport well, will have a very positive impact in this new, updated and simplified practical format. It is evident that the work of qualified coaches is vital for the development of athletics in all countries. It is also clear that the coach working in schools, clubs and other local organisations plays a key role in the identification, motivation and development of those athletes who go on to become champions. For this reason, the education of coaches has been an important and ongoing goal of the Development Programme of the IAAF since I would like to thank the main authors for their experienced input and conscientious work. I also would like to thank the specialists and consultants from all over the world for their contribution to this important publication and to the whole programme in general. Finally, I would like to express my gratitude to the Member Services Department as well as the lecturers and the coaches for their contribution to the success of the IAAF Coaches Education and Certification System. Lamine Diack, IAAF President FOREWORD This book was originally written because time and time again the coach-lecturers who were educating new coaches needed it. But, when they searched for such a book they came up empty-handed. In addition, many sports students desperately want a simple guide to the techniques of athletics that they can take out and use in schools and on the training track. As coaches gain experience they know that an easy-to-use reference would be invaluable as a quick review of the basics before coaching an event which they had perhaps been away from for a while. The IAAF Development Programme and the Coaches Education and Certification System (CECS) in 1991 produced the publication entitled Techniques of Athletics and Teaching Progressions to fill this need. Coaches felt that this book was a big step in the right direction and it was used by all IAAF Level I Lecturers. The authors of this text, with the support of many experts from around the world, have updated the original publications to produce Run! Jump! Throw!, the book you are now holding. In this most recent version, Charles Gozzoli has brought the book to life by adding photograph sequences to accompany the old line drawings and for the text, Peter Thompson has edited and updated the material, adding the text boxes for Coaches should, Help athletes to and the teaching progressions Tips. The IAAF s aim is to provide what coaches need and what the contributors believe new and experienced coaches around the world want enough guidance to allow them to get on with their work and learn by doing. Run! Jump! Throw! does just that in a clear, user-friendly format. Now, when you search for such a book, it will be there. Work on the contents of Run! Jump! Throw! started from the premise that to teach and refine athletic technique properly coaches need the following four things: An understanding of the key points for teaching and learning the event A technical model for their athletes to emulate The ability to analyse technique themselves A programme of activities through which their athletes can learn and develop the desired technique.
8 2 Acknowledgements Run! Jump! Throw! is divided into three main sections, each covering one of the event groups which make up the title. The main sections start with a very brief review of the fundamentals of the event group. These include the most important points of basic theory - the common aims, the key biomechanical principles and an overview of the phase structures the basic exercises, teaching tips and examples of games which help to introduce the skills demanded by the events in the group. The running events section also features a brief overview of training for middle and long distance running. The bulk of each section is taken up by visual descriptions of the techniques of the events in the group. These start with an overview of the whole sequence. Then the models are broken down into constituent parts or phases, each of which is presented on the same page as the objectives of the phase and key technical characteristics for the coach to observe and control. Additionally, text boxes provide some of the principal points the coaches should act on, and what they should be helping athletes to achieve. We believe that this format is unique in coaching literature and that coaches of all experience levels will find it easy to apply the information in practice. Each technical model is followed immediately by a teaching progression of steps by which a beginner, guided by the coach, can learn the event. Again, in addition to visual information, the objective of each step and other key points are given, along with Tips to assist practice. The authors are aware that the phase breakdown and the teaching progressions of some events might be contentious and the IAAF does not mean to imply that those that are presented are the only ones that are correct. However, the reasonable and orthodox models that have been selected give coaches valuable tools that they can work with immediately, effectively and safely. This, in our opinion, is far better than leaving them to the time consuming and haphazard task of creating their own models, unguided. If and when an experienced coach finds the need to develop a new analysis or teaching steps for an event, we hope that what we have presented here will be seen as a starting point. Finally, the IAAF gratefully welcome any comments which might help to improve future editions of this book. These should be directed to the Member Services Department at the IAAF Headquarters, 17 rue Princesse Florestine, BP 359, MC98007 Monaco. ACKNOWLEDGEMENTS The completion of this book was made easier by the work and assistance of a great many expert colleagues around the world. In particular, the IAAF would like to acknowledge the valuable leadership and authorship of: Harald Müller (GER), Wolfgang Ritzdorf (GER), Peter Thompson (GBR), Charles Gozzoli (FRA). Additionally, acknowledgement is made, in alphabetical order and not in order of contribution, of the following individuals: Jim Alford (GBR), Oscar Gadea (URU), Bill Glad (USA), Sergio Guarda (CHI), Herbert Hopf (GER), Guenter Lange (GER), Elio Locatelli (ITA), Victor Lopez (PUR), El Hebil Abdel Malek (MAR), Fletcher McEwen (AUS), Brian Mondschein (USA), Ralph Mouchbahani (GER), Rotimi Obajimi (NIG), Tahar Righi (ALG), Joel Severe (MRI), Debbie Strange (NZL), John Velzian (KEN), Jorge Vieira (POR), Björn Wangemann (GER).
9 INTERNATIONAL ASSOCIATION OF ATHLETICS FEDERATIONS RUN! IAAF Coaches Education and Certification System

10 4 RUNS FUNDAMENTALS OF RUNNING
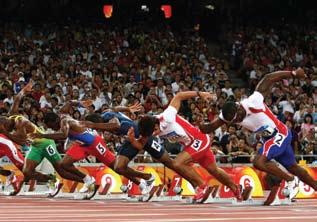
11 FUNDAMENTALS OF RUNNING runs 5 FUNDAMENTALS OF RUNNING 1. INTRODUCTION The running events are sometimes described as non-technical, mainly because running is a natural activity which appears relatively simple when compared to the Pole Vault or the Hammer Throw. However, there is nothing simple about any of the running events. The relative emphasis of speed and endurance dictated by the distance of the race, the crouch start in the sprints, the exchanges in the relays and the presence of barriers in the hurdling and steeplechase races all make technical demands for which athletes must be prepared. Note: For the purpose of this book, Race Walking has been grouped together with the running events. The rules and technique of Race Walking are, of course, very different and a detailed explanation of these differences is given in the Race Walking section. Aims The fundamental goal in all running events is to maximise average running speed over the course of the race. To achieve this aim in the sprint events the athlete must focus on reaching and maintaining maximum velocity. In the hurdle events the focus is the same with the added requirement of clearing the hurdles. In the longer events optimising the distribution of effort is of primary importance. Biomechanical Aspects An athlete s running velocity is determined by stride length and stride frequency. Optimal stride length is largely determined by the physical characteristics of the athlete and by the force he or she exerts on each stride. This force is influenced by the athlete s strength, power and mobility. Optimal stride frequency is dependent on the athlete s running mechanics, technique and coordination. Specific endurance and tactics are, of course, important to the overall speed of a race, though from the sprints to the ultra-distances the degree of importance varies. Movement Structure Each running stride comprises a support phase and a flight phase. These can be broken down into front support and drive phases for the support leg and front swinging and recovery phases for the free leg. The two parts of the support phase are of critical importance. In the front support phase there is actually a deceleration of the forward motion of the athlete s body. This must be minimised by (a) an active landing on the ball of the foot and (b) a pawing action of the foot, particularly in sprinting. During this phase energy is stored in the muscles as the leg bends to absorb the shock of landing - a process known as amortisation. The drive phase is the only part of the stride that accelerates the body. The athlete s aim is to direct the greatest amount of force into the ground in the shortest possible time. This force is created by contractions of the leg muscles and the release of the stored energy in the muscles and tendons as the leg extends. To achieve maximum acceleration from each stride it is essential that there is full extension of the ankle, knee and hip joints in combination with an active swing of the free leg and the powerful drive of the arms.
12 6 RUNS FUNDAMENTALS OF RUNNING 2. TEACHING RUNNING TECHNIQUE Running technique can be taught by introducing the key skills that are related to the elements of all sprint races: reaction, acceleration, maximum speed and speed maintenance. As there is no way to train all elements at once, a variety of exercises and drills focussing on specific aspects are used. Points to Emphasise: Improving reaction (using various starting signals and starting positions, such as lying, sitting, standing). Increasing stride frequency (by working on a high knee action and shortening the pendulum of the free leg). Optimising stride length (by working on the extension of the support leg). Additional exercises and drills focusing on: - a dorsiflexed, toe up ankle at all times - the active, clawing action of the feet - full body extension - powerful but relaxed arm action. A wide variety of games involving running and hurdling. Points to Remember: Use a variety of exercises and drills Maximum effort sprints over various distances Never work on maximum speed when fatigued Most, if not all, of the foot contact will be on the forefoot. Note: The strength and endurance capacities of youngsters are not fully developed. Therefore, exercises and load levels must be carefully considered and set to meet the ability and requirements of the individual. 3. SKILL AND CONDITIONING EXERCISES Basic exercises and drills should be part of almost every training session, particularly for sprinters. They should be carried out after the general warm-up and active mobilisation exercises and should require about 10 minutes. The combined total of repetitions for all the different exercises used in a session should be


13 FUNDAMENTALS OF RUNNING runs 7 Basic Exercise 1: Heel Kick-up Drill Loading: 1 rep = metres. Basic Exercise 2: Ankling Drill Loading: 1 rep = 15 metres. Basic Exercise 3: High-knee Drill Loading: 1 rep = metres. Basic Exercise 4: High-knee with Extension Note: Clawing action of the foot; simultaneous with extension of the knee joint of the free leg. Loading: 1 rep = metres.
14 8 RUNS FUNDAMENTALS OF RUNNING Exercise Group 1: Combinations and variations Basic exercises with one leg then change leg for second repetition. High-knee three running strides Heel Kick-up three running strides High-knee etc. High-knee Heel Kick-up three running strides High-knee Heel kick-up - etc. Loading: 1 rep = metres. Exercise Group 2: Combinations and transitions From Ankling to High-knee. From High-knee to sprinting. From Heel Kick-up to sprinting. From High-knee with Extension to sprinting. Loading: 1 rep = metres. Exercise Group 3: Arm Action Fix arms by grasping the hips. Accelerate for 20 metres, keeping arms fixed. Release arms then sprint normally. Hold hands up. Accelerate for 20 metres. Drop arms then sprint normally. Loading: 1 rep = metres. Exercise Group 4: Ins and outs Accelerate for 10 metres float for metres accelerate for 10 metres float for metres - etc. Up to a maximum of 100 metres.
15 FUNDAMENTALS OF RUNNING runs 9 4. GAMES Sprint Game 15m-20m A tyre or hoop is placed at the far end of each team s course. The runners sprint to the tyre and slip through it before starting the next runner with a hand clap. Variation: All runners start together and slip through the tyre before sprinting back to the starting point together. Relay Game 20m-25 m Teams run easily in single file around two turning marks. The first runner of each team carries a baton. On an agreed signal he/she sprints away from the rest of the team and follows the course until reaching the last runner of his/her team. The baton is handed over and passed forward to the new leader who sprints away, etc. Variation: Run to music.
16 10 RUNS Fundamentals of Running 4. GAMES (continued) Hurdle Game Each team is given a pile of cardboard boxes. Marks are placed showing the points to which the boxes must be carried. The first runner carries his/her box to the first mark, returns and sends off the next runner with a hand slap. The second runner carries his/her box to the second mark, etc. The first round is finished when all the boxes have been distributed. In the following rounds the boxes are used as hurdles. Shuttle and turning relays are possible. In the last round the boxes are collected one by one and returned to the start. Note: The marks should be positioned in such a way that the boxes can be run over with a specific rhythm ( one-stride rhythm, twostride rhythm etc.). Variation: Cones can be set out instead of marks. In the first round the runners place rings over the cones. In the following rounds the runners hurdle the cones/rings. Endurance Game Runners must complete a prescribed number of laps on a metre cross country course. Each lap is interrupted by a throwing station. Runners are allowed to continue only when they hit the target. Runners who fail to hit the target after three throws must run a penalty lap. Variation: Run in teams. The team can only continue when all members have hit the target or completed the penalty lap.

17 Fundamentals of Running SPRINTS runs 11

18 12 RUNS SPRINTS
 and a flight phase (which can be divided into a front swinging phase and a recovery")
 while the other leg bends and")
19 SPRINTS Whole Sequence runs 13 SUPPORT FLIGHT SUPPORT Sprints Whole Sequence Phase Description Each stride comprises a support phase (which can be divided into a front support phase and a drive phase) and a flight phase (which can be divided into a front swinging phase and a recovery phase). z is decelerated (front support) then In the support phase the sprinter s body accelerated (drive). In the flight phase the free leg swings ahead of the sprinter s body and extends for the touchdown (front swing) while the other leg bends and swings to the sprinter s body (recovery).
20 14 RUNS SPRINTS Technique SUPPORT FLIGHT SUPPORT Support PHASE Front Support FRONT SUPPORT DRIVE Coaches should: Objective To minimise deceleration at touchdown and to maximise forward drive. Technical characteristics Landing is on the ball of the foot. (1) Knee bend of the support leg is minimal during amortization; the swing leg is doubled up. (2) Hip, knee and ankle joints of the support leg are strongly extended at take off. Thigh of the swing leg rises quickly towards a horizontal position. (3) Help athletes to:
 Knee bend of the support leg is minimal during amortization; the swing leg is doubled up.")
21 Sprints Technique runs 15 SUPPORT FLIGHT SUPPORT Support PHASE Drive FRONT SUPPORT DRIVE Coaches should: Objective To minimise deceleration at touchdown and to maximize forward drive. Technical characteristics Landing is on the ball of the foot. (1) Knee bend of the support leg is minimal during amortization; the swing leg is doubled up. (2) Hip, knee and ankle joints of the support leg are strongly extended at take off. Thigh of the swing leg rises quickly towards a horizontal position. (3) Help athletes to:
22 16 RUNS SPRINTS Technique SUPPORT FLIGHT SUPPORT Flight PHASE Recovery Coaches should: Objective To maximise the forward drive and to prepare for an effective foot plant at touchdown. Technical characteristics Knee of the swing leg moves forwards and upwards (to continue the drive and increase stride length). (1) Knee of the support leg flexes markedly in the recovery phase (to achieve a short pendulum). (2) Arm swing is active but relaxed. Next support leg sweeps backwards (to minimise the braking action at touchdown). (3) Help athletes to:
23 Sprints Technique runs 17 SUPPORT FLIGHT SUPPORT Flight PHASE Front Swinging Coaches should: Objective To maximise the forward drive and to prepare for an effective foot plant at touchdown. Technical characteristics Knee of the swing leg moves forwards and upwards (to continue the drive and increase stride length). (1) Knee of the support leg flexes markedly in the recovery phase (to achieve a short pendulum). (2) Arm swing is active but relaxed. Next support leg sweeps backwards (to minimise the braking action at touchdown). (3) Help athletes to:
24 18 RUNS SPRINTS Teaching Progression STEP 1 Basic EXERCISES Objectives: To develop basic running skills. Tips: Use the basic exercises to complete the warm-up: Ankling High Knees Heel Kick-up High Knees with extension STEP 2 BASIC DRILLS Objectives: To develop sprinting skills and coordination. Combinations and Variations. Combinations and Transitions to sprinting (see figure). Arm Action Drills. Ins and Outs. Tips: STEP 3 ResiStance runs Objectives: To develop the drive phase and specific strength Tips: Use the resistance of a partner or an implement. Do not exaggerate the resistance. Ensure full extension of support leg and short ground contacts.
25 SPRINTS Teaching Progression runs 19 STEP 4 pursuit runs Objectives: To develop reaction speed and acceleration. Tips: Use a stick or a rope (1.5 m). Jog in line. Front runner releases the stick (or rope) to initiate the pursuit. STEP 5 acceleration runs Objectives: To develop acceleration and maximum speed. Tips: 20 m 6 m Mark a 6 m zone. One partner waits at the end of the zone. Accelerate when the incoming partner enters the zone. STEP 6 FLYING to 30 METRES SPRINT Objectives: To develop maximum speed. Tips: 20m 30m Mark a zone of 20m to 30m depending on the developmental age and experience of the athletes. Always use 30 m approach with maximal accelertion. Run through the zone at maximum speed.
26 20 RUNS RUNS
27 Crouch Start runs 21

28 22 RUNS Crouch Start


29 Crouch Start Whole Sequence runs 23 ON YOUR MARKS SET DRIVE ACCELERATION Crouch Start Whole Sequence Phase Description The Crouch Start is divided into four phases: ON YOUR MARKS position, SET position, DRIVE and ACCELERATION. z has set the blocks and assumed the initial In the on your marks position the sprinter position. In the set position the sprinter has moved z to an optimal starting position. z In the drive phase the sprinter leaves the blocks and takes the first strides. z In the acceleration phase the sprinter increases speed and makes the transition to the running action.


30 24 RUNS Crouch Start Technique ON YOUR MARKS SET DRIVE ACCELERATION Block placement and ADJUSTMENT Objective To set the starting blocks to suit the sprinter s size and ability. Technical characteristics Front block is placed 1½ foot lengths behind the starting line. Rear block is placed 1½ foot lengths behind the front block. Front block is usually set flatter. Rear block is usually set steeper.

31 Crouch Start Technique runs 25 ON YOUR MARKS SET DRIVE ACCELERATION ON YOUR MARKS Position Coaches should: Objective To assume an appropriate initial position. Technical characteristics Both feet are in contact with the ground. Knee of the rear leg rests on the ground. Hands are placed on the ground, slightly more than shoulder-width apart, the fingers are arched. Head is in level with the back, eyes are looking straight down. Help athletes to:


32 26 RUNS Crouch Start Technique ON YOUR MARKS SET DRIVE ACCELERATION SET POSITION Coaches should: 90 Objective To move into and hold an optimal starting position. Technical characteristics Heels press backwards. Knee of the front leg is at a 90 angle. Knee of the rear leg is at a angle. Hips are slightly higher than the shoulders, the trunk is inclined forward. Shoulders are slightly ahead of the hands. Help athletes to:


33 Crouch Start Technique runs 27 ON YOUR MARKS SET DRIVE ACCELERATION Drive Phase Coaches should: Objective To leave the blocks and to prepare for the first stride. Technical characteristics Trunk straightens and lifts as both feet press hard against the blocks. Hands lift from the ground together then swing alternately. Push of the rear leg is hard/short, the front leg s push is a little less hard but longer. Rear leg moves forwards rapidly while the body leans forwards. Knee and hip are extended during the drive. Help athletes to:


34 28 RUNS Crouch Start Technique ON YOUR MARKS SET DRIVE ACCELERATION Acceleration PHASE Coaches should: Objective To increase velocity and to make an efficient transition to the sprinting action. Technical characteristics Front foot is placed quickly onto the ball of the foot for the first stride. Forward lean is maintained. Lower legs are kept parallel to the ground during recovery. Stride length and stride frequency increase with each stride. Trunk straightens gradually after 20-30m. Help athletes to:

35 Crouch Start Technique runs 29
.")
 (2) (3) Tips: Objectives: To practise raising the trunk and accelerating. Falling start without command.")
36 30 RUNS Crouch Start Teaching Progression STEP 1 Starts from different positions Objectives: To improve concentration and acceleration. Tips: On a signal move into running position and accelerate quickly. Can be performed individually or in pairs (one athlete chases the other). STEP 2 standing start from a signal Objectives: To develop concentration and reaction. Tips: Use a variety of starting signals: audible, visual and tactile. STEP 3 Standing STart Variations (1) (2) (3) Tips: Objectives: To practise raising the trunk and accelerating. Falling start without command. (1) Standing start from a forward leaning position. (2) Standing start from 3 or 4 point stances. (3)

37 Crouch Start Teaching Progression runs 31 STEP 4 On your marks position Objectives: To introduce the on your marks position. Place and adjust the starting blocks. Explain and demonstrate key elements of the initial position. Practise with correction by coach or partner. Tips: STEP 5 Set position Objectives: To introduce the set position. Tips: Explain and demonstrate the set position. Practise the change between on your marks and set positions without starting. Correction by coach or partner. STEP 6 Whole Sequence Objectives: To link the phases as a complete sequence. Start and sprint 10m - 30m without command and with command. Use different lanes, straight and bend starts, with and without opponents. Vary duration slightly between set and the gun. Tips:
38 32 RUNS RUNS

39 runs 33 Middle & Long Distance

40 34 RUNS Middle & Long Distance

41 Middle & Long Distance Whole Sequence runs 35 SUPPORT FLIGHT SUPPORT Middle & Long Distance Running Whole Sequence Phase Description The structure of a middle and long distance stride is similar to a sprint stride with the following differences: z running pace. Foot position at touchdown varies with the z Free leg swings forwards with an open knee angle (the lower leg nearly parallel to the ground). z Extension of the hip, leg and foot in the drive phase can be complete (middle distance) or incomplete (long distance). z Knee lift is lower. Arm movement is less pronounced.
42 36 RUNS Middle & Long Distance Technique SUPPORT FLIGHT SUPPORT LEFT FOOT Foot placement Heel Strike Toe-Off Objective To achieve an efficient foot action. Technical characteristics Each athlete will have their individual foot placement. In general: Outside of the heel strikes first in longer, slower races. (1-3) Middle or the forefoot strikes first in shorter, faster races. (4) Foot rolls over and off the tip of the shoe for toe-off. (5) Coaches should: Help athletes to:


43 Middle & Long Distance Technique runs 37 SUPPORT FLIGHT SUPPORT Standing Start Coaches should: Objective To start effectively from a standing position. Technical characteristics Front foot is placed up to the line with the other foot about shoulderwidth behind. Weight is over the front foot. Arms are in position to synchronise immediately with the legs. Drive is off the front foot. Help athletes to:
44 38 RUNS Middle & Long Distance Training TRAINING FOR MIDDLE & LONG DISTANCE Middle and long distance runners, and all athletes, must develop general endurance as well as the endurance which is specific to the energy demands of their event. This endurance comes from correctly developing the energy systems. The training that is described in this section is also suitable for the race walking events. There are three metabolic energy systems operating in our bodies. These energy systems operate continuously and it is how long and how hard we do whatever physical activity that determines which system contributes most. The longer the race the greater the emphasis on aerobic endurance, the shorter the race the greater the emphasis shifts to the lactate system endurance. TIME 0 sec 10 sec 3 min 2 hrs + ATP-CP SYSTEM LACTATE SYSTEM AEROBIC SYSTEM P.J. L. Thompson, 2005 Middle and Long Distance Running and Walking The most important types of running training for middle and long distance runners are: z Continuous Training: Running without rest. Continuous training may be used to develop general endurance, specific endurance and for recovery. It usually takes place away from the track and provides a variety of pace, location and running surface in the athlete s training. Runs may be short, medium or long but it should be remembered that long and short are relative to the stage of development of the athlete and their fitness levels. The same distance might be a short run for one athlete and a long run for another athlete. The other type of continuous training which may be used throughout the year is Fartlek training, where the athlete plays with a variety of running speeds or rhythms. z Repetition Training: Repetition training is breaking a total distance into smaller units which are repeated, hence repetitions, where the pace, distance and rest/recovery intervals and activity are prescribed. Usually done on the track but may be done in a park on grass or anywhere. Repetition training can be divided into two main types by pace or running rhythm: extensive and intensive. When the training emphasis is on general endurance, extensive repetition training is used; when the emphasis is on event specific endurance, particularly for the middle distance events, intensive repetition training is used. Continuous and repetition training loads are usually defined by the following parameters: z Pace, rhythm or running speed (min/km, min/mile, seconds per 400m lap, etc.) z Volume can be described by the running distance (m, km, miles) or the running time (sec, min, hours) or by the number of repetitions or number of sets of repetitions. z Rest/Recovery is the time, or interval, between different repetitions or sets of repetitions (sec, min or distance). Developing General Endurance General endurance is developed mainly through continuous training, extensive repetition training and fartlek training. The pace used for these methods should be based on the athlete s running rhythms. These methods should be applied throughout the training year using the following guidelines: Note: Continuous training runs should also be used throughout the year for recovery and regeneration. z Slow Continuous Runs (Goal: recovery and regeneration) Pace: Easy rhythm; Volume: up to 30 minutes; Rest: not applicable.
45 Middle & Long Distance Training runs 39 z Long Slow Distance Runs (Goal: general endurance) Pace: Marathon rhythm and slower; Volume: minutes; Rest: not applicable. z Medium Continuous Runs (Goal: general endurance) Pace: Half-Marathon to Marathon rhythm; Volume: minutes; Rest: not applicable. z Fast Continuous Runs (Goal: general endurance) Pace: 10 Km to Half-Marathon rhythm; Volume: up to minutes; Rest: not applicable. z Fartlek Runs (Goal: aerobic and lactate system endurance) Pace: rhythmic speed-play ; Volume: minutes, increases with the competition distance; Rest: not applicable but the easier sections should still be active running. z Extensive Repetition Training (Goal: emphasise aerobic endurance) Pace: 3000m to 10,000m rhythm; Volume: increases with the competition distance; Rest: depends on the individual runs in the sessions (see sample sessions). Sample extensive repetition sessions: a) 2 x 10 x 200 m (3000m pace) [between reps = to running time, between sets: 5 min] b) 15 x 400 m (5000m pace) [between reps = to running time] c) 1 min, 2 min, 3 min, 2 min, 1 min (10,000m pace) [between runs = to running time] Note: When using extensive repetition training the coach must monitor the pace carefully to ensure it stays at the prescribed rhyth. Running too fast during extensive repetition training is a common mistake. Repetition training may also be divided into two main types according to the recovery activity that takes place during the intervals, the time between the faster repetition sections. In standard Repetition Training the rest period between repetitions and sets may be passive, walking or easy running. But in the New Interval Training, which is used because of its effectiveness in developing both the aerobic and lactate energy systems, the recovery in the intervals is a very active roll-on, running recovery. This roll-on, active running recovery will depend on the fitness and experience of the athlete. For an experienced athlete a 100m roll-on recovery, for example, is frequently less than seconds. New interval training, then, is a specific type of repetition training where the training effect occurs in the interval between the faster sections. Only repetition training that has the training effect taking place in the interval should be called interval training. To compare a classic repetition session of 15 x 400 (3000m pace) [90 secs] with new interval training: Examples of new interval training sessions based on a classic repetition session: a) 15 x 400 (5000m pace) [100m roll-on] b) 3 x 5 x 400 (3000m pace) [100m roll-on & 3 mins] c) 3 x 5 x 400 (5000m, 3000m, 5000m, 1500m, 5000m) [100m roll-on & 800m roll-on]. All repetition training can, therefore, be varied by: z Repetitions The total number of repetitions in a session - may be divided into sets. z Duration Length of time or distance of one repetition z Intensity Rhythm, pace, speed or velocity of the repetitions z Recovery Time of the intervals between repetitions and sets z Recovery activity From a walk to easy running or more active running, as in new interval training. Pace for Endurance Training Coaches use pace in planning endurance training. It means, The running rhythm the athlete would use if they were racing that distance today - not their personal best. Pace can be used as a guide for an athlete s running rhythms for either their continuous on repetition training. 3000m pace means the running rhythm for this repetition will be the same rhythm as the athlete would have used mid-race if they had been racing in a 3000m race that day. Coaches planning training for running sessions should avoid using target times for most of the year for their athlete s repetition training because these targets do not reflect actual running rhythm. For example, an 82 seconds time for 400m might be an easy effort for an athlete on a day when they are fresh. The same time of 82 seconds may feel much harder, be a different rhythm and produce a different physiological response for that same athlete, if the athlete is very fatigued.
46 40 RUNS Middle & Long Distance Training To give another example, 800m pace means the running rhythm for the repetition will be the same rhythm as the athlete would have used if they had been racing an 800m race that day, the day of the actual training. This should be their 800m mid-race rhythm and not their 800m finishing pace. We do not use, for example, a 36 seconds time for 200m since this might be an easy effort for an athlete on a day when they are fresh. The same time of 36 seconds may feel much harder and produce a different physiological response, or be unachievable, if the athlete is very fatigued from training, from other things in their life or if the weather is not good through wind, rain and/ or temperature. Using running rhythms and pace means that the speed of the repetitions is adjusted each day to each athlete s fitness and energy levels. With training groups, using target times may fit one or two athletes in the group but not most of the athletes in the group. Using rhythms and pace means that every athlete trains at their individual rhythm and level of performance, developing the fitness that they need. Developing Event Specific Endurance Event specific endurance is developed mainly through intensive repetition training. The pace used for this method should usually be the athlete s running rhythm for that event, but may be based on goal pace, the target time for the competition distance very close to and during the competition period. Note: The most intense intensive repetition training (called acidosis training) leads to high concentrations of acid in the body and should be used carefully, if at all, with younger athletes. z Intensive Repetition Training (Goal: event specific endurance) Pace: Based on event specific rhythm; Volume: increases with the competition distance; Rest: depends on individual efforts in the session: passive, active or, in interval training, very active. Full recovery between sets. Event specific endurance becomes important for athletes in the Specialisation and Performance stages of athlete development when it takes place in the specific preparation phase and competition period. Training Walking and Running all distances and speeds, developing rhythm and gears Walking or Running training with an emphasis on the selected event group Walking or Running training with the introduction of event specific training in the Special Preparation Phase and Competition Period Competition All athletes Race Walk and Run Sprints, Middle and Long Distance Athletes can choose the Race Walks or Middle/Long Distance event groups Athletes can choose to specialise in one or two events Performance IAAF stages of Athlete Development Kids Athletics Multi-Events Event Group Development SPECIALISATION Training Age (years) Optimum Biological Age The emphasis of training and competition during the IAAF stages of Athlete Development Teaching and Training Technique There are two basic technical skills in running, the athlete possessing the movement skills of: 1. a functional and technically efficient biomechanical running action, and 2. an awareness, effective control and expression of running rhythm.
47 Middle & Long Distance Training runs 41 In developing the skill of being aware of and controlling rhythm, experience has shown that athletes of all abilities have a greater or lesser sense of rhythm, just in the same way that some individuals are naturally more musical than others. Experience has also shown that all athletes can develop their sense of rhythm, in the appropriate environment and if it is pactised. The rhythms that coaches use are tied to perceptions related to in-race rhythm, not target times. A group of novice athletes might be set the challenge in training of, I would like you to run at your own rhythm and run a 400m with the first 100m at 10,000m pace, the next 100m at 5000m pace, the next 100m at 3000m pace and the final 100m at 1500m pace. If the athletes do not have the experience to imagine how they would feel at the various distances they can be asked to run each 100m slightly faster than the one before and to finish as they would feel in the middle of a 1500m race. Some coaches are doubtful that athletes can achieve this task and then are subsequently surprised when they observe that the athletes can actually find these gears. Times are recorded but not given during repetitions. They may be given, occasionally, between repetitions since the emphasis is for each athlete to develop a self-awareness of their rhythm. This simple learning task is presented as A (10,000m pace), B (5000m pace), C (3000m pace), D (1500m pace) within a single repetition. Once they have done this, the athletes are asked, in the same session, to run for example 1200m with 100 metres at A, B, C, D, A, B, etc. The most difficult transition is usually from D to A but the athletes quickly learn this. It does not matter so much that the pace they are running at is accurately 10,000m or 3000m but that the differences, finding the gears, are exhibited and practised. The Horwill 4-second Rule, devised by British coach Frank Horwill, states that an athlete who can run, for example, a 1500m in 4:00 (64 seconds/400m) should also be able to run 2:00 for 800m (60 seconds/400m), 3000m in 8:30 (68 seconds/400m), 5000m in 15:00 (72 seconds/400m) and 10,000m in 31:40 (76 seconds/400m). Using the Horwill 4-second Rule we know that 800m, 1500m, 3000m, 5000m, 10,000m paces, and even half-marathon and marathon paces, should all potentially vary by 4 seconds per 400m, or by 1 second per 100m. This small difference is the order of variation we should observe in training. Once athletes can achieve a simple A, B, C, D rhythm practice they can move on to much greater variety over different distances e.g. B, D, A, C, D, etc. They can also practice this variety within and between repetitions during their training (see example c) in new interval training). The teaching of the technical skill of running rhythm has a multi-dimensional response. Not only does it develop technique, it produces the optimal physiological response and may enhance the athlete s mental states. The control of the running is with the athlete and in training and races this is an essential technical and tactical skill. Increasing the Training Load Increasing the training load within an annual training programme, or in successive training years, should be individualised, carefully planned and systematic. The following steps provide a guide: Continuous Runs and Extensive Repetition Training: Step 1: Increase the number of weekly sessions of aerobic emphasis training. Step 2: Increase the volume of some of the training sessions (running distance/duration or number of efforts), maintaining variety and shorter recovery/regeneration runs. Step 3: Increase the pace (while decreasing the running distance/duration or number of efforts). Step 4: Adapt the pace and running rhythms individually. Intensive Repetition Training: Step 1: Increase the volume of a session by adding sets (maintaining the same distance and pace of the efforts in the sets). Step 2: Increase the volume of some sessions by increasing the length of the efforts (maintaining the number and pace). Step 3: Increase the intensity (pace and running rhythm) of the efforts. Step 4: Decrease the rest between efforts or, with new interval training, look for improved speed in roll-on recoveries.
48 42 RUNS Middle & Long Distance Teaching Progression STEP 1 RUNNING DRILLS Objectives: To develop basic running skills and coordination Tips: Perform running drills over 20m-60m Emphasise correct action and frequency of movement: At the end of each drill immediately run out for 20m. Heel Flick High Knees Striding with High Knees STEP 2 STANDING START Objectives: To develop reaction, coordination and acceleration from standing start. Tips: Stand about 2m behind the start line. On your marks, place one foot to the start line Other foot about shoulder width behind. Slight lean forward - weight on front foot. Arms synchronised with legs. At the gun, drive is off the front foot. STEP 3 ResiStance runs Objectives: To develop the drive phase and specific strength. Use the resistance of a partner or an implement. Do not exaggerate the resistance. Ensure full extension of support leg and short ground contacts. Tips:
49 Middle & Long Distance Teaching Progression runs 43 STEP 4 pursuit runs Objectives: To develop reaction speed and acceleration. Use a stick or a rope (1.5 m). Jog in line. Front runner releases the stick (or rope) to initiate the pursuit. Tips: STEP 5 FLYING to 30 METRES SPRINT Objectives: To develop maximum speed. Tips: 10 m - 30 m Mark out an acceleration zone of 30 m and a speed zone of 10 m-30 m. Accelerate maximally from a standing start position to be at maximal speed before the speed zone. Run through speed zone at maximal speed. Allow for full recovery, at least 2 minutes. STEP 6 RUNNING RHYTHM Objectives: To develop changes in running rhythm and control of these changes. Tips: Individual runs. Running rhythms should vary. Example 400m: 100m at 5000m pace, then 100m at 3000m pace, 100m at 1500m pace and 100m at 800m pace mid-race pace not finishing pace. Progress, do same rhythm for 3 laps. Creatively use rhythms to develop gears.
50 44 RUNS RUNS
51 RELAYS runs 45

52 46 RUNS Relays Non-Visual Exchange

53 Relays Non-Visual Exchange Whole Sequence runs 47 PREPARATION ACCELERATION EXCHANGE RELAYS Non-Visual Exchange Whole Sequence Phase Description The non-visual exchange is divided into three phases: Preparation, Acceleration and EXCHANGE. z maintains maximum speed and the outgoing In the preparation phase the incoming runner runner assumes a starting position. In the acceleration phase the runners synchronise z their speed by maintaining maximum speed (incoming runner) and maximising acceleration (outgoing runner). In the exchange phase the baton is passed, with z an appropriate technique, as quickly as possible.
54 48 RUNS Relays Non-Visual Exchange Technique PREPARATION ACCELERATION EXCHANGE Alternate Exchanges Objective To maximise the speed of the baton over 400 metres by minimising the distance run on each lane. Technical characteristics First or leadoff runner carries the baton in the right hand and approaches the second runner from the inside of the lane ( inside exchange ). Second runner receives the baton in the left hand and approaches the third runner from the outside of the lane ( outside exchange ). Third runner receives the baton in the right hand and approaches the fourth or anchor runner from the inside of the lane ( inside exchange ). Fourth runner receives the baton in the left hand.
55 Relays Non-Visual Exchange Technique runs 49 PREPARATION ACCELERATION EXCHANGE ZONES AND CHECK MARKS Objective To make a legal and efficient exchange. Technical characteristics Baton must be exchanged within the 20 m exchange zone. Outgoing runner may wait within the 10 m acceleration zone. Check mark is placed on the ground before the acceleration zone to indicate when the outgoing runner should start. Check mark will usually be foot-lengths from the start of the acceleration zone on the side of the lane upon which the incoming runner will approach.
. To assume a starting position and start at the optimum moment (Outgoing runner).")

56 50 RUNS Relays Non-Visual Exchange Technique PREPARATION ACCELERATION EXCHANGE Alternate Exchanges Coaches should: Objective To maintain maximum speed (Incoming runner). To assume a starting position and start at the optimum moment (Outgoing runner). Technical characteristics Incoming runner approaches at maximum speed. Outgoing runner is positioned on the balls of the feet, knees bent, leaning forward. Outgoing runner looks at the check mark and starts when incoming runner reaches it. Help athletes to:
57 Relays Non-Visual Exchange Technique runs 51 PREPARATION ACCELERATION EXCHANGE Acceleration Phase Coaches should: Objective To maintain maximum speed and give the correct command for exchange (Incoming runner). To accelerate in a controlled manner (Outgoing runner). Technical characteristics Acceleration of the outgoing runner must be consistent. Incoming runner gives a verbal command for the outgoing runner to receive the baton as the exchange distance is approached. Outgoing runner extends the receiving arm backwards (according to the exchange technique used) and the incoming runner reaches forwards. Help athletes to:


58 52 RUNS Relays Non-Visual Exchange Technique PREPARATION ACCELERATION EXCHANGE EXCHANGE Phase Coaches should: Objective To pass the baton safely and quickly. Technical characteristics Incoming runner focuses on the outgoing runner s hand. Incoming runner pushes the baton into the outgoing runner s hand. Outgoing runner grips the baton as soon as contact is felt. Both runners stay on their side of the lane during the exchange. Incoming runner must stay in the lane until all exchanges are completed. Help athletes to:


59 Relays Non-Visual Exchange Technique runs 53 PREPARATION ACCELERATION EXCHANGE Passing Techniques Push Pass Technique Objective To pass the baton safely and quickly. Technical characteristics Outgoing runner s arm is extended backward with the palm of the hand in a vertical position and the thumb pointing downwards. Incoming runner pushes the baton horizontally forward and places the top of the vertically held baton across the palm of the outgoing runner s hand. Distance between runners should be 1m or more. Help athletes to:

60 54 RUNS Relays Non-Visual Exchange Technique PREPARATION ACCELERATION EXCHANGE Passing Techniques Upsweep Technique Coaches should: Objective To pass the baton safely and quickly. Technical characteristics Outgoing runner s hand is extended backward at hip level. Incoming runner moves the baton upwards between the outgoing runner s widely spread thumb and first finger. Distance between runners is 1 m or less. A relatively safe technique

61 Relays Non-Visual Exchange Technique runs 55 PREPARATION ACCELERATION EXCHANGE Exchange Point Objective To exchange the baton at optimum speed. Technical characteristics Runners synchronise their speed within the 30 m of the acceleration and exchange zone. Optimum exchange point for beginners is the middle of the 20 m exchange zone. More experienced athletes should move the exchange point to the optimal part of the exchange zone. Correct check mark and consistent acceleration by the outgoing runner are the keys to a successful exchange.

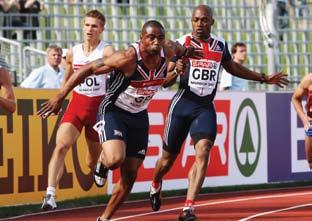
62 56 RUNS Relays Visual Exchange Technique 4 x 400m VISUAL EXCHANGE Objective To ensure a safe and quick exchange of the baton. Technical characteristics Outgoing runner faces the inside of the track and holds the left arm out to receive the baton. Outgoing runner accelerates to match the speed of the incoming runner. Incoming runner holds the baton upright with the right hand and reaches towards the outgoing runner. Outgoing runner takes the baton with the left hand and changes it immediately to the right hand. The main responsibility for an effective exchange in the 4 x 400m Relay is with the outgoing athlete.

63 Relays Visual Exchange Technique runs 57
64 58 RUNS Relays Teaching Progression STEP 1 Introduction to THE Visual Exchange Objectives: To introduce the visual exchange. Tips: Group moves randomly within a 40 m x 40 m area, one baton for every two athletes. Pass batons from the front, side and rear. Work in pairs, practise visual exchanges within a 20 m exchange zone. STEP 2 Introduction to THE non-visual exchange HAND Tips: Objectives: To introduce the non-visual exchange Work in pairs, take it in turn to pass and receive baton at walking then jogging speed. Introduce push pass and upsweep passing techniques. Repeat in groups of four, passing right-left-right-left. STEP 3 Non-visual passes at increased speed Objectives: To adapt passing technique to a higher level of speed. Tips: vertical palm Work in pairs. Pass the baton at a medium to fast speed over m (2-3 repetitions). Use both push pass and upsweep passing techniques.
. Incoming runner approaches at maximal speed.")
65 Relays Teaching Progression runs 59 STEP 4 check mark and starting position Objectives: To introduce the preparation phase of the nonvisual exchange. Tips: Set check mark and practise starts from the starting position. Use various starting positions (standing, then one handed support). Incoming runner approaches at maximal speed. STEP 5 TEST and competition Objectives: To adapt exchange technique to competition speed and conditions Tips: Speed of the baton: Measure the time the baton needs to travel from A to B. (1) Competition in pairs: the faster pairs use the (longer) outside lanes. (2) STEP 6 WHOLE SEQUENCE Objectives: To practice the complete sequence under different conditions. Run teams of four, in different lanes (inside/outside), with and without opponents, with and without handicap. Use shorter distances i.e. 4x50 m or 4x75 m. Tips:
66 60 RUNS RUNS

67 SPRINT Hurdles runs 61

68 62 RUNS Sprint Hurdles
69 Sprint Hurdles Whole Sequence runs 63 Take off CLEARANCE LANDING Sprint Hurdles Whole Sequence Phase Description Sprint hurdling comprises two elements: sprinting between the hurdles and hurdle clearance (which can be broken down into take off, clearance and landing phases). z In the sprinting element the hurdler focuses In the hurdle clearance element the hurdler on repeated three stride accelerations. z minimises the time in the air and prepares for the next running stride.

. Upright body position is achieved earlier than in a sprint start.")
70 64 RUNS Sprint Hurdles Technique Take off CLEARANCE LANDING APPROACH / 3-STRIDE RHYTHM Approach 3-Stride Rhythm Help athletes to: Objective To maximise acceleration to the first hurdle and speed between the hurdles. Technical characteristics Usually eight strides to the first hurdle (take off leg is in the front position in the starting blocks). Upright body position is achieved earlier than in a sprint start. Three strides between the hurdles (short-long-short). High body position between the hurdles.


 (1) Hip, knee and ankle joints of the")
71 Sprint Hurdles Technique runs 65 Take off CLEARANCE LANDING Take off PHASE Coaches should: Objective To establish a trajectory which minimises the height over the hurdle. Technical characteristics High body position for the attack. Drive is more forward than upward. (Run into the hurdle, do not jump) (1) Hip, knee and ankle joints of the support leg are fully extended. Thigh of the lead leg swings rapidly to the horizontal position. Help athletes to:

. Lead leg is actively lowered as quickly as possible after the hurdle.")
72 66 RUNS Sprint Hurdles Technique Take off CLEARANCE LANDING CLEARANCE PHASE General 2 / 3 1 / 3 2 / 3 1 / 3 Objective To minimise the loss of speed and time in the air. Technical characteristics Take off is well in front of the hurdle from the ball of the foot (two thirds of the overall hurdle stride). Lead leg is actively lowered as quickly as possible after the hurdle. Landing is active and on the ball of the foot (no heel contact at touchdown). Coaches should:


 The lean forward of the trunk is more pronounced")

73 Sprint Hurdles Technique runs 67 Take off CLEARANCE LANDING CLEARANCE PHASE Lead Leg Objective To optimise forward lean and to minimise time over the hurdle. Technical characteristics Lower part of the lead leg is actively extended forwards and then downwards in the direction of running. Foot of the lead leg is flexed. (1) The lean forward of the trunk is more pronounced for higher (relative to athlete s height) hurdles, and only what is necessary for lower hurdles. Shoulders remain parallel to the hurdle and facing forwards. Coaches should:

74 68 RUNS Sprint Hurdles Technique Take off CLEARANCE LANDING CLEARANCE PHASE Trail Leg Objective To minimise the height over the hurdle and to prepare for an active landing. Technical characteristics Trail leg is drawn alongside the body. Thigh of the trail leg is roughly parallel to the ground at clearance. Angle between the thigh and lower leg is about 90 or less. Ankle of the trail leg is dorsiflexed markedly. Toe is tilted upward. (1) Knee of the trail leg is kept high as it pulls through. (2) Help athletes to:
 Body should not lean backwards on landing. Trail leg stays tucked until touchdown then it pulls quickly and actively forwards.")
75 Sprint Hurdles Technique runs 69 Take off CLEARANCE LANDING LANDING PHASE Coaches should: Objective To make a fast transition to running. Technical characteristics Landing leg is stiff. Landing is on the ball of the foot. (1) Body should not lean backwards on landing. Trail leg stays tucked until touchdown then it pulls quickly and actively forwards. (2) Contact with the ground is brief, the first stride is aggressive. Help athletes to:


76 70 RUNS Sprint Hurdles Teaching Progression STEP 1 Rhythmic runs Objectives: To introduce the rhythm of the sprint hurdles. Tips: START Use sticks to mark 0.5-1m spaces 6-7 m apart. Use a short approach with either leg to take off. Run over the sticks with 3 strides in between. Do not jump. Distance between canes increases with speed. STEP 2 rhythmic runs over obstacles Objectives: To clear obstacles using the rhythm of the sprint hurdles. Tips: Mark 1.5 m spaces 6-7 m apart. Place small obstacles (i.e. boxes, balls) in the spaces. Run over the spaces with 3 strides in between. STEP 3 RUNS ALONGSIDE THE HURDLE Objectives: To introduce lead and trail leg clearance of hurdles. Tips: Use hurdles of moderate height 7 8 m apart. Run alongside hurdles in 3-stride rhythm. Clear the hurdle with either lead or trail leg.


77 Sprint Hurdles Teaching Progression runs 71 STEP 4 Trail leg Drills Objectives: To improve trail leg action. Tips: Start with exercises standing upright. Add hurdles to get correct height. Proceed to walking and jogging. STEP 5 LEAD AND TRAIL LEG RUNS Objectives: To practise lead and trail leg action together. Tips: Place obstacles or hurdles m apart. Use different heights for lead and trail legs. Clear with either lead or trail leg. STEP 6 Whole Sequence Objectives: To link the whole sequence of sprint hurdling. Place obstacles or hurdles m apart. Use different heights for lead and trail legs. Clear with either lead or trail leg. Tips:
78 72 RUNS RUNS
79 Steeplechase runs 73
80 74 RUNS Steeplechase
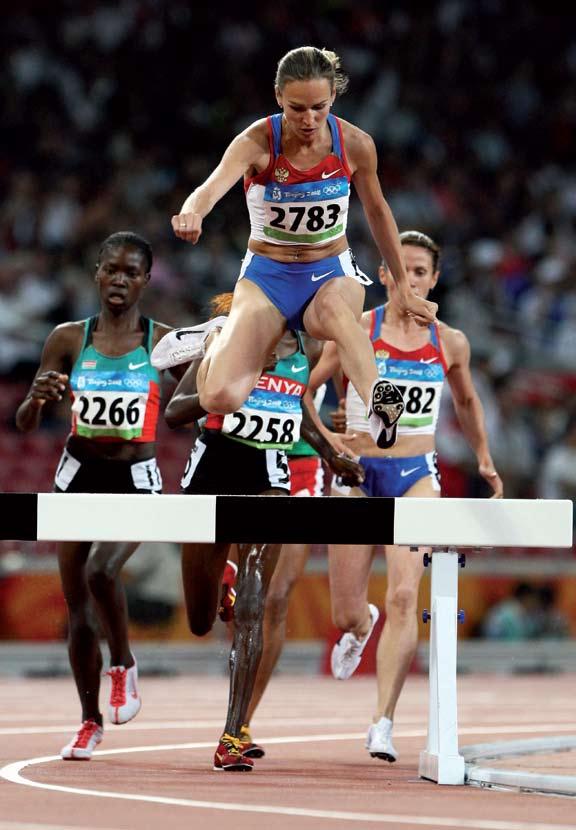
81 Steeplechase Whole Sequence runs 75 Take off CLEARANCE FLIGHT LANDING Steeple Chase Water Jump Phase Description The steeplechase comprises three elements: RUNNING between the barriers, BARRIER clearance (which can be broken down into take off, clearance and landing phases) and water jump CLEARANCE (which can be broken down into take off, clearance, flight and landing phases). z In the Running between the barriers element the runner covers the distance using technique and tactics similar to other middle and long distance races. z In the barrier and water jump clearance phases the runner minimises time in the air and disturbance to the running action. z runner minimises time in the air and the disturbance In the barrier and water jump clearance elements the to the running action. In the barrier and water jump clearance elements the z runner minimises time in the air and the disturbance to the running action.
82 76 RUNS Steeplechase Technique Take off CLEARANCE FLIGHT LANDING WATER JUMP CLEARANCE Take Off Phase Coaches should: Objective To make a smooth transition from running to clearance with minimum loss of speed. Technical characteristics Take off angle is relatively flat. Hip, knee and ankle joints of the support leg are fully extended. Thigh of the lead leg swings quickly to the horizontal position. Help athletes to:
83 Steeplechase Technique runs 77 Take off CLEARANCE FLIGHT LANDING WATER JUMP CLEARANCE Clearance Phase Coaches should: Objective To minimise the time over the barrier. Technical characteristics Athlete either steps on barrier or hurdles the barrier Support leg is well bent. Trunk leans forwards. Touchdown on the barrier is with the middle of the foot. (1) Hurdling requires speed to be maintained Centre of mass stays low throughout. (2) Help athletes to:

84 78 RUNS Steeplechase Technique Take off CLEARANCE FLIGHT LANDING WATER JUMP CLEARANCE Flight and Landing Phases Coaches should: Objective To make a long, flat jump and an immediate transition to running. Technical characteristics Push-off from the barrier is forward and downward. Arms provide balance during the flight. Trunk leans forwards. Support leg is almost fully extended for the touchdown. Free leg drives ahead quickly after landing. Help athletes to:
85 Steeplechase Technique runs 79 Take off CLEARANCE FLIGHT LANDING Barrier CLEARANCE Coaches should: Objective To minimise the time in the air and the loss of speed. Technical characteristics Take off is well in front of the barrier, the distance dependent on the speed. Clearance is low. Lead leg is actively lowered after clearance. Transition to the running stride is quick - running rhythm is maintained. Help athletes to:
86 80 RUNS Steeplechase Teaching Progression STEP 1 Hit THE SPOT Objectives: To learn how to adjust the stride to clear barriers. Tips: Mark a circular course and place low obstacles (boxes) at uneven distances. Run around the course. Adapt the stride length and frequency to clear each obstacle. Maintain the running rhythm STEP 2 STEP TECHNIQUE I Objectives: To introduce basic barrier technique/maintain rhythm before and after. Tips: Clear a barrier with a step technique with minimum 30m approach run and 30m run out. Use a box or boxes for take off according to the stage of learning of the athlete. Do not mark starting spot (so strides must be adjusted each time). STEP 3 STEP TECHNIQUE II Objectives: To master basic barrier technique. Clear 2-3 barriers with step technique with minimum 30m approach run and 30m run out. Increase approach speed to race rhythm. Vary take off leg Tips:

87 Steeplechase Teaching Progression runs 81 STEP 4 HURDLE TECHNIQUE Objectives: To learn the hurdle technique of barrier clearance/maintain rhythm. Tips: 30 m 30 m Hurdle a sequence of 2-3 barriers. Vary take off leg. Increase approach speed to race rhythm before and after the barrier. STEP 5 WATER JUMP TECHNIQUE OVER BARRIER Objectives: To introduce the water jump technique. Tips: 20 m 20 m Clear a barrier as in water jump off a 20 m approach run and land in a sand pit. Maintain rhythm over the barrier and run out of the sand. Check for distance in the landing. Add other athletes. STEP 6 WATER JUMP Whole Sequence Objectives: To master the water jump technique. Tips: Clear water jump off a 30 m approach run and 30 m run out of the pit. Do not mark the starting spot (so strides must be adjusted each time). Maintain rhythm Add other athletes.
88 82 RUNS runs

89 RACE WALKS runs 83

90 84 RUNS race walking
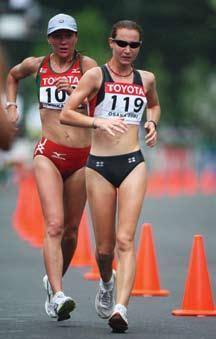
91 Race walking Whole Sequence runs 85 DOUBLE SUPPORT SINGLE SUPPORT DOUBLE SUPPORT SINGLE SUPPORT DOUBLE SUPPORT RACE WALKING Whole Sequence Phase Description Each Race Walking stride comprises a single support phase (which can be divided into front support and rear support phases) and a DOUBLE Support Phase. z The single support phase provides acceleration and includes preparation for planting the foot of the free leg. z The double support phase is necessary in order to maintain ground contact at all times. Definition of Race Walking: Race Walking is a progression of steps so taken that the walker makes contact with the ground, so that no visible (to the human eye) loss of contact occurs. Two basic rules therefore define Race Walking: 1. One foot must be on the ground at all times, the front foot must make contact before the rear foot leaves the ground. 2. The support leg must be straightened (i.e. not bent at the knee) from the moment of first contact with the ground until the vertical upright position.


92 86 RUNS race walking Technique DOUBLE SUPPORT SINGLE SUPPORT DOUBLE SUPPORT SINGLE SUPPORT DOUBLE SUPPORT SINGLE SUPPORT PHASE Rear Support Coaches should: Objective To provide acceleration and to prepare for the double support phase. Technical characteristics Support leg is straight. Support leg remains extended as long as possible. Foot of the support leg points straight ahead and rolls along the outside edge of the sole up to the tip of the toes. Free leg passes the support leg with the knee and the lower leg kept low. Front foot is planted on the heel. Help athletes to:


93 race walking Technique runs 87 DOUBLE SUPPORT SINGLE SUPPORT DOUBLE SUPPORT SINGLE SUPPORT DOUBLE SUPPORT DOUBLE SUPPORT PHASE Coaches should: Objective To link the rear and front support phases. Technical characteristics Front foot lands smoothly on the heel while the rear foot is in a heelup position. Both knees are extended. Arms swing alternately. Help athletes to:


94 88 RUNS race walking Technique DOUBLE SUPPORT SINGLE SUPPORT DOUBLE SUPPORT SINGLE SUPPORT DOUBLE SUPPORT SINGLE SUPPORT PHASE Front Support Coaches should: Objective To minimise the braking forces. Technical characteristics Foot placement of the front leg is active with a backward sweeping motion. Deceleration phase is as short as possible. Knee of the front leg must be extended. Swinging leg passes the support leg with the knee and the lower leg kept low. Help athletes to:
95 race walking Technique runs 89 DOUBLE SUPPORT SINGLE SUPPORT DOUBLE SUPPORT SINGLE SUPPORT DOUBLE SUPPORT FOOT Placement LEFT FOOT LANDING LEFT FOOT TOE-OFF Objective To place feet correctly for achieving optimum stride length. Technical characteristics Feet are placed in a straight line with the toes pointing straight ahead. Touchdown is on the heel and is followed by a rolling movement along outside of sole up to the ball of the foot. Push-off is from the ball of the foot and is followed by a rolling off the tip of the big toe.


96 90 RUNS race walking Technique DOUBLE SUPPORT SINGLE SUPPORT DOUBLE SUPPORT SINGLE SUPPORT DOUBLE SUPPORT HIP MOVEMENT Head should remain on same level Objective To rotate the hips in a manner which ensures proper foot placement and optimum stride length. Technical characteristics Lateral movement of the hips is visible but should not be exaggerated. Hip flexibility is essential.
97 race walking Technique runs 91 DOUBLE SUPPORT SINGLE SUPPORT DOUBLE SUPPORT SINGLE SUPPORT DOUBLE SUPPORT Arm Movement Coaches should: Help athletes to: Objective To conserve forward momentum and balance. Technical characteristics Upper body should remain relaxed. Shoulder drops to counterbalance the drop of the opposite hip. Elbows are carried at approx. 90 angle and kept close to the body. Hands should not move lower than waist level or higher than mid chest height.

98 92 RUNS race walking Teaching Progression STEP 1 Natural Walking Objectives: To introduce the power walking movement. Tips: Introduce the rules and a rough technical model. Walk with gradually increasing tempo, do not break into a run. Stride out comfortably and walk tall with a smooth rhythm for at least 100m. STEP 2 RACE WALKING Objectives: To develop strong rear foot push off and increase stride length. Tips: As for Step 1 but push off harder from the rear foot Turn and stretch the hip and leg forwards on each stride. Maintain contact and straight knee, land with toes up. STEP 3 WALKING THE LINE Objectives: To develop proper hip rotation. (1) Walk on the line (2) Cross over the line As for Step 2 but walk along a line so that each footstep is on the line. Overstride and cross over the line (causes a shift of the weight to the supporting hip after loss of ground contact). Tips:

99 race walking Teaching Progression runs 93 STEP 4 Specific Mobility Exercises Objectives: To develop shoulder and hip flexibility. Tips: Race walk at medium pace with arms out to the side, forward, in a windmill movement. Combine the exercises above, include crossing over the line. STEP 5 VARIED RHYTHM WALKING Objectives: To adapt technique to various speed levels. Tips: Vary rhythm and pace over a distance of 100 m. Combine different arm positions (i.e. 20 m-30 m arms forward, then correct use of arms). Gradually increase the distance of varied rhythm. STEP 6 RACE WALKING OVER DISTANCE Objectives: To maintain technique under conditions of fatigue. Tips: Walk repetitions over at least 400 m. Concentrate on maintaining legal technique rather than speed.
100
101 INTERNATIONAL ASSOCIATION OF ATHLETICS FEDERATIONS JUMP! IAAF Coaches Education and Certification System

102 96 JUMPS Fundamentals of JUMPing
103 FUNDAMENTALS OF JUMPING jumps 97 FUNDAMENTALS OF JUMPING 1. Introduction At first look the four jumping events in athletics might appear very different from each other. From a technical point of view they range from the relatively simple Long Jump through the High Jump and Triple Jump to the apparently complex Pole Vault. There are, however, a number of very important commonalties among the jumps, the understanding of which will help the coach working with athletes in any of the events. Aims The goal in the jumping events is to maximize either the measured distance or height of the athlete s jump. In the Triple Jump, of course, the goal is to maximize the distance of three consecutive jumps while in the Pole Vault the athlete is aided by the use of the pole. Biomechanical Aspects Distance and height of flight are determined mainly by three parameters: (a) velocity at take off, (b) the angle of take off and (c) the height of the centre of mass at take off. Of these, take off velocity and take off angle are generally the most important. The height of the centre of mass is determined by the athlete s body height though it is influenced by the athlete s position at take off. Take off velocity and take off angle are both the result of the actions of the athlete prior to and during take off. So, the take off is of major importance in all jumping events. There are additional factors affecting the height of flight in the Pole Vault. The most important of these are the transfer of energy to the pole during the take off and then the return of that energy from the pole after the take off to provide additional lift to the athlete s body. Once the flight path has been established at take off the measured result can be negatively influenced by, in the case of the High Jump and Pole Vault, ineffective bar clearance or, in the case of the Long and Triple Jump, poor landing technique. Movement Structure The movements of the jumping events can be broken down into four main phases: 1. Approach 2. Take off 3. Flight 4. Landing. In the Triple Jump the take off-flight-landing sequence is repeated three times. In the Pole Vault the four phases apply but the phase structure used by coaches is modified to take into account the additional movements the athlete makes because of the pole. In the approach phase the athlete generates horizontal velocity. In the Long Jump, Triple Jump and Pole Vault of the final result is largely determined by the level of horizontal velocity at take off, therefore, the athlete s objective in the approach phase of these events is to come close to his/her maximum running speed. In the High Jump horizontal velocity plays a lesser part in the final result and the athlete s objective is to find the optimum rather than maximum running speed in the approach. The approach phase also includes preparation for the
104 98 JUMPS Fundamentals of JUMPing take off. It is vital, therefore, that the running speed is appropriate for the athlete s ability to use it in the take off and that the athlete is in control of the speed. The characteristics of a good approach in all the events are: It is fast. It is accurate and consistent. It prepares the athlete for a powerful take off. In the take off phase the flight path of the athlete s body (and thus the maximum distance or height of flight) is determined. Clearly, the take off is of critical importance in all the jumping events. The athlete s objectives in this phase are to (a) ensure that his/her centre of mass is as high as possible at the moment of take off, (b) add the maximum level of vertical velocity to the horizontal velocity generated in the approach and (c) take off at the optimum angle. The optimums for (b) and (c) vary depending on the event and the technique used by the athlete. The characteristics of an effective take off are: The athlete must be tall. The take off foot is planted firmly in a fast, flat pawing action it is not stamped on the ground and there is no bracing action. The knee of the free leg is driven or punched through from the hips. The hip, knee and ankle joints are fully extended. In the flight phase of the Long Jump and the three flight phases of the Triple Jump, the athlete s objectives are to avoid actions that would reduce the distance of the flight path and to position the body for landing. In the flight phase of High Jump and Pole Vault the athlete must avoid reducing the height of the flight path and ensure clearance of the bar. In the Pole Vault the objectives also include maximizing the additional lift available from the pole. In the landing phase of the Long Jump and the final phase of the Triple Jump the athlete s objective is to minimise the loss of distance that occurs after the initial touchdown of the feet. In the first two landings of the Triple Jump the objective is to make the transition to an effective take off into the following phase. The athlete s objective in the landing phase of the High Jump and Pole Vault is land safely and avoid injury. 2. TEACHING JUMPING TECHNIQUE Chaining and shaping methods are both used to teach the jumping events. Concentration should be on the following elements: Take off from a running approach Movements in the flight phase Landing Points to Emphasise: Increased stride frequency at the end of the approach. Active foot plant with the entire sole at take off. Forceful lead leg action at take off. Full extension of the ankle, knee and hip joints at take off.
105 Fundamentals of JUMPing jumps 99 Points to Avoid: A decrease in speed at the end of the approach. Lowering of the centre of mass in preparation for take off. A bracing step with heel contact at take off. Standing jumps. Premature emphasis on the flight phase. Note: Be aware that all jumping exercises involve a high mechanical load on the entire body, especially the foot, ankle and knee joints. Therefore take care to avoid overloading. 3. SKILL AND CONDITIONING EXERCISES Exercise Group 1: General Running Exercises and Drills All exercises and drills described in the Fundamentals of Running are valuable for jumpers. Exercise Group 2: Specific Running Acceleration Runs (all events) - imitation of the approach with or without imitation of take off. Runs with a pole (Pole Vault) including Ankling, Heel Kick-up, High-knee and acceleration runs. Curved Runs (High Jump) slalom runs and J runs (first part straight, second part curving to the left or right) with or without imitation of take off. Loading: Exercise Distance Repetitions Sets Load Level Acceleration Runs m High Runs with the Pole m 3 2 Medium Curved Runs m Medium Exercise Group 3: Bounding (Take off and landing on alternate legs) Bounding from a standing start. Bounding from a short approach. Bounding from a fast approach. Bounding uphill. Bounding for distance (i.e. 5 x 10 bounds as far as possible). Bounding for speed (i.e. 5 x 30 m bounding - timed). Loading: Exercise Distance Repetitions Sets Load Level Bounding from a standing start m Low Bounding from a short approach m Medium Bounding from a fast approach m High Bounding Uphill m Low
106 100 JUMPS Fundamentals of JUMPing Exercise Group 4: Hopping (Take off and landing with the same leg) Note: Hopping produces a higher load than bounding. Always alternate left and right with each alternate repetition. Hopping from a standing start. Hopping from a short approach. Hopping from a fast approach. Hopping up stairs. Hopping for distance or time. Rhythmic hopping (i.e. l l l r r r l l l etc. or l l l r r l l r r l etc.) Loading: Exercise Distance Repetitions Sets Loading Hopping from a standing start m Medium Hopping from a short approach m Medium Hopping from a fast approach m High Rhythmic Hopping m Medium Hopping up stairs m Medium Exercise Group 5: Hurdle Jumps Example: Single leg take off hurdle jump with one step in between and take off leg landing Ankle flips over mini hurdles Double leg hurdle jumps Single leg take off hurdle jumps with one step in between and lead leg landing Single leg take off hurdle jumps with three steps in between and lead leg landing Single leg take off hurdle jumps with one step in between and take off leg landing Single leg take off hurdle jumps with three steps in between and take off leg landing. Loading: Exercise Distance Height Number Reps Sets Loading Ankle flips m cm Low Double legged m cm Medium Single leg take off with lead leg landing Single leg take off with take off leg landing 3-4 m (1 Step) 7-8 m (3 Steps) 3-4 m (1 Step) 7-8 m (3 Steps) cm Medium cm High
107 Fundamentals of JUMPing jumps GAMES Game 1 A variety of boxes and other objects are set up in a marked off area. The athletes move freely within the area jumping over each object as they come to it. The jumping movements can be varied (landing on the take off leg, swing leg or both legs). Game 2 An obstacle course is set up around a square area. A number of hunters are designated. Their task is to capture the other athletes. Captured athletes must run a lap of the obstacle course before being allowed back inside the square. The goal of the hunters is to get all the other athletes out of the square at the same time. Note: The duration of this exhausting task must be limited to a number of rounds. A new team of hunters is designated, for each new round. Game 3 An obstacle course is set up for each team. The members of each team are split into two groups which are positioned at opposite ends of the course. The first runner completes the course and starts the starts the second runner with a hand slap, etc. The race is over when all runners are back to their original position. Variation: Running over obstacles in one direction and sprint on the flat in the opposite direction. Make the obstacles higher from jump to jump.
108 102 JUMPS Fundamentals of JUMPing Game 4 Two teams start at the opposite end of a double course. The teams try to catch up with each other. The race is won when a member of one team touches the back of a runner from the other team. 5. SAFETY AND ORGANISATION It is important to ensure that all approach areas are safe, particularly at take off points. Landing pits should be dug over before use and cleared of rocks and debris. They should also be dug over and raked at frequent intervals during use. Foam landing units should be thick and dense enough to prevent athletes bottoming out. They should be fastened together securely to prevent athletes falling between two units. In those high jump and pole vault exercises where the athletes land on their feet, a well-dug sand pit is safe and acceptable. Only circular cross section bars should be used. Use ropes or rubber bands for beginners. When working with larger groups in the early stage of training sessions should be designed to maximise activity with several athletes being active at the same time. Long breaks are boring, particularly for youngsters.

109 Fundamentals of JUMPing Long Jump jumps 103

110 104 JUMPS Long Jump
111 Long Jump Whole Sequence jumps 105 APPROACH Take Off FLIGHT LANDING Long Jump Whole Sequence Phase Description The long jump is divided into the following phases: approach, take off, flight and landing. z controllable speed. In the approach phase the jumper accelerates to maximum z In the take off phase the jumper generates vertical velocity and minimises the loss of horizontal velocity. z In the flight phase the jumper prepares for landing. Three different techniques can be used: sail, hang and hitch-kick. z In the landing phase the jumper maximises the potential distance of the flight path and minimises the loss of distance at the touchdown.

. Running technique is similar to sprinting.")
112 106 JUMPS Long Jump Technique APPROACH Take Off FLIGHT LANDING APPROACH PHASE Coaches should: Help athletes to: Objective To achieve maximum controllable speed. Technical characteristics Approach length varies between 10 strides (for beginners) and more than 20 strides (for experienced, elite jumpers). Running technique is similar to sprinting. Speed increases continuously until the take off board.


 Take off time is minimised, minimum bending of the take off leg.")
113 Long Jump Technique jumps 107 APPROACH Take Off FLIGHT LANDING Take off PHASE Coaches should: Help athletes to: Objective To maximise vertical velocity and to minimise loss in horizontal velocity. Technical characteristics Foot plant is active and quick with a down and back motion. (1) Take off time is minimised, minimum bending of the take off leg. Thigh of the free leg is driven to the horizontal position. (2) Ankle, knee and hip joints are fully extended.
114 108 JUMPS Long Jump Technique APPROACH Take Off FLIGHT LANDING Flight Phase Sail Technique Objective To prepare for an efficient landing. Technical characteristics Free leg is held in the take off position. Trunk remains upright and vertical. Take off leg trails during most of the flight. Take off leg is bent and drawn forwards and upwards near the end of the flight. Both legs are extended forwards for landing. Coaches should:

115 Long Jump Technique jumps 109 APPROACH Take Off FLIGHT LANDING Flight Phase Hang Technique Good technique especially for jumpers in the 6-7 metres range Objective To prepare for an efficient landing. Technical characteristics Free leg is lowered by rotating at the hip joint. Hips are pushed forwards. Take off leg is parallel to the free leg. Arms are in an upward-backward position. Help athletes to:

116 110 JUMPS Long Jump Technique APPROACH Take Off FLIGHT LANDING FLIGHT PHASE Hitch-kick Technique Advanced technique for elite jumpers Objective To prepare for an efficient landing. Technical characteristics Running action continues in the air supported by arm swing. Stride rhythm of the approach should not be changed. Running action must be finished at landing, with both legs extended forward. Variations: 1½ or 2½ or 3½ strides during the flight.


117 Long Jump Technique jumps 111 APPROACH Take Off FLIGHT LANDING LanDING Phase Coaches should: Objective To minimise the loss of distance. Technical characteristics Legs are almost fully extended. Trunk is bent forward. Arms are drawn backwards. Hips are pushed forwards toward the touchdown point. Help athletes to:
118 112 JUMPS Long Jump Teaching Progression STEP 1 Consecutive Jumps over obstacles Objectives: To take off from a short approach and improve the take off position. Use a short approach using either take off leg. Land on the free leg. Use a 3-stride rhythm. Height: cm Distance: 6-8 m (increases with speed) Tips: STEP 2 Telemark Jump OFF A PLATFORM Objectives: To get used to jumping off a platform and increase the time in the air. Tips: Use a 5 7 step approach. Hold the take off position in the air. Approach from the runway (small group) or side of the pit (large group). Land in stride position (telemark). Height of platform: cm. STEP 3 Telemark Jump Objectives: To emphasise the take off movement and freeze the take off position. Use a 5 7 step approach. Hold the take off position in the air. Approach from the runway (small group) or side of the pit (large group). Land in a stride position (telemark). Tips:
119 Long Jump Teaching Progression jumps 113 STEP 4 Sail TEchnique off A platform Objectives: To practise technique with assisted take off. Tips: Use a 5-7 step approach. Hold the take off position in the air. Extend the free leg before landing. Draw the take off leg forwards-upwards. Land with feet level. STEP 5 SAIL TECHNIQUE FROM A SHORT APPROACH Objectives: To practise the sail technique. Tips: Turn through 180 balanced on the heel of left foot, pivoting on to the ball of right foot. Continue turn another 180 balanced on the ball of the left foot while lifting the right foot. Place the right foot down to complete a 360 turn. STEP 6 WHOLE SEQUENCE FROM A FULL APPROACH Objectives: To set approach length and link the complete movement. Tips: Use back straight of the track to determine the length of the approach. Sprint an appropriate number of strides three times and coach or partner marks spot. Average length is pigeon stepped (foot lengths) out and then measured on runway. This approach and complete Sail technique is practiced and, if necessary, adjustments made to starting mark.
120 114 JUMPS Jumps

121 TRIPLE Jump jumps 115

122 116 JUMPS TRIPLE Jump

123 Triple Jump Whole Sequence jumps 117 APPROACH HOP STEP JUMP Triple Jump Whole Sequence Phase Description The triple jump is divided into the following phases: approach, hop, step, and JUMP. The hop, step and jump phases can each be divided into the typical phases for the jumps: take off, flight and landing. z maximum controllable speed. In the approach phase the jumper accelerates to a z In the hop phase the jumper executes the movement quickly and flatly, covering about 35% of the overall distance. z In the step phase the jumper covers about 30% of the overall distance. The step is the most critical part of the triple jump. Its duration should be equal to the hop. In the jump phase the athlete takes off with opposite leg z and covers about 35% of the overall distance.


. Running technique is similar to sprinting.")

124 118 JUMPS TRIPLE Jump Technique APPROACH HOP STEP JUMP APPROACH PHASE Coaches should: Objective To reach maximum velocity and position the body for the take off. Technical characteristics Approach length varies between 10 strides (for beginners) and more than 20 strides (for experienced, elite jumpers). Running technique is similar to sprinting. Stride frequency is increased at the end of the approach. Velocity is increased continuously throughout the approach. Foot plant is active and quick with a down and back motion. (1) Help athletes to:

 Free leg is drawn back.")
125 TRIPLE Jump Technique jumps 119 APPROACH HOP STEP JUMP HOP PHASE Coaches should: Objective To achieve a long, flat flight with a minimal loss of horizontal velocity. Technical characteristics Thigh of the free leg is driven to the horizontal position. Take off direction is forward, not upward. (1) Free leg is drawn back. Take off leg is drawn forwards-upwards then extended forwards to prepare for touchdown. (2) Trunk is kept upright. Help athletes to:

 Trunk position is upright. Free leg is extended forwards-downwards.")
126 120 JUMPS TRIPLE Jump Technique APPROACH HOP STEP JUMP STEP Phase Coaches should: Objective To equal the duration of the hop, i.e. to achieve the same height as in the hop Technical characteristics Foot plant is active and quick with a down and back motion. Lead leg is almost completely extended. Double arm swing is used, if possible. Thigh of the free leg is horizontal, or higher. (1) Trunk position is upright. Free leg is extended forwards-downwards. (2) Help athletes to:
 Technical characteristics Foot plant is active and quick with a down and back motion. Support leg is almost straight during take off. Double arm action is used if possible.")
127 TRIPLE Jump Technique jumps 121 APPROACH HOP STEP JUMP JUMP Phase Coaches should: Objective To take off powerfully at an optimum take off angle. (1) Technical characteristics Foot plant is active and quick with a down and back motion. Support leg is almost straight during take off. Double arm action is used if possible. (2) Body position is upright. Hang or sail technique are used in the air. Legs are almost fully extended at landing. Help athletes to:
128 122 JUMPS Triple Jump Teaching Progression STEP 1 rhythmic jumping L L R R L L Objectives: To improve general jumping ability using both legs for take off. Use a 3-5 step approach. Consecutive alternate bounds. Consecutive hops. Use various combinations of bounds and hops. Tips: STEP 2 MULTIPLE TRIPLE JUMP Tips: L L R L L R OR R R L R R L Objectives: To get used to the triple jump rhythm. Use a 3-5 step approach. Use the triple jump rhythm. Keep the rhythm of the hop and step even. Distance: m. STEP 3 TRIPLE JUMP WITH STEP TO PLATFORM Objectives: To improve step technique. Tips: 2-3m Use a 5-7 steps approach. Mark a gap (2-3 m) for the hop and position a cm platform. After the hop step on to the platform Jump into the pit.

129 Triple Jump Teaching Progression jumps 123 STEP 4 TRIPle jump grid Objectives: To avoid over-emphasis on the hop. 2m 2m 1m Tips: HOP STEP JUMP SAND PIT 4m 4m 2m Mark out an angled grid along side of the pit. Use a 5-7 steps approach from the side of the pit. Hop and step into the grid. Move down the grid, increasing distance as long as rhythm is maintained. STEP 5 triple jump FROM A MEDIUM APPROACH Tips: Objectives: To get used to higher approach speeds and harder surfaces. Use runway for the approach. Use 7-9 step approach. Keep the rhythm for the hop and step even. STEP 6 WHOLE SEQUENCE FROM A FULL APPROACH Objectives: To set the approach length and link the complete movement. Tips: Use back straight of the track to determine the length of the approach. Sprint an appropriate number of strides three times and coach or partner marks spot. Average length is pigeon stepped (foot lengths) out and then measured on runway. This approach and complete triple jump technique is practiced and, if necessary, adjustments made to starting mark.
130 124 JUMPS JUMPS

131 HIGH JUMP jumps 125

132 126 JUMPS HIGH JUMP

133 HIGH JUMP Whole Sequence jumps 127 LANDING FLIGHT Take Off APPROACH High Jump Whole Sequence Phase Description The high jump is divided into the following phases: approach, take off, flight and landing. z prepares for the take off. In the approach phase the jumper accelerates and z In the take off phase the jumper generates vertical velocity and initiates rotations necessary for bar clearance. z In the flight phase the jumper rises to the bar and then clears it. z In the landing phase the jumper safely completes the jump.
 speed.")
, then curved (4-5 strides).")

134 128 JUMPS HIGH JUMP Technique LANDING FLIGHT Take Off APPROACH APPROACH PHASE Coaches should: Objective To generate optimum (not maximum) speed. Technical characteristics Approach run is J-shaped: straight at first (3-6 strides), then curved (4-5 strides). Foot plant for the first strides is on the ball of the foot. Body lean is moderately forward for the first strides. Velocity is increased continuously throughout the approach.


135 HIGH JUMP Technique jumps 129 LANDING FLIGHT Take Off APPROACH APPROACH PHASE Final Strides Objective To minimise the loss of speed and prepare for an effective take off. Technical characteristics Stride frequency is increased continuously. Body leans inward, the angle is dependent on the approach speed. Forward lean is reduced and body is upright. Centre of mass is lowered moderately in the penultimate stride. Active drive of the right foot in the penultimate stride. Help athletes to:
 Take off foot points towards the landing area.")
136 130 JUMPS HIGH JUMP Technique LANDING FLIGHT Take Off APPROACH Take off PHASE Coaches should: Objective To maximise vertical velocity and to initiate rotations necessary for bar clearance. Technical characteristics Foot plant is active, quick and flat with a down and back motion. (1) Take off foot points towards the landing area. Time on ground and the bending of the take off leg are both minimised. Knee of free leg is driven up until the thigh is parallel with the ground. Body is vertical at the end of the take off. (2) Help athletes to:

 Leading arm is fixed or reaches up, across and over the bar.")
137 HIGH JUMP Technique jumps 131 LANDING FLIGHT Take Off APPROACH FLIGHT PHASE Coaches should: Objective To clear the bar. Technical characteristics Take off position is held as the body gains height. (1) Leading arm is fixed or reaches up, across and over the bar. Hips are raised over the bar by arching the back and lowering legs and head. Knees are spread to allow more body arch. Help athletes to:


138 132 JUMPS HIGH JUMP Technique LANDING FLIGHT Take Off APPROACH LANDING PHASE Coaches should: Objective To land safely and avoid injury. Technical characteristics Head is drawn towards the chest. Landing is on the shoulders and back. Knees are apart for touch down. Help athletes to:

139 HIGH JUMP Technique jumps 133

140 134 JUMPS High Jump Teaching Progression STEP 1 Scissors jump Objectives: To improve the vertical take off. Tips: Use straight approach. Plant take off foot in line of approach. Gradually increase height. Use standing landings only - on free leg. STEP 2 Curve running Objectives: To feel the inward lean and the rhythm of the approach. 1.5 m 4 m-5 m Run in and out of cone markers. Run fast but controlled. Increase speed when entering each curve. Variations: high-knees or high frequency. Tips: STEP 3 Scissors jump from Curve Running Objectives: To learn to jump vertically off a curved approach. Tips: Use J-curved approach. Plant take off foot naturally. Gradually increase height. Use standing landings on sand - on free leg.
. STEP 5 Flop FROM A high-knee approach Objectives: To improve the rhythm of the final strides.")
141 High Jump Teaching Progression jumps 135 STEP 4 Standing flop Objectives: To improve bar clearance. Tips: Take off from the ground (1) or a box (3). Use different landing heights. Open knees at clearance and landing. Use uprights with a rope or a bar (2, 3). STEP 5 Flop FROM A high-knee approach Objectives: To improve the rhythm of the final strides. Mark a J-curve and starting point. Use a 5-7 stride high-knee approach. Use high stride frequency. Do not lower the hips in preparation for take off. Tips: STEP 6 WHOLE SEQUENCE Objectives: To practise the complete movement with increasing speed. Tips: Mark a J-curve and the starting point. Start with shortened approach (4-6 strides). Gradually increase approach length and speed.
142 136 JUMPS JUMPS

143 Pole Vault jumps 137

144 138 JUMPS Pole Vault

145 Pole Vault Whole Sequence jumps 139 APPROACH PLANT Take off/ Penetration Rockback/ Stretch/ Turn Bar Clearance/ Landing Phase Description Pole Vault Whole Sequence The pole vault is divided into the following phases: approach, plant, Take off and PENETRATION, rockback and stretch/turn, bar clearance and landing. z In the approach and plant phases the vaulter accelerates to maximum controllable speed and smoothly positions the pole for the take off. In the take off and penetration phase energy from the z approach is transferred to the pole. z pole then utilised to raise the vaulter. z This is assisted by additional muscle actions. z The bar clearance phase is the completion of the vault and In the rockback and stretch/turn phase energy is stored in the the start of preparation for a safe landing.


146 140 JUMPS Pole Vault Technique APPROACH PLANT Take off/ Penetration Rockback/ Stretch/ Turn Bar Clearance/ Landing GRIP AND CARRY POSITION Objective To hold the pole correctly for the approach run and plant. Technical characteristics Hands are shoulder-width apart. Right hand is higher on the pole. Both arms are bent, the right hand is close to the hip. Tip of the pole is above head height. Elbow of the left arm points to the side. Upper body is upright.


147 Pole Vault Technique jumps 141 APPROACH PLANT Take off/ Penetration Rockback/ Stretch/ Turn Bar Clearance/ Landing Approach Objective To minimise the loss of speed and Prepare for an effective plant phase. Technical characteristics The approach is active and with gradual acceleration. Elbows are relaxed; the pole should not disturb the approach. The pole is held obliquely forward then is carried horizontally during the run. Coaches should:

148 142 JUMPS Pole Vault Technique APPROACH PLANT Take off/ Penetration Rockback/ Stretch/ Turn Bar Clearance/ Landing Plant Phase Objective To position the pole in preparation for the take off while minimising the loss of speed. Technical characteristics Tip of the pole is lowered gradually and smoothly in the last third of the approach. Plant commences on the penultimate contact of the left foot with a forward push of the pole. (1) Right arm is raised quickly, the hand pushing close to the head at the contact of the right foot. (2) Body is upright with the shoulders square to the box. Help athletes to:


149 Pole Vault Technique jumps 143 APPROACH PLANT Take off/ Penetration Rockback/ Stretch/ Turn Bar Clearance/ Landing Take off/penetration PHaSE Take off Coaches should: Objective To transfer maximum energy to the pole. Technical characteristics Foot plant is active and on the entire sole. Body is completely stretched with the right arm fully extended. Upper (right) hand is directly above or in front of the take off foot. (1) Thigh of the free leg swings actively forwards. (2) Help athletes to:
 Left arm is pushed forwards and upwards.")
150 144 JUMPS Pole Vault Technique APPROACH PLANT Take off/ Penetration Rockback/ Stretch/ Turn Bar Clearance/ Landing Take off/penetration PHaSE Penetration Objective To transfer maximum energy to the pole. Technical characteristics Vaulter freezes in the take off position. Long pendulums are created around both the shoulders and the hips. (1) Left arm is pushed forwards and upwards. (2) Right arm is fully extended.
 and to position the body to utilise the stored energy. Technical characteristics Both legs are bent and drawn to the chest. Both arms are extended.")
151 Pole Vault Technique jumps 145 APPROACH PLANT Take off/ Penetration Rockback/ Stretch/ Turn Bar Clearance/ Landing Rockback/STRETCH/TURN PHASE Rockback Objective To achieve maximum bend of the pole (storing energy) and to position the body to utilise the stored energy. Technical characteristics Both legs are bent and drawn to the chest. Both arms are extended. Back is roughly parallel to the ground. (1) Help athletes to:

152 146 JUMPS Pole Vault Technique APPROACH PLANT Take off/ Penetration Rockback/ Stretch/ Turn Bar Clearance/ Landing Rockback/STRETCH/TURN PHASE Stretch and Turn Objective To use energy from the pole to lift the vaulter. Technical characteristics Body moves from the L to the I position. Right arm is extended, left arm bends with the elbow on the right side of the pole. Hips pass close to the pole. Turn is commenced with the pull of both arms. Body turns to face the bar. Coaches should:


 or bent (2) position.")
153 Pole Vault Technique jumps 147 APPROACH PLANT Take off/ Penetration Rockback/ Stretch/ Turn Bar Clearance/ Landing BAR CLEARANCE/LANDING PHASE Bar Clearance Coaches should: Objective To gain maximum height after the release of the pole and clear the bar. Technical characteristics Push-off from the pole is with the right arm. Bar is crossed in an arched (1) or bent (2) position. Body is straightened after crossing the bar. Landing is on the back. Help athletes to:
154 148 JUMPS Pole Vault Teaching Progression STEP 1 Grip and carry the pole Objectives: To get used to holding and running with the pole. Place right hand close to the top of the pole. Place left hand about 50 cm down the pole. Keep right hand close to the hip. Start with walking. Proceed to easy running and sprinting. Tips: STEP 2 Steps into swing Objectives: To feel the hang and the carry function of the pole. Tips: Hold pole above the head. Use three stride approach (l r l). Take off from left foot (right handed vaulters). Drive free leg forwards and upwards. Pass the pole on the right side. Land on left or both feet without turning. STEP 3 Step into swing from A platform Objectives: To increase the hang time and develop confidence in landing safely Set up a platform 15cm-35cm high. Use sand pit if no suitable pit. Stand upright and grip pole with extended upper arm. Drive free leg forward to swing off platform. Do not turn in the air. Land sitting on mat or on feet if sand pit. Tips:
155 Pole Vault Teaching Progression jumps 149 STEP 4 swing and turn from A platform Objectives: To practise the swing and turn with assisted take off. Set up a platform 15cm-35cm high. Stand upright - grip pole with extended arm. Drive free leg forward to swing off platform. Swing and turn in the second half. Land on both feet, face take off point. Vault over a low height. Tips: STEP 5 PLANT AND VAULT Objectives: To introduce the regular plant and to experience clearing the bar. Tips: Practise the pole plant. Plant the pole first from walking then from jogging. Use a 5-7 stride approach. Take off, swing and turn. Land on both feet. STEP 6 WHOLE SEQUENCE Objectives: To practise the complete movement with increasing speed. Carry the pole as per normal and plant. Start with a medium approach length. Gradually increase approach length and speed. Tips:
156
157 INTERNATIONAL ASSOCIATION OF ATHLETICS FEDERATIONS Throw! IAAF Coaches Education and Certification System


158 152 THROWS Fundamentals of THROWing
159 Fundamentals of THROWing throws 153 FUNDAMENTALS OF THROWING 1. INTRODUCTION Each of the events has a specific set of restrictions including (a) the characteristics of the implement used (size, weight, shape and aerodynamic qualities), (b) space limitations (the Shot Put ring, the length of the Javelin Throw runway, the throw sector lines) and (c) technique requirements dictated by the rules which influence the sequence of movements and make them unique. However, there are a number of very important commonalties among the different throws, the understanding of which will help the coach working with athletes in any of the events. Aims The goal in the throwing events is to maximize the measured distance covered by the implement. Biomechanical Aspects The distance that any thrown object travels is determined by a number of parameters. For the athlete and coach the most important are the three release parameters: (a) height (b) speed and (c) angle and, in the cases of the Discus Throw and Javelin Throw, the (d) aerodynamic qualities of the implement and (e) environmental factors (wind and air density due to relative humidity and or altitude). The release height is determined by the athlete s body height though it is influenced by the athlete s position at release. The release velocity and release angle are both the result of the actions of the athlete prior to and during release. Neither the aerodynamic qualities of the implement nor the environmental factors can be affected by the athlete, though it is possible to make some adjustments to the throwing technique that will maximise the potential distance of a throw. Movement Structure The movements of the throwing events can be broken down into four main phases: 1. Preparation 2. Momentum building 3. Delivery 4. Recovery. Note: The descriptions below apply to right-handed throwers. In the preparation phase the athlete grips the implement and assumes a position to start the momentum building phase. The preparation has no direct influence on the throwing distance. In the momentum building phase the athlete and implement initially move together as one unit but then the athlete overtakes the implement during the hop or impulse stage in the javelin, the glide in the linear shot put, the turn in the discus and the rotational shot put and during the single support phase of the hammer turns. In the delivery phase velocity is stored, increased and transferred from the athlete s body to the implement and the implement is released. The link between the momentum building phase and the delivery phase is the power position, when the athlete has two feet on the ground. With some differences for the Hammer Throw, the common features of an effective power position in the throwing events are: Muscular tension throughout the body. A balanced stance with both feet on the ground.
160 154 THROWS Fundamentals of THROWing Body weight over the right foot, right heel lifted. Right heel and left toe lined up. Backward lean against the direction of the throw. In addition to an effective power position the common elements of effective delivery phases are: A well co-ordinated sequence of successive action of all the joints involved in the throw: foot, knee, hip, shoulder, arm and hand. A twisting extension of the right leg using the strong muscles of the leg to lift the body. A bracing of the left leg to accelerate the right side of the body and produce vertical movement. A bow tension or twisted position causing high pretension in the trunk, shoulder and arms which can be used to produce acceleration. A blocking action in the upper body in which turning movement of the trunk is stopped with the left side allowing the right side to accelerate. In the recovery phase the athlete braces against any remaining velocity and avoids fouling. 2. Teaching Throwing Technique The chaining method is usually used to teach the throwing events. Concentration should be on the following elements in the order given: Introduction to the implement (safety and grip) Delivery (using front throws) Power Position Delivery Recovery Momentum Building Preparation Phase Points to Emphasise: Optimum speed in the preparation and building momentum phases in the momentum building phase. Increasing acceleration in all phases finishing as fast as controllable in the delivery. Effective and stable power position. Successive sequencing of body movements starting from ground level and moving up through the body finishing with maximum speed being transferred to the implement. Complete extension of the body in the delivery. Developing technique with implements slightly lighter than competition weight. A wide variety of exercises, implements, throwing movements and situations. Points to Avoid: Introduction of competition technique to young or beginner athletes who have not reached the appropriate physical stage of development. Implements of inappropriate size, weight or aerodynamic qualities. Introduction of new technique elements before satisfactory performance of those already learnt. Excessive throwing movements for athletes who have not gained the appropriate strength levels in the abdominal and leg muscles.
161 Fundamentals of THROWing throws Skill and conditioning exercises Note: Many exercises described in the Fundamentals of Running and Fundamentals of Jumping are also useful for throwers. Exercise Group 1: Whipping action (Javelin Throw) One-handed throws with lighter implements Variations: - from standing position - from knee stand - with 3-stride rhythm - with 5-stride rhythm Two-handed throws with heavier implements Variations: - throw-ins - from sitting position - from knee stand - with 3-stride rhythm Loading: Exercise Weight Effect Repetitions Sets Standing Throw one handed kg Strength step rhythm one handed throws kg Strength Standing Throw two handed kg Strength step rhythm two handed throws kg Strength Standing Throw one handed gr Speed step rhythm one handed throws gr Speed
162 156 THROWS Fundamentals of THROWing Exercise Group 2: Putting Action (Shot Put) Forward and backward overhead throw Variations: - from turning movement (see backward slinging action) - with different implements: medicine balls, stones, shots Standing put Variations: - chest-pass - with glide - with two steps(left-right-left) - from turning movement Loading: Exercise Weight Effect Repetitions Sets Forward/backward overhead throw kg Strength Standing put / with glide/steps kg Strength Standing put / with glide/steps kg Speed Exercise Group 3: Slinging Action (Discus Throw) Throws with light weights Throws with heavier weights Variations: - sitting position - knee stand - frontal position (see above on the right) - power position (see above on the left) - one-turn throw - 1½ turns - with different implements: light: sticks, rings, cones, light shots, light stones, disks heavy: heavy medicine balls, stones, shots, disks Loading: Exercise Weight Effect Repetitions Sets Exercises with light implements kg Speed Exercises with heavy implements kg Strength
163 Fundamentals of THROWing throws 157 Exercise Group 4: Backward Slinging Action (Hammer Throw) Two handed backward throw over shoulder Variations: - lighter implements - heavier implements - shorter implements - with preliminary swings, no turn - with preliminary swings and turn - with different implements: medicine balls, stones, hammers Squat extension jumps Variations: - throws for height - throws for distance Loading: Exercise Weight Effect Repetitions Sets Exercises with light implements kg Speed Exercises with heavy implements kg Strength


164 158 THROWS Fundamentals of THROWing 4. GAMES Games to introduce the Javelin Throw Throwing and sprinting : Athletes sprint with boxes to set up the targets, then return to the throwing line. After the targets are knocked down they sprint to collect the boxes. Hit the targets : Athletes aim at bicycle tyre hung in the top corners of a football goal or at a ball swinging from the crossbar. Games to introduce the Shot Put Ball over the cord Athletes throw a medicine ball back and forth over a goal, a fence, a cord or a net. The aim is to put the ball on to the ground inside the other team s area. compete to make the most throws in a set time period. Follow the ball : Each athlete throws or puts a medicine ball to an athlete at other end of throwing area then runs after the ball. Teams of three
165 Fundamentals of THROWing throws 159 Games to introduce the Discus Throw Throwing hoops/rings around flagpole Athletes throw rings or hoops at a small flag pole, trying to land exactly over it. A round is finished when one team has achieved a certain number of hits or when the teams have thrown all their hoops. Knocking down cardboard boxes Athletes throw rings or hoops at a row of cardboard boxes. A round is finished when one team has knocked down its boxes or when the teams have thrown all their hoops. 5. SAFETY and organisation Equipment should be kept in good repair and stored in a safe place. Test the safety of any improvised equipment before teaching. Throwing implements should not be used on the way to or from the throwing area and should be carried safely, javelins must be carried vertically. Initially all training should be under the direction of the coach. All throwers should stand well back from the throw line when they are waiting their turn. The thrower should make sure there is no one in the landing area or probable line of flight of the implement before the throw is made. After throwing, the thrower should wait under all have thrown or instructed to collect the implement by the coach. Wet conditions increase the chances of accidents and extra caution should be taken, particularly for implements sliding after landing. The athletes should keep in eye-contact with the coach. Left handed thrower should be placed to left and right handed thrower to the right side of a group. Use specific organisation forms (see next page).
166 160 THROWS Fundamentals of THROWing organisation of Groups for throwing practice (1) Can be used for Shot Put (Linear Technique) and Javelin Throw (2) Can be used for Shot Put (Rotational Technique), Discus Throw and Hammer Throw (3) Useful for linear throwing events

167 Fundamentals of THROWing JAVELIN THROW throws 161

168 162 THROWS JAVELIN THROW
 and Recovery. z In the approach phase the thrower and javelin are accelerated.")
169 JAVELIN THROW Whole Sequence throws 163 Approach 5-stride rythm delivery Recovery Javelin Throw Whole Sequence Phase Description The javelin throw is divided into the following phases: APPROACH, 5-Stride Rhythm, DELIVERY (which is part of the 5-stride rhythm) and Recovery. z In the approach phase the thrower and javelin are accelerated. z In the 5-stride rhythm phase they are accelerated further as the thrower prepares for the delivery phase. z In the delivery phase additional velocity is produced and transferred to the javelin before it is released. In the recovery phase the thrower braces and z avoids fouling.

 Javelin lays diagonally in the hand. Palm faces upward.")
170 164 THROWS JAVELIN THROW Technique Approach 5-stride rythm delivery Recovery GRIP 1 2 Objective To grasp the javelin firmly and comfortably. Technical characteristics Thumb and first finger grip (1), or Thumb and second finger grip. (2) Javelin lays diagonally in the hand. Palm faces upward. Grip hand is relaxed.
.")
171 JAVELIN THROW Technique throws 165 Approach 5-stride rythm delivery Recovery Approach Phase Coaches should: Objective To accelerate the thrower and javelin. Technical characteristics Javelin is held horizontally over the shoulder. Top of the javelin is at head height. Arm is held steady (no forward or backward movement). Acceleration run is relaxed, controlled and rhythmic (6-12 strides). Acceleration to optimum speed, which is maintained or increased in the 5-stride rhythm. Help athletes to:


172 166 THROWS JAVELIN THROW Technique Approach 5-stride rythm delivery Recovery 5-Stride Rhythm PHASE Withdrawal Coaches should: Objective To position the javelin correctly for the delivery. Technical characteristics Withdrawal starts on landing of the left foot. Left shoulder faces the direction of the throw, the left arm is held forward for balance. Throwing arm extends backwards during first and second strides. Throwing arm is at shoulder height or slightly higher after withdrawal. -Tip of the javelin is close to the head. Help athletes to:

. Body leans backwards: legs and trunk overtake the javelin.")
173 JAVELIN THROW Technique throws 167 Approach 5-stride rythm delivery Recovery 5-Stride Rhythm PHASE Impulse Stride Objective To position and prepare the body for the delivery. Technical characteristics Drive-off is active and flat from the whole sole of the left foot (no loss of velocity!). Right knee swings forwards (not upwards!). Body leans backwards: legs and trunk overtake the javelin. Left shoulder and head face the direction of the throw. z Throwing arm and shoulder axis are parallel. Impulse stride is longer than the delivery stride.


174 168 THROWS JAVELIN THROW Technique Approach 5-stride rythm delivery Recovery DELIVERY PHASE Part 1: Transition Objectives To transfer velocity from the legs to the trunk. Technical characteristics Right foot is placed flat at an acute angle to the direction of the throw. Legs have overtaken the trunk. Axes of the shoulder, javelin and hip are parallel. Right knee and hip push forwards actively. Throwing arm remains extended. Coaches should:

175 JAVELIN THROW Technique throws 169 Approach 5-stride rythm delivery Recovery DELIVERY PHASE Part 2: Power Position Objectives To transfer velocity from the trunk to the shoulder and arm. Technical characteristics Power Position Arc Position Placement of left foot is active and solid. Left side is stabilised. Trunk is raised and there is a turning movement around the left leg. Muscles in the front of the body are highly pre-tensed in the Arc Position. Throwing shoulder pushes forwards. Throwing elbow turns inwards, palm remains up. Help athletes to:

176 170 THROWS JAVELIN THROW Technique Approach 5-stride rythm delivery Recovery DELIVERY PHASE Part 3: Final Arm Movement Objective To transfer velocity from the shoulder and arm to the javelin. Technical characteristics Right elbow draws forwards and upwards alongside the head. Trunk moves forwards. Throwing elbow straightens explosively. Left side of the body is blocked by a solid left leg and the fixing of the bent left elbow close to the trunk. Right foot maintains ground contact until the javelin is released.


177 JAVELIN THROW Technique throws 171 Approach 5-stride rythm delivery Recovery DELIVERY PHASE Part 3: Final Arm Movement Objectives To transfer velocity from the shoulder and arm to the javelin. Technical characteristics Right foot turns on its outside edge and is dragged behind. (1) Trunk leans slightly to the left, the right shoulder is directly over the left foot. (2) (3) Throwing arm should be as close to vertical as possible at release. (3)
178 172 THROWS JAVELIN THROW Technique Approach 5-stride rythm delivery Recovery 5-Stride rhythm phase Foot Placement Withdrawal IMPULSE STRIDE DELIVERY STRIDE Objective To create velocity and transfer it to the javelin. Technical characteristics 5-stride rhythm comprises: the withdrawal the impulse stride the delivery Speed increased to optimum level (based on individual capability).


179 JAVELIN THROW Technique throws 173 Approach 5-stride rythm delivery Recovery RECOVERY PHASE Coaches should: Objectives To stop the forward movement of the body and avoid fouling. Technical characteristics Legs are reversed quickly after the release. Right is leg bent. Upper body is lowered. Left leg swings backwards. Distance from the foot of the brace leg to the foul line is m. Help athletes to:
180 174 THROWS JAVELIN THROW Teaching Progression STEP 1 FRONT throws Objectives: To accelerate the javelin along a straight path. Tips: Introduce the javelin, safety measure and grip. From a line, face the throwing area. Withdraw the javelin, holding high above the head and point the javelin to the ground. Lean backwards and throw the javelin to land 8m-10m away, and with the end of the javelin pointing to the thrower. STEP 2 STANding Throw Objectives: To throw from the power position. Stand with the left foot about 60cm-90cm in front of the right with feet pointing in direction of throw. Withdraw the javelin keeping the palm above shoulder level. Lift the left leg slightly to initiate movement, keeping the weight on a bent right leg. Drive the right hip forward and throw. Tips: STEP 3 3-Stride rhythm AND THROW Tips: Objectives: To introduce impulse stride and link it with the power position. Start with the right leg forward and the javelin withdrawn. Step onto the whole sole of the left foot and push off into the impulse stride, with the feet landing quickly one after the other. Continue into the throw
181 JAVELIN THROW Teaching Progression throws 175 STEP 4 5 steps and throw Tips: Objectives: To develop the movements of the 5-stride rhythm. Start with feet level and javelin withdrawn. First step is onto the right leg. Begin with 2 walking strides, later 2 running, into the 3 stride rhythm. Continue into the throw. STEP 5 APPROaCH AND WITHDRAWAL Tips: Objectives: To introduce withdrawal and couple approach with the 5-stride rhythm. Ensure a safe practice area. Practice withdrawal at walking then running speed. STEP 6 WHOLE SEQUence Tips: Objectives: To link the phases into a complete movement. Complete sequence controlling and correcting the power position. Complete sequence with a light javelin. Complete sequence with different implements such as throwing balls or stones.
182 176 THROWS THROWS

183 Shot Put linear throws 177

184 178 THROWS SHOT PUT Linear Technique

185 SHOT PUT Linear Technique Whole Sequence throws 179 PREPARATION MOMentum Building delivery Recovery SHOT PUT Linear Technique Whole Sequence Phase Description The Linear Shot Put Technique is divided into the following phases: Preparation, momentum building, Delivery and Recovery. z In the preparation phase the thrower is positioned for the start of the glide, the momentum building phase. In the momentum building phase the z thrower and the shot are accelerated as the thrower prepares for the delivery phase. z In the delivery phase additional velocity is produced and transferred to the shot before it is released. In the recovery phase the thrower z braces and avoids fouling.


186 180 THROWS SHOT PUT Linear Technique Technique PREPARATION MOMentum Building delivery Recovery GRIP Objective To hold the shot firmly. Technical characteristics Shot rests on the fingers and the base of the fingers. Fingers are parallel and slightly spread. Shot is placed at the front part of the neck, the thumb on the collarbone. Elbow is out at a 45 angle to the body.


187 SHOT PUT Linear Technique Technique throws 181 PREPARATION MOMentum Building delivery Recovery Preparation PHASE Coaches should: Objective To prepare for the glide. Technical characteristics Thrower starts upright at the rear of the circle with back to the stopboard. Trunk is bent forward parallel to the ground. Body is balanced in the single support. Support leg is bent while the free leg is drawn towards the back of the circle. (1) Help athletes to:


188 182 THROWS SHOT PUT Linear Technique Technique PREPARATION MOMentum Building delivery Recovery MOMENTUM BUILDING OR Glide Phase Objective To initiate acceleration and position the body for the final putting action. Technical characteristics Body moves from the forefoot on to the right heel, unseating the hips. Free leg is driven low towards the stopboard. Support leg extends over its heel. Support leg maintains ground contact through most of the glide. Shoulders are kept square to the rear of the circle. Coaches should:
189 SHOT PUT Linear Technique Technique throws 183 PREPARATION MOMentum Building delivery Recovery GLIDE PHASE Foot Placement Power Position Objective To initiate acceleration and position the body for the final putting action. Technical characteristics Right foot glides off its heel and lands on the ball of the foot. Right foot is placed in the centre of the circle. Feet land almost simultaneously, right foot first. Left foot lands on the ball and inside of the foot. The delivery phase begins when both feet land on the ground after the glide. Help athletes to:
190 184 THROWS SHOT PUT Linear Technique Technique PREPARATION MOMentum Building delivery Recovery Delivery Phase Part 1: Power Position Help athletes to: Objective To maintain the speed of the shot and begin its main acceleration. Technical characteristics Body weight is carried on the ball of the right foot, right knee is bent. Heel of the right foot and the toe of the left foot are placed in line ( Heel-Toe Position ). Hips and shoulders are twisted. Head and left arm locked back. Right elbow is at approx. 90 angle to the trunk.

191 SHOT PUT Linear Technique Technique throws 185 PREPARATION MOMentum Building delivery Recovery Delivery Phase Part 2: Main Acceleration Coaches should: Objective To transfer velocity from the thrower to the shot. Technical characteristics Right leg is extended in an explosive twisting movement until the right hip faces the front of circle. Left leg is almost extended and braced, lifting the body (and influencing the angle of release). Trunk s twisting movement is blocked by the left arm and shoulder. Right elbow is turned and raised in the direction of the throw. Body weight is transferred from the right leg to the left.
192 186 THROWS SHOT PUT Linear Technique Technique PREPARATION MOMentum Building delivery Recovery Delivery Phase Part 3: Final Arm Movement Objective To transfer velocity from the thrower to the shot. Technical characteristics Strike of the putting arm begins after full extension of the legs and trunk. Left arm is bent and fixed close to the trunk. Acceleration is continued by the pre-stretched wrist (thumbs down, fingers turning out after the release). Feet are in contact with the ground for the release. Head is behind the left (bracing) foot until the release.


193 SHOT PUT Linear Technique Technique throws 187 PREPARATION MOMentum Building delivery Recovery Recovery Phase Coaches should: Objective To stabilise the thrower and avoid fouling. Technical characteristics Legs change quickly after the release. The right leg is bent. Upper body is lowered. Left leg swings backwards. Eyes look down. Help athletes to:
194 188 THROWS SHOT PUT Linear Technique Teaching Progression STEP 1 Introduction Objectives: To get used to the implement and the basic putting movements. Introduce the shot, safety measures and grip. Slow extension or push upwards. Flicking shot with fingers. (1) Forward two-handed toss. (2) Backward overhead, twohanded toss. (3) Tips: STEP 2 Front PutS Objectives: To use legs for acceleration and learn the correct arm strike. Stand with feet shoulder-width apart. Wind up with bent knees, unwind and throw. As for previous drill, but step forwards on to the balls of feet. Maintain contact with the ground. Tips: STEP 3 Put from a Step Objectives: To develop the activity of right leg and blocking of left side (leg and trunk). Tips: Stand with feet shoulder-width apart. Step backwards, turning hip and shoulder against direction of throw. Continue with an immediate, forwards twisting extension of the legs and hips.
195 SHOT PUT Linear Technique Teaching Progression throws 189 STEP 4 Put from power position Objectives: To develop the activity of right leg; turn of legs, hips, trunk and blocking. Tips: STEP 5 Glide Objectives: To develop the glide action of the legs and link it with the delivery. Tips: (2) Start with feet in the power position. Turn shoulders away from the direction of the throw, weight over the right foot Begin the put with the right leg and hip. Transfer weight from right to left. Glide with a partner holding the free arm. (1) Continue glide along a line, stop in power position (1) (without/with release). (2) STEP 6 Whole Sequence Tips: Objectives: To link the phases into a complete movement. Perform without and with the shot, controlling and correcting the power position. Perform on different surfaces, with eyes closed, different implements (e.g. medicine balls) and different shot weights.
196 190 THROWS THROWS

197 throws 191 Shot Put Rotational

198 192 THROWS SHOT PUT Rotational Technique

199 SHOT PUT ROTATIONAL Technique Whole Sequence throws 193 PREPARATION MOMentum Building delivery Recovery SHOT PUT ROTATIONAL Technique Whole Sequence Phase Description The Rotational Shot Put Technique is divided into four phases: Preparation, MOMENTUM BUILDING, Delivery and RECOVERY. z In the preparation phase the thrower moves to the optimum position to begin the turn and pre-tension is built up. In the momentum building phase the shot z is accelerated as the thrower moves to the optimum position for delivery. z In the delivery phase additional velocity is produced and transferred to the shot before it is released. In the recovery phase the thrower avoids z fouling.

200 194 THROWS SHOT PUT Rotational Technique Technique PREPARATION MOMentum Building delivery Recovery PREPARATION PHASE Coaches should: Objective To assume an optimum position and grip, pre-tensing the trunk in preparation for the turn. Technical characteristics Shot is placed further back on the neck then in the Linear Technique. Upper body is bent slightly forward with the back to the stopboard. Legs are spread a little more than shoulder-width. Weight is on the balls of the feet. Upper body twists against the direction of the turn. Turn starts when right shoulder points in the direction of the throw. Turn starts to the left. Help athletes to:


201 SHOT PUT Rotational Technique Technique throws 195 PREPARATION MOMentum Building delivery Recovery Momentum Building PHASE Part 1 Objective To accelerate the thrower and shot. Technical characteristics Body weight is transferred on to the ball of the left foot, knees are bent. Left foot, left knee and straight left arm turn to the left simultaneously. Right leg swings wide. Shoulders must remain level. Initial movement is slow and controlled in the direction of the throw. Help athletes to:

202 196 THROWS SHOT PUT Rotational Technique Technique PREPARATION MOMentum Building delivery Recovery MOMENTUM BUILDING Phase Part 2: Non-Support Objective To accelerate the shot and thrower and to prepare for the delivery Technical characteristics SIDE VIEW Left knee and toe must have turned completely to the front before drive off of left foot. Driving leg is not completely extended. Flat jump, lead by a high right knee (leads forwards not upwards). Landing is on the ball of the right foot at the centre of the circle. Trunk is bent for landing, the left arm folds across the chest. REAR VIEW Coaches should:
203 SHOT PUT Rotational Technique Technique throws 197 PREPARATION MOMentum Building delivery Recovery MOMENTUM BUILDING Phase Foot Placement Power Position Objective To provide support for the correct body positions. Technical characteristics Feet are more than shoulder-width apart, turn is to the left on the ball of the left foot. (1) Right leg swings over the outside to the centre of the circle. (2) Right foot lands on the ball of the foot in the centre of the circle, the left foot lands quickly after the right foot. (3) Power position is shorter than in the linear technique ( Heel-Toe position). (4)

204 198 THROWS SHOT PUT Rotational Technique Technique PREPARATION MOMentum Building delivery Recovery MOMENTUM BUILDING Phase Objective To prepare for the Power Position. Technical characteristics Landing is on the ball of the right foot. Body weight is over the right foot. Left knee moves close to the right knee and forwards. Body is kept closed (left arm is in front of the trunk, head faces the rear of the circle) The delivery phase begins when both feet land on the ground.
205 SHOT PUT Rotational Technique Technique throws 199 PREPARATION MOMentum Building delivery Recovery Delivery Phase Part 1: Power Position Help athletes to: Objective To maintain the speed of the shot and begin its main acceleration. Technical characteristics Body weight is carried mostly on the ball of the right foot, the right knee is bent. Ball of the right foot and the heel of left foot are placed on a line: Heel-Toe position. Hips and shoulders are twisted. Head and shoulders are back. Right elbow is at a 90 angle to the trunk.
206 200 THROWS SHOT PUT Rotational Technique Technique PREPARATION MOMentum Building delivery Recovery Delivery Phase Part 2: Main Acceleration Objective To transfer velocity from the thrower to the shot. Technical characteristics Right leg is extended and twisted explosively until the right hip faces the front of the circle. Left leg is fixed then lifts creating a jump delivery (influencing the angle of release). Trunk s twisting movement is blocked by the left arm and shoulder. Right elbow is turned and raised in the direction of throw. Coaches should:
207 SHOT PUT Rotational Technique Technique throws 201 PREPARATION MOMentum Building delivery Recovery Delivery Phase Part 3: Final Arm Movement Objective To transfer velocity from the thrower to the shot. Technical characteristics Strike of the putting arm begins after full extension of the legs and trunk. Left arm is bent and fixed close to the trunk. Acceleration is continued by pre-stretched wrist (fingers turning out after the release). Release is made immediately after loss of ground contact.

208 202 THROWS SHOT PUT Rotational Technique Technique PREPARATION MOMentum Building delivery Recovery Recovery Phase Coaches should: Help athletes to: Objective To stabilise the thrower and avoid fouling. Technical characteristics Legs change quickly after the release. Right leg is bent. Upper body is lowered. Left leg swings backwards. Eyes look down.

209 SHOT PUT Rotational Technique Technique throws 203
210 204 THROWS SHOT PUT Rotational Technique Teaching Progression STEP 1 Introduction Objectives: To get used to the implement and the basic putting movements. Introduce the shot, safety measures and grip. Slow extension or push upwards, Flicking shot with fingers. (1) Forward overhead toss. (2) Backward overhead toss. (3) Tips: STEP 2 Front PutS Objectives: To use legs for acceleration and learn the correct arm strike. Tips: Stand with feet shoulder-width apart. Wind up with bent knees, unwind and throw. As for previous drill, but step forwards on to the balls of feet. Maintain contact with the ground. STEP 3 Turn Exercises Objectives: To develop orientation in the turns. Turn continuously along a straight line Control the power position after each turn. Remain on the balls of the feet. With and without shot, no release With other implements Tips:
211 SHOT PUT Rotational Technique Teaching Progression throws 205 STEP 4 One-Turn Throw Tips: Objectives: To achieve a flat jump and active placement of the right foot. Face direction of the throw, step into the circle with the left foot turned inward. Drive off from the right leg, turn on the left foot. Swing the right leg straight to the centre of the circle, unwind and throw. STEP 5 ONE-Turn THROW Objectives: To turn on the ball of the left foot and to couple the turn. Tips: Start with the left shoulder pointing in the direction of the throw, the left foot inside and right foot outside the circle. Turn on ball of the left foot, swing the right leg outside then to the centre of the circle. STEP 6 Whole Sequence Objectives: To link the phases into a complete movement. Perform without and with the shot, controlling and correcting the power position. Perform on different surfaces, with eyes closed, different implements (e.g. medicine balls) and different shot weights. Tips:
212 206 THROWS THROWS

213 Discus THROW throws 207

214 208 THROWS DISCUS THROW

215 DISCUS THROW Whole Sequence throws 209 PREPARATION MOMentum Building delivery Recovery Discus Throw Whole Sequence Phase Description The Discus Throw is divided into four phases: PREPARATION, MOMENTUM BUILDING, Delivery and Recovery. z In the preparation phase motion is initiated and the thrower moves into position to build momentum. In the momentum building phase the discus is z accelerated and the lower body rotates ahead of the upper body, producing pre-tension. z In the delivery phase additional velocity is produced and transferred to the discus before it is released. In the recovery phase the thrower braces and z avoids fouling.


216 210 THROWS DISCUS THROW Technique PREPARATION MOMentum Building delivery Recovery GRIP Objective To hold the discus firmly for the acceleration and to impart correct rotation on release. Technical characteristics Discus is held in the last joints of the fingers. (1) Fingers are spread on the rim of the discus. Wrist is relaxed and straight. (2) Discus rests against the base of the hand. (2) Thumb rests on the discus. (3)


217 DISCUS THROW Technique throws 211 PREPARATION MOMentum Building delivery Recovery Preparation PHASE Coaches should: Objective To prepare for the turn by winding up and to pre-tense the trunk, shoulders and arm. Technical characteristics Back faces the direction of the throw. Legs are shoulder-width apart, knees bent slightly. Weight is on the balls of the feet. Discus is swung back and behind up to the vertical projection of the left heel. Trunk is rotated at the same time. Arms are kept at nearly shoulder height. Help athletes to:


218 212 THROWS DISCUS THROW Technique PREPARATION MOMentum Building delivery Recovery MOMENTUM BUILDING Phase Part 1 Objective To accelerate the thrower and discus and to prepare for the non-support. Technical characteristics Left knee, left arm and ball of foot are turned actively and simultaneously in the direction of the throw. Weight shifts over the bent left leg. Throwing shoulder is kept behind the body. Right leg is swung low and wide across the circle. Coaches should:
219 DISCUS THROW Technique throws 213 PREPARATION MOMentum Building delivery Recovery MOMENTUM BUILDING Phase Part 2: Non-Support Help athletes to: Objective To accelerate the thrower and discus and build up pre-tension in the trunk Technical characteristics Left foot pushes off forwards when its toes point in the direction of the throw. Jump is flat with an incomplete extension of push-off leg. Throwing arm is above hip height and behind the body. Right foot lands actively on the ball of the foot turning inwards as it does. Left arm folds back across chest. Left leg brushes past the right knee on its way to the front of the circle.
220 214 THROWS DISCUS THROW Technique PREPARATION MOMentum Building delivery Recovery MOMENTUM BUILDING Phase Foot Placement Power Position Objective To provide support for the correct body positions. Technical characteristics Feet are more than shoulder-width apart, turn is to the left on the ball of the left foot. (1) Right leg swings over the outside to the centre of the circle. (2) Right foot is placed on the ball of the foot in the centre of the circle, the left foot lands quickly after the right foot. (3) Power position covers half of the circle (Heel-Toe Position). (4)
221 DISCUS THROW Technique throws 215 PREPARATION MOMentum Building delivery Recovery MOMENTUM BUILDING Phase Objective To maintain momentum and begin the final acceleration of the discus. Technical characteristics Right leg is bent. Right foot/leg are turned immediately in the direction of the throw. Left arm points towards the rear of the circle. Discus is at head height. Left leg lands quickly after the right leg. The delivery phase begins when both feet land on the ground.

222 216 THROWS DISCUS THROW Technique PREPARATION MOMentum Building delivery Recovery Delivery Phase Part 1: Power Position Help athletes to: Objective To begin the final acceleration. Technical characteristics Direction of Throw Weight is supported on the bent right leg. Shoulder axis is over the right foot. Feet are in the Heel-Toe position. Discus is visible behind the body (from side-view).


223 DISCUS THROW Technique throws 217 PREPARATION MOMentum Building delivery Recovery Delivery Phase Part 2: Main Acceleration Objective To transfer velocity from the thrower to the discus. Technical characteristics Right leg is twisted and extended explosively. Right hip turns towards the front of circle. Left side of the body is blocked by the extension of the left leg and the fixing of the bent left elbow held close to trunk. Body weight is shifted from the right leg to left. Throwing arm is drawn through after both feet have made ground contact and the hip has turned. Discus leaves the hand at or slightly below shoulder height (shoulders are parallel!). Coaches should:

224 218 THROWS DISCUS THROW Technique PREPARATION MOMentum Building delivery Recovery Recovery Phase Coaches should: Help athletes to: Objective To stabilise the thrower and avoid fouling. Technical characteristics Legs change quickly after release. Right leg is bent. Upper body is lowered. Left leg swings backwards.

225 DISCUS THROW Technique throws 219
226 220 THROWS DISCUS THROW Teaching Progression STEP 1 Introduction Objectives: To get used to the discus and learn to rotate it correctly. Introduce the discus, safety measures and grip. Bowl the discus on the ground to a partner, releasing off the index finger. Modify the bowl to flip/toss the discus in the air. Tips: STEP 2 STANDING Front THROW Objectives: To learn to throw straight from a rotational acceleration. 1 2 Tips: Start with feet parallel (1) or from split-leg position (2). Wind up backwards, use legs for acceleration, unwind and throw. Use other implements (e.g. rings, light medicine balls); throw at target. STEP 3 STANDING Side THROW Objectives: To learn use of right leg, the hip activity and the blocking action. Tips: Start with left shoulder in direction of the throw, feet 1 1/2 shoulderwidths apart. Swing discus backwards, pivoting on the right foot. Turn right heel out while pushing the right hip forwards, block with left leg.
227 DISCUS THROW Teaching Progression throws 221 STEP 4 Standing throw from power position Objectives: To learn the activity of the right leg, the turn of legs, hips and shoulders. Tips: Start with back facing the direction of the throw. Initiate the throw with a vigorous action of the right hip turning to the front. Swing the discus backwards-upwards with palm down (do not break the movement). STEP 5 One-Turn Throw Objectives: To introduce one complete turn. Tips: Start outside the circle facing the direction of throw with discus behind the body. Step into circle with inward turned left foot (pointed to the left). Turn forwards on the left foot, continue with active right foot into power position, throw. STEP 6 Whole Sequence Objectives: To link the phases into a complete movement. Perform the complete sequence controlling and correcting the power position. Perform with lighter discs. Perform with different implements (e.g. rings, light medicine balls). Tips:
228 222 THROWS ThrowS

229 HAMMER THROW throws 223

230 224 THROWS Hammer Throw

231 Hammer Throw Whole Sequence throws 225 PREPARATION FIRST TURN second TURN THIRd TURN delivery MOMentum Building Hammer Throw Whole Sequence Phase Description The Hammer throw technique is divided into the following phases: PREPARATION, momentum BUILDING and delivery. z of the hammer is initiated and the thrower In the preparation or swings phase the motion moves into position for the momentum building phase, the turns. In the momentum building phase the thrower z and hammer are accelerated through 3 or 4 turns. z produced and transferred to the hammer In the delivery phase additional velocity is before it is released. There is no specific recovery phase in the z hammer throw, the thrower remains in the delivery position.

232 226 THROWS Hammer Throw Technique PREPARATION FIRST TURN second TURN THIRd TURN delivery MOMentum Building GRIP Objective To resist the pull and ensure the correct direction of throw. Technical characteristics Right handed throwers hold the handle with left hand. Handle is placed on the middle section of the fingers. Right hand covers the left hand. Grip is closed by crossing the thumbs or holding them parallel. Grip is strong but relaxed.

233 Hammer Throw Technique throws 227 PREPARATION FIRST TURN second TURN THIRd TURN delivery MOMentum Building Preparation PHASE Starting Position Objective To initiate the acceleration of the hammer. Technical characteristics Alternatives to start the swings: Hammer lays on the ground to the back of the thrower s right side and is pulled to the left and upwards. Swings are started with a pendulum movement of the hammer between and beside the thrower s legs. Coaches should:
234 228 THROWS Hammer Throw Technique PREPARATION FIRST TURN second TURN THIRd TURN delivery MOMentum Building Preparation Phase Objective To accelerate the hammer and prepare for the first turn. Technical characteristics Feet are slightly more than shoulder-width apart, torso is vertical. Body weight shifted visibly, corresponding to the hammer s orbit. Trunk is twisted to the right side when the hammer reaches the high point of its orbit ( look through window formed by arms ). Low point of the hammer s orbit is in front of the right foot. 2-3 wide and flat preliminary swings. Speed is increased gradually from swing to swing. Help athletes to:

235 Hammer Throw Technique throws 229 PREPARATION FIRST TURN second TURN THIRd TURN delivery MOMentum Building MOMENTUM BUILDING Phase First Turn - Transition Objective To link the swings with the first turn and accelerate the thrower and hammer. Technical characteristics Knees are bent, the trunk is upright, and arms are extended. Foot movement commences when the hammer reaches the low point of its orbit. Pivot is on the heel of the left foot, push off is from the right foot, eyes should focus on hammer. Right side of the body is turned actively around the fixed left side. Coaches should:
 and accelerate the hammer (in the double support).")
; Continue with quick pivot on ball of the left foot; Close, low turning movement of the right foot/leg around the left leg; Place the")
236 230 THROWS Hammer Throw Technique PREPARATION FIRST TURN second TURN THIRd TURN delivery MOMentum Building MOMENTUM BUILDING Phase First Turn Objective To develop pre-tension (in the single support) and accelerate the hammer (in the double support). Technical characteristics Heel-Ball Turn: Pivot on the heel of the left foot, push off from the right foot; Change from the heel to the ball of the left foot (over edge of the shoe); Continue with quick pivot on ball of the left foot; Close, low turning movement of the right foot/leg around the left leg; Place the right foot on the ground quickly and smoothly. Help athletes to:

.")
.")

237 Hammer Throw Technique throws 231 PREPARATION FIRST TURN second TURN THIRd TURN delivery MOMentum Building MOMENTUM BUILDING Phase Second Turn Objective To develop pre-tension (in the single support) and accelerate the hammer (in the double support). Technical characteristics z Heel-Ball Turn ( 1 /3 of turn on heel, 2 /3 of turn on ball). Body weight is on the left leg, which remains bent. Body sits visibly against the hammer. Shoulder-axis and the arms form a triangle. Hips move ahead of shoulder during right foot touchdown causing pre-tension. Coaches should:
238 232 THROWS Hammer Throw Technique PREPARATION FIRST TURN second TURN THIRd TURN delivery MOMentum Building MOMENTUM BUILDING Phase Third Turn Help athletes to: Objective To develop pre-tension (in the single support) and accelerate the hammer (in the double support). Technical characteristics Heel-Ball Turn. Height of the low point of the orbit is reduced from turn to turn. Foot separation is reduced from turn to turn. Rotational velocity is increased from turn to turn.


239 Hammer Throw Technique throws 233 PREPARATION FIRST TURN second TURN THIRd TURN delivery MOMentum Building Delivery Phase Coaches should: Objective To transfer velocity from the thrower to the hammer. Technical characteristics Legs are extended rapidly when the hammer reaches the low point of its orbit. Pushoff of the right foot/leg is active, turning the right hip to the front. Left side is blocked when the hip axis points in the direction of the throw. Arms move upwards and to the left, in a whiplash movement. Hammer is released when the shoulder axis points in the direction of the throw. Help athletes to:
240 234 THROWS Hammer Throw Technique PREPARATION FIRST TURN second TURN THIRd TURN delivery MOMentum Building Foot Placement Direction of throw 20 cm 10 cm 70 cm Objective To achieve correct body positions for acceleration. Technical characteristics Preliminary swings are with the feet more than shoulder-width apart (approximately 70 cm). Foot separation is reduced from turn to turn. Feet are staggered by about 10 cm. Feet point to the right after one turn (between ).

241 Hammer Throw Technique throws 235 PREPARATION FIRST TURN second TURN THIRd TURN delivery MOMentum Building Foot Placement Direction of throw Objective To achieve correct placement of high and low points of the orbit. Technical characteristics From turn to turn: Orbit becomes steeper; Low point moves left towards the centre at the rear of the circle; High point moves to the centre at the front of the circle.
242 236 THROWS Hammer Throw Teaching Progression STEP 1 Introduction Objectives: To learn use of the whole body for acceleration in a backward throw. Introduce safety measures. Use legs for acceleration. Keep back straight, arms extended. Sling over the left shoulder. Variations: use improvised implements. Tips: STEP 2 Standing Swings Objectives: To introduce swinging and find a balanced position. Introduce implement and grip. Stand with feet slightly more than shoulder-width apart. Swing hammer between the legs, to the right side then left. Swing several times without releasing. Tips: STEP 3 STANDING THROW Objectives: To introduce the delivery and link it with swings. Tips: Use same starting position as for Step 2. After 2 swings throw the hammer over the left shoulder. Remain in fixed position after release, follow hammer flight with eyes.
243 Hammer Throw Teaching Progression throws 237 STEP 4 Introduction to turning Objectives: To introduce the turn and develop orientation during rotations. Tips: Hold a stick with extended arms, feet shoulder-width apart, knees slightly bent. Turn on the spot by moving the feet anti-clockwise. Keep eyes on the end of the stick, repeat, replacing the stick with hammer. STEP 5 Heel-Toe Turns Objectives: To introduce the Heel-Toe turn. Tips: Turn through 180 balanced on the heel of left foot, pivoting on to the ball of right foot. Continue turn another 180 balanced on the ball of the left foot while lifting the right foot. Place the right foot down to complete a 360 turn. STEP 6 Complete Sequence (2 Swings and 1 Turn) Objectives: To link the phases into a whole, but shortened, competition movement. Take two preliminary swings and commence the turn. Use one heel-toe turn and delivery. Use alternative implements. Tips:
244
245 INTERNATIONAL ASSOCIATION OF ATHLETICS FEDERATIONS RUN Jump & Throw! IAAF Coaches Education and Certification System


246 240 Combined COMBINED EVENTS


247 COMBINED EVENTS COMBINED throws 241
ATHLETICS OMNIBUS - HURDLING From the Athletics Omnibus of Richard Stander, South Africa
 ATHLETICS OMNIBUS - HURDLING From the Athletics Omnibus of Richard Stander, South Africa 1. HIGH HURDLING (70M 110M) 1.1. GENERAL INFORMATION High hurdling is regarded as a sprinting event. It is required
Javelin Technical Model
 Javelin Technical Model Progression related to Multi-Events Development (aged 8/9-12 years) can be referenced to Athletics 365. Further technical information can be found HERE Whole Sequence The javelin
The Hurdle Events. Jeff Martin IATCCC Clinic. Indianapolis, Indiana. 5 Myth s about Hurdling
 The Hurdle Events Jeff Martin Indianapolis, Indiana 5 Myth s about Hurdling - Speed is not a necessity to hurdle fast - Good form not pure speed makes a good hurdler - An athlete that can t jump, throw,
Hammer Technical Model
 Hammer Technical Model Progression related to Multi-Events Development (aged 8/9-12 years) can be referenced to Athletics 365 More technical information can be found HERE IAAF CECS Level II Event Specific
ATHLETICS OMNIBUS - TRIPLE JUMP From the Athletics Omnibus of Richard Stander, South Africa
 ATHLETICS OMNIBUS - TRIPLE JUMP From the Athletics Omnibus of Richard Stander, South Africa The objective of triple jumping is to try and jump as far as possible by stepping on a take off board, take 2
Beginner Developing (RUN School Rabbits) Practising (RUN School Run) Emerging (Athletes) ATHLETE
 Practising (RUN School Run) Emerging (Athletes) ATHLETE") various s in response to instructions 2 Use backward to forward arm swing to increase ing distance 3 Identify preferred take off leg fast led approach with limited run up: 10-12 strides Achieve optimum
various s in response to instructions 2 Use backward to forward arm swing to increase ing distance 3 Identify preferred take off leg fast led approach with limited run up: 10-12 strides Achieve optimum
RJT. Pupil Task Cards: Throwing JUMP THROW RUN
 RJT s: Throwing RUN JUMP THROW s: Introduction Introduction to the s An important part of every child s cognitive development is to encourage them to explore new things and use self-guided learning to
Page 1 Introduction. Fast and slow twitch muscle fibres are. Page 2 The Sprint Start. Page 4 - Sprints. Page 5 - Middle Distance
 Name: Below are some terms for you to research. Once you have found out what each term means write a short paragraph explaining why you perform better in some events than you do others. Page 1 Introduction
IAAF CECS Digital Development Center
 IAAF CECS Digital Development Center IAAF / EA Coach Management System Seminar Cologne / GER November 28 th 2017 Günter Lange gunter.lange@iaaf.org IAAF CECS Long-Term Goals to ensure that each country
Rules of Hurdling. Distance Between Hurdles
 The Hurdle Events Introduction Brief discussion of rules, safety practices, and talent demands for the hurdles. Examine technical and training considerations for the hurdle events. 100 Meter Hurdles for
H.Dh. AEC PE Scheme Grade 3 Term1 2008
 1 We ek First Week Dat e 9 th January Topic Objectives Activities Assessment Material Needed Physical Fitness Activity Build up physical strength while doing fun activities Exercise whole body parts while
Sprinting. Relevant Knowledge** Overall Level. Assessment Criteria. Learning Outcomes
 Sprinting 1. coordinate their limbs. 2. be familiar with the starter s order.. swing their arms in rhythm. 1. coordinate their limbs. 2. swing their arms in rhythm.. react accurately to signals.. master
USA Track & Field Heptathlon Summit- November
 USA Track & Field Heptathlon Summit- November 1994 1 I. Technical considerations in the sprint hurdles Practical Biomechanics For the 100m Hurdles By Gary Winckler University of Illinois A. General flow
110m Hurdle Theory and Technique
 110m Hurdle Theory and Technique Ralph Lindeman Head Track Coach, U.S. Air Force Academy Men's Hurdle Development Chairman, USATF WANTED: Highly motivated sprinters to attempt one of track & field's most
THROW. Skill Progressions at a Glance. General Criteria (for right-handed throws) Safety for the Throws
 Safety for the Throws") THROW Skill Progressions at a Glance General Criteria (for right-handed throws) Movement sequence: a. preparation; b. momentum building; c. delivery; and d. recovery. During the delivery, right heel and
THROW Skill Progressions at a Glance General Criteria (for right-handed throws) Movement sequence: a. preparation; b. momentum building; c. delivery; and d. recovery. During the delivery, right heel and
Shot Technical Model
 Shot Technical Model Progression related to Multi-Events Development (aged 8/9-12 years) can be referenced to Athletics 365. Further technical information can be found HERE Linear Shot - Whole Sequence
ATHLETICS OMNIBUS - SPRINTS From the Athletics Omnibus of Richard Stander, South Africa
 ATHLETICS OMNIBUS - SPRINTS From the Athletics Omnibus of Richard Stander, South Africa 1. THE SPRINT The sprint is the fastest event of all events in athletics. The distances 100m, 200m, 400m and relay
THROWING SKILLS RUN JUMP THROW
 RUN JUMP THROW CHAPTER 7: KEY IDEAS Throwing activities can be divided into the following sub-groups: pushing activities which lead to shot put pulling activities which lead to javelin throw slinging activities
ATHLETICS OMNIBUS - JAVELIN THROW From the Athletics Omnibus of Richard Stander, South Africa
 ATHLETICS OMNIBUS - JAVELIN THROW From the Athletics Omnibus of Richard Stander, South Africa JAVELIN THROW Javelin Throw is regarded as a strength event. The Javelin Thrower is required to throw a spear
Discus Technical Model
 Discus Technical Model Progression related to Multi-Events Development (aged 8/9-12 years) can be referenced to Athletics 365 stages Red, Yellow & Green Whole Sequence Preparation Momentum Building Delivery
LEVEL 1 SKILL DEVELOPMENT MANUAL
 LEVEL 1 SKILL DEVELOPMENT MANUAL Lesson Manual C A Publication Of The USA Hockey Coaching Education Program The USA Hockey Coaching Education Program is Presented By LESSON C-1 SPECIFIC OBJECTIVES 1. Refine
ShuttlE. Schools Badminton LESSON PLANS 10 STARTER LESSONS
 Schools Badminton LESSON PLANS 10 STARTER LESSONS Schools Badminton LESSON PLANS 10 STARTER LESSONS Badminton World Federation 2011. First published November 2011. Overview 1. Introduction 10 Starter
Sprint/Speed Training
 Sprint/Speed Training By Paul Tramontanas In footy, speed is required over distances from 10m-70m depending on the state of play. This being the case, the full range of distances need to be trained to
Racing Start Safety Certification Protocol. Forward and Backstroke Starts. Updated: February 2018
 Racing Start Safety Certification Protocol Forward and Backstroke Starts Updated: February 2018 1 Date: March 9, 2018 To: From: Subject: USA Swimming Member Clubs USA Swimming Member Coaches LSC General
ATHLETICS OMNIBUS - DISTANCE RACES 800M M AND STEEPLE CHASE From the Athletics Omnibus of Richard Stander, South Africa
 ATHLETICS OMNIBUS - DISTANCE RACES 800M - 10000M AND STEEPLE CHASE From the Athletics Omnibus of Richard Stander, South Africa 1. DISTANCE RACES (800 10000M) THE CORRECT RUNNING TECHNIQUE In distance running
ATHLETICS OMNIBUS - HIGH JUMP From the Athletics Omnibus of Richard Stander, South Africa
 ATHLETICS OMNIBUS - HIGH JUMP From the Athletics Omnibus of Richard Stander, South Africa 1. HIGH JUMP The objective of high jumping is to try and jump as high as possible by taking a run-up and jump over
ATHLETICS OMNIBUS - RACE WALKING From the Athletics Omnibus of Richard Stander, South Africa
 ATHLETICS OMNIBUS - RACE WALKING From the Athletics Omnibus of Richard Stander, South Africa 1. RACE WALKING THE CORRECT WALKING TECHNIQUE 1.1. GENERAL There is very little resemblance between having a
ABOUT THE TEACHING OF THROWING EVENTS
 ABOUT THE TEACHING OF THROWING EVENTS By Friedheld Endemann The following address provides a general outline of principles applied to learning practices in throwing events with recommended sequences for
Rugby Strength Coach. Speed development guide
 Rugby Strength Coach Speed development guide Outline Why do Newton's laws of motion matter? What is speed? The technique and physical demands of speed Speed training parameters Rugby specific speed training
Discus Technique: Basic Technique A Technical Analysis Grip Fork Gr Purpose: To provide control over Discus is held with Discus is held
 Discus Technique: A Technical Analysis Sandy Fowler University of Michigan Assistant Track & Field Coach Grip Purpose: To provide control over the implement throughout the spin. To provide for a proper
A coaching guide Stephen Cowburn
 A coaching guide Stephen Cowburn 1 Introduction This guide has been written principally for use by Little Athlete Relay Coach s. The information and advice it offers has been gathered over several years
Introduction for Coaches By Coach Andrew Blanks
 Introduction for Coaches By Coach Andrew Blanks (Except from upcoming book Hurdles Are Fundamental & Fun ) Young hurdlers have to be developed with rhythm and technique. The idea, coaches, is to make sure
Outline. Newton's laws of motion What is speed? The technical and physical demands of speed Speed training parameters Rugby specific speed training
 Linear speed Outline Newton's laws of motion What is speed? The technical and physical demands of speed Speed training parameters Rugby specific speed training Outline Session structure Teaching guidelines
Components of the 400m Hurdles
 Components of the 400m Hurdles By Ray Boyd NATIONAL 400M HURDLE COACH-AUSTRALIA FROM: Modern Athlete and Coach The 400m hurdles race can be broken up into four stages: Start to First Hurdle Movement Across
Coaching Principles. 1. Introduce 2. Demonstrate 3. Explain 4. Organize 5. Execute 6. Correct 7. Practice
 5 Pin Bowling Drill Book Updated August 2008 Coaching Principles STEPS IN TEACHING A DRILL 1. Introduce 2. Demonstrate 3. Explain 4. Organize 5. Execute 6. Correct 7. Practice GENERAL PRINCIPLES Drills
ATHLETICS OMNIBUS - JAVELIN THROW From the Boland Athletics website:
 ATHLETICS OMNIBUS - JAVELIN THROW From the Boland Athletics website: www.bolandathletics.com 1. JAVELIN THROW Javelin Throw is regarded as a strength event. The Javelin Thrower is required to throw a spear
PARA-BADMINTON WHEELCHAIR DEVELOPMENT
 PARA-BADMINTON WHEELCHAIR DEVELOPMENT Para-Badminton Wheelchair Development Introduction The use of the arms for both movement and hitting technique are the main challenges in the wheelchair sports class.
TRAVELLERS SPORTS ATHLETICS COACHING MANUAL
 Travellers Worldwide: ATHLETICS Coaching Manual page 1 of 13: TRAVELLERS SPORTS ATHLETICS COACHING MANUAL Issue Date of Issue CR/DR Numbers CHANGE HISTORY No. of Pages 1 30-Nov-06 13 Pages Changed and
Standing javelin. Development Stage: event group development. Outcome of Activity. What-2 Get the Athletes to Do. Equipment.
 24 Standing javelin 5m 30m 5m THROW FROM HERE IN DIRECTION OF THE ARROW SAFE WAITING AREA event group development Athletes will be able to perform an overhead pull throw from the Power Position with a
Fitness Drills and Games
 Fitness Drills and Games Select from a large variety of Fitness drills and games to custom design your own practice sessions. There are fun and challenging practices for every age and skill level. Chasing
LEVEL 1 SKILL DEVELOPMENT MANUAL
 LEVEL 1 SKILL DEVELOPMENT MANUAL Lesson Manual D A Publication Of The USA Hockey Coaching Education Program The USA Hockey Coaching Education Program is Presented By 1. Proper Stance: LESSON D-1 SPECIFIC
Player Development. Pitching 1
 Pitching Player Development Pitching 1 Delivery Mechanics Checklist: 1. Feet slightly spread on throwing arm side of rubber 2. Body weight positioned over stride leg 3. Torso upright 4. Hips and shoulders
Racing Start Safety Certification Protocol PROPOSAL. Combined Forward and Backstroke
 Racing Start Safety Certification Protocol PROPOSAL Combined Forward and Backstroke DRAFT for Operational Risk Committee REVISED 6/05/2017 page 1 TEACHING RACING STARTS SAFELY Before You Teach, Be Sure:
15KM 14-WEEK TRAINING PROGRAMME
 15KM 14-WEEK TRAINING PROGRAMME T H E G O A L O F T H I S P L A N I S N T T O G E T Y O U A C R O S S T H E F I N I S H L I N E, I T S T O G E T T H E B E S T V E R S I O N O F Y O U A C R O S S T H E
The Grip: Place the shot comfortably on the base of the hand with the thumb down and the four fingers balancing the shot.
 The Javelin By Mark Mirabelli, Throwing Specialist - www.mmtrackandfield.com If I could use one word to express success in all three styles of throwing the shot put I would have to say the word drill.
ATHLETICS OMNIBUS - RELAYS From the Boland Athletics website:
 ATHLETICS OMNIBUS - RELAYS From the Boland Athletics website: www.bolandathletics.com The relay event is a team event, consisting of 2 or more athletes changing over a baton from one athlete to another
A Publication Of The USA Hockey Coaching Education Program The USA Hockey Coaching Education Program is Presented By
 LEVEL 1 SKILL DEVELOPMENT MANUAL Lesson Manual B A Publication Of The USA Hockey Coaching Education Program The USA Hockey Coaching Education Program is Presented By LESSON B-1 SPECIFIC OBJECTIVES 1.
-$9(/,1²/(9(/ Learning Activities. 78/ THROW (Javelin Level 1) Run, Jump, Throw and away we go! (2001)
 Run, Jump, Throw and away we go! (2001)") -$9(/,1²/(9(/ Learning Activities OVERHEAD SOCCER THROWS (LARGE BALL) x Both hands are on the ball and it is thrown from overhead with both feet on the ground. Note the whipping action created. Limit to
-$9(/,1²/(9(/ Learning Activities OVERHEAD SOCCER THROWS (LARGE BALL) x Both hands are on the ball and it is thrown from overhead with both feet on the ground. Note the whipping action created. Limit to
AMATEUR HOCKEY ASSOCIATION ILLINOIS, INC. MITE 8 & UNDER AMERICAN DEVELOPMENT MODEL
 Mite 8 & Under American Development Model Week 1 This coach s manual is intended to provide the instructions and tools to conduct the Mite and 8 & Under Illinois Hockey - Skills Challenge. Mite
Hurdles. Steve Cowburn
 Steve Cowburn 0419 301 412 Theory Session Objectives Discuss & define stride pattern and rhythm Discuss stride length & cadence and identify importance Analyse and identify key actions at various stages
Spring 2010 Coaching Sessions U14
 Spring 2010 Coaching Sessions U14 Coaching Ages 13 to 14 Years This section provides you with a eight week training program for children ages 13 through 14 years. Each practice features four fun and progressive
18-WEEK BANK OF AMERICA CHICAGO MARATHON TRAINING PROGRAM OCTOBER 7, 2018
 18-WEEK BANK OF AMERICA CHICAGO MARATHON TRAINING PROGRAM OCTOBER 7, 2018 CONTENTS 04 INTRODUCTION 05 WEEKLY WORKOUTS 08 PACE CHART 09 GLOSSARY 10 IF YOU... 11 2018 BANK OF AMERICA CHICAGO MARATHON WEEK-BY-WEEK
Sprint run Card One. State of NSW, Department of Education and Communities, Skill components
 Sprint run Card One 1 2 3 4 5 6 Skill components 1. Lands on ball of the foot. 2. Non-support knee bends at least 90 degrees during recovery phase. 3. High knee lift (thigh almost parallel to the ground).
Coaching Principles. STEPS IN TEACHING A DRILL 1. Introduce 2. Demonstrate 3. Explain 4. Organize 5. Execute 6. Correct 7. Practice GENERAL PRINCIPLES
 Alpine Skiing Drill Book Updated August 2008 STEPS IN TEACHING A DRILL 1. Introduce 2. Demonstrate 3. Explain 4. Organize 5. Execute 6. Correct 7. Practice GENERAL PRINCIPLES Coaching Principles Drills
INTRODUCTION TO GOALKEEPING COACHING TECHNICAL INFORMATION
 INTRODUCTION TO GOALKEEPING COACHING TECHNICAL INFORMATION Welcome The Introduction to Goalkeeping Coaching Course (ITGKC) presents new or existing coaches with the opportunity to familiarise themselves
The Athlete. The 100m Hurdles. Athletic Ability. Internal Drive. Stick-to-it-ness
 The 100m Hurdles The Athlete Athletic Ability Internal Drive Stick-to-it-ness Try everyone and don t count anyone out you might miss out on an athlete as they develop. Average to better than average speed
TEACHING RACING STARTS SAFETY PROTOCOLS AND CHECKLIST
 TEACHING RACING STARTS SAFETY PROTOCOLS AND CHECKLIST Before You Teach, Be Sure: 1. Swimmers can jump feet first into deep water, surface, turn around, level off and swim 10 feet. 2. Swimmers can demonstrate
100 / 110m HURDLES. Contemporary Technique & Training. RALPH LINDEMAN, Head Track Coach US Air Force Academy
 RALPH LINDEMAN, Head Track Coach US Air Force Academy PRIMARY CONCERNS Teach hurdler to sprint over the barriers! Analyze for the causes of effects. Coach for balance eliminate causes of excessive rotation.
Racewalking Training Manual for Junior Athletes. Leg drive & Feet placementy
 Leg drive & Feet placementy ü The double support phase of a walkers stride occurs for only a fraction of a second. ü It should be the aim of every walker to reduce the time taken on this phase. ü Contact
THE INITIAL STAGE THE FINAL STAGE
 THE JAVELIN RUN-UP By Hans Torim A detailed description of the author s views on the javelin run-up from the initial stages to the impulse stride and the pre-delivery position. The article is a slightly
Effectively. Coaching the 4x100 Relay
 Effectively Coaching the 4x100 Relay Athletics Scotland Conference Emirates Arena, Glasgow 2016 The 4x100 Pop Quiz 1. How many meters of acceleration could an outgoing runner possibly have before receiving
18-WEEK MARATHON TRAINING PROGRAM
 18-WEEK MARATHON TRAINING PROGRAM OCTOBER 9TH, 2016 T H E G O A L O F T H I S P L A N I S N T T O G E T Y O U A C R O S S T H E F I N I S H L I N E, I T S T O G E T T H E B E S T V E R S I O N O F Y O
ShuttlE. Schools Badminton LESSON PLANS Throw and Hit
 Schools Badminton LESSON PLANS Throw and Hit Schools Badminton LESSON PLANS Throw and Hit Badminton World Federation 2011. First published November 2011. Overview 1. Introduction Throw and Hit Before
30m Crouch Start. 100m Crouch Start. # of Steps
 Approach Run PRECEPTS RALPH LINDEMAN Head Men s and Women s Track & Field Coach US Air Force Academy Coaching Staff, USA Men s Team, 2004 Olympic Games, Athens, Greece Coaching Staff, USA Men s Team, 2007
front crawl Published in associa on with swim-teach.com
 front crawl Front Crawl Technique Made Easy Front crawl swimming stroke broken down and explained Including 2 bonus exercises Published in associa on with swim-teach.com Legal No ce Copyright 2008, swim-teach.com
18-week training program
 MARA T HON 18-week training program T H E G O A L O F T H I S P L A N I S N T T O G E T Y O U A C R O S S T H E F I N I S H L I N E, I T S T O G E T T H E B E S T V E R S I O N O F Y O U A C R O S S T
100/110 Hurdle Training. Wendy Truvillion
 100/110 Hurdle Training Wendy Truvillion Introduction Hurdling is sprinting with rhythm! Hurdling deviates as least as possible from normal sprinting. The abilities needed in hurdling are very similar
Coaches Handbook. Coaches Handout Page 1
 Coaches Handout 2009 Page 1 General Session 1: How to Warm-up! Players are put through basic warm-ups and exercises that they should perform each week when they come to Tball. Stretching should be the
Event Format. On the track. and in the field
 Event Format The Sportshall Secondary Programme offers an ideal format for competition in which young people may develop their skills ahead of the track and field season. Team Information Each team should
Skating Coach Resource Package
 Skating Coach Resource Package 2005, Hockey Canada 1 of 15 Dear Coach, Specialty coach clinics are a national initiative of the Hockey Canada s National Coach Mentorship Program and designed on a modular
JUMP FOR. AIM For athletes to jump for height from one foot, landing on two feet. YOU WILL NEED Low (30cm) hurdle or cones and a stick, landing mat
 hurdle or cones and a stick, landing mat") JUMP FOR Game card: JUMPING Low (0cm) hurdle or cones and a stick, landing mat For athletes to jump for height from one foot, landing on two feet Group athletes in threes, each with a jumping area. ON
JUMP FOR Game card: JUMPING Low (0cm) hurdle or cones and a stick, landing mat For athletes to jump for height from one foot, landing on two feet Group athletes in threes, each with a jumping area. ON
APRIL 2, WEEK TRAINING PROGRAM
 APRIL 2, 2017 8-WEEK TRAINING PROGRAM T H E G O A L O F T H I S P L A N I S N T T O G E T Y O U A C R O S S T H E F I N I S H L I N E, I T S T O G E T T H E B E S T V E R S I O N O F Y O U A C R O S S
2017 Grades K-3 Coaches Handbook Track and Field
 2017 Grades K-3 Track and Field Table of Contents Coaching...3 Season Schedule...4 Weather...4 Parent Volunteers Schedule...5 Skills Clinic...6 Pictures...7 Practice...8 Logistics...9 Schedule... 10 Field
TRACK AND FIELD STUDY GUIDE
 TRACK AND FIELD STUDY GUIDE I. TRACK EVENTS Dash sprint Staggered Start runners line up on different lines to equalize the distance around the track Pace spreading out your energy for a longer race in
The Discus. By Al Fereshetian. Nature of the Event
 11 The Discus By Al Fereshetian Nature of the Event Because of the numerous diverse qualities necessary for success, the discus throw is one of the most complex events in all of track and field. Discus
Baserunning Skills and Drills
 Baserunning Skills and Drills 1 Copyright Notice -IT IS ILLEGAL TO POST THIS DOCUMENT ONLINE 2 The material enclosed is copyrighted. You do not have resell rights or giveaway rights to the material provided
Toronto Triathlon Club Sprint/Try-a-Tri Training Program
 Toronto Triathlon Club Sprint/Try-a-Tri Training Program WHO IS THIS FOR?? This program is designed for athletes who have little or no experience in triathlons and their main goal is to finish the event.
Rules and Guidance Notes Sportshall Primary Yr 3&4.
 and Sportshall Primary Yr 3&4 www.sportshall.org Competition Overview Sportshall Primary Competition This exciting format provides many children with their first competitive athletic experiences. Large
Racewalking advice Bulletin board March 2008 By Mark A Donahoo
 Racewalking advice Bulletin board March 2008 By Mark A Donahoo I have received a caution or a red card from Often you hear a walker say: I received a caution (or red card) but I don t know why? Everyone
ShuttlE. Schools Badminton. Module 5: 10 starter lessons
 ShuttlE Time Schools Badminton Teachers MANUAL Module 5: 10 starter lessons ShuttlE Time Schools Badminton Teachers MANUAL 10 starter lessons Badminton World Federation 2011. First published November
Softball Pitching Mechanics
 Softball Pitching Mechanics When teaching softball pitching mechanics, the best way to avoid injury, develop consistency, and see results is through repetition and attention to detail. Even a slight change
ATHLETICS OMNIBUS - SHOT PUT From the Athletics Omnibus of Richard Stander, South Africa
 ATHLETICS OMNIBUS - SHOT PUT From the Athletics Omnibus of Richard Stander, South Africa 1. SHOT PUT Shot Put is regarded as a strength event. The Shot Putter is required to push a steel ball as far as
SHOT PUT - GLIDE TECHNIQUE
 SHOT PUT - GLIDE TECHNIQUE The Shot Put can be broken down to four different phases. Preparation/Glide/Delivery & Recovery. Preparation - The thrower sets up correctly to commence the glide. Glide - The
Rules and Guidance Notes Sportshall Primary.
 and Sportshall Primary www.sportshall.org Competition Overview Sportshall Primary Competition This exciting format provides many children with their first competitive athletic experiences. Large numbers
Weekly Practice Schedule:
 Coaching Ages 13 to 14 Years This section provides you with a twelve-week training program for children ages 13 through 14 years. Each practice features four fun and progressive drills and culminates with
Olympian Kevin Young World Record Holder 400 meter Hurdles. Olympian Sharrieffa Barksdale Former American Record Holder 400 meter Hurdles
 Olympian Kevin Young World Record Holder 400 meter Hurdles Olympian Sharrieffa Barksdale Former American Record Holder 400 meter Hurdles Technique Drills for Men and Women 300 and 400 meters Hurdles Stage
LGFA Interfirms Coaching Resource Booklet Ladies Gaelic Football
 LGFA Interfirms Coaching Resource Booklet Ladies Gaelic Football 1 Coaching Resource (Part 1) IDEAL Principle Head, Hands Feet Technique LGFA Skill Cards 2 IDEAL PRINCIPLE When coaching a technique or
BADMINTON LEADERS HANDBOOK JAKE DOWNEY
 BADMINTON LEADERS HANDBOOK JAKE DOWNEY 1 BADMINTON LEADERS HANDBOOK JAKE DOWNEY ex-director of Coach Education Badminton Association of England Ltd Published by Jake Downey (2004) First published in Great
QUICK TIPS THROWING & FIELDING
 PRACTICE ACTIVITIES The number one reason children decided to stop playing baseball is they get bored. The best approach to planning and organizing practices is to make sure players are always active rather
ACTIVITY TYPE. Coaching Points COACHING RESOURCE
 ACTIVITY TYPE Coaching Points COACHING RESOURCE 171 Footwork, Balance and Movement Skills Initial Stance Forms the starting point for most attacking and defending skills. Feet shoulder-width apart Shoulders
Fun Run Training Program
 Fun Run Training Program 21km Half Marathon The programs outlined below will highlight the key weekly sessions that need to be completed during your half marathon preparation. Your weekly program structure
primary Intra-school/Level 1 Resource - challenge card gymnastics - floor work one foot balance
 primary Intra-school/Level 1 Resource - challenge card gymnastics - floor work one foot balance Quick introduction This one foot balance challenge gets progressively harder as it moves from floor to apparatus
GYROSTATIC DELIVERY TECHNIQUE By Macka Jensen
 GYROSTATIC DELIVERY TECHNIQUE By Macka Jensen Knowledge dispels fear 1. INTRODUCTION Gyrostatic technique: The application of these factors in the gyrostatic delivery technique is based on the principle
Football Association of Wales Professional Licence. Pre-season training programme
 Football Association of Wales Professional Licence Pre-season training programme Pre-season training AEROBIC POWER (85 95% Max HR) INTENSIVE ENDURANCE (Interval training) TO INCREASE HIGH-INTENSITY PRESSING
Selecting Successful Vaulters. Teaching the Beginning Pole Vaulter 12/31/2010. Speed. Jumping Ability KCCTFCA Winter Coaches Clinic
 Teaching the Beginning Pole Vaulter 2011 KCCTFCA Winter Coaches Clinic Thane Nonamaker Gardner Edgerton High School Selecting Successful Vaulters Speed Jumping Ability Athletic Ability Attitude Speed The