Schaefer recognized this issue and they offer to replace the drum bearing assembly for $
|
|
|
- Janice Bridges
- 5 years ago
- Views:
Transcription


1 Schaefer 2100 roller furler drum replacement on Catalina 320 Danny Jensen, A BOA VIDA hull #972, Thanks to contributions Chris Burti, Jeff Hare and C320 group for comments Photos were taken and edited with iphone app My Measures. Symptom: The basic symptom is your sail will not roll in or out without force. The drum unit is hard to turn. Your sail will not roll out on it s own. Causes: The cause of this problem is years of salt and sand encrusting in the upper and lower bearings. Some owners feel that the bearings are ruined when encrusted bearings are forced by the use of a winch.schaefer has attempted to prevent this problem by a minor redesign of the drum assembly to create a wash hole. My furling hull #972 drum did not have a wash hold. Some owners also sail the older bearings had tighter tolerances so these bearings were more apt to clog with junk. View Looking down on the lower bearings of the drum unit. Solution: View Looking down on the lower bearings of the drum unit. Schaefer recognized this issue and they offer to replace the drum bearing assembly for $
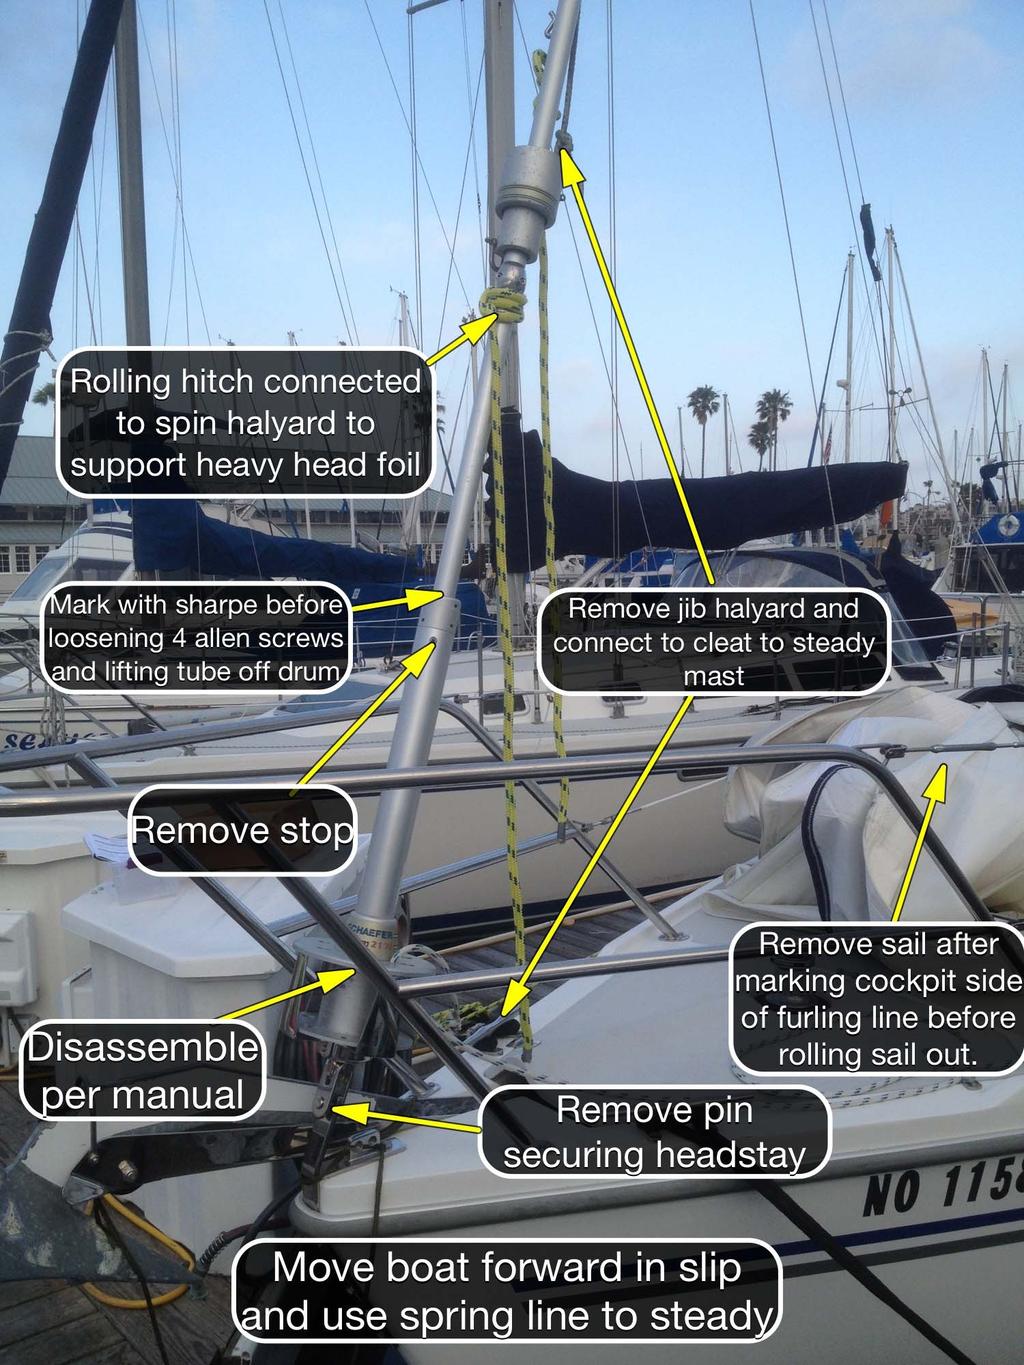
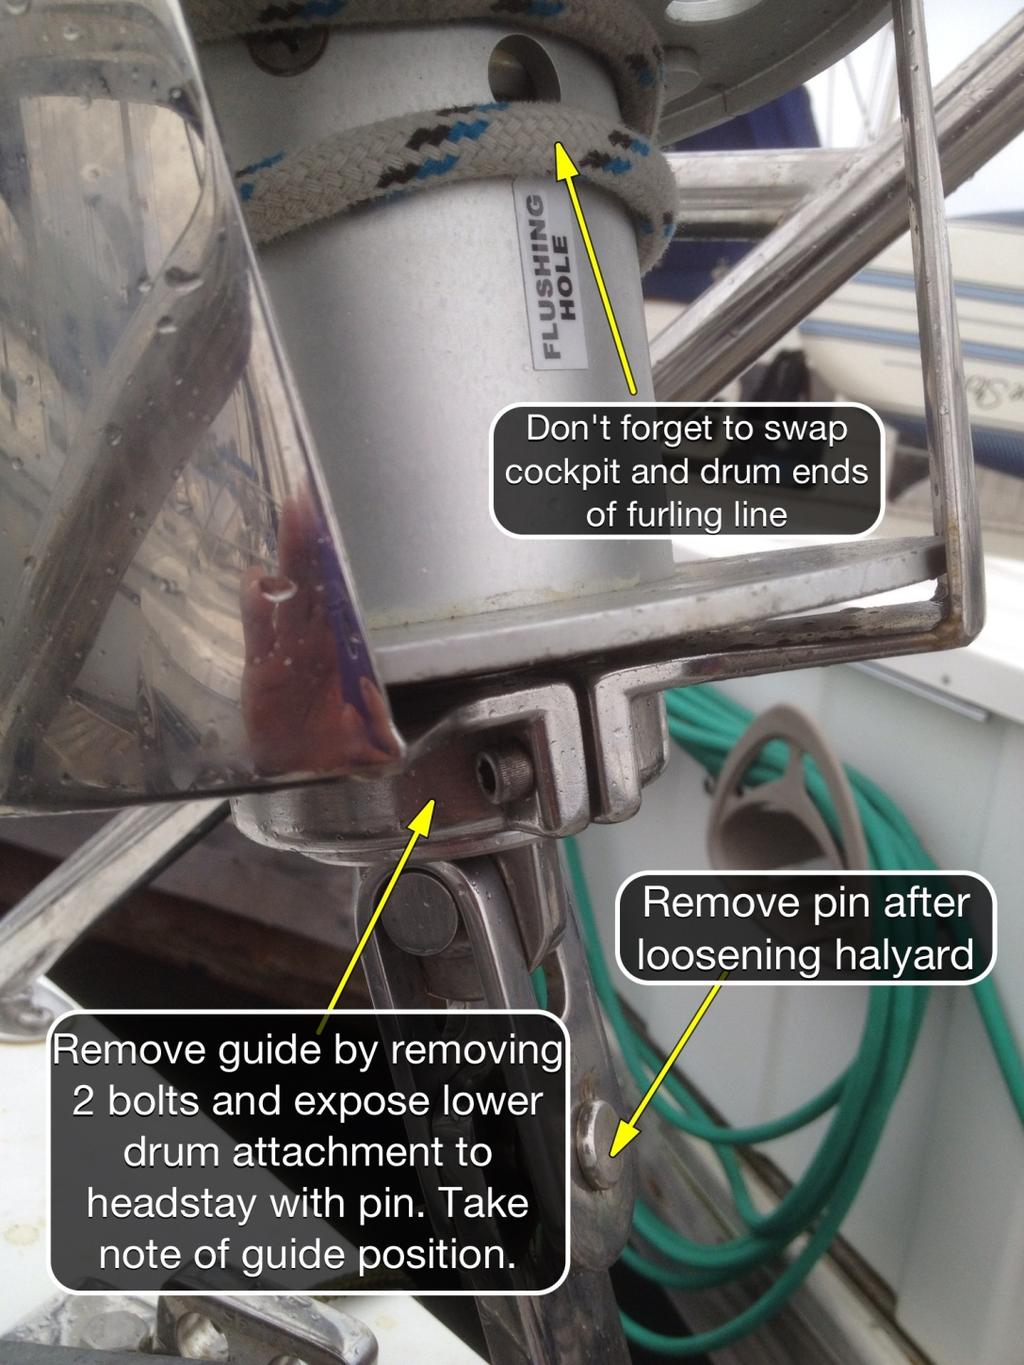
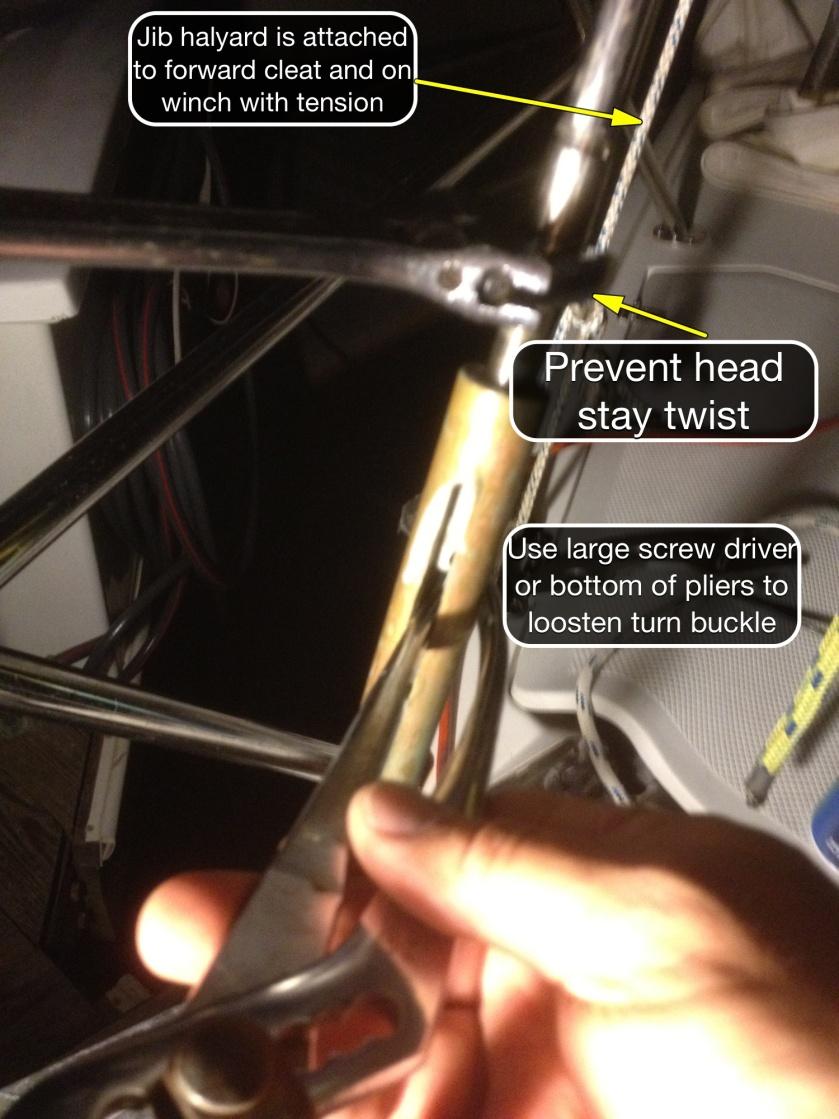
2 Replacement Instructions: What you need before you start: 1. Call Schaefer and request a replacement 2100 furler drum bearing assembly part # A. They will also provide you with qty 4 part number drum screws and Installation instructions ( Have your credit card ready. Allow 5 working days for delivery. Here is another drawing of the system 2. Channel lock pliers use the tail of pliers on turnbuckle 3. Adjustable wrench for head stay 4. Large slotted screw driver for turnbuckle 5. Phillips screwdriver 6. Knife to cut and reverse furling line 7. Allen wrenches / Allen screwdriver is best 8. Needle nose pliers 9. Sharpe marker mark turnbuckle, 10. Hammer 11. Vise grips 12. Winch grease / wd Anti seize Use on all screw holes use wench grease if you don t have this 14. Rags / Small Containers / Boxes for small parts 15. A few 5 ft segments of line and a shackle 16. About 3 hrs of time when wind is not howling just in case things go wrong 17. Good spray nozzle Use for bearings that attach to the halyard clean them while your sail is down. 18. Optional Spare cotter pins Everything below has been covered in the Catalina 320 news group or is contained in the manual. Here my recollection of the procedure I followed. Make sure you look at the manual. My instructions that follow are not as detailed as the manual after reading owner comments and the manual. 1. Pull your boat up to the forward edge of your slip using a spring line. It is best if the bow overhangs the dock. 2. Mark the top part of the torque tube above the clamp where screws lock the tube against the head foil. 3. Take a picture of your furling unit with the furling line run through it. This way you can duplicate the lead and the gage housing position. 4. Before unfurling the sail, mark the cockpit end of the rolling furling line. 5. Unfurl the sail and take a picture of the unfurled drum 6. Lower and remove the sail and tie with sail ties 7. With a short line, rig a rolling hitch around the head foil just below the feeder and tie to the spinnaker halyard and tension with the winch. Your hitch should be just below the feeder. 8. Run the jib halyard through the forward cleat and tie it around itself then tension the halyard with the wench after loosening the backstay. This will be your new head stay. 9. Remove stainless cage / guide by loosening 2 screws at base 10. Remove top and bottom plates. Clean them and apply light grease to inside edge. 11. Loosen 4 bolts securing the head foil tube. 12. Remove allen stop pin. Your head stay may be resting on this. This pin should be flush with surface of the tube and you will replace it flush. Don t over tighten on reassembly! 13. Remove 4 fasteners in inside drum. This bolts are replaced with new bolts in the kit has replacement bolts. 14. Lift the tube off the drum about 18 inches and tighten screws holding tube in place
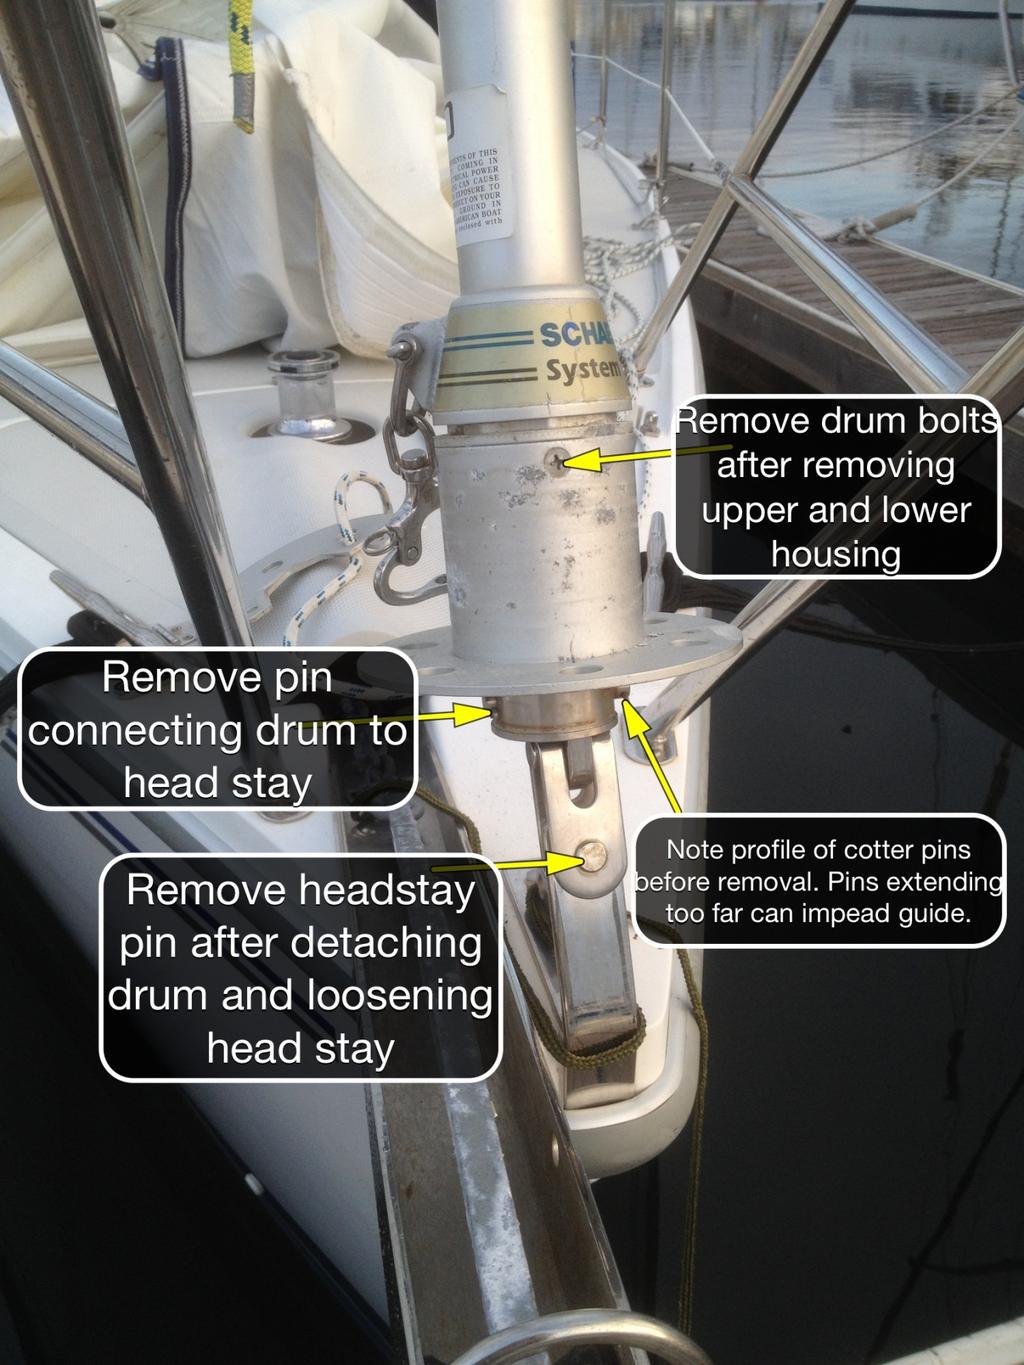
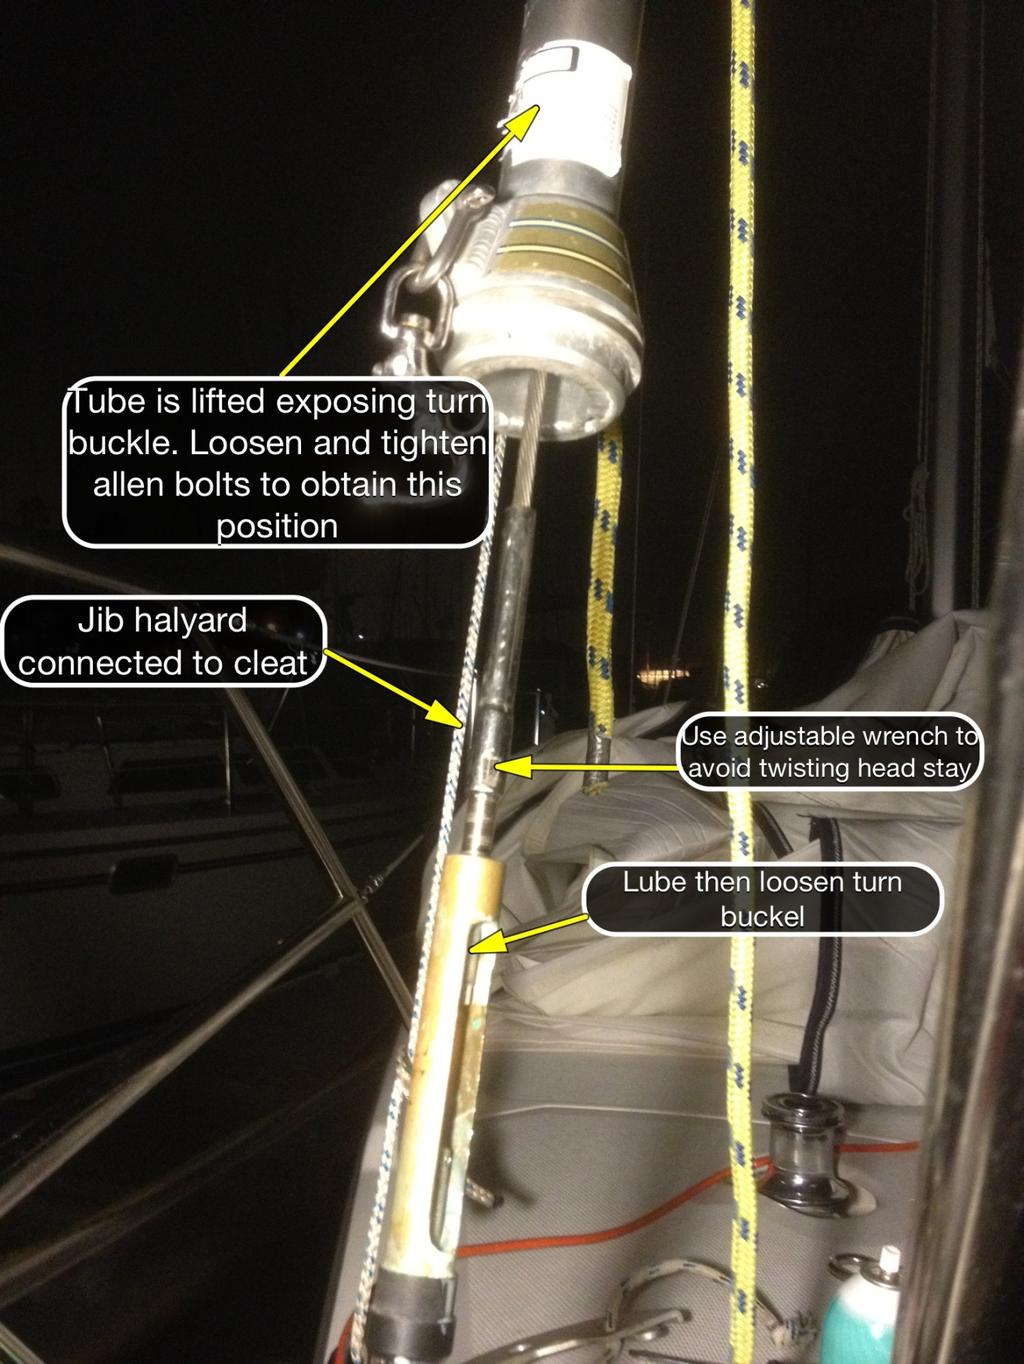
3 15. Remove the pin securing the drum assembly to the fore stay. Look at the exact profile of the cotter pins. If these cotter pins extend too far, your cage guide will not rotate correctly on reassembly 16. Lube and clean turnbuckle. Loosen turnbuckle with adjustable wrench on head stay and large screwdriver. 17. Use small line with small shackle. Attach shackle to head stay and tie line off to anchor support sprit. This will help you re-attach the head stay later and it will prevent the head stay from going mid ship. 18. Release head stay pin freeing head stay. 19. Remove old assembly and put new assembly on head stay 20. Use the line with shackle you rigged on the head stay to pull down and while you insert the head stay pin. You can do this by yourself but it is a bit difficult. 21. Reassemble in reverse order. Swap ends of furling line 22. Flush top bearing connected to halyard with high-pressure hose.
4
5
6
7

8
Symptom: The basic symptom is your sail will not roll in or out without force. The drum unit is hard to turn. Your sail will not roll out on its own.
 Schaefer 2100 roller furler drum replacement on Catalina 320 Danny Jensen, A BOA VIDA hull #972, Thanks to contributions Chris Burti, Jeff Hare and C320 group for comments Photos were taken and edited
2. Note that the ropes from the rigging board are secured in the cam cleats of the jib fairleads.
 VII 1. Place the hull, bow into wind, on its trailer, a soft surface, or a rigging board. We strongly recommend making a rigging board; it is simple and inexpensive and greatly simplifies rigging and working
Installation Instructions for Reef-Rite Furling Systems
 Installation Instructions for Reef-Rite Furling Systems Congratulations on the purchase of your new Reef-Rite Furling System! It has been constructed with great care from the finest materials available,
Submitted by Tim Ryan, C350 Tech Ed. Article by Dave Brown, C350 # 246, Bat- 06. Servicing the Harken Winches on the Catalina 350
 Submitted by Tim Ryan, C350 Tech Ed. Article by Dave Brown, C350 # 246, Bat- 06 Servicing the Harken Winches on the Catalina 350 To me, one of the most intimidating things about sailing and sail boats
OPERATIONAL CHECK LIST
 www.spinnakersailing.com (650) 363-1390 OPERATIONAL CHECK LIST https://twitter.com/#!/spinnakersailin http://www.facebook.com/spinnakersailingrwc http://www.spinnakersailing.com/newsletter.html Dear Sailor,
TUNE YOUR RIG FOR OUTRIGHT SPEED. J/88 Tuning Guide Solutions for today s sailors
 TUNE YOUR RIG FOR OUTRIGHT SPEED 2 We hope you enjoy your J/88 Tuning Guide. North class representatives and personnel have invested a lot of time to make this guide as helpful as possible for you. Tuning
RIGGING INSTRUCTIONS Let's assume that you have your boat on a trailer when you take delivery from your dealer.
 This is the original owner's manual, written about 1972, and applicable for boats manufactured through 1978. Starting in 1979 a few changes were made in the roller furling jib and forestay arrangement.
MANUAL REEFING SYSTEMS
 MANUAL REEFING SYSTEMS Reliability > Performance > Robustness PROFURL offers a comprehensive range of manual headsail furlers. With its Cruising and Racing models, PROFURL is able to match the expectations
Below are the instructions to build a roller-furling unit for under $10. Read the entire process before beginning the project.
 Greg Cowens' $10 PVC Roller Reefing for CP-16's by Greg Cowen Below are the instructions to build a roller-furling unit for under $10. Read the entire process before beginning the project. Materials: 2
2012-June-12 SECOND DRAFT Hobie Getaway Spinnaker Installation Instructions
 SECTION A: INTRODUCTION This unofficial set of installation instructions was written for a 2009 Hobie Getaway, using a 2012 Hobie Spinnaker Kit 20999020. Note from the Author: I had never seen this kit
INSTRUCTIONS FOR CONTINUOUS LINE FURLER KF1, KF2, KF5
 INSTRUCTIONS FOR CONTINUOUS LINE FURLER KF1, KF2, KF5 KARVER SYSTEMS Avenue Marcel Liabastre, Zone Industrielle Portuaire, 14600 Honfleur www.karver-systems.com contact@karver-systems.com Tel: (+33)2 31
M32 CATAMARAN ASSEMBLY MANUAL
 M32 CATAMARAN ASSEMBLY MANUAL 1 M32 CATAMARAN ASSEMBLY MANUAL MANUAL SUMMARY M32 ASSEMBLY Parts and tools Instructions MAST PLATFORM Parts and tools Instructions MAST STEPPING Instructions MAIN HALYARD
Rudder Kit Assembly Instructions for Quest 13
 Rudder Kit Assembly Instructions for Quest 13 Revised 4/2/2015 78501 Rudder System The Hobie Quest is designed for the addition of an optional rudder system. Rudder systems in boats like this allow you
VERSA BIKE RACK INSTRUCTIONS
 VERSA BIKE RACK INSTRUCTIONS Models #8, 8 Important This rack is designed for use with a or. receiver hitch. The rack is designed to hold a maximum of two bicycles. Do not use it for anything other than
SOLUTIONS FOR TODAY S SAILORS J/88
 SOLUTIONS FOR TODAY S SAILORS J/88 Tuning Guide Contents Initial Headstay Set-up... 3 Onboard Headstay Adjustment... 5 J/88 Tuning Guide... 7 Sailing Setup... 8 North Sails Tips for J/88... 9 Jib Leech
Nautique Triton Clamping Board Rack V2
 w w w.ro swe l l marine.co m Nautique Triton Clamping Board Rack V2 Installation & Usage Instructions Part # C917-180045 Information: info@roswellmarine.com If you have any questions please call : 1-21-68-11
QuikVang. The Original High-Performance Vang INSTALLATION AND OPERATING INSTRUCTIONS MODEL D-30 MODEL D-40
 QuikVang The Original High-Performance Vang INSTALLATION AND OPERATING INSTRUCTIONS MODEL D-30 MODEL D-40 33 Broadcommon Road, Bristol, RI 02809 USA T: 401.253.4858 F: 401.253.2552 www.hallspars.com 1
OWNER S MANUAL. for Inters and Nacra F-18
 OWNER S MANUAL for Inters and Nacra F-18 Tools you ll need: 9/16 socket Wrench Phillips Screwdriver Allen Wrench (included) HULL ASSEMBLY Place hulls boxes approx. 8 feet apart. Make sure both hulls are
F-27 RIGGING GUIDE EXTRACTED FROM ORIGINAL F-27 SAILING MANUAL
 F-27 RIGGING GUIDE EXTRACTED FROM ORIGINAL F-27 SAILING MANUAL By Ian Farrier not be possible if the towing vehicle is a van. When trailering, allow extra distance for stopping. Watch also for low bridges,
U.S.SPARS. Operational Manual
 US SPARS is a part of group Z-Spars, the world s largest spar builders. From a small shop in Paris making bows and arrows to the largest spar producing group on the planet, the Z-Spars Group is now at
FLEXIBLE FURLER 4/6 INSTALLATION / OPERATING INSTRUCTIONS
 FLEXIBLE FURLER 4/6 INSTALLATION / OPERATING INSTRUCTIONS 44 James Street, Homer, NY 13077 Tel. 607 749 4599 Fax 607 749 4604 Website: www.sailcdi.com Updated July 2006 WARNINGS READ BEFORE INSTALLING
For ANCHOR WINCH Model: T Big Water 45 T sw Salt Water Series Big Water 45
 INSTALLATION AND OPERATING INSTRUCTIONS ANCHOR WINCHES For ANCHOR WINCH Model: T10110-45 Big Water 45 T10103-45sw Salt Water Series Big Water 45 If you have any questions or difficulty installing this
Mast Assembly Manual. for
 Mast Assembly Manual for J 44 Hall Spars 1 Introduction MAST ASSEMBLY MANUAL Welcome to the Hall Spars owners family. Our spars are designed for strength, function, and reliability. Please read this assembly
Index 1. Trampoline 2. Main Foils 3. Spinnaker Pole 4. Mast Setup 5. Mast Rigging 6. Rig Tension 7. Trapeze Lines 8. Rudders 9. Boom 10. Main Sheet an
 By User Manual Index 1. Trampoline 2. Main Foils 3. Spinnaker Pole 4. Mast Setup 5. Mast Rigging 6. Rig Tension 7. Trapeze Lines 8. Rudders 9. Boom 10. Main Sheet and Traveler 11. Main Sail 12. Downhaul
Manual for installation and operation for
 597-077-E 2015-09-11 Manual for installation and operation for GX7.5, GX10, GX15 & GX25 Seldén Furling system for Gennakers/Asymmetric spinnakers and Seldén GX Tack adapter compatible with CX furler GX7.5/CX10,
Telescopic winch handle Speedfriend"
 Winch handles, jib furlers JIB FURLERS - WINCH HANDLES - SPREADER COVERS 57 Floating winch handles Floating universal size winch handles Fitted with "Lock In" winch system; universal size for any winch;
Santa Fe Cycles Assembly Guide Introduction
 Santa Fe Cycles Assembly Guide Introduction Congratulations on your purchase of your new Santa Fe bicycle. You have purchased a bicycle that has many features and qualities. Please take a few minutes and
FITTING INSTRUCTIONS FOR CASCADE LIGHTWEIGHT LAZY JACK KITS For yachts up to 10.5m (35ft) Part No
 Part No") FITTING INSTRUCTIONS FOR CASCADE LIGHTWEIGHT LAZY JACK KITS For yachts up to 10.5m (35ft) Part No. 41 143 The lightweight Lazy Jack System allows the mainsail to be easily reefed or stowed in all weather
FITTING INSTRUCTIONS FOR CASCADE LIGHTWEIGHT LAZY JACK KITS For yachts up to 10.5m (35ft) Part No. 41 143 The lightweight Lazy Jack System allows the mainsail to be easily reefed or stowed in all weather
TUNE YOUR SAILS SPEED
 TUNE YOUR SAILS FOR OUTRIGHT SPEED Rev R05 Important Notes l We recommend not exceeding 350lbs total crew weight as this puts excess stress on the mast and the boat. l When sailing, the boat performs best
ESP JIB REEFING & FURLING Unit 2, 3
 ESP JIB REEFING & FURLING Unit 2, 3 Installation Manual Intended for specialized personnel or expert users 5003 09/18 Preassembly Safety Precautions/Parts Descriptions 2 3 Specifications 3 Parts List 4
Essential Rig Tuning Guide The Ins and Outs of tuning your mast.
 Essential Rig Tuning Guide The Ins and Outs of tuning your mast. Tuning Your Rig The main goal in tuning your mast is to achieve a spar that s straight. By doing this it will help you gain control of sail
Weta Basic Rigging Guide
 Weta Basic Rigging Guide A quick reference guide of how to rig your Weta, with some tips to make rigging quick and easy! For a more indepth guide see our Weta Manual under Weta Owners on the website. 1.
OWNER S MANUAL OWNER'S MANUAL TABLE OF CONTENT. 1. Introduction. 2. EC Documentation a) Certificate of homologation b) Declaration of conformity
 Certificate of homologation b) Declaration of conformity") OWNER'S MANUAL TABLE OF CONTENT 1. Introduction 2. EC Documentation a) Certificate of homologation b) Declaration of conformity 3. Description a) Hull identification b) Design category c) Technical data
OWNER'S MANUAL TABLE OF CONTENT 1. Introduction 2. EC Documentation a) Certificate of homologation b) Declaration of conformity 3. Description a) Hull identification b) Design category c) Technical data
INSTRUCTION NO
 INSTRUCTION NO. 14138 Dagger Rigging Instr. P~e 2.of 6 MODEL 244 CHRYSLER "DAGGER" SAILBOAT RIGGING INSTRUCTIONS We, at Chrysler Boat Corporation, congratulate you on your selection of our Model 244 "Dagger"
FLYING SAIL FURLERS. nex : The new generation of flying sail. furlers from Profurl
 FLYING SAIL FURLERS nex : The new generation of flying sail furlers from Profurl Fast, safe and easy flying sail hoisting, and improved boat performance: this is what Profurl offers you with its range
Tread Brake Assembly Instructions
 reated: 9/06/202, Revision: 2/20/204 Tread rake ssembly Instructions Table of ontents: Lower rake omponents..2-4 able rake ssembly: rake Handle omponents..5-7 able ssembly....8 Tee Handle rake ssembly...9-0
To save this document, scroll up and select the download icon
 Thank you for purchasing a RustySpokes Softcruise. We know you are going to enjoy the bike, but if you had it shipped to you, there are a few things you need to do to assemble the bike. The seat, pedals
FDR CHRYSLER 16' CATAMARAN (MUSKETEER) The initial rigging of a sailboat is not difficult, but if the boat is strange
 The initial rigging of a sailboat is not difficult, but if the boat is strange") Page of 6 Revised 2/0/76 RIGGING INSTRUCTIONS FDR CHRYSLER 6' CATAMARAN (MUSKETEER) The initial rigging of a sailboat is not difficult, but if the boat is strange to the new owner, or the new owner is
Page of 6 Revised 2/0/76 RIGGING INSTRUCTIONS FDR CHRYSLER 6' CATAMARAN (MUSKETEER) The initial rigging of a sailboat is not difficult, but if the boat is strange to the new owner, or the new owner is
Vanguard Sailboats 300 Highpoint Avenue Portsmouth, RI For the dealer nearest you call SAIL
 Vanguard Sailboats 300 Highpoint Avenue Portsmouth, RI 02871 For the dealer nearest you call 800. 966.SAIL Unpack the major parts listed below and lay them out on a soft piece of ground free of sharp objects.
MKIV UNDERDECK JIB REEFING & FURLING Unit 1, 2, 3
 MKIV UNDERDECK JIB REEFING & FURLING Unit, 2, 3 Installation Manual Intended for specialized personnel or expert users Please read these instructions carefully before installing, servicing, or operating
CO V E R S TA R AU TO MAT I C S A F E T Y CO V E R INSTALLATION GUIDE
 CO V E R S TA R AU TO MAT I C S A F E T Y CO V E R DECKMOUNT SYSTEM INSTALLATION GUIDE SECTIONS System Parts Reference...3 Standard Top Track...4-6 Mechanism... 7-10 Cover Fabric...11-16 Home Owner & Builder
Table of content Introduction 5 1. Part 1. Assembly Tools needed for Assembly Glossary Hulls Mounting the beams 7
 Table of content Introduction 5 1. Part 1. Assembly 6 1.1. Tools needed for Assembly 6 1.2. Glossary 6 1.3. Hulls 7 1.3.1. Mounting the beams 7 1.3.2. Fixing the mast rotation cleats 8 1.3.3. Placing the
SCUBAPRO. Balanced Power Inflator
 SCUBAPRO Balanced Power Inflator USE THIS GUIDE AS A REFERENCE WHEN SERVICING THE BALANCED POWER INFLATOR Important note: The following information is not designed to be a complete training guide for servicing
Ref Part Part # Qty Letter A Rudder Catcher B X 1/2 PH Bolts C Rudder Bracket
 Ref Part Part # Qty A Rudder Catcher 07.2694.0000 1 J B Q A B 10-32 X 1/2 PH Bolts 07.2136.0000 10 C Rudder Bracket 07.2689.0000 1 D Kayak Pad Eye 01.1315.0430 2 E Cherry Rivets 01.1315.0459 4 H T N P
Specifications Testing & Adjusting Disassembly & Assembly
 SB4191E00 Jul. 2005 Specifications Testing & Adjusting Supplement for Quad Lift Mast D20/25/30/32/33S-3 G/GC20/25/30/32P-3 G/GC20/25/30/32E-3 Important Safety Information Most accidents involving product
Furlex 104S-404S (Standard)
") 104S-404S (Standard) The 4th generation of an icon The fourth generation of is an uncompromising evolution of the world s best selling jib furling and reefing system. Proven design blended with innovation
104S-404S (Standard) The 4th generation of an icon The fourth generation of is an uncompromising evolution of the world s best selling jib furling and reefing system. Proven design blended with innovation
ASSEMBLY MANUAL HOBIE CATSY
 ASSEMBLY MANUAL HOBIE CATSY HOBIE CAT EUROPE ZI Toulon Est, BP 50 8078 Toulon cedex 9, France Tel : + (0)9 08 78 78 - Fax : + (0)9 08 99 Email : hobiecat@hobie-cat.net - http://www.hobie-cat.net ASSEMBLY
Installation Instructions MODEL VSTI-A020 Tank Indicator Installation Model: VSTI-A020, Stainless Reverse Read System Versa Steel Inc. Guide Cables No
 Tank Indicator Installation Model: VSTI-A020, Stainless Reverse Read System Guide Cables No Guide Cables 1 August 4, 2011 Assembly Instructions: (Shown with a 2 board, 12 ft kit) ITEM NO. PART NUMBER DESCRIPTION
Flexible Furler FF2 INSTALLATION / OPERATING INSTRUCTIONS
 Flexible Furler FF2 INSTALLATION / OPERATING INSTRUCTIONS Cruising Design International 1036 Waverley St., Winnipeg, MB R3T 0P3 Toll Free: (844) 379-2407 Fax: (204) 896-6969 info@sailcdi.com WARNINGS READ
COASTAL IN-BOOM FURLING SYSTEM. Installation Manual
 COASTAL IN-BOOM FURLING SYSTEM Installation Manual 1 TABLE OF CONTENTS Page Number 3. Disclaimer 4. Components packing list & required tools 5. Gooseneck bracket location 6. Installation sail track 7.
OWNER'S MANUAL. Copyright 2003 GAMMA - All Rights Reserved
 OWNER'S MANUAL AL Issue 1 - December 2003 Copyright 2003 GAMMA - All Rights Reserved OWNER'S MANUAL TABLE OF CONTENTS PAGE 1... WARRANTY PAGE 2... ASSEMBLY INSTRUCTIONS PAGE 4... MOUNTING THE RACQUET PAGE
RIGGING SERVICES AND PRICE LIST
 RIGGING SERVICES AND PRICE LIST Mast Stepping RIG 100 FULL SERVICE Build, clean and step rig. Static tune to approx. sailing tension. Rig boom and control lines, run halyards. Make electrical connections
RG1200 Service and Repair Manual
 Dive Rite RG 1200 Regulator Service and Repair Manual Page 1 Text and Photography by Pete Nawrocky Copyright ( ) 1999-2000, Lamartek, Inc., dba Dive Rite RG1200 Service and Repair Manual First Stage.........................................
Unit 1, 2, 3. Installation Manual Intended for specialized personnel or expert users
 ESP Jib Reefing & Furling Unit 1, 2, 3 Installation Manual Intended for specialized personnel or expert users 5003/11-01-2012 Preassembly Safety Precautions/Parts Descriptions 2 3 Specifications 3 Parts
How to install AEA s 10 meter meteorological tower
 How to install AEA s 10 meter meteorological tower Before you start: This guide assumes that you have obtained permission from the land owner, consulted with US Fish & Wildlife Service and obtained approval
OWNER'S MANUAL. Copyright 1999 ATS - All Rights Reserved
 OWNER'S MANUAL AL Issue 2 - August 19, 1999 Copyright 1999 ATS - All Rights Reserved OWNER'S MANUAL TABLE OF CONTENTS PAGE 1... WARRANTY PAGE 2... ASSEMBLY INSTRUCTIONS PAGE 4... MOUNTING THE RACQUET PAGE
Air Intake Snorkel Kit
 SSV KIT - Air Intake Snorkel Kit Part number (SKU) : 715003733 Product: Side-by-side Project no: 487802499 Instruction Sheet P/N: 487802499 Revision no: Revision date: Item covered: Air Intake Snorkel
JARVIS. Model CPE Hock and Neck Cutter EQUIPMENT... TABLE OF
 74 Hock and Neck Cutter EQUIPMENT SELECTION... Ordering No. TABLE OF CONTENTS... Page with Control Circuit. 4304003 only... 4304004 Balancer... 1350084 Control Circuit... 3350010 Air Hose (Yellow)... 3323003
Tube-on-tube to wire luff conversion by Rey Garza
 Tube-on-tube to wire luff conversion by Rey Garza I recommend changing from the old tube-on-tube furling system to the wire luff system. I did it and I think that the boat is now easier to rig, plus I
For ELECTRIC ANCHOR WINCH Models: T Pontoon 35 T sw Salt Water Series Coastal 35
 INSTALLATION AND OPERATING INSTRUCTIONS ANCHOR WINCHES For ELECTRIC ANCHOR WINCH Models: T10109-35 Pontoon 35 T10102-35sw Salt Water Series Coastal 35 If you have any questions or difficulty installing
Congratulations! 1 (877) You have purchased one of the best known trailerable cruising vessels available.
 You have purchased one of the best known trailerable cruising vessels available.") Congratulations! You have purchased one of the best known trailerable cruising vessels available. We invite you to spend a few moments with the following pages to become better acquainted with your new
Congratulations! You have purchased one of the best known trailerable cruising vessels available. We invite you to spend a few moments with the following pages to become better acquainted with your new
REEFIT SYSTEM C -14. Installation Guide. Stay diameters 7/16, 11mm, 12mm. Manufactured By Almasts Australia Pty Ltd. Unit. Serial Number.
 Reefit www.almasts.com.au +61 3 6331 3171 REEFIT SYSTEM C -14 Stay diameters 7/16, 11mm, 12mm Installation Guide Manufactured By Almasts Australia Pty Ltd Unit Serial Number Some images may depict generic
CABLE REPAIR PROCEDURE 2100 Series, 2000 Series & Eventer
 August 2005 CABLE REPAIR PROCEDURE 2100 Series, 2000 Series & Eventer 2000 SERIES 2100 SERIES EVENTER 7514 Alabonson Rd. Houston, Texas 77088 281-999-6900 281-999-6966 (fax) 51A Caldari Rd., #16 Concord,
Topaz OMEGA Rigging Instructions
 Topaz OMEGA Rigging Instructions www.toppersailboats.com TOPAZ OMEGA RIGGING INSTRUCTIONS CONTENTS 02. Introduction 02. Manufacturers Details 03. Maintenance 04. Raising the Mast 05. Attaching the Boom
SIGNATURE DEF REELS Models: Bare Reel Reel Reel Reel
 SERVICE BULLETIN SB2023 Rev C 7/11 SIGNATURE DEF REELS Models: 2400-006 Bare Reel 2400-007 16 Reel 2400-008 20 Reel 2400-009 30 Reel Thoroughly read and understand this manual before installing, operating
Schaefer s New Mainsail Furler Answers All Your Questions
 Boom Furler FAQ s Schaefer s New Mainsail Furler Answers All Your Questions Q: Why put a mainsail furler on your boat? A: Contemporary mainsail furlers allow you to: Shorten sail without leaving the safety
TECH SHEET ORANGE PIVOT TOOL INSTRUCTIONS
 page 1 ORANGE PIVOT TOOL INSTRUCTIONS This is a guide of how to change the pivot bearings on an Orange frame with a bore style pivot axle. 4 8 Bore Type Pivot Axle Horiz-Hold Type Pivot Axle Please read
3. Sail Kit. Table of Contents: Portland Pudgy Safety Dinghy: 3. Sail Kit
 Table of Contents: 3. Sail Kit Sailing the Portland Pudgy... 1 Sailing Tips... 1 Reducing the Sail Area (Reefing the Sail)... 2 Method 1. Reducing Sail without the Exposure Canopy... 2 Method 2. Reducing
E S/304S. Manual and Spare parts list Furlex 204S & 304S
 597-132-E 2018-04-03 204S/304S Manual and Spare parts list Furlex 204S & 304S 1 Contents Page 1 Introduction 3 1.1 Key features 3 1.2 What s included? 4 1.3 Main dimensions 4 1.4 Safety precautions 5 1.5
Roller Furler Repair on an I October August 2002
 Roller Furler Repair on an I-36 6 October 1999-4 August 2002 Preface March 2009 This article has been turning over in my mind for several years. It summarizes the most horrific maintenance action I have
BEFORE YOU BEGIN TO READ THE WI BEFORE YOU BEGIN TO READ THE WA BEGIN BY READING THIS RIGGING GU
 BEFORE YOU BEGIN TO READ THE WI BEFORE YOU BEGIN TO READ THE WA BEGIN BY READING THIS RIGGING GU Nomad Rigging Guide uide to better familiarize yourself with the parts and rigging of. If you have any questions
Changing Out the Rear Hub and Sprocket on a 2012 Morgan Three Wheeler Calum Fraser 17/07/2015
 Intro The early Three Wheelers had the rear sprocket in a stepped arrangement relative to the front sprocket with the belt overhanging the sprocket on the outside face. While this is probably less of a
QuikVang. The Original High-Performance Vang INSTALLATION AND OPERATING INSTRUCTIONS MODEL A-8 MODEL A-12
 QuikVang The Original High-Performance Vang INSTALLATION AND OPERATING INSTRUCTIONS MODEL A-8 MODEL A-12 33 Broadcommon Road, Bristol, RI 02809 USA T: 401.253.4858 F: 401.253.2552 www.hallspars.com 1 INTRODUCTION
Model 23H Hand Crank Seamer
 OPERATOR'S MANUAL Model 23H Hand Crank Seamer If you are not experienced with your seamer, please read and understand this manual before operating the machine. If you have a question discuss it with your
LS LX RX STRENGTH PERFORMANCE INNOVATION / 11
 H E A D S A I L F U R L I N G & R E E F I N G S Y S T E M S Race developed technology : The LS/LX/RX Range has been developed according to a specific technological concept to establish the west-about solo
SMALL BOAT UNDERDECK FURLER 477, 493, 478
 SMALL BOAT UNDERDECK FURLER 477, 493, 478 Installation Manual Intended for specialized personnel or expert users 4428/11-17 Preassembly Safety precautions/terms/general information 2 Parts descriptions/specifications
 Table of content Introduction 5 1. Part 1. Assembly 6 1.1. Tools needed for Assembly 6 1.2. Glossary 6 1.3. Hulls 7 1.3.1. Mounting the beams 7 1.3.2. Fixing the mast rotation cleats 8 1.3.3. Mounting
Carbo Racing Foil Instruction Manual Unit 0, 1, 2, 3
 Carbo Racing Foil Instruction Manual Unit 0, 1, 2, 3 WARNING!: Strictly follow all instructions to avoid an accident, damage to your vessel, personal injury or death. See www.harken.com/manuals for additional
Replacing the Reverse Osmosis ( RO ) Membranes
 Membranes") Replacing the Reverse Osmosis ( RO ) Membranes Changing your membranes is a relatively straightforward procedure that can be achieved by carefully following these instructions. During disassembly, water
Replacing the Reverse Osmosis ( RO ) Membranes Changing your membranes is a relatively straightforward procedure that can be achieved by carefully following these instructions. During disassembly, water
Hydraulic Jib Reefing & Furling Installation Manual Unit 3/3.25
 Hydraulic Jib Reefing & Furling Installation Manual Unit 3/3.25 WARNING!: Strictly follow all instructions to avoid an accident, damage to your vessel, personal injury or death. See www.harken.com for
INSTALLATION INSTRUCTIONS FOR NEW MDS (SELF-LUBRICATING) NYLON STEERING COLUMN SUPPORT BUSHING
 NYLON STEERING COLUMN SUPPORT BUSHING") INSTALLATION INSTRUCTIONS FOR NEW MDS (SELF-LUBRICATING) NYLON STEERING COLUMN SUPPORT BUSHING Please read the entire installation instructions before proceeding. If you're like me it's really hard, so
INSTALLATION INSTRUCTIONS FOR NEW MDS (SELF-LUBRICATING) NYLON STEERING COLUMN SUPPORT BUSHING Please read the entire installation instructions before proceeding. If you're like me it's really hard, so
2019 MADONE ASSEMBLY MANUAL
 2019 MADONE ASSEMBLY MANUAL 2019 MADONE Rim brakes and Di2 drivetrain Rim brakes and mechanical drivetrain Disc brakes and Di2 drivetrain Disc brakes and mechanical drivetrain TABLE OF CONTENTS Common
In each step, the needed parts are shown the number right below. Locate all parts for the step.
 Tools Required for Assembly Phillips Screwdriver, Med Needle Nose Pliers Sandpaper (#400 grit) Hobby Knife Scissors CA Instant Glue Rubbing Alcohol Drill Bit 1/16", 1.6mm 5/64, 2mm 1/8, 3mm 5/32, 4mm Before
RIGGING SERVICES AND PRICE LIST
 RIGGING SERVICES AND PRICE LIST MAST STEPPING RIG 100 FULL SERVICE Build, clean and step rig. Static tune to approx. sailing tension. Rig boom and control lines, run halyards. Make electrical connections
PR4 Installation, Operation & Maintenance Instructions (DOT Certification Included)
") PR4 Installation, Operation & Maintenance Instructions (DOT Certification Included) March 2006 Form FVC 054 Rev. 6 KEEP THIS DOCUMENT WITH THE PRODUCT UNTIL IT REACHES THE END USER. The Passive - R4 device
PR4 Installation, Operation & Maintenance Instructions (DOT Certification Included) March 2006 Form FVC 054 Rev. 6 KEEP THIS DOCUMENT WITH THE PRODUCT UNTIL IT REACHES THE END USER. The Passive - R4 device
J/70 Building Specification
 DECK, HARDWARE AND FITTINGS 1 FRP Composite deck 2 Indeck furler unit 3 Bow "U" bolt mooring eye (stainless) Option for one 6" (152mm) mooring cleat in lieu of eye. 4 Shroud chainplates (stainless) (BSI
DIRECT DRIVE DIXIE DOUBLE SEAMER Model 25D
 OPERATOR'S MANUAL DIRECT DRIVE DIXIE DOUBLE SEAMER Model 25D LUBRICATE DAILY: A. Gears inside gear housing at chuck shaft (1) Oil B. Seam rolls and cam rolls (4) - Oil C. Seam roll levers through gear
(PLEASE CONTACT YOUR LOCAL DEALER or CUSTOMER SERVICE FOR WARRANTY INFORMATION)
") RUDDER KIT SOLO AND TANDEM KAYAKS IMPORTANT: For Tandem kayaks, the Supplemental Kit will be needed in addition to this kit and can be purchased through a registered dealer. The addition of a rudder to
RUDDER KIT SOLO AND TANDEM KAYAKS IMPORTANT: For Tandem kayaks, the Supplemental Kit will be needed in addition to this kit and can be purchased through a registered dealer. The addition of a rudder to
J/22 Dave Perry. Based on sailing the POW in the Ft Worth Boat Club (TX) boats in 2006 We sailed with three in the boat
 boats in 2006 We sailed with three in the boat") J/22 Dave Perry Based on sailing the POW in the Ft Worth Boat Club (TX) boats in 2006 We sailed with three in the boat GENERAL Boats spin fast! Boats go fast sideways when downspeed Use weight to help
J/22 Dave Perry Based on sailing the POW in the Ft Worth Boat Club (TX) boats in 2006 We sailed with three in the boat GENERAL Boats spin fast! Boats go fast sideways when downspeed Use weight to help
QUALITY ALUMINUM BOAT LIFTS, INC. INSTRUCTIONS. Dominator Lake Lift
 INSTRUCTIONS Dominator Lake Lift PHONE:251-986-3882 * FAX:251-986-3136 QABLDOMINATORINST.2014 P a g e 1 Quality Aluminum Boat Lifts, INC. Installation Instructions: Dominator Lake Lift Thank you for your
-607- TP 52 Valars 3 (Ex-Mean Machine) SOLD
 SOLD") -607- TP 52 Valars 3 (Ex-Mean Machine) SOLD Name Model TP 52 GENERAL TP 52 Valars 3 (Ex-Mean Machine) Type RACER Year 2007 Hull Material GRP Flag russian Lying.Valencia Price PRICE UNDER REQUEST Vat NOT
-607- TP 52 Valars 3 (Ex-Mean Machine) SOLD Name Model TP 52 GENERAL TP 52 Valars 3 (Ex-Mean Machine) Type RACER Year 2007 Hull Material GRP Flag russian Lying.Valencia Price PRICE UNDER REQUEST Vat NOT
Installation Guide RHT-380. This Manual Must Be Read Before Operating The Equipment CUSTOMER COPY
 Installation Guide This Manual Must Be Read Before Operating The Equipment RHT-380 Madison Heights, Michigan 48071 800-725-8377 www.snowexproducts.com CUSTOMER COPY Trynex International 2013 (REV B) F50767
STERN MOTOR FOOT CONTROL KIT For use with the Torqeedo 403 Ultralight
 STERN MOTOR FOOT CONTROL KIT For use with the Torqeedo 403 Ultralight The Wilderness Systems Foot Control Kit is designed to connect directly to a Torqeedo 403 Ultralight motor mounted on the stern of
Operating instruction for the quick-change tap holders type:
 type: HF 20 HF 30 Date of edition: 15.07.2008 Stage of alteration: 4 Please keep this for future use! Contents: 1 Application range, safety instructions and technical data... 3 1.1 Application range,
Chapter 2 Rigging. Cutting Wire Rope. Anchoring Wire Rope to Drum. Winding Wire Rope Onto Drum
 Chapter 2 Rigging Cutting Wire Rope The wire rope must be tightly seized on both sides of the point where the wire rope will be cut, as shown in Figure 2-1. Seize the wire rope with either seizing wire
400/488 Rotating Davit Installation Instructions
 400/488 Rotating Davit Installation Instructions These instructions were written with the owner in mind. If you are the installer make sure these instructions are passed along to the owner of the boat.
Peinert ZEPHYR. Assembly. The Zephyr is easily rigged; there are only three removable parts - the seat, the foot stretcher, and the rigger arm.
 Peinert ZEPHYR Assembly The Zephyr is easily rigged; there are only three removable parts - the seat, the foot stretcher, and the rigger arm. Removal and installation of the seat. If the seat is in the
OWNER'S MANUAL LOCK-N-LOAD BULLET FEEDER (PISTOL)
") OWNER'S MANUAL LOCK-N-LOAD BULLET FEEDER (PISTOL) Table of Contents ASSEMBLY ASSEMBLY Pistol Bullet Feeder... Page 3 CHANGE-OVERS The Hornady Lock-N-Load Pistol Bullet Feeder is capable of feeding most
OWNER'S MANUAL LOCK-N-LOAD BULLET FEEDER (PISTOL) Table of Contents ASSEMBLY ASSEMBLY Pistol Bullet Feeder... Page 3 CHANGE-OVERS The Hornady Lock-N-Load Pistol Bullet Feeder is capable of feeding most
CDI Cruising Design, Inc Mainsail Reefing System Installation/Operating Instructions
 CDI Cruising Design, Inc Mainsail Reefing System Installation/Operating Instructions 44 James Street, Homer, N.Y. 13077 Tel: 607-749-4599 FAX: 607-749-4604 Website: www.sailcdi.com Updated December 2006
Darling Downs Soaring Club Inc
 Darling Downs Soaring Club Inc Rigging and De-Rigging Instructions LS7 XOW Overview Page 2 Rigging page 3 De-Rigging page 19 Overview It is the pilot s responsibility to make sure that the trailer is fully