IMPORTANT: READ THIS FIRST BEFORE BEGINNING INSTALLATION
|
|
|
- Jessie Lane
- 6 years ago
- Views:
Transcription
1
2 NOTES IMPORTANT: READ THIS FIRST BEFORE BEGINNING INSTALLATION PREPARATION The thruster has been Anodized, which is a treatment for aluminum which creates a protective barrier around the aluminum. It protects the aluminum from oxidation and also creates a surface with better adhesion for primer and paints. DO NOT SAND THE THRUSTER UNDER ANY CIRCUMSTANCES AS THIS WILL REMOVE THE PROTECTIVE ANODIZATION COATING AND VOID YOUR WARRANTY. As most Anti-fouling paints used on boats contain the active ingredient Copper, and copper is a dissimilar metal to Aluminum, using a copper paint on these aluminum thrusters (even if you apply an epoxy barrier coat first) will cause corrosion and WILL void your warranty. MOUNTING o The Anti-Fouling paint used on these thrusters must be one that Is designed specifically for aluminum application. This can be any number of products and comes in many colors to match your hull paint, if you'd like it to. There are even arosol paints available for easy installation o Priming the thruster can be done either with the primer recommended by the manufacturer of the Anti- Fouling you are going to be using, or you may also use an epoxy barrier coat (such as West System Barrier coat) if that is easier or more accessible. If you can not find metric drill bits as requested in the manual, any drill bit will work as long as it is the same diameter as the outside of the purple neoprene bushing. Using a drill be that is slightly smaller than the outside diameter of the purple bushing is better than one that is too big. If the hole is small and you are having a hard time getting the bushing into it, simply use sandpaper to reem the inside of the hole and make it larger until the bushing fits. a slightly snug fit is best. PLEASE NOTE THAT THE MATHMATICAL FORMULA OF 1.25% OF THE HULL THICKNESS IS ONLY A GUIDE! The PRIMARY OBJECTIVE in the mounting of these units is to COMPRESS the neoprene bushings NOT to get the mounting nuts tight to the boat or rely on glue or sealant to seal the mounting holes. Any Sealant that is used, should be used sparingly and with the understanding that it is working in conjunction with the neoprene compression seals. POWER HARNESS The Main Power Harness connecting the thruster motor to the ibox CANNOT BE EXTENDED, SHORTENED or ALTERED in any way as this WILL VOID WARRANTY and may cause irreparable damage to the thruster motor. BATTERY CHARGER Please read the instruction booklet that comes with the battery charger COMPLETELY as it contains very important information about the operation of the unit. It is recommended that you connect the battery charger to an engine starting battery as opposed to your house battery bank AS IT WILL NOT OPERATE IF THE INCOMING VOLTAGE IS NOT SUFFICIENT.

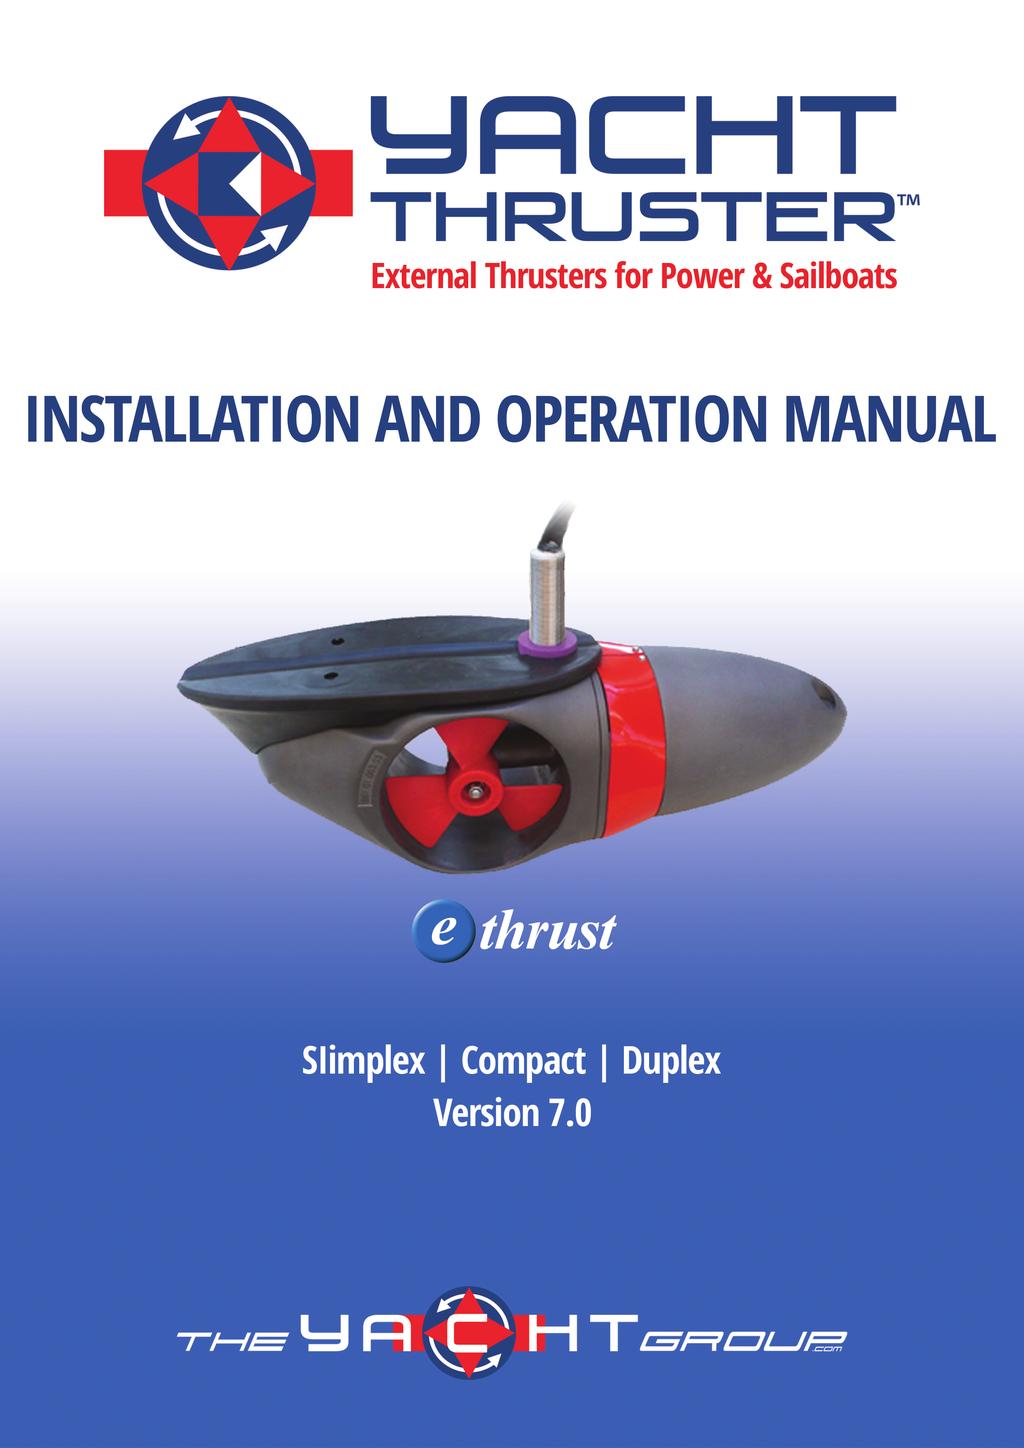
3 Thank you for your purchase of the Yacht Thruster system. We are sure you will be pleased with its operation, reliability and durability. If we can be of assistance to you at any time please do not hesitate to contact us via e mail at sales@yachtthruster.com or We also appreciate the referral of your friends and associates who may be interested in the Yacht Thruster Happy boating from the Yacht Thruster team! This document contains proprietary intellectual information exclusively owned by Yacht Controller, LLC. All information contained herein is the exclusive property of Yacht Controller. YACHT THRUSTER IS A DEVICE USED TO CONTROL THE MANEUVERING OF A BOAT WHEN DOCKING, ANCHORING OR MOORING. IT IS NOT A SUBSTITUTE FOR PROPER KNOWLEDGE, EXPERIENCE AND OPERATION OF THE CONTROL OF A YACHT WHEN PERFORMING THESE PROCEDURES. WARNING: THIS INSTRUCTION MANUAL MUST BE CAREFULLY REVIEWED PRIOR TO USING THE YACHT THRUSTER SYSTEM; IT IS THE OBLIGATION OF THE PURCHASER TO CONTACT THE SELLER OF THE YACHT THRUSTER SYSTEM DIRECTLY IN THE EVENT THERE IS ANY DOUBT WHATSOEVER CONCERNING THE USE OR OPERATION OF THE DEVICE. YACHT CONTROLLER LLC DOES NOT TAKE ANY RESPOSIBILITY OR LIABILITY FOR INJURY OR DAMAGE TO PROPERTY DUE TO IMPROPER INSTALLATION OR USE OF THE YACHT THRUSTER DEVICE.. The information contained in this manual is subject to change or modification without notice; in the event of any differences or ambiguity, please ask Yacht Thruster Yacht Controller LLC, All rights reserved
4 CONTENT 1. PREPARATION 1.1. Introduction Safety Regulations Necessary Tools 4 2. PRODUCT CONTENTS 2.1. Mounting kit "Compact'' Mounting kit "Simplex'' Electronics Control elements (separately available) Cable Sets (separately available) 7 3. MOUNTING GENERAL 3.1. Mounting Variations Restrictions Choice of the mounting position Measuring of the mounting position Main drilling and sealing The reference sticker Galvanic reaction and mounting adjustment MOUNTING KIT BASIC 4.1. Measuring of the mounting bolts Bolting and sealing Mounting illustration MOUNTING DUPLEX 7.1. General Instructions Measuring of the mounting position ELECTRICAL INSTALLATION 8.1. General Instructions YACHT THRUSTER Performance Specifications Fuse protection and wire cross section Choice of battery Wiring Installation of the i-box Installation of single joystick and touch panel Installation of Dual Joystick Control Installation of Wireless Remote Control (optional) Installation of multiple control elements 9. OPERATION 9.1. YACHT THRUSTER as bow thruster YACHT THRUSTER as stern thruster Bow and stern thrusters combined Operation with multiple control elements Important User Information Maintenance Troubleshooting WARRANTY MOUNTING KIT ADAPTER 5.1. Adapter positioning (round chine) Bolting and sealing Fiberglass adapter installation Mounting illustration FIBERGLASS MOUNTING COMPACT APPENDIX 11.1 Dimension sheet YACHT THRUSTER Simplex 11.2 Wiring diagram Simplex - Manual main switch 11.3 Wiring diagram Simplex - Automatic main switch 11.4 Dimension sheet Yacht Thruster Duplex 11.5 Control Circuit Scheme Yacht Thruster Duplex 11.6 Technical Facts 11.7 Propeller Replacement 11.8 Anode Replacement 11.9 Schematic overview 24v Thruster in 12v boat system Compability with other Thruster Template for joystick and touch panel Surplus Energy Distributor 12v-24v (Auto on/off) ADDENDUM Installation and Operation Manual 5.0
5 1. PREPARATION 1.1. Introduction Thank you for choosing YACHT THRUSTER worldwide first external bow and stern thruster: 1.2. Safety Regulations Read this manual carefully. Provide the safety regulations also to all persons who are engaged in the assembly or the operation of YACHT THRUSTER. The driving power of the Yacht Thruster bow and stern thruster depends on the boat length and assembly position: the efficiency, apart from the hull form, depends on various other factors, like, among other things, boat weight, freeboard surface, operational area and wind force. T h e i n d i c a t e d p o w e r w i l l b e a c h i e v e d u n d e r o p t i m a l circumstances. In order to ensure this, the choice of the assembly position, the assembly, as well as the electrical install ation and wiring should be conducted with care and by specialists. The electrical installation must principally be accomplished by a specialist! During the operation of YACHT THRUSTER never touch moving parts! Do not operate YACHT THRUSTER, neither in the water nor outside of the water, if there are people standing close to the bow and stern thruster! When working on the YACHT THRUSTER, always switch off the YACHT THRUSTER main switch! Always switch the YACHT THRUSTER main switch off when the bow and stern thruster is not used for a long period! Yacht Thruster has a substantial task: To increase safety and comfort on board. Regular maintenance work is not necessary, though proper operation are very important. With professional assembly and with consideration of the recommendations contained in this manual, YACHT THRUSTER will soon become indispensible for maneuvering your boat. When lifting, be sure your lifting strap is not placed where it touches the YACHT THRUSTER bow and stern thruster! 1.3. Necessary Tools For the assembly of the YACHT THRUSTER bow and stern thruster the following tools are needed depending on the mounting variant: Measuring tape Cord or leveling rule Hand drill Drill bits Ø 18 mm Hole saw mm Pipe wrench size 46mm Socket wrench size 13mm Flat wrench size 10mm Allen wrench size 4mm Suitable sealant 4 Installation and Operation Manual 5.0
6 2. PRODUCT CONTENTS 2.1. Mounting kit ''Compact'' (Article No ) Attachment distance (Article No ): 4x safety nut M8 Attachment main connection (Article No ): 2x hexagon nut 4x disk M8 1x disk M30 1x sheet (B01.M5.003.B3) 1x disc (B01.M ) 1x isolator (B01.M5.005.B3) 1x Sealing D50 12,5 mm (B01.M ) 2x sealing D18 12,5 mm (B01.M5.006.B3) 2x sealing D50 25 mm (B01.M ) 4x sealing D18 25 mm (B01.M5.004.B3) 2x Teflon-washer 1x pad (B01.M ) 2x mounting bolt 250 (B01.M3.002.B3) 1x isolator (B01.M ) 2x distance piece (B01.M5.001.B3) 5 Installation and Operation Manual 5.0
7 2.2. Mounting kit ''Simplex'' (Article No ) Attachment adapter (Article No ): 4x safety nut M8 Attachment main connection Fiberglass (Article No ): 2x hexagon nut 4x disk M8 1x disk M30 1x sheet (B01.M5.003.B3) 1x disk (B01.M ) 1x isolator (B01.M5.005.B3) 2x sealing D18 12,5 mm (B01.M5.006.B3) 1x sealing D50 12,5 mm (B01.M ) 4x sealing D18 25 mm (B01.M5.004.B3) 2x sealing D50 25 mm (B01.M ) 2x tefl on-washer 1x isolator (B01.M ) 2x mounting bolt 250 (B01.M3.002.B3) 1x adapter (B01.M3.001.B3) 6 Installation and Operation Manual 5.0
8 2.3. Electronics 1x i-box 2.5. Cable Sets (separately available) Likewise, for the connection between i-box and control panel, control cable with appropriate length is required: M Control cable 4 meter, 4-lead M Control cable 7 meter, 4-lead M Control cable 9 meter, 4-lead M Control cable 12 meter, 4-lead M Control cable 15 meter, 4-lead M Control cable 18 meter, 4-lead M Control cable 22 meter, 4-lead Y-connector for multiple control panels, 4-lead Fig.. : i-box If an automatic main switch is used, a 5-lead cable from control panel to the automatic main switch is required: M Control cable 4 meter, 5-lead M Control cable 7 meter, 5-lead M Control cable 9 meter, 5-lead M Control cable 12 meter, 5-lead M Control cable 15 meter, 5-lead M Control cable 18 meter, 5-lead M Control cable 22 meter, 5-lead Y-connector for multiple control panels, 5-lead 2.4. Control Elements (separately available) To operate Yacht Thsuter one of the following separately available control elements is necessary: Control Element "single joystick panel (Article No. 8960X) Control Element "dual joystick panel (Article No. 8940X) Control Element "touch panel (Article No. 8950X) Control Element "radio remote control (Article No. RC10-XE) 7 Installation and Operation Manual 5.0
9 3. MOUNTING GENERAL 3.1. Mounting Variances The areas of application of the respective YACHT THRUSTER mounting kits constitute as follows: Area of application Mounting kit "Basic Mounting kit "Adapter bow thruster ROUND CHINE + + bow thruster HARD CHINE + stern thruster ROUND CHINE + + stern thruster bathing platform + + stern thruster vertical transom Restrictions YACHT THRUSTER as bow thruster: The permitted driving speed for the use of YACHT THRUSTER is 35 knots [no constant load!). YACHT THRUSTER as stern thruster: O n fiberglass-boa ts w ith a s p eed abov e 12 kno t s t he hul l construction must comply to the guidelines USCG From approx. 15 knots driving speed YACHT THRUSTER must be outside the water! It has to be assured that the incident flow of the rudder and drive is not affected! The propeller needs free sight at starboard and port, so when mounting two YACHT THRUSTER s side by side on one axis, sufficient space between the units is required to ensure free flow of water. CAUTION! CAUTION! The permitted driving speed for the use of The mounting on the slide surface of a YACHT THRUSTER is 35 knots! planning hull is not permitted! 8 Installation and Operation Manual 5.0

 under the waterline is sufficient.")
.")
10 3.3. Choice of the mounting position The mounting of the YACHT THRUSTER bow and stern thruster is unbelievably simple and can be carried out without a large expenditure of time. Nevertheless, it should principally be done by a knowledgeable person. In order to achieve the optimal efficiency of YACHT THRUSTER when used as bow thruster, it should be positioned as far down and as far forward as possible, though 30cm (9 inches to the center of the propeller) under the waterline is sufficient. When operated as a stern thruster, naturally, it should be positioned as far down and in the back as possible; however, again, 30cm (12in) under the waterline is sufficient. Minimum of 8" to the center of the propeller. (Tip: Drill from the inside out). The YACHT THRUSTER bow thruster must be positioned exactly on the middle line of the boat, if mounted as a single unit under the boat. In order to determine this, it is recommended to draw a line from the keel to the bow or stern with a cord or a measuring tape and afix it. Subsequently, by means of this line, the desired position can be shifted easily forward or backward. For the choice of the mounting position, it is to be likewise made certain that the required hole with a diameter of 2 inches is not drilled at an unsuitable position (e.g. bulkhead). So that it can be placed without problems, the borehole must be at least 2.5 from the next bulkhead. For the reasons mentioned above, the positioning should be measured exactly in any case before the execution of the drilling, also inside the boat. Fig. 8: example measuring L position bow thruster position stern thruster bulkhead Fig. 6: mounting sailboat L L S = at least 2.5 inches middle line position bow thruster Only on displacements boats position stern thruster bulkhead Fig. 7: mounting motorboat 9 Installation and Operation Manual 5.0

11 3.4. Measuring of the Mounting position 3.5. Main drilling and sealing The drilling for the hollow shaft needs a diameter of 2. It is When mounted on a waterline and planning line have to be marked recommended to use a hand-held drill. with a tape. The bottom edge of YACHT THRUSTER has to be above the planning line by all means! mm sealing waterline planning line 25 % of (x + 10) hull thikness x 10 mm total sealing height Fig. 9: measurement on a glider CAUTION! On a planning hull the bottom edge of YACHT THRUSTER has to be above the planning lineby all means! Fig. 10: drilling and total sealing height Depending on the hull thickness, several seals must be used. It is to be considered that those seals are compressed by about 25% when tightening the bolts. Enough bushings should be used so that the stainless washer inside the boat sits 1/8" or less from the hull when hardware is fully tightend. The total sealing height results as follows: hull thickness x 1.25 Example: Total sealing height with hull thickness of 1.2" : 1.2" x 1.25 = 1.5 This is for reference purposes only. Please see Notes on inside Cover for more details 10 Installation and Operation Manual 5.0
12 3.7. Galvanic reaction and mounting adjustment It is necessary to pay attention to special material properties to assure correct potential equalization and avoid oxidation reaction between YACHT THRUSTER and the boat hull. (see table). Since mounting with welded bolts is possible on hulls out of steel or aluminum, it has to be adjusted to the respective hull. However, it is recommended to use the provided mounting kits. Fiberglass Steel Aluminum Wood direct contact direct contact prevention between prevention between Specifics none YACHT THRUSTER fasting elements none and fasting and hull elements and hull Critical range none 8mm / mm / 0.08 none Usage of welded mounting bolts - must be isolated from YACHT THRUSTER with rubber must not be isolated from YACHT THRUSTER - Usage sealing main connection required required required required Usage isolator no required required no CAUTION! On hulls out of steel or aluminum after mounting it has to be verified with a multimeter, that there is no direct connection between the YACHT THRUSTER bow and stern thruster and the boat hull!! *** Each Yacht Thruster will have a Magnesium Anode attached at the bottom of the aluminum housing (See Page 35) that should be carefully monitored if the boat is kept in the water for long periods of time. If the anode detriorates quickly (less than 3 months) there may be a problem with the installation or stray current (electrical current flowing through paths other than the intended circuit) may be present in the waters surrounding the marina which may cause damage to your unit. 11 Installation and Operation Manual 5.0
13 4. MOUNTING KIT BASIC (Only for special circumstances installations) 4.1. Measuring of the mounting bolts First the pad (1) must be glued on the bow thruster. Afterwards mount the thruster temporarily via the main connection and mark the front boreholes for the mounting bolts. (5) hexagon nuts (4) disk M30 (3) disk (2) sealing (1) pad 4.2. Bolting and sealing Bolt down the thruster via the main connection, thereby paying attention to the right number of seals (fig. 10). The sequence corresponds to the one in fig. 12, whereby, depending on the hull thickness, several seals (2) must be used. It is to be considered that those seals are compressed by about 25 % when tightening the bolts (fig. 10). Apply disk (3) and disk M30 (4) and tighten the two hexagon nuts (5) firmly. Thereby the sealings (2) are compressed and fill out the drill hole completely. It is recommended to press against the thruster from the outside to prevent the sealings from being pressed out of the borehole when tightening the bolts. Fig. 12: main connection Fiberglass Measure the length for the distance pieces (fig. 13) and demount the thruster. Then make the drillings for the mount-ing bolts with a diameter of 18 mm and cut the distance pieces as measured before (fig. 14). distance piece On hulls out of steel or aluminum it is required to use the isolator instead of the metal sheet (see 4.4. Mounting illustration steel and aluminum)! Finally plug the distance pieces on the thruster. Insert the mounting bolts like illustrated in fig. 15 cutting them in the boat interior as necessary. Apply seals (2) according to the hull thickness (note: hull thickness + 25 %). On hulls out of fiberglass and boreholes of 9 mm the seals (2) can be omitted by using suitable sealant (e.g. Sikaflex, 3M 4200). Fig. 13: distance piece length (6) safety nut (5) disk (4) sheet (3) isolator (2) sealing Fig. 14: distance piece (1) mounting bolt Fig. 15: assembly mounting bolts CAUTION! On hulls made out of steel or aluminum it is required to use the isolator instead of the metal sheet! Total sealing height for mounting bolts: hull thickness x 1.25 Example: total sealing height with hull thickness 1.2": 1.2 x 1.25 = Installation and Operation Manual 5.0
14 4.3. Mounting Illustration Fig. 17: Mouting Installation 13 Installation and Operation Manual 5.0
 on the thruster and mount it temporarily via the main connection. Mark the front boreholes for the mounting bolts. 5.2.")
 must be used. It is to be considered that those seals are compressed by about 25 % when tightening the bolts (fig. 10). Fig.")
15 5. MOUNTING KIT ADAPTER (Standard ''Simplex'' supplied Installation Kit) 5.1. Adapter positioning (round chine) First plug the adapter (fig. 18) on the thruster and mount it temporarily via the main connection. Mark the front boreholes for the mounting bolts Bolting and sealing Bolt down the thruster via the main connection, thereby paying attention to the right number of seals (fig. 10). The sequence corresponds to the one in fig. 20, whereby, depending on the hull thickness, several seals (1) must be used. It is to be considered that those seals are compressed by about 25 % when tightening the bolts (fig. 10). Fig. 18: Adapter Afterwards turn the thruster with attached adapter to the side and drill the holes for the mounting bolts with diameter 18 mm. Apply disk (3) and disk M30 (4) and tighten the two hexagon nuts (5) firmly. Thereby the sealings (1) are compressed and filling the drill hole completely. It is recommended to press against the thruster from the outside to prevent the sealings from being pressed out of the borehole when tightening the bolts. On hulls out of steel or aluminum it is required to use the isolator between the metal sheet. Finally screw together the mounting bolts like illustrated in fig. 21 cutting them in the boat interior as necessary. Apply seals (2) according to the hull thickness (note: hull thickness + 25 %). Fig. 19: mounting bolts drilling (4) disk M30 (4) hexagon nuts (3) disk M30 () disk (1) sealings (6) safety nut (5) disk (4) sheet (3) isolator (2) sealings Fig. 20: main connection Fiberglass (1) mounting bolts CAUTION! On hulls out of steel or aluminum it is required to use the isolator Fig. 21: assembly mounting bolts 14 Installation and Operation Manual 5.0
.")
. 5.3. Fiberglass adapter installation (see Fig. 23) 1.")
16 Total sealing height for mounting bolts: hull thickness x 1.25 Example: total sealing height with hull thickness 1.2 inches: 1.2 x 1.25 = 1.5 If there remains a gap between adapter and boat hull it is recommended to fill it out with suitable sealant (e.g. gelcoat Sikaflex, silicone). Note: In order to protect the outside edges of the drill holes, it is recommended to apply a suitable sealant (e.g. Sikaflex, 3M 4200). With the mounting kit Adapter on a round chine YACHT THRUSTER is mountable within one hour (without electrical installation) Fiberglass adapter installation (see Fig. 23) 1. Determine the installation site and mark the positions on the hull. 2. Align the adapter lengthwise and crosswise on the stern and clamp it using a mounting bracket. 3. Measure the distance to the stern at the front edge of the adapter. Next, using a suitable marking tool (e.g. a compass or a block of wood with a pencil), transfer the measured distance from the contact edge between the adapter and the hull to the adapter at an angle. 4. Saw off the adapter along the line you ve drawn using a suitable tool (e.g. an angle grinder or a jigsaw). 5. The foam must also be cut flush with the fiberglass edge using a suitable tool (e.g. finger polisher or router). 6. Hold the adapter in place against the hull again and examine the fit. Care must be taken that the fiberglass adapter lies flat against the area of the main stud at the stern. Repeat steps 2 5 if necessary. 7. If you have accidentally removed too much foam, it can be replaced by firm filling paste (epoxy or fiber glass bridging filler). 8. Remove the anti-fouling under the adapter and coarsely whet and degrease the hull. Fig. 22: YACHT THRUSTER mounted with mounting kit "Adapter" 9. Place the adapter on the device, put the seals in place and mount the adaptor together with the device. Waterproof adhesives such as polyurethane sealants should be used in order to achieve adhesion between the hull and the adapter. 10. Remove any adhesive that has leaked, slightly whet the adapter and coat it with epoxy primer and anti-fouling (like on the hull). Fig. 23: Fiberglass Adapter 15 Installation and Operation Manual 5.0
 at a distance of 65mm (2.5in). YACHT THRUSTER can be mounted on a hard chine hull within five hours using the Adapter assembly kit.")

17 Next, prepare the contact surface (V-shaped, made of hardwood) for bolting the fastening on the inside (Fig. 24). To do so, drill two holes with a diameter of 8mm (5/16in) at a distance of 65mm (2.5in). YACHT THRUSTER can be mounted on a hard chine hull within five hours using the Adapter assembly kit. (without electrical installation). Fig. 24. Contact surface using a wooden wedge as an example Fig. 26: YACHT THRUSTER varnished and mounted CAUTION! It is essential to prevent contact between the adapter and fuel, oil, grease, white-spirit, solvents such as toluol, dichloromethane, trichloroethane, cellulose thinner or concentrated nitric or sulphuric acid. Fig. 25: Screw connection fiberglass in the boat interior 16 Installation and Operation Manual 5.0


18 5.4. Mounting illustration Fig. 29: Mounting Adapter round chine Fig. 30: Mounting Adapter on hard chine 17 Installation and Operation Manual 5.0

19 6. MOUNTING YACHT THRUSTER COMPACT Installation of the Yacht Thruster Compact is almost identical to that of the Yacht Thruster Simplex. It differs in that the Yacht Thruster Compact is mounted vertically on the transom of the motorboat. The Yacht Thruster Compact is mounted using the mounting bolt holes located at the end of the motor cone. In addition, the assembly differs in that the black plastic spacer must be used for assembly (see the Yacht Thruster Compact figure). The side with the thinner opening is inserted into the small ho-les in the Yacht Thruster Compact. The boardlocks are then passed through them (see the Yacht Thruster Compact figure). Fig. 31: Mounting YACHT THRUSTER Compact 40mm / 1.58" 153.5mm / 6.04" 71mm / 2.8" 294mm / 11.58" 254mm / 10" 165mm / 6.5" 165mm / 6.5" 18 Installation and Operation Manual 5.0

20 7. MOUNTING DUPLEX 7.1.General Instructions 7.2. Measuring of the mounting position The YACHT THRUSTER Duplex has two motors and therefore is to be handled like two single YACHT THRUSTER s during mounting. The hole center distance of the two hollow shafts has to exactly comply with the dimension sheet. The mounting surface for the YACHT THRUSTER Duplex must be in-plane, if necessary a socket has to be developed accordingly [Fig. 32). The YACHT THRUSTER bow and stern thruster must be positioned exactly on the middle line of the boat. In order to determine this, it is recommended to draw a line from the keel to the bow or stern with a cord or a measuring tape and affix it. Subsequently, by means of this line, the desired position can be shifted easily forward or backward. The YACHT THRUSTER Duplex requires two holes with a diameter of 50-51mm (2in). The hole center distance has to exactly comply with the dimension sheet. Check the distance between the boreholes before drilling! Fig. 32: YACHT THRUSTER Duplex mounting surface For the choice of the mounting position, it is to be likewise made certain that the required holes are not drilled at an unsuitable position [e.g. bulkhead). So that they can be placed without problems, the boreholes must be at least 60 mm from the next bulkhead. For the reasons mentioned above, the positioning should be measured exactly in any case before the execution of the drilling, also inside the boat. Fig. 33: YACHT THRUSTER Duplex mounted 19 Installation and Operation Manual 5.0
21 8. ELECTRICAL INSTALLATION 8.1. General Instructions The electrical installation is to be accomplished by a specialist. All contacts, plugs and connections must be installed in a way that they always remain dry. The i-box must be placed in such a way that it always remains dry. All screws must be tight before start-up. The general instructions refer to YACHT THRUSTER Simplex and also to YACHT THRUSTER Duplex YACHT THRUSTER Performance Specifications Model Power (kw) Thrust (lbf) Voltage (V) Nominal Current (A) 130S 1, S 1, S 2, S 3, D 4, x D 6, x175 * Thrust equivalent (lbf x 1.4 due to positional advantages) 8.3. Fuse protection and wire cross section Fuse Cable Cross Section Cable Cross Section Model (NH00) (A) (Length) 0-8 m* Size (mm2) / AWG (Length) 8-16 m* Size (mm2) / AWG Battery Recommendation 130S /0 1 x AGM Dual Purpose > 55 Ah 180S /0 70-2/0 1 x AGM Dual Purpose > 55 Ah 230S /0 300S /0 70-2/0 400D 2x /0 70-2/0 600D 2x /0 70-2/0 2 x AGM Dual Purpose > 55 Ah In Series 2 x AGM Dual Purpose > 55 Ah In Series 2 x AGM Dual Purpose > 55 Ah In Parallel 4 x AGM Dual Purpose > 55 Ah In Series * wire length is the sum of + and - wire. 20 Installation and Operation Manual 5.0
22 8.4. Choice of battery The overall capacity of the battery must be coordinated with the power setting of the respective YACHT THRUSTER model [see 8.2. YACHT THRUSTER Performance Specifications and 8.3. Fuse protection and wire cross section). It is recommended to use one or more separate Dual Purpose AGM batteries for each YACHT THRUSTER and to place these as close as possible to the bow or stern thruster to minimize cable length or cable thickness and power losses Wiring The cable length of YACHT THRUSTER is 2.5 The main relay should therefore be placed as close as possible to the bow or stern thruster. The main thruster harness CANNOT BE EXTENDED, SHORTENED or MODIFIED in any way as this will Void manufacturer warranty. The minimum cable diameter is to be coordinated with the power setting of the YACHT THRUSTER model used (see 8.3. Fuse protection and wire cross section), in order to keep the power loss between battery and bow or stern thruster as low as possible. Always use batteries with matching type and capacity! With the employment of an YACHT THRUSTER model with 24 V with a board voltage of 12 V, it is recommended to connect two 12 V- batteries in series, in order to achieve the necessary voltage for the bow or stern thruster. A 12 V / 24 V battery charger is available on request. In order to protect YACHT THRUSTER from overloading and to protect the electrical system from short-circuit both a main switch and a protection fuse must be integrated into the positive wiring loom [see 8.3. Fuse protection and wire cross section). The YACHT THRUSTER main switch should be installed in an easily accessible place, thus the power for the bow or stern thruster can be switched off in emergencies, without influencing the other electronics on board. With non-operation, the YACHT THRUSTER main switch should generally be switched off. 21 Installation and Operation Manual 5.0
23 8.6. Installation of the i-box The i-box is the central control element, to which several control panels can be attached. It should be mounted with the cable connections facing down. Fig. 34 To control panel(s)/remote. See alternatives 8.9 Fig.36 Note: It is not possible to operate two Yacht Thrusters independently by means of one i-box. 22 Installation and Operation Manual 5.0


24 8.7. Installation of joystick and touch panel (optional) Find a comfortable position for the panel where it does not obstruct or are obstructed by other controls. Use the enclosed cut-out pattern to mark the area. Cut out the circular area as shown on pattern. If the front surface around your cut out is jaggered or chipped, use a sealant to assist the gasket. 8.8 Installation of dual joystick control When installing a Dual Joystick for bow and stern control, it is necessary for the battery banks powering each thruster to share a common ground. A minimum 14awg cable must be used to link the negatives on each battery source. (This step is necessarry for any combination of 12v or 24v bow & stern thrusters) A B C Put the gasket (2) in its designated track in the back face of the panel (1). Connect the contact with the control cable from the thruster, use 5-lead control cable if automatic main switch is used. Put the panel (1) in place and screw in and tighten the four screws (3). Press gently each of the four corner clips (4) into their corner slot. 8.9 Installation of wireless remote control (optional) Please refer to the separate manual included in wireless remote control package Note: If the thruster runs the opposite way of the panel, swap positions of the grey and the blue control cables in one contact, either in the i-box or by the panel. E Fig Partslist Ref: Pcs. Parts: 1 1 x Control panel 2 1 x Gasket 3 4 x Screws (A4) 4 4 x Corner clips 23 Installation and Operation Manual 5.0
25 8.9. Installation of multiple control elements The i-box offers the possibility of attaching several control elements (e.g. joystick and touch panel) to the same Yacht Thruster. You can install as many panels as you wish by using optional Y-connectors. If two or more panels are operated at the same time in opposite directions, the electronic control box will stop the thruster until it only receives a signal to go in one direction. Fig Installation and Operation Manual 5.0
26 9. OPERATION 9.1. YACHT THRUSTER as bow thruster 1. Switch on the YACHT THRUSTER main switch then PUSH BOTH ON BUTTONS on the Yacht Thruster Panel simultaneously. Upon illumination of the white light the Thruster is operational. 2. To save battery power in radio remote control, automatic disconnection takes place after 90 seconds. The joystick switches off after 6 minutes of no use. 3. Move the joystick in the respective direction (joystick panel) or push the respective key (touch panel, remote control) in order to maneuver the bow in the desired direction: RED = port GREEN = starboard 4. Depending on the speed of the movement, stop steering before reaching the desired goal position, as the bow will move a little more in the chosen direction YACHT THRUSTER as stern thruster 1. Switch on the YACHT THRUSTER main switch then PUSH BOTH ON BUTTONS on the Yacht Thruster Panel simultaneously. Upon illumination of the white light the Thruster is operational. 2. To save battery power in radio remote control, automatic disconnection takes place after 90 seconds. The joystick switches off after 6 minutes of no use. 3. Move the joystick in the respective direction (joystick panel) or push the respective key (touch panel, remote control) in order to maneuver the bow in the desired direction: RED = port GREEN = starboard 4. Depending on the speed of the movement, stop steering before reaching the desired goal position, as the stern will move a little more in the chosen direction. 5. If necessary, make yourself familiar with the control of YACHT THRUSTER on open waters, in order to get a feeling for it. 6. Always turn off the YACHT THRUSTER main switch when leaving the boat. 5. If necessary, make yourself familiar with the control of YACHT THRUSTER on open waters, in order to get a feeling for it. 6. Always turn off the YACHT THRUSTER main switch when leaving the boat. Fig. 37: YACHT THRUSTER as bow thruster Fig. 38: YACHT THRUSTER as stern thruster 25 Installation and Operation Manual 5.0
.")
27 9.3. Bow and stern thrusters combined 9.5. Important User Information The use of both a bow thruster and a stern thruster allows the movement of the boat sideways or turns it around its own axis. It is however necessary for both YACHT THRUSTER to have their own control unit with i-box and control element (see 8. Electrical Installation). Do not allow YACHT THRUSTER to run for more than 5 seconds when not immersed in water! Yacht Thruster is not a toy. It is a technical auxiliary motor used to help maneuver a ship. With normal use (e.g. brief activation while mooring), YACHT THRUSTER has an operational life span of about 10 years (250 hours of operating time). The operation corresponds to the instructions for YACHT THRUSTER as bow thruster and YACHT THRUSTER as stern thruster. Do not operate YACHT THRUSTER outside of the water if there are people near the bow or stern thruster. When working on YACHT THRUSTER (e.g. applying antifouling, replacing the propeller) always switch off the YACHT THRUSTER main switch. Fig. 44: bow and stern thrusters combined If the drive direction of the bow or stern thruster does not correspond to the directions on the control element, wires 1 and 3 at the main relay must be reversed (see or for YACHT THRUSTER Simplex and 10.5 or 10.6 for YACHT THRUSTER Duplex) Operation with Multiple control elements The i-box offers the possibility of attaching several control elements (e.g. joystick and touch panel) to the same YACHT THRUSTER. Thereby, the following function mode is to be considered: YACHT THRUSTER has a continuous runtime of 5 to 7 minutes depending on the water temperature. Afterwards the overheat protection is activated and the thruster will stop. The thruster will need to cool down before operation can resume. You can install as many panels as you wish by using optional Y- connectors. If two or more panels are operated at the same time in opposite directions, the electronic control box will stop the thruster until it only receives a signal to go in one direction Maintenance The YACHT THRUSTER bow and/or stern thruster is absolutely maintenance-free. In order to avoid fouling, it is required to coat the bow or stern thruster with antifouling. Therefore use an aluminum primer and then the according antifouling. Existing/installed anode has to be checked regularly (at least once a year) YACHT THRUSTER, except of the plastic parts (covers, propeller), is resistant against all prevalent detergents. For cleaning purposes it is recommended to use a high-pressure cleaner. Persistent dirt should be removed by hand brush! Note: When working on YACHT THRUSTER (e.g. applying antifouling, changing the propeller) always switch off the main switch! 26 Installation and Operation Manual 5.0

 at the")
.")
.")
28 9.7. Troubleshooting The YACHT THRUSTER bow or stern thruster cannot be started: The main switch is not switched on. The control panel is inactive, No LED light. The main fuse tripped. The control fuse tripped. The over temperature control fuse tripped. The YACHT THRUSTER bow or stern thruster runs in the wrong direction: Wires 1 and 3 (blue & grey) at the main relay are improperly connected and must be reversed. (see or for YACHT THRUSTER Simplex and 11.5 or 11.6 for YACHT THRUSTER Duplex). The YACHT THRUSTER bow or stern thruster has insufficient power: The battery is not sufficiently charged. The electrical connections are bad (e.g. because of corrosion). The necessary minimum voltage of 10 V or 21 V is not reached. The propeller is blocked (e.g. by fouling, wood, line). 27 Installation and Operation Manual 5.0
29 10. Warranty 1. Yacht Thruster issues to the original purchaser a 3 year guarantee on purchase of an External bow and stern thruster hereafter called 'product". Manufacturer warranty is non transferable. Yacht Thruster guarantees that the product is free of deficiencies in material and construction. 2. The 3 year term starts on the date of delivery to the first user or the date of invoice whichever is later 3. In case of deficiency, covered by the guarantee, Yacht Thruster is authorized to choose either to remedy the deficiency himself or by an authorized partner or to replace the defect product by an equal substitute. Replaced spare parts or products become property of Yacht Thruster. 4. The following applies when processing a warranty claim: a.) The buyer must mail or a detailed description of the fault(s) including the date and place of purchase, photographs of all connections device, i-box, battery, etc. and the installer's address to Yacht Thruster. Photos of the interior fastening of the bow thruster (if the boat is out of the water, the outside fastening as well) must be included with a request for warranty, photos of the electrical connections at the i-box and a photo of the defective part (e.g. the joystick), if necessary, as well as a photo of the i-box connection to the on-board power supply. b.) After evaluating the photo material and the description of the defect on the warranty request form, Yacht Thruster will ask the customer to send in the i-box (if the defect is expected to be in the bow-stern thruster) or the defective part concerned (e.g. the joystick), provided the connection and the assembly are correct. c.) The i-box is read by Yacht Thruster. Based on these data, Yacht Thruster will decide on the further procedure within a brief period of time. This can be: -The customer receives a new part (e.g. joystick exchange) -The customer receives a new bow/stern thruster after Yacht Thruster places a credit card hold (current original price plus analysis costs) with the request that the old device incl. photographs taken from all 8 sides (to rule out that any transport damage is assessed in-correctly later on) be returned. The defective bow/stern thruster is tested. If the warranty claim is justified, a credit note is issued to the customer and the hold released. If the warranty claim is not justified (e.g. if the device has been manipulated, or in the event of collision damage), the credit card amount will be charged promptly following notification to the customer. The customer receives notification that a warranty claim does not exist. This can also happen as soon as the photo material has been evaluated. In this case, the costs incurred thus far shall be invoiced to the customer 5. There are no warranty obligations if the defect or the damage was caused by incorrect or inadequate installation, incorrect operation or use improper maintenance or repair, or dismantling of the product, or adaptations or modifications to the product, by unauthorized persons. This includes in particular shortening the shaft as well as the engine wiring. Only the main circuit fuses offered by Yacht Thruster (EXT-HSA 80/100/125) may be used. Alternatively, fuses that have exactly the same specifications can be used instead. 6. Expenses for installation and removal, cranes and/or other expenses shall not be reimbursed. If a warranty claim is valid, only the defective device will be replaced free of charge. 7. Warranty analysis costs: a.) Assessment on the basis of the damage report and the photo material ($200.00) b.) Assessment on the basis of point a) and reading the i-box ($400.00) c.) Assessment on the basis of points a), b( and analysis of the bow/stern thruster sent in ($ plus the current selling price of the new replacement device). if the new replacement device is returned to Yacht Thruster in the original packaging and unused, the amount invoiced will be credited to the customer accordingly, and the amount already paid for the bow thruster will be returned. A device that has already been used or mounted will not be accepted back and there will be no refund. 8. No other claims shall arise from this warranty, especially all types of claims for compensation or consequential damages. 9. The present warranty shall not limit the legal rights, or warranty claims against the seller and potential claims arising against Yacht Thruster as a seller. The warranty does not apply if any changes have been made to the device (shortening the hollow threaded bolt, lengthening/ shortening the cables, opening the i-box, etc.)! By submitting a warranty request, the customer agrees to the procedure used for the warranty process and is aware that the costs listed above wilt be billed to him if the warranty claim is not valid. 28 Installation and Operation Manual 4.2
30 11. APPENDIX Dimension sheet YACHT THRUSTER Simplex 306mm [ in] (M30x1,5) 294mm [11.575in] Ø30 [1,181 Zoll] 152mm [5.984 in ] 13mm [0.523 in] 554 [21.81in]. 165mm [6.496 in] 254 mm [10 in] 65mm [2.559 in] 40mm [1.575 in] 176mm [6.929 in] 29 Installation and Operation Manual 5.0
31 11.2.Wiring diagram Yacht Thruster Simplex - Manual main switch Yacht Thruster Motor 30 Installation and Operation Manual 5.0
32 11.3. Wiring diagram Yacht Thruster Simplex - Automatic main switch Yacht Thruster Motor 31 Installation and Operation Manual 5.0
33 11.4. Dimension sheet Yacht Thruster Duplex [42,476 Zoll] 466 [18,346 Zoll] M30x1,5 Ø30 [1,1 81 Zoll] 306 [1 2,065 Zoll] 1 76 [6,929 Zoll] 65 [2,559 Zo ll] 81 8 [32,205 Zoll] 79 [3,099 Zoll] (130) 1 52 [5,984 Zoll] 1 3 [0,523 Zoll] 165 [6,496 Zoll] 165 [6,496 Zo ll] 32 Installation and Operation Manual 5.0
34 11.5. Control Circuit Scheme Yacht Thruster Duplex 2x YACHT THRUSTER Simplex/Compact or 1x DUPLEX 33 Installation and Operation Manual 5.0

35 11.6 Technical Facts 34 Installation and Operation Manual 5.0
36 Yacht Thruster Prop and Anode Installation and Operation Manual Propeller Replacement The propeller has to be replaced depending on the particular Yacht Thruster series model: 11.8 Anode Replacement Anode ethrust Art. # Anode kit ethrust Art. # Propeller ethrust 130 / 180 / 400D (Article No ) Propeller ethrust 230 / 300 / 600D (Article No ) The space between the plastic disk (2) and the sealing of the necessary to remove pre-existing grease. The space between Remove galavanic corrotion from the threaded hole with a drill bit or a sharp object to establish proper electrical connection Remove corrotion on bolt if necessary Apply locktite in the midle of the bolt (1) cylinder pin (2) plastic disk (3) O-ring (4) propeller (5) disk Remove corrotion (6) safety nut (7) propeller grease FIg. 42: propeller set CAUTION! Locktite the space between plastic disk and sealing of the housing completely with propeller grease! CAUTION! During propeller replacement always switch off the Yacht Thruster series main switch! Fit anode to thruster 35

37 11.9. Schematic overview, 24v Thruster in 12v Boat system It is recommended that the 12v-24v charger be connected to a 12v battery which in turn is continuously or frequently charged by an ac 110v or 220v charging system or by a charging alternator, the charger will not turn unless the supply battery or AC charger provides IN EXCESS of 13.5v. In the event you decide to connect directly to an ac/dc charger instead of a battery, please see below: The attached drawing shows connecting the 12v-24v charger directly to an ac/dc battery charger. (1) Using a battery charger with line AC input to power the 12v-24v charger. (2) The output of the ac input charger is connected to the input of 12v-24v charger. (3) A 24V battery is connected to the output of the 12v-24v for charging. That is no problem in such connection provided that (1) The dc output voltage of the ac input charge must be over 13.5V at power up and will not drop below 12.4V during the operation. (2) The ripple voltage (steady output) of the dc output of the ac input charger should be less than 15% in order to keep the 12v-24v charger running at acceptable temperature. (3) The output current of the ac input charger must be large enough (at least 30A) to provide the necessary power to 12v-24v charger for 10A charging. 36 Installation and Operation Manual 5.0

38 Compatibility with other thrusters The current Yacht Thruster system features the i-box control system is plug and play compatible with Side-Power thrusters from Sleipner motor. A combination of Yacht Thruster and Side-Power thrusters can be controlled by a Side-Power or EXTURN control panel. Older EXTURN thrusters using the E-BOX control system must be upgraded with an i-box and last generation control cables/panels before it can be used in combination with the current EXTURN and Side-Power thrusters. The upgrade is done by disconnecting and removing the E-Box and the main relay and then install the i-box and control pannels as describes in section 8.6 Fig. 40: i-box Fig 41. Relay and E-BOX 61,1mm Template for joystick and touch panel For control panels 8950 / 8960 This way Up! Ø52 Cut out area: Ø 51,8 mm / 2" 61,0 mm / 2,4" 50,5mm 111,1mm Ø 3,0 mm / 0,12" Ø52 61,0 mm / 2,4" 38,4mm Cut-Out Template double joystick panel Installation and Operation Manual 5.0
39 11.12 Surplus Energy Distributor 12v-24v (Auto on/off) 1. FEATURES Microcontroller based 4-Stage 3-Level adaptive charging Fully automatic without intervention DC input for charging 24V batteries Auto power on/off depended on input voltage Output short circuit protection Input low voltage and high voltage protections Informative panel LED indications 2. SPECIFICATIONS Input Voltage Battery Voltage Charging Current Auto Power On/Off Input Fuse Protections Cooling Operating Temperature Dimensions(mm) Weight 10 15V 24V 10A (Peak) Power On at 13.5V (+/-2%) Power Off at 12.5V (+/-2%) 40A Input Polarity Yes Low Input Voltage < 9.5V High Input Voltage > 15.5V Over Temperature Internal 80 O C Output Short Circuit Yes Controlled DC Fan 0 55 O C 200 (W) x 205 (L) x 70 (H) 1.5Kg 38 Installation and Operation Manual 5.0
40 3. INSTALLATION & MOUNTING Mount the charger such that there is no blocking of the ventilation holes at the rear panel Ensure the charger is mount securely Do not install the charger near any heat source or direct sunlight and water Use sufficient gauge size cables for both input and output Always fasten cables securely Ensure good ventilation 39 Installation and Operation Manual 5.0
41 4. OPERATION. ➀ Trickle Charge Red LED ➅ - Black Output Binding Post ➁ Bulk Charge Red LED ➆ Ventilation Holes (Fan Behind) ➂ Quick Charge Yellow LED ➇ DC12V - Input Terminal ➃ Float Charge Green LED ➈ DC12V + Input Terminal ➄ + Red Output Binding Post ➉ Blade Type Car Fuse Holder (1) Connect DC 12V to the terminal on the rear panel. (Cable size should be at least AWG#12 for full capacity operation) (2) Charger turns on when the input voltage is above 13.5V and it turns off when the input voltage is below 12.5V. (3) Panel LEDs flash in cyclic manner (standby state) after power on. (4) Connect the battery to the charger. The charger detects and charges the battery according to the charging condition of the battery automatically. (5) Buzzer sounds whenever there is a change in status or alarm. (6) Charging is finished at float charge (green LED flashes). 40 Installation and Operation Manual 5.0
42 5. INDICATIONS Charging Status LEDs Status Completion Red Red Yellow Green Standby --- Cycling Trickle 30% Cycling Off Off Bulk 60% Off Cycling Off Quick Charge 90% Off Off Cycling Float 100% Off Off Off Flash Low Battery Voltage Flash Off Off Off High Battery Voltage Off Flash Off Off Low Input Voltage Alarms Flash Off On Off High Input Voltage Off Flash On Off Over Temperature Off Off Flash Off * All alarms and protections are auto resume 6. REMEDIES Symptom No indicator is on or they are not in standby cyclic mode after power on Input low/high voltage alarm when power on Charger is still in standby mode even the battery has been connected Always low input voltage alarm when the charge at bulk charge mode After battery is connected, Trickle & Bulk LEDs flash in cycling mode for a while & low/high battery alarm rises After battery is connected, Trickle & Bulk LEDs flash in cycling mode for a long time. Or It always jumps back to Trickle LED from QC or F The charger always jumps back from float charge to bulk charge after it stays at float charge for some time The charger jumps to float charge after a discharged battery is connected Recommended Action (1) Check fuse. (2) Check input power cable connection (3) Need repairing. Check the input voltage range. (1) Check the cables. (2) Faulty battery. (1) Check the stability of the DC input source during charging process. (2) Use large gauge size input cable. Check the battery voltage Aged battery with very large leakage current. Need to change the battery. (1) The leakage current of the battery is large. (2) Check if there is any loading on the battery. Aged battery with large internal resistance. Need to change the battery. 41 Installation and Operation Manual 5.0
43 Please see Addendums below.

44
444C DUAL PERFORMANCE VALUE PACK
 (Chrome) PART NO. 44432 IMPORTANT: It is essential that you and any other operator of this product read and understand the contents of this manual before installing and using this product. SAVE THIS MANUAL
400C & 450C DUAL PERFORMANCE VALUE PACKS
 (Chrome) PART NO. 40013 (Silver) PART NO. 45012 (Chrome) PART NO. 45013 IMPORTANT: It is essential that you and any other operator of this product read and understand the contents of this manual before
200 PSI COMPRESSORS - MODEL NUMBERS
 200 PSI COMPRESSORS - MODEL NUMBERS 380C AIR COMPRESSOR KIT PART NO. 38033 480C AIR COMPRESSOR KIT PART NO. 48043 380C 480C IMPORTANT: It is essential that you and any other operator of this product read
Model PSI Compressor with 3-Gallon Air Tank 12VDC
 Model 6350 150 PSI Compressor with 3-Gallon Air Tank 12VDC IMPORTANT: It is essential that you and any other operator of this product read and understandd the contents of this manual before installing
420C AIR COMPRESSOR KIT PART NO C AIR COMPRESSOR KIT PART NO
 420C AIR COMPRESSOR KIT PART NO. 42042 460C AIR COMPRESSOR KIT PART NO. 46043 420C 460C IMPORTANT: It is essential that you and any other operator of this product read and understand the contents of this
100C Air Compressor Kit
 10010 100C Air Compressor (standard mounting bracket, CE Spec) 10014 100C Air Compressor (no leader hose or check valve, CE Spec) 10016 100C Air Compressor (with Omega Bracket, CE Spec) IMPORTANT: It is
250C-IG COMPRESSOR KIT 12V PART NO C-IG COMPRESSOR KIT 24V PART NO
 250C-IG COMPRESSOR KIT 12V PART NO. 25050 250C-IG COMPRESSOR KIT 24V PART NO. 25058 IMPORTANT: It is essential that you and any other operator of this product read and understand the contents of this manual
250C-IG COMPRESSOR KIT 12V PART NO C-IG COMPRESSOR KIT 24V PART NO
 250C-IG COMPRESSOR KIT 12V PART NO. 25050 250C-IG COMPRESSOR KIT 24V PART NO. 25058 IMPORTANT: It is essential that you and any other operator of this product read and understand the contents of this manual
This document to be used with Hurley traditional Davits
 ~ InstructIon Manual ~ This document to be used with Hurley traditional Davits WarnIngs WarnIng - Failure to install, maintain, protect, and operate the system properly can cause malfunction resulting
IMPORTANT SAFETY INSTRUCTIONS
 IMPORTANT SAFETY INSTRUCTIONS CAUTION - To reduce risk of electrical shock: - Do not disassemble. Do not attempt repairs or modifications. Refer to qualified service agencies for all service and repairs.
PLAQUE MFM0680 UNDERWATER LIGHT. Operating Instructions
 PLAQUE MFM0680 UNDERWATER LIGHT Operating Instructions CONTENTS Preface... 3 Features... 3 Precautions... 3 Controls and Connectors... 4 Underwater Light PLAQUE MFM0680... 4 Power Supply Unit MPS021000
CONUS MSR0680 UNDERWATER LIGHT. Registered Community Design. Operating Instructions
 CONUS MSR0680 UNDERWATER LIGHT Registered Community Design Operating Instructions CONTENTS Preface... 3 Features... 3 Precautions... 3 Controls and Connectors... 4 Underwater Light CONUS MSR0680... 4 Power
WIND CLIPPER KTS ILLUM SCALE INC DEC CLIPPER WIND SYSTEM
 CLIPPER WIND KTS ILLUM SCALE DEC INC CLIPPER WIND SYSTEM TABLE OF CONTENTS INTRODUCTION PRE-TEST OF INSTRUMENT INSTALLING THE MASTHEAD SENSOR UNIT INSTALLING THE DISPLAY NORMAL OPERATION CHANGING THE
Instructions for Use. Plug connection for medical gas and vacuum acc. to DIN / 2004 DIN EN ISO
 Instructions for Use Plug connection for medical gas and vacuum acc. to DIN 13260-2 / 2004 DIN EN ISO 9170-1 Table of Contents Page 1. MANUFACTURER S DATA... 3 2. INTRODUCTION... 4 3. APPLICATION... 5
PLAQUE MFM18240 UNDERWATER LIGHT. Operating Instructions
 PLAQUE MFM18240 UNDERWATER LIGHT Operating Instructions CONTENTS Preface... 3 Features... 3 Precautions... 3 Controls and Connectors... 4 Underwater Light PLAQUE MFM18240... 4 Power Supply Unit MPS061000
400H HARDMOUNT AIR COMPRESSOR KIT PART NO H HARDMOUNT AIR COMPRESSOR KIT PART NO
 400H HARDMOUNT AIR COMPRESSOR KIT PART NO. 40042 450H HARDMOUNT AIR COMPRESSOR KIT PART NO. 45042 400H 450H IMPORTANT: It is essential that you and any other operator of this product read and understand
97C COMPRESSOR KIT 12V PART NO C COMPRESSOR KIT 24V PART NO C COMPRESSOR KIT PART NO
 97C COMPRESSOR KIT 12V PART NO. 00097 97C COMPRESSOR KIT 24V PART NO. 02497 98C COMPRESSOR KIT PART NO. 00098 97C 98C IMPORTANT: It is essential that you and any other operator of this product read and
42045 Heavy Duty ADA Base Model Kit: 85/105 PSI (ADA Compressor Only) Heavy Duty ADA Base Model Kit: 110/145 PSI (ADA Compressor Only)
 Heavy Duty ADA Base Model Kit: 110/145 PSI (ADA Compressor Only)") 42045 Heavy Duty ADA Base Model Kit: 85/105 PSI (ADA Compressor Only) 42047 Heavy Duty ADA Base Model Kit: 110/145 PSI (ADA Compressor Only) 45052 Constant Duty ADA Base Model Kit: 85/105 PSI (ADA Compressor
42045 Heavy Duty ADA Base Model Kit: 85/105 PSI (ADA Compressor Only) 42047 Heavy Duty ADA Base Model Kit: 110/145 PSI (ADA Compressor Only) 45052 Constant Duty ADA Base Model Kit: 85/105 PSI (ADA Compressor
PO Box 370 Phone: Swansea NSW 2281 Fax: AUSTRALIA Mobile: Web:
 EZI-DRY Pty Limited ABN: 98 114 507 443 PO Box 370 Phone: 0249711993 Swansea NSW 2281 Fax: 0249135490 AUSTRALIA Mobile: 0427587900 Web: www.ezi-dry.com.au Email: ezidry@exemail.com.au INSTRUCTION MANUAL
PILOT PEDAL DRIVE INSTRUCTIONS
 PILOT PEDAL DRIVE INSTRUCTIONS TABLE OF CONTENTS 1. INTRODUCTION 2. IMPORTANT SAFETY AND OPERATING INFORMATION 3. EQUIPMENT 3.1 Items Supplied 3.2 Tools Required 4. ASSEMBLY OF THE PEDAL DRIVE 4.1 Installing
Planning and general precautions ithrust Tunnel Systems installations.
 Version 1.0 This recommendation will go through the different factors to consider when choosing where and how to fit thruster tunnels in a boat. Some of these recommendations might be difficult, or even
9A5N Solid State CW Paddle
 9A5N Solid State CW Paddle User manual Table of contents: 1. General description 2. Before you begin 3. Finger piece and/or battery installation 4. Interconnection 5. Lever(s) sensitivity adjustment 6.
QUALITY ALUMINUM BOAT LIFTS, INC. INSTRUCTIONS. Dominator Lake Lift
 INSTRUCTIONS Dominator Lake Lift PHONE:251-986-3882 * FAX:251-986-3136 QABLDOMINATORINST.2014 P a g e 1 Quality Aluminum Boat Lifts, INC. Installation Instructions: Dominator Lake Lift Thank you for your
MODEL NUMBER: M20005 AIR SOURCE KIT. 30% Duty Compressor on. 2.0 Gallon Air Tank SAVE THIS MANUAL FOR FUTURE REFERENCE
 MODEL NUMBER: M20005 AIR SOURCE KIT 30% Duty Compressor on 2.0 Gallon Air Tank SAVE THIS MANUAL FOR FUTURE REFERENCE USER MANUAL IMPORTANT SAFETY INSTRUCTIONS CAUTION - To reduce risk of electrical shock
MANUAL SEALLESS STEEL STRAPPING TOOL MODEL A
 OPERATION MANUAL / SPARE PARTS LIST MANUAL SEALLESS STEEL STRAPPING TOOL MODEL A337.0001 13.1912.01 13191201.en/MAS/ 10.02 INDEX PAGE 1 SAFETY INSTRUCTIONS 2 2 WARRANTY CONDITIONS AND LIABILITY 4 3 APPROPRIATE
480C DUAL PERFORMANCE VALUE PACK
 (Pewter) PART NO. 48012 (Chrome) PART NO. 48032 (Stealth Black) PART NO. 48042 IMPORTANT: It is essential that you and any other operator of this product read and understand the contents of this manual
AMP Oil Free Manual AMP 50-8-TC AMP 50-6-D AMP General User and Maintenance Instructions
 AMP Oil Free Manual AMP 50-8-TC AMP 50-6-D AMP 50-24 General User and Maintenance Instructions Silentaire Technology 8614 Veterans Memorial Dr. Houston, TX 77088 800-972-7668 Fax 832-327-0669 www.silentaire.com
ULTRA-LIGHT DUTY ONBOARD AIR SYSTEM
 ULTRA-LIGHT DUTY ONBOARD AIR SYSTEM PART NO. 10000 IMPORTANT: It is essential that you and any other operator of this product read and understand the contents of this manual before installing and using
PRODUCT SUPPORT MANUAL YACHT BEAM 6M Searchlight Remote Control System with Joystick Remote Control Panel
 PRODUCT SUPPORT MANUAL YACHT BEAM 6M Searchlight Remote Control System with Joystick Remote Control Panel The Yacht Group - 4545 Ponce de Leon Blvd. Coral Gables FL 33146 Tel. 305.667.5811 - Fax. 305.663.5551
Allspeeds Ltd. Royal Works, Atlas St Clayton le Moors Accrington Lancashire England BB5 5LW. Tel +44 (0)
") Allspeeds Ltd. Royal Works, Atlas St Clayton le Moors Accrington Lancashire England BB5 5LW Tel +44 (0)1254 615100 www.allspeeds.co.uk SOFT LINE CUTTER SL55 PRODUCT CODE No. 980504 INSTRUCTIONS FOR INSTALLATION,
Allspeeds Ltd. Royal Works, Atlas St Clayton le Moors Accrington Lancashire England BB5 5LW Tel +44 (0)1254 615100 www.allspeeds.co.uk SOFT LINE CUTTER SL55 PRODUCT CODE No. 980504 INSTRUCTIONS FOR INSTALLATION,
What hull material types will the system work on? Do I still need an antifoul paint?
 1. The Hull What hull material types will the system work on? The system is effective on all GRP (Glass Reinforced Plastic), STEEL and ALUMINIUM hulls up to thickness of 70mm. Unfortunately the system
RPS900W Redundant Power Supply. Installation Guide.
 RPS900W Redundant Power Supply Installation Guide www.edge-core.com Installation Guide RPS900W Redundant Power Supply Single DC Output Port with Dual Output Voltages RPS900W E10013-CS-R01 1500000081A
Depth sensor. Product reference : REV 1. USER GUIDE and INSTALLATION GUIDE. nke Sailing competition
 Depth sensor Product reference : 90-60-456 REV 1 USER GUIDE and INSTALLATION GUIDE nke Sailing competition Z.I. Kerandré Rue Gutenberg 56700 HENNEBONT- FRANCE http://www.nke.fr After sale service n 33
MODEL NUMBER: PSI AIR SOURCE KIT 200 PSI Compressor on 2.0 Gallon 200 PSI Air Tank
 IMPORTANT SAFETY INSTRUCTIONS CAUTION - To reduce risk of electrical shock or Electrocution: MODEL NUMBER: 20008 200 PSI AIR SOURCE KIT 200 PSI Compressor on 2.0 Gallon 200 PSI Air Tank IMPORTANT: It is
Sideshift SS230 Installation on a 2006 Bayliner 265SB
 The Sideshift SS230 was packaged very well and all parts were clearly labelled and documented. The overall quality seems far more durable than I expected... I was somewhat concerned that the unit may become
Translation of the original Operating Instructions for HKS rubber compensators
 Because of their flexible elements and mechanisms, HKS rubber compensators are susceptible to damage of all types and adverse loads in operation. For reliable operation of a compensator and, thus, the
AC1810 / AC1810-A TECHNICAL SPECIFICATIONS. Operating Pressure psi ( kgs/cm²) [AC1810] Displacement. Net Weight
![AC1810 / AC1810-A TECHNICAL SPECIFICATIONS. Operating Pressure psi ( kgs/cm²) [AC1810] Displacement. Net Weight](/thumbs/83/88369739.jpg "AC1810 / AC1810-A TECHNICAL SPECIFICATIONS. Operating Pressure psi ( kgs/cm²) [AC1810] Displacement. Net Weight") Technical Specifications Operating Instructions Maintenance Information Troubleshooting Guide Parts Diagrams AC1810 / AC1810-A THE EVOLUTION OF PERFECTION CAUTION: Before attempting to use or service this
Technical Specifications Operating Instructions Maintenance Information Troubleshooting Guide Parts Diagrams AC1810 / AC1810-A THE EVOLUTION OF PERFECTION CAUTION: Before attempting to use or service this
Manual Leveling Control Installation/Operation
 ELECTROMECHANICAL TRIM TAB SYSTEMS Manual Leveling Control Installation/Operation Linear Devices Corporation dba Lectrotab 11126 Air Park Road, Suite G Ashland, VA 23005 www.lectrotab.com Phone: 804-368-8428
TECHNICAL INFORMATION
 TECHNICAL INFORMATION Model No. Description RP2300FC, RP2301FC Router CONCEPT AND MAIN APPLICATIONS Models RP2300FC and RP2301FC are upgraded sister tools of our current plunge-type electronic router Model
200 PSI HIGH-FLOW AIR SOURCE KIT
 200 PSI HIGH-FLOW AIR SOURCE KIT 50% Duty Compressor on 2.0 Gallon Air Tank PART NO. 20008 IMPORTANT: It is essential that you and any other operator of this product read and understand the contents of
200 PSI FAST-FILL AIR SOURCE KIT
 200 PSI FAST-FILL AIR SOURCE KIT 55% Duty Compressor on 2.0 Gallon Air Tank PART NO. 20007 IMPORTANT: It is essential that you and any other operator of this product read and understand the contents of
SEADUCER BOATS GAS MONO COME VISIT US ON THE WEB AT
 SEADUCER BOATS GAS MONO COME VISIT US ON THE WEB AT WWW.SEADUCERBOATS.COM 1 - Pkg. Of 440 push rod ends 1 - Pkg. of solder-on rod ends 2 -water outlet fitting 1-1/4" prop nut 1 -.250" x 24" flex shaft
SPECIFICATIONS Type: Twin stack, single phase Tank: 4 gallon Air Output: PSI; PSI Max PSI: 125 PSI HP: 1.
 2 GALLON TWIN STACK AIR COMPRESSOR Model: 9526 DO NOT RETURN TO STORE. Please CALL 800-348-5004 for parts and service. CALIFORNIA PROPOSITION 65 WARNING: You can create dust when you cut, sand, drill or
PROPORTIONING VALVE. Model 150 INSTRUCTION MANUAL. March 2017 IMS Company Stafford Road
 PROPORTIONING VALVE Model 150 INSTRUCTION MANUAL March 2017 IMS Company 10373 Stafford Road Telephone: (440) 543-1615 Fax: (440) 543-1069 Email: sales@imscompany.com 1 Introduction IMS Company reserves
24L AIR COMPRESSOR MODEL NO: TIGER 11/250 PART NO: OPERATION & MAINTENANCE INSTRUCTIONS LS01/13
 24L AIR COMPRESSOR MODEL NO: TIGER 11/250 PART NO: 2244010 OPERATION & MAINTENANCE INSTRUCTIONS LS01/13 INTRODUCTION Thank you for purchasing this product. Before attempting to use this product, please
AIR COMPRESSOR OPERATING INSTRUCTION AND PARTS LIST
 AIR COMPRESSOR OPERATING INSTRUCTION AND PARTS LIST OIL-LESS TYPE IMPORTANT: PLEASE READ CAREFULLY BEFORE STARTING OPERATIONS. THE CONTENTS ARE FOR GENERAL INFORMATION OF ALL THE SIMILAR MODELS. Record
GV Standard X-Vent. Setup, Commissioning & Installation Guide
 GV Standard X-Vent Setup, Commissioning & Installation Guide Technical experts in the design, manufacture and supply of precision engineered, architectural rooflights for residential and commercial buildings.
Components for air preparation and pressure adjustment. OUT port position ( ) connected Rear side. of IN port. Air tank. directly.
 connected Rear side. of IN port. Air tank. directly.") Components preparation and pressure adjustment ABP Overview ABP is a component that enables boosting by s only up to twice primary pressure (.0MPa max.) in combination with using air tank but not using
Components preparation and pressure adjustment ABP Overview ABP is a component that enables boosting by s only up to twice primary pressure (.0MPa max.) in combination with using air tank but not using
Misaligned Folds Paper Feed Problems Double Feeds Won t Feed FLYER Won t Run iii
 Operator s Manual Table of Contents Operator Safety... 1 Introduction... 2 Unpacking and Setup... 3 Unpacking... 3 Setup... 4 FLYER Overview... 5 FLYER Diagram... 5 Capabilities... 5 Control Panel... 6
IMPORTANT SAFETY INSTRUCTIONS
 IMPORTANT SAFETY INSTRUCTIONS CAUTION - To reduce risk of electrical shock or electrocution: - Do not disassemble. Do not attempt repairs or modifications. Refer to qualified service agencies for all service
AIR COMPRESSOR OPERATION & MAINTENANCE INSTRUCTIONS MODEL NO: CHAMP 3 PART NO: LS0115
 AIR COMPRESSOR MODEL NO: CHAMP 3 PART NO: 2225222 OPERATION & MAINTENANCE INSTRUCTIONS LS0115 INTRODUCTION Thank you for purchasing this CLARKE Air Compressor. Please read this manual fully before use
VERTICAL AIR COMPRESSORS
 VERTICAL AIR COMPRESSORS MODEL NO: VE11C150, VE15C150, VE18C150 PART NO: 2226005, 2226000, 2226015 OPERATION & MAINTENANCE INSTRUCTIONS LS0615 INTRODUCTION Thank you for purchasing this CLARKE Vertical
COOPER POWER SERIES. D-73P3 bypass switches installation instructions. Switches MN008005EN. Effective April 2016 Supersedes S June 2013
 Switches MN008005EN Effective April 2016 Supersedes S328-120-1 June 2013 D-73P3 bypass switches installation instructions COOPER POWER SERIES DISCLAIMER OF WARRANTIES AND LIMITATION OF LIABILITY The information,
T i m i n g S y s t e m s. RACEAMERICA, Inc. P.O. Box 3469 Santa Clara, CA (408)
") RACEAMERICA T i m i n g S y s t e m s Demo Tree Controller Owner s Manual Models 3204D, 3204DW & 3204DX Rev D RACEAMERICA, Inc. P.O. Box 3469 Santa Clara, CA 95055-3469 (408) 988-6188 http://www.raceamerica.com
RACEAMERICA T i m i n g S y s t e m s Demo Tree Controller Owner s Manual Models 3204D, 3204DW & 3204DX Rev D RACEAMERICA, Inc. P.O. Box 3469 Santa Clara, CA 95055-3469 (408) 988-6188 http://www.raceamerica.com
24L AIR COMPRESSOR OPERATION & MAINTENANCE INSTRUCTIONS MODEL NO: RANGER 7/240 PART NO: LS0913
 24L AIR COMPRESSOR MODEL NO: RANGER 7/240 PART NO: 2242000 OPERATION & MAINTENANCE INSTRUCTIONS LS0913 INTRODUCTION Thank you for purchasing this CLARKE 24L Air Compressor. Please read this manual fully
Installation, Compensation and Maintenance Instructions for. RITCHIE Compasses. Made In U.S.A
 Installation, Compensation and Maintenance Instructions for RITCHIE Compasses Made In U.S.A All Magnetic Compasses are vulnerable to magnetic interference, which will produce errors, called deviation.
GETZ EQUIPMENT INNOVATORS PART NO.: 9G59554 MODEL: MS 36 SC-R HYDROSTATIC TEST PUMP
 GETZ EQUIPMENT INNOVATORS PART NO.: 9G59554 MODEL: MS 36 SC-R HYDROSTATIC TEST PUMP LIMITED WARRANTY Getz Equipment Innovators warrants its products, and component parts of any product manufactured by
POWER ASSISTED BICYCLES OWNERS MANUAL
 POWER ASSISTED BICYCLES OWNERS MANUAL WE HAVE INCLUDED A BICYCLE OWNER S MANUAL WHICH YOU SHOULD REFER TO FOR ALL GENERAL CYCLE MAINTENANCE. CONTENTS Page. 3 Unpacking. Page. 3-4 Easy steps to get started.
OWNERS MANUAL. Model Shown with optional Primary Mooring Cleats. Portable Mooring System SAFETY OPERATION MAINTENANCE PARTS
 OWNERS MANUAL Model 2400 Shown with optional Primary Mooring Cleats. Portable Mooring System SAFETY OPERATION MAINTENANCE PARTS CAUTION: Before using your new Pier Tender, read rules for Safety, Operation,
24L OIL FREE AIR COMPRESSOR MODEL NO: TIGER 7/250 PART NO: OPERATION & MAINTENANCE INSTRUCTIONS LS10/13
 24L OIL FREE AIR COMPRESSOR MODEL NO: TIGER 7/250 PART NO: 2244030 OPERATION & MAINTENANCE INSTRUCTIONS LS10/13 INTRODUCTION Thank you for purchasing this product. Before attempting to use this product,
METEOR LSR36500 LIGHTING UNDERWATER POOL LIGHT. Operating Instructions
 METEOR LSR36500 UNDERWATER POOL LIGHT Operating Instructions LIGHTING CONTENTS Preface...3 Features...3 Precautions...3 Components and Connectors...4 Installation...5 Controls...7 Appearance...8 Technical
INSTRUCTION MANUAL Pressure Relief Device LPT
 INSTRUCTION MANUAL Pressure Relief Device LPT 5COV475800 LPT REV00 CONTENT: 1 SAFETY 1.1 Safety instructions 2 1.2 Specified applications 2 1.3 Safety notes on the equipment operation 2 2 PRESSURE RELIEF
accidents which arise due to non-observance of these instructions and the safety information herein.
 3 GALLON PANCAKE COMPRESSOR Model: 50959 CALIFORNIA PROPOSITION 65 WARNING: You can create dust when you cut, sand, drill or grind materials such as wood, paint, metal, concrete, cement, or other masonry.
100L AIR COMPRESSOR MODEL NO: TIGER 16/1010 PART NO: OPERATION & MAINTENANCE INSTRUCTIONS LS01/13
 100L AIR COMPRESSOR MODEL NO: TIGER 16/1010 PART NO: 2244025 OPERATION & MAINTENANCE INSTRUCTIONS LS01/13 INTRODUCTION Thank you for purchasing this product. Before attempting to use this product, please
RAM 4021 Operation Manual
 RAM 4021 Operation Manual Worldwide Manufacturer of Gas Detection Solutions TABLE OF CONTENTS RAM 4021 For your safety...3 Description...3 Set-up mode...4 Annunciator lights/alarms...4 Operation...5 Calibration...6
For ANCHOR WINCH Model: T Big Water 45 T sw Salt Water Series Big Water 45
 INSTALLATION AND OPERATING INSTRUCTIONS ANCHOR WINCHES For ANCHOR WINCH Model: T10110-45 Big Water 45 T10103-45sw Salt Water Series Big Water 45 If you have any questions or difficulty installing this
Low Wind High Yields Series
 Low Wind High Yields Series Wind Turbines USER S MANUAL Introduction Low Wind High Yields Series rotor blades apply the latest advanced thermoplastic engineering and are manufactured by precision injection
Operating Instructions for BAIR22-6 AIR-POWERED CRIMPING TOOL
 Operating Instructions for BAIR22-6 AIR-POWERED CRIMPING TOOL Read and understand all of the instructions and safety information in this manual before operating or servicing this tool. Table of Contents
INSTRUCTIONS AND MAINTENANCE MANUAL SERIES: RT
 INSTRUCTIONS AND MAINTENANCE MANUAL 05/11/2015 SERIES: RT cmo @cmo.es http://www.cmo.es page 1 ASSEMBLY THE RT VALVE COMPLIES WITH THE FOLLOWING: Machinery Directive: DIR 2006/42/EC (MACHINERY) Pressure
RAM 4021-PR. Operation Manual. Worldwide Manufacturer of Gas Detection Solutions
 RAM 4021-PR Operation Manual Worldwide Manufacturer of Gas Detection Solutions TABLE OF CONTENTS RAM 4021-PR For Your Safety... 2 Description.... 2 Setup Mode.... 2 Lights/Alarms.... 3 Operation.... 4
The P-Rod Double by The Airgun Lab Installation Instructions Revision F 08/01/2016 page 1 of 18
 Installation Instructions Revision F 08/01/2016 page 1 of 18 Safety Warning, Terms and Conditions: Each P-Rod Double kit has been designed, manufactured, and tested to function with a standard Benjamin
For ELECTRIC ANCHOR WINCH Models: T Pontoon 35 T sw Salt Water Series Coastal 35
 INSTALLATION AND OPERATING INSTRUCTIONS ANCHOR WINCHES For ELECTRIC ANCHOR WINCH Models: T10109-35 Pontoon 35 T10102-35sw Salt Water Series Coastal 35 If you have any questions or difficulty installing
120 PSI FAST-FILL AIR SOURCE KIT 25% Duty Compressor on 1.5 Gallon Air Tank
 120 PSI FAST-FILL AIR SOURCE KIT 25% Duty Compressor on 1.5 Gallon Air Tank PART NO. 20003 IMPORTANT: It is essential that you and any other operator of this product read and understand the contents of
MASTER TRUING STAND TS-3. Optional Dial indicator set with brackets Dial indicator bracket set only
 MASTER TRUING STAND TS-3 3 2 1 3 8 9 4 10 7 6 5 12 13 Optional 1555-1 Dial indicator set with brackets 1556-1 Dial indicator bracket set only 49 11 16 14 15 48 32 31 37 38 20 19 17 18 34 39 21 36 22 33
USER GUIDE TO POWER ASSISTED BIKES
 USER GUIDE TO POWER ASSISTED BIKES 1 PAGE CONTENTS Page. 3 Unpacking Page. 3-4 Easy steps to get started Page. 5 General Assembly Instructions Page. 6 Aligning H/Bars, Page. 7 Tightening pedals onto Crank
RAM Operation Manual. Worldwide Manufacturer of Gas Detection Solutions
 RAM 4021 Operation Manual Worldwide Manufacturer of Gas Detection Solutions TABLE OF CONTENTS RAM 4021 For Your Safety... 2 Description.... 2 Setup Mode.... 2 Lights/Alarms.... 3 Operation.... 4 Calibration....
ATD /8 x 50 Retractable Air Hose Reel Owner s Manual
 ATD-31166 3/8 x 50 Retractable Air Hose Reel Owner s Manual Features Heavy-gauge, all-steel reel assembly 8-position ratchet mechanism locks reel at desired hose length 5-position adjustable roller outlet
Product instruction manual Easymount Sign Laminators EM-S1400C, EM-S1600C, EM-S1400H, EM-S1600H
 Product instruction manual Easymount Sign Laminators EM-S1400C, EM-S1600C, EM-S1400H, EM-S1600H The Easymount Sign has been designed to be user friendly, however we strongly recommend you take a few minutes
Installation, Operation & Maintenance Manual
 Original Instructions Installation, Operation & Maintenance Manual Sentry VREL Control Valve Pressure Conditioning S-SW-IOM-00277-15 1-17 Table of Contents Safety Information... 3 General Safety Precautions...
2,500/4,000 LB Easy Riser Vertical Cable Feighner Lift
 2,500/4,000 LB Easy Riser Vertical Cable Feighner Lift CAUTION - PUT SAFETY FIRST 1. Before attempting to install or operate this lift, study and fully understand the proper operating procedures and safety
TABLE OF CONTENTS FRAME FEATURES INTRODUCTION
 S3 DISC MANUAL TABLE OF CONTENTS Introduction...1 Frame Features...2 Fork Preparation...3 Small Parts...5 Frame Preparation...6 Brake Housing Installation...7 Mechanical Cable Routing...9 Electric Cable
Exercise 2-3. Flow Rate and Velocity EXERCISE OBJECTIVE C C C
 Exercise 2-3 EXERCISE OBJECTIVE C C C To describe the operation of a flow control valve; To establish the relationship between flow rate and velocity; To operate meter-in, meter-out, and bypass flow control
SIX R (P ) AND SEVEN R (P ) POSITION CYLINDERS Service Information
 AND SEVEN R (P ) POSITION CYLINDERS Service Information") SIX R431006322 (P -063892-00001) AND SEVEN R431006321 (P -063981--00002) POSITION CYLINDERS Service Information The six and seven position cylinders are medium duty pneumatic positioning devices that operate
SIX R431006322 (P -063892-00001) AND SEVEN R431006321 (P -063981--00002) POSITION CYLINDERS Service Information The six and seven position cylinders are medium duty pneumatic positioning devices that operate
1 DRIVE INDUSTRIAL IMPACT WRENCH
 1 DRIVE INDUSTRIAL IMPACT WRENCH 92622 ASSEMBLY AND OPERATING INSTRUCTIONS 3491 Mission Oaks Blvd., Camarillo, CA 93011 Visit our Web site at http://www.harborfreight.com Copyright 2004 by Harbor Freight
2 GALLON TWIN STACK AIR COMPRESSOR W/ HOSE REEL
 2 GALLON TWIN STACK AIR COMPRESSOR W/ HOSE REEL Model: 52024 CALIFORNIA PROPOSITION 65 WARNING: You can create dust when you cut, sand, drill or grind materials such as wood, paint, metal, concrete, cement,
VERTICAL AIR COMPRESSORS
 VERTICAL AIR COMPRESSORS MODEL NO: VE15C150, VE18C150, VE25C150 PART NO: 2226010, 2226020, 2226025 OPERATION & MAINTENANCE INSTRUCTIONS LS0715 INTRODUCTION Thank you for purchasing this CLARKE Vertical
GRAVITY BIKE RACK ASSEMBLY & OPERATING INSTRUCTIONS
 GRAVITY BIKE RACK 94479 ASSEMBLY & OPERATING INSTRUCTIONS Due to continuing improvement, actual product may differ slightly from the product described herein. 3491 Mission Oaks Blvd., Camarillo, CA 93011
Freedom8 ShoeBox Compressor Manual
 Freedom8 ShoeBox Compressor Manual Warning!! This product is not a toy! Use or misuse can cause severe injury or death! Use only with adult supervision. This unit is only to be used with tanks, hoses and
accidents which arise due to non-observance of these instructions and the safety information herein. SPECIFICATIONS
 18 GAUGE 1-1/4 INCH BRAD NAILER Model: 7611 CALIFORNIA PROPOSITION 65 WARNING: You can create dust when you cut, sand, drill or grind materials such as wood, paint, metal, concrete, cement, or other masonry.
DBML-60/80 Squeeze Tool
 DBML-60/80 Squeeze Tool OPERATORS MANUAL Description The Mustang Model DBML-60/80 Hydraulic squeeze tool has been manufactured since 1995. A Mustang 3 3/4 bore doubleacting cylinder producing 41,000 lbs
TECHNICAL INFORMATION
 TECHNICAL INFORMATION Models No. TD0101, TD0101F Description Impact Driver L PRODUCT P 1/ 14 CONCEPT AND MAIN APPLICATIONS Models TD0101 and TD0101F are cost-competitive 100N.m-class impact driver developed
Quattrocycle BV. Quattrocycle. User Manual. Last update February Quattrocycle BV Bremkant EJ Middelbeers. User Manual Quattrocycle 1
 Quattrocycle User Manual Last update February 2010 Quattrocycle BV Bremkant 6 5091 EJ Middelbeers User Manual Quattrocycle 1 Table of Contents Page Chapter 1: Introduction 3 Chapter 2: Instructions for
GEMLUX FISHING SYSTEM INSTALLATION AND USER GUIDE
 GEMLUX FISHING SYSTEM INSTALLATION AND USER GUIDE SEPTEMBER 2016 TABLE OF CONTENTS WELCOME TO THE GEMLUX FISHING SYSTEM 3 FIRST THINGS FIRST! 4 WHAT S IN THE BOX? 4 UNPACKAGING 4 WHAT ELSE DO I NEED FOR
Budget Range Operators Handbook
 Budget Range Operators Handbook BAMBI AIR COMPRESSORS LTD 152 Thimble Mill Lane Heartlands Birmingham B7 5HT United Kingdom Tel: 0121 322 2299 Fax: 0121 322 2297 Email: sales@bambi-air.co.uk www.bambi-air.co.uk
CSA Sample Draw Aspirator Adapter Operator s Manual
 30-0951-CSA Sample Draw Aspirator Adapter Operator s Manual Part Number: 71-0367 Revision: 0 Released: 4/30/15 www.rkiinstruments.com WARNING Read and understand this instruction manual before operating
M03 WUNDATRADE. Heat Pump Manifold. Before you start: Check the contents. Optional. ...a division of WUNDA GROUP PLC
 Before you start: Check the manifold box contents against the list below. Check the contents Flow gauges 1. Bar assembly with manual return valves 2. 2 x Auto air vent & drain hose attachments Optional
STEYR evo 10 E STEYR evo 10 E Compact
 TM STEYR evo 10 E STEYR evo 10 E Compact MATCH Bedienungsanleitung Operator's manual Mode d'emploi Instrucciones de funcionamiento STEYR evo 10 E STANDARD STEYR evo 10 E COMPACT ATTENTION This operator
Type BBS-03, BBS-05, BBS-06, BBS-25
 Type BBS-03, BBS-05, BBS-06, BBS-25 Sterile connection elements Sterile Verbindungselemente Raccords union stériles Operating Instructions Bedienungsanleitung Manuel d utilisation 1. THE OPERATING INSTRUCTIONS
CONTENTS AIRBERTH OWNER S MANUAL I 3
 CONTENTS 1 Introduction...4 2 Suitable Mooring Locations...5 3 Operating Procedures...6 3.1 Safety Checklist...6 3.2 Store your Boat with AirBerth...7 3.3 Launch your Boat with AirBerth...8 3.4 Hull Rinsing
MODEL ANALOG ALTIMETER USER'S MANUAL 330KHZ, 1000M DEPTH RATED 0.2 TO 100FT OPERATING RANGE ANALOG OUTPUT
 MODEL 862-000-200 ANALOG ALTIMETER USER'S MANUAL 330KHZ, 1000M DEPTH RATED 0.2 TO 100FT OPERATING RANGE ANALOG OUTPUT DOCUMENT NO. 430-007H September 20, 2005 S/N IMAGENEX TECHNOLOGY CORP. 209-1875 BROADWAY