Shade Sails - Installation Tips
|
|
|
- Jeffrey Ellis
- 6 years ago
- Views:
Transcription
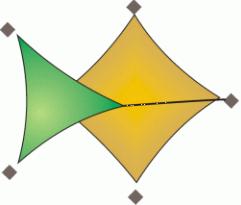
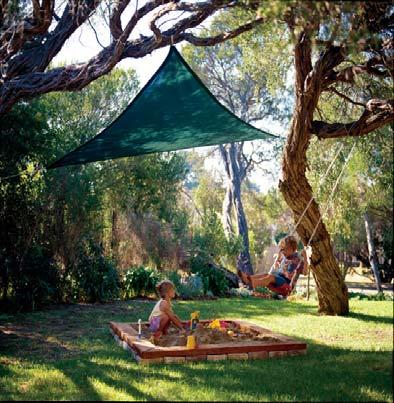
1 Shade Sails - Installation Tips Shade Sails Installation Suggestions Design and Layout: Shade Sails can be mounted in a variety of ways. Sails can be mounted flat or with high and low points. A flat sail can more difficult to properly tension and can catch rain and wind. One of the best methods of mounting a shade sail is to have high points diagonally opposite each other. This creates an architectural hypar. Setting a minimum slope of 15 degrees is ideal. This slope creates a rise to run ratio of 1 / Prior to installation, check with local authorities for any relevant building regulations which may exist and with the local utility companies for any underground services prior to digging holes for posts. In determining the location for your shade sail it is important to keep in mind the fact that the sun is constantly moving across the sky from east to west, which means that the shade moves with the position of the sun. You will only have shade directly under the shade sail at midday during midsummer. Note: Shade sails should not be used near an open flame. Do not use your barbecue under the shade structure. Once you have identified the location for your shade sails it is important to determine the most suitable mounting points for the corners. Some of these fixing points could already exist e.g. pergola, large tree, fence post or fascia. You should allow a space between the corner of the shade sail and the mounting point that is at least 10% of the shade sail length. If the shade sail has a 12 foot length, there should be at least 12 inches between the corner of the shade sail and the mounting point. This will provide enough room for tensioning hardware. Selecting The Position: Before you commence installation it is very important that you consider the most suitable location for your shade sails taking into account the following: Size of the shade sails; Strength of existing structures intended to be anchor points; Ability to insert fixing posts; Location of barbecues; Sun direction etc. There could also be other factors, specific to your situation, which require consideration. Determining The Correct Fixing Points: Once you have identified the location for your Coolaroo shade sails it is important to determine the most suitable fixing points for the corners. Some of these fixing points could already exist e.g. pergola, large tree, fence post or fascia. You should allow a space between the corner of the shade sail and the mounting point that is at least 10% of the shade sail length. If the shade sail has a 12 foot length, there should be at least 12 inches between the corner of the shade sail and the mounting point. This will provide enough room for tensioning hardware.

2 This stage of the installation is critical. You should ensure all fixing points are structurally sound and if unsure, obtain independent advice from a builder or engineer. Building Approvals: Prior to installation, check with local authorities for any relevant building regulations which may exist. Selecting Fixing Accessories: There is an extensive range of fixing accessories available to help you secure your shade sails. These accessories are readily available from your normal hardware supplier. Rope or Wire can be used to extend your shade sail to a fixing point if required. Select the fixing accessories which best suit your own installation. Attaching To Fascia: If you intend to fix your shade sails to a fascia the use of a Fascia Support is strongly recommended. The Fascia support is used to connect the overhangs of rafters or trusses to fascias ledgers giving a strong connection between the two for improved strength. Use with Metal Fascias Use with Timber Fascias Post Supports: If additional posts are required, we recommend the use of a minimum 4 inch, schedule 40 steel pipe or 6" x 6" treated softwood (H5 level treatment). Hardwood of durability Class 1 can also be used. Your local timber supplier can assist you in selection. Post lengths should be calculated taking into account the proposed height your sail plus the depth of your footings. The footing depth should be 1/2 the length of the exposed pole. For example, if your post height is to be 10 feet, you would use a 15 foot long post with a footing depth of 5 feet
 depth of 3/4 in diameter gravel at the base of the hole. Next, pour a 4 in (100mrn) depth of concrete to provide a solid pad.")
 Pour the concrete footing and temporarily brace the posts until the concrete has set. Wood Post Footing - Lay a 4 in (100mm) depth of 3/4 in diameter gravel at the base of the post.")

3 Footings: Measure out centers of footing positions and mark as illustrated. Dig holes 16 in sq. and to the depth required by the post height as described above. Steel Post Footing - Lay a 4 in (100mm) depth of 3/4 in diameter gravel at the base of the hole. Next, pour a 4 in (100mrn) depth of concrete to provide a solid pad. Patio stones can be substituted in place of the poured concrete. Insert the post with a hold down bolt through the post to keep it secure. (see diagram) Pour the concrete footing and temporarily brace the posts until the concrete has set. Wood Post Footing - Lay a 4 in (100mm) depth of 3/4 in diameter gravel at the base of the post. Insert the posts using lag bolts partially driven into the post to hold it in place. Use string lines to ensure they are in plumb alignment. Temporarily brace the posts until the concrete has set. Concreting: Mix concrete in line with manufacturers instructions. These will be labeled clearly on the packet. Your supplier will be able to give you any special advice you may require for your own conditions. Pour concrete to the top of the holes ensuring it is packed well. Ensure the concrete surface is sloping away from the posts to assist water drainage. Allow poles to set in concrete for a minimum of 48 hours. Brace if required.


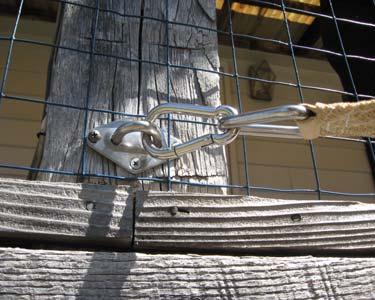
4 Installation: Connect fixing accessories to mounting points as required. Ensure all connections face towards the middle of the sail and are tightly secured. Check again to ensure all mounting points are solid. Lay your shade sail out and commence the installation. Tensioning: Using the selected fixing accessories, commence connecting the corners of the shade sail to the fixing points. Tension Required Tension Correct A properly mounted and tensioned shade sail will have approximately 100 pounds of tension on it and will have little to no wrinkles. Connect all points, using rope or wire cable if necessary to gain increased leverage. The rope can be threaded around a number of times so that it works as a "pulley" mechanism. Another tensioning method would be to use a turnbuckle which can aid in applying the proper amount of tension. Stop tensioning when the shade sail is rigid with little or no creases. CAUTION: Do not over tension. Tension only by hand and only tight enough to get the wrinkles out of the shade cloth. Re-tension periodically if required. Warning: Your Coolaroo shade sail is designed to provide UV protection and comfort in domestic areas. When selecting the position for your shade sail, ensure all fixing points are structurally sound and fixings are tightly secured. Inspect regularly. Prior to installing, consult your local council regarding building regulations which may apply in your area. Exposure to certain chemicals e.g., Chlorine can lead to the premature breakdown of the fabric. Chemicals to be used on or around the fabric should be referred to BackyardCity.com prior to their use. Do not have fire or an open flame close to the fabric. Do not use your barbecue under the shade structure. Care Instructions: Your shade sails may be cleaned at any time using a solution of mild detergent and water. Apply the solution with a sponge or a very soft brush. Let the solution stand on the fabric for 10 minutes and rinse thoroughly with water from your garden hose. DO NOT put the fabric in your washing machine, clothes drier, or scrub it with a stiff brush, scouring pad, or an abrasive cleaner.


5 Shade Sails Designs & Layouts Sample Designs for Shade Sail Coverings


6 FOR ADDITIONAL PICTURES CHECK:
coolaroo.com Protection all year round Installing your new Coolaroo all weather sail is simple, following our step-by-step instructions.
 Protection all year round Installing your new Coolaroo all weather sail is simple, following our step-by-step instructions. Features Provides 100% UV block Water resistant M ade with UV stabilised knitted
Table of Contents. Introduction... 2 Product Overview...2 Safety Information...2 Safety Notes...2
 Table of Contents Introduction... 2 Product Overview...2 Safety Information...2 Safety Notes...2 Design & Construct the Layout... 3 The Layout...3 Fixed Columns...4 Semi-Permanent (removable) Columns...4
Shade Sail Structures
 Shade Sail Structures The Complete How to" Guide Provided by:- Sail Shade World Pty Ltd There are 5 steps in creating a custom made shade sail structure: 1. Planning your structure 2. Installing your fixing
Sail Shade World The coolest shade under the Sun
 Installing Pre Made Sail Shades Thank you for purchasing a Pre-Made Shade from Sail Shade World. We hope this product will assist you in creating a functional and visually appealing outdoor entertaining
20', 15', AND 12' BALL STOPS ASSEMBLY INSTRUCTIONS
 20'-0" 15'-0" 1 739020 739020A 20' BALL STOP; STRAIGHT POLE 739015 739015A 15' BALL STOP; STRAIGHT POLE 739012 739012A 12' BALL STOP; STRAIGHT POLE Read all of the instructions before beginning. Make sure
Life is better under a Shazeebo
 Life is better under a Shazeebo A word from our founder. I love shade sails! A well-designed outdoor space with shade sails floating above can be very inviting. You get the feeling that you are supposed
First Team Sports, Inc. Stellar Recreational Volleyball System
 First Team Sports, Inc. Stellar Recreational Volleyball System BILL OF MATERIALS A 2 Volleyball Vertical Post K 1 ½ Centerlock Nut B 2 Height Labels L 2 Carabiner Clip C 3 Net Clamp M 1 ½ x 2 Hex Bolt
Instant Garage 20' x 12' 3" x 8' 3"
 Instant Garage 20' x 12' 3" x 8' 3" Assembly Instructions Description Model # Instant Garage 20' x 12' 3" x 8' 3" - Grey CIG 1220 3503502 Recommended Tools OR THIS IS A TEMPORARY STRUCTURE AND NOT RECOMMENDED
First Team Sports, Inc. Blast Recreational Volleyball System
 First Team Sports, Inc. Blast Recreational Volleyball System BILL OF MATERIALS A 2 Volleyball Vertical Post K 1 ½ Centerlock Nut B 3 Net Clamp L 2 Carabiner Clip C 1 Pulley Clamp M 1 ½ x 2 Hex Bolt D 4
Shade Sail DIY. Installation Guide
 DIY Shade Sail Installation Guide DISCLAIMER: All information provided here is a general guide only. Installation of shade sails can vary depending on may factors including but not limited to, fixing points,
STRAIGHT POLE TENSIONED BATTING TUNNEL POLE LAYOUT
 STRAIGHT POLE TENSIONED BATTING TUNNEL POLE LAYOUT SOFTBALL: 55' x 14' Nets BASEBALL: 75' x 14' Nets No. 330155 No. 330175 63'-0" 83'-0" SINGLE NET 1 1 No. 330255 No. 330275 63'-0" 83'-0" DOUBLE NET No.
NEXT GENERATION FLEX FENCE
 NEXT GENERATION FLEX FENCE Area To Be Fenced.. With Next Generation Flex Fence any post that is not in a straight line with another post must be braced. Layout your fence installation. Determine all end
FNFB-30 (30 FT FIELDPRO FOOTBALL BACKSTOP SYSTEM) Installation Instructions
 Installation Instructions") FNFB-30 (30 FT FIELDPRO FOOTBALL BACKSTOP SYSTEM) Installation Instructions Call Jaypro Sports Equipment at 1-800-243-0533 during regular business hours for technical support. www.jaypro.com Rev: - Page
FNFB-30 (30 FT FIELDPRO FOOTBALL BACKSTOP SYSTEM) Installation Instructions Call Jaypro Sports Equipment at 1-800-243-0533 during regular business hours for technical support. www.jaypro.com Rev: - Page
Tripod Setup Guide (M-TPx)
") Items needed: 1/2 inch wrench, mast level (M-MLA), medium size wire cutters, crescent wrench, all-purpose grease, tape measure, tie wraps, redi-mix cement (optional), shovel (optional), sledge hammer (for
Items needed: 1/2 inch wrench, mast level (M-MLA), medium size wire cutters, crescent wrench, all-purpose grease, tape measure, tie wraps, redi-mix cement (optional), shovel (optional), sledge hammer (for
BP48-1 AND SSP48-1 IN-GROUND POST INSTALLATION INSTRUCTIONS
 BP48-1 AND SSP48-1 IN-GROUND POST INSTALLATION INSTRUCTIONS WARNING: THIS IN-GROUND POST IS NOT DESIGNED FOR USE WITH AN LP GAS CYLINDER. WARNING: SEE YOUR GRILL OWNER S MANUAL FOR PROPER LOCATION, MINIMUM
Low Wind High Yields Series
 Low Wind High Yields Series Wind Turbines USER S MANUAL Introduction Low Wind High Yields Series rotor blades apply the latest advanced thermoplastic engineering and are manufactured by precision injection
Installation and Training Manual
 AirForce1 Tower Kit Installation and Training Manual FuturEnergy Limited Ettington Park Business Centre Stratford upon Avon CV37 8BT +44 (0)1789 451070 Table of Contents Safety Notes... 3 Parts Supplied
DE8410 FIVB Official Beach Volleyball Net
 DE8410 FIVB Official Beach Volleyball Net User s Manual For Safety Use Caution Misuse causes unexpected injury and net damages. Keep the net away from solid and sharp materials. Keep the rope away from
L.Ph. Bolander & Sons 1355 Evans Ave. 800/
 L.Ph. Bolander & Sons 1355 Evans Ave. 800/434-5611 San Francisco, Ca. 94124 Fax 415/648-0402 GOUNDSET ALUMINUM FLAGPOLE INSTALLATION INSTRUCTIONS STEP 1: DIG THE HOLE TO THE DIMENSIONS LISTED BELOW STEP
USER MANUAL. Beach volleyball posts BEACH CHAMP ID:
 USER MANUAL Beach volleyball posts BEACH CHAMP ID: 111203 INDEX USER MANUAL FOR BEACH VOLLEYBALL POSTS BEACH CHAMP General information Overview Overview: Floor mounting options City Beach - for a freestanding
American Flagpole & Flag Co. 1(800)
") SENTRY CONCEALED HALYARD-REVOLVING TRUCK GROUND SET INSTALLATIONS INSTRUCTIONS 1. Dig foundation as detailed in SECTION A FOUNDATION SPECIFICATIONS, set sleeve in enter of hole with top 2 above grade.
SENTRY CONCEALED HALYARD-REVOLVING TRUCK GROUND SET INSTALLATIONS INSTRUCTIONS 1. Dig foundation as detailed in SECTION A FOUNDATION SPECIFICATIONS, set sleeve in enter of hole with top 2 above grade.
BRAKE WINCH RUP 503-[T/BT] EQUIPMENT FOR LIFTING LOADS. AT 053-[T/BT] xx
![BRAKE WINCH RUP 503-[T/BT] EQUIPMENT FOR LIFTING LOADS. AT 053-[T/BT] xx](/thumbs/88/115945274.jpg "BRAKE WINCH RUP 503-[T/BT] EQUIPMENT FOR LIFTING LOADS. AT 053-[T/BT] xx") Reference number: BRAKE WINCH RUP 503-[T/BT] EQUIPMENT FOR LIFTING LOADS DESIGNATED USE The brake winch RUP 503-[...]T series is a load lifting / lowering device. Device is equipped with safety brake for
Reference number: BRAKE WINCH RUP 503-[T/BT] EQUIPMENT FOR LIFTING LOADS DESIGNATED USE The brake winch RUP 503-[...]T series is a load lifting / lowering device. Device is equipped with safety brake for
LoneStar Fiberglass Pools. Do-It-Yourself. Installation Manual
 LoneStar Fiberglass Pools Do-It-Yourself Installation Manual Chris 1/3/2008 Do-It-Yourself The installation of a LoneStar Fiberglass pool is a much simpler task than most people think. What is important
Troyer s Gourd Rack 8 unit F R H O P
 B E A D I M-N L Vertical Parts F R H O P Horizontal Parts C G J Updated 11/16 Parts List A: Top of Pole B: Bottom of Pole C: 48 Ground Stake D: Top Perch rods 48 long E: Hub F: Rope Winder w/ attached
Round pool 52 (1,32m)
") Round pool 52 (1,32m) www.aquabois.com above ground or semi-inground Instructions for the assembly and installation of a wood pool Dear client, Congratulations, you have purchased a pool of superior quality
Round pool 52 (1,32m) www.aquabois.com above ground or semi-inground Instructions for the assembly and installation of a wood pool Dear client, Congratulations, you have purchased a pool of superior quality
BALL STOP INSTALLTION GUIDE
 BALL STOP INSTALLTION GUIDE GROUND SLEEVE INSTALLATION: 1. Locate the exact location of the ground sleeve. NOTE: Maximum recommended pole spacing is 20 feet on center. 2. Excavate the pole footing; refer
POP UP ANCHOR. Part Number Spectrum Lane ~ Missoula MT ~
 POP UP ANCHOR Part Number 153169 7100 Spectrum Lane ~ Missoula MT 59808 800.791.8056 ~ www.spectrumproducts.com You have purchased a Spectrum Products Pop Up Lane Rope Anchor. Providing the unit is installed
Log Balance Beam. Product: (4 ), (6 )
, (6 )") Log Balance Beam A naturally appearing log with a sculpted bark finish makes for a very unique Log Balance Beam. Fabricated and themed from GFRC concrete to create a great look and feel. Available in 4
Log Balance Beam A naturally appearing log with a sculpted bark finish makes for a very unique Log Balance Beam. Fabricated and themed from GFRC concrete to create a great look and feel. Available in 4
SPOOLER INSTRUCTIONS. STEP 12 If you are going to paint your posts, that should be done at this time.
 STEP 4 Starting where you marked the end post location, move down your fence line 6 feet and make another mark. This mark is where your second upright post will be installed. Continuing down the fence
STATIONARY TRUCK INTERNAL HALYARD V-CLEAT FLAGPOLES FOR QUICK AND PROFESSIONAL INSTALLATION READ ALL INSTRUCTIONS BEFORE PROCEEDING
 9390 South 300 West, Sandy, Utah 84070 801-562-0123 800-782-0500 ColonialFlag.com STATIONARY TRUCK INTERNAL HALYARD V-CLEAT FLAGPOLES FOR QUICK AND PROFESSIONAL INSTALLATION READ ALL INSTRUCTIONS BEFORE
QUALITY ALUMINUM BOAT LIFTS, INC. INSTRUCTIONS. Dominator Lake Lift
 INSTRUCTIONS Dominator Lake Lift PHONE:251-986-3882 * FAX:251-986-3136 QABLDOMINATORINST.2014 P a g e 1 Quality Aluminum Boat Lifts, INC. Installation Instructions: Dominator Lake Lift Thank you for your
ORNAMENTAL CANTILEVER GATE INSTRUCTIONS
 U.S.A. Patent Number 5,36,83 ORNAMENTAL CANTILEVER GATE INSTRUCTIONS *NOTICE: Ornamental Cantilever Gates are supplied with rolls of 2 mesh safety screening in sufficient quantities to cover the entire
IS37 10 Metre Instrument Mast Handbook
 IS37 10 Metre Instrument Mast Handbook Version 10.1 6 th February 2014 Environdata Australia Pty Ltd 42-44 Percy Street Warwick Queensland 4370 Australia Phone: (07) 4661 4699 Fax: (07) 4661 2485 International
Installation, Operating, Inspection and Maintenance Instructions Ladder Climber s Safety System. Warning
 OWNER'S MANUAL Installation, Operating, Inspection and Maintenance Instructions Ladder Climber s Safety System Model # s: 6000, 6001, 6010 Warning You must read and fully understand all instructions, or
Instant Garage 16' x 12' 3" x 8' 6"
 Instant Garage 16' x 12' 3" x 8' 6" Assembly Instructions Door Height 1.8M A B DESRIPTION MODEL # A B IG 1216 Instant Garage 4.9 x 3.7 x 2.6 M - Grey 3503500 16' x 12' 3" x 8' 6" REOMMENDED TOOLS OR Please
3/8" Safety Cable Systems
 3/8" Safety Cable Systems Ladder-Mount 3/8" Cable System (No Slider) Kits include appropriate length of aircraft cable, top and bottom support brackets, 12" tensioning turnbuckle, tension spring, and all
HEAVY DUTY H.S. DISCUS CAGE NET POLE NET POLE INSTALLATION
 901020 - HEAVY DUTY H.S. DISCUS CAGE NET POLE NET POLE INSTALLATION www.gillathletics.com 800-637-3090 Install the pipe cap (PCAP00158002) at the top of the net pole. Install net pole pulley (73210042)
Floor Mount Socket. T: +44 (0) F: +44 (0)
 F: +44 (0)") G-Davit : Floor Mount Socket USER INSTRUCTION MANUAL A davit socket for installation bolted to a high strength flooring material. Suitable for both fall arrest use and lifting. EN795 Class B, PPE Anchor
G-Davit : Floor Mount Socket USER INSTRUCTION MANUAL A davit socket for installation bolted to a high strength flooring material. Suitable for both fall arrest use and lifting. EN795 Class B, PPE Anchor
DAS Dark Site Windscreens
 DAS Dark Site Windscreens Instructions for Installation, Use and Stowing Revised April 15, 2018 This publication is intended to assist DAS members using the windscreens at the Edmund G. Kline Dark Site
KERSPLASH POOL CLIMBING WALL INSTALLATION INSTRUCTIONS
 TOLL FREE: 1-800-476-7366 VOICE 651-665-9131 FAX 651-665-9130 EMAIL: INFO@POOLCLIMBINGWALLS.COM EVERLAST CLIMBING 1335 MENDOTA HEIGHTS ROAD MENDOTA HEIGHTS, MN 55120 2012 EVERACTIVE BRANDS Congratulations!
Donaghys Winch Ropes. Handling & Installation Guide
 Donaghys Winch Ropes Handling & Installation Guide September 2015 Choosing the right rope for the job It is important to choose the right rope for the job. Donaghys specialise in custom designing ropes
Installation and Operating Instructions for Automotive Winch Synthetic Rope
 Installation and Operating Instructions for Automotive Winch Synthetic Rope 2 1 Synthetic Rope Kit Parts List Part No. 251262 1. Rope Assembly (3/8 x 100 ) 2. Hook Strap WARNING: A minimum of EIGHT wraps
TOWER INSPECTION REPORT
 3010 S. Hwy 77, Suite 600 Waxahachie, Texas 75165 http://ctctower.com Office: 972/923-9504 Fax: 972/923-9619 TOWER INSPECTION REPORT PREPARED FOR MR. CUSTOMER 1,563 GUYED TOWER NEAR CITY, STATE JANUARY
TOWER INSTALLATION MANUAL For A.R.E. Guyed Pipe Towers Short Towers 43, 64 and 85 feet tall
 TOWER INSTALLATION MANUAL For A.R.E. Guyed Pipe Towers Short Towers 43, 64 and 85 feet tall Contents 1) Introduction...2 2) Site Selection and Preparation...2 3) Tools List...3 4) Parts List...4 5) Tower
STATIONARY TRUCK INTERNAL HALYARD CAM CLEAT FLAGPOLES FOR QUICK AND PROFESSIONAL COMMERCIAL INSTALLATION READ ALL INSTRUCTIONS BEFORE PROCEEDING
 9390 South 300 West, Sandy, Utah 84070 801-562-0123 800-782-0500 ColonialFlag.com STATIONARY TRUCK INTERNAL HALYARD CAM CLEAT FLAGPOLES FOR QUICK AND PROFESSIONAL COMMERCIAL INSTALLATION READ ALL INSTRUCTIONS
Inspection & Maintenance
 PERSONAL FALL ARREST EQUIPMENT Inspection & Maintenance This article addresses the requirements of OSHA1926.502(d)(21), which states that personal fall arrest systems shall be inspected prior to each use
BPB26-1 AND SSPB26-1 PATIO BASE INSTALLATION INSTRUCTIONS
 BPB26-1 AND SSPB26-1 PATIO BASE INSTALLATION INSTRUCTIONS WARNING: THIS PATIO BASE IS NOT DESIGNED FOR USE WITH AN LP GAS CYLINDER. WARNING: SEE YOUR GRILL OWNER'S MANUAL FOR PROPER LOCATION, MINIMUM CLEARANCES,
TENSOREX C+ TENSOREX C+
 Installation instruction TENSOREX C+ TENSOREX C+ is a new spring automatic tensioning device for tramway, light and heavy railways Overhead Contact Lines ( OCL ). TENSOREX Products are only by PFISTERER
T3200 TransPlate Harness
 T3200 TransPlate Harness www.diverite.com Product Description The TransPlate Harness is designed specifically for use with hard back-plates, such as stainless steel or aluminum. The TransPlate Harness
WHISPER 42 FOOT (13 Meter) TOWER KIT for SKYSTREAM 3.7 AND WHISPER 500 WIND TURBINE
 TOWER KIT for SKYSTREAM 3.7 AND WHISPER 500 WIND TURBINE") WHISPER 42 FOOT (13 Meter) TOWER KIT for SKYSTREAM 3.7 AND WHISPER 500 WIND TURBINE Made in the USA by: SOUTHWEST WINDPOWER, INC. 1801 Route 66 Flagstaff, AZ 86001 (928) 779-9463 SOUTHWEST WINDPOWER Page
WHISPER 42 FOOT (13 Meter) TOWER KIT for SKYSTREAM 3.7 AND WHISPER 500 WIND TURBINE Made in the USA by: SOUTHWEST WINDPOWER, INC. 1801 Route 66 Flagstaff, AZ 86001 (928) 779-9463 SOUTHWEST WINDPOWER Page
Airwalker. Installation and Safety Information. Stretch Products for Dance, Therapy, Education, and Fitness
 Airwalker Installation and Safety Information Stretch Products for Dance, Therapy, Education, and Fitness www.dyenamicmovement.com Airwalker is a Registered Trademark of Dye namic Movement Products, Inc.
Zip-Line Kit Instructions
 1 Zip-Lines Ireland - Zip-Line Kit Instructions DC001A Zip-Line Kit Instructions Thank you for your purchase of the ZLI Zip-line kit! This product was engineered to provide safe fun for all ages when the
Owner s Manual & Safety Instructions
 Owner s Manual & Safety Instructions Save Save This This Manual Manual Keep manual for the safety warnings and precautions, assembly, Keep manual for the safety warnings and precautions, assembly, operating,
OUTDOOR BACKSTOP WITH 5'-0" EXTENSION
 INSTALLATION INSTRUCTIONS OUTDOOR BACKSTOP WITH 5'-0" EXTENSION NoUU. 00175- _ READ ALL INSTRUCTIONS THOROUGHLY BEFORE ATTEMPTING TO INSTALL THIS EQUIPMENT. INSTALLATION / ASSEMBLY OF THIS EQUIPMENT MUST
Hot Tub Pre-Delivery Guide
 Hot Tub Pre-Delivery Guide To prepare for the delivery of your hot tub, make sure the delivery path is clear and no obstructions are present. Obstacles such as overhanging tree limbs, awnings, protruding
Soma Wind Generators
 Soma Wind Generators 13M WINH TOWER INSTALLATION MANUAL ERTIFIED to AS4100 Steel Structures ode AS3995 (1994) Design of Steel Lattice Towers and Masts AS1170.2 (1989) SAA Wind Loading Manufactured by SOMA
Safe Installation Procedures and Care Manual Meyco Safety Pool Covers
 Safe Installation Procedures and Care Manual Meyco Safety Pool Covers Meyco Products relies on the experience and knowledge of pool professionals to properly install our products. Damage that occurs to
Guyed 70 Foot Tower Kit for Skystream 3.7 Owner s Manual
 Guyed 70 Foot Tower Kit for Skystream 3.7 Owner s Manual 3-CMLT-1028-03 REV F Installation Operation 2013 XZERES Corp All Rights Reserved Please read this manual thoroughly before beginning assembly. If
The purpose of this brochure is to explain to owners and contractors the City of Burnaby s requirements for private swimming pools.
 Building Information BURNABY PLANNING & BUILDING DEPARTMENT Swimming Pools The purpose of this brochure is to explain to owners and contractors the City of Burnaby s requirements for private swimming pools.
SPM B-Net Assembly Instructions. Installation Recommendations
 SPM B-Net Assembly Instructions & Installation Recommendations WCS B-Net Installation Video SPM B-Net Study Ski Racing Safety is NO Accident! INSPECT, PLAN AND EXECUTE NO EXCUSES! 2015, World Cup Supply,
INSTRUCTION MANUAL FOR USE OF BABY WALKER FLOWER
 The safety of this product and the materials used for its production is guaranteed and certified in test laboratories according to EN standards. INSTRUCTION MANUAL FOR USE OF BABY WALKER FLOWER PLEASE,
Wet Lamination of Dry Film Photoresist for the Hobbyist
 Wet Lamination of Dry Film Photoresist for the Hobbyist By Adam Seychell Updated: 10. September 2009 Table of Contents Introduction...2 Equipment List...3 Squeegee Board...4 The Procedure...5 Cut photoresist
Array Solutions 350 Gloria Rd Sunnyvale, TX Phone FAX
 Array Solutions 350 Gloria Rd Sunnyvale, TX 75182 Phone 972-203 2008 FAX 972-203 8811 E-mail: info@arraysolutions.com Installation Instructions AS-AYL-4 WM Array Solutions K9AY Loop Wire/Mast Kit Thank
Sunshade Owner s Manual
 DRAGONWING Sunshade Owner s Manual DRAGONWING P. O. Box 13322 Sacramento, CA 95813-3322 3322 DRAGONWING Sunshade Owner's Manual Page 2 T hank you for your selection of the DRAGONWING Sunshade. We are sure
Page 1 of 1 04/19/13 SBR
 Office of Roadway Engineering - Plan Insert Sheets Number Title Date Number Title Date Number Title Date 201015 Extension of Anchor Bolts 07/20/12 207000 Bikeway Pavement Marking Details 01/18/13 202010
No ' Long No ' Long
 ASSEMBLY, INSTALLATION & USAGE MANUAL BATTING CAGES No. 0150-50' Long No. 0170-70' Long No. 0150 BATTING CAGE - 50' Long No. 0170 BATTING CAGE - 70' Long Upon completion of the assembly/installation of
POOL FENCE STARTER KIT INSTALLATION MANUAL WARNING! ADULT ASSEMBLY ONLY DESIGNED FOR ASSEMBLY ON GRASS
 POOL FENCE STARTER KIT Complies with Australian Standard, AS1926.1-2012: Safety barriers for swimming pools INSTALLATION MANUAL Pool not included DESIGNED FOR ASSEMBLY ON GRASS WARNING! ADULT ASSEMBLY
SafetyBuletin. Se ingoutriggerstopreventaccidents
 SafetyBuletin Se ingoutriggerstopreventaccidents Safety Bulletin This document is intended to supplement but not supersede the manufacturer s applicable insrtuctions. Copyright 2010 ACPA All rights reserved
Gym Dandy TEETER TOTTER TT-320. Model TT-320. Retain This Manual for Reference OWNER'S MANUAL
 NOTE: Please read all instructions carefully before using this product Gym Dandy Table of Contents Safety Notice Hardware Pack TEETER TOTTER TT-320 Assembly Instruction Parts List Operation Tips Warranty
-FRU FREEZE RESISTANT WATER VALVE COOLERS SYSTEM
 I N S TA L L AT I O N / I MN SA TA I N TL EL NAT AIN OC N E / MI AN IS NT RE UN CA TN I CO E N SI N S T R U C T I O N S INSTALLATION INSTRUCTIONS FOR -FRU OPTION Important: Read all instructions and refer
INSTRUCTIONS FOR CHAIN LINK INSTALLATION
 INSTRUCTIONS FOR CHAIN LINK INSTALLATION This guide explains how to correctly install our chain link fencing and post system. The guide provides details of which post type you will need for your fence
LEGACY II TM STARTING PLATFORMS
 LEGACY II TM STARTING PLATFORMS INSTALLATION INSTRUCTIONS CORPORATE HEADQUARTERS WESTERN SALES AND MANUFACTURING PLANT P.O. Box 400 1017 SW Berg Parkway Canby, Oregon 97013 (503) 266-2231 Fax (503) 266-4334
Foundation Products. Poured In Ground Anchor Bolts E1 - E4. Structural Foundations E5 - E12. Copyright 2016 s Industry Inc. SIE-RA-CMP EN
 Foundation Products Poured In Ground Anchor Bolts E1 - E4 Structural Foundations E5 - E12 EA EB Poured in Ground Anchor Bolts Layout SIEMENS Anchor Bolts 131702-4X shown for reference purposes only! Actual
FAST 2K Fence Post Backfill
 1 - Where can I buy Fast 2K? Consult: Where to Buy tab at www.fast2k.com 2 - What is Fast 2K? Fast 2K is an award winning innovation, much better and more convenient than concrete for setting fence posts,
Our Spa covers. About Spa Cover Vinyl
 Our Spa covers Whether you are in the market for a new Spa cover or just want to get the most out of your existing one, this guide will give you a wealth of helpful information. These basic maintenance
TECNODECK SHADE SAILS
 TECNODECK SHADE SAILS EN - Tecnodeck 04/2017 - Tecnodeck ALL RIGHTS RESERVED TECNODECK SHADE SAILS TECNODECK SHADE SAILS allows the perfect combination with the Tecnodeck Pergola System or with the use
The Complete HOW TO Guide Custom Shade Sail Structures Made by A&B Canvas Australia
 We Protect You from the Sun Wind and Rain The Complete HOW TO Guide Custom Shade Sail Structures Made by A&B Canvas Australia INSIDE The 5 Steps to Creating an Amazing Shaded Area to Help you Become the
2010 International Snow Science Workshop
 HOW TO TURN A KIDS BIKE INTO A BOMB TRAM FOR AVALANCHE CONTROL WORK David Immeker* Heavenly Mountain Resort Professional Ski Patrol, South Lake Tahoe, California ABSTRACT: Bomb trams have been used for
Model: 5100 OmniSteel Volleyball System
 Model: 5100 OmniSteel Volleyball System Installation, Operation and Maintenance Instructions Please read all instructions before attempting installation or operation of these units SAVE THESE INSTRUCTIONS
Moai Bike Rack Heavy Duty Submittal Sheet. Materials: 2.0 Schedule 40 Pipe (2.375 OD) Finishes: Capacity: Mount Options: Setbacks: 2 Bikes
 Finishes: Capacity: Mount Options: Setbacks: 2 Bikes") Submittal Sheet Materials: 2.0 Schedule 40 Pipe (2.375 OD) Finishes: Galvanized An after fabrication hot dipped galvanized finish is available. Powder Coat Our powder coat finish assures a high level of
Submittal Sheet Materials: 2.0 Schedule 40 Pipe (2.375 OD) Finishes: Galvanized An after fabrication hot dipped galvanized finish is available. Powder Coat Our powder coat finish assures a high level of
Portable Soccer Goal Safety Program
 Portable Soccer Goal Safety Program Overview This program addresses moveable/portable soccer goal safety, particularly full size or near full size goals. Soccer goals have caused dozens of deaths and hundreds
Instruction Manual for ZY-021 Height adjustable Acrylic Backboard with Chain net
 Instruction Manual for ZY-021 Height adjustable Acrylic Backboard with Chain net WARNING: IMPROPER INSTALLATION OR SWINGING ON THE RING MAY CAUSE SERIOUS INJURY OR DEATH Notice to assemblers: All basketball
INSTALL INSTRUCTIONS. If YOU can IMAGINE it... WE can BUILD it TIDEWATER SAILCLOTH TENTS
 INSTALL INSTRUCTIONS If YOU can IMAGINE it... WE can BUILD it TIDEWATER SAILCLOTH TENTS WARNING! The safe installation and use of commercial tenting products can vary from site to site and during varying
Nice. Nine. Need to. You
 Nine Nice You Need to Okay, it s actually six knots, one sling, one lashing and one handy tip, but who can resist the alliteration? The knots are no big secret. You ll find them in many publications and
INSTALLATION INSTRUCTIONS FOR GRT75-PF-RFS PET FOUNTAIN
 INSTALLATION INSTRUCTIONS FOR GRT75-PF-RFS PET FOUNTAIN Important: Read all instructions and refer to local codes prior to installation. l Local soil conditions may require more gravel for drainage. l
Thank you for purchasing a Porta-Dock product! *Please read and follow these instructions step by step*
 PG 1 OF 9 PORTA-DOCK, INC. 74A ABL/APW 1056 & 44A FLB APW 1056 PORTA-LIFT Thank you for purchasing a Porta-Dock product! *Please read and follow these instructions step by step* STEP 1. Separate and group
Product Manual B-Safety ClassicLine & PremiumLine Emergency Eyewash and Eye/Face Wash Equipment
 Product Manual B-Safety ClassicLine & PremiumLine Emergency Eyewash and Eye/Face Wash Equipment 1. Application Emergency eyewash and eye/face wash equipment are prescribed first aid installations for workplaces
Made in U.S.A. Narrow-U Bike Rack Heavy Duty Submittal Sheet. Materials: Finishes: Mount Options: Setbacks:
 Submittal Sheet Materials: 2 Schedule 40 Steel Pipe (2.375 OD) Finishes: Galvanized An after fabrication hot dipped galvanized finish is available Powder Coat Our powder coat finish assures a high level
BOUNDARY Deer & Perimeter Fence
 Three-Part Specifications - Copyright 2015 - Nixalite of America Inc BOUNDARY Deer & Perimeter Fence Includes specifications for: BOUNDARY Lightweight, Standard, Extra Tall, Extra Strength and Maximum
Introduction. Congratulations on your purchase of DRi-Z All Weather Shade Fabric. Table of contents:
 Introduction Congratulations on your purchase of DRi-Z All Weather Shade Fabric Rainbow Shade Products, the supplier of DRi-Z All Weather Shade Fabric has published this document to assist you in the following
TOWN of CHEEKTOWAGA Permit Application for Swimming Pools, Hot Tubs, or Personal Spas
 Permit Application for Swimming Pools, Hot Tubs, or Personal Spas / 20 - Date of Application Received By Permit No. APPLICANT to COMPLETE the PINK PORTION! ( ) ( ). Applicant s Name Daytime Phone No. Cell
Shoreline Cantilever Lift 2500lb Capacity Models: (108" inside width) - Part # (120" inside width) - Part #
 - Part # (120 inside width) - Part #") Shoreline Cantilever Lift 2500lb Capacity Models: 25108 (108" inside width) - Part # 1017402 25120 (120" inside width) - Part # 1017403 1. 2. 3. 4. 5. CAUTION - PUT SAFETY FIRST Before attempting to install
Shoreline Cantilever Lift 2500lb Capacity Models: 25108 (108" inside width) - Part # 1017402 25120 (120" inside width) - Part # 1017403 1. 2. 3. 4. 5. CAUTION - PUT SAFETY FIRST Before attempting to install
Swimming Pools, Hot Tubs and Spas
 OLATHE FIRE DEPARTMENT BUILDING CODES 1225 S. Hamilton Circle Olathe, KS 66061 / Main: (913) 971-7900 / Fax: (913) 971-9812 Swimming Pools, Hot Tubs and Spas Definitions: Swimming Pool- Any structure intended
Turnout gear is comprised of boots, coat, pants, suspenders, hood, gloves, helmet, and SCBA Facepiece.
 Purpose: Turnout gear is a vital piece of personal protection for every member of the Fire Department. The City of Bryan Fire Department will provide its members with protective clothing and equipment
product use, care, & inspection Document Released: January, 10, 2012 Approved By: Bryce Merrick
 product use, care, & inspection Document Released: January, 10, 01 Approved By: Bryce Merrick product use, care, & inspection Contents product use 03 product warning 03 tuff bucket ANATomy 04 how to properly
Figure 1 - Parts Identification. Copyright 2002, DB Industries, Inc.
 User Instruction Manual Zorbit Energy Absorber Kits for Horizontal Lifeline Systems This manual is provided as the Maunfacturer s Instructions, and should be used as part of an employee training program
How To Measure And Mark Basketball Lines Like The Pros
 Return To The Court Store 48 Cherokee 758 S. Broad Hills Street Drive Toccoa, GA 30577 Rydal, Phone: Georgia 404.915.8352 30171 Fax: 800.470.3537 Mark@thecourtstore.com Phone: 678.528.0354 02/15/2011 Author:
WARNING! ADULT ASSEMBLY ONLY
 POOL FENCE EXPANSION KIT Complies with Australian Standard, AS1926.1-2012: Safety barriers for swimming pools WARNING! ADULT ASSEMBLY ONLY PACKAGE CONTENTS: Part A - 1 x 30cm LONG POST SECTION Part B 1
Below are the instructions to build a roller-furling unit for under $10. Read the entire process before beginning the project.
 Greg Cowens' $10 PVC Roller Reefing for CP-16's by Greg Cowen Below are the instructions to build a roller-furling unit for under $10. Read the entire process before beginning the project. Materials: 2
Model: 7200 Collegiate Volleyball System
 Model: 7200 Collegiate Volleyball System Installation, Operation and Maintenance Instructions Please read all instructions before attempting installation or operation of these units SAVE THESE INSTRUCTIONS