Cleopatra British Obelisk Transport Barge. Kartonbau.de Exclusive Edition
|
|
|
- Constance Ashlynn Price
- 6 years ago
- Views:
Transcription


1 Cleopatra 188 British Obelisk Transport Barge Kartonbau.de Exclusive Edition Copyright 2006 Oliver Weiss / The Walden Font Co. P. O. Box 81, Winchester, MA
2 Historical Notes The Cleopatra was designed and built in 18 to transport an obelisk from Alexandria to London. This obelisk had been presented to the English nation in 1819 by Mehmet Ali, the viceroy of Egypt, in commemoration of the victories of Lord Nelson in the Battle of the Nile and Sir Ralph Abercromby in the Battle of Alexandria. The English government, while appreciating the gesture, declined to finance the transport of the gift. Over the years, several schemes were devised to get the obelisk to London, none of which came to fruition. However, in 18 the necessary elements to undertake the project, namely brains and money, came together in the shape of the engineer John Dixon and the distinguished and very wealthy Sir Erasmus Wilson. John Dixon devised a plan for a 92 foot long, cylindrical barge that would completely encase the obelisk, to be towed to England by a tug boat. Sir Erasmus, who was a devoted freemason and so had a certain fondness for obelisks, agreed to put up 15,000 pounds (about 2 million U.S. Dollars in today s money) to finance the project. The barge was built and shipped in sections to Alexandria, where the obelisk lay buried in sand on the beach. As the monument was unearthed, the barge was assembled around it. The giant cylinder was then rolled into the sea. A deck house, rudder and mast where fitted and the little ship was dubbed Cleopatra. On September 21, 18 the tug Olga towed Cleopatra out into the Mediterranean. All went well until disaster struck on October 14, 18. The ships were caught in a storm in the Bay of Biscay. Cleopatra rolled wildly and became utterly untenable. Six volunteers from the Olga manned a boat to rescue Cleopatra s crew of five and her captain, but the boat capsized and all six were lost. Olga sent another boat which at length succeeded in taking off her crew. The barge was cut loose and quickly disappeared from sight. The Cleopatra was believed lost until the Glasgow steamer Fitzmaurice spotted her floating upright and apparently undamaged. Taken into the Spanish harbor of El Ferrol, Cleopatra underwent repairs. The tug Anglia was sent to retrieve her, and she left El Ferrol on January 15, 188. She arrived at Gravesend, at the mouth of the River Thames, on January 21, 188. Amid great fanfare the obelisk, now known as Cleopatra s Needle was erected on the Thames embankment on September 12, 188, almost a year after the voyage had begun. To extract the obelisk, the ugly, little barge that had attracted so much public attention was, of course, dismantled and unceremoniously sold for scrap. Note: The parts page should be printed on heavy paper rather than traditional model card. (28-32 lbs.) The Hull Separate parts 1a and 1b at the cut marks near the stern. Cut glue tabs of a suitable length from the grey field on page 6 Round 1a and 1b lengthwise to form the main hull and the stern sections. Close the seams with the glue tabs, colored side inwards. Fold parts 2 at the center line. To attach these parts to the hull section, I recommend you fix first one side and let it dry, then the other, then the top and bottom. After these glue points have dried, apply glue from the inside to seal the seams. Use the small marks on the edges of 2 and parts 1a and 1b to line parts 2 up correctly. You may wish to use small glue tabs to help in positioning. Cut out bulkhead 1d and glue ring 1c. You may wish to double 1d for extra stability. Carefully sand the edges of 1d so that it fits snugly into 1a. Push 1d all the way into 1a, but do not yet apply glue. Next, fit glue ring 1c into 1a. Dry-fit first, then apply glue to 1a and insert the glue ring up to the center line. Let dry. Next, apply glue to the inner edge of 1c and pull 1d forward against it. Let dry thoroughly. Page 2 Assembly Instructions
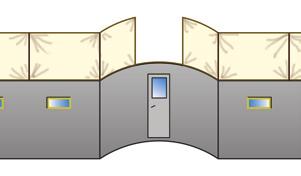
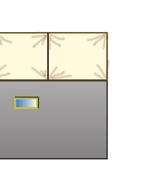
3 Incise the small black marks on parts 4a and 4b, then fit 4b squarely into 4a. Mount the rudder to the stern section of the hull with glue. Attach bilge keels 5 to the markings on 1b. The bilge keels should slant downward by about 30 degrees. Girders and Bulkheads Cut out bulkheads 6a 6j. For those using circle cutters, center marks have been supplied. Cut out the white square centers. Make sure to cut on the line, so that no white remains in the center. This will ensure a proper fit for the obelisk. Doubling of these parts is not recommended, however, you may wish to stiffen them with acrylic floor wax ( Future ) or CA glue. The bulkheads should fit snugly into the hull, but should have enough play to be removed easily. Double parts to 1mm. Cut out the small slits. Color the sides of parts to match the surface. These will fit into the grooves in the bulkheads. You may wish to stiffen the doubled parts as well. Let everything dry thoroughly, then assemble. Take care to keep the proper order of the bulkheads, else the obelisk will not fit! Note that parts are extending longer at the stern end. Make sure the structure is square and the outer edges of parts are flush with the edges of the bulkheads. After the structure has dried, glue the extensions of parts at the stern end of the structure into the stern hull assembly, butting against bulkhead 1d. You may need to sand the outer edges slightly to accommodate the thickness of glue ring 1c. Obelisk To check proper assembly of the inner structure, you may wish to assemble the obelisk at this point rather than at the end. Part 26 is scored from the front at all fold lines, then gathered at the seams. You may employ glue tabs if you wish. Deck House and Superstructure Score and fold 9a at the score lines. Apply parts 9b, 9c, and 9d to the back of part 9a to form the interior of the railing. Glue the vertical seam of 9a to form a box. You may wish to use glue tabs or reinforce the inside of the deck house with cardboard if you wish. Cut or punch the hole for the mast in deck 10. Gently round part 10 lengthwise, then glue in place to butt against the inside railings. Score and fold companionway 12 into a box. Glue it to the deck, doors facing towards the stern. Glue the finished deck house to the hull. Making sure it is straight. Double parts 13 onto the colored section, then cut out. Attach the ends of parts 13 with the steeper angle to the hull at their position markers. The other ends are fixed against the deck house. The assembly of parts 14a - 14c into stairs is evident from the diagram A. The stairs are fixed to the back of the deck house. Parts 8a and 8b are shaped into cylinders. Slide 8a over the bottom of 8b so that the bottom edges are flush with each other. Cap 8b with 8c. Make sure the handle on the manhole cover faces the seam of 8b. Glue this assembly onto the larger circular marking at the bow end of the hull, seams facing toward the deck house. Double parts 15 onto the colored area, then cut out. You may wish to stiffen these parts as described above. Double spar deck 11 onto 11b and fix parts 15 to 11b at the white markings. Make sure parts 15 are at right angles with the spar deck. Page 3
4 Glue the spar deck into place as follows: The front edge rests on the edge of cylinder 8b. The rear dovetail fits against the front edge of the deck house. Note that there is a step between the deck house deck and the spar deck. Glue the bottom ends of supports 15 on their markings on the hull. Railings To model realistic railings, you can either use the paper railings 20 and 21 as they are, or use them as templates to make wire or string railings, or replace them altogether with photo etched parts. Railing 20 is fitted to the spar deck, railing 21 to the hull behind the deck house. Equipment Form part 16 into a cylinder and cap it on both ends with parts 16b. Glue stands 16c to each end and mount the finished cable drum as shown in the diagram A. Anchor 1 is fitted on the hull with the stock end resting against the front left support 15. Shape part 18b into a boat hull by gathering the part at the seams. Fit 18c into the stern end and cap with deck 18a. The Boat is attached to the deck house with a dab of glue, as seen on the cover page. You may wish to do this after the rigging is complete. Shape 19a into a short cylinder and cap top and bottom with 19b. Glue this bollard on the small circular mark at the bow. Life preservers 22 are fitted as follows: 2 on the outside railings at the rear of the deck house, on either side of the opening. 2 on the outside railings at the front of the deck house on either side of the opening. 2 on the outside railing on each side of the spar deck, at equal intervals. Wheel 23a is cut out, colored on the back side and fitted with a stand 23b on each side. It is mounted on the deck house as shown in diagram A. Position lights 24a and 25b are folded upwards at the lines to form a pan that is colored on the inside and white on the outside. You can color the outsides grayish if you wish. Position lamps 24b and 25b are doubled to 1mm and painted gold. They are glued to the inside corners of the parts 24a and 25a, respectively. Alternatively, a 1mm high section of toothpick or other suitable material can be colored and used. The position lights are fitted to the deck house on supports made from thin wire, according to the template. Mast, Sails and Rigging The mast and gaff can be made from toothpicks or kebob skewers cut to length and sanded into shape according to the template. Note that the mast goes through the hole in the main deck and is footed on the hull. The sails 30 and 31 are folded at the center lines indicated by score marks. Insert a thin thread into the fold before gluing the sails together. Attach the thread to the mast with small glue points. The same goes for the flags 2, 28 and 29. A basic rigging plan is shown in diagram C Stand Score the beam at the fold lines and glue at the seams. Double each stand support to the colored backs. Assemble as shown in diagram D. If you wish to make a stand from real wood, you can use the parts as templates. Page 4
5 8c 8b 8a 19a 19b 19a b 14b 14c b 15 9a a Diagram A 1c 1d 2 1a 4a 4b Page 5


6 6j 6i 6h 6g 6f 6e 6d 6c 6b 6a Diagram B Additional Parts - Print this Sheet on Thin Paper Page 6 Use this field to cut glue tabs
7 Pin Pins Mast Template Diagram C Diagram D Diagram E Page


8 4b c 1b a 9b 11a 15 9c 11b 9d 1d 6f 6a Cleopatra 2006 Oliver Weiss / Walden Classic Paper Models, a Division of the Walden Font Co. 4a 2 1a 12 8b 8a 13 Stand 16a 25a 25b 16b 16c 19a 19b 18c 18b 6i 6d 1 23a 6j 6e 23b Support x 2, use mm wire 24a 24b 8c 18a 6h 6c 14a 14c 14b 10 6g 6b
9
Stevenson Projects Building the Hull Top Deck and Bulkheads
 Stevenson Projects Building the Hull 1. Print out both piece sheets. 2. Cut out one keel piece and glue it to a piece of balsa wood or dense cardboard. Cut out the second keel piece and glue it to the
Constitution Instructions
 Constitution Instructions This kit will build a 1:48 scale hull for the USS Constitution frigate. The kit contains the following parts. 1/8 deck with laser etched deck lines 1/8 railing Ribs Center keel
Bob's Card Models and [Resources]
![Bob's Card Models and [Resources]](/thumbs/89/98525234.jpg "Bob's Card Models and [Resources]") + Bob's Card Models www.bobscardmodels.altervista.org and www.zealot.com [Resources] Sikorsky S-40 (1:72) The Sikorsky S-40 was an American amphibious flying boat built by Sikorsky in the early 1930s for
+ Bob's Card Models www.bobscardmodels.altervista.org and www.zealot.com [Resources] Sikorsky S-40 (1:72) The Sikorsky S-40 was an American amphibious flying boat built by Sikorsky in the early 1930s for
8-GUN CORVETTE ASSEMBLY INSTRUCTIONS
 8-GUN CORVETTE ASSEMBLY INSTRUCTIONS THE HULL STEP 1 Fasten the Deck to the Hull. Find the hull. This is a large, pink, ship-shaped piece of insulating foam board. This will form the base of your model
GREEK TRIREME, 480 B.C. Scale: 1/72 Length: 515mm Width: 180mm Height: 220mm
 GREEK TRIREME, 480 B.C. Scale: 1/72 Length: 515mm Width: 180mm Height: 220mm HISTORY: The model represents a Greek Trireme from the age of battle of Salamis (480 B.C.). The crew were 170 oarsmen and about
Soling Building Tips II
 Soling Building Tips II Prepared: Arthur Deane Jan 20, 2002 adeane@ic.net Introduction The following are some lessons learned and experience gained in building a Soling kit. The plan developed is based
VALDIVIA BUILD LOG Dr Ron
 VALDIVIA BUILD LOG Dr Ron The Robbe kit of the two-masted schooner Valdivia was purchased in 2007, along with the fitting set and propulsion accessories, and has been staring me in the face since then
MARIA HF31. SCALE: 1/72 Length: 365 mm width: 85mm height: 295 mm
 MARIA HF31 SCALE: 1/72 Length: 365 mm width: 85mm height: 295 mm HISTORY: Maria HF 31 is a fishing Ewer whose home base was Finkenwerder in northern Germany. Maria HF31 operated in the North Sea for more
PACK 24 RAINGUTTER REGATTA November 19, 2010 (7pm at Hawthorne)
") PACK 24 RAINGUTTER REGATTA November 19, 2010 (7pm at Hawthorne) Welcome to the Pack 24 Raingutter Regatta! Get ready for a night of excitement, action and a lot of hot air. The premise of Raingutter Regatta
PACK 24 RAINGUTTER REGATTA November 19, 2010 (7pm at Hawthorne) Welcome to the Pack 24 Raingutter Regatta! Get ready for a night of excitement, action and a lot of hot air. The premise of Raingutter Regatta
Construction Chapters Index
 Construction Chapters Index 9 7 8 Chapters Index c. c. c. c. c. c. c7. c8. c9. c0. c. c. c. c. c. c. c7. Balsa Wood Skeleton Strip Planking Hull Fairing Keel Bulb Mould Lead Bulb Casting Keel Construction
Hansa COG 14 th century SCALE: 1/72 Length: 430mm Width: 210mm Height: 330mm
 Hansa COG 14 th century SCALE: 1/72 Length: 430mm Width: 210mm Height: 330mm HISTORY: The Hansa was a medieval association of German cities which engaged by in long distance business mainly in area of
An Australian Classic by spectre.com
 An Australian Classic by www.go spectre.com Your Bug! Welcome to the Balain Bug experience!!!!!! The Bug kit has been designed so as to be a modern version of the Traditional Bug now you can sail like
Making Spars for the Schooner Jeanette
 Making Spars for the Schooner Jeanette..... by Byron Rosenbaum Figure 1. Byron Rosenbaum s 1:16-scale radio-controlled model of the schooner Jeanette. All photographs by the builder. The spars required
Bob's Card Models and [Resources]
![Bob's Card Models and [Resources]](/thumbs/74/69776662.jpg "Bob's Card Models and [Resources]") Bob's Card Models http://www.bobscardmodels.altervista.org/ and www.zealot.com [Resources] Savoia-Marchetti S.55 1:72 The Savoia-Marchetti S.55 was a double-hulled flying boat produced in Italy beginning
Bob's Card Models http://www.bobscardmodels.altervista.org/ and www.zealot.com [Resources] Savoia-Marchetti S.55 1:72 The Savoia-Marchetti S.55 was a double-hulled flying boat produced in Italy beginning
Samurai Armor Set: Step by Step
 Samurai Armor Set: Step by Step Pack 6 Stages -5 Contents Stage Pages 7-76 The tasset plates and shoulder pad Stage Pages 77-8 The tassets, helmet and helmet lining Stage Pages 8-86 The tasset plates and
Place a rope coil here
 1 2 3 4 The anchor buoys were made from Sculpey. You could however, carve them from wood but I wanted to continue my experimentation with this material. A buoy from this time period would have ranged from
PAY N PAK, 1/12 th Scale, Limited Sport Hydro P Sport Hydro
 1980 82 PAY N PAK, 1/12 th Scale, Limited Sport Hydro P Sport Hydro Introduction: The 1980 turbine Pay N Pak is a good subject for a model race boat. It has a low profile, mild pickle-fork setback, long
Assembly instructions nortik scubi 2 Recreational kayak
 Assembly instructions nortik scubi 2 Recreational kayak QR-Code assembly video: Assembly instructions nortik scubi 2 Dear Customer, You have purchased a nortik scubi 2, an innovative hybrid kayak for recreational
MSA Confined Space Entry Equipment
 MSA Confined Space Entry Equipment Because every life has a purpose... MSA Confined Space Entry Equipment MSA XTIRPA Manhole Guard System Use for confined space vertical entry and fall protection when
STRUCTURAL MEMBERS OF A SHIP. compartment stem frame beam bracket girder stern post hull angle bar stiffener
 Unit 2 SHIPS AND SHIPS TERMS STRUCTURAL MEMBERS OF A SHIP Basic terms shell plating strake keel deck tank top floor stringer buoyancy strength stability bulkhead compartment stem frame beam bracket girder
RUDDER KIT INSTRUCTIONS
 C I N S T R U C T I O N S RUDDER KIT INSTRUCTIONS PAMLICOS-0,0,T, T, 60T, Excel Rotomolded Pamlico 0, 0, T, T, 60T, Excel The addition of a rudder to a kayak results in additional control and efficiency,
Building the Corel Endeavour
 SPECIAL ISSUE # 7 DECEMBER 2017 All photographs and articles published remain the copyright property of the contributor and SMSC unless released. Building the Corel Endeavour Photos and commentary by Leon
1/10 th Scale 1956 Ted Jones Classic Hydroplane
 1/10 th Scale 1956 Ted Jones Classic Hydroplane Preparation These plans show outside sheeting of 3/32 balsa laminated with 1/64 birch ply. This makes a light and strong skin for this boat. Optionally you
Parts of the Ship. Terms you should already know
 Parts of the Ship Toronto Brigantine Terms you should already know After-peak Fore-peak Bow Stern Fairlead Scupper Freeing port Hull Deck Lifeline Hatch Skylight Cleat Pin-rail Fife-rail Spider-band Block
Rain Gutter Regatta Pack Event
 Rain Gutter Regatta Pack Event Sunday July 24 th Check-in: 1:30PM Races start: 2 PM Location: 4512 Hoffman Farms Drive Cost: $4/boat kit Organizer: Matt Cook Ahoy, Mates! Although the seas are only 10-foot
Building a model of a Thames Barge
 Building a model of a Thames Barge Stage 1 : Reading the instructions The model which I purchased is of the Will Everard, a steel-hulled barge built in the 1920's, one of a range of laser-cut kits from
Pre-Paint>Fuselage>Empennage>Fit vertical tail fin. Objectives of this task: Materials and equipment required: Fit the spar extender
 Pre-Paint>Fuselage>Empennage>Fit vertical tail fin Objectives of this task: To fit the vertical tail fin to the fuselage, including fitting the static probe, static tube, optional strobe light wiring and
INSTRUCTIONS FOR CHAIN LINK INSTALLATION
 INSTRUCTIONS FOR CHAIN LINK INSTALLATION This guide explains how to correctly install our chain link fencing and post system. The guide provides details of which post type you will need for your fence
aero naut Order No. 3009/00
 aero naut Order No. 3009/00 Introduction: The model should be assembled following the sequence of the stages of construction described in these instructions. The laser-cut components are individually numbered.
We hope you ll enjoy the Drifter as much as we have! Scott DeTray Model Aero Specifications:
 We are excited to bring you the Drifter RC airboat. You re probably thinking it doesn t fly so what is Model Aero thinking??? We have always liked RC vehicles of all types and have had a fondness for airboats
Below are the instructions to build a roller-furling unit for under $10. Read the entire process before beginning the project.
 Greg Cowens' $10 PVC Roller Reefing for CP-16's by Greg Cowen Below are the instructions to build a roller-furling unit for under $10. Read the entire process before beginning the project. Materials: 2
Bottle Rocket Launcher P4-2000
 WWW.ARBORSCI.COM Bottle Rocket Launcher P4-2000 BACKGROUND: The Bottle Rocket Launcher allows for the exploration of launching rockets using commonly available materials such as plastic soda bottles and
In Part 6 of this series, we completed building and painting the hull and rigged the bowsprit. Now, we re ready to make up the masts and spars.
 In Part 6 of this series, we completed building and painting the hull and rigged the bowsprit. Now, we re ready to make up the masts and spars. Making the Spars I prefer to make up all the spars before
Blazer Marine, Whiplash Sport 40
 Blazer Marine, Whiplash Sport 40 Thank you for choosing to build the Whiplash 40. We have spent over 12 years perfecting this design, and finally we are making it available to the world. We are excited
Topaz OMEGA Rigging Instructions
 Topaz OMEGA Rigging Instructions www.toppersailboats.com TOPAZ OMEGA RIGGING INSTRUCTIONS CONTENTS 02. Introduction 02. Manufacturers Details 03. Maintenance 04. Raising the Mast 05. Attaching the Boom
GYBE TALKING: A guide to sloop talk
 GYBE TALKING: A guide to sloop talk Before coming aboard for your sail, learn some basic vocabulary in sailor language. This will help you connect with your experience! Here s a list of some terms and
Friendship 30 Apogee
 Friendship 30 Apogee Make: Model: 30 Length: Friendship 30 ft Price: $ 29,900 Year: 1969 Condition: Used Location: Deale, MD, USA Boat Name: Hull Material: Draft: Number of Engines: 1 Fuel Type: Total
THE AMERICAN BARN DOOR KITE
 THE AMERICAN BARN DOOR KITE Oregon Kitemaker s Retreat January 2007 Rod Beamguard 4104 NW 112 th Way Vancouver, WA 98685-3578 (360) 574-8050 home (360) 750-9833 office kytfevr@wa-net.com PLANFORM BARN
HMS Colossus Dive Trail
 HMS Colossus Dive Trail HMS Colossus Dive Trail Read this page before the dive HMS Colossus was a 74 gun warship built in 1787 at Gravesend and wrecked in 1798. These 74 gun ships were one of the most
LE CERF, Scale: 1/72 Length: 685mm Width: 255mm Height: 520mm
 LE CERF, 1779-1780 Scale: 1/72 Length: 685mm Width: 255mm Height: 520mm HISTORY: The cutter LE CERF was build after the plans of well known French ship designer Denys. The CERF was launched in March 2,
Falcon 3 145, 170, 195 and Tandem Owner / Service Manual
 Falcon 3 145, 170, 195 and Tandem Owner / Service Manual January 2007 - Second Edition Removing The Sail From The Airframe And Short Packing The Glider Many maintenance and repair procedures will require
Dolly wheels in slot #8 for Boat #10.
 Rigging: Laser SAIL SELECTION: The International Laser Class has three different official rigs. Each sail is designed for sailors of different weights. The Standard Rig was designed for sailors weighing
DURAS INFLATABLE BOAT OWNER'S MANUAL
 DURAS INFLATABLE BOAT OWNER'S MANUAL Table of Contents About your new Duras Inflatable Boat Page 1 Assembly Instruction Page 3 Motor Installation Page 5 Capacities Page 5 Troubleshooting Page 6 Using
THE OWNER'S MANUAL IS IN TWO VOLUMES: VOLUME 2 TECHNICAL SPECIFICATIONS - ASSEMBLY PROCEDURE ZODIAC
 CAUTION NOTICE: CAREFULLY READ THIS MANUAL BEFORE OPERATING YOUR BOAT. THIS OWNER S MANUAL IS IN TWO VOLUMES THAT MUST BE KEPT TOGETHER. THE OWNER'S MANUAL IS IN TWO VOLUMES: - VOLUME 1 DEALS WITH OPERATING
O K D I A MEASUREMENT FORM INTERNATIONAL OK DINGHY CLASS
 O K D I A 2010 MEASUREMENT FORM INTERNATIONAL OK DINGHY CLASS NOTES GENERAL 1. The builder shall pay the current building fee to the National OK Dinghy Association which shall issue a building fee receipt
KNARR. SCALE: 1/35 length: 440mm width: 300mm height: 400mm
 KNARR SCALE: 1/35 length: 440mm width: 300mm height: 400mm HISTORY: The Knarr is a type of Viking ship which serves for long trade naval business. The Knarrs were very robust and very well resist against
LITTLE TRI construction
 LITTLE TRI construction I have built almost anything that can sail. At the age of 12 my first sail thing, an ice boat. I used skates which had to be mounted on shoes as runners. Big fun, very fast, only
Miss Mayflower. Build Manual
 Miss Mayflower Build Manual Thank you for the purchase of the Miss Mayflower, this new exciting craft will give you fun on many types of terrain including snow, gravel, pavement, grass, water, and when
Boat Boat Loader Fitting Instructions
 Aerodynamic & Heavy Duty Roof Rack Systems Australian Made - Australian Owned www.rhinorack.com Boat Boat Loader Fitting Instructions CONTROLLED Balance point 3 Front eye nuts position 3 Transom eye nut
Assembly Instruction - Triton Vuoksa 2 advanced Touring kayak
 Assembly Instruction - Triton Vuoksa 2 advanced Touring kayak QR-Code assembly video: You can find many assembling videos to our boats on our YouTube channel: https://www.youtube.com/c/faltbootde Assembly
Index 1. Trampoline 2. Main Foils 3. Spinnaker Pole 4. Mast Setup 5. Mast Rigging 6. Rig Tension 7. Trapeze Lines 8. Rudders 9. Boom 10. Main Sheet an
 By User Manual Index 1. Trampoline 2. Main Foils 3. Spinnaker Pole 4. Mast Setup 5. Mast Rigging 6. Rig Tension 7. Trapeze Lines 8. Rudders 9. Boom 10. Main Sheet and Traveler 11. Main Sail 12. Downhaul
Grandpa's Homemade Rocket for About a Dollar!
 Grandpa's Homemade Rocket for About a Dollar! Grandpa and Granny Co. 2012 The most common items needed: (The number of Rocket parts from each item is before the parts name and its proportionate cost is
ANGEL INSTRUCTIONS ALMOST READY TO SAIL MODEL YACHT
 ANGEL INSTRUCTIONS ALMOST READY TO SAIL MODEL YACHT Long: 920mm High:1840mm Toatl sail area: 0.4 m2 1 MODEL YACHT ASSEMBLY INSTRUCTIONS & SAILING HINTS Thank you for purchasing one of our range of model
The True Confessions of Charlotte Doyle
 Novel Ties The True Confessions of Charlotte Doyle Avi A Study Guide Written By Kathleen M. Fischer Edited by Joyce Friedland and Rikki Kessler LEARNING LINKS P.O. Box 326 Cranbury New Jersey 08512 TABLE
AMYA SeaWind Class Rules
 AMYA SeaWind Class Rules Revised 4/1/2011 1 GENERAL - CLASS: The SeaWind is a one design class. The class objective is competition where the skill of the skipper in sailing and adjusting his boat will
THUNDER INSTRUCTIONS A LMOST READY TO SAIL MODEL YACHT
 THUNDER INSTRUCTIONS A LMOST READY TO SAIL MODEL YACHT Long: 1000mm High:1890mm Toatl sail area: 0.4 m2 1 MODEL YACHT ASSEMBLY INSTRUCTIONS & SAILING HINTS Thank you for purchasing one of our range of
The author's TD Coupe, used as a towplane, and the Airhopper. The gas model is equipped with an automatic towline release.
 THE AIRHOPPER BY STANLEY ORZECK PLANS BY PAUL PLECAN An eight-foot sailplane either towed by a gas model or launched by hand tow. The author's TD Coupe, used as a towplane, and the Airhopper. The gas model
Chapter Twelve. Starting the rigging process
 Chapter Twelve Starting the rigging process Before I begin describing the rigging process, I must remind folks that it would be a great time to slip that traveler ring onto the bowsprit. I forgot to mention
Tugster. Tug Boat. Competition or Sport Tug Kit. A Zippkits R/C Boat. Building Instructions
 Z I P P M A N U FA C T U R I N G Tugster Tug Boat Competition or Sport Tug Kit A Zippkits R/C Boat Building Instructions 2016 JMP Hobby Group St. Paul, Indiana 47272 www.zippkits.com Toll Free (866) 922-ZIPP
Dornier Do R 4 Super-Wal
 Dornier Do R 4 Super-Wal Model Aviation Laddie Mikulasko s Dornier Do R 4 Super-Wal Build the multiengine, record-setting seaplane. Article, plans, instructions, and photos by Laddie Mikulasko. Complete
DRAGONFLITE 95 RESTRICTED CLASS RULES 2016
 DragonFlite Force 95, Restricted Class Rules 2016 2013 Version 1.0 DRAGONFLITE 95 RESTRICTED CLASS RULES 2016 Version 1.0 DF Racing Rules Committee 2016 Introduction The DragonFlite 95 (DF95) project started
SailTrack Installation Instructions. External Track
 SailTrack Installation Instructions External Track SH-500 SS SH-401 SS SH-600 SS SH-200B SS SH-200A SS www.tidesmarine.com Before You Begin Your installation will be easier if you move the boom well off
CR 914 Class Rules. Revised July 15, 2000 See also CR-914 Class Rule Interpretations
 CR 914 Class Rules Revised July 15, 2000 See also CR-914 Class Rule Interpretations 1 GENERAL - CLASS: The CR 914 is a One-Design class. The Class objective is that the sailing skills of the skipper shall
OPPI Rigging Guide 3/2008
 OPPI Rigging Guide 3/2008 McLaughlin Boat Works optistuff.com Thanks for purchasing OPPI, the most durable and F-U-N sailboat available. Rigging your OPPI is easy and the following pictures make it a breeze
Vanguard Sailboats 300 Highpoint Avenue Portsmouth, RI For the dealer nearest you call SAIL
 Vanguard Sailboats 300 Highpoint Avenue Portsmouth, RI 02871 For the dealer nearest you call 800. 966.SAIL Unpack the major parts listed below and lay them out on a soft piece of ground free of sharp objects.
AMYA SeaWind Class Rules
 AMYA SeaWind Class Rules Revised 4/1/2013 1 GENERAL - CLASS: The SeaWind is a one design class. The class objective is competition where the skill of the skipper in sailing and adjusting his boat will
INSTALLING THE TRIDENT 11, 13 OR 15 RUDDER
 INSTALLING THE TRIDENT 11, 13 OR 15 RUDDER Parts Included: Steering Parts: Foot Rail Parts: Rudder Parts: Retraction Parts: 4 - Rubber 2 - Rail Assemblies 1 - Rudder Body 1 - Rudder Retraction Grommets
Measurement Checklist for the Lido for the Championships
 This paper is intended to be a guide for rapid and easy measurement of the Lido 14 to assure painless application of the rules that, in general, govern one design performance and compliance. It is not
Samurai Armor Set: Step by Step
 Samurai Armor Set: Step by Step Pack 3 Stages 9-12 1 Contents Stage 9 Pages 29-31 The cuirass side and tassets Stage 10 Pages 32-37 The shoulder plate and tassets Stage 11 Pages 39-41 The shoulder plate
Ships of the world : Esmeralda : Assembly Instructions
 http://www.canon.com/c-park/ Before starting assembly: Writing the number of each section on its back side before cutting out the sections is highly recommended. (* This way, you can be sure which section
AVA Building Instructions
 Suggested Assembly Sequence: AVA Building Instructions 1. Insert fittings in rudder and trial fit rudder on boom 2. Attach stab to v-mount and position ahead of rudder ¼, sanding the v-mount as needed.
2. DEFINITION In these Rules, builder means any manufacturer who is licensed to build the BYTE Class sailboat by the Copyright Holder.
 By-law 1 of the BYTE Class International Association Constitution 2005 Byte Class Rules Effective March 1, 2005 Revisions to the 2000 Rules are shown in red PART 1 1. OVERRIDING ONE-DESIGN PRINCIPLE The
Paper Tiger Catamaran International Association MEASUREMENT FORM
 Paper Tiger Catamaran International Association MEASUREMENT FORM Amended June 2000: July 2002: April 2012 Name of boat: Sail No: Owner s name: Owner s address: Postcode: Phone: (H) (B) (Mob.) Email: Owner
Assembly Instructions for STS-97 payload (P6 Truss)
") 2008 Assembly Instructions for STS-97 payload (P6 Truss) Familiarization with P6 Truss sides This is the FORWARD side of P6. It is the side that will be facing forward on top of the Z1 truss. Easily identified
2008 Assembly Instructions for STS-97 payload (P6 Truss) Familiarization with P6 Truss sides This is the FORWARD side of P6. It is the side that will be facing forward on top of the Z1 truss. Easily identified
BUILDING A SET OF FRIGATES
 BUILDING A SET OF FRIGATES As I prepared my fleets for the upcoming convention of the Seven Years War Association, I found myself suffering from the same malady that afflicted Lord Nelson when he wrote
JABBA S SAIL BARGE (THE KHETANNA) READ BEFORE UNPACKING. VEHICLE ASSEMBLY REQUIRED. NO TOOLS NEEDED. AGES 14+
 READ BEFORE UNPACKING. VEHICLE ASSEMBLY REQUIRED. NO TOOLS NEEDED. AGES 14+") AGES + JABBA S SAIL BARGE TM (THE KHETANNA) VEHICLE READ BEFORE UNPACKING. REQUIRED. NO TOOLS NEEDED. E5900_595_SW_E_HASLAB_JABBAS_SAIL_BARGE_KHETANNA_INST.indd CREATIVE DEVELOPMENT STUDIOS // CREATIVE
AGES + JABBA S SAIL BARGE TM (THE KHETANNA) VEHICLE READ BEFORE UNPACKING. REQUIRED. NO TOOLS NEEDED. E5900_595_SW_E_HASLAB_JABBAS_SAIL_BARGE_KHETANNA_INST.indd CREATIVE DEVELOPMENT STUDIOS // CREATIVE
The Main Gaff... Main Gaff completed. Bearing block
 Once the boom has been placed on the model, the topping lift needs to be rigged. It will be belayed to the port side cap rail. Use the eye bolt aft of the tackle we set up for the backstay. The topping
GRAVITY BIKE RACK ASSEMBLY & OPERATING INSTRUCTIONS
 GRAVITY BIKE RACK 94479 ASSEMBLY & OPERATING INSTRUCTIONS Due to continuing improvement, actual product may differ slightly from the product described herein. 3491 Mission Oaks Blvd., Camarillo, CA 93011
CamRT Sun Top Bimini Installation Instructions
 CamRT Sun Top Bimini Installation Instructions C910-07 & C910-08 Rev. 16-Jun-15 Information: info@roswellglobal.com Warranty: warranty@roswellglobal.com Questions? Please call us at (31) 638-1331 Setup:
ASSEMBLY MANUAL HOBIE CATSY
 ASSEMBLY MANUAL HOBIE CATSY HOBIE CAT EUROPE ZI Toulon Est, BP 50 8078 Toulon cedex 9, France Tel : + (0)9 08 78 78 - Fax : + (0)9 08 99 Email : hobiecat@hobie-cat.net - http://www.hobie-cat.net ASSEMBLY
Basic Install Guide. Parts: 1 P a g e
 Basic Install Guide Parts: 1 P a g e Step One: Remove all panels and components from boxes. Step Two: Carefully unroll your turf. Be sure not to cut the turf when removing from protective plastic. The
BonHomme Richard. as a Ship-in-Light-Bulb Model. ... by John Fox III
 BonHomme Richard as a Ship-in-Light-Bulb Model..... by John Fox III Figure 1. I am on a mission to prove that shipin-bottle (or light bulb) models can be every bit as historically accurate, and to scale,
aero naut Electric Model Aeroplane Quido Order-No. 1303/00
 aero naut Electric Model Aeroplane Quido Order-No. 1303/00 Quido is a small model that accompanies you wherever you go. The prefabricated parts are mostly balsa and just need to be assembled according
Wysiwig - Wayfarer Rigging Guide
 Wysiwig - Wayfarer 8767 - Rigging Guide GENERAL NOTES Before you go afloat, make sure that the self-bailer is closed. It is operated through the cut-out in the starboard floorboard. If you do not close
WHITE ENSIGN MODELS. 7. Etched parts 20 are the netted sections of railing that fit to the edges of the mid gun deck extensions, kit parts D25.
 WHITE ENSIGN MODELS RN Littorio-Class Battleships Photoetched Metal details to fit the Trumpeter kits in 1/00 Scale Instructions for working with Photoetched Metal 1. Do not remove the etched parts from
Bladerider X8 Assembly Help Notes
 2.1 Remove All Parts & Have Some Tools Handy Remove all items from the box and identify each part as per the packing sheet and check that nothing is missing. If there is something missing, please email
3. Sail Kit. Table of Contents: Portland Pudgy Safety Dinghy: 3. Sail Kit
 Table of Contents: 3. Sail Kit Sailing the Portland Pudgy... 1 Sailing Tips... 1 Reducing the Sail Area (Reefing the Sail)... 2 Method 1. Reducing Sail without the Exposure Canopy... 2 Method 2. Reducing
400/488 Rotating Davit Installation Instructions
 400/488 Rotating Davit Installation Instructions These instructions were written with the owner in mind. If you are the installer make sure these instructions are passed along to the owner of the boat.
Building your first hull.
 Building your first hull. You ve built your first model boat from a kit, and now you re ready to scratch-build a scale model. You may find what you need as a ready-made hull. Alternatively you may decide
INSTALLING YOUR CLC RUDDER
 INSTALLING YOUR CLC RUDDER These instructions are written to help you install the CLC rudder kit on your wooden kayak. The rudder can be fitted to your boat during construction or after completion. Please
Constructing the Masts
 A: Fore Mast completed B: Main Mast unpainted C: Boom Rest D: Unpainted mast detail (fore and main mast) A D B C Constructing the Masts The main and fore masts are virtually identical. At least as far
Shrouds, dead-eyes and ratlines
 Shrouds, dead-eyes and ratlines On a real vessel the shrouds would be put up before the running rigging and many modellers follow this sequence. On Sherbourne I attached the stays and the running rigging
APPENDIX IV DEVELOPMENT AND MEASUREMENT RULES OF THE INTERNATIONAL TEN SQUARE METER SAILING CANOE
 APPENDIX IV Development Canoe Rules APPENDIX IV DEVELOPMENT AND MEASUREMENT RULES OF THE INTERNATIONAL TEN SQUARE METER SAILING CANOE 1 GENERAL Class and measurement rules measurement forms may be obtained
INTERNATIONAL FLYING FIFTEEN CLASS MEASUREMENT FORM
 INTERNATIONAL FLYING FIFTEEN CLASS MEASUREMENT FORM 2014 Authority: * International Sailing Federation, Ariadne House, Town Quay, Southampton, Hampshire, SO14 2AQ, UK IN ORDER TO OBTAIN A MEASUREMENT CERTIFICATE
Highlander Specifications
 Highlander Specifications July 22, 2012 Highlander Specifications The intent of this section is to clarify and add to what is shown in the official plans. In case of conflict between these specifications
RUDDER KIT INSTRUCTIONS
 A I N S T R U C T I O N S RUDDER KIT INSTRUCTIONS TARPON 0/40/60/60i The Tarpon series is designed as a high performance sit-on-top kayak tailored for the sport paddler. Our rudder system is designed to
INSTALLING THE PROWLER 13 RUDDER
 INSTALLING THE PROWLER 13 RUDDER Parts Included: Steering Parts: Foot Rail Parts: Rudder Parts: Retraction Parts: 4 Rubber 2 Rail Assemblies Rudder Body 1 Rudder Retraction Grommets (includes steering
A Table Top Wind Tunnel You Can Build
 A Table Top Wind Tunnel You Can Build Basic principles of aerodynamics can be studied in the classroom with this simple, inexpensive wind tunnel. All you need to build it is some cardboard boxes, glue,
Rudder Kit Assembly Instructions for Quest 13
 Rudder Kit Assembly Instructions for Quest 13 Revised 4/2/2015 78501 Rudder System The Hobie Quest is designed for the addition of an optional rudder system. Rudder systems in boats like this allow you
Table of content Introduction 5 1. Part 1. Assembly Tools needed for Assembly Glossary Hulls Mounting the beams 7
 Table of content Introduction 5 1. Part 1. Assembly 6 1.1. Tools needed for Assembly 6 1.2. Glossary 6 1.3. Hulls 7 1.3.1. Mounting the beams 7 1.3.2. Fixing the mast rotation cleats 8 1.3.3. Placing the