Congratulations! Sincerely, The Parks Family
|
|
|
- Elwin Atkinson
- 6 years ago
- Views:
Transcription
1
2
3 Congratulations! Welcome to the Blue Wave Family. We sincerely hope that you are happy with your choice of a Blue Wave Boat. As a family-owned business, we care about our customers and try to continue to provide award-winning service so that each customer feels like they are truly part of the Blue Wave Team. We use the best materials and process to bring to you a high-quality, versatile, family and fishing vehicle. We stand behind the quality of every Blue Wave that leaves the factory, and that still shows today as every boat goes through a rigorous quality control process and is finished by being hand-checked by one of the owners of the company so that you can enjoy your boat with hopefully no inconveniences. Thank you for your purchase, and be sure to let us or your Blue Wave dealer know if there is any way we can make your boating experience better. Sincerely, The Parks Family
4
5 Bay Boat TABLE OF CONTENTS PARKS MANUFACTURING, INC. LIMITED WARRANTY... v Introduction Congratulations Owner s Packet Safety Good Boating Practices Water Sports Safety Boating Regulations and Your Responsibilities Boat Owner / Operator Responsibilities Safety Registration Insurance Reporting Accidents Operation by Minors Boating Under the Influence Operator s License and Education Emergency Assistance Protecting the Environment Fishing Foreign Species Transportation Wake Noise Speed Pollution Regulations Emergencies First Aid / Medical Emergencies Emergency Preparation Checklist Carbon Monoxide Poisoning Using Distress Signal Devices and Calling for Help Man Overboard Capsizing and Flooding Running Aground Dangerous Weather Engine or Boat System Failure Accidents, Collisions and Giving Assistance Towing on the Water Bay Boat 2015 i
6 Operating in Hazardous Conditions Severe Weather Water Hazards Restricted Areas Markers, Warnings and Advisories Navigation Rules and Aids Right-of-Way Navigational Lights and Night Operation Speed Wake Overtaking / Passing Operating Your Boat Safety Precautions Trailering and Launching Legal Considerations Trailer Classification Trailer Gross Vehicle Weight Rating Towing Vehicle Vehicle Towing Hitch Hitch Ball and Trailer Coupler Safety Chains Trailer Brakes Launching Boat Features and Options Fuel System Engine Lubrication System Shift and Throttle Controls Electrical System Propellers Gauges / Instruments Helm and Control Switches Bilge Pump System Raw Water System Livewells Electric Trolling Motor Systems Fish Locators, Graphs and Depth Indicators Fishing Seats General Care and Maintenance Engine Fuel System ii Bay Boat
7 Table of Contents Steering System Corrosion Protection General Maintenance and Cleaning Safety Equipment Trailer Winterization and Storage Winterization and Storage Preparation Storing on a Cradle or Blocks Recommissioning After Storage Troubleshooting Glossary of Nautical Terms Index... I-1 Bay Boat iii
8 This Page Intentionally Left Blank iv Bay Boat
9 PARKS MANUFACTURING, INC. LIMITED WARRANTY Blue Wave Boats For up-to-date warranty information, please refer to the owner section on our website, or call Parks Mfg., Inc. at to request a copy. Register your new boat online at v
10
11 Bay Boat Section 1 INTRODUCTION CONGRATULATIONS Congratulations and Welcome Aboard! To ensure each boating experience is a safe and enjoyable one, please read all the literature provided with your newly purchased boat carefully before operating the boat or any equipment. OWNER S PACKET Your Blue Wave has many features and accessories that have existing material that is provided by the various manufacturers. The information is compiled within this packet. This packet includes your Blue Wave Owner's Manual, Component Manual, and Engine Manual (if applicable) to advise you on operation, servicing, specifications and warranty as well as other useful information. Bay Boat 1-1
12 Section 1 ABOUT YOUR NEW BOAT Boat Terminology It is important that you understand, learn and use appropriate and common nautical terminology while boating to ensure your safety and the safety of others. Figure 1-1 LENGTH OVERALL PORT SIDE BEAM STARBOARD SIDE TRANSOM HELM FORWARD AFT BOW FREEBOARD DRAFT WATERLINE GUNWHALE STERN See the Glossary of Nautical Terms on page 13-1 for additional boating terminology. BW Bay Boat
13 CERTIFIED Introduction Hull Identification, Capacity and Safety Plates Hull Identification Number The hull identification number (HIN) is usually located near the upper starboard corner of the transom on the outside of the boat. In some instances, the HIN may be located in an alternate location as determined by the manufacturer (e.g., a pontoon HIN may be located on the aft crossmember approximately 1 foot (0.3 meters) from the starboard hull attachment). The HIN must be clearly visible and may not be removed, altered or tampered with in any way as regulated by federal law. In case of collision, theft or damage, report these numbers to the local authorities, your insurance agent and your dealer. Safeguard information about your boat by recording the HIN and model of your boat, and model and serial numbers of the engine, trailer and accessories on the Boat Information Form on page 1-6. U.S. Coast Guard Safety Standards Compliance Plate All power boats less than 20 feet (6 meters) must have a manufacturer s compliance plate clearly indicating that your boat is in compliance with the USCG safety standards and the effective date of the compliance. The compliance plate may be combined onto one plate showing both the capacity plate and compliance information by the manufacturer. Capacity Plate U.S. COAST GUARD MAXIMUM CAPACITIES 11 PERSONS OR 1620 LBS. MODEL: 1620 POUNDS, PERSONS, GEAR THIS BOAT COMPLIES WITH U.S. COAST GUARD SAFETY STANDARDS IN EFFECT ON THE DATE OF CERTIFICATION MANUFACTURER: DESIGN COMPLIANCE WITH BIA REQUIREMENTS BELOW IS VERIFIED. MFGR. RESPONSIBLE FOR PRODUCTION CONTROL. LOAD CAPACITY COMPARTMENT VENTILATION STEERING, FUEL AND ELECTRICAL SYSTEMS INTERNATIONAL LIGHTS MANEUVERABILITY NATIONAL MARINE MANUFACTURERS ASSN. KC-0038-B All mono-hull recreational boats less than 20 feet (6 meters) require a gross weight and person-capacity plate to be clearly displayed as provided by the manufacturer. Outboard engine-powered boats must also state the maximum horsepower on the plate. Boats in the National Marine Manufacturers Association (NMMA) program up to 26 feet (7.9 meters) have a maximum rated load capacity, which is stated on the certification plate (if equipped). The person/load capacity is determined by the USCG. The capacity plate is usually located within clear visibility of the boat operator or helm area. The capacity plate indicates limits for loading the boat, which are enforceable by law. Never exceed the U.S. Coast Guard Maximum Capacities indicated on the capacity plate. Bay Boat 1-3
14 Section 1 References and Contact Information Use the following list of publications and organizations for reference and contact information concerning safe boating, navigational rules and other boating topics. Publications Bottomley, Tom. Boatman s Handbook. Hearst Marine Book. Morrow Brotherton, Miner. Twelve Volt Bible. Seven Seas Chapman, Charles F. and Maloney, E.S. Chapman s Piloting, Seamanship and Small Boat Handling. Hearst Marine Book. Morrow Damford, Don. Anchoring. Seven Seas National Fire Protection Association. Fire Protection Standard for Pleasure and Commercial Motor Craft. National Fire Protection Association Strahm, Virgil. Does Your Fiberglass Boat Need Repair? Strahm United States Coast Guard. Navigational Rules for U.S. Waterways. United States Coast Guard. Visit to view or download this publication. United States Coast Guard Auxiliary. Boating Skills and Seamanship Thirteenth Edition. United States Coast Guard Whiting, John and Bottomley, Tom. Chapman s Log and Owner s Manual. Hearst Marine Book Organizations American Boat & Yacht Council American Red Cross or consult your local telephone directory Boat Owners Association of The United States BoatU.S. Foundation for Boating Safety Hotline Phone: BOAT (In Virginia call BOAT) National Association of State Boating Law Administrators National Marine Manufacturers Association National Oceanic and Atmospheric Administration's National Weather Service Bay Boat
15 Introduction National Safe Boating Council Inc. Sea Tow Services International, Inc. Phone: ; Fax: Toll free: 800-4SEATOW ( ) U.S. Coast Guard (To contact the U.S. Coast Guard for an emergency while on the water, always use your on-board VHF-FM radio Channel 16. Use cell phones only as a secondary means of communication. Call to reach rescue personnel.) U.S. Coast Guard Auxiliary Phone: U.S. Coast Guard Auxiliary Float Plan Information U.S. Coast Guard Navigation Center (NAVCEN) U.S. Coast Guard Office of Boating Safety U.S. Coast Guard Pollution Control National Response Center Phone: U.S. Coast Guard s America s Waterway Watch Program (A program for recreational boaters to assist the U.S. Department of Homeland Security in reporting suspicious activity on U.S. waterways) Phone: WATCH ( ) U.S. Government Printing Office Website - (For information and documentation on FCC rules and regulations and Skippers Course information, and other government, marine and nautical related documents) U.S. Power Squadrons Phone: Bay Boat 1-5
16 Section 1 Boat Information Form BOAT Boat Manufacturer: Hull Colors: Weight: Length: Draft: Beam: Vertical Clearance: Dealer: Dealer Representative: Dealer Phone: Boat Model: Hull ID Number (HIN): Registration Number: Registration State: Purchase Date: Delivery Date: Warranty Expiration Date: Manufacturer Representative: Manufacturer Phone: ENGINE, DRIVE and PROPELLER Engine Make: Engine Model Number Engine Serial Number Make: Type: Propellers Size: Material: Part Number: 1-6 Bay Boat
17 Introduction ACCESSORIES Fuel Tank Capacity: Fuel Filter Part Number: Ignition Key Number: TRAILER Make: Model Number: Trailer Serial Number: GVWR: Tire Size: Battery Make: Battery Size: Bay Boat 1-7
18 Section 1 This Page Intentionally Left Blank 1-8 Bay Boat
19 Bay Boat Section 2 SAFETY The popularity of boating and other water sports has undergone an explosion of growth in the past few years, making safety an important issue for everyone who shares in the use of our waterways. WARNING! Read and understand this Operator s Manual, the Engine Operator s Manual and all manufacturer-supplied information regarding the operation of equipment. As a boat owner, you must understand all safety information responsibilities, regulations, controls and operating instructions before attempting to operate your boat. Improper operation can be extremely dangerous and/or fatal. The safety content and precautions listed in this manual and on the boat are not all-inclusive. If a procedure, method, tool or part is not specifically recommended, you must feel confident that it is safe for you and others, and that your boat will not be damaged or become unsafe as a result of your decision. REMEMBER ALWAYS USE COMMON SENSE WHEN BOATING! As a boat owner, you are responsible for your own safety, as well as that of your passengers and other boaters. GOOD BOATING PRACTICES Boating-related accidents are generally caused by the operator s failure to follow basic safety rules or written precautions. Most accidents can be avoided if you are completely familiar with your boat and its operation and can recognize potentially hazardous situations. In addition to everyday safety, failure to observe safety recommendations may result in severe personal injury or death to you or to others. Use caution and common sense when operating your boat. Do not take unnecessary chances! Failure to adhere to these warnings may result in severe injury or death to you and/or others. Read this entire manual and be aware of other specific safety guidelines not listed below. Seek additional safety information from the USCG and state and local authorities. In addition to specific safety statements noted in this manual, a general list of safety guidelines and recommendations is listed below: Your boat must comply with USCG safety equipment regulations. Before each outing, check all safety equipment such as fire extinguishers, personal flotation devices (PFDs), flares, distress flags, flashlights and engine emergency stop switch. Make sure they are operable, in good condition, readily visible and easily accessed. Bay Boat 2-1
20 Section 2 On-board equipment must always conform to the governing federal, state and local regulations. Never allow any type of spark or open flame on-board. It may result in fire or explosion. Take the keys with you when you leave your boat to keep untrained and unauthorized persons from operating your boat. Know how to react correctly to adverse weather conditions, have good navigation skills and follow navigational rules as defined by USCG, state and local regulations. Check local weather reports before casting off. Do not leave the dock area when strong winds and electrical storms are in the area or predicted to be in the area. Seek shelter from open water if lightning is an imminent threat. Tell someone of your travel plans before departing. Know the weight capacity of your boat. Never overload your boat. Never operate your boat while under the influence of drugs or alcohol. Look before you turn your boat. As a boater, you are obligated to maintain a course and speed unless it is safe to alter course and speed. Look before you turn. You, as the operator, must read and understand all operating manuals supplied with your boat before operation. Whenever you are going for an outing, make sure that at least one passenger is familiar with the operation and safety aspects of your boat in case of emergency. Do not allow passengers to sit in front of the operator; always avoid obstructing the operator s view. Show all passengers the location of emergency equipment and explain how to use it. Never allow passengers to drag their feet or hands in the water, or sit on the bow, bow pulpit, deck or gunwale while the engine is running. Never use or hold onto the boarding platform while the engine is running. Never stand or allow passengers to stand in the boat or sit on the transom, seat backs, engine cover or sides of the boat while the engine is running. You or others may be thrown from your boat. Children and nonswimmers must wear a life jacket at all times. Never leave children in the boat without adult supervision. Improper operation of your boat is extremely dangerous. Securely attach the engine emergency stop switch lanyard to a part of your clothing, such as a belt loop, when operating your boat. Operate slowly in congested areas such as marinas and mooring areas. The bow may be slippery. Do not go forward while the engine is running. Slow down when crossing waves or wake in order to minimize the impact on passengers and the boat. 2-2 Bay Boat
21 Safety Never dive from your boat without being absolutely sure of the depth of the water; severe injury or death may occur from striking the bottom or submerged objects. Never swim near a boat when the engine is running. Even if the boat is in the NEUTRAL position, the propeller may still be turning and carbon monoxide may be present. Never wrap ski lines or mooring lines around any body part. You could become entangled in the line if you fall overboard while the boat is moving. Keep track of ski lines and dock lines so they do not become entangled in the propeller. Watch for other boats, swimmers and obstructions in the water. Stay away from other boats and personal watercraft. Have an experienced operator at the helm and always have at least three people present for safe towing one to drive, one to observe, and one to ski or ride. Never replace your boat s marine parts with automotive parts (if applicable). Never remove or modify any components of the fuel system. Always have qualified personnel perform fuel system maintenance. Tampering with fuel components may cause a hazardous condition. Avoid contact with engine exhaust gases engine exhaust contains carbon monoxide. Never operate the engine in a confined space. Never go under the boat cover with the engine running or shortly after the engine has been running. Allow adequate ventilation with fresh air before entering any enclosed areas. Always routinely check the various fasteners on your boat (screws, bolts and POP rivets) to insure they are tight and secure. Always check steering systems to insure they are secure, turning the engine the proper direction, and if hydraulic that there are no hydraulic fluid leaks under the helm or at the cylinder in front of the motor. Always check that your bilge plugs are in, your battery is charged, and your fuel level is reading properly prior to launching your boat. Always start the outboard engine while the boat is still on the trailer and insure it is running properly before pushing away from the trailer. Bay Boat 2-3
22 Section 2 SAFETY DECALS AND STATEMENTS Safety Decals Your boat is affixed with various hazard and safety decals at the time of manufacture. These decals appear in specific locations on the boat and on equipment where safety is of particular concern. Hazard and safety decals must remain legible. If you suspect a decal is missing or one becomes damaged, contact your dealer for immediate replacement. Safety Statements There is no substitute for common sense and careful practices. Improper practices or carelessness can cause burns, cuts, mutilation, asphyxiation, other bodily injury or death. This information contains general safety precautions and guidelines that must be followed to reduce risk to personal safety. Special safety precautions are listed in specific procedures. Read and understand all of the safety precautions before operation or performing repairs or maintenance. Note: This safety alert symbol appears with most safety statements. It means attention, become alert, your safety is involved! Please read and abide by the message that follows the safety alert symbol.! DANGER Indicates a hazardous situation which, if not avoided, will result in death or serious injury.! WARNING Indicates a hazardous situation which, if not avoided, could result in death or serious injury.! CAUTION Indicates a hazardous situation which, if not avoided, could result in minor or moderate injury. Used to address practices not related to personal injury. 2-4 Bay Boat
23 Safety Safety Precautions! DANGER The safety messages that follow have DANGER level hazards. These safety messages describe hazardous situations which, if not avoided, will result in death or serious injury. Do not permit anyone to launch, operate or retrieve your boat without proper training. Read and understand this operator s manual and all manufacturer-supplied information before you operate or service your boat to ensure that you follow safe operating practices and maintenance procedures. Safety signs and decals are additional reminders for safe operating and maintenance techniques. See your authorized boat dealer for additional training. Exhaust Hazard Carbon monoxide (CO) is a colorless and odorless gas produced by all engines, fuel-burning appliances, and any material that contains carbon and is burned. Even with the best boat design and construction, plus the utmost care in inspection, operation and maintenance, hazardous levels of CO may still be present in accommodation areas under certain conditions. To reduce CO accumulation, always provide adequate ventilation in the boat interior by opening the deck hatches, windows or canvas. Do not confuse carbon monoxide poisoning with seasickness, intoxication or heat stress. If someone complains of irritated eyes, headache, nausea, weakness, dizziness or drowsiness, or you suspect carbon monoxide poisoning, immediately move the person to fresh air, investigate the cause and take corrective action. Seek medical attention if necessary. Explosion Hazard While the engine is running or the battery is charging, hydrogen gas is being produced and can be easily ignited. Keep the area around the battery well-ventilated and keep sparks, open flames and any other form of ignition out of the area. Bay Boat 2-5
24 Section 2! WARNING The safety messages that follow have WARNING level hazards. These safety messages describe hazardous situations which, if not avoided, could result in death or serious injury. Fire and Explosion Hazard Gasoline is extremely flammable and highly explosive under certain conditions. Do not smoke or allow open flames or sparks nearby when refueling. Stop all engines, motors and fans before refueling. Maintain contact between the fuel nozzle and the fuel tank or container to prevent electrostatic spark. Do not use a plastic funnel. Run the blower (if equipped) to clear the engine compartment of gasoline vapors for at least five minutes BEFORE turning on any electrical devices or starting the engine. Do not block fuel vents. Do not store fuel in any containers or compartments which are not designated for fuel storage and do not use these storage areas for any other purpose. Gas discharged by a fire extinguisher system displaces oxygen to smother the fire. If the fire is in the engine compartment, do not open the hatch for at least 15 minutes after the fire extinguisher system operates. Oxygen from the open hatch can feed the fire and cause a flashback. Runaway Boat Hazard The engine emergency stop switch and lanyard are extremely important safety devices that must always be used when operating the engine. These safety devices will prevent the boat from becoming a runaway if the operator is accidentally thrown from the seat or away from the helm. 2-6 Bay Boat
25 Safety! WARNING Entanglement Hazard Rotating or moving parts can entangle or sever body parts. Do not wear jewelry, unbuttoned cuffs, ties or loose-fitting clothing. Tie long hair back when working near moving or rotating parts such as the flywheel or propeller shaft. Keep hands, feet and tools away from all moving parts. Keep all guards in place when engine is operating. Use caution when working with ski or mooring lines so they do not become entangled with the propeller. Exposure Hazard Do not mix cleaning agents together; harmful vapors may be released. Read and follow safety-related precautions found on containers of hazardous substances like parts cleaners, primers, sealants and sealant removers. Fire and Explosion Hazard Hydrogen gases produced by a lead acid battery while it is charging, or the engine is running, can cause an explosion and/or a fire. Gasoline is extremely flammable and highly explosive under certain conditions. Wear personal protective equipment when working on or around batteries. Do not smoke or bring a flame near a battery. Do not check for a dead battery by placing a metal object between the battery posts. Sparks could cause an explosion. Do not place your head directly above a battery when making or breaking electrical connections. Charge the battery outside of your boat. Do not use a battery booster to start your engine. Bay Boat 2-7
26 Section 2! WARNING Lifting Hazard Special equipment is necessary to lift the boat and/or engine. Always use lifting equipment with sufficient capacity to lift your boat and/or engine. Alcohol and Drug Hazard Do not operate your boat while you are under the influence of alcohol or drugs or are feeling ill. Exposure Hazard Wear personal protective equipment, including appropriate clothing, gloves, work shoes, eye and hearing protection, as required by the current task.! CAUTION The safety messages that follow have CAUTION level hazards. These safety messages describe hazardous situations which, if not avoided, could result in minor or moderate injury. Wear eye protection when servicing your boat or when using compressed air or high-pressure water. Dust, flying debris, compressed air, pressurized water or steam may injure your eyes. Poor Lighting Hazard Ensure that the work area is adequately illuminated. Install wire cages on portable safety lamps. Tool Hazard Use tools appropriate for the current task. Use the correct size tool for loosening or tightening machine parts. Slip and Trip Hazard Keep your boat free of water, oil, mud and other foreign matter. Remove anything that creates slippery areas around your boat. 2-8 Bay Boat
27 Safety The safety messages that follow have NOTICE level hazards. These safety messages are used to address practices not related to personal injury. Structural Hazard Modifications may impair your boat s safety and performance characteristics and shorten the boat s life. Any alterations to your boat may void its warranty. Environmental Hazard ALWAYS be environmentally responsible. Follow the guidelines of the EPA or other governmental agencies for the proper disposal of hazardous materials such as engine oil and fuel. Consult the local authorities or reclamation facility. Bay Boat 2-9
28 Section 2 CARBON MONOXIDE DANGER! CO gas is colorless, odorless and extremely dangerous. All engines and fuel-burning appliances produce CO as exhaust. Direct and prolonged exposure to CO will cause brain damage or death. Even with the best boat design and construction, plus the utmost care in inspection, operation and maintenance, hazardous levels of CO may still be present in accommodation areas under certain conditions. To reduce CO accumulation, always provide adequate ventilation in the boat interior by opening the deck hatches, windows or canvas Bay Boat
29 Safety Figure 2-1 Potential Causes of CO Poisoning While Under Way Blockage of boat exhaust by obstruction Exhaust from other vessels in confined areas KC-0228-A KC-0231-A Operating at a high bow angle Operating at slow speed or while idling KC-0230-A KC-0232-A Exhaust traveling along obstruction KC-0229-A Always ensure adequate fresh air ventilation through the boat when under way. KC-0310-A KC-0297-B Figure 2-1 Bay Boat 2-11
30 Section 2 REQUIRED BOATING SAFETY EQUIPMENT AND REGULATIONS U.S. Coast Guard Minimum On-Board Personal Safety Equipment Required LIFE JACKETS AND PERSONAL FLOTATION DEVICES FIRE EXTINGUISHERS VISUAL DISTRESS SIGNALING DEVICES Less than 16 ft (4.9 m) One Coast Guardapproved Type I, II, III or V wearable life jacket for each person on-board One B-I type (Coast Guard-approved) CLASS 1: 16 to less than 26 ft (4.9 to less than 7.9 m) If the vessel meets any one or more of the following conditions, the vessel must carry one B-I type USCG-approved extinguisher on-board: Inboard/Sterndrive engine powered Has closed compartments where portable fuel tanks can be stored Has double bottom construction that has areas where air or gases can be open or trapped Has an enclosed living space Has compartments where flammable, combustible or explosive materials are stored Has permanent fuel tanks installed Vessel is 26 ft (7.9 m) or more in length One (1) electric distress light OR three (3) day and night combination red flares CLASS 2: 26 to less than 40 ft (7.9 to less than 12.2 m) CLASS 3: 40 to 65 ft (12.2 to 19.8 m) One Coast Guard-approved Type I, II, III or V wearable life jacket for each person on-board and one throwable Type IV PFD device One B-II OR two B-I type (USCGapproved) (A fixed extinguishing system is equal to one B-I.) One B-II AND one B-I OR three B-I type (USCGapproved) (A fixed extinguishing system is equal to one B-I OR two B-II.) One orange distress flag or one electric distress light OR three floating or handheld orange smoke signals and one electric distress light OR three day and night combination red flares, handheld, parachute or meteor type 2-12 Bay Boat
31 Safety AUDIBLE DISTRESS SIGNALING DEVICES NAVIGATION LIGHTS Less than 16 ft (4.9 m) CLASS 1: 16 to less than 26 ft (4.9 to less than 7.9 m) A vessel less than 39.4 ft (12 m) must have on-board an efficient sound-producing device. (Example: hand or mouth whistle OR a compressed or powered air horn) CLASS 2: 26 to less than 40 ft (7.9 to less than 12.2 m) CLASS 3: 40 to 65 ft (12.2 to 19.8 m) A vessel less than 39.4 ft (12 m) must have on-board an efficient sound-producing device. (Example: hand or mouth whistle OR a compressed or powered air horn) A vessel 39.4 ft (12 m) but less than 65.6 ft (20 m) in length operating in inland waterways must carry a power whistle OR powered air horn AND a bell Regulations require that navigational lights be clearly lit and properly displayed at all times between sunset and sunrise and always when operating in reduced visibility while boating Fire Extinguisher OVERCHARGED USCG-approved fire extinguishers are required on all Class I, II and III boats. Mount all handheld fire extinguishers in readily accessible areas away from the engine compartment and other combustible devices. All passengers must know the location and operating procedure of each extinguisher. Follow the manufacturer s instructions for proper use and operation of the fire extinguisher. RECHARGE KC-0009C-B All fire extinguishers used on marine boats must be classified to extinguish type B fires (gasoline, oil or grease). The size and number of required fire extinguishers depend on the size of your boat. The two type B fire extinguishers commonly used are B-I and B-II. Type B fire extinguishers are classified by the different extinguishing compound amounts used in each. Check the fire extinguisher condition and pressure gauge regularly, if not before every trip, to ensure that the fire extinguisher is in good operating condition and is fully charged. If the fire extinguisher is damaged or not properly pressurized, replace it. For specific on-board requirements, see U.S. Coast Guard Minimum On-Board Personal Safety Equipment Required on page Bay Boat 2-13
32 Section 2 Engine Emergency Stop Switch and Lanyard SAFETY SWITCH LANYARD The engine emergency stop switch is an extremely important safety precaution. Use the engine emergency stop switch when operating the boat s engine. This safety device prevents your boat from becoming a runaway if you are accidentally thrown from the seat or away from the helm. HOOK KC-0110C-B Before turning on the boat s engine, secure the engine emergency stop switch lanyard to the operator. If the operator is thrown from the seat or moves too far from the helm, the lanyard will disconnect from the switch, activating the switch to turn off the engine. Never remove or modify the engine emergency stop switch and/or lanyard. Always keep the lanyard free from obstructions that could interfere with its operation. Always check the switch for proper operation. With the engine running, pull the lanyard. If the engine does not stop, have the switch repaired before continuing to operate your boat. Never operate your boat if the engine emergency stop switch does not work. Life Jackets All passengers on Class I, II and III boats must wear a USCG-approved Type I, II, III or V life jacket. All Class I, II and III boats must have one USCG-approved Type IV throwable Personal Flotation Device (PFD) on-board. Children and nonswimmers must always wear a life jacket when boating. All life jackets and PFDs must be in a readily accessible area and within immediate reach. All passengers must know the location of the life jackets and how to wear and adjust them. Follow the manufacturer s instructions for proper use, care and operation of the life jacket. Each USCG-approved life jacket on-board must: Clearly show the manufacturer s name Clearly show the USCG approval label and number Be an appropriate size and type for each person on-board 2-14 Bay Boat
33 Safety Be in good, usable condition Selecting the proper life jacket application type and size is important to your safety while boating. There are four application types of wearable PFDs and one type that is used only for throwing in emergency situations. Life jackets may include inherently buoyant designs (do not require inflation) or inflatable (manual and manual with automatic backup). Life jacket sizes generally correspond to chest size and weight. TYPE I TYPE II TYPE III TYPE IV TYPE V Type I Figure 2-2 This life jacket is designed so that the person wearing it turns to a face-up position when conscious or unconscious. Type I life jackets are the most buoyant and are effective on all waters, especially when rescue is delayed or flotation time is extended. Type II This life jacket is recommended for use in calm water near shore on most inland waters where quick rescue is likely. A Type II life jacket is similar to a Type I life jacket, but is not as buoyant or effective in turning the wearer to a face-up position. Type III This life jacket is designed for personal buoyancy when the wearer is alert and conscious. Type III life jackets require users to turn themselves to a face-up position. Type III life jackets are recommended in most inland water applications where quick rescue is likely or when used in the presence of other people. Type IV KC-0318C-A These PFDs are designed to be thrown to a person in the water who can grab and hold it while being rescued. Never wear a Type IV PFD. Bay Boat 2-15
34 Section 2 Type V This life jacket is designed for special activities and may be worn instead of a Type I, II or III life jacket if used in accordance with the approval conditions on the label. If a Type V life jacket is part of the minimum on-board life jacket requirements and if it has a label that indicates required to be worn, it must be worn at all times, otherwise one additional Type I, II or III life jacket must be on-board to satisfy the minimum life jacket requirements. Some Type V life jackets provide increased protection against hypothermia. Other special life jackets are available for skiing and other water sports. These life jackets are constructed with materials suitable for high-impact falls. When selecting these life jackets, ensure that they meet USCG approval requirements. Note: Inflatable USCG-approved life jackets are not to be used by persons under the age of 16. Children s Life Jackets All life jackets are clearly labeled with the appropriate weight range. Check the label to match the weight range of your child. To check for a good fit, pick the child up by the shoulders of the life jacket. If the life jacket fits, the child s chin and ears will not slip through. Children weighing between 30 and 50 pounds may like the freedom of movement that a Type III life jacket provides; however, a Type I or Type II life jacket will usually offer greater protection for most children in this weight range, especially those who cannot swim. Use a life jacket with a collar that turns a child s face up in the water. It must have strong straps and buckles, a handle on the collar and, preferably, be bright yellow or orange in color for high visibility. Attach a plastic safety whistle to the life jacket. Teach the child how to use the whistle, and practice using it and signaling for help. Note: Inflatable USCG-approved life jackets are not to be used by persons under the age of 16. Visual Distress Signaling Devices Boats less than 16 feet (4.9 meters) must have USCG-approved Visual Distress Signals (VDS) on-board when operating between sunrise and sunset in coastal waters, including ocean bays, gulfs and sounds, as well as the Great Lakes, seas, bays and river mouths that are 2 or more miles wide and only to the point proceeding inland where the water narrows to less than 2 miles. Visit the U.S. Coast Guard website for additional information on specific VDS requirements for your boat. Ensure all passengers on-board understand how to operate all VDS. Keep VDS in a readily accessible area and within immediate reach at all times when boating Bay Boat
35 Safety VISUAL DISTRESS SIGNALS DYE MARKER USE DAY ONLY USE DAY ONLY ARMS SIGNALS (USE BRIGHT CLOTH) USE DAY ONLY USE DAY ONLY SIGNAL (HAND) ELECTRIC DISTRESS LIGHT S O S RED DISTRESS FLARE (HAND) RED METEOR FLARE USE DAY AND NIGHT USE NIGHT ONLY Figure 2-3 USE DAY AND NIGHT KC-0008C-B Regulations prohibit using pyrotechnic VDS or any VDS in non-emergency situations. VDS must be: USCG-approved In proper operating condition Safely stowed and readily available Within the clearly marked expiration date stamp on the device (where applicable) Types of VDS vary by emergency situation. VDS are classified as either pyrotechnic or non-pyrotechnic. Note: Some pyrotechnics may be restricted on certain bodies of water. Check with local authorities, or visit the National Association of State Boating Law Administrators (NASBLA) website: or the U.S. Coast Guard website: for additional information. For specific on-board requirements, see U.S. Coast Guard Minimum On-Board Personal Safety Equipment Required on page Bay Boat 2-17
36 Section 2 Audible Distress Signaling Devices Audible (sound) distress signals are required to be on-board all boats. A boat less than 39.4 feet (12 meters) must always have an efficient sound-producing device on-board (Example: hand or mouth whistle, or a compressed or powered air horn). A boat at least 39.4 feet (12 meters) but less than 65.6 feet (20 meters) operating in inland waterways must always have a power whistle or powered air horn and a bell on-board. All devices must be acceptable for use in marine environments, audible for 1/2 nautical mile and maintain a continuous four- to six-second sound duration. The diameter of the bell s mouth must be a minimum of 7.9 inches (20.0 centimeters). Ensure all passengers understand how to operate all audible distress signaling devices on-board. Keep these devices in a readily accessible area and within immediate reach at all times when boating. For specific on-board requirements, see U.S. Coast Guard Minimum On-Board Personal Safety Equipment Required on page 2-12 and for usage information, see Audible Distress Signals on page 6-2. Navigational Lights Navigational lights are intended to alert other boats to your presence and course. Regulations require that navigational lights be clearly lit and properly displayed at all times between sunset and sunrise, and always when operating in reduced visibility. The placement, shape and visibility requirements of navigational lights may vary depending on usage. Check with local authorities, or visit the NASBLA or U.S. Coast Guard website for additional information. For additional information, see Navigational Lights and Night Operation on page Bay Boat
37 Safety RECOMMENDED SAFETY EQUIPMENT Carry and know how to use the following equipment in addition to the required equipment on-board at all times as an extra safety precaution: Figure 2-2 Figure 2-4 KC-0010C-A Anchor and line with minimum 75 feet (23 meters) of line Auxiliary starting battery Boat hook Cellular phone Compass Dock fenders Duct and electrical tape Electrical wire Emergency food and water Emergency Position Indicating Radio Beacon (EPIRB) Engine lubricant Extra drain plug Extra keys First aid kit and manual Flashlight Flashlight and radio batteries Foul weather gear/clothing Fuses GPS Global Positioning Device Insect repellent Local charts and compass Mooring lines Navigational and interior light bulbs Oar/paddles Propeller, nut and washer Radio Spark plugs Sunglasses and sun block Thermal clothing Tool kit including propeller replacement tools Tow line VHF-FM/AM with weather band radio Waterproof flashlight WATER SPORTS SAFETY Some boats are not designed or recommended to be used for water sports. Use boats equipped with a ski-tow eye or other specially designed line attachment device to pull persons or equipment engaged in a water sport. DANGER! It is unlawful to participate in water sports while under the influence of alcohol or other drugs. Bay Boat 2-19
38 Section 2 Water sports may include, but are not limited to, any activity performed in the water such as swimming, diving, snorkeling, knee boarding, tubing, skiing, parasailing, kiting, gliding or any activity using a device that may be pulled or pushed by a boat. Check with local and state authorities or water sports clubs and affiliations for additional information. Platform Dragging Every year tragic deaths occur from the negligence of unsafe boating and dangerous activities. NOTICE: It is UNLAWFUL to be on or holding on to the boarding platform, swim deck, swim step, swim ladder or any portion of the exterior of the transom at any time while the boat is running or under way in any direction and at any speed. WARNING! Body, teak or platform dragging is extremely dangerous and can be fatal. Never hold on to the transom of a boat while in the water when the boat is running or under way. Do not use the boarding platform or ladder for any purpose other than boarding the boat or entering the water. Do not use the boarding platform or ladder while the engine is running. Do not swim under the boarding platform when the engine is running. These dangerous and even fatal activities can lead to any or all of the following, as well as other dangers not listed here: Carbon monoxide poisoning Severe injury from a rotating propeller Drowning or entrapment under the water Water Sports Guidelines The following water sports guidelines only cover the general conditions that frequently arise. The participants must respond to the constantly changing weather and the conditions of the sea by using reasonable and safe judgment in light of the circumstances. Boat Operator, Occupants and Participants Always be safe and courteous. Be considerate to fishermen and all others with whom you share the water. Always ensure that all water sports participants and occupants of the boat, especially the operator, are fully aware at all times of the participants condition and location in the water, as well as the surrounding environment. Make safety the primary concern of all involved during the activity. Only allow safe and capable participants to engage in the activity Bay Boat
39 Safety The boat operator and water sports participants must always know their limitations in the activity and never exceed them. Never perform water sports in or near: Congested areas Restricted areas Navigation or other waterway markers Other boats Other water sports participants Obstructions in the water Shorelines Shallow water Hazardous weather conditions Hazardous waterways, rapid moving water, dams, spillways, etc. Areas or times of restricted visibility Hours between sunset and sunrise Locations too far from shore that could hinder immediate rescue or emergency help if needed Always engage in water sports activities in safe waterways only. Always attach the water sports tow rope to approved attachment points on your boat. Never jump from a boat that is moving at any speed, and do not enter or exit the water when the engine is running. Never use different length ropes simultaneously for water sports activities. Always make sure that participants know and use approved skiing hand signals and common skiing courtesy. Before starting, always agree to speed and communication hand signals between the boat operator, spotter/observer and participants. Before starting, always inspect the water sports equipment and tow eye, tow point and towline for safe operating condition, or damage that may lead to failure. Boat Operator Specific Guidelines The following guidelines are for the boat operator while a participant is in the water. Always have a spotter (designated observer) other than the boat operator on-board to ensure the safety of the participants in the water and provide communication to and from the boat operator and the participants. Always turn the engine off from a safe distance when approaching participants in the water and allow them to reach the boat. Never run the engine near a person in the water. Never operate your boat in reverse to retrieve anyone in the water. Bay Boat 2-21
40 Section 2 Always return immediately to a fallen water sports participant. Always approach the participant on the operator s side while keeping the participant in view from a direction opposite the wind or seas. Never drive directly at a person in the water or directly behind another boat. Always maintain a safe distance from people and objects in and on the water. Always look in the direction you plan to turn before turning your boat to pick up a fallen skier. Never retrieve any object from the water while the engine is running. Always keep the skier in view when the skier is entering or exiting the boat. Always watch the skier as the line begins to tighten (in case the rope wraps around ski or skier). Always look ahead before starting. Always start from a safe place with good forward and peripheral visibility. Always check direction of steering before starting, ensuring that your boat steers straight. Always be aware of what is occurring in front of your boat, and of a participant s condition. Always display a skier down flag whenever a skier is in the water and not skiing. Always follow the approved towing pattern for the waterway in which you are operating Bay Boat
41 Safety Additional Guidelines for Participants in the Water The following guidelines are for the water sports participant. Never participate in water sports if you cannot swim. Always wear a bright-colored USCG-approved activity PFD at all times. Wear suitable protective clothing or gear and/or a wet suit to prevent impact injuries, abrasions and hypothermia. Never approach or enter the boat if the engine is running. Always avoid the boat s propeller. Even when the propeller is not rotating, its sharp edges can cause serious injury. Never put any part of your body through the handle of the ski line or wrap the line around any part of your body. Never enter the water from a boat that is running or moving at any speed. Always indicate that you are clear of the boat prior to the operator starting the boat or putting the boat into gear and tightening the rope. Figure 2-3 CIRCLE BACK TO DOCK CUT ENGINE SPEED FASTER SPEED SLOWER TURN LEFT SPEED OK STOP TURN RIGHT SKIER IN WATER SKIERS O.K. WATER SPORT HAND SIGNALS Figure 2-5 KC-0016C-A Bay Boat 2-23
42 Section 2 This Page Intentionally Left Blank 2-24 Bay Boat
43 Bay Boat Section 3 BOATING REGULATIONS AND YOUR RESPONSIBILITIES The U.S. Coast Guard (USCG) is the federal authority on U.S. coastal and inland waterways, but state and local regulations may exist that exceed USCG regulations. The purpose of all of these regulations is to assist the boating public and maintain navigational order on waterways. Many state equipment requirements go beyond USCG requirements. Contact your state and local boating authorities for further information. Equipment requirements for coastal and inland waters differ. Check with local authorities or the USCG for further information about coastal water requirements. Boating regulations are enforced by USCG, state and local authorities. You are subject to marine navigation regulations for both federal and state waterways. You must comply if enforcement officers signal you to stop your boat or if they ask to board your boat. Many USCG, state and local resources are available to you. For additional and current information on regulations, safety and navigation, contact your local USCG unit or local marine authority. See References and Contact Information on page 1-4 for a list of resources. BOAT OWNER / OPERATOR RESPONSIBILITIES As a boat owner/operator, understand and be aware of USCG federal regulations as well as state and local regulations where you operate your boat. Boating regulations include, but are not limited to, boat regulations, boat equipment regulations and navigational regulations. You must have on-board at all times all mandatory safety and boat equipment as regulated by the governing authorities. All equipment must be maintained in proper working order. SAFETY As a boat owner/operator, you are legally responsible for your safety, the safety of your passengers and the safety of other boaters. In addition, you are responsible for the operation and navigation of your boat under all operating conditions. Your boat must be in compliance with USCG safety equipment regulations. Bay Boat 3-1
44 Section 3 REGISTRATION The USCG requires that all power boats operated on the navigable waters of the United States be currently registered in the state in which they are principally used. Many states require current registration in that state whenever boating on waters within their state boundary. Always contact your state boating authorities (and authorities in neighboring states) for registration information on boats and trailers. Registration numbers must be current and clearly displayed on the boat according to the defined regulations. Registration certificates must be current and on-board at all times. State and local authorities may require additional registration for boating on certain waterways. Check with state and local authorities for additional registration information. For more information visit: U.S. Coast Guard Office of Boating Safety: National Association of State Boating Law: INSURANCE As a boat owner, you are legally responsible for any damage or injury caused when you or someone else is operating your boat when an accident or collision occurs. Individual states have laws detailing minimum insurance needs. Contact your insurance agent to verify the type of insurance you need BEFORE operating your new boat. REPORTING ACCIDENTS The USCG requires the owner/operator of a boat involved in an accident to report the incident to the proper marine law enforcement agency for the state in which the accident occurred. If a person dies or disappears as a result of a recreational boating accident, the boat owner/operator must immediately notify the nearest state boating authority. If a person dies or injuries requiring more than first aid are involved, the owner/operator must file a formal report within 48 hours of the accident. An owner/operator has 10 days to file a formal report for accidents exceeding $500 in property damage or complete loss of boat. OPERATION BY MINORS Minors must always be supervised by an adult whenever operating a boat. Many states have laws regarding the minimum age and licensing requirements of minors. Regulations may vary from state to state. Contact your local and state boating authorities for specific information. 3-2 Bay Boat
45 Boating Regulations and Your Responsibilities BOATING UNDER THE INFLUENCE Federal and state laws prohibit the operation of a boat while under the influence of alcohol or drugs, and authorities actively enforce these regulations. If the operator s blood alcohol content is 0.08% or above, violators are subject to civil and criminal penalties and imprisonment. Operating a boat under the influence can also result in a loss of motor vehicle driving privileges. KC-0011C-B Alcohol and drugs slow your reaction time and affect your judgment. This type of impaired operation may result in death or severe personal injury. As the owner/operator, you are responsible for the alcohol and drug use, as well as on-board behavior, of your passengers. Regulations and penalties for operators and passengers may vary from state to state. Contact your local and state boating authorities for specific information. OPERATOR S LICENSE AND EDUCATION This manual does not provide complete training on all aspects of boating safety, operation or regulations. Boating authorities highly recommend that all boat operators and passengers seek additional training in boating safety and seamanship from a USCG-approved course. Some states require youths 16 years of age and younger to complete a boating safety course before operating any watercraft. Many others require operators under the age of 18 to be licensed in small boat operation. Check with your state and local authorities for requirements of operator s license, certificate or training before you or anyone operates your boat. See References and Contact Information on page 1-4 for a list of some of the agencies and organizations that offer water/boating safety courses, first aid/cpr, or other recommended training and/or information. EMERGENCY ASSISTANCE If you see a distress signal or suspect a boat is in trouble, you must assume it is a real emergency and render assistance immediately. By law, the operator in charge of the boat is obligated to provide assistance to any individual in danger if such assistance can be provided safely. Failure to render assistance can result in a fine Bay Boat 3-3
46 Section 3 and/or imprisonment. The 1971 Boating Safety Act grants protection to a Good Samaritan boater providing good faith assistance, and absolves a boater from any civil liability arising from such assistance. PROTECTING THE ENVIRONMENT As a boat owner/operator, you are responsible for protecting wildlife and the natural environment by keeping waterways clean. There is currently a tremendous drain on our natural resources. Excessive fishing and hunting, as well as pollution, have strained the fish and game population. Do your part by keeping only what you will eat; practice catch-and-release and obey bag limits. FISHING Fishing can be very exciting and distracting for the operator when the action gets intense. You must always be conscious of the fact that your primary responsibility is the safe operation of your boat and the safety of your passengers and other boats in the area. You must always make sure the helm is properly manned and is never left unattended while trolling. If your boat is equipped with a tower, caution and good common sense must be exercised whenever someone is in the tower. Remember, weight in the tower raises your boat s center of gravity and your boat s motion is greatly exaggerated for the person in a tower. If you are fishing in an area that is crowded with other fishing boats, it may be difficult to follow the rules of the road. This situation can become especially difficult when many boats are trolling. Being courteous and exercising good common sense is essential. Avoid trying to assert your right-of-way and concentrate on staying clear and preventing tangled or cut lines and other unpleasant encounters with other boats. Also keep in mind that fishing line wrapped around a propeller shaft can damage seals in the engine lower unit. FOREIGN SPECIES TRANSPORTATION If you trailer your boat from lake to lake, you may unknowingly introduce a foreign aquatic species from one lake to the next. Thoroughly clean your boat below the waterline, remove all weeds and algae, and drain the bilge and livewells before launching your boat in a new body of water. WAKE As a boat owner/operator, you are responsible for the wake your boat creates. Regulations may vary from state to state. Contact your local and state boating authorities for specific information, as you may be responsible for any damage or injury your wake causes. Always be alert for NO WAKE zones and be courteous of others while boating. Excessive and unexpected wakes can cause dangerous and even life-threatening situations. 3-4 Bay Boat
47 Boating Regulations and Your Responsibilities NOISE As a boat owner/operator, you are responsible for the noise your boat creates. Many state and local boating authorities enforce noise limits that may restrict engine noise, radio volume or even loud talking. Regulations may vary from state to state. Contact your local and state boating authorities for specific information. SPEED As a boat owner/operator, you are responsible for maintaining your boat under control at a safe speed. Many state and local boating authorities enforce speed limits. Regulations may vary from state to state. Contact your local and state boating authorities for specific information. POLLUTION REGULATIONS The discharge of any type of debris or waste into the water, including, but not limited to, food, trash, garbage, oil, fuel, liquids and human waste, is highly restricted and sometimes considered unlawful. Authorities highly recommend that you NEVER discharge anything into the water. Become familiar with the following pollution regulations. Pollution is a serious matter, and law enforcement authorities highly enforce these regulations. As a boat owner/operator, you are responsible for your actions affecting the environment; therefore, you must fully understand and be aware of these regulations. Contact the USCG, state and local authorities for additional information. MARPOL Treaty The USCG enforces the International Convention for the Prevention of Pollution from ships, commonly referred to as the MARPOL Treaty (MARine POLlution). This treaty prohibits the overboard dumping of all ship-generated plastics, chemicals, garbage and oil. Contact the USCG for further information. Refuse Act of 1899 The Refuse Act of 1899 prohibits throwing, discharging or depositing refuse matter of any kind (including food, trash, garbage, oil and other liquid pollutants) into U.S. waterways. Federal Oil Pollution Act of 1990 The Federal Oil Pollution Act of 1990 was passed by Congress to prevent further oil spills from occurring in the U.S. As a boat owner, be familiar with your liability under this act, as you may be liable for the cost of actions in the prevention and/or removal of, or damage from, oil spills created by you. Bay Boat 3-5
48 Section 3 Federal Water Pollution Control Act The Federal Water Pollution Control Act prohibits the discharge of oil or hazardous, potentially harmful substances into U.S. navigable waters. Boats at least 26 feet (7.9 meters) in length must display a placard at least 5 x 8 inches (127 x 203 mm), made of durable material, fixed in a conspicuous place in the machinery spaces, or at the bilge pump control station, stating the following: Paints As a boat owner, you are responsible for the environmental regulations that may govern the use of antifouling paint. If your boat is kept in water where marine growth is a problem, the use of antifouling paint may reduce the growth rate. Regulations may vary from state to state. Contact your local and state boating authorities for specific information. Cleaning Agents As a boat owner, you are responsible for the environmental regulations that may govern the use of cleaning agents. Use household cleaners sparingly and never discharge them into waterways. Do not mix cleaners and be sure to use plenty of ventilation in enclosed areas. Avoid using chlorine, solvents and products that contain phosphates, as well as non-biodegradable or petroleum-based products. Regulations may vary from state to state. Contact your local and state boating authorities for specific information. Exhaust Emissions Discharge of Oil Prohibited The Federal Water Pollution Control Act prohibits the discharge of oil or oily waste upon or into any navigable waters of the U.S. The prohibition includes any discharge which causes a film or discoloration of the surface of the water or causes a sludge or emulsion beneath the surface of the water. Violators are subject to substantial civil and/or criminal sanctions including fines and imprisonment. As a boat owner, you are responsible for the exhaust emissions from your boat. Increased exhaust (hydrocarbon) emissions, which are regulated by the EPA, pollute the water and air. Contact your dealer and the engine manufacturer for more information. Additional restrictions may apply and vary from state to state. Contact your local and state boating authorities for specific information. 3-6 Bay Boat
49 Proposition 65 Boating Regulations and Your Responsibilities A wide variety of components used on this vessel contain or emit chemicals known to the state of California to cause cancer, birth defects and other reproductive harm. Examples include: Engine and generator exhaust Engine and generator fuel and other liquids, such as coolants and oil, especially used motor oil Cooking fuels Cleaners, paints and substances used for vessel repair Waste materials that result from wear of vessel components Lead from battery terminals and from other sources, such as ballast or fishing sinkers To avoid harm: Keep away from engine, generator and cooking fuel exhaust fumes. Wash areas thoroughly with soap and water after handling the substances above. Figure 3-1 A wide variety of components used on this vessel contain or emit chemicals known to the State of California to cause cancer and birth defects and other reproductive harm. EXAMPLES INCLUDE: Engine and generator exhaust. Engine and generator fuel, and other liquids such as coolants and oil, especially used motor oil. Cooking fuels. Cleaners, paints and substances used for vessel repair. Waste materials that result from wear of vessel components. Lead from battery terminals and from other sources such as ballast or fishing sinkers. TO AVOID HARM: Keep away from engine, generator and cooking fuel exhaust fumes. Wash area thoroughly with soap and water after handling the substances above. California Health & Safety Code Figure 3-1 KC-0206C-B Bay Boat 3-7

50 Section 3 State of California Requirements Your boat may be equipped with an engine that meets the strict requirements outlined by the California Air Resources Board (CARB). If so, the engine has a special environmental tag and the boat has one of the following labels affixed to it. The tag and the label are required by CARB. The label has 1, 2, 3 or 4 stars and must be affixed to your boat if it is operated in the state of California and/or bordering waters. For more information visit: Figure 3-2 KC-0211-B 3-8 Bay Boat
51 Bay Boat Section 4 EMERGENCIES Be prepared to deal with emergencies before they happen. Try to formulate a plan for each type of emergency in advance so you can make decisions quickly and without hesitation. Precious moments lost can mean the difference between losing and saving a life. Before operating your boat, see Safety on page 2-1. FIRST AID / MEDICAL EMERGENCIES Every second counts toward preventing injury or death in case of a medical emergency. Boaters must have proper training and take necessary preventive measures to properly assist in times of need. Carrying an adequate and current first aid kit is critical in the immediate response and care of someone in need of medical attention. Always have dry blankets readily accessible to help prevent hypothermia. For additional information on medical, first aid and safety training such as CPR, contact your state and local authorities, or visit the Red Cross website: EMERGENCY PREPARATION CHECKLIST In addition to a safety equipment list, have an emergency checklist on-board to assist in times of emergency. Use the following topics as a guideline to develop a list of emergency procedures and instructions for the use of visual and audible distress signaling devices, radios, first aid kits and all related information that could assist you or others in the event of an emergency. CARBON MONOXIDE POISONING DANGER! Carbon Monoxide (CO) is a colorless and odorless gas produced by all engines, fuel-burning appliances, and any material that contains carbon and is burned. Do not confuse carbon monoxide poisoning with seasickness, intoxication or heat stress. If someone complains of irritated eyes, headache, nausea, weakness, dizziness or drowsiness, or you suspect carbon monoxide poisoning, immediately move the person to fresh air, investigate the cause and take corrective action. Seek medical attention if necessary. For additional information, see Carbon Monoxide on page Bay Boat 4-1
52 Section 4 USING DISTRESS SIGNAL DEVICES AND CALLING FOR HELP Ensure all passengers understand how to operate all on-board visual and audible distress signaling devices and communication equipment. Keep all distress signaling devices and communication equipment in a readily accessible area and within immediate reach at all times. KC-0246C-B An emergency can occur when you least expect it. Be sure you and your passengers know how to use all types of distress signaling devices. Seconds count during emergencies. Knowing the proper way to use the distress signaling devices on-board your vessel can help saves lives. The word MAYDAY is the international signal of distress. Use MAYDAY only in emergency situations. In emergency situations and when lives are in danger, you may need to use VHF-type two-way radios, cell phones and Emergency Position Indication Radio Beacons (EPIRBs). Knowing the proper use and operation of these communication devices is critical. Make sure you know what channels to use and numbers to call. Know how to send an efficient and informative message about your emergency to ensure that proper help and assistance can be provided. The VHF-type radio channel commonly used for communicating distress, safety and urgent calls is Channel 16. To contact the USCG for an emergency while on the water, always use your on-board VHF-FM radio (Channel 16). Use cell phones only as a secondary means of communication. The number to call within the U.S. is 911. For additional information on the safe and proper use of distress signaling devices and the safe and proper use of emergency communication equipment, contact your state and local authorities. Additional information can be found on the USCG website: Bay Boat
53 Emergencies FIRE AND EXPLOSION DANGER! Gasoline is extremely flammable and highly explosive under certain conditions. Do not smoke or allow open flames or sparks nearby when refueling. Do not store fuel in any containers or compartments which are not designated for fuel storage. Static electricity can be generated while fueling and can cause a fire or explosion. To prevent electrostatic spark when refueling, make sure the nozzle is in contact with the fill pipe at all times. Avoid damaging fuel lines and connectors and make sure fuel does not contact hot engine parts. Do not confuse the fuel fill deck plate with the water or waste fill plates, if equipped. All deck plates are properly labeled. If fuel is accidentally pumped into any other deck plate, do not attempt to pump it out yourself. Water and waste pumps are not designed to pump fuel and a fire or explosion could result. Contact your dealer to have the fuel professionally removed. USCG-approved fire extinguishers are required on all Class I, II and III boats. Figure 4-1 KC-0076C-A A fire or explosion may occur when you least expect it. Your decision regarding whether to abandon your boat or stay to fight the fire is difficult and depends on many factors. Formulate a fire plan in advance to make that decision quickly and without hesitation. Keep in mind the following guidelines: Bay Boat 4-3
54 Section 4 Many fires are the result of gasoline and oil accumulating in the bilge, careless fueling practices and electrical problems. In the event of a fire, try to stop your boat and turn off the engine as quickly and safely as possible. Immediately use a fire extinguisher at the base of the flames in a sweeping motion to reduce or extinguish the fire. Ensure that all passengers are safe from immediate danger and are wearing PFDs. If the fire is located in the engine compartment (if equipped), make sure the bilge blower (if equipped) is off and do not open the engine cover. Once you have extinguished the fire, check for other immediate fire threats and personal injuries and call for assistance immediately. If you are unable to easily extinguish the fire, or if the fire is uncontrollable, attempt to get yourself and all passengers off your boat and into the water. If possible, ensure that all passengers are wearing PFDs or have access to one by the time they are in the water. Before leaving the boat, if possible, verify that there is no immediate danger of fuel sitting or burning on the water s surface where you and your passengers will be floating. Immediately swim to a safe position upwind from your boat and use distress signals to get assistance. MAN OVERBOARD If someone falls into the water unexpectedly, use the following guidelines. Every second counts toward preventing injury or death. At the first sign that a person has fallen overboard, loudly yell Man overboard! and state the position of the person in relation to the boat (Example: Man overboard - port! ). Set the engine throttles at idle and place the gear controls in the NEUTRAL position immediately. Throw a Type IV PFD to the victim immediately if the PFD will be within reach of the victim. If the victim is too far away to throw a PFD to, navigate back and throw the PFD from a safe distance. If a Type IV PFD is not readily available, any life jacket or floating device will suffice. Someone in your boat must keep the victim in sight at all times. It is the captain s responsibility to assign one person to watch the victim. Carefully navigate back to the victim, staying at a safe distance and position to safely retrieve the victim. Avoid going into the water to assist the victim unless there is absolutely no way to retrieve the victim safely from your boat and there is no chance of endangering others. 4-4 Bay Boat
55 Emergencies CAPSIZING AND FLOODING A boat may capsize or flood when you least expect it. Formulate a plan in advance in case of capsizing or flooding. Review the following guidelines: If your boat capsizes, locate all passengers and guide them to a safe flotation device or the forward hull if your boat is floating upside down. If possible, provide life jackets to all persons in the water and assess them for alertness and injuries. STAY WITH THE BOAT! Climb up on the hull and try to get assistance. Do not try to swim to shore, as it can be farther than it appears. If your boat starts to flood, slow the boat to a safe speed and stop as quickly as possible. Activate the bilge pump(s) immediately. Try to locate the cause of the flooding. If the cause is not readily apparent or not easily corrected, head for shore or shallow water as quickly as possible and call for help. Figure 4-2 KC-0013C-A RUNNING AGROUND When a boat runs aground, the stop is usually abrupt. Because passengers are not secured to a seat, abruptly stopping a boat while in motion can cause serious personal injury or even death. First, turn off the engine(s) immediately, locate all passengers and attend to any injuries, calling for emergency assistance as needed. Then, assess the damage to your boat and determine if there are any other immediate threats such as water leaking into your boat, or fuel or flammable materials leaking into the water or inside your boat. Immediately call for assistance if threats exist that could endanger the safety of passengers. If there are no immediate safety threats to passengers and your boat is not damaged, attempt to propel it away from the obstacle. If the engine or drive system has been damaged and the engine restarts, be aware of excessive vibrations or uncommon noises, which usually indicate damage to the drive system. If this is the case, it is not safe to proceed. Call for emergency or professional towing assistance immediately. Bay Boat 4-5
56 Section 4 WARNING! Use extreme caution when using tow lines and when connecting tow lines to cleats. Death or serious injury could occur when lines and/or cleats fail while they are under extreme tension. If the engine restarts and your boat can be navigated back safely to port, proceed slowly back to port and be ready to call for emergency assistance if needed. Even if your boat and engine appear to be in good operating condition after running aground, have the boat inspected by a qualified marine technician BEFORE returning it to service. Damage may have occurred that is not obvious to you as an operator. DANGEROUS WEATHER Take special precautions when encountering or operating in dangerous or hazardous weather conditions. For additional information, see Severe Weather on page 5-1. ENGINE OR BOAT SYSTEM FAILURE In the event of an engine or boat system failure and when not in immediate danger, try to troubleshoot or identify the problem before calling for assistance. For additional information, see Troubleshooting on page ACCIDENTS, COLLISIONS AND GIVING ASSISTANCE A collision or accident may occur when you least expect it. Formulate a course of action in advance in case of a collision or accident. Keep in mind the following guidelines: If an accident or collision occurs involving your boat, locate all passengers first and verify and secure their safety. Check for injuries and provide all passengers with a flotation device. Once you have determined that your passengers are not in danger, provide assistance to passengers on the other boat. Immediately call for help and then assess the damage to the boats. Render necessary assistance to prevent further damage or personal injury. The USCG requires the owner/operator of a boat involved in an accident to report the incident immediately to the proper marine law enforcement agency for the state in which the accident occurred. If you witness or are aware of an accident or collision while boating, you must report it immediately and provide assistance. 4-6 Bay Boat
57 Emergencies If you see a distress signal or suspect a boat is in trouble, you must assume it is a real emergency and render assistance immediately. Once you have determined that a real emergency exists, call for help immediately and then provide assistance to all passengers to ensure their safety. TOWING ON THE WATER If you encounter a situation where you are asked to tow or be towed for any reason, assess the situation and try to contact a professional towing service or other emergency assistance first. When encountering a boat in distress, always offer emergency or safety assistance and/or call for assistance for the distressed parties if necessary. Towing or being towed presents an increased risk of personal injury and boat damage. BOW EYE TOW LINE STERN EYES Figure 4-3 WARNING! Use extreme caution when using tow lines and when connecting tow lines to cleats. Death or serious injury could occur if lines and/or cleats fail while they are under extreme tension. Follow these guidelines when towing or being towed: Use extreme caution when throwing weighted lines to a boat in distress. When in rough seas, use a light throwing line with a weight secured on the throwing end and a heavier towing line secured to the other end. Never attempt to tow a boat larger or heavier than your own. Never attempt to tow a grounded, damaged or capsized boat. Use a tow line that is rated at least four times the gross weight of the boat being towed. Make sure tow lines are in good condition and are free of damage, cuts or abrasions. Attach a tow line to the bow eye on the disabled boat. Never attach a tow line to any point on the disabled boat other than the bow eye. Attach the tow line to the stern eyes of the tow boat. Wrap the tow line with chafing gear where it rubs against the boat or any corners. Leave at least two boat lengths between the boats for adequate movement. Bay Boat 4-7
58 Section 4 Never allow anyone to be in line with the tow line. If the line breaks or pulls free, dangerous recoil could occur, resulting in severe injury or death to anyone in its path. Adjust the tow line to match wave action. Keep the boats on the crest or in the trough of the waves at the same time. In protected, calm waters, shorten the line for better handling. Tow at moderate speed, allowing for adverse wind and wave conditions. Have the operator of the towed boat steer with you if possible. Have a person on the tow boat watch the disabled vehicle and, if necessary, be available to signal the operator of the disabled boat. Check with local and state authorities prior to towing for additional regulations and restrictions on towing other boats or equipment. 4-8 Bay Boat
59 Bay Boat Section 5 OPERATING IN HAZARDOUS CONDITIONS Before operating your boat, see Safety on page 2-1. SEVERE WEATHER Getting caught in severe weather can be dangerous and even fatal. Check with local weather stations, the USCG or weather-service broadcasts ( or MHz) for the latest conditions. Check the weather not only before you go out on the water, but also periodically while you are on the water. Consult the following websites for weather information: Storm Conditions Take the following precautions if you operate your boat in storm conditions: Have all occupants wear life jackets. Turn on navigation lights. Locate and have inclement weather gear and safety equipment ready. Mark or identify your position. Close all ports, stow all gear and secure any loose equipment on deck. Reduce speed and head for port or a safe, easily reachable place. Keep a lookout for debris and obstructions in the water. When possible, head into the waves at a 45-degree angle. Allowing high waves to strike the side of your boat may cause it to capsize or swamp. If you lose power, keep your boat headed into the waves by rigging a sea anchor off the bow. Fog Conditions Avoid operating your boat in foggy weather, if possible. If you encounter fog conditions, return to port immediately. Also, take the following precautions: Reduce speed to a safe speed or idle. Take bearings and log your course and speed before the fog sets in. Use of a GPS is recommended. Have all occupants wear life jackets. Assign lookouts to the bow and stern to keep watch and listen. Bay Boat 5-1
60 Section 5 While navigating in fog, you must sound a five-second blast from your horn or whistle once every two minutes to alert other boaters of your position. If you determine that it is unsafe to continue navigating your boat, quickly find the best position to anchor. You must sound a five-second blast from your horn or whistle once every minute while anchored to alert other boaters of your position. Reduced Visibility Natural environments and inclement weather can cause reduced visibility. Storm condition hazards can be compounded by reduced visibility while on the water. Always use common sense and take safety precautions if you are operating your boat in reduced visibility conditions. Cold Weather and Cold or Frozen Water Conditions Avoid operating your boat in cold water or weather conditions, and never operate in frozen or icy waters. Operating in these conditions significantly increases the risk of serious injury or death. Boating in these conditions can lead to cold-water immersion, shock or hypothermia. Weather conditions may hinder emergency rescue or assistance, and cold weather poses potential problems for on-board equipment, as well as the engine. See the Engine Operator s Manual and the equipment manufacturer s instructions for operating in cold weather. WATER HAZARDS Every waterway poses hazards that you must be aware of and avoid. These hazards include shallow water, tree stumps and sand bars. Ask local authorities and other boaters for information and consult a marine chart when boating on unfamiliar waters. As a boat operator, try to avoid all hazards, known and unknown. Aquatic Vegetation/Weeds Operating in weeded areas can be extremely hazardous. Aquatic vegetation can be a threat to your boat s drive system. Vegetation and weeds can wrap around the propeller, causing loss of propulsion and steering control. They may also restrict the engine water cooling intake, causing the engine to overheat. Avoid operating in or near vegetation. If you encounter any restriction because of vegetation, stop the engine. See the Engine Operator s Manual for recommendations on the removal of vegetation from the propeller and water cooling intake ports. Be extremely careful and never get into the water when clearing the propeller. Stay out of the water in highly congested vegetative areas, which can severely restrict your mobility and create a life-threatening situation. 5-2 Bay Boat
61 Operating in Hazardous Conditions NOTICE: Vegetation can sometimes be removed by shifting to NEUTRAL, pausing a moment, then shifting to REVERSE to unwind the vegetation from the propeller. Dams and Spillways The waterways around dams and spillways are extremely hazardous. Dams and spillways are subject to rapid water flow changes, and may have floating and sunken debris in the nearby water. These areas are often marked as restricted, and it is best to always stay clear of them. Shallow Water Operation Operating in shallow water presents a number of hazards. Sandbars in narrow inlets are constantly shifting, making it difficult to mark them with buoys. Sandbars are sometimes indicated by waves as they form into breakers when passing over the sandbar. In coastal areas, tides can affect water level as much as 30 feet (9 meters). Check with local marinas or Coast Guard stations for tide tables and current charts. RESTRICTED AREAS Some waterways and areas are restricted. Always check with local, state and federal authorities to identify restricted areas. Because of the threat of terrorism, the USCG has implemented and will continue to enforce strict limits on watercraft near U.S. Navy and Coast Guard ships and other potential targets. For more information, contact the USCG or local authorities. MARKERS, WARNINGS AND ADVISORIES Find out from local authorities if hazards exist in areas where you intend to navigate, and know how these hazards are marked. You must also recognize flag designs that indicate hazards or activities that are present and keep well clear of those areas. Always watch for swimmers and stay clear of all swimming areas, marked or unmarked. KC-0015C-B Become familiar with navigation markers, which identify navigable routes and indicate water hazards. Always stay within marked boundaries and steer clear of hazards. Distress flags and indicators are markers of potential emergencies and hazards. Become familiar with these flags and indicators. Additionally, understand your responsibilities when operating at these times and in these areas. Bay Boat 5-3
62 Section 5 DIVERS FLAG ALPHA FLAG DISTRESS FLAG USED BY RECREATIONAL DIVERS - INDICATES DIVER'S POSITION WORLDWIDE VESSELS ENGAGED IN DIVING OPERATIONS - DOES NOT INDICATE DIVER'S POSITION Figure 5-1 INDICATES FELLOW BOATER IS IN NEED OF ASSISTANCE KC-0017C-A Storm warning advisory flags and indicators alert boaters to impending weather conditions. Become familiar with these flags and indicators and understand the potential hazards associated with operating in these conditions. DAYTIME WARNING DESCRIPTION NIGHTTIME WARNING DAYTIME WARNING DESCRIPTION NIGHTTIME WARNING Small Craft Advisory - Winds greater than 18 knots, sustained for two hours or more, or hazardous wave conditions. Following a storm, hazardous wave conditions can persist long after the high winds have subsided. Storm Warning - Sustained winds of 48 knots or greater. Gale Warning - Sustained winds (2 or more hours) of knots. Hurricane Warning - Forecast winds of 64 knots and above. Displayed only in connection with a hurricane. Figure 5-2 KC-0018C-B 5-4 Bay Boat
63 Bay Boat Section 6 NAVIGATION RULES AND AIDS Before operating your boat, see Safety on page 2-1. The following information outlines basic navigational rules. Boating regulations are enforced by USCG, state and local authorities. You are subject to marine navigation regulations for both federal and state waterways. For more information, contact the USCG, state and local marine authorities. The navigational rules for U.S. waterways can be found in the Navigational Rules publication. This publication can be found at most marine supply stores, or you may contact the USCG or visit: to view or download the publication. Any boat 39 feet (12 meters) or longer must have a copy of the Navigational Rules publication on-board at all times. Failure to have this document on-board can result in penalties and/or fines. RIGHT-OF-WAY Boats with less maneuverability have right-of-way over more agile boats. You must stay clear of a boat with right-of-way. Examples of boats with right-of-way are: Boats aground or not under command Boats with restricted maneuverability Boats engaged in fishing Non-motor boats (having no power propulsion), i.e., rowboats, paddle boats, canoes and sailboats Small pleasure craft must yield right-of-way to large commercial boats in narrow channels. A boat with right-of-way is sometimes referred to as the privileged boat. The General Prudential Rule The general prudential rule regarding right-of-way is if a collision appears unavoidable, neither boat has right-of-way. Both boats must act to avoid collision. Bay Boat 6-1
64 Section 6 AUDIBLE DISTRESS SIGNALS It is not necessary to sound a signal every time a boat is nearby. It is typical for boat operators to signal their intention, using a whistle, horn or bell, to avoid potentially confusing or hazardous situations. Privileged boat operators customarily signal first, then the yielding boat operators return the same signal to acknowledge they understand and will comply. Use the danger signal (five or more short, rapid blasts) if intent is not clear. Use the following signal blasts early enough so other boaters notice and understand them: Audible Distress Signal One long blast One short blast Two short blasts Three short blasts Five or more short blasts Definition Warning signal (coming out of slip or passing astern) Pass on port side Pass on starboard side Engine(s) in reverse Danger signal NAVIGATIONAL LIGHTS AND NIGHT OPERATION Navigational lights alert other boats to your presence and course, especially when operating at night or in restricted visibility conditions. Regulations require that navigational lights be clearly lit and properly displayed at all times between sunset and sunrise, and always when operating in reduced visibility. Where applicable, lights must appear on the sides, stern, masthead and all-around positions. It is the responsibility of the boat operator to insure that persons in the boat are situated in a manner that does not block or impair any navigation lights on the boat. Also be aware it is the boat operator s responsibility to insure that no equipment or hardware is added to the boat that can block or impair the navigation lights on the boat. All navigational rules apply at night, but speed is restricted on many waterways. Night boaters must operate at a slow, safe speed and stay clear of all boats, regardless of which boat has right-of-way. Protect your night vision by avoiding bright lights. If possible, have a passenger help keep watch for other boats, water hazards and aids to navigation. 6-2 Bay Boat
65 Navigation Rules and Aids The size, speed and direction of other vessels are determined at night by white, green and red running lights. A green light indicates the starboard side of the boat. Generally, if you see a green light on another boat, you have the right-of-way. Hold your course. A red light indicates the port side of the boat. Generally, if you see a red light on another boat, they have right-of-way and you must yield your course. SPEED As the operator, you are responsible for maintaining your boat under control at a safe speed. Many state and local boating authorities enforce speed limits. Regulations may vary from state to state. Contact your local and state boating authorities for specific information. WAKE You, as the operator, are responsible for the wake your boat creates. Always be alert for NO WAKE zones and be courteous of others while boating. Excessive and unexpected wakes can cause dangerous and even life-threatening situations. Regulations may vary from state to state. Contact your local and state boating authorities for specific information, as you may be responsible for any damage or injury your wake causes. OVERTAKING / PASSING The boat overtaking or passing must yield right-of-way to the boat being passed. The overtaking boat must make any adjustments necessary to keep out of the way of the boat being passed. The boat being passed has the right-of-way and must hold its course and speed. HORN (2 SHORT BLASTS) HORN (2 SHORT BLASTS) BURDENED VESSEL OVERTAKING HORN (SHORT BLAST) PR VELEGED VESSEL BEING OVERTAKEN HORN (SHORT BLAST) Figure 6-1 Bay Boat 6-3
66 Section 6 MEETING HEAD-ON When two boats meet head-on, neither boat has the right-of-way. Both boats should decrease speed, turn to the right and pass port to port. If, however, both boats are on the left side of a channel, each vessel should sound two short horn blasts and pass starboard to starboard. HORN (SHORT BLAST) HORN (2 SHORT BLASTS) HORN (SHORT BLAST) HORN (2 SHORT BLASTS) PASSING PORT TO PORT MEETING HEAD TO HEAD Figure 6-2 PASSING STARBOARD TO STARBOARD 6-4 Bay Boat
67 Navigation Rules and Aids CROSSING In crossing situations, the boat to the right from the 12 o clock to the 4 o clock position has the right-of-way and must hold course and speed. The boat without right-of-way must yield and pass to the stern of the privileged boat. Boats going up and down a river have the right-of-way over boats crossing the river. PRIVELEGED VESSEL Figure 6-3 Bay Boat 6-5
68 Section 6 AIDS TO NAVIGATION Learn to recognize the different buoys and day markers; they are the signposts of the waterways. The United States Aids to Navigation System (USATONS) is the primary marking system used on inland water, coastal waters and rivers. This system is maintained by the USCG. Navigational aids are designed and placed accordingly to help you navigate safely on the water. Learn to recognize the different buoys and day markers. The following information is based on the USATONS. For further information, contact the USCG and state and local marine authorities. Also visit for buoyage system information. The USATONS uses buoys, beacons and minor lights as markers. NEVER tie or anchor to a navigational aid. This action is unlawful and dangerous to you, your boat and other boaters. NEVER move or damage a navigational aid. This action is unlawful and dangerous for other boaters. Buoys Most anchored floating markers are generally referred to as buoys. Buoys have many uses and color schemes, and can vary in size and shape. The most commonly used buoy colors are white, red, green, yellow and black. Buoys may be unlighted or lighted. Some are audible; others have both an audible and a visual signal. Lights, bells and horns on buoys aid in night boating or poor visibility conditions. Buoys with unique light-flashing characteristics are identified on nautical charts with the specific flashing pattern. Become familiar with the specific buoys used in the waters where you are boating. Contact local authorities for specific information and/or navigational aid charts for your waterways. UNLIGHTED BELL BUOY SPAR BUOY CAN BUOY LIGHTED BUOY NUN BUOY SPHERICAL SAFE WATER MARKER KC-0052C-B Figure Bay Boat
69 Navigation Rules and Aids Mooring Buoys The only buoys you are permitted to moor to are mooring buoys. Mooring buoys are white with a blue horizontal stripe. Mooring to a navigation buoy, regulatory markers or lateral markers is illegal. WHITE WITH BLUE BAND MAY SHOW WHITE REFLECTOR OR LIGHT Figure 6-5 KC-0020C-A Daymarks / Dayboards Daymarks or dayboards are fixed visual markers in the water. The markers are commonly attached to a post or piling and are sometimes accompanied by a light. Daymarks are either red or green and are usually triangular- or square-shaped, though their shapes can vary. Daymarks often display numbers, which act as navigation guides. Red daymarks are usually triangular and sometimes show an odd number. Green daymarks are usually square and sometimes show an even number. The numbers on the markers are sequential and increase from seaward. STARBOARD DAY MARKER PORT DAY MARKER Figure 6-6 KC-0021C-A Lights and Lighted Structures Maneuvering a boat at night can be dangerous and confusing. To aid boaters with navigation and to warn of hazards, the USCG and state and local authorities maintain a variety of light structures. Some light structures are equipped with radio beacons, radar reflectors and/or fog signals. Minor Lights Minor lights are colored according to the buoyage marking system in use. They are similar to lighted buoys, except they are usually higher and on more stable platforms to increase visibility. Most minor lights are part of a series to mark a channel, river, or harbor and fairways. Bay Boat 6-7
70 Section 6 Range Lights Range lights are usually visible in one direction and help a boat operator navigate safely. Steering a course to keep range lights arranged in a line (one on top of the other) will help guide a boat through a channel. FRONT MARKER REAR MARKER LEFT OF RANGE LINE ON RANGE LINE RIGHT OF RANGE LINE Lighthouses Figure 6-7 KC-0022C-A Lighthouses can be found at harbor entrances, prominent headlands, isolated danger areas and along the coasts. These striped or patterned structures have unique flashing signals, which help boaters identify them. KC-0023C-B 6-8 Bay Boat
71 Markers Navigation Rules and Aids Seven (7) types of markers are used to assist the boat operator: Regulatory Range Special Lateral Safe Water Preferred Channel Isolated Danger Regulatory Markers Regulatory markers are used to display information or indicate danger. Regulatory markers can be fixed visual markers or anchored floating buoys. Fixed visual markers are usually white with orange geometric shapes that display information. Anchored floating buoys are white cylinder-shaped buoys with orange bands at the top and orange geometric shapes that may display information. Following are the various orange geometric shapes used on these markers: Diamond Indicates danger Diamond with cross marks inside Indicates that a boater must keep away Circle Indicates a controlled area or speed limit Square Displays important information DANGER BOATS KEEP OUT CONTROLLED AREA INFORMATION Figure 6-8 KC-0244C-A Range Markers Range markers have many color schemes, may have numbers or letters and may be lighted or unlighted. They are placed in pairs within close distance of each other. They are commonly used in channels to guide boats safely through the center or safe line of navigation. Keep range markers visually in line with each other while navigating the waterway to avoid obstacles or other invisible dangers. Bay Boat 6-9
72 Section 6 Special Markers Special markers are yellow and come in various styles and shapes. Lighted and unlighted daymarks and buoys vary in function. Many are used to display information and navigational direction rules. The most common special markers are those used in intercoastal waterways. Contact your state and local authorities for more information on special markers used in your boating area. Lateral Markers Lateral markers are used to mark the sides of navigable channels. They can be buoys, daymarks or minor lights, and are red and green in color. They can be lighted or unlighted and may or may not have numbers. The basic nautical rule of lateral markers is the phrase Red, Right, Returning. The term sea generally refers to the ocean or a large body of water. Seaward refers to traveling from the sea or a large body of water inland or to a smaller body of water. When traveling seaward keep red markers to your port (left) and green markers to your starboard (right). When returning from seaward keep red markers to your starboard (right) and green markers to your port (left). GREEN LIGHT ONLY Flashing (2) Flashing Occulting Quick Flashing Iso Port Side Odd Numbers 3 5 Lateral Aids Marking the Sides of Channels as Seen When Entering from Seaward Lighted Buoy RED LIGHT ONLY Flashing (2) Flashing Occulting Can Buoy Quick Flashing Iso Daymark Starboard Side Even Numbers 2 4 Lighted Buoy Nun Buoy Daymark Figure 6-9 KC-0054C-A 6-10 Bay Boat
73 Navigation Rules and Aids Safe Water Markers Fairways and mid-channels may be marked with safe water markers or buoys. These markers indicate safe water all around. Safe water markers are red and white with vertical stripes, and are round or have a red spherical top mark. WHITE LIGHT ONLY MORSE CODE Mo (A) Safe Water Aids Marking Mid-Channels and Fairways (No Numbers May be Lettered) G Lighted E Spherical Buoy C Daymark KC-0055C-A Figure 6-10 Preferred Channel Markers Obstructions, channel junctions and preferred channels are marked with red and green horizontally striped can and nun-style buoys. The top band color indicates the preferred path to take. Use these markers in the same manner as lateral markers to follow preferred channels. GREEN LIGHT ONLY Composite Group Flashing (2+1) Preferred Channel to Starboard L B Preferred Channel Aids (No Numbers May be Lettered) Lighted Buoy Can Buoy RED LIGHT ONLY Composite Group Flashing (2+1) Daymark Preferred Channel to Port H D Lighted Buoy Nun Buoy Daymark Figure 6-11 KC-0056C-A Bay Boat 6-11
74 Section 6 Isolated Danger Markers Isolated danger markers indicate an isolated danger which may be passed on all sides. These markers are black with one or more broad horizontal red bands and are equipped with a top mark of two black spheres, one above the other. On inland waters, a buoy with alternating vertical black and white stripes may be used to indicate that an obstruction or other danger exists between the buoy and the nearest shore. Do not pass between the buoy and the shore. WHITE LIGHT ONLY FI (2) 5s Isolated Danger (No Numbers May be Lettered) C Lighted Unlighted Figure 6-12 KC-0057C-A Other Special Signs and Markers Various signs and markers are used throughout U.S. waterways for different purposes. In Florida, special signs are used to warn of manatee areas. These signs help to control speed and/or restrict areas from boating to conserve this endangered species. As a boat owner and operator, be aware of special information and markers on the waterways. Contact your state and local authorities for more information on local restricted or controlled areas and their markers Bay Boat
75 Bay Boat Section 7 OPERATING YOUR BOAT Before operating your boat, see Safety on page 2-1. SAFETY PRECAUTIONS! WARNING These safety messages describe hazardous situations which, if not avoided, could result in death or serious injury. Runaway Boat Hazard Certain actions can cause you to lose control of your boat: When accelerating your boat in the forward direction, the bow can rise and restrict visibility. Observe for obstacles and people before accelerating. The rotational thrust of the propeller under rapid acceleration can create high steering torque and rapidly change the direction of steering, causing loss of control. Do not trim the engine out too far or the boat may begin to porpoise (bounce up and down). Porpoising reduces control and visibility. If you lose control of your boat, pull back on the throttle and trim in at the same time. Improper use of trim tabs or moving them down at high speeds can cause an accident or injury. Bay Boat 7-1
76 Section 7 BEFORE GETTING UNDER WAY Safety Equipment Federal and local laws require certain safety equipment to be on-board at all times. Responsible boaters carry additional equipment in case of emergency. Float Plan Complete a float plan before departure and leave it with a reliable person who is aware of your intentions while on the water. In case of emergency or if you do not return as planned, this information can be helpful to the USCG or others in rescuing or contacting you. For more information on float plans or to download a float plan form, visit the U.S. Coast Guard Auxiliary website at: Pre-Departure Safety Checklist The following checks are essential to safe boating and must be performed before starting the engine or getting under way. Perform these checks every time you operate your boat so they become routine. Never launch the boat or leave the safety of the dock if any problem is found during the pre-departure safety check. A problem could lead to an accident during the outing, causing severe injury or death. Have any problems corrected before proceeding: Check the current and forecasted weather reports, as well as wind and water conditions. Make sure the operator is qualified to operate the boat and does not use drugs or alcohol while at the helm. Make sure all required safety equipment is on-board. Make all passengers aware of safety procedures. File a float plan. Have all required documents on-board. Have all maps or navigational charts for the intended destination on-board. Be sure all passengers are properly seated. Be sure the boat is not overloaded. Check the engine emergency stop switch lanyard for proper installation and operation. Be sure the fire extinguisher is fully charged. Check bilge drain plugs for proper installation. Be sure all water has been pumped from the bilge area. Have plenty of emergency food and water on-board. Check the bilge, and be sure no fumes are present. 7-2 Bay Boat
77 Operating Your Boat Be sure all required equipment is on-board (mooring lines, anchor lines, tool kit, etc.). Be sure you have enough fuel for the return trip. Check all compartments for fuel fumes. Check that no fuel, oil or water is leaking or has leaked into the bilge compartment. Check all hoses and connections for leakage and damage. Check the hull and propeller for damage. Check the engine cooling water intake pickup for blockage. Check that batteries are fully charged and the battery terminals are clean and tight. Check the electrical systems and navigation lights for proper operation. Be sure no person or obstacle is near the propeller. Check that the throttle/shift control is in the NEUTRAL position. Check the steering system for proper operation. Check that all required maintenance has been performed. Boarding Helpful guidelines when boarding a boat: Always step, rather than jump, into a boat. Avoid stepping on fiberglass or other potentially slippery surfaces. Always board one person at a time. Never board while carrying gear. Set the gear on the dock, board the boat and then pick up the gear. Never use the engine unit as a boarding ramp. It is courteous to always ask for permission to board so the owner/operator is aware of your presence on the boat. Boat Loading The safety and performance of your boat depends on load, weight and the distribution of each. The person/load capacity is determined by the USCG. A capacity plate is usually located within clear visibility of the boat operator or helm area. The capacity plate indicates limits for loading the boat, which are enforceable by law. WARNING! NEVER exceed the USCG certified maximum capacities under any circumstances. Exceeding the limitations stated on the capacity plate can cause the boat to sink or the passengers and/or operator to drown, resulting in death or serious injury. Bay Boat 7-3
78 Section 7 Board passengers one at a time and distribute them equally to maintain equal buoyancy of the boat. Distribute weight equally from port to starboard and fore to aft. The shifting of weight may be required when under way to maintain an efficient trim position for optimum performance. Stow and secure all loose gear in stowage areas to prevent load shifting. Do not stow gear on top of safety equipment; safety equipment must be quickly accessible. In adverse weather, reduce the load in the boat. Person and load capacity ratings are calculated for normal boating conditions. Be sure all passengers are properly seated and not riding on the bow, bow pulpit, deck, gunwale or rear sun deck while under way. Use caution when riding in the bow. Move to the aft passenger seats during rough water operation. Figure 7-1 PROPER DISTRIBUTION IMPROPER DISTRIBUTION (BOW HEAVY) IMPROPER DISTRIBUTION (STARBOARD HEAVY) KC-0333-A Fuel Management Figure 7-1 Use the one-third rule for fuel management. Use one-third of the fuel to reach your destination, one-third to return and one-third as reserve fuel. Filling the Outboard Engine Oil Reservoir Outboard engines with oil injection may also have separate tanks and fillers for the oil reservoir. Use lubricant recommended by the engine manufacturer. See the Engine Operator s Manual for information. 7-4 Bay Boat
79 Fueling Operating Your Boat Portable tanks must be removed from the boat when fueling. Outboard engines that have an oil injection system may also have separate fillers for the oil reservoir. Use lubricant recommended by the engine manufacturer. See the Engine Operator s Manual for additional information. The fuel filler can be located in the aft area, port side or on side of console. The shutoff valve requires you to manually turn the fuel valve, while the antisiphon valve operates automatically. Because gasoline fumes are heavier than air, they will sink to the lowest part of your boat, such as the bilge. All newer boats are equipped with EPA compliant fuel tank systems, which are intended to help reduce fuel emissions. This can cause the fuel tank to fill slower. It can also cause the initial fuel filling of the tank to be short of full capacity. Tips to help insure the tank fills as fast as possible and to full capacity are: Insure that the nose of the boat is angled upward at approximately 2-4 degrees during filling. For the first time filling, put as much fuel in as the tank will allow. If it is not near capacity and will not accept any more fuel, then allow the tank to sit for approximately 30 minutes to 1 hour and then attempt to fill the rest of the way. (New fuel tanks emit extra gases the first time they come into contact with fuel. Therefore, they can slow the venting process and slow or stop the acceptance of fuel. After a couple times of filling, this problem should no longer be a factor.) NOTICE: To prevent unwarranted engine damage, see your Engine Operator s Manual for manufacturer-recommended fuel and oil specifications. When refueling, observe the following: Figure 7-2 KC-0027C-A Have a proper and charged fire extinguisher ready. WARNING! Gasoline is extremely flammable and highly explosive under certain conditions. See the Safety Section for more details. Secure the boat to the dock. Stop all engines, motors and fans before refueling. Bay Boat 7-5
80 Section 7 Never smoke or allow open flames or sparks within 50 feet (15 meters) of the fueling area. Close all doors, windows, hatches and ports that could allow fuel vapors to enter the boat s enclosed spaces. Avoid spills and know how much fuel is already in the tank before adding fuel. Wipe up any spills immediately. Always fill fuel tanks slowly. Be aware that if the boat s attitude changes while floating, the fuel level and position change in the tank, which could cause spillage. Never overfill the fuel tanks. Always allow space (at least 6%) for expansion of fuel in the fuel tank. Always be sure you are filling the proper tank; some deck filler plates appear similar to the fuel tank. Never pump fuel into an unapproved container. Use only fuel approved by the engine manufacturer. Check for fuel leaks. Refuel only at safe and approved filling stations such as marina fuel docks or automotive fuel stations. Approved venues have safeguards in place to lessen the likelihood of static discharge. Read and follow all warnings on the pump or in the vicinity of the pump. Maintain contact between the fuel nozzle and the fill pipe at all times, before and during refueling, to prevent an electrostatic spark. Keep away from the fuel tank vent to avoid splash-back and fumes. Never reenter your vehicle while refueling on land and towing your boat. Getting into and out of your vehicle might build up a static charge that could ignite the fumes at the fill pipe. If a fire occurs, do not panic, and do not remove the nozzle from the gas tank. Evacuate all passengers from the vehicle and refueling area, and immediately alert station attendants so they can use the emergency shutoff and fire extinguisher. If you are unable to pump fuel at a reasonable speed, check the fuel tank vent for restrictions. After refueling, observe the following: The first time you fill your boat s fuel tank(s) and after each refueling, check the entire fuel system for leaks and/or damaged parts. Leaks and/or damaged parts must be repaired and the area ventilated to remove explosive fumes. Close the fill cap(s) securely. Wipe up any spilled fuel completely. Dispose of the rags properly. Open all hatches and doors to ventilate all spaces. Check for fuel vapors before starting any engines or appliances. 7-6 Bay Boat
81 Operating Your Boat GETTING UNDER WAY The following basic boat maneuvering and operation principles do not cover all conditions or situations you may encounter during operation. It is important for you and anyone else operating the boat to have certified instruction from local boating authorities. Always advise all passengers on-board of your steering, stopping and accelerating intentions to avoid personal injury or even death. Make sure all passengers are properly seated and not riding on the bow, bow pulpit, deck, gunwale or rear sun deck while under way. Use caution when riding in the bow. Move to the aft passenger seats during rough water operation. Starting The following information is intended as a basic guideline only and may not apply to your specific engine or controls. See the Engine Operator s Manual or control manufacturer s information for instructions on starting and operating the engine, adjustments and maintenance. Secure your boat to the dock before starting the engine. Check that the throttle is in the NEUTRAL position. Turn the battery selector switch to the appropriate ON position. Operate the bilge blower (if equipped) long enough to fully evacuate the engine and bilge compartments of explosive fumes. Attach the engine emergency stop switch lanyard to the boat operator. Check that all passengers are seated properly. Position the lower drive power trim to the full DOWN position. Start the engine. Steering Steering a boat is very different from steering an automobile. Steering and maneuvering a boat is far more difficult and requires time and practice to master. When steering a boat, it is important to understand the causes and effects of turning. Since both thrust and steering are at the stern of the boat, the stern will push away from the direction the steering wheel (helm) or tiller arm is turned. The boat seems to skid across the water while turning, which feels very different from an automobile making a turn. Steering in reverse has its own challenges. Practice forward and reverse steering to gain comfort and to feel in control of your boat in any steering situation. Be prepared for wind and current while steering your boat. Steering in wind or water currents is difficult and requires skill to be able to anticipate and compensate for these effects. Bay Boat 7-7
82 Section 7 Figure 7-2 RIGHT TURN Turn wheel to right Stern will move to left. LEFT TURN Turn wheel to left Stern will move to right. Figure 7-3 BACKING TO LEFT Turn wheel to left Stern will pull to left. KC-0115-A Rotational thrust of the propeller is an aspect most propeller-driven boats share and needs to be compensated for at slow speeds. During rotational thrust, torque is transmitted to the helm and may cause your boat to drift either port or starboard when moving forward at a slow speed. Rotational thrust usually goes unnoticed at high speeds. While moving forward at a slow speed, constant helm corrections are usually necessary to maintain a straight course. Stopping A boat does not have brakes. Controlling your boat to a stop and while stopped are important skills that must be learned. Reverse thrust is commonly used to slow and stop a boat. The continued momentum of a boat will vary according to the boat design, load and speed. You must also consider and learn to compensate for the effects of wind and current. Stopping in wind or water currents is difficult and requires skill to be able to anticipate and compensate for these effects. To stop or slow forward motion, always gradually return the throttle(s) to the slow IDLE position, pause and shift into NEUTRAL, then pause and shift into REVERSE. WARNING! Always gradually return the throttle(s) to the slow IDLE position. Failure to do so can cause loss of boat control, personal injury or death, and engine propulsion system damage, and may cause water to come up and over your transom area. 7-8 Bay Boat
83 Operating Your Boat If your boat has been driven for a long period of time at high speed, allow the engine a two- to three-minute cool-down period at low idle in NEUTRAL. Turn the ignition key to the OFF position. NOTICE: Never pull the lanyard from the engine emergency stop switch for normal shutdown. Doing so may impair your ability to restart the engine quickly. Avoid collisions; at high speeds your boat will require more time and distance to stop or slow. The proper use of trim tabs and outdrive trim angle is important when slowing to a stop. Qualified local boating authorities can provide proper instruction in slowing and stopping your boat. Shifting The following information is a basic guideline only and may not apply to your specific shift control. See the Engine Operator s Manual or control manufacturer s information for the shift control operation, adjustment and maintenance. Most throttle and shift controls have a neutral detent locking lever that must be released before shifting from NEUTRAL. Always use a brisk and decisive movement when shifting into or out of gear. Always pause in NEUTRAL before shifting from FORWARD to REVERSE, or REVERSE to FORWARD. Most throttle and shift controls have a detent position for NEUTRAL, FORWARD and REVERSE engagement positions. These detent positions are important; when shifting into and out of gear, always pause in these positions. Never shift into REVERSE while your boat is in FORWARD gear when traveling at a high speed. Always keep the shift control clean and clear of obstructions. Accelerating and Running Under Way You must understand your boat s equipment and controls in order to drive and control your boat in a forward direction at all speeds and in all conditions. Learning to drive and control your boat can be challenging; take this matter seriously and spend plenty of time practicing. WARNING! When accelerating the boat in the forward direction, the bow can rise and restrict visibility. The phrase on plane is commonly used when referring to the running angle of a boat in forward motion. When a boat is on plane, its hull is usually running level or almost level with the water s surface, which is considered level. The level plane of the water s surface is the most efficient angle to run in. This basically means that the boat is running on top of the water and not plowing through it. Factors to consider when accelerating a boat forward and running at the most efficient planing angle are: Boat design Bay Boat 7-9
84 Section 7 Hull type and condition Boat load and distribution of weight Engine capability and condition Propeller type, size and condition Outdrive and boat power trim equipment and condition Because all boats are different and vary in design, purpose and load, planing angles and characteristics will vary among all boats. Become familiar with your boat s characteristics and obtain qualified assistance. The following guidelines provide a basic understanding of forward acceleration and operating on plane while under way: Always look in front of and around you before proceeding. Avoid collisions before accelerating; be aware and stay clear of people and obstacles in the water. Always advise all passengers on-board of your intention to accelerate and get under way. Stow and fasten all loose gear. Make sure the engine emergency stop switch lanyard is connected to your person. If equipped, adjust your boat trim tabs up or to a neutral position with the hull. If equipped, adjust the engine power trim to the full-in position. Shift from NEUTRAL into FORWARD detent idle position. Adjust steering to the direction of travel. Using a controlled and constant motion, move the throttle control forward. WARNING! When accelerating forward, the bow can rise and restrict visibility. Never remove your hand from the helm. The rotational thrust of the propeller under rapid acceleration can create high steering torque and rapidly change the direction of steering, causing loss of control, personal injury or death. As your boat begins to move, the bow will rise and the boat will tend to plow through the water. As acceleration increases, your boat will begin to plane or level out within a few seconds. If it will not plane to a near-level position, slowly reduce the throttle back to the FORWARD detent idle position. Recheck your load and trim equipment position to determine the cause. Once the boat is on plane, the steering torque will diminish; however, never remove your hands from the helm while under way. While running at a planed position, you will notice greater throttle response and steering control as you continue to accelerate or achieve the most comfortable and safe speed for the conditions. You can achieve better performance, control and running efficiency using the engine s power trim and the boat s trim tabs, if equipped Bay Boat
85 Operating Your Boat Be aware of the wake you create and anticipate the effect it will have on others. During acceleration, deceleration and at speeds other than on plane, a heavy wake is usually created. You are responsible for your boat s wake and any damage or injury it causes. Obey no-wake areas and speed-controlled areas. Stay clear of or at a safe distance from other boats. Avoid collisions; at high speeds your boat will require more time and distance to stop or slow. Checks During and After Operation Check gauges frequently for signs of abnormal conditions. Check that controls operate smoothly. Check for excessive vibration. Power Trim and Tilt The following information is a basic guideline only and may not apply to your specific power tilt unit. See the Engine Operator s Manual for information on your power tilt operation, adjustment and maintenance. The engine s power tilt generally operates in conjunction with the power trim system, which is commonly called power trim and tilt. This system allows you to raise and lower the lower drive unit and propeller to adjust trim (the planing and running angle of the boat while under way) and tilt (used to position the lower drive unit up beyond the power trim range used for trailering, launching or beaching). Never use power tilt while the engine is running. Power Trim Operation The following information is a basic guideline only and may not apply to your specific power trim unit. See the Engine Operator s Manual for information on your power trim operation, adjustment and maintenance. The engine s power trim allows you to raise and lower the lower drive unit and propeller to adjust the planing and running angle of the boat while under way. Boat trim adjustment while under way greatly affects boat performance and efficiency. During normal operation while under way at speed, trim your boat to the best possible position to reduce the wetted surface of the hull. With less boat in the water, both speed and fuel economy increase. Adjust systems with manual trim adjustment for best overall operation for the load and conditions. Engines with power trim allow for continuous adjustment for best results. You can adjust the power trim by using a switch at the helm area or on the throttle control. Trim gauges are available in most applications to provide a visual gauge-to-trim position. Most gauges indicate trim position between UP (out, away from the transom) and DOWN (in, closer to the transom). Bay Boat 7-11
86 Section 7 DN UP TRIM CORRECT DN UP TRIM ENGINE IN TOO FAR - BOW DOWN DN UP TRIM ENGINE OUT TOO FAR - BOW UP Figure 7-4 KC-0126-A General effects of power trim under way: Trim in too far (closer to the transom): Speed decreases. Fuel economy decreases. Boat may handle and steer poorly. Boat will have difficulty achieving a proper running, planing position. Trim out too far (away from the transom): Steering torque increases. Speed decreases. Fuel economy decreases. Boat may handle and steer poorly. Boat will bounce or porpoise. Engine RPM increases. Propeller may ventilate as it nears the surface of the water and slip excessively as it pulls air from the surface. This will cause engine RPM to rapidly rise. Boat will have difficulty getting on plane from an idle position Bay Boat
87 Operating Your Boat WARNING! Do not trim the engine out too far or you may lose control of your boat. See Safety Precautions at the beginning of this section for more details. General power trim operation guidelines: When getting on plane from an idle position, start with the trim full in. As the throttle position increases, the boat speed will increase and drive the bow up. As acceleration proceeds, the bow will start to come down. When the bow starts to fall and the boat begins to plane, slowly start to trim out. Trimming out while under way generally causes the boat to rise up and plane. The boat begins accelerating without adjusting the throttle as less of the boat is dragging in the water. Trimming up causes the engine RPM to increase. It is very important to watch the engine tachometer to keep it at or near full throttle operating range and not to exceed the engine s wide-open throttle operation range. See the Engine Operator s Manual for the engine s wide-open throttle operation range. To find the optimum trim position while under way, run your boat at a stable planed angle with the least possible amount of the hull in the water. The boat reaches optimum trim position when it is not porpoising or plowing excess water. High-speed operation on smooth water provides stability, but you must maintain control by using quick reactions and adjustments. Know your limits and stay within them. Keep one hand on the helm and the other on the throttle controls at all times. WARNING! If you lose control of your boat, pull back on the throttle and trim in at the same time. Constant adjustments are necessary for rapidly changing conditions. Small inputs of throttle and steering are exaggerated at high speeds. Depending on the speed, keep watch well ahead so that you have enough time to react. If your boat has trim tabs, you can achieve further boat trim adjustment by using the trim tabs in conjunction with the engine power trim equipment. Bay Boat 7-13
88 Section 7 Mooring Because mooring configurations vary, consult with other experienced boaters or qualified boating authorities for recommendations on properly mooring your boat. Always moor your boat securely to prevent personal injury or property damage. Helpful guidelines when mooring: Each mooring line must be of the appropriate strength, material and type to safely secure your boat when moored. Each mooring line must be longer than the length of your boat. Use bow and stern mooring lines, as well as spring lines, for additional security. Use fenders to protect your boat from damage. When possible, tie up with the bow facing into the wind or current. Never attach a mooring line to a point or part of your boat that is not designed to withstand the stress and the weight of the boat. Only use the bow eye, stern eyes and other cleats or attachment points that have been approved for mooring. If you plan on mooring your boat for a long period of time, use chafing protectors on lines to protect the boat s finish. Leave some slack in the lines to allow for wave movement or tidal action if applicable. Docking Practice leaving and approaching the dock to become familiar with the procedures. Helpful guidelines when departing from the dock: Make sure you have sufficient space to maneuver your boat away from the dock, other boats and any other obstacles that may hinder your departure. Always allow sufficient clearance to the stern for the engine to clear any obstructions. Be aware of other boat traffic, wind and water conditions before departing. Make sure the engine is started and you have boat movement under control before casting off any mooring lines. Always proceed slowly when departing from a dock. Helpful guidelines when docking: Make sure you have sufficient space to maneuver your boat around the dock, other boats and any other obstacles that may hinder your approach. Be aware of other boat traffic, wind and water conditions on your approach. Always approach from a direction against the wind or current. When possible, approach slowly from a 45-degree angle and then steer parallel to the dock Bay Boat

89 Operating Your Boat Have fenders, mooring lines and assistance ready. WARNING! Never use your hand, arm or any other part of your body to attempt to keep your boat from hitting the dock. The boat could push against the dock, causing severe injury. If possible, throw a mooring line to a person on the dock and have that person secure the bow. With the bow secure, swing the stern in with the engine or pull it in using a boat hook or the stern line. Tie off the bow and then the stern. Figure 7-5 BW-0362 Bay Boat 7-15
90 Section 7 Anchors and Anchoring Anchors are available for various applications and come in many sizes, types and shapes. Boat weight and size are primary factors in choosing an anchor. When selecting an anchor, consult other qualified boaters or local marine authorities. DANFORTH ANCHOR KC-0042-A Anchor line (rode) is constructed from various materials and is available in many diameters and types. Consult with your local marine supply store for a recommendation on appropriate lines for your boat anchor and application. For most applications, anchor line length should be at least six to seven times longer than the depth of the water in which you are anchoring. Always have plenty of additional anchor line on-board. WARNING! ALWAYS anchor from the bow; NEVER anchor from the stern. A small amount of current will make a boat unsteady. A strong current can pull a boat anchored by the stern under the water and keep it there. 6 TO 7 TIMES THE DEPTH Figure 7-6 BW Bay Boat
91 Operating Your Boat Helpful guidelines when anchoring: Make sure the anchor line is tied to the anchor. Tie the other end of the line to the forward cleat or bow eye. Head your boat into the wind or current over the spot where you want to lower the anchor. Stop your boat before lowering the anchor. Slowly lower the anchor until it hits bottom. Allow the boat to back away, keeping tension on the line. Release at least six to seven times as much line as the depth of the water. Secure the anchor line to the bow cleat or eye. Firmly pull on the line to make sure the anchor is holding. Occasionally check your position against the shoreline. If the anchor is dragging and the boat is drifting, reset the anchor. Helpful guidelines when weighing (pulling in) the anchor: Start the engine(s). If necessary, move forward until enough tension is off the anchor line to allow for retrieval of the anchor. Avoid running over the anchor line; retrieve the line as you approach the anchor. Once the anchor line is straight up and down, lift the anchor from the bottom. If the anchor is stuck, attach the anchor line to the bow cleat so that it is tight. The up-and-down motion of the bow from wave action may loosen the anchor from the bottom. If the anchor remains stuck, let out a few more feet of line and attach it to the bow cleat. While keeping tension on the line, slowly maneuver your boat around the anchor to help loosen it. Avoid running over the anchor line. Always stow and secure the anchor and line before departing. Bay Boat 7-17
92 Section 7 Lines and Knots Mooring, anchor and other nautical lines are constructed from many different types of materials, and are available in many diameters and styles. Consult with your local marine supply store for a recommendation of appropriate lines for your boat and application. Commonly used mooring lines are constructed of a high-quality synthetic material in a double-braided configuration and usually have eye splices on at least one end. Learn and become familiar with tying and using knots. Knowing how to use knots and lines properly can prevent personal injury and property damage. Practice tying lines to docks, cleats and anchors, and connecting two lines together. Consult other qualified boaters or local marine authorities, or visit your local bookstore, library or the Internet for information on the proper use of nautical lines and knots. The following illustrations represent a few examples of securing mooring lines. Cleating an open line Cleating an eye-spliced line Securing to a dock bit Figure 7-7 Securing to a piling using a clove hitch KC-0248C-A 7-18 Bay Boat
93 Bay Boat Section 8 TRAILERING AND LAUNCHING Before using your trailer, see Safety on page 2-1. LEGAL CONSIDERATIONS The following information is intended as a basic guideline only. See the Trailer Operator s Manual for information on operation, adjustments and maintenance. Before you use your trailer, contact your state s Department of Motor Vehicles (and that of other states through which you may be traveling) for information on trailering regulations. Trailer regulations vary widely from state to state, and it is your responsibility to be in compliance with all regulations when trailering your boat. Regulations include, but are not limited to, trailer registration, licensing, width, height, length, lights, safety chains, tie-downs, hitch type, weight capacity, brakes, spare wheels, vehicle mirrors and gross vehicle weight. TRAILER CLASSIFICATION Trailers are separated into four classes based on the Gross Vehicle Weight Rating (GVWR): Trailer Class Class One Class Two Class Three Class Four GVWR under 2000 lb (907 kg) over 2000 lb (907 kg) and under 3500 lb (1588 kg) over 3500 lb (1588 kg) and under 5000 lb (2268 kg) over 5000 lb (2268 kg) Trailers are usually ordered and packaged with the boat by your selling dealer. Please verify with them that the specs meet the class required and the fit of the trailer properly supports the hull of the boat so as to not affect the hull warranty of the boat. Bay Boat 8-1
94 Section 8 TRAILER TYPE Trailers are designed for many applications and can vary in style. To prevent damage to your boat and/or personal injury, always use the appropriate trailer for your boat. Contact your dealer for more information. TRAILER GROSS VEHICLE WEIGHT RATING All trailers must display a Gross Vehicle Weight Rating (GVWR) decal, which shows the load-carrying capacity plus the weight of the trailer. The total weight of your boat (fully loaded with fuel, batteries, water, etc.), engine, gear and trailer must never exceed the GVWR. TOWING VEHICLE The towing vehicle must be able to safely pull the full trailer and boat load. Never pull a trailer load that exceeds the vehicle s towing capacity; you risk losing control of the trailer and/or vehicle. Before trailering, always check your Vehicle Operator s Manual for maximum towing/trailering load specifications and maximum gross vehicle weight specifications that include the fully loaded trailer. VEHICLE TOWING HITCH The towing vehicle must be able to safely pull the full trailer and boat load. The vehicle must have a towing hitch that is capable of safely handling the trailering load and tongue weight of the trailer. Hitches are designed for many applications and can vary in style. Use professional assistance when selecting the correct hitch and hitch ball for your towing application. WARNING! A vehicle hitch that is underrated or improperly installed can lead to loss of control of the trailer and/or vehicle, causing serious personal injury or even death. Hitches are divided into classes that specify the trailer s gross trailer weight and maximum tongue weight for each class. WARNING! Never use a hitch that is not rated to pull the maximum weight of your trailering load or that is not rated for the maximum tongue weight that your trailering load applies. 8-2 Bay Boat
95 Trailering and Launching MAXIMUM TONGUE WEIGHT 5000 (2268) 4500 LOADED (2041) TRAILER 4000 WEIGHT (1814) 3500 lb (kg) (1588) 3000 (1361) 2500 (1134) 2000 (907) 100 (45) 200 (91) 300 (136) 400 (181) TONGUE WEIGHT lb (kg) Figure 8-1 HITCH BALL AND TRAILER COUPLER Most boat trailers have a coupler that connects to a hitch ball attached to the towing vehicle s hitch. The trailer hitch coupler must always match the size of the hitch ball. The correct hitch ball diameter for the coupler is usually marked on the trailer coupler. WARNING! Never use a hitch ball size or rating that does not match the trailer coupler specifications. Trailer hitch balls are sized and rated for use based on the trailer GVWR: KC-0039-A Trailer Class Class One Class Two Class Three Class Four GVWR under 2000 lb (907 kg) over 2000 lb (907 kg) and under 3500 lb (1588 kg) over 3500 lb (1588 kg) and under 5000 lb (2268 kg) over 5000 lb (2268 kg) Hitch Ball Diameter Size 1-7/8 in. diameter size 2 in. diameter size 2 in. diameter size 2-5/16 in. diameter size Bay Boat 8-3
96 Section 8 LATCH RELEASE HANDLE SOCKET TRAILER COUPLER CLAMP PROPER SIZE HITCH BALL RELEASE HANDLE LOCK PIN TOWING VEHICLE HITCH Figure 8-2 KC-0043C-A SAFETY CHAINS Your boat trailer s safety chains prevent the trailer from completely detaching from the towing vehicle when under way. Connect the chains to the vehicle s hitch or frame and crisscross the chains under the trailer tongue to prevent the tongue from dropping to the road if the trailer separates from the hitch ball. Rig the chains as tight as possible with enough slack to permit full-free turning. Safety chains must be rated at the same or greater weight capacity as the trailer s GVWR. Never allow the chains to drag on the ground when trailering. Attach the chains properly and securely between the towing vehicle and trailer before trailering. CRISSCROSS SAFETY CHAINS (BOTTOM VIEW) TOW TRAILER VEHICLE Figure 8-3 KC-0045C-A 8-4 Bay Boat
97 Trailering and Launching TRAILER BRAKES In some states, any trailer with a GVWR of 1500 lb (680 kg) or more is required to have trailer brakes. Check with your state and local authorities for more information. The three basic types of trailer brakes are electric, hydraulic surge and air-actuated. If your trailer is equipped with brakes, see the Trailer Operator s Manual for more information on operation, adjustments and maintenance. BRAKE FLUID RESERVOIR FILLER CAP WHEEL LOCK HAND WHEEL Figure 8-4 BRAKE RELEASE LEVER SURGE BRAKE CABLE KC-0044C-B 5-Pin Wiring Connector Some trailers equipped with surge brakes may utilize a 5-pin wiring connector. These trailers use an electric solenoid valve that allows brake fluid to bypass back to the reservoir while in REVERSE. The solenoid is usually connected to the reverse lights on the tow vehicle to ensure the brakes only bypass in REVERSE. The fifth pin is for deactivating the brakes when backing up, and is required to be connected to the vehicle s power when backing up. In some instances, the 5-pin connector can be connected to a 4-pin connector for normal operation of the lights. Bay Boat 8-5
98 Section 8 TRAILERING GUIDELINES Follow these guidelines when trailering: Maintain a safe speed as regulated by the trailering laws of the state where you are traveling. Check the trailer and vehicle brakes for proper operation and fluid level prior to departure. Check the trailer for damage prior to departure. Once the trailer is secured to the vehicle hitch, stow the trailer jack or lift so that it will not hit the ground. Check the trailer and vehicle tires for proper inflation. Under-inflated tires heat up rapidly and may cause tire damage or failure. Check trailer wheel bearings and lug nuts before each trip. Secure the stern of your boat to the trailer from the stern eyes. Fasten the bow of your boat to the trailer with the bow winch line connected to the bow eye and bow safety chains. WINCH LINE WINCH STAND BOW STOP WINCH STAND SAFETY CHAIN BOW EYE Figure 8-5 KC-0047C-A If travel conditions require, use an additional tie-down strap across the rear of your boat from side to side to further secure the stern. Check all strapping material for wear. Make sure trailer and vehicle running, brake and signal lights are in good working condition. Drive with the vehicle and trailer running lights on. Too much or too little tongue weight makes steering difficult and causes the tow vehicle to sway. Put approximately 5% to 10% of boat and trailer weight on the tongue. 8-6 Bay Boat
99 Trailering and Launching Side curtains, backdrop, aft curtains, convertible tops and detachable windshields are not designed to stay on boats at highway speeds. Before towing, take down the convertible top, side curtains, back cover and detachable windshield, if equipped. Remove any covers that are not designed to stay on boats at highway speeds. Carry a spare tire and wheel for both your trailer and your towing vehicle, along with tools to change them. See the Engine Operator s Manual for engine-related trailering information. Continuous road shocks may fatigue your boat s steering system. Tie outboard motors in place so they will not tilt or turn from road shock. On extended trips, carry spare wheel bearings, seals and races. While traveling, check the wheel hubs every time you stop. If the hub feels abnormally hot, inspect the bearing before continuing your trip. Carry a fire extinguisher in the vehicle. Turn carefully while towing a trailer; additional space and distance are needed. TRAILER PATH Figure 8-6 Drive slowly over railroad tracks or rough roads. BW-0364 Bay Boat 8-7
100 Section 8 If you trailer your boat from lake to lake, you may unknowingly introduce a foreign aquatic species from one lake to the next. Thoroughly clean your boat below the waterline, remove all weeds and algae, and drain the bilge and livewells before launching it in a new body of water. Make sure the hitch ball and trailer coupler are the same size and bolts and nuts are tightly secured. The coupler must be completely over the ball, and the latching mechanism must be locked down. The safety chains must be attached crisscrossing under the coupler to the frame of the tow vehicle. If the ball was to break, the trailer would follow in a straight line and prevent the coupler from dragging on the road. Make sure the trailer emergency brake cable or chain is also installed to the tow vehicle frame. Figure 8-7 Make sure the lights on the trailer function properly. Make sure the tow vehicle has side view mirrors that are large enough to provide an unobstructed rear view on both sides of the vehicle. Note: KC-0046C-A Make sure your towing vehicle and trailer are in compliance with all state and local laws. Contact your state motor vehicle bureau for laws governing the towing of trailers. 8-8 Bay Boat
101 Backing Up Trailering and Launching If you have never towed a trailer before, take time to practice and become comfortable with backing up your boat and trailer. Situations can arise in traffic, or when launching, that will require you to be able to back up your trailer safely. Follow these guidelines when backing a trailer: Back slowly and make small steering adjustments. Turn the car wheels in the direction opposite where you want the trailer to go. After the trailer begins moving, turn the car to follow it. Have a second person assist you with audible and hand signals. BACKING TO RIGHT BACKING TO LEFT FOLLOWING THRU TURN Figure 8-8 LAUNCHING Before launching, inspect the launch ramp for any problems that may hinder launching or make launching unsafe. Ramps can be slick and dangerous to drive or walk on, and may have unseen drop-offs beneath the water that would pose a safety hazard. Always be aware of water conditions and the effects of the wind when launching. Before launching, inspect your boat and trailer for damage. Do not launch if you detect damage or find that the engine or propeller is not in good operating condition. Have any repairs made before launching. Bay Boat 8-9
102 Section 8 Use courtesy when preparing your boat for launching by preparing away from the ramp on level ground before proceeding to the launch ramp. When launching your boat on the trailer, have two or more people assist you. Since all launches are different, the following procedures are intended as guidelines only: Verify that your vehicle s brakes, including the parking brake, are in proper working order. Make sure the trailer is securely fastened to the vehicle. Remove the boat cover, if equipped. Check that the bilge drain plug is in place and all other plugs that allow water to leak into the boat are in place. Remove all tie-downs from your boat. Attach the bow and stern docking lines. Attach boat fenders if necessary. Disconnect the trailer lights from the car. If applicable, trim or tilt the engine/outdrive up to avoid damage. Make sure the bow winch and strap are securely locked and fastened. Make sure the bow winch safety chains, if equipped, are in place. Make sure all required documentation and safety equipment are on-board. Verify that batteries are fully charged and in good condition. Check fuel level; add fuel if necessary. Always launch with the help of another person. Make sure there is no one on the ramp behind your boat. Keep the trailer/vehicle combination as straight as possible and at 90 degrees to the shoreline. Back slowly down the ramp until the transom of your boat is a few inches in the water; then stop the vehicle. Stop the vehicle and shift into PARK (automatic transmission) or REVERSE (manual transmission). Apply the brakes and/or parking brake. If possible, use wheel blocks. Position the mooring lines within reach of the dock. Disconnect the bow winch strap and safety chains, if equipped, from the bow eye. Manually back your boat clear of and off the trailer into the water and secure to the dock using mooring lines. Remove any wheel blocks and release the vehicle brakes. Pull the trailer slowly out of the water, and secure and park in a designated area. Board your boat. Lower the engine, if applicable. See the Engine Operator s Manual for starting procedures. Remove dock lines from the dock and proceed slowly away from the dock Bay Boat
103 Trailering and Launching LOADING GUIDELINES Follow these guidelines while loading your boat onto the trailer: When loading your boat on the trailer, have two or more people assist you. Stop, turn off the engine and secure it to the dock with dock lines at a position clear from where the trailer will be in the water. If applicable, trim or tilt the engine up to avoid damage. Verify that your vehicle s brakes, including the parking brake, are in proper working order. Disconnect the trailer s light harness from the tow vehicle. Make sure the trailer is securely fastened to the vehicle. Back the trailer slowly down the ramp until it is positioned so that your boat can be loaded. Stop the vehicle and shift into PARK (automatic transmission) or REVERSE (manual transmission). Apply the brakes and/or parking brake. If possible, use wheel blocks. Position the mooring lines within reach of the dock. Manually position your boat onto the trailer using mooring lines. Make sure it is centered on the supports of the trailer. Position the bow eye into the bow stop and connect and secure the bow winch strap and safety chains, if equipped, to the bow eye. Secure the mooring lines inside your boat. Remove any wheel blocks and release the vehicle brakes. Slowly pull the trailer and boat up the ramp. Secure the transom to the trailer. Prepare for trailering as necessary. Bay Boat 8-11
104 Section 8 This Page Intentionally Left Blank 8-12 Bay Boat
105 Bay Boat Section 9 BOAT FEATURES AND OPTIONS Before operating any systems within this section, see Safety on page 2-1. Your boat may be equipped with a variety of systems to operate your boat and to provide other conveniences you may need while on the water. The following basic and typical information may not apply to your specific application. All of your boat s systems may not be covered in this section. See the Manufacturer s Operator s Manual for specific details. Regularly inspect and maintain all components and systems to prevent unexpected hazards due to worn or faulty components. Be sure to replace components and hardware with marine-grade parts. Never use automotive components. Bay Boat 9-1


106 Section 9 FUEL SYSTEM The basic fuel systems consist of one or more fuel tanks, tank vents, level sensor and gauge, lines, pumps, valves and carbon canister. Blue Wave Fuel System Fuel Line to Motor Fuel Gauge Sending Unit EVAP Vent Line to Fuel Tank Carbon Canister Under Console To Exterior EVAP Vent EVAP Vent Line enters under console Fill Inlet Valve Assembly Figure 9-1 The above diagram is an example only. It may appear different depending on your model. 9-2 Bay Boat
107 Boat Features and Options Each tank has an antisiphon valve to prevent fuel from leaking out of the tank. A fill line with a one-way valve in line is designed to prevent fuel or fumes from coming back up the fuel fill line and a carbon canister in line on the fuel vent line complies with the EPA regulations on fuel tank emissions. Refer to your Engine Operator's Manual for specific fuel system information and service related to the engine. ENGINE LUBRICATION SYSTEM Depending on engine type, your boat may feature one of several engine lubrication systems. Many small-to-mid-range outboards are lubricated by oil mixed directly with the gasoline in the fuel tank, while other outboards may be equipped with an oil injection system. In each system, the oil is consumed as the engine runs. Oil injection systems include a separate reservoir for oil containment and an oil pump or combination fuel/oil pump that supplies oil to the fuel system for engine lubrication. Stern drive engines, like automotive engines, use a sump system where the engine oil is contained in the engine. See the Engine Operator s Manual for engine oil recommendations and information. Bay Boat 9-3
108 Section 9 ENGINE COOLING SYSTEM Most outboard engines are cooled by using raw water to transfer heat from the engine and then returning the raw water to the sea/lake. A raw water pickup and screen on the lower drive unit allows water into the engine. A pump then circulates the water to cool the engine. Be sure to periodically inspect the intake screen and clear it of any debris which could obstruct water flow into the engine. A continuous discharge of water from the cooling water check port while the engine is running is a visual indication that the engine s cooling system is operating properly. NOTICE: To prevent engine damage, DO NOT run it with the lower drive unit raw water intake above the waterline or out of the water. Figure 9-1 WATER LINE COOLING WATER INDICATOR WATER INTAKE Figure 9-2 KC-0192-B 9-4 Bay Boat
109 Boat Features and Options STEERING SYSTEM Steering systems vary in type and operation. The most common steering systems are mechanical, power-assisted and hydraulically operated. Boat steering controls are not self-centering. Always keep a secure grip on the steering wheel to maintain full boat control. Mechanical steering helm controls transfer the rotary motion of the steering wheel to linear cable motion, which pushes or pulls the engine s steering arm. Some boats are equipped with two mechanical cables to provide positive steering control and additional safety in case one cable fails. It is normal for the torque of the prop to make turning the steering wheel in one direction slightly harder than turning in the other. Figure 9-3 KC-0268-A SHIFT AND THROTTLE CONTROLS Knowing how to operate the shift and throttle controls of your boat is essential for safe and proper operation. The following basic and typical information may not apply to your specific shift control. See the Engine Operator s Manual or control manufacturer s instructions for information on your throttle and shift control operation, adjustment and maintenance. Bay Boat 9-5
110 Section 9 Single-Lever Controls Single-lever controls operate both the gear shift and the throttle for one engine with one control lever. Single-lever controls can be used on single- or twin-engine boats. Figure 9-2 BOW FORWARD IDLE FORWARD THROTTLE RANGE FORWARD SHIFT RANGE NEUTRAL REVERSE SHIFT RANGE REVERSE IDLE RANGE REVERSE THROTTLE FULL THROTTLE FULL THROTTLE Figure 9-4 NEUTRAL - The lever is detented in the NEUTRAL position (center of travel) for starting; the neutral safety switch allows starting in this position only. For engine warm-up, a separate lever or button on the control is used to disengage the shift cable and allow the throttle to advance only while the transmission remains in NEUTRAL. FORWARD - Release the detent lock to allow shifting to the FORWARD position. Moving the lever into the first 15 of travel (toward the bow or up) positions the control in the FORWARD detent IDLE position. Advancing the lever beyond 15 allows throttle increase in FORWARD. REVERSE - Release the detent lock to allow shifting to the REVERSE position. Moving the lever into the first 15 of travel (toward the stern or down) positions the control in the REVERSE detent idle position. Advancing the lever beyond 15 allows throttle increase in REVERSE. Control Operation Guidelines KC-0092-A WARNING! Improperly maintained controls are hazardous and may cause sudden loss of control. Make sure all shift/throttle hardware and cables are regularly inspected and maintained. Improper maintenance may result in a loss of control, resulting in serious injury or death. Side mount throttle and shift controls have a neutral detent locking lever that must be released before shifting from NEUTRAL. 9-6 Bay Boat
111 Boat Features and Options Always use a brisk and decisive movement when shifting into or out of gear. Always pause in NEUTRAL before shifting from FORWARD to REVERSE, or REVERSE to FORWARD. Most throttle and shift controls have a detent position for NEUTRAL, FORWARD and REVERSE engagement positions. Engine damage may occur if you rapidly shift into gear without pausing in these detent positions or allowing the engine RPM to lower into the approved shifting range. When traveling at high speed, never shift into REVERSE while your boat is in FORWARD gear. Always keep the shift control clean and clear of obstructions. NOTICE: All shift and throttle controls are equipped with a safety switch for start-in-gear prevention. Place the control in the NEUTRAL position before you attempt to start the engine. Never attempt to shift when the engine is not running. ELECTRICAL SYSTEM Boats may be equipped with a Direct Current (DC) electrical system. Most boats use a battery-powered direct current (DC) system. Most systems have a main load panel which serves as the main distribution panel. DC System Most boats use a 12-volt common negative ground DC system. DC systems are usually the primary electric supply for lights, pumps, blowers, engine starting, etc. Boats require at least one battery per engine. Multiple-battery systems consist of a cranking battery for each engine and additional batteries that supply auxiliary power to DC electrical circuits. Battery switches control battery power distribution and disconnect the batteries from the boat s electrical system. The engine s charging system charges batteries connected to the charging system when the engines are running. Battery isolators prevent accessory loads and other batteries from depleting power from charged batteries. Isolators also allow the engine s charging system to isolate the alternator charging output and distribute the charge among all batteries according to individual need. The main DC control panel may feature a voltmeter, battery test switch, fuses, circuit breakers and a master breaker switch. WARNING! Never reset a breaker that has been automatically tripped without first identifying and correcting the cause of the problem. A fire could result. Bay Boat 9-7
112 Section 9 Pure Bay Small Console Lower Dash Panel Electrical Diagram Figure 9-3 Schematics subject to change without notice. 9-8 Bay Boat
113 Boat Features and Options Pure Bay Small Console Upper Dash Panel Electrical Diagram Figure 9-4 Schematics subject to change without notice. Bay Boat 9-9
114 Section 9 Pure Bay Tall Console Dash Panel Electrical Diagram Figure 9-5 Schematics subject to change without notice Bay Boat
115 Boat Features and Options PROPELLERS The following basic information may not apply to all engines. See the Engine Operator s Manual for information on propellers for your boat. Consult your local marina or certified marine technician for assistance when replacing or servicing propellers. The propeller converts the engine s power into the thrust needed to propel the boat. Care and selection of your propeller is very important for proper boat operation. Propeller size is usually identified by two numbers, such as 13 x 19, and a material identification, such as aluminum or stainless steel. In the number sequence, the first number is the diameter of the propeller in inches and the second is the pitch in inches. Pitch is the angle of the blades expressed in the theoretical distance a propeller travels in each revolution. In the previous example, the pitch is 19, which means that each revolution of the propeller pushes the boat 19 inches (483 mm) through the water. Propellers on boats powered by outboard or stern drive propulsion systems are usually replaced out of the water to prevent loss of parts and to ensure correct installation. Although propeller replacement can be completed with the boat in the water, it is not recommended. Remove an inboard-powered boat from the water for propeller replacement because the propeller is not accessible while the boat is in the water. Special tools are required for most applications. Always consult your local marina or certified marine technician for assistance when replacing or servicing propellers. Figure 9-6 DIAMETER KC-0149-A Figure 9-5 PITCH (ONE REVOLUTION) KC-0150-A Propeller Selection and Replacement Guidelines There are many different propeller designs for specific operating characteristics. Always consult a certified marine technician when replacing your propeller. Bay Boat 9-11
116 Section 9 To prevent accidental start-up, complete the following before installing or removing the propeller: Position the shift control in NEUTRAL. Position the battery switch to the OFF position and remove the key. Place a wood block between the cavitation plate and the propeller to hold the propeller in place. Remove the propeller nut. WARNING! Never use your hand to hold the propeller when removing the propeller nut. GAUGES / INSTRUMENTS The following basic and typical information may not apply to your specific boat. This section may not cover all gauges on your boat, and some gauges shown may be optional. See the Engine Operator s Manual or equipment manufacturer s supplied information on the use and operation of the unique gauges and instruments. Some models may be equipped with a multi-gauge instrument which integrates the functions of several single gauges. Gauges are visual indicators that help you monitor various system and component operation parameters. Gauges usually have lights integrated into them for visual clarity when operating at night. They are located near the helm area or other main control areas. Tachometer RPM x The tachometer indicates engine speed in revolutions per minute (rpm). Monitor engine rpm at all times to keep the engine within the proper rpm operating range. See the Engine Operator s Manual for the rpm operating range of your engine. KC-0095-A 9-12 Bay Boat
117 Speedometer (optional) Boat Features and Options MPH KPH KC-0098-A The speedometer indicates approximate forward boat speed in miles per hour (mph). The normal analogue speedo reads from the water pressure coming through the inlet hole in the front of the lower unit. If the gauge is not reading the first step is to insure there is no blockage in that hole. See Engine Operator s Manual for more details. Fuel Level Gauge E 1 / 2 FUEL F The fuel level gauge indicates approximate fuel level in the fuel tank. The accuracy of the fuel gauge may vary as the attitude of the boat changes; the reading is only an approximation. As a general rule, always use the one third rule. Use one third of the fuel to reach your destination, one third to return and one third as reserve fuel. KC-0099-A Engine Water Pressure Gauge (optional) The engine water pressure gauge indicates the water pressure of the engine cooling system in pounds per square inch (psi). This gauge monitors the engine cooling system operation and indicates overheating problems. See the Engine Operator s Manual for the normal operating range. WATER PRESS KC-0100-A Bay Boat 9-13
118 - + Section 9 Power Trim / Tilt Gauge (optional) DN TRIM UP The power trim/tilt gauge indicates the angular position of the lower drive unit and propeller in relation to the transom of the boat. KC-0101-A Voltmeter VOLTS 16 The voltmeter indicates the voltage of the main cranking battery in volts DC. See the Engine Operator s Manual for the normal operating range. KC-0102-A Engine Water Temperature Gauge (optional) C x F x 10 TEMP KC-0104-A The engine water temperature gauge indicates the water/coolant temperature of the engine cooling system. Most marine engines use seawater to cool the engine. A sudden increase in temperature could be an indication of a blocked cooling passage or a water pump malfunction. Check the gauge immediately after starting the engine. If the temperature gauge is high, STOP the engine immediately and see the Engine Operator s Manual for corrective action Bay Boat
119 Boat Features and Options Engine Hour Meter (optional) ENGINE HOURS h Quartz 100 The engine hour meter indicates the total number of hours the ignition switch is in the ON position. Under normal conditions, the engine is running when the ignition switch is ON; therefore, the hour meter provides an approximate indication of engine hours. An hour meter is useful in determining scheduled maintenance. KC-0106-A Oil Level Gauge (Outboard Engine Oil Injection Optional) The oil level gauge indicates the level of outboard engine oil in the reservoir used for the oil injection system. Some oil injection systems may provide an indicator on the reservoir. See the Engine Operator s Manual for additional information. Engine Warning Alarm System Your engine may have integrated audible alarms to warn of engine overheating, low oil pressure or other conditions. See the Engine Operator s Manual for more information. Bay Boat 9-15
120 Section 9 HELM AND CONTROL SWITCHES The following information is intended as basic and typical and may not apply to your specific application. Not all switches may be covered in this section. See the Manufacturer s Operator s Manual for specific information on the use and operation of switches in your boat. Many of the electrical features and systems in your boat are equipped with a control switch and protected with breakers or fuses. Switches are designed for different applications and found in many styles and shapes. Some switches may have a lighted indicator for easy ON/OFF identification. Ignition Switch The ignition switch controls the engine starter circuit, the engine ignition system and accessory circuits connected to the ignition switch. Horn Switch The horn switch controls power ON/OFF to sound the horn. Battery Switch Battery switches are used to control battery power distribution and disconnect the batteries from the boat s electrical system. Battery switches are designed in many styles and for different applications. They generally provide battery isolation when used with multiple batteries and are used primarily as a method of quick and positive battery disconnection. Battery switches also protect against tampering, electrical fire hazards and battery drain. Keep this switch off when not using your boat or when storing it for extended periods of time. NOTICE: Do not move the battery switch with the engine running; this could damage the engine s charging system. Consult a qualified, knowledgeable technician for proper operation of your boat s specific electrical system. Figure 9-7 SINGLE ON BOTH DUAL 1 2 OFF OFF TYPICAL BATTERY SWITCH Figure 9-6 KC-0292-A 9-16 Bay Boat
121 Boat Features and Options Engine Emergency Stop Switch and Lanyard SAFETY SWITCH LANYARD HOOK KC-0110C-B The engine emergency stop switch controls the engine ignition ON/OFF. This safety device shuts the engine off immediately and prevents the boat from becoming a runaway if the operator is accidentally thrown from the seat or away from the helm. Whenever your boat s engine is on, physically secure one end of the emergency engine stop switch lanyard to the emergency stop switch and the other to the boat operator. If the operator is thrown from the seat or moves too far from the helm, the lanyard will disconnect from the switch, activating the switch to turn off the engine. Never remove or modify the engine emergency stop switch and/or lanyard. Always keep the lanyard free from obstructions that could interfere with its operation. Always check the switch for proper operation. With the engine running, pull the lanyard. If the engine does not stop, have the switch repaired before operating your boat further. Never operate your boat if the engine emergency stop switch does not work. WARNING! Removing the engine stop switch and/or the lanyard can cause loss of control. See Safety Precautions in the Safety Section of this manual for more details. Neutral Start Safety Switch (Start-in-Gear Prevention) The neutral start safety switch provides start-in-gear prevention. The switch controls power to the engine starter circuit of the ignition switch. The engine gear shift control lever must be in the NEUTRAL position to allow the ignition switch to activate the engine starter. This safety device will prevent the boat s engine from starting if the engine is in gear. Navigation Lights Switch The navigation lights switch controls power ON/OFF to the boat s navigation, running and anchor lights. This switch is usually a three-position switch, with OFF in the center. When the switch is in the NAV position, the red and green navigational, white stern and running lights, and console gauge lights are activated. When the switch is in the ANC position, only the white stern light is activated. Bay Boat 9-17
122 Section 9 Never operate your boat between sunset and sunrise using only the stern light. Use all navigational lights when operating under way between sunset and sunrise. Power Trim / Tilt Switch TYPICAL TRIM SWITCH UP DN KC-0108-A The power trim/tilt switch controls power ON/OFF to the engine s power trim/tilt electric hydraulic pump. This switch is usually a three-position switch, with OFF in the center. If engine is equipped with power trim and tilt, this system allows you to raise and lower the lower drive unit and propeller to adjust trim (the planing, and running angle of the boat while under way). The tilt feature positions the lower drive unit up beyond the power trim range and is used for trailering, launching or beaching. Never use power tilt when the engine is running. Bilge Pump Switch The bilge pump switch controls power ON/OFF to the bilge pump to remove excess water from the bilge area of the boat. Some models are equipped with an automatic bilge pump setting. Switching to AUTO when the boat is in operation will allow water to be automatically pumped out when it reaches a level that activates the float sensor in the bilge area. Some water may always be present in the bilge. This is normal and can be from rain or condensation. Be sure to switch the bilge to OFF (not AUTO) when your boat is not in use. Wave action or trailer travel can cause the pump to drain the battery. Running the pump when the bilge is dry will damage the pump. Do not allow the bilge pump to operate after all the water has been cleared from the bilge area; damage to the pump will occur if the pump is allowed to operate without water. If oil is spilled in the bilge, do not run the pump. Keep the oil from spreading in the bilge and properly dispose of the oil on shore. BILGE PUMP SYSTEM The Federal Water Pollution Control Act prohibits the discharge of oil or oily waste into the water. Violators can be fined $5, Bay Boat
123 Boat Features and Options Water will enter a boat for a number of reasons, including heavy seas, strong storms and long periods of rain. The bilge area is usually the deepest part of the hull and where the water settles. The bilge pump moves water from the bilge area through hoses and empties it through an opening in the hull. The bilge pump can be operated manually by a switch. Some models feature an automatic bilge pump setting. Switching to AUTO when operating your boat will allow water to be automatically pumped out when it reaches a level that activates the float sensor in the bilge area. NOTICE: Be sure to switch the bilge to OFF (not AUTO) when you are not using your boat. Wave action or trailer travel can cause the pump to drain the battery. DO NOT allow the bilge pump to operate after all the water has been cleared from the bilge area; damage to the pump will occur if you operate it without water. RAW WATER SYSTEM Raw water is seawater (non-drinking water). Some boats use raw water systems for engine cooling, head, and utility and cockpit washdowns. Some raw water systems may supply two components and have a flow control valve for directing water flow. Raw water systems include: An individual thru-hull raw water intake and strainer. A pump to draw water into the system. An outlet valve, fitting or nozzle. Guidelines when operating a raw water system: Open the desired seacock. Adjust flow control valve (if equipped). Turn on appropriate pump switch as required. Bay Boat 9-19
124 Section 9 LIVEWELL WATER INLET WASHDOWN OUTLET FOR HOSE CONNECTION WASHDOWN OPEN LIVEWELL OPEN SEACOCK HANDLE FLOW CONTROL VALVE RAW WATER PUMP Figure 9-7 RAW WATER INTAKE (Actual look of pickups may vary) BW-0365 The above diagram is an example only. System may differ per model and model year.livewells Livewells are designed to help protect and keep fish or bait alive. Some are equipped with an aeration pump that circulates and refills the water in the livewell to help keep fish alive. Always clean and empty the livewells after each use to prevent contaminating the fish. Never use soap, detergents or other cleaners that may be harmful to fish to clean the livewell. If a livewell system does not drain completely, you may have to bail remaining water by hand or remove your boat from the water. NOTICE: To avoid freeze damage to the livewell system, be sure it is completely empty in freezing weather. Residual water in the system may freeze and cause damage. Livewell systems are usually manual, remote or recirculating. Do not use manual and remote livewell systems while your boat is in operation or on the trailer. Also, make sure the livewell pump is switched off, or pump damage will occur. Manual Livewell Manual livewells aerate the water by continuously pumping sea/lake water into the well. A spray-head nozzle aerates the water by spraying water into many small streams that splash into the livewell water Bay Boat
125 Boat Features and Options To fill the livewell, install the removable overflow tube (or drain plug if equipped with an overflow fitting) into the drain hole, and turn on the livewell pump. The large aerator pump equipped on your boat allows you to fill your livewell quickly, but it can at times overcome the overflow and overfill the livewell. To maintain the level of your livewell equal to the overflow, follow these instructions. As your livewell starts to become full, begin closing the adjustment valve at the fill head where the water is spraying into the livewell until it reaches an adequate amount of water coming in to maintain desired levels. To empty the livewell, turn off the livewell pump and remove the overflow tube (or drain plug). BOAT HULL OVERFLOW FITTING MAX. WATER LEVEL AERATION SPRAY NOZZLE REMOVABLE OVERFLOW TUBE DRAIN PLUG DRAIN HOLE BOAT TRANSOM LIVEWELL PUMP Recirculating Livewell TYPICAL MANUAL LIVEWELL SYSTEM Figure 9-8 WATER INTAKE SCREEN KC-0181C-A Recirculating livewells allow water recirculation while a boat is in operation or on the trailer. Like manual and remote types, this system continuously aerates the livewell with sea/lake water while you are fishing. While under way or when trailering, the system can be closed to recirculate the water in the livewell. During recirculation, keep in mind that sea/lake water is not used and water temperature increases quickly, which may kill the fish in the livewell. Bay Boat 9-21

126 Section 9 Figure 9-9 Livewell Controls and Operation Livewell Pump Switch The livewell pump switch controls the livewell pump ON/OFF. NOTICE: Most livewell systems draw power from the main engine cranking battery Bay Boat

127 Boat Features and Options Figure 9-8 Figure 9-10 Bay Boat 9-23


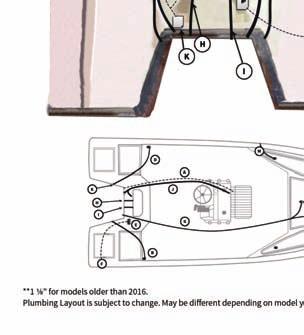
128 Section 9 Figure 9-9 Figure Bay Boat
129 Boat Features and Options ELECTRIC TROLLING MOTOR SYSTEMS See the Electric Trolling Motor Operator's Manual. Electric trolling motors are generally used by anglers to quietly and slowly maneuver their boats while fishing. Trolling motors are available in many types and sizes and usually mount on the bow of the boat. Trolling Motor Batteries Electric trolling motors depend on batteries for power. Deep-cycle batteries are recommended for use with trolling motors, as they can provide the longest use/charge time and are designed to be charged and discharged repeatedly. Use battery switches to disconnect the trolling motor from the batteries when not in use. Battery usage and setups vary depending on the application and manufacturer recommendations. Trolling motor battery setups are 12-volt, 12/24-volt, 24-volt or 36-volt, and may include a battery isolator and on-board charging system. WARNING! Hydrogen gases produced by a lead acid battery while it is charging, or the engine is running, can cause an explosion and/or a fire. See Safety Precautions in the Safety Section of this manual for more details. The following diagram illustrates some typical trolling motor battery installations. + BATT 1 + JUMPER BATT 2 24 VOLT DIRECT BLACK RED BOW PANEL RECEPTACLE KC-0152-A Figure 9-12 FISH LOCATORS, GRAPHS AND DEPTH INDICATORS Fish finders and graphs are available in many different types for various applications. Typical finders use a transducer mounted below the waterline on the hull of the boat. The transducer sends and receives electrical signals through the water that are interpreted by the finder to calculate depth and any structure beneath the boat. A display on the finder generates a representative image showing depth, structure and fish. See the manufacturer's information for operating instructions. See your authorized dealer for help installing transducers. Bay Boat 9-25
130 Section 9 Note: The transducers that shoot through the hull may require special adaptation to remove a small section of the grid to allow direct access to bond the transducer directly to the hull. FISHING SEATS See the seat manufacturer s information for operation and maintenance instructions. Typical fishing boats may use pedestal-mounted seats that allow anglers to sit higher in the boat. Pedestal seats provide better maneuverability and visual perspective while fishing. WARNING! DO NOT sit in pedestal seats on high platform locations while under way except at trolling speeds. You risk being thrown overboard. Pedestal seats in the bow area can restrict the driver s view and must be removed when under way at speeds other than trolling Bay Boat
131 Bay Boat Section 10 GENERAL CARE AND MAINTENANCE Your boat may feature a variety of specialized systems and components. The following basic and typical information may not apply to your specific application. This section may not cover all systems or components on your boat. See the Engine Operator s Manual or the equipment manufacturer s information for maintenance procedures. Maintenance procedures may require special knowledge and equipment. Always consult your local marine dealer or certified marine technician for assistance in performing service, maintenance or modifications to your boat. Neglect of maintenance and unauthorized service work is not recommended and may void your warranty. Refer to the Engine and Equipment Manufacturer s maintenance schedules and requirements, and keep a detailed log of the procedures and dates completed. Always consult your local marine dealer for assistance with periodic maintenance. Before performing any general care and maintenance procedures within this section, see Safety on page 2-1. ENGINE The manufacturer of your boat s engine(s) will provide a separate maintenance procedure. See the Engine Operator s Manual for specific information on maintenance procedures. FUEL SYSTEM Fuel vents are normally located in the deck in the same general area as the fuel fills. Periodically check that the fuel fills and vent lines are free of obstructions and kinks. Check and/or replace the fuel filter and carbon canister filter periodically or clean as needed. Check fuel lines, vent hoses and drain hoses frequently for leaks. Replace any worn or cracked hoses. Tightening a fitting or clamp may correct a fuel leak. If the leak continues, however, replace the line, fitting or hose immediately to prevent a build-up of fluids or gases. Use fuel system parts certified for marine use only. Never use automotive parts in marine applications. Bay Boat 10-1
132 Section 10 ELECTRICAL SYSTEM Before performing any work on the electrical system or the battery, see Safety on page 2-1. Battery Always turn off the battery switch (if equipped) or disconnect the negative battery cable before servicing the electrical system. When you install a battery: Always use correct polarity when you connect the battery cables to the battery. Make sure the battery terminals are clean. Make sure the cable connections are tight. Always shut down the engine before removing or attaching battery cables and never run the engine with the battery cables disconnected. Always remove the negative (-) cable first. Always attach the negative (-) cable last. TERMINAL POST VENT CAP VENT WELL MAXIMUM LIQUID LEVEL MINIMUM LIQUID LEVEL PLATES KC-0151C-A Figure 10-1 Check the battery frequently for signs of corrosion. If corrosion is evident, clean the terminal posts with a baking soda and water solution and a wire brush. Disconnect the battery terminals before cleaning. Check the fluid levels in the cells. NOTICE: Some batteries are sealed and cannot be filled. A level of approximately 1/4 to 1/2 in. (6 to 13 mm) above the plates is sufficient. If needed, fill with distilled water; do not overfill. WARNING! Lead-acid battery fluid can cause severe burns Bay Boat

133 General Care and Maintenance During extended periods of non-use, batteries will self-discharge and should be recharged. Before recharging, disconnect the battery terminals and remove the battery from your boat. Recharge the battery according to the directions enclosed with your battery and battery charger. When installing the battery in your boat, make sure the battery is secured in the battery box, the terminals are tight and all protective covers are in place. WARNING! Hydrogen gases produced by a lead-acid battery while it is charging, or the engine is running, can cause an explosion and/or a fire. Circuit Breakers and Fuses Never exceed the recommended fuse sizes or bypass a fuse in a circuit. Always install the proper (type and rating) fuses whenever replacing or changing fuses. Continuous fuse/breaker failures indicate a severe problem and require immediate attention. WARNING! Installing an incorrect fuse or breaker can cause a fire. Some applications use circuit breaker switches to provide individual circuit protection with the ability to manually reset the breaker switch. Figure 10-2 Bay Boat 10-3


134 Section 10 Figure 10-3 Figure 10-4 To reset a tripped circuit breaker, move the breaker switch to OFF. Identify and correct any problems with the circuit and unplug all loads connected to it. Wait a minimum of one minute for the breaker switch to cool and then push the breaker switch to ON. Turn the breaker switch to OFF immediately if it trips, and consult qualified personnel. To replace a fuse, locate the fuse block and the failed fuse. Carefully remove the fuse without touching other fuses or wires. When possible, use a fuse removal/installation tool. WARNING! Never reset a breaker that has been automatically tripped, or replace a burned out fuse, without first identifying and correcting the cause of the problem. A fire could result. NOTICE: A boat s electrical system is designed to protect you from electrocution, short 10-4 Bay Boat
Copyright All Rights Reserved TABLE OF CONTENTS
 OWNER S MANUAL igure 1-1 / R / ;, c o =. -. + < >? @ @ A B C D B >? @ @ A B C D B d e f g h d i j k l k l m k e i n S @ T U B V W X Y B Z @ D S @ D [ \ @ ] B Y B Z ^ @ _ T A W D Z B Y ` a b + 3 H : 9 P
Berkeley Island Marine Pre-Rental Instructions. If you do not have a
 Berkeley Island Marine Pre-Rental Instructions. If you do not have a safe boating certificate or a boat license in the state of NJ, or an equivalent in another state, you must take this instruction. Approximate
Scope: This is the minimum required standard that applies to all basic boating courses in the U.S. states and territories and District of Columbia.
 Title: Level 1 Basic Boating Knowledge Scope: This is the minimum required standard that applies to all basic boating courses in the U.S. states and territories and District of Columbia. Purpose: To establish
Boating Tip #47: Safety Gear & Required Equipment
 Boating Tip #47: Safety Gear & Required Equipment The U.S. Coat Guard requires that recreational vessels carry specific safety equipment while underway. The safety gear must be in good condition and readily
2 RIDER TUBE TOW ROPE PRODUCT INSTRUCTIONS AND WARNINGS
 2 RIDER TUBE TOW ROPE PRODUCT INSTRUCTIONS AND WARNINGS Watersports can be safe and fun for all levels of enthusiasts. The User s Manual is presented to enhance your enjoyment of the sport. It is intended
KEEPING YOUR BOATING EXPERIENCE FUN AND SAFE FROM THE U.S. COAST GUARD AND THIS COMPANY
 KEEPING YOUR BOATING EXPERIENCE FUN AND SAFE FROM THE U.S. COAST GUARD AND THIS COMPANY YOUR RESPONSIBILITY NEGLIGENT OPERATION Excessive speed in the vicinity of other boats or in dangerous waters. FROM
General Boating Knowledge. Common Sense before leaving shore
 General Boating Knowledge Common Sense before leaving shore Engines work, battery charged, hull, tires, drain plug, etc Safety equipment example - Life jackets fit correctly for everyone on board Safety
1. An aid to navigation is any object external to the boat that: 1) helps a boater pilot a boat safely, 2) aids a boater in finding position and 3)
 helps a boater pilot a boat safely, 2) aids a boater in finding position and 3)") 1. An aid to navigation is any object external to the boat that: 1) helps a boater pilot a boat safely, 2) aids a boater in finding position and 3) a. marks the best fishing holes. b. provides a place
1. An aid to navigation is any object external to the boat that: 1) helps a boater pilot a boat safely, 2) aids a boater in finding position and 3) a. marks the best fishing holes. b. provides a place
Personal Watercraft Required Onboard Equipment, etc. for Virginia & North Carolina
 Personal Watercraft Required Onboard Equipment, etc. for Virginia & North Carolina February 19, 2013 ITEM VA PWCs NC PWCs REQUIRED Vessel Registration Req'd 1 Req'd 21 Registration Decal Req'd 2 Req'd
RULES OF TENNESSEE WILDLIFE RESOURCES AGENCY BOATING AND LAW ENFORCEMENT
 RULES OF TENNESSEE WILDLIFE RESOURCES AGENCY BOATING AND LAW ENFORCEMENT CHAPTER 1660-02-03 RULES AND REGULATIONS GOVERNING EQUIPMENT REQUIRED ON VESSELS AND NAVIGATION RULES TABLE OF CONTENTS 1660-02-03-.01
EPA Vessel Safety during Response Operations
 EPA Vessel Safety during Response Operations EPA Vessel Safety Manual EPA employees who operate Class A vessels under 45 feet in length, shall conform to the minimum qualifications; 1) Approval by the
Vessel Safety Check Review. Prepared by: Michael J. Lauro Vessel Examiner United States Coast Guard Auxiliary
 1. Vessel Safety Check Review Prepared by: Michael J. Lauro Vessel Examiner United States Coast Guard Auxiliary The Vessel Safety Check The Vessel Safety Check- One-on-One Education! Vessel Safety Check
Chapter 2. Before You Get Underway. Copyright Coast Guard Auxiliary Association, Inc.
 Chapter 2 Before You Get Underway 1 We ll Discuss: 1 Capacity 2 Float Plan 3 Pre-Departure Checks 4 Trailering & Fueling - Safety 5 Launching and Retrieving 6 Boat Maintenance 7 Boating Accessories 2 Capacity
When answering a question, when in doubt, pick answer that considers safety first. Navigation Aids
 Appendix A Boat Course Review When answering a question, when in doubt, pick answer that considers safety first. Navigation Aids Port hand lateral buoy Starboard hand lateral buoy (red right returning)
Pontoon Slide Owner s Manual
 Pontoon Slide Owner s Manual Introduction Water sports can be safe and fun for all levels of enthusiasts. The Owner s Manual is presented to enhance your enjoyment of the sport. It is intended to alert
ABC 3 SM Errata as of 15 July 2013
 ABC 3 SM Errata as of 15 July 2013 This errata is applicable unless otherwise indicated to the four printings of ABC3; 2008, 2010, 2012 and 2013. Section 1 Pg. 10, Para. 97 Change to read: Directed Thrust.
SAFE POWERBOAT HANDLING EXAM B
 SAFE POWERBOAT HANDLING EXAM B PO Box 1260 Portsmouth, RI 02871 Tel 401 683-0800 Fax 401 683-0840 powerboat@ussailing.org www.uspowerboating.com US Powerboating an affiliate of US Sailing SAFE POWERBOAT
Personal Watercraft Safety Course for Boy Scouts
 This syllabus is designed to be a guideline for local councils intending to implement a Personal Watercraft Program. This is a compilation of three years of experience and best practices. Changes are made
First Printing, 2018
 O P E R A T O R S M A N U A L1 O P E R A T O R S M A N U A L 2 2018 Afina Yachts All rights reserved. This book or any portion thereof may not be reproduced or used in any manner whatsoever without the
SUB Vessel Safety Check Review D11NR VE s-we save lives! Prepared by: Mike Lauro DSO-VE 11NR and Tony Budlong ADSO-VE 11NR
 SUB Vessel Safety Check Review D11NR VE s-we save lives! Prepared by: Mike Lauro DSO-VE 11NR and Tony Budlong ADSO-VE 11NR Sport Utility Boats (SUB) The fastest growing area of Recreational Boating! What
Aqua Buddy Owner s Manual
 Aqua Buddy Owner s Manual www.ravesports.com Table of Contents Product instructions and warnings... 2 Instructions on how to use product...3 Water sports safety code... 5 Inflating instructions... 8 Troubleshooting...
Pontoon Slide Owner s Manual
 Pontoon Slide Owner s Manual WWW.RAVESPORTS.COM Copyright 2018 All rights reserved. No part of this publication may be reproduced or transmitted in any form or by any means, electronic or mechanical, including
Pontoon Slide Owner s Manual
 Pontoon Slide Owner s Manual www.ravesports.com Table of Contents Introduction... 2 Safety rules and information... 3 Boat compatibility guide.5 Assembling and using your Pontoon Slide... 6 Cleaning and
Inflatable Dock Slide Owner s Manual
 Inflatable Dock Slide Owner s Manual Introduction Water sports can be safe and fun for all levels of enthusiasts. The Owner s Manual is presented to enhance your enjoyment of the sport. It is intended
FILED 12/04/2017 3:00 PM ARCHIVES DIVISION SECRETARY OF STATE
 OFFICE OF THE SECRETARY OF STATE DENNIS RICHARDSON SECRETARY OF STATE LESLIE CUMMINGS DEPUTY SECRETARY OF STATE PERMANENT ADMINISTRATIVE ORDER OSMB 4-2017 CHAPTER 250 OREGON STATE MARINE BOARD ARCHIVES
Schedule 1 Safety Equipment & Scrutineering Check List
 Schedule 1 Safety Equipment & Scrutineering Check List BOAT NAME SKIPPER NAME CREW MEMBER NAME We, the undersigned, hereby confirm that we have each physically checked that the safety equipment required
DRI Policy for Safety Associated with Measurements, Sampling, and Related Streamgaging. Table of Contents
 Table of Contents Introduction 1 Scope 1 General Policy 1 Responsibilities for Safety Compliance 2 Corrective Action for Failure to Follow Procedures 2 Appendix A General Safety Guidance for Making Measurements
Paddle Craft Vessel Safety Check Review D11NR Vessel examiner swe save lives! Prepared by: Mike Lauro DSO-VE 11NR
 1. Paddle Craft Vessel Safety Check Review D11NR Vessel examiner swe save lives! Prepared by: Mike Lauro DSO-VE 11NR Paddle Craft The fastest growing area of Recreational Boating! What s a Paddle Craft?
Chapter 1 Boat systems
 Chapter 1 Boat systems Hulls Two common types of boating hulls, displacement and planing, are shown in Figure 5.1. A displacement hull is a type of hull that ploughs through the water, displacing a weight
2002 National Recreational Boating Survey Technical Report
 2002 Technical Report November 30, 2003 995 Goodale Blvd. Columbus, OH 43212 Voice: (614) 220-8860 Fax: (614) 220-8845 Toll Free Number: (800) 341-3660 Website: www.strategicresearchgroup.com TABLE OF
VESSEL REGISTRATION # P.O. BOX Rev. 09/10 BATON ROUGE, LA OPERATOR BOATING INCIDENT REPORT PAGE 1 of
 LOUISIANA DEPARTMENT OF WILDLIFE AND FISHERIES LAW ENFORCEMENT DIVISION DWF-BIR-010-OP VESSEL REGISTRATION # P.O. BOX 98000 Rev. 09/10 BATON ROUGE, LA 70898-9000 OPERATOR BOATING INCIDENT REPORT PAGE 1
WARNING: FOR OUTDOOR USE ONLY
 Certified to CSA International 4.96 US For Outdoor Gas Fireplaces A HIGHER STANDARD IN QUALITY AND APPEARANCE SAFE AND BEAUTIFUL OUTDOOR LARGO FIRE PIT FOR PROPANE AND *NATURAL GAS OWNER S MANUAL WARNING:
NAUTICAL TERMINOLOGY
 It s important to have a basic understanding of common nautical terms associated with the parts, positions and directions of your vessel. Knowing these terms will make it easier to communicate with people
Appendix Aggie Crew Operating Procedures
 Revised 8/31/13 Appendix Aggie Crew Operating Procedures Contents 1. Pre-requisites for Aggie Crew Team... 2 2. Reporting and Communications... 4 3. Aggie Crew Safe Practice Requirements... 5 4. Requirements
SS&S Chapter 8 Instructor Guide
 SS&S Chapter 8 Instructor Guide The Rules of the Nautical Road The PowerPoints (PPT) slides for this SS&S chapter were copied from the BS&S-13 th Ed PPT because they are identical. Only the chapter numbers
Vessel Safety Check Review. Prepared by: Mike Lauro DSO-VE 11NR
 Vessel Safety Check Review Prepared by: Mike Lauro DSO-VE 11NR D11NR V-Department For 10+ years: 1-Is the ONLY District to offer a 2-day Vessel Examiner class TWICE a year. 2-Offers New Member and New
Storm Owner s Manual
 Storm Owner s Manual www.ravesports.com Table of Contents Product instructions and warnings... 3 Water sports safety code... 8 Inflating instructions... 11 Troubleshooting... 12 Cleaning and storage...
UNITED STATES COAST GUARD AUXILIARY 2019 VESSEL EXAMINER WORKSHOP
 UNITED STATES COAST GUARD AUXILIARY 2019 VESSEL EXAMINER WORKSHOP Prepared by the NATIONAL DIRECTORATE FOR VESSEL EXAMINATION AND RECREATIONAL BOATING SAFETY PROGRAM VISITATION 1 THE VSC PROGRAM The Vessel
Boating Activity-Specific Plan
 Boating Activity-Specific Plan Camp Name: Prepared By: Phone number: Signature: Date: Enter a date. Title: Email: Complete the following plan for each boating activity that campers participate in. Use
The Office of the Chancellor
 POLICY STATEMENT NO. 6.17.00 Issued By: Coordinated By: The Office of the Chancellor Red River Watershed Program College of Sciences Effective: July 1, 2008 Revised: April 1, 2009 Subject: Water Vessel
LOGO TO COME PLEASE PROVIDE. Ballast & Tower. Operator s Manual
 LOGO TO COME PLEASE PROVIDE Ballast & Tower Operator s Manual INTRODUCTION INTRODUCTION...2 SAFETY...3 Safety Warnings...3 Medical Emergency...3 Reporting Accidents...3 Boat Capacity Chart...4 TOWER...5
National Maritime Center
 National Maritime Center Providing Credentials to Mariners Q301 Rules of the Road-Inland (Sample Examination) Page 1 of 19 Choose the best answer to the following Multiple Choice Questions. NO reference
GENERAL INFORMATION 1
 70358_Princecraft-01_Sect 12/8/04 9:08 PM Page 1.1 GENERAL INFORMATION 1 ABOUT THIS MANUAL More and more people are joining the ranks of boat owners who find enjoyment in the leisure activity of boating
Think Safe. Choose the Right Personal Flotation Device (PFD)
") Think Safe Choose the Right Personal Flotation Device (PFD) This package contains a Flotation Aid (Type III PFD). Other available types are described within. A Flotation Aid (Type III PFD) is: Designed
Think Safe Choose the Right Personal Flotation Device (PFD) This package contains a Flotation Aid (Type III PFD). Other available types are described within. A Flotation Aid (Type III PFD) is: Designed
Operating Instructions and Parts Manual 24529
 Please read and save these instructions. Read through this owner s manual carefully before using product. Protect yourself and others by observing all safety information, warnings, and cautions. Failure
Know About Boating Before You Go Floating
 Know About Boating Before You Go Floating KEY TERMS All-around white light: Navigation light that is visible in all directions around the boat from 2 miles away. Bow: The front part of a boat. Buoy: An
Inland Boat and Vessel Safety
 Safety Manual Page 1 of 9 1. Purpose The purpose of this policy is to promote safety in the marine environment which poses some unique hazards. Various marine vessels are used by USPL personnel to access
US POWERBOATING/US SAILING Safe Powerboat Handling RI State-Specific Lesson Plans
 78 Lesson: 24 OTHER BOATING ACTIVITIES (INCLUDING RHODE ISLAND REGULATIONS) Time: 10 minutes Equipment: Whiteboard with dry erase markers Student References: Start Powerboating Right! RI State-Specific
Chapter 5 Personal Watercraft Jet Skis and High Speed Power Boats
 Chapter 5 Personal Watercraft Jet Skis and High Speed Power Boats 69 5 Personal Watercraft (PWC) such as jet skis or water/wet bikes are a rapidly growing segment of the recreational craft market. A PWC
SUB Vessel Safety Check Review. Prepared by: Mike Lauro DSO-VE 11NR and Tony Budlong ADSO-VE 11NR
 SUB Vessel Safety Check Review Prepared by: Mike Lauro DSO-VE 11NR and Tony Budlong ADSO-VE 11NR Sport Utility Boats (SUB) The fastest growing area of Recreational Boating! What s an SUB? Canoe, kayak,
INFLATABLES OWNERS MANUAL
 Read This Manual First Before Using This Product!! This Manual Contains Important Product and Safety Information INFLATABLES OWNERS MANUAL PRODUCT INSTRUCTIONS AND WARNINGS Watersports can be safe and
2 Boating Rules and Regulations... 73
 Contents at a Glance Chapter 1 Boat Design and Construction Chapter 2 Boating Rules and Regulations Chapter 3 Navigation Rules (ColRegs) Chapter 4 Boat Operating and Seamanship Chapter 5 Piloting and Navigation
20 Ton SD Shop Press Operating Instructions
 20 Ton SD Shop Press Operating Instructions MODEL NO. 850SD Hazard Symbols Used in the Manuals This manual includes the hazard symbols defined below when the operations or maintenance job involves a potential
Safety Powder Spray Systems
 Instruction Sheet P/N 107 952C Safety Powder Spray Systems 1. Introduction This section contains general safety instructions for using your Nordson equipment. Task- and equipment-specific warnings are
Miss Joy Boat Manual
 Miss Joy Boat Manual BOAT CODE H33 SLIP F97 MAXIMUM CAPACITY: 8 PASSENGERS Violation Will Result In Suspension of Members Certification and Charter Privileges 111917 24707 Dana Drive, Dana Point, CA 92629
INTENDED USE TECHNICAL SPECIFICATIONS
 1/2IN. HEAVY-DUTY AIR IMPACT WRENCH OWNER S MANUAL WARNING: Read carefully and understand all INSTRUCTIONS before operating. Failure to follow the safety rules and other basic safety precautions may result
Central Michigan University Field Safety AQUATIC WORK HAZARDS
 Central Michigan University Field Safety AQUATIC WORK HAZARDS This document describes the hazards and safety requirements for specific work in aquatic environments: using boats, SCUBA diving and snorkeling,
HYDRAULIC WINCH FOR AUGERS UP TO WR10 X 71 / W130 X 41 ASSEMBLY & OPERATION MANUAL
 HYDRAULIC WINCH ASSEMBLY & OPERATION MANUAL Read this manual before using product. Failure to follow instructions and safety precautions can result in serious injury, death, or property damage. Keep manual
TEXAS A&M WATER SKI CLUB BOAT DRIVER S MANUAL
 TEXAS A&M WATER SKI CLUB BOAT DRIVER S MANUAL Effective 10-8-13 The purpose of this manual is to teach the basic duties and responsibilities of a Texas A&M Water ski Club boat driver. This information
ISAF OFFSHORE SPECIAL REGULATIONS Appendix J
 Page - 95 - APPENDIX J CATEGORY 5 SPECIAL REGULATIONS for inshore races Category 5 Special Regulations are intended for use in short races, close to shore in relatively warm and protected waters where
REGULATION on life boats operated from land, No 123/1999 CHAPTER I. General provisions Article 1
 REGULATION on life boats operated from land, No 123/1999 CHAPTER I General provisions Article 1 Scope These rules apply to lifeboats, the construction of which has begun or which have arrived in the country
Safety Management System And Marine Occupational Health and Safety Manual
 Safety Management System And Marine Occupational Health and Safety Manual Operated by Cumberland Charter Yachts 1 Emergency Procedures Rescue Fire Medical Emergency Loss of Propulsion 2-3 Emergency Procedures
GUIDELINES FOR PADDLE CRAFT
 GUIDELINES FOR PADDLE CRAFT Introduction: The operator is responsible for the carrying of necessary equipment and for the safety of the vessel at all times. The following guidelines are established to
BOATING AND SWIMMING RULES
 BOATING AND SWIMMING RULES Revised by the ALA Board of Directors June 23, 2018 A. GENERAL RULES: 1. All members participating in boating and swimming activities agree to know and follow these rules. Violation
NEPTUNE SAILING CLUB RULES
 NEPTUNE SAILING CLUB RULES The following Club Rules have been adopted by the Board of Directors of the Neptune Sailing Club to achieve the following purposes: 1) to ensure the safety of club members, 2)
Parts and Owners Manual
 Parts and Owners Manual MOWER MODEL: SERIAL: ENGINE MODEL & HP: DATE PURCHASED: PURCHASED FROM: You must receive special training from the dealer before operating this mower. 9/30/2005 Commercial Mower
2,500/4,000 LB Easy Riser Vertical Cable Feighner Lift
 2,500/4,000 LB Easy Riser Vertical Cable Feighner Lift CAUTION - PUT SAFETY FIRST 1. Before attempting to install or operate this lift, study and fully understand the proper operating procedures and safety
British Schools Karting Championship 2017 Risk Assessment
 British Schools Karting Championship 2017 Risk Assessment Overview This Risk Assessment for the British School Karting Championship is a championship wide risk assessment that covers the risks involved
2014 Advantage Boating Sail Canada Basic Cruising Standard. Section III: Part B Safety Safety Guidelines and Avoiding Hazards
 Section III: Part B Safety Safety Guidelines and Avoiding Hazards Lesson Outline Lesson Objectives Introduction Navigation lights Distress signals Hazards Radar reflector Summary Quiz 2 Lesson Objectives
National Maritime Center
 National Maritime Center Providing Credentials to Mariners (Sample Examination) Page 1 of 19 Choose the best answer to the following multiple choice questions. NO reference materials are authorized for
U.S. POWER SQUADRONS QUALIFICATION EXAMINATION FOR VESSEL EXAMINER. 1. Check the subject of this examination to insure it is the one requested.
 Test Edition: A Test Number: 99 Course Code: VSC Rev. Date: 12/14 Revised Manual U.S. POWER SQUADRONS QUALIFICATION EXAMINATION FOR VESSEL EXAMINER 1. Check the subject of this examination to insure it
RISK ASSESSMENT. Bobcat Excavator. Models , (Series D & G) For. Version 1.2
 For. Version 1.2") PO Box 50, Hornsby, NSW 2077 Phone: 1800 643 853 Web: www.bobcat.com.au RISK ASSESSMENT For Bobcat Excavator Models 322 341, (Series D & G) CONTENTS Applicability Standards referenced in the preparation
PO Box 50, Hornsby, NSW 2077 Phone: 1800 643 853 Web: www.bobcat.com.au RISK ASSESSMENT For Bobcat Excavator Models 322 341, (Series D & G) CONTENTS Applicability Standards referenced in the preparation
LAHAINA YACHT CLUB BOAT USE POLICY & REQUIREMENTS
 LAHAINA YACHT CLUB BOAT USE POLICY & REQUIREMENTS Adopted by the Board of Governors 3/15/17 I. INTRODUCTION The boats owned by the Lahaina Yacht Club (LYC) are used for events sponsored by the Club, such
GENERAL INFORMATION 1
 GENERAL INFORMATION 1 ABOUT THIS MANUAL More and more people are joining the ranks of boat owners who find enjoyment in the leisure activity of boating and fishing. For this reason, this manual is written
AIR COMPRESSOR OPERATING INSTRUCTION AND PARTS LIST
 AIR COMPRESSOR OPERATING INSTRUCTION AND PARTS LIST OIL-LESS TYPE IMPORTANT: PLEASE READ CAREFULLY BEFORE STARTING OPERATIONS. THE CONTENTS ARE FOR GENERAL INFORMATION OF ALL THE SIMILAR MODELS. Record
FEMA NATIONAL US&R RESPONSE SYSTEM INCIDENT MANAGEMENT SYSTEM TASK BOOK FOR THE POSITION OF. US&R Boat Operator. August 2016
 FEMA NATIONAL US&R RESPONSE SYSTEM INCIDENT MANAGEMENT SYSTEM TASK BOOK FOR THE POSITION OF US&R Boat Operator August 2016 POSITION TASK BOOK ASSIGNED TO: INDIVIDUAL S NAME, TASK FORCE AFFILIATION, AND
CS150 CAP STAPLER OWNER S MANUAL
 Operation Revised 6/2013 www.stingerworld.com CS150 CAP STAPLER OWNER S MANUAL! Maintenance Safety Warranty PLEASE READ! This manual contains important information about product safety. WELCOME TO STINGER
18 Island Bay Owners Manual
 18 Island Bay Owners Manual WELCOME TO THE SPORTSMAN TEAM! Here at Sportsman Boats, we take great pride in producing the finest, most well designed saltwater fishing and pleasure boats on the market today.
Shoreline Cantilever Lift 2500lb Capacity Models: (108" inside width) - Part # (120" inside width) - Part #
 - Part # (120 inside width) - Part #") Shoreline Cantilever Lift 2500lb Capacity Models: 25108 (108" inside width) - Part # 1017402 25120 (120" inside width) - Part # 1017403 1. 2. 3. 4. 5. CAUTION - PUT SAFETY FIRST Before attempting to install
Shoreline Cantilever Lift 2500lb Capacity Models: 25108 (108" inside width) - Part # 1017402 25120 (120" inside width) - Part # 1017403 1. 2. 3. 4. 5. CAUTION - PUT SAFETY FIRST Before attempting to install
Tube-Line Accelerator Spinner Kit
 Tube-Line Accelerator Spinner Kit Operator's Manual PP-00799 (19/09/11) 2 TO THE OWNER This manual contains information concerning the adjustment, assembly and maintenance of your Tube-Line Spinner Kit.
License to Keel Boat Manual
 License to Keel Boat Manual BOAT CODE R32 SLIP C110 NOTE: SAIL IN REVERSE MAXIMUM CAPACITY: 8 PASSENGERS Violation Will Result In Suspension of Members Certification and Charter Privileges 110117 Table
CONFINED SPACE POLICY
 Policy No. 6 THE CITY OF POMONA SAFETY POLICIES AND PROCEDURES CONFINED SPACE POLICY City Manager I. PURPOSE The purpose of the City of Pomona Confined Space Policy is to ensure that employees are adequately
MODEL H8214 AIR BODY SAW INSTRUCTION MANUAL
 MODEL H8214 AIR BODY SAW INSTRUCTION MANUAL COPYRIGHT SEPTEMBER, 2007 BY GRIZZLY INDUSTRIAL, INC. WARNING: NO PORTION OF THIS MANUAL MAY BE REPRODUCED IN ANY SHAPE OR FORM WITHOUT THE WRITTEN APPROVAL
3/8" Dr. Air Butterfly Impact Wrench
 8192106 3/8" Dr. Air Butterfly Impact Wrench Owner s Manual Read and understand all instructions before use. Retain this manual for future reference. Specifications Construction: Polished aluminum and
STUDENT STUDY GUIDE ASA 103 BASIC COASTAL CRUISING
 STUDENT STUDY GUIDE ASA 103 BASIC COASTAL CRUISING Traverse City, Michigan (231) 941-0535 GreatLakesSailingCo.com Solstice Sailing, Inc. Basic Coastal Cruising Standard (ASA 103) Prerequisites: Basic Keelboat
75 Ton SD Shop Press Operating Instructions
 75 Ton SD Shop Press Operating Instructions MODEL NO. 856SD Hazard Symbols Used in the Manuals This manual includes the hazard symbols defined below when the operations or maintenance job involves a potential
HOT SHOT OPERATING INSTRUCTIONS AND OWNER S MANUAL. Model SPC-500. (Propane Torch)
") OPERATING INSTRUCTIONS AND OWNER S MANUAL Model # SPC-500 READ INSTRUCTIONS CAREFULLY: Read and follow all instructions. Place instructions in a safe place for future reference. Do not allow anyone who
OPERATING INSTRUCTIONS AND OWNER S MANUAL Model # SPC-500 READ INSTRUCTIONS CAREFULLY: Read and follow all instructions. Place instructions in a safe place for future reference. Do not allow anyone who
2017 Water Safety Manual. Presented by:
 2017 Water Safety Manual Presented by: 1 WATER EMERGENCY SAFETY PLAN This Water Emergency Safety Plan was developed to aid in the response to injuries or illnesses on the water during the Partners In Education
USER S INFORMATION MANUAL
 USER S INFORMATION MANUAL UPFLOW, DOWNFLOW, UPFLOW/HORIZONTAL & HORIZONTAL ONLY INDUCED DRAFT GAS FURNACES Recognize this symbol as an indication of Important Safety Information If the information in this
BOATING AND SWIMMING RULES
 BOATING AND SWIMMING RULES Revised by the ALA Board of Directors June 24, 2017 A. GENERAL RULES: 1. All members participating in boating and swimming activities agree to know and follow these rules. Violation
MODEL NUMBER: PSI AIR SOURCE KIT 200 PSI Compressor on 2.0 Gallon 200 PSI Air Tank
 IMPORTANT SAFETY INSTRUCTIONS CAUTION - To reduce risk of electrical shock or Electrocution: MODEL NUMBER: 20008 200 PSI AIR SOURCE KIT 200 PSI Compressor on 2.0 Gallon 200 PSI Air Tank IMPORTANT: It is
Parts & Operators Manual
 Parts & Operators Manual (888) 317-5878 www.talet.ca To The Owner General Comments Congratulations on the purchase of your new Talet Mat Grapple. Your unit was carefully designed and manufactured to give
MODEL NUMBER: M20005 AIR SOURCE KIT. 30% Duty Compressor on. 2.0 Gallon Air Tank SAVE THIS MANUAL FOR FUTURE REFERENCE
 MODEL NUMBER: M20005 AIR SOURCE KIT 30% Duty Compressor on 2.0 Gallon Air Tank SAVE THIS MANUAL FOR FUTURE REFERENCE USER MANUAL IMPORTANT SAFETY INSTRUCTIONS CAUTION - To reduce risk of electrical shock
Installation and service should be performed by a qualified service professional.
 Damage to your lift or vessel can result from improper initial setup of the system. Consult a HydroHoist Certified Installer for initial setup and support Installation and service should be performed by
1. SAFETY 2. PREPARATION 3. FRAME 4. TRANSMISSION 5. DRIVE 6. ROW UNIT 7. OPTIONAL EQUIPMENT
 TABLE OF CONTENTS 1. SAFETY 2. PREPARATION 3. FRAME 4. TRANSMISSION 5. DRIVE 6. ROW UNIT 7. OPTIONAL EQUIPMENT This symbol means: ATTENTION - BECOME ALERT YOUR SAFETY IS INVOLVED. When you see this symbol
Intermediate Cruising Standard (ASA 104)
") Intermediate Cruising Standard (ASA 104) Prerequisites: Basic Keelboat Sailing (ASA 101) and Basic Coastal Cruising (103) Certification General Description: Demonstrated ability to skipper a sloop-rigged,
Intermediate Cruising Standard (ASA 104) Prerequisites: Basic Keelboat Sailing (ASA 101) and Basic Coastal Cruising (103) Certification General Description: Demonstrated ability to skipper a sloop-rigged,
Boating safety checklist. A guide to lifejacket and safety equipment rules on NSW waters
 Boating safety checklist A guide to lifejacket and safety equipment rules on NSW waters Definitions Master s responsibility The master is responsible for all people on board and can direct passengers to
200 PSI FAST-FILL AIR SOURCE KIT
 200 PSI FAST-FILL AIR SOURCE KIT 55% Duty Compressor on 2.0 Gallon Air Tank PART NO. 20007 IMPORTANT: It is essential that you and any other operator of this product read and understand the contents of
PCWR.US Operations / Coxswain Water Rescue Task Book Orientation and Skills
 Student Date Started Operator/ Coxswai Date Completed Administrative Lecture Series P O Date Discuss the type of expected responses Water Rescue Response Philosophy Related water rescue SOPS Related water
TABLE OF CONTENTS PART 2 - CONFINED SPACES
 May 11, 2006 TABLE OF CONTENTS PART 2 - CONFINED SPACES Page DEFINITIONS... 2-1 GENERAL... 2-2 RESPONSIBILITIES... 2-2 HAZARD ASSESSMENT AND WORK PROCEDURES... 2-3 IDENTIFICATION AND ENTRY PERMITS... 2-3