Campbell Boat Bulkhead Replacement
|
|
|
- Rosemary Johns
- 6 years ago
- Views:
Transcription
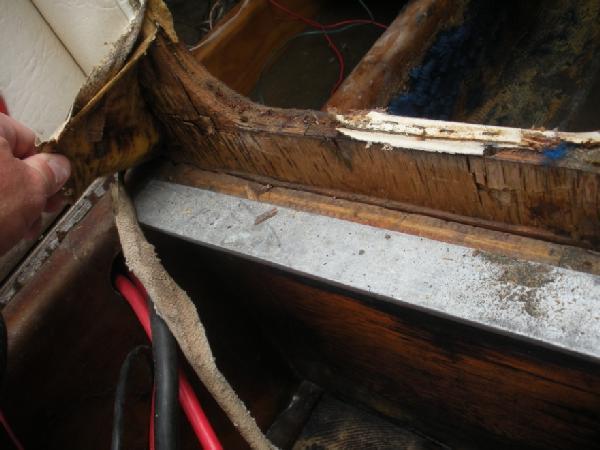
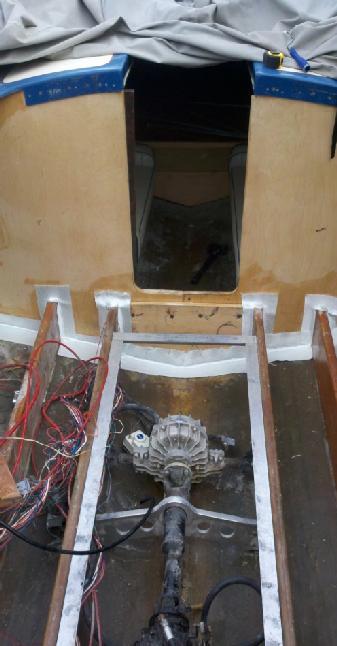
1 Campbell Boat Bulkhead Replacement Bob & Buddy Steele Assisted by Brad Riggen, Ron Fasola, Freddie Kuerner Our story begins in the late spring of 2012, with the purchase of my 1974 Campbell Cuddy Cabin (CC), from a gentleman in Fillmore Ca. The previous owner (PO) stated that the boat had spent most of its life in or around the lakes of the Central Coast (and had been babied!!!). It was in reasonably good shape and everything appeared to work. After a test ride on beautiful Lake Piru, we closed the deal and I drug her home. Early on I suspected that the main bulkhead was in need of some love but based on the price and our skills I was confident that we could handle this small job. One clue there was a problem; as the boat went down the lake, when the hull would encounter wakes or waves, you could literally feel the boat flex. I knew it had something to do with the bulkhead as the front cabin area moved at a different rate than the rear of the boat. The boat just did not have that solid feel to it that I had felt in other boats. On top of that you could see things moving around at or near the bulkhead, which you know should be a secure fixed location. The problem is that in most Campbell Cruisers, this area is completely covered in material or carpet and is difficult to inspect. This was the second CC I had owned and it was the second CC that needed bulkhead work. After lots of research and discussion with the Campbell veterans, it appears to be a common design flaw if you will in these boats. Given the combination of hull design, trailer design and bulkhead assembly, that area of the boat is the lowest spot and hence is where water can collect and sit. Other boats have plugs in this area used to drain the low spot of excess water and accumulated oil. Not so in our boats. In addition to this, the main structural support in the boat is a two piece unit, which connects right where the water sits and you now have the right combination for a bulkhead replacement after 39 years of service!!!! My son, Buddy, is a finish carpenter by trade, and I have limited DIY skills. So while researching this project, never did I think it was beyond the scope of our abilities. We had access to most of the power tools needed and most importantly, a support staff of "Campbell Vets" willing to share their time and knowledge to assist us. On top of that was my lovely bride, who was willing to put up with boat construction in the driveway. The biggest issue for me in moving forward with this project was that it was going to require some amount of upholstery replacement, which was ok in that we had kicked around the idea of changing the color of our boat and the upholstery anyway. The bulkheads are wrapped in material and the cabin headliner is sewn into the bulkhead upholstery so that it stays tight. I think Freddie has replaced bulkheads without having to completely replace the headliner, but my boat needed a new headline anyway so it was not a big deal to remove everything.

 Not like")
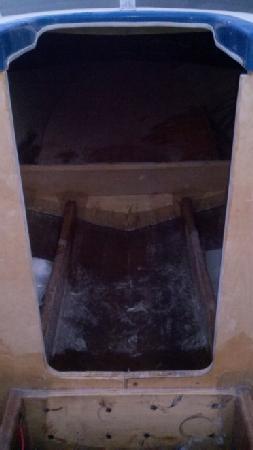
2 This is how the bulk head should look on a well taken care of Campbell Cuddy Cabin (ie Strange Brew) Not like this.
3


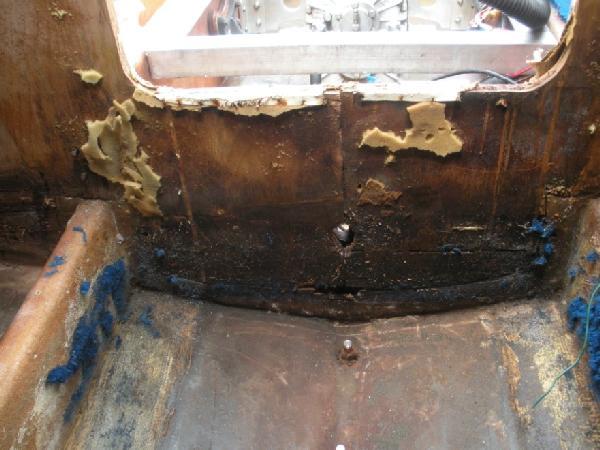
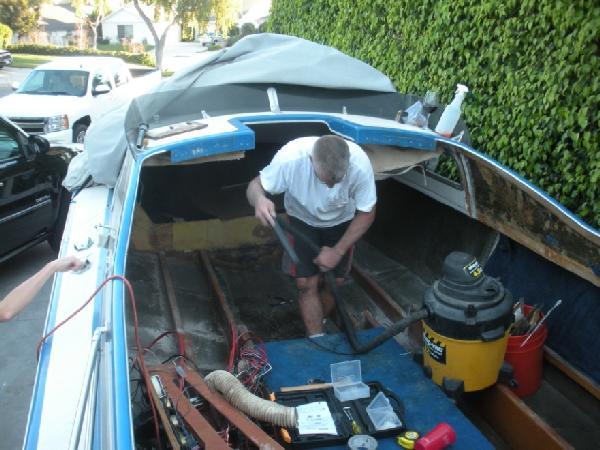
4 The process is fairly simple; rip or remove everything around the bulkheads. I removed the tiller station and labeled everything for future reassembly. All the interior upholstery needs to come off the bulkheads to facilitate further inspection. I initially thought that my front bulkhead, (the smaller one in front of the cabin seats) was fine as it appeared to be ok at the contact point of the bottom hull. Upon further inspection, it was clear what had been going on. When the main bulkhead failed from water/oil rot, the smaller bulkhead was still trying to hold everything together. Alas, it is the smaller of the two bulkheads and did its best, but ultimately the 40 year old plywood gave up and the bulkhead was actually ripped top to bottom on both of the outboard stringers!!!!

5 Again, not a big deal just more work was required. The one important piece of information here: Before starting any removal of the bulkheads, measure, measure, measure. We took some basic measurements but, but if I were to do this again, I would take many more measurements before I started cutting stuff out. Simple things like, measuring the distance of the bulkhead at the bottom and at the top from a known location are invaluable so that when the new bulkhead is reinstalled, you could insure that it was true in the boat. When the Campbell s were laid up at the factory, they used ¾ inch plywood. The ¾ ply is fine and like Brad said, it would still be in there long after he was dead!!!! Some have upgraded to 1 inch plywood but this comes at a price. Not only is 1 inch ply more expensive to purchase, it is also more difficult to work with. The additional thickness of the bulkhead will create issues with the fitment of cabin furniture if the addition of the thicker wood is not incorporated. I went with the thicker 1 inch plywood and handled this problem by moving the forward bulkhead forward to accommodate the new wood. Before locking down my new bulkheads, I test fit everything in the cabin to insure I had enough room for everything. We used a (Harbor Freight) oscillating saw to cut the fiberglass around the bulkhead and stringers. Be careful when cutting the old bulkhead out, because it will serve as the pattern for the new bulkheads. The removal is not really a big deal; simply cut the fiberglass around the stringers and the hull and then pound it out.
6
 was grinding")

7 Patterns for my new bulkheads!!!! The biggest and nastiest job (I thought) was grinding out all the old fiberglass and prepping the hull for the new stuff. Goggles, respirator, ear plugs and a tyvek suit are strongly recommended here!!!!

8 I spent about 2 weeks grinding on the hull and stringers getting them ready for the install. The bulkheads are tabbed in place with several layers of fiberglass and resin. Grinding out the old fiberglass and resin was the worst part of this entire job. The cool part about doing this work myself was that I got to see firsthand, how strong these boats were built. Even with the bulkheads broken, the hull and stringers were in great shape and were still holding things together!!! Once I had the hull prepped, I focused on building the new bulkheads. Buddy cut the initial pattern for me using Maple Hardwood plywood from our local source. Nothing fancy here, just a jig saw and a belt sander and lots and lots of patience.


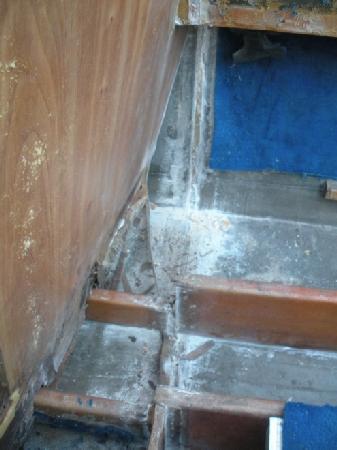
9 I started with the forward bulkhead and worked my way out. Here you can see where I have moved the new bulkhead forward to accommodate the thicker wood. The grinding marks in the hull show where the original bh was located.


10 Having never done a job like this, I had to rely on the veterans and experts who were guiding me along. When fitting the bulkheads into place, I would use the belt sander to remove material from the wood and then try to slide it into place. This process went on for days!!!!! Trim a little here and then a little more there. The idea is to have a small gap between the sides of the hull and the bulkhead so that the wood is not resting directly on the sides of the hull. This gap is then filled with thickened resin before the tabbing process begins. If the bulkhead were fitted too tight to the sides of the hull, it is possible that the twisting and flexing the bulkhead and stringers experience could be transferred to the hull and end up ultimately producing stress cracks in the gel coat. So there were many trips in the boat and then out again to make adjustments. In addition, referencing the measurements we had taken earlier and then moving everything to adjust for the thicker wood. Slowly it started to come together.


11 Here you can see the small gap sides of the hull to allow for the flexing or movement of the bulkhead. Before locking things down, the next step was to test fit everything to see if we were close on our measurements.

.")
12 Once I was comfortable with where I had located the bulkheads and I was fairly sure everything would fit right, I could move on to securing them into place. I used counter sunk stainless steel screws in the top of the cabin and then I screwed the bulkhead into the stringer at the bottom. Brad suggested that I would need about 5 gallons of resin to complete this job. I think I ended up using 6 gallons. Living between two marinas and right in the middle of surf country, I had a great local source for resin and fiberglass (Fiberglass Hawaii in Ventura). I mixed up a batch of laminating resin with thickening agent added, to give the resin the consistency of peanut butter. I found it easier to mix up about a quart of resin at a time; anything more and the resin would start to kick before I could finish.


13 I used the thickened resin to make my fillets between the bulkhead and the hull. Having access to guys like Freddie and Brad Riggen was huge for me in making sure I did this job right. The two halves of the main bulkhead are secured together or sistered by using pieces of wood on either side to make a sandwich if you will. In my application, I drilled and counter sunk all the holes for stainless steel machine screws and locking nuts. I also used a layer of fiberglass and lots of resin between the sister piece and the bulkhead pieces.
14

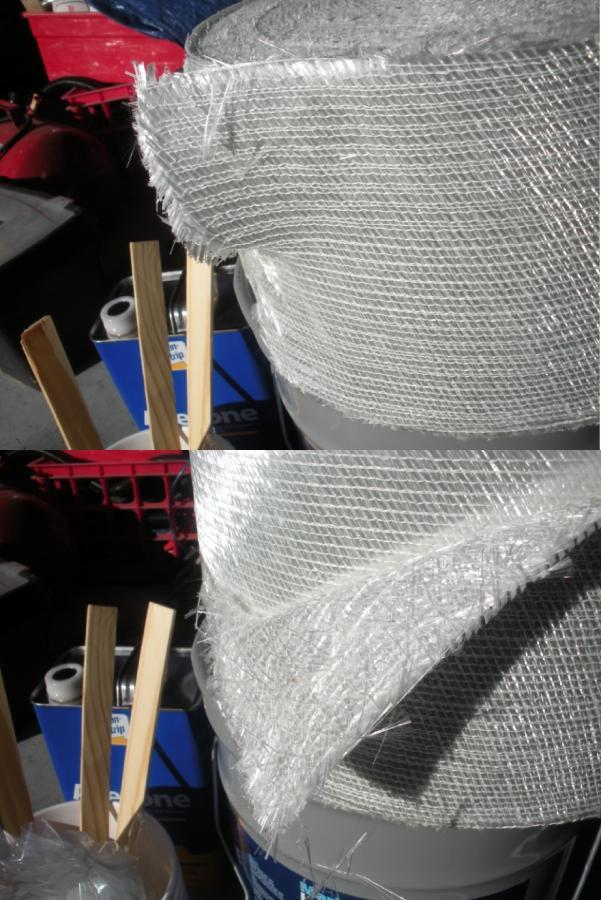
15 As I started to look at tabbing in the bulkheads, I learned there were two schools of thought on this. One is to laminate several layers of glass with each layer being slightly larger than the last using at least 3 layers total. The second school of thought, was the way Campbell was doing it just before they shut down production at the factory, according to Freddie. Fiberglass panels come in three distinct styles; cloth, mat, and a combination or hybrid of both called (1708). The hybrid (1708) is newer technology and is supposed to take the best properties of cloth and mat and combine them into one stronger product. Freddie said Campbell was using one layer of 1708 to tab in their bulkheads, and Pete Giroux of Giroux Boats confirmed that is what he uses when he tabs in the bulkheads of the race flat bottoms he builds. When I bought the 1708, I could have bought just the length I needed or I could buy it by the pound and save some money. I bought it by the pound, trying to save some cash, but ended up needing much less than I thought. But we may change out the bulkhead in Buddy s boat so it will get used.
16

17 The actual job of tabbing in is not that big of a deal. I precut my sections and had them ready to go when I had my batch of resin mixed up. I used lots of small batches, took my time wetting out the cloth, then laying it into position, then wetting it out again. No big secrets here, just trial and error on how much catalyst to use. Bottom line is - use more catalyst when it's cold and less when it's warm. The catalyst is nasty stuff so lots of protection is needed to keep it off and out of you (eyes, ears, throat, skin!!!). I love the smell of resin, some do not, but while I was mixing it up and tabbing it stunk up the whole place and I even got comments from the neighbors saying they could tell when I was working with it!!!! I chose not to use marine grade plywood in part because, before putting any wood in the boat it got several coats of resin. Additionally, once the bulkheads were installed, everything got another coat of resin. One thing I chose not to do, was to install a drain plug through the bulkhead, which allows any water in the cabin area to drain back into the motor compartment where the bilge pumps are located. This discussion went back and forth several times but ultimately I decided that I did not want water running the other way - from the motor compartment forward into the cabin area, to be possible. I also did not think I could seal the wood of the drain hole sufficiently to keep the wood from being exposed to water and oil (which sort of caused this whole mess to begin with!!!!). If a small amount of water gets into the cabin, I will deal with it. If a large amount gets in, somebody might need a life vest anyway???? In conclusion, bulkhead replacement was a fairly straight forward job that someone with marginal skills could tackle. It made a huge mess of my garage and driveway and took me approximately 2 ½ months to complete, working on it in my spare time. But it was never really a job for me, because the way I saw it, I was boat building and saving a classic.
18 I had received informal estimates of $2-2,500 to have this job done by a professional. Looking back at the work involved, I believe that is a smoking good deal if anyone is considering farming this job out. Here is a breakdown of my expenses: Contractor Pricing on 4x8 sheets of 1 MPH (White Maple) $ Vinyl Ester laminating resin5 gallons Catalyst for resin (14oz.) inch 1708 Fiberglass (25 lbs.) Aerosol (thickening agent for resin) 1lb Miscellaneous supplies (brushes, mixing tubs, respirators, Tyvek suits, sticks) and an additional gallon of resin to finish the job $ Total Additional resources Fiberglass Boat Repairs Illustrated by Roger Marshall
[ ] 10 YEAR HULL WARRANTY [ ] GEL COAT: [ ] RESIN: [ ] FIBERGLASS [ ] VACUUM BAGGING:
![[ ] 10 YEAR HULL WARRANTY [ ] GEL COAT: [ ] RESIN: [ ] FIBERGLASS [ ] VACUUM BAGGING:](/thumbs/96/127756955.jpg "[ ] 10 YEAR HULL WARRANTY [ ] GEL COAT: [ ] RESIN: [ ] FIBERGLASS [ ] VACUUM BAGGING:") Progression 22 This list is provided to help you to evaluate the many advantages that come STANDARD with a PROGRESSION 22. As you compare Progression s many superior features to the competition, it will
Progression 22 This list is provided to help you to evaluate the many advantages that come STANDARD with a PROGRESSION 22. As you compare Progression s many superior features to the competition, it will
1982 Hydrostream Viking Restoration
 1982 Hydrostream Viking Restoration Part 2c: The Rebuild Daniel W. Rickey Winnipeg, Manitoba Canada daniel@cancercare.mb.ca 2000-09-22 Introduction Part one of this report showed how the shoddy manufacturing
Progression 24LD Stern Drive
 Progression 24LD Stern Drive This list is provided to help you to evaluate the many advantages that come STANDARD with a PROGRESSION 24LD. As you compare Progression s many superior features to the competition,
Surfboard Repairs Chapter 7
 Surfboard Repairs Chapter 7 The Complete Surfing Guide for Coaches - Bruce "Snake" Gabrielson Repair Problems Boards continuously get bumped, hit rocks, break fins, get dropped, and many other things that
1982 Hydrostream Viking Restoration
 1982 Hydrostream Viking Restoration Part 1: Discovery Daniel W. Rickey Winnipeg, Manitoba Canada daniel@cancercare.mb.ca 2000-06-19 Introduction The following photos illustrate some of the work I have
1/10 th Scale 1956 Ted Jones Classic Hydroplane
 1/10 th Scale 1956 Ted Jones Classic Hydroplane Preparation These plans show outside sheeting of 3/32 balsa laminated with 1/64 birch ply. This makes a light and strong skin for this boat. Optionally you
CONTESSA 32 CLASS ASSOCIATION TECHNICAL PAPER FITTING A GAS LOCKER
 CONTESSA 32 CLASS ASSOCIATION TECHNICAL PAPER FITTING A GAS LOCKER CONTACTS This document and the information contained therein remains the property of the Contessa 32 Class Association. The document may
SEADUCER BOATS GAS MONO COME VISIT US ON THE WEB AT
 SEADUCER BOATS GAS MONO COME VISIT US ON THE WEB AT WWW.SEADUCERBOATS.COM 1 - Pkg. Of 440 push rod ends 1 - Pkg. of solder-on rod ends 2 -water outlet fitting 1-1/4" prop nut 1 -.250" x 24" flex shaft
 Photo Essay: How to Build a Nova Scotian Grand Banks Dory By Jeff Spira Plans available at: http://spirainternational.com/ How to Build a Nova Scotian Grand Banks Dory By Jeff Spira In Lunenburg, Nova
There is virtually nothing you can do to a boat that we can not repair as good or better than new!
 There is virtually nothing you can do to a boat that we can not repair as good or better than new! Does not look too bad from 50 The worst of it cut out Guide coat blocked down and waiting for gel Starting
What hull material types will the system work on? Do I still need an antifoul paint?
 1. The Hull What hull material types will the system work on? The system is effective on all GRP (Glass Reinforced Plastic), STEEL and ALUMINIUM hulls up to thickness of 70mm. Unfortunately the system
A Boat Builders Story
 A Boat Builders Story By Ken Simpson September 2013 This is a tale about the experiences of Bayard Stix Cook of Florida, and his build of the 1 SHEET + pram. For the purpose of this story we will call
Et's Skeg: the full story
 Et's Skeg: the full story Having used pie-slice skegs on mass-market boats with big floppy slots and finding them ok, but not ideal, I researched a bit online looking for a skeg or skeg design for my North
Riviera Draft Shaft Hole Boring
 Riviera Draft Shaft Hole Boring a. Height from bottom of hull thru the hull to the center of the drive shaft. This will be calculated. b. Height of drop of strut. The strut for the Riviera is 7.5 c. Distance
Carving a Custom Seat
 Carving a Custom Seat Seat Carving your own seat from mini-cell, high-density foam is really quite simple and has proven to be more comfortable than any commercially produced seat and often more reasonably
West River 180. There are 3 main types of home built kayaks that are within the abilities of anybody:
 West River 180 During the months of July and August 2001 I lost my last remnants of sanity, covered my back deck with plastic, and spent every spare moment I had building my own kayak. Since I have yet
Boat Strength Errata & Updates 5/7/18 Sheet 1 of 5
 Boat Strength Errata & Updates 5/7/18 Sheet 1 of 5 Formulas 1-2 and 1-3, page 7: Instead of averaging LOA and LWL and when LOA is more than 108% and instead of averaging BOA and BWL when BOA is over 112%,
General Assembly Venice Lagoon Boat Length 8.2m Beam m Disp kg Power - 10/15hp (Short Shaft)
") General Assembly Venice Lagoon Boat Length 8.2m Beam - 1.977m Disp - 1000kg Power - 10/15hp (Short Shaft) DESIGNER Michael Storer Adelaide, Australia Email storerm@ozemail.com.au Table of Contents Table
General Assembly Venice Lagoon Boat Length 8.2m Beam - 1.977m Disp - 1000kg Power - 10/15hp (Short Shaft) DESIGNER Michael Storer Adelaide, Australia Email storerm@ozemail.com.au Table of Contents Table
ADVENTURES WITH. Both of my grandfathers fished, my dad fished, and. creating unique handles for custom rods. 22 RodMaker
 From RodMaker Magazine Volume 7 Issue #4 WOOD creating unique handles for custom rods ADVENTURES WITH story by Ray Jergensen photos by Les Jergensen 22 RodMaker Both of my grandfathers fished, my dad fished,
NEW YORK FIREBOAT - Three-Forty-Three
 NEW YORK FIREBOAT - Three-Forty-Three One of the newest fireboats is currently in use by the New York Fire Department. Two identical models were built by Eastern Shipbuilding in Panama, Florida and delivered
REPLACING THE AFT RUDDER CABLES
 REPLACING THE AFT RUDDER CABLES Note: You must have the assistance of a qualified Aircraft Mechanic to perform this procedure. A logbook entry with the mechanics signature is required. Please read these
Standard Operating and Maintenance Instructions for Pumping System Model PS-90
 Standard Operating and Maintenance Instructions for Pumping System Model PS-90 High Pressure Equipment Company 2955 West 17th Street, Suite 6 PO Box 8248 Erie, PA 16505 USA 814-838-2028 (phone) 814-838-6075
Trim Tab Wind Vane for boats with transom mounted rudders
 Trim Tab Wind Vane for boats with transom mounted rudders If your boat has a transom mounted rudder, you can build this self-steering windvane for around $150, using regular wood working tools and some
SNT Installation of a SNT Walk In Bath Tub follows the basic steps below. SNT: $2,248.00
 PRICE: $5,862.00 SNT WHIRLPOOL ADA WALK IN TUB Want a walk-in bathtub that has all the bells and whistles? Need a safe solution for bathing that's also luxurious and relaxing? The Sanctuary Whirlpool Duo
LITTLE TRI construction
 LITTLE TRI construction I have built almost anything that can sail. At the age of 12 my first sail thing, an ice boat. I used skates which had to be mounted on shoes as runners. Big fun, very fast, only
DURAS INFLATABLE BOAT OWNER'S MANUAL
 DURAS INFLATABLE BOAT OWNER'S MANUAL Table of Contents About your new Duras Inflatable Boat Page 1 Assembly Instruction Page 3 Motor Installation Page 5 Capacities Page 5 Troubleshooting Page 6 Using
Pitts Model 12 Wing Leading edge Installation
 Pitts Model 12 Wing Leading edge Installation This procedure is used to install molded plywood leading edges included in the Pitts Model 12 kit. Nine (9) molded leading edge section are require per aircraft;
400/488 Rotating Davit Installation Instructions
 400/488 Rotating Davit Installation Instructions These instructions were written with the owner in mind. If you are the installer make sure these instructions are passed along to the owner of the boat.
Installing N-Strike Recon CS-6 Stage 1 and Stage 2 Performance Kits
 Installing N-Strike Recon CS-6 Stage 1 and Stage 2 Performance Kits The Nerf N-Strike Recon CS-6 is a currently available blaster that is relatively easy to modify. The guys at Orange Mod Works have produced
Pre-Paint>Fuselage>Empennage>Fit vertical tail fin. Objectives of this task: Materials and equipment required: Fit the spar extender
 Pre-Paint>Fuselage>Empennage>Fit vertical tail fin Objectives of this task: To fit the vertical tail fin to the fuselage, including fitting the static probe, static tube, optional strobe light wiring and
REPAIR MANUAL. Materials
 REPAIR MANUAL Materials Balsa: Raw material for FST (Future Shape Technology series) and HELIUM rails or parabolic stringers. It is what gives our unique product its excellent performance characteristics.
NEW DESIGNS. Print in Landscape Mode with ¼ inch borders. Hinges (2) degrees. 1 Seating Type Optional
 degrees. 1 Seating Type Optional") 2017 IDEAS NEW DESIGNS Ken Simpson Designs Drawn 06-01-2017 Rev. 07-02-2017 The SPORTSMAN 10'L x 36 W x 15 H 475 pound Capacity Print in Landscape Mode with ¼ inch borders. Hinges (2) 36 30 8 degrees Click
2017 IDEAS NEW DESIGNS Ken Simpson Designs Drawn 06-01-2017 Rev. 07-02-2017 The SPORTSMAN 10'L x 36 W x 15 H 475 pound Capacity Print in Landscape Mode with ¼ inch borders. Hinges (2) 36 30 8 degrees Click
Hot Tapping Machine. OPERATIONS MANUAL and OPERATING INSTRUCTIONS
 262-2040 Hot Tapping Machine For performing 1/4 6 Hot taps 285 psi or less. Municipal Water, Sewage, & Building Services Use OPERATIONS MANUAL and OPERATING INSTRUCTIONS WARNING: These instructions are
North American Waterway
 North American Waterway Pontoon Enclosures Boating just became more 1447027 Ontario Corporation, P.O. Box 1613, Peterborough, Ontario, CA, K9J 7S4 exciting. 3 Easy Ways to Order: By Phone: 1-705-745-6849
Service Bulletin 70. Subject: Vertical fin cracks. Applicability: All Sportsman aircraft
 Subject: Vertical fin cracks Applicability: All aircraft Issue: Inspection of the vertical fin and aft fuselage bulkheads B and C, repair of vertical fin and bulkheads and reinforcement of vertical fin
Hip Block Installation Instructions:
 Hip Block Installation Instructions: The instructions that follow are shown for our low profile hip blocks installed in a Storm Chaser M C-1. However, the very same technique can be used for any of our
WILLEY CAT SHEET B. Daggerboard - 9mm x 2 Daggerboard Ballast - Lead/Epoxy - 6" diameter
 WILLEY CAT Willey Cat was designed for performance. The flexible reefing arrangement allows tailoring your sail area to wind conditions. Best with a crew of -. DESIGN FEATURES Flexible Reefing - reefs
Soling Building Tips II
 Soling Building Tips II Prepared: Arthur Deane Jan 20, 2002 adeane@ic.net Introduction The following are some lessons learned and experience gained in building a Soling kit. The plan developed is based
Constitution Instructions
 Constitution Instructions This kit will build a 1:48 scale hull for the USS Constitution frigate. The kit contains the following parts. 1/8 deck with laser etched deck lines 1/8 railing Ribs Center keel
Tugster. Tug Boat. Competition or Sport Tug Kit. A Zippkits R/C Boat. Building Instructions
 Z I P P M A N U FA C T U R I N G Tugster Tug Boat Competition or Sport Tug Kit A Zippkits R/C Boat Building Instructions 2016 JMP Hobby Group St. Paul, Indiana 47272 www.zippkits.com Toll Free (866) 922-ZIPP
Kayak Trailer Project.doc
 Kayak Trailer Project.doc Note: the red trailer shown in some of the illustrations is no longer available from Northern Tools. However, may be able to adapt similar trailer, but measurements may not be
Trogear Bowsprit Through Hull Installation Manual
 Trogear Marine Products, LLC www.trogear.com info@trogear.com 866-616-2978 Trogear Bowsprit Through Hull Installation Manual Congratulations on your purchase of the Trogear Bowsprit which can be installed
It was sticking out at the wing end and was too far in at the other.
 I've thought for a long time that there was something wrong with my headlight alignment. On dipped beam, it looked all right but on main beam the left and right "hotspots" almost touched each other when
Careful planning will prevent unwanted headaches later!
 When you buy a hot tub, you re investing in one of life s greatest pleasure-giving devices something you should enjoy for years to come. To ensure that happens, you need to make the wisest investment possible.
Call for Additional Information (cell) NIMBLE KODIAK Trawler
 NIMBLE KODIAK Trawler") Call for Additional Information NIMBLE KODIAK Trawler The Pilothouse of the Ted Brewer designed Nimble KODIAK sets this boat apart from any production boat built today. The KODIAK has a pilothouse 6 ft.,
Call for Additional Information NIMBLE KODIAK Trawler The Pilothouse of the Ted Brewer designed Nimble KODIAK sets this boat apart from any production boat built today. The KODIAK has a pilothouse 6 ft.,
Treated w/ mildew and UV inhibitors to keep its beauty through all seasons
 Cover Features Ideal Spa Covers Have Over 20 Points Of Reinforcement Ideal Spa Cover Features Marine Grade Vinyl Treated w/ mildew and UV inhibitors to keep its beauty through all seasons Double Reinforced
With a Contender, You re Always in the Game. Powered by
 From the marlin rich waters of the Caribbean Islands, up the checkered coastal towns of the eastern seaboard. You ll find Contender Boats - In the Game No matter if you re bumping around the bay, or battling
Seamax Boat Bimini Top User Manual
 Seamax Boat Bimini Top User Manual Size A / B / C 3 BOW Size D / E / F 4 BOW Thanks for your purchase. Seamax Bimini Top has built-in the aluminum eye-end fitting to install on standard oar lock pin (diameter
2,500/4,000 LB Easy Riser Vertical Cable Feighner Lift
 2,500/4,000 LB Easy Riser Vertical Cable Feighner Lift CAUTION - PUT SAFETY FIRST 1. Before attempting to install or operate this lift, study and fully understand the proper operating procedures and safety
SIGNATURE DEF REELS Models: Bare Reel Reel Reel Reel
 SERVICE BULLETIN SB2023 Rev C 7/11 SIGNATURE DEF REELS Models: 2400-006 Bare Reel 2400-007 16 Reel 2400-008 20 Reel 2400-009 30 Reel Thoroughly read and understand this manual before installing, operating
Spray Gun 134-A. 1 Liter High- Pressure Gel Coat. Usage Instructions & Parts List
 1 Liter High- Pressure Gel Coat Spray Gun 134-A Usage Instructions & Parts List www.fibreglast.com 1.800.821.3283 385 Carr Drive Brookville, OH 45309 Operating Instructions & Suggestions This is a high
Teak & Holly Installation Amtico (Luxury Vinyl Tile) 1968 Chris Craft Commander 35 Cabin Sole Summer 2017 Matt Cowles;
 1968 Chris Craft Commander 35 Cabin Sole Summer 2017 Matt Cowles;") Teak & Holly Installation Amtico (Luxury Vinyl Tile) 1968 Chris Craft Commander 35 Cabin Sole Summer 2017 Matt Cowles; MC1600@yahoo.com I m providing this write-up to document my installation of Amtico
Teak & Holly Installation Amtico (Luxury Vinyl Tile) 1968 Chris Craft Commander 35 Cabin Sole Summer 2017 Matt Cowles; MC1600@yahoo.com I m providing this write-up to document my installation of Amtico
Stand-N-Fish FULL DETAIL INSTALLATION INSTRUCTIONS
 1 Stand-N-Fish FULL DETAIL INSTALLATION INSTRUCTIONS Thank you for purchasing the incredible new Stand-N-Fish Kayak Fishing System. Once installed on your kayak the Stand-N-Fish will take your kayak fishing
SEADUCER BOATS GAS SPORT HYDRO
 SEADUCER BOATS GAS SPORT HYDRO COME VISIT US ON THE WEB AT WWW.SEADUCERBOATS.COM 2 - Pkg. Of 440 push rod ends 2 - Pkg. of solder-on rod ends 2 -water outlet fitting 1-1/4" prop nut 1 -.250" x 30" flex
Can you imagine......a boat that combines advantages of a RIB and a conventional open boat?
 Can you imagine......a boat that combines advantages of a RIB and a conventional open boat? Can you imagine......a boat more spacious but only weighing about half? Can you imagine......a boat built with
Falcon 3 145, 170, 195 and Tandem Owner / Service Manual
 Falcon 3 145, 170, 195 and Tandem Owner / Service Manual January 2007 - Second Edition Removing The Sail From The Airframe And Short Packing The Glider Many maintenance and repair procedures will require
HP-104 & HP-106 Tapping Machine OPERATIONS MANUAL
 30230 Los Alamos Rd. Murrieta, CA 92563 800-279-5659 FAX 951-926-2334 TappingMachines.com HP-104 & HP-106 Tapping Machine OPERATIONS MANUAL & OPERATING INSTRUCTIONS WARNING READ: Before using this product,
Stevenson Projects Building the Hull Top Deck and Bulkheads
 Stevenson Projects Building the Hull 1. Print out both piece sheets. 2. Cut out one keel piece and glue it to a piece of balsa wood or dense cardboard. Cut out the second keel piece and glue it to the
CATBOX. A Puddle Duck Racer. By Jim Michalak
 CATBOX A Puddle Duck Racer By Jim Michalak CAT BOX HULL SPECIFICATIONS 1. Bow transom from 1/4" plywood. Top and bottom edges framed with 3/4 x 1-1/2" lumber with bevels as shown. Mark centerlines boldly.
Sideshift SS230 Installation on a 2006 Bayliner 265SB
 The Sideshift SS230 was packaged very well and all parts were clearly labelled and documented. The overall quality seems far more durable than I expected... I was somewhat concerned that the unit may become
2018 Lucerne Seafair Milk Carton Derby Presented by Safeway/Albertsons BOAT BUILDING GUIDE
 2018 Lucerne Seafair Milk Carton Derby Presented by Safeway/Albertsons BOAT BUILDING GUIDE Pick Your Strategy Do you have a need for speed? Do you like to make your own wind? If Yes, maybe consider building
LOD 39.8, LWL 29.1, Beam 11, Draft 4.7 (centerboard up), Displacement 21,000 lbs Designer: Wirth M. Munroe Built 1956 by Warren Bailey.
, Displacement 21,000 lbs Designer: Wirth M. Munroe Built 1956 by Warren Bailey.") COMANCHE LOD 39.8, LWL 29.1, Beam 11, Draft 4.7 (centerboard up), Displacement 21,000 lbs Designer: Wirth M. Munroe Built 1956 by Warren Bailey. Comanche was designed and built in Miami for Jack Price,
COMANCHE LOD 39.8, LWL 29.1, Beam 11, Draft 4.7 (centerboard up), Displacement 21,000 lbs Designer: Wirth M. Munroe Built 1956 by Warren Bailey. Comanche was designed and built in Miami for Jack Price,
Grounds Equipment Operation Contest Guidelines
 Contest Guidelines The Grounds Equipment Operation contest includes the following: 1. General safety test (true/false and multiple choice)* covering: a. Walk behind power lawn mower. b. Gasoline powered
MANUAL BE SERIES Test Benches
 The CustomCrimp Manual BE Series Test Benches are designed with features that make proof and burst testing of hydraulic hose assemblies a quick and easy procedure. CUSTOMIZED AND SPECIAL DESIGN BENCHES
REV 000A. High Quality Nautical Equipment STERN THRUSTERS STERN TUNNEL
 REV 000 High Quality Nautical Equipment STERN THRUSTER STERN TUNNEL 140-185 - 250-300 IT Manuale d'installazione Installation's Manual ELICHE DI POPP STERN THRUSTERS INSTLLTION Please follow the instructions
The Outer Seal is highly abrasion resistant and provides mechanical stiffness to the splice in order to better match the cable stiffness.
 The Sealing Compound encapsulates the electrical splices, provides a strain relief for the conductors, acts as a water block, eliminates air voids which tend to act as pumps to draw in water during pressure
Kayaking Bob s Tandem Island SpraySkirt Kit Installation Instructions
 Kayaking Bob s Tandem Island SpraySkirt Kit Installation Instructions Copyright 2011 by R. E. & D. L. Conlon Kit Contains: Right & Left SpraySkirts 3 Long Black Wire Ties* 3 Short Black Wire Ties* 1 3/16
10YEAR INTELLIGENT CUSTOM DESIGN. HULL WARRANTY. high-performance air-entrapment stepped hull design. transom pad
 INTELLIGENT CUSTOM DESIGN transom pad 52 inch tunnel for shallow water performance 2-stage stepped hull BACKED WITH OUR 10YEAR HULL WARRANTY high-performance air-entrapment stepped hull design www.scbboats.com
BUILDING INSTRUCTIONS
 Z I P P M A N U FA C T U R I N G A Zippkits R/C Boat BUILDING INSTRUCTIONS 2010 Zipp Manufacturing Frankfort, New York 13340 www.zippkits.com Table of Contents Introduction 1 Engine Mounting 30 S E C T
The Refit of a Classic Cheoy Lee 41
 DOCTYPE HTML PUBLIC "-//W3C//DTD HTML 4.01 Transitional//EN" "http://www.w3.org/tr/html4/loose.dtd"> The Refit of a Classic Cheoy Lee 41 The Refit of Astraea Site Navigation Phase I Phase 1B Phase 1B Cont
Build a Milk Carton Boat for the
 Milk Carton Boat Building Guide - 2017 Build a Milk Carton Boat for the Here s How PICK A CATEGORY The Valleyfair Milk Carton Boat Race is divided into two boat categories. A boat can be used for only
With a better idea of the space I had to deal with, I decided to make a regulator mock up to experiment on before risking the life of another reg, a
 The Dacor Olympic 400 and 800 series of regulators were sold for a good number of years but in the modern era do not have any following for a multitude of reasons. They are fairly large, heavy and parts
Booster Pump PB4-60 Replacement Kits
 Booster Pump PB4-60 Replacement Kits FOR YOUR SAFETY - This product must be installed and serviced by a contractor who is licensed and qualified in pool equipment by the jurisdiction in which the product
34. Aft view of the boat at it s highest point.
 32. The repaired holes. Still looks pretty ugly, though maybe not quite as bad. The epoxy probably isn t strong enough to make any difference in strength, but you never know of a piece of masking tape.
SEA RAY 290 BOWRIDER SEA RAY
 SEA RAY 290 BOWRIDER SEA RAY Builder: SEA RAY Year Built: 2003 Model: Runabout Price: $32,900 USD Off the market LOA: 29' 0" (8.84m) Beam: 9' 8" (2.95m) Min Draft: 1' 11" (0.58m) Max Draft: 3' 2" (0.97m)
Confer Plastics Inc. - Installation Manuals CONFER PLASTICS, INC. CONFER PLASTICS, INC. POOL ENTRY SYSTEM FOR ABOVE-GROUND POOLS
 Page 1 of 6 Other Installation Manuals CONFER PLASTICS, INC. CONFER PLASTICS, INC. POOL ENTRY SYSTEM FOR ABOVE-GROUND POOLS Adjusts to fit most above-ground pools with flat or slightly dished bottoms PARTS
CONSTRUCTION OF A GUNBOAT A CLASS YACHT by Brian Dill
 CONSTRUCTION OF A GUNBOAT A CLASS YACHT by Brian Dill The Gunboat design is the latest Radio A class from Graham Bantock, optimised to provide the best boat speed below 4 knots and to be as good as possible
This document to be used with Hurley traditional Davits
 ~ InstructIon Manual ~ This document to be used with Hurley traditional Davits WarnIngs WarnIng - Failure to install, maintain, protect, and operate the system properly can cause malfunction resulting
Refinishing two carbon fiber masts
 Refinishing two carbon fiber masts Originally re-finishing the masts was going to be Meps' project instead of mine, but it got out of hand. Let me start with a disclaimer: You would all probably like reading
What s Inside. art. coat. tools. outline top. rails. wood blank. bottom
 What s Inside tools wood blank outline top bottom rails art coat What is it? The Alaia is one of the first surfboard designs ever. It is super challenging to surf, but relatively easy and insanely fun
Air Intake Snorkel Kit
 SSV KIT - Air Intake Snorkel Kit Part number (SKU) : 715003733 Product: Side-by-side Project no: 487802499 Instruction Sheet P/N: 487802499 Revision no: Revision date: Item covered: Air Intake Snorkel
HOW TO DO STUFF: CHAPTER I WATER WELLS CHECKING GRAVEL PACKING DISINFECTING WATER WELLS
 HOW TO DO STUFF: CHAPTER I WATER WELLS CHECKING GRAVEL PACKING As sand is pumped out of the well, the gravel will fill in the cavity that is created and the gravel level will drop. This can result in exposing
Blazer Marine, Whiplash Sport Hydro
 Blazer Marine, Whiplash Sport Hydro Thank you for choosing to build the Whiplash Sport Hydro. We have spent over 12 years perfecting this design, and finally we are making it available to the world. We
Parts List. Description. Additional Considerations. Installation Instructions. Dual/Elite Hydraulic Treadmill Kit (supplied by EPI)
") Page 1 of 9 Parts List Dual/Elite Hydraulic Treadmill Kit (supplied by EPI) Qty Description Treadmill Body 1 Treadmill Power Unit (per Treadmill Body) 2 Treadmill Decks (per Treadmill Body) 1 Treadmill
Page 1 of 9 Parts List Dual/Elite Hydraulic Treadmill Kit (supplied by EPI) Qty Description Treadmill Body 1 Treadmill Power Unit (per Treadmill Body) 2 Treadmill Decks (per Treadmill Body) 1 Treadmill
1ml] ARROWQUIP Q-CATCH 86 SERIES MANUAL SQUEEZE CHUTE PRODUCT MANUAL arrowquip.com
![1ml] ARROWQUIP Q-CATCH 86 SERIES MANUAL SQUEEZE CHUTE PRODUCT MANUAL arrowquip.com](/thumbs/72/66693620.jpg "1ml] ARROWQUIP Q-CATCH 86 SERIES MANUAL SQUEEZE CHUTE PRODUCT MANUAL arrowquip.com") 1ml] ARROWQUIP Q-CATCH 86 SERIES MANUAL SQUEEZE CHUTE PRODUCT MANUAL 1-866-383-7827 operations@arrowquip.com arrowquip.com CONTENTS 1. General Description of the Q-Catch 86 Series Manual Squeeze Chute
1ml] ARROWQUIP Q-CATCH 86 SERIES MANUAL SQUEEZE CHUTE PRODUCT MANUAL 1-866-383-7827 operations@arrowquip.com arrowquip.com CONTENTS 1. General Description of the Q-Catch 86 Series Manual Squeeze Chute
1 DRIVE INDUSTRIAL IMPACT WRENCH
 1 DRIVE INDUSTRIAL IMPACT WRENCH 92622 ASSEMBLY AND OPERATING INSTRUCTIONS 3491 Mission Oaks Blvd., Camarillo, CA 93011 Visit our Web site at http://www.harborfreight.com Copyright 2004 by Harbor Freight
Finnish Yacht Surveyor Association MARINE SURVEY REPORT
 Finnish Yacht Surveyor Association MARINE SURVEY REPORT Place and date of the survey: Kotka Wooden Boat Center, and the sea area outside Kotka, in Finland. Conditions during the survey: The yacht was lifted
PART II Building the MDV-1
 21 PART II Building the MDV-1 The MDV-1 is a simple, easily driven, seaworthy boat intended for both rowing and power propulsion. Its general-purpose design is suitable for inshore waters around the world.
AGM 33 PIKE ALL FIBERGLASS. Specifications Length: 92 Diameter 5.5 Weight: 24 lbs Motor Mount: 75mm Fins: 6-3/16 G10 CP: 68 from nose tip Parts List
 ALL FIBERGLASS AGM 33 PIKE Specifications Length: 92 Diameter 5.5 Weight: 24 lbs Motor Mount: 75mm Fins: 6-3/16 G10 CP: 68 from nose tip Parts List (1) Filament Wound Nose Cone w/ Metal Tip (1) Nose Cone
ASSEMBLY MANUAL HOBIE CATSY
 ASSEMBLY MANUAL HOBIE CATSY HOBIE CAT EUROPE ZI Toulon Est, BP 50 8078 Toulon cedex 9, France Tel : + (0)9 08 78 78 - Fax : + (0)9 08 99 Email : hobiecat@hobie-cat.net - http://www.hobie-cat.net ASSEMBLY
DIY Shallow Water Anchor Assembly Instructions for Rods, T-grips, Stainless Tips, Stainless Couplers, and the 4-in-1 Paddle
 DIY Shallow Water Anchor Assembly Instructions for Rods, T-grips, Stainless Tips, Stainless Couplers, and the 4-in-1 Paddle All Shallow Water Anchor Parts First, start by laying out and identifying all
LUBRICATOR ASSEMBLY AND OPERATING INSTRUCTIONS
 AIR FILTER, REGULATOR AND LUBRICATOR 4035 ASSEMBLY AND OPERATING INSTRUCTIONS 349 Mission Oaks Blvd., Camarillo, CA 930 Visit our Web site at http://www.harborfreight.com Copyright 004 by Harbor Freight
Cleaning and maintaining the M14/M1A rifle
 Cleaning and maintaining the M14/M1A rifle Part 1, simple maintenance after a day at the range Always clean your rifle when you get home from the range, if you don t it will affect the rifle and you ll
LJ1-25 LouieJRtm Tapping Machine
 1/21/08 WARNING: Before using this product, read owners manual and follow all Safety Rules and Operating Instructions. LJ1-25 LouieJRtm Tapping Machine OPERATIONS MANUAL & OPERATING INSTRUCTIONS 30230
PT 11 trouble-shooting and maintenance.
 PT 11 trouble-shooting and maintenance. Does your rudder not stay down?...your back seat slip off?...your knobs tight and your leather pads loose? Maybe we can help. We have used our PT 11 s hard enough
Assembly Instructions. -Cantilever Boat Lifts
 Assembly Instructions -Cantilever Boat Lifts Winch Instruction Page Safety Information 1. The winch is built for the multipurpose of hauling and lifting operations. It is not to be used as a hoist for
Depth transducer TH 52
 Depth transducer TH 52 performance by NEXUS NETWORK Installation Manual English DEPTH TH52 English 11-1 English DEPTH TH52 11-2 DEPTH TH52 English CONTENTS: 1 Applications...4 2 Tools and Materials Needed...4
A REPORT ON THE ICLARM EXPERIMENTAL SMALL FISHING BOAT. by Glen Fredholm, Technical Consultant
 A REPORT ON THE ICLARM EXPERIMENTAL SMALL FISHING BOAT by Glen Fredholm, Technical Consultant October 27-28, 1975 Small Boat Workshop Noumea, New Caledonia A REPORT ON THE ICLARM EXPERIMENTAL SMALL FISHING
Trixie 7. Study Plans. for a 7' 2" x 4' 6" Tender. Andrew Walters. For Rowing, Sail and Short Shaft Outboard Motors
 Trixie 7 Study Plans for a 7' 2" x 4' 6" Tender For Rowing, Sail and Short Shaft Outboard Motors Andrew Walters Trixie 7 Study Plans for a 7' 2" x 4' 6" Tender For Rowing, Sail and Short Shaft Outboard
foldable/adjustable sawhorse
 foldable/adjustable sawhorse Model 96506 Set up And Operating Instructions Diagrams within this manual may not be drawn proportionally. Due to continuing improvements, actual product may differ slightly