Sea Wings Owner s Notes
|
|
|
- Valerie Cox
- 6 years ago
- Views:
Transcription
1 Sea Wings Owner s Notes Revised June 30, 2017 Table of Contents From the Owners... 1 And Just A Reminder... 2 Five Requests to Keep Sea Wings in Top Shape for Other Guests... 3 Anchoring and Mooring Equipment... 4 Dinghy Operations... 7 Electrical Systems Engine and Thruster Systems Entertainment and Connectivity Flybridge and Cockpit Galley, BBQ, Crab Equipment, Vacuum, and Windows Genset (Generator) System Head Systems Heating and Cooling the Cabins Navigation, Radar and Autopilot Systems VHF Radios Water Systems Wireless Headsets Appendix A: Spare Parts Inventory Appendix B: Safety Equipment Appendix C: Schematic of the Thru-hulls... 39
2 From the Owners Welcome Aboard! Sea Wings is a 2006 Navigator 51 pilothouse motor yacht. We purchased her in March We are the second owners. She was with her first owner in Seattle and was known at that time as Miss Chardonnay. Harbored on Lake Union, the prior owner kept her in pristine condition. We are fortunate to have acquired her and hope that you ll take good care of her during your adventures cruising the San Juan Islands and beyond. PLEASE TAKE TIME TO READ THIS MANUAL AND USE IT AS A REFERENCE SOURCE DURING YOUR CHARTER CRUISE. Spending some time now will make your checkout a breeze and your actual cruise through the inland waters of the Salish Sea will be more enjoyable. And if you need more info, Sea Wings carries a comprehensive set of the manuals for the installed equipments, kept in a case in the forward part of the engine room. Please don t be afraid to ask any question of the San Juan Yachting staff during your orientation or at any time during your cruise. You may also contact us the owners at any time using the info in the emergency contact list (noted in the Chart Guest Reference Manual). No question is too insignificant. We have enjoyed getting Sea Wings ready for your cruise. We hope you will sense our pride in her and enjoy your time on her as much as we do. As you cruise, if you discover anything we could do to enhance your experience, please share that with the good folks at San Juan Yachting when you return or contact us directly at Lotharjt@comcast.net May you be blessed with blue skies and calm waters. Bon Voyage, Lothar and Donna Taylor 1
3 And Just A Reminder These notes have been prepared to give the charter captain and crew a helpful resource of information. While the goal is to summarize information from multiple sources into a single item, this document does not pretend to be the ultimate authority on the equipment and systems on board. Consult the manuals provided by the various manufacturers. Further, the captain accepts and is the ultimate person responsible for the safety of the crew, passengers and the vessel. It is expected that he / she is qualified to operate a vessel the size, type and complexity of Sea Wings and has become throughly familiar with her prior to leaving the dock. Good judgment and following all applicable laws during operations is fundamental to a safe and successful experience on board this vessel and in the maritime environment. No warranties are expressed or implied by this document. 2

4 Five Requests to Keep Sea Wings in Top Shape for Other Guests 1. Shore Shoes: Cleaned or Removed Shore shoes can pick up lots of stuff that increases the wear and tear on the interior. Help us keep her looking great by cleaning the bottom of your shoes before stepping into the salon or removing them whenever inside. 2. Damp Lifejackets Need Fresh Air If a lifejacket, flag or canvas cover is even slightly damp, please hang it where fresh air circulates until it s completely dry. Snap straps on flybridge bimini support arms make a good hanging device. The slightest moisture in an enclosed place creates mildew quicker that one would think. 3. Wash Down the Anchor Chain Use the saltwater washdown system with the dedicated coiled hose to thoroughly wash mud and marine debris from the anchor chain BEFORE it goes into the chain locker. Failing to do so can result in foul odors in the chain locker! 4. Please Keep Salon Door Closed when engines are running Diesel engines produce soot when they run and that can build up a film in the cabin. Therefore please keep the salon door closed whenever the engines are running. 5. The engines benefit from a periodic run at high speed Sea Wings is equipped with two very reliable John Deere diesel engines. Yet, the engines can build up diesel soot in the turbo chargers and exhaust ports when cruising for many hours at low speed economy cruise (less than 1400 RPM). We ve found it helpful to run the engines at high speed cruise ( RPM) for at least 20 minutes every other day while cruising to help keep the buildup to a minimum. Remember to use the trim tabs at these higher speeds. The Owners and other Guests thank you 3
5 Anchoring and Mooring Equipment Anchors & Rodes: Sea Wings carries a 45# plow anchor in a bow pulpit and roller and 320 feet of 3/8 high tensile chain lifted by an electric windlass. There is also secondary anchor (Foretress) and spare rode (15 of chain and 150 of nylon rode) located in the lazerette. Chain markings: Yellow nylon line segments are woven into the chain at 25 increments and a double segment is woven into the chain at the 100 ft, 200 ft and 300 ft marks. Red nylon line marks the last 5 ft prior to the end of the chain. After the end of the chain, there is triple braid nylon line that will deploy thru the windlass. Under normal conditions, one would never deploy the chain with any portion of the red chain exposed. Always use the proper anchor rode ratio as noted below and seek appropriate anchorage water depths to achieve that. In an emergency, the captain may determine that personnel or the vessel are in significant imminent danger and the only viable option is to quickly cut loose the anchor rode rather than haul it in. Hopefully that situation will never happen but if it does, the rode can be let all the way out and the triple braid line can be cut with a knife. This is an expensive, last resort option! If at all possible don t do it but if you must, attach a fender to the bitter end of the rode and note your lat/long position (use the Man Overboard, MOB, function on the chartplotter), this will allow for future retrieval of the anchor and the chain rode. Rode Consideration for NW waters In the Northwest, we usually do not have to follow Chapman s 7:1 scope minimum. It is common for boats with all chain rodes to use a 4:1 or 5:1 ratio (i.e., in a depth of 30 feet you let out approximately 120 to 150 feet of chain.) In addition, we have substantial tides: 10 ft. tide swing and occasional minus tides (level below the chart datum). Do your calculations for the expected high tide level and yet be sure there will be sufficient water in your anchorage at low tide. Reminder: the depth sounder is calibrated to the bottom of the vessel. While this could indicate 5 ft of water depth, the propellers / shafts hang below the bottom of the vessel s hull so it is a good idea to assume less than 5 ft of water is a very hazardous area, after all, seldom is the sea bottom perfectly flat and there are uncharted rocks out there! We recommend always being in at least 10 of water at low-low tide. Anchoring process: 1. Determine the total length of anchor rode you need to deploy. 2. Turn on Windlass power at the power panel. Release the safety line that secures anchor. 3. Anchor is lowered with foot switches on bow deck or from remote controls at either helm while boat is backed up slowly away from anchor. 4. Slowly let out the first few feet of anchor rode taking care to manually ease the anchor over the roller and not allow it to swing wildly. 5. Mate at the bow will monitor length of chain deployed and troubleshoot if it gets tangled. 6. Deploy the estimated length to initially hit the sea bottom plus another 5-10 feet and then continue to pay out the anchor rode while the helmsman begins to slowly back down the vessel. In essence, you are laying down a line of anchor rode on the sea bottom. When the target length is deployed, stop the windlass. 4
6 Skipper will continue to reverse on one engine (idle throttle) at a time gently to test the set of the anchor. Stay in reverse on one engine long enough to convince yourself that the anchor is set. 7. Attach the Snubber line to the anchor rode: Secure the bitter end of the snubber line to windlass cleat. Attach hook to anchor chain beyond anchor roller. Run out enough added chain to form loop in the chain so that tension is transferred to the snubber line. 8. Turn off Windlass switch at the power panel. 9. Turn off engines, shutdown the chartplotters, turn off all unneeded circuit breakers. Time to relax and enjoy! And occasionally, check to see your position is still stabile and you aren t slowly dragging anchor. Raising the Anchor and Washdown: 1. Before raising the anchor, attach washdown hose (kept in the lazerette in a bucket) to the deck connection at the bow. To connect, push the end of the coiled hose straight down into the deck connection. Then turn on the anchor washdown and windlass circuit breakers. Start the engines so they can be used to inch the boat forward toward the anchor and manage vessel movement once the anchor releases. Key is to recognize that the bow pulpit and windlass will be under strain as you haul the anchor rode and you don t want to use the windlass to pull the boat toward the anchor. 2. Press foot switch next to the windlass. Wash chain and anchor thoroughly as you haul it in. This prevents unpleasant odors from marine growth ending up in the anchor locker. 3. Remember to remove the snubber line as soon as you can reach the hook. 4. Please bring anchor up to the windlass carefully to protect the fiberglass around the roller from gouges. Stow the anchor in its support with no tension on the windlass and secure it with the safety line before getting underway. Best practice during anchor raising: The anchor locker is accessed thru the forward cabinet door at the head of the Guest VIP berth. All 320 ft of anchor rode sits in this space so long as the chain is layered to port and starboard sides of this space during the haul in process. We recommend that a crew member be stationed at this spot during haul-in process and periodically position the anchor rode (every 50 of rode works well) so that it settles into the space. Else you ll end up with a growing mound of chain that may backup into the windlass and jam. Gloves are available in the pilothouse storage cabinet just forward of the electrical panel. Emergency Manual Winch: In the event that the windlass motor fails, you can operate the windlass manually. A handle (looks much like a winch handle for a sailboat) is located in the pilothouse storage cabinet just forward of the electrical panel. Caution: If you turn it counter-clockwise, it will release the clutch and the anchor chain to run freely due to gravity. Stop the free run by engaging the winch handle in a clockwise turn. Shore Lines (Stern Tie) Why? It is common to use a stern tie line in crowded / narrow anchorages (for example, in most Desolation Sound locations, Todd Inlet at Butchart Gardens, Inati Bay near Bellingham) where there simply isn t enough room to have your own swinging space. Stern tie limits your swing and the anchorage will support more boats in close proximity. 5
7 How? Survey the intended spot to determine depths, hazards close to shore, expected tidal swing, etc. Then do the math to determine the total amount of anchor rode you need to deploy. Estimate where you will drop the anchor and aim to be ft out from shore once the total anchor rode is deployed (of course this assumes sufficient depth and no hazards this close to shore). Then a stern line is paid out, passed around a tree or a convenient steel ring in some locations. If sufficiently close, you can pass the bitter end of the stern tie line out to the point on shore and back to the boat. This practice will enable a quick release without having to go ashore when you re ready to untie. To get to shore, you will need to have the dinghy down and have your mate keep the boat toward shore with short bursts of reverse gear. Sometimes a helpful boater already anchored will help you by taking your line to shore for you with her / his dinghy---a considerate good deed that you might reciprocate some day. We have met some nice boaters this way! Using Sea Wing s Shore Line 1. Find the 275-foot shore line on a reel stowed on top of the engine/house batteries aft of the port engine, secured by a bungee cord around the reel and around a securing hook on the bulkhead. 2. Position the reel in the cockpit and with one foot, steady it in place and then manage deployment of the line as the mate in the dinghy heads to shore. 3. Once dinghy operator has run the line to shore and back to the boat, secure both ends of line on one of the stern cleats. The goal is a firm line at high tide and no tension on the remaining line on the reel. Secure the reel so it doesn t go overboard. Do not attempt to secure the line to the hand railings, they are not strong enough to withstand the potential forces on the line. After retrieving the stern tie line and prior to stowing the reel in the engine room, please be sure it has dried sufficiently to not dribble seawater on to the battery covers. Then secure the reel back in place on top of the batteries aft of the port engine. Mooring Equipment Dock lines are stowed in latch straps on the rails for regular use at docks: Two 20-ft, typically at the stern Two 25-ft, typically at the bow Two 30-ft, typically used for mid-ship spring lines Stowed in the transom storage locker: Extra dock lines including two 50-ft lines that work well in transiting the Chittenden Locks Black Fenders: When not in use, store the smaller black fenders in racks on bow rails and stow the larger fenders in the cockpit or in the lazerette. As a general practice, we use the larger fenders, all four of them, for the dockside of the vessel and we use the smaller fenders tied high for protection on the non-dockside of the vessel. Boat Hook: A floating, telescoping boat hook is stored in the transom locker. 6

8 Dinghy Operations The law requires everyone under 12 in the dinghy to wear a lifejacket and all others to have a lifejacket readily available. Launching: 1. Turn davit ON at power panel; find remote control in the forward cabinet adjacent to the power panel. 2. Connect remote control, plug receptacle in on the base opposite the lifting arm. 3. MAKE CERTAIN BILGE PLUG IS IN THE DINGHY!! Then ensure the winch carabineer is secured to the lift ring in the dinghy. Remove (if not already done) the canvas cover from the dinghy. Make ready the stern and bow lines on the starboard side of the dinghy, use them control the movement of the dinghy during the launch. Remove tie-down straps from dinghy (lower the aft portions away from the dinghy but leave them attached to cradle hooks and secure so they don t dangle in a breeze). 4. Using the power winch, lift dinghy free and manually rotate the davit arm and the dinghy over the starboard side (bow of the dinghy pointing to the stern of the vessel), then lower it to the water, use the bow/stern and painter lines to help manage movement in the process. 5. Secure painter so dinghy won t drift away once you release the winch cable. 6. Disconnect winch cable and secure it to the starboard stern cleat with light tension. Clip the carbineer to the bowline loop of the Lifesling s safety line is a good option, then lightly tension the davit cable to keep it secure. 7. Disconnect and safely stow the remote control. 8. Turn off the davit circuit breaker. Starting the Outboard Motor: 1. Be certain fuel line is connected; squeeze bellows pump till slightly firm and confirm the air vent on fuel tank is open. 2. Lower the motor with Up/Down lever on the starboard side of the engine. 3. Insert the key at the control quadrant, pump the priming lever 2-3 times, ensure the shifter is in neutral, push the key in and turn clockwise until the starter motor engages. It should start very quickly. There is no choke, the engine manages the process as it warms up. 4. You are ready to go once the engine sustains a smooth idle. Retrieving and Loading: Prevent Mildew! Please be sure lifejackets are bone-dry before stowing them. Hanging them on the Bimini snap straps is a handy way to let them dry. 1. BE SURE GRILL IS COVERED to avoid saltwater dripping on it and causing rust. 7


9 2. To hoist dinghy, reverse Launching procedure. Note: Be sure to raise the motor to the first click of trimmed up position (see pictures) to avoid contact with the upper deck structure when hauling the dinghy aboard. And ensure there is not a lot of water in the bilge, pump out manually to avoid excess weight during haulout. 3. Raise the dinghy and manage it physically via the davit arm and bow / stern lines. Rotate it back into position on the flybridge and slowly lower it to the cradle support arms. You can check the proper position of the dinghy by sighting the alignment of the bow and stern of the dinghy with the reference pictures here: 8
10 4. BE SURE TO SECURE DINGHY IN CRADLE WITH TIE- DOWN STRAPS. If you don t do it right away, it is easy to forget and dinghy will bounce out of cradle while cruising! 5. Maintain light tension on the davit cable when all is secured. 6. When finished with the winch, return remote control to the pilothouse cabinet. 7. Close the fuel tank vent and remove the bilge plug to allow the dinghy to drain. Outboard Fuel: Unleaded regular (87 octane), non-ethanol if possible. NO oil mixture needed for the 4-stroke motor. Please replace the fuel you use! Dinghy Care: Keep the dinghy clean and well inflated. There is a portable bilge pump and a foot air pump in forward seat of the dinghy. A spare fuel filter and spark plugs are kept in the spare parts bin under the guest VIP berth in a Rubbermaid storage bin. Dinghy toolkit is in the bow compartment in the dinghy. If Dinghy doesn t run: Is the safety clip in place? Is the tank vent open? Is the fuel line connected? Is there gas in the tank? Did you prime it prior to start (only when cold)? If it still won t run or runs very rough, first suspect contaminated gas. If you can t figure it out, call the San Juan Yachting office or the owner for advice. Trimming the Dinghy and Balancing the Weight: The dinghy is heavy aft so passengers should sit forward as much as possible and the engine should be trimmed all the way down. Anchoring the Dinghy: There is a collapsible anchor in the dinghy that can be attached to the end of the painter for anchoring the dinghy. Going Ashore: Estimate the change in tide during your time ashore and secure the dinghy accordingly. The metal sand spike in the dinghy can be used to secure the painter on a sandy beach. Otherwise, secure the painter to a log on the beach. Cleaning Your Shoes: Your shore shoes are likely to pick up gravel or dirt on shore. Please clean them off or remove them before boarding Sea Wings. A brush to help clean your shoes is stored in the transom cabinet, starboard side. Use of Swim Ladder: The swim ladder is stored in the engine room, outboard of the port engine and can be hung off the center of the swim platform using the two stainless mounting holes. Remember to rinse the ladder thoroughly using the fresh water shower in the transom. Stow the ladder before getting underway and always maintain a firm grasp of the ladder when installing and retrieving it (it doesn t float!). 9
 and DC (direct current, much like you have in your automobile) electrical systems.")
11 Electrical Systems The electrical systems of a vessel are its nervous system. Sea Wings has both AC (alternating current like you have in your home) and DC (direct current, much like you have in your automobile) electrical systems. All functions within the vessel that require power to operate get their power source from one or more connections to the AC or DC power systems. The electrical panel on the starboard side of the pilothouse is where you go to control the power status of all the DC and AC systems through the use of the circuit breakers. The circuit breakers act like switches. White switches control 110 volt/ac systems; black switches control 12 volt/dc systems. All switches have colored bands on them to indicate the typical / normal state: Green: ON for all normal activities Yellow: ON as needed depending on the activity Red: OFF most of the time, activated only for select times The AC Main and DC Main breakers are at the bottom of the electrical panel. The DC Main breaker should be on during all normal operations. The AC main is actually two sets of breakers that are interlocked so that only one source of AC power can feed the ship. Slide the interlock to expose the appropriate breaker source and then you can activate that source. DC Systems: There are a number of systems that use DC power (from an on-board battery). So first, let s review just what is on board for sources. There are: Engine start: a single 8D battery dedicated and isolated for this sole purpose House systems: two 8D batteries to supply power for many items including lights, navigation electronics, autopilot, davit and the windlass Inverter system: four deep cycle 4D batteries dedicated to sourcing power for the inverter Bow thruster: two 8D batteries solely for this system Stern thruster: two 27D batteries solely for this system Genset start: one 27D battery solely for this purpose AC Systems: There are three sources of AC power for the ship: on-board generator, shore and on-board inverter. When using the generator (capable of 12,500 Watts) there is adequate power to run virtually everything on the vessel simultaneously. But when using shore power or the on-board inverter, you will need to manage the power loads you allow to be active at any one time. Further, in the case of the inverter, there is a practical limit to the total energy that the inverter batteries can support before they need to be recharged. We will cover that later. 10

12 Let s just consider managing the total power draw. You will do this by using the AC circuit breakers as switches to turn on and off functions. And with the knowledge of what a given function uses for power, you can estimate what the total load current will be and then select functions to turn off to stay within the available power level. The basic formula is: power of a load (in Watts) = source voltage multiplied by the current draw (in amps). A conservative approximation is to assume the voltage is 100, then the current required of any load is simply its wattage rating divided by 100. For example, a device with a 350 watt power consumption will require 3.5 amps of current to operate. Do that for each load and you can now determine when the budget will be exceeded. Why do you have to do this? It is typical that a marina will offer power service limited at the main breaker on the dock to either 50 amps (6000 watts), 30 amps (3,600 watts), 20 amps (2,400 watts), or even as low as 15 amps (1,800 watts). Below is a table of the typical load required by various functions on board the vessel: Bow Thruster Battery Charger 500 watts Coffee grinder 475 watts Coffee maker 1000 watts House / Engine Battery Charger 2000 watts Microwave 1000 watts Portable Cabin Heater 750 or 1500 watts (depends on the heat setting) Refrigerator 400 watts Stern Thruster Battery Charger 1000 watts Toaster 800 watts Water heater 1800 watts Note: If the various battery banks have had significant use without recharging, the current draw can be significant and may limit the other functions that can be powered at the same time. Shore Power: The main power cord to feed the ship is available at the starboard lower corner of the outboard transom. The ship is designed for and the main power cable is rated for a 50 Amp, 125 V service connection. The cord itself is managed using the Glenndinning cablemaster system. Turn on the DC breaker for the cablemaster system and then the toggle switch on the transom above the cable outlet is used to manage deployment and retrieval of the main power cord. Depending on the service available at the shore connection point, you may need to use an adapter or power cord extension. The following are provided to accommodate the most common situations: 1) 50 amp ship s connection to a 30 amp shore service connection 2) 30 amp service extension cord (yellow) 3) 30 amp service connection to a 20 amp service connection Once connected to a shore power source, enable that source to feed the ship by engaging the main AC breaker at the bottom of the electrical panel. The AC voltmeter will register the voltage of the shore power and you can then use the AC breakers to manage the load. 11

13 Inverter: The inverter is a great device, it will take DC power from a bank of dedicated deep cycle batteries and convert that energy into AC power. The circuits that can access this AC power are the two outlet breakers that control all the AC outlets throughout the ship and the microwave. The inverter is controlled through the Xantrex control panel on the aft side of the electrical control panel cabinet. The inverter batteries will charge automatically when shore power is connected and the charge button is activated. When not connected to shore power and you wish to use the inverter to power the AC outlets or the microwave, activate the Invert button. The inverter battery bank consists of four deep cycle batteries. Their total capacity is 440 amp-hours and the practical limit is 50% of this capacity or 220 amp-hours. To keep it simple, the Xantrex monitors the batteries and will cease inverter operation if the battery capacity is too low. As stated earlier, one needs to consider the total load to be drawn and manage that usage to stay below the output capacity of the inverter. It is capable of 2000 Watts of AC power generation. So, you will need to manage the loads drawing power from the AC outlets and the microwave to stay below the 2000 Watt limit. Use the same table presented earlier in making this decision. Do the battery banks automatically recharge while cruising under engine power? Yes and no. The engine start and house batteries are recharged by the alternators on the engines. All the other battery banks are only recharged when AC power is available. So if you will be away from any port with shore power for a number of days, it will be a necessary practice to run the genset for a few hours every couple of days to recharge the other batteries. Battery Switches: There are three battery switches located in the engine room aft of the port engine. They are used to manage connections between the engine battery, genset battery and the main house batteries. The general rule of thumb is don t touch them unless there is a problem or if specific maintenance action is required. Better to call the emergency contacts and discuss the situation before changing any of the switch settings. 12

14 Engine and Thruster Systems Access: Through a hatch in the cockpit deck or the floor hatch in the galley. Engine room lights are controlled by a breaker on the main electrical panel. The engine room lights are long life LED lights but please remember to turn them off when done in the engine room. The twin 375hp, 6-cylinder turbocharged John Deere engines drive the propeller shafts directly through inline 2:1 reduction gear transmissions with dripless shaft seals. Starting: The twin 375HP John Deere engines require no preheating during the normal seasonal conditions (see below for circumstances that warrant the use of engine block heaters). Be sure you do a visual inspection of the engine room looking for signs of something amiss. Check oil, coolant, thru hulls, sea strainers and fuel filters. The keys at the lower helm have two positions, Off and Run. Turn the key to the Run position, wait for the Murphy display to power up, transmissions in neutral, throttles at idle, engage the starter and the engine will start with ease. You may start the engines at either helm station after turning on the keys at the lower helm. Follow the quick start procedure. Cold weather OPS: Each engine has an AC powered block heater that can be used to warm the engines when the ambient temp is 40 F or below. They are controlled by breakers on the AC electrical panel and can be powered by shore power or the genset. Use them for 1-2 hours prior to engine start will make for quicker warmup of the engines and reduce wear / tear. Remember to turn off the block heaters prior to engine start. Keys: The two ignition keys are interchangeable. Please keep the keys in the ignition switches at all times. A spare set of ignition keys are stowed with the spare engine parts under the forward end of the guest VIP stateroom berth. Engine Alarms: The engines are managed by an Electronic Control Module (ECM computer). The ECM has numerous sensors for various engine parameters and uses those to create any cautionary or warning alarms. The Murphy LCD display is the visual screen for the ECM and will annunciate any abnormal conditions. In general, a caution (yellow) alarm should result in immediate action to slow the vessel, consult the Murphy display and potentially shut down the alerting engine. A warning (red) requires immediate action to slow the vessel and shutdown the alerting engine immediately. Engine Warm-up / Normal Indications: Start-up and initial running of the diesel engines is when most of the wear occurs. Allowing the engines to reach normal operating temps before putting them under heavy load is critical to ensuring long life and trouble-free performance. Don t plan to leave the dock until the engines have idled for a few minutes. You ll notice on a cold start, the ECM will automatically keep the idle speed at 750 RPM and after about a minute, drop that idle speed to 600 RPM. Idle out of the harbor / anchorage area. 13
15 Keep engine speeds below 1000 RPM until temps are above 125 and below 1300 RPM until engine temp reaches 155 degrees. Normal Readings: Engine temp Oil pressure: psi Optimum RPM for low speed cruise efficiency: approx Optimum RPM for high speed cruise efficiency: approx ; Do not run at wide open throttle (2400 RPM) nor run above 2100 RPM for more than short durations. Shifting: Shift gears only at idle RPM. Allow a couple seconds between shifts from forward to reverse or vice-versa. Dockside maneuvering should be performed with the throttles at dead idle speed and rudder amidships. Bow and Stern Thrusters: The thrusters are controlled from the dedicated joystick controls at each helm or by using the wireless remote and activating it with the power switch at the lower helm. The thrusters are quite capable of pushing the vessel sideways but you will notice the bow thruster seems more effective than the stern thruster. It is a good practice to make short bursts of thruster engagement and then evaluate if the vessel is making adequate progress in the desired direction. Too much input generally results if further inputs of the opposite direction to slow or reverse the process. Learn to make less of an input and wait to see the result. The thrusters are high current, short term use devices. They will significantly drain the dedicated batteries if overused and potentially will overheat and shut down to protect the motor from damage. For the bow thruster, there is a dedicated charger and master cutoff switch on the forward bulkhead of the engine room, starboard side. For the stern thruster, the dedicated charger and master cutoff switch are mounted on the lower portion of the transom, visible when standing in the lazerette. As mentioned in the electrical systems section, remember that the thruster batteries will only be recharged when the ship is connected to AC power, either via shore power or thru operating the genset. Exhaust: Each engine has two exhaust ports, an idle overflow port visible just at the waterline on the aft portion of each side of the ship. Exhaust fumes and some water flow will exit these ports during very low speed operations. A second set of exhaust ports are plumbed into the bottom of the hull (underwater ports). Above 1000 RPM, most of the exhaust gas and seawater passing through the engines will exit via these ports. That s a real benefit as it keeps exhaust fumes and sooting of the stern to an absolute minimum. Never the less, please keep salon door closed while engines are running to prevent diesel exhaust film from settling on interior furnishings. Pumps: The engines are dependent on several pumps to operate properly. Most important of these is the seawater (raw water) pump on each engine, which circulates seawater through a heat exchanger to cool the engine and then expels it through the exhaust system to keep the 14

16 pipes cool. If a pump fails, it could severely damage the engine. If something smells hot or an alarm sounds, investigate at once! There should be no steam or water spraying in the engine room. If a pump seems to have failed, the usual causes are: Plugged intake. Is there plastic wrap, seaweed, jellyfish or other obstruction? Clogged sea strainer. Is there debris in the sea water strainer for this engine? Failed impeller in the pump itself? Troubleshooting any of the above problems takes only a few minutes: 1. Turn off the seacock to the pump on the defective engine. 2. Take the top off the sea strainer. Save the gaskets! 3. Open the seacock valve to make sure it is clear (water won t gush in but will start to overflow the strainer, a plastic bag and / or towel is handy to capture the water while you are confirming water flow). 4. If the strainer is clogged, rinse in a bucket with clear water and a hose if available. You can also rinse it in the sea but don t let go, it won t float and operation without it in place will damage the engine. 5. If seacock and strainer are clear, the problem is likely the pump impeller. Time to call for help using the emergency contact list. Fuel: Each engine has a supply and a return hose. Racor primary fuel filters are mounted inboard of the fuel tanks and do not require service unless the bowl is full of sediment and / or the disposable filter is clogged. The condition of the filter can be monitored by the vacuum gauge. The gauge has a memory function where the highest vacuum measured is shown. Perfect filters will result in less that 2 of vacuum at high cruise speeds. If the max vacuum measured is above 5, it is time to report the condition for timely maintenance. If the primary fuel filter must be replaced, it is relatively simple. Call for help and guidance. Spare filters are under the forward side of the Guest VIP berth. Shaft Logs: Shaft logs are watertight fittings that prevent water from coming into the boat around the holes where the propeller shafts exit the hull. Sea Wings is fitted with excellent shaft seals. There should be no need to adjust these. If there is any sign of water dripping / concern, contact the maintenance pro or owner. Checking Engine and Genset Oil Levels: The oil used in the engine and genset is the same, 15W-40 weight Chevron Delo 400. Spare oil is kept in the bilge forward of the port engine and the containers are labeled. Check oil levels on the engines and genset every few days so long as no spotting is noted, more frequently if there is any question in your mind. For the engines, there is a dipstick midway along the inboard side of each engine. Using a clean paper towel and with the engines off for at least a few minutes, pull the dipstick and wipe it clean. Then reinsert it fully and then pull it again. The oil level should be between the upper XXX mark and the lower fill mark on the dipstick. If below the lower mark, add oil to the engine via the dipstick port (its wide enough if you use care). You should also question why oil is needed if it is a sudden change during your trip as these engines use virtually no oil. If the oil 15
17 level is suddenly lower / low, the real question is why. Look for spotting or leakage. Call for advice if in doubt. Note: diesel engines create some residue as part of the combustion process that ends up accumulating in the oil, hence in part why the quantity of oil in a diesel engine is so much more than a gasoline engine. A by-product of this process is that the engine oil will appear very dark, almost black even after just a short time of operation. This is normal. Similarly, the genset oil level can be checked. The oil dipstick is behind the forward cover of the enclosure. Using a clean paper towel and with the genset off for at least a few minutes, pull the dipstick and wipe it clean. Then reinsert it fully and pull it again. The oil level should be between the upper and lower marks on the dipstick. Coolant: Engine coolant should be above cold level in the reservoirs on the forward support posts of the engine room. There is spare coolant in the bilge area forward of the starboard engine. Note that the raw coolant is concentrated and must be diluted to a 50/50 mixture of coolant and distilled water before use. We keep a marked gallon container of premixed coolant that should be used first. If it becomes necessary to make more diluted coolant, use the half gallon empty container to measure out first a given portion of coolant and then an equal amount of distilled water, pouring each measured amount into the pre-mixed gallon container. Distill water is store outboard of the port engine in the bilge area of the port exhaust tube. Mixing coolants is discouraged and in fact can cause harm as not all coolants are compatible. We exclusively use Cat DEAC coolant (purple in concentrate form) and spare concentrate is on board in front of the starboard engine. Fueling Process: Port and Starboard fillers are located on the cockpit deck. A cap key (on a floating key ring) is in the storage bin just inside the lazerette. A spare can be found in the storage bins in the forward part of the engine room. Estimating how much fuel you will need can prevent overfilling and spills: Sea Wings carries 600 gallons of diesel (300 gallons on each side). Each tank has a fuel gauge at the lower helm. The Horn circuit breaker must be ON to read these gauges. These gauges are reasonably accurate but a more precise reading can be obtained by using the metal yardstick (located on top of the port fuel tank). Wipe the yardstick clean prior to using as dirt added to the tank is not a good thing! Holding the whiffle ball, lower yardstick into the tank until it touches the bottom. The level of diesel indicated on the yardstick corresponds to the chart on the lazerette hatch. Or simply do the math in your head. The tank is 30 high, every inch is 10 gallons. Take the yardstick measurement, multiply by ten, that s the number of gallons in the tank. That amount subtracted from 300 is what is needed to fill the tank. Either method is a good way to estimate how much fuel you need before you begin filling. While filling, be certain to form a doughnut around the filler hole with paper towels or absorbent pads. As you fill, listen for a change in pitch as the air exits the tank. Another clue is that marine diesel will foam quite a bit while filling the tank so watch for that as it will start to bubble up the fill tube as you get near the full point of the tank. When you get close to the expected amount needed for the tank, that s when to be particularly careful and reduce the flow rate. You have filled the tank sufficiently when a short burst of fuel added results in immediate foam forming in the fill tube. 16
18 Remember: Protect the environment. Fuel spills are your responsibility and may need to be reported to the Coast Guard. Note: there is a gravity based fuel cross-feed with shutoff valves that connect the two tanks. Normally these valves are closed. It is a good idea to confirm they are closed prior to refueling as you ll be slowly transferring fuel to the opposite tank when refueling the first tank if both valves are open. You will find the valves on the lower inboard corner of each tank. Fuel consumption: Sea Wings uses approximately gal/nm at a cruising speed of 8-10 knots and approximately gal/nm running at fast cruise (14-18kts). The Murphy digital displays have a selectable screen format that will show actual measured fuel flow in real time. As owners, we ve found it most comfortable to cruise at 8-10 knots with an engine speed of RPM. It allows time to enjoy the scenery and maintains a relatively quiet salon noise level while being able to cover reasonable distances in a day. We ve also found that it s not good to baby the engines all the time, they are meant to run a high speed cruise loads. Running at those higher speeds ensures carbon buildup is kept at a minimum. So please run at higher speeds of at least 1700 RPM at least every other day for 15 minutes or more. Checking Transmission Oil Levels: The oil used in the transmission of the engines is different that the primary crankcase engine oil. For the transmissions, it is straight 30W oil and spare oil can be found in the bilge forward of the port engine (be sure to check the label to find the correct container). The dipstick for the transmissions is found at the rear of each engine, down low and to starboard of the drive shaft. It has a rubber cap with groves at the top which secure it in place. Transmission oil is checked without the engine running. This is best done during the morning check of the engine room. Oil level can normally be checked less frequently than the engines, once or twice per week assuming no spotting is observed in the bilge as part of your daily engine room checks. Using a clean paper towel, pull the dipstick and wipe it clean. Then reinsert it fully and then pull it again. The oil level should be between the upper and lower marks on the dipstick. If the oil level is below the lower mark, use a funnel and the provided 30W oil. It won t take much to move the level on the dipstick, the capacity of each transmission is 4 quarts in total. If oil is added, please make note of it and mention it to San Juan staff during your check-in at the end of your trip as it is a potential indication of a more serious issue. 17

19 Entertainment and Connectivity Audio Amp / Surround Sound System The salon has a surround sound speaker system and subwoofer to provide a hi-fidelity sound experience. The amplifier has an AM / FM radio receiver, CD and DVD five disc player and audio / video connections to the salon TV. Use the provided wireless remotes to control the amplifier and the source media selection. A few tips: - Tuner: allows selection of AM and FM stations, an external antenna is automatically used for reception - DVD/CD: allows direct play of a DVD or CD. DVD video will be viewed on the salon TV with the TV selected to view the S-video input. - Aux 2: select this input to listen to mobile media from your smart phone or tablet and connect those devices thru the audio/video cord provided just above the amplifier (forward salon cabinet on the port side). - Aux 1: select this input to listen to an audio track from a media source connected to the HDMI input of the TV Salon TV The salon TV is on a remote-controlled lift. The lift will automatically fully raise or lower the LCD TV once activated through the provided remote. The TV is interfaced to several sources of selectable media: - Air: Over the air with an antenna inside the flybridge arch when the A/B switch is in the Antenna selection - Air: Cable source from the marina when the ship is plugged into shore service and the A/B switch is in the shore position - S-video: DVD player integrated with the stereo amp - HDMI: external source when the HDMI cable found under the amplifier is connected to a suitable source (audio will play thru the amplifier on the Aux 1 selection) - PC: digital video interfaced (DVI) video which is a direct output from the lower helm s chartplotter TIP: We found that some guests like to stay connected to what s happening in the world. Here s one way to do so. If you have a smart device like a cellphone or tablet with a sufficient dataplan, those devices can be turned into a temporary hot-spot. Once operating in that mode, they can be a wi-fi datapath for content from the internet. We ve successfully demonstrated this connectivity to a laptop that then feeds the HDMI port of the salon TV, now you can watch streamed content. The same is possible with a direct wi-fi connection to a marina s wi-fi service. Even at low data rates like 1Mbit / second, we ve seen good results in streaming Netflix content. 18
20 Use of the TV while underway: The TV lift is sturdy and in mild sea conditions, it is permissible to be underway with the monitor up and operational. But if conditions are expected to be more challenging (3-ft. waves or winds above 20 kts), please refrain from using the TV and stow it in the lowered position while underway. Flybridge Stereo Radio There is a typical car stereo installed in the starboard side of the flybridge helm. Speakers are installed in the radar arch. This radio can also play CDs or external media from a smart device. A cable to connect to the radio is kept in the middle drawer of the salon credenza. 19
21 Flybridge and Cockpit Flybridge Lighting: Arch Lights switch on panel controls lights on flybridge. The breaker switch enables power to the circuits and individual toggle switches on the flybridge activate the lighting systems: (1) Radar Arch Lights and (2) Deck Lights (floodlight above the dinghy). Canvas and Strataglass Enclosure: The flybridge enclosure is normally kept in place for the cruising season as it provides additional sheltered area while cruising. On warmer days, you can unzip and roll up the two side windows, they are made of a heavy gauge plastic and can be rolled with care. The forward facing Strataglass are made of a more rigid polycarbonate that looks like glass. It can flex but must be done with care. For additional airflow exchange, the center panel of the forward facing windscreen can be unzipped on each side and unsnapped along the bottom, then flex it carefully and raise it aft and up to secure the bottom corners to snap straps hanging from the bimini support bars. Care of the Strataglass is relatively simple. To remove saltspray, liberally hose off with fresh water. Then use a soft cloth or towel to wipe dry. A cleaner that is specially designed for Strateglass is kept in the port side seating of the flybridge seats. Be careful not to leave navigation electronics uncovered and exposed to weather or overnight dew if the side windows or center front panel are open. Sliding Hatch to the Flybridge: The hatch slides to port to open and has a simple latch to secure it in the full open or full closed position. While underway, please always secure the hatch in one of the two locked positions. Caution: We ve found that it is possible to lock yourself out on the flybridge by inadvertently closing the hatch all the way in the closed position. The simple latch will lock into place! So take care not to fully close without having someone below to open it up, else, with some care, you can skinny over the side of the aft flybridge deck to the cockpit using the handhold railing along each side of the vessel. Cockpit Lighting is controlled with the lowermost switch adjacent to the salon door. A wood table and deck chairs are stowed in the lazarette for use in the cockpit. BBQ: See the Galley section. Flags: A U.S. flag on a wood flagstaff fits into the mount on the top center of the transom. Tradition calls for this to be in place during all operations of the vessel as a declaration of the ships country of origin. An optional San Juan Yachting pennant clips on to the bow staff. While cruising in Canadian waters, fly the Canadian courtesy pennant on the bow staff. Please be sure 20

22 flags and pennants are completely dry before stowing them in the pilothouse storage cabinet on the starboard side. Clothesline: Utility line and clothespins are in the storage bins forward in the engine room. Cleaning Supplies: Boat soap, deck brush, etc. are stowed on the port side of the aft bilge adjacent to the port fuel tank. Securing the Ship There are several things to do to ensure the ship is secured / locked prior to leaving her and your valuables inside: 1) Lock the pilothouse door, the slide lock will be in the down position to be locked. 2) Close the lazerette hatch and then engage the cable latch by ensuring the T handle is not extended. This handle is accessed in the aft port corner of the galley hatch to the engine room 3) Lock the flybridge hatch 4) Lock the salon door 21
23 Galley, BBQ, Crab Equipment, Vacuum, and Windows Cooktop: Turn the propane on in 3 steps: 1. Open valve on propane tank that is connected (in the box on swim step). Note the box has a stiff spring, bend the spring manually to help relieve the tension and assist the top in closing when it is time to do so. 2. Turn ON the DC frig circuit breaker (it s the power source for the step 3) switch). We normally leave this switch on at all times. 3. Turn on propane solenoid switch in the galley, forward and to port of the frig. Burners have an ignitor, simply depress the control and rotated counterclockwise to a high temp setting, allow the flame to form and wait 3-5 seconds before releasing the control and adjusting for the desired flame. Generally, the burners will light with ease unless that gas line has not been used for some extended time. In that case, it may take up to 15 seconds or so for the gas supply to fill the line and reach the burners. Beware: Keep large kettles and pans positioned so that they don t deflect excessive heat towards the burner controls, it may melt the control knob! Steam: If cooking creates a lot of steam (such as the crab cooker), please open the pilothouse and salon doors to encourage air flow or use a fan to help circulate the steam to minimize buildup on upper cabinets and ceiling in the galley. Crab or Shrimp Boil: We have provided an auxiliary cooktop and portable propane bottles to use for boiling a large pot of water. The amount of steam that comes from such cooking can leave a film and smell in the galley area that is hard to clean. So please use this cooktop for this purpose. It is stowed in the transom storage cabinet and can be set up on the cockpit table stowed in the lazerette. Microwave/Convection Oven: Many of the basic controls are self-explanatory. See the instruction manual stored with the ship s instruction manuals stored in the engine room, forward on the starboard side. We ve found the convection oven to be very productive. We ve baked whole chickens and bread in it with excellent results. Note that it can be run from any AC power source, either shore power, the genset or the inverter. Frig / Freezer: The refrigerator / freezer will run on either DC or AC power and will default to AC when available. Both switches at the electrical panel can be on and the power switching is automatic. The compressor and cooling fan are very quiet but can be heard if you listen carefully. Inside the frig at the top starboard corner is the temp control. We ve found that a setting of 3 with a moderate amount of food in the frig and freezer yields excellent results. Adjust the setting accordingly for how much food you have stored and how often you open the door(s). 22
24 Disposal: The galley sink disposal discharges waste directly into the sea (under the water line) as gray water, which is permissible in both U.S. and Canadian waters. Run tap water while running the disposal. There is a disposal wrench stored under the galley sink for unjamming the disposal. Consult the service manual. If the outlet hose becomes plugged, it may be cleaned out by closing the seacock and disconnecting the hose on the port side of the vessel just forward of the Xantrex charger/inverter. A drain snake is also stored at this location. Countertops: The countertops are Corian and are very durable. Please do not cut or chop food on the Corian surfaces. Please do not put hot pans from the stove or oven directly on the countertop or table. You will find cutting boards and heat-proof trivets stowed in the galley under the stove and in the forward galley cabinet. Pilothouse Settee: The pilothouse settee is a distinctive element of Sea Wings. From this seating area you have a very broad view of the surrounding waters / landscape. Enjoy! The tabletop is a high gloss wood finish, please exercise care so that it continues to look sharp for future charter guests. Please do not sit or lean on the table top, it will stress the mounting of the table stand. Drying dishes: A dish strainer set is located under the galley sink. Please take care to dry dishes and flatware thoroughly before putting away. Small Appliances: Using too many at a time may cause a circuit breaker to pop. Unplugging them when not in use helps to conserve inverter battery power while at anchor. BBQ: The BBQ grill is mounted on the transom. Please secure the lid and keep the canvas cover on when cruising. A propane hose for connection to the grill is stowed in the propane locker. Gas flow is enabled using the same process as for the galley cooktop with one additional step. There is also a dedicated gas valve that must be in the open position to all gas to flow to the grill, you will find it tuck along the forward side of the port propane tank. The grill has an ignitor which we ve found to be very reliable. If it doesn t work, there will be a butane lighter stowed in the galley. BBQ cooking utensils are also stowed in the galley. 23
25 Cleaning the Grill: Please keep the grill clean inside and out so that food stains won t build up and it will look good for the next charter guest. A good practice is to run the grill burner on high with the lid closed for minutes after all grilling is done, then use a pair of tongs and a wad of aluminum foil to brush the grill grates and remove the charred residue. Crab Fishing and Cooking Equipment: A collapsing crab cage is stowed in the lazerette forward of the port fuel tank, along with line, a buoy and a bait box. The crab cooker pot is located in the galley, under the sink. Vacuum: A central vacuum system is installed in the companion way leading to the staterooms. The storage closet adjacent to the central vacuum has the hose and attachments. Use it as appropriate to clean. A Note about Cleaning Windows: Glass Windows: There is a spray bottle of vinegar based cleaning solution under the galley sink. Use that and paper towels only for touching up glass smudges. NO Ammonia-based products, please, as they destroy the UV protection built into the glass. Plastic Windows on Flybridge: There is a spray bottle of special cleaner at the upper helm (labeled for this purpose). This is the only product you should use on the plastic windows. Use a soft cloth to apply and dry, NO squeegee and NO abrasive material, please. The windows MUST NOT BE FOLDED OR ROLLED TIGHTLY if removed. To open the front window, unsnap the bottom and unzip both sides completely. Using the top zipper as a hinge lift window up to the inside and secure corners by snapping to the straps on the bimini frame. 24

26 Genset (Generator) System The diesel powered AC generator is installed and has a capacity of 12.5 KWatts (100 amps at 125 VAC). The ship s AC electrical system is limited to 50 Amp service so the genset can easily source the entire ship and have only a 50% load. Starting the generator is a 10-sec. sequence, using either the switches in the lower aft corner of the main electrical panel or the matching switches hung from the ceiling just above the genset. 1) Unless you have run the generator within the last hour, hold the PREHEAT switch ON for 5 seconds. Continue holding it while you perform the next step. 2) Toggle the ENGINE CONTROL switch to START; hold 2 seconds or until generator starts. Release START switch; continue holding PREHEAT switch 5 more seconds, then release it. 3) After one minute of the generator running, bring the generator on line with the ships AC circuits by engaging the main breaker at the bottom center of the electrical panel. You will see volts on the AC voltmeter. 4) Look over the starboard side at the generator exhaust. Water should be flowing from exhaust opening. If not, stop the generator and check strainer and the thru hull valve. 5) Activate AC loads as necessary through the AC circuit breakers at the electrical panel. (Be aware that switching on too many AC loads at the same time could trip a breaker switch.) To stop the generator: 1) Remove the electrical load from the generator by turning off the generator master breaker at the electrical panel. 2) Run the generator with no load for a 2-3 minutes cool-down period. 3) Move the generator toggle switch to the STOP position and hold it there until the unit stops completely. Note: The generator monitors its own operational parameters and will shut itself off if there is low oil pressure, low coolant level or high coolant temperature. 25

27 Head Systems The main cause of problems is misuse. Dealing with a stopped-up head is an unpleasant task, especially when it can easily be avoided. The only things that should be put into the head are human waste. Under no circumstances should Kleenex tissue, feminine hygiene products, or wads of hair be flushed down the heads. It is current SJY practice to provide household quality toilet paper, not the ultrathin marine toilet paper and dispose of the used paper in small sandwich baggies. We keep a supply of small plastic sandwich bags (with Ziploc closure) at each head as a dedicated disposal bag for all toilet paper. Put that bag into the trash bin under the vanity sink, hence never flushing any paper down the head. One less thing to cause problems. Change the trash bin as needed to keep things fresh and the net result is no problems with clogged heads Flushing: The Vacuflush system uses fresh water from the tank. Flush by depressing the flush pedal beside the toilet bowl. If waste matter is solid, add a little extra water to the bowl before flushing by lifting the flush pedal briefly. Flush by holding the pedal down for 2-3 seconds and then allow the pedal to bounce back up to the center position. Allow the bowl to refill with a small amount of water (it will do so automatically with the pedal at its center rest position) and the pump to rebuild the vacuum pressure for the next usage. Holding Tank: Turn the Tank Monitor switch ON to get a reading on the waste tank gauge at the lower helm. Holding tank gauges don t tend to be terribly accurate. We ve found that the needle will start to register with usage but then not move as fast with continued usage. We ve found that the tank will be nearly full when the meter reads 3/4 full, so it is a good idea to empty the tank when it is getting close to 2/3 full on the gauge. If you are boarded by the U.S. Coast Guard, and they ask to see the Y-valve, explain to them that this boat has no Y-valve. The heads pump only to the holding tank. There is no way to flush the heads directly overboard. Only the head waste goes into the holding tank; waste water from sinks and showers is legally discharged overboard as gray water. The Thru-hull for the macerator is under the floor in the forward stateroom blue handle on the starboard side. This thru-hull valve shall remain closed except when needing to pump overboard. Access is gained by pulling up the carpeting at the foot of the berth in the forward stateroom (start at the starboard forward end and gently fold it back towards the center walkway), then do the same for the carpet padding. Pull the removable hatch panel in the subfloor. You now will be able to see the blue-handled valve just to starboard (normally closed). Discharging the Holding Tank: In U.S. waters, the holding tank may be pumped overboard in deep water more than 3 miles from land. Discharge of waste overboard is permitted in Canada except in harbors and near land. To discharge the holding tank under these allowable conditions, open the thru-hull valve (access to the valve described above) and turn ON the Macerator switch on the DC panel until the tank gauge reads empty. The Macerator switch has a safety cap which must be opened in order to flip the switch. Be sure to turn the Macerator switch OFF and close the thru- hull valve after the tank is emptied. As a precaution, we 26
28 recommend setting the timer on the microwave for 15 minutes for a nearly full tank to remind you to turn the switch OFF, to avoid burning out the pump. Note that discharge occurs below the water line so be underway at a modest speed while discharging the tank. To pump out at a Pumpout Station: Pumpout access is on the starboard walkway forward of the pilothouse door. Follow instructions at the Pumpout Station. SJY has provided a list of pumpout locations in the Charter Guest Resource Manual. Occasional Vacuflush Pump Operation: We ve found through experience that occasionally, we will hear one of the Vacuflush pumps run for a few seconds for no apparent reason. Invariably, the condition is caused by some waste matter that has decided to cling to the vacuum systems duck bill valves. To clear the debris, fill the head with a large volume of water and flush all at once. This heavy flow of liquid will almost always clear the debris with just a single cycle. The trick may be in determining which head s vacuum pump is running. You can isolate by turning off just one of the pump breakers temporarily to see if the problem continues or stops. REMEMBER TO TURN ON THE CIRCUIT BREAKER AFTER RUNNING THIS TEST! Vacu-Flush Repair Parts are located under the sink in the guest head. 27

29 Heating and Cooling the Cabins Electric Space Heaters: Three electric space heaters are stowed on-board to provide supplemental heating for the salon and staterooms. They use 750 watts on low and 1500 watts on high, so they can be used while on shore power or with generator power. Be aware that their energy draw means you may have to turn them down or off while running other heavy electrical loads such as the convection oven, water heater, toaster, etc. ESPAR Diesel Furnace: When not on shore power, diesel heat is a comfortable option. It will take less than two minutes for the system to heat up enough to start distributing warm air throughout the ship. There is no electrical panel switch for it. It has a dedicated circuit breaker adjacent to the furnace itself which is forward in the engine room on the port side of the ship. It is wired into the inverter batteries, the only system that draws directly from those batteries besides the inverter itself. The thermostat forward on the starboard side of the salon cabin is the primary ON/Off control and temperature setting for the furnace. The red and green lights means the thermostat is turned on and the system is active. You ll hear a click when you rotate the dial clockwise and that will be the current trip point of calling for a warmer cabin temperature. The furnace sources the entire ship including the pilothouse defogger vents. You can moderate the amount of heat delivery in each space using the vent louvers of the air vents. Fresh Air / Cooling Fans: There are two independent blowers which will draw outside air into the ship, one in the main salon and one in the pilothouse. Both are controlled by circuit breakers on the DC panel. Small summer fans are stowed in the closets of each stateroom (three on-board). Using these along with opening the guest VIP stateroom hatch, pilothouse door and salon doors to provide a cross-ventilation flow can make the interior spaces more comfortable on hot days. Note as well that the forward hatch has a screen insert to keep pests out and both the pilothouse and salon doors have hide-a-screens to be used when necessary. Defrosters: The Espar diesel furnace is also the source of defrost / defog air for the lower helm windshield. It is very effective as the furnace is very quick to source warm air. Position the vent louvers for the given conditions. 28
30 Navigation, Radar and Autopilot Systems Sea Wings is equipped with a comprehensive set of multifunction navigation displays, sensors, radar, fish finder, AIS and autopilot. All of the equipment works together to provide a wealth of information and control in all phases of operation. We don t want to duplicate the information found in the manuals so please utilize them for all reference information. Manuals for the Raymarine and Garmin systems are kept in a basket just to port of the lower helm station. What we will do here is summarize what s on board and the general nature of operation and practices we ve found that work for us, maybe they will work for you too. Multifunction Displays (MFDs) There are two multifunction displays (Raymarine classic E-series) that are networked together to share data across the displays and from all available sources. The MFD is the central hub of the action, its where you will look the most for situational awareness of where you are, which direction you are headed, how fast you are going, how deep is the water in the area and current depth under the ship, where are the adjacent land masses and navigation markers, what other reporting vessels are in the area, what am I able to confirm via radar. When we are cruising, we usually select the full size chart depiction on the MFD and set the range for about 6nm. This gives you a good view of the area ahead of the vessel, sea bottom contours, radar returns, AIS targets. In and close to the harbor or anchorage, we slow down and range in to the 0.5 or 1.0 nm range. In inclement weather, we use the split screen format where half the display is a chart, the other half is a radar return page. We like this because when really focusing on radar, a screen just dedicated to the radar return will allow you to see small targets that may get lost in a radar overlay format. The navigation system is capable of being programmed for an entire route, from start to finish. But we find that tedious to set up and prefer to have the route planned on paper or on a tablet app. Then while underway, select a heading and monitor the green track line on the display to ensure we are making our desired course over the water. Engage the autopilot to reduce the tedium of holding a heading and now you have a wealth of information and can focus your attention on what s floating in the water, what s coming at you from the sides or behind and periodic glances at the engine gauges and displays. Doing that in a pattern allows you plenty of time to enjoy the scenery, monitor the radio, assess the weather and tide forecast and still have time to be thankful for having a great time out on the water. Life is pretty good! Depth and Speed Sensors Sea Wings is equipped with a DSM-300 digital sounder module which provides water speed over the hull, digital depth sensing and fish finding / sea floor structure sensing. Data from the DSM is networked and utilized in various manners on each of the MFDs. 29

31 GPS Sensors The primary GPS antenna is mounted on the port side of the radar arch above the flybridge. It maintains excellent reception of the satellite signals. Those signals are interfaced to the master MFD at the lower helm, networked to the flybridge MFD and also shared with the lower helm VHF radio. The AIS transceiver has its own GPS antenna and it provides GPS position data to the flybridge VHF radio. The Garmin Portable chartplotter has an independent GPS sensor and provides a backup source of position data and navigation if necessary. Radar The radar is a 48 open array analog system. Radar s primary use is to sense objects and land masses that are within a mile radius of the vessel. When used properly, it provides a useful tool in monitoring the performance of the navigation and AIS systems by providing independent painted images of other vessels, navigation aids and land masses that should be depicted already. In reduced visibility conditions, it is another tool to help the captain maintain situational awareness. Consult the manual for proper operation and settings. We encourage you to practice using the radar during fair weather conditions so that it is familiar and will be less daunting when conditions become more challenging. AIS Sea Wings is equipped with a Class B transceiver AIS system. It will transmit Sea Wings position and identification data periodically to other vessels and receive AIS data from all other ships that are broadcasting their ident information. Display of AIS-equipped vessels and their data is visible on either of the MFDs. The MFDs have an alert feature that will sound (when enabled) that an AIS target is too close and presents a possible danger. Enabling and disabling this alert feature is accomplished by selecting Menu / Alarm Setup / AIS Alarms Setup. Autopilot The autopilot is another useful tool to maintaining the ship s operations and reducing workload. It includes a magnetic compass and turn rate sensor module that provides excellent performance in heading and waypoint tracking under all sea conditions. The primary autopilot controller is mounted at the lower helm. You can control the autopilot from the flybridge using the wireless remote controller. It is a good idea to put the wireless controller in the cradle at the flybridge helm and plug it in to the umbilical cord periodically to charge its batteries. One word of caution: An autopilot is a great tool as it relieves the helmsman from having to make frequent rudder inputs to hold a course or heading. But it is important to be on alert at all times, never should the helm be left unattended. Logs and tide lines with lots of seaweed or debris have a way of popping up when least expected. We urge you to use the autopilot as a tool to take the drudgery out of steering the ship and allowing you to keep your eyes up and looking outside the ship. It s called maintaining situational awareness in the aviation world and is equally valid here. Garmin GPS Chartplotter At the lower helm station is the Garmin portable chartplotter. It can run on internal batteries or off ship s power from a local plug-in port 30
32 at the helm. We recommend keeping the plotter here at the lower helm station. We always run it with the screen displaying the local tide chart. It s just a handy reminder of what the tide state is and what the flow will be doing in the next hours. And in case there is a major system failure or you need to run with reduced power, this chartplotter is fully capable of being used for navigation, ie, it is a useful backup if the need arises. To summarize, both MFD s share information and settings to allow the operator to make a change at one display and see it reflected at the other display. Each display is very flexible and allows the operator to choose from various page formats, scale the map display for close-in or far out ranging, show radar data overlaid on the moving map and review navigation waypoint data. A few key reminders: START ENGINES BEFORE turning on the Nav System and Autopilot breakers on the DC panel, which supplies power to all navigational equipments and the autopilot system. Turning them on beforehand could result in a momentary power spike that will confuse the electronics and result in erroneous operation. The 12 MFD at the lower helm is the master display. As such, it must be on whenever the flybridge MFD is to be used as it coordinates distribution of system data from the master MFD. DO NOT elect to make the flybridge MFD as the system master even if a momentary system message pops up suggesting that choice. It will only cause problems with some data / functions no longer working. CAUTION: Please do not change MFD settings randomly. The settings, system page formats and optional parameters are set for a specific reason. Getting this fixed later is time consuming and could result in lost data! Follow manual instructions; call for help if you are confused. The AIS alarm function will potentially give false warnings in the harbor area. To disable it, select Menu / Alarm Settings / AIS Alarm Setup / Off. This will silence the alarm itself and put an X thru the status symbol in the upper right portion of each MFD screen. To re-enable the alarm after leaving the harbor, select Menu / Alarm Settings / AIS Alarm Setup / On. Monitor the emergency calling frequency, channel 16 whenever underway. Nautical Charts and Tide Tables Charts of San Juan Islands are kept in the pilothouse forward and to port of the helm. Annotated paper charts of Strait of Georgia and Gulf Islands are stored in a plastic tube in the closet to starboard of the companionway. Cruising guides, current and tide tables are will be found at the lower helm. A set of dividers and parallel ruler is kept in the center drawer of the credenza in the salon. 31
33 VHF Radios VHF Radio Sea Wings has two fixed mount radios, one at each helm and a handheld VHF kept at the lower helm, port side. Both fixed mount radios have GPS position sourced to them. In an emergency; either radio s DSC function can be activated to broadcast a unique identifier code along with GPS position. The identifier code is called the MMSI (Maritime Mobile Service Identity) and is unique to Sea Wings. The MMSI is and is registered in a database that is accessible to both the USA and Canadian coast guard. We hope it never becomes necessary to use it but if it does, we want you to know that it will broadcast who you are and your position so long as the radio and GPS signals are functioning. To activate that Panic call, lift the red plastic cover on either of the fixed mount VHF radios and press and hold the Distress button. The radio s display will count down (3-2-1) and then transmit the distress call information. The radio will automatically channel to 16 and the coast guard will hail Sea Wings on that channel to establish contact and determine what assistance is needed. Consult the radio manual for further details. The handheld VHF radio is provided in case you wish to take it with in the dinghy or be able to communicate with another vessel while not present at either helm. It must be charged periodically, the charging cord is kept in the salon credenza, center drawer. There is a standard protocol to communications on the marine radio. For guidance, refer the the page in the Wagonner s Guide, it provides a good tutorial on radio etiquette. 32
34 Water Systems Fresh Water: The 170-gallon fresh water tank (in engine room along the centerline of the bilge) is filled through a deck plate on the port side of swim step. Please use care in filling the tank with only clean water and from a hose of known quality / cleanliness. The fresh water pump is controlled by a 12 V circuit breaker. It pressurizes the entire water system and strives to maintain a constant pressure of psi. Turn off the circuit breaker switch when you are not on the boat so that if a leak develops, you won t lose all the fresh water. Water gauge is at the lower helm and is active when the Tank Monitor circuit breaker is ON. Be aware that while underway, this gauge will not give an accurate reading. Dock water that is safe for consumption may also be connected directly to Sea Wings. Doing so will bypass the water tank (ie, it won t fill the tank). When using this method, you can turn off the Fresh Water pump switch at the electrical panel as the incoming pressure is regulated at the connection point and will pressurize the water system. Connection is made thru the female water hose connection on the outboard transom, port side. Please remember to secure this connection with the plug on a lanyard when no longer using this system. The cold water source that feeds the galley faucet is fitted with a high capacity charcoal water filter. The filter is changed prior to every cruising season. Try it, we believe you ll find the water quality is great. Swim Shower Washdown: There is a hot / cold swim shower in the transom, port side. Use it to wash off the saltwater after swimming (if you dare in our cold waters!). Remember to turn off the water control after usage to avoid a slow water leak of the fresh water supply. Use of Showers at Each Head: MUST DO s: 1. The showers drain to a sump container that periodically pumps the water overboard (outlet is on the starboard side above the water line). No need to activate a breaker for the sump pump, it is powered at all times and has an in-line fuse. The sump is in the bilge and accessed thru a floor hatch just aft of the entrance to the master state room. 2. After showering, please wipe up water spills on wood areas around shower. 3. Hang wet towels so they are not left up against wood surfaces. (Moisture turns wood black and encourages mildew.) TIPS: 1. To conserve your water supply, turn off the shower head while lathering. 2. While cruising, it is best to place the shower heads on the floor of the shower to prevent them from bouncing out of the brackets. Water System Repair Parts (Connectors and tubing) are located under the sink in the guest head. 33

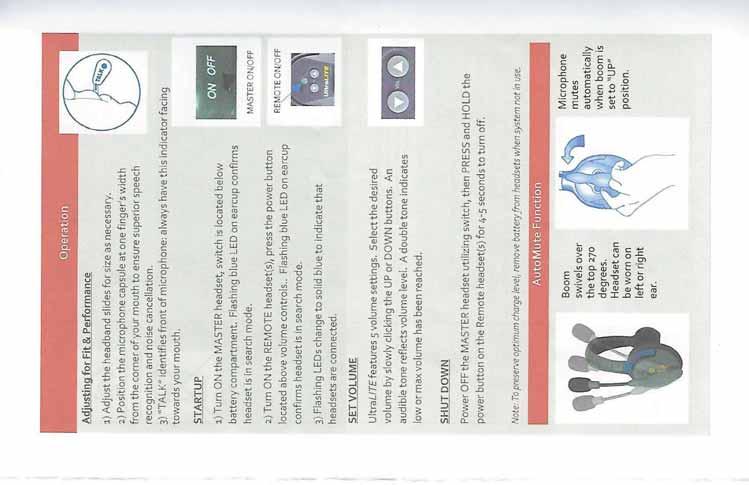
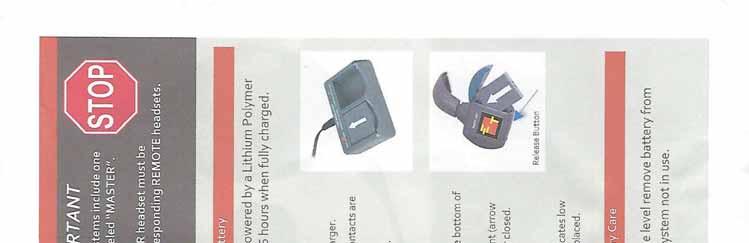
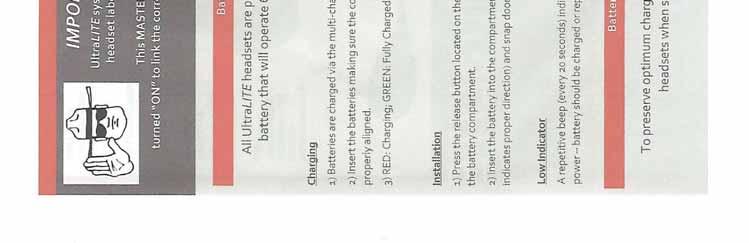
35 Wireless Headsets We have provided a pair of Eartec wireless headsets that will allow the skipper and first mate to communicate clearly and calmly during any close quarters maneuvering. Docking, anchoring, backing, all are so much easier and less stressful when the crew mates can communicate without seeing one another. The headsets are a kept in a softsided case at the lower helm, port side. We ve added lanyards to them to clip onto an adjacent collar, just in case the slip off while being used (they don t float). One tip: after using the system, ensure the ON/OFF switch on the master headset is turned OFF. Then press and hold the power button on the remote headset for 4-5 seconds to ensure it turns off and doesn t continue to hunt for the master headset (will result in the remote s headset being run down). 34
36 35
37 Appendix A: Spare Parts Inventory Antifreeze Batteries for remotes & flashlights Dinghy spare parts Distilled water Engine and Genset fan belts Helm keys, spares Filters - oil Filters - fuel Filters fresh water at galley sink Fuses Radio/CD Head parts: Duck bill valves; Ball assembly Helm keys, spares Hose clamps Impellers and gaskets Light bulbs Oils Purple-ish DEAC antifreeze is used in the engines and genset: a spare gallon is kept in the bilge forward of the starboard engine. Note that the coolant must be diluted to a 50/50 mix with distilled water prior to using it. Salon credenza, center drawer Under guest VIP berth, in a Rubbermaid container Bilge, outboard and aft of the port engine Under guest VIP berth, in a Rubbermaid container Under guest VIP berth, in a Rubbermaid container Under guest VIP berth, in a Rubbermaid container Under guest VIP berth, in a Rubbermaid container Under guest VIP berth, in a Rubbermaid container Storage bins ahead of starboard engine Under guest head vanity Under guest VIP berth, in a Rubbermaid container Storage bins ahead of starboard engine Under guest VIP berth, in a Rubbermaid container Storage bins ahead of starboard engine Bilge ahead of the port engine. Note each container is marked for its intended usage 36
38 Appendix B: Safety Equipment This vessel has passed a Coast Guard Safety Inspection each boating season (sticker on forward port window). But, if you are boarded by the Coast Guard for any reason, you may be required to locate the following items: Flares and Flare Gun: Starboard cabinet in pilothouse, forward of the electrical panel Handheld Air horn: Starboard cabinet in pilothouse, forward of the electrical panel Lifejackets: Two vest style lifejackets in each stateroom closet and ten total standard type 1 lifejackets forward of the starboard engine in white plastic stowage bags. Lifesling Rescue System: Mounted on the inboard side of the transom door Fire Extinguishers: o Engine Room: one aft of the starboard engine o Interior: four in total; one adjacent the salon entry on the port side, aft of the pilothouse door, one inside the master stateroom door, and one under the forward portion of the Guest VIP stateroom berth. Whistle: Starboard cabinet in pilothouse, forward of the electrical panel Ship s Bell: Flybridge seating, port side storage Location of Placards (Waste Overboard & Oil Discharge): Engine Room forward ahead of the port engine. Other Safety Equipment: Bilge Pumps: There are two high capacity bilge pumps. Both are powered by separate breakers that should be on at all times. Both have sensors to detect a modest level of water in the bilge and will pump automatically as needed. There are also override switches at each helm to force the pumps to run before the float switch triggers them. Flashlights: Engine Room: kept on top or inside the main toolbox Salon: credenza middle drawer, starboard side All flashlights are labeled with locations; please return them to those stations when not in use. Spare batteries are in the salon credenza middle drawer. Spot Light: A rechargeable, portable spot light is kept at the lower helm, storage bins to the port of the helm. Please remember to recharge it periodically. First-Aid Kit: Located in salon port cabinets, aft portion. Boat Hook: Two, both located in the transom storage locker in the cockpit. Tools: A fully equipped toolbox and wrench set is located forward in the engine room, secured under the stairs from the galley hatch entrance. Thru-hull Plugs, the universal foam type, are provided. One is stowed between the engine s seawater strainers, one adjacent to the genset strainer and one adjacent to the galley sink 37
39 garbage disposal thru-hull and one in the forward bilge adjacent to the holding tank and seawater washdown thru-hulls. A schematic of the thru-hulls is shown in Appendix C. Smoke Detectors: There are two smoke detectors, one in the aft port corner of the pilothouse and the other above the door to the master stateroom. CO Detectors: Each stateroom has a carbon monoxide detector. Please keep these clear as piles of clothing, towels, etc. stashed too close to the carbon monoxide detectors could elicit a false alarm. VHF Distress Call Using DSC (Digital Selective Calling): There are two independent VHF radios, one at each helm. Both are capable of sending DSC messages include a distress all-call. See the section on VHF radios for further information. 38


40 Appendix C: Schematic of the Thru-hulls Anchor Washdown Macerator Galley Speed / Depth Transducer Port Engine Stbd Engine Genset 39
Island Spirit. Welcome Aboard! No smoking please. And Close portholes in Berth before departure - Every day!
 Island Spirit Welcome Aboard! No smoking please And Close portholes in Berth before departure - Every day! Island Spirit is a 1998 Camano Troll 28, powered by a 200 hp. Volvo diesel. Specifications: Length
S/Y MORSKI ZEKAN TECHNICAL INFORMATION
 S/Y MORSKI ZEKAN TECHNICAL INFORMATION Cabins: 3 Toilets: 1 Max. Persons: 8 (6+2) LOA: 11,35 m Beam: 3,80 m Draft: 1,95 m Engine: Volvo 28HP Water tanks: 360 L Fuel tank: 150 L Anchor windlass Speed and
License to Keel Boat Manual
 License to Keel Boat Manual BOAT CODE R32 SLIP C110 NOTE: SAIL IN REVERSE MAXIMUM CAPACITY: 8 PASSENGERS Violation Will Result In Suspension of Members Certification and Charter Privileges 110117 Table
Jefferson Rivanna 53 Prop 23
 Jefferson Rivanna 53 Prop 23 Year: 1998 Make: Jefferson Model: Rivanna 53 Price: $ 299,000 Location: Engine Make: Snead Island, FL, United States Detroit Diesel Engine Model: 6V-92TA Hull Material: Fiberglass
3604 ValhannaCatalina 37
 3604 ValhannaCatalina 37 Starting DC Main Breaker House Locker Settee Windless Breaker Nav Table Aft Cabin V Berth I I Head Intake T T Head Sink Drain (Head) Shower Drain Settee Sink Drain (Galley) T Galley
QUICK START NOTES FROM THE OWNERS OF TUG TIME! April 2015
 QUICK START NOTES FROM THE OWNERS OF TUG TIME! April 2015 Welcome aboard TUG TIME!. TUG TIME! is a 2010 Ranger Tug 29. We named our boat TUG TIME! because it is your time to just kick back and relax and
4301 Whale Song Jeanneau 43
 4301 Whale Song Jeanneau 43 Settee Galley Sink Drain Unused Engine Intake V Berth House Bank Common Shower Drain Head I I Sink Drain Bilge Pump USCG NO. Fuel ank Head Intake Head Engine Bank Aft Cabin
Miss Joy Boat Manual
 Miss Joy Boat Manual BOAT CODE H33 SLIP F97 MAXIMUM CAPACITY: 8 PASSENGERS Violation Will Result In Suspension of Members Certification and Charter Privileges 111917 24707 Dana Drive, Dana Point, CA 92629
Miss Joy Boat Manual
 Miss Joy Boat Manual BOAT CODE SLIP F97 DO NOT SAIL IN REVERSE At the End of Your Charter Please Leave Battery Switch on OFF MAXIMUM CAPACITY: 8 PASSENGERS Violation Will Result In Suspension of Members
4207 M Catalina 42. Nav. Head. Aft Cabin. V Berth. Head. Laz. Galley. Settee. Legend. Notes USCG NO. First Aid Kit. Head. AC/DC Panel. Sink.
 Nav ool for Emergency iller Settee AC/DC Panel USCG NO. First Aid Kit Head Sink Head Aft Cabin V Berth Head I I Watermaker AC Supply Head Intake Raw H2O Engine Generater E Legend Engine Oil Dipstick Emergency
Osprey Owners Notes Revised May 1, 2018
 Osprey Owners Notes Revised May 1, 2018 Table of Contents Welcome from Nicholas and Anna Davidson... 1 And Just a Reminder... 2 Safety Aboard 3 Five Requests to Keep Osprey in Top Shape for Other Guests...
Bonnie Seas Boat Manual
 Bonnie Seas Boat Manual BOAT CODE E38 SLIP B186 NOTE: DO NOT SAIL IN REVERSE After Charter Please Leave Battery Switch on BOTH MAXIMUM CAPACITY: 8 PASSENGERS Violation Will Result In Suspension of Members
Amicitia Boat Manual
 Amicitia Boat Manual BOAT CODE N33 SLIP B100 DO NOT SAIL IN REVERSE After Charter Please Leave Battery Switch on ALL MAXIMUM CAPACITY: 8 PASSENGERS Violation Will Result In Suspension of Members Certification
4206 Windsong Catalina 42
 Forward Head Sink Drain USCG NO. Cabinets Nav AC/DC Panel Settee Emergency iller Head Head Sink Outlet Head Intake Aft Cabin Head Head Intake Engine Intake Pullman Berth R Laz Shower Drain Macerator Outlet
Laura Ann. 32 Bayliner Orientation Guide
 Laura Ann 32 Bayliner Orientation Guide Contents 1. Boat Operation 2. Boat Electrical 3. Sanitation Systems 4. Water Systems 5. Galley 6. Heating Systems 7. Electronics 8. Anchoring/Mooring Cans 9. Barbecue
Blew M'en Fous Boat Manual
 Blew M'en Fous Boat Manual BOAT CODE SLIP E40 DO NOT SAIL IN REVERSE At the End of Your Charter Please Turn Battery STARTER Switch OFF MAXIMUM CAPACITY: 8 PASSENGERS Violation Will Result In Suspension
1977 Viking Convertible
 JIMMY ECONOMOU Brewer Yacht Sales 56 Roseleah Dr Mystic, CT, US Office: 8602505912 Mobile: (860) 2505912 jeconomou@shmarinas.com 1977 Viking Convertible Boat Type: Convertible Boat Address: Mystic, US
Zephyr Boat Manual H31 DO NOT SAIL IN REVERSE. At the End of Your Charter Please Leave Battery Switch on OFF
 Zephyr Boat Manual BOAT CODE SLIP B31 DO NOT SAIL IN REVERSE At the End of Your Charter Please Leave Battery Switch on OFF MAXIMUM CAPACITY: 9 PASSENGERS Violation Will Result In Suspension of Members
Jeanneau Sun Odyssey 36.2 Bona Chute
 Jeanneau Sun Odyssey 36.2 Bona Chute Make: Jeanneau Model: Sun Odyssey 36.2 Length: 36 ft Price: $ 73,500 Year: 1998 Condition: Used Location: Seattle, WA, United States Boat Name: Hull Material: Draft:
3405 Vested Interest Hunter 34 Y Valve
 3405 Vested Interest Hunter 34 Y Valve Sink Drain V Berth Settee USCG No. Nav Head Head Intake o Holding ank o Overboard I I Aft Cabin Engine Intake Settee Sink Drain Galley Legend Notes Engine Oil Dipstick
Tiara 3500 Express High Velocity
 Tiara 3500 Express High Velocity Make: Model: Length: Tiara 3500 Express 35 ft 8 in Price: $ 149,000 Year: 2001 Condition: Used Boat Name: Hull Material: Draft: High Velocity Fiberglass 4 ft Number of
Huckins 50 Pilothouse
 Huckins 50 Pilothouse Make: Model: Length: Huckins 50 Pilothouse 50 ft Price: $ 139,900 Year: 1985 Condition: Used Location: Punta Gorda, FL, United States Hull Material: Number of Engines: 2 Fuel Type:
1995 Hinterhoeller Nonsuch 324
 RICHARD NOLAN Eastland Yacht Sales 33A Pratt Street Essex, CT, US Office: 8607678224 rnolan@eastlandyachts.com 1995 Hinterhoeller Nonsuch 324 Boat Type: Cruiser Address: Groton, CT, US Price: $60,000 OVERVIEW
3010 Sea Breeze Catalina 30
 3010 Sea Breeze Catalina 30 House battery switch And Charger Engine battery Locker Settee Nav Quarter Berth Y VALVE / Head O/B Discharge V Berth Holding ank I Head Inlet & Sink Drain Sink Drain Y Head
American Tug 41 The Lady C
 American Tug 41 The Lady C Year: 2006 Make: Model: 41 American Tug Designer: Lynn Senour Price: $ 450,000 Location: Engine Make: Palmetto, FL, USA Cummins Engine Model: 540 QSB Diesel Hull Material: Fiberglass
Ocean Alexander 46 Cockpit Motor Yacht Ocean Air
 Ocean Alexander 46 Cockpit Motor Yacht Ocean Air Make: Model: Length: Ocean Alexander 46 Cockpit Motor Yacht 46 ft Price: $ 186,500 Year: 1994 Condition: Used Boat Name: Hull Material: Number of Engines:
Selene Passage Maker 53 Selene
 Selene Passage Maker 53 Selene Year: 2001 Make: Model: Builder: Selene Passage Maker Selene Designer: Howard Chen Price: $ 539,900 Location: Engine Make: Engine Model: 6.8L Hull Material: Sarasota, FL,
westsail 42 Center cockpit ASTRAEA
 westsail 42 Center cockpit ASTRAEA Make: westsail 42 Model: Length: Center cockpit 42 ft Price: $ 89,900 Year: 1978 Condition: Used Location: San Diego, CA, United States Boat Name: Hull Material: Draft:
One World 40 Lagoon Catamaran Reference Notes. Index
 One World 40 Lagoon Catamaran Reference Notes Index These notes are intended to be used as reminders only; not as a substitute for proper training, boat check-out, and operating manual review Verify locations,
Coldwater. Catalina 36. Orientation Guide
 Coldwater Catalina 36 Orientation Guide 1. Table of contents 1. Electrical System 2. Engine Operation 3. Sails & Rigging 4. Dock lines and fenders 5. Safety and Emergency Equipment 6. Navigation equipment,
Welcome aboard, here are some of the basics and FAQs you ll want to know in Operating.
 Operating Manual for Shangri La Beneteau Cyclades 443 Welcome aboard, here are some of the basics and FAQs you ll want to know in Operating. Engine Start Engine starts with a key, insert and turn the key
Orientation Checklist for Evening Star Updated:
 Orientation Checklist for Evening Star Updated: 09-29-2016 This is a brief description of Evening Star systems, including on-board location of equipment, and specific procedures for engine operation. Please
Number of Engines: 2 x 800 mhp MAN R6
 Azimut 60 Flybridge Make: Model: Length: Asking price: Year: Azimut 60 Flybridge 60 ft $ 999,000 2012 Condition: Pre-owned Location: Fort Lauderdale, FL United States Hull Material: Fiberglass Draft: 4
Make Model Length Price Year Condition. Mainship Motor Yacht 47 ft $ 139, Used. Boat Name Hull Material Draft Number of Engines Fuel Type
 Mainship Motor Yacht Make Model Length Price Year Condition Mainship Motor Yacht 47 ft $ 139,900 1995 Used Boat Name Hull Material Draft Number of Engines Fuel Type Isla Kay Fiberglass 3 ft 10 in 2 Diesel
WHITE CAPS. Billy Black
 WHITE CAPS LOA 42.3, Beam 14.4, Draft 3.8 Displacement 29000 lb (fully loaded) Owners: Harvey and Judy White Designer: Sabre Design Team Built 2006 by Sabre Yachts, South Casco, Maine The owners of White
CHB Europa Sedan Casa Dos Perro
 CHB Europa Sedan Casa Dos Perro Make: Model: Length: CHB Europa Sedan 42 ft Price: $ 89,500 Year: 1985 Condition: Used Boat Name: Hull Material: Draft: Number of Engines: 2 Fuel Type: Casa Dos Perro Fiberglass
Catana 44 Sailing Cat Listing ID:
 Catana 44 Sailing Cat Listing ID: 1109494 DESCRIPTION: Catana 44 Sailing Cat DATE LAUNCHED: 1993 LENGTH: 13.41m (44ft) BEAM: 7m (23ft) DRAFT: 1.21m (4ft) LOCATION: Cruising Indonesia then the Philippines
Orientation Checklist (ver.2) for Madi-Noelle
 for Madi-Noelle") Orientation Checklist (ver.2) for Madi-Noelle Updated: 09-15-13 This is a brief description of Madi-Noelle systems, including on-board location of equipment, and specific procedures for engine operation.
Orientation Checklist (ver.2) for Madi-Noelle Updated: 09-15-13 This is a brief description of Madi-Noelle systems, including on-board location of equipment, and specific procedures for engine operation.
38' Marine Trader-Eagle Trawler Double Cabin Trawler Trawlers Location: Newport News VA
 38' Marine Trader-Eagle Trawler Double Cabin Trawler Trawlers Location: Newport News VA Page 1 of 5 Listing Number: M-6045294 Price: Broker: LOA: 38' Model Year: 1986 Was Listed At: $ 34,900 Windswept
Three Little Birds. Asking Price US$795,000
 Three Little Birds Acclaimed features of the Lagoon 500 include a huge amount of entertaining space, the popular fly bridge helm station and forward seating area. The owners version has 4 cabins with island
ON-DECK TRIP: Charter Boat Check-Out/Check-In Form
 Charter Boat Check-Out/Check-In Form TRIP: Skipper: Phone: Boat Type & Size: Boat Name: Draft: Beam: Mast Height: Water: Cap. Gal. in tank(s) Waste: Cap. Gal in tank(s) Fuel: Cap. Gal THIS FORM IS FOR
Pretty Girl Beneteau 39
 1 Operation Manual: Pretty Girl Beneteau 39 2 Welcome Note Hello and welcome to New England Sailing Center and your Beneteau 39 Pretty Girl. Inside this manual you should find directions and instruction
Strickly for Fun Departure Manual
 Strickly for Fun Departure Manual 1. Purpose This manual describes the steps we follow to begin our trip. 1. Purpose...1 2. Departure planning:...2 3. Advanced voyaging actions:...3 4. Advanced departure
Azimut 53 Flybridge TRAVELER
 Azimut 53 Flybridge TRAVELER Make: Model: Length: Azimut 53 Flybridge 53 ft Price: $ 795,000 Year: 2012 Condition: Used Boat Name: Hull Material: Draft: Number of Engines: 2 Fuel Type: TRAVELER Fiberglass
40' Monterey 400 IPS Sport Yacht
 WAYNE LEA 5828 CAPE HARBOUR DR. SUITE 101 CAPE CORAL, FL 33914 United States Toll-free 888-223-9933 Tel 239-541-2004 Tel 239-541-2004 Fax 239-541-2217 Email WAYNE@PIERONEYACHTSALES.COM 40' Monterey 400
CHB Double Cabin Trawler Orient Express
 CHB Double Cabin Trawler Orient Express Year: 1978 Length: Make: Model: 34 ft CHB Price: $ 28,700 Double Cabin Trawler Location: Punta Gorda, FL, United States Beam: Draft: 11 ft 9 in 3 ft 2 in Hull Material:
Mikelson Nauti Nana. Price: $ 185,000
 Mikelson Nauti Nana Make: Length: Mikelson 48 ft Price: $ 185,000 Year: 1989 Condition: Used Boat Name: Hull Material: Number of Engines: 2 Fuel Type: Nauti Nana Fiberglass Diesel 2515 Shelter Island Drive,
Beneteau 411 Mi Amante
 Beneteau 411 Mi Amante Make: Model: 411 Length: Beneteau 41 ft Price: $ 145,000 Year: 2001 Condition: Used Location: Seattle, WA, United States Boat Name: Hull Material: Draft: Number of Engines: 1 Fuel
2000 Mainship Pilot 34
 RICH FEINEN Knot 10 Yacht Sales 106 Wells Cove Road (behind Fishermens Inn & Crab Deck Turquoise Buildings) Grasonville, MD, US Office: (844) 815-0508 Mobile: (978) 660-1213 rich@knot10.com 2000 Mainship
Topaz Express Rigged Right
 Topaz Express Rigged Right Make: Model: Length: Topaz Express 32 ft Price: $ 174,449 Year: 2005 Condition: Used Boat Name: Hull Material: Draft: Number of Engines: 2 Fuel Type: Rigged Right Fiberglass
OPERATION MANUAL This 2002 Carver 410 Sport Sedan
 OPERATION MANUAL Welcome aboard! We are happy you have chosen for your vacation. We are sure you will enjoy cruising the lovely islands of the Pacific Northwest. This 2002 Carver 410 Sport Sedan is one
NAV-COM OFFICER PREP FOR SEA CHECKLIST
 NAV-COM OFFICER o Radars are on and functioning properly o Both GPS units are on and functioning properly o Chart Plotter is on and functioning properly o VHF radios are on and functioning properly o VHF
40' SPARKMAN & STEVENS - NORTHSTAR -.CENTER COCKPIT - MOTIVATED SELLER
 www.bestboatusa.com +17866235554 Fort Lauderdale Florida USA EMAIL : sales@bestboatusa.com 40' SPARKMAN & STEVENS - NORTHSTAR -.CENTER COCKPIT - MOTIVATED SELLER Boat Name: Sparkman & Stevens Year: 1976
Black Swan-GB 49 Brief
 Table of Contents Basic Running Operations Engine Start-Before Start Engine Room Checks In Preparation for Departure Engine Start Engine Stop Navigation Furuno Quirk-Alert VHF Radio Autopilot Autopilot
POWER BOAT Do Don t OPERATION MANUAL. Welcome aboard!
 OPERATION MANUAL POWER BOAT Do Don t Welcome aboard! We are happy you have chosen Do Don t for your vacation. We are sure you will enjoy cruising the lovely islands of the Pacific Northwest. The Ranger
1997 Azimut 70 Sea-Jet
 1997 Azimut 70 Sea-Jet Description SOLD - VERKOCHT Fantastic pocket sized mega-yacht this first owner Azimut 70 Sea-Jet, in CARAT version! Maintained from new by the official Azimut dealer. Only 1400 hours!
Island Packet SP Cruiser Island Time
 Island Packet SP Cruiser Island Time Make: Model: Length: Island Packet SP Cruiser 41 ft Price: $ 339,000 Year: 2009 Condition: Used Location: Westerly, RI, United States Boat Name: Hull Material: Number
35 ' 1999 Carver 356 Motor
 35 ' 1999 Carver 356 Motor Yacht A L E X A N D E R M A R I N E U S A Carver 356 Motor Yacht Big Decision Make: Model: Length: Carver 356 Motor Yacht 39 ft Price: $ 109,900 Year: 1999 Condition: Used Boat
60 Power Catamaran. Prestige Yachts Investment (Yachts Invest) - Jean Lacombe
 - Jean Lacombe") Sunreef 60 Power Catamaran Make: Model: Length: Sunreef 60 Power Catamaran 18.9 m Price: EUR 1,500,000 Year: 2012 Condition: Used Location: Cote D'Azur, France Hull Material: Draft: Number of Engines:
Sunreef 60 Power Catamaran Make: Model: Length: Sunreef 60 Power Catamaran 18.9 m Price: EUR 1,500,000 Year: 2012 Condition: Used Location: Cote D'Azur, France Hull Material: Draft: Number of Engines:
34' (10.36m) CRUSADER
 CRUSADER") Gotcha 34' (10.36m) CRUSADER LOA: Beam: Min Draft: Max Draft: Speed: 34' 0" (10.36m) 12' 0" (3.66m) Max 3' 6" (1.07m) Cruising 20 knots Max 22 knots Year: Builder: Type: Price: Location: Mfg-1992 Model-1992
Gotcha 34' (10.36m) CRUSADER LOA: Beam: Min Draft: Max Draft: Speed: 34' 0" (10.36m) 12' 0" (3.66m) Max 3' 6" (1.07m) Cruising 20 knots Max 22 knots Year: Builder: Type: Price: Location: Mfg-1992 Model-1992
1982 Whitby 42. Shared Dreams. Click here to view more pictures $74,900. Full Keel. Ketch-Rig. Ford Lehman Diesel. Solar Panels
 1982 Whitby 42 Shared Dreams Click here to view more pictures $74,900 Full Keel Ketch-Rig Ford Lehman Diesel Solar Panels Air Breeze Wind Generator Custom Hard Bimini with Full Enclosure Stack-Pack with
Tiara 5200 Express Outta Here
 Tiara 5200 Express Outta Here Year: 2000 Make: Tiara Model: 5200 Express Price: $ 375,000 Location: Engine Make: Snead Island, FL, United States Caterpillar Engine Model: 3406 Hull Material: Fiberglass
OCEANIS 400 DECK FITTINGS
 DECK FITTINGS Anodized aluminum stemhead fitting with (2) rollers, one tilting Anodized aluminum toerails (4) anodized aluminum mooring cleats (4) roller fairleads aft and amidships Aft anchor roller to
Jeanneau Sun Odyssey 39 DS. Price: 89,995
 Jeanneau Sun Odyssey 39 DS Network ID 03635 Year 2008 Hull Material GRP Fuel Diesel Location Chichester Maina Power/Sail Sailboat Engines 1 Construction GRP LOA 38' 10" (11.84m) Keel Shoal... Min Draft
Make Model Length Price Year Condition. Bavaria 36 Cruiser 37 ft 1 in $ 109, Used. Boat Name Hull Material Draft Number of Engines Fuel Type
 Bavaria 36 Cruiser Make Model Length Price Year Condition Bavaria 36 Cruiser 37 ft 1 in $ 109,000 2011 Used Boat Name Hull Material Draft Number of Engines Fuel Type Duet Fiberglass 6 ft 4 in 1 Diesel
How to Operate the MYC Support Boats and Equipment
 How to Operate the MYC Support Boats and Equipment Definitions: 1) MYC Support boats include: Carlyle (Start Boat) Robbie R RIBs- Christabel, Margo, Nigel Holman 2) Boat Licence: A boat licence issued
Fuel Tanks #: 1 Fuel Tanks Capacity: 30 gal Fresh Water Tanks #: 2
 http://www.yachtworld.com/larsenmarine Larsen Marine - John Jirsa, CPYB Main Office & Yard, 625 Sea Horse Drive Waukegan, IL 60085, United States Toll-free: 866-492-3109 Tel: 847-336-5456 Tel: (847) 336-5456
Bayliner 285 Cruiser
 Bayliner 285 Cruiser Year: 2003 Length: Make: Model: 28 ft Bayliner 285 Cruiser Price: $ 34,900 Location: St. Petersburg, FL, United States Beam: Draft: 9 ft 10 in 3 ft 1 in Hull Material: Fiberglass Fuel
Sumerset FB Houseboat Bella Vita
 Sumerset 70-14 FB Houseboat Bella Vita Make: Model: Length: Sumerset 70-14 FB Houseboat 70 ft Price: $ 92,500 Year: 1986 Condition: Used Boat Name: Hull Material: Number of Engines: 2 Fuel Type: Bella
SCOUT RYBOVICH. LOA: 37' 0" (11.28m) Builder: RYBOVICH. Beam: 11' 3" (3.43m) Year Built: Max Draft: 3' 5" (1.04m) Model: Sport Fisherman
 Builder: RYBOVICH. Beam: 11' 3 (3.43m) Year Built: Max Draft: 3' 5 (1.04m) Model: Sport Fisherman") SCOUT RYBOVICH Builder: RYBOVICH Year Built: 1965 Model: Sport Fisherman Price: $369,000 USD Off the market Location: United States LOA: 37' 0" (11.28m) Beam: 11' 3" (3.43m) Max Draft: 3' 5" (1.04m) Cruise
SCOUT RYBOVICH Builder: RYBOVICH Year Built: 1965 Model: Sport Fisherman Price: $369,000 USD Off the market Location: United States LOA: 37' 0" (11.28m) Beam: 11' 3" (3.43m) Max Draft: 3' 5" (1.04m) Cruise
Sabre 42 Salon express
 Sabre 42 Salon express Design Our fiberglass shop uses infusion molding, a process that is cleaner, greener, uses less resin, and generates lower emissions levels. he hull and deck are lighter, allowing
Rocky Captain Users Manual
 Rocky Captain Users Manual 5/13/14 rev 3 pg Table of Contents LEROY (INFLATABLE DINGHY) 3 FLOAT PLAN 3 AIR 3 YAMAHA ENGINE 5 GASOLINE 5 CONTROLS FOR OPERATING ENGINE 6 TIE- OFF 10 MAINTENANCE 11 ROCKY
Length Overall - L.O.A. 40 Hull Length 38 6 Length on Waterline - L.W.L Overall Beam: Width on Waterline 10 9 Draft 6 4
 Bear Boat Jeanneau 40.3 Specifications Length Overall - L.O.A. 40 Hull Length 38 6 Length on Waterline - L.W.L. 35 3 Overall Beam: 12 11 Width on Waterline 10 9 Draft 6 4 Ballast Light Displacement Load
OPERATION MANUAL POWER BOAT. Moon Dance
 OPERATION MANUAL POWER BOAT Moon Dance Welcome aboard! We are happy you have chosen Moon Dance for your vacation. We are sure you will enjoy cruising the lovely islands of the Pacific Northwest. We trust
T.D. Vinette North Shore 32 Pelican
 Make: T.D. Vinette Model: North Shore 32 Length: 32 ft Price: $ 24,900 Year: 1977 Engine Make: Ford Barr Marine Diesel Location: T.D. Vinette North Shore 32 Pelican Alpena, MI, United States Boat Name:
OPERATION MANUAL. Pane e Vino
 OPERATION MANUAL Pane e Vino Welcome aboard! We are happy you have chosen Anacortes Yacht Charters for your vacation. We are sure you will enjoy cruising the lovely islands and coast of the Pacific Northwest.
Houseboating Handbook
 Houseboating Handbook Life Jackets We provide 12 adult life jackets aboard each houseboat. If you require smaller jackets for children aboard, please request jackets from our office upon check in. In addition
ALL IN BUDDY DAVIS. Builder: BUDDY DAVIS. LOA: 38' 0" (11.58m) Year Built: Beam: 14' 4" (4.37m) Model: Sport Fisherman
 Year Built: Beam: 14' 4 (4.37m) Model: Sport Fisherman") ALL IN BUDDY DAVIS Builder: BUDDY DAVIS Year Built: 1996 Model: Sport Fisherman LOA: 38' 0" (11.58m) Beam: 14' 4" (4.37m) Cruise Speed: 23 Kts. (26 MPH) Price: PRICE ON APPLICATION Location: United States
ALL IN BUDDY DAVIS Builder: BUDDY DAVIS Year Built: 1996 Model: Sport Fisherman LOA: 38' 0" (11.58m) Beam: 14' 4" (4.37m) Cruise Speed: 23 Kts. (26 MPH) Price: PRICE ON APPLICATION Location: United States
OPERATION MANUAL POWER BOAT SCAPA
 OPERATION MANUAL POWER BOAT SCAPA Welcome aboard! We are happy you have chosen SCAPA, which is a verb word for to escape or to seek refuge, for your vacation. We are sure you will enjoy escaping to the
35' Rosborough RF-35 Atlantic Trawler Trawlers Location: Gloucester Point VA
 35' Rosborough RF-35 Atlantic Trawler Trawlers Location: Gloucester Point VA Page 1 of 5 Listing Number: M-6206090 Price: Broker: LOA: 35' Beam (ft): 13.17' Max. Draft (ft): 4.00' Model Year: 1985 Was
2006 Bayliner 305 Express Sunbridge
 2006 Bayliner 305 Express Sunbridge Specifications Builder/Designer Year: 2006 Construction: Fiberglass Engines / Speed Engines: 2 Engine Power: 440 hp Dimensions Nominal Length: Length Overall: Beam:
Bayliner 3888 Motor Yacht Dock Holiday
 Bayliner 3888 Motor Yacht Dock Holiday Make: Model: Length: Bayliner 3888 Motor Yacht 38 ft Price: CAD 119,000 Year: 1992 Condition: Used Boat Name: Hull Material: Draft: Number of Engines: 2 Fuel Type:
Empty Pockets. 31' (9.45m) BERTRAM Page 1 of 25
 BERTRAM Page 1 of 25") 31' (9.45m) BERTRAM LOA: Beam: Min Draft: Max Draft: Speed: 31' 0" (9.45m) 11' 2" (3.40m) Max 2' 9" (0.84m) Cruising 27 knots Year: Builder: Type: Price: Location: Mfg-1976 Model-1976 BERTRAM Sport Fisherman
31' (9.45m) BERTRAM LOA: Beam: Min Draft: Max Draft: Speed: 31' 0" (9.45m) 11' 2" (3.40m) Max 2' 9" (0.84m) Cruising 27 knots Year: Builder: Type: Price: Location: Mfg-1976 Model-1976 BERTRAM Sport Fisherman
41' Meridian 419 WAYNE LEA 5828 CAPE HARBOUR DR. SUITE 101
 WAYNE LEA 5828 CAPE HARBOUR DR. SUITE 101 CAPE CORAL, FL 33914 United States Toll-free 888-223-9933 Tel 239-541-2004 Tel 239-541-2004 Fax 239-541-2217 Email WAYNE@PIERONEYACHTSALES.COM 41' Meridian 419
1986 Hinterhoeller Nonsuch 30 Ultra
 RICHARD NOLAN Eastland Yacht Sales 33A Pratt Street Essex, CT, US Office: 860-767-8224 rnolan@eastlandyachts.com 1986 Hinterhoeller Nonsuch 30 Ultra Boat Type: Cruiser Address: Essex, CT, US Price: $48,000
Catalina 36 Onyenma. Number:
 Catalina 36 Onyenma Make: Model: 36 Length: Catalina 36 ft Price: $ 42,995 Year: 1988 Condition: Used Location: Kemah, TX, United States Boat Name: Hull Material: Draft: Number of Engines: 1 Fuel Type:
ODYSSEY OWNER S NOTES
 ODYSSEY OWNER S NOTES 1 Table of Contents Introduction Quickstart Dinghy Operation, Swim Ladder Electrical Systems (Including Genset) Engine Systems Description & Operation Navigation Equipment/ VHF Radio
Jeanneau Sun Odyssey 45 DS MELUSINA
 Jeanneau Sun Odyssey 45 DS MELUSINA Make: Jeanneau Boat Name: Model: Sun Odyssey 45 DS Hull Material: Length: 45 ft Draft: Price: $ 239,500 Year: 2008 Condition: Used Location: MELUSINA Fiberglass 5 ft
Intermediate Cruising Standard (ASA 104)
") Intermediate Cruising Standard (ASA 104) Prerequisites: Basic Keelboat Sailing (ASA 101) and Basic Coastal Cruising (103) Certification General Description: Demonstrated ability to skipper a sloop-rigged,
Intermediate Cruising Standard (ASA 104) Prerequisites: Basic Keelboat Sailing (ASA 101) and Basic Coastal Cruising (103) Certification General Description: Demonstrated ability to skipper a sloop-rigged,
Asking $49, Make an Offer
 S.V. Temeraire The Columbia 34 is popular and spacious making for an ideal pocket cruiser. Presently stored on the hardstand and ready for your out of water inspections. The hull has had its annual maintenance
Catalina Sailboat Tropical Dreamer
 Catalina Sailboat Tropical Dreamer Year: 1995 Length: Make: Model: 36 ft Catalina Sailboat Price: $ 59,500 Location: Treasure Island, FL, United States Beam: Draft: 11 ft 11 in 4 ft 6 in Hull Material:
Leopard 43 COOL CHANGE
 Leopard 43 COOL CHANGE Make: Model: 43 Length: Leopard 43 ft Price: $ 295,000 Year: 2005 Condition: Used Location: Fort Lauderdale, FL, United States Boat Name: Hull Material: Draft: Number of Engines:
LOA: 30' 0" (9.14m) Beam: 10' 3" (3.12m) Min Draft: 2' 6" (0.76m) Max Draft: 2' 6" (0.76m) Cruise Speed: 18 Kts. (21 MPH)
 Beam: 10' 3 (3.12m) Min Draft: 2' 6 (0.76m) Max Draft: 2' 6 (0.76m) Cruise Speed: 18 Kts. (21 MPH)") LULU MAINSHIP Builder: MAINSHIP Year Built: 2004 Model: Cruiser Price: $87,900 USD Off the market Location: United States LOA: 30' 0" (9.14m) Beam: 10' 3" (3.12m) Min Draft: 2' 6" (0.76m) Max Draft: 2'
LULU MAINSHIP Builder: MAINSHIP Year Built: 2004 Model: Cruiser Price: $87,900 USD Off the market Location: United States LOA: 30' 0" (9.14m) Beam: 10' 3" (3.12m) Min Draft: 2' 6" (0.76m) Max Draft: 2'
34,000 Tax Paid. E: T: over 700 boats listed
 DARTMOUTH OFFICE OFFICES THROUGHOUT THE UK AND EUROPE Arvor 250 AS Year: 2008 Heads: 1 Location: Salcombe Cabins: 1 LOA: 27' 0" (8.23m) Berths: 2 Beam: 9' 7" (2.93m) Keel: Semi Displacement Min Draft:
CAPRERA47 ERMAN YACHTING
 CAPRERA47 ERMAN YACHTING Builder: ERMAN YACHTING Year Built: 2012 Model: Motor Yacht LOA: 47' 0" (14.33m) Beam: 14' 0" (4.27m) Max Draft: 3' 0" (0.91m) Price: 280 000 EUR Off the market Location: Turkey
PRICE REDUCED $10,000. A finer Grand Banks 32' will be hard to find. Be sure to see this trawler.
 317 South Morris Street P.O. Box 190 Oxford, MD 21654, USA Tel (410) 226-5454 Fax (410) 226-5244 Email sales@oya.com 32' Grand Banks Sedan Trawler Year: 1983 Current Price: US$ 119,000 (12/05) Located
Custom Gulet Cihan Marin Izmir
 Broker: Karen Kelly Shea Custom Gulet Cihan Marin Izmir Make Model Length Price Year Condition Custom Gulet Cihan Marin Izmir 118 ft $ 2,100,000 1997 Used Boat Name Hull Material Draft Number of Engines
3 GALLON, OILLESS PANCAKE COMPRESSOR INSTRUCTIONS. Item #31289
 3 GALLON, OILLESS PANCAKE COMPRESSOR INSTRUCTIONS Item #31289 The EASTWOOD 3 GALLON, OILLESS PANCAKE COMPRESSOR, with an Integral Air Regulator, efficiently supplies all compressed air requirements for
Fountaine Pajot MAHE 36 COOL CAT
 Fountaine Pajot MAHE 36 COOL CAT Make: Fountaine Pajot Model: MAHE 36 Length: 36 ft Price: $ 185,000 Year: 2006 Condition: Used Location: Miami, FL, United States Boat Name: Hull Material: Draft: Number
"Cariad" - Stevens 1285 Open Cockpit
 "Cariad" - Stevens 1285 Open Cockpit Location Unknown, United Kingdom Builder/Designer Dimensions Price: 219000 Length: 12.8m / 42ft Year: 2008 Beam: 4.06m / 13.33 feet Boat Name: Cariad Min Draft: 1.09m