Small, Lightweight, Very Portable and Low Cost. Print in Landscape Mode with ¼ inch borders.
|
|
|
- Lee Ford
- 6 years ago
- Views:
Transcription
1 The 1 SHEET WEDGE Drawn Small, Lightweight, Very Portable and Low Cost Ken Simpson Designs Rev Print in Landscape Mode with ¼ inch borders It may look similar to some of my other wedge designs, and it is, but it differs in one important aspect, the basic hull is primarily constructed from just a single sheet of 1/4 plywood This lone occupant hull weighs only 30 pounds, and nests to a 4' x 25' x 15' storage size A little smaller the the new FIT plans, the 1 Sheet Wedge has the same performance, but 50 pounds less capacity It also has far fewer options, unlike the FIT, which can be scaled up or down to satisfy the builders needs So, why build this design? Well, it's less costly, simple to build, and acts more like a Kayak than a Punt It paddles effortlessly with minimal wake, can accept a trolling motor, and will also fit in almost any car But, equally important, it is fun Fun to build and fun to use So get busy, start construction today! The straight sides contribute to the lateral stability of the small hull And, the wedge shape puts the load over the most buoyant area, insuring good axial hull balance As you can see from these sketches, the hull is ultra simple, all straight lines, no frills, thereby creating an easy to build boat that will provide many hours, and even years, of pleasurable use Bare bones cost to build about $100 8 feet 24 Max hull capacity 225 pounds inches 4 degree sides The beauty of the wedge shape hull is it's ability to track true Rowing position See specifications on Page 3 Nested 15 inches Water Line Front View Empty weight = 30 pounds Motoring & Paddling position Row, Paddle or add a Trolling Motor for power Always keep a bow-up attitude An even lighter version can be constructed of 5 MM thick Plywood, with a double floor, for lighter weight occupants See last pages of the plans for other design variations! PortableBoatPlanscom Page 1 of 27 This is an experimental design drawn up by an untrained amateur The Designer accepts no liability for any loss, harm or damage sustained during construction or use Builders may use these plans to construct a small quantity of boats for their own use only Commercial manufacturers must ask the Designer for permission
2 General Notes The idea for the 1 Sheet Wedge came from my desire for a simple, low cost, yet useful small portable hull design It includes an ample beam and freeboard, decent volume, seating for one, and optional safety buoyancy It is sturdy, easy to build, very portable and utilizes paddle, oar or a standard trolling motor power To have strength and yet be lightweight, the plans use some non-traditional methods of assembly, specifically the Tape & Glue 2 construction process developed and incorporated by the designer This provides a durable, yet truly portable, finished boat, and the building process is easily mastered by the home handyman and amateur boat builder As a result, only hand tools, a jig-saw, a power drill and a large carpenters square, scissors, and tape measure are all that will be required throughout the assembly process Be selective in your choice of materials Use plywood that is preferably exterior rated Marine Plywood is very expensive, so the use of ABX Grade, or better, is recommended, but be choosy It is important to note, the final choice of materials is the decision of the builder We have made specific recommendations, but if the builder has previous experience with different methods and materials, that is their choice, and we respect that decision Certainly, minor changes in design are encouraged, to provide a 'custom' boat to satisfy a builders specific needs We do not make changes to the drawings This would be up to the individual builder, and their responsibility Also, it is very important that none of the basic design parameters be drastically modified, as this may adversely affect overall boat safety or performance Seating choice is also up to the builder I have folding seat plans available for free on the website It should also be noted that the hull modules can be glued and screwed together, for those that do not have limitations of storage or transportation The hull is constructed using 1/4 plywood, for greater durability, but the exterior could also be fiberglassed, allowing yet thinner and lighter (5 mm) plywood hull building material Any questions or comments regarding the construction and/or design of this project will be responded to in a timely fashion Note, these plans are hand drawn one line at a time, not CAD, and as such are prone to minor drawing flaws Thank you for your interest, and for purchasing these plans, and good luck with your project And don t forget to visit wwwportableboatplanscom for new designs and updates Happy Boating! Ken Simpson, Designer PortableBoatPlanscom Page 2
3 The 1 SHEET WEDGE FEATURES Constructed the same way as most of my designs, Tape & Glue all seams and joints Waterproof inside and out Finish to your requirements An excellent lightweight boat for getting out on the water whenever you want Stores easily, in minimal space Low in cost, high in fun! Good luck with your build, and always keep safety in mind! Optional side mount motor See Mini BOM on page 7 Please add your own personal touches to the design Optional Deck Cover & Bulkhead Water Line Although not originally designed as a multipurpose boat, the 1 Sheet Wedge is an ideal vehicle for children to learn about boating safety It's small and stable, and it floats, even when full of water Further, the older set will find it to be a practical choice for the occasional trip to the lake, for fishing or just to get away, and then be able to store it in a confined space when home It really can be many things to many people! Try it, you'll like it! Note max hull capacity includes occupant, motor, battery and/or gear Cost to build about $100 See page 16 for a 32 wide version Safety Buoyancy and/or Dry Storage SPEC'S: OAL = 8 feet OAW = 30 inches OAH = 15 inches Weight = 30 pounds Capacity = 225 pounds, Includes Single Occupant Motor & Battery Transport: OAL = 50 inches OAW = 30 inches OAH = 18 inches A unique design for unique people Stacked Modules or Nested Modules Max hull capacity 225 pounds If you elect to use a trolling motor, strengthen the transom with a 2x3 (shown below) 26 Max Stacked 6' adult 35AH, 12V BATT 18 Max Nested 1/2 Ply Bulkheads, Transom & Bow Row, Paddle or Trolling Motor Power! 1x2 Rub Rails and Skids Some of the feature details mentioned can be found on my Website, such as the side motor mount 4' Radius Alternate hull shape PortableBoatPlanscom a ken simpson design Page 3
4 30 ref 9 PLYWOOD LAYOUT 4 x 12 Score & Bend Line 48 1/4 ABX PLYWOOD 4' x 8' 4 degree sides 1x2 Skids Forward Side 12 To make it easier to get the plywood sheet home, cut the sheet in half (48 ) at the store, and make the 4 length cuts at home Rear Side 15 Rear Base Forward Side Forward Base Score & Bend Line During assembly, it may be necessary to trim the length of the side panels to agree with the pre-cut length of the base panels Rear Side 4 x ref A lighter version can be constructed from 5 MM Plywood, for loads not to exceed 190 pounds, including occupant, gear, motor and battery Also note, for those of you that do not have a transport or storage problem, the hull can be made all one piece Just do not make the 48 cut And, make only 1 center bulkhead Bulkhead (2) x 23-1/2 Bow 5 x 17-7/8 Transom 11 x 29-7/8 (fit to base & side panel size) 2' x 4' 1/2 Plywood Bulkhead dimensions page 6 Recommended Optional Forward Deck Cover 1/4 Ply Fit at Assy scrap 1/2 Assembly Bolt Holes See page 18 Recommended Optional Forward Bulkhead 1/2 Ply Note: This forward enclosed area can be used for dry storage, and safety buoyancy As there are only a few simple cuts to be made, I will not go into much pre-assembly detail Just use a good plywood saw blade, and cut straight lines This is best done by using a straight piece of lumber, clamped to the plywood, as a saw guide Always cut from the inside surface of the plywood, which prevents splinters on the outside, as the good side of the plywood always goes on the outside of the hull And remember, measure twice, but cut only once! The next page shows typical tools that can be used to build this boat NOTE: 5 MM Plywood can be used for an occupant 160 pounds, or less For purposes of plan detail, the latest version of the T&G Process (6 pages) can be downloaded from my Website, Accessories section, before starting construction wwwportableboatplanscom Click Here Page 4


5 Roto-Tool with a 1/4 Radius cutter Page 5
6 Bulkhead, Bow & Transom Edge Trim It will be necessary to trim the outside edges of the Bulkheads to conform to the 4 degree angle of the side of the hull To do this requires that the 2 identical Center Bulkheads be placed face to face (good side of plywood facing each other), as shown below Using small clamps, secure them together, flush on all sides Next, mark a pencil line down one side, 1/8 from the edge Do the same on the opposite side of the same panel Now, set your saw at a 4 degree angle It is suggested you again use a saw guide, to insure a straight cut Do one side of the double bulkhead assembly, and then the other, a total of 2 cuts You can then release the clamps Mark the bulkhead with the deepest cut, the Bow end bulkhead The other is the Stern end bulkhead Also shown below are the Bow and Transom panels The 4 degree side angle cuts are done as individual panels, and only 1/16 from edge Insure that the good side of the plywood will face the outside of the hull 4 Degree saw cut 1/8 inch 4 degree saw cut Good side of Bow 1/16 Bow Bulkhead Stern Bulkhead TOP VIEWS Full Size Bow or Transom Good side of Transom Good side of Bulkheads Side Panel to Bulkhead Assembly Bulkhead Detail Here is where the fun begins The methods and materials used for this assembly will be the same for all future assemblies Bond the Side Panels to the Bulkheads using Titebond III waterproof wood glue, and secure using 5/8 Brad Staple Nails, as defined on the next page First, apply a small bead of glue to each surface to be bonded, and wipe into the wood with finger Remember, Titebond III is a water clean up glue, so it is OK to get on your hands Next apply a thick bead of TB3 on the Bulkhead and align the panel in place Secure with Brad Nails from the outside Hammer nails flush to the panel Allow to cure for at least 4 hours Very important, place on a flat surface to prevent the assembly from warping See sketches on next page PortableBoatPlanscom 1-1/2 Edge Trim 4 Radius Optional 12 6 Bulkheads 2 required 23-1/2 Check to insure the assembly fits the size of the cut Base & Side Panels See next page Page 6
7 TYPICAL MODULE ASSEMLY Rear Side Panels Assembly The assembly process of mounting the Side Panels to the 1/2 Bulkhead and Transom is easy, as defined on the previous page Make sure the Side Panels are mounted flush to the ends of the Bulkhead and Transom assemblies, and are square to the base See sketches This is a good place to use the small square, shown on page 5 Note: You may have to trim the length of the side panels slightly, to agree with the already cut length of the base panels Check base panel length fit prior to this assembly! Bulkhead Drawings Not To Scale Check to make sure the assembly is aligned properly and flat on the floor Flush Inside 90 degrees Base Side View Cutaway Also check to make sure the width of the Bow & Transom are equal to the width of the Base Panel ends Top View Rear Module Brads T R A N S O M 4 degree sides Note, the Forward Module is assembled exactly the same way, and looks very similar, only narrower Aligning the Modules Prior to fastening the Base to the Hull Assembly, it is very important that it be square The easiest way to do this is to measure from corner point A on the assembly, to point B Then measure from point C to point D Both dimensions should be the same If not, adjust the Hull until they are within 1/4 of each other Hold the shape with heavy objects (books or bricks, for example), and then continue on to the base panel assembly, as described next D A Mini BOM The 1 Sheet Wedge (2015) Est Cost 1 - sheet of 4'x8' 1/4 Plywood - $25 1 2'x4' 1/2 inch Plywood - $ gallon of TB3 Wood Glue - $30 6-1x2x8' Framing Lumber - $ box of 5/8 Staple Brads - $4 1 - roll of Ultra-Thin Fiba-Tape - $8 1 roll of High Stick Masking Tape - $3 C Top View PortableBoatPlanscom B Page 7
8 Base to Module Assembly Now it's time to place a score line on the inside of the base panel, where it has to bend down to meet the Transom Score Line About 12 Base Panel Inside Surface Mark a pencil line across the panel, from the points you marked Using a sharp utility knife, cut a groove, as shown below, about ¾ into the panel Do not cut through the panel You may want to use a steel guide to prevent knife wander Groove Critical: Refer to previous page to insure base panels fit entirely over the module assemblies! Enlarged Side View Groove Brad s B U L K H E A D Base Installed T R A N S O M High Stick Masking Tape Flush Note: Apply the 1x2 Rub Rails to the Side Panels, shown below, prior to installing the Base Panel Allow to cure Next, slowly start to bend the Base Panel up at the groove line Do not force It might be best if you clamp a straight piece of lumber (2 x 3) next to the groove, for support Do not over bend, otherwise it may splinter on the other side Then, turn the panel over and prepare to mount to the module assembly Align the panel carefully, after applying TB3 glue to all the Module interface surfaces (edges), and Staple Brad in place the Bulkhead end, while working along the sides applying High Stick Masking Tape Then slowly bend the end down to the Transom surface and brad staple in place You may need a helper to do this Insure the sides and bottom panel are aligned and well bonded Add glue to any visible voids Some groove splintering may occur, but sanding the hull will smooth it all out Trim as necessary Allow the assembly to cure overnight REPEAT THIS EXACT ASSEMBLY PROCESS FOR THE FORWARD MODULE 1 x 2 Outside Gunwale Supports Outside These supports make the side panels rigid Gunwale Supports (Rub Rails) and Rear Base Assembly Before applying the Base Panel, cut, fit and glue the 1 x 2 Gunwale Supports to the outside of each Side Panel, flush to the top of the panel, per sketch at left Allow to cure PortableBoatPlanscom Rear Base Panel Trim Ends Inside Cutaway Side View Upside Down Drawings Not To Scale Page 8
9
10
11
12
13
14

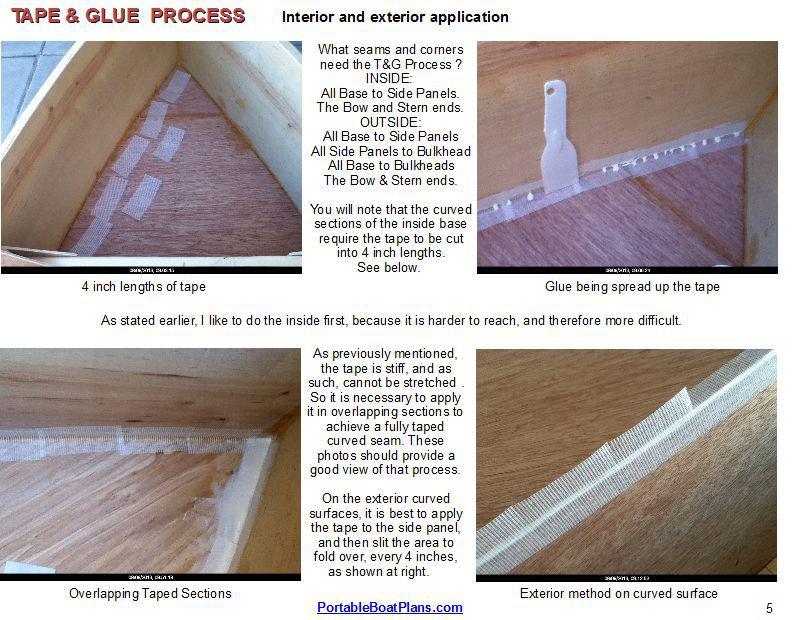
15 Alternate Construction for Internal Corner and Edge Sealing Kerf slots This is an example of alternate edge sealing, used to further describe the need for plywood edge protection One of the few things that will determine how long your boat will last, is how well you sealed the plywood edges and surfaces from water penetration! 1x1 Stringers Remember to keep the boat stored indoors if possible, upside down, and away from moisture when not in use Rubrail Side Panel 1 x 1 Internal Stringers ¼x¾ Chine Edging Base Panel CROSS SECTION Brads or Screws Some builders may opt out of using the T&G Process for sealing all hull joints and seams This could be because they are familiar with another process, or the materials may not be available to them If so, they should place 1x1 Stringers along the bottom edge of the side panels, prior to mounting the base panel, to provide sufficient strength and area on which to assemble the base See sketches above In some cases, where the there is hull bottom or side curvature, the stringers will have to be kerffed, partially slotted every inch or two, to fit properly along the curved edges Others may choose to use the stringers on the inside, because it may be easier for them to accomplish, and then apply the T&G Process to only the outside corners and edges, for the best water protection This is quite acceptable However, if the stringer method of assembly is used exclusively, without the T&G Process, special care must be given to the exterior edges and surfaces of the hull, where plywood edges are completely exposed Rounding all corners is necessary, and then special waterproofing of the edges must be applied I would also place a chine stringer along the bottom edges for further hull protection PortableBoatPlanscom 15

16 16
17 Download T&G Process : wwwportableboatplanscom Prior to the T&G Process it is necessary to round all edges and corners of the hulls I use a ¼ inch radius router bit in a high speed Roto-Tool After rounding, it is important that you lightly sand all surfaces, inside and out, to provide a smooth & clean hull surface For this particular design, it is imperative that ALL seams, corners and edges, inside first, then outside, be treated with the T&G Process After all taping is complete, and cured, it is necessary to Waterproof the entire hull, inside and out Allow to cure, and sand lightly NOTE : The Skids are to be applied AFTER the T&G Process & Waterproofing is completed to the finished hull modules! The 1 x 2 Skids perform a couple of different functions First, they protect the base when beaching or launching the boat They also add considerable strength to the floorboards, and structural stiffness to the overall hull design Cut the 1 x 2's to the length shown along the bottom, and up the bow and stern Mark their location, and drill through clearance holes, on center, for #6 screws, about every 6 inches Apply generous glue to the skid, and hold in place, while inserting #6 x 3/4 screws from the inside It is best done if two people are involved in the process Make sure the screws are flush to the inside base panel Allow to cure Then round all skid edges and sand smooth the entire assembly 6 6 Bottom View On Center All these shaded lines represent the T&G application, Inside and Out The multiple 1x2 skids are necessary for strength and protection If you intend to fiberglass the hull bottom, the multiple skid option is yours Optional Deck When all woodworking, rounding, taping and sanding are complete, it will be necessary to water seal the skids on the two hull modules The builder has the option to use any other additional method of waterproofing they desire Drawings Not To Scale PortableBoatPlanscom Complete Hull Assembly Page 17

18 ASSEMBLY BOLT HOLES Gussets 5 3 from the side panel, and 5 up from the base See drawing on next page of this plan 2 inches exposed Place the T-Nuts on the least occupied Module Page 18
19 PortableBoatPlanscom Page 19


20 SEATING The folding Beach Seat, below, also works very well in this type of boat, and is comfortable too I recommend it for all but the largest of people It can be purchased from many sources on-line for about $10 Riser Folding Beach Seat The Folding Seat shown above can be made by the builder for a reasonable cost, about $20 However, the Folding Beach Seat shown right, normally about $24, can cost even less It can be purchased at most home goods stores, or on-line I got mine at Target on an end of season sale for only $11 Either one will work well with The One Sheet Wedge This is the end of the plans Finishing the hull, paint or varnish, is up to the builder Select only quality materials, and apply carefully Remember, you built it, you want to be proud of it Happy and Safe Boating! Page 20


21 Hull Module Assembly Nested Hull Modules This is a 1/5 scale model, made from foam board, with a scale outline of a 6 foot adult It shows the internal volume of the hull, defining the sitting space and the space for gear Depending on the weight of the operator, and if a trolling motor will be used, the battery could go behind or in front of the operator The important element is that the hull should rest level in the water, and this is accomplished by shifting weight fore and aft The long somewhat narrow hull is very functional, with the bow slightly elevated while underway, providing smooth water passage As shown, this is a bare bones hull, no deck or forward storage area These are all builder specific items Here's a Ten Step recap of the assembly process 1 Layout & cut all panels from the ¼ inch and ½ inch plywood sheets 2 Angle trim edges of bulkheads and the bow and transom panels 3 Assemble the 2 hull modules 4 T&G all inside seams and corners 5 Round all outside edges and corners 6 T&G all outside edges and corners 7 Lightly sand and clean all surfaces 8 Waterproof all surfaces, inside and outside 9 Apply skids to bottom of hull, and waterproof them 10 Apply a finish per the builders requirements If, for some reason, this design does not satisfy all your needs, but you do like the concept, I suggest you look at the FIT Plans for a more adaptable design The enlarged version can be powered by a 25 hp gas outboard, and achieve planning speeds, up to about 10 mph Also, it can accommodate at least 2 people, plus some gear Page 21 Just go to PortableBoatPlanscom for the plans
22 , W I D E Version, with options This is the Wide design version of the hull The transom is 2 inches wider, providing nearly 15 pounds of additional buoyancy to the aft of the hull The slightly wider design also produces a little more lateral stability, great for a slightly heavier occupant The bow is one inch lower to the water, which should not pose a problem for general use The application of a small deck (as shown), with a splash guard, is suggested Choppy waters are always a concern in small boats, and this one is no different Otherwise, all other aspects of the design remain the same 8 feet So, what's the main difference between the 2 hull designs? Well, not much, other than the Wide version is capable of a heavier occupant, due to the increased buoyancy aft For most, this would not make a significant difference However, if you also decide to make the boat into a day sailer, then the wider hull would contribute added stability However, the 30 inch wide standard hull would be more capable of transport in smaller cars, and consumes less storage volume And the bow provides a little more freeboard, which translates to possible increased safety Your choice! All assembly details are the same as the standard hull 32 inches 16 5 degree sides Sealed compartment option Wheel Stop Optional Flip-over bicycle tow transport mode Hinge Pivot 26 Inches stacked Removable Hitch Ring Good luck with your project OPTIONS All options shown can also be utilized by the standard width hull 24 Flip-down 16 dual wheel Bicycle Trailer option The beauty of this wedge design is it's ability to accept options unavailable to most conventional hull shapes Nested for Transport Sun Canopy option 18 Inches nested Water Line Front View a ken simpson design 9/26/2015 Paddle, Row or add a Trolling Motor for power PortableBoatPlanscom Page 22
23 32 ref 8 PANEL LAYOUT WIDE Version Score & Bend Line 48 1/4 ABX PLYWOOD 4' x 8' Bulkhead (2) x 12 1x2 Skids 6 5 Note: The side trim of the bulkheads, transom and bow is 5 degrees for the wide design 3 12 To make it easier to get the plywood sheet home, cut the sheet in half (48 ) at the store, and make the 4 length cuts at home Rear Side 16 Rear Base 24 Forward Base Score & Bend Line 16 ref Forward Side 12 During assembly, it may be necessary to trim the length of the side panels to agree with the cut length of the base panels 2' x 4' 1/2 Plywood The sponsons provide lateral stability, and safety buoyancy 1/2 Assembly Bolt Holes See page 18 Sail, Rudder and Sponsons No daggerboard or leeboard required PortableBoatPlans@coxnet Folding mast and boom-less sail is great for beginners! Bow 4 x 15-7/8 Optional Sailing Rig Concept Only Similar Sail, Mast, Rudder and Sponson designs are available from the Designer Sail area is small, and hull speed is slow 10 Mast Just right for leisurely sailing 8' x 6' 24 Sq Ft Sail Long articulated tiller Always wear a PFD! Rear Side 4 x 12 scrap Transom 11-7/8 x 31-7/8 Bulkhead dimensions page 6 Forward Side 12 x 23-1/2 3' Sponsons PortableBoatPlanscom See next page for design detail R u d d e r 23
24 10' Folding MAST SAILBOAT RIGGING CONCEPT DETAIL Halyard Removable Sponsons 'H x 6'W SAIL 24 sqft area Tiller Arm (removable for transport) Rudder Pivot Shaft Center area of the Sponsons should be approximately in line with the center area of the Sail Rudder Mount Sheet Cleat Each Side SHEET Push-Pull 4' TILLER Tiller Retainer Strap Halyard Cleat Kick-Up RUDDER (removable for transport) Bungee Spring SPONSONS 75# buoyancy (each) Mast Step Note: Mast folds in half (5') and fits in most cars The rudder is removable, and fits in the hull for storage The tiller also fits in the hull, as does the sail and all other rigging elements Pull-Down Rudder Cord Twin Skegs PortableBoatPlanscom Pivot Pin 24
25 , with a 30 Rectangular Center Module The optional addition of a 30 center module increases the buoyancy of the 1 Sheet Wedge to a 2 occupant design A simple to build rectangular module, scaled to fit between the other 2 existing modules, converts the design into an easy to transport double occupant hull, ready for some serious paddling, or effort free motoring, for you and your best friend! 10-1/2 feet 30 inches 30 or 32 inches Front View Note the additional gussets for increased rigidity The Center Module adds 120 pounds of buoyancy to the original hull, for a total of 350 pounds maximum load capacity, which includes occupants and gear 27 Inches max Center Module Nested Modules for Transport Water Line Paddle, Row or add a Trolling Motor for power Constructed using the same design processes as the other hull modules The bulkheads are identical, and the method of attaching the modules together is the same Use the boat in either configuration PortableBoatPlanscom Page 25
26 36 3 1/4 ACX PLYWOOD 4' x 8' Score & Bend Line This design variation is unusual, in the sense that it minimizes the wetted surface area of the hull, keeping water drag low, and paddle power high It is constructed exactly the same way as the original design Only the Bow and Transom panels are a different size, and note how they sit high in the water 1x2 Skids 48 Forward Side V Bow Version Concept Rear Base Forward Side 12 Bulkhead (2) 24 Same as standard version Max hull capacity 225 pounds Nested Forward Base Rear Side Rear Side These are just some of the variations that can be developed from the basic 1 Sheet Wedge design Any of the suggestions can be scaled up to provide a larger hull, with much greater capacity In the final analysis though, use your imagination for unlimited design possibilities X 24 PortableBoatPlanscom Page 26
27 3 Module Finally, for those that are very limited in vehicle storage, a 3 module version, only 36 inches long when nested! Typical Bulkhead Nested Max It will be necessary to make the two 8 foot long base cuts first, then the 28, 32, and 36 inch individual panel cuts, as shown All other construction and assembly processes will be the same as the 2 module hull Note that the two Bulkheads will have different length and width dimensions Merely measure the individual panels to determine those dimensions The Bow and 18 Transom panels remain the same as the standard version First Cuts 36 End of Plans 32 PortableBoatPlanscom 28 Page 27
Small, Lightweight, Very Portable and Low Cost. Print in Landscape Mode with ¼ inch borders.
 The 1 SHEET WEDGE Drawn 09-20-2015 Small, Lightweight, Very Portable and Low Cost Ken Simpson Designs Rev 03-14-2018 Print in Landscape Mode with ¼ inch borders It may look similar to some of my other
NEW DESIGNS. Print in Landscape Mode with ¼ inch borders. Hinges (2) degrees. 1 Seating Type Optional
 degrees. 1 Seating Type Optional") 2017 IDEAS NEW DESIGNS Ken Simpson Designs Drawn 06-01-2017 Rev. 07-02-2017 The SPORTSMAN 10'L x 36 W x 15 H 475 pound Capacity Print in Landscape Mode with ¼ inch borders. Hinges (2) 36 30 8 degrees Click
2017 IDEAS NEW DESIGNS Ken Simpson Designs Drawn 06-01-2017 Rev. 07-02-2017 The SPORTSMAN 10'L x 36 W x 15 H 475 pound Capacity Print in Landscape Mode with ¼ inch borders. Hinges (2) 36 30 8 degrees Click
CORO POWER BOAT 3 in 1 Design
 3 in 1 Design A MULTI-PURPOSE COROPLAST BOAT Ideal for all generations to enjoy. Weighs only 20 pounds! Drawn 06-20-2014 Ken Simpson Designs Rev. 09-25-2014 Print in Landscape Mode with ¼ inch borders.
POD 2 Paddle On Demand & POD 2-XL Adult ( Page 17 ) SPECIFICATIONS:
 SPECIFICATIONS:") POD 2 Paddle On Demand & POD 2-XL Adult ( Page 17 ) SPECIFICATIONS: Simple to build, light weight, rugged, stable, unsinkable, & designed for the younger generation! Glue & Screw Assembly Nov. 2010 Hull
POD 2 Paddle On Demand & POD 2-XL Adult ( Page 17 ) SPECIFICATIONS: Simple to build, light weight, rugged, stable, unsinkable, & designed for the younger generation! Glue & Screw Assembly Nov. 2010 Hull
BASIC COROPLAST HULLS FOUR HULLS, all single occupant designs. Choose the one that suites your needs.
 BASIC COROPLAST HULLS FOUR HULLS, all single occupant designs. Choose the one that suites your needs. The build notes for one hull 5 type should 8 apply to all hull types. 1 CUT these 2 lines First 20
POD 2-XL & & ( 17 ) SPECIFICATIONS:
 SPECIFICATIONS:") POD 2 Paddle On Demand & POD 2-XL Adult ( Page 17 ) Simple to build, light weight, rugged, stable, unsinkable, & designed for the younger generation! Kid Friendly! Nov. 2010 SPECIFICATIONS: Glue & Screw
POD 2 Paddle On Demand & POD 2-XL Adult ( Page 17 ) Simple to build, light weight, rugged, stable, unsinkable, & designed for the younger generation! Kid Friendly! Nov. 2010 SPECIFICATIONS: Glue & Screw
TRIFECTA. 3 Boat Plans for the Price of 1 - FREE. Assembly Manual. The GUPPY. The TRIPOD. The TADPOLE. Nov.
 The GUPPY TRIFECTA 3 Boat Plans for the Price of 1 - FREE Assembly Manual 3 SIMPLE MODULAR BOATS THAT CAN BE NESTED AND EASILY STORED ON-BOARD SHIP, OR IN AN RV, SUV, TRUCK and GARAGE. Less than 5 feet
BASIC COROPLAST HULLS
 BASIC COROPLAST HULLS Quick Assembly, Folds Up to a Small Package. FOUR + HULLS, most single occupant designs. Light Weight, Supports 215. Easy to Set-Up, and Easy to Paddle. Fits in any vehicle! Choose
CATBOX. A Puddle Duck Racer. By Jim Michalak
 CATBOX A Puddle Duck Racer By Jim Michalak CAT BOX HULL SPECIFICATIONS 1. Bow transom from 1/4" plywood. Top and bottom edges framed with 3/4 x 1-1/2" lumber with bevels as shown. Mark centerlines boldly.
Constitution Instructions
 Constitution Instructions This kit will build a 1:48 scale hull for the USS Constitution frigate. The kit contains the following parts. 1/8 deck with laser etched deck lines 1/8 railing Ribs Center keel
A Boat Builders Story
 A Boat Builders Story By Ken Simpson September 2013 This is a tale about the experiences of Bayard Stix Cook of Florida, and his build of the 1 SHEET + pram. For the purpose of this story we will call
Trixie 7. Study Plans. for a 7' 2" x 4' 6" Tender. Andrew Walters. For Rowing, Sail and Short Shaft Outboard Motors
 Trixie 7 Study Plans for a 7' 2" x 4' 6" Tender For Rowing, Sail and Short Shaft Outboard Motors Andrew Walters Trixie 7 Study Plans for a 7' 2" x 4' 6" Tender For Rowing, Sail and Short Shaft Outboard
Blazer Marine, Whiplash Sport 40
 Blazer Marine, Whiplash Sport 40 Thank you for choosing to build the Whiplash 40. We have spent over 12 years perfecting this design, and finally we are making it available to the world. We are excited
Soling Building Tips II
 Soling Building Tips II Prepared: Arthur Deane Jan 20, 2002 adeane@ic.net Introduction The following are some lessons learned and experience gained in building a Soling kit. The plan developed is based
PAY N PAK, 1/12 th Scale, Limited Sport Hydro P Sport Hydro
 1980 82 PAY N PAK, 1/12 th Scale, Limited Sport Hydro P Sport Hydro Introduction: The 1980 turbine Pay N Pak is a good subject for a model race boat. It has a low profile, mild pickle-fork setback, long
1/10 th Scale 1956 Ted Jones Classic Hydroplane
 1/10 th Scale 1956 Ted Jones Classic Hydroplane Preparation These plans show outside sheeting of 3/32 balsa laminated with 1/64 birch ply. This makes a light and strong skin for this boat. Optionally you
The Micro Camper Cruiser by Ken Simpson
 9/10/2016 The Micro Camper Cruiser by Ken Simpson The following is a record of the design, build and use of the newest ship in my portfolio, the MICRO CAMPER CRUISER. Although similar to the larger sister
Uncle John's Choupique Road Sulphur, LA Materials needed to build the basic boat 1/4" x 48" x 96" exterior plywood ~ 3 sheets
 Uncle John's 5229 Choupique Road Sulphur, LA 70665 Thank you for purchasing our plans. Have a safe and enjoyable experience building and using your craft. Materials needed to build the basic boat 1/4"
CONSTRUCTION OF A GUNBOAT A CLASS YACHT by Brian Dill
 CONSTRUCTION OF A GUNBOAT A CLASS YACHT by Brian Dill The Gunboat design is the latest Radio A class from Graham Bantock, optimised to provide the best boat speed below 4 knots and to be as good as possible
WILLEY CAT SHEET B. Daggerboard - 9mm x 2 Daggerboard Ballast - Lead/Epoxy - 6" diameter
 WILLEY CAT Willey Cat was designed for performance. The flexible reefing arrangement allows tailoring your sail area to wind conditions. Best with a crew of -. DESIGN FEATURES Flexible Reefing - reefs
 Photo Essay: How to Build a Nova Scotian Grand Banks Dory By Jeff Spira Plans available at: http://spirainternational.com/ How to Build a Nova Scotian Grand Banks Dory By Jeff Spira In Lunenburg, Nova
Adaptation of the Paddle-One
 Adaptation of the Paddle-One Putting some into your paddling machine. Richard E. Butts richeb@frontiernet.net @Richard_Butts Bring balance and fun to your paddlesport training! January 2010 http://www.frontiernet.net/~richeb/
Kayak Trailer Project.doc
 Kayak Trailer Project.doc Note: the red trailer shown in some of the illustrations is no longer available from Northern Tools. However, may be able to adapt similar trailer, but measurements may not be
Stevenson Projects Building the Hull Top Deck and Bulkheads
 Stevenson Projects Building the Hull 1. Print out both piece sheets. 2. Cut out one keel piece and glue it to a piece of balsa wood or dense cardboard. Cut out the second keel piece and glue it to the
Carving a Custom Seat
 Carving a Custom Seat Seat Carving your own seat from mini-cell, high-density foam is really quite simple and has proven to be more comfortable than any commercially produced seat and often more reasonably
LOA: 2,39m Beam: 1,17m
 D5 LOA: 2,39m Beam: 1,17m Large scale plans for this boat can be purchased online from bateau.com The large scale version is printed on B and E size paper and includes full size patterns for the frames
Seamax Boat Bimini Top User Manual
 Seamax Boat Bimini Top User Manual Size A / B / C 3 BOW Size D / E / F 4 BOW Thanks for your purchase. Seamax Bimini Top has built-in the aluminum eye-end fitting to install on standard oar lock pin (diameter
Cardboard Boat Basics
 Georgetown Wooden Boat Show 2016 What Floats Your Boat Cardboard Boat Basics 1 Construction Rules (Equal Opportunity) The ENTIRE BOAT must be built of CARDBOARD Only exceptions are the decorations Use
Making Spars for the Schooner Jeanette
 Making Spars for the Schooner Jeanette..... by Byron Rosenbaum Figure 1. Byron Rosenbaum s 1:16-scale radio-controlled model of the schooner Jeanette. All photographs by the builder. The spars required
Hat s off to you for choosing a kit from Port Townsend Watercraft.
 Hat s off to you for choosing a kit from Port Townsend Watercraft. 1 A 30 year fascination with the challenges of nesting boat design, and many prototypes have led to the PT Eleven. Because you chose this
John with his stiff back, rows Caravan Leghorn ashore in the KISS dinghy.
 The Kiss Dinghy (Keep It Stupid, Simple.) My friend Caravan had been using the prototype for a year when I asked him how it was going. It is phenomenally sensible. He replied. John is crippled with a bad
8-GUN CORVETTE ASSEMBLY INSTRUCTIONS
 8-GUN CORVETTE ASSEMBLY INSTRUCTIONS THE HULL STEP 1 Fasten the Deck to the Hull. Find the hull. This is a large, pink, ship-shaped piece of insulating foam board. This will form the base of your model
Stand-N-Fish FULL DETAIL INSTALLATION INSTRUCTIONS
 1 Stand-N-Fish FULL DETAIL INSTALLATION INSTRUCTIONS Thank you for purchasing the incredible new Stand-N-Fish Kayak Fishing System. Once installed on your kayak the Stand-N-Fish will take your kayak fishing
aero naut Order No. 3009/00
 aero naut Order No. 3009/00 Introduction: The model should be assembled following the sequence of the stages of construction described in these instructions. The laser-cut components are individually numbered.
OK DINGHY INTERNATIONAL ASSOCIATION. MANUAL OF MEASUREMENT Revised Apr 2009
 OK DINGHY INTERNATIONAL ASSOCIATION MANUAL OF MEASUREMENT Revised Apr 2009 1. GENERAL This manual should be read in conjunction with the racing rules of sailing 2009-2012, the current class rules and measurement
PT 11 trouble-shooting and maintenance.
 PT 11 trouble-shooting and maintenance. Does your rudder not stay down?...your back seat slip off?...your knobs tight and your leather pads loose? Maybe we can help. We have used our PT 11 s hard enough
Boat Building Basics. How To Build Your Cardboard Boat
 Boat Building Basics How To Build Your Cardboard Boat Construction Rules The ENTIRE boat must be built of cardboard, duct tape, and one-part polyurethane. Only exceptions are the paddles & decorations
Et's Skeg: the full story
 Et's Skeg: the full story Having used pie-slice skegs on mass-market boats with big floppy slots and finding them ok, but not ideal, I researched a bit online looking for a skeg or skeg design for my North
GREEK TRIREME, 480 B.C. Scale: 1/72 Length: 515mm Width: 180mm Height: 220mm
 GREEK TRIREME, 480 B.C. Scale: 1/72 Length: 515mm Width: 180mm Height: 220mm HISTORY: The model represents a Greek Trireme from the age of battle of Salamis (480 B.C.). The crew were 170 oarsmen and about
Tugster. Tug Boat. Competition or Sport Tug Kit. A Zippkits R/C Boat. Building Instructions
 Z I P P M A N U FA C T U R I N G Tugster Tug Boat Competition or Sport Tug Kit A Zippkits R/C Boat Building Instructions 2016 JMP Hobby Group St. Paul, Indiana 47272 www.zippkits.com Toll Free (866) 922-ZIPP
Mount the actuator in the bracket provided and install a 24-foot EFTC cable to the actuator.
 . Mount the actuator in the bracket provided and install a 4-foot EFTC cable to the actuator. Route the cable through left stanchions,, and 4. Be sure that the cable does not contact any spring or push
General Assembly Venice Lagoon Boat Length 8.2m Beam m Disp kg Power - 10/15hp (Short Shaft)
") General Assembly Venice Lagoon Boat Length 8.2m Beam - 1.977m Disp - 1000kg Power - 10/15hp (Short Shaft) DESIGNER Michael Storer Adelaide, Australia Email storerm@ozemail.com.au Table of Contents Table
General Assembly Venice Lagoon Boat Length 8.2m Beam - 1.977m Disp - 1000kg Power - 10/15hp (Short Shaft) DESIGNER Michael Storer Adelaide, Australia Email storerm@ozemail.com.au Table of Contents Table
COMPARISON BETWEEN THE MACGREGOR 26 AND THE HUNTER EDGE. November 20, 2008
 COMPARISON BETWEEN THE MACGREGOR 26 AND THE HUNTER EDGE November 20, 2008 PRICE: (Retail) MACGREGOR 26M HUNTER EDGE Base price, standard boat $21,500 $32,990 Surge Brakes Option $584 Std This is an option
Step 1: Block sand the transom to remove the seam joint. The end result should be a flat transom without a ledge where the seam joint is.
 WhiplashGV Instruction Manual Email: Brian@Blazermarine.com Phone: 513-598-1769 Step 1: Block sand the transom to remove the seam joint. The end result should be a flat transom without a ledge where the
How do you build a cardboard boat?
 How do you build a cardboard boat? 2015/2016 Campaign Kick-Off 8 th Annual Cardboard Boat Race Saturday, September 12, 2015 Dundee Lake Park Cardboard Boat Race 2015/2016 1 Boat Construction Rules The
Peinert Dolphin. Assembly
 Peinert Dolphin Assembly The Dolphin is easily rigged; there are only four removable parts - the seat, the foot stretcher, the rigger arm, and the fin. Removal and installation of the seat. If the seat
Blazer Marine, Whiplash Sport Hydro
 Blazer Marine, Whiplash Sport Hydro Thank you for choosing to build the Whiplash Sport Hydro. We have spent over 12 years perfecting this design, and finally we are making it available to the world. We
General Build Instructions for Mach 1 BT50 and BT55 Single Fin Kits. Needed Items for Assembly
 General Build Instructions for Mach 1 BT50 and BT55 Single Fin Kits 60-80 grit sandpaper Hobby knife Tape measure Scissors CA Super glue 30-minute epoxy 5-minute epoxy Masking tape 1/16 drill bit Needed
Skoota 24 By Woods Designs
 Skoota 24 By Woods Designs Introduction Power catamarans offer many significant advantages over monohull power boats. They are safer, due to their high stability and self draining cockpit. They do not
COLLECTION
 info@oxxeaninflatables.com www.oxxeaninflatables.com COLLECTION About OXXEAN Inflatables is dedicated to the manufacture of high quality PVC rigid inflatable boats. We are committed to exceed customer
Planning and general precautions ithrust Tunnel Systems installations.
 Version 1.0 This recommendation will go through the different factors to consider when choosing where and how to fit thruster tunnels in a boat. Some of these recommendations might be difficult, or even
Sincerely, Carl Crewson President
 The revolutionary Radisson didn t just happen by. A long process of development, experience, and good engineering produced a craft truly Born of Canadian Waters. Since it s humble beginnings in a small
Building a Wind Tunnel
 Technical Report TR-5 Building a Wind Tunnel Estes Industries 1963 These reports are published as a service to its customers by Estes Industries, Inc., Box 227, Penrose, Colorado 81240 Building a Wind
Construction Chapters Index
 Construction Chapters Index 9 7 8 Chapters Index c. c. c. c. c. c. c7. c8. c9. c0. c. c. c. c. c. c. c7. Balsa Wood Skeleton Strip Planking Hull Fairing Keel Bulb Mould Lead Bulb Casting Keel Construction
INSTALLING YOUR CLC RUDDER
 INSTALLING YOUR CLC RUDDER These instructions are written to help you install the CLC rudder kit on your wooden kayak. The rudder can be fitted to your boat during construction or after completion. Please
Here's the comparison of the stock rock shaft vs. a 3pt rock shaft.
 This documents a build of a Category 0 3 point hitch for the John Deere 316 Onan, 318, 322, 330, 332, 420 and 430 tractors. This is Neil Koch's build for his 318. Here's the comparison of the stock rock
INTERNATIONAL SUNFISH CLASS ORGANIZATION CLASS RULES
 INTERNATIONAL SUNFISH CLASS ORGANIZATION November 2017 CLASS RULES 1. GENERAL The design and development of the Sunfish sailboat was directed to the creation of a one-design class where the true test is
Trogear Bowsprit Through Hull Installation Manual
 Trogear Marine Products, LLC www.trogear.com info@trogear.com 866-616-2978 Trogear Bowsprit Through Hull Installation Manual Congratulations on your purchase of the Trogear Bowsprit which can be installed
INSTRUCTIONS FOR GLUING ON THE BUMPER FOR PORT TOWNSEND WATERCRAFT S NESTING DINGIES. (Or requires a 1 surface to adhere to.)
") INSTRUCTIONS FOR GLUING ON THE BUMPER FOR PORT TOWNSEND WATERCRAFT S NESTING DINGIES. (Or requires a 1 surface to adhere to.) The PT 11 bumper is made from a high quality, non marking EPDM rubber. This
INSTRUCTIONS FOR GLUING ON THE BUMPER FOR PORT TOWNSEND WATERCRAFT S NESTING DINGIES. (Or requires a 1 surface to adhere to.) The PT 11 bumper is made from a high quality, non marking EPDM rubber. This
Highlander Specifications
 Highlander Specifications July 22, 2012 Highlander Specifications The intent of this section is to clarify and add to what is shown in the official plans. In case of conflict between these specifications
3. Sail Kit. Table of Contents: Portland Pudgy Safety Dinghy: 3. Sail Kit
 Table of Contents: 3. Sail Kit Sailing the Portland Pudgy... 1 Sailing Tips... 1 Reducing the Sail Area (Reefing the Sail)... 2 Method 1. Reducing Sail without the Exposure Canopy... 2 Method 2. Reducing
An Australian Classic by spectre.com
 An Australian Classic by www.go spectre.com Your Bug! Welcome to the Balain Bug experience!!!!!! The Bug kit has been designed so as to be a modern version of the Traditional Bug now you can sail like
U STAND INSTALLATION INSTRUCTIONS
 U STAND INSTALLATION INSTRUCTIONS Thank you for purchasing the incredible new U STAND by Stand N Fish. Once installed on your kayak the U STAND will enhance your kayak fishing enjoyment to a whole new
WHITE WOLF. X-ray View MID POWER MODEL ROCKET KIT BUILDING INSTRUCTIONS KIT SPECIFICATIONS:
 WHITEWOLF-38 PARTS LIST 1 - Nose Cone 1-17" Airframe 1-6" Motor Tube 3 - Aft Fins 3 - Forward Fins 2 - Centering Rings 1-15" Parachute 2 - launch lugs 1-12 Kevlar Shock Cord 1 - Motor Retention >>(screw/washer)
Portlight Construction
 Portlight Construction Version 2, dated 28 th June 2012 Contents Opening Portlights - Requirements... 2 Opening Portlights Design Parameters... 2 An Opening Portlight Design... 3 Making the Opening Portlight
aero naut Electric Model Aeroplane Quido Order-No. 1303/00
 aero naut Electric Model Aeroplane Quido Order-No. 1303/00 Quido is a small model that accompanies you wherever you go. The prefabricated parts are mostly balsa and just need to be assembled according
Bladerider X8 Assembly Help Notes
 2.1 Remove All Parts & Have Some Tools Handy Remove all items from the box and identify each part as per the packing sheet and check that nothing is missing. If there is something missing, please email
Grandpa's Homemade Rocket for About a Dollar!
 Grandpa's Homemade Rocket for About a Dollar! Grandpa and Granny Co. 2012 The most common items needed: (The number of Rocket parts from each item is before the parts name and its proportionate cost is
RUDDER KIT INSTRUCTIONS
 C I N S T R U C T I O N S RUDDER KIT INSTRUCTIONS PAMLICOS-0,0,T, T, 60T, Excel Rotomolded Pamlico 0, 0, T, T, 60T, Excel The addition of a rudder to a kayak results in additional control and efficiency,
Miss Mayflower. Build Manual
 Miss Mayflower Build Manual Thank you for the purchase of the Miss Mayflower, this new exciting craft will give you fun on many types of terrain including snow, gravel, pavement, grass, water, and when
INTERNATIONAL FLYING FIFTEEN CLASS MEASUREMENT FORM
 INTERNATIONAL FLYING FIFTEEN CLASS MEASUREMENT FORM 2014 Authority: * International Sailing Federation, Ariadne House, Town Quay, Southampton, Hampshire, SO14 2AQ, UK IN ORDER TO OBTAIN A MEASUREMENT CERTIFICATE
Installation of Nylon Putting NP50
 Installation of Nylon Putting NP50 1. Layout of Green and Existing Ground Preparation Step 1: Determine the size and shape of your green as well as any chipping stations and/or sand traps. Step 2: Measure
NEXT EXIT THE GREAT OUTDOORS POPULATION: EVERYONE
 2017 NEXT EXIT THE GREAT OUTDOORS POPULATION: EVERYONE SportRack is proud to offer safe, quality products that allow you to take full advantage of your vehicle s carrying capacity. SportRack accessories
Model Aero Sportster Indroduction
 1 Model Aero Sportster Indroduction We are excited to introduce the Model Aero Sportster! Inspired by classic designs of the past, the Sportster is a relaxing slow flyer, equally at home indoors or outside
Paper Tiger Catamaran International Association MEASUREMENT FORM
 Paper Tiger Catamaran International Association MEASUREMENT FORM Amended June 2000: July 2002: April 2012 Name of boat: Sail No: Owner s name: Owner s address: Postcode: Phone: (H) (B) (Mob.) Email: Owner
400/488 Rotating Davit Installation Instructions
 400/488 Rotating Davit Installation Instructions These instructions were written with the owner in mind. If you are the installer make sure these instructions are passed along to the owner of the boat.
Pitts Model 12 Wing Leading edge Installation
 Pitts Model 12 Wing Leading edge Installation This procedure is used to install molded plywood leading edges included in the Pitts Model 12 kit. Nine (9) molded leading edge section are require per aircraft;
LoneStar Fiberglass Pools. Do-It-Yourself. Installation Manual
 LoneStar Fiberglass Pools Do-It-Yourself Installation Manual Chris 1/3/2008 Do-It-Yourself The installation of a LoneStar Fiberglass pool is a much simpler task than most people think. What is important
NEW YORK FIREBOAT - Three-Forty-Three
 NEW YORK FIREBOAT - Three-Forty-Three One of the newest fireboats is currently in use by the New York Fire Department. Two identical models were built by Eastern Shipbuilding in Panama, Florida and delivered
International Cadet Class Cadet Mark IV Specification Measurement Form 2010
 International Cadet Class Cadet Mark IV Specification Measurement Form 2010 The Cadet was designed in 1946 by Jack Holt and was adopted as an international class in 1958. International Cadet Class Cadet
Seadog One Design Rules DRAFT
 Seadog One Design Rules DRAFT Wickford Frostbite Fleet #166 Sachems Head Frostbite Fleet 1. Seadog One Design Rules 1.1 Mission and Purpose Racing shall be strictly one design in intent and the following
Aruba 8 ss Sit-In Kayak. Aruba 10 Sit-In Kayak RECREATIONAL KAYAKS. 2 sundolphin.com
 PRODUCT CATALOG RECREATIONAL KAYAKS Aruba 8 ss Sit-In Kayak Aruba 10 Sit-In Kayak Lightweight easy to carry Adjustable, padded seat back Storage compartment On-board storage with shock cord deck rigging
Little Dog Dual Deploy
 Little Dog Dual Deploy John Wilke & Paul Fechtmeister September 2010 All dimensions are in inches unless specified Construction Notes: Other items you will need: One set of epoxy Motor One sheet of 120
Measurement Checklist for the Lido for the Championships
 This paper is intended to be a guide for rapid and easy measurement of the Lido 14 to assure painless application of the rules that, in general, govern one design performance and compliance. It is not
Hansa COG 14 th century SCALE: 1/72 Length: 430mm Width: 210mm Height: 330mm
 Hansa COG 14 th century SCALE: 1/72 Length: 430mm Width: 210mm Height: 330mm HISTORY: The Hansa was a medieval association of German cities which engaged by in long distance business mainly in area of
Building a coracle. Let's build a coracle roughly like this:
 Building a coracle Let's build a coracle roughly like this: Modeled loosely as Severn-Ironbridge. Width about 3 1/2' (105 cm), length about 4 1/2' (135 cm), depth about 14" (35 cm). The oval of the gunwale
AUSTRALIAN ARROW AND ARAFURA CADET ASSOCIATION ARROW CATAMARAN RESTRICTIONS AND MEASUREMENT CERTIFICATE
 AUSTRALIAN ARROW AND ARAFURA CADET ASSOCIATION ARROW CATAMARAN RESTRICTIONS AND MEASUREMENT CERTIFICATE 1 NOTE: The object of these restrictions is to provide uniform specifications and restrictions for
Peinert ZEPHYR. Assembly. The Zephyr is easily rigged; there are only three removable parts - the seat, the foot stretcher, and the rigger arm.
 Peinert ZEPHYR Assembly The Zephyr is easily rigged; there are only three removable parts - the seat, the foot stretcher, and the rigger arm. Removal and installation of the seat. If the seat is in the
EPP Version Building Notes Updated
 EPP Version Building Notes Updated 12-10-2013 The Zulu covers a wide range of flying conditions: slope soaring in light to strong lift, thermalling, aerobatics, discus launches, and combat; for skill levels
Dornier Do R 4 Super-Wal
 Dornier Do R 4 Super-Wal Model Aviation Laddie Mikulasko s Dornier Do R 4 Super-Wal Build the multiengine, record-setting seaplane. Article, plans, instructions, and photos by Laddie Mikulasko. Complete
3190A NEO-ANGLE DOOR INSTALLATION INSTRUCTIONS. Series MODEL NO
 NEO-ANGLE DOOR INSTALLATION INSTRUCTIONS Series 30A Please read these instructions carefully to familiarize yourself with the required tools, materials, and installation sequences. The Exploded Diagram
Building a model of a Thames Barge
 Building a model of a Thames Barge Stage 1 : Reading the instructions The model which I purchased is of the Will Everard, a steel-hulled barge built in the 1920's, one of a range of laser-cut kits from
Inuit Owners Manual. Inuit 13.5
 Inuit Owners Manual We have advanced the design and comfort level of the Inuit series beyond any other touring kayak. The Tru-Track hull offers straight tracking despite the shorter hull length plus it
LITTLE TRI construction
 LITTLE TRI construction I have built almost anything that can sail. At the age of 12 my first sail thing, an ice boat. I used skates which had to be mounted on shoes as runners. Big fun, very fast, only
O K D I A MEASUREMENT FORM INTERNATIONAL OK DINGHY CLASS
 O K D I A 2010 MEASUREMENT FORM INTERNATIONAL OK DINGHY CLASS NOTES GENERAL 1. The builder shall pay the current building fee to the National OK Dinghy Association which shall issue a building fee receipt
Parts of the Ship. Terms you should already know
 Parts of the Ship Toronto Brigantine Terms you should already know After-peak Fore-peak Bow Stern Fairlead Scupper Freeing port Hull Deck Lifeline Hatch Skylight Cleat Pin-rail Fife-rail Spider-band Block
PURSUIT. Standard Features. Custom-Height 360 Pinnacle Seat 2017 PRODUCT LIST
 PURSUIT With a hull that maximizes speed and stability, integrated features that keep your deck clean & open, and a comfort-redefining custom-height 360 seat, the Pursuit is not just an entirely new NuCanoe.
Model Aero AT-6 Texan Introduction
 1 Model Aero AT-6 Texan Introduction We are excited to introduce the Model Aero AT-6 Texan! Originally used as an advanced trainer by the U.S. Armed Forces, the AT-6 is a relaxing slow flyer, equally at
Trim Tab Wind Vane for boats with transom mounted rudders
 Trim Tab Wind Vane for boats with transom mounted rudders If your boat has a transom mounted rudder, you can build this self-steering windvane for around $150, using regular wood working tools and some
BUILDING INSTRUCTIONS
 Z I P P M A N U FA C T U R I N G A Zippkits R/C Boat BUILDING INSTRUCTIONS 2010 Zipp Manufacturing Frankfort, New York 13340 www.zippkits.com Table of Contents Introduction 1 Engine Mounting 30 S E C T