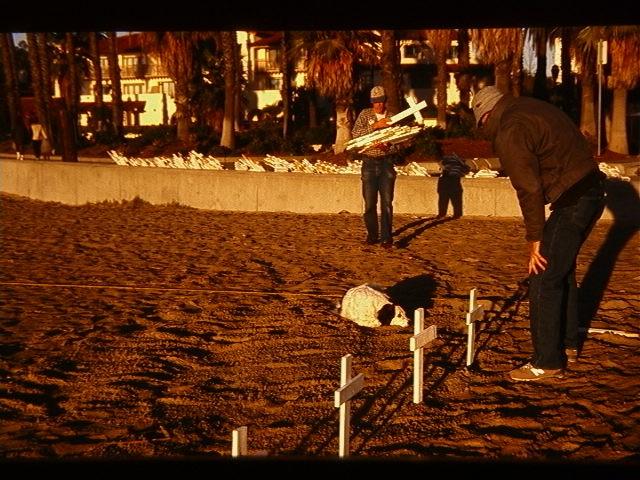
Laying out the Grid Laying out an accurate grid pattern in the sand is very important in order to get the columns and rows straight and true.
|
|
|
- Adelia Sutton
- 5 years ago
- Views:
Transcription

1 Laying out the Grid Laying out an accurate grid pattern in the sand is very important in order to get the columns and rows straight and true. As of this writing, the plot is 72 feet wide by 156 feet deep which will accommodate 650 crosses. As the number of casualties grows, you will have to add additional rows or columns. The crosses are 3 feet apart from side to side and 6 feet apart from front to back.

2 We use 24-inch metal construction stakes for the four corners (any stout stake will work). Drive them deep into the sand so that they won't move. For this description, the rows go from side to side and the columns go from front to back. Standing in front of the plot looking at it, start with the right, front corner. Drive the first stake there. Hook the end of a 100-foot measuring tape to that stake and pull it out to the left. At 72 feet, drive in the second (left, front) stake. With the tape pulled straight and lying on the sand, plant one cross every three feet being careful not to move the measuring tape with the crosses or the line will be crooked. When finished, the front row of crosses will be in. Note: Leave all four of the metal corner stakes in place until the very end.
3
4

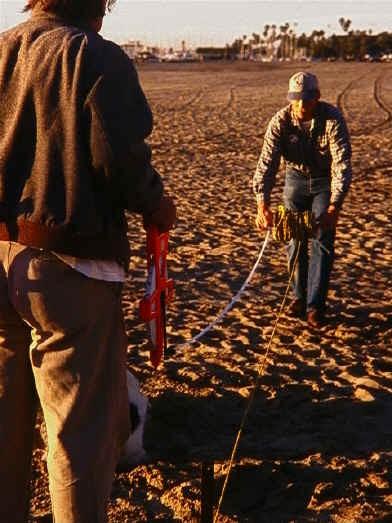
5 To lay out the columns, use a 3/8-inch diameter polypropylene rope on a spool. Pre mark the rope every 6 feet with a piece of red electrical tape. Tie a loop at the starting end of the rope before you begin measuring and applying the red tape marks so that there is 6 feet from the starting loop to the first red tape mark. Hook the end of the rope over the first (right, front) metal corner stake and spool out the rope in the direction of the right rear corner. Square the first corner using the rule. If you can imagine the front row being one side of a right triangle and the right column being other side of that triangle, you can make a square corner by setting the diagonal to the proper length. With the first (right, front) stake as the corner of the triangle, measure 6 feet to the left of the corner stake and make a mark. Then from the same corner, measure 8 feet down the right column and make a second mark there. The diagonal between those two marks should measure 10 feet if the corner is square. To be more accurate you can make the triangle 60 feet by 80 feet with a 100-foot diagonal (same thing only bigger). Pulling the tape marked rope straight, let it relax and lie down on the sand (if you hold too much tension on it, it will stretch and throw your measurements off). At the last tape mark (156 feet or 25 tape marks) drive in the right, rear metal corner stake. Then plant a cross in at each tape mark down the right side column being careful not to move the rope with the crosses. When finished, the right most column of crosses will be in. Note: We use the tape marked rope for convenience but a long tape measure will work just as well.

6 Then unhook the 100 foot measuring tape from the right front corner stake and walk it all the way to the back and hook the end of the measuring tape to the right rear corner stake and pull it tight across the back. Then unhook the rope from the right front corner stake and walk it to the left front corner stake. Hook it over the left, front corner stake and pull the rope out toward the back. Pulling the 100-foot measuring tape and the rope straight, where the 72 foot mark on the measuring tape intersects with the last red tape mark on the rope (remember not to stretch the rope) that's where the last corner stake will go. When finished, all four corner stakes will be in. Then, with the measuring tape pulled straight and lying on the sand, plant one cross every three feet being careful not to move the tape with the crosses (just the same way as the front row). When finished, the back row of crosses will be in. Do the same thing with the rope, planting a cross in at each red tape mark to make your left most column. When finished, the entire perimeter of crosses will be in. If you are installing your crosses on surfaces OTHER THAN SAND, see the instructions for "Surfaces Other Than Sand" below. Note: When you are through with the measuring tape, roll it up carefully while wiping the sand off to avoid sand getting inside the case and jamming up the mechanism. An open reel tape (usually available in 300 foot length) would eliminate the problem of sand getting in the tape housing. Now you are ready to lay out the grid. Unhook the rope from the left front metal corner stake and with a person holding each end of the rope, lift it up, move it over and lay it down at the base of the next cross column to your right (front and rear). With the rope pulled very tight and straight, press the rope into the sand over its entire length. This can be accomplished by carefully walking on it (use two people walking from each end and meeting in the middle and then on the next one walking

7 from the middle back to the ends, alternating on each line) or by rolling a bicycle wheel with the air let out of the tire, over the rope to press the rope into the sand. This is faster than walking on the rope. Repeat this process until you have made a line for every one of the columns. Then simply lift the rope up, swing it around and use the same procedure for all the perpendicular rows. Everywhere two perpendicular lines intersect (rows and columns), plant a cross. Your columns and rows should be straight and true. Finally remove the four corner stakes and replace them with crosses We sometimes use a 3/4 inch steel rod to make holes in the sand to make the crosses go in easier on each mark. If you ram the rod in and wiggle it side to side the cross will go in easier. The wetness of the sand will determine what method is best. The rods double as flag poles

8 Note: These techniques work best if there is some moisture in the sand. With dry, powdery sand, things are a little more challenging. Remember to use rubber mallets to drive in the crosses because metal hammers will tear up the ends and can split the wood. You only need to drive the crosses in far enough to stand up (about 6 or 8 taps with a mallet). You can paint the crosses as they are standing in the sand or pre paint them off site. It takes more time to paint the crosses than to build them. Use cheap exterior water base latex paint (no primer). Surfaces Other Than Sand If you are installing your project on surfaces other than sand (such as grass) you will lay out the perimeter of your plot exactly the same way as described above. However, you will not be able to make a grid pattern with rope impressions as in sand. So, after the perimeter is complete, simply have two people hold each end of the 100 foot tape measure, and move it back to the second row and hold it tightly in place as other volunteers place one cross every three feet until the entire second row is in. Then repeat the process, moving the tape measure back one row at a time until all the crosses are in. Stacking and Transporting We have developed a system of stacking and transporting the crosses that takes up less

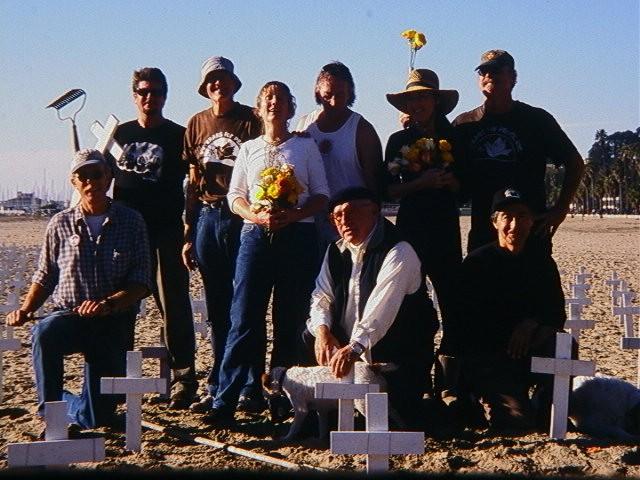
9 space and makes the bundles of crosses easier to handle and transport. For purposes of this description, we call the side of the cross with the short horizontal piece the face side. Stack 4 crosses, side by side and put them down in the sand with the face side up. Then, place the next stack of 4 crosses face down on top of the first stack with the pointed ends of the first stack in the opposite direction so that the two stacks of 4 interlock with each other. Now you have a pack of 8 crosses, face to face with the smooth (back) sides of each stack facing out. Repeat this process until you have a second pack of 8. Stack those two packs together to make a pack of 16. We call this a Dexter Pack after Ron Dexter who came up with the idea. To make things even easier, we tie each Dexter Pack with a piece of cord to keep it together and make it easier to move around and load into a van or trailer. The Crew (#45) Good luck.
10
STATIONARY TRUCK INTERNAL HALYARD CAM CLEAT FLAGPOLES FOR QUICK AND PROFESSIONAL COMMERCIAL INSTALLATION READ ALL INSTRUCTIONS BEFORE PROCEEDING
 9390 South 300 West, Sandy, Utah 84070 801-562-0123 800-782-0500 ColonialFlag.com STATIONARY TRUCK INTERNAL HALYARD CAM CLEAT FLAGPOLES FOR QUICK AND PROFESSIONAL COMMERCIAL INSTALLATION READ ALL INSTRUCTIONS
STATIONARY TRUCK INTERNAL HALYARD V-CLEAT FLAGPOLES FOR QUICK AND PROFESSIONAL INSTALLATION READ ALL INSTRUCTIONS BEFORE PROCEEDING
 9390 South 300 West, Sandy, Utah 84070 801-562-0123 800-782-0500 ColonialFlag.com STATIONARY TRUCK INTERNAL HALYARD V-CLEAT FLAGPOLES FOR QUICK AND PROFESSIONAL INSTALLATION READ ALL INSTRUCTIONS BEFORE
Stand-N-Fish FULL DETAIL INSTALLATION INSTRUCTIONS
 1 Stand-N-Fish FULL DETAIL INSTALLATION INSTRUCTIONS Thank you for purchasing the incredible new Stand-N-Fish Kayak Fishing System. Once installed on your kayak the Stand-N-Fish will take your kayak fishing
Xtender30. Home Batting Cage. Assembly Instructions
 Xtender30 Home Batting Cage Assembly Instructions IMPORTANT DO NOT RETURN THIS BATTING CAGE TO THE RETAIL STORE WHERE PURCHASED. CALL TOLL FREE: (800) 492-9334 IMPORTANT WARRANTY WARNING: DO NOT LEAVE
Hillbilly Golf. Included. Game Building Instructions. 2-foot Fence Building Instructions. Bolo making Instructions
 Hillbilly Golf Game Building Instructions Included 2-foot Fence Building Instructions Bolo making Instructions Minus Bar Building Instructions and Minus bar play rules Plus some Extras! Hillbilly Golf
Basket for Janice. by Beth Hester. GH Productions, Inc. The Basket Maker s Catalog
 Basket for Janice by Beth Hester GH Productions, Inc. The Basket Maker s Catalog Materials are available from your basketry supply store or contact: The Basket Maker s Catalog GH Productions, Inc. 521
Bottle Rocket Launcher P4-2000
 WWW.ARBORSCI.COM Bottle Rocket Launcher P4-2000 BACKGROUND: The Bottle Rocket Launcher allows for the exploration of launching rockets using commonly available materials such as plastic soda bottles and
ROADEO EVENTS LAYOUTS & DIAGRAMS. (January 8, 2018)
") ROADEO EVENTS LAYOUTS & DIAGRAMS (January 8, 2018) 1 The Roadeo Events Layout book was developed as a guide to assist in the set-up of Roadeo events for practice and/or competition. It is recommended that
ROADEO EVENTS LAYOUTS & DIAGRAMS (January 8, 2018) 1 The Roadeo Events Layout book was developed as a guide to assist in the set-up of Roadeo events for practice and/or competition. It is recommended that
Kayak Trailer Project.doc
 Kayak Trailer Project.doc Note: the red trailer shown in some of the illustrations is no longer available from Northern Tools. However, may be able to adapt similar trailer, but measurements may not be
Troyer s Gourd Rack 8 unit F R H O P
 B E A D I M-N L Vertical Parts F R H O P Horizontal Parts C G J Updated 11/16 Parts List A: Top of Pole B: Bottom of Pole C: 48 Ground Stake D: Top Perch rods 48 long E: Hub F: Rope Winder w/ attached
Instructions. Follow All Instructions Before Assembling Or Using This Product
 Instructions Follow All Instructions Before Assembling Or Using This Product IMPORTANT DO NOT RETURN THIS PRODUCT TO THE RETAIL STORE WHERE PURCHASED. CALL TOLL FREE: (800) 492-9334 WARNING: Improper use
Trampoline Installation Instructions
 Congratulations on purchasing an Oz Trampolines Product. Following are detailed setup instructions for your trampoline. Please ensure all boxes and parts are present before continuing. Setting Up Your
How To Measure And Mark Basketball Lines Like The Pros
 Return To The Court Store 48 Cherokee 758 S. Broad Hills Street Drive Toccoa, GA 30577 Rydal, Phone: Georgia 404.915.8352 30171 Fax: 800.470.3537 Mark@thecourtstore.com Phone: 678.528.0354 02/15/2011 Author:
Installation of Nylon Putting NP50
 Installation of Nylon Putting NP50 1. Layout of Green and Existing Ground Preparation Step 1: Determine the size and shape of your green as well as any chipping stations and/or sand traps. Step 2: Measure
Hitching Horses to Get the Most Work Done
 July, 1924 Circular No. 283 UNIVERSITY OF ILLINOIS AGRICULTURAL COLLEGE AND EXPERIMENT STATION Hitching Horses to Get the Most Work Done BY E. W. LEHMANN AND E. T. R obbins TH LIRPARV or THE SEP 17 LY.24
INSTALL INSTRUCTIONS. If YOU can IMAGINE it... WE can BUILD it TIDEWATER SAILCLOTH TENTS
 INSTALL INSTRUCTIONS If YOU can IMAGINE it... WE can BUILD it TIDEWATER SAILCLOTH TENTS WARNING! The safe installation and use of commercial tenting products can vary from site to site and during varying
RATLINER Assembly Instructions.
 Model Shipways Inc. www.modelexpo-online.com RATLINER Assembly Instructions. Patent Pending 1. Remove center stands and braces from the main rigging frame. 2. The Stands and Braces should press release
FREEFORM POOL MEASURING GUIDELINES: HOW TO FILL OUT YOUR FREEFORM FORM!
 FREEFORM POOL MEASURING GUIDELINES: HOW TO FILL OUT YOUR FREEFORM FORM! Read instructions fully and carefully both here and on your Freeform Measurements form. Liners are non-refundable and an error in
A Foundation Of Trust. Hanging By A Thread
 Hanging By A Thread PROPS: Rope maker (See video at DoingWorks.com/movies.) 1 spool of cord for each team [I like to use 10 lb (4 kg test, 525 feet (160 meters) sisal cord] 1 spool of cord to use for demonstration
PULLTARP INSTALLATION & OPERATORS MANUAL
 PULLTARP INSTALLATION & OPERATORS MANUAL Step 1. Mounting Positions Determine the mounting position for your truck Fig. 1 - Fig. 7. Fig. 1 Fig. 2 Fig. 3 A Mount Top Or Bottom Roll B Mount Top Or Bottom
Nice. Nine. Need to. You
 Nine Nice You Need to Okay, it s actually six knots, one sling, one lashing and one handy tip, but who can resist the alliteration? The knots are no big secret. You ll find them in many publications and
Shade Sail Structures
 Shade Sail Structures The Complete How to" Guide Provided by:- Sail Shade World Pty Ltd There are 5 steps in creating a custom made shade sail structure: 1. Planning your structure 2. Installing your fixing
Design Guide. balloons.com
 Design Guide balloons.com Quick Link Tower #40121 Air inflate and attach to uninflated 160. Once column is complete, tie each end of the uninflated 160 into opposite corners of the top square. #12804 Air
a WOW Lab Prep Instructions
 Pulleys and Mechanical Advantage A major step in the prep of this activity is choosing a good location. A key feature is an easily accessible top anchor. Some examples of good anchors are a solid tree
U STAND INSTALLATION INSTRUCTIONS
 U STAND INSTALLATION INSTRUCTIONS Thank you for purchasing the incredible new U STAND by Stand N Fish. Once installed on your kayak the U STAND will enhance your kayak fishing enjoyment to a whole new
Prop Racer System. User Guide V0210
 Prop Racer System User Guide 59718 V0210 Introduction The CO 2 dragster racing activity is popular with older students, but has eluded elementary students due to its complexity. Pitsco s latest race system
FIELD EVENTS DIAGRAMS
 FIELD EVENTS DIAGRAMS Landing System Approach HIGH JUMP The declination in the high jump approach shall not exceed 1:100 (1%). The approach shall consist of a semicircle or rectangle of unvarying surface.
ESOCCI RIGGING MANUAL
 ESOCCI RIGGING MANUAL 1 Spray Covers Hull Rear Iako Forward Iako Ama ESOCCI RIGGING MANUAL 2 When training & racing in outrigger canoes, the canoe is your protector on the water and therefore it is imperative
Deluxe Gourd Racks I D E G A. Parts List. Shown above are parts for the two-level, Deluxe Gourd Rack (DGR 12V)with 12 arms for vertically hung gourds.
with 12 arms for vertically hung gourds.") Deluxe Gourd Racks H F K I D E J C G A Shown above are parts for the two-level, Deluxe Gourd Rack (DGR V)with arms for vertically hung gourds. Parts List Code Quantity A B C D E F G H I J 6, or 4 6, or
Deluxe Gourd Racks H F K I D E J C G A Shown above are parts for the two-level, Deluxe Gourd Rack (DGR V)with arms for vertically hung gourds. Parts List Code Quantity A B C D E F G H I J 6, or 4 6, or
Home Batting Cage. Assembly Instructions
 PowerAlley Home Batting Cage Assembly Instructions IMPORTANT DO NOT RETURN THIS BATTING CAGE TO THE RETAIL STORE WHERE PURCHASED. CALL TOLL FREE: (800) 492-9334 IMPORTANT WARRANTY WARNING: DO NOT LEAVE
To purchase replacement parts and accessories, or to obtain technical assistance, visit:
 IMPORTANT Read this guide and follow all instructions carefully before assembling or using this product. To purchase replacement parts and accessories, or to obtain technical assistance, visit: www.splasharoundpools.com
Installation Instructions
 116-3027, 116-3017 X-Pando Adjustable Steel Protector Installation Instructions 1404 N. Marshall Ave. El Cajon CA. 92020 For technical support call us at (800) 368-3075 NB 6/28/10 607-0112 Step 1. Mounting
Safety System Installation Guide for ARE Wind Poles
 Safety System Installation Guide for ARE Wind Poles V. 1 May 2011 ** Climbing pegs and ladder should be installed before the pole is erected.** A. Install climbing pegs Install climbing pegs (bolt set)
Array Solutions 350 Gloria Rd Sunnyvale, TX Phone FAX
 Array Solutions 350 Gloria Rd Sunnyvale, TX 75182 Phone 972-203 2008 FAX 972-203 8811 E-mail: info@arraysolutions.com Installation Instructions AS-AYL-4 WM Array Solutions K9AY Loop Wire/Mast Kit Thank
A-B Triangulation Freeform Pools: Guide To Measuring Safety Covers
 A-B Triangulation Freeform Pools: Guide To Measuring Safety Covers To ensure accurate measurements, you need to position 2 stakes (one labeled A, one labeled B) at a distance of 10 ft. Depending on landscaping
Getting Started with the Articulated Shank (Version 1) Some ideas for tying different types of articulated flies
 Some ideas for tying different types of articulated flies") Getting Started with the Articulated Shank (Version 1) Some ideas for tying different types of articulated flies Getting Started with the Articulated Shank The Articulated Shank is a fly tying material
Getting Started with the Articulated Shank (Version 1) Some ideas for tying different types of articulated flies Getting Started with the Articulated Shank The Articulated Shank is a fly tying material
Wing assemblyfinal Master 4/29/04 11:20 PM Page 1. Issued January 1, Sabre Aircraft. Assembly Manual. Sabre 16ss Wing
 Wing assemblyfinal Master 4/29/04 11:20 PM Page 1 Issued January 1, 2002 Sabre Aircraft Assembly Manual Sabre 16ss Wing Wing assemblyfinal Master 4/29/04 11:20 PM Page 2 1. 2. 1. Unzip the cover and remove
Push & Pull You can see the forces push and pull at work with this door. We can push the door to close it, or pull the handle to open it.
 Gogglebox Video Script FORCES & MOTION Introduction
NEXT GENERATION FLEX FENCE
 NEXT GENERATION FLEX FENCE Area To Be Fenced.. With Next Generation Flex Fence any post that is not in a straight line with another post must be braced. Layout your fence installation. Determine all end
Instructions. Follow All Instructions Before Assembling Or Using This Product
 Instructions Follow All Instructions Before Assembling Or Using This Product IMPORTANT DO NOT RETURN THIS PRODUCT TO THE RETAIL STORE WHERE PURCHASED. CALL TOLL FREE: (800) 492-9334 WARNING: Improper use
Start by crossing the two sticks or dowels at perpendicular or 90 degree angles.
 Square Lashing Used to fasten two spars or poles together. Start by crossing the two sticks or dowels at perpendicular or 90 degree angles. Make a Clove Hitch on the vertical stick or dowel near the point
SPOOLER INSTRUCTIONS. STEP 12 If you are going to paint your posts, that should be done at this time.
 STEP 4 Starting where you marked the end post location, move down your fence line 6 feet and make another mark. This mark is where your second upright post will be installed. Continuing down the fence
A PRACTICAL GUIDE TO YOUR TRAINING SESSIONS
 A PRACTICAL GUIDE TO YOUR TRAINING SESSIONS WHEN and WHY? Once you have followed the advice in the How to Get Everything Learnt by Opening Day handout you will need to go back and to improve on the basic
Advisor Pack. Balloons and more! Easy to order at balloons.com
 Advisor Pack Balloons and more! Easy to order at balloons.com balloons.com 4 TALL Introducing & Easy Assembly Lasts for Weeks Variety of Colors No Helium Required Everything s Included! 4 Red & Silver
SECTION V. Terminology: Bight: Double Bight: Loop: Turn: Round Turn: Half Hitch: Girth Hitch: Running End: Standing End:
 SECTION V. Terminology: When using ropes, understanding basic terminology is important. The terms explained in this section are the most commonly used in military mountaineering. (a) Bight: A bight of
2010 International Snow Science Workshop
 HOW TO TURN A KIDS BIKE INTO A BOMB TRAM FOR AVALANCHE CONTROL WORK David Immeker* Heavenly Mountain Resort Professional Ski Patrol, South Lake Tahoe, California ABSTRACT: Bomb trams have been used for
Square Diagonal Tripod Japanese Square Filipino Diagonal Round Shear Ladder
 Square Diagonal Tripod Japanese Square Filipino Diagonal Round Shear Ladder Square Lashing - Step by Step Used to fasten two spars or poles together. Start by crossing the two sticks or dowels at perpendicular
Pythagorean Theorem Name:
 Name: 1. A wire reaches from the top of a 13-meter telephone pole to a point on the ground 9 meters from the base of the pole. What is the length of the wire to the nearest tenth of a meter? A. 15.6 C.
PLOT D-FENCE FOOD PLOT SYSTEM. The Power to Plant, Protect, Produce & Provide
 PLOT D-FENCE FOOD PLOT SYSTEM The Power to Plant, Protect, Produce & Provide 1 Food Plot Over-Browse Damage: Many summer annual legume food plot plants like lablab, soybeans and ebony pea are dicotelydons
Plans and Instructions to build a folding reflector oven
 Plans and Instructions to build a folding reflector oven Kayak2go.com also has folding kayak plans available for purchase. The low cost and ease of construction make the folding kayaks a great youth group
GATE INSTALLATION INSTRUCTIONS
 For Technical Support: 1-877-862-7049 GATE INSTALLATION INSTRUCTIONS What You Need: Posthole digger 4 long, 2 diameter galvanized pipe For Loose Soil 3 additional 3 long, 2 diameter galvanized pipe Level,
HEAVY DUTY H.S. DISCUS CAGE NET POLE NET POLE INSTALLATION
 901020 - HEAVY DUTY H.S. DISCUS CAGE NET POLE NET POLE INSTALLATION www.gillathletics.com 800-637-3090 Install the pipe cap (PCAP00158002) at the top of the net pole. Install net pole pulley (73210042)
TR5000 THE TOUGHEST TRAINING SYSTEM ON THE PLANET. MODEL NO. STRIKER TRAINER 2L Escalade Sports
 MODEL NO. TR5000 THE TOUGHEST TRAINING SYSTEM ON THE PLANET. STRIKER TRAINER TM 2L-7250-00 R Escalade Sport products may be manufactured and/or licensed under the following patents. 6419596, 6179733, 5919102,
Retrofitting Green SkiErg Handles
 Materials Needed 1 replacement cord* 1 Bulldog clip Measuring tape or ruler Scissors *Contains lanolin Procedure Overview Remove the SkiErg from the wall or floor stand Remove cover plates Remove old cord
INSTRUCTIONS. for installing ALDON Two-Way LOCOMOTIVE Hinged Derail on wooden ties. For 4-Axle and 6-Axle Locomotives and all Freight Cars
 INSTRUCTIONS for installing ALDON Two-Way LOCOMOTIVE Hinged Derail on wooden ties For 4-Axle and 6-Axle Locomotives and all Freight Cars Manual Lift Sign Holder 4014-18-5-D size 5 4014-18-6-D size 6 4014-18-7-D
LoneStar Fiberglass Pools. Do-It-Yourself. Installation Manual
 LoneStar Fiberglass Pools Do-It-Yourself Installation Manual Chris 1/3/2008 Do-It-Yourself The installation of a LoneStar Fiberglass pool is a much simpler task than most people think. What is important
will not support combustion
 Strain Relief Grips Operating Temperatures Material Temperature Range Aluminum 40 C to +149 C ( 40 F to +300 F) Aluminum deluxe cord grips 34 C to +115 C ( 30 F to +240 F) Non-metallic deluxe cord grips
Claremont Little League Field Maintenance January 27, 2017
 Claremont Little League Field Maintenance January 27, 2017 An electronic copy is available at the Claremont Little League webpage. www.claremontlittleleague.org Go to Manager Info, Field Maintenance. Introduction
Seamanship. A braided line comprises a core of braided or stranded threads covered with a sheath. The center or core of the line gives strength.
 Seamanship 1. Describe the life boat ropes. On a life boat, we rarely use the word rope but rather lines to describe all of the ropes. Moreover, each line has a specific name, such as the painter, halyard
2012 K9100 COMPACT Worldwide Cycling Solutions Through Creative Innovations.
 Home Instruction Sheet Step-1Please check for any missing parts. Model K9100 COMPACT (Basic AirCaddy) aircaddy web page 20 04/03/12 98% (1) T3230-00 METAL WHEEL TRUCK Model K8350 (Aircraft Kit) (Optional)
Scout It Out would like to extend its gratitude to all the sites where the following information had been gathered.
 Rope Work introduces the basic knots that all Scouts and Guides should know. Most of the knots featured here are very useful in Pioneering and should be learnt. This Section does not fully teach the exact
Children s University Tasmania Monthly Challenge Make your own Robo Wheel
 Children s University Tasmania Monthly Challenge Make your own Robo Wheel Have you ever spun a Top? A top is a flywheel, a spinning disc that stores energy. Once a flywheel gets going, the stored energy
How Do I Install My Garden Master Bucket Garden?
 How Do I Install My Garden Master Bucket Garden? 1. On the arrival of your Bucket Garden open the bucket and remove the 4 screws from the outside of the bucket rim and pull the 2 buckets apart. Check the
Trinidad Slat Wall Pool Instructions
 Trinidad Slat Wall Pool Instructions This slat wall above ground pool is installed just like a regular pool except for the pool wall itself. The traditional rolled metal wall is replaced with extruded
Swing Your Partner. by Beth Hester. GH Productions, Inc. The Basket Maker's Catalog
 Swing Your Partner by Beth Hester GH Productions, Inc. The Basket Maker's Catalog Materials are available from your basketry supply store or contact: The Basket Maker's Catalog GH Productions, Inc. 521
ASSEMBLY MANUAL HOBIE CATSY
 ASSEMBLY MANUAL HOBIE CATSY HOBIE CAT EUROPE ZI Toulon Est, BP 50 8078 Toulon cedex 9, France Tel : + (0)9 08 78 78 - Fax : + (0)9 08 99 Email : hobiecat@hobie-cat.net - http://www.hobie-cat.net ASSEMBLY
End. Standing Part. An underhand loop is made by crossing the end under the standing part.
 Knot Board Learn to tie the four basic camping knots as illustrated as well as others you might add. Practice them until you can tie them well. Display them on a knot board made from a square of peg board
Fun Physics Workshop
 Name: University of Cape Town Department of Physics Fun Physics Workshop Equipment checklist. Each group should get the following: 2 tins, saucer, beaker, straws, 2 balloons, tube, wooden balance, 2 weights,
Try it! You ll like it!
 083016 1 Lashing is a method used to join together poles (or spars as they are often called) with rope to build camp projects like wash stands, tables, and even a camp shower! Knowing how to attach two
The Mirror, Rigging and Improving Performance. Series One, Basic Improvements
 The Mirror, Rigging and Improving Performance Short notes to help you towards that elusive goal of perfect performance. Series One, Basic Improvements Angus Carlisle Mirror Fleet Captain, 2005 Ripon Sailing
HOW TO DIG A TEST PIT
 HOW TO DIG A TEST PIT An archaeological test pit is a small 1m by 1m trench dug in a series of layers, or spits, to a depth of approximately 1m. The archaeological materials collected from these layers
Apple Basket with Swing Handle
 Apple Basket with Swing Handle GH PRODUCTIONS, INC. The Basket Maker's Catalog www.basketmakerscatalog.com Materials are available from your basketry supply store, or contact: Copyright 2000 GH Productions,
IF YOU EXPERIENCE ISSUES WITH THIS PRODUCT, DO NOT RETURN TO THE RETAIL STORE WHERE PURCHASED - CALL TOLL FREE: (800) IMPORTANT
 IMPORTANT") Sandlot TM 4-in-1 Model# TSH199PRO Assembly Instructions IF YOU EXPERIENCE ISSUES WITH THIS PRODUCT, DO NOT RETURN TO THE RETAIL STORE WHERE PURCHASED - CALL TOLL FREE: (800) 492-9334 IMPORTANT This product
Sandlot TM 4-in-1 Model# TSH199PRO Assembly Instructions IF YOU EXPERIENCE ISSUES WITH THIS PRODUCT, DO NOT RETURN TO THE RETAIL STORE WHERE PURCHASED - CALL TOLL FREE: (800) 492-9334 IMPORTANT This product
PLAY BETTER GOLF and HAVE MORE FUN
 PLAY BETTER GOLF and HAVE MORE FUN Randy Meyer PGA Table of Contents Chapter Page Teaching Philosophy 1 Philosophy and Approach 3 Swing Fundamentals 2 Pre-swing 4 In-swing 5 Golf Tips 3 Ball position,
Troop 226. Knot Master Program
 Troop 226 Knot Master Program Knots are a skill taught at every level of scouting. The Knot Master program is designed to provide each scout an opportunity to learn essential knots. In addition to learning
-- SGP (NOVA TEAM SQUARE)
") -- SGP-100 -- (NOVA TEAM SQUARE) Installation Instructions Call Jaypro Sports Equipment at 1-800-243-0533 during regular business hours for technical support. www.jaypro.com Rev-B Page 1 of 9 JAYPRO SPORTS
-- SGP-100 -- (NOVA TEAM SQUARE) Installation Instructions Call Jaypro Sports Equipment at 1-800-243-0533 during regular business hours for technical support. www.jaypro.com Rev-B Page 1 of 9 JAYPRO SPORTS
Now that you have a Safety Break or
 The SAFETY BREAK SYSTEM User Instructions push block breaking button Glass Breaking Tools The three-part UN-PLIER CENTER Safety Break Safety Break System and the onepiece M-80 allow glass breaking anywhere
Bladerider X8 Assembly Help Notes
 2.1 Remove All Parts & Have Some Tools Handy Remove all items from the box and identify each part as per the packing sheet and check that nothing is missing. If there is something missing, please email
BEST TIME: Any time, but usually in conjunction with the lesson on selection of fly tackle.
 FLY CASTING INTRODUCTION - lesson plan Phil Genova (deceased) Former Director, Fly Fisher Apprentice and Community Fly Fisher Programs Chair, Federation of Fly Fishers Youth Committee NYS Sportfishing
Attaching the ball Attach the rope to the underside of the middle of the inflatable. The rope will then attach to the ball using a D-ring.
 General info 29 x29 x13 1 operator required 4 players max at one time Max weight per person 225lbs Minimum height 44 maximum height 80 2 x 1.5 hp blower WRECKING BALL Setup Unroll the inflatable onto a
Chapter 2 Rigging. Cutting Wire Rope. Anchoring Wire Rope to Drum. Winding Wire Rope Onto Drum
 Chapter 2 Rigging Cutting Wire Rope The wire rope must be tightly seized on both sides of the point where the wire rope will be cut, as shown in Figure 2-1. Seize the wire rope with either seizing wire
OPPI Rigging Guide 3/2008
 OPPI Rigging Guide 3/2008 McLaughlin Boat Works optistuff.com Thanks for purchasing OPPI, the most durable and F-U-N sailboat available. Rigging your OPPI is easy and the following pictures make it a breeze
ATT-66/96, DENSITY TEST, ASBC CONTROL STRIP METHOD
 1.0 Scope ATT-66/96, DENSITY TEST, ASBC CONTROL STRIP METHOD 1.0 SCOPE This test procedure describes the method of determining the required minimum number of "passes" with approved compaction equipment,
Shoulder Exercises for Combined Labrum Repair Rehabilitation Protocol
 Shoulder Exercises for Combined Labrum Repair Rehabilitation Protocol The exercises illustrated and described in this document should be performed only after instruction by your physical therapist or Dr.
Single scuba tank rack
 How to build a Single scuba tank rack Simple and cheap! Stop that tank rolling around in your car boot or on the boat, build yourself a tank rack. Designed around a 12L steel tank; it also restrains 10L
METHODS EMPLOYED IN LOCATING SOUNDINGS
 METHODS EMPLOYED IN LOCATING SOUNDINGS The soundings are located with reference to the shore traverse by observations made (i) entirely from the boat, (ii) entirely from the shore or (iii) from both. The
PART 5: TEACHING SKIPPING SKILLS
 : TEACHING SKIPPING SKILLS This section includes: Learning skipping skills Skipping skills Individual Skipping skills Partner Skipping skills Long rope Skipping skills Double Dutch There are hundreds of
WHEELCHAIR SKILLS PROGRAM (WSP) 4.1 OBSTACLE COURSE GUIDELINES
 4.1 OBSTACLE COURSE GUIDELINES") WHEELCHAIR SKILLS PROGRAM (WSP) 4.1 OBSTACLE COURSE GUIDELINES WSP 4.1 assessment and training activities can take place in any environment, because the obstacles are based on common ones found in hospitals,
WHEELCHAIR SKILLS PROGRAM (WSP) 4.1 OBSTACLE COURSE GUIDELINES WSP 4.1 assessment and training activities can take place in any environment, because the obstacles are based on common ones found in hospitals,
Heading Drills and Games
 1 Heading Drills and Games German 2 v 2 Heading Game Throw, Head, Catch Crash the Goal Defensive Heading Heading in Midfield Attacking Heading 2 v 2 World Cup Heading Game The Heading Race Head or Catch
The Coach then sorts the 25 players into separate teams and positions
 Section 4 A: Contingency Tables Introduction A local school has a Varsity and Junior Varsity basketball team. No player plays on both teams and no player plays at more than one position. The coach writes
Instructions For: Installing McGregor s Small Animal Garden Fence
 Instructions For: Installing McGregor s Small Animal Garden Fence A hybrid barrier/electric fence Height: 18 Inches Includes directions on how to augment an existing barrier fence with an electric one
5200 Lawrence Place Hyattsville, Maryland 20781, USA Toll Free: Phone: Fax:
 5200 Lawrence Place Hyattsville, Maryland 20781, USA Toll Free: 1-888-416-0174 Phone: 301-277-3888 Fax: 301-277-3323 www.premierkites.com Congratulations on your purchase of the Osprey sport kite. The
Cat Fence Installation Instructions for Regular and Snow Protection Kits with Extra Posts. List of items shown
 CF-INST-E, Rev., 0/7/ Cat Fence Installation Instructions for Regular and Protection s with Extra Posts Attachment Close-up Regular Regular Post with Post Attached A B F K J E C D I G, H L List of items
Konza District Pinewood Derby Track Parts And Assembly Instructions
 Konza District Pinewood Derby Track Parts And Assembly Instructions - 1 - Pinewood Derby Track Parts List: Box 1 of 3 2 each - Race Track Flat Sections 1 each - Race Track Finish Line Section 1 each -
Experimental Procedure
 1 of 15 9/13/2018, 12:47 PM https://www.sciencebuddies.org/science-fair-projects/project-ideas/sports_p060/sports-science/physics-of-baseball-hit-charts (http://www.sciencebuddies.org/science-fairprojects/project-ideas/sports_p060/sports-science/physics-of-baseball-hit-charts)
THE AMERICAN BARN DOOR KITE
 THE AMERICAN BARN DOOR KITE Oregon Kitemaker s Retreat January 2007 Rod Beamguard 4104 NW 112 th Way Vancouver, WA 98685-3578 (360) 574-8050 home (360) 750-9833 office kytfevr@wa-net.com PLANFORM BARN
Keep these things in mind when tying your knots:
 FISHING KNOTS Keep these things in mind when tying your knots: https://www.redington.com/new-to-fly-fishing/knot-tying 1. Wet your knot. Before you tighten a knot, lubricate it with saliva or by dipping
Work Standard CABLE PULLING OPERATIONS
 Page 1 of 19 ****This document supercedes BECo WMS 2.9-1.1**** 1.0 Purpose CABLE PULLING OPERATIONS 1.1 This Work Method Standard prescribes the preferred methods of removing and installing cables between
L.Ph. Bolander & Sons 1355 Evans Ave. 800/
 L.Ph. Bolander & Sons 1355 Evans Ave. 800/434-5611 San Francisco, Ca. 94124 Fax 415/648-0402 GOUNDSET ALUMINUM FLAGPOLE INSTALLATION INSTRUCTIONS STEP 1: DIG THE HOLE TO THE DIMENSIONS LISTED BELOW STEP
STAGE 4 ACTIVITIES YEAR OLD PLAYERS
 STAGE 4 ACTIVITIES 12-14 YEAR OLD PLAYERS NSCAA Foundations of Coaching Diploma NSCAA Foundations of Coaching Activities Stage 4: 12-14 Year Old Players 3V2 TO 6V5 SMALL SIDED GAME This activity provides