1.0 SAFE WORK PRACTICES EMERGENCY RESPONSE Control of Fires Evacuation procedures during a fire alarm
|
|
|
- Beatrix Griffith
- 6 years ago
- Views:
Transcription
1 1.0 SAFE WORK PRACTICES EMERGENCY RESPONSE Control of Fires Evacuation procedures during a fire alarm Chemical Spill Cleanup Procedures Chemical Splash to Eyes Chemical Splash to Skin or Clothing PERSONAL PROTECTIVE EQUIPMENT STORAGE, HANDLING AND DISPOSAL OF CHEMICALS Container labeling and MSDS General Chemical Safety Guidelines Hazardous Waste Disposal COMPRESSED GAS CYLINDERS General-Storing and Handling Use of Compressed Gas Cylinders WORKING ALONE AND AFTER HOURS CHEMICAL FUME HOODS REFRIGERATORS AND WALK-IN FREEZERS OVENS AND MUFFLE FURNACES RECIRCULATING BATHS LABORATORY GLASSWARE ELECTRIC POWER TOOLS HAND TOOLS GAS CHROMATOGRAPH HYDROLAB OHMMAPPER GEL CELLS (SEALED LEAD ACID BATTERIES) BATTERY DISPOSAL LASER RANGE FINDER LASER PARTICLE SIZE ANALYZER DRIVING A VEHICLE SAFETY IN AND AROUND THE VEHICLE GENERAL SAFETY IN THE FIELD SAFETY WHILE WADING PROTOCOL FOR HANDLING IMPORTED SOIL TECHNICON BLOCK DIGEST0R PICOFLUOR HANDHELD FLUOROMETER SORVALL LEGEND T CENTRIFUGE LABORATORY INSPECTION PROCESS CHEMICAL INVENTORY TECHNICON AUTOANALYZER SAFE LIFTING PROCEDURES NOGGIN 500 GROUND PENETRATING RADAR PAPER SHREDDER...53
2 35.0 PAPER CUTTER HALF MASK RESPIRATOR TOC ANALYZER ION CHROMATOGRAPHY...60
3 1.0 SAFE WORK PRACTICES Safe work practices are the responsibility of every lab participant. It is the responsibility of each employee and every student to abide by the rules and regulations established by the University of Calgary including any Response Plans, Standard Operating Procedures or additional procedures defined for a specific worksite or procedure. Each lab participant is required to: 1. Use equipment only for its designated use. 2. Become familiar with the location and use of emergency equipment and facilities, such as: eye wash, safety shower, fire extinguishers, fire alarm pull stations, emergency exits and chemical spill equipment. 3. Never eat, drink, smoke, chew gum, apply cosmetics or manipulate contact lens while in the laboratory. 4. Never leave exposed sharps or broken glass on the lab bench. 5. Never leave open containers of caustics, corrosives or toxic substances on the bench. 6. Clearly label all containers of any substance at the worksite following WHMIS regulations. The label must include the name of the substance (not the chemical formula), the concentration and the major health or physical hazard as specified by the MSDS format. 7. Remove personal protective equipment (gloves, lab coats) before leaving the laboratory. Potentially contaminated equipment must be kept where it will not pose a threat to others. 8. Wash your hands after removing gloves and before leaving the laboratory. 9. Remove or obscure hazard labels from cartons, containers or bottles before discarding. 10. Rinse bottles before throwing in garbage. Never throw chemicals into the trash. 11. Place clean broken glassware in appropriate container under sink in ES Wear appropriate clothing in the lab. Open-toed shoes, bare legs or shorts are not permitted. 13. All University employees, research assistants or students who might work alone (e.g. graduate students) must take a site specific WHMIS course before working with hazardous materials or in laboratory where others use hazardous materials. 14. Laboratory doors should be locked if no one is present. This is a fire and safety issue. 15. Unauthorized individuals must not be allowed in the laboratory. Authorized means having business in the laboratory with the permission of the laboratory supervisor. These persons must be made aware of the hazards and provided with the same protection from hazards as others
4 working in the laboratory. Anyone under the age of 18 must be under the immediate supervision of a qualified authorized person at all times. 16. Use mechanical devices for all pipetting procedures; never pipet by mouth. 17. Be alert to unsafe conditions and call attention to them so corrections can be made. 18. Consider any unlabeled chemical solution to be hazardous until indentified. 19. Place warning labels on hot surfaces. 20. Make sure floors and passageways are free of hazards. 21. Keep clear two passageways to exit doors. 22. Clear space around eyewashes, safety showers and fire extinguishers. 23. Avoid horseplay, practical jokes and other acts of carelessness.
5 2.0 EMERGENCY RESPONSE Type Emergency Medical Emergencies of Who to Call Campus Security (24 hrs) Fire Pull fire alarm (located in hallway by each centre stairwell or in the elevator foyer). Call 911. Chemical Spill Campus Security (24 hrs) Bomb threat Suspicious person Altercation Campus Security (24 hrs) Directions/Procedures Campus security will assist, contact EMS and direct them to your location. EASC and ENSC technologists are trained in First Aid. Proceed to the nearest stairwell. DO NOT use elevators or stairwell by elevators. Once outside move away from the exit and do not reenter unless instructed to do so. Environmental Health and Safety will arrange for help with spill clean up or provide advice on proper clean up procedures 2.1 Control of Fires 1. Know the location of all fire extinguishers and fire pull alarms. 2. A small fire may be extinguished using a fire extinguisher. Remember R.A.C.E. Rescue First clear people from the lab Announce Call 911 and activate the fire alarm. Contain the fire by closing doors. Extinguish the fire only after calling 911, activating the fire alarm and only if you are competent it can be done quickly and successfully. 3. To use a fire extinguisher remember P.A.S.S. Pull safety pin from handle. Aim nozzle at base of fire. Squeeze trigger handle. Sweep from side to side and watch for reflash. When using an extinguisher, always stand between the fire and the exit. Do not underestimate fires and remember that toxic gases and smoke provide additional hazards.

6 4. In the event of a more serious fire, evacuate the lab, activate the nearest alarm and call Personal injuries can result from fires. If a person s clothing catches fire, they should STOP, DROP and ROLL. 2.2 Evacuation procedures during a fire alarm 1. Respond to fire alarms and strobe lights by evacuating your area. 2. Take your personal belongings only if they are within reach. 3. Close all doors behind you. 4. The fire wardens assigned to the Earth Science 9 th floor will ensure that all persons in the area will have received the alarm. 5. If you discover a fire, activate the nearest fire alarm pull station and proceed to nearest safe exit. Do not use the elevators or the stairwell between the elevators. Only the centre stairwells (marked in red below) are fire rated. 6. Once outside, move away form the exit and do not reenter the building until instructed to do so by the City of Calgary Fire Department, Campus Security, Environmental Health and Safety personnel or the Emergency Warden.
7 2.3 Chemical Spill Cleanup Procedures The spill kit is located under the centre bench across from the sink in ES 905. A successful spill clean up is one in which no one gets exposed or injured during the clean up. DON'T RUSH, DON'T WORK ALONE, AND DON'T CLEAN UP A SPILL UNTIL YOU ARE FAMILIAR WITH THE PROPERTIES OF THE CHEMICAL *Remember to check the MSDS (Material Safety Data Sheet) prior to cleaning up any chemical. 1. Warn personnel in the laboratory. If a volatile, flammable, or highly toxic material is spilled, have everybody extinguish flames and turn off spark-generating equipment and evacuate the laboratory immediately. 2. If clothing is contaminated, remove it and use the emergency shower to rinse the affected areas. If contaminates are in your eyes rinse for at least 15 minutes at an eyewash station. Seek medical attention. 3. If there are medical emergencies call Campus Security at for an ambulance. Provide the following information: Your name and phone extension. Exact location of spill (building and room number). Name of material spilled. Quantity of material spilled. Information on injuries to personnel. 4. Obtain the required spill supplies, put on appropriate protective equipment. 5. If non-toxic, non-volatile, non-flammable material is spilled, start to place absorbent materials at the edge of the spill. 6. Always pour the neutralizer or absorbent starting at the edges and moving toward the center of the spill site. 7. Scoop up all absorbed material. Remember, if no neutralizer was used, the absorbed material is still hazardous. 8. Neutralize any residue you are unable to pick up with appropriate absorbent. 9. Wash the affected area with an appropriate cleaning solution (soap and water). 10. Report the spill to your Supervisor. Complete a Campus Incident / Illness Report. 11. Dispose of all cleanup materials as hazardous waste. 2.4 Chemical Splash to Eyes 1. Get to the eye wash station (ES 905) or any source of water immediately and wash the eye out thoroughly with copious amounts of water. Hold the eye open to wash thoroughly behind the eyelid.
8 2. In the absence of an eyewash fountain, place injured person on his/her back and pour water gently into the eye. The injured eye must be held open. 3. Continue washing for at least 15 minutes. 4. Seek medical help by calling Campus Security at Chemical Splash to Skin or Clothing 1. Get to the safety shower immediately (ES 905). 2. Quickly remove all contaminated PPE and clothing WHILE USING THE SHOWER! 3. Flood the affected body area with COLD water for at least 15 minutes. The safety shower dumps a preset volume of water once the pull cord has been activated. 4. Seek medical help by calling Campus Security at Associated SAFE WORK INSTRUCTIONS 1. Personal Protective Equipment 2. Safe Work Practices 3. Storage, Handling and Disposal of Chemicals
9 3.0 PERSONAL PROTECTIVE EQUIPMENT 1. Safety glasses, protective gloves, lab coats and splash guards are provided in the lab. 2. Safety glasses are located on the shelf above the balance in ES 923 and under the fire extinguisher in ES A selection of protective gloves (latex and/or nitrile) is located on the shelf to the right of the sink in both labs. Ensure that the type of glove you are wearing is a suitable protectant for the chemical you are using. 4. The splash guard is located on top of the general chemical storage area in ES Lab coats are provided on coat racks in both labs in case you have forgotten one or do not have your own lab coat. 6. Since the walk-in freezer is set to temperatures as cold as -20ºC, it is necessary to wear cold weather clothing when working inside. With the wind chill from the fans, temperatures are likely to seem colder. If you know you will be working in the freezer, please bring your own gear. There is one set hanging on the coat rack in the ES 923A should you forget your own. 7. When handling samples, crucibles, glassware or other items that have been placed in the oven, use tongs and/or heat resistant gloves to protect your hands. Always wear safety glasses. 8. When removing samples from the muffle furnace, allow the items to cool in the furnace before attempting to remove them. Use heat resistant gloves and/or tongs to remove the samples. Never place warm samples directly on the bench as the countertops are not heat resistant. There are heat resistant bricks located on the side of the furnace to place your samples on when they come out of the furnace. 9. Respirators are provided for the use of the EASC or ENSC technicians only and are kept in their respective offices. They are custom fit for their use only.
10 4.0 STORAGE, HANDLING AND DISPOSAL OF CHEMICALS Noxious Fumes and Vapors Unknown Vapors Chemical Agents Volatile Liquids 1. Chemicals must be stored according to chemical class. 2. Date containers (month/day/year) when received. 3. Chemical storage should be kept to a minimum by storing only for immediate needs. 4. Prior to working with a new chemical, always read the MSDS. 5. Personal protective equipment (PPE) must be worn when working with chemicals. 6. Keep eyewashes and showers, fire extinguishers, fire alarm stations, and exits clear. 7. Never eat, drink, chew gum, apply cosmetics, or wear open-toed shoes in the laboratory. 8. Remove PPE, including gloves, and wash hands before entering common areas. 9. Chemical spill kits must be readily available. 10. Laboratory doors must be kept closed at all times if no one is in the lab. 11. Ensure chemicals are properly labeled and dated (when received). 12. Do not use equipment unless you have been properly trained in its use. 13. Use practices and equipment that minimize hazards. 4.1 Container labeling and MSDS All chemicals must be labeled according to WHMIS rules and regulations. Before working with a chemical, read the MSDS. Links to MSDS information are found on the computer by the Particle Size Analyzer in ES 905. The sign-on password is taped to the CPU. Click on the MSDS icon on the desktop. The chemicals are listed alphabetically. Clicking on the name of the chemical will link to the vendor MSDS. 4.2 General Chemical Safety Guidelines Acids 1. Store large bottles of acids on low shelves or in acid cabinets.
11 2. Segregate oxidizing acids from organic acids, flammable and combustible materials. 3. Segregate acids from bases. 4. Use bottle carriers for transporting acid bottles. 5. Have spill control pillows or acid neutralizers available in the event of a spill Bases 1. Segregate bases from acids. 2. Store large bottles of liquid bases on trays in a cabinet marked Bases. 3. Have spill control pillows or caustic neutralizers available for caustic spills Flammables 1. Only store flammable liquids in a specially equipped explosion proof refrigerator or flammables cabinet. 2. Store in approved safety containers in approved cabinets. 3. Keep away from sources of ignition. 4. Keep fire extinguishing and spill control equipment readily available Oxidizers 1. Store in a cool, dry area 2. Store away from flammable and combustible materials, such as paper, wood, etc Compressed Gases 1. Store in a secure and upright position. Chain individually, 2/3 to 3/4 from the floor up. 2. Indicate: Full or In Use or Empty. 3. When not in use, replace cylinder cap. 4. To transport use a cylinder cart; remove all manifolds, secure cap, and chain tank to cart 4.3 Hazardous Waste Disposal 1. Select a suitable container for the material being disposed. 2. Document and clearly list the contents of the container on the waste sheet attached to the container. 3. Complete the appropriate waste forms. Chemicals must be identified with their chemical name, not chemical formula. Amounts and concentrations must be noted.
12 4. All waste containers must be free from contamination and spills. 5. Do not fill bottles past the shoulder of the bottle. 6. EASC or ENSC technologists will call for hazardous pickup as necessary. 7. On pickup day, containers must be easily assessable. Associated SAFE WORK INSTRUCTIONS 1. Safe Work Practices 2. Personal Protective Equipment 3. Chemical Fume Hoods 4. Emergency Response
13 5.0 COMPRESSED GAS CYLINDERS High Pressure Gases Flammable Gases Explosion Crushing Injuries 5.1 General-Storing and Handling 1. Supervisors shall verify that operators are trained, capable and qualified in the use of compressed gas cylinders before allowing them to be operated. 2. Do not handle oxygen cylinders while wearing greasy or oily gloves. 3. Store all compressed gas cylinders in the upright position. 4. Place valve protection caps on compressed gas cylinders that are in storage and are not being used. 5. Do not lift compressed gas cylinders by the valve protection cap. 6. Store compressed gas cylinders in areas where they will not come in contact with corrosive chemicals or corrosive mists. 7. Do not place compressed gas cylinders against electrical panels or live electrical cords where the cylinder can become part of the circuit. 8. Use a cylinder cart to move cylinders. Secure cylinder to cart before moving. 5.2 Use of Compressed Gas Cylinders 1. Operators shall perform a pre-operational check of all air hoses, couplings and connections to determine if leakage or other damage exists. Be familiar with operator's manual. Do not operate unsafe equipment. 2. Wear appropriate personal protective equipment consistent with hazard and job task. 3. Do not use dented, cracked or other visibly damaged cylinders. 4. Only use an open ended or adjustable wrench when connecting or disconnecting regulators and fittings. 5. Do not transport cylinders without first removing the regulators and replacing the valve protection caps. 6. Close the cylinder valve when work is finished, when the cylinder is empty or at any time the cylinder is moved. 7. Do not store oxygen cylinders near fuel gas cylinders such as propane or acetylene, or near combustible material such as oil or grease. 8. Stand to the side of the regulator when opening the valve. 9. Do not use compressed gas to clean yourself, equipment or work area.
14 10. Open cylinder valves slowly. In order to eliminate possible leakage around the cylinder valve stem, open valves fully when the compressed gas cylinder is in use. Associated SAFE WORK INSTRUCTIONS 1. Safe Work Practices 2. Personal Protective Equipment 3. Hand Tools 4. Emergency Response 5. Storage, Handling and Disposal of Chemicals
15 6.0 WORKING ALONE AND AFTER HOURS Electrical Tripping and Falling Chemical agents Medical emergency Fire/Explosion Volatile liquids Noxious fumes and vapours 1. Do not work alone/after hours without prior approval from the principal investigator. Inform the technician when you will be working and what you will be working with. 2. Working alone where the work has a high potential hazard is strictly prohibited (for example: working with concentrated acids, highly toxic chemicals, open flames). 3. If you must work after hours, you must either work in pairs or institute a regular call out system with another individual. If this individual does not hear from you within a reasonable time, they must call Campus Security at Associated SAFE WORK INSTRUCTIONS 1. Safe Work Practices 2. Personal Protective Equipment 3. Emergency Response 4. Storage, Handling and Disposal of Chemicals
16 7.0 CHEMICAL FUME HOODS Noxious Fumes and Vapors Unknown Vapors Chemical Agents Volatile Liquids Limited Space Poor Ventilation 1. Verify exhaust system is operating before working in the hood. Monitor the dial to verify continued operation. Normal operating pressure is 0.1 Pascal. 2. Procedures which involve the liberation of volatile, flammable or toxic materials must be performed in a fume hood. 3. Work well inside the hood: minimally, 6 inches from the face. 4. Maintain a sash height as feasible within the guidelines of the inspection for the manipulations performed 5. Do not block the air exit slots at the lower rear of the hood 6. Large equipment in the hood creates potentially dangerous zones of turbulence. If this use is necessary, the hood should be so dedicated and not used for other purposes. 7. Keep your head outside the fume hood. 8. Do not overcrowd or clutter the fume hood. 9. Do not store chemicals in the fume hood. Associated SAFE WORK INSTRUCTIONS 1. Safe Work Practices 2. Storage, Handling and Disposal of Chemicals 3. Personal Protective Equipment 4. Emergency Response
17 8.0 REFRIGERATORS AND WALK-IN FREEZERS Cold temperatures Confined spaces Slipping and Falling Ventilation Working Alone Walk-In Freezer 1. No flammable liquids or gases can be stored in this room. This includes Liquid Nitrogen and Dry Ice. 2. Take care when entering the walk-in freezer as there may be ice on the floor and you may slip and fall. 3. If the freezer door is left open for more than 45 seconds an auditory alarm will sound and phone out alarm will also be sent. Closing the door will silence the alarm. 4. You cannot be locked inside the freezer. Push on the mushroom shaped door handle on the inside to release the lock. This emergency release will work even if the freezer is locked. 5. The freezer may be set to temperatures as low as -20ºC and there is a wind-chill from the compressor fans. Dress in winter gear before working in the freezer. Hypothermia may result if you work in the freezer without proper clothing. Take special care to protect your hands and face. 6. Do not work in the freezer without alerting others to your whereabouts and the approximate time that you will be inside. Develop a buddy system so that someone will check on you if you do not come out of the freezer in a reasonable amount of time. 7. No food and/or beverages for human consumption may be stored in the Walk-in Freezer. Refrigerators 1. Special care is necessary to ensure protection from explosion or fire when storing chemicals in a refrigerator. Only explosion-proof refrigerators can be used to store flammable chemicals. Sparking in regular units can ignite and explode fumes. None of the refrigerators in ES 923 or 905 is rated as explosion proof so no flammable chemicals should be stored in them. 2. No food and/or beverages for human consumption may be stored in the laboratory refrigerators. Associated SAFE WORK INSTRUCTIONS 1. Safe Work Practices 2. Working Alone and After Hours 3. Personal Protective Equipment 4. Emergency Response
18 9.0 OVENS AND MUFFLE FURNACES Electrical Shock Hot surfaces Harmful vapour Explosion hazard Burns Ovens 1. Neither of the ovens in ES 923 are explosion proof. Do not place combustible or flammable materials in the ovens as a fire or explosion may result. 2. Fumes and spillage from acidic solutions cause corrosion of the stainless chamber. Care should be taken to maintain a neutral ph at all times. 3. Wear insulated gloves when reaching into a heated oven or handling hot samples. 4. Use heat resistant gloves when reaching inside a hot oven or when removing your samples from a hot oven. 5. Use tongs to remove your samples from the oven. 6. Never stand in front of an open oven. 7. Never place hot samples on the bench tops. Cool samples in the oven prior to removing them. 8. Never place samples directly on the bottom of the oven; use only the racks provided. Muffle furnace 1. Make sure the ventilation hood is over the top vent. Turn on the ventilation (slider switch on front of fume hood) prior to turning on the oven. 2. Cool your samples in the furnace before removing them. 3. Remove samples with tongs. 4. Wear heat resistant gloves when reaching inside a hot furnace or when removing your samples from a hot furnace. 5. Never place hot samples on the bench top. 6. Place hot samples on the heat resistant bricks provided. 7. Use tongs to remove samples from the furnace. 8. Never stand directly in front of a heated furnace. Avoid placing your head or unprotected hands near the oven. 9. Place samples inside the furnace only on the porous ceramic plates or shelf and never directly on the bottom of the furnace. 10. Turn on the venting system when the furnace is in operation. Associated SAFE WORK INSTRUCTIONS 1. Safe Work Practices 2. Emergency Response 3. Personal Protective Equipment
19 10.0 RECIRCULATING BATHS Electrical Shock Temperature Extremes Chemical agents 1. Do not place hands inside the circulator when the pump is running. 2. Do not fill the tank with Antifreeze that contains additives, bleach, concentrated acids or bases, or any flammable liquids. 3. When refrigeration is switched off, it should not be restarted for approximately 10 minutes to allow the internal pressures to equalize. System damage could result if this waiting period is not observed. 4. The tanks are filled with 1:1 antifreeze: water unless otherwise specified. Read the MSDS for antifreeze (ethylene glycol) prior to using the recirculator. 5. Wear safety glasses and wear protective gloves when handling the antifreeze. Associated SAFE WORK INSTRUCTIONS 1. Safe Work Practices 2. Emergency Response 3. Personal Protective Equipment 4. Storage, Handling and Disposal of Chemicals
20 11.0 LABORATORY GLASSWARE Sharp edges Cuts and Abrasions Improper equipment 1. Wear safety glasses at all times. 2. All glassware must be used only for its intended purpose. 3. All glassware will be handled and stored with care to minimize breakage. 4. All clean broken glass must be disposed into the broken glassware container under the sink in ES When cleaning up broken glass, wear protective gloves to avoid cuts. Associated SAFE WORK INSTRUCTIONS 1. Safe Work Practices 2. Personal Protective Equipment
21 12.0 ELECTRIC POWER TOOLS Electrical Shock Noise Pinch Points Dust Sharp Edges and Points Improper Tool Flying particles Cuts and Abrasions When working with power tools, basic safety precautions must always be followed to mitigate the risk of fire, electrical shock and personal injury. 1. Employees should be thoroughly trained before attempting to use any power tool. Read all the instructions for the specific tool including application, operating limitations and potential hazards of each before attempting use. 2. Keep work area clean and uncluttered. 3. Avoid dangerous environments. Do not expose power tools to rain or use in wet or damp locations. Use only in well lit areas. Do not use in the presence of flammable liquids or gases. 4. Guard against electrical shock. Prevent body contact with grounded surfaces. 5. Keep untrained persons away from work area. 6. Store idle tools in the storage room in ES 905. The door to this storage area will remain locked when unattended. 7. Do not force the tool. It will do a better job at the rate for which it was intended. 8. Use the right tool. Do not use a tool for a use for which it was not intended. 9. Dress properly. Do not wear loose clothing or jewelry that could become caught in moving parts. Pull back long hair. 10. Use safety glasses. All persons in the area where power tools are used must also wear safety glasses. 11. Don t abuse the electrical cord. Never carry tool by cord or yank it to disconnect from the electrical receptacle. Keep cord away from heat, oil, and sharp edges. Replace worn or damaged cords. Never use a power tool with a damaged cord. 12. Secure work. Use clamps or vise to hold work. It is safer than using your hand and it frees up both hands to operate the tool. 13. Don t over reach. Keep proper footing and balance at all times. 14. Maintain tools. 15. Disconnect tools when not in use, before servicing and when changing accessories such as blades, bits, cutters etc.
22 16. Avoid unintentional starting. Be sure switch is off when plugging in. Keep hands, body and clothing clear of blades, bits, cutters etc. when plugging in. 17. Stay alert, watch what you are doing and use common sense. Do not operate tool when you are tired, or under the influence of medication, alcohol or drugs. 18. Check for damaged parts and report damage to EASC or ENSC technologist. Do not attempt to use a tool that has damaged parts. 19. Wear ear protection to safeguard against hearing loss. Ear plugs and/or ear muffs are available in ES Tools with sharp edges will be guarded and handled to avoid injury. 21. Do not interrupt a person who is using a power tool. An interruption takes away their concentration from safe procedures and may cause a serious injury. Associated SAFE WORK INSTRUCTIONS 1. Safe Work Practices 2. Personal Protective Equipment
23 13.0 HAND TOOLS Pinch Points Dust Flying particles Improper Tool Sharp Edges and Points Cuts and Abrasions 1. Use the right tool. Do not use a tool for a use for which it was not intended 2. Hammers with metal handles, screwdrivers with metal continuing through the handle and metallic measuring tapes shall not be used on or near energized electrical current or equipment. 3. Tools shall not be thrown from place to place or from person to person. 4. Tools shall never be placed unsecured on elevated places. 5. Wrenches with sprung or damaged jaws shall not be used. 6. Tools with sharp edges shall be stored and handled so that they will not cause injury. 7. Tools with wooden handles that are loose, cracked or splintered will be replaced. The handle shall not be taped or lashed with wire. 8. Tools shall not be left lying around where they might cause a tripping hazard. 9. Eye protection must be used at all times with using hand tools. 10. Never attempt to use a sledgehammer at or above shoulder height. 11. Shovels must never be left lying around with blades in an upright position. Blades, when stepped upon, may cause the handles to fly up and strike you in the face. 12. Long-handled tools must be placed in an upright position when not in use. 13. Pliers must not be used as a substitute for wrenches as they do not hold the work securely and injury may result from slipping. 14. Screwdrivers must not be used as substitutes for punches, hammers, wedges, or similar. Associated SAFE WORK INSTRUCTIONS 1. Safe Work Practices 2. Personal Protective Equipment
24 14.0 GAS CHROMATOGRAPH Explosive Gases Toxic Vapours Asphyxiation Electric Shock Open Flame 1. Be familiar with the operating instructions set forth in the operators manual for the particular GC you are using and follow all manufacture guidelines. 2. Prior to use, perform a check of the GC and ensure that all parts are intact and properly functioning. 3. The column must be connected to the detector before igniting the flame. 4. Always be aware that flame ionization detector (FID) gases (hydrogen and air) form explosive mixtures. All gas connections must be properly leak tested at installation. 5. High-pressure compressed-gas cylinders must be secured to the wall and chained in place or held with a cylinder clamp. 6. When it is necessary to perform maintenance on the GC, the detector gases shall be shut off. 7. The detectors and injectors are kept at a very high temperature and can cause burns when touched. Before working on the detectors or injectors, turn the detector or injector ovens off and allow the detectors or injectors to cool first. 8. Avoid high voltage sources inside the GC. Before removing any external covers, unplug the GC from the electrical outlet. Be sure that any residual current in capacitors has discharged before touching any component of an internal circuit. Work with one hand, using plastic coated tools, and keep the other hand in the air and away from your body to prevent creating a circuit through your heart. Associated SAFE WORK INSTRUCTIONS 1. Safe Work Practices 2. Personal Protective Equipment 3. Emergency Response 4. Storage, Handling and Disposal of Chemicals
25 15.0 HYDROLAB Blunt injury Electrical shock Drowning Slipping and falling 1. Read and understand the Hydrolab manual before attempting use. 2. To avoid potential fatal electrical shock and/or instrument damage, avoid using AC current to power the probe. Use battery power with a combined voltage not to exceed 15 volts. 3. When loosening removable parts from the probe, always point those parts away from your body and other people. In extreme conditions, excess pressure may build up inside any underwater housing, causing the caps, sensors, or other removable parts to disengage with force sufficient to cause serious injury. 4. The probe maximum immersion depth is 225 meters (738 feet). To protect the 1-10 and 0-25 meter depth sensors, install the depth s seal screw in the face of the multiprobe sensor cap. 5. Water can get trapped between the multiprobe battery cap contact surface and the top of the multiprobe compartment 0-rings. To avoid water leaks into the battery compartment during maintenance or replacement, place the multiprobe horizontally on the work surface when removing the batter cap. To avoid water contact with the multiprobe internal components during battery replacement, avoid replacing batteries near any water source. 6. If water leaks into the battery component, remove the batteries, pour the water out and thoroughly dry the compartment with a towel. Then install new batteries. 7. Be cautious on river and stream banks. The rocks may be slippery. Associated SAFE WORK INSTRUCTIONS 1. Safe Work Practices 2. Working in the Field 3. Driving a Vehicle 4. Water Safety
26 16.0 OHMMAPPER Electrical shock 1. Read and understand the OhmMapper manual before attempting use. 2. The transmitter can generate up to 1000 Volts AC at current levels of 16 ma. This can be dangerous under certain circumstances. 3. All batteries should be charged after each use. Write the date of charging on the label. Associated SAFE WORK INSTRUCTIONS 1. Safe Work Practices 2. Gel Cells 3. Battery Disposal
27 17.0 GEL CELLS (SEALED LEAD ACID BATTERIES) Inhalation of dangerous vapours Exposure to dangerous chemicals Burns 1. Gel cells have the potential to be dangerous if not properly installed, maintained or charged. 2. Store cells in a dry ventilated area. 3. Charge batteries in a well ventilated area. 4. Keep battery clear of oxidizers and solvents. 5. Use gloves and safety glasses when working with cells 6. Do not overcharge battery. The charging procedure produces hydrogen gas which is recombined into the electrolyte under normal circumstances. Overcharging the battery can rupture the case and cause exposure to hydrogen gas, lead, lead dioxide, lead sulfate and sulfuric acid. 7. Avoid electrically shorting the battery. 8. If cell ruptures, flush with copious amounts of lukewarm water for a minimum of 15 minutes. Get immediate medical attention for eyes. Wash skin with soap and water. Remove all contaminated clothing. 9. Batteries must be recycled. Associated SAFE WORK INSTRUCTIONS 1. Safe Work Practices 2. Emergency Response 3. Battery Disposal 4. Personal Protective Equipment
28 18.0 BATTERY DISPOSAL Hazardous chemicals All batteries that are considered to be hazardous waste must be collected for pickup by Environment Health and Safety Services. Place all batteries for disposal in the plastic tray under the fume hood in ES Alkaline batteries are disposable or non-rechargeable batteries. They are often GPS units, flashlights, and small electronic equipment. They commonly come in sizes such as AAA, AA, C, D and 9-volt. Alkaline batteries are not classified as hazardous and can be thrown in the garbage. 2. Nickel-cadmium (ni-cad) batteries are the most common type of rechargeable battery. These are often found in cellular phones, equipment, and some toys. They also come in standard sizes such as AA, but often come in widely assorted sizes and shapes. Most equipment that comes with a recharger probably uses ni-cad batteries. Ni-cad batteries contain regulated amounts of cadmium and must be handled as hazardous waste. 3. Lithium ion batteries are rechargeable batteries most commonly found in digital cameras, cell phones and lap top computers. Lithium batteries that are fully discharged are not hazardous and can safely be placed in the garbage. 4. Nickel Metal Hydride batteries are more environmentally friendly than nickel cadmium batteries. These batteries are rechargeable and may be found in camcorders, power tools and cell phones. 5. Silver oxide (button) batteries are commonly used in watches, calculators and hearing aids. These batteries contain a small amount of mercury and should be handled as hazardous waste. 6. Sealed Lead-acid batteries contain regulated amounts of lead and must be disposed as hazardous waste. If any battery is damaged or leaking, over pack it in a container with a tight fitting lid and label it as Hazardous Waste. Be sure to denote the type of battery that is leaking.
29 Associated SAFE WORK INSTRUCTIONS 1. Safe Work Practices 2. Personal Protective Equipment 3. Gel Cells 4. Storage Handling and Disposal of Chemicals
30 19.0 LASER RANGE FINDER Laser damage to eyes 1. Read and understand the Laser Ranger Finder manual before attempting use. 2. The instrument components are rated for a temperature range of -30ºC to +60ºC. Do not expose the instrument to temperatures outside that range. 3. If the instrument becomes wet or damp, towel off the excess moisture and air dry the instrument at room temperature. 4. If there is dust or dirt on the lens, use a lens brush to remove it. Clean lens with a lens tissue and lens cleaning solution (Windex will work). 5. If you won t be instrument again soon, remove the batteries before storing. 6. Pointing the laser at a person s face could result in severe damage to the eyes. Do not look directly into the laser path. Associated SAFE WORK INSTRUCTIONS 1. Safe Work Practices 2. Battery Disposal
31 20.0 LASER PARTICLE SIZE ANALYZER Chemical Agents Cuts and abrasions Laser Sonication Hydrogen Peroxide 1. Read and understand the MSDS for Hydrogen Peroxide prior to using this chemical. 2. Hydrogen peroxide is an oxidizing reagent. It may react violently with air, water or other substances. Avoid contact with skin or eyes and avoid breathing vapour. 3. Wear protective eyewear, a lab coat and gloves when using this chemical. Calgon 1. Read and understand the MSDS for Calgon prior to using this product. 2. This is not a product controlled under WHMIS, however it is considered an eye and skin irritant. 3. Wear protective eyewear, a lab coat and gloves when using this product. Bleach 1. Read and understand the MSDS for Bleach prior to using this product. 2. Avoid contact with skin and eyes and avoid breathing the vapour. 3. Wear protective eyewear, a lab coat and gloves when using this product. Glassware 1. Take care when handling glass (i.e. beakers). Hazardous materials may enter a wound caused by broken glass. Serious lacerations may be caused by the sharp edges of broken glass. 2. Dispose of clean broken glass into the container located under the sink in ES 905. Mastersizer The Mastersizer 2000 optical unit is a Class 1 laser product. The laser passes through the cell area but this area is enclosed when the cell is fitted preventing exposure to laser radiation. When the cell is not fitted, a mechanical shutter prevents exposure to laser radiation. If protective covers are removed, NEVER look directly into the path of the laser. Only Malvern employees and the Earth Science Technician, under the guidance of Malvern Instruments, are allowed to remove the instrument covers. Under no circumstances will any other student or employee be allowed to perform any instrument maintenance.
32 2. Care should be taken to prevent liquid or powder spillages over the covers of the system. Conducting materials or liquids can break down insulation and cause dangerous electrical conditions within the system. 3. The Mastersizer 2000 is plumbed into the distilled water line, however, the valve that should only in be in the ON position while the operator is using the instrument. Should you leave the instrument for more than 5 minutes, the valve should be turned to the OFF position. This water valve must be turned OFF when the instrument is shut down. 4. Due to the possible risk of sonication to the blood, never place fingers into the tank when the ultrasonic probe is in operation. 5. Due to the risk of lacerations, never place fingers in to the tank when the pump/stirrer is rotating. 6. Observe alternate disposal protocol if analyzing samples imported from other countries. These samples must be diverted into the holding tank and treated with bleach (1 part bleach to 6 parts water) before disposing to the drain. Associated SAFE WORK INSTRUCTIONS 1. Protocol for Handling Imported Soil 2. Personal Protective Equipment 3. Storage, Handling and disposal of Chemicals 4. Safe Work Practices 5. Emergency Response
33 21.0 DRIVING A VEHICLE Motor vehicle accident 1. Only properly licensed personnel will operate University or University rented vehicles. Personnel with learner s permits or graduated licenses are not authorized to operate University vehicles. 2. The driver and all vehicle passengers will be properly seated and restrained with seat belts before the vehicle is driven. 3. Vehicle operators will adjust the vehicle speed with respect to visibility, weather and proximity to other vehicles. 4. Operators will not exceed posted speed limits. 5. Equipment will be secured to prevent movement during transport or quick stop. 6. All drivers must have completed a University of Calgary Driver s Authorization form prior to driving. 7. When stopping, vehicles must park away from traffic in safe locations. 8. Cones will be placed behind vehicle to warn other drivers. 9. Go/No Go criteria must be established. Associated SAFE WORK INSTRUCTIONS 1. Safety In and Around the Vehicle 2. General Safety in the Field
34 22.0 SAFETY IN AND AROUND THE VEHICLE Traffic on road 1. The driver and all passengers are required by law to use their seatbelts when the vehicle is in motion. The driver cannot and will not proceed unless everyone is buckled in. 2. Students are not allowed to drive University vehicles (rental or otherwise) without a Driver s Authorization form. 3. Often the van will stop at a site and be parked on the side of the road. You must exercise caution when exiting the van onto the roadway. It is a legal requirement that you wear a reflective vest (which will be provided) if the group stands on the road or road allowance. The van is provided with safety cones or reflectors which will be put out to warn other drivers that there are people on the road. 4. Do not exit the vehicle until instructed to do so by the team leader. Stay with the group and do not wander on to the road. 5. Each van is provided with a first aid kit. Associated SAFE WORK INSTRUCTIONS 1. General Safety in the Field 2. Driving a Vehicle
35 23.0 GENERAL SAFETY IN THE FIELD Tripping and falling Extreme temperatures Falling Rocks/Debris Separation from group Encountering wildlife Heat exhaustion and hypothermia 1. You must use a buddy system while in the field. You and your buddy must never lose sight of each other and in times of increased danger (such as wading in a stream) take special precautions. 2. At no time will you or your buddy wander away from the group without first advising an instructor. 3. Use caution when walking along stream beds as the banks may be slippery or unstable. 4. Use caution when walking below an embankment and watch for falling debris or rocks if other students are walking above you. 5. Use caution while walking on slopes. You may injure yourself or others on loose or slippery rocks. 6. Keep in sight of your group when in dense brush. Compasses and/or GPS units will be provided for those who are required to work away from the group. Appropriate instructions on GPS/compass use will be provided. 7. You must come prepared to be outdoors in all sorts of weather. Dressing in layers is advisable as is having an extra set of clothing in case you get wet. Having a change of clothing may save your life and/or prevent hypothermia. 8. In cold or wet weather, monitor your buddy for the signs of hypothermia (shivering, numbness, lack of coordination, confused or unusual behavior). 9. In hot weather, monitor your buddy for the signs of heat exhaustion (cool, moist, pale or red skin, headache, nausea, dizziness and weakness, exhaustion, normal or slightly elevated body temperature). The best defense against heat emergencies is to drink plenty of fluids, avoiding caffeine. 10. Open toed shoes are not to be worn in the field. You must wear runners or hiking boots. 11. Alert your instructor and your buddy if you have a medical condition that could require immediate assistance (diabetic, asthmatic, bee sting allergy etc.). 12. Be sure that you know which instructors are trained in first aid where they will be at all times. 13. Do not approach wildlife. Caution is advised when working in bear country. Bear spray and instructions will be provided if conditions warrant.
36 14. Wear a hat and use sunblock to protect against the sun s rays. Wearing sunglasses will protect your eyes and reduce glare. 15. Use insect repellant during spring, summer or fall field seasons. In tick infested areas, protect yourself by wearing long-sleeved shirts and pants. Check yourself for ticks after walking in tick infested areas. 16. Drink plenty of water while in the field. Bring a water bottle with at least 1L of water. 17. No chemicals or litter should ever be left in the field. Carry out all your garbage and place the chemical residues in the containers provided. 18. Horseplay in the field will not be tolerated. Associated SAFE WORK INSTRUCTIONS 1. Safety In and Around the Vehicle 2. Driving a Vehicle
37 24.0 SAFETY WHILE WADING Hypothermia Drowning Slipping and Falling 1. If you are unfamiliar with the stream to be sampled or the stream bed is subject to change, then explore the stream bed watching for obstacles or holes. Wade carefully into the stream bed with the aid of a wading stick. 2. Hip or chest waders should be worn as a protection against rocks and cold. 3. You MUST wear a life vest when entering the water. The waders should be worn over top of the life vest (if you fall in the water and need to get out of the waders quickly, you must have easy access to the release clasps). 4. Even if you have waders on, you should never wade deeper than you knees in swiftly moving water. 5. Your buddy should position himself downstream of you and be prepared to throw a rope should you fall in. Associated SAFE WORK INSTRUCTIONS 1. General Safety in the Field
38 25.0 PROTOCOL FOR HANDLING IMPORTED SOIL Contamination of domestic water supply Contamination of landfill 1. Soil permits must be acquired prior to importation of soil from a foreign country. 2. Material must be packaged and transported in sturdy leak-proof containers. Soil should be double bagged in ziplock bags and placed in a plastic container such as Tupperware or Rubbermaid for transport. 3. A copy of the permit must accompany the soil, whether you bring it yourself or it is sent via courier. 4. At all times during importation, research, storage and disposal, the material will be labeled clearly and uniquely. Attach a brightly coloured label to the outer box and include the country of origin, the researcher involved and the words High Risk Material. 5. Give a copy of the permit to the lab manager. 6. The lab manager will keep a logbook of all importations. The logbook will show the following information: date of importation, location of the stored material, the amount of material stored, the status of the material, the disposal date and the amount of material disposed. 7. Gloves, safety glasses and lab coat must be worn when handling material. 8. No soil or any material contaminated with the soil may be thrown down the drain or into the garbage. Care should be taken to minimize spilling. 9. Any soil that is spilled must be cleaned up and placed in a plastic bag marked Residual for disposal, High Risk Material. This bag should be kept with the original sample bags. Any paper towels or gloves used for the cleanup must also be placed in the residual bag. 10. Lab benches and equipment must be washed down after use with a 10% bleach solution. Any paper towels used for wiping up should also be discarded into the residual bag and kept for disposal. 11. All soil samples and residuals must be packaged in an autoclavable bag and safely transported to the autoclave room in the Biological Sciences Building. The samples will be autoclaved for 30 minutes at 15 lbs pressure and 121ºC. 12. Samples that are analyzed for particle size must be diverted into the holding tank and treated with 1 part bleach to 6 parts water, held for 30 minutes and then disposed to the drain. 13. Soil extractants must be treated with bleach (1 part bleach to 6 parts water) before being disposed to the drain. 14. Filters, through which soil has been filtered, must be autoclaved.
39 15. Any glassware used with the soil must be washed down with 10% bleach before being placed in the dishwasher. 16. Samples must not be moved from the storage location except for on-site analysis. 17. Subsamples can not be sent to subcontract labs for analysis. Associated SAFE WORK INSTRUCTIONS 1. Safe Work Practices 2. Personal Protective Equipment
40 26.0 TECHNICON BLOCK DIGEST0R Burns Chemical Splash Heavy lifting Fumes and Vapours Electrical hazard 1. The Technicon Block Digester, located in Science A in the Perchloric Acid Fume Hood room, belongs to Dr. Dennis Parkinson in Biological Sciences (parkinso@ucalgary.ca or ). You must obtain permission to use it. 2. You must sign out the key to this room from Environmental Health and Safety. Call to make arrangements to pick up the key. WHMIS certification is a prerequisite to getting the key. 3. To avoid the danger of acid burns whenever handling the digestor stand, gloves, lab coat and safety glasses and/or must be worn at all times. 4. The door to the room must be shut at all times. If you leave the room, you must LOCK the door behind you to prevent unauthorized entry. 5. If you are working alone in this room, notify another person of your schedule, where you are and when you will be checking in. This person must know what to do and who to notify if you do not check on schedule. 6. The Technicon Block Digestor must be used during regular working hours and never used after hours on weekdays or during the weekend. 7. To avoid acid irritation to the operator and assure the removal of fumes and vapours that issue from the digestion procedure, the Heating Unit must be placed in the fume hood before use. It is heavy and awkward to move. Slide it over the lip of the fume hood and place it so the light indicator is visible. The Unit must be place far enough back in the fume hood so that the sash may be pulled down. Leave the Control Unit on the lab bench. Do not disconnect the Heater Unit from the Control Unit. 8. Start the ventilation in the fume hood by pressing the blue fan button on the wall to the left of the hood. You should hear the fan. 9. On the Control Unit, press the MANUAL button and set the High Temp. Regulator to the required temperature. 10. Plug the Control Unit into the 220V receptacle. To avoid the danger of shock, make certain that the available electrical service is the either 3- wire, 208 volt or 3-wire, 220V. The Heaters Check indicator should fall within the green band. When the temperature in the Heating Unit is reached, this indicator will click off the green band. During the run, the indicator will cycle on and off the green band. 11. During the run, ensure that the indicator light on the Heating Unit remains lit at all times. If it goes out, the block is not heating. The most likely
41 cause for this is a blown fuse (located on the back of the control unit). Extra fuses are found in the drawer below the Control Unit. 12. Carefully insert the digestion tubes into the holes in the rack. When ready, carefully elevate the assembly by grasping the handles provided and place in position on the Heater Unit. As you lift the assembly, each tube will rest on its top rim. Carefully and slowly, lower unit so that each tube enters its respective hole and bottoms in the base. DO NOT let any tube drop into the hole as this may cause the tube to break. The Heater Block is extremely hot. Take precautions that you do not touch it while lowering the rack. 13. Never put your head inside the fume hood to look into the tubes. The acid in the tube may splash up outside of the tube during heating. 14. Lower the sash on the fume hood to the level indicated on the hood during the digestion. 15. If you check on the digestion process, open the sash as little as possible. Wear heat protective gloves to handle the tube and hold the tube opening away from you. 16. When the digestion is complete, turn the Control Unit OFF and remove the plug from the receptacle. 17. Remove the rack from the Heating Unit and place to the side in the fume hood, remembering to close the sash. 18. Let the Heating Unit and rack of tubes cool until they reach room temperature. The top surface of the Heating Block will remain hot for some time. To avoid the possibility of burns, do not touch the surface with bare hands. 19. Remove the Heating Unit from the fume hood and slide it on the bench next to the Control Unit. 20. Turn off the fan to the fume hood by pressing the blue button. 21. Remove rack from fume hood. 22. Wash down the fume hood after each use. The acid used in the digestion is very corrosive to the stainless steel fume hood. Start the wash down procedure by pressing the button on the wall beside the fume hood. The process will stop by itself when a measured amount of water has run through the system. 23. Wash the inside of the hood down by turning on the handheld spray unit. Pull down the sash and spray the walls and ceiling of the fume hood. 24. Turn off the hand held spray. 25. Lock the door to the digestion room when you leave and return the key to the Environmental Health and Safety Office. 26. NOTE: While some methods in the literature employ perchloric acid in the digestion mixture, the explosion hazards with the compound and its salts are well know. PERCHLORIC ACID IS NOT TO BE USED IN THIS TECHNICON DIGESTION SYSTEM.
42 Associated SAFE WORK INSTRUCTIONS 1. Safe Work Practices 2. Emergency Response 3. Personal Protective Equipment 4. Working Alone and After Hours 5. Chemical Fume Hoods 6. Storage, Handling and Disposal of Chemicals
43 27.0 PICOFLUOR HANDHELD FLUOROMETER Chemical exposure Chemical Splash 1. Read and understand the User s Manual before using the instrument. 2. The sample compartment cannot accept glass or quartz cuvettes. Use only the polystyrene cuvettes provided. 3. Take care not to spill samples into the sample container. Promptly wipe any spills up. 4. Do not use corrosive materials in or around this instrument. 5. Remove batteries from the battery compartment between uses. 6. Discard leaking or corrosive batteries. Making up Fluorescein Standards 1. Read the MSDS for fluorescein. 2. Use good laboratory practices when handling this chemical. 3. Avoid breathing dust. 4. Wear safety glasses, a lab coat and gloves when handling this chemical. The dye will stain your skin. 5. Do not pipet chemicals by mouth. Associated SAFE WORK INSTRUCTIONS 1. Safe Work Practices 2. Personal Protective Equipment 3. Chemical Fume Hoods 4. Storage, Handling and Disposal of Chemicals
44 28.0 SORVALL LEGEND T CENTRIFUGE Chemical exposure Chemical Splash Instrument damage if unbalanced 1. During a run, a safety zone of 30 cm (12 inches) around the centrifuge must be maintained where neither persons nor hazardous materials are stationed. 2. Explosive materials, flammable materials or substances prone to react violently with each other must not be centrifuged. 3. Never manually open the lid if the rotor is still turning. 4. Never use the centrifuge with the lid open. 5. Do not tamper with the safety systems that are equipped with the instrument. 6. When transporting or moving the centrifuge, consider its weight. Always grab from on both sides and do not lift by the front panel. 7. Overloading can result in destruction and severe damage to the centrifuge. 8. Borosilicate glass tubes may not be centrifuged over 4000 x g. 9. The rotor must be loaded symmetrically. Failure to do so may cause rotor imbalance leading to significant detrimental wear to the motor and drive system. 10. All positions have to be loaded with identical carrier buckets. 11. The minimum speed for the 750 ml round bucket is 300 rpm. 12. The maximum speed for the 750 ml round bucket is 4150 rpm.


45 Proper loading Improper loading
46 Operation OPEN LID START STOP 1. Turn the main power switch located on the right-hand side of the front panel to the ON position. 2. The instrument will go through an internal check of its software. 3. Open the lid by pressing the open lid key. The lid is closed and locked by slightly pressing down on the front part of the lid. Do not slam the lid. 4. Load the rotor symmetrically. Opposite bores should always receive tubes of equal weight. When centrifuging a single sample, place another tube filled with water on the opposite side. 5. Tubes should never be more than 2/3 full. 6. Use adapters that fit the size of your tubes. 7. Set the acceleration by pressing or until the desired acceleration is reached. Maximum acceleration for this rotor is 4150 rpm. 8. Set the centrifugation time by pressing or in the timing section. Time should be set between 1 min and 9 h 59 min ( ). 9. After entering all the parameters, start the centrifuge by pressing the START key. 10. The centrifuge may be stopped at any time by pressing the STOP key Associated SAFE WORK INSTRUCTIONS 1. Safe Work Practices 2. Personal Protective Equipment 3. Storage, Handling and Disposal of Chemicals
47 29.0 LABORATORY INSPECTION PROCESS 1. The laboratories will be inspected by the EASC and ENSC technologists four times a year (January, April, July, October). 2. Results of previous inspections will be reviewed to ensure compliance. 3. A new copy of the Inspection checklist and the Deficiency Summary Report will be obtained from: spectionchecklist.doc encysummaryreport.doc 4. Results of the inspection will be recorded on the checklist. 5. Deficiencies will be ranked as follows: Ranking Timelines for Correction H(igh) Immediate M(oderate) As soon as possible L(ow) Before next inspection High Hazard = any condition or practice that has potential for causing of of life, body part and/or extensive loss to structure, equipment or material. Moderate Hazard = any condition or practice with potential for causing serious injury, illness or property damage Low Hazard = any condition or practice with a probable potential for causing a non-disabling injury or non-disruptive property damage. 6. Deficiencies will be identified by location, the concern and the corrective action required and noted on the Deficiency Summary Report. 7. If no deficiencies are found, this will be noted on the inspection form. 8. All inspection reports are to reviewed and signed off by the either/both EASC or ENSC Program Director. 9. Copies of the both the Inspection checklist and Summary Report will be archived.
48 30.0 CHEMICAL INVENTORY 1. A chemical inventory will be conducted annually in December by the EASC and ENSC technologist. 2. The inventory must contain: the chemical name, the storage location, the amounts of material present in each location, the CAS #, the physical state, the measure, the manufacturer, the catalog number, and a current MSDS web link. 3. The inventory must be an EXCEL spreadsheet and be saved as Building name.room number. Investigator. Example: ES.ES905.Mottle.xls 4. Completed inventory should be ed to ucsafety@ucalgary.ca
49 31.0 TECHNICON AUTOANALYZER Chemical exposure Chemical Splash Carcinogen Instrument damage Chemical burns 1. All users must be WHMIS certified. 2. Users must read the appropriate MSDS for all the chemicals in the method(s) they are using prior to analysis. 3. Wear a lab coat, safety glasses and gloves at all times. 4. Read and understand the SAFE WORK INSTRUCTIONS on Storage, Handling and Disposal of Chemicals. 5. Read and understand the operating manual for the Technicon Autoanalyzer. 6. Ensure that the distilled wash water carboy is full and the drain carboy is empty. 7. Do not allow the platen to remain down on the rollers for long periods of time when the Pump is not operating. Fixed roller pressure on the pump tubes will damage the tubing. 8. To ensure equipment is maintained, the following should be done after each run: a. Place all reagent and sample lines in distilled water and pump for 15 minutes. b. After 15 minutes, remove lines from water and pump dry. c. Set the Pump Power to off. d. Remove platen from pump. e. Wipe up all spillage and clean module. 9. To ensure equipment is maintained, the following should be done weekly or after 5 uses: a. Lubricate the side rails b. Clean the pump platen and rollers c. Lightly oil the pads on the chain guide and place a few drops of oil into the hole in central area of chain support. 10. To ensure equipment is maintained, the following should be done every 18 months a. Lubricate gears in sampler. b. Oil sampler motor. 11. Never throw chemical or sample waste down the drain or into the garbage. 12. Use caution when handling the chemicals used for each method. Use appropriate cleanup procedures spilled chemicals. Avoid splashing chemicals on skin, clothing or in eyes.
50 13. Use caution when handling samples that have been acid digested. The ph of these samples is around 2 and will cause burns to skin or eyes. 14. Use caution when using or repacking the cadmium reduction column. Cadmium is hazardous if ingested or inhaled. It is a potential carcinogen. Never handle cadmium without wearing gloves. Associated SAFE WORK INSTRUCTIONS 1. Safe Work Practices 2. Personal Protective Equipment 3. Storage, Handling and Disposal of Chemicals
51 32.0 SAFE LIFTING PROCEDURES Injury Preserve your back health by using the following lifting strategies: 1. Before lifting a load, think of other means of moving it using a device that can help you to pull, push or roll the load. 2. Have firm footing and make sure the standing surface that you are on is not slippery. 3. Determine the best way to hold the load using handles, gripping areas or special lifting tools. 4. Facing the load, position your feet about shoulder width apart with one foot slightly ahead of the other. 5. Squat, keeping your back straight by tucking your chin in. 6. Get a firm grip on the load, using your hands not just your fingertips. 7. Tighten your stomach muscles and use large leg muscles to lift.. 8. Lift the load slowly. Lift steadily and smoothly and avoid quick, jerky movements. 9. Hold the load as close to the body as possible; be sure you position the load close to the body before lifting. 10. Do not twist during your lift or when moving the load. Turn with your feet rather than your back. Remember to Turn, don t Twist. Twisting is the most common cause of back injury. 11. Set the load down gently, using your legs and keeping your back as straight as possible. 12. Be sure your fingers are out of the way when putting the load down and when moving the load through tight spaces. 13. Ask for help if you need it and use lifting tools and devices (such as carts, hand trucks or forklifts) whenever they are available. 14. Remember to follow the same procedures in reverse when putting down the load.
52 33.0 NOGGIN 500 GROUND PENETRATING RADAR Electrocution Electromagnetic fields 1. The Noggin poses no risk to health and safety whn operated in the normal manner of intended use. 2. Radio frequency electromagnetic fields may pose a health hazard when the fields are intense. The Noggin is typically operated at a distance of 1m or greater from the operator. Power levels are less than 1 3 mw/cm2 which are 200 to 10,000 lower than mandated limits.
53 34.0 PAPER SHREDDER Cuts 1. Never put fingers or objects other than paper (like paper clips or staples) into the shredder feed opening. 2. Keep jewelry, long hair, ties, lanyards, etc. away from the paper shredder feed opening. 3. Feed paper smoothly into the shredder, not forcing the paper in. 4. If there is a paper jam, and forward and reverse buttons don t move the paper, disconnect the power source before attempting to remove the jammed paper. 5. If the shredder motor overheats, turn off the shredder for at least 15 minutes, allowing the motor to cool before using again. 6. Locate the paper shredder and its power cord outside of foot traffic areas. 7. Always be later and focus on the shredding task when using a paper shredder. 8. Shred paper in small quantities. 9. Always disconnect the power source before removing and emptying the waste box.
54 35.0 PAPER CUTTER Cuts Pinch 1. Keep fingers away from cutting edge. 2. Never try to transport a cutter by the handle or blade. 3. Make sure that the cutting guard is in place. 4. Concentrate on the cutting task and be sure that your hands, fingers and clothing are clear from the blade. 5. Secure the cutter with a locking device after use.
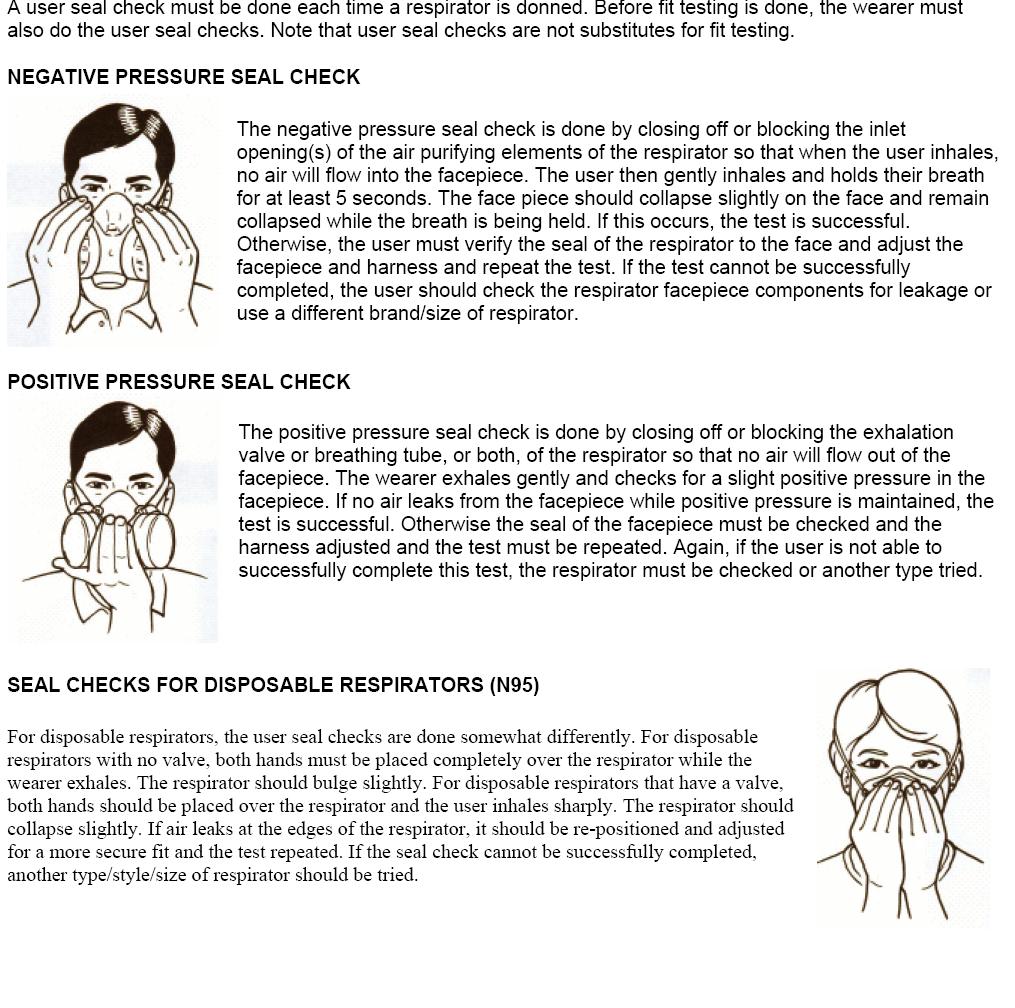
55 36.0 HALF MASK RESPIRATOR Inhalation of acid gases Inhalation of organic vapours The following elements are required for selection, maintenance, use and care of approved half-face and full-face respiratory protection in accordance with the University of Calgary Respiratory Protection Program. Environmental Health & Safety (EH&S) is a resource for all members of the University community for any matters concerning health, safety and the environment at the University of Calgary. EH&S is the liaison between the supervisors and the regulators and provides current information needed to keep in compliance with the appropriate legislation. EH&S coordinates the Respiratory Protection Program as well as the Respiratory Fit Testing & Training Course. RESPONSIBILITIES Supervisors must implement a written hazard control plan in identified airborne hazard work areas that informs and trains workers concerning: 1. Airborne or potentially airborne hazards in the area. 2. Retain training records and all documentation. 3. Implement the rules and standards of the University of Calgary and the Alberta Occupational Health and Safety Act, Regulation and Code. 4. Ensure the availability and proper use of appropriate personal protective equipment and relevant health and safety reference materials. Workers must 1. Follow all health and safety standards, rules and regulations. 2. Report all hazardous conditions to the supervisor immediately. 3. Wear or use prescribed protective equipment. HAZARD COMMUNICATION AND HAZARD ASSESSMENT The supervisor must complete a written hazard assessment (Respirator Selection Information Form) of each specific hazard, must develop safe work procedures to eliminate or reduce those identified hazards, and shall integrate the safe work procedures into the job tasks. The hazard assessment must be communicated and understood by all individuals involved or affected in the work area. A Respirator Selection Information Form is required to choose the correct type of respirator and cartridges.
56 If elimination strategies or engineering and/or administrative control measures have not reduced worker potential exposures below the stated Occupational Exposure Levels (OELs) or the potential of an oxygen concentration of less than 19.5 percent by volume still exists, then appropriate respiratory protection must be provided and available to all workers being exposed. TRAINING & FIT TESTING All tight-fitting (half and full-face-piece respirators, whether negative or positive pressure, must be fit tested. The worker must be fit tested with the same make, model, style, and size of respirator that will be used. The worker must be fit tested prior to the initial use of the respirator, whenever a different respirator facepiece (size, style, model or make) is used, and at least annually thereafter. All workers who require respirators for their work must have training in a Respiratory Fit Testing Course conducted by EH&S. Workers must bring a written hazard assessment (Respirator Selection Information Form) with them to the Respiratory Fit Testing Course. Workers will not be trained or fit tested without the written hazard assessment. RESPIRATORY PROTECTION SELECTION A written hazard assessment (Respirator Selection Information Form) is required to assist in selecting the appropriate type of respirator and cartridges. Contact EH&S for recommended manufacturer s and styles of respiratory protective equipment. USE AND CARE OF RESPIRATORS Respirators are to be used for non-routine and infrequent tasks where other hazard control strategies are not practicable. All workers wearing respiratory protective equipment must be clean-shaven where the respirators face piece seals against the worker s face. Workers with facial hair, like beards, long sideburns, or even a two-day stubble may not wear respirators because the hair breaks the seal between the skin and the respirator mask. Wearing eyeglasses may also break the respirator seal. This means that the respirator mask will leak and not provide the needed respiratory protection. All workers wearing respiratory protection must conduct a field check (positive and negative pressure test) to check the effectiveness of the respirator seal each time the respirator is donned. See Safety Bulletin Respirator Equipment User Seal Check Respirators must be inspected before and after each use according to the manufacturer s directions. Respiratory protective equipment that is not used routinely, but kept ready for emergency situations, must be inspected once per month by to verify its satisfactory working condition. Respirators must be:
57 Stored in a readily accessible location, Stored in a manner that prevents contamination, for example in a SEALED plastic bag (a zip-lock type), Maintained in a clean and sanitary condition, Maintained and used according to the manufacturers specifications. Follow the manufacturer s specific instructions for use, care, and maintenance of respiratory protection equipment. MEDICAL SURVEILLANCE Prior to respirator fit-testing, workers must complete a health surveillance questionnaire to be reviewed by a medical professional. A physician should examine the medical and psychological fitness of workers. This should be done before they are assigned to complete work in areas where respirators may be required. The workers must be physically fit to carry out the work while wearing respiratory equipment and be comfortable about wearing respirators. REFERENCES AND ADDITIONAL RESOURCES University of Calgary Asbestos Management Program University of Calgary Occupational Hygiene Program University of Calgary Respiratory Protection Program
58
Safety Rules for the Science Lab
 Science 10 Safety in the Science Lab Name: Date: Block: Safety Rules for the Science Lab DRESS CODE 1. To protect your eyes from possible injury, wear safety goggles whenever you are working with chemicals,
1. Safety glasses are to be worn at all times in the laboratory except in the study area adjacent to the lab.
 SAFETY RULES page 1 General Precautions 1. Safety glasses are to be worn at all times in the laboratory except in the study area adjacent to the lab. 2. No horseplay. This includes running, throwing of
Laboratory Safety Training. Environmental Health and Safety
 Laboratory Safety Training Environmental Health and Safety Why You Need Lab Safety Training Hazardous materials and/or equipment. You need to understand the risks and how to mitigate them. OSU requires
LABORATORY SAFETY INSPECTION
 LABORATORY SAFETY INSPECTION DATE: P.I./LAB MANAGER(S): PHONE(S): DEPARTMENT: BUILDING: ROOM(S) INSPECTED: INSPECTOR(S): TIME IN: TIME OUT: TOTAL TIME: LAB TYPE: DISCIPLINE: General Laboratory Safety S
Student Information & Laboratory Safety Contract
 Student Information & Laboratory Safety Contract Mrs. Mawhiney Student Information Last Name First Name Preferred Name Home Address (including ZIP) Home Phone student e-mail Parent/Guardian Name Relationship
Guide to Safety in the Science Classroom
 ECC Health & Science Building Guide to Safety in the Science Classroom SC 1000 Laboratory Safety for Students East Central College 1964 Prairie Dell Road ~ Union, Missouri 63084 Phone: (636) 584-6500 ~
UNH Department of Forensic Sciences
 UNH Department of Forensic Sciences LABORATORY SAFETY RULES, PRACTICES AND AGREEMENT (Professors, Graduate Students, Research Assistants, Teaching Assistants, Students Working on Research Projects and
1b. Slipping; tripping; getting knocked into by pedestrians.
 MAINTAINING AND REPAIRING HYDRAULIC AND TRACTION PASSENGER AND FREIGHT ELEVATORS AND HANDICAP EQUIPMENT Activity Hazard Identification Required Precautions 1. Walking to and from work site. 1a. Back ache;
SAFETY ORIENTATION. University of Evansville Department of Chemistry
 SAFETY ORIENTATION University of Evansville Department of Chemistry Safety Topics 1. Personal Protection and Proper Attire 2. Personal Hygiene and Conduct 3. Proper Handling of Chemicals 4. Safety Equipment
General Safety Rules
 General Safety Rules 1. The goggles provided by the university are to be properly worn at all times in the lab. 2. You are to be properly dressed in the lab. a. Close-toed shoes. b. At least a short sleeve
STANDARD OPERATING PROCEDURES (SOP) FOR REPRODUCTIVE HAZARDS
 FOR REPRODUCTIVE HAZARDS") STANDARD OPERATING PROCEDURES (SOP) FOR REPRODUCTIVE HAZARDS INTRODUCTION: Standard operating procedures (SOP) are intended to provide you with general guidance on how to safely work with a specific class
STANDARD OPERATING PROCEDURES (SOP) FOR REPRODUCTIVE HAZARDS INTRODUCTION: Standard operating procedures (SOP) are intended to provide you with general guidance on how to safely work with a specific class
Lab: Safety Due: Lab # 0
 Name: Lab Section: Lab: Safety Due: Lab # 0 Purpose Science is a hands-on laboratory class. You will be doing many laboratory activities which require the use of hazardous chemicals. Safety in the science
General Precautions for handling compressed gases
 General Precautions for handling compressed gases Introduction Compressed gas cylinders can be extremely hazardous when misused or abused. Compressed gas cylinders can present a variety of hazards due
CHEMISTRY FACULTY LABORATORY SAFETY CONTRACT CENTRAL CAMPUS
 CHEMISTRY FACULTY LABORATORY SAFETY CONTRACT CENTRAL CAMPUS Potential hazards exist in all chemical laboratories and some can cause serious accidents. Fortunately, most accidents can be prevented if each
University of New Haven DEPARTMENT OF CHEMISTRY and CHEMICAL ENGINEERING
 University of New Haven DEPARTMENT OF CHEMISTRY and CHEMICAL ENGINEERING A. Instructions: Student: Read carefully the following laboratory rules, safety precaution, and regulations. Your laboratory conduct
1/4 SHEET PALM SANDER
 1/4 SHEET PALM SANDER OWNER S MANUAL WARNING: Read carefully and understand all ASSEMBLY AND OPERATION INSTRUCTIONS before operating. Failure to follow the safety rules and other basic safety precautions
EHS-SWP-140. Safe Work Practice. Animal Projects with Chemicals. 1.0 Hazard Description
 EHS-SWP-140 This document is to be used when completing the hazard assessment portion of an Animal Use Protocol. Safe Work Practice Animal Projects with Chemicals 1.0 Hazard Description Chemicals utilized
Chemical Spill Clean-up Protocol
 Protocol Department of www.rms.ubc.ca UBC-RMS-OHS-PRO 17-002 Date created: November 3, 2015 Date revised: April 28 th, 2017 Chemical Spill Clean-up Protocol Scope Laboratory-specific safe work procedures
Standard Operating Procedure
 Standard Operating Procedure Cleaning Ni Columns Department: Date SOP was written: Date SOP was approved by PI/lab supervisor: 12/29/2012 Reviewed by: Principal Investigator: Internal Lab Safety Coordinator/Lab
Biology Lab Safety Procedures and Information
 Biology Lab Safety Procedures and Information Health and safety are paramount values in science classrooms, laboratories and field activities. You are expected to learn, understand and comply with ACC
Section 2 Safety, Tools and Equipment, Shop Practices Unit 4 General Safety Practices. Unit Objectives. Pressure Vessels and Piping (1 of 2)
") Section 2 Safety, Tools and Equipment, Shop Practices Unit 4 General Safety Practices Unit Objectives After studying this chapter, you should be able to: Describe proper procedures for working with pressurized
Section 2 Safety, Tools and Equipment, Shop Practices Unit 4 General Safety Practices Unit Objectives After studying this chapter, you should be able to: Describe proper procedures for working with pressurized
Katy Independent School District Science Safety Rules
 Katy Independent School District Science Safety Rules PURPOSE Science is a hands-on laboratory class. You will be doing many laboratory activities which may require the use of hazardous chemicals or potentially
Laboratory Personal Protective Equipment & Hazard Assessment Tool
 Laboratory Personal Protective Equipment & Hazard Assessment Tool This form must be completed by the person in charge of the laboratory, with the guidance of the Chemical Hygiene Officer to conduct a laboratory
Wolfson Campus Natural Science Department. Biology Laboratory. Student Safety Contract
 Wolfson Campus Natural Science Department Biology Laboratory Student Safety Contract July 2000 Wolfson Campus Student Safety Contract-Biology Laboratory Purpose The Biology laboratory is a hands-on learning
High School Safety Acknowledgment Form
 High School Safety Acknowledgment Form Note to science teachers and supervisors/administrators: Safety is the most important part of a science lesson. This includes monitoring student behavior and taking
Research Laboratory Safety Self-Inspection: Chemical & Physical Safety Checklists
 Research Laboratory Safety Self-Inspection: Chemical & Physical Safety Checklists Principal Investigator: Lab Building: Lab Rooms: Department: Inspector Name: Inspection Date: Question Y N NA Comments
INTENDED USE TECHNICAL SPECIFICATIONS
 1/2IN. HEAVY-DUTY AIR IMPACT WRENCH OWNER S MANUAL WARNING: Read carefully and understand all INSTRUCTIONS before operating. Failure to follow the safety rules and other basic safety precautions may result
Chemistry Safety Packet
 Chemistry Safety Packet Mr. Buchanan Chemistry TO THE STUDENT Chemistry is exciting! Each day in the laboratory you are given the opportunity to confront the unknown, and to understand it. Each experiment
Laboratory Emergency Response & Incident Reporting Guide. Occupational & Environmental Safety Office Duke University Health System.
 Laboratory Emergency Response & Incident Reporting Guide Occupational & Environmental Safety Office Duke University Health System Quick Reference Revised 2016 Blood/Body Fluid Hotline From a Duke phone...
Standard Operating Procedure #COE-SOP-0001 Chemical Fume Hood Operation
 Standard Operating Procedure # Chemical Fume Hood Operation Facility: NMSU College of Engineering Laboratories Written by: Juanita Miller, Safety Specialist, miljgh@nmsu.edu (575)-646-1292 Scope: This
Operations: HSE. Health and Industrial Hygiene. Laboratory Safe Work Practice
 Operations: HSE Health and Industrial Hygiene Laboratory Safe Work Practice Page 2 of 8 AMENDMENT RECORD Amendment Date Revision Number Revision Number 08/11/2016 4 Authority: Health Manager Custodian:
INDUSTRIAL - SOLVENT PARTS CLEANER
 INDUSTRIAL - SOLVENT PARTS CLEANER OPERATION & INSTRUCTION MANUAL I. Introduction A. Manufacturer s Statement CM400 This manual will provide you with important information about the Solvent Parts Cleaners
Standard Operating Procedure (SOP)
") Microwave Digester #1 General Process Description Standard Operating Procedure (SOP) This instrument is used to digest small amounts of material for chemical analysis (ICP), by placing the sample in a
Microwave Digester #1 General Process Description Standard Operating Procedure (SOP) This instrument is used to digest small amounts of material for chemical analysis (ICP), by placing the sample in a
HAZARDOUS WASTE OPERATIONS AND EMERGENCY RESPONSE PLAN Kenyon College
 HAZARDOUS WASTE OPERATIONS AND EMERGENCY RESPONSE PLAN Kenyon College PURPOSE The purpose of this Emergency Response Plan is to plan for and execute an organized response to hazardous waste spills or releases
1/2 in. AIR IMPACT WRENCH (TWIN HAMMER)
") 1/2 in. AIR IMPACT WRENCH (TWIN HAMMER) WARNING Read Operator s Manual. Do not operate equipment until you have read this Operator s Manual for Safety, Assembly/Operation and Maintenance Instructions.
1/2 in. AIR IMPACT WRENCH (TWIN HAMMER) WARNING Read Operator s Manual. Do not operate equipment until you have read this Operator s Manual for Safety, Assembly/Operation and Maintenance Instructions.
Composite Pistol-Type Air Needle Scaler OWNER S MANUAL
 Composite Pistol-Type Air Needle Scaler OWNER S MANUAL WARNING: Read carefully and understand all INSTRUCTIONS before operating. Failure to follow the safety rules and other basic safety precautions may
OWNER S MANUAL. Page: 1 of 8
 Air Needle Scaler OWNER S MANUAL WARNING: Read carefully and understand all INSTRUCTIONS before operating. Failure to follow the safety rules and other basic safety precautions may result in serious personal
Section 1. Contact Information. Procedure Title: Procedure Author: Date of SOP Creation/Revision: Name of Responsible Person: Location of Procedure:
 Western Carolina University Standard Operating Procedure for the use of Sodium amide This is an SOP template for a specific chemical or class of chemicals and is not complete until: 1) lab specific information
TEMPLE UNIVERSITY A Commonwealth University Environmental Health & Radiation Safety (EHRS)
") Page 1 of 8 TEMPLE UNIVERSITY A Commonwealth University Environmental Health & Radiation Safety (EHRS) Standard Operating Procedure (SOP) Bromodeoxyuridine (BrdU) Principal Investigator: Room & Building
Page 1 of 8 TEMPLE UNIVERSITY A Commonwealth University Environmental Health & Radiation Safety (EHRS) Standard Operating Procedure (SOP) Bromodeoxyuridine (BrdU) Principal Investigator: Room & Building
Laboratory Self Inspection Checklist LAB01
 Laboratory Self Inspection Checklist LAB01 General Chemical/Biological Laboratories Location Assessor Date This core checklist is provided by the Health and Safety Department as a template, which provides
STANDARD OPERATING PROCEDURE (SOP): URETHANE
: URETHANE") TEMPLE UNIVERSITY A Commonwealth University Environmental Health & Radiation Safety (EHRS) STANDARD OPERATING PROCEDURE (SOP): URETHANE LABORATORY/USER INFORMATION Principal Investigator (PI): Phone #
TEMPLE UNIVERSITY A Commonwealth University Environmental Health & Radiation Safety (EHRS) STANDARD OPERATING PROCEDURE (SOP): URETHANE LABORATORY/USER INFORMATION Principal Investigator (PI): Phone #
Hazardous Materials Spill Response
 Hazardous Materials Spill Response The University of Iowa Rev. 02/10 Department Lab/Room Number PI/Lab Coordinator After Hours Contact Number University Public Safety (Phone 911) Fire, Police, Ambulance
Safety & Class Contract
 Safety & Class Contract Required of ALL High School Science Students I will:! Follow all instructions given by the teacher and/or in the lab handout.! Protect my eyes, face, hands, and body when involved
How Environment-friendly Is Your Home?
 How Environment-friendly Is Your Home? Topic Producing an environmental profile of the home Introduction More new houses are being built with the environment in mind. They can have energy-saving features
NOTE: Parts are no longer available for this tool. The manual will continue on the next page.
 NOTE: Parts are no longer available for this tool. The manual will continue on the next page. Form Z455 Date 12-97/D Page 1 of 6 INSTRUCTIONS & PARTS LIST FOR SIOUX 8200 POLISHER GENERAL SAFTEY RULES READ
Section 1. Contact Information. Procedure Title: Procedure Author: Date of SOP Creation/Revision: Name of Responsible Person: Location of Procedure:
 Western Carolina University Standard Operating Procedure for the use of Acetaldehyde This is an SOP template for a specific chemical or class of chemicals and is not complete until: 1) lab specific information
RECOGNIZING LABORATORY SAFETY
 INTRODUCTION: RECOGNIZING LABORATORY SAFETY An important part of your study of biology will be working in a laboratory. In the laboratory, you and your classmates will learn biology by actively conducting
AC1810 / AC1810-A TECHNICAL SPECIFICATIONS. Operating Pressure psi ( kgs/cm²) [AC1810] Displacement. Net Weight
![AC1810 / AC1810-A TECHNICAL SPECIFICATIONS. Operating Pressure psi ( kgs/cm²) [AC1810] Displacement. Net Weight](/thumbs/83/88369739.jpg "AC1810 / AC1810-A TECHNICAL SPECIFICATIONS. Operating Pressure psi ( kgs/cm²) [AC1810] Displacement. Net Weight") Technical Specifications Operating Instructions Maintenance Information Troubleshooting Guide Parts Diagrams AC1810 / AC1810-A THE EVOLUTION OF PERFECTION CAUTION: Before attempting to use or service this
Technical Specifications Operating Instructions Maintenance Information Troubleshooting Guide Parts Diagrams AC1810 / AC1810-A THE EVOLUTION OF PERFECTION CAUTION: Before attempting to use or service this
LABORATORY SAFETY. A general overview
 LABORATORY SAFETY A general overview INTRODUCTION Environmental protection, Occupational Safety and Health are the Responsibility of all staff, students and collaborators working at ETH. OBJECTIVES General
Hudson City School District. Student Safety Contract
 Hudson City School District Student Safety Contract Purpose To all Students The following rules and regulations are extremely important to your safety in many areas of the school environment. Your instructor
Salt Lowers the Freezing Point of Water
 Salt Lowers the Freezing Point of Water Topic Sodium chloride (NaCl), salt, lowers the freezing point of water. Introduction Salt is added to ice in ice cream freezers because salt lowers the freezing
OKLAHOMA CITY COMMUNITY COLLEGE PERSONAL PROTECTIVE EQUIPMENT PROGRAM. Environmental Health and Safety
 OKLAHOMA CITY COMMUNITY COLLEGE PERSONAL PROTECTIVE EQUIPMENT PROGRAM Environmental Health and Safety Reviewed and Revised: August 28, 2008 Reviewed and Revised: August 6, 2010 Reviewed and Revised: September
U.S. CONCRETE, INC. SAFETY POLICY and PROCEDURE MANUAL
 SAFE -14 Page 1 of 8 U.S. CONCRETE, INC. SAFETY POLICY and PROCEDURE MANUAL FUNCTION Safety TOPIC Hotwork Permit Program OBJECTIVE(S): GENERAL POLICY: To provide a work atmosphere that is conducive to
Northern Kentucky University Issue Date: 11/02/2018 Revised Date: Title: PERSONAL PROTECTIVE EQUIPMENT PROCEDURE OBJECTIVE AND PURPOSE
 Northern Kentucky University Issue Date: 11/02/2018 Revised Date: Policy Link: Occupational Safety Policy Title: PERSONAL PROTECTIVE EQUIPMENT PROCEDURE OBJECTIVE AND PURPOSE The objective of this procedure
BIOSAFETY SELF AUDIT PRINCIPAL INVESTIGATOR/PERMIT HOLDER: CONTAINMENT LEVEL: 1 2 (Shaded) RISK GROUP: 1 2 AUDIT TO BE COMPLETED BY (DATE):
 RISK GROUP: 1 2 AUDIT TO BE COMPLETED BY (DATE):") Page 1 of 5 BIOSAFETY PROGRAM BIOSAFETY SELF AUDIT PRINCIPAL INVESTIGATOR/PERMIT HOLDER: SELF AUDIT COMPLETED BY: LABORATORY ROOM NUMBER: CONTAINMENT LEVEL: 1 2 (Shaded) RISK GROUP: 1 2 DATE OF AUDIT:
Page 1 of 5 BIOSAFETY PROGRAM BIOSAFETY SELF AUDIT PRINCIPAL INVESTIGATOR/PERMIT HOLDER: SELF AUDIT COMPLETED BY: LABORATORY ROOM NUMBER: CONTAINMENT LEVEL: 1 2 (Shaded) RISK GROUP: 1 2 DATE OF AUDIT:
OSHA Office of Training and Education 2
 The Occupational Safety and Health Administration aims to ensure employee safety and health in the United States by working with employers and employees to create better working environments. Since its
LABORATORY HAZARD AWARENESS TRAINING
 Open minds. Open doors. TM LABORATORY HAZARD AWARENESS TRAINING FOR NON LABORATORY PERSONNEL Objectives Hazard Awareness Be familiar with the hazards, warning signs and labels Protective measures PPE Training
Laboratory Safety Inspection Checklist
 Conducted By: Date of Inspection: Location: Safety and Risk Management Office Laboratory Safety Inspection Checklist Principal Investigator/Supervisor: General Lab Housekeeping A M S NO NA Comments Laboratory
Safe Work Instructions For Oxygen Acetylene Equipment
 Safe Work Instructions For Oxygen Acetylene Equipment Policy Sponsor: Assistant Vice President Facilities Management Responsible Unit: Trade Services Approval Date: September 2010 Revisions: January 2018
Hazardous Materials Spill Response
 Hazardous Materials Spill Response The University of Iowa Rev. 01/2019 Department: Lab/Room Number: PI/Lab Coordinator: After-hours Contact Number: University Public Safety - 911 Fire, Police, Ambulance
EMERGENCY PHONE NUMBERS
 EMERGENCY GUIDE EMERGENCY PHONE NUMBERS 434-592-3911 or 3911 (Campus Phones) EMERGENCY STATUS In the event of a major emergency affecting the campus, check the Emergency status web page: http://www.liberty.edu/index.cfm?pid=18468
Lecture Demonstrations Safety Manual & New Staff Induction
 Lecture Demonstrations Safety Manual & New Staff Induction Overview The lecture demonstrations team provides and maintains demonstrations to lectures, tutorials and outreach. Demonstrations and equipment
Western Sydney University Safety Inspection Checklist - Laboratory Environments
 Western Sydney University Safety Inspection Checklist - Laboratory Environments Useful Hint: To maximise the benefits that can be gained from a workplace inspection activity read the Western Sydney University
RUN TIME: 50 MIN PL02 Page 1 of 7 POGIL LAB EXERCISE 02 What Makes the Lab a Safe and Effective Place to Do Chemistry?
 RUN TIME: 50 MIN PL02 Page 1 of 7 POGIL LAB EXERCISE 02 What Makes the Lab a Safe and Effective Place to Do Chemistry? Each member should assume their roles at this time (Table 1). Table 1. Group Member
Laboratory Safety Manual Prepared by RAEIN-Africa & Partners. Under the Implementation of The National Biosafety Framework Project for Swaziland
 Laboratory Safety Manual Prepared by RAEIN-Africa & Partners Under the Implementation of The National Biosafety Framework Project for Swaziland Contents Preamble/ Introduction... 2 Safety declaration...
Laboratory Safety Review Checklist One Shields Ave Davis, CA Phone: (530) Fax: (530)
 Fax: (530)") http://safetyservices.ucdavis.edu Laboratory Safety Review Checklist One Shields Ave Davis, CA 95616 Phone: (530)752-1493 Fax: (530)752-4527 E-mail: researchsafety@ucdavis.edu U C Davis Environmental Health
http://safetyservices.ucdavis.edu Laboratory Safety Review Checklist One Shields Ave Davis, CA 95616 Phone: (530)752-1493 Fax: (530)752-4527 E-mail: researchsafety@ucdavis.edu U C Davis Environmental Health
PLANT HAZARD REPORT. Plant Description: Element Aspect Plant Hazards and Controls Advice. Circular Saw
 PLANT HAZARD REPORT Plant Description: Circular Saw PLEASE NOTE This plant information has been prepared to assist the purchaser in identifying hazards associated with the plant prior to the purchaser
Laboratory Preparedness Checklists for Advanced Planning, Preparing to Close & Safe Re-Entry
 Laboratory Preparedness Checklists for Advanced Planning, Preparing to Close & Safe Re-Entry Disruptions, utility outages, and severe weather events may require a laboratory closure. These events have
Laboratory Standard Operating Procedure: Acutely Toxic Substances
 I. CONTACT INFORMATION Procedure Title Procedure Author Date of Creation/Revision: April 12, 2013 Name of Responsible Person Location of Procedure (The PI, Lab Supervisor, or Autonomous Researcher) (Building
Hydrofluoric Acid SOP
 Introduction Hydrofluoric acid (HF) has a number of chemical, physical, and toxicological properties, which make handling this material especially hazardous. Anhydrous HF is a clear, colorless, fuming,
Bauman Machine Inc. COMPRESSED GAS CYLINDER SAFETY
 Bauman Machine Inc. COMPRESSED GAS CYLINDER SAFETY Many industrial and laboratory operations require the use of compressed gases for a variety of different operations. Compressed gases present a unique
Laboratory Safety Review Checklist One Shields Ave Davis, CA Phone: (530) Fax: (530)
 Fax: (530)") http://safetyservices.ucdavis.edu Laboratory Safety Review Checklist One Shields Ave Davis, CA 95616 Phone: (530)752-1493 Fax: (530)752-4527 E-mail: ehsdesk@ucdavis.edu U C Davis Environmental Health and
http://safetyservices.ucdavis.edu Laboratory Safety Review Checklist One Shields Ave Davis, CA 95616 Phone: (530)752-1493 Fax: (530)752-4527 E-mail: ehsdesk@ucdavis.edu U C Davis Environmental Health and
Cal/OSHA T8 CCR 1536 Cal/OSHA T8 CCR 4799 Cal/OSHA T8 CCR 4845 Cal/OSHA T8 CCR 4848
 Cal/OSHA Gas Systems for Welding GAS WELDING Cal/OSHA T8 CCR 1536 Cal/OSHA T8 CCR 4799 Cal/OSHA T8 CCR 4845 Cal/OSHA T8 CCR 4848 When performing gas welding, the following precautions, work procedures,
Yeo Soh Bee A/Prof Dan Yock Young 28/03/2016 Prepared by Approved By Issue Date
 Page: 1 of 6 Yeo Soh Bee A/Prof Dan Yock Young 28//2016 Prepared by Approved By Issue Date 1. OBJECTIVE The purpose of this SOP is to outline the procedures of cleaning up chemical spills. It will provide
General Guidelines: 1. Conduct yourself in a responsible manner at all times in the Art Classroom.
 ART STUDENT SAFETY CONTRACT Purpose: Art is a hand-on class. You will be doing many activities in this room that will require the use of chemicals, tools and machines. Safety in the Art Room is the number
The health hazards of HF are dependent upon the concentration, temperature and nature of exposure.
 Hydrofluoric Acid Safe Handling and Use Hydrofluoric acid (HF) is a corrosive acid used for many processes including mineral digestion, surface cleaning, glass etching, and biological staining. HF is a
Laboratory Inspection Checklist
 Date: Time: Inspector(s): Laboratory Information Department Principal Investigator (PI)/Laboratory Instructor PI telephone number PI e-mail address Building Laboratory room number(s) Backup Safety Contact
Material Handling and Storage of compressed gases and Air equipment
 Material Handling and Storage of compressed gases and Air equipment Compressed gases can be toxic, flammable, oxidizing, corrosive, inert, or some combination of these hazards. Compressed gas cylinders
POTENTIAL HAZARDS OF VARIOUS SUBSTANCES
 POTENTIAL HAZARDS OF CLASS 1 EXPLOSIVES For those Divisions and Compatibility Groups acceptable for carriage by air, little immediate health hazard. Should any explosives consignment become involved in
BOILER MECHANIC//SR. BOILER MECHANIC
 WORKING IN STEAM MANHOLES Activity Hazard Identification Required Precautions 1. Driving to and from work site. 1. Motor vehicle accident; striking pedestrians, bicyclists, or individuals using rollerblades.
MAFES Horticultural Facilities AREA-SPECIFIC SAFETY TRAINING GUIDANCE
 MAFES Horticultural Facilities AREA-SPECIFIC SAFETY TRAINING GUIDANCE Each University of Maine employee, Faculty, graduate student, and undergraduate shall take the University of Maine Basic Safety Training
3/8" Dr. Air Butterfly Impact Wrench
 8192106 3/8" Dr. Air Butterfly Impact Wrench Owner s Manual Read and understand all instructions before use. Retain this manual for future reference. Specifications Construction: Polished aluminum and
Appendix C Health and Safety Guidelines for investigators
 38 Appendix C Health and Safety Guidelines for investigators Introduction Investigations must be conducted in a safe manner. This document provides an overview of the health and safety guidelines investigators
A Health and Safety Tip Sheet for School Maintenance Staff. Did you know? Step 1. Identify job hazards. Step 2. Work towards solutions
 INSPECTION Health and CHECKLIST Safety Committees MAINTAINING SAFETY: A Health and Safety Tip Sheet for School Maintenance Staff 1 Maintenance and facilities staff members keep schools operational, safe,
Laboratory Standard Operating Procedure: Specimen Preservatives
 I. THIS STANDARD OPERATING PROCEDURE (SOP) IS FOR A: Specific laboratory procedure or experiment Examples: Formalin, Formaldehyde, Caro-Safe, Alcohol. Generic laboratory procedure that covers several chemicals
Environmental Engineering Laboratory General Guidelines for Safety Practices
 Environmental Engineering Laboratory General Guidelines for Safety Practices Safety is as simple as ABC Always Be Careful AN EXPERIMENT DONE WELL IS... AN EXPERIMENT DONE SAFELY. 1. Think Safety First.
Vertebrate Animal Biosafety Level 1 Criteria
 Vertebrate Animal Biosafety Level 1 Criteria Biosafety in Microbiological and Biomedical Laboratories (BMBL) 5 th Edition Section V Animal Biosafety Level 1 (ABSL-1): Animal Biosafety Level 1 is suitable
MAINTENANCE MECHANIC RCF
 REPAIRING AND REPLACING VALVES AND COILS MAINTENANCE MECHANIC Activity Hazard Identification Required Precautions 1. Walking to and from work site. 1a. Back ache; overexertion from carrying heavy weight.
Emergency Response Code CODE BROWN HAZARDOUS SPILLS. Purpose & Authority. Definitions
 CODE BROWN HAZARDOUS SPILLS Purpose & Authority This plan addresses the procedures to be followed in the event of a spill involving a hazardous substance. All hazardous substance spills shall be reported
Laboratory Standard Operating Procedure: Carcinogens
 I. THIS STANDARD OPERATING PROCEDURE (SOP) IS FOR A: Specific laboratory procedure or experiment Examples: synthesis of chemiluminescent esters, folate functionalization of polymeric micelles, etc. Generic
Operating Instructions and Parts Manual 24529
 Please read and save these instructions. Read through this owner s manual carefully before using product. Protect yourself and others by observing all safety information, warnings, and cautions. Failure
1 DRIVE INDUSTRIAL IMPACT WRENCH
 1 DRIVE INDUSTRIAL IMPACT WRENCH 92622 ASSEMBLY AND OPERATING INSTRUCTIONS 3491 Mission Oaks Blvd., Camarillo, CA 93011 Visit our Web site at http://www.harborfreight.com Copyright 2004 by Harbor Freight
WHS Guidelines Working with Chemicals
 WHS Guidelines Working with Chemicals 1. Scope These guidelines are applicable to all environments where are used. The purpose of this document is to detail minimum requirements for working with, to list
Biosafety Level 2 (BSL2) Laboratory Safety Inspection Checklist
 Laboratory Safety Inspection Checklist") Conducted By: Date of Inspection: Location: Safety and Risk Management Office Biosafety Level 2 (BSL2) Laboratory Safety Inspection Checklist Principal Investigator/Supervisor: General Lab Housekeeping
Conducted By: Date of Inspection: Location: Safety and Risk Management Office Biosafety Level 2 (BSL2) Laboratory Safety Inspection Checklist Principal Investigator/Supervisor: General Lab Housekeeping
PPE and Tools PPE and Tools
 PPE and Tools PPE and Tools PPE Definition Personal protective equipment (PPE) refers to protective clothing, helmets, goggles, or other garments or equipment designed to protect the wearer's body from
G10K - 1/2" Heavy-Duty Air Impact Wrench
 G10K - 1/2" Heavy-Duty Air Impact Wrench OWNER S MANUAL WARNING: Read carefully and understand all ASSEMBLY AND OPERATION INSTRUCTIONS before operating. Failure to follow the safety rules and other basic
AIR INLINE METAL SHEAR
 AIR INLINE METAL SHEAR ASSEMBLY and OPERATING INSTRUCTIONS 3491 Mission Oaks Blvd. / Camarillo, CA 93011 Copyright 1997 by Harbor Freight Tools. All rights reserved. No portion of this manual or any artwork
CITY AND COUNTY OF DENVER CR&CF RISK UNIT Compressed Gas Safety Standard
 CITY AND COUNTY OF DENVER CR&CF RISK UNIT 65.5.11 Compressed Gas Safety Standard 1.0 Introduction 2.0 Scope This standard has been developed to protect all City and County of Denver employees and contractors
Laboratory Standard Operating Procedure: Reproductive Toxins
 I. CONTACT INFORMATION Procedure Title Procedure Author Date of Creation/Revision: April 12, 2013 Name of Responsible Person Location of Procedure Approval Signature (The PI, Lab Supervisor, or Autonomous