Any tool, at the ready.
|
|
|
- Diane Townsend
- 6 years ago
- Views:
Transcription

1 Any tool, at the ready. 3M DBI-SALA Fall Protection for Tools Pocket Reference Guide


2 No matter what your drop prevention needs are, 3M Fall Protection is equipped to help you achieve your goals with the DBI-SALA Fall Protection for Tools product range. We can provide you with an entire drop prevention program or a sample plan to help you deploy a program that fits your needs. To order a Full Range Catalogue or a Tool Attachment Points poster, or for more information on Fall Protection for Tools call your Regional Sales Manager or contact 3M Fall Protection customer service. Alternatively download these resources from 3M.com.au/FallProtection. Fall Protection for Tools Everything you need to stop the drop. 3M DBI-SALA Fall Protection for Tools Australia/New Zealand Catalogue Download the Full Range Product Catalogue at 3M.com.au/FallProtection To see the full impact of damage that falling objects can inflict, scan the QR code or visit 3M.com.au/FallProtection 2
3 About The science of fighting gravity. Protecting workers takes more than just keeping them from falling. Their equipment also needs to be kept safe at height. That s why for over 10 years, we ve been pioneering an innovative line of products and solutions to prevent dropped tools and equipment. From construction sites to oil rigs, we help make work environments safer and more productive by protecting workers from hazards that can result in personal injury, equipment damage and tool loss. Certified and Tested 3M DBI-SALA verifies fall protection for tools product performance through testing in an ISO accredited fall protection testing laboratory. The facility can simulate heat, cold, moisture, corrosion and abrasion the challenges you face every day. As a part of 3M DBI-SALA product development and quality assurance processes, static or dynamic load tests are conducted to determine the safe working limits based on the solution s intended use. For product inquries: Australia New Zealand anzfallprotectionsales@mmm.com 3M.com.au/FallProtection 3
4 IMPORTANT Important Notice All procedures shown in this document are for DBI-SALA Fall Protection for Tools products only. All attachment points should be connected to a DBI-SALA extension or tool lanyard. Ensure operators are assessed for competency in using all equipment and tools. Be careful working around rotating and moving equipment. Ensure operators have read and understood product information and warning labels for all tool lanyards and attachment points Ensure all equipment and tools are regularly maintained and checked before each use for defects and deterioration. Ensure damaged, worn, or defective equipment, tools, tool lanyards, and attachment points are immediately removed from service. Never modify a tool from the manufacturer s specification. Inspect Before Use Visual inspection is vital to ensure equipment is safe prior to use. Inspect the entire surface of the product by starting on one side and working your way to the opposite, carefully rotating the product as you visually inspect for damage or wear that might affect the usefulness and dependability of the tool lanyard, attachment point or the tool. After Use After use, clean the equipment of dirt, corrosives, or contaminants and store in a clean and dry environment, free from fumes or corrosive elements. Taking care of your safety equipment will ensure it works effectively and will extend its service life. Cleaning Nylon & Polyester Clean off the surface dirt with a water-dampened wipe. Dip the wipe in a mild solution of water, soap, or detergent; work it up into a thick lather; and clean the item. Wipe with a clean cloth and hang to dry away from excessive heat, steam, or sunlight. In Case of a Dropped Tool If a tool is dropped and/or load is forced onto the connection point and/or the tool lanyard, remove affected parts from service and replace immediately. Any impacted tool or tool lanyard should be immediately taken out of service. All incidents should be reported to your safety coordinator. 4

5 Table of Contents Table of Contents D-Rings & Quick Wrap Tape... 6 Tool Cinch Attachments...10 Heat Shrink Quick Spins...18 D-ring Cord Quick Rings Tool Lanyards & Tethers...30 Wristbands Tool Belts Belt & Harness Tool Holsters Tool Pouches Spill Control Buckets...36 Attachment Points Poster Impact Force of a Dropped Object...38 Falling Object Deflections
6 D-Rings & QUICK Quick Wrap WRAP Tape D-Rings * Non-Conductive Part # Dimensions Load Rating mm X 57 mm 0.9 kg mm X 57 mm 0.9 kg * 13 mm X 57 mm 0.9 kg mm X 89 mm 2.3 kg Quick Wrap Tape Part # Colour Length Yellow 2.7 m Blue 2.7 m Blue 5.5 m When to use D-Rings and Quick Wrap Tape For tools weighing up to 2.3 kg or 0.9 kg depending on the D-ring. When a non-conductive attachment point is needed for tools up to 0.9 kg. When Quick Rings, Quick Spins and D-ring Cord Attachments won t work. Many tools do not have pre-drilled holes for Quick Rings and lack handles that a Quick Spin will fit. When Not to use D-Rings and Quick Wrap Tape When a tool is over 2.3 kg or 0.9 kg depending on the D-ring. When a D-ring will interfere with the safe working condition of the tool. 6


7 D-Rings & & QUICK Quick WRAP Wrap Tape D-Ring & Quick Wrap Tape Examples 7


8 D-Rings & Quick Wrap Tape Figure 1 Figure 2 Figure 3 Figure 4 Figure 5 8
9 D-Rings & Quick Wrap Tape Usage Instructions Step 1 Cut a strip of Quick Wrap Tape approximately 30 to 60 centimetres long depending on the size of the handle. Peel plastic coating away from wrap. Tape should wrap times around the tool. Note: Never use the D-ring with Quick Wrap on the tapered portion of a tool. Step 2 Make sure the tool is free of debris which would interfere with the bonding of the Quick Wrap. Place a D-ring attachment so that the ring of the D-ring is facing away from the center of gravity of the tool. Ensure that when installed, the D-ring will not interfere with the safe working condition of the tool (figure 1). When placing the D-ring, ensure that the tab of the D-ring is facing up as shown here (figure 2). Step 3 Wrap the tape around the tool while stretching the tape. It is critical to stretch the tape while wrapping, as this activates the tape and causes it to self-vulcanise creating a secure connection (figure 3). Step 4 Once the connection is complete, test the connection to ensure proper installation has taken place (figure 5). Note: Remember to always inspect the connection prior to each use for damage or irregularities that might affect the connection. Apply approximately 2.3 kg of force when inspecting. 9
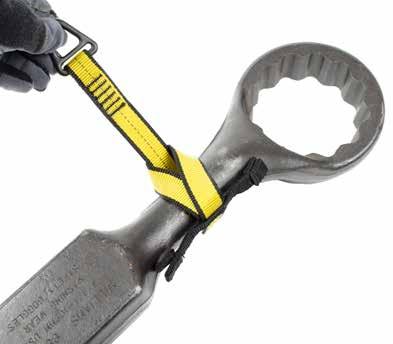
10 Tool Cinch Attachments Tool Cinch Attachments Part # Load Rating kg kg kg kg When to use a Tool Cinch Tools weighing up to 15.9 kg and 36.3 kg unless otherwise stated. On difficult to tether tools such as pinch bars, torque wrenches, clamps, and many closed handled tools. When Not to use a Tool Cinch Do not use a Tool Cinch on tools that exceed the Tool Cinches load rating. When a Tool Cinch will interfere with the safe working condition of the tool. 10


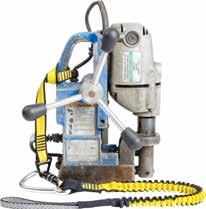
11 Tool Cinch Attachments Tool Cinch Examples Figure 1 Figure 2 Figure 3 11
12 Tool Cinch Attachments Usage Instructions Step 1 Select a Tool Cinch Attachment that is appropriate for your tool. For closed handled tools without triggers, part should be used. For example, see the magnetic base drill (figure 1) on page 11. For tools without closed handles, or tools with triggers, part should be used instead. For example, see the reciprocating saw (figure 2) on page 11. For tools where there is at least 14 cm of available space for stabiliser wings to be taped down, part should be used. This Tool Cinch is ideal for tools with long cylindrical handles. For example, see the slugging wrench (figure 3) on page 11. Step 2 Pass the ring end of the cinch through the loop end, and cinch around your tool (figure 1). Step 3 If using a Tool Cinch with wings, use Quick Wrap Tape to hold the Tool Cinch in place. If using part , continue to step 4. Cut a strip of Quick Wrap Tape approximately 30 to 60 cm long depending on the size of the handle. Peel plastic coating away from wrap. Tape should wrap at least 5 times around the tool. Make sure the tool is free of debris which would interfere with the bonding of the Quick Wrap. Wrap the tape around the tool while stretching the tape. It is critical to stretch the tape while wrapping, as this activates the tape and causes it to self-vulcanise creating a secure connection (figure 2). Step 4 Once the connection is complete, test the connection to ensure proper installation has taken place. Note: Remember to always inspect the connection prior to each use for damage or irregularities that might affect the connection. 12

13 Tool Cinch Attachments Figure 1 Figure 2 13
 to create a more abrasion resistant attachment point. When Not to use Heat Shrink In temperatures exceeding 54 degrees Celsius.")
14 Heat Shrink Heat Shrink Part # Dimensions mm X 45 mm mm X 45 mm mm X 45 mm mm X 102 mm mm X 102 mm When to use Heat Shrink Used on top of Quick Wrap Tape (Page 6) to create a more abrasion resistant attachment point. When Not to use Heat Shrink In temperatures exceeding 54 degrees Celsius. Never use Heat Shrink without first applying Quick wrap Tape. Heat Shrink is not a replacement for Quick Wrap Tape, it is only used to protect the tape. 14

15 Heat Shrink Heat Shrink Examples 15


16 Heat Shrink Figure 1 Figure 2 Figure 3 Figure 4 Figure 5 16
17 Heat Shrink Usage Instructions Step 1 Make sure the tool is clean and free of debris. If there is a detachable handle, ensure the handle is secure. If the handle is loose, detach before applying Heat Shrink. Step 2 Attach a D-ring using Quick Wrap Tape to the tool, as shown on page 16 (figure 1). Step 3 Slide Heat Shrink over the D-ring and Quick Wrap Tape. Ensure that the Heat Shrink covers as much of the D-ring as possible without covering the ring itself (figure 2). Never use Heat Shrink without first applying Quick Wrap Tape. Step 4 Wearing heat resistant gloves, use a Heat Gun to evenly apply heat to the Heat Shrink being careful not to burn the webbing of the D-ring or Heat Shrink itself. Allow the Heat Shrink to completely shrink around the tool and D-ring (figure 3). Do not apply any adhesives to Heat Shrink. Step 5 Let cool approximately five minutes before using. Refrain from pulling or tugging on the connection until completely cooled (figure 4). Step 6 Once the connection is complete, test the connection to ensure proper installation has taken place (figure 5). Note: Remember to always inspect the connection prior to each use for damage or irregularities that might affect the connection. Apply approximately 2.3 kg of force when inspecting. 17


18 Quick Spins Quick Spins Part # Diameter Load Rating mm 0.5 kg mm 0.5 kg mm 0.5 kg mm 0.5 kg mm _ * 8 mm _ mm _ * 13 mm _ * with coil tether When to use Quick Spins On tools under 0.5 kg where the Quick Spin will fit tightly on a handle. When a non-conductive attachment point is necessary. When Not to use Quick Spins Tools over 0.5 kg. Do not use a Quick Spin if a snug fit cannot be secured. 18


19 Quick Spins Quick Spin Examples 19


20 Quick Spins Figure 1 Figure 2 Figure 3 20
21 Quick Spins Usage Instructions Step 1 Identify a Quick Spin Adaptor that will properly fit the handle of the tool (figure 1). Step 2 Push and twist the Quick Spin onto the tool. Some force should be necessary to create a snug fit (figure 2). Step 3 Ensure that the Quick Spin is firmly in place before use (figure 3). Important: Inspect before use. Never connect to anything over 0.5 kg. 21
22 D-Ring Cord D-Ring Cord Part # Load Rating kg When to use a D-Ring Cord Attachment For tools weighing up to 2.3 kg. For creating quick attachment points on a variety of tools. On tools with closed handles, or with pre-drilled holes. When Not to use a D-Ring Cord Attachment For tools weighing over 2.3 kg. When a non-conductive attachment point is needed, use a Quick Spin (Page 18), or Non-conductive D-ring (Page 6). When the attachment will interfere with the safe working condition of the tool. 22
23 D-Ring Cord D-Ring Cord Examples 23
24 D-Ring Cord Usage Instructions (Closed Handled Tools) Step 1 Ensure that cinching the D-ring Cord to the handle of your tool will not interfere with the safe working condition of the tool. Step 2 Pass the cord end of the D-ring Cord through the handle of the tool. Step 3 Pass the ring side of the D-ring Cord through the loop of the cord. Step 4 Pull tightly to cinch and create a secure connection. Usage Instructions (Pre-drilled holes) Step 1 Ensure that cinching the D-ring Cord to the tool will not interfere with the safe working condition of the tool. Step 2 Pass the cord end of the D-ring Cord through the pre-drilled hole in the tool. Step 3 Pass the ring side of the D-ring cord through the loop of the cord. Step 4 Pull tightly to cinch and create a secure connection. 24


25 D-Ring Cord Closed Handled Tools Pre-drilled Holes 25
26 Quick Rings Quick Rings Part # Diameter Load Rating mm 0.9 kg mm 0.9 kg mm 0.9 kg When to use Quick Rings When there are pre-drilled holes in a tool, or when a quick ring can be fitted around a tool in such a way where it cannot slide off. Never modify a tool in a way that would void the manufacturers warranty. When a tool weighs less than 0.9 kg When Not to use Quick Rings When a tool weighs over 0.9 kg. When there is no pre-drilled hole that a Quick Ring can be fitted through, or when a Quick Ring cannot be fitted onto a tool in such a way that the Quick Ring cannot slide off. When a non-conductive attachment point is needed, use a Quick Spin (Page 18), or Non-conductive D-Ring (Page 6). 26

27 Quick Rings Quick Ring Examples 27


28 Quick Rings Figure 1 Figure 2 28
.")
29 Quick Rings Usage Instructions Step 1 Use split ring pliers to separate the Quick Ring so it can be threaded through an attachment point (figure 1). Step 2 Begin threading the Quick Ring through the attachment point with the pliers. Continue to thread the tool through by hand if necessary (figure 2). Step 3 After installation, check for damage of tool or Quick Ring. If either the tool or Quick Ring is damaged, replace that component. Important: Inspect before use. Never connect to anything over 0.9 kg. 29


30 Tool Lanyards & Tethers Bungee Tethers Part # Load Rating kg kg Coil Tethers Part # Load Rating kg kg kg kg kg kg 30
31 Tool Lanyards & Tethers Retractors Part # Load Rating kg Trigger To Trigger Lanyards Part # Load Rating Length kg 0.3 m kg 0.6 m kg 0.9 m Medium and Heavy Duty Tool Lanyards Part # Load Rating Length kg 1.8 m kg 1.8 m kg 1.8 m 31
32 Wristbands Pullaway Wristband Pullaway Wristband Slim Pullaway Wristbands Part # Size Load Rating Profile Small 2.3 kg Standard Medium 2.3 kg Standard Large 2.3 kg Standard Small 2.3 kg Slim Medium 2.3 kg Slim Large 2.3 kg Slim Adjustable Wristbands Part # Load Rating kg kg kg 32

33 Tool Belts Comfort Tool Belts Available in several sizes. See product catalogue for more information Utility Tool Belts Available in several sizes. See product catalogue for more information is used for tying off tools from a belt, while the is used for staging tools Belt Loops Part # Load Rating kg kg 33
34 Belt & Harness Tool Holsters Smart Holsters A wide selection of holsters are available that accommodate nearly any hand tool. To learn more about available holsters, please visit 3M.com.au/FallProtection or see full product catalogue. Tool Holsters Part # Product Name Single Tool Harness Holster Single Tool Harness Holster with Retractor Single Tool Belt Holster Single Tool Belt Holster with Retractor Extra-Deep Single Tool Belt Holster Dual Tool Harness Holster Dual Tool Harness Holster with Retractors Dual Tool Belt Holster Dual Tool Belt Holster with Retractors Tape Measure Retractor Holster Tape Measure Sleeve Scaffold Wrench Holster with Retractor Hammer Holster Adjustable Radio Holster Spray Can / Bottle Holster 34


35 Tool Pouches Small Parts Pouches Part # Product Name Vinyl Yellow Canvas Black Canvas Camo (Tan) Canvas Orange Extra Deep Canvas Black Innovative self-closure system that traps objects inside, the pouch makes it nearly impossible for objects to fall out once placed in the bag. Easy to retrieve objects since no opening or closing is necessary Inspection Pouch Designed for the safe transport and use of most multimeters, air monitors, and other portable testing devices. Tool Pouches Available in several sizes and variants. See product catalogue for more information


36 Safe Spill control Bucketsbuckets Safe Buckets Part # Load Rating Closure System kg Hook and Loop kg Drawstring kg Hook and Loop kg Drawstring kg Hook and Loop Scaffold Pole Buckets Part # Load Rating Length kg 1.2 m kg 1.8 m kg 3.1 m 36
37 Attachment Points Poster Free Common Tool Attachment Points Poster Common Tool Attachment Points. Tools Up To 0.5 kg Tools Up To 0.9 kg Tools Up To 2.3 kg Important: Follow all instructions when using Attachment Points. Instructions are available online or in the Fall Protection for Tools Pocket Reference Guide Attachment Points should never interfere with the safe working condition of a tool. Inspect before use. Tools Up To 15.9 kg Attachment Point Legend Micro D-Ring kg load rating only when used with D-Ring 13 mm x 57 mm Load Rating: 0.9 kg Tool Cinch Medium Duty Load Rating: 15.9 kg Quick Spin , , , Load Rating: 0.5 kg D-Ring 25 mm x 89 mm Load Rating: 2.3 kg Tool Cinch Medium Duty Single Wing Load Rating: 15.9 kg D-Ring Cord Load Rating: 2.3 kg Tool Cinch Medium Duty Dual Wing Load Rating: 15.9 kg Hard Hat Tether Load Rating: 0.9 kg Tool Cinch Heavy Duty Dual Wing Load Rating: 36.3 kg Quick Ring , , Load Rating: 0.9 kg Quick Wrap Tape 25.4 mm Wide Blue, Yellow Important! Choose The Correct Tool Lanyard Up To 2.3 kg Hook2Hook Coil Tether Up To 4.5 kg Hook2Loop Bungee Tether Up To 15.9 kg Hook2Loop Bungee Tether Medium Duty Up To 36.3 kg Hook2Rail Tether Lanyard Heavy Duty Protect with Heat Shrink Heat Shrink can be used to protect Quick Wrap Tape from dust, abrasives, and harsh work environments. Apply Heat Shrink over Attachment Points that use Quick Wrap tape to make them last longer. Apply a Heat Shrink Link over an attachment point that uses Quick Wrap Tape. Apply heat using a heat gun until the link shrinks completely. Do not burn the Heat Shrink Link. The sky s the limit Quality Quality IS ISO 9001 Environment IS ISO Health & Safety AS 4801 Let the Heat Shrink Link cool for 5 minutes before use. Remember to always inspect the connection prior to each use for damage or irregularities that might affect the connection. Height Safety Confined Space Industrial Rescue AUS: NZ: M.com.au/FallProtection 3M033 3M Fall Protection for Tools-Attachment Poster V2.indd 1 3M Australia Pty Ltd Bld A, 1 Rivett Road North Ryde, NSW 2113 TechAssist Helpline: Customer Services: techassist@mmm.com 3M New Zealand Limited 94 Apollo Drive Rosedale, Auckland 0632 TechAssist Helpline: Customer Services: M Fall Protection Business Personal Safety Division 3M All rights reserved. 3M and DBI-SALA are trademarks of 3M Company. AV /01/2017 1:39:51 PM Request a Printed Poster Contact your local Sales Manager or 3M Fall Protection Customer Service: Australia New Zealand
38 SERIOUS SEVERE FATAL TETHER READY Drop Height (metres) Weight of Dropped Object (kilograms) Impact Force Of A Dropped Object Measured In Kilograms Per Square Centimetre.
39 Falling Object Deflections Dropped objects don t always fall straight down 60 metre drop 30 metre drop 8 metre drop Impact at 6 metres 20 Metre Deflection Max Deflection Height: 9 m Max Velocity: 59 km/hr. Max Deflection Height: 17 m Max Velocity: 96 km/hr) Max Deflection Height: 24 m Max Velocity: 131 km/hr 66 Metre Deflection 128 Metre Deflection hitting a bar 6 metres off the ground. a 3.6 kg wrench can deflect after The diagram below illustrates how far OBJECTS DON T JUST FALL STRAIGHT DOWN! Dropped Object Deflection Study, Southern Polytechnic State University 39 TETHER READY 39
40 For more information visit 3M.com.au/FallProtection or call (AUS) (NZ) 3M Fall Protection Business Personal Safety Division 3M Australia Pty Ltd Bldg A, 1 Rivett Road, North Ryde, NSW 2113 TechAssist Helpline: Customer Services: techassist@mmm.com 3M.com/au/ppesafety 3M New Zealand Limited 94 Apollo Drive, Rosedale, Auckland 0632 TechAssist Helpline: Customer Services: M All rights reserved. 3M and DBI-SALA are trademarks of 3M Company. AV
Any tool, at the ready. 3M DBI-SALA Fall Protection for Tools Pocket Reference Guide
 Any tool, at the ready 3M DBI-SALA Fall Protection for Tools Pocket Reference Guide About 3M DBI-SALA Fall Protection for Tools Product Catalog Fall Protection for Tools Everything you need to stop the
Any tool, at the ready. 3M DBI-SALA Fall Protection for Tools Pocket Reference Guide
 Any tool, at the ready 3M DBI-SALA Fall Protection for Tools Pocket Reference Guide 3M DBI-SALA Fall Protection for Tools Product Catalog Fall Protection for Tools Everything you need to stop the drop.
Any tool, at the ready. 3M DBI-SALA Fall Protection for Tools Pocket Reference Guide
 Any tool, at the ready 3M DBI-SALA Fall Protection for Tools Pocket Reference Guide 3M DBI-SALA Fall Protection for Tools Product Catalog Download/Request a Printed Catalog Download the product catalog
Stop the Drop. Fall Protection for Tools. Protecting workers from hazards that can result in personal injury, equipment damage and tool loss.
 Stop the Drop Fall Protection for Tools Protecting workers from hazards that can result in personal injury, equipment damage and tool loss. M 2018. #MScienceOfSafety M.com.au/FallProtection 1800 245 002(AUS)
Fall Protection for Tools Australia/New Zealand Catalogue
 Fall Protection for Tools 2015 Australia/New Zealand Catalogue REQUEST A FREE DROP PREVENTION AWARENESS PACKAGE DROP PREVENTION AWARENESS POSTER The Drop Prevention Awareness Package comes with a 610 mm
Miller Revolution Key Features
 Thank you for purchasing the Miller Revolution Harness. The Revolution is an all new and totally innovative harness engineered with seven (7) unique components and more than eleven (11) key product features.
FALL PROTECTION FOR TOOLS
 2015 PRODUCT CATALOGUE 1 FALL PROTECTION FOR TOOLS T H E U L T I M A T E I N F A L L P R O T E C T I O N 2 WWW.CAPITALSAFETY.COM 00 800 999 55500 TABLE OF CONTENTS 3 DBI-SALA and Python Safety, two highly
KNOW THE 3T S OF OBJECTS AT HEIGHTS SAFETY SOLUTIONS
 // OBJECTS AT HEIGHTS PRODUCT SOLUTIONS // OBJECTS AT HEIGHTS SAFETY With the exception of Chuck Norris, hurricanes and halitosis, there s little more dangerous than a plummeting object. Regardless of
Miller Tool Lanyards. Preventing injury or loss from dropped objects.
 Miller Tool Lanyards Preventing injury or loss from dropped objects. The Brutal Truth Numbers don t lie. According to the Royal Society for the Prevention of Accidents, the top three causes of fatal work
MILLER REVOLUTION REVOLUTION KEY FEATURES. Miller Revolution Key Features. Stand Up D-Ring Spring loaded D-Ring simplifi es snaphook connection.
 MILLER REVOLUTION REVOLUTION KEY FEATURES Thank you for purchasing the Miller Revolution Harness. The Revolution is an all new and totally innovative harness engineered with seven (7) unique components
IMPORTANT: If you have questions on the use, care, application, or suitability of this equipment contact DBI/SALA.
 Model Numbers: (See back cover for model numbers) User Instruction Manual Body Belts for Personal Restraint Applications This manual ishould be used as part of an employee training program as required
Inspection & Maintenance
 PERSONAL FALL ARREST EQUIPMENT Inspection & Maintenance This article addresses the requirements of OSHA1926.502(d)(21), which states that personal fall arrest systems shall be inspected prior to each use
Z NE DROPS FREE TM SOLUTIONS FOR A {ERGODYNE S GUIDE TO OBJECTS AT HEIGHTS SAFETY}
 SOLUTIONS FOR A DROPS FREE TM Z NE {ERGODYNE S GUIDE TO OBJECTS AT HEIGHTS SAFETY} WWW.ERGODYNE.COM 014 Tenacious Holdings, Inc. All Rights Reserved. All Wrongs Reversed. // OBJECTS AT HEIGHTS PRODUCT
Rapid Survival System
 Rapid Survival System Model W User Manual Emergency Floatation for Moving Water Self Rescue Version 10.02 Contents User Manual... 1 Part 1: Description and Function... 3 Part 2: Package Contents... 3 Part
Instructions for Dual Retractable Web lanyards Type 1. Instructions for E6 Energy Absorbing Y, Bypass Lanyards. For Worker Mass Range of 90 to 175 kg
 P.O. Box 3026 Sherwood Park Alberta T8H 2T1 Phone: (780) 464-7139 Fax: (780) 464-7652 e-mail: inquiries@ safetydirect.ca Web site: www.safetydirect.ca Instructions for Dual Retractable Web lanyards Type
POLE CLIMBING FALL RESTRICTING POLE STRAP
 I T S A N E W D I R E C T I O N I N POLE CLIMBING FALL RESTRICTING POLE STRAP WHERE BUCKET TRUCKS DARE NOT GO CYNCH-LOK GETS YOU THERE FASTER AND SAFER Climbing wood poles is one of the most difficult
SOLUTIONS FOR A DROPS FREE ZONEṬM
 SOLUTIONS FOR A DROPS FREE ZONEṬM THE COMPLETE GUIDE TO OBJECTS AT HEIGHTS SAFETY. WWW.ERGODYNE.COM WANTED: KNOWN KILLERS RESPONSIBLE FOR HUNDREDS OF DEATHS ANNUALLY PLAN YOUR WORK. WORK YOUR PLAN. A tape
Authorized Ergodyne Distributor:
 www.ergodyne.com Authorized Ergodyne Distributor: TO PLACE AN ORDER FOR PRODUCTS IN THIS CATALOG: Call Mars Co. 800-862-6093 (Bloomington) 800-662-5789 (Duluth) 800-662-5789 (Hibbing) Email: sales@marssupply.com
3M Personal Safety Division. 3M Protecting Workers from Falls and Falling Objects. by Raymond Mann and Travis Betcher
 3M Personal Safety Division 3M Protecting Workers from Falls and Falling Objects by Raymond Mann and Travis Betcher 364 454 % OF DEATHS FROM FALLS IN 2015 FROM FALLS 38.8% FROM OBJECTS 9.6% DEATHS FROM
Rescue ladder System. User Instruction Manual
 User Instruction Manual for: Rescue Ladder System (Model Numbers: Ladder - 8516294, Hanging Plate Bracket - 8516316) User Instruction Manual Rescue ladder System This manual is intended to meet the Manufacturer
Vertical Lifeline. Ladder Climb. User Instructions. 3M Occupational Health and Environmental Safety. Fall Protection Equipment
 3M Occupational Health and Environmental Safety Fall Protection Equipment Ladder Climb Vertical Lifeline User Instructions User Instructions for the 3M TM Ladder Climb Vertical Lifeline System. Important:
Instructions for Y Style Full Body Harness Model YH130
 P.O. Box 3026 Sherwood Park Alberta T8H 2T1 Phone: (780) 464-7139 Fax: (780) 464-7652 e-mail: inquiries@ safetydirect.ca Web site: www.safetydirect.ca Instructions for Y Style Full Body Harness Model YH130
Instructions for The Rose Crossover Style Full Body Harness For Women
 P.O. Box 3026 Sherwood Park Alberta T8H 2T1 Phone: (780) 464-7139 Fax: (780) 464-7652 e-mail: inquiries@ safetydirect.ca Web site: www.safetydirect.ca Instructions for The Rose Crossover Style Full Body
SOLUTIONS FOR A DROPS FREE ZONE.
 SOLUTIONS FOR A DROPS FREE ZONE. THE COMPLETE GUIDE TO OBJECTS AT HEIGHTS SAFETY. WWW.ERGODYNE.COM PROUDLY SETTING A HIGHER STANDARD IN AT-HEIGHTS SAFETY ISEA 2 DROPPED OBJECTS STANDARD We ve teamed with
Product Numbers & Ordering Information
 Australia / NZ Product Family Miller Miners Harnesses (AUS) Welders Harnesses are designed for use in applications where hot sparks or molten materials may come into contact with the harness. Visit MillerFallProtection.com
Product Name: Hold Me Rope Anchor
 Product Name: Hold Me Rope Anchor Part #: 01300 Instruction Manual Do not throw away these instructions! Read and understand these instructions before using equipment! Introduction 1 Applicable Safety
WARNING! DO NOT THROW AWAY THESE INSTRUCTIONS! READ AND UNDERSTAND BEFORE USING EQUIPMENT!
 Guardian Fall Protection Kent, WA 800-466-6385 www.guardianfall.com GENERAL SYSTEM SELECTION CRITERIA: Selection of fall protection shall be made by a Competent Person. All fall protection equipment shall
INSTRUCTIONS FOR USE
 INSTRUCTIONS FOR USE 7100 Series Lanyards Complies with the current ANSI Z359.1-2007 and all applicable OSHA regulations and requirements. Reliance Industries P.O. Box 2046 Deer Park, TX 77536 Phone :
NORTHERN DIVER PFD MANUAL
 PFD MANUAL NORTHERN DIVER PFD MANUAL Thank you for purchasing this Northern Diver PFD. To help ensure your future safety, do not use this product before reading this manual. It is important to fully understand
ExtendAire TM II. Intermediate Pressure Accessory Kit USER INSTRUCTIONS
 ExtendAire TM II Intermediate Pressure Accessory Kit USER INSTRUCTIONS THIS MANUAL MUST BE CAREFULLY READ AND FOLLOWED BY ALL PERSONS WHO HAVE OR WILL HAVE THE RESPONSIBILITY FOR USING OR SERVICING THIS
User Instructions Series Descent Device
 User Instructions - 199 Series Descent Device This document serves as the Manufacturer s Instructions, and is to be used as part of an employee training program for the system, as required by OSHA. ATTENTION:
User Instruction Manual For Davit Rescue System
 Instructions for the following series products: Rescue Davit System Model numbers 8004000 and 8302500 User Instruction Manual For Davit Rescue System This manual should be used as part of an employee training
Fire Innovations Product Specifications
 Fire Innovations Product Specifications Product No 1101-0001 Description Cheyenne Ladder/Escape Belt Revision D Date: 04.18.13 INTENTION OF DESIGN KEY FEATURES Custom fitted or multi-size belts available.
Product Name: O-Torque Beamer
 Product Name: O-Torque Beamer Part #: 00141 Instruction Manual Do not throw away these instructions! Read and understand these instructions before using equipment! Introduction 1 Applicable Safety Standards
Marking films - Application guide
 Marking films - Application guide The application techniques that we will describe should help users by making their job easier, or by saving them time. However, we know that all the advice in the world
Floor Mount Socket. T: +44 (0) F: +44 (0)
 F: +44 (0)") G-Davit : Floor Mount Socket USER INSTRUCTION MANUAL A davit socket for installation bolted to a high strength flooring material. Suitable for both fall arrest use and lifting. EN795 Class B, PPE Anchor
G-Davit : Floor Mount Socket USER INSTRUCTION MANUAL A davit socket for installation bolted to a high strength flooring material. Suitable for both fall arrest use and lifting. EN795 Class B, PPE Anchor
Height Safety Lifting Load Control
 01 Safety Height Safety Lifting Load Control Management HARNESS RANGE Technical Data Sheet SpanSet Australia Ltd 13 Pullman Place Emu Plains NSW 2750 Australia Telephone +61 2 4735 3955 Fax +61 2 4735
Fall Protection STANDARD PROCEDURE INSTRUCTION. Fall Protection. Title SPI. Department. Supersedes SPI Dated. Jan 19, 2016.
 STANDARD PROCEDURE INSTRUCTION Title Fall Protection Department Safety, Health and Environment Supersedes SPI Dated March 27, 2014 SPI 34-21 Effective Date Jan 19, 2016 Fall Protection SPI 34-21 Page 1
User Instructions 1789 Parapet Wall Anchor
 User Instructions 1789 Parapet Wall Anchor This manual is intended to meet the Manufacturer Instructions as required by ANSI Z359.1 and should be used as part of an employee training program as required
USER INSTRUCTION MANUAL: CYNCH-LOK WOOD POLE FALL RESTRICTION DEVICE
 1 Wood Pole Fall Restriction Device Model Numbers: 1204057, 1204058, 1204075, 1204076 USER INSTRUCTION MANUAL: CYNCH-LOK WOOD POLE FALL RESTRICTION DEVICE This manual is intended to meet the Manufacturer
DBI SALA Confined Space Rescue Davit System
 Instructions for the following series products: Rescue Davit System (See back page for specific model numbers.) User Instruction Manual For Davit Rescue System This manual should be used as part of an
INSTRUCTIONS FOR USE
 Rebar Chain Assembly INSTRUCTIONS FOR USE 7260XX Rebar Chain Assembly Complies with the current ANSI Z359.1-2007 and all applicable OSHA regulations and requirements. Reliance Industries P.O. Box 2046
420 LB. CAPACITY. PROTECTIVE SHOULDER CAPS Provide protection and comfort when carrying heavy materials. The Ultimate Full Body Comfort Harnesses
 F U L L B O D Y H A R N E S S E S The Ultimate Full Body Comfort Harnesses PROTECTIVE SHOULDER CAPS Provide protection and comfort when carrying heavy materials. ExoFit NEX harnesses are the newest, most
PN BuckCat Series Saddles Instructions/Warnings
 PN 16905 BuckCat Series Saddles Instructions/Warnings The BuckCat is a light weight saddle developed for the professional arborist. It is fully adjustable at the sides, waist and legs to provide ease of
Security and confidence at height.
 A Security and confidence at height. Vertical Systems DISTRIBUTED BY M DBI-SALA Vertical Systems are designed to complement your ability to work while meeting all applicable OSHA and ANSI standards. Vertical
IMPORTANT:KEEP THESE INSTRUCTIONS FOR FUTURE REFERENCE. ROCK A BABY BABY ROCKER WITH TOY BAR INSTRUCTION BOOK Series LX9068
 IMPORTANT:KEEP THESE INSTRUCTIONS FOR FUTURE REFERENCE ROCK A BABY BABY ROCKER WITH TOY BAR INSTRUCTION BOOK Series LX9068 WARNINGS ALWAYS FOLLOW THE MANUFACTURERS INSTRUCTIONS. READ ALL INSTRUCTIONS CAREFULLY
Usage and Care Instructions
 SUPERSTAR Student Transportation Add-On Restraint Usage and Care Instructions SUPERSTAR 25-90 lbs. (11.3-40.8 kg) 52 in. (132 cm) tall or less at least 2 years of age *927360* Table Of Contents Store this
USER INSTRUCTIONS LARGE HOOK & STRAP ANCHORAGE CONNECTOR ! WARNING
 ROSE MODEL NUMBER USER INSTRUCTIONS LARGE HOOK & STRAP ANCHORAGE CONNECTOR! WARNING National standards and state, provincial and federal laws require the user to be trained before using this product. Use
IMPORTANT: Record the product identification information from the ID label in the inspection and maintenance log in section 9.0 of this manual.
 Instructions for the following series products: Vacuum Anchor HLL System (See back page for specific model numbers.) User Instruction Manual Vacuum Anchor Horizontal Lifeline System This manual is intended
Butler Parachute Systems, Inc
 Butler Parachute Systems, Inc A division of Butler Parachute Systems Group, Inc. TT-600 GEN 1 & 2 TETHERED TANDEM BUNDLE DELIVERY SYSTEM ASSEMBLY MANUAL 1 JUN 2010 INTRODUCTION This manual contains all
OPERATION AND INSTRUCTION MANUAL
 OPERATION AND INSTRUCTION MANUAL Swivel Anchor Model: SWS100N-316-CTS Patent US # 8,424,638 WARNING: ALL PERSONS USING THIS EQUIPMENT MUST READ AND UNDERSTAND ALL INSTRUCTIONS. FAILURE TO DO SO MAY RESULT
OPERATION AND INSTRUCTION MANUAL Swivel Anchor Model: SWY100N
 OPERATION AND INSTRUCTION MANUAL Swivel Anchor Model: SWY100N IMPORTANT!!! ALL PERSONS USING THIS EQUIPMENT MUST READ AND UNDERSTAND ALL INSTRUCTIONS. FAILURE TO DO SO MAY RESULT IN SERIOUS INJURY OR DEATH.
OPERATION AND INSTRUCTION MANUAL Beam Trolley Model: BTA012N
 OPERATION AND INSTRUCTION MANUAL Beam Trolley Model: BTA012N WARNING: ALL PERSONS USING THIS EQUIPMENT MUST READ AND UNDERSTAND ALL INSTRUCTIONS. FAILURE TO DO SO MAY RESULT IN SERIOUS INJURY OR DEATH.
WARNING! DO NOT THROW AWAY THESE INSTRUCTIONS! READ AND UNDERSTAND BEFORE USING EQUIPMENT!
 Guardian Fall Protection Kent, WA 800-466-6385 www.guardianfall.com GENERAL SYSTEM SELECTION CRITERIA: Selection of fall protection shall be made by a Competent Person. All fall protection equipment shall
SUPER SLIDER BEAM ANCHOR ADJUSTABLE FROM Model # BWA030N
 SUPER SLIDER BEAM ANCHOR ADJUSTABLE FROM 12-30 Model # BWA030N IMPORTANT!!! ALL PERSONS USING THIS EQUIPMENT MUST READ AND UNDERSTAND ALL INSTRUCTIONS. FAILURE TO DO SO MAY RESULT IN SERIOUS INJURY OR
TRUSTED. DURABLE. RELIABLE.
 SEALED-BLOK SELF RETRACTING LIFELINEs TRUSTED. DURABLE. RELIABLE. SRL with Field Proven Technology, RSQ Feature & Retrieval Capabilities. WHY USE A SEALED-BLOK? Trusted DBI-SALA continues to set the standard
Brummel Eye Splice SP-02(0718)
") Brummel Eye Splice SP-02(0718) Brummel Eye Splice These instructions for the Brummel Eye Splice are recommended for 12 strand single/hollow braid ropes made with polyester or nylon, such as our Static-12
Brummel Eye Splice SP-02(0718) Brummel Eye Splice These instructions for the Brummel Eye Splice are recommended for 12 strand single/hollow braid ropes made with polyester or nylon, such as our Static-12
Height Safety Lifting Load Control
 01 Safety Height Safety Lifting Load Control Management SPECIALISED LANYARDS Technical Data Sheet SpanSet Australia Ltd 150 Old Bathurst Road Emu Plains NSW 2750 Australia Telephone +61 2 4735 3955 Fax
product use, care, & inspection Document Released: January, 10, 2012 Approved By: Bryce Merrick
 product use, care, & inspection Document Released: January, 10, 01 Approved By: Bryce Merrick product use, care, & inspection Contents product use 03 product warning 03 tuff bucket ANATomy 04 how to properly
FREQUENTLY ASKED QUESTIONS ABOUT FALL PROTECTION
 FREQUENTLY ASKED QUESTIONS ABOUT FALL PROTECTION What s the difference between polyester and nylon webbing in harnesses and lanyards? Nylon (polyamide) and polyester are both synthetic products with very
TECHNICAL DATASHEET HC71 SERIES SAFETY HELMET DESCRIPTION APPLICATIONS
 HC71 SERIES SAFETY HELMET DESCRIPTION The Australian made Protector HC71 series ABS safety helmet (Type 1) with comfortable 6 point terylene head harness is designed to deflect falling objects and provide
Operating instructions. Bolt-on Bar Joist Anchorage
 Reliance Industries, LLC Operating instructions for the Bolt-on Bar Joist Anchorage Model # 3072 Reliance Industries, LLC PO Box 140008 Denver, CO 80214 Ph. (800) 488-5751 Ph. (303) 424-8650 Fax (303)
ROLLGLISS TECHNICAL RESCUE RANGE
 Rollgliss Rescue ROPECRAFT ref# size STATIC RESCUE LINE ROPE 1270158 SRTE11 11mm 1270009 SRTE13 13mm E7 Accessory Cord 7mm 1270168 1270179 883S4016 KF7T180404 DELTA II SUSPENSION Harness ACCESSORY CORD
SAFETY ENGINEER S GUIDE TO TOOL TETHERING
 SAFETY ENGINEER S GUIDE TO TOOL TETHERING Building quality tool and gear tethers since 1995 The Leader In Innovative Tethering Solutions Gear Keeper Woven integrated elastic The Leader In Innovative Tethering
Product Name: Beamer Trolley Anchor
 Product Name: Beamer Trolley Anchor Part #: 00215 Instruction Manual Do not throw away these instructions! Read and understand these instructions before using equipment! Introduction 1 Applicable Safety
HEIGHT SAFETY. Elasticised shock absorbing Lanyard Twin tail lanyard allowing transfer to adjacent anchors
 Elasticised shock absorbing Lanyard Twin tail lanyard allowing transfer to adjacent anchors Height Safety Padded waist belt/lumbar support for wearer comfort stitch pattern webbing Extension strap secured
SADDLES FOR ARBORISTS USE INSTRUCTIONS / WARNINGS
 SADDLES FOR ARBORISTS USE INSTRUCTIONS / WARNINGS All Arborist Saddles manufactured by Buckingham Mfg. Co. are made from the finest quality components. Buckingham offers a wide selection of Arborist Saddle
GRAVITY BIKE RACK ASSEMBLY & OPERATING INSTRUCTIONS
 GRAVITY BIKE RACK 94479 ASSEMBLY & OPERATING INSTRUCTIONS Due to continuing improvement, actual product may differ slightly from the product described herein. 3491 Mission Oaks Blvd., Camarillo, CA 93011
Product Name: Internal Shock Lanyard
 Product Name: Internal Shock Lanyard Part #: 11200; 11201; 11202; 11203; 21215; 01295; 01296; 01297; 01298; 11211; 11212; 11213; 11260; 11261 Instruction Manual Do not throw away these instructions! Read
Step By Step How to Establish, Manage and Implement a Fall Protection Program
 Step By Step How to Establish, Manage and Implement a Fall Protection Program The following is a step by step guideline for establishing, managing and implementing a fall protection program arranged in
Product Name: Non-Shock Lanyard
 Product Name: Non-Shock Lanyard Part #: 01121, 01122; 01280, 01250, 01255, 01260, 01265, 01251, 01261, 01265, 01270, 01271 Instruction Manual Do not throw away these instructions! Read and understand these
OPERATION AND INSTRUCTION MANUAL Swivel Anchor Model: HD26248
 OPERATION AND INSTRUCTION MANUAL Swivel Anchor Model: HD26248 IMPORTANT!!! ALL PERSONS USING THIS EQUIPMENT MUST READ AND UNDERSTAND ALL INSTRUCTIONS. FAILURE TO DO SO MAY RESULT IN SERIOUS INJURY OR DEATH.
OPERATION AND INSTRUCTION MANUAL
 OPERATION AND INSTRUCTION MANUAL Dual Extension Swivel Anchor Model: SWD100N-036 WARNING: ALL PERSONS USING THIS EQUIPMENT MUST READ AND UNDERSTAND ALL INSTRUCTIONS. FAILURE TO DO SO MAY RESULT IN SERIOUS
ANCHORAGE STRAPS INSTRUCTION MANUAL
 ANCHORAGE STRAPS INSTRUCTION MANUAL THE INSTRUCTIONS APPLIES TO THE FOLLOWING MODELS: EZA6350 4' Cross Anchor Strap for Concrete EZA635 6' Cross Anchor Strap for Concrete CONCRETE ANCHOR WEB STRAPS INSTRUCTIONS
GEMLUX FISHING SYSTEM INSTALLATION AND USER GUIDE
 GEMLUX FISHING SYSTEM INSTALLATION AND USER GUIDE SEPTEMBER 2016 TABLE OF CONTENTS WELCOME TO THE GEMLUX FISHING SYSTEM 3 FIRST THINGS FIRST! 4 WHAT S IN THE BOX? 4 UNPACKAGING 4 WHAT ELSE DO I NEED FOR
WHITE WOLF. X-ray View MID POWER MODEL ROCKET KIT BUILDING INSTRUCTIONS KIT SPECIFICATIONS:
 WHITEWOLF-38 PARTS LIST 1 - Nose Cone 1-17" Airframe 1-6" Motor Tube 3 - Aft Fins 3 - Forward Fins 2 - Centering Rings 1-15" Parachute 2 - launch lugs 1-12 Kevlar Shock Cord 1 - Motor Retention >>(screw/washer)
BABY ROCKER WITH TOY BAR
 BABY ROCKER WITH TOY BAR IMPORTANT: KEEP THIS BOOKLET IN A SAFE PLACE FOR FUTURE REFERENCE. www.britax.com.au Series AX910 WARNINGS ALWAYS FOLLOW THE MANUFACTURERS INSTRUCTIONS. READ ALL INSTRUCTIONS CAREFULLY
USER INSTRUCTION MANUAL CONCRETE BOLT ANCHORAGE CONNECTOR
 Instructions for the following series products: Concrete Bolt Connector Models: 2100041, 2100066, 2104560, 2104561, 2104562 USER INSTRUCTION MANUAL CONCRETE BOLT ANCHORAGE CONNECTOR This manual is intended
Product Name: Concrete Anchor Strap
 Product Name: Concrete Anchor Strap Part #: 10705; 10710; 10715 ; 10717; 10720 Instruction Manual Do not throw away these instructions! Read and understand these instructions before using equipment! Table
Tactical Flotation Support System (TFSS) User s Manual
 User s Manual") Tactical Flotation Support System (TFSS) User s Manual Aerial Machine and Tool Corp. 4298 JEB Stuart Hwy Meadows of Dan, VA 24120 www.aerialmachineandtool.com Phone: 276-952-2006 FAX: 276-952-2231 Table
Tactical Flotation Support System (TFSS) User s Manual Aerial Machine and Tool Corp. 4298 JEB Stuart Hwy Meadows of Dan, VA 24120 www.aerialmachineandtool.com Phone: 276-952-2006 FAX: 276-952-2231 Table
Owner s Manual & Safety Instructions
 Owner s Manual & Safety Instructions Save Save This This Manual Manual Keep manual for the safety warnings and precautions, assembly, Keep manual for the safety warnings and precautions, assembly, operating,
Height Safety Lifting Load Control
 01 Safety Height Safety Lifting Load Control Management WATERWORKS HARNESS RANGE Technical Data Sheet SpanSet Australia Ltd 150 Old Bathurst Road Emu Plains NSW 2750 Australia Telephone +61 2 4735 3955
RIGGERS SAFETY SAFETY IS IN THE DETAILS FULL LINE CATALOG
 RIGGERS SAFETY SAFETY IS IN THE DETAILS FULL LINE CATALOG Riggers Safety is a California-based manufacturer of Personal Fall Arrest Systems (PFAS) and Fall Prevention Products. Our automated manufacturing
ANNUAL SELF INSPECTION / SERVICING INSTRUCTION SHEET
 ANNUAL SELF INSPECTION / SERVICING INSTRUCTION SHEET These instructions relate ONLY to the following models of inflatable PFD s: Watersnake Inflatable PFD & Watersnake Deluxe PFD (ADULT AND CHILDRENS SIZES)
OPERATION AND INSTRUCTION MANUAL Swivel Anchor Model: SWY100N
 OPERATION AND INSTRUCTION MANUAL Swivel Anchor Model: SWY100N Patent # US 8,424,638 WARNING: ALL PERSONS USING THIS EQUIPMENT MUST READ AND UNDERSTAND ALL INSTRUCTIONS. FAILURE TO DO SO MAY RESULT IN SERIOUS
Ground Release Shackle
 Operator Manual Subhead Advantages: In the process of installing Slide Rail, the shackle connecting the top of posts, panels, and sheeting must be removed manually. This is normally done by climbing on
OWNER S MANUAL. Page: 1 of 8
 Air Needle Scaler OWNER S MANUAL WARNING: Read carefully and understand all INSTRUCTIONS before operating. Failure to follow the safety rules and other basic safety precautions may result in serious personal
275 RID Assembly Instructions
 75 RID Assembly Instructions Part No. 0003003 v. Lscsep0 PARTS LIST (Specifications and contents subject to change without notice) Description Part # A. RID Track...0000050 B. Capacity Plate...0053 C.
BALL STOP INSTALLTION GUIDE
 BALL STOP INSTALLTION GUIDE GROUND SLEEVE INSTALLATION: 1. Locate the exact location of the ground sleeve. NOTE: Maximum recommended pole spacing is 20 feet on center. 2. Excavate the pole footing; refer
Saflok Concrete Wedge Anchor
 User Instruction Manual for: Saflok Concrete Wedge Anchor (Model Numbers: 2100085, 2100085C) User Instruction Manual Saflok Concrete Wedge Anchor This manual is intended to meet the Manufacturer s Instructions
USER S INSTRUCTION MANUAL FOR THE INSTALLATION, OPERATION & MAINTENANCE OF THE GUARDIAN TEMPORARY HORIZONTAL LIFELINE SYSTEM
 USER S INSTRUCTION MANUAL FOR THE INSTALLATION, OPERATION & MAINTENANCE OF THE GUARDIAN 04630 TEMPORARY HORIZONTAL LIFELINE SYSTEM 1 WARNING This is a design compatible component for a comprehensive Guardian
Lineman Buckets & Accessories
 F o r P Lineman Buckets & Accessories r o f e s s i o n a l s. Klein lineman buckets and accessories have been trusted and recognized for decades for their durability and dependability and are built for
This manual is intended to meet the Manufacturer s Instructions and should be used as part of an employee training program.
 Instructions for the following series products: User Instruction Manual Anchorage D-Bolt Anchorage D-Bolt Model Numbers: AN112A, 9504766 This manual is intended to meet the Manufacturer s Instructions
RIGGERS SAFETY SAFETY IS IN THE DETAILS FULL LINE CATALOG
 RIGGERS SAFETY SAFETY IS IN THE DETAILS FULL LINE CATALOG Riggers Safety is a California-based manufacturer of Personal Fall Arrest Systems (PFAS) and Fall Prevention Products. Our automated manufacturing
USER INSTRUCTIONS. Complies with ANSI Z359.1, ANSI Z359.4 standards and OSHA 29 CFR 1910 and 1926 regulations.
 FALL PROTECTION USER INSTRUCTIONS TRIPOD SYSTEM Complies with ANSI Z359.1, ANSI Z359.4 standards and OSHA 29 CFR 1910 and 1926 regulations. Models: T100009, T210030B, T210060B, T210100B, T510000B, T510045,
rooftop anchor Standing Seam Metal Roofs
 The Ultimate in Fall Protection INSTRUCTION MANUAL ANSI Z359.1 OSHA This manual is intended to meet the Manufacturer s Instructions as required by ANSI Z359.1 and should be used as part of an employee
E. Test, and if needed, adjust tips of antenna. 1. Mark will test antennas with meter at ground end of feedline bundle. Will take 10 minutes.
 Project Steps Overview: A. Prepare: B. Raise up small antenna. C. Raise up large antenna. D. Connect to new bundle of 4-feedlines pulled up from ground. E. Test, and if needed, adjust tips of large antenna.
CLIMBING Pads. Straps Gaffs Spikes Hardware
 CLIMBING Pads Straps Gaffs Spikes Hardware Quick Change Aluminum Climbers CTB Tree and Pole Climbing Kit Kit with straps and L pads Patented design give these climbers strength, durability and style Utilizes
PRODUCT CARD WALL MOUNTED FIXED BASKETBALL CONSTRUCTION PROJECTION: FROM 1,00 TO 2,25 M
 PRODUCT CARD WALL MOUNTED FIXED BASKETBALL CONSTRUCTION PROJECTION: FROM 1,00 TO 2,25 M I. List of components... 2 II. Complimentary products... 2 III. Product description... 3 IV. Product Purpose... 3
RollGliss Rescue Emergency Descent Device. This manual is intended to be used as part of an employee training program as required by OSHA.
 User Instruction Manual for: RollGliss Rescue Emergency Descent Device with Auto-Retract (Model Numbers: See Figure 1) User Instruction Manual RollGliss Rescue Emergency Descent Device with auto-retract