AR251/AR251-B. Venepuncture and Infusion Arm. Instruction Manual
|
|
|
- Moris Eaton
- 6 years ago
- Views:
Transcription
1 AR251/AR251-B Venepuncture and Infusion Arm Instruction Manual
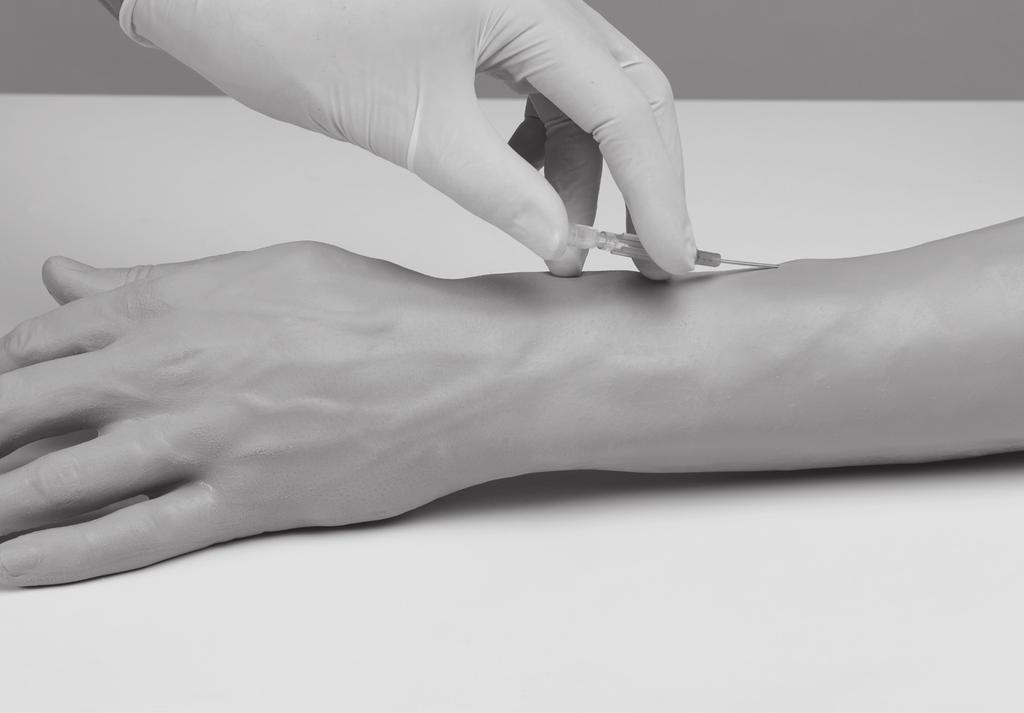
2 Thank you for purchasing this AR251 Venepuncture and Infusion Arm. Cast from life, it shows a well developed male left arm in fine detail. The arm features a flexible wrist for added realism, durable silicone skin and is simple to set up, operate and maintain. Please read this instruction manual carefully and retain it for future reference. Skills Intravenous cannulation - on the back of the hand or forearm Setting up and monitoring infusions including application of dressings to secure cannula in place Withdrawal of blood using syringe or vacutainer Features Easy to set up Flexible wrist for improved realism Closed blood system which is clean to use The skin is moulded from a specially selected grade of silicone for improved feel, durability and palpation of the veins Many procedures can be carried out before a replacement skin is required A realistic sensation is felt when the skin and vein are penetrated When charged with artificial blood, a realistic flashback confirms correct needle location in the vein and blood can then be withdrawn Continuous vein system, and innovative two bottle sealed blood assembly, greatly reduce the risk of leakage The working veins, which can be identified from the blind veins by palpation, are made from a material with self sealing characteristics that can be penetrated many times The self-sealing material used for the veins, as well as the silicone skin, enhance durability Automatic pressure relief valve Replacement skins and veins are simple to fit Accessible Veins Dorsal metacarpal Cephalic Median cubital Basilic 2
3 Safety and Precautions The veins in this arm contain natural latex which may cause an allergic reaction to some individuals. If a reaction occurs, discontinue use immediately and seek medical advice. Do not leave the blood system pressurised when not in use. Do not mark the skin with ink from ball point pens, marking pens or newsprint as these cannot be removed. It is recommended that 21 gauge or smaller cannulae and needles be used for practice on the arm to avoid accelerated wear of the skin and veins. Please treat the Infusion Arm with the same care you would a patient. Contents Parts and Configuration 4 - Supplied with 5 Preparing the Arm For Use - Making Blood Concentrate 6 - Setting up the Arm & Pressurising the System 6 During Use - Using Vascular Access Devices & Keeping the System Pressurised 8 - When Blood Has Transferred from One Bottle to the Other 8 After Use - Emptying Vein System of Blood & Disconnecting the Arm 10 - Using the Blanking Plugs for Transportation 10 Maintenance - Flushing the Vein System & Bottles 12 - Cleaning the Skin 12 Replacing the Skin and Veins - Removing the Old Skin & Vein System 14 - Insert the New Vein System 16 - Install the New Arm Skin 18 3
4 Parts and Configuration a l d b k c d e e f i j i f g h 4
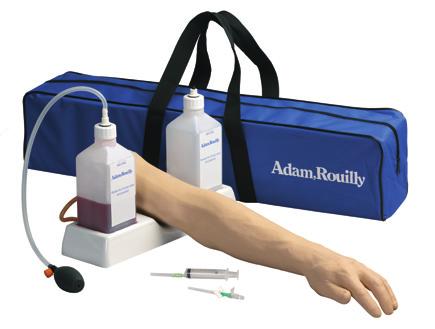
5 a b c Infusion Arm (made up of Skin, Vein, Core) S251/8 Blanking Plugs (x 2) S251/11 Tube and Bulb Connector d White bottle cap (x 2) e S251/4C Bottle (x 2) f Blue bottle valve (x 2) g h S341/7 Orange Pressure Release Cap S341/6 Bulb i S251/6 Blue vein connector (x 2) j S201/2A Arm Rest k S251/4D Rubber Washer (x 2) l S251/7 Pressure Release Valve Assembly Supplied With Syringe: 5 ml Syringe: 10 ml Cannulae (2) AR204 S024 Blood Concentrate Lubricant S251/3 Carrying Bag If you require replacement parts please contact our Sales Department, quoting codes where applicable. Parts to are available as one complete set - order SPAR251 5
6 Preparation for Use 1a 1b 1c 10 g (x1 teaspoon) 2a 2b x2 2c 3a 3b 6
7 Make the Blood Concentrate 1a 1b 1c Ensure the work area is clean and dry. Keep paper towels nearby in case of any spillage. Unscrew the cap of the bottle with the tube and bulb attached. Prepare artificial blood by putting 10 grams (Approx. 1 teaspoon) of artificial blood powder concentrate in the bottle and fill with water to the Max Level line. Replace cap and shake well to mix. Set Up the Arm Rest and Connect the Veins to the Bottles 2a Locate the bottles in the arm rest holder positioning the blue connectors to the slots in the back. 2b 2c Place the arm with the palm of the hand facing down, supporting the arm at the shoulder end on the arm rest. Connect the arm veins to both bottles using the blue connectors. Locate the connector and insert fully into the valve. Twist the connector clockwise until it locks into place. Pressurise the System 3a Pump the bulb to charge the vein system. 3b Continue to pump the bulb until blood begins to flow through the arm and into the other bottle. There should be no visible air bubbles in the veins before use. If bubbles are present, keep charging the system until there is a steady flow of blood. Do not over pressurise the system. The pressure release valve on the second bottle will automatically open if the system is over pressurised. 7
8 During Use 4a 4b 5a 5c 5b 5d 5e 5g 5f 8
9 Using Vascular Access Devices & Keeping the System Pressurised 4a A range of vascular access devices may be used to take blood from the arm such as syringes, vacutainers and cannulae. It is recommended that 21 gauge or smaller cannulae and needles be used on the arm to avoid accelerated wear of the skin and veins. 4b Periodically pump the bulb to maintain pressure in the system during use. When Blood Has Passed from One Bottle to the Other 5a During use, blood will eventually pass from one bottle to the other. The bulb can easily be swapped to the other bottle so use may continue relatively uninterrupted. Before the first bottle is completely empty and air enters the vein system, discontinue use and depressurise. To depressurise the system, open the orange cap on the bulb and allow air to escape. 5b 5c 5d 5e 5f 5g Once the system has depressurised, close the orange cap again. Remove the pressure release valve from the second bottle by turning it anti-clockwise and pulling it out of the bottle valve. Remove the bulb and tube from the first bottle by turning the connector anticlockwise and pulling it out of the bottle valve. Swap both the bulb and pressure release valve onto the alternate bottles. Locate the tube and bulb connector fully into the second bottle valve and turn clockwise until it locks into place. Locate the pressure release valve fully into the first bottle valve and turn clockwise until it locks into place. Re-charge the system by pumping the bulb until blood begins to flow into the first bottle. The arm is now ready for use again. 9
10 After Use 6a 6b 6c 7a x2 8a 8c x2 8b 10
11 Empty the Vein System of Blood 6a 6b 6c After use, pump the bulb until blood has collected in one bottle and the vein system is empty. Depressurise the system by opening the orange cap on the bulb and allow air to escape. Once the system has depressurised, close the orange cap. Do not leave the blood system pressurised when not in use. Disconnect the Veins from the Bottles 7a Disconnect both veins from both bottles before transportation or storage. To disconnect, turn the blue connectors anti-clockwise and pull out of the bottle valves. When not in use, the bottles should be completely emptied of blood and washed out. Using the Blanking Plugs for Transportation 8a The supplied blanking plugs may be placed into both bottles for easy transportation. Remove the bulb and tube from the bottle by turning the connector anticlockwise and pulling it out of the white bottle valve. 8b 8c Remove the pressure release valve from the bottle by turning it anti-clockwise and pulling out of the bottle valve. Insert blanking plugs into both bottles by locating plugs fully into bottle valves and turning clockwise until they lock into place. When not in use, the bottles should be completely emptied of blood and washed out. 11
12 Maintenance 9a 9b 9c 10 12
13 Flushing the Vein System & Bottles 9a To clean the bottles and veins the system should be flushed with warm water. Fill the first bottle with warm water and attach the bulb and tube. 9b 9c Set up the infusion arm as before, connecting both veins to both bottles in the stand. Pump the bulb to begin flushing the system. Allow all of the water to flush through the system and pass into the second bottle. Maintain system pressure by pumping the bulb. Depressurise the system and empty the bottles. Do not use soap, detergents or any other chemical cleaners to clean the vein system or bottles. Before storage, or at the end of a training session, the vein system must be flushed through with clean water to prevent mould growth. Cleaning the Skin and Removing Adhesive Residues 10 The arm skin may be washed with a soap solution. Methylated spirits can be used to remove residues from adhesive tapes and dressings etc. Do not mark the skin with ink from ball point pens, marking pens or newsprint as these cannot be removed. 13
14 Replacing the Skin and Veins 11a x2 11b 11c 11d 14
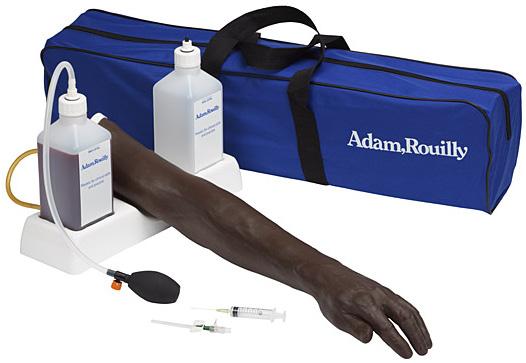
15 Replacement Skin and Vein Sets Replacement skin and vein sets are available from Adam,Rouilly or your local distributor. AR253 Skin and Vein Set, White for AR251 AR253-B Skin and Vein Set, Black for AR251-B Replacing the skin and vein set is a relatively simple procedure, as below. However we can carry out this service for you. Please contact our Sales Department for more information. The veins in this arm contain natural latex which may cause an allergic reaction to some individuals. If a reaction occurs, discontinue use immediately and seek medical advice. 1. Remove the Old Skin and Vein System 11a Remove the two blue vein connectors from each arm vein. Keep these safely for re-fitting onto the new vein set later. 11b 11c 11d Detach the white end cap from the shoulder of the arm and pull off from the two veins completely. Pull the old arm skin off the inner arm core and throw away. Remove the old vein system from the core by carefully removing it from the channels in the arm core. Be sure to remove the veins carefully from tunnels and so that the core is not damaged. Excessive force during vein removal may cause damage to the core. Continues, please see next page... 15
16 Replacing the Skin and Veins (Continued) 11e 1/2 1/2 11f 11g 11h 16
17 2. Insert the New Vein System 11e 11f 11g To insert the new vein, first loop it through tunnel in the back of the hand. Pull the vein through so that there are equal halves on each side of the tunnel. With the back of the core facing you, loop the first half vein around the right channel in the back of the hand and down the arm to tunnel Insert the vein through tunnel 11h Loop the other half of the vein around the left channel in the back of the hand. Continues, please see next page... 17
18 Replacing the Skin and Veins (Continued) 11i 11j 11k 11l 11m 11n x2 18
19 2. Insert the New Vein System (Continued) 11i Insert the rest of the vein system into its corresponding channels in the arm core, keeping the two ends of remaining vein out of the way during installation of the new arm skin. 3. Installing the New Arm Skin 11j Spray lubricant liberally down the inside of the new skin and work it down by rubbing sides together. 11k With the end of the arm core facing you, slide the arm core over the hand end of the core, all the way to the shoulder. 11l 11m Be sure that the new vein system is still in the vein channels in the arm core. If the vein is not in the channel in the core it can be pushed back into the channel through the skin. Replace the end cap by threading both ends of the vein through the two holes, pushing firmly into place 11n Replace both blue vein connectors in each end of the new vein system. The arm is now ready for use again. 19
20 Adam,Rouilly has over 93 year s experience in providing quality medical models and simulators. Should you require any further information please contact our Sales Department who will be pleased to help with your enquiry. Adam,Rouilly Limited Castle Road Eurolink Business Park Sittingbourne Kent United Kingdom ME10 3AG T: +44(0) F: +44(0) E: sales@adam-rouilly.co.uk Copyright 2011 NM1 S0017 MN1
limbsandthings.com Advanced Venepuncture Arm User Guide For more skills training products visit Limbs & Things Ltd.
 User Guide Advanced Venepuncture Arm Product No: 00290 (Light) Product No: 00298 (Brown) For more skills training products visit limbsandthings.com Limbs & Things Ltd. Sussex Street, St Philips Bristol,
Standard. Bag & Stand Advanced Venepuncture Arm. Light. Part No: Brown. Part No: Black. Part No: 00442
 Setup Guide Bag & Stand Advanced Standard Light. Part No: 00440 Brown. Part No: 0044 Black. Part No: 0044 Part No: 065-0 Issue, May 0 0 Limbs & Things For more skills training products visit limbsandthings.com
PEDIATRIC INJECTABLE TRAINING ARM SIMULATOR LF00958U INSTRUCTION MANUAL
 PEDIATRIC INJECTABLE TRAINING ARM SIMULATOR LF00958U INSTRUCTION MANUAL DO NOT REMOVE FILM FROM TUBING! THIS PRODUCT CONTAINS DRY NATURAL RUBBER! Products by NASCO About the Simulator The Life/form Pediatric
Standard. Standard. Venepuncture Arm. Light. Part No: Brown. Part No: Black. Part No: 00332
 Setup Guide Standard Standard Light. Part No: 000 Brown. Part No: 00 Black. Part No: 00 Part No: 065-964 Issue, June 0 0 Limbs & Things For more skills training products visit limbsandthings.com Limbs
Infant IV Leg LF03636U Instruction Manual
 Infant IV Leg LF03636U Instruction Manual Products by Nasco About the Simulator The Life/form Infant IV Leg Simulator is an exciting training aid for practicing and demonstrating intravenous puncture
AT Kelly Torso. Directions for Use
 AT Kelly Torso Directions for Use 260-00001 2 Table of Contents Recommends 4 Items Included 5 Skills Taught 5 Preparing the Manikin for Use 6 Head 6 Lungs 6 Abdominal Thrust 6 Instructions for Use 6 Airway
Nita Newborn Model 1800 User Manual
 Nita Newborn Model 1800 User Manual 308 South Sequoia Parkway, Canby, Oregon 97013 USA ph. 503.651.5050 fax 503.651.5052 email info@vatainc.com www.vatainc.com Meet Nita Newborn TM Nita Newborn is a unique
Peripheral Venous Catheter Placement Simulator
 Attention Do not let ink from pens, newspapers, this manual or other sources come in contact with the manikin, as they cannot be cleaned the manikin skin. MW9 Peripheral Venous Catheter Placement Simulator
AT Kelly Torso. Directions for Use
 AT Kelly Torso Directions for Use Table of Contents Recommends 4 Items Included 5 Skills Taught 5 Preparing the Manikin for Use 6 Head 6 Lungs 6 Abdominal Thrust 6 Instructions for Use 6 Airway Management
STANDARD OPERATING PROCEDURE ADVANCED INTRAVENOUS TRAINING ARM (S )
") Page 1 of 27 1. Scope This Standard Operating Procedure (SOP) applies to the staff and students using the Advanced Intravenous Training Arm in the Pharmacy Practice Resource Unit (PPRU) at the Pharmacy
Page 1 of 27 1. Scope This Standard Operating Procedure (SOP) applies to the staff and students using the Advanced Intravenous Training Arm in the Pharmacy Practice Resource Unit (PPRU) at the Pharmacy
Patients Guide for Self Administering Intravenous Antibiotics General points
 Patients Guide for Self Administering Intravenous Antibiotics General points An intravenous line is an open route for infection therefore you need to prevent this by washing your hands before any procedure
Parts identification:
 ARTERY PUNCTURE AND INTRAMUSCULAR TRAINING ARM Parts identification: FAST-derm replacement skin (removable) Intramuscular injection pad (removable for cleaning) Training arm (includes one FAST-derm replacement
Bleeding Trauma Module Set. Directions for Use
 Bleeding Trauma Module Set Directions for Use 38 15 50 2 Laerdal TABLE OF CONTENTS Items Included 4 Skills Taught 5 Attaching Modules to Manikin 6 Set-up Procedures for Connecting Blood Bags to Modules
Arterial Puncture Wrist
 M99 Arterial Puncture Wrist Production supervision Dr. Hiroshi Koyama, Medical Director, General Internal Medicine National Hospital Organization Kyoto Medical Center Instruction manual Caution Do not
Articulating Legs with Intraosseous Infusion Simulator LF03840U Instruction Manual
 Articulating Legs with Intraosseous Infusion Simulator LF03840U Instruction Manual Products by Nasco C. O. A. D. B. E. M. I. J. G. K. H. F. N. L. About the Simulator Designed to attach easily to any Life/form
INSTRUCTION MANUAL Elisa Baby-PICC
 The simulator is ideal for techniques and skills in vascular access and intravenous therapy. The newborn is made of semi-flexible and non-toxic material. It measures approximately 52cm in height and weighs
Ultrasound Guided Thoracentesis Simulator Strap-on Type
 Caution Do not mark on the model and other components with pen nor leave printed materials contacted on surface. Ink marks on the models cannot be removed. MW4A Ultrasound Guided Thoracentesis Simulator
Ultrasound Guided Thoracentesis Simulator Strap-on Type
 Do not mark on the model and other components with pen nor leave printed materials contacted on surface. Ink marks on the models cannot be removed. MW4A Ultrasound Guided Simulator Strap-on Type Instruction
Arterial Puncture Wrist. Instruction Manual
 Arterial Puncture Wrist Instruction Manual Production supervision Dr. Hiroshi Koyama National Hospital Organization Kyoto Medical Center ENGLISH Index Features Components Before training While training
Newborn Nursing Skills and ALS Simulator LF01400U Instruction Manual
 Newborn Nursing Skills and ALS Simulator LF01400U Instruction Manual Products by Nasco About the Simulator Meeting your neonatal resuscitation program course curriculum, the Life/form Newborn Nursing Skills
CHILD CRiSis INJECTABLE TRAINING ARM LF03612U INSTRUCTION MANUAL
 CHILD CRiSis INJECTABLE TRAINING ARM LF03612U INSTRUCTION MANUAL Warning this product contains dry, natural rubber. Products by NASCO Synthetic Blood Posterior Anterior Pinch Clamp Venous System 12" Anterior
Advanced IV Hand LF01139U & LF01146U Instruction Manual
 Advanced IV Hand LF01139U & LF01146U Instruction Manual WARNING: This product contains dry natural rubber. Do not remove film from tubing! Products by Nasco List of Components 3 cc syringe with needle
Ultrasound Compatible Lumbar Puncture/ Epidural Simulator
 M43E Ultrasound Compatible Lumbar Puncture/ Epidural Simulator Instruction Manual Contents Please read General information Preparation Before training Training After training P.1 P.2-6 P.7 P.8-10 It includes
Child CRiSis Injectable Training Arm LF03612U Instruction Manual
 Child CRiSis Injectable Training Arm LF03612U Instruction Manual Warning: This product contains dry, natural rubber. Products by Nasco Synthetic Blood Posterior Anterior Pinch Clamp Venous System 12" Anterior
Ultrasound Guided Thoracentesis Simulator
 Do not mark on the model and other components with pen nor leave printed materials contacted on surface. Ink marks on the models cannot be removed. MW4 Ultrasound Guided Simulator Instruction Manual Contents
CVC Insertion Simulator
 M93UB CVC Insertion Simulator Don t mark on the model and other components with pen or leave printed materials contacted on their surface. Ink marks on the models will be irremovable. Instruction Manual
Skin and Vein Replacement Kit LF01122U (Light Skin) LF01123U (Dark Skin) LF01124U (Vein) Instruction Manual
 LF01123U (Dark Skin) LF01124U (Vein) Instruction Manual") Skin and Vein Replacement Kit LF01122U (Light Skin) LF01123U (Dark Skin) LF01124U (Vein) Instruction Manual CAUTION: PRODUCT CONTAINS DRY NATURAL RUBBER! DO NOT REMOVE FILM FROM TUBING! Products by Nasco
Skin and Vein Replacement Kit LF01122U (Light Skin) LF01123U (Dark Skin) LF01124U (Vein) Instruction Manual CAUTION: PRODUCT CONTAINS DRY NATURAL RUBBER! DO NOT REMOVE FILM FROM TUBING! Products by Nasco
NG Tube and Trach Skills Trainer LF01174U Instruction Manual
 NG Tube and Trach Skills Trainer LF01174U Instruction Manual Products by Nasco The Nasco Life/form NG Tube and Trach Skills Trainer offers students realistic experience in the insertion and management
Operation and Maintenance Instructions
 Hydratight Limited Bentley Road South Darlaston West Midlands WS10 8LQ United Kingdom Tel: +44 121 50 50 600 Fax: +44 121 50 50 800 E-mail: enquiry@hydratight.com Website: www.hydratight.com TOP COLLAR
Alfred ECMO Circuit Priming and Storage Guide
 Alfred ECMO Circuit Priming and Storage Guide 1 March 2012 Check List Page 2. Assembly, Priming and Storage Page 3. Prepare ECMO trolley and Circuit immediately before use Page 6. Connection to Patient
INFANT INJECTABLE TRAINING LEG LF03636U INSTRUCTION MANUAL
 INFANT INJECTABLE TRAINING LEG LF03636U INSTRUCTION MANUAL Products by NASCO About the Simulator... The Life/form Infant Injectable Training Leg Simulator is an exciting training aid for practicing and
Adult Sternal Intraosseous Infusion Simulator LF04200U Instruction Manual
 Adult Sternal Intraosseous Infusion Simulator LF04200U Instruction Manual Products by Nasco Figure 1 Figure 2 Figure 3 Figure 4 Figure 5 About the Simulator The Life/form Adult Sternal Intraosseous Infusion
Ultrasound Guided Thoracentesis / Pericardiocentesis Simulator Full set
 Do not mark on the model and other components with pen nor leave printed materials contacted on surface. Ink marks on the models cannot be removed. MW7 Ultrasound Guided Thoracentesis / Pericardiocentesis
Chester Chest Model 2400 User s Manual
 Chester Chest Model 2400 User s Manual 308 South Sequoia Parkway, Canby, Oregon 97013 USA ph. 503.651.5050 fax 503.651.5052 email info@vatainc.com Thank You For Your Purchase! Thank you for your purchase
Chester Chest Model 2400 User s Manual
 Chester Chest TM Refurbishing Service The purchase of training models is a significant financial investment. Realizing this, VATA is proud to offer a refurbishing service, to bring your model to new condition.
Tentec. Instruction Document. Mini Air Driven Pump Unit Model: HTT.627X Series. Part Identifier
 Tentec Page 1 w w w. t e n t e c. n e t Instruction Document Mini Air Driven Pump Unit Model: HTT.627X Series HTT.6271 Maximum Working Pressure = 1500bar (21750 psi) HTT.6272 Maximum Working Pressure =
PO Box 370 Phone: Swansea NSW 2281 Fax: AUSTRALIA Mobile: Web:
 EZI-DRY Pty Limited ABN: 98 114 507 443 PO Box 370 Phone: 0249711993 Swansea NSW 2281 Fax: 0249135490 AUSTRALIA Mobile: 0427587900 Web: www.ezi-dry.com.au Email: ezidry@exemail.com.au INSTRUCTION MANUAL
To assist you in preparing STAT Baby for student activities we offer the following set up suggestions:
 No 350 Stat Baby Instructions for STAT Baby, item 350 To assist you in preparing STAT Baby for student activities we offer the following set up suggestions: After connecting fluid reservoir bags to the
Techcon Systems TS1254 Pressure Pot
 Techcon Systems TS1254 Pressure Pot User Guide Copyright OK International, Inc. TABLE OF CONTENT 1. SAFETY. 3 1.1 Intended Use 3 1.2 Safety Precaution 3 2. FEATURES. 5 3. SPECIFICATIONS 4 4. INSTALLATION
Techcon Systems TS1258 Pressure Pot
 Techcon Systems TS1258 Pressure Pot User Guide TABLE OF CONTENT 1. SAFETY. 3 1.1 Intended Use 3 1.2 Safety Precaution 3 2. CERTIFICATE OF COMFORMANCE 4 3. FEATURES. 5 4. SPECIFICATIONS 5 5. INSTALLATION
Owner s Instruction Manual
 Owner s Instruction Manual IMPORTANT! PLEASE READ THIS MANUAL CAREFULLY BEFORE PROCEEDING. AFTER READING THIS MANUAL, SAVE THESE INSTRUCTIONS FOR FUTURE REFERENCE. Congratulations on your purchase of the
Difficult Airway Management Simulator
 MW13 Difficult Airway Management Simulator Training Model Caution Do not mark on the model and other components with pen nor leave printed materials contacted on surface. Ink marks on the models cannot
Venepuncture. Clinical Skills. Venepuncture. Dr Brian Jenkins (Clinical Skills Lead) Sian Williams (Clinical Skills Manager)
 Sian Williams (Clinical Skills Manager)") Clinical Skills Venepuncture Dr Brian Jenkins (Clinical Skills Lead) Sian Williams (Clinical Skills Manager) Aims and Objectives Aims and Objectives The aim of this module is to facilitate learning regarding
Clinical Skills Venepuncture Dr Brian Jenkins (Clinical Skills Lead) Sian Williams (Clinical Skills Manager) Aims and Objectives Aims and Objectives The aim of this module is to facilitate learning regarding
INSTRUCTION MANUAL FOR POLYKEG DISPOSABLE KEG
 TABLE OF CONTENTS OF MANUAL Chapters 1.0 Product description 2.0 Safety rules for the utilisation of the keg 3.0 Instructions for manual filling 4.0 Instructions for automatic filling 5.0 Instructions
Pressure Dump Valve Service Kit for Series 3000 Units
 Instruction Sheet Pressure Dump Valve Service Kit for Series 000 Units. Overview The Nordson pressure dump valve is used to relieve hydraulic pressure instantly in Series 00, 400, 500, and 700 applicator
Standard. Abdominal Aortic Aneurysm (AAA) Repair Trainer. Part No: 60610
 Repair Trainer. Part No: 60610") User Guide Abdominal Aortic Aneurysm (AAA) Repair Trainer Part No: 6060 Standard Part No: 065-088 Issue, June 005 04 Limbs & Things For more Vascular training products visit limbsandthings.com Limbs &
User Guide Abdominal Aortic Aneurysm (AAA) Repair Trainer Part No: 6060 Standard Part No: 065-088 Issue, June 005 04 Limbs & Things For more Vascular training products visit limbsandthings.com Limbs &
BOYLE S / CHARLES LAW APPARATUS - 1m long
 BOYLE S / CHARLES LAW APPARATUS - 1m long Cat: MF0340-101 (combination Boyle s and Charles without mercury) DESCRIPTION: The IEC Boyle's & Charles Law apparatus is a high quality instrument designed to
Aquor House Hydrant V2
 Aquor House Hydrant V2 IN-WALL OUTDOOR FAUCET SYSTEM FLUSH-MOUNT QUICK-CONNECT SELF-DRAINING ANTI-SIPHON NON-FREEZE VBH-SERIES AQUOR HOUSE HYDRANT V2: WALL HYDRANT / FREEZELESS SILLCOCK Freezeless sillcock
Abdominal Aortic Aneurysm (AAA) Repair Trainer User Guide
 Repair Trainer User Guide") Abdominal Aortic Aneurysm (AAA) Repair Trainer User Guide Designed and manufactured by Limbs & Things Limited, Sussex Street, St. Philips, Bristol, BS 0RA, UK. Telephone: +44 (0)7 3 0500 Fax: +44 (0)7
Abdominal Aortic Aneurysm (AAA) Repair Trainer User Guide Designed and manufactured by Limbs & Things Limited, Sussex Street, St. Philips, Bristol, BS 0RA, UK. Telephone: +44 (0)7 3 0500 Fax: +44 (0)7
Venous Blood Collection Passport
 Venous Blood Collection Passport Western Australia and New South Wales HLT37215 Certificate III in Pathology Collection Venous Blood Collection Passport (VCP) Student name Instructions: You will use this
Owner s Guide. ElevateSUP.com
 Owner s Guide ElevateSUP.com IMPORTANT READ THIS IMPORTANT INFORMATION BEFORE USING YOUR STAND UP PAD- DLEBOARD Disregarding any of the safety precautions and instructions contained in the owner s manual
FILTER REGULATORS MODEL NO: CAT155 & CAT156 FITTING & MAINTENANCE INSTRUCTIONS PART NO: & ORIGINAL INSTRUCTIONS
 FILTER REGULATORS MODEL NO: CAT155 & CAT156 PART NO: 3120169 & 3120170 FITTING & MAINTENANCE INSTRUCTIONS ORIGINAL INSTRUCTIONS GC0117 INTRODUCTION Thank you for purchasing this CLARKE Filter/Regulator.
Booster Pump PB4-60 Replacement Kits
 Booster Pump PB4-60 Replacement Kits FOR YOUR SAFETY - This product must be installed and serviced by a contractor who is licensed and qualified in pool equipment by the jurisdiction in which the product
PRODUCT CATALOGUE OF
 PRODUCT CATALOGUE OF INTERVENTIONAL CARDIOLOGY AND GENERAL MEDICAL DISPOSABLES Table of Contents INFLATION DEVICE... 4 GUIDE WIRE (PTFE)... 5 MANIFOLD... 6 PTCA Y Connector... 7 INTRODUCER SHEATH (Femoral/
Training. tm PA90 Series - Lung Demand Valve
 D Training Dräger tm12842 PA90 Series - Lung Demand Valve Index Section 1 Instructions for Use Section 2 Introduction and Safety Warnings Section 3 Product Description Section 4 Operating Principle Section
Airway Larry Airway Management Trainer Head LF03667U Instruction Manual
 Airway Larry Airway Management Trainer Head LF03667U Instruction Manual CAUTION: PRODUCT CONTAINS DRY NATURAL RUBBER! Products by Nasco A. B. C. About the Simulator The Life/form Airway Larry Airway Management
INTERMEDIATE INFANT MANIKIN LF03700U INSTRUCTION MANUAL
 INTERMEDIATE INFANT MANIKIN LF03700U INSTRUCTION MANUAL Products by Nasco Table of Contents page Introduction 2 Airway Management Trainer 3 IV Arm 4 IV Leg 9 Intraosseous Infusion Leg 14 Chest Skin with
THE HF-210 SERIES. Operating and Service Manual. Series includes all variants of HF-210/211. Issue A October 2014 *Section 6.
 THE HF-210 SERIES Operating and Service Manual Series includes all variants of HF-210/211 Issue A October 2014 *Section 6.1 in development 1 TABLE OF CONTENTS 1. Description... 3 2. Installation... 3 3.
Port - Body in a Box User s Manual
 Port - Body in a Box - 5010 User s Manual 308 South Sequoia Parkway Canby, Oregon 97013 USA ph. 503.651.5050 fax 503.651.5052 email info@vatainc.com Thank you for purchasing VATA s Port - Body in a Box
1. A proper preparation of the cone and other material is inevitable prior to a CPTU test.
 PREPARATION FOR CPTU Procedure for saturation of a piezocone for CPTU 1. A proper preparation of the cone and other material is inevitable prior to a CPTU test. 2. GeoMil Equipment recommends to saturate
! WARNING! IMPORTANT HPA AIR TANK SAFETY INSTRUCTION AND GUIDELINES ! WARNING! IMPORTANT SAFETY INSTRUCTION AND GUIDELINES
 ! WARNING! IMPORTANT SAFETY INSTRUCTION AND GUIDELINES! WARNING! IMPORTANT HPA AIR TANK SAFETY INSTRUCTION AND GUIDELINES This Paintball Marker is NOT A TOY. Misuse can cause serious injury or death. It
Training. Testor Training Manual
 Training Testor Training Manual Index Section 1 Introduction and Safety Warnings Section 2 Test Procedures Section 3 Test Hoses Section 4 Fault Location 1:1 1.1 Introduction The Dräger Testor test equipment
V-24 OXYGEN LANCE VALVE
 INSTRUCTIONS for F-4737-U May, 2009 V-24 OXYGEN LANCE VALVE w/ C -Size Inlet w/ B -Size Inlet V-24 Oxygen Lance with 1/8" Pipe Holder... 9728D65... 2218939 V-24 Oxygen Lance with 1/4" Pipe Holder... 9728A65...
35 TON HYDRAULIC PUNCH WARNING
 OPERATORS GUIDE REL-35T-PNC 35 TON HYDRAULIC PUNCH NOTICE Sizes, weights and tool specifications listed in this manual are subject to change without notice. Please consult factory for information and updates.
PREPARATION AND SELF-ADMINISTRATION INSTRUCTIONS FOR PATIENTS
 PREPARATION AND SELF-ADMINISTRATION INSTRUCTIONS FOR PATIENTS Hereditary Angioedema Jenny, a real HAE patient TAKE CONTROL OF YOUR HEREDITARY ANGIOEDEMA (HAE) TREATMENT WITH SELF-ADMINISTRATION Choosing
LEAK SEALING SYSTEMS
 OPERATION MANUAL FOR LEAK SEALING SYSTEMS 04 FEB 2016 PN 22-891709 Paratech Incorporated Headquarters Paratech Europe, Branch of Paratech Inc. P.O. Box 1000, Frankfort, IL 60423 USA P.O. Box 174, 5260
Table of Contents. Introduction 2. Airway Management Trainer 3. IV Arm 4. IV Leg 9. Intraosseous Infusion Leg 14
 INFANT MANIKIN LF03709U INSTRUCTION MANUAL CAUTION: THIS PRODUCT CONTAINS DRY NATURAL RUBBER! Life/form Products by Nasco Table of Contents page Introduction 2 Airway Management Trainer 3 IV Arm 4 IV Leg
6900 Maintenance Instruction System Flush
 Equipment Required FA74005 Damper Drain Tube FA16005 Cover Removal Tool FA900005 Beaker 0.25 Litre FA900003 Solvent Cleaning Bottle FA940021 Syringe Polypropylene 50 ml as required FA999045 Gloves Latex
Latvin Luxury Shower Panel. Telephone Product Specification. ~ Minimum Working Pressure 1.0 bar ~ Maximum Working Pressure 3.
 Product Specification ~ Minimum Working Pressure 1.0 bar ~ Maximum Working Pressure 3.0 bar Latvin Luxury Shower Panel ~ Fixing Centres 150mm +/- 10mm ~ Outlet size 1/2" Bottom Outlet Always maintain a
M03 WUNDATRADE. Heat Pump Manifold. Before you start: Check the contents. Optional. ...a division of WUNDA GROUP PLC
 Before you start: Check the manifold box contents against the list below. Check the contents Flow gauges 1. Bar assembly with manual return valves 2. 2 x Auto air vent & drain hose attachments Optional
Instruction Manual Updated 7/26/2011 Ver. 2.2
 4-Unit Model MB HTHP Filter Press #171-50-4: 115-Volt #171-51-4: 230-Volt Instruction Manual Updated 7/26/2011 Ver. 2.2 OFI Testing Equipment, Inc. 11302 Steeplecrest Dr. Houston, Texas 77065 U.S.A. Tele:
TDUX Inflatable Duct Sealing System 1.0 General Product Information
 TDUX I N S T A L L A T I O N I N S T R U C T I O N Inflatable Duct Sealing System 1.0 General Product Information The TDUX inflatable duct sealing system is a wraparound, inflatable, mastic-lined bladder
Making Life Easier Easypump II
 Making Life Easier Easypump II The elastomeric pump system for short- and long-term infusion therapy Elastomeric Infusion Systems Technical Guide Easypump II Disposable Elastomeric Infusion Pump System
Pressure Dump Valve Service Kit for Series 2300 Units
 Instruction Sheet Pressure Dump Valve Service Kit for Series 00 Units. Overview The Nordson pressure dump valve is used to relieve hydraulic pressure instantly in Series 00 applicator tanks when the unit
Nursing Guide Portsystems
 Quality and Experience Portsystems This nursing-guide is intended to answer general questions concerning port catheter systems. All other questions should be addressed to your attending physician or nursing
Replacement of Interchangeable Membrane
 Replacement of Interchangeable Membrane Replacement of Expansion Vessel Membrane 100+ Capacity 1. Firstly, before disconnecting the vessel, bear in mind that you must isolate the vessel from the system
CHILD INJECTABLE TRAINING ARM INSTRUCTIONS FOR INSTALLING LF03629U REPLACEMENT SKIN ON IV ARM LF03612U
 CHILD INJECTABLE TRAINING ARM INSTRUCTIONS FOR INSTALLING LF03629U REPLACEMENT SKIN ON IV ARM LF03612U This kit includes specially-treated tubing, upper and lower arm skins, liquid lubricant, and lubricating
PRESSURISED PAINT CONTAINER
 PRESSURISED PAINT CONTAINER MODEL NO: CPP2B PART NO: 3082115 OPERATION & MAINTENANCE INSTRUCTIONS GC0913 INTRODUCTION Thank you for purchasing this CLARKE Pressurised Paint Container. Before attempting
Santa Fe Cycles Assembly Guide Introduction
 Santa Fe Cycles Assembly Guide Introduction Congratulations on your purchase of your new Santa Fe bicycle. You have purchased a bicycle that has many features and qualities. Please take a few minutes and
BELT DRIVE INDOOR CYCLING BIKE SF-B1712 USER MANUAL
 BELT DRIVE INDOOR CYCLING BIKE SF-B1712 USER MANUAL IMPORTANT! Please retain owner s manual for maintenance and adjustment instructions. Your satisfaction is very important to us, PLEASE DO NOT RETURN
Budget Range Operators Handbook
 Budget Range Operators Handbook BAMBI AIR COMPRESSORS LTD 152 Thimble Mill Lane Heartlands Birmingham B7 5HT United Kingdom Tel: 0121 322 2299 Fax: 0121 322 2297 Email: sales@bambi-air.co.uk www.bambi-air.co.uk
HOME ASSEMBLY INSTRUCTIONS
 HOME ASSEMBLY INSTRUCTIONS This Papillionaire Bicycle now belongs to you. It will take you to work, wait patiently outside your local cafe, and carry your groceries home. This is the start of your long-term
RECOMBINATE. [Antihemophilic Factor (Recombinant)] (For intravenous use only)
![RECOMBINATE. [Antihemophilic Factor (Recombinant)] (For intravenous use only)](/thumbs/79/80305643.jpg "RECOMBINATE. [Antihemophilic Factor (Recombinant)] (For intravenous use only)") Website for more information: http://www.recombinate.com/ INSTRUCTIONS FOR USE RECOMBINATE [Antihemophilic Factor (Recombinant)] (For intravenous use only) Do not attempt to do an infusion to yourself
Website for more information: http://www.recombinate.com/ INSTRUCTIONS FOR USE RECOMBINATE [Antihemophilic Factor (Recombinant)] (For intravenous use only) Do not attempt to do an infusion to yourself
Syringe, Distribution Valve and Infusion Pump Removal/Replacement ATTENTION SYRINGE REPLACEMENT
 ATTENTION SYRINGE REPLACEMENT Please read through the document completely before starting any repairs. Refer to the proper section in the service manual for complete removal and replacement procedures.
LP90 Sink the stink with display (100 pieces single use packets) LP91 Sink the stink REFILLS (25PCS) Display not included
 LP91 Sink the stink REFILLS (25PCS) Display not included") LP83 1/2 Gallon Sink the Stink super concentrate Replaces the old gallon jugs. LP90 Sink the stink with display (100 pieces single use packets) LP91 Sink the stink REFILLS (25PCS) Display not included
LP83 1/2 Gallon Sink the Stink super concentrate Replaces the old gallon jugs. LP90 Sink the stink with display (100 pieces single use packets) LP91 Sink the stink REFILLS (25PCS) Display not included
User manual STARLOCK. Careways International - Innovation Quality Performance
 EN User manual LOCK Careways International - Innovation Quality Performance Content About this manual... 3 The Starlock cushion... 4 1 Warnings... 5 2 Important parts... 6 3 Use... 8 3.1 The right amount
PREPARATION AND SELF-ADMINISTRATION INSTRUCTIONS FOR PATIENTS
 PREPARATION AND SELF-ADMINISTRATION INSTRUCTIONS FOR PATIENTS Hereditary Angioedema TAKE CONTROL OF HEREDITARY ANGIOEDEMA (HAE) TREATMENT WITH FLEXIBLE ADMINISTRATION Choosing to treat with CINRYZE (C1
Owner s Instruction Manual
 Owner s Instruction Manual IMPORTANT! PLEASE READ THIS MANUAL CAREFULLY BEFORE PROCEEDING. AFTER READING THIS MANUAL, SAVE THESE INSTRUCTIONS FOR FUTURE REFERENCE. Congratulations on your purchase of the
RG1200 Service and Repair Manual
 Dive Rite RG 1200 Regulator Service and Repair Manual Page 1 Text and Photography by Pete Nawrocky Copyright ( ) 1999-2000, Lamartek, Inc., dba Dive Rite RG1200 Service and Repair Manual First Stage.........................................
Chapter 9 Accessories for the Kirby Morgan BandMasks
 Chapter 9 Accessories for the Kirby Morgan BandMasks 9.1 Introduction This section provides the manufacturer s advice on how to install KMDSI accessories including the hot water shroud, low pressure inflator
Varithena Delivery System Instructions for Use INSTRUCTIONS FOR USE Please read the Product Monograph before using the product.
 Varithena Delivery System Instructions for Use INSTRUCTIONS FOR USE Please read the Product Monograph before using the product. The Instructions for Use are for the entire Varithena TM system. There are
Drive Belt Instructions
 Drive Belt Safety Do not roll, pry, twist, invert or bend the belt back on itself. Do not zip tie the belt. The acceptable temperature range for your belt drive is -53 C to 85 C. Do not lubricate the belt
Owner s Instruction Manual
 Owner s Instruction Manual IMPORTANT! PLEASE READ THIS MANUAL CAREFULLY BEFORE PROCEEDING. AFTER READING THIS MANUAL, SAVE THESE INSTRUCTIONS FOR FUTURE REFERENCE. Congratulations on your purchase of the
CRP INSTALLATION, OPERATING AND MAINTENANCE INFORMATION FOR INLINE SAMPLING VALVES
 CRP INSTALLATION, OPERATING AND MAINTENANCE INFORMATION FOR INLINE SAMPLING VALVES Sampling Valves Installation Commissioning and Operating Instructions SD IL 300 & SD IL 400 Inline Sampling Valve This
Code AWC20HP Air Compressor
 Code 951816 AWC20HP Air Compressor Index of Contents Index of Contents 02 Declaration of Conformity 02 What s Included 03 Safety Precautions 03 Specifications (AWC20HP Air Compressor) 04 Assembly Instructions
SimNewB. User Guide.
 EN SimNewB User Guide www.laerdal.com Contents Introduction 4 Items Included & Storage 5 System Overview & Setup 6 Features 7 Airway Features 7 Breathing Features 7 Vascular Features 7 Circulation Features
Standard Specifications
 NARM, 2 Ways of Connection Small Size Pressure Gauge ø5mm Reverse flow function available on the standard model Space Saving -B2 NARM-6A-NG Standard Specifications Fluid Proof pressure psig (MPa) Max.
RB70 Automatic Diluent Valve Maintenance Manual. Version 1.1 November 2006 Written by Tino de Rijk. Page 1 of 23
 RB70 Automatic Diluent Valve Maintenance Manual Version 1.1 November 2006 Written by Tino de Rijk Page 1 of 23 Table of Contents 1. Introduction... 3 2. ADV diagram and parts list (Pre June 2006)... 4
Varithena Delivery System Instructions for Use
 Varithena Delivery System Instructions for Use Please read all prescribing information before using the product. The Instructions for Use are for the entire Varithena system. There are 2 packaging configurations:
OPERATOR S MANUAL Ar-Gone Weld Gas Analyzer
 July 2011 OPERATOR S MANUAL Ar-Gone Weld Gas Analyzer WARNING! Before operating this product, read and understand this Operator s Manual. Become familiar with the potential hazards of this unit. Contact