Alternative Drive Mounting Hardware. Quick Install IDCH. I-Drive Control Harness. mo-vis :
|
|
|
- Emory Melton
- 6 years ago
- Views:
Transcription


1 Alternative Drive Mounting Hardware Quick Install IDCH I-Drive Control Harness mo-vis :

 806-1225 info@stealthproducts.")
2 Customer Satisfaction 1.0 Stealth Commitment 1.1 Stealth Products strives for 100% customer satisfaction. Your complete satisfaction is important. Please contact us with feedback or suggested changes that will help improve the quality and usability of our swing away hardware. You may reach us at: Stealth Products, LLC 104 John Kelly Drive, Burnet, TX Phone: (512) Toll Free: 1(800) Fax: (512) Toll Free: 1(800) MDSS GmbH Schiffgraben Hannover, Germany Installation Date : Dealer : Dealer Stamp : Serial Number : i
3 Warning Labels 2.0 Warning Labels 2.1 Warnings are included for the safety of the user, client, operator and property. Please read and understand what the signal words SAFETY, NOTICE, CAUTION, WARNING and DANGER mean, how they could affect the user, those around the user, and property. DANGER WARNING CAUTION NOTICE Identifies an imminent situation which (if not avoided) will result in severe injury, death, and property damage. Identifies a potential situation which (if not avoided) will result in severe injury, death, and property damage. Identifies a potential situation which (if not avoided) will result in minor to moderate injury, and property damage. Identifies important information not related to injury, but possible property damage. SAFETY Indicates steps or instructions for safe practices, reminders of safe procedures, or important safety equipment that may be necessary. Limited Liability 2.2 Stealth Products, LLC accepts no liability for personal injury or damage to property that may arise from the failure of the user or other persons to follow the recommendations, warnings, and instructions in this manual. Testing 2.3 Initial setup and driving should be done in an open area free of obstacles until the user is fully capable of driving safely. The i-drive Control Harness and joystick should be tested by the care givers and end user and adjusted specifically to their needs. ii
4 Table Of Contents Customer Satisfaction... i 1.1 Stealth Commitment... i 2.0 Warnings... ii 2.1 Warning Labels... ii 2.2 Limited Liability... ii 2.3 Testing... ii 3.0 Table of Contents.iii 4.0 Parts and Accessories Mounting Hardware Parts Mounting Hardware Tools Installation Instructions Installing The Multi/IDPMP Joystick Installing The Micro Joystick Functioning Addition/Removal Of Link Height Adjustment Swivel Link Adjustment Joystick Mount Adjustment Lateral Adjustment Depth Adjustment Replacing The IDCH Belt Removing The Collar Warranty In Case Of Product Failure Notes... a iii

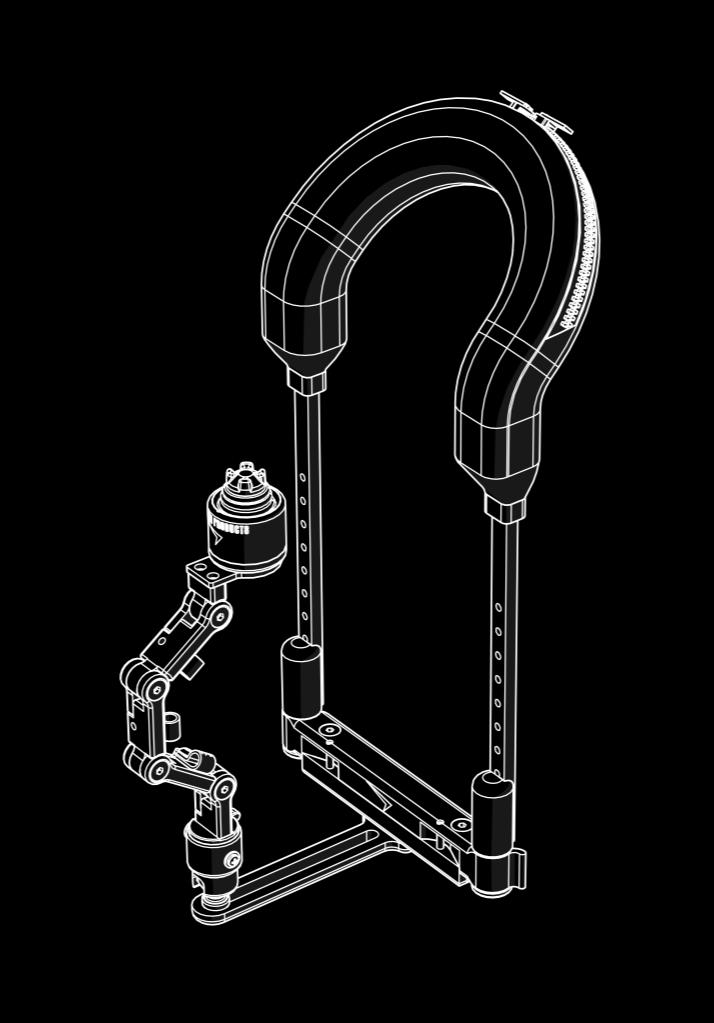
5 Parts And Accessories 4.0 Mounting Hardware Parts 4.1 A G F1 F E H E1 B D D1 C2 C1 D2 C C3 Description A Collar B IDCH ARM C Latch for the IDCH C1 Height Adjustment Latch C2 Depth Adjustable Track C3 Lateral Adjustment Track D Swivel Link for IDCH D1 Swivel Adjustment Handle D2 M6 Screw E Niño Link for IDCH E1 M5X.8X20 MM FHS (3) F Joystick Mount F1 M5X.8X6 MM BHS (2) G Niño Link For Mount H 1/4 Wire Clamp 1


6 Parts And Accessories 4.0 Mounting Hardware Tools Tools Description 5 T-Handle 1 2mm T-Handle 3mm T-Handle 4mm T-Handle 6 Phillips Screwdriver Small 1. T-Handles not included 2

.")

7 Installation Instructions 5.0 Installing The Multi/IDPMP Joystick 5.1 IDM-MULTI-9 1A IDPMP-1 / IDPMP-9 2A 1A H * USB ports to client s right side for forward direction. Standard Configuration. * Orient dimple on top of housing, furthest from client for forward direction. 1A Multi Mounting M4 x.7x10mm PHS (included in IDM-Muti-9 accessory pack). 2A IDPMP 1 / IDPMP 9 Mounting x 1/4 BHS (2) Phillips Screwdriver Small T-Handle 1 2mm T-Handle Step 1: Place Multi or IDPMP joystick atop the joystick mount. Match the holes on the base of the joystick to the holes on the mount. Step 2: Secure joystick to mount by inserting provided screws through the matching holes. Step 3: Secure Power Cord via 1/4 clips (H). WARNING Ensure joystick power cord is fed thru joystick mount cutout, without splicing or kinking. 3
 from joystick mount.")

8 Installation Instructions 5.0 Installing The Micro Joystick 5.2 F1 F Step 1: Loosen and remove screws (F1) from joystick mount. Step 2: Remove joystick mount from niño link. Step 3: Slightly loosen M5 x.8 x 6mm BHS and slide Micro joystick through the strap. Tighten screws with 3mm T-Handle. *Orient the arrow, on the underside of the joystick, pointing away from the client for standard configuration. 4

9 Installation Instructions 5.0 F1 Step 4: Attach joystick strap mount to niño link with screws (F1) and tighten with 3mm T-Handle. 5
 on the top link.")
 to open end.")

10 Functioning 6.0 Addition/Removal Of Link 6.1 E E1 2 F 5 If additional height is required: Step 1: Locate the link screw (E1) on the top link. Remove the M5x.8x20mm FHS from the link, detaching the joystick mount and link nut. Step 2: Line up holes on link and add the IDCH-Link (E) to open end. Step 3: Insert link screw (E1) and tighten with a 3mm T-Handle. Step 4: Remove screw at the top of the new link. Step 5: Add joystick mount and link nut, lining up all the holes. Insert screw and tighten. CAUTION DO NOT OVER TIGHTEN SCREWS. This could cause wearing of screws or joystick threads, causing the client to lose efficient control. 6

. Using the 2mm T-Handle, tighten the M3 x.5 x 12mm FHS back into place. SAFETY Always have adjustments performed by a trained service technician.")
11 Functioning 6.0 Height Adjustment 6.2 Add links to adjust height before determining if the arms should be cut. If there are no other options follow the steps below. B C C Step 1: Loosen and remove the M3 x.5 x 12mm FHS with the 2mm T-Handle to remove the collar. Determine the correct height of the mount that is needed for the user. Step 2: Once the desired height has been determined, make cuts on the arms (B). Adjustments to the height of the arms should only be made in 1/2 increments. Step 3: Snap the arms back into the latch (C). Using the 2mm T-Handle, tighten the M3 x.5 x 12mm FHS back into place. SAFETY Always have adjustments performed by a trained service technician. NOTICE Cutting the arms should be done only as a last resort. Cuts on the arms need to be made on the hole below the desired mount location. Ensure cut is made through the middle of the hole. CAUTION After cutting adjustments for the arms, smooth all sharp edges. 7
 in a")

12 Functioning 6.0 Swivel Link Adjustment OF ADJUSTMENT D1 Lock Step 1: Turn the handle (D1) in a downward direction to unlock and adjust. Step 2: Orient to desired angle of client s needs. Step 3: Turn handle (D1) in an upward direction to lock into place. 8

 to desired angle and tighten screw (E1)")
13 Functioning 6.0 Joystick Mount Adjustment 6.4 To adjust the angle of the Multi or IDPMP joystick mount: F E E1 + OF ADJUSTMENT Step 1: Loosen screw (E1) on niño link nut (E). Step 2: Adjust Joystick mount (F) to desired angle and tighten screw (E1) with 3mm T-Handle. CAUTION Do not over tighten. 9
.")

. 3.25 in. 8.")
14 Functioning 6.0 Lateral Adjustment 6.5 Step 1: Loosen M5x.8x12mm FHS on track and position lateral track to desired location on horizontal track (C3). Range of adjustment depends on size of control harness. C3 C2 Step 2: Tighten screws when track is in the correct location using the 3mm T-Handle. Minimum 3 in. to max 6 in. adjustment depending on collar size Depth Adjustment 6.6 Step 1: Loosen screw (D2). Move the swivel mount to the desired location along the track (C2) in cm Step 2: When the mount is in the desired location along the track, tighten the screw (D2) using the 4mm T-Handle. C2 D2 * Depth adjustment does not vary per size. 10


.")
15 Functioning 6.0 Replacing The IDCH Belt 6.7 B Step 1: Unscrew and remove M3 x.5 x 12mm FHS with the 2mm T-Handle. Separate arms (B) from latch (C1). C1 Step 2: Loosen and remove the M5 x.8 x 20mm FHS (2) from the i-drive latch (top). Step 3: Separate the latch from the track. Pull straight upward. 11


.")
16 Functioning 6.0 Step 4: Remove buckles off of pins. Replace new buckles by sliding 3/8 webbing onto pins. Match holes of the track to the holes of the latch, and snap back together. 5 Step 5: Give a slight tug to female buckle to ensure webbing is hooked onto slotted spring pin. Insert M5 X 0.8 X 20mm FHS (2) and tighten. 6 Step 6: Snap the arms back into the latch (C1). Using the 2mm T-Handle, tighten the M3-.5 x 12mm FHS screws back into place. C1 12
 different options are available to remove the arms from the latch; left, right, or a full release.")
17 Functioning 6.0 Removing The Collar 6.8 The track can be released from the collar (Client s perspective). Three (3) different options are available to remove the arms from the latch; left, right, or a full release. (Swing to client s right side) (Swing to client s left side) Step 1: For your safety, unbuckle the belt from collar. Step 2: Chose the direction to release the arms from the latch. Step 3: Place a firm hold on the latch and arm. Step 4: Pull latch away from client. Step 5: Secure and turn latch. Step 6: Remove from around the neck. 13
18 Warranty 7.0 The pads/covers are designed and produced to the highest of standards. Our pads/ covers are guaranteed to be free of defects in material and workmanship for a period of 24 months. If any defect in the material or workmanship is found, Stealth Products will repair or replace, at our discretion, the pad/cover of the product. This warranty does not apply to pads/covers abused or misused by the user and deemed such by Stealth Products, LLC. Claims and repairs should be processed through the nearest Stealth Products provider. No person is authorized to alter, extend, or waive the warranties of Stealth Products, LLC. Stealth Products warrants against failure due to defective materials or workmanship: Hardware: 5 years Electronics: 3 years Limitations This warranty does not extend to those items which may require replacement due to normal wear and tear: Outer covers Inner covers Circumstances beyond the control of Stealth Labor, service calls, shipping, and other charges incurred for repair of the product, unless specifically authorized, IN ADVANCE, by Stealth Products, LLC Repairs and/or modifications made to any part without specific consent from Stealth. Exclusions also include components with damage caused by: Exposure to moisture In Case of Product Failure In the event of product failure covered by our warranty, please follow the procedures outlined below: 1. Call Stealth at +1 (512) or toll free Request the Returns Department or obtain an RA from the Returns Department and follow department or documentation instructions. 14
19 Notes 8.0 a

20 Stealth Products, LLC. +1(800) (512) John Kelly Drive, Burnet TX P132D407R1 Revision Date
HMO500. Headrest Hardware. Stealth s Multi-Axis Headrest Hardware. Installation Manual INSTALLATION INSTRUCTIONS FOR. Stealth Products HMO500 Hardware
 Headrest Hardware Installation Manual HMO500 Stealth s Multi-Axis Headrest Hardware INSTALLATION INSTRUCTIONS FOR Stealth Products HMO500 Hardware Compatible with: All Stealth Products Headrests Customer
The World s Best Adductors
 Pelvic Support USER MANUAL The World s Best Adductors Stealth s User Manual and Maintenance Guide for The World s Best Adductors Customer Satisfaction 1.0 Stealth Products strives for 100% customer satisfaction.
TWB Shoulder Retractors
 Upper Extremities USER MANUAL TWB Shoulder Retractors Stealth s User Manual and Maintenance Guide for The World s Best Shoulder Retractors Customer Satisfaction 1.0 Stealth Products strives for 100% customer
TWB Shoulder Retractors
 Upper Extremities USER MANUAL TWB Shoulder Retractors Stealth s User Manual and Maintenance Guide for The World s Best Shoulder Retractors Customer Satisfaction 1.0 Stealth Products strives for 100% customer
Medial Hardware USER MANUAL MTMD-42. Stealth s User Manual and Maintenance Guide for Medial Thigh Support
 Medial Hardware USER MANUAL MTMD-42 Stealth s User Manual and Maintenance Guide for Medial Thigh Support Customer Satisfaction 1.0 Stealth Products strives for 100% customer satisfaction. Your complete
Upper Extremities USER MANUAL ARMS-ESF3GP. Stealth s User Manual and Maintenance Guide for the 3G Fixed Elbow Stop
 Upper Extremities USER MANUAL ARMS-ESF3GP Stealth s User Manual and Maintenance Guide for the 3G Fixed Elbow Stop Customer Satisfaction 1.0 Stealth Products strives for 100% customer satisfaction. Your
i2i Head & Neck Positioning System
 Positioning & Support USER MANUAL i2i Head & Neck Positioning System Stealth s User Manual and Maintenance Guide for the i2i Head & Neck Positioning System Customer Satisfaction 1.0 Stealth Products strives
AN AUTHORIZED SUPPLIER OF HELMETS TO THE NFL PLAYER S MANUAL VISIT: XENITH.COM CALL:
 AN AUTHORIZED SUPPLIER PLAYER S MANUAL VISIT: XENITH.COM CALL: 866.888.2322 FITTING INSTRUCTIONS AN AUTHORIZED SUPPLIER INTRODUCTION A PROPER FIT IS INTEGRAL TO A HELMET S PERFORMANCE. PLEASE READ THE
Adapter Kit 5WAR RA NT Y. For use with EZ-Up Gravity Boots and select Teeter Inversion Tables* NEW! Assembly Instructions FULL YEAR
 NEW! Follow along with your smartphone to make assembly even easier! Adapter Kit For use with EZ-Up Gravity Boots and select Teeter Inversion Tables* Assembly Instructions FULL YEAR 5WAR RA NT Y Specifications
SERIES 2 RAMP OWNER S MANUAL TOOLS REQUIRED: BEFORE YOU BEGIN... Read and understand these instructions before beginning a ramp setup.
 SERIES 2 RAMP OWNER S MANUAL BEFORE YOU BEGIN... Read and understand these instructions before beginning a ramp setup. Use caution and care for your back when lifting, pushing, pulling, folding or unfolding
ExtendAire TM II. Intermediate Pressure Accessory Kit USER INSTRUCTIONS
 ExtendAire TM II Intermediate Pressure Accessory Kit USER INSTRUCTIONS THIS MANUAL MUST BE CAREFULLY READ AND FOLLOWED BY ALL PERSONS WHO HAVE OR WILL HAVE THE RESPONSIBILITY FOR USING OR SERVICING THIS
RADROVER REAR RACK INSTALLATION MANUAL
 RADROVER REAR RACK INSTALLATION MANUAL WWW.RADPOWERBIKES.COM We are here to help! Please contact us at SUPPORT@RADPOWERBIKES.COM or 1-800-939-0310 if you have questions. REV022216 Welcome Thanks you for
Marine 6-Boat Free-Standing Racks SKU: Updated November 2011
 Marine 6-Boat Free-Standing Racks SKU: 30-061 Updated November 011 Contains: Marine -Boat Free-Standing Racks (SKU 1-003) Marine 3 rd Boat Expansion Racks (SKU 1-0303) Marine Back Legs (SKU -001) 3 Sets
SASK-A-POLE OWNERS AND USERS MANUAL
 SASK-A-POLE OWNERS AND USERS MANUAL GENERAL INFORMATION The Saskatchewan Abilities Council s Sask-a-Pole accessibility and transfer aid is designed to help provide safe and easy access to chairs, beds,
USER MANUAL
 C Cimarron Sports 1-888-816-6517 www.cimarronsports.com Combo Pitching Machine USER MANUAL TABLE OF CONTENTS Thank you for purchasing the Cimarron Combo Pitching Machine. The Cimarron Combo Pitching Machine
HELMETS SAVE LIVES!!! ALWAYS WEAR A PROPERLY FITTED HELMET WHEN YOU RIDE YOUR SCOOTER. DO NOT RIDE AT NIGHT. AVOID RIDING IN WET CONDITIONS.
 HELMETS SAVE CORRECT FITTING - MAKE SURE YOUR HELMET COVERS YOUR FOREHEAD. LIVES!!! ALWAYS WEAR A PROPERLY FITTED HELMET WHEN YOU RIDE YOUR SCOOTER. DO NOT RIDE AT NIGHT. AVOID RIDING IN WET CONDITIONS.
Portable Massage Table User Manual
 Portable Massage Table User Manual For Use With The Model Numbers Below: IT-C62T-H1TS, RK-IO6F-YA6L, SC-1001, SC-1004, SC-1005-MF, SC-1006-MF, SC-401, SC-402, SC-500, SC- 501, SC-501A, SC-501A-MF, SC-601,
SKYBIRD TRAP OWNER S / OPERATOR S MANUAL PARTS AND ASSEMBLY INSTRUCTIONS
 SKYBIRD TRAP PART NO. 40903 OWNER S / OPERATOR S MANUAL PARTS AND ASSEMBLY INSTRUCTIONS WARNING: THIS MACHINE CAN CAUSE SERIOUS INJURY OR DEATH! THOROUGHLY READ INSTRUCTIONS AND SAFETY INFORMATION BEFORE
ATD /8 x 50 Retractable Air Hose Reel Owner s Manual
 ATD-31166 3/8 x 50 Retractable Air Hose Reel Owner s Manual Features Heavy-gauge, all-steel reel assembly 8-position ratchet mechanism locks reel at desired hose length 5-position adjustable roller outlet
Triple Tine Mechanical Grapple
 Attachment Solutions Triple Tine Mechanical Grapple Operators Manual KENCO Mechanical Grapple Operation Manual 1 TABLE OF CONTENTS 170 State Route 271 Section I. General Information.... 3 Section II. Safety...
3 Post Pressure Fit System Owner s Manual
 3 Post Pressure Fit System Owner s Manual Use and Care Trouble Shooting Warranty Information Table of Contents 3 Post Pressure Fit System Introduction... 3 Overview of the 3 Post Pressure Fit System...
P Pod Postural Support System
 P Pod Postural Support System APP-1000XS APP-2000S APP-3000M APP-4000L APP-5000XL www.inspiredbydrive.com WARNING! Read ALL instructions before using this product! IMPORTANT SAFETY RULES Determine, with
Revolution Gurney Attachment
 Revolution Gurney Attachment PART NUMBER: F-30RSA-S2 (2nd SERIES) WEIGHT CAPACITY: 350 POUNDS - STANDARD REVOLUTION 300 POUNDS - DEEP DRAFT REVOLUTION MANDATORY LEAVE THIS MANUAL WITH LIFT OWNER Read &
602 STRINGING MACHINE OWNER'S MANUAL
 PROGRESSION 602 STRINGING MACHINE OWNER'S MANUAL AL Issue 1- April 2000 Copyright 2000 GAMMA Sports - All Rights Reserved PROGRESSION 602 STRINGING MACHINE TABLE OF CONTENTS PAGE 1... WARRANTY PAGE 2...
600 / 600FC OWNER'S MANUAL
 PROGRESSION 600 / 600FC OWNER'S MANUAL Issue 2 / Version E - Dec. 10, 1997 Copyright 1997 GAMMA Sports - All Rights Reserved PROGRESSION 600 / 600FC OWNER'S MANUAL TABLE OF CONTENTS PAGE 1... WARRANTY
CAUTION: WEIGHT ON THIS PRODUCT SHOULD NOT EXCEED 136KG / 300LBS
 OWNER S MANUAL Thank you for choosing the Sit N Cycle. We take great pride in producing this quality product and hope it will provide many hours of quality exercise to make you feel better, look better
X-6 STRINGING MACHINE OWNER'S MANUAL. Issue 1 - May Copyright 2004 GAMMA Sports - All Rights Reserved
 X-6 STRINGING MACHINE OWNER'S MANUAL Issue 1 - May 2004 Copyright 2004 GAMMA Sports - All Rights Reserved OWNER'S MANUAL GAMMA X-6 TABLE OF CONTENTS PAGE 1... WARRANTY PAGE 2... FEATURES PAGE 3...ASSEMBLY
OWNER'S MANUAL. Copyright 1999 ATS - All Rights Reserved
 OWNER'S MANUAL AL Issue 2 - August 19, 1999 Copyright 1999 ATS - All Rights Reserved OWNER'S MANUAL TABLE OF CONTENTS PAGE 1... WARRANTY PAGE 2... ASSEMBLY INSTRUCTIONS PAGE 4... MOUNTING THE RACQUET PAGE
Pay special attention to information provided in warnings, cautions and notes that are accompanied by one of these symbols:
 TABLE OF CONTENTS General Information Outlaw / Rogue Components ModLock Connectors Waistband / Shoulder Strap Assembly Aircell Assembly ModLock Connector Disassembly Waistband Extender Double Cylinder
Compact Triple Cabinet Outlet Station Model Installation and Operating Instructions
 Compact Triple Cabinet Outlet Station Model 6258-1 Installation and Operating Instructions The Porter Compact Triple Outlet Station (6258-1) provides a quick, safe, and reliable method of connection to
Copyright Trek Bicycle Corporation 2005 All rights reserved
 i ii iii Aero Brake Levers Owner s Manual Table of contents Read this manual before you ride... 1 Introduction... 2 Inspect your brake levers regularly... 2 Adjusting aero brake levers... 2 Lubricating
GRAVITY BIKE RACK ASSEMBLY & OPERATING INSTRUCTIONS
 GRAVITY BIKE RACK 94479 ASSEMBLY & OPERATING INSTRUCTIONS Due to continuing improvement, actual product may differ slightly from the product described herein. 3491 Mission Oaks Blvd., Camarillo, CA 93011
ROPV R40 E Series User Manual
 HARBIN ROPV INDUSTRY DEVELOPMENT CENTER ROPV R40 E Series User Manual For Use with the Following ROPV Pressure Vessel Models: R40 300E R40 450E Headquarters Tel:(+86)451-82267301 Fax:(+86)451-82267303
Pressure Fit System - Two Post Version Owner s Manual
 Pressure Fit System - Two Post Version Owner s Manual Use and Care Trouble Shooting Warranty Information Table of Contents Pressure Fit System Introduction... 3 Overview of the Pressure Fit System... 3
IMPORTANT: RECEIVING INSTRUCTIONS:
 Instruction Sheet Sidewinder Mechanical Bender IMPORTANT: RECEIVING INSTRUCTIONS: Visually inspect all components for shipping damage. If any shipping damage is found, notify carrier at once.shipping damage
ASSEMBLY INSTRUCTIONS
 XR 9-2009:new odc 1018 revised 2/17/10 9:11 AM Page 1 ODC XR 9 OUTDOOR DISCOVERY CRAFT ASSEMBLY INSTRUCTIONS Your ODC XR 9 Pontoon Boat comes in two separate cartons consisting of the following parts:
INTRODUCTION BILL OF MATERIALS SPECIFICATIONS & TOOLS PROCEDURES OPERATION OF SEATPOST GIANT LIMITED WARRANTY
 INTRODUCTION BILL OF MATERIALS SPECIFICATIONS & TOOLS PROCEDURES OPERATION OF SEATPOST GIANT LIMITED WARRANTY 1 INTRODUCTION Congratulations on the purchase of your new GIANT CONTACT SWITCH seatpost. This
DISASSEMBLING & REASSEMBLING CARTRIDGE INSTALLING SEATPOST ON BIKE
 INTRODUCTION BILL OF MATERIALS SPECIFICATIONS & TOOLS PROCEDURES DISASSEMBLING & REASSEMBLING CARTRIDGE INSTALLING SEATPOST ON BIKE OPERATION OF SEATPOST GIANT LIMITED WARRANTY 1 INTRODUCTION Congratulations
MALONER. Installation & Loading Instructions - Please Read Before Beginning. Step 1: Installing Carriers to Cross Bars
 SeaWing V-STYLE KAYAK CARRIER 60mm 50mm Rubber Plugs SeaWing Kayak Carriers 12 Load Straps Jawz Universal Adapters Mounting Bolts T-Knobs 12 Safety Lines MD Series Only Installation & Loading Instructions
OWNER'S MANUAL. Copyright 2003 GAMMA - All Rights Reserved
 OWNER'S MANUAL AL Issue 1 - December 2003 Copyright 2003 GAMMA - All Rights Reserved OWNER'S MANUAL TABLE OF CONTENTS PAGE 1... WARRANTY PAGE 2... ASSEMBLY INSTRUCTIONS PAGE 4... MOUNTING THE RACQUET PAGE
Superstand HLT. Standing System OWNER S MANUAL. ***Note*** Read Owner s Manual before use.
 Superstand HLT Standing System OWNER S MANUAL ***Note*** Read Owner s Manual before use. Manufactured By Prime Engineering A Division of Axiom Industries, Inc. 04-15_SSHLT_OM TABLE OF CONTENTS This owner
HoldUp Plus2. Safety Kit included: See additional instructions for installation. REAR WHEEL TRAY. BASE (1x) lock WASHER (1x) KEY (2x) SAFETY CLIP (1x)
 lock WASHER (1x) KEY (2x) SAFETY CLIP (1x)") HoldUp Plus2 InsTAll This product on 2" hitch version of the HoldUp Front WHEEL TRAY assembly (1x) REAR WHEEL TRAY assembly (1x) wrench (1x) BASE (1x) bolt (8X) Lock WASHER (8X) Washer (8x) KEY (2x) SAFETY
HoldUp Plus2 InsTAll This product on 2" hitch version of the HoldUp Front WHEEL TRAY assembly (1x) REAR WHEEL TRAY assembly (1x) wrench (1x) BASE (1x) bolt (8X) Lock WASHER (8X) Washer (8x) KEY (2x) SAFETY
SERIES L4E & L6E LADDER EXTENSIONS
 SERIES L4E & L6E LADDER EXTENSIONS T AB L E O F C O N T E NT S V e n d o r D a t a Feature and Specification P a r t s L i s t Installation and Operation Instructions Limited Warranty 1 VENDOR DATA H ALLID
OPERATING and MAINTENANCE INSTRUCTIONS MAXIS 6K Puller (M6K-M)
") OPERATING and MAINTENANCE INSTRUCTIONS MAXIS 6K Puller (M6K-M) READ AND UNDERSTAND ALL OF THE INSTRUCTIONS AND SAFETY INFORMATION IN THIS MANUAL BEFORE OPERATING OR 04/17 (M6K-M) SERVICING THIS TOOL TABLE
OPERATING and MAINTENANCE INSTRUCTIONS MAXIS 6K Puller (M6K-M) READ AND UNDERSTAND ALL OF THE INSTRUCTIONS AND SAFETY INFORMATION IN THIS MANUAL BEFORE OPERATING OR 04/17 (M6K-M) SERVICING THIS TOOL TABLE
OPERATOR S MANUAL AND PARTS LISTING FOR THE. CTM Series Mounted Harrow
 MANUFACTURERS OF QUALITY AGRICULTURAL EQUIPMENT SINCE 1936 OPERATOR S MANUAL AND PARTS LISTING FOR THE CTM Series Mounted Harrow VERSION: 7-12 (MM-2300) TO THE OWNER AND OPERATORS Before assembling or
USER S MANUAL QUESTIONS? CAUTION. Model No. FMEX Serial No. Write the serial number in the space above for reference. Serial Number Decal
 Model No. FMEX81110.0 Serial No. Write the serial number in the space above for reference. USER S MANUAL Serial Number Decal QUESTIONS? If you have questions, or if parts are damaged or missing, please
deluxe toilet safety support
 deluxe toilet safety support Model 97388 Cleaning, Assembly, And Operation Instructions Diagrams within this manual may not be drawn proportionally. Due to continuing improvements, actual product may differ
isup MANUAL THANK YOU FOR PURCHASING A KAHUNA isup, WE HOPE YOU HAVE MANY YEARS OF PADDLING ENJOYMENT.
 i isup MANUAL THANK YOU FOR PURCHASING A KAHUNA isup, WE HOPE YOU HAVE MANY YEARS OF PADDLING ENJOYMENT. THIS MANUAL IS A GENERAL GUIDELINE FOR SET-UP, CARE AND PROPER USE. PLEASE REFER TO OUR WEBSITE
OWNERS MANUAL. Model Shown with optional Primary Mooring Cleats. Portable Mooring System SAFETY OPERATION MAINTENANCE PARTS
 OWNERS MANUAL Model 2400 Shown with optional Primary Mooring Cleats. Portable Mooring System SAFETY OPERATION MAINTENANCE PARTS CAUTION: Before using your new Pier Tender, read rules for Safety, Operation,
Compact Triple Cabinet Outlet Station Model B Installation and Operating Instructions
 PORTER Parker Hannifin Corporation Porter Instrument Division 245 Township Line Rd. P.O. Box 907 Hatfield, PA 19440-0907 USA (215) 723-4000 / fax (215) 723-5106 Compact Triple Cabinet Outlet Station Model
TWO KAYAK VERTICAL FOLD-DOWN CARRIER
 S P X O TWO KAYAK VERTICAL FOLD-DOWN CARRIER TA R 2 50mm 40mm Stax Pro2 Kayak Carrier Red Load Straps Jawz Adapters Mounting Bolts Foam Blocks 9 Safety Strap 12 Tie-Downs Installation & Loading Instructions
COOPER POWER SERIES. D-73P3 bypass switches installation instructions. Switches MN008005EN. Effective April 2016 Supersedes S June 2013
 Switches MN008005EN Effective April 2016 Supersedes S328-120-1 June 2013 D-73P3 bypass switches installation instructions COOPER POWER SERIES DISCLAIMER OF WARRANTIES AND LIMITATION OF LIABILITY The information,
i-fit Positioning Products
 i-fit Positioning Products OWNERS MANUAL i-fit Positioning Products Stealth s User and Installation Guide for the i-fit Line of Belts, Thoracic Supports, and Foot Positioners Customer Satisfaction 1.0
Read Instructions carefully before use. Rollator is designed for indoor & outdoor use. Do NOT use as a wheelchair or as a transport chair.
 Charcoal Red Seat Height 500-10191 500-10195 19 500-10211 500-10215 21 500-10241 500-10245 24 User Manual Read Instructions carefully before use. Rollator is designed for indoor & outdoor use. Do NOT use
SUP Owner s Manual.
 SUP Owner s Manual www.futurebeach.com Introduction Congratulations! You have just purchased a Future Beach SUP. The SUP business is growing and Future Beach is at the leading edge of this change. Our
This document to be used with Hurley traditional Davits
 ~ InstructIon Manual ~ This document to be used with Hurley traditional Davits WarnIngs WarnIng - Failure to install, maintain, protect, and operate the system properly can cause malfunction resulting
Instruction and Practice Manual
 Instruction and Practice Manual Axiom Sports Manufacturing A Division of Fitec International 3525 Ridge Meadow Parkway Memphis, TN 38175 (901) 366-9144 www.axiomsports.com 1 Thank you for purchasing the
BT PAINTBALL DESIGNS, INC. 570 MANTUA BLVD., SEWELL, NJ
 Rip Clip Manual_2.qxp 4/15/08 11:00 AM Page a BT PAINTBALL DESIGNS, INC. 570 MANTUA BLVD., SEWELL, NJ 08080 WWW.BTPAINTBALL.COM Rip Clip Manual_2.qxp 4/15/08 11:00 AM Page b BT Paintball would like to
Rip Clip Manual_2.qxp 4/15/08 11:00 AM Page c
 Rip Clip Manual_2.qxp 4/15/08 11:00 AM Page b Rip Clip Manual_2.qxp 4/15/08 11:00 AM Page c Rip Clip Manual_2.qxp 4/15/08 11:00 AM Page 1 BT Paintball would like to thank you for your purchase of the BT
Installation Manual. Version 12-10
 Installation Manual The products and parts shown herein are to be installed and used adjusted in accordance with these instructions. Any deviation by the buyer, installer, or user from these instructions
Portable Massage Table
 User Manual [Revision 3.0 January 2018] READ THIS MANUAL CAREFULLY BEFORE USE FAILURE TO DO SO MAY RESULT IN INJURY, PROPERTY DAMAGE AND MAY VOID WARRANTY. KEEP THIS MANUAL FOR FUTURE REFERENCE. Products
Caliber Sled Wheels Assembly Instructions for PN and 13579
 Caliber Sled Wheels Assembly Instructions for PN 13576 and 13579 Caution: Read all instructions before assembling or using Sled Wheels. Follow the steps in order. Only use Sled Wheels as intended, following
USER MANUAL. DM65 Manual Flush/Tilt Combo Mount
 USER MANUAL DM65 Manual Flush/Tilt Combo Mount 1 D1_1.11.11.indd 1 ! CAUTION When using this mounting system, basic precautions should be followed, including: Follow the entire installation/user s manual
INSTRUCTION MANUAL. January 23, 2003, Revision 0
 INSTRUCTION MANUAL Model 810A In-Vitro Test Apparatus for 310B Muscle Lever January 23, 2003, Revision 0 Copyright 2003 Aurora Scientific Inc. Aurora Scientific Inc. 360 Industrial Parkway S., Unit 4 Aurora,
SILENCERCO CHIMERA FIELD MANUAL
 SILENCERCO CHIMERA FIELD MANUAL Thank you for choosing to add a SilencerCo silencer to your collection. We manufacture all of our products under one roof here in the USA and are proud to deliver only the
OPERATOR'S & PARTS MANUAL
 MULTI-TASK ATTACHMENT OPERATOR'S & PARTS MANUAL OM638 8963 11-5-04-3 REV. 3 75538 IMPORTANT: Read this manual carefully. It contains information about your safety and the safety of others. Also become
MODEL / SINGLE and DUPLEX PULLEY SYSTEMS
 MODEL 922181/922182 SINGLE and DUPLEX PULLEY SYSTEMS MODEL 922181 SINGLE PULLEY SYSTEM MODEL 922182 DUPLEX PULLEY SYSTEM 1 PARTS LIST FOR SINGLE/DUPLEX COLUMN PULLEYS Note: Check with your architect or
Assembly Instructions & Manual. Configuration subject to change
 Assembly Instructions & Manual Configuration subject to change O R Y X II A S S E M B L Y I N S T R U C T I O N S & M A N U A L IMPORTANT PRECAUTIONS WARNING: To reduce the risk of serious injury, read
MODEL CHEST PULLEY SYSTEM
 MODEL 9180 CHEST PULLEY SYSTEM 1 PARTS LIST FOR CHEST PULLEY Note: Check with your architect or a professional contractor for hardware required to attach the unit to the wall and floor in your facility.
COMPACT METAL bender 99826
 COMPACT METAL bender 99826 Set up And Operating Instructions Distributed exclusively by Harbor Freight Tools. 3491 Mission Oaks Blvd., Camarillo, CA 93011 Visit our website at: http://www.harborfreight.com
Skatecycle Instructions
 Skatecycle Instructions ANVL BOARDS Skatecycle Riding Instructions BEFORE YOU START: Although some with prior abilities are able to ride within a few minutes of practice, most need a day or two of solid
T3200 TransPlate Harness
 T3200 TransPlate Harness www.diverite.com Product Description The TransPlate Harness is designed specifically for use with hard back-plates, such as stainless steel or aluminum. The TransPlate Harness
InstallatIon and owner s InstrUCtIons
 InstallatIon and owner s InstrUCtIons Wall Mount Series Adjustable and Fixed Height Goal Systems table of Contents Safety Instructions... 2 Goal Specifications... 3 Frame Attachment... 4 Frame Assembly
MODEL SWH10 1,000 LB CAPACITY SWIVEL HOIST
 MODEL SWH10 1,000 LB CAPACITY SWIVEL HOIST PARTS BREAKDOWN AND OPERATING MANUAL Copyright 2007, Arcan Professional Tools Rev: 05/15/07 This operating manual contains important safety information. Read
PROPORTIONING VALVE. Model 150 INSTRUCTION MANUAL. March 2017 IMS Company Stafford Road
 PROPORTIONING VALVE Model 150 INSTRUCTION MANUAL March 2017 IMS Company 10373 Stafford Road Telephone: (440) 543-1615 Fax: (440) 543-1069 Email: sales@imscompany.com 1 Introduction IMS Company reserves
Lock-N-Load. Bullet Feeder
 Lock-N-Load Bullet Feeder table of contents steps Overview... 2 List of required hand tools... 2 1: Mounting the Bullet Feeder to the Bench... 3 2: Mounting the Bullet Feed Hopper... 4 3: Bullet Feed Hopper
QuadraTop Bimini Top and Bimini Top Plus
 QuadraTop Bimini Top and Bimini Top Plus Installation Manual for 97-06 Jeep TJ Wrangler Vehicles # 11022.XXX5 and # 11022.1XXX BIMINI TOP BIMINI PLUS Loss of vehicle control involves risk of death or serious
Instruction Manual. Confirm the package. 4 x 4 Discs M6 screws (countersunk screws)
") 6002761B Instruction Manual In order to ensure safe snowboarding, follow the instructions below and check for the correct settings. This Instruction Manual contains important information regarding correct
6002761B Instruction Manual In order to ensure safe snowboarding, follow the instructions below and check for the correct settings. This Instruction Manual contains important information regarding correct
FOLD AND ROLL PLAYBACK TABLE TENNIS TABLE
 OWNER'S MANUAL FOLD AND ROLL PLAYBACK TABLE TENNIS TABLE MODEL NOs. T8269 T8169 Thank you for buying our product. We try hard to ensure that our products are of high quality and free of problems, such
2000 lb manual winch
 2000 lb manual winch Model 41694 Operation Instructions Due to continuing improvements, actual product may differ slightly from the product described herein. 3491 Mission Oaks Blvd., Camarillo, CA 93011
X-6FC STRINGING MACHINE OWNER'S MANUAL. Issue 1 - May Copyright 2004 GAMMA Sports - All Rights Reserved
 X-6FC STRINGING MACHINE OWNER'S MANUAL Issue 1 - May 2004 Copyright 2004 GAMMA Sports - All Rights Reserved OWNER'S MANUAL GAMMA X-6FC TABLE OF CONTENTS PAGE 1... WARRANTY PAGE 2... FEATURES PAGE 3...
GENUINE CARGO NET INSTALLATION AND USER S INSTRUCTIONS
 GENUINE CARGO NET INSTALLATION AND USER S INSTRUCTIONS Thank you for purchasing a genuine Mazda accessory. Before removal and installation, be sure to thoroughly read these instructions. Please read the
1.2 LIMITATIONS: Consider the following application limitations before using this equipment:
 User Instruction Manual Standing Seam Roof Anchor This manual is intended to meet the Manufacturer s Instructions, and should be used as part of an employee training program as required by OSHA. Figure
COPY. **For U.S. and Canada Customers ONLY:** IF ASSISTANCE IS NEEDED,
 MODEL #73729 WARNING Failure to comply with any of the warnings in these instructions may result in serious personal injuries such as cuts, broken bones, nerve damage, paralysis, brain injury, or death.
J800 HOPE BUOYANCY COMPENSATOR OWNER S MANUAL
 J800 HOPE BUOYANCY COMPENSATOR OWNER S MANUAL EN1809 0 www.istsports.com 1 0120 I. INTRODUCTION I. INTRODUCTION CONTENTS II. GENERAL WARNING AND CAUTION Definition of WARNING, CAUTION and ATTENTION III.
C - SERIES. Height Adjustable Portable Goal Supports. Installation & Owner s Instructions C1000 C2000. Made in the USA
 C - SERIES Height Adjustable Portable Goal Supports C1000 C2000 Installation & Owner s Instructions Made in the USA This manual explains the proper installation, operation, and maintenance of your Schutt
Falcon 3 145, 170, 195 and Tandem Owner / Service Manual
 Falcon 3 145, 170, 195 and Tandem Owner / Service Manual January 2007 - Second Edition Removing The Sail From The Airframe And Short Packing The Glider Many maintenance and repair procedures will require
OPERATOR S MANUAL SPREADER. CSS, VNQ [For Combine Harvester AW82V] Original instructions
![OPERATOR S MANUAL SPREADER. CSS, VNQ [For Combine Harvester AW82V] Original instructions](/thumbs/90/102423265.jpg "OPERATOR S MANUAL SPREADER. CSS, VNQ [For Combine Harvester AW82V] Original instructions") OPERATOR S MANUAL SPREADER CSS, VNQ [For Combine Harvester AW82V] en Original instructions Introduction Introduction Please read this operator s manual before using your spreader. We would first like to
OPERATOR S MANUAL SPREADER CSS, VNQ [For Combine Harvester AW82V] en Original instructions Introduction Introduction Please read this operator s manual before using your spreader. We would first like to
Duo/Trio Office Bike Owner s Manual
 Duo/Trio Office Bike Owner s Manual Welcome Congratulations on choosing to enhance your productivity and wellness with LifeSpan. You ve made a healthy decision, as the need for increased amounts of daily
Bimini Top, Bimini Top Plus for Jeep Wrangler (TJ) Vehicles Items #141042XX and #143002XX
 Vehicles Items #141042XX and #143002XX") MT_TJ_BIMINI_TOPS_INST_LTR.qxp_Layout 1 5/11/17 11:21 AM Page 1 Installation Instructions Bimini Top, Bimini Top Plus for 1997-2006 Jeep Wrangler (TJ) Vehicles Items #141042XX and #143002XX Bimini Top
MT_TJ_BIMINI_TOPS_INST_LTR.qxp_Layout 1 5/11/17 11:21 AM Page 1 Installation Instructions Bimini Top, Bimini Top Plus for 1997-2006 Jeep Wrangler (TJ) Vehicles Items #141042XX and #143002XX Bimini Top
OPERATING and MAINTENANCE INSTRUCTIONS MAXIS 3K Puller (M3K-M)
") OPERATING and MAINTENANCE INSTRUCTIONS MAXIS 3K Puller (M3K-M) 04/17 (M3K-M) READ AND UNDERSTAND ALL OF THE INSTRUCTIONS AND SAFETY INFORMATION IN THIS MANUAL BEFORE OPERATING OR SERVICING THIS TOOL TABLE
OPERATING and MAINTENANCE INSTRUCTIONS MAXIS 3K Puller (M3K-M) 04/17 (M3K-M) READ AND UNDERSTAND ALL OF THE INSTRUCTIONS AND SAFETY INFORMATION IN THIS MANUAL BEFORE OPERATING OR SERVICING THIS TOOL TABLE
Owner s Manual. Model H4685
 Owner s Manual Model H4685 TABLE OF CONTENTS Important Information.................................... 3 Parts.................................................. 4 Battery Installation......................................
TABLE OF CONTENT IMPORTANT HPA AIR TANK SAFETY INSTRUCTIONS AND GUIDELINES RYSE ON/OFF ASA GETTING STARTED O-RING LIST SCREW LIST MICRO SQ BOARD
 TABLE OF CONTENT 4 IMPORTANT HPA AIR TANK SAFETY INSTRUCTIONS AND GUIDELINES 22 RYSE ON/OFF ASA 6 GETTING STARTED 23 O-RING LIST 8 MICRO SQ BOARD 25 SCREW LIST 6 TRIGGER ADJUSTMENT 28 INTERNAL PARTS 7
INSTRUCTION MANUAL. Includes: OPERATION SETUP USE & CARE SERVICE. SPORTS ATTACK LLC
 Electronic Baseball Pitching Machine baseball INSTRUCTION MANUAL PART NO. B-EHABA-100 REV022111 INSTRUCTION MANUAL Includes: OPERATION SETUP USE & CARE SERVICE SPORTS ATTACK LLC 800-717-4251 www.sportsattack.com
Bimini Top, Bimini Top Plus for Jeep Wrangler Vehicles Items # , # and #
 MT_BIMINI_TOPS_INST_LTRR.qxp_Layout 1 8/9/17 3:34 PM Page 1 Installation Instructions Bimini Top, Bimini Top Plus for 2007-2017 Jeep Wrangler Vehicles Items #14100335, #14300335 and #14300435 Bimini Top
FIRST TEAM SPORTS, INC Storm Portable Series Assembly Instructions
 FIRST TEAM SPORTS, INC Storm Portable Series Assembly Instructions WARNING! WARNING! WARNING! THIS BASKETBALL SYSTEM IS SPRING LOADED AND SHIPPED UNDER TENSION. ATTEMPTING TO ASSEMBLE OR DISASSEMBLE ANY
Invacare Twilight II Nasal Mask
 Assembly, Installation, and Operating Instructions Invacare Twilight II Nasal Mask LATEX FREE USER: Before using this nasal mask, read this manual and save for future reference. DEALER: This manual must
Universal Anchoring Adapter For Mercedes
 Universal Anchoring Adapter For Mercedes Anchoring Pin & Tube Set (For Most Mercedes Models) Users Manual 006 Chief Automotive Technologies, Inc. Chief s Limited One-Year Warranty & Liability CHIEF'S
MODEL #7100X A-FRAME LADDER
 SAVE THESE INSTRUCTIONS DEALER/INSTALLER: GIVE TO HOMEOWNER MODEL #7100X A-FRAME LADDER LADDER MUST BE ATTACHED TO POOL FRAME... DO NOT USE WITH INFLATABLE POOLS ASSEMBLY AND INSTALLATION MANUAL The Anti-Entrapment
Important Note: Tighten lock nuts so the support tubes still swing freely see figure 2. There must be 1 2 threads of bolt past end of lock nuts.
 Kit Contents: DESCRIPTION QTY. DESCRIPTION QTY. 2 Shank Assembly 1 Support Tube Assembly 1 Side Tube - Short 2 1-1/4 Shank 1 Center Tube - Long 1 3/8-16 x 2.0 Carriage Bolt 2 5/16-18 x 2.25 Carriage Bolt