1. Software Installation Please make sure to install software before connecting the PC Interface Unit to your Computer.
|
|
|
- Jerome Berry
- 6 years ago
- Views:
Transcription


1 Ver. 6.01

 detects the USB device, it will show new hardware wizard to install the USB driver (see below fig).")
2 Remarks when making Manual for PC Interface Unit It is necessary for the end user to know the remarks below in the manual for both software and hardware installation concerning the PC interface unit. 1. Software Installation Please make sure to install software before connecting the PC Interface Unit to your Computer. 1) Windows XP User Please connect the PC Interface Unit to your Computer after installing software. Once the operating system (OS) detects the USB device, it will show new hardware wizard to install the USB driver (see below fig). Please click [Next]; then OS will show the below warning message because we do not apply a MicroSoft certification. This is not a problem since we verified and tested our driver and software under Windows XP. Therefore please describe in manual to click [Continue Anyway]. Then OS continue to install driver and show the message Installation Completed.
3 If end user clicks the [STOP installation] button, end user will have to follow the steps below to install the hardware again: i) Right click My Computer Icon and Click Properties from pull down menu ii) Click Hardware Tab and Click Device Manager iii) Select USB Controller then double click! marked unknown USB-Serial controller iv) Click Reinstall Driver on USB-Serial controller property then start to install USB Driver from new hardware wizard again. 2) Other OS User It is OK to just plug PC Interface unit in Computer; OS will detect the new hardware and install it without a confirmation 3) Verification method whether USB driver is built in correctly. Please plug only PC Interface unit to PC and check the LED indicator. i) If LED Indicator is turned on from plug in to finish installing driver and then it is turned off. ii) If LED Indicator keep lighting, USB driver is not installed correctly. End user needs to install driver again. Or there is another way to verify it by checking from Device Manager on OS. 2. Hardware installation 1) Cleaning sensors of Dive computer before connection Sensor has two functions. One is water detect function and other is communication port. Rust or dust on sensors cause poor connection between PC Interface unit and Dive computer. 2) How to install between Dive computer and PC Interface unit i) PC Interface is pincer style type If the Dive computer is wrist type, strap (located at sensor side) should be gone through the window of lower jaw so that it can connect firmly. ii) Dive computer is watch type PC interface has 3 electrodes and there are 2 electrodes at the base plain and there is 1 electrode at the side face. There is a seal on back cover of dive computer then it is necessary to remove seal so that 2 electrodes at base plain can be contacted with back cover firmly. In case installing Dive computer to PC Interface unit, please note to connect so that water sensor of dive computer could be contacted with electrode at the side face firmly. 3) Shock free during downloading to avoid disconnection Please do not give any shocks to devices during downloading data. If a shock occurs on the devices, it will cause poor communication. 4) Uninstalling Dive computer from PC Interface unit after downloading is complete Especially that the PC interface unit has no electrical power; such conditions as unplugging the PC Interface or PC shut down. In such case Dive computer will detect as if it were under water then it will cause short battery life because of heavy power consumption.
4 Introduction Welcome to PC LogBook! This software is an application for managing log data during a dive on a computer. PC LogBook features are the following functions. * Downloading log data and profile data from dive computer. * Setting history to dive computer. * Printing log books. * Simulating a dive. 2
5 Contents Introduction System Requirements Installation Method Installation Steps...6 (1) Begin installation...6 (2) Setup screen...7 (3) Enter user information...8 (4) Select installation directory...9 (5) Restart the system Canceling Installation...10 (1) User interface...10 (2) Functions Basic Operations Mouse Operations Keyboard Operations Overview of Functions Overview of UI (User Interface) Configuration OLE Support Function Specifications Start UI specification Description of function Main View UI specification Title bar Menu bar Pop-up menu bar Status bar Main view Linkage to Excel Files File-New File-Open File-Save File-Save As File-Print File-Print Preview
6 5.3.7 File Printer set up File Import File-Export File-Exit application Editing Functions Edit-Add Edit-Open Edit-Delete Tool menu View-Main View View-Data Tool menu Tool-Transfer Tool-History Tool-Registration Tool-Simulation Tool-Option Help Help-Help Topics Help-About
7 1. System Requirements OS: Microsoft Windows 98 Second Edition, Windows ME, Windows 2000, or Windows XP Microsoft, Windows, and Microsoft Excel are registered trademarks of Microsoft in the United States and other countries. (Other product names are also trademarks or registered trademarks.) Computer: Any IBM PC/AT-compatible computer (including PC-98NX Series computers) that operates using one of the above-listed operating systems CPU Disk capacity Memory Video resolution Pentium II 266 MHz or above At least 30 MB of available disk space 64 MB or above (recommended) dots (or above) Caution (1) Duplication of any or all of these help contents without prior authorization is strictly prohibited. (2) These help contents are subject to revision without prior notification. (3) Please do not hesitate to contact us regarding any errors or omissions that may have been included in this document despite our efforts to the contrary. (4) Please note that, even though every effort has been made to ensure the accuracy of this document, we cannot be responsible for the result of its use in all situations. 5
 Begin")

8 2. Installation Method 2.1 Installation Steps (1) Begin installation Double-click "PCLogBook.exe" to bring up the splash screen shown below. 6

9 (2) Setup screen The following Setup window will appear. Select Next. 7

10 (3) Enter user information Enter a username, company name, and serial number. And enter the following serial number and press Next button. DE51A (for Archimede) DE51B (for Archimede2) DE40C (for Edy) 8


11 (4) Select installation directory Select the folder where the software will be installed, then select Next. Then confirm the folder name and select Next again to start the installation process. (5) Restart the system After the installation process is completed, restart your system to finish installation. 9

12 2.2 Canceling Installation (1) User interface (2) Functions This window appears if you click Cancel during the installation process Click Yes to abort installation. Click No to continue installation. 10
13 3. Basic Operations 3.1 Mouse Operations These operations comply with the standard Windows interface. Mouse operation Left click Left double click Left drag & drop Shift + left click Ctrl + left click Function Executes processing assigned to a button. Selects data shown at the cursor position in a list view. Controls scrolling of list display via scrollbar. Selects and executes items shown on the menu bar. Selects data shown at the cursor position in a list view. Performs spin control via scroll bar. Copies list of data selected in a list view to an Excel sheet. Selects multiple lists of data shown in a list view. (Complies with standard Windows interface) 3.2 Keyboard Operations These operations comply with the standard Windows interface. Key Function Enter Executes processing assigned to a button. Selects data shown at the cursor position in a list view. Up/down (arrow Moves highlighted cursor position up or down in list view. keys) Shift + up/down Selects multiple data shown in a list view. (Complies with the Ctrl + up/down standard Windows interface) PageUp Moves to the next or previous page in list view. PageDown Tab Moves to the input insertion point. F1 Displays help screen. 11
14 4. Overview of Functions 4.1 Overview of UI (User Interface) All controls in the UI conform to the Windows standard interface. When a dialog box is opened from a list, it must be closed before other list data can be displayed. 4.2 Configuration The configuration of application is outlined below. Start MAIN VIEW File menu Edit menu View menu Tool menu Help menu New Open Save Insert Open Delete View Data Transfer History Set Simulation Version Help Topics Save As Register Print Options Print Preview Print Setup Import Export Exit Exit 4.3 OLE Support Transfer of OLE data to Microsoft Excel is supported by PC LogBook. The following versions of Microsoft Excel are supported. Excel 97 Excel 2000 Excel XP 12
15

16 5.2 Main View UI specification At the top-left of the main screen, the name of the current file is displayed. The first time this screen is opened after installation, name of sample data is displayed. Ex: MyLogBook.lgb PC LogBook for Cressi Title bar The following example is based on the Windows standard specification. The application's icons and names are listed on the left column. Left-click an icon to open the corresponding window control menu. This menu provides the following window control functions. Control element Function Restore original size Restores maximized window to its original size. Move Moves window. Resize Changes window size. Minimize Minimizes window. Maximize Maximizes window. Close Terminates application. In addition, the functions can also be controlled directly by using the buttons in the window. (The functions assigned to buttons conform to the Windows standard specification.) Menu bar 14
17 The menu bar conforms to the Windows standard specification. The menu bar is used to execute various PC LogBook functions. Below, "LGB files" are a type of file created by PC LogBook. Each LGB file can contain one or several dive data items. Dive data consists of specific diving information. Menu Sub menu Shortcut key Function File View Edit Tools Help New... Ctrl+N Creates a new LGB file Open... Ctrl+O Opens a saved LGB file Save Ctrl+S Saves an LGB file Save As... Saves an LGB file under another name Print... Ctrl+P Prints the selected data Print Preview Printer setup Displays print-related information Sets printer to be used for output Import Ctrl+L Imports previous versions of LG B files Export Ctrl+E Outputs to a CSV file Exit Application Main View List View Tree View Data All Dive mode Gage mode Free diving mode Add Open Delete Exits application Switches the Main View Switches the data to be displayed Add dive data Displays dive data Deletes dive data Transfer Ctrl+T Downloads dive data History Ctrl+H Writes history information Register Simulation New Open Delete Delete All Close Options Search Help Topics About PCLogBook Registers diving information Performs dive simulation Performs a new dive simulation Opens saved data Deletes saved data Deletes all saved data Closes simulation Sets environment settings Displays help topics Displays version information 15
18 The menu bar has a tree structure. Click on the top menu item to view the corresponding sub menu items on a pull-down menu Pop-up menu bar This conforms to the Windows standard specification. From the Main View window, click the mouse's right button to view the pop-up menu bar. Various PC LogBook functions can be executed via the pop-up menu bar. Add Add dive data Open Displays dive data Delete Deletes dive data Export Exports dive data to a CSV file Print Prints dive data Status bar This conforms to the Windows standard specification. When an item has been selected on the menu bar, the status bar displays information about the corresponding menu bar function Main view In the Main View, you can select "List View" in which all dive data are listed or "Tree View" in which multiple data with the same dive date and data mode are displayed in a branch. To switch these views, select View - [VIEW]. In each view, you can select and open dive data by using cursor keys. And you can select several dive data by using cursor key with [Ctrl] key or [Shift] key. Selected dive data can be easily transferred to Excel by drag-and-drop operation. Main view shows the various dive information items contained in dive datas. Data items: -Dive No. : The dive number. Memo: The start number for the dive number can be changed via an option setting. Up to 9,999 dives can be numbered. Caution: In case the dive number exceeds 9,999 during a download, then thedownloading data will not be saved. -Location : This indicates the location of the dive. 16
19 -Site -Date -Dive start -Dive time -Maximum depth -Total dive time -Product Type : The specific site of the dive. : Date of the dive. :This indicates the starting time of the dive. :This indicates the total time of the current dive. : This indicates the maximum depth during a dive. : This indicates a running total of current and previous dive times. Memo: The start time for the total dive time can be changed via an option setting. : Indicates a model name of the dive computer Linkage to Excel Dive data can be transferred to Excel from the list in the Main View window using a drag-and-drop operation. The data is transferred via the Clipboard. Up to 256 data items can be transferred to Excel. Example) Product Archimede Archimede2 Arcimede2 Dive No Dive date 2003/4/8 2003/4/8 2003/4/9 Altitude rank PGT (Residual nitrogen level) OLI (Residual oxygen level) Max. Depth (m) Ave. Depth (m) Temperature ( C) Dive time (minutes) Entry 11: 32 14: 18 9: 58 Exit 12:05 14: 53 12: 25 Surface Interval 0:00 2: 12 19:04 Safety factor Sampling FO2Mix (%) FO2Mix (%) Sea/Fresh Sea Sea Sea DECO Dive Warning DECO Stop Violation Warning PO2 (Pressure of Oxygen ) Warning OLI (Oxygen Limited Indicator) 17
20 warning Over Range Warning Warning Ascent Rate Warning Profile Profile Profile Profile Profile Profile Profile Profile Profile Profile To be continued. 18

21 5.3 Files From the file menu, the creation of new files, edit and save for the existing log data, print dive data, import and export dive data can be performed. Each item can be selected by mouse operation or key input File-New (1) UI specification 19
22 (2) Description of function When you select File [New], you can create a new logbook. At the beginning, the file open dialogue appears and you are requested to input the path to the file where you want to save. The only supported file type is LGB data files (*.lgb). In case there are any unsaved data, a warning message will appear. When [Cancel] button is pressed, then screen will returns to the Maine View window without saving any files. When you specify the file name and [Save] button is pressed, a file will be created in the name you specified. At this transaction, if there already exist a file with same name with your specification, then come up warning message asking whether can overwrite or not. When you click [OK], the file is overwritten. When you click [Cancel], it returns to the screen that to specify the file name. If the extension is abbreviated when you specify a file name,.lgb is automatically applied to it then the file is saved. When extension is specified, this transaction will be disregarded. And if an error occurs while retaining a file, a saving error message appears and returns to the screen that to specify the file name File-Open (1) UI specification 20
![(2) Description of function When you select File [Open], you can open existing logbook files. At the beginning, the file open dialogue box comes up and you are requested to specify the file name.](/docs-images/78/77785078/images/23-0.jpg "When you specify a file name and click [Open], proceeds reading the specified file. In the file open dialogue, LGB data file (.")
23 (2) Description of function When you select File [Open], you can open existing logbook files. At the beginning, the file open dialogue box comes up and you are requested to specify the file name. When you specify a file name and click [Open], proceeds reading the specified file. In the file open dialogue, LGB data file (.lgb) has been already selected as file type, even if any extension is not specified for the input file, it opens with the file name that supplement its extension. When [Cancel] is pressed, it returns to the Main View window without opening any files. You can only specify one file. If the specified file content is incorrect, a warning message of unable to read the file appears and returns to the screen that to specify the file name. CAUTION: When you want to open a LGB file that was created by previous version of PCLogBook older than Ver.5.00, then select File - [Import] and try import action File-Save (1) UI specification (None) (2) Description of function When File-Save is selected, the currently selected LGB file is saved (any previous version is overwritten) File-Save As (1) UI specification 21
24 (2) Description of function When you execute File- [Save as], the file open dialogue opens and you can save the log data. Only LGB data file type (*.lgb) can be saved. When [Cancel] is pressed, returns to the Main View window without saving any files. When a file name has specified and [Save] is pressed, a file is newly created with the name that is specified. During this transaction, if the file with the same name exists, an overwrite warning message appears then the file is overwritten when you click [OK]. When you select [Cancel], it returns to the screen that to specify the file name. If extension is abbreviated when you specify the file name,.lgb is automatically applied to it then the file is saved. This transaction will be disregarded when extension is specified. 22


25 5.3.5 File-Print (1) UI specification (2) Description of function Selecting "File-Print" brings up the Print dialog box that is used to print dive data. The selected dive data is printed using a predetermined layout. A summary of the dive data is printed on one sheet of paper, as shown below. If several sets of data files are selected, an additional page is printed for each set of selected dive data. Print paper sizes from A4 to postcard size are supported. Letter size (for English-speaking countries) is also supported. However, border-free printing is not supported. 23
26 <Print Illustration> 24

27 5.3.6 File-Print Preview (1) UI specification (2) Description of function Selecting "File-Print Preview" brings up a window that shows a preview of the selected dive data in the standard print layout. Each set of dive data is printed in summary form on one sheet of paper, as shown in the UI specification. If several sets of data files are selected, an additional page is printed for each set of selected dive data. 25
 UI Specification (2) Functional specification Modify the setting of the printer which is connected")
28 5.3.7 File Printer set up... (1) UI Specification (2) Functional specification Modify the setting of the printer which is connected to your PC File Import (1) UI Specification (2) Functional specification 26
 UI specification (2) Description of function When you execute File [export], you can save the specified dive data in CSV format.")
29 Imports LGB files that are created by previous versions of PCLogBook older than Ver File-Export (1) UI specification (2) Description of function When you execute File [export], you can save the specified dive data in CSV format. When several files are selected, each dive data is converted to CSV format then creates individual CSV files. CSV (*.csv) is the only file type. When you press [cancel], it returns to the Main View window without saving any files. When you click [Save] after specifying the file name, it creates a file with the specified file name. During this transaction, if the file with the same name exists, an overwrite warning message appears then the file is overwritten when you click [OK]. When you click [Cancel], it returns to the screen that to specify the file name. When file extension is abbreviated when you specify a file name,.csv is automatically applied to then the file is saved. When file extension is specified, this transaction is disregarded. And if an error occurs during while retaining a file, a saving error message appears and returns to the screen that to specify the file name. 27
, edit (open), or delete dive data. 5.4.1 Edit-Add (1) UI specification (2) Description of function When you execute Edit - [Insert] (or when you")
![select [Insert] from the popup menu), you can create a newly dive data by choosing product type and diving mode. You can choose product type from "Archimede", "Archimede2" or "Edy".](/docs-images/78/77785078/images/30-1.jpg "And you can also choose diving mode from \"DIVE MODE\", \"GAGE MODE\", or \"FREE DIVING MODE\". However, there are some modes you cannot choose depending on the type.")
30 File-Exit application (1) UI specification (None) (2) Description of function This closes the current application. 5.4 Editing Functions These functions add (insert), edit (open), or delete dive data Edit-Add (1) UI specification (2) Description of function When you execute Edit - [Insert] (or when you select [Insert] from the popup menu), you can create a newly dive data by choosing product type and diving mode. You can choose product type from "Archimede", "Archimede2" or "Edy". And you can also choose diving mode from "DIVE MODE", "GAGE MODE", or "FREE DIVING MODE". However, there are some modes you cannot choose depending on the type. Relations between each type and their available modes are shown in the following table. PRODUCT DIVE MODE GAGE MODE FREE DIVING MODE Archimede OK - - Archimede2 OK OK - Edy OK OK OK 28
31 <Supplemental note> You can not create "GAGE MODE" dive data with Archimede. Algorithm-based calculations can be performed only on downloaded log data. Up to 9999 data items can be inserted (data cannot inserted once 9999 items have been reached). If this limit of 9999 data items is reached during a data transfer, the data being transferred will not be saved. DIVE DATA Initialized dive data is inserted as the following dive data immediately after the currently selected dive data. If several dive data items have been selected, the selected items are inserted in descending order, starting from the item with the highest log number. The number of the dive data that comes after this inserted dive data is incremented by 1. Data item New dive data Log No. (Highest No. in LGB file) + 1 Date Current date Dive No. 0 Altitude rank 0 Residual nitrogen level 0 Residual oxygen level 0 Maximum depth (m) 0 Average depth (m) 0 Water temperature ( C) 0 Dive time (minutes) 0 Entry time Current time Exit time Current time Fraction of oxygen 1 (%) 21 Fraction of oxygen 2 (%) 21 Elapsed surface time 0:00 Safety factor 0 Sampling (seconds) 30 Residual oxygen level warning Pressure of Oxygen (PO2) warning Decompression warning Decompression stop violation warning Over range warning Ascent rate warning 29
 UI specification The combo box does not include the dates of downloaded data. The dates of inserted data can be set.")
32 Dive time (minutes) 0 Sea /Fresh Sea Tank size 0 Operating pressure 0 Start pressure and end pressure Edit-Open (1) UI specification The combo box does not include the dates of downloaded data. The dates of inserted data can be set. * Above image is an example of data that has been downloaded from a dive computer. 30


33 < ARCHIMEDE > Non Decompression Dive Decompression Dive < ARCHIMEDE 2 > Non Decompression Dive Decompression Dive Gage Mode < EDY > Non Decompression Dive Decompression Dive Gage Mode Free Diving Mode
34 DC display information - From top of screen: Up to 600 minutes of dive time : Current depth 0 to 199.9m : NDL (Non Decompression Limit) to 200 minutes : Decompression stop depth, 3m to 99 m (3-30m for Archimede) : Decompression stop time, 1 to 99 minutes : Total decompression stop time, up to 999 minutes : PGT (Residual nitrogen level), levels 0 to 9 : OLI (Residual oxygen level), levels 0 to 8 <Explanation about icons> Next button :Displays next dive data PREV button :Displays the previous dive data Print button :Prints the dive data that are currently displayed (2) Description of function When you select dive data from the Main View window, it displays detailed dive data. Only one selected dive data can be displayed at a time. By using buttons in the right bottom of the screen, you can display the next dive data and the previous dive data. When you click the print button, it prints the dive data that is currently displayed. In the dialogue title, the dive number is displayed. When you close the dialogue, it returns to the Main View window. Dive data is composed of the four property sheets and it displays dive information (information), log information (Log), Gear information (Gear), and Comments from the left. 32
 Functional specification [Dive information (Information)] is selected when you open dive data. [Date] displays calendar.")
35 DIVE INFORMATION(LOG) (1) UI specification *The current display shows the inserted data. The dates of downloaded data are not shown in a combo box and cannot be edited. (2) Functional specification [Dive information (Information)] is selected when you open dive data. [Date] displays calendar. [Location], [Site], [Buddy], [Condition], [Weather], and [Visibility] are provided in combo boxes, you can directly input the dive data. Also, once the data has been input, it registers them and next time you input, you can select by clicking drop-down buttons from the list. Maximum text string for input: 100 characters 33

36 LOG (1) UI specification The data in the Sampling combo box cannot be changed if the data is downloaded. The above display shows an example data that has been downloaded from a dive computer. (2) Description of function Data that is input and displayed includes the following. 34
37 Title Altitude Description Min. value Max. value Input condition Function Altitude rank 0 3 Integers Altitude rank of dive Rank PGT OLI Nitrogen bar graph Oxygen bar graph 0 9 Integers Indicates the level of residual nitrogen in the body at the end of the dive 0 8 Integers Indicates the level of residual oxygen in the body at the end of the dive Max. Maximum depth m m:real This is not linked with the Depth 656 ft number *1 maximum depth profile data ft: Integer during the dive. Ave. Average depth m m:real This is not linked with the Depth 656 ft number *1 average depth profile data ft: Integer during the dive. Temperat Water -5 C 45 C C,F:Real Lowest water temperature ure temperature 23 F 113 F number *1 during dive Dive Time Dive time (minutes) Integers Dive time Entry Dive start time 0:00 23: 59 Integers Time when dive started (entry into water) Exit Dive stop time 0:00 23: 59 Integers Time when dive ended (exit from water). Exit = Entry + Dive Time (calculated automatically) FO2-1,2 Fraction of oxygen 1, 2 *2 21 (air) 99 Integers Percentage of oxygen in the gas mixture used for diving Surf.T SF Sampling Time Elapsed surface time Safety Factor Sampling time (seconds) 0:00 47: 59 Integers Time from previous exit until current entry. Surf.T = Entry - (previous) Exit 0 1 Integers Diving safety factor(archimede) 0 2 Integers Diving afety factor (Archimede2, Edy) ,15, 30, 60 Depth profile's sampling time. The profile data is set according to this time. *1 Water depth for downloaded data is shown as a value from 0 to meters, but 35
38 entered depth values are shown as real numbers. (No decimal point restrictions) Water temperature for downloaded data is shown as a value from -5.0 to 45.0 C, but entered *2 This indicates the ranges for data input and display in Utility. The setting ranges of dive computer specification are Mix 1: 21% to 50% and Mix 2: 21% to 99%. When it is in the gage mode, they are not displayed. 36
 Description of function This is a record of equipment and air information used during a dive.")
39 GEAR (1) UI specification When "liters" has been selected (via the capacity unit option setting) Or: When "cuft" has been selected (via the capacity unit option setting), the operating pressure is appended. (2) Description of function This is a record of equipment and air information used during a dive. Item Minimum value Maximum value Input condition Function Tank size Integers Tank size used during dive Working pressure Integers Standard pressure Pressure at start Integers Tank's residual pressure at start of Pressure at end Integers Tank's residual pressure at end of dive dive - Gear item list :This lists the names of registered gear items. Any gear item that has been registered can be selected from this list. - Gear item :This shows equipment used during a dive. 37
40 - Set button :Use this button to register gear items to specific patterns.registered names of gear items are set to the gear item list. - Tank size :This is the size of the tank used during a dive. - Start(Pressure) :This is the tank's residual pressure at the start of a dive. - End(Pressure) :This is the tank's residual pressure at the end of a dive. - Used(Air usage) :This is the amount of air used during a dive. Air usage = (pressure at start pressure at end) tank size - Surface Air Consumption Rate : This is the amount of air consumption per 1 minute when converted to surface level. Surface air consumption = usage / dive time / (10 + average depth ) 10 However, when the capacity unit is cubic feet, the following formula is used. (Note: The tank size has a different meaning compared to when liters are the capacity unit.) (Example) When, (tank size) = 80 cu ft, (working pressure) = 3000 psi, (pressure at start) = 2800 psi, (pressure at end) = 800 psi, (dive time) = 40 minutes, and (average depth) = 20 m: Then the volume of air filled in the tank is calculated as following way. (air volume at start) = (pressure at start) / (operating pressure) * (tank size) = 2800 / 3000 * 80 = (almost 74.6 cu ft) (air volume at end) = (pressure at end) / (working pressure) * (tank size) = 800 / 3000 * 80 = (almost 21.3 cu ft) (air volume used) = (air volume at start - air volume at end) = = 53.3 cu ft (surface air consumption rate) = (air volume used) / (dive time) / (10 + average depth (m)) * 10 = 53.3 / 40 / ( ) * 10 = 0.44 cu ft/min Where 1 L = cu ft (cubic feet) 38


41 - Working Pressure: : This is the standard pressure at which air is inserted into the tank. - Tank size: : This is the total amount of air required to fill the tank to the specified working pressure. COMMENT (1) UI specification (2) Description of function This function records comments. GRAPH (1) UI specification a) Dive profile graph 39

42 b) Dive profile graph in a day (Free dive mode only) (2) Description of function A depth profile graph is displayed. The Y axis shows the depth and the X axis shows the time. The selected points on the line graph displays how those points are displayed using background grid lines that across X axis and Y axis in parallel. Scales on the graph are automatically adjusted to the optimum scale. Vertical range: 0 m ~ 99.9 m or 0 ft ~ 328 ft Horizontal range: 0 minutes to 599 minutes And when you use the product that is corresponded to 2Mix function, the indicator belt of tank switching is displayed at the top of a graph then the status of tank switching is displayed with bar graphs. When you use the product that is not corresponded to 2Mix, the indicator of tank switching does not appear. Either using the scroll bar in the bottom graph or left clicking on the graph, you can view dive point data. Such as depth data and nitrogen amount graphs at that operation, are calculated and updated every time they are selected. Dive profiles during a day can be displayed in a graph if dive logs are free dive mode. (But the dive information, log and so on are displayed at current dive log's informations indicated by Dive No.) 40

43 DIVE INFORMATION (1) UI specification See "5.4.2 (1) UI specification". (2) Description of function Dive information is displayed based on the profile data selected on the graph. The depth are indicated by selected unit. Dive Time Depth NDL PGT 0 to 9 OLI 0 to 8 Max. Depth Deco Stop Time Deco Stop Depth Total Ascent Time 0 to 600 minutes 0 m to 199.9m, or 0ft to 656ft 1 to 200 minutes 0 m to 199.9m, or 0 ft to 656ft 1 to 99 minutes 3m to 30m (Archimede) 3m to 99m (Archimede2, Edy) 1 to 999 minutes TISSUE SATURATION (1) UI specification (2) Description of function Based on the selected profile data via the graph, a vertical bar graph of the residual nitrogen level is displayed. Along the vertical axis, values are given in relation to the M value (limit amount of nitrogen that can accumulate in the body) and along the horizontal axis each compartment is arranged from the left by the compartment of the body that accumulates nitrogen rapidly (Compartment). The number of defined compartment is 9(Archimede) or 12(Archimede2) On the vertical axis, they displays as the tissue saturation level is 100% when the amount of nitrogen in each compartment is equivalent to the M value, then they are displayed up to the maximum 200%. And when it exceeds the M value, the bar graph is 41
 PROFILE (1) UI specification (2) Description of function This sheet displays data from the Graph sheet. The column headings (from left to right) are Dive.")
44 displayed in red color. The tissue saturation level at starting a dive is also indicated in the graph in advance. (Please refer to the image data at the printing procedure.) PROFILE (1) UI specification (2) Description of function This sheet displays data from the Graph sheet. The column headings (from left to right) are Dive.T (dive time), Depth, and FO2 (fraction of oxygen). The displayed depth value includes the first decimal place and the time display format is 00:00:00 (HH:MM:SS), using two digits per time unit. The sampling time cannot be changed via this dialog box. 42


45 (3) Dive graph's warning patterns <Ascent rate violation> A red line appears as a warning in any area of the graph that indicates an overly rapid ascent. <Decompression dive> During a dive, when decompression dive is required, the area from the surface to the decompression stop depth is displayed in red color. The height of the red colored area indicates the depth requiring for the decompression stop and the widths indicates time. 43


46 <OLI warning (OLI = Oxygen Limited Indicator) > When air with high partial-pressure of oxygen (exceeding the limit) has been consumed, a yellow line appears as a warning for the parts of the dive when such air consumption occurred. <O2 warning (PO2 = Pressure of Oxygen)> Warning yellow line appears along the PO2 level of Tank-1 is 1.4. Warning red line appears along the PO2 level of Tank-1is 1.6. Warning yellow line appears along the PO2 level of Tank-2 is 1.4. Warning red line appears along the PO2 level of Tank-2 is

47 5.4.3 Edit-Delete (1) UI specification (2) Description of function Selecting Edit-Delete ("Delete" in the pop-up menu) brings up a confirmation dialog box that asks you to confirm deletion of selected dive data. Clicking the Cancel button closes this dialog box and returns to the Main View window without deleting the dive data. Clicking the OK button deletes the selected dive data. After the data is deleted, the data items with higher log numbers are shifted automatically. If no dive data has been selected, a dialog box appears and prompts you to select dive data. 5.5 Tool menu You can specify the view and the data display mode View-Main View You can select the Main View from either "List View" or "Tree View". 45


48 5.5.2 View-Data You can select the data to be displayed in the Main View from the following. All Dime mode Gage mod Free diving mode Displays all data Displays only the dive mode data Displays only the gage mode data Displays only the free diving mode data 46

49 5.6 Tool menu When the Tool menu is selected, 5 items of Transfer, History set, Simulation, Registration, and Option are displayed in the pop-up menu. 47


50 5.6.1 Tool-Transfer (1) UI specification (2) Description of function Selecting Tool-Transfer, brings up the Download dialog box. The Download dialog box includes a START button at the top for starting a download and a STOP button below for stopping it, along with an animated display of the download and a progress bar indicating download progress. Selecting the STOP button terminates the current download and returns to the Main View window. Selecting the START button initiates communication between the dive computer and a connected PC. When you choose "START" button, PCLogBook starts downloading dive datas from Dive Computer. The newest dive data is tranfered first. When PCLogBook detect same data which have already been in your dive data list, a warning dialog comes up and ask whether keep the downloading or not. If you choose "NO", PCLogBook quit downloading. Then newest dive datas are downloaded and added to your dive data list. If you choose "YES", then PCLogBook will continue downloading to the end of the datas in your Dive Computer. After that, same datas will be added to your dive data list. 48
 UI specification (2) Description of function When you select [Tool] - [History] menu, a dialog box for history set appears and you can set your total number of dive, total dive")
51 While you had selected wrong interface device or wrong port No. at communication option, a warning message is displayed when you try downloading Tool-History (1) UI specification (2) Description of function When you select [Tool] - [History] menu, a dialog box for history set appears and you can set your total number of dive, total dive time, and maximum depth of your past dives into your dive computer. Enter each values and connect the dive computer to your PC and press [START] button. Then the values will be set into your dive computer. In case thare are some trouble on transfer procedure, then comming up warning dialog box. Cick [OK] then aborts history set menu and turns back to main view window. 49
 Total Dive Time: The total dive time of your whole dives(0h0m -- 999h 59m) h:hour m:minutes Maximum Depth: The maximum depth you've ever experienced. (0 -- 199.")
52 Total Dive Number: The total number of yor dives. ( 0-999) Total Dive Time: The total dive time of your whole dives(0h0m h 59m) h:hour m:minutes Maximum Depth: The maximum depth you've ever experienced. ( m or ft) There are two kinds of history sets - dive mode history set and gage mode history set. Note that you can specify the gage mode history set only when you select Edy. Specifying gage mode history set in Archimede or Archimede2 does not take any effect Tool-Registration (1) UI specification (2) Description of function When you select Tool [Registration], a dialogue box for registration appears and frequently input items such as Guide name, Gear name, can be registered. In the registration dialogue, Guide, Gear Set, Conditions, Site, Buddy, Location, Weather, and Visibility folders are displayed. Previous data that are input in [Dive information], [Gear information] sheets on the dive data display screen, are stored in the folders that are corresponded to registration dialogue. When you select [Insert], a new data is inserted in the selected folder. When you select [Edit], edit the selected data. But you cannot edit the name of each folder. 50
![When you select [Delete], delete the selected data. Before deleting data, a delete confirmation dialogue appears. Select Close to close the Registration dialog box.](/docs-images/78/77785078/images/53-1.jpg "Data that is registered via this Registration dialog box can be viewed as an input list by selecting the drop-down buttons in the dive information combo boxes. 5.6.")
53 When you select [Delete], delete the selected data. Before deleting data, a delete confirmation dialogue appears. Select Close to close the Registration dialog box. Data that is registered via this Registration dialog box can be viewed as an input list by selecting the drop-down buttons in the dive information combo boxes Tool-Simulation (1) UI specification At start-up: 51

54 (2) Description of function New : Create a new simulation. Open : Displays previously saved simulation data. Delete : Deletes previously saved simulation data. Delete All : Deletes all previously saved simulation data. Close : Ends a simulation. < New : Create a new simulation. > (1) UI specification <When 'liters' are the unit of capacity:> The dialog above is the case when you choose ARCHIMEDE2 52

55 <When 'cubic feet' are the unit of capacity:> The dialog above is the case when you choose ARCHIMEDE <<Select the type of simulation>> You can choose the type of simulation from followings. <Create a new simulation data> 1. Starting setting of simulation dialogue Select NEW button at the right side of simulation list in order to create a new simulation data. 2. Setting simulation data. Input simulation name, altitude rank, safety factor, sampling time, FO2, tank size, starting pressure of the tank and SACR(Surface Air Consumption Rate). NOTE: You must input simulation name. 3. Confirmation If you finish inputting data, press [OK] button. Then, simulation dialogue is displayed. 53
56 <Open a simulation data you made> 1. Open a simulation data You can select simulation data you want to open in simulation list, and press Open. Or you can open simulation data by double click. <Simulation using the actual dive data> You can simulate using the actual dive data of the past. 1. Start the preference dialogue Select the dive data that you want to use from the dive data preference dialogue then click [OK]. 2. Input simulation data Input simulation name, altitude rank, safety factor, sampling time, FO2, tank size, starting pressure of the tank and SACR(Surface Air Consumption Rate). NOTE: You must input simulation name. 3. Confirmation After finishing input, click "OK". The simulation data creation screen will be started. <Using a copy of simulation data> You can newly simulate by copying simulation data that are created in the past. 1. Start the simulation data preference dialogue Select simulation data that you want to use from the simulation data preference dialogue then click [OK]. 2. Input simulation data Input simulation name, altitude rank, safety factor, sampling time, FO2, tank size, starting pressure of the tank and SACR(Surface Air Consumption Rate). Memo: You must input simulation name. 3. Confirmation After finishing input, click "OK". The simulation data creation screen will be started. 54
57 (2)Description of function Selecting [Tool] - [Simulation] - [New], brings up the New Simulation dialog box. The following dive information is shown in the New Simulation dialog box. You cannot enter data that is out of the setting range. Title Min. value Max. value Input condition Function Simulation Up to 100 characters Name of simulation name Duplicate simulation names are allowed Altitude 0 3 Integers The altitude rank during rank a dive Fraction of 21 (Air) 99 Integers The fraction of oxygen in oxygen 1 gas used during a dive Fraction of 21 (Air) 99 Integers The fraction of oxygen in oxygen 2 gas used during a dive (Archimede2 only) Safety 0 1 Integers Diving Safety factor factor (Archimede) 0 2 Integers Diving safety factor (Archimede2, Edy) Sampling , 15, 30, 60 Sampling time for depth time profile. Profile data is set (seconds) based on this timing. Tank size Integers Tank size during a dive Pressure at Integers Tank's residual pressure start of dive during a dive Surface air Integers Percentage of surface consumptio air consumption during n a dive After finishing input, click "OK". The simulation data creation screen will start. When no data has been saved, the Open, Delete, and Delete All buttons are grayed out and cannot be used. 55
. The current dive time and current depth are highlighted at the mouse cursor position in the dive graph (lower left of screen).")
58 (3) Execution of simulation The Simulation window shows the previously set altitude rank, safety factor, sampling time (seconds), and fraction of oxygen FO2 (%) as dive information (upper left of screen). The current dive time and current depth are highlighted at the mouse cursor position in the dive graph (lower left of screen). The upper right of the screen shows the residual pressure gauge, and the center right contains dive computer information, below which is a bar graph (dive graph) of nitrogen saturation values for each compartment. Clicking the mouse to create a dive pattern. The screens show the residual pressure gauge, dive computer information, and simulated results on the bar graph corresponding to depth versus dive time in the pattern. 1. Create dive pattern Click the mouse at any position on the dive graph. Memo: The current mouse cursor position is displayed based on a calculation using the current dive time and current depth. 2. Dive graph scale adjustment Use the arrow buttons near the bottom right corner of the dive graph to resize the scale of time and depth axes when creating a dive graph. 56
59 Use this button to increase the dive time scale. (This scale's maximum value is 650 minutes.) Use this button to increase the depth scale. (This scale's maximum value is 120 meters or 350 ft.) Use this button to optimize the graph's size. 3.UNDO At graph creation, this button cancels the operation currently done and reset to the state before the operation. 4. Delete dive pattern Select the Delete Profile button to delete the dive pattern. 5. Reset dive patterns Select the Reset button to reset all dive patterns. 6. Checking dive information Click any point in a previously created dive pattern to check the dive information at that point. 7. Closing a dive pattern Close a display of dive information by clicking a spot that shows a depth of 0 meters or less (out of range). 8. Switching to surface interval mode Select the Next Dive button to switch to surface rest mode before starting the next dive. 9. Setting the elapsed surface time Adjust the slider position to change the elapsed surface time. Memo: Changes in amount of residual nitrogen during surface time can also be checked by the tissue saturation bar graph. 57
60 10. Move to the Repetitive Dive Mode Press the Repeat Dive button to transfer to repeated (continuous) dive mode. Memo: Up to 10 dives can be set as repetitive dives. 11. Printing Simulation Data Select the Print button to print simulation data. Memo: Data for the selected diving pattern will be printed Tool-Option (1) UI specification TRANSFER When the automatic recognition is selected, recognizes the interface unit that is connected automatically and starts communication. When the manual setting is selected, communicates to the specified communication port. The communication cannot be done if the specified communication port and the interface unit do not correspond. 58
61 UNITS 59
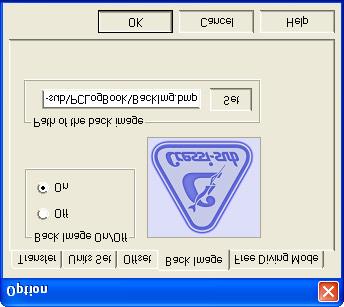
62 OFFSET BACKGROUND IMAGE 60

63 FREE DIVING MODE You can select how to output free diving mode data. Print When you select free diving mode data and execute print operation: radio button means 1 Log Specifies the selected data as the print target Prints only the selected data 1 Day Specifies the daily data as the print target Prints the accumulated free diving mode data for the selected day Export When you select free diving mode data and execute export operation: radio button means 1 Log Specifies the selected data as the export target Exports only the selected data 1 Day Specifies the daily data as the export target Exports the accumulated free diving mode data for the selected day (2) Description of function Select Tool-Option to bring up the Option dialog box. The Option dialog box includes three property sheets. From left to right, these are the Units sheet, Offset sheet, and Background Image sheet. In all of these property sheets, select OK to save your settings or select Cancel (or the x button at the upper right corner) to cancel your settings. 61
64 <UNITS> The four options for unit settings are described below. Unit Settings Initial setting Depth Meters or feet Meters Water temperature Celsius or Fahrenheit Celsius Pressure Bars or cubic pounds per inch Bars Capacity Liters or gallons Liters <OFFSET> This sets the initial value for the dive number. Total number of dives: 0 to Total dive time: 00:00 to 9999: 59 <BACKGROUND IMAGE> This registers a background image to display in the Main View window. Click the Register button to open a dialog box for selecting the file that contains the desired background image. 62


65 5.7 Help Select the Help menu to display a pull-down menu that includes the application's version information and a link to the Help Topics dialog box Help-Help Topics (1) UI specification (2) Description of function Selecting a search of topics from the menu bar brings up a list of help topics. 63

66 5.7.2 Help-About (1) UI specification (2) Description of function When revision information has been executed for the menu bar, the lgb1.dat file in the installation directory is displayed. Left-click the mouse in the dialog box or press the Enter or Esc key to close this dialog box and return to the list. 64
FireHawk M7 Interface Module Software Instructions OPERATION AND INSTRUCTIONS
 FireHawk M7 Interface Module Software Instructions OPERATION AND INSTRUCTIONS WARNING THE WARRANTIES MADE BY MSA WITH RESPECT TO THE PRODUCT ARE VOIDED IF THE PRODUCT IS NOT USED AND MAINTAINED IN ACCORDANCE
ENGLISH. uemis ZURICH. SDA Scuba Diver Assistant Quick Reference Guide
 EN ENGLISH uemis ZURICH SDA Scuba Diver Assistant Quick Reference Guide 2 21 Getting Started Carefully read the detailed instruction manual before diving with the Scuba Diver Assistant (SDA). Don t use
SENSUS PRO MANAGER (for SENSUS or SENSUS PRO devices) User s Guide -- Windows. Version 2.0 Published October 17, ReefNet Inc.
 User s Guide -- Windows. Version 2.0 Published October 17, ReefNet Inc.") SENSUS PRO MANAGER (for SENSUS or SENSUS PRO devices) User s Guide -- Windows Version 2.0 Published October 17, 2002 2002 ReefNet Inc. 1.0 Introduction The SENSUS PRO data recorder captures the time, depth,
SENSUS PRO MANAGER (for SENSUS or SENSUS PRO devices) User s Guide -- Windows Version 2.0 Published October 17, 2002 2002 ReefNet Inc. 1.0 Introduction The SENSUS PRO data recorder captures the time, depth,
Microsoft Windows Software Manual for FITstep Stream Version 4
 Thank you for purchasing this product from Gopher. If you are not satisfied with any Gopher purchase for any reason at any time, contact us and we will replace the product, credit your account, or refund
ALGE DIVE! ALGE. ALGE-TIMING GmbH & Co
 ALGE ALGE DIVE! ALGE-TIMING GmbH & Co Rotkreuzstrasse 39 A-6890 Lustenau Telephone: +43 5577-85969 Fax: +43 5577-85969 e-mail: office@alge-timing.com Internet: www.alge-timing.com Table of contents 1.
Race Screen: Figure 2: Race Screen. Figure 3: Race Screen with Top Bulb Lock
 Eliminator Competition Stand Alone Mode - Instruction Manual Main Menu: After startup, the Eliminator Competition will enter the Main Menu. Press the right/left arrow buttons to move through the menu.
Blackwave Dive Table Creator User Guide
 Blackwave Dive Table Creator User Guide Copyright 2002-2009 Blackwave. All rights reserved. These materials (including without limitation all articles, text, images, logos, compilation, and design) are
PC Configuration software for Discovery MkVI v 1.03 User guide
 PC Configuration software for Discovery MkVI v 1.03 User guide This user guide describes the different features included in PC Config software, version 1.03, and how they are used. When referring to this
English. English. Predictive Multi Gas for
 English English Predictive Multi Gas for TABLE OF CONTENTS 1. Glossary...1 English 2. Pairing of transmitters and gas summary table...2 3. PMG menu...2 4. RBT=0min in Gas integration menu...2 5. Screen
Pegas 4000 MF Gas Mixer InstructionManual Columbus Instruments
 Pegas 4000 MF Gas Mixer InstructionManual Contents I Table of Contents Foreword Part I Introduction 1 2 1 System overview... 2 2 Specifications... 3 Part II Installation 4 1 Rear panel connections...
Version 3.1.0: New Features/Improvements: Improved Bluetooth connection on Windows 10
 Version 3.1.0: Improved Bluetooth connection on Windows 10 ***Important notice for Mac Users: Upgrading from Shearwater Desktop 3.0.8 to 3.1.0 will not cause issues. Upgrading from any 2.X.X to any 3.X.X
Oxygen Meter User Manual
 Oxygen Meter User Manual Monday, July 23, 2007 1. Outline...2 2. Program...3 2.1. Environment for program execution...3 2.2. Installation...3 2.3. Un installation...3 2.4. USB driver installation...3 2.5.
Previous Release Notes
 Release Notes Shearwater Desktop 3.1.5 Support for NERD 2. Previous Release Notes Version 3.1.4 Improved Bluetooth Reliability with the initial connection. Bug Notes: dded software workaround to allow
CONSUMER MODEL INSTALLATION GUIDE
 CONSUMER MODEL INSTALLATION GUIDE System requirements Windows System Requirements To use your TOMI and its software, your system should have: A Microsoft Windows compatible PC with a Pentium IV processor
ScoreKeeper tm. ~ Software for Golf ~ for Microsoft Windows 98 through Windows 7. User's Guide
 ScoreKeeper tm ~ Software for Golf ~ for Microsoft Windows 98 through Windows 7 User's Guide March, 2011 Copyright Mark II Systems. Long Valley, N.J., USA 908-850-5252 www.scorekeeper.com Installation
uemis CONNECT: Synchronisation of the SDA with myuemis
 uemis CONNECT: Synchronisation of the SDA with myuemis 1 What is myuemis? In myuemis, your private area on the Internet portal www.uemis.com, you can visualise your dives, manage your database and transfer
XP EINS USER MANUAL. Contents: 1.1XP EINS USER S MANUAL
 XP EINS USER MANUAL Contents: 1.1 XP EINS USER S MANUAL... 1 1.2 INTRODUCTION... 2 2. WATCH FUNCTIONS...3 3. DIVE COMPUTER FUNCTIONS...5 4. ADVANCED TIME FUNCTIONS..6 5. ADVANCED DIVE COMPUTER FUNCTIONS...7
ACI_Release_Notes.txt VERSION Fixed Tank info for ELITE in Dive section 2. Fixed USB port initializing for old DC VERSION
 VERSION 2.4.0 1. Fixed Tank info for ELITE in Dive section 2. Fixed USB port initializing for old DC VERSION 2.3.9 1. Fixed Dive Computer configuration section error 2. Fixed message for download/upload
The ICC Duckworth-Lewis-Stern calculator. DLS Edition 2016
 The ICC Duckworth-Lewis-Stern calculator DLS Edition 2016 (DLS2-2016) Installation and operating instructions Queries about program operation should be sent to: Steven.Stern@qut.edu.au 2016 International
Software Manual for FITstep Pro Version 2
 Thank you for purchasing this product from Gopher. If you are not satisfied with any Gopher purchase for any reason at any time, contact us and we will replace the product, credit your account, or refund
SHIMADZU LC-10/20 PUMP
 SHIMADZU LC-10/20 PUMP Clarity Control Module ENG Code/Rev.: M091/70C Date: 24.10.2017 Phone: +420 251 013 400 DataApex Ltd. Fax: +420 251 013 401 Petrzilkova 2583/13 clarity@dataapex.com 158 00 Prague
Operating Manual. SUPREMA Calibration. Software for Fire and Gas Warning Units. Order No.: /01. MSAsafety.com
 Operating Manual Software for Fire and Gas Warning Units Order No.: 10154656/01 MSAsafety.com MSA Europe GmbH Schlüsselstrasse 12 8645 Rapperswil-Jona Switzerland info.ch@msasafety.com www.msasafety.com
ELIMINATOR COMPETITION DRAG RACE Program Manual Firm Ver 4.11
 ELIMINATOR COMPETITION DRAG RACE Program Manual Firm Ver 4.11 The Portatree Eliminator Super 2000 Competition Track Timer can be used with an IBM Compatible Personal Computer connected through Com Port
AIR FLOW ANEMOMETER INSTRUCTION MANUAL
 AIR FLOW ANEMOMETER INSTRUCTION MANUAL Thank you for purchasing our company Air Flow Anemometer. This manual provides relative information on how to use the Air Anemometer and warning in operation Please
Memo Mouse / DataTrak
 DataTrak transfer ok no transfer battery DIVE depth dive time max.depth deco info tank data bar Memo Mouse / DataTrak Page 2 DataTrak Table of Contents Survey..................... 5 The system..................
The ICC Duckworth-Lewis Calculator. Professional Edition 2008
 The ICC Duckworth-Lewis Calculator Professional Edition 2008 (Version 1.1) Installation and operating instructions Any queries about operating the program should be sent to steven.stern@anu.edu.au 2008
v2.3 USER MANUAL
 v2.3 USER MANUAL www.foresightsports.com Table of Contents 03 04 05 09 12 17 20 21 Activation Getting Started Play Compete Improve Settings Update Manager Glossary 04 11 05 12 03 Activation FSX Activation
Diver-Office. Getting Started Guide. 2007, Schlumberger Water Services
 Diver-Office Getting Started Guide 2007, Schlumberger Water Services Copyright Information 2007 Schlumberger Water Services. All rights reserved. No portion of the contents of this publication may be reproduced
Mac Software Manual for FITstep Pro Version 2
 Thank you for purchasing this product from Gopher. If you are not satisfied with any Gopher purchase for any reason at any time, contact us and we will replace the product, credit your account, or refund
DIVECOMPUTER.EU USER MANUAL V3.0
 DIVECOMPUTER.EU USER MANUAL V3.0 1 Introduction 5 2 Getting the computer ready to work. 7 2.1 Bungee cord. 7 2.2 Changing the battery. 7 2.3 Turning on. 8 2.3.1 Auto turn-on. 8 2.4 Turning off. 9 2.5 Dive
Aladin ONE (Matrix) User Manual
 User Manual") Aladin ONE (Matrix) User Manual ALADIN ONE DIVING COMPUTER - DESIGNED BY DIVING ENGINEERS Welcome to SCUBAPRO dive computers and thank you for purchasing the Aladin One. You are now the owner of an extraordinary
Aladin ONE (Matrix) User Manual ALADIN ONE DIVING COMPUTER - DESIGNED BY DIVING ENGINEERS Welcome to SCUBAPRO dive computers and thank you for purchasing the Aladin One. You are now the owner of an extraordinary
Aladin SPORT User manual
 Aladin SPORT User manual Safety considerations I Safety considerations You must carefully read and understand this entire manual before using your Scubapro Aladin SPORT. Diving has many inherent risks.
Instruction Manual. BZ7002 Calibration Software BE
 Instruction Manual BZ7002 Calibration Software BE6034-12 Index _ Index Index... 2 Chapter 1 BZ7002 Calibration Software... 4 1. Introduction... 5 Chapter 2 Installation of the BZ7002... 6 2. Installation
NEWTON QUICK REFERENCE CARD
 NEWTON QUICK REFERENCE CARD This document is only a quick reference guide. Cressi recommends you read the whole instruction manual supplied with your computer. cressi.com NEWTON WATCH BUTTONS LIGHT BUTTON:
DST Host User Manual
 For DST Host version 7.0 onwards, published October 2017 Cefas Technology Limited CONTENTS About this Manual... 2 Conventions used in this Manual... 2 Getting Started... 3 Installing the Host Software...
SENSUS PRO MANAGER (for SENSUS or SENSUS PRO devices) User s Guide Palm OS. Version 2.0 Published October 17, ReefNet Inc.
 User s Guide Palm OS. Version 2.0 Published October 17, ReefNet Inc.") SENSUS PRO MANAGER (for SENSUS or SENSUS PRO devices) User s Guide Palm OS Version 2.0 Published October 17, 2002 2002 ReefNet Inc. 1.0 Introduction The SENSUS PRO data recorder captures the time, depth,
SENSUS PRO MANAGER (for SENSUS or SENSUS PRO devices) User s Guide Palm OS Version 2.0 Published October 17, 2002 2002 ReefNet Inc. 1.0 Introduction The SENSUS PRO data recorder captures the time, depth,
Software for electronic scorekeeping of volleyball matches, developed and distributed by:
 Software for electronic scorekeeping of volleyball matches, developed and distributed by: Developed for the rules of USports 2017-18 As adopted by Ontario University Athletics for Men s & Women s Volleyball
Aladin TEC 2G. Deutsch English. Nederlands Español Italiano Français. User manual. Bedienungsanleitung. Manuel d utilisation.
 Nederlands Español Italiano Français Deutsch English User manual Bedienungsanleitung Manuel d utilisation Manuale d uso Instrucciones para el uso Handleiding Aladin TEC 2G Safety considerations You must
Shearwater GF Computer
 Shearwater GF Computer DANGER This computer is capable of calculating deco stop requirements. These calculations are at best a guess of the real physiological decompression requirements. Dives requiring
Diver-Pocket Diver-Pocket Premium
 User s Manual Diver-Pocket Diver-Pocket Premium Copyright Information 2011 Schlumberger Water Services. All rights reserved. No portion of the contents of this publication may be reproduced or transmitted
Aladin TEC 3G User manual
 Aladin TEC 3G User manual SAFETY CONSIDERATIONS You must carefully read and understand this entire manual before using your Scubapro Aladin TEC 3G. Diving has many inherent risks. Even if you follow the
Dive Computer NEMO SPORT
 Nemo Sport Manuale d istruzioni User s Guide Bedienungsanleitung Manuel d utilisation Manual de instrucciones Manual de instruções Gebruikershandleiding Användarinstruktioner Οδηγίες χρήσης Käyttäjän Opas
XC2 Client/Server Installation & Configuration
 XC2 Client/Server Installation & Configuration File downloads Server Installation Backup Configuration Services Client Installation Backup Recovery Troubleshooting Aug 12 2014 XC2 Software, LLC Page 1
Computer Scorekeeping Procedures
 Computer Scorekeeping Procedures 3-23-16 COMPUTER SETUP: Unlock Computer Storage Box: Enter combination so that it appears on the side of the lock Computer Setup: Place a computer, keyboard & mouse at
DIVE COMPUTER.
 DIVE COMPUTER www.istsports.com I. General Information 1.1. Hardware Specification CONTENT II. Operational modes 2.1. General 2.2. Operational Modes Flow Chart & Functions 2.2.1. Time mode 2.2.2. Dive
For running only the scoresheet application without any video features only some very basic hardware / software requirements have to be fulfilled:
 Digital Scoresheet user manual Requirements For running only the scoresheet application without any video features only some very basic hardware / software requirements have to be fulfilled: Laptop, preferably
AX5000 Operational Manual
 MIYACHI AMERICA CORPORATION The World Leader in Hermetic Sealing Systems AX5000 Operational Manual 0 Document #107-00092-001 Dec, 2013 AX5000 Operational Manual Miyachi America Corporation 1820 S. Myrtle
To Logon On to your tee sheet, start by opening your browser. (NOTE: Internet Explorer V. 6.0 or greater is required.)
") 1. Log-On To Logon On to your tee sheet, start by opening your browser. (NOTE: Internet Explorer V. 6.0 or greater is required.) (NOTE: Logon ID s must be 7 characters or more and passwords are case sensitive.)
1. Log-On To Logon On to your tee sheet, start by opening your browser. (NOTE: Internet Explorer V. 6.0 or greater is required.) (NOTE: Logon ID s must be 7 characters or more and passwords are case sensitive.)
RM-80 respiration monitor
 RM-80 respiration monitor User Manual September 18, 2015 0025-003M 950 North Hague Avenue Columbus, Ohio 43204-2121 USA Sales: sales@colinst.com Service: service@colinst.com Phone: (614) 276-0861 Fax:
Introduction This section includes suggestions on how to use this guide, an overview of course philosophy and goals.
 Oceanic OC1 Computer Diver DISTINCTIVE SPECIALTY INSTRUCTOR OUTLINE Introduction This section includes suggestions on how to use this guide, an overview of course philosophy and goals. How to Use this
UNITY 2 TM. Air Server Series 2 Operators Manual. Version 1.0. February 2008
 UNITY 2 TM Air Server Series 2 Operators Manual Version 1.0 February 2008 1. Introduction to the Air Server Accessory for UNITY 2...2 1.1. Summary of Operation...2 2. Developing a UNITY 2-Air Server method
Date of Purchase
 NiTek Trio Dive Computer User Guide www.diverite.com Date of Purchase Content DEVELOPED BY COPYRIGHT NOTICE WARRANTY INFORMATION Dive Rite 175 NW Washington Street Lake City, FL 32055 Phone: 386.752.1087
Technology. In the My Files [My Files] submenu you can store all the programs that you have made on the NXT or downloaded from your computer.
![Technology. In the My Files [My Files] submenu you can store all the programs that you have made on the NXT or downloaded from your computer.](/thumbs/74/70002303.jpg "Technology. In the My Files [My Files] submenu you can store all the programs that you have made on the NXT or downloaded from your computer.") NXT Main Menu My Files Files are automatically placed into the appropriate folders. When you download a program using a Sound file to the NXT, the program will be placed under Software files while the
NXT Main Menu My Files Files are automatically placed into the appropriate folders. When you download a program using a Sound file to the NXT, the program will be placed under Software files while the
Matrix Dive Computer. Instruction Manual
 Instruction Manual Matrix Dive Computer MATRIX Dive Computer TABLE OF CONTENTS 1 Introduction 3 1.1 Glossary 3 1.2 OPERATING MODES 4 1.3 Rechargeable battery 4 1.3.1 CHARGING THE BATTERY 4 1.3.2 CONNECTING
Tru Flight TRUFLIGHT INSTALLATION GUIDE TRUGOLF.COM
 Tru Flight T R A C K I N G S Y S T E M TRUFLIGHT INSTALLATION GUIDE TRUGOLF.COM TruFlight Camera Tracking System Setup & Installation TruFlight : How It Works... 1 TruFlight Components... 1 TruFlight Installation...
Callaway upro Golf GPS. User Guide (v1.3) 2009 Callaway Golf Company
 2009 Callaway Golf Company") Callaway upro Golf GPS User Guide (v1.3) 2009 Callaway Golf Company Table of Contents 1 GETTING STARTED WITH THE CALLAWAY UPRO...3 1.1 UPRO OVERVIEW...3 1.2 SYSTEM REQUIREMENTS...5 1.3 CHARGING THE UPRO...6
Callaway upro Golf GPS User Guide (v1.3) 2009 Callaway Golf Company Table of Contents 1 GETTING STARTED WITH THE CALLAWAY UPRO...3 1.1 UPRO OVERVIEW...3 1.2 SYSTEM REQUIREMENTS...5 1.3 CHARGING THE UPRO...6
Deutsch. User Guide. English. Français. SmartTRAK SWISS MADE BY UWATEC AG
 User Guide Deutsch English Français SmartTRAK SWISS MADE BY UWATEC AG Dive window Dive information panel Dive profile panel Dive computer display Tissue panel Alarm symbols Physiology panel Notes panel
KEM Scientific, Inc. Instruments for Science from Scientists
 KEM Scientific, Inc. Instruments for Science from Scientists J-KEM Scientific, Inc. 6970 Olive Blvd. St. Louis, MO 63130 (314) 863-5536 Fax (314) 863-6070 E-Mail: jkem911@jkem.com Precision Vacuum Controller,
Operating Manual. BACVis. Manual BACVis. for. Sensors and MilliGascounter. Rev
 Operating Manual BACVis Manual BACVis for Sensors and MilliGascounter Rev.150728001 Contents 1 ABOUT THIS DOCUMENT... 2 1.1 Function... 2 1.2 Target group... 2 1.3 Symbols used... 2 2 SYSTEM REQUIREMENTS...
ClubHub. User s Guide
 ClubHub User s Guide Table of Contents Setup... Initial Club Setup...7 Changing Clubs...5 Settings...8 My Clubs... Turn On/Off Sounds...9 Play Round Mode...0 List View...8 Social Sharing...0 Viewing D
Quick Start Guide. A. Hardware installation B. Software installation C. Start the software for the first time D. Do your first measurement
 Quick Start Guide This Quick Start Guide describes the hardware and software installation process and the Measurement feature in a simple way. Please follow the sequence of the steps to avoid problems
Quick Start Guide. For Gold and Silver Editions
 Quick Start Guide For Gold and Silver Editions Table of Content Introduction... 3 Prerequisites... 3 Installation and Setup... 4 Download and Install QQEvolution 2... 4 Create Users... 8 Create Agent/CSR/Producer...
STAT-O-MATIC FOOTBALL
 Version 2 STAT-O-MATIC FOOTBALL Version 2 TABLE OF CONTENTS 1. GETTING STARTED...2. 2. ENTERING, EDITING, IMPORTING ROSTERS, SWAP #...3. 3. SETTING UP / LOADING A GAME FILE... 7. 4. STARTING A GAME...
XP-3G. English Deutsch Français Italiano Español Nederlands 日本語简体中文
 XP-3G Deutsch Français Italiano Español Nederlands 日本語简体中文 Safety considerations You must carefully read and understand this entire manual before using your Subgear XP-3G. Diving has many inherent risks.
USA Jump Rope Tournament Software User Guide 2014 Edition
 USA Jump Rope Tournament Software User Guide www.usajumprope.org Table of Contents Contents System Requirements... 3 System Conventions... 4 Phase 1 Tournament Pre registration Preparation... 5 Name Your
BVIS Beach Volleyball Information System
 BVIS Beach Volleyball Information System Developments in computer science over the past few years, together with technological innovation, has in turn stimulated the development of tailored software solutions
NEMO AIR User s Guide
 NEMO AIR Dive computer User s Guide Nemo Air Dive computer TABLE OF CONTENTS Quick guide 2 NEMO AIR DIVE COMPUTER 3 IMPORTANT WARNINGS 3 RESPONSIBLE DIVING PRACTICES 4 HOW THE NEMO AIR DIVE COMPUTER WORKS
For clarification or assistance with TDM-web or any USTA web-based application,
 TD # 1 Tournament Set Up Guidelines: Follow These Steps and TDM Q&A s - April 2014 Batch enter players & process entries on the sanction form. Then use TDM to enter tournament information. For clarification
APA software instruction manual
 1. Starting the program In order to start the control software for the APA device press APAxx shortcut located on the desktop of the supplied computer. XX corresponds to the current software version. When
REMOTE CLIENT MANAGER HELP VERSION 1.0.2
 VERSION 1.0.2 MERCHANT SALES: 800-637-8268 New Merchant Accounts PARTNER PROGRAMS: 800-637-8268 New and existing partnerships CUSTOMER CARE: 800-338-6614 Existing merchant account support Statements and
Integrated Sports Systems (ISS) Inc. Meet Management Suite
 Inc. Meet Management Suite") November 2010 Integrated Sports Systems (ISS) Inc. Meet Management Suite User Guide and Technical Document Version 2.0 Table of Contents Table of Contents... 2 General Concepts... 3 Installation Meet Management
November 2010 Integrated Sports Systems (ISS) Inc. Meet Management Suite User Guide and Technical Document Version 2.0 Table of Contents Table of Contents... 2 General Concepts... 3 Installation Meet Management
HPICAL Operation & Data Logging Procedures. Click spacebar to advance through slides 1
 HPICAL-15000 Operation & Data Logging Procedures Click spacebar to advance through slides 1 WARNING Always wear proper safety equipment when using high pressure equipment. Do not exceed 125 psi air pressure.
Understood, Inc. User Guide SCUBA Solutions Version 1.7
 Understood, Inc. User Guide SCUBA Solutions Version 1.7 Table of Contents Revision History... 4 Introduction... 5 Purpose... 5 Scope... 5 Home... 5 Today s Dive Trips [Display]:... 6 Next Dive Trip [Display]:...
New product release. Universal Rebreather Monitor (URBM) Single O2 cell and Dual HP package
 Single O2 cell and Dual HP package") New product release Closed Circuit Research is pleased to announce the launch of our range of Universal Rebreather Monitors Key features and benefits include: Universal Rebreather Monitor (URBM) Single
New product release Closed Circuit Research is pleased to announce the launch of our range of Universal Rebreather Monitors Key features and benefits include: Universal Rebreather Monitor (URBM) Single
Computer Scorekeeping Procedures Page 1
 Computer Scorekeeping Procedures Page 1 COMPUTER SET-UP: Scorekeepers for the first game on a field should plan to arrive at least one-half hour prior to the game time to allow time for computer set-up.
Setting up the Ingenico isc250 Pinpad via USB in Windows 8
 One Blue Hill Plaza, 16 th Floor, PO Box 1546 Pearl River, NY 10965 1-800-PC-AMERICA, 1-800-722-6374 (Voice) 845-920-0800 (Fax) 845-920-0880 Setting up the Ingenico isc250 Pinpad via USB in Windows 8 The
ARCCOS 360 NEW USER GUIDE
 ARCCOS 360 NEW USER GUIDE Table of Contents 1. Getting Started a. Download & Install.2 b. Create Account....3 c. Pair Clubs..4 2. Play a. Starting a Round..5 b. Shot Editing.6 c. Shot List.7 d. Flag &
SUUNTO EON CORE USER GUIDE
 SUUNTO EON CORE USER GUIDE 2017-11-05 1. Safety...4 2. Getting started...7 2.1. Display states and views... 7 2.2. Icons...7 2.3. Set up... 8 2.4. Product compatibility...8 2.5. Before you dive... 9 3.
Boyle s Law: Pressure-Volume Relationship in Gases
 Boyle s Law: Pressure-Volume Relationship in Gases The primary objective of this experiment is to determine the relationship between the pressure and volume of a confined gas. The gas we will use is air,
NEMO EXCEL User s Guide
 NEMO EXCEL Dive computer User s Guide Nemo Excel dive computer TABLE OF CONTENTS Nemo Excel dive computer 3 responsible Diving Practices 3 Quick Start Guide 3 Time Mode display 3 Time Menu 4 Time Menu
1. SYSTEM SETUP AND START TOURNAMENT... 8
 PICTORIAL HANDBALL MATCH STATISTICS (PHMS for Windows 7 Version E5.1) User's Manual November 2011 1. SYSTEM... 6 1.1 INTRODUCTION... 6 1.2 SYSTEM NAME... 6 1.3 SYSTEM FUNCTION... 7 2. SETUP AND START...
NiTek X Dive Computer User Guide
 NiTek X Dive Computer User Guide Date of Purchase DEVELOPED BY COPYRIGHT NOTICE WARRANTY INFORMATION Dive Rite 175 NW Washington Street Lake City, FL 32055 Phone: 386.752.1087 Fax: 386.755.0613 Web: www.diverite.com
NiTek He. Owners Manual NiTek is a registered trademark of Lamartek, Inc., dba Dive rite
 NiTek He Owners Manual NiTek is a registered trademark of Lamartek, Inc., dba Dive rite Read this manual, in its entirety, before using your NiTek He. Failure to follow the instructions it gives, or to
DATAMASK HUD. Water or Push Button Modified Haldanean / DSAT (Diving Science and Technology) Database Each Level provides No.
 Database Each Level provides No.") FEATURES & FUNCTIONS Modes of Operation DATAMASK HUD Air, Nitrox, Gauge, and Free Dive Push Buttons 2 Mounting Options Activation Algorithm Basis Personal Conservative Factor Adjustment Altitude Algorithm
FEATURES & FUNCTIONS Modes of Operation DATAMASK HUD Air, Nitrox, Gauge, and Free Dive Push Buttons 2 Mounting Options Activation Algorithm Basis Personal Conservative Factor Adjustment Altitude Algorithm
Color Dive Computer. Instruction Manual
 Instruction Manual Color Dive Computer Icon HD Dive Computer TABLE OF CONTENTS ICON HD 3 CHARACTERISTICS OF ICON HD 3 IMPORTANT WARNINGS 3 RESPONSIBLE DIVING PRACTICES 3 HOW ICON HD WORKS 4 DURING THE
TOMI PRO MODEL PERSONAL MODEL
 TOMI PRO MODEL PERSONAL MODEL System requirements Windows System Requirements To use your TOMI and its software, your system should have: A Microsoft Windows compatible PC with a Pentium IV processor (1.5
Tennis...32 Stay above...34 Decimal...36 Bundesliga simulator...38 Shooter management...41 Installation...43 Registration...45 Where do I get the
 Content ShotAnalyzer with Scatt and the Häring target system... 3 ShotAnalyzer with Scatt and the Meyton target system... 5 ShotAnalyzer with Scatt and the Disag target system... 7 ShotAnalyzer with Scatt
Revision: 23 March 2008 (nk)
") CCAP Air Monitoring Protocol #01 Secondhand Smoke Drift Between Apartment Units Version 1.0 California Clean Air Project March 2008 CCAP AIR MONITORING PROTOCOL #01 SECONDHAND SMOKE DRIFT BETWEEN APARTMENTS
CCAP Air Monitoring Protocol #01 Secondhand Smoke Drift Between Apartment Units Version 1.0 California Clean Air Project March 2008 CCAP AIR MONITORING PROTOCOL #01 SECONDHAND SMOKE DRIFT BETWEEN APARTMENTS
MASSACHUSETTS STATE POLICE CRIME LABORATORY. Certificate of Calibration Procedure for the Alcotest 9510
 MASSACHUSETTS STATE POLICE CRIME LABORATORY Certificate of Calibration Procedure for the Alcotest 9510 Effective Date: May 10, 2017 Page 1 of 23 TABLE OF CONTENTS 1 INTRODUCTION... 3 2 ABBREVIATIONS...
SQL LiteSpeed 3.0 Installation Guide
 SQL LiteSpeed 3.0 Installation Guide Revised January 27, 2004 Written by: Jeremy Kadlec Edgewood Solutions www.edgewoodsolutions.com 888.788.2444 2 Introduction This guide outlines the SQL LiteSpeed 3.0
DIVE MEET SCORING INSTRUCTIONS. Day before meet
 DIVE MEET SCORING INSTRUCTIONS Day before meet Physical set up Set up registration/scoring table #1 on 1 meter side and scoring table #2 on 3 meter side of diving well, judges chairs, and award stand as
Nemo Wide. JoeDiverAmerica.com
 Nemo Wide Manuale d istruzioni User s Guide Bedienungsanleitung Manuel d utilisation Manual de instrucciones Manual de instruções Gebruikershandleiding Användarinstruktioner Οδηγίες χρήσης Käyttäjän Opas
Wickets Administrator
 Wickets Administrator Software For Managing Stored Value Wickets 01/08/2008 Product Details And Operating Instructions Overview This page describes each major function of Wickets Administrator in detail.
NiTek X Dive Computer User Guide
 NiTek X Dive Computer User Guide Date of Purchase Content DEVELOPED BY COPYRIGHT NOTICE WARRANTY INFORMATION Dive Rite 175 NW Washington Street Lake City, FL 32055 Phone: 386.752.1087 Fax: 386.755.0613
SWIM MEET MANAGER 5.0 NEW FEATURES
 SWIM MEET MANAGER 5.0 NEW FEATURES Updated January 24, 2014 1 ABOUT SWIMMING MEET MANAGER 5.0 MEET MANAGER 5.0 for ming (SWMM) is HY-TEK's 6th generation of Meet Management software. Provides the very
SUUNTO EON STEEL 1.6 USER GUIDE
 SUUNTO EON STEEL 1.6 USER GUIDE 2018-05-08 1. Safety...4 2. Getting started...7 2.1. Display states and views... 7 2.2. Icons...7 2.3. Set up... 8 3. Features... 9 3.1. Alarms, warnings and notifications...9
APBA Baseball for Windows 5.75 Update 17
 APBA Baseball for Windows 5.75 Update 17 Update #17 7/18/2015 This update is cumulative and supersedes all previous updates. You do not have to install previous updates. This file, guides, and help files
Setting Up the Ingenico isc250 Pinpad via USB
 One Blue Hill Plaza, 16 th Floor, PO Box 1546 Pearl River, NY 10965 1-800-PC-AMERICA, 1-800-722-6374 (Voice) 845-920-0800 (Fax) 845-920-0880 Setting Up the Ingenico isc250 Pinpad via USB The following
TR Electronic Pressure Regulator. User s Manual
 TR Electronic Pressure Regulator Page 2 of 13 Table of Contents Warnings, Cautions & Notices... 3 Factory Default Setting... 4 Quick Start Procedure... 5 Configuration Tab... 8 Setup Tab... 9 Internal
Online League Management lta.tournamentsoftware.com. User Manual. Further support is available online at
 Online League Management lta.tournamentsoftware.com User Manual Further support is available online at www.lta.org.uk/leagueplanner Contents Welcome... 3 Using this guide... 3 Further support?... 3 Publishing