PROCESS AUTOMATION. INSTALLATION AND OPERATION MANUAL MODEL 3003 TYPE Y, Z & Ex [np] RAPID EXCHANGE PURGE SYSTEM
|
|
|
- Bennett Washington
- 6 years ago
- Views:
Transcription


1 PROCESS AUTOMATION INSTALLATION AND OPERATION MANUAL MODEL 3003 TYPE Y, Z & Ex [np] RAPID EXCHANGE PURGE SYSTEM
2 Table of Contents Purpose and Description Page 2 Page 3 System Purpose and Description Purpose, System description, Important notes Identifying Your System Defines specific features of the system Page 3 General Information System & material specifications, Spare parts, Tools & test equipment, System accessories Page 4 and Device Design Design requirements, Adjacent enclosures, Device ventilation, Temperature limitations Page 5 Getting Started Establishing connection sizes, Determining enclosure inlet & outlet connection locations Page 6 VM & HM Mounting Flange & face-plate mounted installations Page 7 CK / RCF Mounting GCK procedure, CK configuration mounting procedure, RCF enclosure mounting procedure Page 8 Required Hardware Mounting Required enclosure protection vent, Warning nameplates Page 9 System Mounting Dimensions Face plate & component dimensional diagrams Page 11 Typical System Installation Details Typical internal & external installation diagrams Page 12 Pneumatic Tubing Requirements Protective gas supply requirements, Pneumatic connection requirements Page 13 Tubing Installation Surface, pipe, frame & panel mount installations Page 14 Tubing Connection Diagrams Surface, pipe, frame & panel mount installation connection points, pneumatic diagrams Page 15 Electrical Supply Requirements Wiring requirements, power & alarm signal, wiring methods & connections Page 16 Conduit Installation Electrical & WPS style conduit and connection parts Page 17 Set-Up Procedure Important notes, Class I purging set-up Page 18 Operating Sequence Class I purging operation Page 19 Troubleshooting Procedures Troubleshooting chart Page 20 Warranty and Liability Statement Warranty notes, General terms, Limitations Page 21 Customer Notes Page 22 System Maintenance Regular maintenance, Long-term maintenance, Maintenance schedule Page 23 Systems Identification & Application Information Purpose Pepperl+Fuchs' Bebco EPS System allows the use of generalpurpose or nonrated electrical or electronic devices, with exception to devices that produce excessive heat, utilize combustible gas, or expose arcing contacts to the hazardous atmosphere, in NEMA (National Electrical Manufacturers Association) 4 or 12 enclosures in the place of explosion proof NEMA 7 enclosures. Other purposes include heat, moisture and dust contamination prevention. Description Model 3003 is a Rapid Exchange purging system that operates on a supply of compressed instrument air or inert gas. It regulates and monitors pressure within one or more sealed (protected) enclosures, in order to rapidly remove and prevent flammable vapor accumulation within the enclosure(s). The system accomplishes four air exchanges and maintains a "safe" (0.25") pressure on one or more enclosures not exceeding a total volume of fifteen cubic feet. An EPV-3 enclosure protection vent is required for proper operation. This process reduces the hazardous (classified) area rating within the enclosure(s), in accordance with the NEC - NFPA 70, Article 500, NFPA 496 and ISA 2.4. Important Notes One (1) permanent file copy and one (1) operations copy of this manual must be studied and retained by the operator of this system. User s agents are responsible for transferring this manual to the user, prior to start-up. The contents of this manual have been arranged to allow the use of this product as a stand-alone device on equipment and enclosures supplied by the user or its agents. The manual s parameters encompass a combination of both National Fire Protection Association (NFPA) requirements and Pepperl+Fuchs, Inc. requirements. Pepperl+Fuchs therefore acknowledges the use of NFPA 496 as a guideline, that we have enhanced certain NFPA requirements and that additional information has been compiled to complete this document. The manual is intended as a complete guide and must be considered, unless specifically stated otherwise, that all directives contained herein are requirements for safe, practical and efficient use of this product. This system is not intended for use to protect enclosures or devices that contain ignitable concentrations of gases or vapors. This exclusion generally applies to process or product analyzing systems equipment. All specifications are subject to change without notice. 2
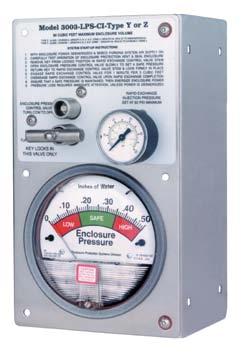
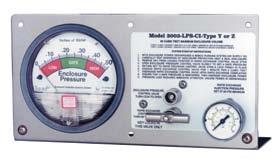
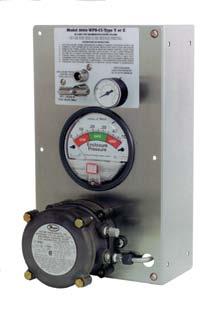
3 CLASSIFIED Model 3003 Installation and Operation Manual Identifying Your System This enclosure protection system is offered in various styles. For proper installation and operation, examine the system model number nameplate to identify the system style, area classification, and type, as noted below LPS - CI - YZ - VM - ## Series Model Number System Style LPS - less pressure switch WPS - with pressure switch WPSA - with pressure switch Area Classification CI - Class I Area System Type YZ - Div. 1 to Div. 2 Div. 2 / Zone 2 to Nonhazardous Mounting Configuration VML - vertical mount left left of enclosure VMR - vertical mount right right of enclosure HMT - horizontal mount top top of enclosure HMB - horizontal mount bottom bottom of enclosure CK - Component Kit - LPS style only ## - Additional factory installed accessories Does not have ATEX certification Model 3003-WPS Type Y or Z 90 CF / 2.5 CM Max. Encl. Volume REDUCES INTERNAL AREA CLASSIFICATION AS FOLLOWS: TYPE Z: CL. I, DIV. 2 GR. C & D / ZONE 2, GR. IIB TO NONHAZARDOUS MIN. SUPPLY PRESSURE 80 PSI TYPE Y: CL. I, DIV. 1 GR. C & D / ZONE 1, MAX. SUPPLY PRESSURE 120 PSI GR. IIB TO DIV. 2 / ZONE 2 PURGE CONTROL FOR USE IN HAZARDOUS LOCATIONS IN ACCORDANCE WITH THE NATIONAL FIRE PROTECTION ASSOCIATION STANDARD FOR PURGED AND PRESSURIZED ENCLOSURES FOR ELECTRICAL EQUIPMENT NFPA S11. THIS PRODUCT MUST BE INSTALLED AND OPERATED IN COMPLETE ACCORDANCE WITH CONTROL DOCUMENT 3003-IOM. APPROVED BY FM APPROVALS AS ASSOCIATED TYPE Y OR Z PRESSURIZATION CONTROL EQUIPMENT FOR USE IN HAZARDOUS LOCATIONS. REDUCES THE INTERNAL AREA OF A CONNECTED ENCLOSURE IN ACCORDANCE WITH DRAWING NUMBER 3003-IOM. Exchange flow rating is based on safety factors considered after extensive factory testing and does not reflect actual flow. Flow was measured upstream of system with an electronic flowmeter on a five cubic feet enclosure. The system was installed with tubing that exceeded the maximum allowable linear length and quantity of bends listed in this manual for system supply, enclosure supply and enclosure reference connections. The system was tested in conjunction with an EPV-3-SA-00 enclosure protection vent, mounted directly on the test enclosure. ABS traceable certified exchange flow measurements with system regulator set at 60 psi, ambient temperature of 75 F 80 psi supply pressure: scfm/ scfh Material Specifications Regulator body: Regulator handle & bowl: pressure gauge: Rapid Exchange gauge: Tube fittings: Tubing: Fastener hardware: System face plate: System mounting flange: Manifold body: Manifold valves: EXP pressure switch body: Manufacturer ID nameplate: VM & HM configuration- CK configuration- System Start up instructions : VM & HM configuration- CK configuration- warning nameplate: Zinc w/ enamel finish Polycarbonate Aluminum w/ enamel finish Poly & nickel-plated 316 SS forged body 316 SS 1/4".035 welded Aluminum & SS ga #3 brush SS 316 SS tumble finish Anodized aluminum 316 SS Anodized cast alum. Reversed silkscreen Lexan Anodized aluminum Silkscreened to face plate Anodized auminum nameplate Silkscreened SS General Information System Specifications System dimensions: See pages 9 & 10 Shipping weight LPS/WPS & WPSA: 10 lb /15 lb Operating temperature range: -20 F F Supply pressure range: psi max. When using the optional inline filter, max. supply pressure is 80 psi Capacity & filtration (VM only): Microns Supply requirements: Clean air or inert gas Safe pressure setpoint: 0.25" Safe pressure flowrate: * SCFH ( l/hr) Maximum exchange pressure: * 3" - 5" ( mm) Minimum exchange flowrate: ** 12 SCFM/720 SCFH (340 l/m / l/hr) Exchange time: 1 minute/3 ft 3 (85 l/min) System supply port: 1/4" FPT supply port: 1/2" FPT reference fitting: 1/4" tube Switch setting (WPS & WPSA only): 0.15" ± 0.02" Switch conduit port size: 1/2" FPT Switch contact ratings: WPS style: Amps WPSA style: *** 120/220 VAC, 24 Amps, ma * integrity determines actual flow rate ** With regulator set at 60 psi min. during exchange *** Supply voltages 24 VDC and 240 VAC available upon request Recommended Spare Parts Qty Description Part # (supercedes) 1 pressure indicator-ci (001000) 1 WPS style EXP pressure switch (001085) 1 WPSA style EXP pressure switch (001080) 1 System filtered regulator (VM only) (002040) 1 System regulator (HM & CK ) (002037) 1 Rapid exchange pressure gauge (002300) 1 T-bar valve key (002740) 1 Installation & operation manual warning nameplate-ci (EWN-1) Please call and reference the above part number for current spare parts pricing. Immediate pricing is available to all confirmed customers. Installation Tools & Testing Equipment 1/2" chuck drill Complete set of drill bits 1 1/4" conduit knockout punch or " hole saw Complete set of tubing, conduit bending, instrument fitting and electrical craftsman hand tools 0-10" differential pressure indicator or monometer (connected to the protected enclosure to measure maximum pressure) 3
4 Model 3003 System Accessories Protection Vents (one required with each system) EPV-3-SA-00 Straight w/ spark arrestor EPV-3-SA-90 Rt angle w/ spark arrestor Additional Items SMK-1 System mounting kit - flange SMK-6m System mounting kit - frame / panel PMK-1 Pipe mounting kit ILF-4 1/4" in-line filter RCF-4 1/4" remote mount cube filter GCK Gauge conversion kit GPSK-1 General-purpose switch kit EPSK-1 Class I, Gr. C & D exp. proof switch kit EPSK-1A Class I, Gr. A - D exp. proof switch kit RAH Div. 1 remote alarm horn RAB-1 Div. 1 remote alarm beacon RAB-2 Div. 2 remote alarm beacon LCK L fitting conduit kit TCK T fitting conduit kit EFC-4 1/4" flush connector EFC-6 3/8" flush connector EBC-4 1/4" bulkhead connector EBC-6 3/8" bulkhead connector EPC /4" pipe connector NC-6-4 3/8" T x 1/4" P ninety connector SC-6-4 3/8" T x 1/4" P straight connector NC-6-8 3/8" T x 1/2" P ninety connector SC-6-8 3/8" T x 1/2" P straight connector ETW temperature warning & Device Design Design Requirements 1. All windows must be shatterproof and sized as small as possible. 2. All NFPA 496 required markings must be placed on or near all enclosure doors and covers. 3. The enclosure must withstand an internal pressure of ten (10) inches of water without sustaining permanent deformation and resist all corrosive elements in the surrounding atmosphere. 4. All lightweight objects in the enclosure, such as paper or insulation, must be firmly secured. 5. The enclosure should be constructed from materials such as metal or anti-static polycarbonate to meet or exceed NEMA 4 or 12 performance requirements, but does not require third party approval. 6. The installation of obstructions or other barriers that block or impede the flow of protective gas must be avoided. 7. The creation of air pockets or other areas that trap flammable gases within the enclosure or devices must be avoided. 8. The enclosure should be located in an area where impact hazards are minimal. 9. If the enclosure is nonmetallic and contains equipment that utilizes or switches power loads greater than 2500 VA, it must be constructed from substantially noncombustible materials, such as materials designed to meet or exceed ANSI/UL94 ratings of 94 V-0 or 94 5V. Adjacent s 1. Adjacent enclosures must be protected by one of the following means: a) purged or pressurized in series with the protected enclosure b) purged or pressurized separately or c) protected by other means; e.g., explosion proof enclosures, hermetically sealed devices or intrinsic safe circuits 2. Adjacent purged or pressurized enclosures must be designed to meet all construction requirements above. Total Volume Calculation 1. The total volume of all pressurized enclosures, devices and wireways must be considered. 2. All enclosure, device, and wireway volumes must be calculated without consideration of internally consumed space. Device Ventilation 1. Enclosed devices within the protected enclosure which do not exceed 1.22 in 3 of free volume do not require ventilation to the protected enclosure. 2. If the free volume of an internal device exceeds 1.22 in 3 it must be protected by one of the following means: a) ventilated on the top and bottom sides with 1 in 2 of opening for each 400 in 3 of volume within the internal protected enclosure, at a minimum diameter of 1/4" b) purged in series with the protected enclosure or be purged separately or c) protected by other means; e.g., explosion proof enclosures, hermetically sealed devices, or intrinsic safe circuits. Temperature Limitations 1. The enclosure must have no surface area that exceeds 80 percent of the flammable or ignitable substance s autoignition temperature. 2. Internal devices that exceed this temperature must be protected by one of the following manners: a) The device is enclosed in a chamber that is ATEX, CUL US or FM listed as a hermetically sealed device that prohibits the entrance of a flammable or ignitable substance, and maintains a surface temperature below temperature limits. b) It can be proven by testing that the devices will not ignite the substance involved. c) The device is purged in a separate enclosure that bears an ETW (enclosure temperature warning nameplate). Devices may be accessed only after power has been removed and the device has been allowed to cool to safe temperature, or the area is positively known to be nonhazardous. 4
5 Getting Started Typical Single Protected Connections 1/2" PROTECTIVE GAS SUPPLY HEADER C REFERENCE ENCLOSURE PROTECTION VENT (Required) ENCLOSURE PROTECTION SYSTEM SUPPLY PROTECTED ENCLOSURE A B E Description *Tubing or pipe diameter Tubing & pipe must be fully reamed Maximum tubing / pipe length and maximum number of bends / elbows A B C D E System supply tubing 3/8" O.D. tubing or 1/4" I.D. pipe 20 feet 10 bends supply 3/8" O.D. tubing or 1/2" I.D. pipe 5 feet 5 bends reference 1/4" O.D. tubing fully reamed 20 feet 10 bends Multi - enclosure connections 1 1/4" I.D. pipe fully reamed 10 feet 5 elbows Optional remote venting 1 1/4" I.D. pipe fully reamed 30 feet 5 elbows TYPICAL MULTIPLE PROTECTED ENCLOSURE CONNECTIONS 1/2" PROTECTIVE GAS SUPPLY HEADER ENCLOSURE PROTECTION SYSTEM B SUPPLY PROTECTED ENCLOSURE REFERENCE D PROTECTED ENCLOSURE D PROTECTED ENCLOSURE A C *NOTE: Tube and pipe sizes are trade sizes and are not equal in inside diameters. do not substitute tube for pipe with same trade size. HELPFUL HINTS To ensure adequate protective gas flow to the protected enclosure(s), all piping and tubing must be fully reamed. Precautions must be taken to prevent crimping and other damage to protective gas piping and tubing. When protecting multiple enclosures with a single enclosure protection system, the enclosures must be connected in series from the smallest to the largest to ensure adequate protective gas flow. Determining Inlet & Outlet Connection Locations INLET Connections for heavier than air gases and vapors OUTLET INLET Connections for lighter than air gases and vapors OUTLET HELPFUL HINTS If flammable gases are lighter than air, the inlet connection to each enclosure must enter near a bottom corner. The outlet connection, for the required enclosure protection vent or piping to an adjacent protected enclosure, must exit near an extreme opposite top corner. If flammable gases are heavier than air, inlet and outlet connections must be reversed. In all cases, the most prevalent gas must determine the location of inlet and outlet connections. 5
 and conduit, pipe, tubing or cable entries.")

.")
6 VM & HM Mounting IMPORTANT NOTES The system should be mounted at EYE LEVEL. Care must be taken to ensure the system and all protruding components are clear of all enclosure accesses (doors and covers) and conduit, pipe, tubing or cable entries. Flange mounted systems are intended for mounting adjacent to the protected enclosure and are also suitable for 2" schedule 40 pipe mounting. Dimensional mounting configuration diagrams are located on pages 9 & 10. Remove and save the clear plastic envelope containing the enclosure warning nameplate. Although all purge systems are factory tested and calibrated, we strongly suggest a bench test of basic functions prior to installation. Flange Mounted Systems First, determine the system mounting flange to system face plate orientation for your installation (top or bottom for HM configurations, left or right for VM configurations). Surface mounting systems 1. Transfer hole pattern of system mounting flange to intended enclosure or adjacent mounting surface. 2. Secure system mounting flange to system face plate using the mounting hardware provided. 3. Check for obstructions hindering bolt fastening, drill and ream the mounting holes before mounting the system. 4. Secure the system to the enclosure, or other mounting surface, using one (1) SMK-1 mounting kit or equivalent - four (4) 1/4" x 3/4" stainless steel bolts, nuts and lock washers. Pipe mounting systems 1. Secure system mounting flange to system face plate using the mounting hardware provided. 2. Locate 2" schedule 40 pipe within five (5) feet of protected enclosure. 3. Ensure system is mounted in a true vertical position, secure the system to pipe, using one (1) PMK-1 mounting kit or equivalent - two (2) 1/4" x 2" pipe stainless steel U bolts, nuts and lock washers. Face Plate Mounted Systems HELPFUL HINTS Frame mount (FM) and panel mount (PM) installations are designed to mount through a cutout one half (1/2) inch smaller than the overall height and width of the system face plate, using clips and fasteners provided with a SMK- 6m mounting kit. This design eliminates the need to drill the system mounting bolt holes in the mounting surface. FM installations are intended for operation adjacent to the protected enclosure. PM installations are intended for mounting through a cutout directly in the protected enclosure surface. PM installations require a GCK gauge conversion kit for proper operation (see page 7 for conversion instructions). 1. Transfer panel cutout pattern to the intended surface. 2. Check for obstructions which could prohibit bolt fastening or system pneumatic connections. 3. Cut panel cutout pattern on the intended surface. 4. Deburr all cutout surfaces. 5. Secure system to surface using SMK-6m mounting kit, or equivalent - six (6) 5mm x 12mm stainless steel nuts, bolts, mounting clips and lock washers. 6. Go to page 7 for RCF-4 installation (if provided). Typical Surface, Pipe, Panel & Frame Mounted Systems Model 3003-LPS-CI-Z-VM Flange Mounted to Flat Vertical Surface with Model SMK-1 Fastener Kit Model 3003-LPS-CI-Z-VM Flange Mounted to Vertical 2" Pipe Stand with Model PMK-1 Fastener Kit Model 3003-LPS-CI-Z-VM Frame or Panel Mounted through Cutout in Suitable Surface with Model SMK-6m Fastener Kit 6


7 CK & RCF Mounting HELPFUL HINTS The Model 3003 purging system is supplied in several configurations to meet your installation needs. When ordered as a VM or HM configuration, the system face plate can be mounted directly through the surface of a pressurized enclosure. See page 6 "Face Plate Mounted Systems." When ordered as a CK configuration, the system components mount directly through panel cutouts (provided by others) adjacent or external to the pressurized enclosure. In addition, the CK configuration can also be mounted directly through the surface of a pressurized enclosure when modified with Pepperl+Fuchs GCK gauge conversion kit. See "Panel Mount Conversion Procedure" below. Care must be taken to ensure the system and all protruding components are clear of all enclosure accesses (doors and covers) and conduit, pipe, tubing or cable entries. Dimensional component diagrams are located on pages 9 & 10. Remove and save the clear plastic envelope containing the enclosure warning nameplate. Although all purge systems are factory tested and calibrated, we strongly suggest a bench test of basic functions prior to installation. Panel Mount Conversion Procedure Perform the following procedure to convert Pressure Gauge for Panel Mount (PM) installations. 1. Secure one model GCK gauge conversion kit. Kit includes one (1) PRB-4 & SC-2 fitting and one (1) enclosure pressure gauge gasket. 2. Remove enclosure pressure gauge and install gauge gasket between gauge and mounting surface. Reinstall gauge. 3. Remove venturi orifice and run tee from high port located on rear of enclosure pressure gauge, discard. 4. Remove sintered vent from low port located on rear of enclosure pressure gauge. 5. Reinstall sintered vent into high port located on rear of the enclosure pressure gauge. 6. Remove stainless steel orifice plug from low port located on side of enclosure pressure gauge. 7. Reinstall stainless steel orifice plug into low port located on rear of enclosure pressure gauge. 8. Install model SC-2 fitting into low port located on side of enclosure pressure gauge. 9. Install model PRB-4 vent through enclosure surface (vent end out) and connect tubing (furnished by others) between SC-2 & PRB-4 fittings. Typical Panel Mount Conversion Venturi orifice Run tee Standard configuration (prior to conversion) High port Low port Sintered vent PRB-4 CK Configuration Mounting Procedure Sintered vent SC-2 Panel Mount configuration (after conversion) 1. Transfer hole pattern of system panel cutout to intended surface. See page 10 for dimensions. 2. Check for obstructions hindering component installation or operation. Drill and ream the manifold holes. 3. Remove adhesive backing from system instruction nameplate and place on intended surface, taking care to align all holes of nameplate with corresponding manifold mounting holes on intended surface. 4. Insure manifold mounting gasket and manifold valve stem O-rings are installed onto manifold. Install manifold through cutouts in intended surface. 5. Secure manifold to intended surface utilizing hardware supplied with system. Do not overtighten. 6. Install Rapid Exchange injection pressure indicator into appropriate threaded hole in manifold. Tighten and align. 7. Install enclosure pressure gauge, with gasket in place, secure gauge with mounting hardware provided. RCF Mounting Procedure The following instructions detail mounting an optional RCF-4 (remote cube filter) directly to the protected enclosure of a PM system installation. Alternately, the RCF-4 can be installed "inline" on the protective gas supply. 1. Determine the mounting location of the remote cube filter (RCF-4). 2. Transfer hole pattern (located on page 10) of RCF-4 to intended enclosure surface. 3. Check for obstructions hindering bolt fastening or tubing connections, drill and ream the mounting holes before mounting the RCF Ensure the O-ring gasket supplied with the filter is placed around the outlet port of the mounting cube mounted directly to the protected enclosure surface. This O-ring will seal filter to the enclosure to prevent air leakage. 5. Secure filter to intended mounting surface with mounting hardware provided, confirm O-ring seal is properly positioned. Tighten mounting hardware. 6. Follow tubing instructions located on pages 13 & 14. 7

. 3. Using a 1.6875\" hole saw or 1.")

 EWN is provided with each system, located in the manila envelope taped to the mounting flange of the system. Additional EWNs are available from Pepperl+Fuchs.")

8 Required Hardware Mounting Required Protection Vent All configurations must be mounted in a true vertical position. The vent must be located to provide access for routine testing of the vent s flapper assembly. A minimum 8" clearance is required below the vent opening. 1. Determine the vent s mounting configuration, i.e., -00 vertical mount or -90 side mount. See photos below. 2. Determine vent location and layout vent mounting hole on the protected enclosure (as determined on page 5, Getting Started ). 3. Using a " hole saw or 1.1/4" conduit punch, drill and deburr the enclosure protection vent mounting hole. 4. Remove the hub mounting nut from the vent hub and place the hub, with O-ring intact, through the mounting hole. The O-ring must be on the outside of the protected enclosure. 5. Reinstall the hub mounting nut to the mounting hub from inside the protected enclosure and tighten. Required Warning Nameplate(s) An EWN ( Warning Nameplate) must be located in a prominent position on or near all enclosure accesses (doors and covers). One (1) EWN is provided with each system, located in the manila envelope taped to the mounting flange of the system. Additional EWNs are available from Pepperl+Fuchs. All EWNs provide labeled spaces allowing the customer to mark the protected enclosure with: 1) a T Code (temperature identification number), 2) Class, Group and Division of surrounding area, and 3) NFPA pressurization Type X, Y or Z, as may be required by plant and local codes and is required by NFPA 496. The ETW ( Temperature Warning nameplate) must be located in a prominent position on or near all enclosure accesses (doors and covers) when the temperature of an internal component exceeds 80 percent of the ignition temperature of the flammable vapor, gas or dust involved. An ETW warns the operator to deenergize all equipment for a specified length of time, allowing the protected equipment to cool before opening the protected enclosure. The length of time required is determined by the customer and can be factory or field engraved. All EWNs and ETWs are furnished with an adhesive back, but should also be riveted or screwed to the protected enclosure. EPV SA - 00 Vertical Mount Warning Nameplate - Class I Warning Nameplate - Class II EPV SA - 90 Side Mount Temperature Warning Nameplate 8
9 System Mounting Dimensions Model 3003-LPS VM Configuration System & Flange Dimensions Panel Cutout 9 (228.6) Panel Cutout 5 (127) Model 3003-LPS-CI Type Y OR Z 9.5 (241.3) IMPORTANT NOTE Panel cutout dimensions are to be used only when installing a HM or VM configuration in a frame or panel mount installation. See page 6 for more information. 4.0 (101.6) 1.5 (38.1) 4.0 (101.6) 3.38 (85.7) 0.63 (15.9) 1.0 (25.4) 8.5 (215.9) 9.5 (241.3) 0.25 ( 6.4) O.D. TYP 4 SERIAL# 5.5 (139.7) VM Configuration front view VM Configuration side view Model 3003-LPS HM Configuration System & Flange Dimensions Vertical Mount Flange front view 5.5 (139.7) Panel Cutout (260.4) Panel Cutout 5 (127) 4.0 (101.6) 1.5 (38.1) (273.1) 9.75 (247.7) 1.0 (25.4) 0.63 (15.9) 3.38 (85.7) 4.0 (101.6) (273.05) HM Configuration front view HM Configuration side view 0.25 ( 6.4) O.D TYP 4 Horizontal Mount Flange front view Model 3003-LPS CK Configuration System & Optional Remote Cube Filter Dimensions (101.6) (38.1) 4.75 (120.7) 3.13 (79.4) 0.5 (12.7) 1.63 (41.3) square 3.75 (95.3) 5.25 (133.4) 4.38 (111.1) CL 4.88 (123.8) Side view Front view Pneumatic Manifold Panel Cutout Front view Side view Pressure Gauge Side view Model RCF-4.79 (20) 0.39 (10) 1.34 (34) 3.25 (82.6) 4.5 (114.3) Ø 0.35 (9) 1.26 (32) 2.33 (59) 0.82 (20.8) 4.5 (114.3) Ø 0.59 (15) 6.38 (161.9) ( 5.5) Ø TYP (11.1) Ø 0.66 (16.7) Ø TYP. 2 Model 3003 CK System Panel cutout pattern 1.40 (35.4) CL HELPFUL HINTS Note: Two optional enclosure pressure gauge positions are shown on the model 3003 CK system panel cutout pattern to the left. The optional positions center gauge to the right or bottom side of system nameplate. Only cut ONE 4.5" Ø hole in panel. CL 0.63 (15.9) 0.63 (15.9) CL 0.17 (4.4) Ø TYP (12.7) Ø Model RCF-4 Panel cutout pattern 9
10 System Mounting Dimensions (continued) Model 3003-WPS & WPSA VM Configuration System & Flange Dimensions Panel Cutout 7.5 (190.5) Model 3003-WPS-CI Type Y OR Z 4.0 (101.6) 3.5 (88.9) 4.0 (101.6) 3.38 (85.7) 0.63 (15.9) 1.0 (25.4) Panel Cutout 13.5 (242.9) 14 (356) 13 (330) 14 (356) 0.25 ( 6.4) O.D. TYP 4 8 (203.2) VM Configuration front view VM Configuration side view Vertical Mount Flange front view IMPORTANT NOTE Panel cutout dimensions are to be used only when installing a HM or VM configuration in a frame mount installation. See page 6 for more information. Model 3003-WPS & WPSA HM Configuration System & Flange Dimensions Panel Cutout 14.5 (368.3) 4.0 (101.6) 3.5 (88.9) Z 8 (203.2) Panel Cutout 7.5 (190.5) 15 (381) HM Configuration front view (387.4) HM Configuration side view 0.25 ( 6.4) O.D TYP (222.3) 1.0 (25.4) 0.63 (15.9) Horizontal Mount Flange front view 3.38 (85.7) 4.0 (101.6) 10
11 Typical System Installation Details External To The Protected reference tubing, customer supplied System supply inlet fitting SC-6-4 or NC-6-4 supply inlet fitting SC-6-8 or NC-6-8 System supply tubing, customer supplied reference fitting EFC-4 Flange mount HM configuration with model SMK-1 fastener kit protection system System mounting kit SMK-1 Pressurized (protected) enclosure supply fitting EFC-6 Required enclosure protection vent EPV-3-SA-90 Internal To The Protected Panel mount CK configuration with model RCF-4 remote cube filter & model GCK gauge conversion kit Atmospheric reference tubing, customer supplied Atmospheric reference bulkhead fitting PRB-4 System supply inlet fitting SC-6-4 or NC-6-4 System supply tubing, customer supplied System supply inlet fitting SC-6-4 or NC-6-4 Optional accessory remote cube filter model RCF-4 shown mounted to the protected enclosure Required enclosure protection vent EPV-3-SA-00 Pressurized (protected) enclosure pressure indicator w/ GCK installed Start up instruction nameplate System pneumatic manifold Optional supply outlet fitting SC-6-8 or NC-6-8 supply tubing, customer supplied 11

, no farther than twenty (20) feet from the protection system.")


 additional SC-4-6 or NC-6-4 connectors.")
12 Pneumatic Tubing Requirements Protective Gas Supply Requirements The protective gas supply to the protection system must be a clean, instrument quality compressed air or nitrogen and must contain no more than trace amounts of flammable gas, vapor or dust. The protective gas supply compressor intake must originate in a nonhazardous location. Suction duct passing through a hazardous location and the protection system tubing and piping must be fabricated from noncombustible materials suitable for prevailing hazards and environmental conditions. The protective gas supply must originate from a dedicated instrument quality compressed air header (1/2" pipe or larger), no farther than twenty (20) feet from the protection system. Local compressors and gas cylinders should not be used before consulting with Pepperl+Fuchs. The protective gas supply to the protection system must be regulated from 120 psi maximum to 80 psi minimum. SC-6-4 & SC-6-8 NC-6-4 & NC-6-8 SYSTEM SUPPLY INLET & ENCLOSURE SUPPLY OUTLET FITTINGS EFC-4 & EFC-6 EBC-4 & EBC-6 ENCLOSURE SUPPLY, ENCLOSURE REFERENCE & SYSTEM SUPPLY BULKHEAD FITTINGS Pneumatic Connection Requirements ALL FITTINGS MAY BE CUSTOMER OR FACTORY FURNISHED 1. For system supply, one (1) SC-6-4 3/8" tube x 1/4" NPT male straight connector or one (1) NC-6-4 3/8" tube x 1/4" NPT male elbow connector or equivalent fitting per system. Note: Systems supplied with optional RCF-4 or ILF-4 filter accessories require two (2) additional SC-4-6 or NC-6-4 connectors. One (1) similar fitting which will connect the protective gas supply tubing to the protective gas supply header connection point and one (1) lot of 3/8" O.D.,.035" wall thickness, welded or seamless stainless steel tubing. NOTE: 1/4" 150# rated pipe, couplings & unions, fully reamed, can be utilized in place of the fittings and tubing listed above. 2. For enclosure supply from the purge system, one (1) SC /8" tube x 1/2" NPT male straight connector or one (1) NC-6-8 3/8" tube x 1/2" NPT male elbow connector or equivalent fitting per system. 3. For enclosure supply into the protected enclosure, one (1) EFC-6 3/8" flush connector, or one (1) EBC-6 3/8" feedthrough connector or equivalent fitting per system. 4. For enclosure reference, one (1) EFC-4 1/4" flush connector, or one (1) EBC-4 1/4" feed-through connectoror equivalent fitting per system. 5. One (1) lot of 1/4" & 3/8" O.D.,.035" wall thickness, welded or seamless stainless steel tubing. 6. For multiple enclosure connections, two (2) EPC /4" pipe mounting hubs or equivalent and 1-1/4" 150# rated pipe couplings & unions per interconnection. One (1) lot 150# rating 1-1/4" galvanized or aluminum pipe and fittings, fully reamed and unrestricted. PM Pneumatic Connection Requirements In addition to item numbers 1, 5, and 6 above, the following fittings are required for all PM systems. 1. For system supply on PM installations, one (1) additional EBC-6 or equivalent 3/8" through bulkhead fitting per system is required. 2. For atmospheric reference, one (1) PRB-4 or equivalent 1/4" female bulkhead fitting and stainless steel sintered element is required. EPC-13 MULTIPLE ENCLOSURE CONNECTION FITTING PRB-4 SYSTEM ATMOSPHERIC REFERENCE FITTING 12
13 Tubing Installation HELPFUL HINTS All work must be performed by technicians qualified in pneumatic tubing and electrical conduit installation. Pepperl+Fuchs recommends the use of.035" wall thickness, welded or seamless stainless steel tubing. If flexible tubing is used, it must be installed in a manner that protects it from damage and corrosion. Surface, Pipe or Frame Mounted Installations System supply connections 1. Select or install a protective gas supply header tap, fitted with the proper tube size fitting and located within twenty (20) feet (6.1 m) of the enclosure protection system. 2. If a service valve is placed between the protective gas supply header and the enclosure protection system, it must be installed in close proximity of the protected enclosure. 3. Select the appropriate fittings required to connect the protective gas supply to the System Supply Inlet as determined on page 12, Pneumatic Connection Requirements. Install fittings. 4. Determine appropriate tubing route from the protective gas supply header to the System Supply Inlet. 5. Bend tubing using industrial grade benders, check tubing fit to ensure proper seating between the tubing and fittings. Fully ream all tubing ends. 6. Install tubing and tighten all fittings to fitting manufacturer s specifications. Secure tubing to appropriate structural supports as required. supply & reference connections 1. Choose location for the enclosure supply connection(s) based on the requirements on page 5, Getting Started. 2. Place the enclosure reference connection fitting directly behind the enclosure protection system and at least one foot away from the enclosure supply and enclosure protection vent connections, whenever possible. For systems protecting multiple enclosures in series, the enclosure reference connection fitting must be placed on the last enclosure in the series. See page 5, Getting Started. 3. Drill and deburr enclosure supply and reference fitting holes on the protected enclosure. Mount the fittings. 4. Determine appropriate route for the enclosure supply and reference tubing. 5. Bend tubing using industrial grade benders, check tubing fit to ensure proper seating between the tubing and fittings. Fully ream all tubing ends. 6. Install tubing and tighten all fittings to fitting manufacturer s specifications. Secure tubing to appropriate structural supports as required. Panel Mounted Installations IMPORTANT NOTE: The purge system's enclosure pressure gauge must be modified for panel mount installation prior to performing the following instructions. Refer to page 7 "Panel Mount Conversion Process" for additional information. Bulkhead Fittings 1. Select the fittings required to install the system supply, system supply bulkhead fitting and atmospheric reference bulkhead fitting. See page 12, Pneumatic Tubing Requirements. 2. Choose location for the system supply bulkhead fitting. This fitting allows the protective gas supply to pass through the wall of a protected enclosure to the protection system s regulator supply inlet connection. 3. Choose location for the atmospheric reference bulkhead fitting. This fitting allows the enclosure pressure gauge to reference atmospheric pressure. 4. Drill and deburr system supply and reference bulkhead fitting holes in the protected enclosure. Mount the fitting and the bulkhead connection. System supply & reference connections 1. Select or install a protective gas supply header tap, fitted with the proper tube size fitting and located within twenty (20) feet of the enclosure protection system. 2. If a service valve is placed between the protective gas supply header and the protection system, it must be in close proximity of the protected enclosure and labeled in accordance with NFPA Determine appropriate tubing route from the protective gas supply header to the system supply bulkhead fitting. 4. Determine appropriate tubing route from the system supply bulkhead fitting to the system supply inlet. 5. Determine appropriate tubing route from the atmospheric reference bulkhead fitting to the enclosure pressure gauge s reference inlet connection. 6. Bend tubing using industrial grade benders, check tubing fit to ensure proper seating between the tubing and fittings. Fully ream all tubing ends. 7. Install tubing and tigghten all fittings to fitting manufacturer's specifications. Secure tubing as required 13


14 Tubing Connection Diagrams Surface, Pipe & Frame Mounted Connection Points & Pneumatic Diagram Regulator System supply inlet Mounting plate Regulator filter Rapid Exchange manifold body supply outlet Venturi orifice HELPFUL HINT This information is intended for systems mounted external or adjacent to the protected enclosure. HM & CK configuration connection points and pneumatic diagrams are identical to the VM configuration shown to the left. pressure gauge Model 3003-LPS-CI-Z-VM Shown Optional EXP pressure switch reference inlet pressure gauge Required enclosure protection vent System supply Venturi orifice Regulator Sintered vent Rapid Exchange pressure gauge Sintered vent Rapid Exchange control valve Reference reference bulkhead fitting Inlet pressure control valve Supply supply bulkhead fitting Protected enclosure Panel Mount Connection Points & Pneumatic Diagram Regulator System supply inlet Mounting plate Regulator filter pressure gauge Model 3003-LPS-CI-Z-VM Shown w/ GCK installed HELPFUL HINT Pneumatic connections are bolded. System supply Rapid Exchange manifold body supply outlet reference Atmospheric reference Inlet Inlet Atmospheric reference bulkhead System supply bulkhead HELPFUL HINT This information is intended for systems mounted internal to or through the surface of the protected enclosure. HM & CK configuration connection points and pneumatic diagrams are identical to the VM configuration shown to the left. pressure gauge Regulator Required enclosure protection vent Sintered vent Rapid Exchange pressure gauge Protected enclosure Rapid Exchange control valve pressure control valve 14
15 Electrical Supply Requirements General Wiring Requirements WARNING! This device contains electrical parts which can cause shock or injury. All electrical connections, conduit and fittings on the protected enclosure must be suitable for the hazardous location in which they are installed. In addition, all conduit and wire must be installed in accordance with NEC as required and all relevant plant and local codes. Note: Do not use seals on conduit used as a protected wireway to supply protective gas to adjacent protected enclosures. The same conduit can be utilized for both electrical and pneumatic service to an adjacent protected enclosure(s), provided the conduit is oversized to allow a minimum free clearance equal to or larger than the pipe size required between multiple enclosures as stated on page 5, Getting Started. Power Requirements The protected enclosure(s) electrical power source must originate from a circuit breaker or fused disconnect suitable for the hazardous location in which it is installed. The switch must be located within fifty (50) feet of the protected enclosure(s) and the protection system and be properly marked. Typical Wiring Methods Protected enclosures must be wired similar to explosion proof enclosures, in accordance with Article 500 of the National Electric Code - NFPA 70. Single conductor wiring must be placed in rigid metal conduit, seal-flex conduit, or other mediums approved for use in the hazardous location surrounding the protected enclosure. Additionally, NFPA 496 requires approved conduit seals on all pressurized enclosure conduit wiring entries, in accordance with NFPA 70. Furthermore, the use of an approved conduit seal is simply the most practical way to prevent excessive leakage through conduit connections. However, while explosion-proof enclosures require conduit seals on all cable entries, in accordance with NFPA 70, other methods of sealed cable entries that are suitable for hazardous locations can be used, such as compression glands. In conclusion, there are two primary goals. First, the installer should ensure that all associated wiring and cable is protected by pressurization or other means, such as explosion-proof conduit or intrinsic safety barriers. Secondly, the installer must ensure that all associated conduit and wireways are sealed to conserve protective gas, unless they are used to supply protective gas to other enclosures or devices. Alarm Signal Requirements The WPSA style pressure switch requires a 120 VAC power supply in addition to the alarm signal. The WPS and WPSA style systems alarm signal may originate from the protected enclosure if the alarm signal is disconnected by the protected enclosure s circuit breaker or fused disconnect as stated in enclosure power requirements above. The protected enclosure(s) alarm signal power may also originate from outside of the protected enclosure. In this application, the protected enclosure may be used as a wireway to pass alarm signal wiring from the power source to the alarm device, if the wiring is isolated and properly labeled. In addition, appropriate conduit seals must be provided outside of the protected enclosure separately. IMPORTANT NOTE: NFPA 496 requires the use of an alarm or an indicator to detect the loss of safe enclosure pressure. In addition, the NFPA 496 requires that if an indicator alone is utilized, a protective gas supply alarm must also be installed between the last valve in the protective gas supply and the protected enclosure. Therefore, the protective gas supply to all LPS Style systems must be equipped with the above mentioned protective gas supply alarm. Exception: systems utilizing either an EPSK or GPSK enclosure pressure loss alarm switch accessory will satisfy the above mentioned NFPA requirement. Typical Wiring Connections Protected enclosure or device Conduit Seal Conduit Seal Cable Conduit Seal Gland fitting Pressurized raceway Explosion proof device Intrinsically safe or fiber optic device Intrinsically safe or fiber optic device Independently pressurized device Adjacent pressurized device 15


16 Conduit Installation Electrical Conduit 1. Choose the location for the enclosure s electrical conduit connection(s) based on the requirements on page 15, Electrical Supply Requirements. 2. Drill and deburr enclosure conduit fitting holes in the protected enclosure. Mount the fittings. 3. Determine appropriate route for the enclosure electrical and power alarm signal conduit. 4. Measure, cut and thread conduit, check conduit fit to insure proper seating. Fully ream all conduit. 5. Install conduit and tighten all fittings to fitting manufacturers specifications. Secure conduit to appropriate structural supports as required. 6. Seal all conduit with an approved compound prior to operation of the protection system. HELPFUL HINT It may be impractical to pour all electrical conduit seals prior to installation in the field. However, all conduit connections must be sealed for proper testing and operation of the protection system. Therefore, the use of temporary seals such as duct seal or masking tape for bench or shop testing, prior to final field installation may be used. WPS Style Conduit WPS & WPSA style systems provide electrical contacts for audible or visual alarm devices that signal a loss of protected enclosure pressure. They are calibrated to alarm at 0.15" (3.8 mm) for Class I applications. The switches are suitable for hazardous (classified) outdoor locations. Wiring must be installed with a seal and conduit fittings suitable for the area. Alarm circuit power may be derived from the protected enclosure power source or an intrinsically safe alarm signal source. All associated alarm devices must be protected by suitable means (explosion proof, purged or intrinsically safe). WPS Style Conduit Connection Parts Fitting Kits Can Be Factory Furnished 1. For EXP pressure loss alarm switch connected to an enclosure mounted alarm, one (1) LCK (L fitting conduit kit) or equivalent conduit elbow, coupling and seal fittings. 2. For EXP pressure loss alarm switch connected to a remote mounted alarm, one (1) TCK (T fitting conduit kit) or equivalent conduit tee, coupling and seal fittings. 3. One (1) lot 150# rating 1/2 galvanized or aluminum pipe. Switch body Setpoint calibration screw Grounding screw 1/2" conduit port WPS Style EXP pressure switch with cover removed Electrical switch contacts Low port sintered vent High port tube fitting Switch body Setpoint calibration screw Grounding screw 1/2" conduit port WPSA Style EXP pressure switch with cover removed Low port sintered vent Supply power & electrical switch contacts High port tube fitting TCK T fitting conduit kit LCK L fitting conduit kit 16
17 Set-up Procedure HELPFUL HINTS Safe pressure, for purposes of this manual, is defined as a minimum.25 inch (6.4 mm) of water column. Regulator may be in the locked position upon arrival. To adjust regulator, pull handle to outward position. Carefully insert T-bar valve key to align valve stem tip of both valves. Practice locking and unlocking key in the RECV valve stem. Practice and familiarization of this process should ease operation of the system. To test the vent s operation, gently prod the vent flapper open with a soft-pointed object, (example: eraser end of a pencil) ensuring that the vent valve works freely. On vertically configured vents, this can be accomplished from within the protected enclosure. Side mounted -90 configured vents can be tested by removing the conduit plug at the bottom of the mounting tee. Multiple operations require only one test per day if enclosure is not opened or left unattended. IMPORTANT NOTES: The Rapid Exchange control valve and the enclosure pressure control valve are both operated by utilizing the removable T-bar valve key supplied with the system. The purge system is shipped with the T-bar valve key locked in the Rapid Exchange control valve stem. To remove the T-bar valve key, wrap your index and middle finger around the T-Bar and place your thumb firmly against the system face plate. Pull the T-bar valve key straight out firmly. This will unlock and free the T-bar valve key for use in the enclosure pressure control valve stem. When Set-up or operating procedures are complete, replace the T-bar valve key in the Rapid Exchange control valve stem and push in firmly to lock in position. THE T-BAR VALVE KEY LOCKS IN THE RAPID EXCHANGE CONTROL VALVE STEM ONLY. Operators must secure wrist or stop watch to manually time exchange cycle for all applications. Pepperl+Fuchs Rapid Exchange purging systems are designed to provide a pre-calibrated and certified volume exchange rate. With the Rapid Exchange pressure gauge set at 60 psi (4.14 bar)minimum, the model 3003 will accomplish the required volume exchanges at a rate of ONE MINUTE PER 3 CUBIC FEET (85 l/min) of enclosure volume. The volume exchange rate is based on a four (4) enclosure volume exchange. Multiply the required exchange time by 2.5 for applications requiring a ten (10) volume exchange for motors. Regardless of enclosure volume or system flow rate, Pepperl+Fuchs requires that operators withhold power to the enclosure while inducing the Class I enclosure volume exchange, for at least five (5) minutes. Normal exchange times should be doubled if large obstructions block protective gas flow. Class I Purging Set-up READ IMPORTANT NOTES BEFORE PROCEEDING WITH SET-UP 1. Utilizing the T-bar valve key supplied with system (see important notes), close Rapid Exchange control and enclosure pressure valves fully by turning clockwise (CW). 2. Engage the protective gas supply to the system supply Inlet and set the Rapid Exchange pressure gauge to 60 psi. 3. Temporarily connect a 0-10 inch (0-254 mm) water column pressure gauge or manometer to the protected enclosure. 4. Check operation of enclosure protection vent as detailed above. See "Helpful Hint." 5. Seal enclosure(s) and adjust enclosure pressure control Valve, utilizing the T-bar valve key, by opening slowly counterclockwise (CCW) to set a safe pressure on the enclosure pressure gauge. NOTE: If pressure setting is difficult to stabilize or set.see page 19, Troubleshooting Procedures. 6. Carefully remove T-bar valve key from enclosure pressure control valve stem. Ensure enclosure pressure gauge"safe" pressure setting is stable. 7. Utilizing the T-bar valve key supplied with system (see important notes above), lock T-bar valve key into Rapid Exchange control valve stem. Open valve fully by turning 90 CCW and quickly ensure the enclosure protection vent opens. Note: The enclosure pressure gauge should move quickly off scale to the right, this is normal for all Rapid Exchange purging systems. 8. Readjust the regulator to 60 psi (4.14 bar) minimum, while inducing Rapid Exchange, until the test gauge reads approximately 3 to 5 inches ( mm) of pressure and does not fluctuate. (Insufficient enclosure pressure will cause the enclosure protection vent to "shuttle.") DO NOT exceed 10 inches (254 mm) of pressure within the protected enclosure. 9. Close Rapid Exchange control valve fully and ensure T-bar valve key is firmly locked in Rapid Exchange control valve stem. 10. Cease testing and remove test equipment. 17

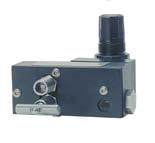
18 Operating Sequence WARNING! Do not exceed a safe pressure with the enclosure pressure control regulator. Operators must follow step-by-step sequence of the startup instructions nameplate on the protection system. Class I Purging Operation With the protective gas supply connected, enclosure power deenergized and alarm system energized (if utilized). 1. Carefully read start-up Instructions on system. 2. Check operation of the enclosure protection vent ( EPV-3), opening it manually several times. See page 17, Helpful Hint. 3. Seal protected enclosure(s). 4. Unlock T-bar valve key from the RECV stem and place in the EPCV stem. See important notes on page 17. Open enclosure pressure control valve, by turning CCW, to set enclosure pressure gauge at safe pressure, the pressure loss alarm switch (if utilized) should then activate to silence the alarm system. 5. Ensure the protection system enclosure pressure gauge maintains a safe pressure for one (1) minute. 6. Carefully remove T-bar valve key from enclosure pressure control valve stem. Ensure enclosure pressure gauge "safe" pressure setting is stable. 7. Utilizing the T-bar valve key supplied with system (see important notes, page 17), open Rapid Exchange control valve fully by turning 90 CCW and quickly ensure the enclosure protection vent opens. Note: The enclosure pressure gauge should move quickly off scale to the right, this is normal for all Rapid Exchange purging systems. 8. Standby for the exchange time as specified on the start-up Instructions (five minutes minimum), then close the Rapid Exchange control valve fully and ensure T-bar valve key is firmly locked in Rapid Exchange control valve stem. 9. Wait for the enclosure pressure gauge to return to a "safe" pressure and energize the protected enclosure(s) power via the local disconnect switch. 10. Ensure the enclosure pressure indicator maintains a safe pressure before leaving system unattended. System start-up instructions Model identification pressure control valve stem Rapid Exchange pressure gauge T-bar valve key pressure gauge Rapid Exchange control valve stem Model 3003-LPS-CI-Z-VM front view System face plate 18
PROCESS AUTOMATION. INSTALLATION AND OPERATION MANUAL MODEL 3004 TYPE Y, Z & Ex [np] RAPID EXCHANGE PURGE SYSTEM
![PROCESS AUTOMATION. INSTALLATION AND OPERATION MANUAL MODEL 3004 TYPE Y, Z & Ex [np] RAPID EXCHANGE PURGE SYSTEM](/thumbs/85/92594529.jpg "PROCESS AUTOMATION. INSTALLATION AND OPERATION MANUAL MODEL 3004 TYPE Y, Z & Ex [np] RAPID EXCHANGE PURGE SYSTEM") PROCESS AUTOMATION INSTALLATION AND OPERATION MANUAL MODEL 3004 TYPE Y, Z & Ex [np] RAPID EXCHANGE PURGE SYSTEM Table of Contents Purpose and Description Page 2 Page 3 System Purpose and Description Purpose,
PROCESS AUTOMATION INSTALLATION AND OPERATION MANUAL MODEL 3004 TYPE Y, Z & Ex [np] RAPID EXCHANGE PURGE SYSTEM Table of Contents Purpose and Description Page 2 Page 3 System Purpose and Description Purpose,
MODEL 1003 TYPE Y OR Z RAPID EXCHANGE PURGING SYSTEM INSTALLATION & OPERATION MANUAL
 CLASS I APPLICATIONS 75 Cubic Feet Maximum MODEL 1003 TYPE Y OR Z RAPID EXCHANGE PURGING SYSTEM INSTALLATION & OPERATION MANUAL LPS Style (Less Pressure Switch) WPS & WPSA Style (With Pressure Switch)
MODEL 1001B TYPE Y OR Z PRESSURIZATION SYSTEM INSTALLATION & OPERATION MANUAL
 CLASS II APPLICATIONS 50 Cubic Feet Maximum MODEL 1001B TYPE Y OR Z PRESSURIZATION SYSTEM INSTALLATION & OPERATION MANUAL LPS Style (Less Pressure Switch) WPS Style (With Pressure Switch) Table of Contents
Series 1001A Type Y or Z
 Series 1001A Type Y or Z Class I Applications 2 Cubic Feet Maximum class II Applications 10 Cubic Feet Maximum Pressurization / Purging Kits Installation & Operation Manual Face Plate w/ Universal Flange
Model 10E Enviro-Line Environmental Pressurization System Installation & Operation Manual
 Model 10E Enviro-Line Environmental Pressurization System Installation & Operation Manual Table of Contents Table of Contents Page 2 Purpose and Description Page 8 Dimensions Page 2 Page 3 Identifying
PROCESS AUTOMATION INSTALLATION AND OPERATION MANUAL MODEL 1001B TYPE Y OR Z PRESSURIZATION SYSTEM
 PROCESS AUTOMATION INSTALLATION AND OPERATION MANUAL MODEL 1001B TYPE Y OR Z PRESSURIZATION SYSTEM Page 2 Page 3 Page 3 Page 4 Page 5 Page 6 Page 7 Page 8 Page 9 Table of Contents System Purpose and Description
PROCESS AUTOMATION. INSTALLATION AND OPERATION MANUAL MODEL 1001A TYPE Y or Z PURGE/PRESSURIZATION SYSTEM
 PROCESS AUTOMATION INSTALLATION AND OPERATION MANUAL MODEL 1001A TYPE Y or Z PURGE/PRESSURIZATION SYSTEM Table of Contents Purpose and Description Page 2 Page 3 Page 3 Page 4 Page 5 Page 6 Page 7 Page
PROCESS AUTOMATION INSTALLATION AND OPERATION MANUAL MODEL 1012 TYPE Z UNIVERSAL RAPID EXCHANGE PURGING SYSTEM
 PROCESS AUTOMATION INSTALLATION AND OPERATION MANUAL MODEL 1012 TYPE Z UNIVERSAL RAPID EXCHANGE PURGING SYSTEM Page 2 Page 3 Page 3 Page 4 Page 5 Page 6 Page 7 Page 8 Page 9 Table of Contents System Purpose
PROCESS AUTOMATION INSTALLATION AND OPERATION MANUAL MODEL 1011 TYPE Z PURGE/PRESSURIZATION SYSTEM
 PROCESS AUTOMATION INSTALLATION AND OPERATION MANUAL MODEL 1011 TYPE Z PURGE/PRESSURIZATION SYSTEM Page 2 Page 3 Page 3 Page 4 Page 5 Page 6 Page 7 Page 8 Page 9 Table of Contents System Purpose and Description
PROCESS AUTOMATION MANUAL ENVIRO-LINE ENVIRONMENTAL PRESSURIZATION SYSTEM
 PROCESS AUTOMATION MANUAL ENVIRO-LINE ENVIRONMENTAL PRESSURIZATION SYSTEM Page 2 Page 2 Page 3 Page 3 Page 4 Table of Contents Purpose and Description Purpose, System Description, Important Notes Identifying
Z, Y, and X PURGE INDICATORS / CONTROLLERS
 PurgEx XXXXXX Z, Y, and X PURGE INDICATORS / CONTROLLERS PURGE / PRESSURIZATION PURGE / PRESSURIZATION XXXXX XXXXXXXXX 8626 SERIES Globally Certified Z,Y,X Purge Indicators / Controllers and Accessories
TECHNICAL DATA MAINTENANCE AIR COMPRESSOR MODEL G-1
 Dry 131h 1. DESCRIPTION The Viking Model G-1 Maintenance Air Compressor is an electric motor-driven, aircooled, single-stage, oil-less compressor. The unit is equipped with a check valve and provides a
SIMPLAIR PIPING TOOL. JXT Company
 SIMPLAIR PIPING INGERSOLL-RAND SIMPLAIR PIPING With push-in fittings and lightweight anodized aluminum pipe, a SimplAir system provides ideal connection throughout your entire air distribution system.
Model 106 DPI "Micro-switch" Installation and Operating Instructions
 Mid-West Instrument Model 106 DPI "Micro-switch" Installation and Operating Instructions BULLETIN NO. IM116DPImicro/09A Replaces --- INSPECTION Before installation carefully check the Model Number on each
Installation, Operation and Maintenance Manual for Back Pressure Regulator
 Installation, Operation and Maintenance Manual for Back Pressure Regulator Model 8860 2009 Groth Corporation IOM-8860 Rev. B 12541 Ref. ID: 95565 Page 2 of 13 Table of Contents I. INTRODUCTION 3 II. DESIGN
Installation Instructions
 48011HW NATURAL GAS TO PROPANE CONVERSION KIT 58HDX, 359AAV, PG9YAB, PG9YAA Installation Instructions SAFETY REQUIREMENTS Installing and servicing heating equipment can be hazardous due to gas and electrical
Model PSI Compressor with 3-Gallon Air Tank 12VDC
 Model 6350 150 PSI Compressor with 3-Gallon Air Tank 12VDC IMPORTANT: It is essential that you and any other operator of this product read and understandd the contents of this manual before installing
G196 Series BASOTROL Redundant Combination Gas Valve with Manual Shutoff Valve
 Installation Instructions Issue Date August 19, 2008 G196 Series BASOTROL Redundant Combination Gas Valve with Manual Shutoff Valve Application The G196 valves are suitable for use with natural gas, Liquefied
G196 Series BASOTROL Redundant Combination Gas Valve with Manual Shutoff Valve
 Installation Instructions Issue Date March 13, 2013 G196 Series BASOTROL Redundant Combination Gas Valve with Manual Shutoff Valve Application The G196 valves are suitable for use with natural gas, Liquefied
English. Introduction. Safety Instructions. All Products. Inspection and Maintenance Schedules. Parts Ordering. Specifications WARNING WARNING
 Contents All Products... Gb-1 Control Valves... Gb-2 Control Valve Actuators... Gb-3 Regulators... Gb-3 Relief Valves... Gb-4 Instruments, Switches, and Accessories... Gb-4 Products Covered by Battery
TECHNICAL DATA. Q = C v P S
 Page 1 of 13 1. DESCRIPTION The Viking 6 Model G-6000 Dry Valve Riser Assembly consists of a small profile, light weight, pilot operated valve that is used to separate the water supply from the dry sprinkler
SPECIFICATIONS ATTENTION
 VPS 504 S06 Installation Manual - P/N 80122 - Ed. 01/09 VPS 504 S06 and S05 Valve Proving System Installation Instructions VPS 1 6 Gases Natural gas, air and other inert gases. NOT suitable for butane
G96 Series BASOTROL Dual Operator Valve
 Installation Instructions 9. Issue Date February 22, 2013 G96 Series BASOTROL Dual Operator Valve Applications The G96 valves are combination, dual operator, automatic valves available with or without
Operator: Save these instructions for future use!
 INLET PRESS TAP WHITE-RODGERS 36E93-304 Delay-Opening Combination Gas Valve INSTALLATION INSTRUCTIONS Operator: Save these instructions for future use! FAILURE TO READ AND FOLLOW ALL INSTRUCTIONS CAREFULLY
36E DSI, HSI & Proven Pilot Two-Stage Combination Gas Valve INSTALLATION INSTRUCTIONS
 INLET PRESS TAP WTE-RODGERS 36E96-314 DSI, HSI & Proven Pilot Two-Stage Combination Gas Valve INSTALLATION INSTRUCTIONS Operator: Save these instructions for future use! FAILURE TO READ AND FOLLOW ALL
TECHNICAL DATA 3 MODEL G-3000 DRY VALVE RISER ASSEMBLY
 Page 1 of 13 1. DESCRIPTION The Viking 3 Model G-3000 Dry Valve Riser Assembly is equipped with a small profile, light weight, pilot operated valve that is used to separate the water supply from the dry
Pressure Dump Valve Service Kit for Series 3000 Units
 Instruction Sheet Pressure Dump Valve Service Kit for Series 000 Units. Overview The Nordson pressure dump valve is used to relieve hydraulic pressure instantly in Series 00, 400, 500, and 700 applicator
Installation Operating Instructions for Simple Duplex Manual Manifolds PX-TSD Series
 Introduction Powerex manifolds are cleaned, tested and prepared for the indicated gas service and are built in accordance with the Compressed Gas Association guidelines. The manifold consists of a regulator
INSTALLATION GUIDE Gas Rangetops
 INSTALLATION GUIDE Gas Rangetops Contents Wolf Gas Rangetops........................... 3 Safety Instructions............................ 4 Gas Rangetop Specifications.................... 5 Gas Rangetop
PROPORTIONING VALVE. Model 150 INSTRUCTION MANUAL. March 2017 IMS Company Stafford Road
 PROPORTIONING VALVE Model 150 INSTRUCTION MANUAL March 2017 IMS Company 10373 Stafford Road Telephone: (440) 543-1615 Fax: (440) 543-1069 Email: sales@imscompany.com 1 Introduction IMS Company reserves
GM Series Dual-Block Multi-Function Gas Control Valves
 Installation Sheets Manual 121 Gas Combustion Combination Controls and Systems Section G Technical Bulletin GM Issue Date 0297 GM Series Dual-Block Multi-Function Gas Control Valves Figure 1: GM Series
EASTERN ENERGY SERVICES PTE LTD. 60 Kaki Bukit Place #02-19 Eunos Tech Park Singapore, SG Singapore Telephone: Fax:
 2 Table Of Contents 1. Introduction 3 2. About this Manual 3 3. Contacting YZ Systems 3 4. Vessel Components 4 5. Specifications 5 6. Application 6 7. Theory of Operation 7 8. DuraSite Installation & Use
TECHNICAL DATA. Q= Cv S
 Page 1 of 13 1. DESCRIPTION The Viking 4 inch Model G-4000 Dry Valve Riser Assembly consists of a small profile, light weight, pilot operated valve that is used to separate the water supply from the dry
TECHNICAL DATA Q = C. v P S. 2 Model G-2000 Dry valve. Page 1 of 13
 Page 1 of 13 1. Description The Viking 2 Model G-2000 Dry Valve Riser Assembly consists of a small profile, light weight, pilot operated valve that is used to separate the water supply from the dry sprinkler
TECHNICAL DATA. Trimpac 244a. September 16, 2013
 September 16, 2013 Trimpac 244a 1. DEsCrIpTION DESCRIPTION TRIMPAC Model B-1 and B-1B is a factory-assembled trim package with an electric release module in a metal enclosure. The standard trim normally
INSTALLATION INSTRUCTIONS. CVS 67CFR Pressure Reducing Instrument Supply Regulator INTRODUCTION
 INSTALLATION INSTRUCTIONS CVS 67CFR Pressure Reducing Instrument Supply Regulator INTRODUCTION The CVS Controls 67CFR Filter regulator is a pressure reducing supply regulator typically used for pneumatic
FOR INSTALLING CO 2 BLENDER KIT (P/N IN BEER SYSTEM
 IMI CORNELIUS INC One Cornelius Place Anoka, MN 55303-623 Telephone (800) 238-3600 Facsimile (612) 22-326 INSTALLATION INSTRUCTIONS FOR INSTALLING CO 2 BLENDER KIT (P/N 111612000 IN BEER SYSTEM SECONDARY
3/8" Dr. Air Butterfly Impact Wrench
 8192106 3/8" Dr. Air Butterfly Impact Wrench Owner s Manual Read and understand all instructions before use. Retain this manual for future reference. Specifications Construction: Polished aluminum and
TECHNICAL DATA. TRIMPAC Model B-5 & B-5B
 September 16, 2013 Trimpac 250a 1. DESCRIPTION DEsCRIPTIoN is a factory assembled trim package for a ed an electric/pneumatic release module in a metal enclosure. The standard trim normally required on
Pressure Dump Valve Service Kit for Series 2300 Units
 Instruction Sheet Pressure Dump Valve Service Kit for Series 00 Units. Overview The Nordson pressure dump valve is used to relieve hydraulic pressure instantly in Series 00 applicator tanks when the unit
MEDICAL EQUIPMENT CATALOG
 THE MOST TRUSTED MEDICAL EQUIPMENT IN NORTH AMERICA MEDICAL EQUIPMENT CATALOG Total Components Including Bulk Oxygen Supply, Back up and Delivery Equipment Designs for High Pressure, Liquid or Bulk Applications
RAM 4021-PR. Operation Manual. Worldwide Manufacturer of Gas Detection Solutions
 RAM 4021-PR Operation Manual Worldwide Manufacturer of Gas Detection Solutions TABLE OF CONTENTS RAM 4021-PR For Your Safety... 2 Description.... 2 Setup Mode.... 2 Lights/Alarms.... 3 Operation.... 4
TECHNICAL DATA. Trimpac 251a. Spetember 16, 2013
 Spetember 16, 2013 Trimpac 251a 1. DEsCrIpTION DESCRIPTION TRIMPAC Model B-6 and B-6B is a factory assembled trim package for a double interlocked preaction system with an electric/pneu-lectric release
PRO-50 Instrument Supply Regulator
 Features CRN Approved The PRO-50 Regulator has been granted a Canadian Registration Number. Sour Service Capability Available in NACE configurations that comply with NACE MR0175/MR0103. Environmental limits
36E DSI and HSI Two-Stage Combination Gas Valve INSTALLATION INSTRUCTIONS
 INLET PRESS TAP WTE-RODGERS 36E54-214 DSI and HSI Two-Stage Combination Gas Valve INSTALLATION INSTRUCTIONS Operator: Save these instructions for future use! FAILURE TO READ AND FOLLOW ALL INSTRUCTIONS
SUMMITTM 400 & 600. Natural Gas Barbecues. Step-By-Step Guide
 SUMMITTM 400 & 600 Natural Gas Barbecues Step-By-Step Guide W E B E R W E B E R W E B E R W E B E R Summit 400 NG Summit 600 NG CANADIAN GAS ASSOCIATION R A P P R O V E D WARNING: Follow all leak check
Model 130M Pneumatic Controller
 Instruction MI 017-450 May 1978 Model 130M Pneumatic Controller Installation and Operation Manual Control Unit Controller Model 130M Controller is a pneumatic, shelf-mounted instrument with a separate
OPERATING AND MAINTENANCE MANUAL
 Series 4300 Engineered Performance TABLE OF CONTENTS 0 INTRODUCTION 1 1 Scope 1 2 Description 1 3 Specifications 1 0 INSTALLATION 1 1 Mounting 1 2 Piping 1 1 Connecting Process Pressure 2 2 Vent Connections
Bermad Pressure Reducing. Model: 42T
 Bermad Pressure Reducing Pilot Operated Pressure Control Valve Model: 42T Installation Operation Maintenance Manual (IOM) REV. 27.7.17 Page 1 of 12 Safety First BERMAD believes that the safety of personnel
36H SERIES Combination Gas Valve
 FAILURE TO READ AND FOLLOW ALL INSTRUCTIONS CAREFULLY BEFORE INSTALLING OR OPERATING THIS CONTROL COULD CAUSE PERSONAL INJURY AND/OR PROPERTY DAMAGE. DESCRIPTION The 36H series combination gas valve is
36G22, 36G23, 36G24 & 36G52 36J22, 36J23, 36J24 & 36J52 DSI and HSI Single Stage Combination Gas Valve
 Operator: Save these instructions for future use! FAILURE TO READ AND FOLLOW ALL INSTRUCTIONS CAREFULLY BEFORE INSTALLING OR OPERATING THIS CONTROL COULD CAUSE PERSONAL INJURY AND/OR PROPERTY DAMAGE. DESCRIPTION
G92 Series BASOTROL Automatic Pilot Gas Valve
 Installation Instructions Issue Date September 17, 2008 G92 Series BASOTROL Automatic Pilot Gas Valve Installation IMPORTANT: Only qualified personnel should install or service BASO Gas Products. These
OPERATION MANUAL NTF-15
 OPERATION MANUAL NTF-15 Nitrogen Tire Filling Valve Stem Caps (Qty=200) Order P/N 436075 RTI Technologies, Inc 10 Innovation Drive York, PA 17402 800-468-2321 www.rtitech.com 035-81235-00 (Rev B) TABLE
ACCESSORY KIT INSTALLATION INSTRUCTIONS
 ACCESSORY KIT INSTALLATION INSTRUCTIONS 1NP0680 - PROPANE CONVERSION FOR USE WITH MODELS: PM8, PC8, PM9, PC9, FL9M, FL9C, FC9M, FC9C This conversion kit is to be installed by a qualified service agency
97C COMPRESSOR KIT 12V PART NO C COMPRESSOR KIT 24V PART NO C COMPRESSOR KIT PART NO
 97C COMPRESSOR KIT 12V PART NO. 00097 97C COMPRESSOR KIT 24V PART NO. 02497 98C COMPRESSOR KIT PART NO. 00098 97C 98C IMPORTANT: It is essential that you and any other operator of this product read and
RAM Operation Manual. Worldwide Manufacturer of Gas Detection Solutions
 RAM 4021 Operation Manual Worldwide Manufacturer of Gas Detection Solutions TABLE OF CONTENTS RAM 4021 For Your Safety... 2 Description.... 2 Setup Mode.... 2 Lights/Alarms.... 3 Operation.... 4 Calibration....
Magnetic level switch type MR783 Instruction Manual
 Magnetic level switch Magnetic level switch type MR783 1. DESCRIPTION page 3 1.1 Operation page 3 1.2 Application page 3 1.3 Description page 3 2. SPECIFICATIONS page 3 2.1 Service Conditions page 4 2.2
Type 1367 High-Pressure Instrument Supply System with Overpressure Protection
 Instruction Manual D100343X012 Type 1367 November 2017 Type 1367 High-Pressure Instrument Supply System with Overpressure Protection TYPE 252 FILTER 2ND-STAGE TYPE 67CF FILTER-STYLE REGULATOR INLET TYPE
Manual Actuated Boiler Blowdown Valves
 Manual Actuated Boiler Blowdown Valves Installation and Maintenance Instructions 1. Safety information 2. General product information 3. Installation 4. Operation 5. Maintenance 6. Spare parts p.1 1. Safety
Float Operated Level Controllers
 CONTENTS Float Operated Level Controllers IM0015 Nov. 2014 PAGE Introduction 1 Scope 1 Description 1 Specification 1 Control Installation 2 INTRODUCTION Side Mount Back Mount Prior to installing, the instructions
Propane Conversion Kit Instructions
 604 8 0/ US/CA For heating engineers Propane Conversion Kit Instructions Logano G4 X gas-fired boiler This conversion kit and the accompanying instructions are for conversion of G4 X gas-fired boilers
1805 Series Relief Valves
 Instruction Manual Form 1211 1805 Series October 2011 1805 Series Relief Valves! WARNING Failure to follow these instructions or to properly install and maintain this equipment could result in an explosion
CentriFlow Meter Integrated Air Entrainment System
 CentriFlow Meter Integrated Air Entrainment System INSTALLATION & OPERATION MANUAL January 2004 Revision 021-4 EASTERN INSTRUMENTS 416 LANDMARK DR. WILMINGTON, NC 28412 910-392-2490 Fax: 910-392-2123 website:
RAM Operation Manual. Worldwide Manufacturer of Gas Detection Solutions
 RAM 4021 Operation Manual Worldwide Manufacturer of Gas Detection Solutions TABLE OF CONTENTS RAM 4021 For Your Safety... 2 Description.... 2 Setup Mode.... 2 Lights/Alarms.... 3 Operation.... 4 Calibration....
100C Air Compressor Kit
 10010 100C Air Compressor (standard mounting bracket, CE Spec) 10014 100C Air Compressor (no leader hose or check valve, CE Spec) 10016 100C Air Compressor (with Omega Bracket, CE Spec) IMPORTANT: It is
Welker Sampler. Model GSS-1. Installation, Operation, and Maintenance Manual
 Installation, Operation, and Maintenance Manual Welker Sampler Model GSS-1 The information in this manual has been carefully checked for accuracy and is intended to be used as a guide to operations. Correct
VERTICAL BLADDER TANK
 Balanced Pressure Proportioning System Reliable Foam System Requiring Only Water Power Perfect For Tight Spaces UL Listed, ASME, National Board Registered Bladder-UL162 Approved, High Tensile Pressure
TECHNICAL DATA. Q = C v P S
 January 6, 2012 Preaction 348a 1. Description Viking supervised Surefire Preaction Systems utilize the Viking G-6000P Valve. The small profile, lightweight, pilot operated Viking G-6000P Valve comes complete
Differential Pressure Regulator Type Type 45-6 (0.1 to 1 bar, DN 15) Mounting and Operating Instructions EB 3226 EN
 Mounting and Operating Instructions EB 3226 EN") Differential Pressure Regulator Type 45-6 Type 45-6 (0.1 to 1 bar, DN 15) Mounting and Operating Instructions EB 3226 EN Edition March 2008 Contents Contents Page 1 Design and principle of operation...................
Differential Pressure Regulator Type 45-6 Type 45-6 (0.1 to 1 bar, DN 15) Mounting and Operating Instructions EB 3226 EN Edition March 2008 Contents Contents Page 1 Design and principle of operation...................
MEGR-1627 Instruction Manual
 MEGR-1627 HIGH FLOW GAS REGULATOR Instruction Manual- Look Inside For: Description Installation Remote Vent Line Installations Startup and Adjustment Shutdown Maintenance Body Maintenance Procedures Diaphragm
WARNING: FOR OUTDOOR USE ONLY
 Certified to CSA International 4.96 US For Outdoor Gas Fireplaces A HIGHER STANDARD IN QUALITY AND APPEARANCE SAFE AND BEAUTIFUL OUTDOOR LARGO FIRE PIT FOR PROPANE AND *NATURAL GAS OWNER S MANUAL WARNING:
TECHNICAL DATA. Q = C v P S
 January 6, 2012 Preaction 333a 1. Description Viking supervised Surefire Preaction Systems Utilize the Viking G-3000P Valve. The small profile, lightweight, pilot-operated Viking G-3000P Valve comes complete
ECS Protector Nitrogen Generator PGEN-30 (PGEN-30E)
") ECS Protector PGEN-30 (PGEN-30E) Specifications For use under U.S. Patents 8,720,591, 9,144,700 and 9,186,533 Dimensions (cabinet): 24.5 (W) x 52.5 (H) x 8.5 (D) (622mm(W) x 1,334mm(H) x 216mm(D)) Dimensions
ECS Protector PGEN-30 (PGEN-30E) Specifications For use under U.S. Patents 8,720,591, 9,144,700 and 9,186,533 Dimensions (cabinet): 24.5 (W) x 52.5 (H) x 8.5 (D) (622mm(W) x 1,334mm(H) x 216mm(D)) Dimensions
Electropneumatic Transducer (I/P) Installation, Operation and
 Installation, Operation and") Nitra NCP1 Series Electropneumatic Transducer (I/P) Installation, Operation and Maintenance Instructions Ordering Information Contents Part Number I/P Transducers Output Range Input psig bar Section Description
Nitra NCP1 Series Electropneumatic Transducer (I/P) Installation, Operation and Maintenance Instructions Ordering Information Contents Part Number I/P Transducers Output Range Input psig bar Section Description
200 PSI COMPRESSORS - MODEL NUMBERS
 200 PSI COMPRESSORS - MODEL NUMBERS 380C AIR COMPRESSOR KIT PART NO. 38033 480C AIR COMPRESSOR KIT PART NO. 48043 380C 480C IMPORTANT: It is essential that you and any other operator of this product read
Anderson Greenwood Series 93 Positive Pressure POSRV Installation and Maintenance Instructions
 Before installation these instructions must be fully read and understood Installation and maintenance instructions for Series 93 Positive Pressure Pilot Operated Safety Relief Valves (POSRV). The intent
HORIZONTAL BLADDER TANK
 Balanced Pressure Proportioning System Reliable Foam System Requiring Only Water Power Perfect For Low Ceilings UL Listed, ASME, National Board Registered Bladder-UL162 Approved, High Tensile Pressure
Dual Solenoid Gas Valve Installation
 Installation IMPORTANT: These instructions are intended as a guide for qualified personnel installing or servicing FLYNN Gas Products. Carefully follow all instructions in this bulletin and all instructions
36C/36D HSI, DSI Proven Pilot Gas Valves INSTALLATION INSTRUCTIONS
 36C/36D HSI, DSI Proven Pilot Gas Valves INSTALLATION INSTRUCTIONS Operator: Save these instructions for future use! FAILURE TO READ AND FOLLOW ALL INSTRUCTIONS CAREFULLY BEFORE INSTALLING OR OPERATING
299H Series. Introduction. P.E.D. Categories. Specifications. Installation. Warning. Installation Guide English September 2012
 Installation Guide English September 2012 299H Series Introduction This Installation Guide provides instructions for installation, startup, and adjustment of 299H Series regulators. To receive a copy of
TECHNICAL DATA. Q = C v P S
 Preaction 346a 1. Description The 6 Model G-6000P Electric Release Preaction System Riser Assembly can be used as a Single Interlock Preaction System with Electric Release, or as a Double Interlock Preaction
Mounting and Operating Instructions EB 3007 EN. Self-operated Pressure Regulators. Differential Pressure Regulators (opening) Type Type 42-25
 Type Type 42-25") Self-operated Pressure Regulators Differential Pressure Regulators (opening) Type 42-20 Type 42-25 Type 42-20 Differential Pressure Regulator Type 42-25 Differential Pressure Regulator Mounting and Operating
Self-operated Pressure Regulators Differential Pressure Regulators (opening) Type 42-20 Type 42-25 Type 42-20 Differential Pressure Regulator Type 42-25 Differential Pressure Regulator Mounting and Operating
ATD LB PRESSURE BLASTER INSTRUCTION MANUAL
 ATD-8402 90LB PRESSURE BLASTER INSTRUCTION MANUAL SAVE THESE INSTRUCTIONS SAFETY INSTRUCTIONS FOR SANDBLASTER 1. Before opening the tank release the air pressure on the sand tank. To do this, turn off
V-24 OXYGEN LANCE VALVE
 INSTRUCTIONS for F-4737-U May, 2009 V-24 OXYGEN LANCE VALVE w/ C -Size Inlet w/ B -Size Inlet V-24 Oxygen Lance with 1/8" Pipe Holder... 9728D65... 2218939 V-24 Oxygen Lance with 1/4" Pipe Holder... 9728A65...
TECHNICAL DATA CAUTION
 Page 1 of 6 1. DESCRIPTION The Viking Model D-2 Accelerator is a quick-opening device, with an integral anti-flood assembly, used to increase the operating speed of a differential type dry pipe valve.
Operating instruction
 Operating instruction MV, XV, HG, HP, RKO, D2G, TV, BV, WB & SLV 1 Introduction 2 2 Stafsjö s knife gate valves 2 3 Technical information 2 3.1 Pressure test 2 3.2 Labelling 2 4 Storage 3 5 Transportation
TECHNICAL DATA. Q = C v P S
 January 6, 2012 Preaction 331a 1. Description Viking supervised Double-Interlocked Electric/Pneumatic Release Preaction Systems utilize the Viking G-3000P Valve. The small profile, lightweight, pilot-operated
Storage Systems and Accessories
 Storage Systems and Accessories High Pressure Air and Inert Gases 4500-6000 PSIG DOT and ASME Cylinders High Pressure Storage Systems If an application requires storage, either in the form of a single
INSTRUCTION MANUAL Pressure Relief Device LPT
 INSTRUCTION MANUAL Pressure Relief Device LPT 5COV475800 LPT REV00 CONTENT: 1 SAFETY 1.1 Safety instructions 2 1.2 Specified applications 2 1.3 Safety notes on the equipment operation 2 2 PRESSURE RELIEF
Gas Lines. Technical Manual. Sumitomo (SHI) Cryogenics of America, Inc Vultee Street Allentown, PA U.S.A.
 Cryogenics of America, Inc Vultee Street Allentown, PA U.S.A.") Gas Lines Technical Manual Sumitomo (SHI) Cryogenics of America, Inc. 1833 Vultee Street Allentown, PA 18103-4783 U.S.A. Revision F: April 2008 261320A TABLE OF CONTENTS Page DESCRIPTION...1 SPECIFICATIONS...2
Gas Lines Technical Manual Sumitomo (SHI) Cryogenics of America, Inc. 1833 Vultee Street Allentown, PA 18103-4783 U.S.A. Revision F: April 2008 261320A TABLE OF CONTENTS Page DESCRIPTION...1 SPECIFICATIONS...2
CLASS D - SENSITIVE LEAK TEST GAS AND BUBBLE METHOD. 1.1 To provide definitive requirements for PNEUMATIC pressure testing of piping systems.
 Page 1 of 7 CLASS D - SENSITIVE LEAK TEST GAS AND BUBBLE METHOD 1. SCOPE 1.1 To provide definitive requirements for PNEUMATIC pressure testing of piping systems. 1.2 The piping system as used herein is
INDUSTRIAL VALVES MODELS: C62-A; C62-D. INSTRUCTION MANUAL Installation Operation Parts Service DIAPHRAGM BYPASS PRESSURE REGULATING VALVES
 INSTRUCTION MANUAL Installation Operation Parts Service IMPORTANT Record your Regulator model number and serial number here for easy reference: Model No. Serial No. Date of Purchase When ordering parts
RIX COMPRESSORS. MICROBOOST Owner s Manual CONFIGURATION A MB-115 MB-230. November 21, 2002 APPLICABILITY [ A]
![RIX COMPRESSORS. MICROBOOST Owner s Manual CONFIGURATION A MB-115 MB-230. November 21, 2002 APPLICABILITY [ A]](/thumbs/77/74792841.jpg "RIX COMPRESSORS. MICROBOOST Owner s Manual CONFIGURATION A MB-115 MB-230. November 21, 2002 APPLICABILITY [ A]") RIX COMPRESSORS MICROBOOST Owner s Manual CONFIGURATION A MB-115 MB-230 November 21, 2002 APPLICABILITY [ A] INTRODUCTION Safety This electromechanical equipment is designed to produce high pressure gas.
RIX COMPRESSORS MICROBOOST Owner s Manual CONFIGURATION A MB-115 MB-230 November 21, 2002 APPLICABILITY [ A] INTRODUCTION Safety This electromechanical equipment is designed to produce high pressure gas.
Your safety and the safety of others are very important.
 NATURAL GAS TO PROPANE CONVERSION KIT ALPKT57- INSTALLATION INSTRUCTIONS PROPANE CONVERSION KIT SAFETY... INSTALLATION REQUIREMENTS... Tools and Parts... LP Gas Requirements... Table of Contents INSTALLATION
SERVICE MANUAL MODEL BA600AMST-S1 BREATHING AIR PANEL
 SERVICE MANUAL MODEL BA600AMST-S1 BREATHING AIR PANEL WARNING: Do not attempt to operate this equipment without first reading and understanding the service manual enclosed with this device. 2/05 GENERAL
ANDERSON GREENWOOD SERIES 9000 POSRV INSTALLATION AND MAINTENANCE INSTRUCTIONS
 Procedure-assembly-functional test and performance requirements 1 SCOPE 1.1 This document establishes the general procedure for assembly, functional testing and normal performance requirements of low Series
Modulating Valves for Atmospheric, Infrared, and Direct Fired Burners
 BULLETIN MT2035-07/05 Modulating Valves for Atmospheric, Infrared, and Direct Fired Burners M/MR Series M411, M511, M611 M420, M520, M620, MR410, MR510, MR610 MR212D, MR212E, MR212G and MR212J (Flanged),
Autocalibration Systems For In Situ Oxygen Analyzers
 Product Data Sheet PDS 106-340AC SPS 4000, IMPS 4000, and MPS 3000 January, 1999 Autocalibration Systems For In Situ Oxygen Analyzers Cost-effective autocalibration systems for installations ranging from
BP48-1 AND SSP48-1 IN-GROUND POST INSTALLATION INSTRUCTIONS
 BP48-1 AND SSP48-1 IN-GROUND POST INSTALLATION INSTRUCTIONS WARNING: THIS IN-GROUND POST IS NOT DESIGNED FOR USE WITH AN LP GAS CYLINDER. WARNING: SEE YOUR GRILL OWNER S MANUAL FOR PROPER LOCATION, MINIMUM
EASIDEW TRANSMITTER with Current Source Output
 EASIDEW TRANSMITTER with Current Source Output INSTALLATION, OPERATION AND MAINTENANCE MANUAL Issue March 2002 2 TABLE OF CONTENTS SECTION PAGE 1. INTRODUCTION 3 1.1 General 3 1.2 Ceramic Sensing Element