Operating Instructions
|
|
|
- Eustace Griffin
- 5 years ago
- Views:
Transcription

1 perating Instructions
2 Table of Contents Introduction...5 Feature List...5 Installing Straps or Bungee Cord...6 Straps...6 Bungee Cord...7 Turning n...8 Auto-n...8 Buttons...9 The Main Screen...10 Color Coding...10 The Top Row...11 The Center Row...13 Center Row Configuration...14 The Bottom Row...15 Info Screens...17 Compass...21 Viewing the compass...21 Marking a Heading...21 Menus...22 pen Circuit Menu Structure...23 Closed Circuit (Int. PP2) Menu Structure...24 Simple Example Dive...25 Gauge Mode...26 Stopwatch...26 Resettable Average Depth...26 Decompression and Gradient Factors...27 Menu Reference...28 Turn ff...28 Switch Setpoint...28 Select Gas...29 Radio Station Gases...29 Select Gas Menu Styles...30 Switch to C/CC...31 Dive Setup...31 Low Setpoint...31 High Setpoint
3 Table of Contents (continued) Define Gas...33 Dive Planner...35 Conservatism...37 NDL Display...38 Brightness...40 Dive Log Menu...41 Display Log...41 Upload Log...41 Edit Log Number...41 System Setup...42 Mode Setup...43 Deco Setup...45 C Gases...45 CC Gases...45 Auto SP (Setpoint) Switch...46 Compass Setup...49 Calibrate...50 System Setup...51 Advanced Configuration Advanced Configuration Firmware Upload and Dive Log Download...54 Changing the Battery...55 Battery Types...56 Behavior on Battery Change...57 Error Displays...59 Troubleshooting...61 Storage and Maintenance...61 Servicing...61 Specifications...62 FCC Warning...63 Industry Canada Warning...63 Contact
4 DANGER This computer is capable of calculating deco stop requirements. These calculations are at best a guess of the real physiological decompression requirements. Dives requiring staged decompression are substantially more risky than dives that stay well within nostop limits. Diving with rebreathers and/or diving mixed gases and/or performing staged decompression dives and/or diving in overhead environments greatly increases the risk of scuba diving. You really are risking your life with this activity. WARNING This computer has bugs. Although we haven t found them all yet, they are there. It is certain that there are things that this computer does that either we didn t think about, or planned for it to do something different. Never risk your life on only one source of information. Use a second computer or tables. If you choose to make riskier dives, obtain the proper training and work up to them slowly to gain experience. This computer will fail. It is not whether it will fail but when it will fail. Do not depend on it. Always have a plan on how to handle failures. Automatic systems are no substitute for knowledge and training. No technology will keep you alive. Knowledge, skill, and practiced procedures are your best defense (Except for not doing the dive, of course). 4
5 Introduction The Shearwater Perdix is an advanced technical diving computer for open and closed circuit divers. Although we strive to make the Perdix easy enough to use without reading the manual, please take some time to read this manual to get the best performance from your new computer. Diving involves risk and education is your best tool for managing this risk. Feature List Technical open and closed circuit dive computer. Bühlmann decompression model with gradient factors conservatism ptional VPM-B decompression model Imperial and metric displays Depth and time display A menu system that adapts to diving status Automatic turn off after 30 minutes on the surface Depth sensor rated to 450 feet/140 meters of seawater Dive Planner Any combination of oxygen, nitrogen, and helium (Air, Nitrox, Trimix) pen and closed circuit, switchable during a dive 5 CC and 5 C gases Gases can be changed and added during a dive CNS tracking No lockout from violating deco stops Automatic PP2 set-point switching (configurable) Two CC PP2 set-points, each of which can be set between.4 and 1.5 Flexible user replaceable battery. Almost any AA type 1000 hour dive log memory Tilt compensated digital compass with markable headings Log downloads and firmware upgrades using Bluetooth 5
6 Installing Straps or Bungee Cord The Perdix includes mounting points for either two elastic straps or two bungee cords. Both types are included in the box. Straps Install the elastic straps as shown in the image below. The buckles feature a locking mechanism to prevent them from inadvertently loosening. Press the tab to allow the buckle to slide freely on the straps. Strap width is 3/4 (19 mm). Install the straps and buckles as shown 6
7 Bungee Cord Bungee cord can be installed in many ways based on your preference. Two examples are shown. The holes are sized for 3/16 (4.8 mm) diameter cord. Allergy Alert! The supplied elastic surgical tubing contains LATEX. A simple overhand knot (at left) works well to secure the bungee cord However, this knot can pull through the mounting holes under very high load. We find that the knot at right works well. 1 This knot has the nice feature of creating loops that stay wide open while putting the Perdix on your wrist Tip: Use two pieces of cord When using the bungee cord, always create two independent loops so that a single break does not result in a lost dive computer. If using a single continuous piece of cord, isolate the sides with a knot. 7
8 Turning n To turn the Perdix on, press both the MENU (left) and the SELECT (right) buttons at the same time. Auto-n The Perdix will automatically turn-on when submerged underwater. This is based on pressure increase and not on the presence of water. Do NT rely on the auto-on feature This feature is supplied as a backup for when you forget to turn on your Perdix. Shearwater recommends turning on manually before each dive to confirm proper operation and to double check battery status and setup. Auto-n Details The Perdix turns on automatically when the absolute pressure is greater than 1100 millibar (mbar). For reference, normal sea level pressure is 1013 mbar and 1 mbar of pressure corresponds to approximately 1 cm (0.4") of water. So the Perdix will automatically turn-on when about 0.9 m (3 ft) underwater when at sea level. If at higher altitude, then the Perdix auto-on will occur at a deeper depth. For example, when at 2000 m (6500 ft) altitude the atmospheric pressure is only about 800 mbar. Therefore, at this altitude the Perdix must be submerged underwater by 300 mbar to reach an absolute pressure of 1100 mbar. This means the auto-on occurs at about 3 m (10 ft) underwater when at an altitude of 2000 m. 8

 From main screen: brings up the menu. In a menu: moves to the next menu item.")
 button SELECT button (Right) From main screen: steps through information screens.")

9 Buttons Two piezo-electric buttons are used to change settings and view menus. Except for turning the Perdix on, all operations are simple single button presses. MENU (left) button Don t worry about remembering all the button rules below. Button hints make using the Perdix easy. MENU button (Left) From main screen: brings up the menu. In a menu: moves to the next menu item. Editing a setting: changes the setting s value. SELECT (right) button SELECT button (Right) From main screen: steps through information screens. In a menu: performs command or starts editing. Editing a setting: saves the setting s value. BTH BUTTNS When Perdix is off: pressing MENU and SELECT at the same time will turn the Perdix on. No other operation requires pressing both buttons at the same time. Button Hints When in a menu, button hints label each button. For example, the hints to the right tell us: use MENU to change the brightness value. use SELECT to save the current value. MENU hint SELECT hint 9
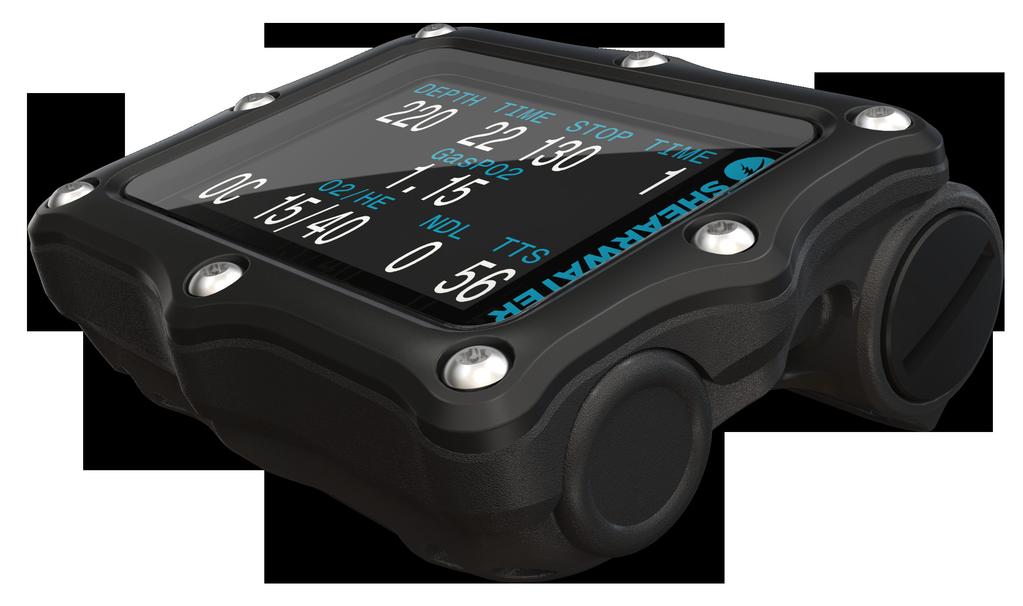
10 The Main Screen Top Row Depth, Time & Deco Stops Center Row PP2 Bottom Row Mode, Gas & Deco Info The main screen shows the most important information needed for technical diving. Color Coding Color coding of text draws attention to problems or unsafe situations. White text indicates normal conditions. YELLW is used for warnings that are not immediately dangerous but should be addressed. FLASHING RED is used for critical alerts that could be life threatening if not immediately addressed. Sample warning - a better gas is available Flashes Sample critical alert - continuing to breathe this gas could be fatal Color Blind Users The warning or critical alert states can be determined without the use of color. Warnings display on a solid inverted background. Critical alerts flash between inverted and normal text. Warning - doesn't flash Flashes Critical alert - flashes 10
11 The Top Row The top row shows depth and time information Depth Imperial: In feet (no decimal places). Metric: In meters (displays with 1 decimal place up to 99.9m) Note: If the depth shows a Flashing Red zero, then the depth sensor needs service. DEPTH 229 DEPTH 69.7 in feet in meters Ascent Bar Graph Shows how fast you are currently ascending. Imperial: 1 arrow per 10 feet per minute (fpm) of ascent rate. Metric: 1 arrow per 3 meters per minute (mpm) of ascent rate. White when 1 to 3 arrows, Yellow when 4 to 5 arrows, and Flashes Red when 6 arrows or more. Note: Deco calculations assume a 33fpm (10mpm) ascent rate. 30 fpm 9 mpm 50 fpm 15 mpm 60+ fpm 15+ mpm Dive Time The length of the current dive in minutes. The seconds display as a bar drawn below the word Time. It takes 15 seconds to underline each character in the word. Does not display the seconds bar when not diving. Battery Icon Yellow when the battery needs to be changed. Red when the battery must be replaced immediately. The default behavior is that battery icon is shown on the surface but disappears when diving. If low or critical then the battery icon will appear while diving. TIME 25 TIME 25 in minutes seconds bar at about 45s K low battery change now! 11
12 Stop Depth and Time Stop The next decompression stop depth in the current units (feet or meters). This is the shallowest depth to which you can ascend. Time The time in minutes to hold the stop. Will Flash Red if you ascend shallower than the current stop. By default the Perdix uses a 10ft (3m) last stop depth. At this setting, you may perform the last stop at 20ft (6m) with no penalty. The only difference is that the predicted time-to-surface will be shorter than the actual TTS since off-gasing is occurring slower than expected. STP TIME 9 2 Stop at 90ft for 2 min DEPTH TIME STP TIME Alert - depth is shallower than the 90ft stop depth There is also an option to set the last stop to 20ft (6m) if you wish. Surface Interval When on the surface, the STP DEPTH and TIME are replaced by a surface interval display. SURFACE 2hr 45mn Shows the hours and minutes since the end of your last dive. Above 4 days, the surface interval is displayed in days. The surface interval is reset when the decompression tissues are cleared. See the section on Tissues Cleared. Sample surface main screen showing the surface interval 12

13 The Center Row The center row displays PP2. PP2 units are absolute atmospheres (1ata = 1013mbar). The layout varies depending on the current mode: Mode Menu Setup Center Row Display pen Circuit GasP C Gas Closed Circuit with Internal PP2 Setpoints 1.3 CC Internal Setpoint In C mode, PP2 displays in Flashing Red when less than 0.19 or greater than These limits can be adjusted in the Adv. Config 2 menu. For CC mode, the Perdix only uses fixed PP2 setpoints. There is no option to connect the Perdix directly to oxygen sensors for direct monitoring of loop PP2. This option is available in the Petrel 2 Fischer and DiveCAN models. Fixed PP2 setpoints are used to calculate backup decompression schedules when CC diving. 13
.")
14 Center Row Configuration In most modes, the center row displays can be customized. Configure the center row in the System Setup Center Row Menu. The left and right positions can be set to display the following: ption None Max Depth Avg Ceil GF99 CNS Clock DET Dil PP2 Fi2 Timer Compass Description Blank (default value). The maximum depth of the current or previous dive. The average depth of the current or previous dive. The TTS if remaining at current depth for 5 more minutes. The current decompression ceiling (not rounded to the stop interval). The Bühlmann ZHL-16C super-saturation percent gradient. Central Nervous System (CNS) toxicity clock as a percentage. The time-of-day in 24hr or am/pm format (same as system setting). Does not show am or pm. Dive End Time. The time-of-day when the dive will end (i.e. Clock plus TTS). In 24hr or am/pm format (same as system setting). Does not show am or pm. The diluent PP2 at the current depth (nly available when CC is available). The fraction of inspired 2 as a percentage (nly available when CC or SC is available). Timer (stopwatch) with minutes and seconds. A miniature compass. Works like a regular compass with the red end of the needle always points to North The center position can only display PP2. In C only mode, the PP2 display can optionally be turned off. 14
15 The Bottom Row The bottom row displays the current mode, gas and decompression information. Circuit Mode The current breathing configuration. ne of: C = pen circuit (when CC available, displays in Yellow to indicate bailout condition) CC = Closed circuit C or C CC Current Gas (2/He) The current gas shown as a percentage of xygen and Helium. The remainder of the gas is assumed to be Nitrogen. In closed circuit mode, this gas is the diluent. In open circuit mode this is the breathing gas. Displays in Yellow when there is better deco gas available than the current gas. No Decompression Limit (NDL) The time remaining, in minutes, at the current depth until decompression stops will be necessary. Displays in Yellow when the NDL is less than 5 minutes. nce NDL reaches 0 (i.e. deco stops needed), the NDL display is just wasting space. To address this, a few different values can be set to replace the NDL (see Dive Setup NDL Display). The options are: CEIL: The current ceiling in the current units (feet or meters). Flashes Red if you ascend shallower than the current ceiling. 2/HE 21/ 2/HE 10/5 2/HE 21/ NDL 2 NDL 5 CEIL 74 21% 2 Air { 79% N2 Tx { 10% 2 50% He 40% N2 a better deco gas available 15
 The time-to-surface in minutes. This is the current time to ascend to the surface including the ascent plus all required deco stops.")
16 GF99: The raw percentage of the Bühlmann allowable supersaturation at the current The predicted time-to-surface (TTS) if you were to stay at the current depth for 5 more minutes. GF99 2 Time-to-Surface (TTS) The time-to-surface in minutes. This is the current time to ascend to the surface including the ascent plus all required deco stops. TTS 35 Assumes: Ascent rate of 33 feet per minute (10 meters per minute). Decompression stops will be followed. Programmed gases will be used as appropriate. The bottom row is also used to show additional information. By using only the bottom row for this additional information, the critical information contained on the Top and Center Rows is always available during a dive. The additional information that can be displayed on the bottom row includes: Info Screens: Menus: Warnings: Shows additional dive information. Press SELECT (right button) to step through info screens. Allows changing settings. Press MENU (left button) to enter menus. Provide important alerts. Press SELECT (right button) to clear a warning. The bottom row is used to display additional information 16

17 Info Screens Info screens display on the bottom row. Press SELECT (right) button to step through the info screens. SELECT button SELECT button SELECT button Info screens provide additional information that does not fit on the main screen. Starting from the main screen, the SELECT (right) button steps through the info screens. When all info screens have been viewed, pressing SELECT again will return to the main screen. Info screens time-out after 10 seconds, returning to the main screen. Pressing the MENU (left) button will also return to the main screen. The info screen content is optimized for each mode. Set the Perdix to the mode you will be using (e.g. C) and step through the info screens to get familiar with the content. The next section describes the individual values shown on the info screens. 17
18 Average Depth Displays the average depth of the current dive, updated once per second. When not diving, shows the average depth of the last dive. Average Depth in Atmospheres (AvgATM) The average depth of the current dive, measured in absolute atmospheres (i.e. a value of 1.0 at sea level). When not diving, shows the average depth of the last dive. Maximum Depth The maximum depth of the current dive. When not diving, displays the maximum depth of the last dive. CNS Toxicity Percentage Central Nervous System oxygen toxicity loading percentage. Flashes Red when 100 or greater. The CNS percentage is calculated continuously, even when on the surface and turned off. When deco tissues are reset, the CNS will also be reset. AVG 5ft AvgATM 2.52 MAX 26ft CNS 11 CNS 1 The CNS value (short for Central Nervous System xygen Toxicity) is a measure of how long you have been exposed to elevated partial pressures of oxygen (PP2) as a percentage of a maximum allowable exposure time. As PP2 goes up, the maximum allowable exposure time goes down. The table we use is from the NAA Diving Manual (Fourth Edition). During a dive the CNS never decreases. When back at the surface, a half-life of elimination of 90 minutes is used. So for example, if at the end of the dive the CNS was 80%, then 90 minutes later it will be 40%. In 90 more minutes it will be 20%, etc. Typically after about 6 half-life times (9 hours), everything is back close to equilibrium (0%). 18
19 Diluent PP2 nly displayed in CC mode. Displays in Flashing Red when the partial pressure of the diluent is less than 0.19 or greater than DilPP2.99 When performing a manual diluent flush, you can check this value to see what the expected PP2 will be at the current depth. Fraction Inspired 2 (Fi2) The fraction of the breathing gas composed of 2. This value is independent of pressure. Fi2.42 Tissues Bar Graph The tissues bar graph shows the tissue compartment inert gas tissue tensions based on the Bühlmann ZHL-16C model. Note that VPM-B also tracks tensions in the same way. The fastest tissue compartment is shown on the top, and the slowest on the bottom. Each bar is the combined sum of the nitrogen and helium inert gas tensions. Pressure increases to the right. The vertical black line shows the inert gas inspired pressure. The boundary between the green and yellow zones is the ambient pressure. The boundary between the yellow and red zone in the ZHL-16C M-Value pressure. Note that the scale for each tissue compartment above the green zone is different. The reason the bars are scaled in this way is so that the tissues tensions can be visualized in terms of risk (i.e. how close they are as a percentage to Bühlmann's original super-saturation limits). Also, this scale changes with depth, since the M-Value line also changes with depth. 16 tissue compartments Inspired inert M-Value pressure gas pressure Ambient pressure Increasing pressure Some Sample Tissues Graphs n surface (sat. with air) After descent n-gassing Deep stop Last deco stop 19
20 Gradient Factor: The deco conservatism value when the deco model is set to GF. The low and high gradient factors control the conservatism of the Bühlmann GF algorithm. See Clearing up the Confusion About Deep Stops by Erik Baker. VPM-B (and VPM-BG): The deco conservatism value when the deco model is set to VPM-B. If the deco model is VPM-B/GFS, also displays the gradient factor for surfacing. Pressure: The pressure in millibars. Two values are shown, the surface (surf) pressure and the current (now) pressure. The current pressure is only shown on the surface. The surface pressure is set when the Perdix is turned on. If the Altitude setting is set to SeaLvl, then surface pressure is always 1013 millibars. Temperature: The current temperature in degrees Fahrenheit (when depth in feet) or degrees Celsius (when depth in meters). Battery: The Perdix s internal battery voltage. Displays in Yellow when the battery is low and needs replacement. Displays in Flashing Red when the battery is critically low and must be replaced as soon as possible. Also shows battery type. Date and Time: In the format dd-mon-yy 12 or 24 hour clock time. Serial Number & Version: Each Perdix has a unique serial number. The version number indicates the available features. The last two numbers are the firmware version (V33in this image). 3/85 GF Pressure mbar SURF113 NW111 BATTERY 3.7V LiIon Date VPM-B +3 VPM-BG +3/90 TEMP 73 F 3.99V 28-Jun-12 16:31 SERIAL N 1234ABCD Time Date Time 28-Jun-12 4:31pm Version
 button once. Press SELECT again to continue on to view the regular info screens.")
21 Compass The compass features: 1 resolution ± 5 accuracy Smooth, high-speed refresh rate User set heading marker with reciprocal True North (declination) adjustment Tilt compensated to ± 45 Viewing the compass When enabled, the compass is viewed by pressing the SELECT (right) button once. Press SELECT again to continue on to view the regular info screens. Unlike the regular info screens, the compass never times out back to the main screen. Pressing the MENU (left) button brings up the Mark Heading option. Pressing MENU again returns to the main screen. Marking a Heading To mark a heading, when viewing the compass press the MENU (left) button. This brings up the "Exit Mark" menu. Press the SELECT (right) button to mark the heading. The marked heading is shown with a green arrow. When within ±5 of the heading, the degrees display turns green. The reciprocal heading (180 from marked heading) is shown with a red arrow. When within ±5 of the reciprocal heading, the degrees display turns red. When more than 5 off the marked heading, a green arrow shows the direction back to the marked heading. Also, the offset degrees to the heading are displayed (16 in the example image). This offset is useful when navigating patterns. For example, a box pattern requires turns at 90 intervals, while a triangle pattern requires 120 turns. 21

22 Menus Press MENU (left) button to step through the menus. Press SELECT (right) button to execute command or enter sub-menu. Menus display on the bottom row. MENU button SELECT button Perdix Turns ff MENU button MENU button SELECT button Enter Select Gas sub-menu Menus perform actions and allow settings to be changed Starting from the main screen, pressing the MENU (left) button steps through the menus. When all menus have been viewed, pressing MENU again will return to the main screen. Pressing the SELECT (right) button when a menu is displayed, either performs that action or enters a sub-menu. If no buttons are pushed for 1 minute, the menu system will time-out, returning to the main screen. Anything that had been previously saved will be retained. Anything that was in the middle of editing will be discarded. Adaptive Menus nly menus necessary for the current mode are shown. This keeps operation simple, prevents mistakes, and reduces buttons presses. 22
23 The following sections show the menu structure in various operating modes. pen Circuit Menu Structure Main Screen Surface only Turn ff Select Gas Sub-Menus Dive Setup+ Define Gas Dive Planner+ Conserv. NDL Display Brightness Surface only Dive Log+ Display Log Upload Log Edit Log Number Surface only System Setup+ Mode Setup Deco Setup Display Setup Compass Setup Center Row System Setup C Gases Advanced Config 23
24 Closed Circuit (Int. PP2) Menu Structure Main Screen Surface only Turn ff Switch.7 > 1.3 Select Gas Switch CC > C Sub-Menus Dive Setup+ Edit Low SP Dive Planner+ Edit High SP Conserv. Define Gas NDL Display Surface only Surface only Dive Log+ System Setup+ Display Log Upload Log Edit Log Number Mode Setup Deco Setup Center Row C Gases PP2 Mode Brightness CC Gases Auto SP Switch Display Setup Compass Setup System Setup Advanced Config 24
25 Simple Example Dive Here is an example of a simple C air dive. It will help to introduce the screen displays as the diver progresses, the dive starts, the depth increases. The display is showing the computer programmed for open circuit (C) air. As we pass through 30 feet, the time-to-surface (TTS) shows one minute. This shows that the computer is expecting the diver to ascend at approximately 30 feet per minute or 10 meters per minute. The dive predictions are based on this ascent rate. The no-decompression limit (NDL) starts off showing 99, but then starts to show a smaller number as the depth increases. The 3rd screen shows that we will go into deco in 12 minutes. We have now entered decompression. ur first stop, or ceiling, is at 20 feet and we will need to remain there for up to one minute. Although stops are shown in minutes, the computer will calculate and change the ceiling in real time and the stop may be less than a minute. As we ascend, the ascent rate indicator shows about 20 fpm or 6 mpm. When we go shallower than our first stop, the stop depth starts to flash red. When we clear the last stop, the stop depth and time goes blank, and now we see a NDL of 99 minutes again. nce we surface, the depth is 0 and a minute later when the computer comes out of dive mode, the NDL goes to 0 as well. DEPTH TIME SURFACE 4hr39mn GasPP2.21 2/HE NDL TTS C 21/ DEPTH TIME STP TIME /HE NDL TTS C 21/ 99 1 DEPTH TIME STP TIME 11 3 GasPP2.9 2/HE NDL TTS C 21/ 12 3 DEPTH TIME STP TIME GasPP2.97 2/HE NDL TTS C 21/ 7 DEPTH TIME STP TIME GasPP2.34 2/HE NDL TTS C 21/ 42 DEPTH TIME STP TIME GasPP2.33 2/HE NDL TTS C 21/ 42 DEPTH TIME STP TIME 9 15 GasPP2.27 2/HE NDL TTS C 21/ 99 25


26 Gauge Mode Gauge Mode turns the Perdix into a simple depth and time display (a.k.a. a bottom timer). Change to Gauge Mode in the System Setup Mode Setup menu. Since decompression tissues are not tracked in Gauge Mode, changing to or from Gauge Mode resets the deco tissues. Features: Extra-Large Depth Display (in feet or meters) Extra-Large Time Display (in minutes:seconds) Maximum and Average Depth on main screen. Stopwatch Resettable Average Depth Gauge - Surface Display The Gauge display is organized as. Depths along the left. Times along the right. Most important information (Depth, Dive Time) on the top row. Stopwatch The Stopwatch is only available in Gauge Mode. Gauge - Dive Display When diving, starting or stopping the Stopwatch is the first menu option. When stopped, the word Stopwatch displays in red. When non-zero, the stopwatch can be reset. Reset behavior depends on state: If running when reset, it continues running, counting up again from 0. If stopped when reset, then it is set 0 and remains stopped. Stopwatch Running Resettable Average Depth During a dive, the average depth can be reset. While on the surface, the MAX and AVG values display the maximum and average depth of the last dive. The AVG depth displayed on the surface is for the entire dive, regardless of whether the reset average depth option was used. The dive log also records the average depth for the entire dive. Stopwatch Stopped 26
27 Decompression and Gradient Factors The basic decompression algorithm used for the computer is Bühlmann ZHL-16C. It has been modified by the use of Gradient Factors that were developed by Erik Baker. We have used his ideas to create our own code to implement it. We would like to give credit to Erik for his work in education about decompression algorithms, but he is in no way responsible for the code we have written. The computer implements Gradient Factors by using levels of conservatism. The levels of conservatism are pairs of number like 30/70. For a more detailed explanation of their meaning, please refer to Erik Baker s excellent articles: Clearing Up The Confusion About Deep Stops and Understanding M-values. The articles are readily available on the web. You might also want to search for Gradient Factors on the web. The default of the system is 30/70. The system provides several settings that are more aggressive than the default. Don t use the system until you understand how it works. Graph from Erik Baker s Clearing Up The Confusion About Deep Stops 27
28 Menu Reference Turn ff The Turn ff item puts the computer to sleep. While sleeping, the screen is blank, but the tissue contents are maintained for repetitive diving. The Turn ff menu item will not appear during a dive on any model. It will also not appear after a dive until the End Dive Delay Time has expired to allow for a continuation dive. DEPTH TIME SURFACE.7 Turn ff Switch Setpoint This menu is only available in CC mode when PP2 mode is set to Int. (internal PP2 Setpoints). The internal PP2 mode is used to calculate decompression for a unconnected rebreather. In this case, the setpoints are switched in the computer to approximate the rebreather setpoint. During a dive the Switch Setpoint menu item will be the first item displayed, since the Turn ff menu item is disabled when diving. Pressing SELECT when this menu is displayed changes the PP2 setpoint from the low setpoint to the high setpoint or vice-versa. To redefine the PP2 value of a setpoint, use the Dive Setup menu. DEPTH TIME SURFACE.7 Switch.7 > 1.3 DEPTH TIME SURFACE 1.3 2/HE NDL TTS CC 1/5 22 This menu item performs a manual switching of PP2 setpoint. In the System Setup Auto SP Switch menu, the Perdix can be setup to automatically perform setpoint switches at programmable depths. When auto setpoint switches are enabled, this menu item is still available to provide manual control. 28

29 Select Gas This menu item allows you to pick a gas from the gases you have created. The selected gas will be used either as the breathing gas in open circuit mode, or the diluent in closed circuit mode. Gases are always sorted from most to least oxygen content. Use the MENU button to increment to the desired diluent/gas, then press the SELECT button to select that diluent/gas. If you increment past the number of gases available, the display will fall back out of the Select Gas display without changing the selected gas. An A will appear next to the currently active gas. A gas that is off will be shown in magenta, but can still be selected. It will be turned on automatically if it is selected. ff gases are not used in decompression calculations. DEPTH TIME SURFACE.7 Select Gas DEPTH TIME SURFACE.7 A1 CC n 21/ Next Gas DEPTH TIME SURFACE Next Gas Select.7 2 CC n 1/5 Select DEPTH TIME SURFACE.7 2 CC ff 1/5 Next Gas Select Radio Station Gases For computer models that support open circuit and closed circuit operation, the system maintains two sets of gases - one for open circuit and one for closed circuit. The way they operate is very similar to the way car radios work with AM and FM stations. When you are listening to an FM station and you push a station selection button, it will take you to another FM station. If you add a new station, it will be an FM station. Similarly, if you are in the AM mode, adding or deleting a station would add or delete an AM station. With radio station gases, when you are in open circuit, adding, deleting or selecting a gas will refer to an open circuit gas. Just like the FM stations are selected when your radio is in FM mode, the closed circuit gases are available in the closed circuit mode. When you switch to open circuit, the gases available will be open circuit gases. 29


. The active gas is shown with a white background. Turned off gases are shown in magneta (purple).")
30 Select Gas Menu Styles Two styles of Select Gas menus are available, Classic and New. Change between the two styles in the Adv. Config 1 menu. Classic Style Select Gas The classic Select Gas style is as described on the previous page. ne gas is shown at a time. Press MENU to step through gases, and SELECT to select the shown gas. Gases are sorted from highest 2% to lowest 2%. Stepping past the last gas will exit the menu without changing the active gas. Upon entering the Select Gas menu, the first gas shown is always the highest 2% gas. Classic Select Gas New Style Select Gas The new style makes visualizing the gas list easier. It also reduces button presses for deco gas switches. Shows all gases on the screen at once. Press MENU to step through gases, and SELECT to select the pointed to gas. A gas must be selected to exit the menu (scrolling past last gas wraps back to first gas). The active gas is shown with a white background. Turned off gases are shown in magneta (purple). Gases are sorted from highest 2% to lowest 2%. When diving and there is a deco stop, the first gas pointed to will be the most appropriate gas (highest PP2 less than 1.61). This reduces button presses in most cases. n the surface or when no deco stops are needed, the first gas pointed to will be the active gas. New Style Select Gas ff Gases are Magenta Active Gas is White 30
31 Switch to C/CC Depending on the current computer setting, this selection will show as either Switch CC > C or Switch C > CC. Pressing SELECT will select the displayed mode for decompression calculations. When switching to open circuit while diving, the most appropriate open circuit gas will become the breathing gas for calculations. At this point, the diver may want to switch to a different gas, but since the diver may have other things to deal with, the computer will make a best guess of which gas the diver would choose. DEPTH TIME Surface 2Hr 45Mn Switch CC > C DEPTH TIME Surface 1.3 Switch CC > C 2Hr 45Mn Dive Setup The Dive Setup menus are available both on the surface and when diving. The values in Dive Setup+ can also be accessed in the Systems Setup+ menu, but the System Setup+ menu is not available when diving. Pressing SELECT will enter the Dive Setup sub-menu. Low Setpoint This item allows you to set the low setpoint value. It will display the currently selected value. Values from 0.4 to 1.5 are allowed. A press of MENU will increment the setpoint. Press the SELECT button when Edit Low SP is displayed and the edit display will be shown. It is set at the lowest valid value for setpoint,.4. DEPTH TIME Surface.7 Dive Setup+ 2Hr 45Mn DEPTH TIME Surface 2Hr 45Mn.7 Edit Low SP.7 Next DEPTH TIME Surface Change Edit 2Hr 45Mn.7 Edit Low SP.4 Save 31
32 Another press of MENU will increment it again. If SELECT is pushed, the currently displayed setpoint will be selected, and the display will return to the Edit Low SP menu item. If the highest allowable value, 1.5, has been passed, the value will return to 0.4. DEPTH TIME Surface 2Hr 45Mn.7 Edit Low SP.5 Change DEPTH TIME Surface Next Save 2Hr 45Mn.7 Edit Low SP 1.5 Edit High Setpoint The high setpoint function works exactly like the low setpoint function. DEPTH TIME Surface 2Hr 45Mn.7 Edit High SP 1.3 Next Edit 32
33 Define Gas The function allows you to set up 5 gases in Closed Circuit and 5 gases in pen Circuit. You must be in pen Circuit to edit open circuit gases, and you must be in Closed Circuit to edit closed circuit diluents. For each gas, you can select the percentage of oxygen and helium in the gas. The remainder is assumed to be nitrogen. Pushing SELECT when Define Gas is displayed presents the function to define gas number 1. Pushing the MENU button will display the next gas. Pushing SELECT will allow you to edit the current gas. The gas contents are edited one digit at a time. The underline will show you the digit being edited. Each push of the MENU button will increment the digit being edited. When the digit reaches 9, it will roll over to 0. Pushing SELECT will lock in the current digit, and move on to the next digit. Pushing SELECT on the last digit will finish editing that gas, and bring you back to the gas number. Any gases that have both oxygen and helium set to 00 will not be displayed in the Select Gas function. DEPTH TIME STP TIME Define Gas Next Define DEPTH TIME STP TIME C n 99/ Next Gas DEPTH TIME STP TIME Next Gas DEPTH TIME STP TIME Change DEPTH TIME STP TIME Change DEPTH TIME STP TIME Change DEPTH TIME STP TIME Change 2% 2% HE% HE% Edit C n 5/ Edit C n 5/ Next C n 5/ Next C n 5/ Next C n 5/ Save 33
34 Pushing MENU will continue to increment the gas number. Note: The A denotes the active gas. You cannot delete the active gas. If you try, it will generate an error. You can edit it, but cannot set both the 2 and HE to 00. The computer will display all 5 gas entries available to allow you to enter new gases. Pressing MENU one more time when the fifth gas is displayed will return you to the Define Gas menu item. DEPTH TIME STP TIME C n 5/ Change DEPTH TIME STP TIME Next Gas DEPTH TIME STP TIME Done HE% Save A3 C n 14/55 Edit C n / Edit nly turn-on gases you are carrying nly turn on the gases you are actually carrying on the dive. With radio station gases, the computer has a full picture of the C and CC gases you are carrying and can make informed predictions about decompression times. There is no need to turn gases off and on when you switch from CC to C, because the computer already knows what the gas sets are. You should have the CC and C gases you are actually carrying turned on. If you often use other gases, but not on this dive, you can enter the gas and turn it off. You can turn gases on and off during a dive and you can also add or remove a gas during the dive if needed. 34

35 Dive Planner INTRDUCTIN Calculates decompression profiles for simple dives. In closed-circuit (CC) mode, also calculates open-circuit (C) bail-out (B). SETUP Uses the current gases programmed into the Perdix, as well as the current GF low/high settings. VPM-B dive planning is available on units with the optional VPM-B unlock. Deco profile is computed for the current circuit mode (CC or C). N THE SURFACE Enter the dive bottom depth, bottom time, respiratory minute volume(rmv) and PP2 (closed-circuit only). Note: Residual tissue loading (and CNS%) from recent dives will be used in calculating the profile. DURING A DIVE Computes the decompression profile assuming the ascent will begin immediately. There are no settings to enter. (RMV is last used value) Dive Plan Setup LIMITATINS The Perdix Dive Planner is intended for simple dives. Multi-level dives are not supported. The Perdix Dive Planner makes the following assumptions: Descent rate is 60ft/min (18m/min) and the ascent rate is 33ft/min (10m/min). For C, the gas in use will be the gas with the highest PP2 less than 1.40 for the bottom gas, and 1.61 for deco gases (the deco gas max PP2 can be changed in the Adv Config 1 menu). For CC, the gas in use will be the gas with the highest PP2 less than The planner will use the configured last stop depth. For CC, the PP2 is constant for the entire dive. The RMV is the same while diving as during deco. Semi-closed uses a metabolic offset. 35

 Tme: Stop Time In minutes Run: Run Time In minutes Qty: Gas")

36 The Dive Planner does not provide thorough validation of the profile. For example, it does not check for nitrogen narcosis limitations, gas usage limitations, CNS percentage violations, or isobaric counter-diffusion risks due to sudden helium switches. The user is responsible for ensuring a safe profile is followed. RESULT SCREENS The results are given in tables showing: Stp: Stop Depth In feet (or meters) Tme: Stop Time In minutes Run: Run Time In minutes Qty: Gas Quantity in CuFt (or liters). C and B only The first two rows are special, the first row showing the bottom time and the second showing the ascent to the first stop. When diving, these two rows are not displayed. Example Results Table for Closed-Circuit and Bailout. If more than 5 stops are needed, the results will be split onto on several screens. Use the right button to step through the screens. For C or B profiles, a total gas consumption report is given. Gas Usage Report 36
 time in minutes, at the given bottom depth will be reported. Also, the gas quantity required to surface (bailout in CC) will be reported.")

37 The final result screen shows the total dive time, the time spent on deco and final CNS%. Results Summary Screen If no decompression is required, no table will be shown. Instead, the total No-Decompression- Limit (NDL) time in minutes, at the given bottom depth will be reported. Also, the gas quantity required to surface (bailout in CC) will be reported. No Decompression Results Screen Conservatism The conservatism settings (GF High and GF Low) can be edited in the Dive Setup menu. While diving, only the GH High value can be edited. This allows changing the surfacing conservatism during a dive. For example, if you worked much harder on the bottom segment than expected, you may wish to add conservatism by reducing the GF High setting DEPTH TIME STP TIME.7 Conserv Next 3/7 Edit 37
38 NDL Display The NDL Display option allows you to display four different values during the dive. The display can be changed during the dive to provide different information. Pushing SELECT will make the NDL display editable. The first choice available will be NDL. If you select NDL, the NDL will always be displayed during the dive whether or not you have a decompression ceiling. The next selection is CEIL. With this setting, as long as the NDL time is 0 (you have a decompression ceiling), the raw ceiling will be displayed instead of the NDL. This is the equivalent of the Man on a rope. It will show your ceiling without it being rounded up to the next even 10 foot or 3 meter stop. Please note that there is very limited information on the effects of following a continuous ceiling instead of stopping at stops and only moving up to the next stop when the stop has cleared. DEPTH TIME STP TIME.7 NDL Display NDL Next DEPTH TIME STP TIME Change DEPTH TIME STP TIME Change Edit.7 NDL Display NDL Save.7 NDL Display CEIL Save It is the author s opinion that all stops should be honored. It seems intuitive that if you have bubbles, and you stop, you give the bubbles an opportunity to be resorbed. If you continuously ascend, the ambient pressure is continuously reduced which prevents bubbles from shrinking. Because of this belief, the computer will give one MISSED DEC STP message during the dive and one after the dive, and will flash the stop depth and time in red as long as you are above the stop depth. It will use the increased gradient though, and your calculated off-gassing will be faster than staying at the stops. The next option is to display the actual supersaturation gradient for a pure Bühlmann (99/99) profile. The selection is GF99. With this setting, as long as the NDL time is 0 (you have a decompression ceiling), the gradient will be displayed instead of the NDL. The number shown is the percentage of supersaturation. The number is calculated by reference to the Ambient Pressure Line and the M-Value line. It can be thought of as the current GF, but it is different in a couple of ways. First, the current GF generates stops rounded to the nearest 10 feet or 3 meters. So a gradient of 40 may reflect a ceiling of 15 feet, but the computer will show a rounded-up 20 foot stop. DEPTH TIME STP TIME.7 NDL Display GF99 Change Save DEPTH TIME STP TIME /HE GF99 TTS CC 1/
39 This number can be used in several ways. First, it can be used to calculate an aggressive ascent that still has some justification in decompression science. For example, if a diver were to lose a significant portion of their gas and needed to get shallow fast, they could ascend until they reached a gradient of 90, then stop until it dropped to 80, then ascend to 90 again, etc. That would produce a Bühlmann-like profile with very little conservatism. In an emergency, that may be an acceptable risk. Another use might be to do a slower ascent on a dive to sightsee, but to stay in the decompression zone by keeping the gradient above 0. Another use would be to observe the rapidly increasing gradient in the last 10 feet to the surface and slow that ascent. All of this is based on gradient theory that may be completely false. There is significant disagreement in the decompression research community about the nature and practice of decompression. Any techniques described here should be considered experimental, but the concepts may be useful to the advanced diver. The last selection This feature was inspired by Dan Wible s CCR2000 computer (Thanks Dan!) It is the time-to-surface (TTS) if you were to stay at the current depth for five more minutes. This can be used as a measure of how much you are on-gassing or off-gassing. DEPTH TIME STP TIME.7 NDL Change Save For example, on a dive on a wreck, you go to the bottom until you accumulate the desired decompression and TTS. After ascending to the second deck, you notice that and TTS are the same. That means that you can spend 5 minutes exploring this deck without incurring more decompression. nce you get to the top deck, the current has picked up. The line runs from the top of the deck to the surface which is a distance of 30 feet/10 m. You see that is 11 minutes and your TTS is 15 minutes. That means that you can stay down out of the current for 5 minutes and burn off about 4 minutes of deco. You may decide to accept the 80% decompression efficiency and stay out of the current. When your TTS is 10 minutes, you see that is 9 minutes. Since the decompression is not very efficient now, you go up the line and spend the last 10 minutes in the current. 39
40 Brightness The display brightness has three fixed brightness settings plus an Auto mode. The fixed options are: Cave: Lowest brightness, suitable for dark environments. Low: Low brightness for long battery life. Med: Best mix of battery life and readability. High: Easiest readability, especially in bright sunlight. DEPTH TIME STP TIME.7 Brightness Exit Auto Edit Auto will use the light sensor to determine the brightness of the display. The more ambient light there is, the brighter the display will get. At depth, or in dark water, very little brightness is needed to see the display. The Auto setting works well in most situations. The brightness of the display is the major determinant of battery life. Up to 80% of the power consumption is to power the display. When a low battery alert occurs, the display brightness is automatically reduced to extend battery life. 40
 - Start- Start of dive - End- End of dive - Length of dive in minutes Press MENU to see the next")
41 Dive Log Menu Display Log At the Display Log prompt, press SELECT to view the most recent dive. The profile of the dive is plotted in blue, with decompression stops plotted in red. The following information is displayed: - Maximum and Average depth - Dive number - Date (mm/dd/yy) - Start- Start of dive - End- End of dive - Length of dive in minutes Press MENU to see the next dive, or SELECT to quit viewing logs. Press Back to see the list of dive logs, and next to select the next dive and View. DEPTH TIME STP TIME.7 Dive Log DEPTH TIME STP TIME.7 Display Log Next Display ft 163ft 40min Start 2:10PM Back Upload Log See Firmware Upload and Dive Log Download instructions. Logs are uploaded using Bluetooth. Selecting this menu item starts the Bluetooth connection and then waits for commands from a desktop or laptop computer. Edit Log Number The dive log number can be edited. This is useful if you want the Perdix log numbers to match your lifetime dive count. At the Edit Log Number prompt, press SELECT to begin editing. While editing, use MENU to change the value of the currently underlined digit, and SELECT to move to the next digit. The next dive number will be +1 from the value entered here. For example, if you enter 0015, then the next dive will be dive number 16. DEPTH TIME STP TIME.7 Edit Log Number Next DEPTH TIME STP TIME Next Edit.7 Log Number= Edit 41
42 System Setup System Setup contains configuration settings together in a convenient format for updating the configuration before a dive. System setup cannot be accessed during a dive. However, many of the settings are also available during the dive in a single line interface. Although all of the settings available in Dive Setup are available in System Setup, not all settings in System Setup can be edited in Dive Setup. The MENU and SELECT buttons are context sensitive to each sub menu and individual setting. When cycling through the sub-menus, MENU will carry the user to the next sub-menu, while SELECT will allow the user to edit the options in this submenu. nce the user has pressed SELECT to edit a submenu, MENU will cycle the user through the different submenu listings, while SELECT will let the user edit those listings. nce the user has pressed SELECT to edit a submenu listing MENU will be used to change the context sensitive variable, while the SELECT button will be used to move to the next field. nce the user has pressed SELECT through all the fields, the new user preferences will be saved. DEPTH TIME STP TIME.7 System Setup Example Menu Example Example Example Example Example Next Example Menu Example Example Example Example Example Change..... Edit..... Next 42
43 Mode Setup The first submenu of System Setup is Mode Setup. Mode Mode sets which breathing circuit configurations are available: C/CC (closed circuit with open circuit bailout) C Tec (with Trimix, default mode) C Tec (air and Nitrox only) Gauge (e.g. bottom timer mode) Mode Setup Mode High SP Salinity PP2 Mode Low SP High SP Next.7 C/CC 1.3 Salt CEIL Int Edit Edit Important information for PEN CIRCUIT divers All Perdix models include Closed Circuit (CC) functionality. Leaving CC mode enabled makes the Perdix more complex and less optimized for C diving. Switch Mode from C/CC to C before performing an open circuit only dive. Also, when CC mode is available, then C is treated as bailout. This is why C is shown as a yellow warning when CC mode is available. When changing to or from Gauge mode, the decompression tissues are cleared. This is because when in Gauge mode the Perdix does not know what gas you are breathing. Salinity Water type (salinity) affects how the measured pressure is converted to depth. Settings: Fresh EN13319 Salt Fresh and Salt water differ by about 3%. Salt water, being denser, will display a shallower depth for the same measured pressure versus the Fresh water setting. The EN13319 value is between Fresh and Salt. It is from the European CE standard for dive computers, and is the Perdix s default value. 43
44 PP2 Mode PP2 mode is only available when CC is enabled. n the Perdix this value cannot be edited and is always "Int" (internal PP2 setpoints) Dive Setup Mode High SP Salinity PP2 Mode Low SP High SP Next.7 C/CC 1.3 Salt CEIL Int Edit Edit Low and High Setpoints The Low and High PP2 Setpoints are only available when CC is enabled. Each setpoint can be set from 0.4 to 1.5. The setpoints can also be edited, even during a dive, in the Dive Setup menu. 44
45 Deco Setup Deco Model May just show Bühlmann ZHL-16 with gradient factors model, or it may allow you to switch between GF and various types of VPM-B. The choices will be available if you have unlocked VPM-B. Conservatism Can be adjusted in either the GF or VPM model. For a more detailed explanation of their meaning for the GF algorithm, please refer to Erik Baker s excellent articles: Clearing Up The Confusion About Deep Stops and Understanding M-values. The articles are readily available on the web. VPM-B has conservatism settings from 0 to +5, with higher numbers being more conservative. Deco Setup Deco Model Conserv(GF) Last Stop NDL Display Next GF 3/7 6m CEIL Edit Last Stop Allows you to chose where to do your last stop. The choices are 10ft/3m and 20ft/6m. Note that this setting does not affect decompression. It only makes the TTS prediction more accurate. NDL Display These options were previously covered in the Dive Setup+ section. C Gases The next submenu is C Gases. This menu allows the user to edit the open circuit gases. The options contained here are the same as those in the Define Gases subsection of the Dive Setup section contained earlier in this manual. The interface conveniently displays all five gases simultaneously. C Gases 1 C n 2 C ff 3 C ff 4 C ff 5 C ff Next 21/ / / / / Edit For a description of how to appropriately set each gas, please see the above Define Gas section CC Gases The next submenu is CC Gases. This menu allows the user to edit the closed circuit diluent gases. The options contained here are the same as those in the Define Gases subsection of the Dive Setup section contained earlier in this manual. The interface conveniently displays all five gases simultaneously. For a description of how to appropriately set each gas, please see the above Define Gas section CC Gases A1 CC n 2 CC ff 3 CC ff 4 CC ff 5 CC ff Next 21/ / / / / Edit 45
46 Auto SP (Setpoint) Switch This menu page is only available in CC mode when PP2 mode is set to internal (see Dive Setup page). Auto Setpoint Switch configuration sets up the setpoint switching. It can be set up to auto switch up only, down only, both, or neither. First, you set the whether the Up switch occurs automatically or manually. If Up is set to Auto, then you can set the depth at which the auto switch occurs. The menu options are the same for the down setpoint switch. Example: Up: 0.7>1.3 = Auto, Up Depth = 70 ft. Down: 1.3>0.7 = Auto, Down Depth = 41ft The dives starts at the 0.7 setpoint. As you descend past 70ft, the setpoint switches up to 1.3. You finish your bottom time, then begin ascending. When you ascend above 41ft, it switches down to 0.7. Auto SP Switch Up:.7>1.3 Up Depth Down: 1.3>.7 Down Depth Next Auto 7ft Auto 4ft Edit Auto SP Switch Up:.7>1.3 Up Depth Down: 1.3>.7 Down Depth Change Auto SP Switch Up:.7>1.3 Up Depth Down: 1.3>.7 Change Auto 7ft Auto 41ft Next Auto 7ft Manual Save When a switch is set to Auto, you can always manually override the setting at any time during the dive. The automatic switches only occur when crossing the specified depth. Say for example, the switch up depth is set to 50 ft. You start the dive on the low setpoint, then as you descend past 50 ft, the setpoint automatically switches up to high. If at say 80 ft you then manually switch back to the low setpoint, the setpoint will remain low. If you ascend shallower than 50ft then re-descend deeper than 50ft again, the automatic setpoint switch will occur again. The Perdix enforces a 20 ft (6m) gap between switch up and switch down depths to prevent rapid automatic switching between setpoints for small depth changes. The values 0.7 and 1.3 are shown as examples only. ther values for the low and high setpoint can be adjusted in the Dive Setup menu. 46
47 Display Setup Units Two options are available: Feet: Imperial units (depth in feet, temperature in F) Meters: Metric units (depth in meters, temperature in C) Brightness Screen brightness can be set to fixed levels or an automatic setting. Fixed options: Cave: Lowest brightness, suitable for dark environments. Low: Low brightness for long battery life. Med: Best mix of battery life and readability. High: Easiest readability, especially in bright sunlight. Display Setup Units Brightness Altitude Flip Screen Next Edit Display Setup Units Brightness Altitude Flip Screen Feet Auto SeaLvl Feet Med SeaLvl The Auto option measures ambient light levels and then adjusts the screen brightness to best performance. It provides maximum brightness in bright sunlight, but then lowers brightess to save battery life when the environment gets darker. Change Save Altitude The altitude setting when set to Auto will compensate for pressure changes when diving at altitude. If all your diving is at sea level, then setting this to SeaLvl will assume that surface pressure is always 1013 mbar (1 atmosphere). If the Perdix measures the surface pressure to be less than 965 mbar, then the Altitude setting will be forced to "Auto" and cannot be changed. Display Setup Units Brightness Altitude Flip Screen Feet Auto SeaLvl Change Save Determination of Surface Pressure Accurate depth measurements and decompression calculations require knowing the ambient atmospheric pressure at the surface. Regardless turn on method, the surface pressure is determined the same way. While in the off state the surface pressure is measured and saved every 15 seconds. A 10 minute history of these pressure samples is kept. Immediately after turn-on this history is examined and the minimum pressure is used as the surface pressure. The surface pressure is then remembered, and not updated again until the next turn-on. 47

48 Flip Screen This function displays the contents of the screen upside down. The Flip Screen is of limited use on the Perdix model, but can be used if you wish to wear the Perdix such that the button are on the top of the device. Exit Flip Feet Auto SeaLvl Units Brightness Altitude Flip Screen Display Setup In the normal orientation, buttons are at the bottom of the display. If you flip the display, the buttons will be up top when the Perdix is worn on the wrist. 48

49 Compass Setup Compass View The Compass View settings can be set to: ff: The compass is disabled. 60, 90, or 120 : Sets the range of the compass dial that is visible on the main screen. The actual amount of arc that there is room for on the sceen is 60, so this may feel the most natural. The 90 and 120 settings allow a wider range to be seen at once. The default is 90. True North (declination) In most locations, a compass does not point to True North, but rather to Magnetic North. The difference in angle between these two headings is called the magnetic declination (also called magnetic variation), and varies around the world. The declination in your area can be found on maps or by searching online. This setting can be set from -99 to +99. If you only need to match an uncompensated compass, or your navigation is based on relative directions, this setting is not necessary and can be left at 0. 49

50 Calibrate Calibration of the compass may be needed if the accuracy drifts over time or if a permanent magnet or ferromagnetic metal (e.g. iron or nickel) object is mounted very close to the Perdix. To be calibrated out, such an object must be mounted with the Perdix such that it moves along with the Perdix. Calibrate the Compass Each Battery Change Each battery has its own magnetic signature, mostly due to its steel case. Therefore, recalibrating the compass when changing the battery is recommended Compare the Perdix with a known good compass or fixed references to determine if calibration is needed. If comparing against fixed references, remember to consider the local deviation between Magnetic North and True North (declination). Calibration is typically not needed when travelling to different locations. The adjustment needed then is the True North (declination). When calibrating, rotate the Perdix smoothly through as many 3D twists and turns as possible in 15 seconds. Keep metal and magnetic objects away during calibration. The calibration can also be reset back to the factory values. After calibration, it is recommended to compare the compass accuracy with a known good compass or fixed references Tips for a Good Compass Calibration Stay away from metal objects. For example, wrist watches, metal desks, boat decks, desktop computers, etc. can all interfer with the Earth's magnetic field. Rotate to as many 3D positions as possible. Upside down, sideways, on edge, etc. Compare with another compass (not a smartphone, those are terrible) to check your calibration. 50
51 System Setup Date The first System Setup changeable option is Date, which allows the user to set the current date. Time The next System Setup changeable option is Time, which allows the user to set the current time. The format can be set to AM, PM or 24 hour time. Unlock Code The next System Setup changeable option is Unlock, which allows the user to enter in an unlock in order to change models and to set other features. Load Upgrade Use this option to load firmware upgrades. This starts a Bluetooth connection and then waits for commands from a laptop or desktop computer. System Setup Date 14-Aug-212 Time 3:28PM Unlock Load Upgrade Reset to Defaults Next Edit System Setup Date 14-Aug-212 Time 12:28PM Unlock Load Upgrade Reset to Defaults Next Edit System Setup Date 14-Aug-212 Time 12:28PM Unlock Load Upgrade Reset to Defaults Next Unlock System Setup Date 14-Aug-212 Time 12:28PM 8567 Load Upgrade Reset to Defaults Change Unlock Next See the section Firmware Upload and Dive Log Download for detailed instructions. Reset to Defaults The final System Setup option is Reset to Defaults. This will reset all user changed options to factory settings and clear the tissues on the Perdix. Reset to Defaults cannot be reversed. Note: This will not delete dive logs, or reset dive log numbers. System Setup Date 14-Aug-212 Time 12:28PM Unlock Load Upgrade Reset to Defaults Exit Reset 51
52 Advanced Configuration 1 Advanced configuration contains items that will be used infrequently and can be ignored by most users. They provide more detailed configurations. The first screen allows you to enter the advanced configuration area, or to set the advanced configurations settings to their default. Advanced Config Enter Adv. Config Reset Adv. Config System Info Battery Info Done Edit Title Color The title colors can be changed for added contrast or visual appeal. Default is Cyan, with gray, white and blue also available. End Dive Delay Sets the time in seconds to wait after surfacing before ending the current dive. This value can be set from 20 seconds to 600 seconds (10 minutes). Default is 60s. Adv. Config 1 Title Color End Dive Delay Bat Icon Gas Select Next Blue 6s Surf + Warn Classic Edit This value can be set to a longer time if you want brief surface intervals connected together into one dive. Some instructors use a longer end dive delay when teaching courses. Alternatively, a shorter time can be used to exit dive mode more quickly upon surfacing. Battery Icon The behavior of the battery icon can be changed here. ptions are: Surf+Warn: The battery icon displays always when on the surface. During dive it displays only if there is a low battery warning. Always: The battery icon always displays. Warn nly: The battery icon only appears when there is a low battery warning (this is how the Predator operates). Gas Select The style of Select Gas menu. Either Classic or New. Classic style shows one gas at a time in the large font. New style shows all gases at once, but in the small font. 52
53 Advanced Configuration 2 This section allows changing of PP2 limits. Warning: Do not change these values unless you understand the effect. All values are in absolute atmospheres [ata] of pressure (1 ata = Bar) C Min. PP2 PP2 displays in flashing red when less than this value. (Default 0.19) C Max. PP2 PP2 displays in flashing red when greater than this value. (Default 1.65) C Deco. PP2 The decompression predictions (TTS and NDL) will assume that the gas in use at a given depth is the gas with the highest PP2 that is less than or equal to this value. Also, the suggested gas switches (when the current gas is displayed in yellow) are determined by this value. If you change this value, please understand its effect. For example, if lowered to 1.50, then oxygen (99/00) will not be assumed at 20ft/6m. (Default 1.61) Note: Semi-closed (SC) PP2 alarms and gas switch depths use the C values. CC Min. PP2 PP2 displays in flashing red when less than this value. (Default 0.40) CC Max. PP2 PP2 displays in flashing red when greater than this value. (Default 1.60) Note: In both C and CC mode, a Low PP2 or High PP2 alert is displayed when the limits are violated for more than 30 seconds. Adv. Config 2 C Min. PP2 C Max. PP2 C Deco PP2 CC Min. PP2 CC Max. PP2 Done Edit 53

54 Firmware Upload and Dive Log Download Bluetooth communications are used for both Firmware Uploading and Dive Log Downloading. NTE: Upgrading the firmware resets decompression tissue loading. Plan repetitive dives accordingly. DEPTH TIME STP TIME Upload Log Next Upload Start a Bluetooth connection by selecting the Upload Log menu. The Perdix screen will switch from Initializing to Wait PC which will have a countdown. Now go back to the Shearwater Desktop. Click start from the open Update Firmware Box, or Download Log. The PC will then connect to the Perdix, and send the new firmware. The Perdix screen will give percentile updates of receiving the firmware, then the Personal Computer will read Firmware successfully sent to the computer. After receiving the new firmware, the Perdix will reset and display a message stating either firmware update success or failure. Warning: During the update process, the screen may flicker or go blank for a few seconds. Do not remove the battery during the upgrade process. 54

55 Changing the Battery NTE: A large coin or washer is required for this section. Remove the battery cap Insert the coin or washer into the battery cap slot. Unscrew by turning counter clockwise until the battery cap is free. Be sure to store the battery cap in a clean dry space. Exchange the battery Remove the existing battery by tilting the Perdix computer. Insert the new battery positive contact first. A small diagram on the bottom of the Perdix shows the proper orientation. Accepted battery types The Shearwater Perdix can accept a wide variety of AA sized batteries. The Perdix can accept any AA sized (or size) battery that outputs a voltage between 0.9V and 4.3V. Reinstalling the battery cap It is very important that the battery cap -rings are clear of dust or debris. Carefully inspect your -ring for any debris or damage and gently clean. It is recommended that you lubricate your battery cap s -ring on a regular basis with an -ring lubricant compatible with Buna-N (Nitrile) -rings. Lubricating helps ensure that the -ring seats properly and does not twist or bunch. Insert the battery cap into the Perdix and compress the battery contact springs. While the springs are compressed rotate the battery cap clockwise to engage the threads. Be sure not to cross thread the battery cap s threads. Tighten the battery cap until snug and the Perdix powers on. Do not over tighten the battery cap. 55
56 Battery Types After changing the battery, a screen will prompt for the battery type to be entered. The Perdix attempts to guess what type of battery is being used. If the battery type is incorrect, it should be manually edited. Having the battery type set correctly is important so that the Perdix can give low battery warnings at the proper voltage levels. Supported battery types are: 1.5V Alkaline: The common AA battery type that can be purchased at most supermarkets and electronics stores around the world. Not rechargeable. Inexpensive and reliable, they provide 45 hours of operation. Recommended. Alkaline Batteries Can Leak! Alkaline batteries are especially prone to leaking corrosive battery acid when completely discharged. Remove discharged batteries immediately, and do not store your Perdix for more than 2 months with an alkaline battery installed. 1.5V Photo Lithium: Fairly common, but more expensive than alkalines. They provide about 60 hours of operation. Common brand is the Energizer Ultimate Lithium. Not rechargeable. Good for use in very cold water. Recommended. 1.2V NiMH: Common rechargeable batteries used in digital cameras and photo flashes. Can have high self discharge. Provide about 30 hours of operation per charge. Can die quickly, so care should be taken to ensure sufficient charge prior to diving. 3.6V Saft: The Saft LS14500 lithium batteries provide very high energy density. However, their high cost makes other battery types a better choice for most users. Provide about 130 hours of operation. Can die quickly, so care should be taken to ensure sufficient charge prior to diving. 3.7V Li-Ion: Rechargeable14500 Li-Ion batteries provide about 35 hours of operation per charge. Can be ordered from the internet. Have more gradual voltage drop as discharged, so easier to determine remaining capacity than NiMH rechargeables. Good in cold water. NTE: Battery operating lifetimes are given with screen on medium brightness and at room temperature. Higher brightness and lower temperature can reduce life. Lower brightness can increase life. 56
57 Behavior on Battery Change Settings All settings are retained permanently. No loss of settings occurs when changing the battery. Clock The clock (time and date) is saved to permanent memory every 16 seconds when the Perdix is on, and every 5 minutes when off. When the battery is removed, the clock stops running. nce the battery is replaced, the clock is restored to the last saved value (so it is best to remove the battery while the Perdix is on for lowest error). Quick battery changes will not require any adjustment, but the time should be corrected if the battery is removed for more than a few minutes. After replacing the battery a screen appears for quick adjustments to the time The Perdix uses a highly accurate quartz crystal for time keeping. Expected drift is about 1 minute per month. If you notice higher drift, it is likely due to clock stoppage during battery changes, and is easily corrected at the time of a battery change (see image above). Decompression tissue loading The battery may be safely changed between repetitive dives. Like the clock, the decompression tissue loading is saved every 16 seconds to permanent memory when on, and every 5 minutes when off. When the battery is removed the tissues remain stored in the permanent memory and are restored once the battery is replaced, allowing for battery changes between repetitive dives. However, the Perdix does not know for how long the battery was removed, so no surface interval adjustment is applied for the time that the battery is removed. 57
58 For quick battery changes, the un-powered time interval is not significant. However, if the battery is removed shortly after a dive and then remains out for a long period, then residual tissue loading will remain when the battery is replaced. If you have not been diving for more than 4 days, it is safe to reset the tissues to their default levels (System Setup->Reset to Defaults->Tissues nly). therwise, just leave the tissues as is and accept the slightly higher conservatism for the next dive. After a battery change the restored tissues are shown (with shortcut to reset) Resetting the deco tissues sets them to saturated with air at the current atmospheric pressure If at time of battery replacement any tissue is below saturated with air at the current pressure, then that tissue is brought up to being saturated with air. This might happen after a decompression dive that used 100% 2, where the faster tissues are often completely depleted of inert gas loading. Bringing such tissues back up to saturated with air after a battery change is the most conservative approach. When deco tissues are reset, the following are reset: - Inert gas tissue loadings set to saturated with air at current atmospheric pressure - CNS xygen Toxicity set to 0% - Surface Interval time set to 0 - All VPM-B values set to default levels 58
59 Error Displays The system has several displays that alert to error conditions. Limitations of Alarms All alarm systems share common weaknesses. They can alarm when no error condition exists (false positive). r they can fail to alarm when a real error condition occurs (false negative). So by all means respond to these alarms if you see them, but NEVER depend on them. Your judgement, education, and experience are your best defenses. Have a plan for failures, build experience slowly, and dive within your experience. Each of the alarms will display the message in yellow until dismissed. The error is dismissed by pressing the SELECT (right) button. For example. this message will appear if the average PP2 goes above 1.65 for more than 30 seconds. ther errors you may encounter are shown in the table below. DEPTH TIME STP TIME Error 45 5 GasP HIGH PP2 Confirm Highest priority error is listed first. if multiple errors occur simultaneously, the error with the highest priority will be displayed. Clear that error by pressing the SELECT (right) button to see the next error. Error Description Solution Low PP2 The PP2 is below the limit set on Change your breathing gas to one the Adv. Config. page (default 0.19) safe for the current depth. High PP2 The PP2 is above the limit set on Change your breathing gas to one the Adv. Config. page (default 1.65) safe for the current depth. Descend to deeper than the Missed Stop currently displayed stop depth. A required decompression stop was Monitor for symptoms of DCS. violated. Use extra conservatism for future repetitive dives. 59
60 Error Description Solution Fast ascent The ascent was sustained at faster than 10m/min (33 feet/min). Use a slow ascent rate. Monitor for symptoms of DCS. Use extra conservatism for future repetitive dives. Tissues Cleared The decompression tissue inert gas loading has been set to default Plan repetitive dives accordingly. levels. Low Battery Int. The internal battery is low. Replace the battery. High CNS Watchdog Reset Central Nervous System (CNS) toxicity clock high exceeded 90%. The computer has reset to recover from an unexpected software condition. Switch to a gas with a lower PP2 or ascend shallower (decompression ceiling allowing). Please report to Shearwater Research Inc. Reset to Defaults Not really an error, just notification that the reset has been completed. N/A New Unlock Upgrade Failed Various other system level errors Not really an error, just notification that a new unlock has been applied. Firmware update failed, possibly due to a communications error or corrupted file. ther messages than those above may be shown for system level failures. N/A Try the firmware upgrade again. Contact Shearwater if problem persists. Please report to Shearwater Research Inc. The center row also shows permanent "Low PP2" or "High PP2" messages when the PP2 is not in a safe range. These message will clear automatically once a safe PP2 is restored. 60
61 Troubleshooting Symptom Time of day is not accurate Battery life is short Battery dies without warning Troubleshooting The Perdix uses a highly accurate quartz crystal for time keeping. Expected drift is about 1 minute per month. If you notice higher drift, it is likely due to clock stoppage during battery changes. Adjust the time in the System menu. Ensure the battery type setting is correct. The battery gauge will not function correct if the setting does not match the actual. This can be adjusted when the battery is changed. Ensure the battery type setting is correct. The battery gauge will not function correct if the setting does not match the actual. This can be adjusted when the battery is changed. Storage and Maintenance The Perdix dive computer should be stored dry and clean. Do not allow salt deposits to build up on your dive computer. Wash your computer with fresh water to remove salt and other contaminants. Do not use detergents or other cleaning chemicals as they may damage the Perdix dive computer. Allow to dry naturally before storing. Do not wash under high pressure jets of water as it may cause damage to the depth sensor. Store the Perdix dive computer out of direct sunlight in a cool, dry and dust free environment. Avoid exposure to direct ultra-violet radiation and radiant heat. Servicing There are no user serviceable parts inside the Perdix. Do not tighten or remove the faceplate screws. Clean with water NLY. Any solvents may damage the Perdix dive computer. Service of the Perdix may only be done at Shearwater Research, or by any of our authorized service centers. Your nearest service center can be found at 61
62 Specifications Specification perating Modes Decompression Model Display Perdix Model C Tec C Rec C/CC (internal PP2) Gauge Bühlmann ZHL-16C with GF VPM-B and VPM-B/GFS (optional) Full color 2.2" QVGA LCD with always on LED backlight Pressure (depth) sensor Piezo-resistive Calibrated Range 0 Bar to 14 Bar Accuracy +/-20 mbar (at surface) +/-100 mbar (at 14bar) Crush Depth Limit 27 Bar (~260msw) Surface Pressure Range 500 mbar to 1040 mbar Depth of dive start 1.6 m of sea water Depth of dive end 0.9 m of sea water perating Temperature Range +4ºC to +32ºC Short-Term (hours) Temperature Range -10ºC to +50ºC Long-Term Storage Temperature Range +5ºC to +20ºC Battery AA Size, 0.9V to 4.3V User replaceable Battery perating Life (Display Medium Brightness) 45 Hours (AA 1.5V Alkaline) 130 Hours (SAFT LS14500) Communications Bluetooth Smary Ready Compass Resolution 1 Compass Accuracy ±5 Compass Tilt Compensation Yes, over ±45 pitch and roll Dive Log Capacity Appoximately 1000 hours Battery cap o-ring Dual o-rings. Size: AS Material: Nitrile Durometer: 70A Wrist Attachment 2 x 3/4" Elastic Straps with Buckles, or 2 x Bungee Cord (3/16" diameter cord) Weight 152 g Size (W X L X H) 81mm X 71mm X 38mm 62
63 FCC Warning a) USA-Federal Communications Commission (FCC) This equipment has been tested and found to comply with the limits for a Class B digital device, pursuant to Part 15 of FCC Rules. These limits are designed to provide reasonable protection against harmful interference in a residential installation. This equipment generates, uses, and can radiate radio frequency energy. If not installed and used in accordance with the instructions, it may cause harmful interference to radio communications. However, there is no guarantee that interference will not occur in a particular installation. If this equipment does cause harmful interference to radio or television reception, which can be determined by tuning the equipment off and on, the user is encouraged to try and correct the interference by one or more of the following measures: Reorient or relocate the receiving antenna Increase the distance between the equipment and the receiver. Connect the equipment to outlet on a circuit different from that to which the receiver is connected. Consult the dealer or an experienced radio/tv technician for help. Any changes or modifications not expressly approved by the party responsible for compliance could void the user s authority to operate the equipment. Caution: Exposure to Radio Frequency Radiation. This device must not be co-located or operating in conjunction with any other antenna or transmitter. Contains TX FCC ID: T7VPAN10 Industry Canada Warning b) Canada - Industry Canada (IC) This device complies with RSS 210 of Industry Canada. peration is subject to the following two conditions: (1) this device may not cause interference, and (2) this device must accept any interference, including interference that may cause undesired operation of this device. L utilisation de ce dispositif est autorisée seulement aux conditions suivantes : (1) il ne doit pas produire d interference, et (2) l utilisateur du dispositif doit étre prêt à accepter toute interference radioélectrique reçu, même si celle-ci est susceptible de compromettre le fonctionnement du dispositif. Caution: Exposure to Radio Frequency Radiation. The installer of this radio equipment must ensure that the antenna is located or pointed such that it does not emit RF field in excess of Health Canada limits for the general population; consult Safety Code 6, obtainable from Health Canada s website guide-lignes_direct-eng.php#sc6 Contains TX IC: 216Q-PAN10 63
64 Contact Shearwater Research Inc. Headquarters E. Kent Avenue South, Vancouver, BC V5X 4N6, CANADA Tel: EU Service Centre Narked at 90 Ltd. 15 Bentley Court, Paterson Rd, Wellingborough, Northants NN84BQ, UK Tel: +44(0) US Rep & Service Center Rebreathers USA, LLC. Curt McNamee nd PL SE Mill Creek, Washington 98012, USA Tel: Asia/Pac Rep & Service Center Paul Trainor (Underwater bsession) 287 Happy Valley Road whiro Bay, Wellington NZ Tel: Visit us on the web:


65 Last Page
Standalone & EXT Models
 Standalone & EXT Models Table of Contents Introduction...5 Models Covered by this Manual...5 Feature List...5 Turning n...6 Buttons...7 The Main Screen...8 Color Coding...8 The Top Row...9 The Center Row...11
Shearwater GF Computer
 Shearwater GF Computer DANGER This computer is capable of calculating deco stop requirements. These calculations are at best a guess of the real physiological decompression requirements. Dives requiring
OPERATING INSTRUCTION MANUAL. Powerful Simple Reliable
 OPERATING INSTRUCTION MANUAL Powerful Simple Reliable CONTENTS INTRODUCTION.... 5 MODELS COVERED BY THIS MANUAL.... 6 MODES COVERED BY THIS MANUAL.... 6 FEATURE LIST.... 7 INSTALLING STRAPS OR BUNGEE CORD....
Screens. Menus Left Button Information Right Button
 Screens Menus Left Button Information Right Button Modes 1{ OC Tec Air, Nitrox, Trimix 5 gas computer 3{ OC Rec Air, Nitrox 3 gas computer 2{ OC/CC OC/SC for Petrel 2 EXT Air, Nitrox, Trimix 5 gas computer
DIVECOMPUTER.EU USER MANUAL V3.0
 DIVECOMPUTER.EU USER MANUAL V3.0 1 Introduction 5 2 Getting the computer ready to work. 7 2.1 Bungee cord. 7 2.2 Changing the battery. 7 2.3 Turning on. 8 2.3.1 Auto turn-on. 8 2.4 Turning off. 9 2.5 Dive
VERSION
 Shearwater Petrel 1 & 2/Perdix/Perdix AI/NERD 2 Firmware v53 Release Notes VERSION 53 2018.02.21! NOTE A note on models: The NERD 2, Petrel, Petrel 2, Perdix, and Perdix AI share a common firmware base.
Shearwater Pursuit Manual
 Manual Introduction... 5 Features... 5 Decompression and Gradient Factors... 6 Display... 7 Buttons... 8 Menu... 9 Basic Setup...11 Simple Example Dive... 12 Complex Example Dive... 13 Menu Reference...
Ver. 2 Displays And Electronics User Manual
 Ver. 2 Displays And Electronics User Manual REV. 2 Document Control Number: 12-4106 Rev. 2 Publish Date: 12/12/13 Written by: Bruce Partridge Contributor: Kevin Watts This is the operations manual for
Version 44 ( ):
:") note on models: The Petrel, Petrel 2, Perdix, and Perdix I share a common firmware base. Due to hardware differences, not all features are available on all models. The following changes apply to all models
note on models: The Petrel, Petrel 2, Perdix, and Perdix I share a common firmware base. Due to hardware differences, not all features are available on all models. The following changes apply to all models
Matrix Dive Computer. Instruction Manual
 Instruction Manual Matrix Dive Computer MATRIX Dive Computer TABLE OF CONTENTS 1 Introduction 3 1.1 Glossary 3 1.2 OPERATING MODES 4 1.3 Rechargeable battery 4 1.3.1 CHARGING THE BATTERY 4 1.3.2 CONNECTING
Version 53 ( ):
:") note on models: The NERD 2, Petrel, Petrel 2, Perdix, and Perdix I share a common firmware base. Due to hardware differences, not all features are available on all models. The following changes apply to
note on models: The NERD 2, Petrel, Petrel 2, Perdix, and Perdix I share a common firmware base. Due to hardware differences, not all features are available on all models. The following changes apply to
English. English. Predictive Multi Gas for
 English English Predictive Multi Gas for TABLE OF CONTENTS 1. Glossary...1 English 2. Pairing of transmitters and gas summary table...2 3. PMG menu...2 4. RBT=0min in Gas integration menu...2 5. Screen
Technical Diving Software for. User Manual
 Technical Diving Software for User Manual TABLE OF CONTENTS General info 1 Warnings 1 Update 2 1. Differences between the Standard Galileo SW and Tec SW 2 1.1 Model Uwatec ZH16-ADT DD...2 1.2 Trimix...2
Version 65 ( ):
:") note on models: The NERD 2, Petrel, Petrel 2, Perdix, and Perdix I share a common firmware base. Due to hardware differences, not all features are available on all models. The following changes apply to
note on models: The NERD 2, Petrel, Petrel 2, Perdix, and Perdix I share a common firmware base. Due to hardware differences, not all features are available on all models. The following changes apply to
User Manual. Heads-Up Display (HUD) DiveCAN. Mechanical Button Version
 DiveCAN. Mechanical Button Version") User Manual Heads-Up Display (HUD) Mechanical Button Version DiveCAN Table of Contents 1. Introduction...4 1.1 Features...4 2. Physical Description...5 3. Reading the PPO2...6 3.1 Modified Smither s Code...7
User Manual Heads-Up Display (HUD) Mechanical Button Version DiveCAN Table of Contents 1. Introduction...4 1.1 Features...4 2. Physical Description...5 3. Reading the PPO2...6 3.1 Modified Smither s Code...7
Electronic controller for Closed Circuit Rebreather USER S MANUAL. version 1.0
 Electronic controller for Closed Circuit Rebreather USER S MANUAL version 1.0 Table of Contents 2 User s manual 1. INTRODUCTION... 3 1.1 How to Use this Manual...3 1.2 Important - Please Read...3 2. DEFINITIONS...
NiTek X Dive Computer User Guide
 NiTek X Dive Computer User Guide Date of Purchase DEVELOPED BY COPYRIGHT NOTICE WARRANTY INFORMATION Dive Rite 175 NW Washington Street Lake City, FL 32055 Phone: 386.752.1087 Fax: 386.755.0613 Web: www.diverite.com
NiTek X Dive Computer User Guide
 NiTek X Dive Computer User Guide Date of Purchase Content DEVELOPED BY COPYRIGHT NOTICE WARRANTY INFORMATION Dive Rite 175 NW Washington Street Lake City, FL 32055 Phone: 386.752.1087 Fax: 386.755.0613
New product release. Universal Rebreather Monitor (URBM) Three cell / Independent backup
 Three cell / Independent backup") New product release Closed Circuit Research is pleased to announce the launch of our range of Universal Rebreather Monitors Universal Rebreather Monitor (URBM) Three cell / Independent backup Key features
New product release Closed Circuit Research is pleased to announce the launch of our range of Universal Rebreather Monitors Universal Rebreather Monitor (URBM) Three cell / Independent backup Key features
Aladin ONE (Matrix) User Manual
 User Manual") Aladin ONE (Matrix) User Manual ALADIN ONE DIVING COMPUTER - DESIGNED BY DIVING ENGINEERS Welcome to SCUBAPRO dive computers and thank you for purchasing the Aladin One. You are now the owner of an extraordinary
Aladin ONE (Matrix) User Manual ALADIN ONE DIVING COMPUTER - DESIGNED BY DIVING ENGINEERS Welcome to SCUBAPRO dive computers and thank you for purchasing the Aladin One. You are now the owner of an extraordinary
Date of Purchase
 NiTek Trio Dive Computer User Guide www.diverite.com Date of Purchase Content DEVELOPED BY COPYRIGHT NOTICE WARRANTY INFORMATION Dive Rite 175 NW Washington Street Lake City, FL 32055 Phone: 386.752.1087
Dive computer, software version 2.52
 Dive computer, software version 2.52 Liquivision Products, Inc -1- Revision 3.1 Software 2.52 CONTENTS IMPORTANT NOTICES... 6 Agreement and Warranty...7...7 Liquivision Limitation of Liability...7 Trademark
Cochran COMMANDER EMC-20H With Helium Owner's Manual
 www.divecohran.com Cochran COMMANDER EMC-20H With Helium Owner's Manual English - Imperial Ver: CmdrEMC-20H-1.00 For your records, please fill in the following: Serial Number: Your Name: Your Contact:
Smart Dive Computer. Instruction Manual
 Instruction Manual Smart Dive Computer Smart Dive Computer TABLE OF CONTENTS IMPORTANT WARNINGS 3 DISCLAIMER 3 1. INTRODUCTION 3 1.1. GLOSSARY 3 1.2. OPERATING MODES 4 1.3. USER-REPLACEABLE BATTERY 4 1.4.
NAUI RGBM Dive Planner Windows Version Rev 9/2016
 NAUI RGBM Dive Planner Windows Version Rev 9/2016 All Rights Reserved 2003 National Association of Underwater Instructors, Inc. (813) 628-6284 or (800) 553-NAUI (6284) http://www.naui.org Installing the
idive Color New Armored with Multi-Transmitter Side Mount Mode RATIO idive Easy idive Deep idive Tech+ with Multi-Transmitter
 New www.ratio-computers.com idive Color with Multi-Transmitter Armored with Multi-Transmitter Side Mount Mode RATIO idive Easy idive Deep idive Tech+ Dive Modes Mix Deco model (Algorithm) Algorithm adjustment
INCREDIBLY EASY. EASILY INCREDIBLE.
 NEW INCREDIBLY EASY. EASILY INCREDIBLE. NEW The moment you put your head below the surface, you fell in love with diving. Shouldn t you feel the same way about your dive computer? SCUBAPRO s ground-breaking
Version 3.1.0: New Features/Improvements: Improved Bluetooth connection on Windows 10
 Version 3.1.0: Improved Bluetooth connection on Windows 10 ***Important notice for Mac Users: Upgrading from Shearwater Desktop 3.0.8 to 3.1.0 will not cause issues. Upgrading from any 2.X.X to any 3.X.X
TDC-3 user manual. by Technical Dive Computers Inc. Victoria BC Canada
 TDC-3 user manual by Technical Dive Computers Inc. Victoria BC Canada v3.05 January, 2019 http://www.tdc-3.com/ Technical Dive Computers inc. Copyright2018 All rights reserved. TDC-3 user manual 2 Table
NAVY EOD III Low Magnetic Signature DIVE COMPUTER Operator's Manual
 NAVY EOD III Low Magnetic Signature DIVE COMPUTER Operator's Manual English Language - Imperial Units Version 001i USER INFORMATION For your records, please fill in the following information. SERIAL NUMBER
INCREDIBLY EASY EASILY INCREDIBLE
 NEW INCREDIBLY EASY EASILY INCREDIBLE NEW The moment you put your head below the surface, you fell in love with diving. Shouldn t you feel the same way about your dive computer? SCUBAPRO s ground-breaking
Cochran EMC-20H FO2/PO2 Owner's Manual
 www.divecochran.com Cochran EMC-20H FO2/PO2 Owner's Manual English - Imperial Ver: EMC-20H FO2PO2-2.50 For your records, please fill in the following: Serial Number: Your Name: Your Contact: Purchase Date:
Introduction. The Shearwater Petrel is an advanced technical diving computer for open and closed circuit divers.
 Introduction The Shearwater Petrel is an advanced technical diving computer for open and closed circuit divers. Although we strive to make the Petrel easy enough to use without reading the manual, please
UNDERSTANDING A DIVE COMPUTER. by S. Angelini, Ph.D. Mares S.p.A.
 UNDERSTANDING A DIVE COMPUTER by S. Angelini, Ph.D. Mares S.p.A. Dive Computer UNDERSTANDING A DIVE COMPUTER The decompression algorithm in a dive computer is an attempt to replicate the effects of a dive
Smart Dive Computer. Instruction Manual
 Instruction Manual Smart Dive Computer Smart Dive Computer TABLE OF CONTENTS 1. INTRODUCTION 3 1.1. GLOSSARY 3 1.2. OPERATING MODES 4 1.3. USER-REPLACEABLE BATTERY 4 1.4. CONNECTING SMART TO A PC OR MAC
Aladin TEC 3G User manual
 Aladin TEC 3G User manual SAFETY CONSIDERATIONS You must carefully read and understand this entire manual before using your Scubapro Aladin TEC 3G. Diving has many inherent risks. Even if you follow the
SUUNTO EON STEEL 1.6 USER GUIDE
 SUUNTO EON STEEL 1.6 USER GUIDE 2018-05-08 1. Safety...4 2. Getting started...7 2.1. Display states and views... 7 2.2. Icons...7 2.3. Set up... 8 3. Features... 9 3.1. Alarms, warnings and notifications...9
Previous Release Notes
 Release Notes Shearwater Desktop 3.1.5 Support for NERD 2. Previous Release Notes Version 3.1.4 Improved Bluetooth Reliability with the initial connection. Bug Notes: dded software workaround to allow
Diving at Altitude. Part One: Starting with Residual Nitrogen. By John Adsit January 30, 2018
 Diving at Altitude By John Adsit January 30, 2018 Diving at altitude demands adjustments to the procedures used at sea level. With moderate increases in altitude and with shallower dives, the differences
CHROMIS DIVING COMPUTER - DESIGNED BY DIVING ENGINEERS WARNING
 Chromis User Manual CHROMIS DIVING COMPUTER - DESIGNED BY DIVING ENGINEERS Welcome to SCUBAPRO dive computers and thank you for purchasing Chromis. You are now the owner of an extraordinary partner for
Ratio Deco. Overview. Global Perspective
 Ratio Deco Overview Ratio deco is simply an on the fly system of applying a set of rules to develop a decompression strategy that will work for you in your range of diving. These rules are derived from
Planning Decompression Diving Gas Requirements in Open Water
 Planning Decompression Diving Gas Requirements in Open Water 1 Background During our Open Water classes we were taught that we should be on the surface with an amount of gas remaining, usually 35-50bar.
Cochran EMC-20H With Helium Owner's Manual
 www.divecohran.com Cochran EMC-20H With Helium Owner's Manual English - Metric Ver: EMC-20H-2.50m For your records, please fill in the following: Serial Number: Your Name: Your Contact: Purchase Date:
Aladin SPORT User manual
 Aladin SPORT User manual Safety considerations I Safety considerations You must carefully read and understand this entire manual before using your Scubapro Aladin SPORT. Diving has many inherent risks.
POSEIDON M28 USER MANUAL 1.2 fw version 1.8
 POSEIDON M28 USER MANUAL 1.2 fw version 1.8 Table of Contents Table of Contents 1 Conventions Used in this Guide 4 Preface 6 Chapter 1 Preparation 7 An overview of the M28 8 Charger cable 9 Charging 10
SUUNTO EON CORE USER GUIDE
 SUUNTO EON CORE USER GUIDE 2017-11-05 1. Safety...4 2. Getting started...7 2.1. Display states and views... 7 2.2. Icons...7 2.3. Set up... 8 2.4. Product compatibility...8 2.5. Before you dive... 9 3.
RESA Standards V1.0 16/08/18
 RESA Standards V1.0 16/08/18 Table of Contents Notes Page 4. Introduction Page 5. CCR Diver Page 10. Decompression CCR Diver Page 17. Trimix CCR Diver 60m Page 23. Trimix CCR Diver 100m Page 29. CCR Crossover
Color Dive Computer. Instruction Manual
 Instruction Manual Color Dive Computer ICON HD Dive Computer TABLE OF CONTENTS 1 INTRODUCTION 3 1.1 GLOSSARY 3 1.2 OPERATING MODES 4 1.3 TURNING ON ICON HD AND MAIN MENU 4 1.4 RECHARGEABLE BATTERY 4 1.4.1
RESA STANDARDS V2.0 15/12/2018
 RESA STANDARDS V2.0 15/12/2018 1 TABLE OF CONTENTS INTRODUCTION... 3 CCR DIVER... 4 CCR DECOMPRESSION DIVER... 9 TRIMIX CCR DIVER 60m... 15 TRIMIX CCR DIVER 100m... 20 CCR DIVER CROSSOVER... 25 2 INTRODUCTION
Color Dive Computer. Instruction Manual
 Instruction Manual Color Dive Computer Icon HD Dive Computer TABLE OF CONTENTS ICON HD 3 CHARACTERISTICS OF ICON HD 3 IMPORTANT WARNINGS 3 RESPONSIBLE DIVING PRACTICES 3 HOW ICON HD WORKS 4 DURING THE
DT 630 ALTIMETER, BAROMETER AND COMPASS WATCH OPERATING INSTRUSTIONS
 DT 630 ALTIMETER, BAROMETER AND COMPASS WATCH OPERATING INSTRUSTIONS Overview:--- Positive or Negative Icon Barometric Trend Indicator SELECT Low Battery Indicator AM/FM Indicator Daily Alarm Indicator
idive Easy User manual Ver 3.2
 Easy User manual Ver 3.2 1 ATTENTION: Changes or modifications not expressly approved by the party responsible for compliance could void the user s authority to operate the equipment. This device complies
VEO 4.0 OPERATING MANUAL VEO 4.0 DIVE COMPUTER OPERATING MANUAL. Doc. No r01 (3/20/19)
") VEO 4.0 DIVE COMPUTER OPERATING MANUAL Pelagic, 2019 1 CONTENTS NOTICES 4 GETTING STARTED 6 BASICS 7 ACTIVATION 7 BUTTONS 9 DIVE FEATURES 11 DTR (DIVE TIME REMAINING) 12 NO DECOMPRESSION 12 O2 MIN (OXYGEN
VEO 4.0 DIVE COMPUTER OPERATING MANUAL Pelagic, 2019 1 CONTENTS NOTICES 4 GETTING STARTED 6 BASICS 7 ACTIVATION 7 BUTTONS 9 DIVE FEATURES 11 DTR (DIVE TIME REMAINING) 12 NO DECOMPRESSION 12 O2 MIN (OXYGEN
NEMO EXCEL User s Guide
 NEMO EXCEL Dive computer User s Guide Nemo Excel dive computer TABLE OF CONTENTS Nemo Excel dive computer 3 responsible Diving Practices 3 Quick Start Guide 3 Time Mode display 3 Time Menu 4 Time Menu
User manual. hwos tech. OSTC dive computer with the Firmware OSTC 2 TR OSTC 2. OSTC cr. OSTC plus
 User manual OSTC 2 TR OSTC 2 OSTC cr OSTC plus OSTC dive computer with the Firmware hwos tech 1 Your OSTC Thank you for choosing a heinrichs weikamp dive computer! The firmware hwos tech which is used
POSEIDON M28 USER MANUAL 1.4 OS version 2.1.7
 POSEIDON M28 USER MANUAL 1.4 OS version 2.1.7 Table of Contents Table of Contents 1 Version update log 4 Conventions Used in this Guide 5 Preface 7 Features: 7 Conformance with CE requirements 8 Chapter
Veo 200/250 dive computers operating manual
 OCEANIC Veo 200/250 dive computers operating manual LIMITED TWO-YEAR WARRANTY For details, refer to the Product Warranty Registration Card provided. COPYRIGHT NOTICE This operating manual is copyrighted,
DIY DECOMPRESSION. By Stuart Morrison. (c) 2000 Stuart Morrison/Liquid Technology
 2000 Stuart Morrison/Liquid Technology") DIY DECOMPRESSION By Stuart Morrison (c) 2000 Stuart Morrison/Liquid Technology The author accepts no responsibility for any errors contained within this article or injuries or illness arising from using
DIY DECOMPRESSION By Stuart Morrison (c) 2000 Stuart Morrison/Liquid Technology The author accepts no responsibility for any errors contained within this article or injuries or illness arising from using
PRO PLUS 2. dive computer. operating manual
 PRO PLUS 2 dive computer operating manual LIMITED TWO-YEAR WARRANTY For details, refer to the Product Warranty Registration Card provided. COPYRIGHT NOTICE This operating manual is copyrighted, all rights
Ascent to Altitude After Diving
 Ascent to Altitude After Diving On many occasions, divers have a need to ascend to a higher altitude after diving, and they need guidance on how long they need to wait before doing so. The reason they
OperatorsManual. Multi gas, multi mode decompression computer
 OperatorsManual Multi gas, multi mode decompression computer Warning! Failure to read and understand this instruction manual in full may result in mis-use of the equipment, injury or even death. Please
DIVE COMPUTER SYSTEM INSTRUCTION MANUAL (Android version)
") DIVE COMPUTER SYSTEM INSTRUCTION MANUAL (Android version) Contents 1. WELCOME TO DIVEPHONE SYSTEM... 4 1.1. System components... 4 1.2. How it works?... 4 1.3. Depth Monitor Software Requirements... 4
DIVE COMPUTER SYSTEM INSTRUCTION MANUAL (Android version) Contents 1. WELCOME TO DIVEPHONE SYSTEM... 4 1.1. System components... 4 1.2. How it works?... 4 1.3. Depth Monitor Software Requirements... 4
Aladin Square User manual
 Aladin Square User manual SQUARE DIVING COMPUTER - DESIGNED BY DIVING ENGINEERS Welcome to SCUBAPRO dive computers and thank you for purchasing Square. You are now the owner of an extraordinary partner
Puck Pro Dive Computer. Instruction Manual
 Instruction Manual Puck Pro Dive Computer Puck Pro Dive Computer TABLE OF CONTENTS 1 Introduction 3 1.1 Glossary 3 1.2 OPERATING MODES 4 1.3 USER-REPLACEABLE battery 4 1.4 CONNECTING Puck Pro TO A PC or
Altimeter and Compass Watch Instruction Manual
 Altimeter and Compass Watch Instruction Manual Overview Figure 1 LCD display description Features Hour, minute, second, year, Auto calendar 12/24 hour format display month, day, day of week Daily alarm
XP-3G. English Deutsch Français Italiano Español Nederlands 日本語简体中文
 XP-3G Deutsch Français Italiano Español Nederlands 日本語简体中文 Safety considerations You must carefully read and understand this entire manual before using your Subgear XP-3G. Diving has many inherent risks.
Instruction booklet Nemo
 Instruction booklet Nemo Congratulations! Your new NEMO Watch-Dive Computer is the result of the latest Mares technology, and has been designed to guarantee maximum safety, efficiency, reliability and
Aladin TEC 2G. Deutsch English. Nederlands Español Italiano Français. User manual. Bedienungsanleitung. Manuel d utilisation.
 Nederlands Español Italiano Français Deutsch English User manual Bedienungsanleitung Manuel d utilisation Manuale d uso Instrucciones para el uso Handleiding Aladin TEC 2G Safety considerations You must
XP EINS USER MANUAL. Contents: 1.1XP EINS USER S MANUAL
 XP EINS USER MANUAL Contents: 1.1 XP EINS USER S MANUAL... 1 1.2 INTRODUCTION... 2 2. WATCH FUNCTIONS...3 3. DIVE COMPUTER FUNCTIONS...5 4. ADVANCED TIME FUNCTIONS..6 5. ADVANCED DIVE COMPUTER FUNCTIONS...7
COSMIQ + Dive Computer User Manual. Firmware version 1.7. Deepblu, Inc. All rights reserved.
 COSMIQ + Dive Computer User Manual Firmware version 1.7 Deepblu, Inc. All rights reserved. Contents 1. Overview 1 1.1 COSMIQ versus COSMIQ + 1 1.2 Key features 1 2. Safety information 2 2.1 Safely diving
New product release. Universal Rebreather Monitor (URBM) Single O2 cell and Dual HP package
 Single O2 cell and Dual HP package") New product release Closed Circuit Research is pleased to announce the launch of our range of Universal Rebreather Monitors Key features and benefits include: Universal Rebreather Monitor (URBM) Single
New product release Closed Circuit Research is pleased to announce the launch of our range of Universal Rebreather Monitors Key features and benefits include: Universal Rebreather Monitor (URBM) Single
PC Configuration software for Discovery MkVI v 1.03 User guide
 PC Configuration software for Discovery MkVI v 1.03 User guide This user guide describes the different features included in PC Config software, version 1.03, and how they are used. When referring to this
Aqua Lung International, Inc. (2016) Doc r03 (3/28/16)
 Doc r03 (3/28/16)") i550 Dive Computer Owner's Manual NOTICES LIMITED TWO-YEAR WARRANTY For warranty details and to register your product, refer to www.aqualung.com. COPYRIGHT NOTICE This owner's manual is copyrighted, all
i550 Dive Computer Owner's Manual NOTICES LIMITED TWO-YEAR WARRANTY For warranty details and to register your product, refer to www.aqualung.com. COPYRIGHT NOTICE This owner's manual is copyrighted, all
 WELCOME This QuickStart Guide will help you to understand the basic surface and underwater operation of the Oceanic DataMask. Prior to diving with the DataMask, you must also read and understand both the
OCEANIC XTC-100. owner's guide
 OCEANIC XTC-100 owner's guide RESPONSIBLE COMPUTER DIVING Always Plan Each Dive Always Limit Your Dive to the Level of Your Training and Experience Always Make Your Deepest Dive First Always Make The Deepest
Addendum 2: Correlations of VPM-B(2), RGBM, and GF Gradients and Tensions
, RGBM, and GF Gradients and Tensions") Addendum : Correlations of VPM-B(), RGBM, and GF Gradients and Tensions Compartment Gradients and Tensions are Tracked Stop-by-Stop for Alternative Ascents from a min dive to ft on Trimix 8/ This addendum
Addendum : Correlations of VPM-B(), RGBM, and GF Gradients and Tensions Compartment Gradients and Tensions are Tracked Stop-by-Stop for Alternative Ascents from a min dive to ft on Trimix 8/ This addendum
PROPLUS X OPERATING MANUAL PROPLUS X DIVE COMPUTER OPERATING MANUAL. Doc. No r01 (8/19/16)
") PROPLUS X DIVE COMPUTER OPERATING MANUAL Pelagic, 2016 1 CONTENTS NOTICES 3 GETTING STTED 5 BASICS 6 POWER 6 CHGING THE BATTERY 6 ACTIVATION 6 QUICK DISCONNECT HOSE 7 BUTTONS 9 HOME MENU 10 HOME MENU 11
PROPLUS X DIVE COMPUTER OPERATING MANUAL Pelagic, 2016 1 CONTENTS NOTICES 3 GETTING STTED 5 BASICS 6 POWER 6 CHGING THE BATTERY 6 ACTIVATION 6 QUICK DISCONNECT HOSE 7 BUTTONS 9 HOME MENU 10 HOME MENU 11
Galileo 2 (G2) User Manual
 User Manual") Galileo 2 (G2) User Manual 2 GALILEO 2 (G2) USER MANUAL GALILEO 2 (G2) USER MANUAL The G2 Diving Computer Designed for all kinds of diving. Welcome to SCUBAPRO dive computers and thank you for purchasing
Galileo 2 (G2) User Manual 2 GALILEO 2 (G2) USER MANUAL GALILEO 2 (G2) USER MANUAL The G2 Diving Computer Designed for all kinds of diving. Welcome to SCUBAPRO dive computers and thank you for purchasing
SEEMANN XP 5 OWNER`S GUIDE
 SEEMANN XP 5 OWNER`S GUIDE LIMITED TWO-YEAR WARRANTY For details, refer to the Product Warranty Registration Card provided. COPYRIGHT NOTICE This owner s guide is copyrighted, all rights are reserved.
Quad Air Dive Computer. Instruction Manual
 Instruction Manual Quad Air Dive Computer Quad Air Dive Computer TABLE OF CONTENTS IMPORTANT WARNINGS 3 DISCLAIMER 3 1. INTRODUCTION 3 1.1. GLOSSARY 3 1.2. OPERATING MODES 4 1.3. USER-REPLACEABLE BATTERY
Syllabus Number: 3.B.35 / BOD n. 188 ( ) CMAS CCR Diver diluent air/nitrox Training Program Minimum Training Program Content
 CMAS CCR Diver diluent air/nitrox Training Program Minimum Training Program Content") Syllabus Number: 3.B.35 / BOD n. 188 ( 09-06-2014 ) CMAS CCR Diver diluent air/nitrox Training Program Minimum Training Program Content 1. Required theoretical knowledge 1.1 Subject Area 1: Introduction
Syllabus Number: 3.B.35 / BOD n. 188 ( 09-06-2014 ) CMAS CCR Diver diluent air/nitrox Training Program Minimum Training Program Content 1. Required theoretical knowledge 1.1 Subject Area 1: Introduction
GALILEO 2 CONSOLE (G2C) USER MANUAL
 USER MANUAL") GALILEO 2 CONSOLE (G2C) USER MANUAL 2 GALILEO 2 CONSOLE (G2C) USER MANUAL GALILEO 2 CONSOLE (G2C) USER MANUAL The G2C Diving Computer Designed for console specialists. Welcome to SCUBAPRO dive computers
GALILEO 2 CONSOLE (G2C) USER MANUAL 2 GALILEO 2 CONSOLE (G2C) USER MANUAL GALILEO 2 CONSOLE (G2C) USER MANUAL The G2C Diving Computer Designed for console specialists. Welcome to SCUBAPRO dive computers
SUUNTO D6I USER GUIDE
 SUUNTO D6I USER GUIDE 2 1 Safety... 5 2 Getting started... 11 2.1 Display states and views... 11 2.2 Icons... 11 2.3 Set up... 13 2.4 Software version check... 14 3 Features... 17 3.1 Activation and pre-checks...
Instructions For Use. Recreational Dive Planner DISTRIBUTED BY PADI AMERICAS, INC.
 Instructions For Use 30 40 50 Recreational Dive Planner 60 70 DISTRIBUTED BY PADI AMERICAS, INC. CAUTION: Do not attempt to use this product without first reading the instructions for use. This product
Nemo Wide. JoeDiverAmerica.com
 Nemo Wide Manuale d istruzioni User s Guide Bedienungsanleitung Manuel d utilisation Manual de instrucciones Manual de instruções Gebruikershandleiding Användarinstruktioner Οδηγίες χρήσης Käyttäjän Opas
12m. Instructions For Use. 14m. 16m. 18m. Recreational Dive Planner. 20m DISTRIBUTED BY PADI AMERICAS, INC.
 Instructions For Use 12m 14m 16m Recreational Dive Planner 18m 20m DISTRIBUTED BY PADI AMERICAS, INC. Recreational Dive Planner Instructions for Use Distributed by PADI Americas, Inc. CAUTION: Do not attempt
Dive Computer NEMO SPORT
 Nemo Sport Manuale d istruzioni User s Guide Bedienungsanleitung Manuel d utilisation Manual de instrucciones Manual de instruções Gebruikershandleiding Användarinstruktioner Οδηγίες χρήσης Käyttäjän Opas
SUUNTO D6I USER GUIDE
 SUUNTO D6I USER GUIDE 2018-05-16 1. Safety...4 2. Getting started...7 2.1. Display states and views... 7 2.2. Icons...7 2.3. Set up... 8 2.4. Software version check... 8 2.5. Product compatibility... 9
Computers and Dive Tables. Revised September 17, 2017
 Computers and Dive Tables Revised September 17, 2017 South Carolina Aquarium Dive Operations Arnold Postell Dive Safety Officer / Senior Biologist (843) 579-8536 apostell@scaquarium.org Ryan Yuen Assistant
500AI. owner's guide
 500AI owner's guide RESPONSIBLE COMPUTER DIVING Always Plan Each Dive Always Limit Your Dive to the Level of Your Training and Experience Always Make Your Deepest Dive First Always Make The Deepest Part
Contact. For any questions relating to your OSTC sport please contact us via. internet forum: forum.heinrichsweikamp.com
 User Manual Contact For any questions relating to your OSTC sport please contact us via internet forum: forum.heinrichsweikamp.com e-mail: info@heinrichsweikamp.com post: heinrichs weikamp Adlerstraße
SUUNTO VYPER NOVO USER GUIDE
 SUUNTO VYPER NOVO USER GUIDE 2017-02-24 2 1 Safety... 5 2 Getting started... 11 2.1 Display states and views... 11 2.2 Icons... 11 2.3 Set up... 13 3 Features... 14 3.1 Activation and pre-checks... 14
FOR YOUR SAFETY...5 INTRODUCTION...7 SECTION
 Owner's Manual 2 Contents FOR YOUR SAFETY...5 INTRODUCTION...7 SECTION 1: Using the QuantumX on the Surface...8 The Push Buttons...8 Time Display Mode (pre-dive)...10 Backlight... 12 Low Battery Indicator...
SUUNTO D6I USER GUIDE
 SUUNTO D6I USER GUIDE 2017-02-24 2 1 Safety... 5 2 Getting started... 11 2.1 Display states and views... 11 2.2 Icons... 11 2.3 Set up... 13 2.4 Software version check... 14 3 Features... 17 3.1 Activation
SUUNTO ZOOP NOVO USER GUIDE
 SUUNTO ZOOP NOVO USER GUIDE 2018-05-16 1. Safety...4 2. Getting started...7 2.1. Display states and views... 7 2.2. Set up... 7 2.3. Icons...7 3. Features... 9 3.1. Activation and pre-checks... 9 3.1.1.
i100 Dive Computer Owner's Manual Aqua Lung International, Inc. (2017) Doc r04 (10/11/17)
 Doc r04 (10/11/17)") i100 Dive Computer Owner's Manual NOTICES LIMITED TWO-YEAR WARRANTY For warranty details and to register your product, refer to www.aqualung.com. COPYRIGHT NOTICE This owner's manual is copyrighted, all
i100 Dive Computer Owner's Manual NOTICES LIMITED TWO-YEAR WARRANTY For warranty details and to register your product, refer to www.aqualung.com. COPYRIGHT NOTICE This owner's manual is copyrighted, all
Smart Apnea Computer. Instruction Manual
 Instruction Manual Smart Apnea Computer Smart Apnea Computer TABLE OF CONTENTS 1. INTRODUCTION 3 1.1. OPERATING MODES 3 1.2. USER-REPLACEABLE BATTERY 3 1.3. CONNECTING SMART APNEA TO A PC OR MAC 3 1.4.
DATAMASK HUD. Water or Push Button Modified Haldanean / DSAT (Diving Science and Technology) Database Each Level provides No.
 Database Each Level provides No.") FEATURES & FUNCTIONS Modes of Operation DATAMASK HUD Air, Nitrox, Gauge, and Free Dive Push Buttons 2 Mounting Options Activation Algorithm Basis Personal Conservative Factor Adjustment Altitude Algorithm
FEATURES & FUNCTIONS Modes of Operation DATAMASK HUD Air, Nitrox, Gauge, and Free Dive Push Buttons 2 Mounting Options Activation Algorithm Basis Personal Conservative Factor Adjustment Altitude Algorithm
Resource Pro FULL LCD DISPLAY. 1b 8. 2a 14 O D E C O
 OWNERSMANUAL FULL LCD DISPLAY Resource Pro 1a 5 4 6 3 7 AIR NITROX MAX M FT 1b D E C 8 O BT OTL TAT D E C O O 2 SAT STOP PO2 AM PM D E C O D E C O 1c 9 13 10 11 12 1a. Nitrogen Bar Graph - (No Deco) 1b.
20. TDI Advanced Mixed Gas Closed Circuit Rebreather, Unit Specific, Ambient Pressure Inspiration & Evolution, Diver Course
 20. TDI Advanced Mixed Gas Closed Circuit Rebreather, Unit Specific, Ambient Pressure Inspiration & Evolution, Diver Course 20.1 Introduction This is the highest level certification course for divers wishing