INSTALLATION, OPERATION AND MAINTENANCE MANUAL ZERO WASTE REVERSE OSMOSIS SYSTEM
|
|
|
- Jodie Greene
- 5 years ago
- Views:
Transcription

1 INSTALLATION, OPERATION AND MAINTENANCE MANUAL Warning Please read carefully before proceeding with installation. Your failure to follow a attached instructions or operating parameters may lead to the product's failure and possible damage to property. ******************************************************************************************* Save manual for future reference. Model FMRO4-ZW ZERO WASTE REVERSE OSMOSIS SYSTEM
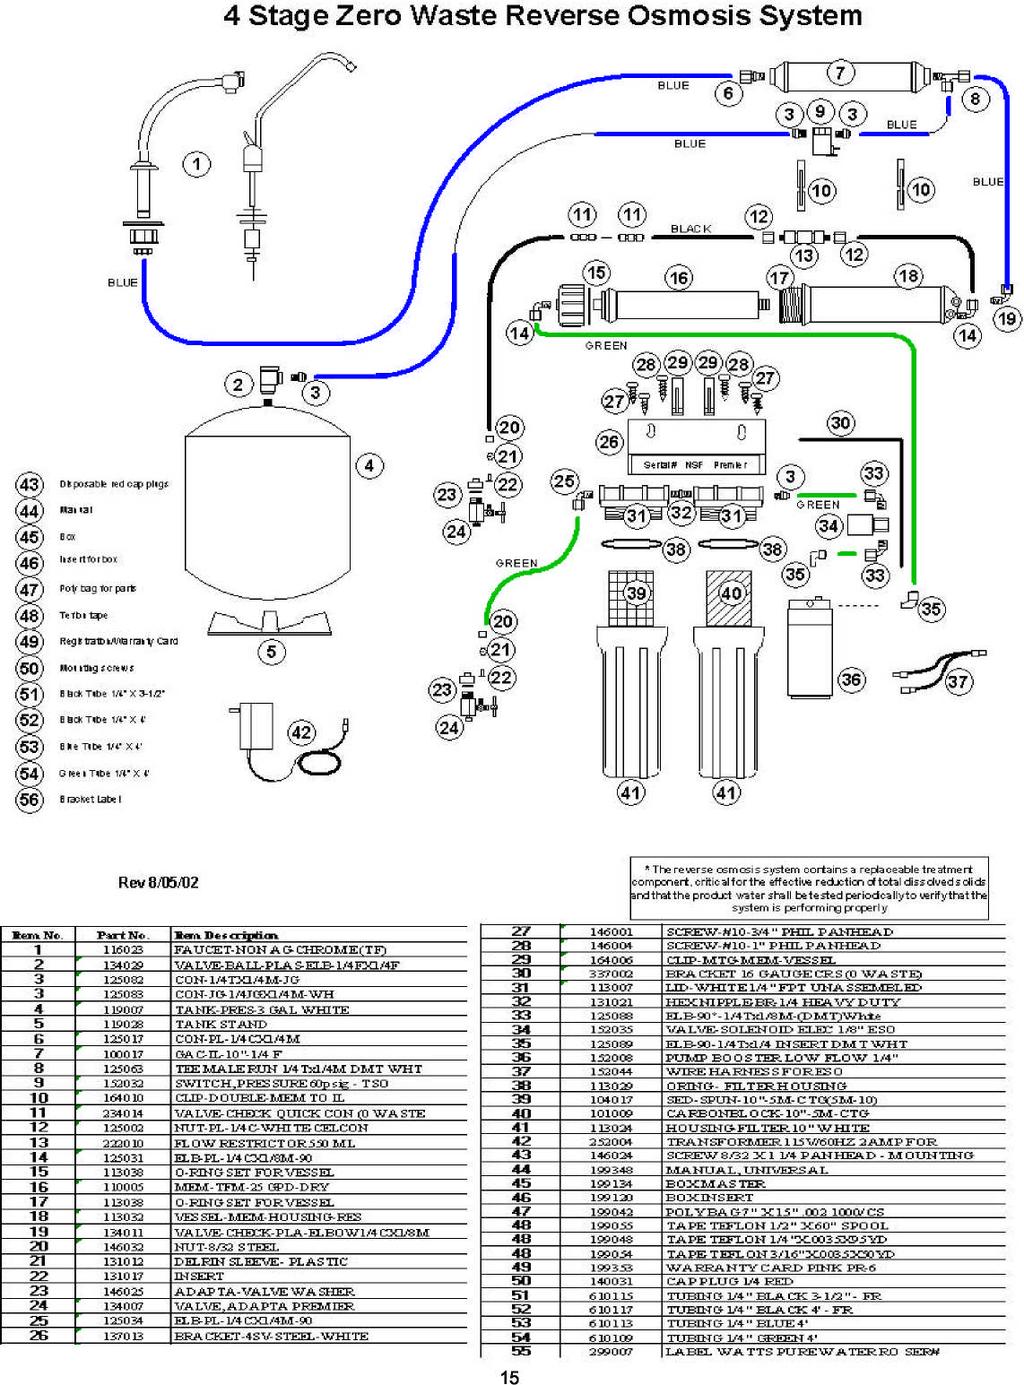
2 Thank you for your purchase of a Flowmatic Reverse Osmosis system. With proper installation and maintenance, this system will provide you with high quality water for years to come. All of Flowmatic water enhancement products are rigorously tested by independent laboratories for safety and reliability. If you have any questions or concerns, please contact our customer service department at TABLE OF CONTENTS Operational Parameters...3 ZRO-4 System...3 Tools recommended for Installation...3 Installation of faucet...4 Installation of hot and cold water line fittings...5 Mounting the RO module...6 Connecting the tube to faucet...6 Connecting the tubes to the hot & cold water supply valves. 6 Installation of storage tank...7 Connecting the tank...7 Start up instructions...8 Semi-annual Maintenance...8 Annual Maintenance...9 Membrane Maintenance...10 Trouble Shooting...11 Check air pressure in the tank...11 Adjust faucet...12 Service Record...13 Warranty...14 Drawing and Parts list...15 Other products
 Minimum 40 F ( 4.4 C) Operating Pressure: Maximum 100 psi (7.43 g/cm2) Minimum 40 psi (2.")

3 Operational Parameters Do not use with water that is microbiologically unsafe or of unknown quality, without adequate disinfection before or after the system. Operating Temperatures: Maximum 100 F (37.8 C) Minimum 40 F ( 4.4 C) Operating Pressure: Maximum 100 psi (7.43 g/cm2) Minimum 40 psi (2.80 kg/cm2) ph Parameters: Maximum 11 Minimum 3 Iron: TDS (Total Dissolved Solids): Turbidity: Maximum 0.2 ppm < 1000 ppm <5NTU Hardness: Recommended hardness not to exceed 7 grains per gallon, or 120ppm. System will operate with hardness over 7 grains but the membrane life may be shortened. Addition of a water softener may lengthen the membrane life. Note: RO unit must be installed a mimimun of 25 feet from hot water heater. FMRO4-ZW System System includes: RO module, 24 volt Pump, 3 gal Storage tank, Long reach faucet, Manual, Warranty Card, Parts Bags, (2 Water line fitting valves, 2 Washers,Transformer, 2 Mounting screws, 1 Teflon tape roll, 2 Brass inserts, 2 Plastic sleeves, 1 Ball valve, one 1/4 Connector) Tools recommended for installation 7/16 Drill bit for faucet Channel lock piers Phillips Screw Driver 1/2" - 5/8" Open End Wrench Adjustable Wrench Sharp knife Electric Drill 3
4 Installation of Faucet Caution: Porcelain sink surface material is extremely hard and may crack or chip. Use extreme caution when drilling. Watts accepts no responsibility for damage resulting from the installation of the faucet. Black Locating Washer (used where a 1/2" hole is available, reverse when mounting on stainless steel or when using drilled hole) Brass Insert (sleeve) 1 /4" Tub Plastic Sleeve 1 /4" Compression Nut Step 1 Step 2 Step 4 Step 5 Determine desired location to drill a hole for the faucet on your sink. Using a variable speed dril on the slowest speed, dril a 7/16 hole for the faucet.use water to keep the drill bit cool while drilling. (If the drill bit gets hot it may cause the porcelain to crack or chip). Step 3 Place the escutcheon chrome plate and the black rubber washer on the faucet shank. (Parts found in faucet parts bag). Insert the faucet shank through the hole in sink and let it rest on the sink top. From the underside of the sink slide on the locating washer, lock washer and brass nut onto the shank. Check orientation of faucet then tighten brass nut securely. 4

 3/8\"M X 1/2\"F Adapter Rubber Washer 1/4\" Compression Nut Plastic Sleeve Brass Insert")


5 Installation of hot and cold water supply line valves For 3/8 plumbing For 1/2 plumbing Hand tighten brass nuts then apply 1/4 turn with a wrench. To RO System 1/2"M X 3/8"F X 1/4"Comp. with needle valve 1/4" Compression Nut Plastic Sleeve Brass Insert Angle Stop Valve (not included) 3/8"M X 1/2"F Adapter Rubber Washer 1/4" Compression Nut Plastic Sleeve Brass Insert Angle Stop Valve (not included) RO Tubes will be connected on page 6. Step 6 Step 7 Step 8 Step 9 Turn off the hot and cold water supply to the faucet by turning the angle stop valves off. Remove water supply line at faucet to the angle stop valves. Attach the water supply line valves as illustrated in the drawings above. Re -attach the water supply line to the fittings attached to the angle stop valves. 5


6 Mounting the RO module Step 10 Determine the best location for the RO Module to be mounted and allow for future system maintenance. Use a Phillips screwdriver and secure the screws 5 3/4 apart and 16 from the botom of the cabinet. Note: There will be (2) Blue, (1) Green and (1) Black coming from the module. Do not cut these tubes at this time. Connecting to the faucet Step 11 Step 12 Connect blue tube from in-line filter over to the faucet shank. Place the brass nut onto the tube, followed by the plastic sleeve (tapered end pointing to the end of tube) and then place the brass insert into the end of the tube. Insert the blue tube into the end of the faucet shank and use a wrench to tighten the brass nut securely. Connect the hot and cold water supply line valves Step 13 Insert the Green tube into the Cold water needle valve fiting 1/4 tube compression fitting until it stops. Slide the Nut and Plastic Sleeve down to where you can thread them onto the male pipe threads. Use a 1/2 wrench to securely tighten. Step 14 Insert the Black tube into the Hot water needle valve fitting 1/4 tube compression fiting until it stops. Slide the Nut and the Plastic Sleeve down to where you can thread them onto the male pipe threads. Use a 1/2 wrench to securely tighten. 6
 onto the stainless steel connector on the tank.")
 into the ball valve attached to the tank.")

7 Installation of Storage Tank Step 15 Apply Teflon tape in a clockwise direction around the male pipe threads on the tank. Thread the ball valve (supplied in the parts bag) onto the stainless steel connector on the tank. Note: Do not over tighten plastics connections. Step 16 Step 17 Thread 1/4 plastic connector fiting (supplied in the parts bag) into the ball valve attached to the tank. Connecting the Tank Step 18 Postion the tank in the desired location. Stand it upright or using black plastic stand lay it on it s side. Connect remaining blue tube from he RO module over to the tank ball valve connector. Step 19 Push blue tube into the connector on the end of ball valve until it stops. Use a wrench to securely tighten the nut on the connector. 7

8 Start up Instructions Warning: To prevent the possibility of electrical shock, clean up any water on cabinet floor and dry all water from outside of RO unit. Step 1 Turn on the incoming hot and cold water angle stop valves. Turn on the water line needle valves by turning counter clockwise. Check the system for leaks and tighten fittings as necessary. Note: Check daily over the next week to ensure no leaks are present. Step 2 Plug the (24 volt) transformer power cord connector into the RO system wire harness connector (labeled transformer.) Step 3 Step 4 Step 5 Plug the transformer into the electrical outlet under the sink. Ensure ball valve on tank is open. Open the RO faucet and leave it open until water begins to drip. Then close the faucet. The tank will take 2 to 4 hours to fill completely. Note: Water may be cloudy or milky due to air in the system. This conditions will resolve its self after a couple of tanks of water. After a final filter change you will see gray water until the carbon particles have flushed from the filter. Step 6 Step 7 After the tank has filled once, open the RO faucet and drain the tank. Close RO faucet and allow the tank to fill, (2-4 hours). System is now ready to use. Note: This system can be hooked up to an ice maker. Place a tee after the final filter and before the faucet. It is recommended to install a ball valve on the ice maker line. This enables you to shut off the water supply to ice maker while the tank is filled and flushed to remove the carbon particles from the final filter. Each time the tank becomes empty you will need to close the water supply to the ice maker until the tank refills. Semi-annual maintenance Step 1 Turn off the water supply line needle valves. Step 2 Step 3 Step 4 Step 5 Step 6 Close the ball valve on the tank. Open the RO faucet to allow the system to depressurize for 5-10 minutes before attempting to remove Housings. Unplug transformer from electrical outlet. Carefully remove the filter housings and pour water out of the housings. Dispose of the used filters. Wash housings with mild soap and rinse thoroughly with water. 8
 Lubricate O-rings with a water soluble lubricant such as KY Jelly, (petroleum based lubricants such as Vaseline must not be used.")


9 Semi-annual maintenance continued Step 7 Inspect O-rings for wear and replace them if needed (order part no. WP from Watts.) Lubricate O-rings with a water soluble lubricant such as KY Jelly, (petroleum based lubricants such as Vaseline must not be used.) Be sure to properly seat the O-ring in the housing before threading the housings onto the lid assembly. Note: Keeping the RO module in an upright position while reattaching the housings will help ensure the o-ring stays properly seated and reduces the possiblity of leaks. Step 8 Step 9 The sediment filter has a cloth like appearance. It must be placed in the 1 st housing on the left where the water inlet connects. The carbon bock filter has a mesh covering and has a gasket on each end. Replace the filter in the 2nd housing with the carbon block filter. Step 10 Visually inspect oring to be sure they are properly seated before threading the housing onto the lid assembly and hand tighten securely. Annual Maintenance Step 1. Perform Semi-annual Preventive Maintenance Steps on page 8. Note: For the annual maintenance drain the tank. Step 2 Replace the final filter by removing the white nuts from both ends of the filter. Remove the connectors from both ends (keep and reuse). Discard the old final filter and replace with new filter reusing the connectors. Note: Flow arrow on final filter must be pointing in the direction of water flow to the faucet. Step 3 Step 4 Step 5 The tank shut off switch has quick-disconnect connectors. Remove the blue tube from the tank side of the tank shut-off switch. Depress the gray ring with the tip of your finger and pull the tube straight out. Use a clean eye dropper to insert ½ teaspoon of 3% hydrogen peroxide or common house hold bleach into the blue tube. (This will flow into the tank once water is turned back on to unit.) To reconnect insert tube into the connector and push firmly. Step 6 Follow Start Up procedure on page 8. 9

10 Membrane Maintenance Membrane filters have a life expectancy of 2 to 5 years, depending on the incoming water conditions and the amount of use of the RO system. If at any time you notice a reduction in water production or a change in the taste of the RO water, it could be time to replace the membrane. Step 1 Step 2 Step 3 To change the membrane, use a 5/8" wrench to remove the nut from the cap side of the membrane housing (the end with only one elbow). Remove the cap from the white horizontal membrane housing. Note: To assist with the removal of cap a double sided wrench canbe purchased from Watts Premier. Using a pair of pliers, grip and pull firmly on the membrane filter to remove it from the housing and discard the membrane. Unwrap new membrane filter and lubricate the o-rings with water soluble lubrication such as KY Jelly. Insert the end with the two black O-rings into the membrane housing. Step 4 Once membrane filter has been inserted into the housing you must take your thumbs and give a firm push to properly seat the membrane. Replace membrane housing cap and tighten. Note: To be properly seated the tip of the membrane filter must be below the housing edge. Step 5 Screw the membrane filter housing cap back on securely. Step 6 Connect the green tube back to the membrane cap fitting. Step 7 You must change the flow restrictor each time you change the Membrane filter. Replace the existing flow restrictor with the new one by removing the White compression nuts. Make sure the arrow is pointing toward the check valves and hot water line fitting. Step 8 Follow Start Up procedures on page 8.
 Wiring connection broken (plug 110 AC wall plug back in at wall and/or reconnect the 24 VAC wire harness")
11 Trouble shooting Problem Cause Solution Low/slow production Excessive air pressure in tank Pump not operating Fouled membrane Plugged pre-filters Crimped tubing Angle stop or water line valve not fully opened Relieve pressure at Schrader valve on tank (set to 7 psi with the tank empty) Wiring connection broken (plug 110 AC wall plug back in at wall and/or reconnect the 24 VAC wire harness connectors) Replace pump if needed Replace membrane Replace filters Check tubes to make sure they are not kinked Ensure valves are opened by turning valve handle counter clockwise until it stops Milky colored water Air in the system Air in the system is a normal occurrence with initial start up of the RO system. This milky look will disappear during normal use within 1-2 weeks. If condition reoccurs after filter changes, drain tank 1 to 2 times. Faucet Dripping Needs adjustment see page 12 Pump short cycles Ball valve on tank closed Blue tube blocked between the tank and RO system Faulty pressure switch Open the ball valve on the top of the tank Remove kinked/damaged section and replace if necessary Call for technical support Bowl leaks at the top after changing the filters Pump constantly running Damaged/Dry O-ring Electrical fault Faucet left on Plugged pre-filters Checking air pressure in tank Lubricate with water soluble lubricant or replace O-ring as necessary (Do not use Vaseline or other petroleum based lubricants) Call for technical support Close faucet and let tank fill for 2 to 3 hours Replace filters Note: Check air pressure when tank is empty. Step 1 faucet and drain the tank. Open Step 2 Step 3 Using a digital air gauge check the air pressure in the tank. There should always be between 5-7 psi. If you have more than 7 psi release air and recheck. If you have less than 5 psi, add air. Air can be added with a bicycle pump. 11

12 Adjust Faucet If the faucet has developed a drip it can be corrected by following the steps outlined below. Step 1 Remove faucet Spout first. Position both thumbs on the back edge of the lever and push forward. Step 2 Lever will slide forward and completely off of the faucet base. Step 3 Small brass tee can be turned 1/2 turn, counterclockwise, to adjust the tension on the black lever. This adjustment may be necessary to stop slow drips from tip of faucet. You may need to repeat the process until the faucet does not drip. Brass tee must always end up facing across body of faucet in order to slide black lever on. 12
13 SERVICE RECORD DATE OF PURCHASE DATE OF INSTALL INSTALLED BY / / / / NAME: SERIAL NO. # Date of Maintenance (6 mos.) 1st stage Sediment (6 mos.) 2nd stage Carbon Block (1 yr.) Final Filter Carbon (2-5 yrs.) TFM Memb. OTHER NOTES: 13
14 Limited Warranty What your Warranty Covers: Limited 3 year warrranty on the Reverse Osmosis module, tank and faucet if defective. 1 year warranty on the electrical components, pump, pressure switch, solenoid valve, and transformer if defective. No warranty on replaceable filters and membranes. Return unit after obtaining a return authorization (see below), less tank, within 3 year of original retail purchase, FLOWMATIC SYSTEMS will repair or, at FLOWMATIC S option, replace the system at no charge. How to obtain Warranty Service: For warranty service, call for a return authorization number. Then, ship your Reverse Osmosis unit (less tank) to our factory, freight and insurance prepaid, with proof of date of original purchase. Please include a note stating the problem. Flowmatic will repair it, or replace it, and ship it back to you prepaid. What this warranty does not cover: This warranty does not cover defects resulting from improper installation, (contrary to FLOWMATIC SYSTEM's printed instructions), from abuse, misuse, misapplication, improper maintenance, neglect, alteration, accidents, casualties, fire, flood, freezing, environmental factors, or other such acts of God. This warranty will be void if defects occur due to failure to observe the following conditions: 1. The Reverse Osmosis System must be hooked up to a potable municipal or well cold water supply. 2. The hardness of the water should not exceed 7 grains per gallon, or 120 ppm. 3. Maximum incoming iron must be less than 0.2 ppm. 4. The ph of the water must not be lower than 3 or higher than The incoming water pressure must be between 40 and 100 pounds per square inch. 6. Incoming water to the RO cannot exceed 105 degrees F (40 degrees C.) 7. Incoming TDS/Total Dissolved Solids not to exceed 1800 ppm. 8. Do not use with water that is micro-biologically unsafe or of unknown quality without adequate disinfection before or after the system. This warranty does not cover any equipment that is relocated from the site of its original installation. This warranty does not cover any equipment that is installed or used outside the United States of America and Canada. LIMITATIONS AND EXCLUSIONS: FLOWMATIC SYSTEMS WILL NOT BE RESPONSIBLE FOR ANY IMPLIED WARRANTIES, INCLUDING THOSE OF MERCHANTIBILITY AND FITNESS FOR A PARTICULAR PURPOSE. FLOWMATIC WILL NOT BE RESPONSIBLE FOR ANY INCIDENTAL OR CONSEQUENTIAL DAMAGES, INCLUDING TRAVEL EXPENSE, TELEPHONE CHARGES, LOSS OF REVENUE, LOSS OF TIME, INCONVENIENCE, LOSS OF USE OF THE EQUIPMENT, AND DAMAGE CAUSED BY THIS EQUIPMENT AND ITS FAILURE TO FUNCTION PROPERLY. THIS WARRANTY SETS FORTH ALL OF FLOWMATIC'S RESPONSIBILITIES REGARDING THIS EQUIPMENT. OTHER CONDITIONS: If Flowmatic chooses to replace the equipment, Flowmatic Systems may replace it with reconditioned equipment. Parts used in repairing or replacing the equipment will be warranted for 90 days from the date the equipment is returned to you or for the remainder of the original warranty period, whichever is longer. This warranty is not assignable or transferable. YOUR RIGHTS UNDER STATE LAW: Some states do not allow limitations on how long an implied warranty lasts, and some states do not allow the exclusion or limitation of incidental or consequential damages, so the above limitations or exclusions may not apply. This warranty gives you specific legal rights, and you may have other legal rights which vary from state to state.
15 15
16 21
Installation & Instruction Manual For Portable Series R.O. units:
 Installation & Instruction Manual For Portable Series R.O. units: Please read carefully before proceeding with installation *System components and appearance may vary from above image. REPLACEMENT AND
UltRo Dual Flow Reverse Osmosis Water System
 UltRo Dual Flow Reverse Osmosis Water System Congratulations on this great investment to your health. **IMPORTANT NOTE BEFORE YOU BEGIN** We recommend you call your local friendly plumber to ensure proper
MineralPRO UF Installation, Operation, & Maintenance Manual
 MineralPRO UF Installation, Operation, & Maintenance Manual Mfg. Ltd. PO Box 1499 Parksville B.C.V9P-2H4 Canada T 250.586-6667 F 250.586-6670 MineralPRO Sept. 2016 Thank you for your purchase of a state
Remineralized Reverse Osmosis System
 Remineralized Reverse Osmosis System Installation, Operation & Maintenance Manual Sept. 2016 Non-AG mineralpro.com MineralPRO Mfg. PO Box 1499 Parksville B.C. V9P-2H4, Canada T 250.586-6667 F 250.586-6670
REVERSE OSMOSIS WATER FILTRATION SYSTEM MODEL EWR 4075 INSTRUCTION MANUAL
 REVERSE OSMOSIS WATER FILTRATION SYSTEM MODEL EWR 4075 INSTRUCTION MANUAL Excalibur Water Systems 142 Commerce Park Drive, Unit M & N Barrie, Ontario L4N 8W8 CANADA www.excaliburwater.com 2013.05.7446
GETZ EQUIPMENT INNOVATORS PART NO.: 9G59554 MODEL: MS 36 SC-R HYDROSTATIC TEST PUMP
 GETZ EQUIPMENT INNOVATORS PART NO.: 9G59554 MODEL: MS 36 SC-R HYDROSTATIC TEST PUMP LIMITED WARRANTY Getz Equipment Innovators warrants its products, and component parts of any product manufactured by
Installation and Instruction Manual for 6 stage ROCCS Requires Professional Installation
 Installation and Instruction Manual for 6 stage ROCCS Requires Professional Installation 2 2 1 Purchase Date: RO Serial Number: Tank Serial Number: Purchased From: Please read carefully before proceeding
INSTALLATION INSTRUCTION & OWNER S MANUAL
 INSTALLATION INSTRUCTION & OWNER S MANUAL System Tested and Certified by NSF International against NSF/ANSI 42 for the reduction of Chlorine, Taste and Odor and 58 for the reduction of Total Dissolved
INSTALLATION INSTRUCTION
 ULTIMATE Countertop REVERSE OSMOSIS SYSTEM INSTALLATION INSTRUCTION & OWNER S MANUAL Ver 2.4 www.freedrinkingwater.com All Rights Reserved APEC Water Systems Please keep this Owner s Manual for future
REVERSE OSMOSIS WATER FILTRATION SYSTEM MODEL EWR 3035 INSTRUCTION MANUAL
 REVERSE OSMOSIS WATER FILTRATION SYSTEM MODEL EWR 3035 INSTRUCTION MANUAL Excalibur Water Systems 142 Commerce Park Drive, Unit M & N Barrie, Ontario L4N 8W8 CANADA www.excaliburwater.com 3-Stage RO System
Installation of Your SprayMaster System
 Installation of Your SprayMaster System 1. At the installation site, remove all equipment from the corrugated box and the polyethylene drum and replace the drum lid. Check the picture to identify each
FlashGARD HP Reverse Osmosis Filtration System Model Number FSTMO75 Part Number
 3M Water Filtration Products FlashGARD HP Reverse Osmosis Filtration System Model Number FSTMO75 Part Number 56123-06 Installer: Please leave this manual with owner/operator. End User: Please retain for
WATER HEATER THERMAL EXPANSION TANKS Owner s Manual. Safety Instructions Installation Maintenance Warranty. Models: 2-5 Gallon Capacity
 WATER HEATER THERMAL EXPANSION TANKS Owner s Manual Safety Instructions Installation Maintenance Warranty Models: 2-5 Gallon Capacity Thank You for purchasing this Thermal Expansion Tank. Properly installed
Owner s Manual AMERICAN. LiquaGen 5 Stage (RO/DI) Aquarium Reef System. YEAR Y 1
 Aquarium Reef System. YEAR Y 1") Owner s Manual A NT HENTI AMERICAN Y 1 UT C WARR AR A 1-Y E LiquaGen 5 Stage (RO/DI) Aquarium Reef System YEAR MANUFACTURER WARRANTY Welcome to the LiquaGen experience and thank you for purchasing our
Owner s Manual A NT HENTI AMERICAN Y 1 UT C WARR AR A 1-Y E LiquaGen 5 Stage (RO/DI) Aquarium Reef System YEAR MANUFACTURER WARRANTY Welcome to the LiquaGen experience and thank you for purchasing our
SpectraPure PUMPED RO SYSTEMS (PSP) User s Manual for PSP-1500 Systems
 User s Manual for PSP-1500 Systems") SpectraPure PUMPED RO SYSTEMS (PSP) User s Manual for PSP-1500 Systems 2 3 PSP-1500 SYSTEM DESCRIPTION Reverse Osmosis RO Reverse Osmosis utilizes the unique properties of a semi-permeable membrane to
SpectraPure PUMPED RO SYSTEMS (PSP) User s Manual for PSP-1500 Systems 2 3 PSP-1500 SYSTEM DESCRIPTION Reverse Osmosis RO Reverse Osmosis utilizes the unique properties of a semi-permeable membrane to
Pressure Dump Valve Service Kit for Series 2300 Units
 Instruction Sheet Pressure Dump Valve Service Kit for Series 00 Units. Overview The Nordson pressure dump valve is used to relieve hydraulic pressure instantly in Series 00 applicator tanks when the unit
Pure Water Power Purification System 4-Stage RODI Operations Manual
 Pure Water Power Purification System 4-Stage RODI Operations Manual Flush Valve Lever Quick Disconnect for RO Water Testing Water Supply In Drain Hose Pure Water Out to Waterfed Pole New Machine Setup
User Instruction Manual
 User Instruction Manual 4500 psi Air Compressor Ver 2, 1.18 Contents Parts Included...3 Assembly Instructions...3-5 Operation Instructions...6-7 Oil Change Intervals...8 Air Filter Replacement...9 Setting
Pressure Dump Valve Service Kit for Series 3000 Units
 Instruction Sheet Pressure Dump Valve Service Kit for Series 000 Units. Overview The Nordson pressure dump valve is used to relieve hydraulic pressure instantly in Series 00, 400, 500, and 700 applicator
Owners Manual Models: 075-AQF-CX. Aquatrol Backwashing Catalytic Carbon Filter. Visit us online at.
 Visit us online at www.uswatersystems.com Aquatrol Backwashing Catalytic Carbon Filter Owners Manual Models: 075-AQF-CX REVISION # 1.0 REVISION DATE October 11, 2017 US Water Systems, Inc. 1209 Country
IMPORTANT PLEASE READ BEFORE COMMENCING INSTALLATION
 IMPORTANT PLEASE READ BEFORE COMMENCING INSTALLATION This Fitting Guide is designed to assist in the Installation of your Reverse Osmosis System. Some of the parts that are supplied with each system may
Customer Support Troublshooting
 PB-TLRO4H50T - 4 Stage Reverse Osmosis Water Filtration System 1 of 6 Customer Support Troublshooting The number one, essential, tool to good customer service is your SMILE. Even if your customer can t
REVERSE OSMOSIS INSTALLATION Watermark 4 Stage
 REVERSE OSMOSIS INSTALLATION Watermark 4 Stage BRIEF TECHNICAL ASPECT OF THE WATER TREATMENT SYSTEM The Filter Systems Australia Water Treatment System utilizes a process called reverse osmosis (RO). As
MN-800-TF REVERSE OSMOSIS TREATMENT SYSTEM OWNERS MANUAL
 MN-800-TF REVERSE OSMOSIS TREATMENT SYSTEM OWNERS MANUAL Nimbus Water Systems 41840 McAlby Court, Suite A Murrieta, CA 92562-7036 800-451-9343 THE NIMBUS MN-800 TF REVERSE OSMOSIS TREATMENT SYSTEM TABLE
FLUSHMATE III FLUSHMATE FLUSHOMETER - TANK SYSTEM. Owner s Service Manual. 503 Series. 503 Series
 Owner s Service Manual 503 Series FLUSHMATE III FLUSHOMETER - TANK SYSTEM 503 Series FLUSHMATE A Division of Sloan Valve Company 30075 Research Drive New Hudson, MI 48165 800-533-3450 248-446-5300 http://www.flushmate.com
3M Water Filtration Products
 3M Water Filtration Products Installation and Operation Instructions for ScaleGard TM HP Reverse Osmosis System Installer: Please leave this manual with owner/operator. Owner/Operator: Please retain for
Installation Guide & Owner s Manual. Model V4700. Water Filtration for Dental & Medical Instrument Washing Equipment
 Installation Guide & Owner s Manual Model V4700 Water Filtration for Dental & Medical Instrument Washing Equipment Safety Guides & General Information Please read this manual completely before attempting
G7S Hand Pump Owner s Manual
 G7S Hand Pump Owner s Manual Copyright Air Venturi 2018 Version 4-18 Specifications 24.80 inches long closed 43.31 inches long extended 4500 psi/310 bar max pressure Features Integral manometer (pressure
TABLE OF CONTENTS. Purchase Records... Introduction... Component List... Diagram... Specifications... Quick Connect Guide...
 TABLE OF CONTENTS Purchase Records... Introduction... Component List... Diagram... Specifications... Quick Connect Guide... 4 5 6 7 8 9 Installation STEP 1 Angle Stop Valve... Installation STEP 2 Drain
ULTIMATE REVERSE OSMOSIS SYSTEM
 ULTIMATE REVERSE OSMOSIS SYSTEM RO-PH90 INSTALLATION INSTRUCTION & OWNER S MANUAL Ver 1.1 www.freedrinkingwater.comr All Rights Reserved APEC Water Systems Please keep this Owner s Manual for future reference.
US WATER DENTAL OFFICE PURIFICATION SYSTEM
 Visit us online at www.uswatersystems.com US WATER DENTAL OFFICE PURIFICATION SYSTEM Owners Manual Models: 200-SENTRY-IX REVISION # 1.0 REVISION DATE June 6, 2018 US Water Systems Corporate Office 1209
ROES-PH75 INSTALLATION INSTRUCTION & OWNER S MANUAL
 ESSENCE REVERSE OSMOSIS SYSTEM ROES-PH75 INSTALLATION INSTRUCTION & OWNER S MANUAL Ver 1.1 www.freedrinkingwater.com All Rights Reserved APEC Water Systems Please keep this Owner s Manual for future reference.
Owners Manual Models: 200-CHS-XXXX-XX. US Water Systems Cobalt Hyper-Safe Reverse Osmosis System. Visit us online at
 Visit us online at www.uswatersystems.com US Water Systems Cobalt Hyper-Safe Reverse Osmosis System Owners Manual Models: 200-CHS-XXXX-XX REVISION # 1.1 REVISION DATE January 5, 2017 US Water Systems Corporate
ULTIMATE REVERSE OSMOSIS SYSTEM
 ULTIMATE REVERSE OSMOSIS SYSTEM INSTALLATION INSTRUCTION & OWNER S MANUAL Ver 3.7 www.freedrinkingwater.com All Rights Reserved APEC Water Systems Please keep this Owner s Manual for future reference.
2 GALLON TWIN STACK AIR COMPRESSOR W/ HOSE REEL
 2 GALLON TWIN STACK AIR COMPRESSOR W/ HOSE REEL Model: 52024 CALIFORNIA PROPOSITION 65 WARNING: You can create dust when you cut, sand, drill or grind materials such as wood, paint, metal, concrete, cement,
Please Keep this Instruction Manual for future reference TABLE OF CONTENT
 Please Keep this Instruction Manual for future reference It contains important information on how to maintain and care for your LiquaGen water filter system Warning : Using a qualified installer is recommended.
Light Commercial Reverse Osmosis System. EE-1000 Manual
 Light Commercial Reverse Osmosis System EE-1000 Manual Nimbus Water Systems 41840 McAlby Court, Suite A Murrieta, CA 92562 800-451-9343 Fax 951-894-2801 www.nimbuswater.com Nimbus Water Systems 1 EE-1000
OWNER S MANUAL. Table of Contents
 OWNER S MANUAL Table of Contents Features Page 2 Components and Functions Page 3 Installation Procedures Pages 4-6 Instructions for Use Page 7 Routine Maintenance Page 8 Notices and Warnings Page 9 Technical
ESSENCE REVERSE OSMOSIS SYSTEM INSTALLATION INSTRUCTION
 ESSENCE REVERSE OSMOSIS SYSTEM INSTALLATION INSTRUCTION & OWNER S MANUAL Ver 2.3 www.freedrinkingwater.com All Rights Reserved APEC Water Systems Please keep this Owner s Manual for future reference.
Installation Instructions
 Installation Instructions COLONY SOFT 7.0 Centerset Lavatory Faucet 7.0 with Speed Connect Drain Congratulations on purchasing your American Standard faucet with the Speed Connect drain, a features found
!!!! SERVICE MANUAL PRESSURE POT 2 GALLON. Service Manual: LT Washington St 931 Progress Ave., #7
 EXEL North America, Inc. EXEL Industrial Canada, Inc. 1310 Washington St 931 Progress Ave., #7 West Chicago, IL 60185 Scarborough ONT, M1G 3V5 Ph : (800) 573 5554 Ph : (800) 450 0655 Fx : (800) 664 1511
FLUSHMATE FLUSHOMETER - TANK SYSTEM. 501-A Series. Owner s Service Manual. 501-A Series
 Owner s Service Manual 501-A Series FLUSHMATE FLUSHOMETER - TANK SYSTEM 501-A Series A Division of Sloan Valve Company 30075 Research Drive New Hudson, MI 48165 800-533-3450 248-446-5300 http://www.flushmate.com
ULTRA REVERSE OSMOSIS SYSTEM
 ULTRA REVERSE OSMOSIS SYSTEM INSTALLATION INSTRUCTION Free Drinking Water.com Please keep this Owner s Manual for future reference. It contains useful information on how to maintain and care for your APEC
INSTALLATION INSTRUCTIONS
 EDGEMERE CENTERSET LAVATORY FAUCET INSTALLATION INSTRUCTIONS 708.0 Thank you for selecting American Standard... the benchmark of fine quality for over 00 years. To ensure that your installation proceeds
ROUND ASSEMBLY. Positioning
 ROUND ASSEMBLY Positioning To ensure maximum enjoyment and efficiency, consider the following steps when selecting the desired location of you pool. Select a location that receives maximum sunlight for
Vessel Installation and Operating Manual
 For In-ground and Aboveground Pools Vessel Installation and Operating Manual Important Safety Information Please read this manual prior to installation. Nature 2 Express is designed to sanitize in-ground
Installation, Operation, and Maintenance Manual
 Installation, Operation, and Maintenance Manual Product Preservers Anti-Scale System Chemical-Free, Salt-Free Scale Prevention Introduction The Product Preservers Anti-Scale System will condition the tap
SPECIFICATIONS Type: Twin stack, single phase Tank: 4 gallon Air Output: PSI; PSI Max PSI: 125 PSI HP: 1.
 2 GALLON TWIN STACK AIR COMPRESSOR Model: 9526 DO NOT RETURN TO STORE. Please CALL 800-348-5004 for parts and service. CALIFORNIA PROPOSITION 65 WARNING: You can create dust when you cut, sand, drill or
Installation, Operation and Maintenance Manual
 Installation, Operation and Maintenance Manual Model H2F H2Flow Anti-Scale System Chemical-Free, Salt-Free Scale Prevention Introduction The H2Flow Anti-Scale System will condition the tap water providing
SSFU SUPER SPRAYFAST UNIVERSAL ADHESIVE APPLICATOR
 S S F U SSFU SUPER SPRAYFAST UNIVERSAL ADHESIVE APPLICATOR MACHINERY DIVISION OWNER S MANUAL UNIT INSTRUCTIONS Please follow all SSFU Safety Instructions. Contact your Duro Dyne Tech Service if you have
INSTALLATION & START-UP INSTRUCTIONS. Clack WS1 & WS1.25 METER WATER SOFTENER SYSTEMS
 INSTALLATION & START-UP INSTRUCTIONS Clack WS1 & WS1.25 METER WATER SOFTENER SYSTEMS 1999-2009 QualityWaterForLess.com - 1 - info@qualitywaterforless.com Preface: Thank you for your purchase of a new Water
NB/NBR NITROGEN BOOSTER FOR AVIATION SERVICE
 NB/NBR NITROGEN BOOSTER FOR AVIATION SERVICE INSTALLATION, OPERATION & MAINTENANCE MANUAL INTERFACE DEVICES, INC. 230 Depot Road, Milford, CT 06460 Ph: (203) 878-4648, Fx: (203) 882-0885, E-mail: info@interfacedevices.com
Iron Filter Installation / Operation Manual
 Iron Filter Installation / Operation Manual BrassMaster and BrassMaster Plus Technical Video Library: http://watercontrolinc.com/residential-technical-support/residential-technical-videos BrassMaster technical
Installation and Operating Manual
 Safety Instructions Important Information Please read prior to installation ATTENTION! ELECTRICAL HAZARD FOR INGROUND POOLS AND ABOVEGROUND POOLS Installation and Operating Manual IMPORTANT Pool Owner,
453 Series Steam Heated Vaporizing Regulator
 ADI 0453A Certified ISO 9001:2000 453 Series Steam Heated Vaporizing Regulator INSTALLATION AND OPERATION INSTRUCTIONS Before Installing or Operating, Read and Comply with These Instructions Controls Corporation
Model PSI Compressor with 3-Gallon Air Tank 12VDC
 Model 6350 150 PSI Compressor with 3-Gallon Air Tank 12VDC IMPORTANT: It is essential that you and any other operator of this product read and understandd the contents of this manual before installing
Installation Instructions
 Installation Instructions COLONY SOFT 7.0 Single Control Lavatory Faucet with Speed Connect Drain Congratulations on purchasing your American Standard faucet with the Speed Connect drain, a feature found
Drinking Water Kit with Non-Air Gap Faucet for RO and RO/DI Systems (Including -MF Systems)
") Drinking Water Kit with Non-Air Gap Faucet for RO and RO/DI Systems (Including -MF Systems) INSTRUCTIONS WARNING Please read carefully before proceeding with installation. Failure to follow any attached
Drinking Water Kit with Non-Air Gap Faucet for RO and RO/DI Systems (Including -MF Systems) INSTRUCTIONS WARNING Please read carefully before proceeding with installation. Failure to follow any attached
GETZ EQUIPMENT INNOVATORS RECOVERY SYSTEM CLEAN AGENT FE-36 / HALOTRON 1 PART NO. 4G59751 OPERATIONS MANUAL
 GETZ EQUIPMENT INNOVATORS CLEAN AGENT FE-36 / HALOTRON 1 PART NO. 4G59751 OPERATIONS MANUAL GETZ EQUIPMENT INNOVATORS PEKIN, ILLINOIS, U.S.A. PHONE: (888) 747-4389 FAX: (309) 495-0625 Limited Warranty
Zoi Series. RO System Reverse Osmosis Water Filtration System. DFK-Alpha * MB F. Core System Filter Set. Replacement Membrane
 Incoming TDS/Total Dissolved Solids not to exceed 2000 PPM. Use of Vaseline or petroleum based lubricants will also void the warranty. How Do I Receive Warranty Service? If your system is found to be defective,
Crystal Quest Voyager Series Inline Water Filter Systems INSTALLATION AND OPERATION GUIDE
 Crystal Quest Voyager Series Inline Water Filter Systems INSTALLATION AND OPERATION GUIDE ONLINE WARRANTY INFORMATION CrystalQuest.com/warranty.html Copyright 2018 Crystal Quest All rights reserved MADE
SPECIFICATIONS TABLE Maximum Air Pressure 115 PSI Air Tank Capacity 20 Gallons
 SPECIFICATIONS TABLE Maximum Air Pressure 115 PSI Air Tank Capacity 20 Gallons Air Flow Capacity 6.2 CFM at 40 PSI 5.2 CFM at 90 PSI Motor 2.5 HP Working / 4 HP Peak 120 Volt / 60 Hz / 13 A / 1-Phase Required
SElECTING A MOUNTING location OPERATING SPECIFICATIONS* * For individual cartridge specifications, refer to cartridge literature.
 by~ Figure 1 - Follett Single System Figure 2 - Follett Twin System SElECTING A MOUNTING location 1. Give consideration to the weight of the unit when operating (filled with water). Operating weights of
ROPV R40 E Series User Manual
 HARBIN ROPV INDUSTRY DEVELOPMENT CENTER ROPV R40 E Series User Manual For Use with the Following ROPV Pressure Vessel Models: R40 300E R40 450E Headquarters Tel:(+86)451-82267301 Fax:(+86)451-82267303
AMP Oil Free Manual AMP 50-8-TC AMP 50-6-D AMP General User and Maintenance Instructions
 AMP Oil Free Manual AMP 50-8-TC AMP 50-6-D AMP 50-24 General User and Maintenance Instructions Silentaire Technology 8614 Veterans Memorial Dr. Houston, TX 77088 800-972-7668 Fax 832-327-0669 www.silentaire.com
Installation Instructions
 Installation Instructions S65-135 (Circular) S65-136 (Semi-Circular) Air Valve Retrofit For Non-Sectional Classic Washfountain Table of Contents.......................2-6 Metering Air Valve Parts List....................6
INSTALLATION AND SERVICE MANUAL FOR LANCER DISPENSING TOWERS
 Please refer to the Lancer web site (www.lancercorp.com) for information relating to Lancer Installation and Service Manuals, Instruction Sheets, Technical Bulletins, Service Bulletins, etc. INSTALLATION
Freedom8 ShoeBox Compressor Manual
 Freedom8 ShoeBox Compressor Manual Warning!! This product is not a toy! Use or misuse can cause severe injury or death! Use only with adult supervision. This unit is only to be used with tanks, hoses and
INDUSTRIAL VALVES MODELS: C62-A; C62-D. INSTRUCTION MANUAL Installation Operation Parts Service DIAPHRAGM BYPASS PRESSURE REGULATING VALVES
 INSTRUCTION MANUAL Installation Operation Parts Service IMPORTANT Record your Regulator model number and serial number here for easy reference: Model No. Serial No. Date of Purchase When ordering parts
Pressure Injection Cell Operator s Manual
 Pressure Injection Cell Operator s Manual Operator s Manual Pressure Injection Cell CONGRATULATIONS! Congratulations on your purchase of a Next Advance Pressure Injection Cell. Please read this operator
INSTALLATION. and INSTRUCTION MANUAL. for QUALITY AIR BREATHING SYSTEMS. Model 50-P-Mini Portable Systems Outfitted with ABM-725 Monitor
 INSTALLATION and INSTRUCTION MANUAL for QUALITY AIR BREATHING SYSTEMS Model 50-P-Mini Portable Systems Outfitted with ABM-725 Monitor M A R T E C H S E R V I C E S C O M P A N Y P.O. Box 7079 OFFICE: (507)
Installation Instructions Air Compressor Part # 2780, 2781
 Note: It is essential that the operator of this product read and understand the contents of this manual before installing and using this product. Parts Included Qty Parts Included Qty Compressor 1 Coil
MODEL 840 AIR HYDRAULIC PUMP INSTRUCTION
 MODEL 840 AIR HYDRAULIC PUMP INSTRUCTION Jackco Transnational Inc. 202 South El Monte, CA 888-452-2526 www.jackco.com FOR YOUR SAFETY Read all instructions, warnings and cautions carefully. Follow all
Model ASSEMBLY and OPERATING INSTRUCTIONS
 QUICK CHANGE AIR BRUSH KIT Model 93506 ASSEMBLY and OPERATING INSTRUCTIONS Due to continuing improvements, actual product may differ slightly from the product described herein. 3491 Mission Oaks Blvd.,
INSTALLATION INSTRUCTIONS FOR GRT75-PF-RFS PET FOUNTAIN
 INSTALLATION INSTRUCTIONS FOR GRT75-PF-RFS PET FOUNTAIN Important: Read all instructions and refer to local codes prior to installation. l Local soil conditions may require more gravel for drainage. l
Yoke Block Instruction Manual
 Yoke Block Instruction Manual ! WARNING IMPORTANT: READ MANUAL COMPLETELY BEFORE OPERATING THIS DEVICE This manual contains instructions on periodically required checks to be performed by the user. These
RG1200 Service and Repair Manual
 Dive Rite RG 1200 Regulator Service and Repair Manual Page 1 Text and Photography by Pete Nawrocky Copyright ( ) 1999-2000, Lamartek, Inc., dba Dive Rite RG1200 Service and Repair Manual First Stage.........................................
5 Gallon Pressure Pot with HVLP Spray Gun and Hose
 California Air Tools 5 Gallon Pressure Pot with HVLP Spray Gun and Hose Model No. 365 Technical Data Type of feed.pressure Maximum pressure in the tank... 0,413Mpa (60PSI) Working pressure in the tank.0,
MANUAL BE SERIES Test Benches
 The CustomCrimp Manual BE Series Test Benches are designed with features that make proof and burst testing of hydraulic hose assemblies a quick and easy procedure. CUSTOMIZED AND SPECIAL DESIGN BENCHES
OPERATING and MAINTENANCE INSTRUCTIONS MAXIS 6K Puller (M6K-M)
") OPERATING and MAINTENANCE INSTRUCTIONS MAXIS 6K Puller (M6K-M) READ AND UNDERSTAND ALL OF THE INSTRUCTIONS AND SAFETY INFORMATION IN THIS MANUAL BEFORE OPERATING OR 04/17 (M6K-M) SERVICING THIS TOOL TABLE
OPERATING and MAINTENANCE INSTRUCTIONS MAXIS 6K Puller (M6K-M) READ AND UNDERSTAND ALL OF THE INSTRUCTIONS AND SAFETY INFORMATION IN THIS MANUAL BEFORE OPERATING OR 04/17 (M6K-M) SERVICING THIS TOOL TABLE
accidents which arise due to non-observance of these instructions and the safety information herein. SPECIFICATIONS
 18 GAUGE 1-1/4 INCH BRAD NAILER Model: 7611 CALIFORNIA PROPOSITION 65 WARNING: You can create dust when you cut, sand, drill or grind materials such as wood, paint, metal, concrete, cement, or other masonry.
Installing ASI Umbilical Delivery Systems
 Rev A 05 Nov 2015 Page 1 of 10 PURPOSE This guide provides an overview of tubing connections into an ASI wall-mounted Junction Box that has already been plumbed with a compressed air connection including
1020 Industrial Drive, Orlinda, TN fax
 Operation Manual Ultrafiltration for High Purity Distribution K-A-HPTUF Series 615-654-4441 sales@specialtyh2o.com 615-654-4449 fax TABLE OF CONTENTS Section 1 GENERAL 1.1 Warnings and Cautions... 1 1.2
INSTALLATION MANUAL Matheson Tri-Gas Cabinet Enclosures
 INSTALLATION MANUAL Matheson Tri-Gas Cabinet Enclosures MINT-0289-XX TABLE OF CONTENTS Limited Warranty... 3 User Responsibility... 3-4 General Service... 4 Safety Precautions.... 5 Physical Dimensions..
4-Stage Drinking Water Systems (MODEL: MPDW, DWS, DWS-PP)
") 4-Stage Drinking Water Systems (MODEL: MPDW, DWS, DWS-PP) INSTRUCTIONS WARNING Please read carefully before proceeding with installation. Failure to follow any attached instructions or operating parameter
4-Stage Drinking Water Systems (MODEL: MPDW, DWS, DWS-PP) INSTRUCTIONS WARNING Please read carefully before proceeding with installation. Failure to follow any attached instructions or operating parameter
AIR COMPRESSOR. Failure to follow all instructions as listed below may result in electrical shock, fire, and/or serious personal injury.
 2 GALLON AIR COMPRESSOR Model: 7517 DO NOT RETURN TO STORE. Please CALL 800-348-5004 for parts and service. CALIFORNIA PROPOSITION 65 WARNING: You can create dust when you cut, sand, drill or grind materials
ASSEMBLY & USE MANUAL
 DRAFT BEER DISPENSER ASSEMBLY & USE MANUAL - Stout Beers SAFETY FIRST! Read instructions completely Mixed gas can be dangerous. Flush chemical out of beer hose completely before re-tapping keg. Micro Matic
High Pressure Inlet Kits for CONCOA BlendMites and BlendMasters
 ADI 3210-A ADI 3210-A Certified ISO 9001 Certified ISO 9001 High Pressure Inlet Kits for CONCOA BlendMites and BlendMasters Warning: An appropriately sized pressure relief device downstream of the regulator
Sterisil Ac+ Installation & Operating Manual
 Sterisil Ac+ Installation & Operating Manual 719 622 7200 Sterisil.com Arbor Dental Associates 2 Table of Contents Introduction 4 Sterisil Ac + Features 5 Installation Instructions 6 Maintenance 10 Troubleshooting
KJ4000 Operating Instructions & Parts Manual NSN
 KJ4000 Operating Instructions & Parts Manual NSN 1025-01-473-7710 Mandus Group Ltd. KJ4000 Operators Manual Date: 3 Jan. 2002 TABLE OF CONTENTS General Safety Instructions...Page 1 Operator Instructions...Page
Your safety and the safety of others are very important.
 NATURAL GAS TO PROPANE CONVERSION KIT ALPKT57- INSTALLATION INSTRUCTIONS PROPANE CONVERSION KIT SAFETY... INSTALLATION REQUIREMENTS... Tools and Parts... LP Gas Requirements... Table of Contents INSTALLATION
accidents which arise due to non-observance of these instructions and the safety information herein. SPECIFICATIONS
 18 GAUGE 2 INCH BRAD NAILER Model: 7555 CALIFORNIA PROPOSITION 65 WARNING: You can create dust when you cut, sand, drill or grind materials such as wood, paint, metal, concrete, cement, or other masonry.
PENTEK GRO STAGE REVERSE OSMOSIS WATER FILTRATION SYSTEM INSTALLATION AND OPERATION MANUAL
 PENTEK GRO-2550 4-STAGE REVERSE OSMOSIS WATER FILTRATION SYSTEM INSTALLATION AND OPERATION MANUAL 2016 Pentair Residential Filtration, LLC waterpurification.pentair.com IMPORTANT: efore installing this
Halsey Taylor Owners Manual STOP!
 Halsey Taylor Owners Manual 4710 Freeze Resistant Floor Mounted Steel Fountain STOP! PLEASE READ THE FOLLOWING INFORMATION. ITALLATION ITRUCTIO FOR THE 4710FR FTN. WITH 97243C SINGLE VALVE CONTROL ASSEMBLY
Halsey Taylor Owners Manual 4410 Freeze Resistant Tubular Fountain STOP!
 Halsey Taylor Owners Manual 4410 Freeze Resistant Tubular Fountain STOP! PLEASE READ THE FOLLOWING INFORMATION. ITALLATION ITRUCTIO FOR THE 4410FR FTN. WITH 97243C SINGLE VALVE CONTROL ASSEMBLY ARE LOCATED
OPERATING and MAINTENANCE INSTRUCTIONS MAXIS 3K Puller (M3K-M)
") OPERATING and MAINTENANCE INSTRUCTIONS MAXIS 3K Puller (M3K-M) 04/17 (M3K-M) READ AND UNDERSTAND ALL OF THE INSTRUCTIONS AND SAFETY INFORMATION IN THIS MANUAL BEFORE OPERATING OR SERVICING THIS TOOL TABLE
OPERATING and MAINTENANCE INSTRUCTIONS MAXIS 3K Puller (M3K-M) 04/17 (M3K-M) READ AND UNDERSTAND ALL OF THE INSTRUCTIONS AND SAFETY INFORMATION IN THIS MANUAL BEFORE OPERATING OR SERVICING THIS TOOL TABLE
PROPORTIONING VALVE. Model 150 INSTRUCTION MANUAL. March 2017 IMS Company Stafford Road
 PROPORTIONING VALVE Model 150 INSTRUCTION MANUAL March 2017 IMS Company 10373 Stafford Road Telephone: (440) 543-1615 Fax: (440) 543-1069 Email: sales@imscompany.com 1 Introduction IMS Company reserves
3 Scotch-Weld Polyurethane Reactive Adhesive Applicator Replacement Part Installation Guide
 3 Scotch-Weld Polyurethane Reactive Adhesive Applicator Replacement Part Installation Guide Description: AIR SUPPLY LINE KIT Product ID/Stock No.: 62-9895-0005-3 For use with: 3M Scotch-Weld Polyurethane
Instruction Manual LIMITED 1 YEAR WARRANTY. Hydraulic Punch Driver Read this material before using this product.
 Instruction Manual Hydraulic Punch Driver 902-483 LIMITED 1 YEAR WARRANTY We make every effort to assure that its products meet high quality and durability standards, and warrant to the original purchaser
R E D I C O N T R O L S
 R E D I C O N T R O L S Operation & Maintenance Manual Portable Service Purger for Low Pressure Chillers Model: PSP-LP-1B For Refrigerants R-11, R-113, R-114 & R-123 & Other Similar Refrigerants File Literature