WARNING! Crystalline silica from bricks, cement and other masonry products
|
|
|
- Olivia Webb
- 5 years ago
- Views:
Transcription
1 1
2 WARNING! DO not use a Pressure Blaster until you have read this manual and you understand its contents and warnings. These warnings are included for the health and safety of the operator and those in the immediate vicinity. Keep this manual for future reference. Dust created by power sanding, sawing, grinding, drilling, and other construction activities may contain chemicals known to cause cancer, birth defects or other reproductive harm and respiratory illnesses. Some examples of the chemicals include: Lead from lead based paints Crystalline silica from bricks, cement and other masonry products Arsenic and chromium from chemically-treated lumber Your risk from these exposures varies, depending on how often you do this type of work. To reduce your exposure to these chemicals: Work in a ventilated area, and work with approved safety equipment, such as those dust masks that are specially designed to filter out microscopic particles. Abrasive blasting produces harmful dust. Everyone in the blasting area must wear a properly fitted and properly maintained NIOSH-approved supplied-air respirator. SILICOSIS AND OTHER DUST WARNINGS: Breathing dust from silica sand may cause silicosis, a fatal lung disease. Breathing dust during blasting operations may also cause asbestosis and/or other serious or fatal diseases. A NIOSH-approved, well-maintained air-supplied abrasive blasting respirator must be used by anyone blasting, anyone handling or using media containing toxic substances or media with more than point one percent free crystalline silica and anyone in the area of the dust, Harmful dust can remain suspended in the air for long periods of time after blasting has ceased, causing serious injury or death. Before removing respirator, use an air monitoring instrument to determine if atmosphere is safe to breathe. Contact local OHSA or NIOSH office to determine the proper respirator for your particular application. Supplied-Air respirators do not remove or protect against carbon monoxide If atmosphere is safe to breathe. Contact local OHSA or NIOSH office to Determine the proper respirator for your particular application. Supplied-Air respirators do not remove or protect against carbon monoxide (CO) or any other toxic gas, Use a carbon monoxide removal device and Monitoring device with the respirator to ensure grade D quality air. Follow All applicable OSHA standards and OSHA regulation (d). 2
3 SPECIFICATIONS Tank Volume 20 gallon Hose Length: 8 feet Working Pressure PSI Air Consumption: 6-25cfm Overall Dimensions: Weight: 55 lbs SAVE THESE INSTRUCTIONS You will need these instructions for the safety instructions, the operating procedures, the parts list and the warranty. Put them in a safe and dry place for future reference. IMPORTANT SAFETY INSTRUCTIONS WARNING: When using tools such as your air compressor, whether powered by electric motor or gasoline engine, basic safety precautions should always be followed to reduce the risk of fire, electric shock, and personal injury. You should review the safety instructions for your air compressor before beginning abrasive blasting with this tool. 3
4 PRESSURE BLASTER SAFETY PROCEDURES CAUTION: READ THESE SAFETY PROCEDURES IN THEIR ENTIRETY-- PARTS OF THE OPERATING INSTRUCTIONS ARE WITHIN THESE WARNINGS. These procedures are not intended to be exhaustive due to the many variables in the abrasive blasting field. Therefore, we INSIST that the hands, ears, mouth, nose and eyes be covered with appropriate safety protection at all times. ADDITIONAL WARNINGS! CAUTION MUST BE EXERCISED BY USER AT ALL TIMES 1. Do not place fingers, any body parts or any components in the filler plug seal area when the blast machine is being pressurized. Failure to keep body parts from the filler plug area will result in serious injury. 2. Do not exceed maximum working pressure of 110 PSI. Failure to keep maximum working pressure below 125PSI can cause the blast machine to burst, causing death or serious injury. 3. Everyone in the blast area including the equipment operator should correctly use and maintain a NIOSH-approved air-supplied respirator, even after blasting has ceased. Harmful dust can remain suspended in the air for long periods of time after blasting has ceased causing injury or death. 4. Before using the pressure blaster: Put on safety glasses, gloves, and NIOSH-approved respirator. Always wear these protective items when operating and while servicing your abrasive blaster. While a protective hood is provided to help protect you from flying patricides as you use the machine, the hood does not provide protection from air borne particles. A well maintained air supplied blasting respirator must be used by anyone blasting. 5. Use thick gloves with gauntlets to protect your hands. 6. Use backboards to prevent overspray from hitting someone or something else because the dust will travel a long distance. Blast in a large open area to minimize abrasive accumulation in surrounding areas. 7. Do not pull media tank around by the abrasive hose or let tank fall over as a fitting may break rendering the machine unsafe. Media and air under 110 PSI have a very high destructive force. Never leave a pressurized machine unattended. If an emergency occurs, such as a burst blast hose, shutdown the machine immediately. 8. Drain air out of tank through the inlet valve and disconnect power before maintenance cleaning of any kind. When removing nozzle, caution must be exercised as air pressure may still be in the hose if the nozzle is plugged. 4
5 9. For safe operation, perform recommended preventive maintenance on blaster tank, remote unit and accessories. Replace all worn parts before they fail. Immediate replacement of worn components is required. Failure to replace worn components could result in exposing the operator or bystanders to high speed media and compressed air, causing serious injury. 10. Do not use corrosive materials of any type in unit. Use only clean, dry media. 11. Do not splice abrasive hose. The splice will wear out quickly and may violently spray media over the surrounding area. A worn blast hose could suddenly fail by bursting, Couplings and nozzle holders may not adequately grip worn hose, causing them to blow off under pressure. Compressed air and abrasive escaping from a burst hose, or disconnected coupling or nozzle holder, could cause severe injury. 12. Welding, grinding, or drilling on the blast machine could weaken the vessel. Compressed air pressure could cause a weakened blast machine to rupture, resulting in death or serious injury. 13. Always place the machine so that the outlet is pointed away from any objects or persons. Stand clear of the path of exiting abrasive. It may come out at high velocity. Impact from exiting abrasive could cause severe injury. 14. Static electricity can be created by the use of this equipment. Do not Use within fifty feet of any explosive, potentially explosive Substances, or their vapors as an explosion can occur. 15. Do not use this equipment in any area that might be considered hazardous or where flammable gases or liquids are present. Failure to do so may cause an explosion resulting in serious injury. 16. Do not overfill tank with media. Do not fill to within 6 inches from top of the tank. 17. BEFORE OPENING THE TANK, release the air pressure on the abrasive tank. To do this, turn off the air supply valve (19), and push down to open the DEADMAN valve (34), to release pressure in the line. Ensure that the tank pressure gauge (16) reads zero, then open the tank. 18. MAINTAIN CORRECT AIR PRESSURE, maximum of 110 PSI is recommended, pressure must not exceed 125 PSI. If pressure exceeds 125 PSI, stop all work immediately, and disconnect the air compressor to reduce the excess pressure. Do not investigate the blaster s pressure problem until the pressure gauge (16), reads zero. 5
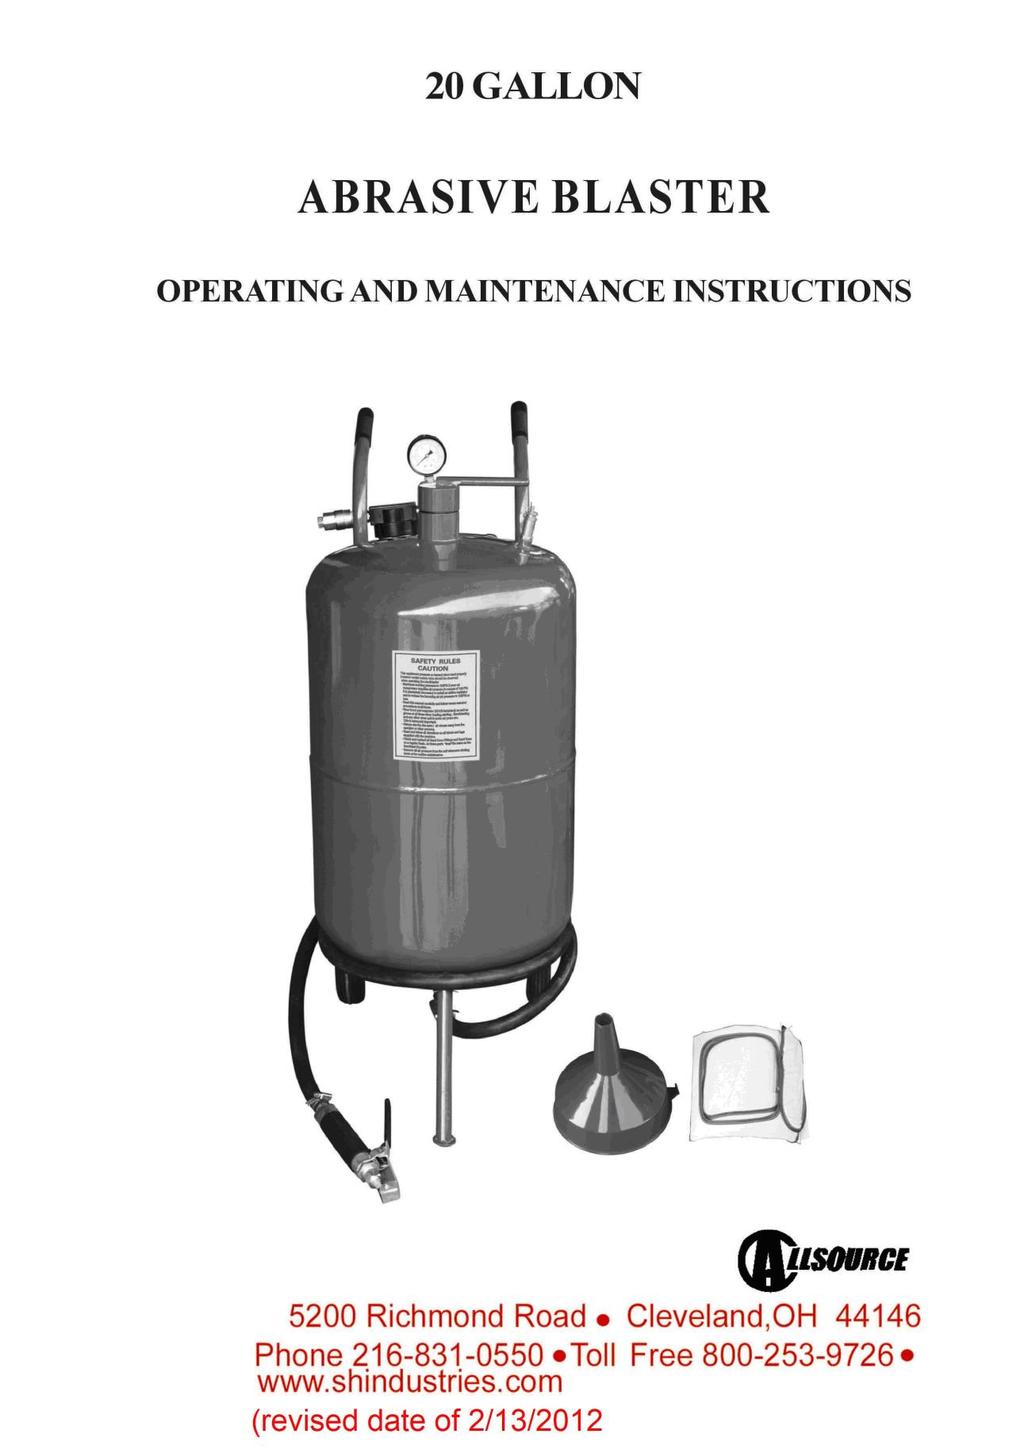
6 ASSEMBING THE ABRASIVE BLASTER 1. Refer to the drawing for step 1, assembling the intake manifold (15). First, attach the pressure gauge (16), to the top of the intake manifold, turning the gauge so that is can be see across the top of the tank. Next, attach the throttling valve (19A) to the bottom of the manifold. Attach the nipple connector (21), to the throttling valve. Attach the joint pipe (14), to the manifold. 2. Refer to the drawing for step 2, to assemble the water trap filter (18). nipple connector (17) is screwed into each side of the filter. On one side, attach the air supply valve (19), to the nipple connector (17), and then attach the male/female connector (20), to the other side of the air supply valve. When you re ready to operate the abrasive blaster, the air hose from the compressor will fasten to the male/female connector (20). 3. Place the tank (01) on a table with the four clips up. Refer to the drawing for step 3. Screw the water trap filter (18) and its parts into the hole at the side of the intake manifold. Then screw the open end of the joint pipe (14) with intake manifold (15) and pressure gauge (16) attached into the threaded hole on the side of the filler pipe on Top of the tank. Again, be sure that the manifold and gauge are vertical. 4. Refer to the drawing for step 4, assembly of the abrasive outlet valve into the hole at the bottom of the tank; Attach four parts, in order: Nipple connector (17); abrasive metering valve (19B); nipple Connector (17) and the abrasive outlet pipe (23). 5. Refer to the drawing for step 5, assembly of the nozzle DEADMAN valve(34). In this assembly process, you ll select one of the four nozzles (28). This is not a permanent selection, as you may change nozzles according to the job being done. Screw the adapter (26), into the nozzle DEADMAN valve (34). Screw the gasket (27) into the nipple connector, then add a nozzle (28) and the nozzle cap-nut (29). 6. Refer to the drawing for step 6, for connecting the abrasive metering valve assembly (step 4) and the assembly (step 5). Slide the two hose clamps (24), over each end of the abrasive hose (25), press one end of the hose, over the nipple on the abrasive outlet pipe (23) and the other end over the adapter (26). Both hose ends should be firmly seated on the nipples. Slide the hose clamps along the hose to each nipple and tighten the clamps very firmly. 7. Fasten the two handlebars (06) to the tank using four pan screws (08) and four washers (10) and four hex nuts (09). Note: keep the handle curve ends upward. 8. Locate the axle (05), and slide it through the holes in the sides of the handlebars (06). Place one wheel (02) at each end of the axle and fasten then into place with cotter pins (03) and washer (30). 9. Insert the fixed foot (04) onto the fitting on the bottom of the tank near the edge. Use your last cotter pin (03) to hold the foot to the tank. 10. Before beginning operations, go back over each connection, double checking to ensure that all are tight and properly seated. 6
7 MAINTENANCE WARNING! Failure to observe the following before performing any maintenance could cause serious injury or death from the sudden release of compressed air: Depressurize the blast machine. Disconnect power supply. Lockout and tag out the compressed air supply. Bleed the air supply line to the blast gun. Immediate replacement of worn components is required. Failure to replace worn components could expose the operator or bystanders to high speed media and compressed air could cause death or serious injury. Leaks around couplings and nozzle holders indicate worn or loose fitting parts. Nozzle holders and couplings that do not fit tightly on hose and nozzles that do not fit tightly in nozzle holders could disconnect while under pressure. Impact from nozzles, couplings, hoses, or abrasive, and parts disconnected while under pressure could cause severe injury. To ensure a long and efficient operational life of the Deadman Handle, it is highly recommended that the following procedures be followed: 1. Periodically(after 5-6 months of moderato use or after hours of heavy industrial use) replace all hose adaptors that are for abrasive flow use only. 2. Periodically replace sealing block in deadman handle to maintain proper shut-off. 3. Replace abrasive hose when it begins to soften or leaks media or air around the hose or handle area. 4. Replace the nozzle when it wears to the next larger size. 5. Adjustment of sealing block may be required after nozzle change. 7
8 OTHER MAINTENANCE ITEMS: 1. You should make every effort to protect your air compressor from any damage it may receive from your abrasive blasting work. Your best option is to keep the compressor up wind from the abrasive blasting, and the greater the distance between them, the better. Other than that, you should continue standard maintenance procedures for the compressor. 2. Some parts of the abrasive blaster will wear much more rapidly than others, the parts needing close attention carry the air/abrasive mixture, starting with the abrasive hose (25) and going through the metal fillings, the DEADMAN valve (34) and the ceramic nozzles (28). 3. If air leaks develop in any of these parts, you should stop all work,and find what needs to be repaired or replaced. When it s new, the abrasive hose (25) has 2 cord piles and the walls are 1/4 thick. As the interior diameter is abraded, this wall becomes thinner and thinner. One way to inspect the hose and other parts affected by the blasting is to put on your protective clothing. Then pressurize the system and close the nozzle shut off the valve (19). Listen for air leaks, fix any leaks before operating. You can also spot places in the hose where the wall is getting very thin. These show up as blisters in the hose; if you find such a blister,get a new hose immediately. If that blister breaks, the abrasive will come out of the side of the hose. 8
9 AIR COMPRESSOR RECOMMENDATION: To permit efficient operation of your air compressor, follow these guidelines: 1. Use a smaller size nozzle to control the demand of air. 2. Do not blast continuously. Stop blasting operation periodically to allow the compressor to cool. No compressor is designed to constantly run at full RPM. Use 70% of the rated output. 3. Use a minimum 1/2 air hose or metal piping from your air compressor to the blaster. If you compressor is creating an excessive amount of moisture, we recommend using a water trap or a moisture separator. 4. The air compressor should be drained at the bottom of the supply tank through a drain valve and should be blown down daily. It is not unusual to drain three or four gallons of water from the supply tank on a high humidity day. An additional supply tank will help. 5. Keep dust and media created by blasting away from the air compressor unit. Observe maximum air pressure requirements for the blaster and either set your compressor to run within these limits or use a pressure regulator valve to reduce the air pressure to the appropriate range. ABRASIVE (MEDIA) USAGE: 1. If moisture is in the media it will eventually damage the blaster tank or plug the system. Keep the media and compressor air dry to avoid this problem. 2. If media is moist, screen it and dry it before using. 3. Do not leave media in the tank after blasting because it can absorb moisture and impair blasting performance. 4. Store media in a dry place; keep media off the ground or concrete floors Put it on a wooden skid. 5. If the humidity is excessively high, it may not be advisable to blast at that time. 6. Consider using different grades or different types of media to prevent nozzle clogging due to high moisture content. 7. DO not use sand. 9
10 OPERATING INSTRUCTIONS OPERATING TECHNIQUE: 1. Connect air hose to air inlet valve. Manufacturer recommends using minimum incoming air hose of 1/2 I.D. Using an air hose smaller than 1/2 I.D. will restrict air volume and result in poor unit operation. Prior to Injection of air, be certain air inlet valve and nozzle valve are in the OFF position. With Deadman Valve closed and filler plug tight, open air inlet valve allowing air to pressurize. Operating range of unit is 40 to 110 PSI Note: For proper nozzle selection, refer to nozzle selection chart on page 11. After proper nozzle selection, insert nozzle into retainer base. Set against washer and slide retainer nut over nozzle and tighten by hand. 2. Manufacturer recommends a fine grade abrasive with granular size similar to that of table salt. This assures proper flow and reduces the possibility of nozzle obstruction. 3. With the blaster pressurized and abrasive flow regulator valve at base of unit closed, open ball valve allowing air to flow through by-pass hose to base of the unit. Then holding the abrasive hose by nozzle retainer housing with nozzle directed away from unit and operator, quickly squeeze the Deadman Valve fully open and adjust the regulator valve at base of tank to bleed the abrasive into air flow. Slowly open regulator valve until abrasive material is slightly visible. Once the regulator flow valve is adjusted to the desired setting, further adjustment should only be required when changing grade of abrasive material or when a nozzle with a different I.D. is used. Opening regulator valve too far will result in a clogged hose or nozzle. For best performance, the Deadman Valve should be opened and closed quickly WARNING! Disconnecting hose while Unit is under pressure could cause serious injury or death. Use safety lock pins and safety cables in all coupling connections to help prevent hose couplings from accidental disconnection. If twist-on type air hose couplings are used, they must be secured by safety lock pins or wires to prevent accidental disconnection while under pressure. Hose disconnection while under pressure could cause serious injury. 10
11 Warning! Do not fill the pressure vessel to within six (6) inches of the top of the vessel. If a hose is accidentally disconnected during use media spray may occur. See respiratory related WARNINGS at the beginning of the manual. Coal Slag Coal Slag is used when paint and rust has to be removed from steel, such as Car bodies, tanks or heavy machinery. Coal Slag is superior to silica because it only has 0.1% free silica, is faster cutting, can be re-used, is moisture free, and will not pack or absorb moisture. Steel Grit Steel grit is extremely fast cutting on rusty metal and hard to remove paint. Steel Grit is popular because it leaves a very smooth finish. It is also comparable in Price to most other specialty abrasives. Steel Grit is recommended in reclaim Systems or cabinets. Glass Bead Glass Bead is used in creating a satin or matte finish. Glass Bead is recommended in reclaim systems or cabinets. Aluminum Oxide Aluminum Oxide is a high quality abrasive that is sharper than sand (not recommended) and cuts twice as fast as sand. It leaves a smooth textured finish with no pits. Aluminum Oxide is rougher than glass bead and can be used over and over again. It is one of the most economical abrasives you can use in any reclaim systems or cabinets. Plastic Grit Primarily used to strip aluminum and fiberglass. Great for stripping paint. Light oxidation and surface rust. Recommended for use is blast cabinets because it creates very little dust. Works quickly, last a long time and increases visibility within the cabinet. 11
12 AIR ABRASIVE SUPPLY REQUIREMENTS Abrasive blasting requires a large volume of air at high pressure. The efficiency of your abrasive blaster can be adversely affected by the use of too small an air supply hose, insufficient air pressure or an overly large nozzle. Hose ID Hose Length Nozzle ID CFM@ 110 Abrasive Use PSI Per Hour 3/8 50ft 3/ lbs 3/8 25ft 7/ lbs 1/2 50ft 1/ lbs 1/2 25ft 9/ lbs We recommend that air pressure in the range of 65/110 PSI will provide the best Results. LOADING ABRASIVES INTO THE TANK 1. Check your abrasive to be sure it s dry, and won t clog the metering valve (19B), abrasive outlet pipe (23), hose (25), or other components. 2. Put on the protective clothing, full hood and MSHA/NICOSH approved Respirator. 3. Turn the air supply valve (19) to the off (horizontal) position. 4. Push down to open the nozzle DEADMAN valve (34). 5. Watch the pressure gauge (16) and make sure it reads zero pressure. 6. Remove the filler cap (13) from the top of the tank. 7. Insert the funnel (31), and pour the abrasive into the funnel. Be sure to get enough into the tank to do the job at hand. But if this is a big job, fill the tank only 3/4 full, and reload as needed to finish the work. TIP: if the humidity is 90/100%, the water trap (18) won t be able to trap all of the moisture in a 3/4 tank. Better to reduce the amount of abrasive, load more frequently, and empty the water trap more open. This will reduce the possibility of clogging the bottom of the tank or the line. 8. with the correct amount of abrasive in the tank, close the filler cap (13). 12
13 9. Close the nozzle shut-off valve (19B), and open the air supply valve (19). 10. Listen for air leaks at the filler cap as you begin to pressurize the tank from the compressor. Fix any leaks before operating. 13
14 Drawing for steps beginning with step number one. 14
15 15
16 16
17 17
18 18
19 19
20 20
ATD LB PRESSURE BLASTER INSTRUCTION MANUAL
 ATD-8402 90LB PRESSURE BLASTER INSTRUCTION MANUAL SAVE THESE INSTRUCTIONS SAFETY INSTRUCTIONS FOR SANDBLASTER 1. Before opening the tank release the air pressure on the sand tank. To do this, turn off
ATD LBS. PRESSURE BLASTER INSTRUCTION MANUAL
 ATD-8402 90 LBS. PRESSURE BLASTER INSTRUCTION MANUAL C f Pr p 65 WARNING h h er h g. ATD abrasive blasting equipment is designed for cleaning and removing rust, scale, paint and dirt. It is the ideal method
40011 PRESSURE BLASTER with Remote Control System
 40011 PRESSURE BLASTER with Remote Control System OPERATION GUIDE SPECIFICATIONS Air Pressure 80 125 PSI Min. CFM 75 CFM Max. Height 52 Tank Dimensions 24 x 40 Tank Capacity 600 lb.6 cu. ft. Blast Hose
x 20 POLYMER BENCH TOP CABINET
 40389 30 x 20 POLYMER BENCH TOP CABINET ASSEMBLY INSTRUCTIONS DIVISION OF S&H INDUSTRIES 5200 Richmond Road Cleveland, OH 44146 Phone 216-831-0550 Toll Free 800-253-9726 Fax 216-831-9573 www.shindustries.com
ATD LBS. PRESSURE BLASTER INSTRUCTION MANUAL
 ATD-8401 40 LBS. PRESSURE BLASTER INSTRUCTION MANUAL ATD abrasive blasting equipment is designed for cleaning and removing rust, scale, paint and dirt. It is the ideal method for stripping, polishing and
TEM# Air Hammer Combo USER'S MANUAL
 Air Tools TEM# 40 Air Hammer Combo USER'S MANUAL Read carefully and understand RULES FOR SAFE OPERATION and instructions before operating. Failure to follow the safety rules and other basic safety precautions
OWNER S MANUAL. Page: 1 of 8
 Air Needle Scaler OWNER S MANUAL WARNING: Read carefully and understand all INSTRUCTIONS before operating. Failure to follow the safety rules and other basic safety precautions may result in serious personal
SPECIFICATIONS Type: Twin stack, single phase Tank: 4 gallon Air Output: PSI; PSI Max PSI: 125 PSI HP: 1.
 2 GALLON TWIN STACK AIR COMPRESSOR Model: 9526 DO NOT RETURN TO STORE. Please CALL 800-348-5004 for parts and service. CALIFORNIA PROPOSITION 65 WARNING: You can create dust when you cut, sand, drill or
INTENDED USE TECHNICAL SPECIFICATIONS
 1/2IN. HEAVY-DUTY AIR IMPACT WRENCH OWNER S MANUAL WARNING: Read carefully and understand all INSTRUCTIONS before operating. Failure to follow the safety rules and other basic safety precautions may result
OWNER S MANUAL SUCTION GUN SG-300
 OWNER S MANUAL SUCTION GUN SG-00 Clemco International GmbH Carl-Zeiss-Straße Tel.: +49 (0) 806 90080 805 Bruckmühl Mail: info@clemco.de Germany Web: www.clemco-international.com Revision: 0.05 SG-00 SUCTION
Composite Pistol-Type Air Needle Scaler OWNER S MANUAL
 Composite Pistol-Type Air Needle Scaler OWNER S MANUAL WARNING: Read carefully and understand all INSTRUCTIONS before operating. Failure to follow the safety rules and other basic safety precautions may
accidents which arise due to non-observance of these instructions and the safety information herein. SPECIFICATIONS
 18 GAUGE 1-1/4 INCH BRAD NAILER Model: 7611 CALIFORNIA PROPOSITION 65 WARNING: You can create dust when you cut, sand, drill or grind materials such as wood, paint, metal, concrete, cement, or other masonry.
2 GALLON TWIN STACK AIR COMPRESSOR W/ HOSE REEL
 2 GALLON TWIN STACK AIR COMPRESSOR W/ HOSE REEL Model: 52024 CALIFORNIA PROPOSITION 65 WARNING: You can create dust when you cut, sand, drill or grind materials such as wood, paint, metal, concrete, cement,
accidents which arise due to non-observance of these instructions and the safety information herein. SPECIFICATIONS
 18 GAUGE 2 INCH BRAD NAILER Model: 7555 CALIFORNIA PROPOSITION 65 WARNING: You can create dust when you cut, sand, drill or grind materials such as wood, paint, metal, concrete, cement, or other masonry.
Hodge Clemco Ltd. SG-300 Suction Gun. Owner s Manual. Hodge Clemco Ltd
 Page 1 of 10 Hodge Clemco Ltd SG-300 Suction Gun Date of issue: 24/08/92 TS.OM64A Owner s Manual Hodge Clemco Ltd Orgreave Drive Sheffield S13 9NR Tel: 0114 254 8811 Email sales@hodgeclemco.co.uk www.hodgeclemco.co.uk
3/8" Dr. Air Butterfly Impact Wrench
 8192106 3/8" Dr. Air Butterfly Impact Wrench Owner s Manual Read and understand all instructions before use. Retain this manual for future reference. Specifications Construction: Polished aluminum and
accidents which arise due to non-observance of these instructions and the safety information herein.
 3 GALLON PANCAKE COMPRESSOR Model: 50959 CALIFORNIA PROPOSITION 65 WARNING: You can create dust when you cut, sand, drill or grind materials such as wood, paint, metal, concrete, cement, or other masonry.
HEAVY-DUTY AIR RATCHET WRENCH OWNER S MANUAL
 HEAVY-DUTY AIR RATCHET WRENCH OWNER S MANUAL WARNING: Read carefully and understand all INSTRUCTIONS before operating. Failure to follow the safety rules and other basic safety precautions may result in
Product Safety Information
 Dwg. Tp2302 Dwg. Tp2301 Dwg. Tp2303 Dwg. Tp2304 Dwg. Tpa1751 45735685 Edition 1 June 2008 Rotary Air Sander, Polisher or Buffer Product Safety Information Save These Instructions MATCO TOOLS EN Product
Product Safety Information
 16609604 Edition 1 May 2008 Fixtured Air Drill Product Safety Information Save These Instructions EN Product Description A Fixtured Air Drill is a compressed air powered, rotary power tool whose output
Binks SG-2 Plus TM Rotary 2 QT. PRESSURE CUP
 Binks SG-2 Plus TM Rotary 2 QT. PRESSURE CUP Model No. 80-651 Rotary Agitator INTRODUCTION Binks SG-2 TM Plus Rotary 2 Qt. Pressure Cup is ideal for component spraying and industrial applications where
RARS5000 AIR BODY SAW OWNER S OPERATING MANUAL
 RARS5000 AIR BODY SAW OWNER S OPERATING MANUAL DESCRIPTION 1. No mar 2. No mar tip 3. Housing grip 4. Trigger 5. Air inlet 6. Air inlet plug 7. Plastic board Important! It is essential that you read the
AIR COMPRESSOR. Failure to follow all instructions as listed below may result in electrical shock, fire, and/or serious personal injury.
 2 GALLON AIR COMPRESSOR Model: 7517 DO NOT RETURN TO STORE. Please CALL 800-348-5004 for parts and service. CALIFORNIA PROPOSITION 65 WARNING: You can create dust when you cut, sand, drill or grind materials
1/4 SHEET PALM SANDER
 1/4 SHEET PALM SANDER OWNER S MANUAL WARNING: Read carefully and understand all ASSEMBLY AND OPERATION INSTRUCTIONS before operating. Failure to follow the safety rules and other basic safety precautions
G10K - 1/2" Heavy-Duty Air Impact Wrench
 G10K - 1/2" Heavy-Duty Air Impact Wrench OWNER S MANUAL WARNING: Read carefully and understand all ASSEMBLY AND OPERATION INSTRUCTIONS before operating. Failure to follow the safety rules and other basic
1/2 in. AIR IMPACT WRENCH (TWIN HAMMER)
") 1/2 in. AIR IMPACT WRENCH (TWIN HAMMER) WARNING Read Operator s Manual. Do not operate equipment until you have read this Operator s Manual for Safety, Assembly/Operation and Maintenance Instructions.
1/2 in. AIR IMPACT WRENCH (TWIN HAMMER) WARNING Read Operator s Manual. Do not operate equipment until you have read this Operator s Manual for Safety, Assembly/Operation and Maintenance Instructions.
AC1810 / AC1810-A TECHNICAL SPECIFICATIONS. Operating Pressure psi ( kgs/cm²) [AC1810] Displacement. Net Weight
![AC1810 / AC1810-A TECHNICAL SPECIFICATIONS. Operating Pressure psi ( kgs/cm²) [AC1810] Displacement. Net Weight](/thumbs/83/88369739.jpg "AC1810 / AC1810-A TECHNICAL SPECIFICATIONS. Operating Pressure psi ( kgs/cm²) [AC1810] Displacement. Net Weight") Technical Specifications Operating Instructions Maintenance Information Troubleshooting Guide Parts Diagrams AC1810 / AC1810-A THE EVOLUTION OF PERFECTION CAUTION: Before attempting to use or service this
Technical Specifications Operating Instructions Maintenance Information Troubleshooting Guide Parts Diagrams AC1810 / AC1810-A THE EVOLUTION OF PERFECTION CAUTION: Before attempting to use or service this
BLAST CABINET FOOT PEDAL & GUN INSTRUCTIONS. Item #21133
 BLAST CABINET FOOT PEDAL & GUN INSTRUCTIONS Item #21133 The EASTWOOD BLAST CABINET FOOT PEDAL KIT is designed to replace the standard trigger operated blast gun in the Eastwood Blast Cabinets. The Foot
4 ANGLE GRINDER MODEL NO: CAT 52 PART
 4 ANGLE GRINDER 4 ANGLE GRINDER MODEL NO: CAT 52 PART No: 3110685 OPERATION & MAINTENANCE INSTRUCTIONS 0807 Fig.1 SPECIFICATIONS Model:...CAG52 Part Number:...3110685 Rated Wheel...Capacity: 4 x 1/4 (type
AC558RB AC7011RB. operation manual
 AC558RB AC7011RB operation manual table of contents Introduction 4 Using the Operators Manual Specifications 4 Specifications Product Identification 5 Record Identification Numbers Safety 6 Safety Instructions
5 Gallon Pressure Pot with HVLP Spray Gun and Hose
 California Air Tools 5 Gallon Pressure Pot with HVLP Spray Gun and Hose Model No. 365 Technical Data Type of feed.pressure Maximum pressure in the tank... 0,413Mpa (60PSI) Working pressure in the tank.0,
PRODUCT OPERATING MANUAL
 PRODUCT OPERATING MANUAL PANBLAST TM VISIFLO RESPIRATOR AIRLINE FILTERS Manual Number: ZVP PC 0084 01 Pressure Equipment Directive 97/23/EC SECTION 1. GENERAL INFORMATION 2. INTRODUCTION 3. PREPARATION
User Guide for. UTR Turbo Air Lappers Pneumatic Air Grinders & Lappers UTR-30, UTR-70, UR , ,
 User Guide for UTR Turbo Air Lappers Pneumatic Air Grinders & Lappers UTR-30, UTR-70, UR-120 8502250, 8502245, 8502251 We thank you for choosing our products. This guide provides information on general
3-IN-1 ABRASIVE BLAST MACHINE OWNER S MANUAL
 Abrasive blasting can create dust that may contain toxic materials from abrasive material and the surface being blasted. NEVER use abrasives containing high amounts of crystalline silica including silica
2.5 & 5.0 GALLON PRESSURE TANKS
 2.5 & 5.0 GALLON PRESSURE TANKS Includes: MODEL 7025 MODEL 7026 MODEL 7027 MODEL 7028 2.5 Gallon Single Regulation (NON A.S.M.E.) 2.5 Gallon Dual Regulation (NON A.S.M.E.) 5.0 Gallon Single Regulation
3 GALLON, OILLESS PANCAKE COMPRESSOR INSTRUCTIONS. Item #31289
 3 GALLON, OILLESS PANCAKE COMPRESSOR INSTRUCTIONS Item #31289 The EASTWOOD 3 GALLON, OILLESS PANCAKE COMPRESSOR, with an Integral Air Regulator, efficiently supplies all compressed air requirements for
AIRLINE-SERIES HELMET AIR FILTER
 OWNER S MANUAL AIRLINE-SERIES HELMET AIR FILTER IMPORTANT WARNING FOR SAFER BLAST CLEANING 1. Use protective equipment: Abrasive-resistant clothing, safety shoes, leather gloves, ear protection, CE-approved
40 LB. CAPACITY SANDBLAST CABINET. Models: /13
 40 LB. CAPACITY SANDBLAST CABINET Models: 7488 CALIFORNIA PROPOSITION 65 WARNING: You can create dust when you cut, sand, drill or grind materials such as wood, paint, metal, concrete, cement, or other
6 DUAL ACTION AIR SANDER
 6 DUAL ACTION AIR SANDER Model 42966 ASSEMBLY AND OPERATING INSTRUCTIONS 3491 Mission Oaks Blvd., Camarillo, CA 93011 Visit our Web site at http://www.harborfreight.com TO PREVENT SERIOUS INJURY, READ
RCV-125 REMOTE CONTROL SYSTEM IMPORTANT WARNING FOR SAFER BLAST CLEANING
 OWNER S MANUAL RCV-125 REMOTE CONTROL SYSTEM IMPORTANT WARNING FOR SAFER BLAST CLEANING 1. Use protective equipment: Abrasive-resistant clothing, safety shoes, leather gloves, ear protection, CE-approved
INTRODUCTION... 3 II II II II II II II II II II II II II I 4-5 ASSEMBLY... 6,7,8 II II II II II II II... 9
 Instruction Manual rode~ AIRLINE F I LTER INTRODUCTION... 3 WARNINGS I 4-5 ASSEMBLY... 6,7,8 OPERATION I... 9 MAINTENANCE I Ill 1 0,11 PARTS LIST I 12 RPB 62/2 a rode~ A I R L I N E F I L T E R..: INTRODUCTION
200 PSI FAST-FILL AIR SOURCE KIT
 200 PSI FAST-FILL AIR SOURCE KIT 55% Duty Compressor on 2.0 Gallon Air Tank PART NO. 20007 IMPORTANT: It is essential that you and any other operator of this product read and understand the contents of
170-CG Feed Unit SPONGE-JET USER MANUAL. Sponge-Jet, Inc. (USA) 14 Patterson Lane Newington, NH
 14 Patterson Lane Newington, NH") SPONGE-JET 170-CG Feed Unit USER MANUAL Sponge-Jet, Inc. (USA) 14 Patterson Lane +1-603-610-7950 Newington, NH 03801 www.spongejet.com AUGUST 2014, Sponge-Jet 170-CG User Manual - REV A / DOC: M-MKTG-002ENG
SPONGE-JET 170-CG Feed Unit USER MANUAL Sponge-Jet, Inc. (USA) 14 Patterson Lane +1-603-610-7950 Newington, NH 03801 www.spongejet.com AUGUST 2014, Sponge-Jet 170-CG User Manual - REV A / DOC: M-MKTG-002ENG
1. CONDITIONS FOR USE 2. SAFETY
 1. CONDITIONS FOR USE This micro abrasive blaster may only be operated: Indoors; Below 6500 ft above sea level altitude; Ambient air temperature between 40-105 F (5-40 C); Maximum relative humidity of
FACTORY SERVICED 8 Gallon Air Compressor. Model: Important Safety Instructions RISK OF EXPLOSION OR FIRE:
 FACTORY SERVICED 8 Gallon Air Compressor Model: 42801 90-DAY LIMITED WARRANTY FOR NON-COMMERCIAL USE STOP DO NOT RETURN THIS PRODUCT TO THE RETAILER! Replacement parts: Replacement parts for this tool
SERVICE MANUAL MODEL BA050BMST BREATHING AIR PANEL
 www.modsafe.com SERVICE MANUAL MODEL BA050BMST BREATHING AIR PANEL WARNING: Do not attempt to operate this equipment without first reading and understanding the service manual enclosed with this device.
200 PSI HIGH-FLOW AIR SOURCE KIT
 200 PSI HIGH-FLOW AIR SOURCE KIT 50% Duty Compressor on 2.0 Gallon Air Tank PART NO. 20008 IMPORTANT: It is essential that you and any other operator of this product read and understand the contents of
Model PSI Compressor with 3-Gallon Air Tank 12VDC
 Model 6350 150 PSI Compressor with 3-Gallon Air Tank 12VDC IMPORTANT: It is essential that you and any other operator of this product read and understandd the contents of this manual before installing
AIR DIE GRINDER KIT ITEM # MODEL #SGY-AIR139. Français p. 14. Español p. 28 ATTACH YOUR RECEIPT HERE
 ITEM #072332 KOBALT and the K & Design are registered trademarks of LF, LLC. All rights reserved. AIR DIE GRINDER KIT MODEL #SGY-AIR39 Français p. 4 Español p. 28 ATTACH YOUR RECEIPT HERE Serial Number
Right-Angle Tube Roller Model
 SPECIFICATIONS Model no. Free Speed (RPM) Throttle Rotation Max. Torque Ft-Lb Air Pressure psi Air Inlet Hose Air Flow @Free Speed Spindle Weight 909-1700 95 Lever type Reversible 240 90 1/2 NPT 1/2 I.D.
PRODUCT OPERATING MANUAL
 PRODUCT OPERATING MANUAL PANBLAST TM AIRSTOP II NPT PNEUMATIC CONTROL HANDLE Manual Number: ZVP PC 0108 00 SECTION 1. GENERAL INFORMATION 2. INTRODUCTION 3. INSTALLATION 4. OPERATING INSTRUCTIONS 5. MAINTENANCE
MODEL NUMBER: PSI AIR SOURCE KIT 200 PSI Compressor on 2.0 Gallon 200 PSI Air Tank
 IMPORTANT SAFETY INSTRUCTIONS CAUTION - To reduce risk of electrical shock or Electrocution: MODEL NUMBER: 20008 200 PSI AIR SOURCE KIT 200 PSI Compressor on 2.0 Gallon 200 PSI Air Tank IMPORTANT: It is
BLAST N' VAC PACKAGE BNVP-300/BNVP-600 OPERATING INSTRUCTIONS
 BLAST N' VAC PACKAGE BNVP-300/BNVP-600 OPERATING INSTRUCTIONS INVENTIVE MACHINE CORPORATION, PO BOX 7585, AKRON, OH 44306 (330) 785-2500 (800)325-1074 FAX (330) 785-2510 TABLE OF CONTENTS 1. 0 GENERAL...
!!!! SERVICE MANUAL PRESSURE POT 2 GALLON. Service Manual: LT Washington St 931 Progress Ave., #7
 EXEL North America, Inc. EXEL Industrial Canada, Inc. 1310 Washington St 931 Progress Ave., #7 West Chicago, IL 60185 Scarborough ONT, M1G 3V5 Ph : (800) 573 5554 Ph : (800) 450 0655 Fx : (800) 664 1511
MODEL NUMBER: M20005 AIR SOURCE KIT. 30% Duty Compressor on. 2.0 Gallon Air Tank SAVE THIS MANUAL FOR FUTURE REFERENCE
 MODEL NUMBER: M20005 AIR SOURCE KIT 30% Duty Compressor on 2.0 Gallon Air Tank SAVE THIS MANUAL FOR FUTURE REFERENCE USER MANUAL IMPORTANT SAFETY INSTRUCTIONS CAUTION - To reduce risk of electrical shock
INSTRUCTION MANUAL MST AFTERCOOLER SYSTEM MODEL
 INSTRUCTION MANUAL MST AFTERCOOLER SYSTEM MODEL 8059601 To be used with MST Model 8050501 Ambient Air Pump 7/12/05 2 TABLE OF CONTENTS GENERAL INFORMATION... 3 WARNING...4,5 UNPACKING AND AFTERCOOLER ASSEMBLY
RASP RX3 Feed UnitTM SPONGE-JET USER MANUAL. Sponge-Jet, Inc. (USA) 14 Patterson Lane Newington, NH
 14 Patterson Lane Newington, NH") SPONGE-JET RASP RX3 Feed UnitTM USER MANUAL Sponge-Jet, Inc. (USA) 14 Patterson Lane +1-603-610-7950 Newington, NH 03801 www.spongejet.com Sponge-Jet RASP RX3 User Manual - REV A / DOC: MKT-014-ENG SPONGE-JET
SPONGE-JET RASP RX3 Feed UnitTM USER MANUAL Sponge-Jet, Inc. (USA) 14 Patterson Lane +1-603-610-7950 Newington, NH 03801 www.spongejet.com Sponge-Jet RASP RX3 User Manual - REV A / DOC: MKT-014-ENG SPONGE-JET
WHEELED AIR COMPRESSOR AC658HB AC708RB AC908HB AC6520HB. User Manual
 WHEELED AIR COMPRESSOR AC658HB AC708RB AC908HB AC6520HB User Manual table of contents table of contents Introduction 4 Using the Operators Manual Product Identification 5 Record Identification Numbers
AIR HAMMERS MODEL NO: CAT138/CAT139 OPERATING & MAINTENANCE INSTRUCTIONS PART NO: / GC064
 AIR HAMMERS MODEL NO: CAT138/CAT139 PART NO: 3120152 /3120153 OPERATING & MAINTENANCE INSTRUCTIONS GC064 INTRODUCTION Thank you for purchasing this CLARKE Air Hammer. Before attempting to use this product,
Safety and operating instructions
 BV 20H Safety and operating instructions Beams and screeds BV 20H Contents Contents Introduction........................................................................ 5 About the Safety and operating
AIR-OPERATED DOUBLE DIAPHRAGM PUMP USER S MANUAL
 00, 0, 000 00, 000, 00 A. TECHNICAL INFORMATION Model 00 Inlet/Outlet " Air Inlet /" 0 / 000 /" /" 00 /" /" 000 /" /" 00 /" /" Flow Rate GPM/ 0LPM GPM/ 0LPM GPM/ LPM GPM/ LPM GPM/ 0LPM GPM/ 0LPM Maximum
3:1 High Ratio Oil Pump W. Extn. Kit
 3:1 High Ratio Oil Pump W. Extn. Kit OWNER S MANUAL WARNING: Read carefully and understand all INSTRUCTIONS before operating. Failure to follow the safety rules and other basic safety precautions may result
275 Questions, problems, missing parts?
 275 17 34 AB14872 Questions, problems, missing parts? Before returning to your retailer, please call our Customer Service Department at 1-888-3KOBALT, 8:00 a.m. 8:00 p.m. EST, Monday Friday. Compressor
Spray Gun 134-A. 1 Liter High- Pressure Gel Coat. Usage Instructions & Parts List
 1 Liter High- Pressure Gel Coat Spray Gun 134-A Usage Instructions & Parts List www.fibreglast.com 1.800.821.3283 385 Carr Drive Brookville, OH 45309 Operating Instructions & Suggestions This is a high
CUT OFF TOOL MODEL: CAT113
 CUT OFF TOOL MODEL: CAT113 Part No: 3120135 ASSEMBLY & INSTRUCTION MANUAL LS0309 INTRODUCTION Thank you for purchasing this CLARKE product Before attempting to use the product, it is essential that you
AIR COMPRESSOR OPERATING INSTRUCTION AND PARTS LIST
 AIR COMPRESSOR OPERATING INSTRUCTION AND PARTS LIST OIL-LESS TYPE IMPORTANT: PLEASE READ CAREFULLY BEFORE STARTING OPERATIONS. THE CONTENTS ARE FOR GENERAL INFORMATION OF ALL THE SIMILAR MODELS. Record
Hotspotter. Model WB-100 Professional Series. Assembly, Testing & Operating Instructions. Safety Information:
 Hotspotter Model WB-100 Professional Series Assembly, Testing & Safety Information: Safety publications related to safe practice and use: CSA 2-94 U.S. Requirements for Hand-Held LP Torches for use with
VRS Assembly & Operating Instructions
 VRS Assembly & Operating Instructions Models VRS-18 Pn #270003 VRS-24 Pn #270006 VRS-30 Pn #270010 Not for use on pressure vessels equipped with Automatic exhaust valve (680 controls) EMPIRE ABRASIVE EQUIPMENT
INDUSTRIAL AIR HYDRAULIC RIVETER 1/4" (6.4MM)
") INDUSTRIAL AIR HYDRAULIC RIVETER 1/4" (6.4MM) 2 YEAR WARRANTY SUITABLE FOR STAINLESS STEEL, ALUMINIUM & STEEL RIVETS 6 NOSE PIECES 1894KG OF TRACTION POWER K13271 ED1 April 17 Table of Contents Know Your
INDUSTRIAL AIR HYDRAULIC RIVETER 1/4" (6.4MM) 2 YEAR WARRANTY SUITABLE FOR STAINLESS STEEL, ALUMINIUM & STEEL RIVETS 6 NOSE PIECES 1894KG OF TRACTION POWER K13271 ED1 April 17 Table of Contents Know Your
ORBITAL AIR SANDER. Owner s Manual
 ORBITAL AIR SANDER Owner s Manual WARNING: Read carefully and understand all ASSEMBLY AND OPERATION INSTRUCTIONS before operating. Failure to follow the safety rules and other basic safety precautions
200 PSI COMPRESSORS - MODEL NUMBERS
 200 PSI COMPRESSORS - MODEL NUMBERS 380C AIR COMPRESSOR KIT PART NO. 38033 480C AIR COMPRESSOR KIT PART NO. 48043 380C 480C IMPORTANT: It is essential that you and any other operator of this product read
AIR HYDRAULIC RIVETER
 AIR HYDRAULIC RIVETER Owner s Manual WARNING: Read carefully and understand all ASSEMBLY AND OPERATION INSTRUCTIONS before operating. Failure to follow the safety rules and other basic safety precautions
100C Air Compressor Kit
 10010 100C Air Compressor (standard mounting bracket, CE Spec) 10014 100C Air Compressor (no leader hose or check valve, CE Spec) 10016 100C Air Compressor (with Omega Bracket, CE Spec) IMPORTANT: It is
CHAPTER 26 WELDING AND CUTTING
 CHAPTER 26 WELDING AND CUTTING Revised 7/2010 1 WELDING AND CUTTING Responsibilities 1. The County Safety Officer is responsible for providing appropriate safety instructions for supervisor's use on welding
1/2 CROWN AIR STAPLER
 1/2 CROWN AIR STAPLER Model 54753 ASSEMBLY AND OPERATION INSTRUCTIONS 3491 Mission Oaks Blvd., Camarillo, CA 93011 Visit our Web site at http://www.harborfreight.com TO PREVENT SERIOUS INJURY, READ AND
FOR INSTALLING CO 2 BLENDER KIT (P/N IN BEER SYSTEM
 IMI CORNELIUS INC One Cornelius Place Anoka, MN 55303-623 Telephone (800) 238-3600 Facsimile (612) 22-326 INSTALLATION INSTRUCTIONS FOR INSTALLING CO 2 BLENDER KIT (P/N 111612000 IN BEER SYSTEM SECONDARY
SERVICE MANUAL MODEL BA100BMST 100 SCFM PORTABLE AIR PANEL
 Product Manual MST Portable Air Filtration System SERVICE MANUAL MODEL BA100BMST 100 SCFM PORTABLE AIR PANEL WARNING: Do not attempt to operate this equipment without first reading and understanding the
97C COMPRESSOR KIT 12V PART NO C COMPRESSOR KIT 24V PART NO C COMPRESSOR KIT PART NO
 97C COMPRESSOR KIT 12V PART NO. 00097 97C COMPRESSOR KIT 24V PART NO. 02497 98C COMPRESSOR KIT PART NO. 00098 97C 98C IMPORTANT: It is essential that you and any other operator of this product read and
IMPORTANT SAFETY INSTRUCTIONS
 IMPORTANT SAFETY INSTRUCTIONS CAUTION - To reduce risk of electrical shock: - Do not disassemble. Do not attempt repairs or modifications. Refer to qualified service agencies for all service and repairs.
OPERATION & MAINTENANCE INSTRUCTIONS
 1 /2 REVERSIBLE AIR DRILL MODEL NO: CAT123 PART NO: 3110879 OPERATION & MAINTENANCE INSTRUCTIONS GC1110 INTRODUCTION Thank you for purchasing this CLARKE product. Before attempting to use this product,
420C AIR COMPRESSOR KIT PART NO C AIR COMPRESSOR KIT PART NO
 420C AIR COMPRESSOR KIT PART NO. 42042 460C AIR COMPRESSOR KIT PART NO. 46043 420C 460C IMPORTANT: It is essential that you and any other operator of this product read and understand the contents of this
pneumatic dust collector
 pneumatic dust collector Model 96450 Operation Instructions Due to continuing improvements, actual product may differ slightly from the product described herein. 3491 Mission Oaks Blvd., Camarillo, CA
3/8 ANGLED AIR DRILL
 3/8 ANGLED AIR DRILL MODEL NO: CAT61 PART NO: 3110461 OPERATING & MAINTENANCE INSTRUCTIONS GC0614 INTRODUCTION Thank you for purchasing this CLARKE Angled Air Drill. Before attempting to use this product,
Air Hammer Model 32940
 Air Hammer Model 32940 Assembly and Operation Instructions 3491 Mission Oaks Blvd., Camarillo, CA 93011 Visit our Web site at http://www.harborfreight.com TO PREVENT SERIOUS INJURY, READ AND UNDERSTAND
SAND BLASTER. Pneumatic. Model No Distributed by Sears, Roebuck and Co., Hoffman Estates, IL
 Owner's Manual Pneumatic SAND BLASTER Model No. 875.167070 WARNING: Before operating tool, read this manual and follow all Safety Recommendations and Operating Instructions., Safety, Warranty, Features
170-SJ Feed UnitTM 470-SJ Feed UnitTM
 SPONGE-JET 170-SJ Feed UnitTM 470-SJ Feed UnitTM USER MANUAL Sponge-Jet, Inc. (USA) 14 Patterson Lane +1-603-610-7950 Newington, NH 03801 www.spongejet.com Sponge-Jet 170-SJ / 470-SJ User Manual - REV
250C-IG COMPRESSOR KIT 12V PART NO C-IG COMPRESSOR KIT 24V PART NO
 250C-IG COMPRESSOR KIT 12V PART NO. 25050 250C-IG COMPRESSOR KIT 24V PART NO. 25058 IMPORTANT: It is essential that you and any other operator of this product read and understand the contents of this manual
Vision Painting Inc Safety Management System
 Abrasive Blasting 1. PURPOSE The purpose of this program is to provide training and qualification guidelines for the safe operation of Abrasive Blasting. The Safety Officer is responsible for facilitating
Work Area. Tool Use and Care. Personal Safety INSTRUCTIONS PERTAINING TO A RISK OF FIRE, ELECTRIC SHOCK, OR INJURY TO PERSONS
 WARNING SYMBOLS AND DEFINITIONS This is the safety alert symbol. It is used to alert you to potential personal injury hazards. Obey all safety messages that follow this symbol to avoid possible injury
TECHNICAL DATA MAINTENANCE AIR COMPRESSOR MODEL G-1
 Dry 131h 1. DESCRIPTION The Viking Model G-1 Maintenance Air Compressor is an electric motor-driven, aircooled, single-stage, oil-less compressor. The unit is equipped with a check valve and provides a
User s Manual. Read Manual SODA STO SODA STORM SERIES BLASTERS. Manual P/N: PB-MAS004
 User s Manual SODA STORM SERIES BLASTERS Featurin g The SODA STO RM SODA BL ASTING These products and equipment are not under any circumstances to be used with sand or silica products of any type and use
0 1,150 1/
 π H-2030 shrinkfast heat gun #975 1-800-295-5510 uline.com general safety provisions Read this manual thoroughly to familiarize yourself with the parts and safe operation of this tool. Keep for future
DUAL ACTION SANDER MODEL NO: CAT121 OPERATION & MAINTENANCE INSTRUCTIONS PART NO: LS0211
 DUAL ACTION SANDER MODEL NO: CAT121 PART NO: 3110877 OPERATION & MAINTENANCE INSTRUCTIONS LS0211 INTRODUCTION Thank you for purchasing this CLARKE product. Before attempting to use this product, please
INDUSTRIAL COMPOSITE 3/8 DRILL REVERSIBLE
 INDUSTRIAL COMPOSITE 3/8 DRILL REVERSIBLE 2 YEAR WARRANTY KEYLESS CHUCK FORWARD & REVERSE ERGONOMIC RUBBER GRIP K13260 ED1 December 15 Table of Contents Know Your Product...1 General Safety Instructions...2
Binks SV100 Conventional Suction Feed Spray Gun
 Binks SV100 Conventional Suction Feed Spray Gun The following instructions provide the necessary information for the proper maintenance of the Binks SV100 suction feed spray gun. Please read and understand
REVERSIBLE AIR DRILL
 REVERSIBLE AIR DRILL MODEL NO: CAT87 PART NO: 3110835 OPERATING & MAINTENANCE INSTRUCTIONS GC0613 INTRODUCTION Thank you for purchasing this CLARKE Reversible Air Drill Before attempting to use this product,
LUBRICATOR ASSEMBLY AND OPERATING INSTRUCTIONS
 AIR FILTER, REGULATOR AND LUBRICATOR 4035 ASSEMBLY AND OPERATING INSTRUCTIONS 349 Mission Oaks Blvd., Camarillo, CA 930 Visit our Web site at http://www.harborfreight.com Copyright 004 by Harbor Freight
2 GAL AIR COMPRESSOR OPERATOR S MANUAL 1/3HP/2-GALLON IMPORTANT: READ THIS OPERATOR S MANUAL BEFORE USING
 ITEM# AT01101 SKU# 207-1525 OPERATOR S MANUAL 1/3HP/2-GALLON 2 GAL AIR COMPRESSOR IMPORTANT: READ THIS OPERATOR S MANUAL BEFORE USING Toll Free Helpline: 1-888-899-0146 Versions 01 TABLE OF CONTENTS SAFETY
SAFETY/RISK/HAZARD ASSESSMENT
 AIR BREAKER 25KG JACK HAMMER SAFETY/RISK/HAZARD ASSESSMENT PLANT INFORMATION NHG Ref/Part No. Plant Name: Potential Noise Level in Db: Atlas Copco Air Breaker 25kg 100db to less than 120db Required hearing
Owner s Manual & Safety Instructions
 Owner s Manual & Safety Instructions Save This Manual Keep this manual for the safety warnings and precautions, assembly, operating, inspection, maintenance and cleaning procedures. Write the product s