Vacuum Bagging Wings Instruction Manual Purdue University
|
|
|
- Amice Atkins
- 5 years ago
- Views:
Transcription

1 Vacuum Bagging Wings Instruction Manual Purdue University Note: Do not leave the vacuum pump running unattended! Revision: Original Release 10/31/15

2 Vacuum bagged wings are quick to build, light weight, and have excellent aerodynamic and structural performance. The method described, sometimes called the glass slipper, produces wings with a smooth surface requiring only a slight cleanup of the leading and trailing edge. The steps in the process are: 1. Cut the foam core out with CNC hot wire or CNC mill 2. Cut out the Mylar, fiberglass, Kevlar strips, breather and vacuum bag tube 3. Tape the Mylar together with ~1/2 inch gap at the leading edge and release wax the Mylar 4. Glue Kevlar strips to the leading edge and aileron hinges with light coat of 3M 77 spray adhesive 5. Lay the fiberglass on the Mylar. Pour resin on near the middle and squeegee out the resin 6. Wrap the Mylar/fiberglass around the foam core. Tape trailing edge and tips to keep the foam core in place. 7. Add the release film, breather and insert in bagging tube. Attach the vacuum connector and the end clips 8. Turn on the vacuum pump and smooth the bag over the wing as the pressure drops. Check for and seal any vacuum leaks. 9. Allow resin to set. Remove wing, sand leading edge and trim trailing edge. Cross Section of layup materials Revision: Original Release 10/31/15 Page 2

 Kevlar strip Epoxy resin and hardener Nylon bagging tube (at least half a size wider than the chord of your wing)")
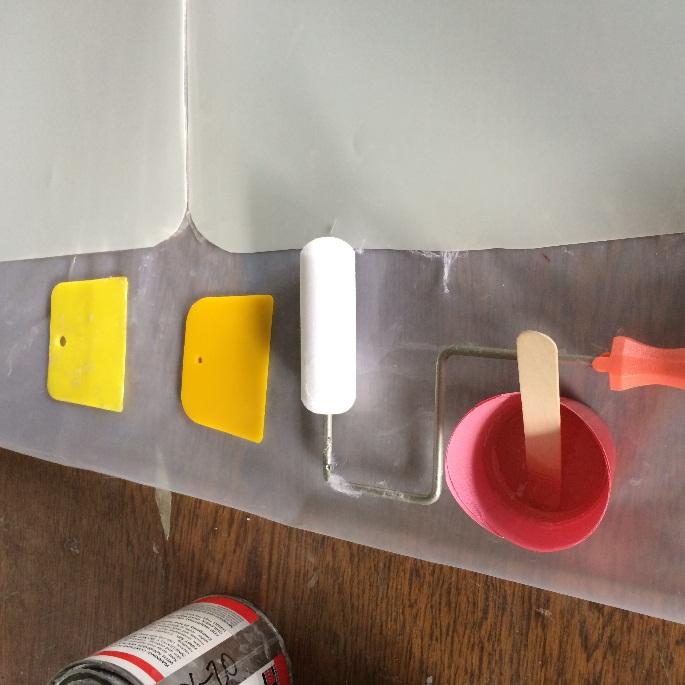
3 1. BASIC VACUUM BAGGING SYSTEM SETUP Vacuum bagging composite parts is a simple process that is used to compress composite layups while they cure. Here we will describe the basic assembly of our vacuum bagging system. One common use for vacuum bagging is foam core wing and tail surfaces for models. In this instruction manual we will cover how to set up the bag and use the system to vacuum bag a foam core wing with fiberglass. Here are the materials that should be prepared. Vacuum bagging materials: Fiberglass/carbon fiber (just enough to cover wing area) Kevlar strip Epoxy resin and hardener Nylon bagging tube (at least half a size wider than the chord of your wing) Mylar sheet Release wax Release film Packing tape Bag clips Breather strip Vacuum pump Other materials: Gloves Clean plastic mixing cups Clean mixing sticks Clean plastic squeegee Preparations: 1. The first step to setting a vacuum bagging process is to have a clean, spacious work area that is enough to lay the foam wing and place the rest of the materials needed. The work area/table should also be close to a power outlet to be connected to the vacuum pump. Revision: Original Release 10/31/15 Page 3
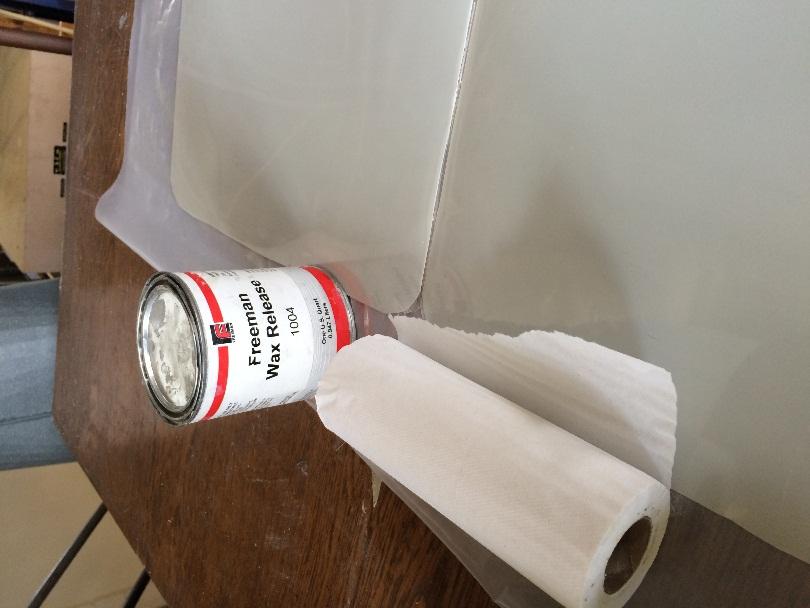
4 2. Vacuum bag can be reused many times. Cut the vacuum bag tube at least a foot longer than the longest part of the wing that is to be bagged. Bag clips are used to seal the ends of the bag at desired lengths. Throughout this entire process, the Nylon bag should be handled careful to prevent having holes on it. 3. Mylar film should be cut to two pieces that covers almost the exact area of top and bottom of the wing, about ½ in from the leading edge. Try not to scratch or put any gauges on the Mylar because any of the defects will be transferred to the wing later on. Tape the trailing edges of the Mylar together to make a folding layer. Clean the inside surface of the Mylar and with paper towels, apply release wax all over the surface. Rub some of the wax along the outer edge of the other surface as well. This prevents the excess resin from sticking and allows the Mylar to be reused. 4. Cut breather strip about a foot longer than the foam core wing that you are using. 5. Cut the release film to almost the size of the wing area, top and bottom. 6. Cut the fiberglass cloth to match the surface of the taped Mylar combined. All the materials prepared above should be at least a foot shorter than the Nylon bag. 7. Epoxy and resin hardener mix (usually West System 105 Epoxy Resin and 205 Hardener) should be prepared the last due to its curing time that allows limited working time. The fast hardener should allow a working time of about 30 minutes in room temperature. Higher ambient temperature makes the epoxy cure faster. Further reading and understandings of epoxy cure time can be done on Dispense the proper proportions of resin and hardener into mixing cup. One squirt of resin for one squirt of hardener. Do not try to adjust the mix ratio. Do not use glass or foam containers because of potential danger from exothermic heat build-up. Stir the two ingredients together thoroughly-at least 1 minute-longer in cooler temperatures. To assure thorough mixing, scrape the sides and bottom of the pot as you mix. Use the flat end of the mixing stick to reach the inside corner of the pot. Revision: Original Release 10/31/15 Page 4


5 Revision: Original Release 10/31/15 Page 5

6 Wing Outline Trailing edge Leading Edge Revision: Original Release 10/31/15 Page 6


7 FOAM CORE FIBERGLASS SLIPPER LAYERING 1. The foam wing should be sanded down to a clean smooth surface before beginning the layering process. Make sure that there are no stray foam fibers on other materials or the workspace. 2. Place the fiberglass cloth on the inner surface of the waxed Mylar film. Wet out the cloth on the Mylar with mixed epoxy resin and spread the resin all over with plastic squeegee, making sure there are no dry spots (cloth should be transparent). Now the surface should look nearly dry. If there are any wet areas repeat the roller and towel process on those areas. 3. Place the foam core on one side of the Mylar and fold over, making sure that the foam is lined and wrapped up properly with the outer Mylar layer. 4. Now we are ready for layering the bag contents. The first layer outside the part is a film of peel ply. Epoxy does not stick to the film. It is very thin and flexible. It easily conforms to the part. The next layer on each side is a breather layer. It assures the vacuum will be uniformly distributed over the entire surface of the part. Revision: Original Release 10/31/15 Page 7


8 VACUUM BAGGING 1. Getting all the layers into the vacuum bag can be a little difficult the first time. One of the easiest ways to slide all layers in the bag is to stack them up the table. Then put an arm through the bag tube and pull the layers into the bag while flattening out the bag over the stack with the other hand. 2. After all the layers are in position in the bag tube, place the female vacuum connector on the excess breather cloth on one of the sides of the layers. Note the correct size of hole to cut. A hole cut too small will make this a leaky seal. Revision: Original Release 10/31/15 Page 8


9 3. Make a cut on the nylon bag where the female connector sits. Insert the male connector. Connect the pump hose. MAKE SURE TO CUT A HOLE IN YOUR BAG LARGER THAN THE CROSS PEG OF THE MALE CONNECTOR. THIS CONNECTION IS PRONE TO A POOR SEAL IF THE BAG GETS WRINKLED WHEN CONNECTING THE MALE AND FEMALE CONNECTORS. 4. Close both ends of the bag tube with clips. This is done by folding the bag tube over the white rod then pressing the blue channel over the outside of the rod. Make sure that the breather cloth does not obstruct the clips and there are no wrinkles in the bag film under the channel. This is another area prone to leaks, but easy to fix. Revision: Original Release 10/31/15 Page 9
10 5. Turn on the vacuum pump. The bag will pull down quickly over the part. Check the reading on the vacuum gauge. It should read between 18 and 24 inches of Hg depending on your altitude. Use a squeegee over the outside of the bag to smooth out the bag surface and help the bag pull tight around the edges of the part. The squeegee will also smooth out any edges in the layup under the Mylar and move any excess epoxy off to the edges. 6. Keep the wing under vacuum for at least 24 hours. REMOVING WING FROM VACUUM BAG 1. Unclip bag 2. Slowly and gently, separate Mylar surface from Nylon bag and pull wing out from one end. 3. Gently peel off Mylar (to be reused) from wing. 4. Discard any one-time-use materials (perf ply, breather). 5. Keep bag for reuse. 6. Clean off vacuum bagging table for the next user. 7. Clean up rest of work area. NOTE: Reference #1 below describes how to paint the Mylar sheets and have the paint transferred to the wing. This gives a smooth shiny painted wing Reference #2 describes using a light colored cloth as the first layer and thus producing a colored wing References: Revision: Original Release 10/31/15 Page 10
other tables and stations. A plexiglass sheet was placed on a table top to provide the smooth flat surface to lay up the fiberglass on.
 Fiberglassing After hot wire cutting our four airfoils for testing, it was decided that greater strength was needed. The foam airfoils do not have the required strength to withstand the forces of the wind
STUDY GUIDE A Day By Day Course Refreshment Quiz To Ensure That You Make The Most Out Of Your Rod Building Class
 DAY ONE: 1) Why would you want to build your own fishing rod? a. It s fun and rewarding b. You can customize your rod to your needs c. You can save money d. All of the Above 2) The main part of a fishing
Pre-Paint>Fuselage>Empennage>Fit vertical tail fin. Objectives of this task: Materials and equipment required: Fit the spar extender
 Pre-Paint>Fuselage>Empennage>Fit vertical tail fin Objectives of this task: To fit the vertical tail fin to the fuselage, including fitting the static probe, static tube, optional strobe light wiring and
Surfboard Repairs Chapter 7
 Surfboard Repairs Chapter 7 The Complete Surfing Guide for Coaches - Bruce "Snake" Gabrielson Repair Problems Boards continuously get bumped, hit rocks, break fins, get dropped, and many other things that
How to repair a dinged windsurf board
 How to repair a dinged windsurf board VERY Important: before the repair, let the board dry out for at least a day in the hot sun. Be sure to read "preparation" below. Repair of a small (1/2") hole in the
Outbound Progress Report
 Outbound Progress Report 7-11-17 Tank Install The new 20 plus gallon fuel tank is underway. In a matter of weeks we should be getting the first article and placing a first run order. The tank fits like
Dornier Do R 4 Super-Wal
 Dornier Do R 4 Super-Wal Model Aviation Laddie Mikulasko s Dornier Do R 4 Super-Wal Build the multiengine, record-setting seaplane. Article, plans, instructions, and photos by Laddie Mikulasko. Complete
Trim Tab Wind Vane for boats with transom mounted rudders
 Trim Tab Wind Vane for boats with transom mounted rudders If your boat has a transom mounted rudder, you can build this self-steering windvane for around $150, using regular wood working tools and some
Your kit contains the following items. Additional Items You May Need. Pre- cut parts Propeller rigging and rubber Sandpaper Covering sheet
 Your kit contains the following items Pre- cut parts Propeller rigging and rubber Sandpaper Covering sheet The SkyFox offers great glide performance in a rubber powered plane due to its built up wing.
Hip Block Installation Instructions:
 Hip Block Installation Instructions: The instructions that follow are shown for our low profile hip blocks installed in a Storm Chaser M C-1. However, the very same technique can be used for any of our
WHITE WOLF. X-ray View MID POWER MODEL ROCKET KIT BUILDING INSTRUCTIONS KIT SPECIFICATIONS:
 WHITEWOLF-38 PARTS LIST 1 - Nose Cone 1-17" Airframe 1-6" Motor Tube 3 - Aft Fins 3 - Forward Fins 2 - Centering Rings 1-15" Parachute 2 - launch lugs 1-12 Kevlar Shock Cord 1 - Motor Retention >>(screw/washer)
FlyingFoam Nurf. General Assembly Instructions
 FlyingFoam Nurf General Assembly Instructions These instructions apply to the Nurf, an all EPP forward swept flying wing available from FlyingFoam.com. Building and operating a remote controlled aircraft
We hope you ll enjoy the Drifter as much as we have! Scott DeTray Model Aero Specifications:
 We are excited to bring you the Drifter RC airboat. You re probably thinking it doesn t fly so what is Model Aero thinking??? We have always liked RC vehicles of all types and have had a fondness for airboats
Manual 1: working with cutting films. MANUAL 1. Working with cutting films. March 2017
 Manual 1: working with cutting films. MANUAL 1 R Working with cutting films March 2017 Manual 1: working with cutting films. R 1 NECESSARY TOOLS It goes without saying that you need the right tools if
AGM 33 PIKE ALL FIBERGLASS. Specifications Length: 92 Diameter 5.5 Weight: 24 lbs Motor Mount: 75mm Fins: 6-3/16 G10 CP: 68 from nose tip Parts List
 ALL FIBERGLASS AGM 33 PIKE Specifications Length: 92 Diameter 5.5 Weight: 24 lbs Motor Mount: 75mm Fins: 6-3/16 G10 CP: 68 from nose tip Parts List (1) Filament Wound Nose Cone w/ Metal Tip (1) Nose Cone
OWNER S MANUAL ALWAYS WEAR A GOVERNMENT APPROVED FLOATATION DEVICE WHEN FISHING. Know the limits of your ability and the limits of your equipment.
 OWNER S MANUAL ALWAYS WEAR A GOVERNMENT APPROVED FLOATATION DEVICE WHEN FISHING. Know the limits of your ability and the limits of your equipment. Changes in air temperature and elevation could cause the
DECAL APPLICATION INSTRUCTIONS
 DECAL APPLICATION INSTRUCTIONS 1. Measure where you want your decal to be. Then tape in place on 1 side only to use as a hinge, using regular masking tape. Place your tape on the top, bottom or either
Exxtacy. Repair and Tuning Manual. Exxtacy Construction Basics
 1 of 20 Exxtacy Repair and Tuning Manual Construction Basics D Cell Repair Rib Repair Tuning Exxtacy Construction Basics The Exxtacy is built with carbon fiber and Kevlar/Aramide honeycomb. The Exxtacy
Wet Lamination of Dry Film Photoresist for the Hobbyist
 Wet Lamination of Dry Film Photoresist for the Hobbyist By Adam Seychell Updated: 10. September 2009 Table of Contents Introduction...2 Equipment List...3 Squeegee Board...4 The Procedure...5 Cut photoresist
How Scott Builds a Fighter Kite, May 2011 Updated Sept 2018
 How Scott Builds a Fighter Kite, May 2011 Updated Sept 2018 MAKE A TEMPLATE 1. Draw half sail plan on 17x22 pad with 4x4 (1/4 inch) grid. Add ¼ inch extra on nose (for reinforcement) and plenty of extra
5. Tailplane assembly
 5. Tailplane assembly Overview This section covers the fitting of your completed tailplanes to the torque tube assembly. Included is the insertion of the TP13 bushes in the inboard rib and the fitting
S A N S I B E A R S P L I N T 2 0 X
 SANSIBEAR SPLINT 20X This is just a short documentation of one way you can assemble the Cylon/Splint I'm sure the pics will speak for themselves. Good pictures are better than to many words. If you have
The Outer Seal is highly abrasion resistant and provides mechanical stiffness to the splice in order to better match the cable stiffness.
 The Sealing Compound encapsulates the electrical splices, provides a strain relief for the conductors, acts as a water block, eliminates air voids which tend to act as pumps to draw in water during pressure
Handle the film very carefully. As with aluminum foil, once creased, the film will remain creased.
 RECOMMENDED TOOLS: Bottled water (not tap water) Spray bottle Squeegee or squeegee card Break-away utility knife (for cutting film) Single-edged razor blade (for cleaning glass) Ruler or tape measure Soft,
THE AMERICAN BARN DOOR KITE
 THE AMERICAN BARN DOOR KITE Oregon Kitemaker s Retreat January 2007 Rod Beamguard 4104 NW 112 th Way Vancouver, WA 98685-3578 (360) 574-8050 home (360) 750-9833 office kytfevr@wa-net.com PLANFORM BARN
Pitts Model 12 Wing Leading edge Installation
 Pitts Model 12 Wing Leading edge Installation This procedure is used to install molded plywood leading edges included in the Pitts Model 12 kit. Nine (9) molded leading edge section are require per aircraft;
AVA Building Instructions
 Suggested Assembly Sequence: AVA Building Instructions 1. Insert fittings in rudder and trial fit rudder on boom 2. Attach stab to v-mount and position ahead of rudder ¼, sanding the v-mount as needed.
EPP Version Building Notes Updated
 EPP Version Building Notes Updated 12-10-2013 The Zulu covers a wide range of flying conditions: slope soaring in light to strong lift, thermalling, aerobatics, discus launches, and combat; for skill levels
Aliphatic Resin Wood Glue. 18" Fabric Parachute Part #PNC50 Part # Part #11700 Part #J0016. Launch Lug
 ADANCED * What you will need to build the Quest High-Q Hobby Knife * Straight Edge Pencil Aliphatic Resin Wood Sanding Sealer & Brush Spray Paint Parts and exploded view of the Quest High-Q Nose Cone 18"
1/10 th Scale 1956 Ted Jones Classic Hydroplane
 1/10 th Scale 1956 Ted Jones Classic Hydroplane Preparation These plans show outside sheeting of 3/32 balsa laminated with 1/64 birch ply. This makes a light and strong skin for this boat. Optionally you
REPAIR MANUAL. Materials
 REPAIR MANUAL Materials Balsa: Raw material for FST (Future Shape Technology series) and HELIUM rails or parabolic stringers. It is what gives our unique product its excellent performance characteristics.
BUIDLING INSTRUCTION GLIDER MINI-RACE. MINI-Race building instruction January
 Wingspan [mm]: 950 Aspect ratio: 7,7 Wing area [dm2]: 11,7 Wing loading [g/dm²] : 16 Takeoff weight [g]: 190 Airfoil: AG03 mod BUIDLING INSTRUCTION GLIDER MINI-RACE www.pcm.at 1 CONTENTS DATA 1. Kit contents
How Do I Install My Garden Master Bucket Garden?
 How Do I Install My Garden Master Bucket Garden? 1. On the arrival of your Bucket Garden open the bucket and remove the 4 screws from the outside of the bucket rim and pull the 2 buckets apart. Check the
Tugster. Tug Boat. Competition or Sport Tug Kit. A Zippkits R/C Boat. Building Instructions
 Z I P P M A N U FA C T U R I N G Tugster Tug Boat Competition or Sport Tug Kit A Zippkits R/C Boat Building Instructions 2016 JMP Hobby Group St. Paul, Indiana 47272 www.zippkits.com Toll Free (866) 922-ZIPP
MiniTwin by Acer
 MiniTwin 250 - by Acer ASSEMBLY INSTRUCTIONS Thank you for choosing the MiniTwin 250 as your next project. This kit is easy to build and only requires a few hours to complete. Once finished, you will be
COATINGS SPRAY GUIDE Urethane 520
 This guide covers handling and airless spray application of AWS URETHANE 520 single component, moisture-cured polyurethane elastomeric coating. Airless spray is an effective method of application particularly
OWNER S MANUAL AirTop Large and AirTop Small
 It is the owner s responsibility to read and understand the material presented in this manual and to instruct all users or operators on how to use product safely. By inflating the product, you hereby agree
WAVE CYBER HANDLING &
 WAVE CYBER PRESSURE VESSEL LIFTING, HANDLING & INSTALLATION INSTRUCTIONS 1 Contents Page Rating, Receiving... 3 Basic Handling Rules... 4 UV Protection... 8 Vacuum Protection Flex Connectors... 9 Flexibility
Bi-Fold Frame Class by Mary Anne
 Bi-Fold Frame Class by Mary Anne Ludgershall Crop You will need: one A3 sheet of black foam core four additional 1 inch x 8 inch strips of black foam core Strong double sided tape (1/2 inch and 1/2 to
LAB Chip Lid Molding LAB PROCEDURE
 LAB Chip Lid Molding LAB PROCEDURE The purpose of this lab is to expose the student to a lab-on-a-chip fabrication technique. The student will utilize polydimethylsiloxane (PDMS) poured in four Petri dishes
WATER SLIDE. Limbo Beach
 84694 Limbo Beach WATER SLIDE IMPORTANT SAFETY INSTRUCTIONS. PLEASE READ AND SAVE THESE INSTRUCTIONS BEFORE SETUP AND USE. KEEP THESE INSTRUCTIONS IN A SAFE PLACE FOR FUTURE REFERENCE. FOR AGES 5-12 ADULT
Samurai Armor Set: Step by Step
 Samurai Armor Set: Step by Step Pack 3 Stages 9-12 1 Contents Stage 9 Pages 29-31 The cuirass side and tassets Stage 10 Pages 32-37 The shoulder plate and tassets Stage 11 Pages 39-41 The shoulder plate
Carving a Custom Seat
 Carving a Custom Seat Seat Carving your own seat from mini-cell, high-density foam is really quite simple and has proven to be more comfortable than any commercially produced seat and often more reasonably
STEP 1 A. Lay the two Motor Mount Tubes on a flat surface with ends even and Glue them together with White Glue. Allow Glue to set before moving on.
 Prod. No. A51003 Skill Level Three QUEST AEROSPACE, INC PO Box 2409 Pagosa Springs, CO 81147 800-858-7302 Things You ll Need To Assemble this Kit: Pencil and Hobby Knife: White Glue: Aliphatic Resin glue,
Standard. Standard. Venepuncture Arm. Light. Part No: Brown. Part No: Black. Part No: 00332
 Setup Guide Standard Standard Light. Part No: 000 Brown. Part No: 00 Black. Part No: 00 Part No: 065-964 Issue, June 0 0 Limbs & Things For more skills training products visit limbsandthings.com Limbs
B. Assemble the Method-25 sample train with a heated probe/filter.
 6/30/2015 VOC Reporting, Inc. Method 25 Heated Controller Operating Instructions. pg. 1 of 5 INSTRUCTIONS FOR EPA METHOD-25 FIELD SAMPLE COLLECTION USING A VRi HEATED PROBE AND FILTER ASSEMBLY Introduction:
Kari-Tek. Kari-Tek. Hydro Skeg Retro-Fitting Instructions. Instructions for retro-fitting of Hydro Skeg
 Kari-Tek Instructions for retro-fitting of Hydro Skeg A good knowledge of fibreglassing will be required to fit the Hydro Skeg successfully. When working with fibreglass and cutting the holes, safety glasses,
Falcon 3 145, 170, 195 and Tandem Owner / Service Manual
 Falcon 3 145, 170, 195 and Tandem Owner / Service Manual January 2007 - Second Edition Removing The Sail From The Airframe And Short Packing The Glider Many maintenance and repair procedures will require
Model Aero AT-6 Texan Introduction
 1 Model Aero AT-6 Texan Introduction We are excited to introduce the Model Aero AT-6 Texan! Originally used as an advanced trainer by the U.S. Armed Forces, the AT-6 is a relaxing slow flyer, equally at
Designed by Steve Shumate Adapted from the North Star design by Laddie Mikulasko. Polaris EX Introduction
 1 Model Aero Polaris Designed by Steve Shumate Adapted from the North Star design by Laddie Mikulasko Polaris EX Introduction We re excited to introduce the Polaris EX seaplane parkflyer! Based on the
3M DICHROIC Glass Finishes
 3M DICHROIC Glass Finishes DF-PA DF-PA Chill Chill & & DF-PA DF-PA Blaze Blaze Doc TypeInstallation Product #Guide (opt.) Revision D, April 2018 Product Description 3M DICHROIC Glass Finish DF-PA (the
Peinert Dolphin. Assembly
 Peinert Dolphin Assembly The Dolphin is easily rigged; there are only four removable parts - the seat, the foot stretcher, the rigger arm, and the fin. Removal and installation of the seat. If the seat
Model Aero Sportster Indroduction
 1 Model Aero Sportster Indroduction We are excited to introduce the Model Aero Sportster! Inspired by classic designs of the past, the Sportster is a relaxing slow flyer, equally at home indoors or outside
Bottle Rocket Launcher P4-2000
 WWW.ARBORSCI.COM Bottle Rocket Launcher P4-2000 BACKGROUND: The Bottle Rocket Launcher allows for the exploration of launching rockets using commonly available materials such as plastic soda bottles and
Pakboats PakCanoe Assembly Instructions
 Pakboats PakCanoe Assembly Instructions Note: Please read these assembly instructions carefully before assembling the canoe. a A. Assembling the canoe Note: Don't be afraid to get into the canoe while
REVISION LIST CHAPTER 8: OUTBOARD WING SECTION CLOSING
 REVISION LIST CHAPTER 8: The following list of revisions will allow you to update the Legacy construction manual chapter listed above. Under the Action column, R&R directs you to remove and replace the
Inflatable Stand-Up Paddle Boards SUPS OWNER S MANUAL
 Inflatable Stand-Up Paddle Boards SUPS OWNER S MANUAL WARNING: Read carefully and understand all ASSEMBLY AND OPERATION INSTRUCTIONS before operating. Failure to follow the safety rules and other basic
SPECIAL THANKS TO THE FOLLOWING PEOPLE FOR THEIR HELP IN THIS PROJECT!
 The Viper Mark VII is the state of the art fighter of the Colonial Fleet. It is sleeker and more modern than the Viper Mark II. The Mk7 is designed for both space and atmospheric environments and is also
Akcent-2 - Building Instructions
 Akcent-2 Home Pictures Building Instructions Ordering Akcent-2 - Building Instructions Note! The pictures show older kits with "diser" wings. The new kits come with nicer D-box wings. Servo locations are
TOURNAMENT ICE. 8Ft-Gold Standard Manual Score Home Air Hockey Game Assembly Instructions / Manual
 TOURNAMENT ICE 8Ft-Gold Standard Manual Score Home Air Hockey Game Assembly Instructions / Manual Thank you for purchasing a Gold Standard Games product. All of us at Gold Standard Games want you to be
Trogear Bowsprit Through Hull Installation Manual
 Trogear Marine Products, LLC www.trogear.com info@trogear.com 866-616-2978 Trogear Bowsprit Through Hull Installation Manual Congratulations on your purchase of the Trogear Bowsprit which can be installed
QUIK-jet Micro-Injection System
 QUIK-jet Micro-Injection System Training Manual Revision Date: 11/12/07 Table of Contents Subject Headings Pages Introduction 3 Parts of the QUIK-jet Kit 4 QUIK-jet Assembly and Setup 5-6 3 Easy Steps
Samurai Armor Set: Step by Step
 Samurai Armor Set: Step by Step Pack 6 Stages -5 Contents Stage Pages 7-76 The tasset plates and shoulder pad Stage Pages 77-8 The tassets, helmet and helmet lining Stage Pages 8-86 The tasset plates and
Standard. Bag & Stand Advanced Venepuncture Arm. Light. Part No: Brown. Part No: Black. Part No: 00442
 Setup Guide Bag & Stand Advanced Standard Light. Part No: 00440 Brown. Part No: 0044 Black. Part No: 0044 Part No: 065-0 Issue, May 0 0 Limbs & Things For more skills training products visit limbsandthings.com
You can use a variety of materials for this kite, such as Tyvek, ripstop nylon, Orcon, paper, or mylar or mylar-like plastic gift wrap films.
 Woody's " Woodtick " Fighter Kite This kite is easy to make and easy to fly. It's performance will allow you to learn all fighter kite flying skills, plus put an ear to ear grin on your face. What more
Stevenson Projects Building the Hull Top Deck and Bulkheads
 Stevenson Projects Building the Hull 1. Print out both piece sheets. 2. Cut out one keel piece and glue it to a piece of balsa wood or dense cardboard. Cut out the second keel piece and glue it to the
CamRT Sun Top Bimini Installation Instructions
 CamRT Sun Top Bimini Installation Instructions C910-07 & C910-08 Rev. 16-Jun-15 Information: info@roswellglobal.com Warranty: warranty@roswellglobal.com Questions? Please call us at (31) 638-1331 Setup:
Safety System Installation Guide for ARE Wind Poles
 Safety System Installation Guide for ARE Wind Poles V. 1 May 2011 ** Climbing pegs and ladder should be installed before the pole is erected.** A. Install climbing pegs Install climbing pegs (bolt set)
GLIDING NEW ZEALAND ADVISORY CIRCULAR MYLAR SEALS. This is an Uncontrolled Document. Issued September 2004
 GLIDING NEW ZEALAND ADVISORY CIRCULAR MYLAR SEALS This is an Uncontrolled Document Issued September 2004 Holder s Name: Address: COPYRIGHT 1999 GLIDING NEW ZEALAND INC. No part of this Advisory Circular
Installing ST1300 Fairing Decals
 Installing ST1300 Fairing Decals Caution: Decals are best applied when ambient air temperature is 60 degrees or higher. Do not apply in direct sunlight. Do not allow the decals to get wet while they are
Round pool 52 (1,32m)
") Round pool 52 (1,32m) www.aquabois.com above ground or semi-inground Instructions for the assembly and installation of a wood pool Dear client, Congratulations, you have purchased a pool of superior quality
Round pool 52 (1,32m) www.aquabois.com above ground or semi-inground Instructions for the assembly and installation of a wood pool Dear client, Congratulations, you have purchased a pool of superior quality
Techcon Systems TS1258 Pressure Pot
 Techcon Systems TS1258 Pressure Pot User Guide TABLE OF CONTENT 1. SAFETY. 3 1.1 Intended Use 3 1.2 Safety Precaution 3 2. CERTIFICATE OF COMFORMANCE 4 3. FEATURES. 5 4. SPECIFICATIONS 5 5. INSTALLATION
Ultrasound Compatible Lumbar Puncture/ Epidural Simulator
 M43E Ultrasound Compatible Lumbar Puncture/ Epidural Simulator Instruction Manual Contents Please read General information Preparation Before training Training After training P.1 P.2-6 P.7 P.8-10 It includes
Instructions for use: Of adhesive ski skins and cut-to-size sets
 Instructions for use: Of adhesive ski skins and cut-to-size sets Colltex self-adhesive skins A worldwide leader for more than 30 years! Colltex adhesive ski skins revolutionized the ski skin market more
Assembly instructions nortik scubi 2 Recreational kayak
 Assembly instructions nortik scubi 2 Recreational kayak QR-Code assembly video: Assembly instructions nortik scubi 2 Dear Customer, You have purchased a nortik scubi 2, an innovative hybrid kayak for recreational
DIY Shallow Water Anchor Assembly Instructions for Rods, T-grips, Stainless Tips, Stainless Couplers, and the 4-in-1 Paddle
 DIY Shallow Water Anchor Assembly Instructions for Rods, T-grips, Stainless Tips, Stainless Couplers, and the 4-in-1 Paddle All Shallow Water Anchor Parts First, start by laying out and identifying all
Instruction Manual. PE-25/32/37 Tapping Machines. POLYTAPP Valves
 Instruction Manual PE-25/32/37 Tapping Machines & POLYTAPP Valves Nov 2016, Revision 2 Document Number 3000111 2 M.T. Deason Company, Inc. PO Box 101807 Birmingham, AL 35210 Phone: 205 956 2266 Fax: 205
Trouble Shooting and Tips. Fujipla LPE-6510 Laminator
 Trouble Shooting and Tips Fujipla LPE-6510 Laminator Wrinkling in Film Is one of the most common problems reported It is important to understand the type of wrinkle and where the wrinkle occurs to diagnose
Owner s Guide. ElevateSUP.com
 Owner s Guide ElevateSUP.com IMPORTANT READ THIS IMPORTANT INFORMATION BEFORE USING YOUR STAND UP PAD- DLEBOARD Disregarding any of the safety precautions and instructions contained in the owner s manual
1982 Hydrostream Viking Restoration
 1982 Hydrostream Viking Restoration Part 2c: The Rebuild Daniel W. Rickey Winnipeg, Manitoba Canada daniel@cancercare.mb.ca 2000-09-22 Introduction Part one of this report showed how the shoddy manufacturing
H ow To Buil d A Wa ter Rocket
 H ow To Buil d A Wa ter Rocket DESIGN AND DEVELOPMENT Brainstorm The first step in the design of a water bottle rocket is brainstorming. Brainstorming is a problem-solving technique that involves the spontaneous
SPUD OWNER S MANUAL ALWAYS WEAR A COAST GUARD APPROVED FLOTATION DEVICE WHEN OPERATING THE SPUD KAYAK.
 SPUD OWNER S MANUAL ALWAYS WEAR A COAST GUARD APPROVED FLOTATION DEVICE WHEN OPERATING THE SPUD KAYAK. Know the limits of your abilities and the limits of your equipment. Changes in air temperature and
Inflatable Dock Slide Owner s Manual
 Inflatable Dock Slide Owner s Manual Introduction Water sports can be safe and fun for all levels of enthusiasts. The Owner s Manual is presented to enhance your enjoyment of the sport. It is intended
Max Bee. Part II: Building Max Bee Stunt News 8. lighter: the building of Max. all published.
 Max Bee Can you say Exotic? Igor s World Championship winning design has lots of interesting aerodynamics as well as interesting aesthetic design cues. I know, I know, the designing article about Max Bee
Installation of Nylon Putting NP50
 Installation of Nylon Putting NP50 1. Layout of Green and Existing Ground Preparation Step 1: Determine the size and shape of your green as well as any chipping stations and/or sand traps. Step 2: Measure
Board Glassing Chapter 6
 Board Glassing Chapter 6 The Complete Surfing Guide for Coaches - Bruce "Snake" Gabrielson Glassing Guidelines Like shaping, there is probably any number of ways to successfully glass a blank. Yet there
Crystal Spring Feeder Protocols
 Crystal Spring Feeder Protocols Installation Instructions Starting Weaned Pigs Management Instructions Gro Master 402.493.4550 3838 North 108th Omaha, NE 68164 Crystal Spring Feeder Protocols Installation
TABLE OF CONTENTS. Hello! Happy Paddling, SAFETY WARNING WHAT S INCLUDED IN YOUR BOX GENERAL USE INFORMATION INFLATION INSTRUCTIONS FIN INSTALLATION
 Hello! Thank you for purchasing an inflatable stand up paddle board and WELCOME TO THE TEN TOES FAMILY! We are a small team of outdoor adventurers who strive to make paddle boarding as enjoyable and fulfilling
Release :
 Release : 25.01.08 1 Technical datas : Wingspan : 936 mm Lenght : 444 mm Surface : 5.07 dm² Mass : 90g Wing loading : 17.8 g/dm² 2 A quick summary of the design The Nexus 900 is the result of a long research
PH: Local: Texoma Drive, Denison, TX Page 1
 Thank you for choosing our newest, most advanced PrismJET digital print film to date, PrismJET 230 Ultra. 230 Ultra is a premium grade ultra-calendered 2.4 mil gloss white vinyl on a 90# air egress liner
How to Make a Boffer Arrow
 How to Make a Boffer Arrow By Dean Hitchcox Intro: To make a boffer arrow you should have some experience making other weapons like a sword first. Bows and arrows can be dangerous if not made correctly.
BCX SERIES STAND UP PADDLEBOARD INSTRUCTION MANUAL
 BCX SERIES STAND UP PADDLEBOARD INSTRUCTION MANUAL Thank you for choosing a Hobie Stand Up Paddleboard Start with an unmatched 60 years of revolutionary board building experience, Add the racing and surfing
Avery Dennison Instructional Bulletin 1.4 Application Methods for Pressure Sensitive Adhesive Films
 Rev. 2 (April 2016) Avery Dennison Instructional Bulletin 1.4 Application Methods for Pressure Sensitive Adhesive Films Introduction Avery Dennison pressure sensitive adhesive films are available in a
Spray Gun 134-A. 1 Liter High- Pressure Gel Coat. Usage Instructions & Parts List
 1 Liter High- Pressure Gel Coat Spray Gun 134-A Usage Instructions & Parts List www.fibreglast.com 1.800.821.3283 385 Carr Drive Brookville, OH 45309 Operating Instructions & Suggestions This is a high
Damage Control/Luminous Shipboard Markings
 3 Damage Control/Luminous Shipboard Markings 3M Diamond Grade Reflective Sheeting 3M Reflective Pipe Markings 3M Luminous Film U.S. Navy Shipboard Label Application Instructions August 2005 Replaces Instructions
COATINGS SPRAY GUIDE Acrylics (210, 211, 211HT, and 212)
") This guide covers handling and airless spray application of American WeatherStar waterborne single component acrylic elastomeric coatings. These American WeatherStar products require only complete evaporation
This guide covers handling and airless spray application of American WeatherStar waterborne single component acrylic elastomeric coatings. These American WeatherStar products require only complete evaporation
FEATHER INLAYS. Custom Rod Builders Guild
 FEATHER INLAYS Using Multiple Feathers by Neal Hall Custom Rod Builders Guild I have been building rods for about 10 years. Five years ago I became intrigued with a feather inlay designed by Charles Reading
ASSEMBLY INSTRUCTIONS
 ASSEMBLY INSTRUCTIONS Ballpark Classics Baseball Game MLB Edition Figure B Read the instructions completely before beginning g assembly. You will need a Phillips screwdriver. 1. Remove the game from the
Fiber Optic Lighted Bubbler Spillway Pot (DLP-45) Installation Manual
 Installation Manual") Fiber Optic Lighted Bubbler Spillway Pot (DLP-45) Installation Manual 27.75 23.75 25.50 20.75 Specifications: 8-13 GPM 100 strand fiber - Bubbler 75 strand fiber - Spillway Light Bar 45 ft. fiber tail
Fiber Optic Lighted Bubbler Spillway Pot (DLP-45) Installation Manual 27.75 23.75 25.50 20.75 Specifications: 8-13 GPM 100 strand fiber - Bubbler 75 strand fiber - Spillway Light Bar 45 ft. fiber tail
A Table Top Wind Tunnel You Can Build
 A Table Top Wind Tunnel You Can Build Basic principles of aerodynamics can be studied in the classroom with this simple, inexpensive wind tunnel. All you need to build it is some cardboard boxes, glue,