Light to Light Walk 2 days
|
|
|
- Gillian Newman
- 6 years ago
- Views:
Transcription


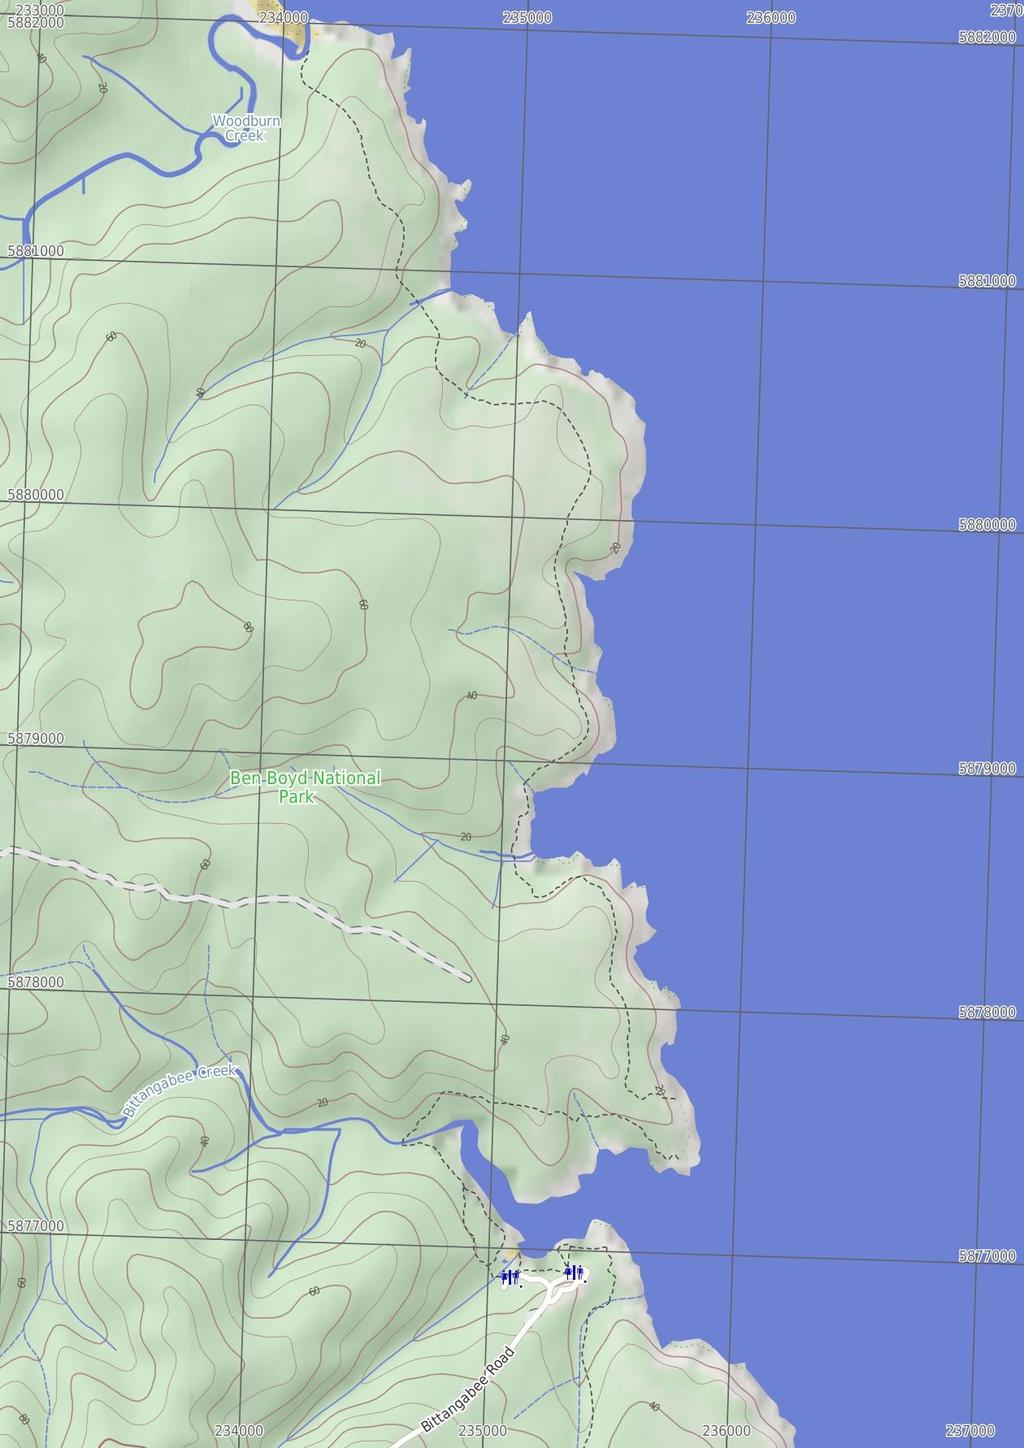
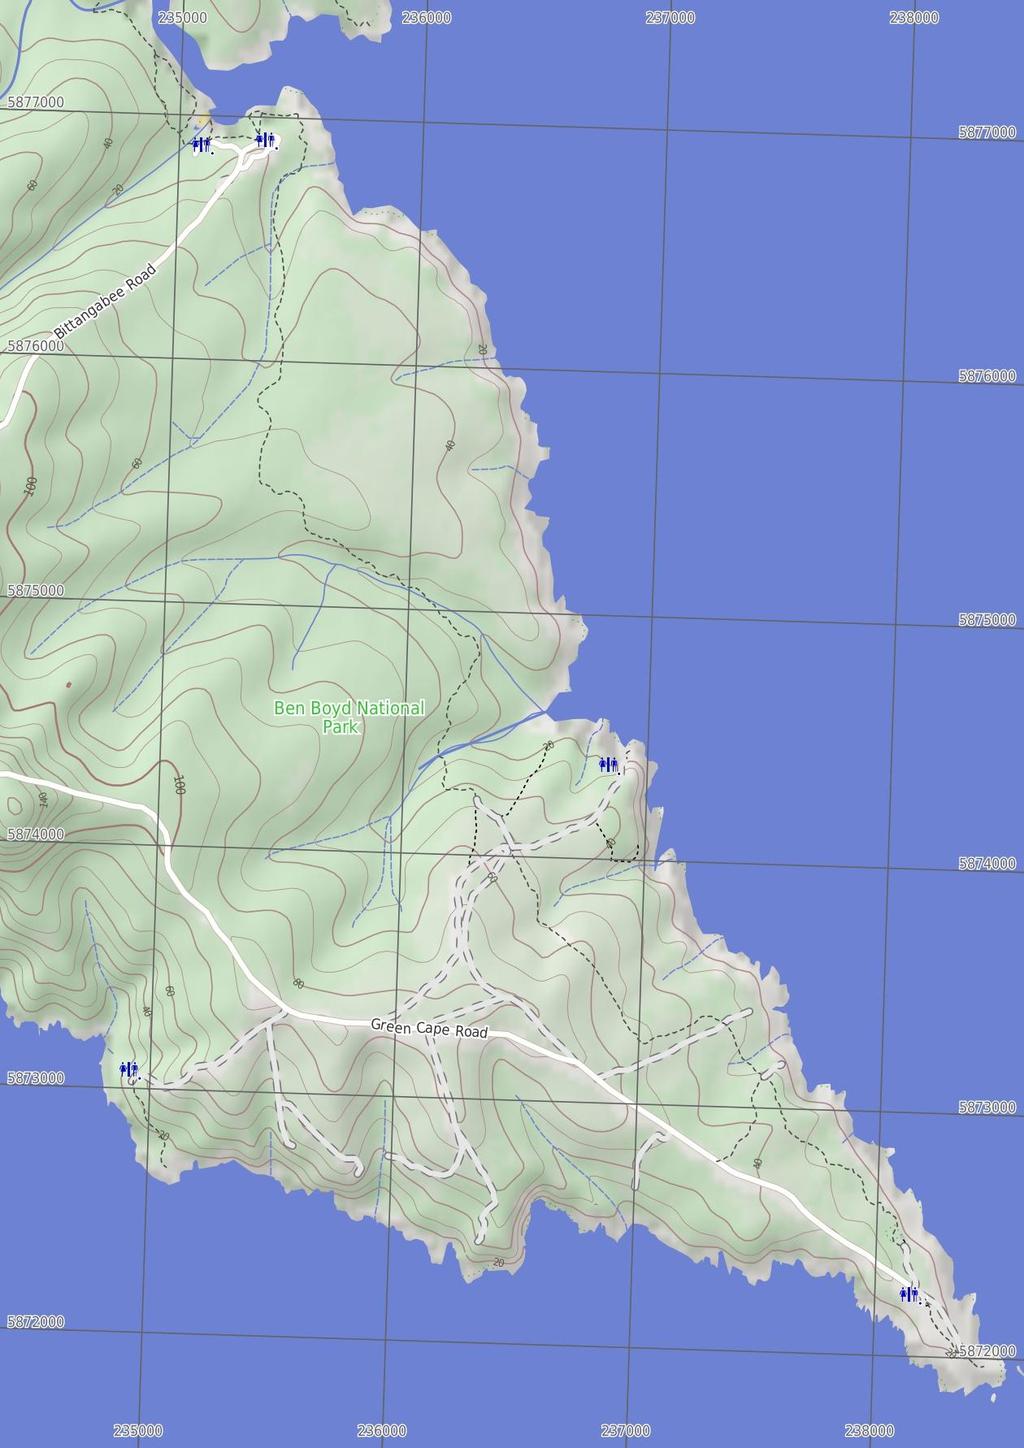
1 Light to Light Walk 2 days 2 Days Hard track 3.9 km One way 4 794m Over two days, this classic walk explores the coast from Boyd Tower to the Green Cape Lighthouse in the south. Hegartys Bay Camp is over halfway and is the quietest campsite in the park (alternative camp at Saltwater creek). The walk explores many of the scenic and historic highlights of Ben Boyd National Park. It is worth taking the time to enjoy the many bays and vantage points along the way. 63m m Ben Boyd National Park Maps, text & images are copyright wildwalks.com Thanks to OSM, NASA and others for data used to generate some map layers.

2 Boyds Tower Before You walk Boyds Tower was commissioned by Benjamin Boyd and originally designed to be lighthouse. After the Government rejected the proposal of the private lighthouse, Boyd changed tact and built the Sydney sandstone tower for whale spotting. The tower gave his whaling ships a strong advantage over other whalers in the area. Built in 1847, Boyds Tower is a large sandstone tower on the southern head of Twofold Bay in Ben Boyd National Park. The top of the tower bears the BOYD title, and boast several viewing points. The ground floor of the tower is open to the public and is well worth exploring. Boyd was declared bankrupt soon after completing the tower and left Australia for the Californian goldfields. Boyd died in the Solomon Islands in 1851 whilst hunting game. "Ben Boyd's Tower is watching - Watching o'er the sea Ben Boyd's Tower is waiting For her and me." Henry Lawson (191) More info. Bushwalking is fun and a wonderful way to enjoy our natural places. Sometimes things go bad, with a bit of planning you can increase your chance of having an ejoyable and safer walk. Before setting off on your walk check Red sands bay Red sands bay (not officially named) is a north-facing bay between Boyd Tower and Leather Jacket Bay in Ben Boyd National Park. The rocky bay is accessed via the Light to Light walk. The beach in this bay is made up of small boulders and a fine red gravel. Most of the red gravel is on the western side of the bay. The gravel is made from the sea smashing the red siltstone into small pieces. The red sands/gravel of this bay makes for a fantastic contrast on sunny days. Leather Jacket Bay Leather Jacket Bay is a north-east facing beach between Boyd Tower and Mowarry Point in the Ben Boyd National Park. The bay has a sandy beach with small rock boulders between the sand and the ocean. The wooded forest behind the bay provides some shade, making this a great place to rest on the Light-to-Light walk. The bay can be access by the Light-to-Light track or by Newtons Road service trail from Edrom Rd. Mowarry Point lookout Mowarry Point lookout is an informal vantage on Mowarry Point in Ben Boyd National Park. There is no signage or other infrastructure. The lookout provides a unobstructed view to the north and northeast, along the coast of Ben Boyd National Park. The view extends up to Eden, into Twofold Bay and out over the South Pacific Ocean. There are some Melaleuca trees that offer limited shade. 1) Weather Forecast (BOM South Coast District) 2) Fire Dangers (Far South Coast, unknown) 3) Park Alerts (Ben Boyd National Park) 4) Research the walk to check your party has the skills, fitness and equipment required 5) Agree to stay as a group and not leave anyone to walk solo Think before you TREK The 'Think before you TREK' program developed by NSW Police & NPWS promotes the benefits of planning ahead for your bushwalking trip by using an easy to remember acronym: adequate supplies of food, water, navigation and first T Take aid equipment. your planned route and tell friends and family when R Register you expect to return. beacon (PLB's) should be carried on walks with E Emergency significant gaps in mobile coverage (check terrain profile). to your planned route and follow the map and walking K Keep trails. Topo Maps The maps provided on wildwalks are helpful, but there are times where you may need maps covering a broader area. Maps that cover this walk include; 1:25 Map Series:88232N NARRABARBA, 88231S KIAH, 88231N EDEN 1:1 Map Series:8923 GREEN CAPE, 8823 EDEN Grade This walk has been graded using the AS The overall grade of the walk is dertermined by the highest classification along the whole track. 4 Grade 4/6 Hard track Length 3.9 km One way Time 2 Days Quality of track Rough track, where fallen trees and other obstacles are likely (4/6) Signs Minimal directional signs (4/6) Experience Required No experience required (1/6) Weather Storms may impact on navigation and safety (3/6) Infrastructure Limited facilities (such as cliffs not fenced, significant creeks not bridged) (4/6)
3 Are you ready to have fun? Please ensure you and your group are well prepared and equipped for all possible hazards and delays. Check park closures, weather information and Fire Danger Rating before setting out. Optional side trips and alternate routes noted are not included in this walks overall grade, length or time estimate. Please allow extra time for resting and exploring areas of interest. The authors, staff and owners of wildwalks take care in preparing this information but will not accept responsibility for any inconvenience, loss or injury you may experience. Please take care, have fun - Happy Walking. Getting there Traveling by car is the only practical way to get to Ben Boyd Car park information sign (gps: , ). Car: A park entry fee is required for driving into the park. Traveling by car is the only practical way to get back from Green Cape Lighthouse Car Park (gps: , 15.48). Car: A park entry fee is required for driving into the park Red sands bay Red sands bay (not officially named) is a north-facing bay between Boyd Tower and Leather Jacket Bay in Ben Boyd National Park. The rocky bay is accessed via the Light to Light walk. The beach in this bay is made up of small boulders and a fine red gravel. Most of the red gravel is on the western side of the bay. The gravel is made from the sea smashing the red siltstone into small pieces. The red sands/gravel of this bay makes for a fantastic contrast on sunny days. Find up to date and more information inlcuding; travel directions, weather, park closures and walker feedback at Int. Light to Light and Leather Jacket Pt Trks (74 m 13 mins) Continue straight: From the intersection, this walk follows the arrow of the tower sign through the small clearing and along the clearer service trail. The track winds quickly through the heath for some time to meet a signposted intersection. Turn left: From the intersection, this walk follows track marker down the hill, towards the ocean. The track leads downhill to a signposted intersection. Veer right: From the intersection, this walk follows the track marker past a white post, keeping the ocean and the other service trail to the left of the track. The walk continues along the service trail for a short time to a signposted intersection. Continue straight: From the intersection, this walk follows the track marker, leaving the fork in the trails behind and heading down the slight hill towards the ocean. The track continues down the hill to a signposted intersection. Optional sidetrip to Int. Boyds Tower and Lookout (28 m 5 mins) From the car park, this walk heads past the information billboard on the left and follows the sign to 'Ben Boyd Tower', down the hill. The walk winds down the hill to a seat on the left and signs on the right. This walk continues, to pass another seat on the right with fantastic views along the rocky coast. The track meanders down the hill to an intersection with a boardwalk below Boyds Tower. Boyds Tower Boyds Tower was commissioned by Benjamin Boyd and originally designed to be lighthouse. After the Government rejected the proposal of the private lighthouse, Boyd changed tact and built the Sydney sandstone tower for whale spotting. The tower gave his whaling ships a strong advantage over other whalers in the area. Built in 1847, Boyds Tower is a large sandstone tower on the southern head of Twofold Bay in Ben Boyd National Park. The top of the tower bears the BOYD title, and boast several viewing points. The ground floor of the tower is open to the public and is well worth exploring. Boyd was declared bankrupt soon after completing the tower and left Australia for the Californian goldfields. Boyd died in the Solomon Islands in 1851 whilst hunting game. "Ben Boyd's Tower is watching - Watching o'er the sea Ben Boyd's Tower is waiting For her and me." Henry Lawson (191) More info. Ben Boyd Car park information sign (2.4 km 48 mins) Continue straight: From the information sign, the walk heads down the hill, following the low posts away from the information sign, to a signposted intersection on the left. From the intersection, the track follows the sign for 'Coastal Walk' down the hill away from the car park. The track soon passes an information sign on the right before tending right, down the hill to be above the coastline. The walk then continues with the coast on your left, down stairs into a gully and back out. The track winds and undulates for some time, leading away from the coast. The track then continues back towards the coast, to a view of the tower on your left and a rock island below in the sea. Continue straight: From the intersection, this walk heads along the track, keeping the the coast to the left. The track soon leads out of the heath and winds along the hillside, tending away from the coast (which disappears below the trees on the left). The walk then winds down into a gully with access to the rocks (below on your left). Rising up and out of the gully, the track winds across the hillside and then down into a rocky bay with an arrow marker. The walk continues across the red flat rock at the back of the bay, coming to the arrow marker pointing inland, in the middle of the bay Red sands bay (41 m 8 mins) Turn right: From the red rock bay, this walk follows the track marker away from the ocean and up the stairs. The track climbs over the hill to head down into a creek bed, where it heads up the hill keeping the ocean on the left of the track. The stairs lead this walk around the hill to the right and then to a signposted intersection with a service trail Int. Light to Light and Leather Jacket View Trks (1.1 km 19 mins) Turn right: From the intersection, this walk follows the track marker into the tall heath, towards the views of the ocean. The track then winds through the heath, passing through some large areas of tall heath and melaleuca trees. The walk follows white posts through the heath to then enter an area of tall eucalypt bush. The track soon passes an old farm fence post on the left of the track while winding down the hill into Leather Jacket Bay. The track follows the creek across the back of the rocky bay to a well signposted clearing - the campsite Leather Jacket Bay Leather Jacket Bay is a north-east facing beach between Boyd Tower and Mowarry Point in the Ben Boyd National Park. The bay has a sandy beach with small rock boulders between the sand and the ocean. The wooded forest behind the bay provides some shade, making this a great place to rest on the Light-to-Light walk. The bay can be access by the Light-to-Light track or by Newtons Road service trail from Edrom Rd Leatherjacket Bay (2.7 km 57 mins) Turn right: From the clearing, this walk follows the sign up the hill along the service trail, away from the clearing and the bay. The track soon comes to a signposted intersection. Turn left: From the intersection, this walk follows the sign to 'Mowarry Point' up the hill. The track winds up the hill to continue across the ridge, with the track soon heading down the hill over large speed bumps. The walk comes to a small bridge over a creek bed, after which it leads up a hill, tending left to head across the flat to an unsignposted intersection on the left. Continue straight: From the intersection, this walk heads down the hill, leaving a track behind on the left. This walk leads down into a saddle, to rise up again along a section of yellow dirt service trail. The track continues to undulate and wind for some time, with views of the ocean appearing on the left of the track under the trees. The track then leads down the hill, tending right for some time to the signposted cul-de-sac at Mowarry car park Mowarry Bay car park (8 m 1 mins) Turn left: From the intersection, this walk follows the sign to 'Mowarry Point 5m', down the hill. The track leaves the car park through the gap in the logs and tends right, heading down the hillside to an intersection (with a track marker present), above a creek. Turn right: From the intersection, this walk follows the track marker down the stairs and upstream of the creek, to turn left across the rocky creek bed. The walk heads up the stairs, leading to a service trail Mowarry Creek Sth bank (1.8 km 34 mins) Turn right: From the intersection, this walk follows the sign up the hill, tending left. The track soon meets a flatter area where this walk comes into sight of a beach, below on the left. The walk passes two access tracks on the left which lead down to the beach. The track continues to a small clearing at an intersection, marked by an arrow. Continue straight: From the intersection, this walk heads up the hill, keeping the ocean below on the left. The track winds up the hillside to a large signpost 'Mowarry Point'. This walk follows the arrow to 'Saltwater Creek 5.4km' into an open grassland, following numerous track markers through the open grass area and patches of heath. The walk soon turns right, up the hill, keeping the ocean well below to the left of the track. The track then enters and winds through an area of heath. Many trees cover the tracks and trodden paths in this part of the walk. The track passes through these trees to a clearing with views towards Boyd Tower and waves crashing below Mowarry Point lookout Mowarry Point lookout is an informal vantage on Mowarry Point in Ben Boyd National Park. There is no signage or other infrastructure. The lookout provides a unobstructed view to the north and north-east, along the coast of Ben Boyd National Park. The view extends up to Eden, into Twofold Bay and out over the South Pacific Ocean. There are some Melaleuca trees that offer limited shade Mowarry Lookout (2.6 km 48 mins) Veer right: From the intersection, the walk winds through the heath, keeping the ocean to your left. The track heads through sections of low and tall heath and eucalypt bush. The walk begins to wind down the hill, and passes a clearing with a fire place, leading onto the rocky beach where there is an arrow marker standing in the pebbles of the beach. Veer right: From the signpost, the walk heads towards the next arrow sign within sight, keeping the ocean on the left. The walk crosses the pebbly beach to the arrow marker, where another can be seen further along the coast on the red rock shelf. The walk meanders across the rock shelf to the track marker, which points into the bush. The walk follows this arrow away from the coast and up the stairs into the heath, where the track winds for quite some time through the heath and then bush. The track then heads back through the bush, down onto a red rock platform above the sea. The walk continues down the rock platform following the arrow signs, with the sea on the left of the track, coming to be opposite a set of stairs (on the right of the track) Red Cliffs Red Cliffs - These fantastic red coastal cliffs are found about 1km north of saltwater creek in Ben Boyd National Park. The cliffs are made of a red siltstone. As the name suggests, this rock is made from deposited silt, making it much finer grain than sandstone. The red silt came from nearby volcanic eruptions long ago, and is clearly different from the other brown siltstone and
4 sandstone in the region. The cliff is unfenced and provides views out to sea and into a few surrounding bays. More info Red Rocks (1.5 km 27 mins) Turn right: From the rock platform, the walk heads up the stairs away from the rock shelf and ocean. The walk winds through the heath along the track, leading away from the coastline. After a while, the heath gives way to Melaleuca trees. There are numerous fallen trees and hanging branches over the track, so walkers should take due care. The track leads down the hill, with views of the ocean under the trees. The track passes through an old farm fence and soon comes down onto Saltwater Creek Beach. The track here is signposted on the ocean side of the headland Saltwater Creek Beach Saltwater Creek meets the South Pacific Ocean at a beautiful white sand beach in Ben Boyd National park. The beach looks north-east and has a rock shelf at either end. The wide Saltwater Creek forms a lagoon at the northern end, popular for swimming. Woodburn Creek also forms a lagoon on the southern end of the beach. Both creeks have a brown colouration from the tea tree, that forms a beautiful contrast with the white sand and blue ocean. The back of the beach is heavily wooded, providing some shade, and is home to the Saltwater Creek campsite. The beach can be accessed from the Saltwater Creek campsite at the end of the access road from Duck Hole Road Saltwater Creek Beach Nth (18 m 3 mins) Turn right: From the intersection, the walk follows the sign to the camping ground across the sandbar, which separates the creek (on the right) from the ocean (on the left). The track heads up the stairs on the opposite side, to follow the fence line through to the day-use parking area. The track continues through to the information signs just behind the day-use area Saltwater Creek campground Salwater Creek campground is a nice place from which to access the coastal walking track -there is plenty of swimming, fishing and snorkeling to be done as well. There are some rainwater tanks on site, but be prepared for them to be empty Saltwater Creek Campsite Information Sign (18 m 3 mins) Turn around: From the information signs at Saltwater Creek camping area, the walk heads through the 'Day use' parking area to the far left corner. The track then follows the track-marker through the fenced area and onto the beach between the creek and ocean. The track continues towards the bush on the other side, where there is a signposted intersection Saltwater Creek Beach Nth (49 m 8 mins) Turn right: From the intersection, this walk follows the sign to 'Bittangabee Bay' heading to the far end of the beach, keeping the ocean on the left. This walk tends right, towards the dunes, to meet a signposted intersection just in the bush, on the hill above the creek Saltwater Creek Beach Sth (4.2 km 1 hr 18 mins) Continue straight: From the intersection, this walk follows the sign to 'Green Cape Lighthouse' across the hill, keeping the creek below on the right. The track soon turns left up the hill, away from the beach and creek, and then heads up the hill to an open grassland. The track meanders for a considerable time through different vegetation types grasslands then heath, then melaleuca, and eucalypts/scrub, before reversing the order up the hill to continue around the flat of the grassy headland. The track continues in this way, passing views of Green Cape Lighthouse to the south and the cliffs, to wind down the hill onto Hegartys Bay beach. Continue straight: From the beach, this walk heads along the rock platform following the arrow markers. The walk winds around the rock features, then turns away from the ocean and lead up stairs into the bush behind the bay. The track winds above the bay (below on the left) for a short time, to then pass a fireplace and seats, before coming to a signposted clearing 'Hegartys Bay Camping Area' with bench seats and a fireplace Hegartys Bay Hegartys Bay is a north-east facing bay, about 2km north of Bittangabee in Ben Boyd National Park. The bay has many small boulders at the apex that then fade to rock shelves at each end. The bay is walled by red cliffs at the entrance and the northern wall has some spectacular examples of rock folding. The bay can be accessed along the Light to Light track and is home to a bush campsite Hegartys Bay camping area Hegartys Bay camping area is a basic bush campsite on the Light to Light walk, about 2km north of Bittangabee. The campsite is signposted and is just north of a small creek that leads to Hegartys Bay. There is another, smaller campsite that is not signposted, about 5m north. The creek is very unreliable and other than some impromptu chairs made from driftwood, there are no facilities provided. The campsite is nestled in a clearing among the tall, dense bush, providing some shade and shelter from winds End of day 1 This is the planned overnight stay for the end of day 1, happy camping.
5 18.29 Hegartys Bay Camp (1.9 km 35 mins) Continue straight: From the camp area, this walk keeps the camp on the right and ocean far on the left. The track heads down hill and over a creek, then winds up and out of the creek to meander across the headland. The track continues to wind through heath and melaleucas on the headland for some time, to go down the stairs onto the rock platform. Continue straight: From the intersection, this walk follows the cairns and track markers along the rock, with the ocean to the left. The walk follows the rockshelf down to an area where it starts to slope down into the sea - this is marked by numerous cairns and an arrow on a boulder Black cliffs The black cliffs of Ben Boyd National Park provide a great vantage point. The headland on the north side of Bittangabee has a fairly large clearing on a rock platform, high above the ocean. There are great views out to sea and into the mouth of Bittangabee Bay. There are no fences or facilities at this informal lookout. Being dark in colour, this rock platform can get very uncomfortable on hot days - trees on the south side provide some respite with shade. The rock slopes into the sea on the south side, but would be too dangerous for swimming Black cliffs south (1.4 km 29 mins) Veer right: From the intersection, this walk heads away from the ocean, behind, and bay, on the left of the rock shelf, leading up into the bush where a cairn is placed. The track winds along the hillside, following the track markers bolted to the trees. The track tends right, up the hill, then veers left down into a gully, with a rocky creek bed at the bottom. The track continues down to cross the creek Bittangabee Creek Bittangabee Creek is a small creek feeding Bittangabee Bay in Ben Boyd National Park. The creek enters the bay and is crossed by the Light to Light track about 8m north-west of Bittangabee Campsite. The creek provides a quiet place for people to paddle and relax Bittangabee Creek (58 m 12 mins) Continue straight: From above the creek, the walk winds above the gully (below on your left). The track veers right, and soon meets a signposted intersection. Veer right: From the intersection, the walk follows the sign 'Via Ruins' up the hill. The track tends right as it climbs, soon winding up to a large black wooden platform. This platform overlooks the ruins Imlay House Imlay House ruins still show the foundations of a house built by the Imlay brothers in The ruins are found in Bittangabee Bay in Ben Boyd National Park, along the Light to Light track. The house was to be a station for the Imlay family to further their grazing and whaling in the area. It appears the stone house was never completed, with the brothers dying in 1846 (George) and 1847 (Alexander). Soon after the Imlay brothers died, Benjamin Boyd began using the bay for his own whaling company in More info Imlay House Ruins (3 m 6 mins) Continue straight: From the black platform, this walk keeps the platform and ruins on the left of the track, heading down the hill. The track winds quickly down to a signposted intersection with views of a beach below. Veer right: From the intersection, the walk heads down the hill towards the water. The track goes across a rocky creek bed to rise up the other side of the gully. The walk continues up the hill to soon find formed log road barriers on the right and then a signposted intersection and picnic area Optional sidetrip to Bittangabee Beach (9 m 2 mins) Turn left: From the road just near the picnic area, this walk heads down the hill, passing through the picnic area and down the stairs. The water and beach are visible through the trees, the track soon leading down onto the beach. At the end of this side trip, retrace your steps back to the main walk then Turn left Bittangabee Bay Beach Bittangabee Bay Beach, Ben Boyd National Park, is a small beach at the south-western corner of the bay. The beach can be accessed by a short walk from Bittangabee picnic area in Ben Boyd National Park. The yellow sand beach has a small creek and lagoon behind. The beach also has rock platforms at each end and is fairly well-protected from swells, being tucked away in the bay. The historic storehouse is visible on the shore to the right Bittangabee Bay Picnic Area (24 m 6 mins) Continue straight: From the picnic area, the walk follows the sign to 'Camping Area 5m', keeping the car park on your right. The track leads below the road (above on the right) for some time, following the arrow markers to a signposted intersection next to the log road barriers. Turn left: From the intersection, the walk follows the sign for 'Walking Track' (not the same direction as the 'Beach' arrow) down the hill. The track leads down the hill a short way to an arrow track marker Optional sidetrip to Int. Light to Light Trk and B (15 m 3 mins) Continue straight: From the intersection, this walk does not follow the arrow marker but heads straight down the hill towards the water. The walk steps down to the water's edge where there is a roofless building on the right. The walk follows around the building on the water side, to an information sign. Turn right: From the intersection, the walk leads up the hill, keeping the bay on your left and the storehouse ruins behind on the right. The track veers right, up the hill to a signposted intersection. At the end of this side trip, retrace your steps back to the main walk then Turn left Bittangabee Storehouse ruins Bittangabee Storehouse ruins is located on the shore of Bittangabee Bay, near the campground, in Ben Boyd National Park. The concrete structure was built by Albert Aspinall ( ) in The building was used to store material unloaded from ships onto a wooden jetty built at the same time. Aspinall then built a wooden tramway to move material and supplies to Green Cape to help in the construction of the lighthouse. The building is now a basic shell, missing roof, windows and a door. The concrete foundations of the timber wharf are still visible. Unfortunately, the building has been marred by graffiti, but is still worth the visit. More info Int. Light to Light Trk and Bittangabee Storehouse (9 m 2 mins) Veer right: From the intersection, this walk follows the arrow into the bush, keeping the bay below on the left. The track winds through the bush to a signposted intersection Int. Light to Light Trk and Bittangabee Storehouse (15 m 3 mins) Turn right: From the intersection, this walk follows the 'Walking Track' sign and arrow posts up the hill. The track winds through the heath and melaleuca for a short time, passing near the campsite (on the right) while following the arrow markers. The track leads closer to the sea on the left, to a clearing overlooking a rock shelf below at the sea and the mouth of Bittangabee Bay Southern Bittangabee Point lookout Southern Bittangabee Point lookout is an unofficial lookout on the southern headland forming the entrance to Bittangabee Bay in Ben Boyd National Park. The lookout is not fenced or signposted and does not have any facilities. The lookout provides a view across the mouth of Bittangabee Bay and a short way down the coast to the south. There is also a view of the red rock platform below, forming a picturesque contrast with the ocean on sunny days Bittangabee Sth Headland Lookout (3.8 km 1 hr 1 mins) Continue straight: From the intersection, this walk follows the arrow markers around the headland, keeping the ocean to the left and the camping area to the right. The track soon comes to a set of wooden stairs. The walk heads down these stairs into the creek bed, and then up the stairs on the other side. Continue straight: From the top of the stairs, this walk leads upstream of the creek, which is below on the right. The track follows this creek for some time, tending left away from it into the bush at times. The track winds slightly uphill for a while, then winds downhill to cross the rocky surface of another creek. The track heads up the hill and over the ridge before heading down to another creek bed. The track then leads up the hill to the cul-de-sac of a service trail Int. Light to Light Walk and Pulpit Rock Rd Access (26 m 4 mins) Continue straight: From the intersection, this walk follows the track markers up the hill to a signposted intersection. Veer right: From the intersection, this walk follows the track marker along the hillside, keeping the ocean on the left of the track. The track passes a few overgrown service trails on either side, as it continues on to the signposted intersection with the main service trail Optional sidetrip to Pulpit Rock (7 m 14 mins) Turn left: From the intersection, this walk follows none of the signs but instead heads down the hill towards the sea. The track winds down through the heath to the one-way car park and toilet. The walk continues through to the far side of the car park, where there is a fenced lookout over the rocks. Continue straight: From the intersection, the walk heads down the stairs just near the lookout. The stairs lead onto the rock shelf, with stunning views to the north (left) and of waves crashing onto the rocks below. At the end of this side trip, retrace your steps back to the main walk then Turn left Pulpit Rock Pulpit Rock is a large rock platform on the south-east coast of NSW, between Green Cape and Bittangabee in Ben Boyd National Park. The rock platform is a popular spot for rock fishing. Pulpit Rock is accessed via a staircase near the end of a service trail off Green Cape Rd. Near the car park is a pit toilet and garbage facilities. From the rock platform, there are great views north up the coast, with the red rock cliffs providing a spectacular highlight Int. Light to Light Trk and Pulpit Rock Rd (2.8 km 49 mins) Continue straight: From the intersection, this walk follows the sign to 'Green Cape Lighthouse 2.5km' keeping the ocean on the left of the track. The track meanders through the heath, then turns left and slowly head down through the heath. The track leads to an arrow-marked intersection with a badly overgrown service trail, on both sides of the track. Continue straight: From the intersection, this walk heads through the heath following the arrow marker, and keeping the ocean on the left of the track. The track leads through the heath and Banksias for a short time, coming to a slightly overgrown service trail. Continue straight: From the intersection, this walk keeps the ocean on the left of the track as it winds through the heath and the Banksias. The track soon
6 becomes surrounded by melaleuca trees, which have many fallen branches. The track continues to a signposted intersection for 'Ly-ee-moon Cemetery' Ly-ee-moon Graveyard The Ly-ee-moon Graveyard is a stark reminder of the horrific accident on the night of May 31st, 1886, when 71 men, women and children lost their lives. The white stone and single cross marks the positions of the unnamed graves. The nearby plaque names the people who lost their lives - sadly some names where not known and these people are remembered only by comments such as 'one who had a German accent'. During the dark night, the lighthouse keeper and assistant heroically rescued 16 people from the sea, and were left to listen to cries for help though the night of other people who could not be saved. The mother of Blessed Mary MacKillop, the first Australian to be beatified by the Catholic church, was one of those lost during the night. The fast and normally reliable ship, operated by the Australian Steam Navigation Company, was a single screw ship converted from a paddle steamer when it was brought to Australia in The graveyard is about 3m north-west of the Green Cape lighthouse, which was operational at the time the SS Ly-eemoon struck the reef and sunk. More info Ly-ee-moon Graveyard (25 m 4 mins) Veer right: From the intersection, this walk follows the arrow marker through the melaleuca trees, away from the 'Ly-ee-moon Cemetery' sign (behind on the left). The track winds through the trees for a short time, to open out onto the clearing of the Green Cape Lighthouse car park. The walk continues to the far end of the car park where there are signs Green Cape Green Cape is a headland at the southern end of Ben Boyd National Park, forming the northern head of Disaster Bay. The cape's traditional owners are the people of the Yuin nation, from whom there remains evidence of a number of camps in the area. The cape was named 'Green Point' by Matthew Flinders in The area began it's notorious fame in 182 when eight of Flinders' crew disappeared when fetching water, in what he then appropriately named 'Disaster Bay'. The Imlay brothers and Boyd both established whaling business in the area in the early to mid 18's, leaving several buildings in the park. There were many shipwrecks in the surrounding waters, the most famous being the SS Ly-ee-moon, whose victims are buried on the cape. The most visible feature on the cape is the 29-metre high lighthouse that is still operational today. NPWS run tours on the site in the middle of the day from Thursdays to Monday - the tour takes about 1 hour and costs $2 per family. There is a pit toilet at the car park at the end of Green Cape Road. Accommodation is also available in the renovated lighthouse keeper cottages. More info Green Cape Lighthouse Car Park (1 m 2 mins) Continue straight: From the car park, the walk follows the 'Walkway to Lighthouse' signs along the grass and through the heath. The walk comes to a fence which it follows to the corner (keeping the fence on the left). The track then continues, coming to be opposite a small white cottage signposted as 'Telegraph Station' Green Cape Telegraph Station Green Cape Telegraph Station was established in The station acted as a relay station, re-sending ship-to-shore messages from boats passing by. Ships, and communication staff on Green Cape, would use semaphore flags to communicate a message. When required, the messages could also be relayed using Morse code. The telegraph station is a white concrete building with a tin roof. The building has a blue painted base and is less than 1m north of Green Cape Lighthouse in Ben Boyd National Park. More info Cape Lighthouse Keepers' cottages The Cape Lighthouse Keepers' cottages is a large concrete building near Green Cape Lighthouse in Ben Boyd National Park. There are two cottages that have been refurbished, each sleeping up to 6 guests and boasting 3.5 stars. Each cottage has a fully equipped kitchen, dining room, bathroom, lounge room (with sofa bed), Master bedroom (Queen) and second bedroom (2 singles). The price starts from $2 a night per cottage. Bookings are essential, for more info call NPWS on More info Green Cape Lighthouse Telegraph Station (17 m 3 mins) Continue straight: From the Telegraph Station, the walk continues down the hill towards the lighthouse. This walk keeps the houses and fence on the left of the track, as it passes large solar panels to your right. The track continues to a gate with a 'No Entry' sign, outside the lighthouse Green Cape Lighthouse Green Cape Lighthouse is a majestic, 29 metre tall, white octagon-shaped, concrete and blue stone monolith, at the southern tip of Ben Boyd National Park. The lighthouse construction was tendered in 188 and Albert Aspinall started construction in He built a timber tram line from Bittangabee Bay to transport materials. After having to dig footing much deeper then expected, in addition to dealing with workers' disputes, Aspinall went broke and his creditors completed the project. The original lantern was oil-fired and was visible 19NM out to sea. Today, the lighthouse still operates with a solarpowered electric light. The lighthouse is open to the public via daily tours, and the surrounding grounds are well worth the time to explore. More info Green Cape Lighthouse entry gate (14 m 3 mins) Continue straight: From Green Cape Lighthouse, the walk heads down the hill towards the white metal tower. The track passes the metal tower (on the left of the track) to then pass a helicopter landing pad on the right. The walk continues down through the grass and heath to a rough track to the right. This is before the weather station. Continue straight: From the intersection, the walk heads down the ridge, away from the lighthouse, passing a weather station to the right of the track. The walk then continues down the hill, passing an information sign before coming to the partially-fenced lookout over Green Cape Green Cape Lookout The lookout at the point of Green Cape, at the southern end of Ben Boyd National Park, provides great views out to sea and along the coast. On the right, the view extends across Disaster Bay to Nadgee Nature Reserve and down into Victoria. To the left, there are views north along rugged sea cliffs and views of Green Cape Lighthouse and accommodation. An information sign at the lookout tells some of the story of the Ly-ee-moon tragedy. The lookout is slightly elevated on a steel platform, and is unfenced. There is a leaning post to rest against whilst taking in the view Green Cape Lookout (41 m 8 mins) Turn around: From the lookout, this walk heads up the ridge towards the lighthouse. The track heads up the hill, passing an information sign, and then a weather station on the left. This walk soon comes to a rough track on the left, which leads down to the rock platforms below. Continue straight: From the intersection, the walk heads up the hill towards the lighthouse. The track heads past a helicopter landing pad (on the left of the track) and past a metal tower on the right. The walk continues to follow the wire fence on the right, until the 'No Entry' sign on the gate of the lighthouse. Continue straight: From the gate, the walk heads up the hill towards the large solar panels. This walk keeps the houses and fence on the right of the track as it leads near the corner in the fence, where a signpost opposite states that a small white cottage structure is the 'Telegraph Station'. Continue straight: From the intersection, the walk heads in the opposite direction to the lighthouse, following the fence around the corner and then down the track through the heath. The walk continues down the grassy hill to the car park.
7
8
9
10
11
12
13 Summary navigation sheet for the Light to Light Walk 2 days km From. Ben Boyd car park information sign , (GR Eden, ) Ben Boyd Car park information sign , (GR Eden, ) Red sands bay , (GR Eden, 63188) Int. Light to Light and Leather Jacket Pt Trks , (GR Eden, 63588) Int. Light to Light and Leather Jacket View Trks , (GR Eden, ) Leatherjacket Bay , (GR Kiah, ) Mowarry Bay car park , (GR Kiah, ) Mowarry Creek Sth bank , (GR Kiah, ) Mowarry Lookout ,15.12 (GR Kiah, ) Red Rocks ,15.81 (GR Kiah, ) Saltwater Creek Beach Nth ,15.24 (GR Kiah, ) Saltwater Creek Campsite Information Sign ,15.7 (GR Kiah, ) Saltwater Creek Beach Nth ,15.24 (GR Kiah, ) Saltwater Creek Beach Sth ,15.53 (GR Kiah, ) End of day , (GR Kiah, 35786) Hegartys Bay Camp , (GR Kiah, 35786) Black cliffs south , (GR Kiah, ) Bittangabee Creek ,15.96 (GR Kiah, ) Imlay House Ruins , (GR Kiah, 34977) Up/Dwn Length Initial directions (Use full tracknotes and maps for more detail) m 5 mins 2.4 km 48 mins 41 m 8 mins 74 m 13 mins 1.1 km 19 mins 2.7 km 57 mins 8 m 1 mins 1.8 km 34 mins 2.6 km 48 mins 1.5 km 27 mins 18 m 3 mins 18 m 3 mins 49 m 8 mins 4.2 km 1 hr 18 mins m 1.9 km 35 mins 1.4 km 29 mins 58 m 12 mins 3 m 6 mins Optional sidetrip to Int. Boyds Tower and Lookout Trks. From the car park, this walk heads past the information billboard on the left and follows the sign to 'Ben Boyd Tower', down the hill. Continue straight: From the information sign, the walk heads down the hill, following the low posts away from the information sign, to a signposted intersection on the left. Turn right: From the red rock bay, this walk follows the track marker away from the ocean and up the stairs. Continue straight: From the intersection, this walk follows the arrow of the tower sign through the small clearing and along the clearer service trail. Turn right: From the intersection, this walk follows the track marker into the tall heath, towards the views of the ocean. Turn right: From the clearing, this walk follows the sign up the hill along the service trail, away from the clearing and the bay. Turn left: From the intersection, this walk follows the sign to 'Mowarry Point 5m', down the hill. Turn right: From the intersection, this walk follows the sign up the hill, tending left. Veer right: From the intersection, the walk winds through the heath, keeping the ocean to your left. Turn right: From the rock platform, the walk heads up the stairs away from the rock shelf and ocean. Turn right: From the intersection, the walk follows the sign to the camping ground across the sandbar, which separates the creek (on the right) from the ocean (on the left). Turn around: From the information signs at Saltwater Creek camping area, the walk heads through the 'Day use' parking area to the far left corner. Turn right: From the intersection, this walk follows the sign to 'Bittangabee Bay' heading to the far end of the beach, keeping the ocean on the left. Continue straight: From the intersection, this walk follows the sign to 'Green Cape Lighthouse' across the hill, keeping the creek below on the right. This is the planned overnight stay for the end of day 1, happy camping. Continue straight: From the camp area, this walk keeps the camp on the right and ocean far on the left. Veer right: From the intersection, this walk heads away from the ocean, behind, and bay, on the left of the rock shelf, leading up into the bush where a cairn is placed. Continue straight: From above the creek, the walk winds above the gully (below on your left). Continue straight: From the black platform, this walk keeps the platform and ruins on the left of the track, heading down the hill.
14 Summary navigation sheet for the Light to Light Walk 2 days km Powered by TCPDF ( From Up/Dwn Length Initial directions (Use full tracknotes and maps for more detail) Bittangabee Bay Picnic area , (GR Kiah, ) Bittangabee Bay Picnic Area , (GR Kiah, ) Int. Light to Light Trk and Bittangabee Storehouse Trk , (GR Kiah, ) m 2 mins 24 m 6 mins 15 m 3 mins Optional sidetrip to Bittangabee Beach. Turn left: From the road just near the picnic area, this walk heads down the hill, passing through the picnic area and down the stairs. Continue straight: From the picnic area, the walk follows the sign to 'Camping Area 5m', keeping the car park on your right. Optional sidetrip to Int. Light to Light Trk and Bittangabee Storehouse Trail. Continue straight: From the intersection, this walk does not follow the arrow marker but heads straight down the hill towards the water Int. Light to Light Trk and Bittangabee Storehouse Trk , (GR Kiah, ) -8 9 m 2 mins Veer right: From the intersection, this walk follows the arrow into the bush, keeping the bay below on the left Int. Light to Light Trk and Bittangabee Storehouse Trail , (GR Kiah, 35377) 6 15 m 3 mins Turn right: From the intersection, this walk follows the 'Walking Track' sign and arrow posts up the hill Bittangabee Sth Headland Lookout ,15.19 (GR Kiah, 35577) Int. Light to Light Walk and Pulpit Rock Rd Access , (GR Kiah, ) km 1 hr 1 mins 26 m 4 mins Continue straight: From the intersection, this walk follows the arrow markers around the headland, keeping the ocean to the left and the camping area to the right. Continue straight: From the intersection, this walk follows the track markers up the hill to a signposted intersection Int. Light to Light Trk and Pulpit Rock Rd , (GR Kiah, 36574) 27.9 Int. Light to Light Trk and Pulpit Rock Rd , (GR Kiah, 36574) Ly-ee-moon Graveyard ,15.47 (GR Narrabarba, ) 3.11 Green Cape Lighthouse Car Park ,15.48 (GR Narrabarba, ) 3.21 Green Cape Lighthouse Telegraph Station , (GR Narrabarba, ) 3.38 Green Cape Lighthouse entry gate , (GR Narrabarba, 38372) 3.52 Green Cape Lookout ,15.57 (GR Narrabarba, 38572) m 14 mins 2.8 km 49 mins 25 m 4 mins 1 m 2 mins 17 m 3 mins 14 m 3 mins 41 m 8 mins Optional sidetrip to Pulpit Rock. Turn left: From the intersection, this walk follows none of the signs but instead heads down the hill towards the sea. Continue straight: From the intersection, this walk follows the sign to 'Green Cape Lighthouse 2.5km' keeping the ocean on the left of the track. Veer right: From the intersection, this walk follows the arrow marker through the melaleuca trees, away from the 'Ly-ee-moon Cemetery' sign (behind on the left). Continue straight: From the car park, the walk follows the 'Walkway to Lighthouse' signs along the grass and through the heath. Continue straight: From the Telegraph Station, the walk continues down the hill towards the lighthouse. Continue straight: From Green Cape Lighthouse, the walk heads down the hill towards the white metal tower. Turn around: From the lookout, this walk heads up the ridge towards the lighthouse.
Wattamolla to Big Marley Beach
 Wattamolla to Big Marley Beach 4 hrs 10.4 km Circuit Moderate track 4m This walk is an excellent loop which takes in both the coast and the heathy inland of Royal National Park. Nearly the whole walk has
Campbell Drive to Snapper Point
 Campbell Drive to Snapper Point 1 hr 45 mins 4.2 km One way Experienced only 135m This walk follows the Coast Track to Frazer Beach, along the Geebung and (overgrown) Grass Tree Tracks. From the northern
Currie Rd to Davidson Park
 Currie Rd to Davidson Park 3 hrs 7.2 km One way Moderate track 28m Starting at Currie Rd in Forestville, this walk follows Middle Harbour to Davidson Park, under Roseville Bridge. There are two optional
Popes Glen, Pulpit Rock, Govetts Leap and Braeside Walk
 Popes Glen, Pulpit Rock, Govetts Leap and Braeside Walk 8 hrs Hard track 13.6 km Circuit 4 1068m This large circuit walk, from Popes Glen to Pulpit Rock, Govetts leap and along the Braeside Track, passes
Hunters Hill to Epping Road
 Hunters Hill to Epping Road 2 hrs 30 mins 5.5 km One way Moderate track 154m An enjoyable walk through lower sections of the Lane Cove National Park, this walk features plenty of mangroves next to the
Echo Point to Leura Forest via Three Sisters and Giant Stairs loop
 Echo Point to Leura Forest via Three Sisters and Giant Stairs loop 3 hrs 3.8 km Circuit Hard track 512m This walk starts from the popular Echo Point, in Katoomba, and winds down to the base of the Three
Govetts Leap Loop. 1065m. 909m Blue Mountains National Park. 4 hrs 30 mins 8.7 km Circuit. Hard track 380m
 Govetts Leap Loop 4 hrs 30 mins 8.7 km Circuit Hard track 380m This walk, from Blackheath Train Station, is a fantastic way to see some of the iconic areas of the Blue Mountains in the Blackheath area.
The Foreshore Walk. 24m. 1m Lake Macquarie LGA. 1 hr 15 mins 2.9 km One way. Hard track 81m
 The Foreshore Walk 1 hr 15 mins 2.9 km One way Hard track 81m This walk traverses the coastline of the Green Point reserve. By following a variety of tracks and occasionally traveling inland through eucalyptus
The Basin Track and Mackerel Track
 The Basin Track and Mackerel Track 3 hrs 5.9 km Circuit Hard track 226m This walk is a great way to see some popular areas in Ku-ring-gai Chase National Park. The walk from West Head Rd travels to The
Waterfall to Heathcote
 Waterfall to Heathcote 5 hrs Hard track 10.8 km One way 4 467m This walk explores the heart of Heathcote National Park, and is easily accessed with a train station at either end. Although relatively close
Carrington Park to Leura Forest and pass loop
 Carrington Park to Leura Forest and pass loop 3 hrs Hard track 4.8 km Circuit 4 674m This walk is a fantastic way to see Leura Forest. The walk descends from Carrington Park, visiting Leura Forest and
Wallarah Coastal Walk
 Wallarah Coastal Walk 3 hrs 8.3 km Return Hard track 247m This walk starts at Caves Beach and travels south along the coastline, until reaching the Pinney s Headland Lookout. There are many opportunities
Wentworth Falls Conservation Hut Loop
 Wentworth Falls Conservation Hut Loop 3 hrs Hard track 6.7 km Circuit 4 341m This scenic walk from Wentworth Falls Station, winds along the Nature Trail to Conservation Hut, then drops into the magnificent
Bouddi Coastal Walk. 5 hrs. Hard track 8.1 km One way. 364m
 Bouddi Coastal Walk 5 hrs Hard track 8.1 km One way 4 364m This is one of the longer walks in the Bouddi National Park and it is rich in scenery. The walk follows the coastline with many side trips to
Morgans Creek to Padstow
 Morgans Creek to Padstow 2 hrs 45 mins 8 km One way Moderate track 3 144m This pleasant walk starts from the Morgans Creek park, at Henry Lawsons Drive, and follows the Georges River past the Boomerang
Little Digger Track. 68m. 1 Hr 2.2 km One way. Moderate track 93m. Moores Creek Reserve
 Little Digger Track Hr 2.2 km One way Moderate track 93m This walk follows Moores Creek through several reserves in east Roseville and East Lindfield. The track is named after Australia's 7th Prime Minster,
Heathcote to Engadine via Audley
 Heathcote to Engadine via Audley 6 hrs 3 mins 5 km One way Hard track 4 635m Covering a large section of central Royal National Park, this walk goes through the heath and scrub along a well managed and
Mackerel Beach, West Head Loop
 Mackerel Beach, West Head Loop 5 hrs 8.6 km Circuit Hard track 422m The Mackerel Beach, West Head Loop is a walk which explores a large part of the West Head. The journey starts and finishes with a ferry
Little Digger Track to Davidson Reserve and Lyrebird Circuit
 Little Digger Track to Davidson Reserve and Lyrebird Circuit 4 hrs 3 mins 11.5 km One way Hard track 4 47m Exploring both the eastern and western sides of Middle Harbour Creek, this walk follows the Little
Mackerel Beach and Resolute Loop
 Mackerel Beach and Resolute Loop 3 hrs 5.4 km Circuit Hard track 384m This walk is another great walk in Ku-ring-gai Chase National Park, accessed by ferry. From the Mackerel Beach wharf, this walk uses
Balmoral Beach to The Spit
 Balmoral Beach to The Spit 2 hrs 30 mins.3 km One way Hard track 85m This walks follows the coast from Balmoral to the Spit and across Spit Bridge. There are some alternate tracks to consider at high-tides,
Sid Pulsford Walk. 175m. 33m. 1 hr 45 mins 4.1 km One way. Hard track 118m. Gosford LGA
 Sid Pulsford Walk 1 hr 5 mins.1 km One way Hard track 118m Sid Pulsford Walk explores the ridge top of Kincumber Mountain, from Honeman's Rock to Green Point. The walk mostly follows wide management trails.
Dead Horse Gap Loop track
 Dead Horse Gap Loop track 4 hrs 30 mins Hard track 9.8 km Circuit 144m 4 This walk starts with a ride up the Kosciuszko Express Chairlift. There is an opportunity to eat at Australia's highest restaurant,
Rail to River Walk. 3 hrs. Hard track 7.5 km Circuit. 222m
 Rail to River Walk 3 hrs Hard track 7.5 km Circuit 4 222m This walk is a great one from Chatswood Station to the Lane Cove River National Park. The walk descends through the vegetated bushland which fills
Katoomba Falls Circuit
 Katoomba Falls Circuit hr 5 mins.5 km Circuit Hard track 59m For those looking for a walk involving more than simple boardwalk, this trail winding through the temperate rain forest could be just the thing.
Epping to Eastwood Station (via Lane Cove River)
") Epping to Eastwood Station (via Lane Cove River) hrs 45 mins 10.2 km One way Moderate track 189m Epping to Eastwood, via Lane Cove River, is the longer route through the bush between the stations. This
Epping to Eastwood Station (via Lane Cove River) hrs 45 mins 10.2 km One way Moderate track 189m Epping to Eastwood, via Lane Cove River, is the longer route through the bush between the stations. This
Scenic World to Echo Point
 Scenic World to Echo Point 1 hr 15 mins 2.1 km One way Moderate track 192m This is one of the most popular tourist walks in the Katoomba area. The walk follows the cliffs along a well maintained and signposted
Epping to Pennant Hills Station (via Lane Cove River)
") Epping to Pennant Hills Station (via Lane Cove River) 3 hrs 5 mins 8.4 km One way Hard track 249m This walk, from Epping to Pennant Hills Station, is a great way to see the upper Lane Cove River Valley.
Epping to Pennant Hills Station (via Lane Cove River) 3 hrs 5 mins 8.4 km One way Hard track 249m This walk, from Epping to Pennant Hills Station, is a great way to see the upper Lane Cove River Valley.
Hornsby Blue Gum Walk
 Hornsby Blue Gum Walk 3 hrs Hard track 6.7 km Circuit 4 374m This delightful loop is one of the prettiest and most popular walks in the Hornsby area. Going from an environment of ferns and clear bushland
Spit Bridge to Middle Head Forts
 Spit Bridge to Middle Head Forts 2 hrs 30 mins 6.3 km One way Hard track 4 181m This scenic walk takes you from the Spit Bridge, along the coast to explore the Middle Head Forts. There are a few alternate
Green Point Circuit Walk
 Green Point Circuit Walk 3 hrs 7.7 km Circuit Hard track 269m This walk visits all of the popular locations in Green Point Reserve, as well as some of the lesser-visited areas inland. Taking in Sea Eagle
De Burghs Bridge to Fullers Bridge
 De Burghs Bridge to Fullers Bridge 2 hrs 3 mins Hard track 6 km One way 2m 4 Following the Lane Cove River, this walk mostly follows a section of the Great North Walk and is well maintained and signposted.
Blackheath Station to Junction Rock Loop (via Grand Canyon and Popes
 Blackheath Station to Junction Rock Loop (via Grand Canyon and Popes 8 hrs 30 mins 18.2 km Circuit Hard track 4 1254m This circuit starts in Blackheath and heads down into the Grand Canyon and Rodriguez
Rail to River and Stringybark Creek Reserve Walk
 Rail to River and Stringybark Creek Reserve Walk 4 hrs Hard track 11.2 km Circuit 4 302m This walk begins in the busy city of Chatswood and soon enters the nearby bushland around the Lane Cove River. The
Dubbo Gully and Ten Mile Hollow Circuit (via Clares Bridge)
") Dubbo Gully and Ten Mile Hollow Circuit (via Clares Bridge) 2 Days Hard track 24.3 km Circuit 4 1117m This two day (or ten hour) walk follows several historic roads, now closed to traffic. Starting with
Dubbo Gully and Ten Mile Hollow Circuit (via Clares Bridge) 2 Days Hard track 24.3 km Circuit 4 1117m This two day (or ten hour) walk follows several historic roads, now closed to traffic. Starting with
Upper Rumbalara circuit
 Upper Rumbalara circuit 1 hr 30 mins 3.3 km Circuit Hard track 176m A great circuit walk, covering most of the walking tracks and sights in the upper section of the Rumbalara Reserve. There is some really
Callicoma Loop. 174m. 98m. 2 hrs. Hard track 5.1 km Circuit. 153m
 Callicoma Loop 2 hrs Hard track 5.1 km Circuit 153m This great circuit walk passes through some really nice forest around the fringe of Cherrybrook. Highlights of the walk include some beautiful rock overhangs
National Pass from Wentworth Falls to Conservation Hut
 National Pass from Wentworth Falls to Conservation Hut 3 hrs Hard track 3.6 km One way 739m Starting at Wentworth Falls picnic area, this scenic and historic walk explores many waterfalls, lookouts and
Berowra to Mt Kuring-gai
 Berowra to Mt Kuring-gai 4 hrs 30 mins 9.4 km One way Hard track 4 551m From the ridges above Cowan Creek, this walk takes in some great lookouts (especially around Mt Kuringgai) as well as enjoying an
Patonga to Woy Woy. 5 hrs 45 mins 15.5 km One way. Hard track. 497m
 Patonga to Woy Woy 5 hrs 45 mins 15.5 km One way Hard track 4 497m This walk explores a variety of environments from the shore line and coastal cliffs near Patonga, to the dry, rocky and open ridge line.
Sphinx, Warrimoo and Bobbin Head tracks
 Sphinx, Warrimoo and Bobbin Head tracks 4 hrs 9.6 km Circuit Moderate track 499m This great walk starts at the Sphinx Memorial and loops around via Cowan Creek, exploring diverse environments as it changes
Middle Harbour Creek Loop
 Middle Harbour Creek Loop 5 hrs 45 mins 15.1 km Circuit Experienced only 5 570m This walk explores the upper reaches of Middle Harbour Creek, starting and ending at the great parklands at Davidson Park,
Taronga Wharf to Chowder Bay
 Taronga Wharf to Chowder Bay 2 hrs 4.4 km One way Moderate track 246m Starting at Taronga Wharf, this walk passes many icons of Sydney, including Taronga Zoo, HMAS Sydney Mast, Chowder Bay. The walk also
Federal Pass Walking Track
 Federal Pass Walking Track 5 hrs Hard track 8 km One way 4 989m This classic trail follows along the base of the cliffs from Leura to the Golden Stairs, passing many of the more popular sights of the Katoomba
Under and Over Cliff Walk
 Under and Over Cliff Walk 4 hrs 9.4 km Circuit Moderate track 576m This walk from Wentworth Falls Station is a fantastic way to see a large majority of the Wentworth Falls cliffline. The track winds under
Woolwich Wharf to Boronia Park
 Woolwich Wharf to Boronia Park 2 hrs 5.8 km One way Moderate track 175m Going through the streets of Hunters Hill, this walk is on the first segment of the Great North Walk. The majority of the walk is
Glenbrook and Euroka Circuit
 Glenbrook and Euroka Circuit 2 Days 16.6 km Circuit Experienced only 790m This two day circuit, returning to Glenbrook Station, is a scenic walk which passes many of the tourist attractions within the
Epping to Gordon Station
 Epping to Gordon Station 4 hrs 15 mins 11.7 km One way Hard track 4 365m This walk, from Epping Station to Gordon Station, passes below the homes which sit on the hills high above the Lane Cove River.
Wentworth Falls Station Loop (Undercliff Walk)
") Wentworth Falls Station Loop (Undercliff Walk) 4 hrs 3 mins Hard track 8.9 km Circuit 658m 4 This walk passes some stunning waterfalls and views into the Jamison Valley, following the cliff edges around
Wentworth Falls Station Loop (Undercliff Walk) 4 hrs 3 mins Hard track 8.9 km Circuit 658m 4 This walk passes some stunning waterfalls and views into the Jamison Valley, following the cliff edges around
Hermitage Foreshore Track
 Hermitage Foreshore Track 1 Hr 2.2 km One way Moderate track 123m The Hermitage Foreshore Walk is a wonderful way to explore Sydney Harbour from the perspective of South Head. This walk starts from Nielsen
Teralba to Charlestown Park track head
 Teralba to Charlestown Park track head 4 hrs 30 mins 13.3 km One way Moderate track 3 220m This section of the Great North Walk starts from the Teralba train station and winds down and around the edge
De Burgs Bridge to Thornleigh station
 De Burgs Bridge to Thornleigh station 3 hrs 45 mins 9.7 km One way Hard track 4 363m This walk follows a section of the Great North Walk, starting from De Burghs bridge. The walk winds north west, through
The Coast Track. 2 Days. Hard track 27.4 km One way. 1351m
 The Coast Track 2 Days Hard track 27.4 km One way 4 1351m Heading south, this walk covers the coastline of the Royal National Park and can truly only be described as amazing. With breathtaking coastal
Gordon to Chatswood Station
 Gordon to Chatswood Station 4 hrs 30 mins 12.2 km One way Hard track 4 381m This walk is a great way to get into the bush without being far from civilisation. The walk wanders through untouched valleys
Roseville to Macquarie Park
 Roseville to Macquarie Park 3 hrs 3 mins 8.8 km One way Hard track 4 29m This walk starts at Roseville station and explores the streets and alleyways of Roseville before joining the main spine of the Great
Bouddi Ridge and Coastal Walk
 Bouddi Ridge and Coastal Walk 2 Days Hard track 27 km Circuit 4 126m This overnight walk takes in the majority of the magnificent Bouddi National Park. The walk starts from the pleasant Putty Beach camping
Faulconbridge to Blaxland
 Faulconbridge to Blaxland 2 Days Experienced only 15.2 km One way 5 693m This two-day walk, or very solid one-day walk, takes you from station to station, through lush, scenic forest in the lower Blue
Lane Cove Tourist Park River Circuit
 Lane Cove Tourist Park River Circuit 5 hrs 12 km Circuit Hard track 383m This walk follows a large section of Lane Cove River. The walk follows the Riverside Walking track up the Lane Cove River to De
Echo Point to Leura Forest Circuit
 Echo Point to Leura Forest Circuit 3 hrs 4.8 km Circuit Hard track 588m Forming a circuit around the cliffs and then the valley floor, this is a walk more then capable of convincing a walker of the beauty
Wentworth Falls Station Loop
 Wentworth Falls Station Loop 5 hrs 3 mins 9.5 km Circuit Hard track 4 13m The Wentworth Falls Station Loop takes in most of the upper tracks around Wentworth Falls. There are many scenic views near the
Cape Banks Circuit. 50m. 2m Botany Bay National Park. 3 hrs 7.3 km Circuit. Hard track 190m
 Cape Banks Circuit 3 hrs 7.3 km Circuit Hard track 19m This Cape Banks Circuit has a lot to offer and is thoroughly recommended. The walking travels over beaches, through coastal forest and across exposed
Wentworth Falls Loop. 893m. 665m. 6 hrs 10.2 km Circuit. Hard track 1093m. Blue Mountains National Park
 Wentworth Falls Loop 6 hrs 1.2 km Circuit Hard track 193m This is a great walk, both in size and spectacular views. The walk makes its way from Wentworth Falls train station and drops off the plateau,
Spit Bridge to Manly (Manly Scenic Walkway)
") Spit Bridge to Manly (Manly Scenic Walkway) 3 hrs 45 mins 9.1 km One way Moderate track 349m The Spit to Manly walk is a classic bushwalk on Sydney's Northern Beaches. The walk follows a well-maintained
Spit Bridge to Manly (Manly Scenic Walkway) 3 hrs 45 mins 9.1 km One way Moderate track 349m The Spit to Manly walk is a classic bushwalk on Sydney's Northern Beaches. The walk follows a well-maintained
Charlestown Park trackhead to Newcastle station
 Charlestown Park trackhead to Newcastle station 5 hrs 30 mins 12.1 km One way Hard track 4 287m This section of the Great North Walk starts from the Charleston Park track head and winds through the streets
Rumbalara Explorer. 158m. 5m Rumbalara Reserve. 2 hrs 45 mins 6.1 km Circuit. Hard track 326m
 Rumbalara Explorer 2 hrs 5 mins 6.1 km Circuit Hard track 326m Pretty well the grand tour of the Rumbalara Reserve, this walk takes in much of the great scenery the reserve has to offer. The walk covers
North Ryde Fairyland circuit
 North Ryde Fairyland circuit 2 hrs 30 mins Hard track 6.9 km Circuit 193m 4 Starting at North Ryde train station this walk explores a stretch of the Lane Cove River, visiting the historic Fairlylands Pleasure
Sphinx to Mt Kuring-gai
 Sphinx to Mt Kuring-gai 4 hrs 45 mins 1.7 km One way Hard track 673m This walk starts at the Sphinx War Memorial and follows some well maintained and popular walking tracks down to Cowan Creek. Enjoy the
Gosford to Lisarow. 202m
 Gosford to Lisarow 4 hrs 3 mins Hard track 11.3 km One way 4 479m This walk is a great way to explore the ridge-top bushland between Gosford and Lisarow. Passing through Rumbalara and Katandra Reserves,
Bobbin Head Loop. 166m. 0m Ku-ring-gai Chase National Park. 5 hrs 12.9 km Circuit. Hard track 619m
 Bobbin Head Loop 5 hrs 12.9 km Circuit Hard track 619m This great circuit walk enjoys a variety of landscapes in Ku-ring-gai Chase National Park. The walk starts at the historic Sphinx war memorial and
Thornleigh to Hornsby
 Thornleigh to Hornsby 4 hrs Hard track 10.2 km One way 4 526m Starting at Thornleigh station you walk through suburban streets for a short while before diving into the bush at the southern end of Berowra
Chatswood to Epping Station
 Chatswood to Epping Station 6 hrs Hard track 16.3 km One way 4 533m This walk, from Chatswood to Epping, is a long but enjoyable walk along the Lane Cove valley. The walk mostly follows the Lane Cove River
Scenic world to Three Sisters Loop via Furber Steps
 Scenic world to Three Sisters Loop via Furber Steps 5 hrs 5.8 km Circuit Hard track 722m This walk starts from the popular Scenic World, in Katoomba, and winds down the Furber steps into the Jamison Valley,
Taronga Zoo to Spit Bridge
 Taronga Zoo to Spit Bridge 5 hrs Hard track 1.4 km One way 4 41m This is a scenic and culturally rich walk with views over Sydney Harbour and many interesting heritage buildings along the way. The start
Manly to Seaforth Oval
 Manly to Seaforth Oval 5 hrs 45 mins 13.7 km One way Moderate track 3 624m This walk follows the Manly to Spit Scenic Walkway, then continues past The Spit Bridge to Seaforth Oval. The walk provides magnificent
Narrabeen Lagoon Trail (from Middle Creek)
") Narrabeen Lagoon Trail (from Middle Creek) 2 hrs 30 mins 8.6 km Circuit Very easy 1 105m The Narrabeen Lagoon Trail is a wonderful and accessible walk on the Northern Beaches of Sydney. The trail is used
Narrabeen Lagoon Trail (from Middle Creek) 2 hrs 30 mins 8.6 km Circuit Very easy 1 105m The Narrabeen Lagoon Trail is a wonderful and accessible walk on the Northern Beaches of Sydney. The trail is used
Six Foot Track. 1212m
 Six Foot Track 3 Days 44.8 km One way Hard track 4 2066m This classic walk takes you from Katoomba to Jenolan Caves via a historic horse route. The walk travels mainly along well-maintained service tracks
SELF GUIDED TOURING ROUTE
 SELF GUIDED TOURING ROUTE Things to see and places to go on the loop from Orbost to Marlo, Cape Conran, Cabbage Tree and back to Orbost (or onwards to Cann River) V6 April 2017 This guide should be read
ST. AGNES. you cannot put a time limit on beauty.
 ST. AGNES CIRCULAR WALKS AROUND There are many enjoyable and picturesque walks around St. Agnes most are signposted and are featured on the St. Agnes Mini-guide map. Because most of our footpaths are in
Beautiful Walks from the Blue Ball Inn
 Walk No. 7 COAST AND VALLEY WALK Countisbury, Glenthorne, County Gate, Brendon, Rockford and Wilsham 10 MILES APPROX. Walking time 5 hours approx. (not including breaks)> OS Sheet 64/74 Lynton and Lynmouth.
Sydney to Thornleigh via Lane Cove Tourist Park
 Sydney to Thornleigh via Lane Cove Tourist Park 2 Days 33 km One way Hard track 4 1114m This overnight walk starts from the Obelisk in Macquarie Park, Sydney, at the official start of the Great North Walk.
Cape to Cape 5 Day End-to-End Detailed Itinerary
 Cape to Cape 5 Day End-to-End Detailed Itinerary Join Cape to Cape Explorer Tours for a grueling five-day express experience on Western Australia s premier coastal long distance hike, the Cape to Cape
eldershuskisson.com.au
 57 GREVILLE AVENUE, SANCTUARY POINT, NSW 2540 The Driftwood Shack Sleeps 5; 1x Queen and 1x Tri Bunk Welcome to The Driftwood Shack. Where you truly unwind and relax among native gardens, with the calm
Directions for Day 1: Colwood To Metchosin
 Colwood-Metchosin Page 1 of 8 Directions for Day 1: Colwood To Metchosin Start: Royal Roads University, Birds of a Feather B&B, or at Esquimalt Lagoon Finish: Your accommodation in Metchosin Time: 4-5
Walk 7: Watchet to washford
 Walk 7: Watchet to washford Length: Moderate - 7.5 miles / 12 km Good For: Theme: History Duration: 2-3 hours depending on speed of walking Notes: This is a moderate to difficult walk in places, with steps,
Canoe Route. Dogtooth Lake-Highwind Lake-Dryberry Lake- Lake of the Woods-Blindfold Lake
 1 Canoe Route Dogtooth Lake-Highwind Lake-Dryberry Lake- Lake of the Woods-Blindfold Lake This is an interesting and challenging route starting and ending at Rushing River Provincial Park. It passes over
Falls Lake Trail (A part of the NC Mountains-to-Sea Trail) East to West
 East to West") Falls Lake Trail (A part of the NC Mountains-to-Sea Trail) East to West Section 1 (Falls of the Neuse Rd to Raven Ridge Rd) 0.0 mi Parking area of the Tailrace Fishing Area, just below the dam, off Falls
Falls Lake Trail (A part of the NC Mountains-to-Sea Trail) East to West Section 1 (Falls of the Neuse Rd to Raven Ridge Rd) 0.0 mi Parking area of the Tailrace Fishing Area, just below the dam, off Falls
Detailed maps, and portaging and camping information follow.
 Overview of Bain route. The launch site is at Davidson Lake, just before the Manitoba/Ontario border. You can do a loop if you leave a vehicle at Tulabi Lake (at the canoe route parking lot). The road
The Mendip Way. Route Directions and Maps Wells to Frome
 The Mendip Way Route Directions and Maps Wells to Frome Website: www.mendiphillsaonb.org.uk Email: mendip@mendiphillsaonb.org.uk Facebook & Twitter: @MendipHillsAONB Phone: 01761462338 1 Wells to Shepton
La Madre Wilderness Area
 La Madre Wilderness Area Rock Climbing Inventory Statistics: Area: Walls La Madre North 3 24 136 22 Kraft Mt./Gateway Canyon White Rock Springs Willow Springs East The Promised Land 18 4 3 3 12 23 11 24
NEWLANDS CORNER AND ST MARTHAS
 NEWLANDS CORNER AND ST MARTHAS 10k CIRCULAR ROUTE 2½-3HRS GU4 8SE From Newlands Corner on the North Downs just outside Guildford, you can enjoy one of the most beautiful panoramas of quintessential English
Christchurch to Hengistbury Head
 Last checked 6 June 2018 Document last updated: 13 July 2018 This document and information herein are copyrighted to Saturday Walkers Club. If you are interested in printing or displaying any of this material,
ISLAND SHARK BAY WORLD HERITAGE AREA 4WD ADVENTURE NEW
 4WD TOURS DIRK HARTOG ISLAND SHARK BAY WORLD HERITAGE AREA BOOK YOUR 4WD ADVENTURE TODAY ON 08 9948 1765 NEW TOURS! oceanpark.com.au DIRK HARTOG ISLAND SHARK BAY WORLD HERITAGE AREA Dirk Hartog Island
Macutagon Creek to Russell s Landing
 Day Trips Macutagon Creek to Russell s Landing Manitouwadge Public Consultation Committee Canoe Route #13 #13 MACUTAGON CREEK TO RUSSELL S LANDING This route is suitable to all levels of paddlers but due
Harlington - Sharpenhoe - Pulloxhill
 Harlington - Sharpenhoe - Pulloxhill ID: 3676, Distance: 8 miles, Height gain: 140 Metres, Map: Explorer 193 Luton & Stevenage, Contributor: Dennis Jeanes Duration: 3 Hours 27 Mins Features Church,Great
Harbour Bridge to Taronga Zoo
 Harbour Bridge to Taronga Zoo 4 hrs 9.8 km One way Moderate track 389m On this walk, you will explore much of the foreshore linking Milsons Point Station to Taronga Zoo Ferry wharf. The walk is mostly
Falls Lake Trail (A part of the NC Mountains-to-Sea Trail) East to West
 East to West") Falls Lake Trail (A part of the NC Mountains-to-Sea Trail) East to West Section 1 (Falls of the Neuse Rd to Raven Ridge Rd) 0.0 mi Parking area of the Tailrace Fishing Area, just below the dam, off Falls
Falls Lake Trail (A part of the NC Mountains-to-Sea Trail) East to West Section 1 (Falls of the Neuse Rd to Raven Ridge Rd) 0.0 mi Parking area of the Tailrace Fishing Area, just below the dam, off Falls
THE WELLDIGGERS ARMS, HESWORTH AND FITTLEWORTH TRAIL
 THE WELLDIGGERS ARMS, HESWORTH AND FITTLEWORTH TRAIL 5.5 miles Circular 3 hours 041017 Challenging Terrain A 300-year-old pub turned country-inn on the edge of the South Downs National Park, The Welldiggers
Detailed Descriptions and Maps of Woodside s Nature Trails
 Detailed Descriptions and Maps of Woodside s Nature Trails Access Mill Road Trail Park along Anderson Mill road. Signs on West Pleasant Colony and Anderson Mill road clearly point to the beginning of the
private island experience
 private island experience Explore Pumpkin Island in the beautiful Southern Great Barrier Reef PRICING PERIOD 01 APRIL 2018-31 DECEMBER 2019 PUMPKIN ISLAND 1 Pumpkin Island An isle called Pumpkin Pumpkin
Hammer Vale and Linchmere Common
 point your feet on a new path Hammer Vale and Linchmere Common Distance: 9 km=5½ miles or 6 km=3¾ miles easy walking with one steep section Region: Hampshire, West Sussex Author: Botafuego Refreshments: