STEWART FARM YEAR ROUND INSULATION SYSTEM FOR BEE HIVES
|
|
|
- Raymond Bradley
- 6 years ago
- Views:
Transcription

1 STEWART FARM YEAR ROUND INSULATION SYSTEM FOR BEE HIVES Insulating a standard Langstroth bee hive with permanent insulation without affecting the design of the internal components or the normal routine for managing the hive Developed by Robert A.L. Williams Stewart Farm 2007 Stewart Road Harsens Island, Michigan, 48028, USA Bob@stewartfarm.org Patent Pending We welcome and encourage beekeepers to try this system on their own hives, for non-commercial purposes. This can be done using materials which can be purchased at any home improvement store. The most recent version of this document with drawings and a video are available online at bees.stewartfarm.org. Last updated July 20, 2012

2 2
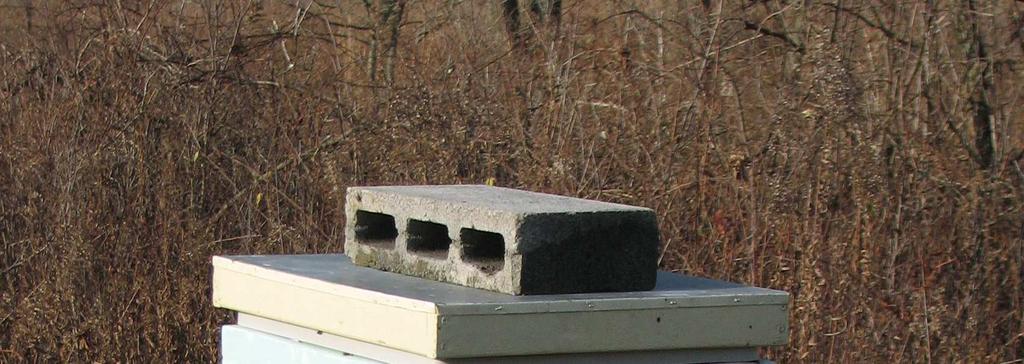
3 Introduction This system is not for those who are firm believers that bee hives should not be insulated and that hives must have lots of ventilation. This is only for those beekeepers that want to insulate their hives and are looking for a better way than wrapping them temporarily with roofing paper. As a beekeeper living and working in Michigan s Northern climate, the design of the standard Langstroth bee hive has bothered me since I started beekeeping. Every winter I lost colonies due to, I believe, the weather conditions. The ¾ solid wood walls, floor and top provide no insulation from the winter s cold and the summer s heat. Within a few hundred yards of my apiary I have observed feral bees living in holes in trees and surviving the winters with no problem. Generally the thickness of wood surrounding a feral bee hive hole in a tree is at least two to three inches thick and part of a large mass of wood which acts as a heat sink. The thickness of the walls of feral bee hives provides more insulation from cold and heat, and the additional wood mass moderates temperature swings from day to night and during short extremes in temperature. As an architect I decided I wanted to try to design a better living environment for my honey bees than I was providing with the standard Langstroth hive. I looked at the design of the hive to figure out how I could insulate it for winter conditions. Since I don t install insulation in my home each fall and remove it in the spring, I wanted something fairly permanent for the hives as well. Also, I felt the hive could use some summer insulation to protect it from overheating in the direct sun. At first I thought through insulating the inside of the hive, but soon gave up that idea when I realized how much that affected the size and quantity of the frames. I wanted to keep all of the components of the hive as standard as possible. After some experimentation with various designs I came up with a system that puts all of the insulation on the outside of the hive except the insulation installed in the top cover. It remains in place year round, so once it s installed it stays there. The system increases the insulation of the hive components from approximately R-1 to R-5 and reduces the transfer of energy to about one fifth that of a standard hive. All materials needed are readily available at home improvement stores; the tools needed are very basic and all of the work can be done by one person working alone. It can be installed in the shop to new hives or in the field to existing hives without disturbing the bees. All of the parts of the system can be easily removed or replaced as needed. Nothing needs to be, or should be removed for the summer. We no longer have to make that very tough decision in the spring about When is the right time to remove the winter insulation wrap? and we don t hesitate from doing an internal inspection in February because we would have to remove and replace the insulation. The system is very simple. Cut panels from ¾ foam board, locally available as a wall sheathing material, and hold them in place with sections of 1 by 2 screwed to the wood hive components through the insulation. Put a sheet of ¾ foam board under the bottom board and one under the upper cover. That is basically it, but, with a few little details added which I will explain. Once you have the materials and tools ready it should take about an hour and a half to cut and install all the components needed for a single hive. Three-quarter inch solid wood has an insulation value of approximately R-1. With ¾ foam board added to the wood the result is an insulation value of approximately R-5. The insulated wood in the hive will transfer energy at one fifth the rate of the standard un-insulated wood. A standard four medium-super hive has approximately 2500 square inches of exposed surface area. The Stewart Farm year-round bee hive insulating system leaves approximately 300 square inches of that surface exposed without insulation, at the joints between supers, around the entrance and at the bottom board sides. The result is that the total amount of heat lost or heat gained directly through the wood surfaces is reduced to approximately one quarter of that of an un-insulated hive. 3
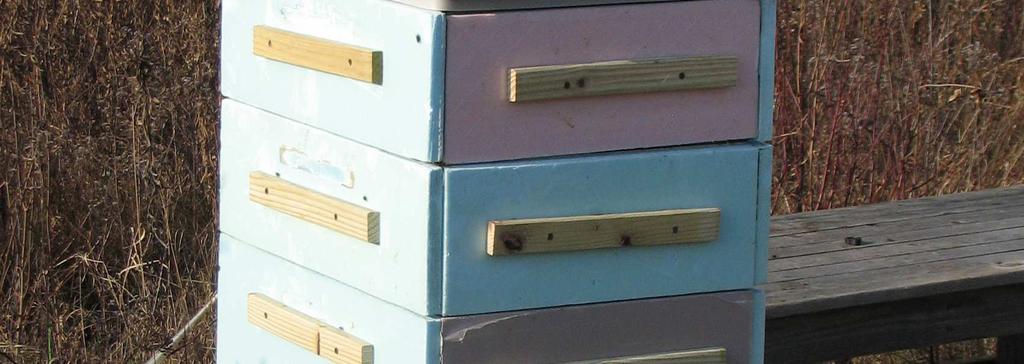
4 In this system all materials needed are readily available at home improvement stores; the tools needed are very basic and all of the work can be done by one person working alone. The system can be installed on hive components in the shop or to existing hives in the field. All of the parts of the system can be easily removed or replaced as needed. Nothing needs to be, or should be removed for the summer. Tools Tools needed to fabricate and install the system are as follows: tape measure pencil powered screw driver or a standard screw driver and drill with bits utility knife or hand saw optional - propane torch Supplies Supplies needed to insulate three hives, each with four medium supers are as follows: Two sheets of 4 x 8 x ¾ foam board insulation - $28 Eight 1 x 2 s by 8 foot long (optionally you can use pressure treated lumber)- $ long exterior screws (about one pound of screws) $8 Two rolls of 3/8 thick x 3/4 wide x 10 foam weather stripping tape - $16 Optional exterior screws and 18 large washers or ceiling buttons Cost Total cost to insulate three hives each with four medium supers is about $60. That s just $20 per hive. The weight that this system adds to a typical medium super is only about a pound. Installation notes While installing the foam panels it is important to have each panel held tight to the hive at the perimeter of the panel. If air can infiltrate under any edge of the panel, the result will be the same as if there were no panel at all. This is one reason that I prefer ¾ foam board to ½ or ¼. The foam board is easily cut with a utility knife or hand saw, however if you use the saw or the utility knife that is not sharp it will leave a ragged edge on the foam board. If you care to you can smooth out the ragged edges with a light pass of a propane torch. Many foam boards come with a clear plastic sheet on the surface. I leave it on the surface that is exposed to the weather. You don t have to leave it on but it will come loose as it weathers unless you lightly melt it to the foam board with a propane torch. I like to run a propane torch over all the panels after installation. It melts the foam slightly and seems to create a harder surface that I think might hold up better to the weather and impacts over the long run. Avoid breathing the fumes when heat the foam because many foam boards can be toxic. If you use a propane torch to sanitize your supers you should be able to continue to do that without affecting the insulation panels. Most foam boards have printing on one side. For aesthetics you might want to make sure you put that side to the box so the printing doesn t show. Supers For super panel cutting patterns I have used a side and front from an unassembled super. At one time I cut the side panels longer so they overlapped the ends of the front and back panels. I later abandoned that practice when it turned out to be more work and sometimes caused problems if the side panels were a little too long. The quickest way to cut the panels if you have a lot to do is to first make ¼ plywood patterns of each size needed and nail four ¾ brads into them so the brads stick out one side by 4
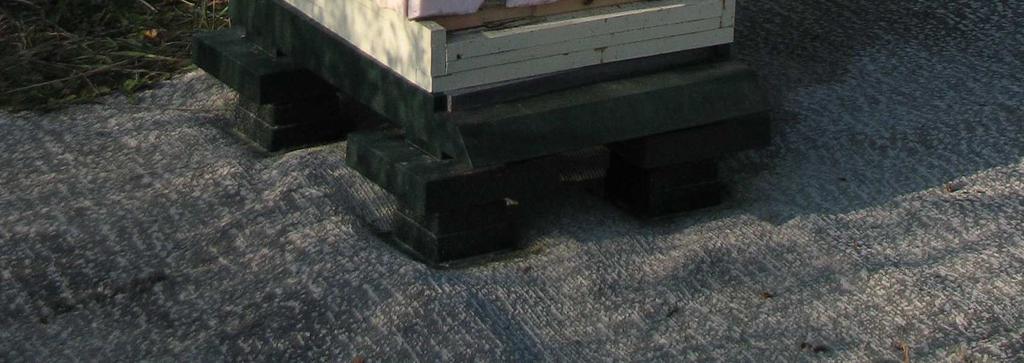
5 ½. You then place the pattern on your foam board for cutting and the brads hold it in place until you are done cutting all four edges. In addition, the pattern does not have the rabbits cut out of the ends and since the pattern is only ¼ thick instead of ¾ wood it is easier to cut the foam board below. Outer Cover The dimensions of your top cover may vary a little from those shown in the drawings. This may affect the thickness of foam board needed to bring the bottom of the foam down to the bottom of the perimeter board around the edge. You can have the bottom of the foam a little lower than the perimeter board but not vice versa. If the perimeter board is lower than the rigid foam board it will rest on and possibly damage the insulation around the edge of the inside cover. You might need to calk around the edge of the foam board. I found that ants like to get up under the cover if I don t. This does not seem to be a problem around the panels on the supers, just under the top cover. Unfortunately this insulation modification to the outer cover defeats its telescoping feature. The top cover will need to be weighed down properly to assure that it does not slide off or blow off. To avoid wind, rain and snow from blowing into the slot of the inner cover you can cut a small piece of milk carton or juice box to act as a canopy over the slot. Tape it to the inner cover. If you don t want to lose the telescoping feature you will need to make a custom outer cover 1½ wider in each dimension and ¾ deeper than the standard cover. As an option you can make a metal cover for the top the usual size, but, bring the sides of the metal down about 2. Have the bottom edges of the sides turned up so the bottom edge is not sharp. Insert a piece of ¾ foam board, calk it and you are done. Inner Cover The inner cover is insulated at the perimeter with foam insulation weather stripping self-stick tape. Though the amount of exposed wood on the inner cover is very small this is a very important step. Cold temperatures on the edge of the inner cover are easily transferred to the remainder of the inner cover and could result in condensation on the underside of the inner cover, the build-up of ice, and water dripping on the bees. With the telescoping feature of the outer cover not working you could get a little blowing rain entering the ventilation opening at the rear of the inner cover. You may want to tape a small piece of plastic on top of the slot to act as a canopy. See the drawings. Bottom Board The design of bottom boards seems to vary a bit and yours probably doesn t match mine. You ll have to figure out what works on your style bottom board. A foam board bottom or a piece of foam board mounted to the bottom or above your current board is the most important component of insulating the bottom board. I happen to have a screened bottom with a slide-out board below the screen. The slot for the slide-out board is about ½ deep, but because of slight warping of the frame a ½ thick insulation board would not slide into the slots. However, two ¼ layers of foam board would fit when I put one in first and then slid in the second one. I like these foam board bottoms, because they are so inexpensive that I consider them disposable. After I flip them over for a second use I replace them with a clean boards at a cost of about 50 cents. Unfortunately I only found the ¼ foam board at the home improvement store in a 200 square foot package for $38. I now have a lifetime supply. One concern I had about replacing the wood bottom board with foam board is that critters can scratch or bite through the foam board and enter the space between the screen and the foam board or just allow air to enter and defeat the insulation. To avoid this I put the original solid wood board between the bottom and the hive stand to prevent animals from getting to the foam board. 5
6 If you don t have a slide-out bottom board, you will need a piece of insulation below your current board. An easy way to do this is to set the hive bottom on the foam board sitting on the hive stand. Though I don t really feel it is needed for insulation purposes, you may want to insulate the sides of your bottom board. In that case you can use scrap foam board left over from cutting the other components from the large sheets. The sizes of the scraps you need will depend on your particular bottom board dimensions. The size of the cleats to hold these small pieces in place could just be the standard size cleats we use everywhere else. We really don t need the cleats to act as handles on the bottom board so, if you don t mind getting a few more hardware items you can also put on the small pieces of foam board with 1.25 screws and either washers or ceiling washers. So far I have had no insulation at all on the sides of the bottom boards, and the colonies are doing great. I almost think it might be better to allow the sides of the bottom board to be colder so if there is any moisture in the hive it will condense near the bottom where it won t drip on the bees. I m going to try to monitor this next winter to see if I am getting any condensation at all. One other advantage of insulating the sides and rear of the bottom board is that it will act as a guide to help you align the first super with the bottom board when you place it following an inspection of the bottom board. Though it is hard to see the wood you can just align the outside of the insulation. Queen Excluder The queen excluder does not need to be insulated, because it is only used in the summer. The problem with the summer heat is not the air temperature outside as much as it is the direct sun radiation on the hive. The total surface area of the edge of the queen excluder that is exposed to the summer sun is minimal and does not have a great effect on the internal temperature of the hive. I ve developed a set of drawings to illustrate the installation of the system components as well as patterns for conveniently and economically cutting the insulation panels for deep, medium and shallow supers from standard 4 x 8 sheets of foam board insulation. These drawings are available at Hive ventilation There are plenty of opinions about ventilation for the hive in the summer and the winter. Here s just another beekeeper s opinion, mine. If we insulate the hive well enough, very little ventilation is needed. We accept that the bees need to breath, their respiration generates moisture and that too much moisture in the hive is not good. There always needs to be some ventilation. The question is how much. In the winter too much ventilation will make the bees too cold. Too little, and the moisture can build up and can create unhealthy damp conditions. Some say that winter is the damp time of the year. Cold air does not hold as much moisture as warm air and cold air will not accept evaporation from surfaces as quickly as warm air will. The reason things seem damp in the winter is not that there is more moisture in the air, but rather, that there is less moisture in the air and more moisture on surfaces. Moisture which is in the air can condense on cold surfaces and make those surfaces damp. Moisture does not condense on warm surfaces. As I understand it, in the winter the bees keep warm by exercising their wing muscles to generate heat. Heat, moisture, carbon dioxide and waste are the products of the bees consuming honey and oxygen, and then exercising. The colder it is in the hive the more the bees have to move to keep warm and the more honey and oxygen they consume to generate that heat. The more honey ingested and converted to heat, the more 6
7 moisture and waste is created. If we give them a well-insulated environment, they will not need to move as much, they will not consume as much honey or create as much waste, they will not create as much moisture and therefore will not need as much ventilation to expel the moisture. They will also be consuming less oxygen and therefore will need less ventilation. The more insulated the hive is, the warmer the inside surfaces, and the less chance that moisture will condense on those surfaces. It is the condensation that can compromise the health of the bees. With less ventilation there is less cold air entering in the winter and the hive will stay warmer with less work from the bees to keep their cluster at the proper temperature. In the summer when the sun shines directly on the hive, the heat inside the hive increases. The bees ventilate the hive by moving air through the hive using their wings as fans. The more heat that radiates into the hive from the walls and top, the more ventilation is needed from the bees. More bee activity in fanning generates more body heat, physically expends the bee s resources, uses more honey reserves, and leaves the bees less time to forage for nectar and produce honey. A hive insulated in the summer should produce more honey and even increase an individual bee s chances of survival and therefore result in a larger colony, more likely to survive the following winter. For ventilation I leave the top entrance open year round and the bottom entrance adjusted from the smallest opening over the winter to almost fully open in the summer. Through the spring I enlarge the bottom entrance as access needs increase and night time temperatures rise. I don t increase the entrance until it appears crowded and I resist increasing it even when it is crowded if I think we still have some cold nights ahead. In the fall I set the bottom entrance ready for winter without hesitation. Less waste and better survival rate As described in the ventilation section above I believe that an insulated hive results in the bees consuming less honey and creating less waste. Less waste being created results in fewer trips outside the hive to excrete that waste. This results in the bees having less chance of exposing themselves to extreme cold temperatures which can result in their death. I believe this also results in a higher winter survival rate. Observations To put into perspective the results of my experiences with this hive insulation system you would probably like to know that my apiary is located on Harsens Island, in Lake St. Clair, southeast Michigan, just north of Detroit. I do not treat my hives for any diseases or mites and I do not do any supplemental feeding with sugar water. I am kind of a hands-off beekeeper. I don t go into the hives more than four or five times a year and I vary rarely disturb the brood supers. Every year I was experiencing winter losses. In the fall of 2010 I had four active colonies, three first year colonies with two medium supers and one older colony with two deep supers and two medium honey supers on top. I insulated one of the first year hives of two medium supers with the system described. That was the only colony to survive the winter of In May of 2011 I retired the hive with the deep supers and bought and installed two replacement colonies in the two double medium hives that had expired. The colony that had survived the winter of did well that summer, and by the fall of 2011 it had grown to five mediums. I should have harvested at least one super but the colony was quite large, needed the space, and the top supers were not full. If I had known then that they would use almost no honey over the coming winter I would have removed one or two honey supers from the top. The two new colonies from the spring were still just double medium supers. I insulated all of the hives for the coming winter, the sides, outer covers, inner covers and the bottom of the bottom board. I did not insulate the sides of the bottom boards. I figured if 7
8 there was going to be any condensation it would be best for it to condense at the bottom of the hive where it wouldn t drip on the bees. That winter, , was very mild. There was not a period of more than a week that stayed continuously below freezing. Normally we would have two weeks or more continuously below freezing with some days below zero. This may not have been the best winter to judge the results of this insulation system however, here s what I observed in on March 7. All three colonies were out flying, active and appeared healthy. When I opened the two hives that had just two medium supers each, there were lots of bees, right up to the top, including between the inside and outside covers. I was surprised to find that they had not used very much honey. In the top supper most of the honey that they had in the fall was still there. There was no need to do any feeding at all. When I cleaned out the dead bees from the bottom screen via the entrance opening slot, there were less than two dozen dead bees in each hive and there were none on the ground nearby. I was amazed because usually I would be pulling out 50 to 100 or maybe more. I checked the last hive, the one with the 5 medium supers. The top three supers appeared to be still filled with the honey that they had in the fall. There were plenty of bees in the bottom two supers. When I cleaned out the bottom screen there were only six dead bees. I could hardly believe it. This was the first time in my six years of beekeeping that all my hives survived the winter. I called a friend of mine who has hives about two miles from me to see how his did over the winter. He had just begun beekeeping the previous year and all his hives were new small colonies. He reported that out of his 30 colonies about 10 survived the winter. Conclusion I believe that a well-insulated, minimally ventilated hive increases the winter survival rate, increases honey preservation over the winter and increases honey production in the summer. I believe that the increased winter survival rate is due partly to less physical stress on the bees and partly to the reduced chance that the honey reserves will be expended before the bees can replenish them in the spring. Some benefits to the beekeeper are not only that they are less likely to need to replace a lost colony in the spring, but also, less or no early spring feeding should be needed, more honey reserves should be remaining in the hive in the spring to give the hive a start towards giving us a good harvest of honey in the summer, and lastly, the more bees that survive the winter the larger the colony to start collecting pollen and nectar in the spring. I believe that honey production is increased also due to resulting larger colonies and the bees spending less time ventilating the hive in the summer, leaving more time for harvesting nectar and producing honey. If you try this insulation system for yourself I would love to hear your experiences and the effects you observe on your colonies, the winter survival rate and your honey harvest. In addition, if you have any questions or comments on the installation of the components of the system or on the instructions please send them along. I have a free newsletter called bees.stewartfarm.org Newsletter to provide updates to this document and the drawings which accompany it and to share the results which others have when using this system. If you would like to be on the newsletter ing list please drop me an . Send your name and address to xharpspah@aol.com and put subscribe bee insulation newsletter as the subject. Thank you, Robert Williams xharpspah@aol.com 8
9 Below are some observations, comments, comparisons to other insulation systems and concerns or possible disadvantages of using this system. Observation Less propolizing It seems to me that the bees do less propolizing of the joints between the supers than they used to before I insulated the hives. I would be interested to know if others observe something similar. Comment - Things tried that didn t work In the process of developing this system I tried a few things that didn t work. I ll mention them here in case you are going to do some experimenting on your own. At first I glued on the foam board panels. I thought I would need to glue or caulk the foam panels to the super in order to limit the exterior air getting behind the edges of the insulation panels. It was difficult to find glue that held well to both the foam board insulation and the wood. Some glues are made for wood, others for foam board. I could not get the panels to stay on over the winter using just glue. At first I left openings in the insulation panels for the hand-holds in the sides of the supers. Later, for better insulation, I didn t put in the hand-holes, but rather, glued wood handles to the outside of the foam. Handles came off. I then screwed the handles on. The screwed on wood cleat handles I use in the current system seem to be a good solution. They hold the insulation tight around the edges and they act as handles. This system also allows for later removal of the panels if needed. The first time I put in the foam bottom boards they were too large and stuck out the back of the hive so I could easily grab them to pull them out. Two weeks later I observed one pulled out a bit and some claw marks on it. It looked like an animal tried to get in. I cut the bottom foam boards down to remove the excess part sticking out. I then realized that having just foam board between the exterior environment and the bottom screen might provide an area where a mouse or other animal could easily make an opening in the foam board and thereby defeat the whole insulation system. It turned out that in the spring the bottom foam boards were all still intact and there were no signs of any animal attempts at intrusion. I won t assume that it won t happen in the future and would like to have some type of solid material protecting the bottom of the foam bottom boards. Next winter I may substitute one layer of 1/4 foam board and one layer of 1/4 hardboard. Comment - Some beekeepers say that the honey frames provide insulation Some beekeepers have told me that they don t feel insulation is needed because honey frames #1 and #9 and maybe #2 and #8 act as insulation for the cluster during the winter. The problem with this theory is that this would only be insulating the cluster from cold on the sides, not from the cold surfaces on the front or rear of the hive. In addition, the bee space around the outside edge of one medium frame is over 18 square inches of free area. That is comparable to the free space of a 5 diameter hole. There is too much bee space for air movement to get any insulation value out of the honey frames on the sides of the cluster. These honey stores do however provide a valuable service in buffering the temperature swings within the hive. The heat stored in the honey is released into the hive when the temperature in the hive drops below that of the stored honey. This moderates the temperature swing from warm days to cold nights but does not actually provide any insulation value from the cold wood surfaces of the super. Comment - Some beekeepers insist that no insulation is needed Many colonies survive in a standard hive. Some colonies survive with no hive at all. This is true. Though some survive under these conditions, not all will. Survival vs. demise may depend on the health or strength of the colony going into winter, the type of bee, the local weather conditions, etc. However, it would be difficult to 9
10 see where any colony would be better off in an exposed environment than in a protected environment. I believe that those which survive without protection will not be as strong in the spring, both in health and numbers, as those which are protected from the cold. I know many homeless people survive the Michigan winters in cardboard boxes. I think I am better off and healthier living in a house with insulation and I think my bees are too. Langstroth himself promoted insulated hives in the form of double walled construction. Today s version of the Langstroth hive overlooks this very important feature of his original hive design. I believe the double wall has been eliminated for ease of construction and economy, but, not because it is any better without it. Comment - Some beekeepers mention that the temperature inside the hive is usually the same as outside In any case, when the temperature during a winter day might range from a low of 10 degrees at night to a high of 40 degrees in the afternoon the temperature inside an insulated hive may only range from 20 degrees to 30 degrees or the length of time at night when the bees need to endure the 10 degree temperature may be shorter. I suspect the swing of temperature from day to night is as detrimental to the bees as much as the absolute temperature itself. Feral hives in tree trunks have a large mass of wood which keeps the temperature in the hive from varying greatly in any 24 hour period. Comment - The cost $20 per hive does not seem like a lot of money to me, especially when you consider the possible cost of replacing the colony with a package the following spring. Even if you don t lose your colony over the winter I believe that the honey harvest will be better the following season due to more and healthier bees. If cost is a concern you might want to consider seeing if you can find some scraps of foam board insulation and lumber at local construction sites. The small size pieces needed for hives are basically throw away scraps in building construction projects. Compared to standard winter wrap insulation Stewart Farm year round system stays on all year round. No installation next fall. It is not in the way if you want to go into the hive on a warm winter day. No removal needed in the spring. No packing up and storing hive wrap materials over the summer. No sorting of materials in the fall to match the size of the wrapping materials with the size of each hive. No damage to materials due to removal, packing, transporting, storage and later reinstallation. The insulation value of this system is more than most systems involving winter wraps. Compared to BeeMax Polystyrene foam hives BeeMax hives are made completely of rigid foam. They too provide insulation for the bees in both winter and summer. Many people who use BeeMax hives agree that winter survival rates are better than non-insulated hives and that honey production is increased. A few differences between the BeeMax hives and the Stewart Farm Year-round Insulation system for Bee Hives are as follows: BeeMax Stewart Farm system Bees exposed to foam interior. Bees exposed only to wood interior. An animal penetrating the foam can get to the bees. There is always a layer of wood keeping out critters. Foam interior will not absorb excess moisture. Wood interior will absorb excess moisture. If a super is damaged it needs to be replaced. Any individual damaged panels can be replaced. Known to sustain some hive tool damage over time. The hive tool contacts the wood, not the foam. Must be purchased from a supplier. Materials are at any home improvement store. You need to buy new hives to convert to BeeMax You upgrade your current hives and do it yourself. Concern or possible disadvantage - Storing supers The supers are obviously larger with the insulation installed. If you normally store your unused supers stacked up with some inside of others you will not be able to do this with the insulated supers as shown. However, 10
11 instead of using ¾ material you could use ½ thick insulation and cleats everywhere. That would reduce the heat loss and gain to about 1/3 the standard un-insulated hive instead of the 1/4 we obtain with ¾ material. Then the supers will fit inside each other. Also, supers being stored on their sides or ends are not as stable as supers without the insulation and cleats. They are balancing on the cleats. Concern or possible disadvantage Frame hanger needs to be modified The frame hanger rack will need to be modified slightly to clip over the super plus the thickness of the insulation. I first wrapped a little stiff wire around the hook portion of the hanger rack and created a new wider hook from that. Later I tried a better system. I made the cleats on one of the long side of each super 18 long instead of 12 and put a ¼ thick piece of foam board under most of it except where the frame holder would hook on the cleat. For me an advantage of using the cleat to hold the frame rack is that now I don t put a super back on the hive and then find I forgot to remove the frame rack. Concern or possible disadvantage - Outer Cover loses its telescoping feature It s important to have the bottom of the foam board a little lower than the perimeter board of the top cover. If the perimeter board is lower than the rigid foam board, the perimeter board will rest on and possibly damage the insulation around the edge of the inside cover, and in addition, leave a larger than bee space gap between the inside cover and the insulation. Unfortunately this insulation modification to the outer cover defeats its telescoping feature. By losing this feature you lose the normal method of opening or closing the upper entrance slot in the inside cover by sliding the outer cover one way or another. If you don t want to lose the telescoping feature, you will need to make a custom outer cover 1½ wider in each dimension and ¾ deeper than the standard cover. In addition depending on the depth of the edge around your cover you may need to add a second layer of 3/8 thick weather stripping around the edge of the inside cover. Concern or possible disadvantage - Realigning the supers after an inspection With the insulation panels in place it can be a little harder to see that you are getting the supers aligned with the bottom board and with each other when reassembling the hive after an inspection. After doing a few inspections you will get used to aligning the supers using the insulation as a guide. It is important that you use the same thickness insulation on all parts and all sides of your hives so you can use the alignment of the outside of the insulation as a guide to know that the wood supers are aligned. This also is a reason to consider insulating the sides and rear of the bottom board, not necessarily for insulation purposes, but rather to make it easier to align the super above. Concern or possible disadvantage You can t use standard hive staples when moving the hive If you are going to pack up and move your hives with the bees in them you will not be able to use standard hive staples to attach supper to super unless you cut off part of the insulation (not advised) or unscrew and remove the cleats and insulation on some sides. You may choose to strap the hive together instead of using staples. Concern or possible disadvantage Rainwater I don t know yet if this could become a problem. Since the insulation is not calked to the supers rainwater could migrate between the two and would not dry out as quickly as surface water. I am wondering if over a period of years or decades this could lead to deterioration of the supers. I do paint all of my supers and am hoping that provides adequate protection for the wood. On the other hand, having the insulation over the painted super is providing additional protection for the paint from sun and wear and tear and I shouldn t have to repaint my supers in the future. Time will tell. Concern or possible disadvantage Replacing entrances Many beekeepers install entrances by pushing on the entrance with the end of their hive tool until the hive tool hits the super. At that point the entrance is flush with the outside of the super. With the insulation in place this method cannot be used unless a couple of small notches are cut from the insulation to expose the surface of the super just above the entrance. 11
12 12
Natural Beekeeping. Small Hive Beekeeping to Manage Varroa Mites
 Natural Beekeeping Small ive Beekeeping to Manage Varroa Mites oney Bee Nests Seasonal Management Traditional Southern Beekeeping LATE SPRING S B B S EARLY SUMMER B MID-SUMMER B LATE SUMMER B Langstroth
Beekeeping in Coastal California. January
 Beekeeping in Coastal California January The bees stay clustered for warmth and protection in the hive during cold cloudy weather, but they will enthusiastically venture out during warm, sunny days to
BEEKEEPING UNDER THE ARCH
 BEEKEEPING UNDER THE ARCH This is NOT a how to, but more of a what/when to do thing. I used paragraphs rather than point form to give an idea of a continuum, so a specific date to do something is not as
Winter Management Techniques (by John Thomas, 2016)
") Winter Management Techniques (by John Thomas, 2016) Winter for a first year beekeeper is tough. At least I know it was for me when I started beekeeping! I had taken the PCBA class, set up my hives and
Winter Management Techniques (by John Thomas, 2016) Winter for a first year beekeeper is tough. At least I know it was for me when I started beekeeping! I had taken the PCBA class, set up my hives and
Stand-N-Fish FULL DETAIL INSTALLATION INSTRUCTIONS
 1 Stand-N-Fish FULL DETAIL INSTALLATION INSTRUCTIONS Thank you for purchasing the incredible new Stand-N-Fish Kayak Fishing System. Once installed on your kayak the Stand-N-Fish will take your kayak fishing
Preparing Honeybee Colonies for Winter
 1 Preparing Honeybee Colonies for Winter The importance of preparing colonies to enter the winter in a healthy state, with an adequate supply of young healthy bees and stores, cannot be overemphasised.
The Bee Keepers Year
 The Bee Keepers Year December, January & February Monitor hive entrances for build up of dead bees and blockage. Wedge up the back of the hive to ensure the floor slopes gently forwards. Repair Woodpecker
Presented by Judy Scher
 Presented by Judy Scher July 1 July 15 Beginning of Beekeeper s Fall for beekeepers west of the Cascades Going Into Fall July / August Fall September - November Winter Thanksgiving - February Care of Honey
Parks Operations. Neighbourhood Outdoor Rink Program. Procedures
 Parks Operations Neighbourhood Outdoor Rink Program Procedures Table of Contents Neighbourhood Outdoor Rink Program... 1 Neighbourhood Volunteer Form... 2 Rink Installation Instructions... 3 Rink Board
nnjbees.org October 2015 NORTHEAST NEW JERSEY BEEKEEPERS ASSOCIATION OF NEW JERSEY A division of New Jersey Beekeepers Association
 nnjbees.org October 2015 NORTHEAST NEW JERSEY BEEKEEPERS ASSOCIATION OF NEW JERSEY A division of New Jersey Beekeepers Association President Frank Mortimer 201-417-7309 3 rd V. Pres. Karl Schoenknecht
A Table Top Wind Tunnel You Can Build
 A Table Top Wind Tunnel You Can Build Basic principles of aerodynamics can be studied in the classroom with this simple, inexpensive wind tunnel. All you need to build it is some cardboard boxes, glue,
U STAND INSTALLATION INSTRUCTIONS
 U STAND INSTALLATION INSTRUCTIONS Thank you for purchasing the incredible new U STAND by Stand N Fish. Once installed on your kayak the U STAND will enhance your kayak fishing enjoyment to a whole new
MITE AWAY QUICK STRIPS FAQS
 PRODUCT HISTORY WHAT IS THE DIFFERENCE BETWEEN MITE-AWAY II, MAQS AND THE MITE AWAY QUICK STRIPS? Mite-Away II was a 21-day formic acid product registered for a short period of time in Canada and the United
Parks Operations. Neighbourhood Outdoor Rink Program. Procedures
 Parks Operations Neighbourhood Outdoor Rink Program Procedures Table of Contents Neighbourhood Outdoor Rink Program 3 Neighbourhood Volunteer Form.. 4 Rink Installation Instructions 5 Rink Board Illustration..
FOR TREATMENT OF VARROOSIS CAUSED BY VARROA DESTRUCTOR IN HONEY BEES (APIS MELLIFERA)
") FORMICPRO From Nature, to Nurture. WWW.NODGLOBAL.COM 1-613-398-8422 INFO@NODGLOBAL.COM Healthy Bees. Healthy Planet. FORMIC PRO: WHAT ARE THEY? Formic Pro is a formic acid polysaccharide gel strip for
FORMICPRO From Nature, to Nurture. WWW.NODGLOBAL.COM 1-613-398-8422 INFO@NODGLOBAL.COM Healthy Bees. Healthy Planet. FORMIC PRO: WHAT ARE THEY? Formic Pro is a formic acid polysaccharide gel strip for
All Purpose Wooden Crate
 All Purpose Wooden Crate I built a wooden crate to carry supplies in, such as, propane, ammo, fake explosives, tape and whatever else will fit in it. I would like to say right off the start that this does
8MAY15 US RACK, Inc Falcon Drive, Madera, CA
 8MAY15 US RACK, Inc. - 2850 Falcon Drive, Madera, CA 93637-559-661-3050 INSTRUCTIONS for Bedrail-mounted MOTORCYCLE RACK, Model 2001-4TRA WARNING: Do NOT attempt to install or use this rack without following
Our Spa covers. About Spa Cover Vinyl
 Our Spa covers Whether you are in the market for a new Spa cover or just want to get the most out of your existing one, this guide will give you a wealth of helpful information. These basic maintenance
8-GUN CORVETTE ASSEMBLY INSTRUCTIONS
 8-GUN CORVETTE ASSEMBLY INSTRUCTIONS THE HULL STEP 1 Fasten the Deck to the Hull. Find the hull. This is a large, pink, ship-shaped piece of insulating foam board. This will form the base of your model
Mounting the RoboFocus RF-3 Unit on the LX-200/400 MicroFocuser
 Mounting the RoboFocus RF-3 Unit on the LX-200/400 MicroFocuser The RoboFocus unit can be mounted on the Meade MicroFocuser, commonly found on the LX-200/400 series. The RF folks point to this URL as a
Gurney Flap for WRX and STI w/low Profile Trunk Spoiler
 Gurney Flap for 2015+ WRX and STI w/low Profile Trunk Spoiler 2017-12-05 Thank you for purchasing this PERRIN product for your car! Installation of this product should only be performed by persons experienced
A NEW LOOK AT SPLITS
 A NEW LOOK AT SPLITS Beekeeping requires more attention to detail in today's environment. Varroa mites, the viruses they bring, new insecticides, small hive beetles, and early Queen supersedure make beekeeping
Learning to identify a common cause of winter death in Northern Climates
 Why did my honey bees die? March 8, 2016 Blog Learning to identify a common cause of winter death in Northern Climates By Meghan Milbrath, Michigan State University Extension, March 8, 2016 Guest Blog
NAVIGATOR PROP BUILDING INSTRUCTIONS & PHOTOS
 NAVIGATOR PROP BUILDING INSTRUCTIONS & PHOTOS Science under the ice Ice sheet At regional competitions the ice is simulated by 8 ft x 4 ft ½-inch foam sheeting (Home Depot part #703990 [in store only],
Beekeeping Supplies 2017 Price List
 Beekeeping Supplies 2017 Price List Use this supply list as a reference guide or an order form. We will always have some assembled inventory on hand for walk-in customers, but we appreciate advance notice
Hot Tub Pre-Delivery Guide
 Hot Tub Pre-Delivery Guide To prepare for the delivery of your hot tub, make sure the delivery path is clear and no obstructions are present. Obstacles such as overhanging tree limbs, awnings, protruding
Plans and Instructions to build a folding reflector oven
 Plans and Instructions to build a folding reflector oven Kayak2go.com also has folding kayak plans available for purchase. The low cost and ease of construction make the folding kayaks a great youth group
BEEKEEPING EQUIPMENT
 B BEEKEEPING STARTER KIT BEEKEEPING EQUIPMENT SINGLE SPARK STARTER KITS FOR ENTREPRENEURS EQUIPMENT FOR 10 HIVES bee colony 10x wax foundation 10x 30pcs solid bee food 10x 3pcs sugar + top feeder 50kg
WHITE WOLF. X-ray View MID POWER MODEL ROCKET KIT BUILDING INSTRUCTIONS KIT SPECIFICATIONS:
 WHITEWOLF-38 PARTS LIST 1 - Nose Cone 1-17" Airframe 1-6" Motor Tube 3 - Aft Fins 3 - Forward Fins 2 - Centering Rings 1-15" Parachute 2 - launch lugs 1-12 Kevlar Shock Cord 1 - Motor Retention >>(screw/washer)
SBA Technical Data Sheet Number 8 - Detecting and monitoring Varroa Mites Including instructions on the making and use of a Varroa Floor
 SBA Technical Data Sheet Number 8 - Detecting and monitoring Varroa Mites Including instructions on the making and use of a Varroa Floor NOTE The original source of the information given here is an article
A Foundation Of Trust. Hanging By A Thread
 Hanging By A Thread PROPS: Rope maker (See video at DoingWorks.com/movies.) 1 spool of cord for each team [I like to use 10 lb (4 kg test, 525 feet (160 meters) sisal cord] 1 spool of cord to use for demonstration
Pitts Model 12 Wing Leading edge Installation
 Pitts Model 12 Wing Leading edge Installation This procedure is used to install molded plywood leading edges included in the Pitts Model 12 kit. Nine (9) molded leading edge section are require per aircraft;
PT 11 trouble-shooting and maintenance.
 PT 11 trouble-shooting and maintenance. Does your rudder not stay down?...your back seat slip off?...your knobs tight and your leather pads loose? Maybe we can help. We have used our PT 11 s hard enough
Engineering Everywhere
 Engineering Everywhere Engineering Notebook Put a Lid on It: Engineering Safety Helmets Name: Crash Test Engineering 1 The Engineering Design Process 2 Museum of Science My Engineering Profile Prep Activity
Revisions to the Regulations for Agility Trials
 Revisions to the Regulations for Agility Trials Effective January 2, 2018 Equipment changes may be done prior to January 2, 2018, but must be completed by January 2, 2018 This insert is issued as a supplement
Siting your apiary and the years work. By Michael O Neill and Jacqui Glisson
 Siting your apiary and the years work By Michael O Neill and Jacqui Glisson Suitable location for apiary Sheltered South or south east facing, early sun Not in a frost pocket Not under trees or electric
Wooden Dummy Construction
 Wooden Dummy Construction Mook Yan Jong - (pronounced moohk yàhn jàng) literally translates "wood man post", but is usually just called a "wooden dummy" in English, or "jong" for short. The dummy consists
-SWEPT AWAY- Description & Overview. VEX Classroom Competition Swept Away
 -SWEPT AWAY- Description & Overview Swept Away is a head-to-head robotics competition designed and scaled to be run in a classroom environment by a single teacher. This game provides a challenge for designers
 www.allsportsystems.com Page 1 of 29 Page 2 of 29 Table of Contents Items You Supply: 4 MICROBAY Setup Instructions 5 Items Provided By AllSportSystems: 5 MEASURING AND CUTTING THE 1 EMT POLES FOR THE
Alternative Methods For Making CoCoRaHS Snow Water Content Measurements. Prepared by: Rick Fleetwood Environment Canada Updated Feb 2015
 Alternative Methods For Making CoCoRaHS Snow Water Content Measurements Prepared by: Rick Fleetwood Environment Canada Updated Feb 2015 Introduction This document will cover off two alternate methods for
Carving a Custom Seat
 Carving a Custom Seat Seat Carving your own seat from mini-cell, high-density foam is really quite simple and has proven to be more comfortable than any commercially produced seat and often more reasonably
[Title of the course]
![[Title of the course]](/thumbs/79/79229979.jpg "[Title of the course]") As with non-metallic raceway, Hubbell metal raceway is available in a variety of styles. There are 13 metal raceway profiles 8 painted and 5 aluminum for customers to choose from! ALL Hubbell painted metal
As with non-metallic raceway, Hubbell metal raceway is available in a variety of styles. There are 13 metal raceway profiles 8 painted and 5 aluminum for customers to choose from! ALL Hubbell painted metal
Basic Install Guide. Parts: 1 P a g e
 Basic Install Guide Parts: 1 P a g e Step One: Remove all panels and components from boxes. Step Two: Carefully unroll your turf. Be sure not to cut the turf when removing from protective plastic. The
Instant Garage 20' x 12' 3" x 8' 3"
 Instant Garage 20' x 12' 3" x 8' 3" Assembly Instructions Description Model # Instant Garage 20' x 12' 3" x 8' 3" - Grey CIG 1220 3503502 Recommended Tools OR THIS IS A TEMPORARY STRUCTURE AND NOT RECOMMENDED
Figure 1. Thresholds for sticky board types. Threshold of 60 varroa mites. Threshold of 120 varroa mites. Research by the beekeeper for the beekeeper
 Bees have a close-knit relationship with people. They have accompanied us on many of our major migrations over time and are found all over the globe. The domestication of bees and the practice of beekeeping
General Build Instructions for Mach 1 BT50 and BT55 Single Fin Kits. Needed Items for Assembly
 General Build Instructions for Mach 1 BT50 and BT55 Single Fin Kits 60-80 grit sandpaper Hobby knife Tape measure Scissors CA Super glue 30-minute epoxy 5-minute epoxy Masking tape 1/16 drill bit Needed
ADVENTURES WITH. Both of my grandfathers fished, my dad fished, and. creating unique handles for custom rods. 22 RodMaker
 From RodMaker Magazine Volume 7 Issue #4 WOOD creating unique handles for custom rods ADVENTURES WITH story by Ray Jergensen photos by Les Jergensen 22 RodMaker Both of my grandfathers fished, my dad fished,
EPP Version Building Notes Updated
 EPP Version Building Notes Updated 12-10-2013 The Zulu covers a wide range of flying conditions: slope soaring in light to strong lift, thermalling, aerobatics, discus launches, and combat; for skill levels
3190A NEO-ANGLE DOOR INSTALLATION INSTRUCTIONS. Series MODEL NO
 NEO-ANGLE DOOR INSTALLATION INSTRUCTIONS Series 30A Please read these instructions carefully to familiarize yourself with the required tools, materials, and installation sequences. The Exploded Diagram
L-23 Super Blanik Rigging (assembly/disassembly) Guide Maj Carl Kerns
 Guide Maj Carl Kerns") L-23 Super Blanik Rigging (assembly/disassembly) Guide Maj Carl Kerns The L-23 Blanik is a difficult Sailplane to rig (assemble). The wings are heavy and are secured via a single
L-23 Super Blanik Rigging (assembly/disassembly) Guide Maj Carl Kerns The L-23 Blanik is a difficult Sailplane to rig (assemble). The wings are heavy and are secured via a single
Creative Arts Photography Dept 35 Section PH. Mounting Your Photographs
 Creative Arts Photography Dept 35 Section PH Mounting Your Photographs Photography non- professional entry rules: - All photos must be taken by exhibitor - Sizes: 8x10 and 8x12 (if you are printing your
DIY WORM BIN.
 DIY WORM BIN Materials * Gallon Plastic Tote (size depends on number of people in household) * Old screen * Soil (can be from the garden, should be good quality) * Dry leaves, crunched up * Hot Glue Gun
Cleaning rod: spring steel, stainless steel or carbon fibre cleaning rod - only use a one-piece rod. Avoid using snakes.
 Telemark Biathlon Where performance and precision come together http://telemarkbiathlon.com Rifle Cleaning Date : July 19, 2013 Anschutz Rifle Manual - Click Here Izhmash 7-3 Rifle Manual - still looking
MICRO - DLG. This kit should only take 30 minutes to compile, very simple and quick.
 MICRO - DLG This kit should only take 30 minutes to compile, very simple and quick. You will need: Hot Glue ( small tip preferably ) Sharp razor blade Ruler a strip of strong fiber tape Thin nose Pliers
-Round Down- Description & Overview. VEX Classroom Competition Round Down
 -Round Down- Description & Overview Round Down is a head-to-head robotics competition designed and scaled to be run in a classroom environment by a single teacher. This game provides a challenge for designers
Thanks for choosing EJAI SOLAR product
 SPLIIT SOLAR WATER HEATER (( YYJ--S01 SERIIES )) IINSTALLATIION MANUAL www.ejaisolar.com ZHEJIANG EJAI SOLAR TECHNOLOGY CO.,LTD. 1 Thanks for choosing EJAI SOLAR product Content 1. Important Information....2
INSTALLATION INSTRUCTIONS v1.7
 INSTALLATION INSTRUCTIONS v1.7 PLEASE READ Thank you for purchasing The TV Shield. Please read the following, before starting the installation process. UYou will need to unscrew the six (6) black threaded
Aliphatic Resin Wood Glue. 18" Fabric Parachute Part #PNC50 Part # Part #11700 Part #J0016. Launch Lug
 ADANCED * What you will need to build the Quest High-Q Hobby Knife * Straight Edge Pencil Aliphatic Resin Wood Sanding Sealer & Brush Spray Paint Parts and exploded view of the Quest High-Q Nose Cone 18"
President's Buzzz. Upcoming Meeting
 President's Buzzz By George McAllister If you have been keeping bees for any length of time you have heard beekeepers lament about varroa mites. What makes this issue so frustrating is there is no simple
Exxtacy. Repair and Tuning Manual. Exxtacy Construction Basics
 1 of 20 Exxtacy Repair and Tuning Manual Construction Basics D Cell Repair Rib Repair Tuning Exxtacy Construction Basics The Exxtacy is built with carbon fiber and Kevlar/Aramide honeycomb. The Exxtacy
Soling Building Tips II
 Soling Building Tips II Prepared: Arthur Deane Jan 20, 2002 adeane@ic.net Introduction The following are some lessons learned and experience gained in building a Soling kit. The plan developed is based
Trapping Protocols 2008 Emerald Ash Borer Survey
 Trapping Protocols 2008 Emerald Ash Borer Survey A. Trap Assembly (should be completed in the field) 1. Items needed: a. Traps (pre-glued) b. Cable ties - 7 inches long (2 per trap) c. Parchment or wax
WHAT IS THE DIFFERENCE BETWEEN MAQS+ AND THE MITE AWAY QUICK STRIPS?
 PRODUCT HISTORY WHAT IS THE DIFFERENCE BETWEEN MAQS+ AND THE MITE AWAY QUICK STRIPS? MAQS+ is the next generation product to the Mite Away Quick Strips formulation. The major differences include the extended
Grandpa's Homemade Rocket for About a Dollar!
 Grandpa's Homemade Rocket for About a Dollar! Grandpa and Granny Co. 2012 The most common items needed: (The number of Rocket parts from each item is before the parts name and its proportionate cost is
INSTRUCTIONS. for installing ALDON Two-Way LOCOMOTIVE Hinged Derail on wooden ties. For 4-Axle and 6-Axle Locomotives and all Freight Cars
 INSTRUCTIONS for installing ALDON Two-Way LOCOMOTIVE Hinged Derail on wooden ties For 4-Axle and 6-Axle Locomotives and all Freight Cars Manual Lift Sign Holder 4014-18-5-D size 5 4014-18-6-D size 6 4014-18-7-D
Below are the instructions to build a roller-furling unit for under $10. Read the entire process before beginning the project.
 Greg Cowens' $10 PVC Roller Reefing for CP-16's by Greg Cowen Below are the instructions to build a roller-furling unit for under $10. Read the entire process before beginning the project. Materials: 2
FAST 2K Fence Post Backfill
 1 - Where can I buy Fast 2K? Consult: Where to Buy tab at www.fast2k.com 2 - What is Fast 2K? Fast 2K is an award winning innovation, much better and more convenient than concrete for setting fence posts,
Surfboard Repairs Chapter 7
 Surfboard Repairs Chapter 7 The Complete Surfing Guide for Coaches - Bruce "Snake" Gabrielson Repair Problems Boards continuously get bumped, hit rocks, break fins, get dropped, and many other things that
Assembly, Fitting, Care & Maintenance
 Assembly, Fitting, Care & Maintenance Assembly 1.1 Remove All Parts and Tools from Packaging 1.2 Part and Tools required for assembly 1.3 Check Foot & Leg Assembly 1.4 Adjust Upper-Leg-Support (ULS) Height
Your kit contains the following items. Additional Items You May Need. Pre- cut parts Propeller rigging and rubber Sandpaper Covering sheet
 Your kit contains the following items Pre- cut parts Propeller rigging and rubber Sandpaper Covering sheet The SkyFox offers great glide performance in a rubber powered plane due to its built up wing.
May 4th Monthly meeting Friends Meeeting House 7:30pm. June Association Apiary visit Richmond Street (date to be announced)
") May 4th Monthly meeting Friends Meeeting House 7:30pm June Association Apiary visit Richmond Street (date to be announced) Geoff Critchley Making Richmond Street Apiary Stoke. Increase/Cut it Out July
May 4th Monthly meeting Friends Meeeting House 7:30pm June Association Apiary visit Richmond Street (date to be announced) Geoff Critchley Making Richmond Street Apiary Stoke. Increase/Cut it Out July
2010 International Snow Science Workshop
 HOW TO TURN A KIDS BIKE INTO A BOMB TRAM FOR AVALANCHE CONTROL WORK David Immeker* Heavenly Mountain Resort Professional Ski Patrol, South Lake Tahoe, California ABSTRACT: Bomb trams have been used for
Model Aero Sportster Indroduction
 1 Model Aero Sportster Indroduction We are excited to introduce the Model Aero Sportster! Inspired by classic designs of the past, the Sportster is a relaxing slow flyer, equally at home indoors or outside
Peinert Dolphin. Assembly
 Peinert Dolphin Assembly The Dolphin is easily rigged; there are only four removable parts - the seat, the foot stretcher, the rigger arm, and the fin. Removal and installation of the seat. If the seat
Instructions For: Installing A Fence to Keep out Raccoons and Woodchucks
 Instructions For: Installing A Fence to Keep out Raccoons and Woodchucks A hybrid barrier/electric fence Height: 18 Inches Includes directions on how to augment an existing barrier fence with an electric
PPM-8240 JEEP XJ REAR SPRING HANGER BRACKET Version 1.1
 SYNERGY MFG. 870 INDUSTRIAL WAY, SAN LUIS OBISPO, CA (805) 242-0397 PPM-8240 JEEP XJ REAR SPRING HANGER BRACKET Version 1.1 GENERAL NOTES: These instructions are also available on our website; www.synergymfg.com.
Manual 1: working with cutting films. MANUAL 1. Working with cutting films. March 2017
 Manual 1: working with cutting films. MANUAL 1 R Working with cutting films March 2017 Manual 1: working with cutting films. R 1 NECESSARY TOOLS It goes without saying that you need the right tools if
Blazer Marine, Whiplash Sport Hydro
 Blazer Marine, Whiplash Sport Hydro Thank you for choosing to build the Whiplash Sport Hydro. We have spent over 12 years perfecting this design, and finally we are making it available to the world. We
Making Spars for the Schooner Jeanette
 Making Spars for the Schooner Jeanette..... by Byron Rosenbaum Figure 1. Byron Rosenbaum s 1:16-scale radio-controlled model of the schooner Jeanette. All photographs by the builder. The spars required
BASIC COROPLAST HULLS FOUR HULLS, all single occupant designs. Choose the one that suites your needs.
 BASIC COROPLAST HULLS FOUR HULLS, all single occupant designs. Choose the one that suites your needs. The build notes for one hull 5 type should 8 apply to all hull types. 1 CUT these 2 lines First 20
AGM 33 PIKE ALL FIBERGLASS. Specifications Length: 92 Diameter 5.5 Weight: 24 lbs Motor Mount: 75mm Fins: 6-3/16 G10 CP: 68 from nose tip Parts List
 ALL FIBERGLASS AGM 33 PIKE Specifications Length: 92 Diameter 5.5 Weight: 24 lbs Motor Mount: 75mm Fins: 6-3/16 G10 CP: 68 from nose tip Parts List (1) Filament Wound Nose Cone w/ Metal Tip (1) Nose Cone
Bottle Rocket Launcher P4-2000
 WWW.ARBORSCI.COM Bottle Rocket Launcher P4-2000 BACKGROUND: The Bottle Rocket Launcher allows for the exploration of launching rockets using commonly available materials such as plastic soda bottles and
Converting a 2006 Royal Enfield Classic to a Kick Start Only Machine. There are good reasons for not having an electric start.
 Converting a 2006 Royal Enfield Classic to a Kick Start Only Machine Reasons There are good reasons for not having an electric start. They are: 1. Reliability. There simply are fewer parts to fail. When
YOUR BEES DON T HAVE TO DIE
 YOUR BEES DON T HAVE TO DIE HOW CAN WE BECOME TREATMENT-FREE WITHOUT KILLING OUR COLONIES? MEGHAN MILBRATH, MICHIGAN STATE UNIVERSITY EXTENSION, SEPTEMBER 2016 The Sand Hill - http://www.sandhillbees.com/
Model Aero AT-6 Texan Introduction
 1 Model Aero AT-6 Texan Introduction We are excited to introduce the Model Aero AT-6 Texan! Originally used as an advanced trainer by the U.S. Armed Forces, the AT-6 is a relaxing slow flyer, equally at
Lil Fun Walker ASSEMBLY INSTRUCTIONS ADULT ASSEMBLY REQUIRED Styles and colors may vary
 Lil Fun Walker ASSEMBLY INSTRUCTIONS ADULT ASSEMBLY REQUIRED Styles and colors may vary Required: Phillips Screwdriver IMPORTANT: Read all instructions before assembly and use of the Walker Keep the instructions
PUN M Manual Finger Punch Safety and Operation Manual
 PUN M Manual Finger Punch 300-600 - 900 Safety and Operation Manual For punching thermoplastic belting materials only. WARNING IMPROPER OR UNSAFE use of this tool can result in serious bodily injury! This
Building a Model Box in 10 Steps and 20 minutes By George White
 Building a Model Box in 10 Steps and 20 minutes By George White In a recent issue of the Southern California Ignition Flyers Flightplug, Mike Myers, editor, I read a discussion of building boxes to protect
NEW DESIGNS. Print in Landscape Mode with ¼ inch borders. Hinges (2) degrees. 1 Seating Type Optional
 degrees. 1 Seating Type Optional") 2017 IDEAS NEW DESIGNS Ken Simpson Designs Drawn 06-01-2017 Rev. 07-02-2017 The SPORTSMAN 10'L x 36 W x 15 H 475 pound Capacity Print in Landscape Mode with ¼ inch borders. Hinges (2) 36 30 8 degrees Click
2017 IDEAS NEW DESIGNS Ken Simpson Designs Drawn 06-01-2017 Rev. 07-02-2017 The SPORTSMAN 10'L x 36 W x 15 H 475 pound Capacity Print in Landscape Mode with ¼ inch borders. Hinges (2) 36 30 8 degrees Click
The "Honey Home" National hive
 The "Honey Home" National hive Up to the 1970 s and notwithstanding its vulnerability to rot, pest and disease, most beekeepers considered that wood was the only material suitable for making hives, with
Winter Culture of Caged Rainbow Trout in the South.
 Winter Culture of Caged Rainbow Trout in the South. Forrest Wynne, State Extension Specialist for Aquaculture, Kentucky State University Cooperative Extension Program, Graves County Extension Office, 251
FITTING and ADJUSTING The Free n Easy SADDLE
 FITTING and ADJUSTING The Free n Easy SADDLE By Les Spark Free n Easy Saddle Company www.free-and-easy-saddles.co.uk Updated by Marlene Moss Moss Rock Endurance www.mossrockendurance.com FITTING and ADJUSTING
Winter Culture of Caged Rainbow Trout in the South.
 Winter Culture of Caged Rainbow Trout in the South. Forrest Wynne, Aquaculture Extension Specialist, Kentucky State University Cooperative Extension Program, Graves County Cooperative Extension Service
Ski Tuning Information
 Ski Tuning Information Table of Contents 1) Vorlage Ski Tuning Support 2) Online Ski Tuning Information 3) Ski Tuning Cheat Sheet 4) Ski Tuning Equipment What do you need and approximate cost Vorlage Ski
F-1279-R UPPER RIGHT SKIN F-1280-R RIGHT SIDE SKIN F-1281-R LOWER RIGHT SKIN F-1208-R FUSELAGE FRAME
 F-1282-R BOTTOM RIGHT SKIN F-1283C J-STIFFENER F-1278 TOP SKIN F-00009-L ADAHRS BRACKET F-00009-R ADAHRS BRACKET F-1279-R UPPER RIGHT SKIN F-1280-R RIGHT SIDE SKIN SECTION 10: TAILCONE F-1279-L UPPER LEFT
Ref Part Part # Qty Letter A Rudder Catcher B X 1/2 PH Bolts C Rudder Bracket
 Ref Part Part # Qty A Rudder Catcher 07.2694.0000 1 J B Q A B 10-32 X 1/2 PH Bolts 07.2136.0000 10 C Rudder Bracket 07.2689.0000 1 D Kayak Pad Eye 01.1315.0430 2 E Cherry Rivets 01.1315.0459 4 H T N P
Level Three Blue Rope
 Level Three Blue Rope Level Three consists of a combination of six fishing knots that work well in monofilament fishing line, two climbing knots and two knots used to secure heavy loads. Monofilament fishing
Dornier Do R 4 Super-Wal
 Dornier Do R 4 Super-Wal Model Aviation Laddie Mikulasko s Dornier Do R 4 Super-Wal Build the multiengine, record-setting seaplane. Article, plans, instructions, and photos by Laddie Mikulasko. Complete
The advantages of the Impact NecksGen unit
 The advantages of the Impact NecksGen unit Comfort The body forming pads place very little pressure on your collar bone, making the unit extremely comfortable and unlikely to create injury to your collarbone
Trike-Bike Assembly Manual
 Be sure to check our website for more instruction details, videos and photographs as well as a complete listing of each Nut and Bolt for the Trike Bike. www.trike-bike.com.au Go to the page marked ASSEMBLY