Amicus 3000 Plus U s e r s M a n u a l
|
|
|
- Kristina Brooks
- 6 years ago
- Views:
Transcription

1 Amicus 3000 Plus U s e r s M a n u a l

 provides a full 1 (one) year warranty. The manufacturer (Cs. Lukacs) provides a service for parts and repairs for 2 years from date of purchase.")
2 Amicus 3000 Plus Users Manual G E N E R A L I N F O R M A T I O N The Amicus 3000 Plus table tennis robot should only be used in closed, dry rooms! Do not touch rotating wheels while machine is running. This can cause injury. If you have problems assembling or using your robot please contact: Tamasu Butterfly Europa GmbH Am Schürmannshütt 40a Moers website: phone: fax: The manufacturer (Cs. Lukacs) provides a full 1 (one) year warranty. The manufacturer (Cs. Lukacs) provides a service for parts and repairs for 2 years from date of purchase Tamasu Butterfly Europa GmbH Am Schürmannshütt 40a, Moers Phone Fax Website:
3
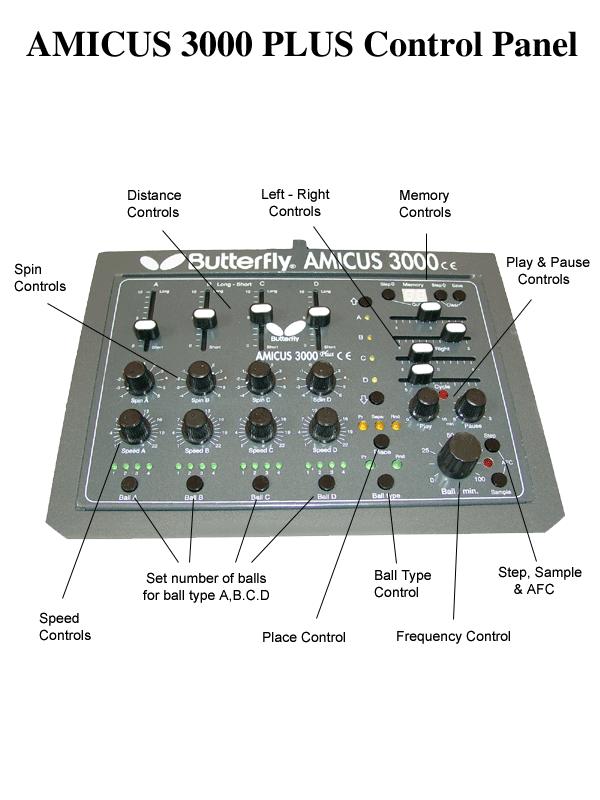
4 C O N T R O L P A N E L Q U I C K R E F E R E N C E G U I D E Speed controls (range: 1 to 22) Controls the speed of the ball. Set to "22" for very fast, "1" for very slow Spin controls (range: -4 to +6) Controls the spin of the ball. Set to -4 for heavy underspin, 0 for no-spin, 6 for heavy topspin. Distance controls (range: 0 to 10) Controls the long-short distance (and height of balls). Set to 10 for longer (higher) balls, 3-4 for shorter (lower) balls, and 0-2 for serves (delivers balls to robot side of table first). Ball number buttons (Located above "Ball A, B, C, and D" labels.) Sets the ball number for this ball type to 1, 2, 3 or 4 balls. (For a total of 16 balls for A, B, C, and D) Memory step & clear buttons The memory "step" button is used to select various memory positions. The "save" button allows saving of a pattern into memory. These buttons are used together to clear patterns from memory. Left-Right position (5 to 5) controls for A, B, C, D. Horizontal levers used to set the left-right positions for positions A, B, C, D. Play & Pause controls Enables setting of the play/pause timer: intervals of continuous play for 10sec to 10min, with 5sec to 2min pauses between each play interval. Step & Sample buttons The "step" button is used to select the next ball within a ball type or within a pattern. The "sample" button is then used to test this ball. Ball/min knob (range: 0 to 100) Allows setting of ball frequency from 0 to 100 balls/min. (Can also be used to start and stop continuous play) "Place" button Allows selection of one of three BALL PLACEMENT modes: Program, Separate, or Random "Ball type" button Allows selection of one of two BALL TYPE modes : Program or Random (See chapters 4,5, and 6 for more information on using the control panel.) "AFC" Automatic Frequency Control (see chapter 5) "Memory Controls Settings for saving programs. (See memory section) 2005 Tamasu Butterfly Europa GmbH Am Schürmannshütt 40a, Moers Phone Fax Website:
5 Amicus 3000 Plus Table Tennis Robot Users Manual Table of Contents Chapter 1 - Introduction Introducing the Amicus 3000 Chapter 2 - Assembly of the Amicus Tools Needed Assembly Procedure Chapter 3 - Quick Start Guide Positioning the Amicus Powering on the Amicus Hitting your first shots Chapter 4 - A tour of control panel basics Ball Type Controls Testing Balls Types: with Step & Sample buttons Understanding ball positioning modes Ball "Place button Ball "Place mode examples "Ball Type" button Ball Type" mode examples Chapter 5 - Using the additional control panel features Using the pattern memory feature To clear a pattern from memory The play/pause feature Changing ball distance of a memory pattern The serve and continue feature The AFC feature CA calibration function Chapter 6 - Misc. features, maintenance, & operating information Delivering sidespin balls Moving the robot using its wheels Delivering balls from the corners of the table Serve Practice Shoot wheels care Ball Jams Stop Pin Maintenance Fuses Adjusting Wheels Appendix I Ball Type & Pattern Set-up sheet Appendix II - Training Patterns (from European users Manual) Appendix III - Technical Specifications (from European users Manual)
6 C H A P T E R 1 I N T R O D U C T I O N Congratulations on your purchase of the Amicus 3000 Plus table tennis robot. Amicus, derived from the Latin language meaning "friend"; that is that the Amicus can become a real friend as your training partner - offering a whole new world of 'dynamic' robot-based table tennis training possibilities for beginners through professionals. Table Tennis is a multi-dimensional sport requiring a unique set of hand-eye coordination skills and athletic abilities. Advancing players are required to learn fundamental strokes, footwork, timing, and a variety of stroke combinations. This is where the power of the Amicus table tennis robot comes in handy. Not only can you learn to master the fundamental strokes such as the counter-drive, push, loop, etc., but you can also practice the combinations that are used in actual games. For example: step in and push ball 1 (against a short underspin ball), move back and loop ball 2 (against a medium speed no spin ball), then move to the side and smash ball 3 (against a lob). The Amicus is unique in its ability to deliver up to four different types of balls - each with its own speed, spin, distance and position settings. Additionally these balls can be delivered in almost any order you can imagine! Here is a short preview of features offered by the Amicus: Topspin, underspin, no-spin, and side-spin balls Independent control of spin, speed, and distance Delivery of balls to various positions on table including long and short balls Delivery up to 100 balls/min Patterns of any of the above ball types 99 pattern setups can be saved in memory Play/Pause timer (up to 10 min for play, 2 min for pause) The Amicus automatically 'recycles' balls that are captured in the net allowing for continuous play Serve and play mode: Amicus delivers a serve then continues with a pattern The Amicus can be used with 38 or 40mm balls Robot has wheels on its base for easier mobility Rugged institutional quality design AFC(Automatic Frequency Control) Function which takes into consideration that the previously projected ball was fast or slow. Backspin or topspin and depending on that simulating a real game shoots the next ball faster or slower for the real time experience. Adjustable neck that lets you shoot balls from different trajectories 2005 Tamasu Butterfly Europa GmbH Am Schürmannshütt 40a, Moers Phone Fax Website:

.")


 Fig 1a Fig 1b 3.")
7 C H A P T E R 2 - A S S E M B L Y O F T H E A M I C U S P A R T S & T O O L S N E E D E D : The Amicus 3000 Plus table tennis robot can be assembled in approximately 40 minutes. The tools needed are: a small flat head screw driver, a Philips-head screwdriver, and a hex wrench (included with the Amicus). *Other items: 2 piece hex wrench, 2 spare fuses, spare rubber rings for collecting net. A S S E M B L Y P R O C E D U R E 2. Fasten the ball container to the robot base using a Philips-head screw driver and the recessed head screws supplied (Fig. 1a, 1b) Ensure that the screws cannot fall into the opening of the container (perhaps covering the opening with a cloth) Fig 1a Fig 1b 3. Slip the ball guide tube onto the tube section of the robot base (studs. must be at the bottom end) and tighten the studs.(fig 2). Ensure that the ball guide tube is mounted on the tube section as far as it will go Fig 2 6.
. 10. Fig 4 11. Slip the robot head onto the Guide Tube as shown in figure 5a.")
 as shown in Figure 5b.")
 to the")

8 Push the cord that connects to control unit snuggly into the slot on the ball guide tube. (Fig 4). 10. Fig Slip the robot head onto the Guide Tube as shown in figure 5a. Make sure the head slides down as far as it can go. Tighten the lower screw of the clip with the hex wrench (supplied) as shown in Figure 5b. Do not tighten or loosen the upper screw for any reason. It is factory set Fig 5a Fig 5b 13. Fasten the holder of the control unit with the two hexagon socket screws (with the washers) to the assembly point intended for it (Fig 6). Tighten the screws evenly. The Butterfly Amicus 3000 Plus labeling must be at the top. Tighten the screws with the hex wrench. Fig Tamasu Butterfly Europa GmbH Am Schürmannshütt 40a, Moers Phone Fax Website:


 and slip")


9 Assembly Procedure cont 14. Then lay the control unit in the frame and insert the cable plugs into the connections on the operating section (Figs 7 & 8). (The center connection remains free for possible special accessories {not yet available}). Fig 7 Fig Fasten the net holders at the corners of the TT Table (Fig 9) and slip the extension tubes onto the tube sections (Fig 10). Place the six plugs sewn onto the net into the end of the extension tubes (Fig 11) or into the tube section at the corner sections. Ensure that the net cutout for the robot head is about 8 inches above the TT table and that the Butterfly logo (printed on the net) can be read by a player using the robot. Then guide the ends of the collecting net over the TT net holder and fasten the rubber rings on the fastening screws of the table tennis net (Fig 12). Fig 9 Fig 10 Fig 11 Fig 12

10 C H A P T E R 3 - Q U I C K S T A R T G U I D E Assuming that your Amicus is fully assembled, this chapter will help you to get your Amicus3000 plus up and running within a few minutes. 16. Position the Amicus such that the head of Amicus is centered just behind the center opening in the net, and that the ball bin is centered below the opening in the bottom of the net. 17. Load the ball bin with about 100 balls (use 40mm balls). 18. Power on the Amicus using the red switch on the base of the robot. The robot needs about 6-8 seconds in to adjust itself (meanwhile the display is flashing) and the integrated computer is booted up. After that, the robot starts calibration function and CA appears in the display. (-> see CA calibration function) Push Ball A button in order to leave the calibration and start defining your first ball! TIP: If the Amicus begins to automatically fire balls you may stop the delivery of balls with the remote control (on/off switch). Set the left-right (horizontal) slide lever for A between 0 and On the far left of control panel set the speed for A to 8, the spin to +1, and the distance slide lever to On the far right of the control panel set the "Ball/min" knob to Next, test the delivery of a few balls by momentarily holding the sample button. 22. If the balls go into the net or off the table, adjust the distance (long/short lever) for ball A accordingly. 23. Once you have set the distance control to deliver the balls properly, use the remote control on/off switch to deliver balls continuously. You may also use the "Ball/min" knob to start/stop the continuous delivery of balls (simply set this knob to "0") 2005 Tamasu Butterfly Europa GmbH Am Schürmannshütt 40a, Moers Phone Fax Website:
11 C H A P T E R 4 - A T O U R O F C O N T R O L P A N E L J U S T T H E B A S I C S Ball Type Controls On the left half of the control panel there are 4 "channels" of controls - One channel for each of the four ball types: A, B, C, D. For each ball type there is a control for you to set the speed, spin, and distance. Additionally there is a button at the bottom of each channel to select the number of balls delivered within a given "sequence" or "pattern". By pattern we mean different ball types linked together - for example, ball "A" could be set for fast balls; followed by ball "B", slow balls; "C", topspin balls; and "D", underspin balls. The Amicus can create almost any pattern you can think of! (Up to four balls of each type can be delivered before delivering a ball of another type.) Try this: For ball A, press the ball number button several times.(this button is located just above "ball A" label.) For each green light that is on, a ball of this type is delivered. Up to four balls of each type can be delivered before delivering balls of another type. Once the end of a pattern is reached the Amicus automatically repeats the pattern. Now try this: Using the ball number buttons, select two balls of type A, and three balls of type B (Note: there should now be two green lights on above ball A and three green lights on above ball B ) If ball A was set (for example) for topspin and ball B for underspin, then two topspin balls would be delivered followed by three underspin balls, then the pattern would automatically repeat with the topspin balls, etc. The following table may be used as a rough guide in creating balls type to train with: SPEED SPIN Long-Short Slow no spin Medium Speed topspin Slow, shoulder high topspin Short, mild underspin Long, medium underspin Long, heavy underspin Heavy topspin In general when setting ball types you may want to set the desired spin and speed first; then set the distance (which also controls ball height). [For examples of training patterns see Appendix II]
12 Note: The Amicus is fairly consistent when delivering the above ball types; however it may not be as consistent with either very slow or very fast balls that are close to the net or near the edge of the table. For more consistent balls, allow the ball to clear the net by more than 2", and landing within 4" from the end of the table. Testing Balls Types with the Step & Sample buttons Ok, so how do you test all of these different ball types before playing a whole pattern? On the bottom right hand corner of the control panel you will find a step button and a sample button. The STEP button is used to "move" to the next ball you want to test, and the SAMPLE button is used to "test" this ball. Try this: Using the above example (two balls for A, and three balls for B ), use the step button to move to each of the balls in this pattern. Note that after moving from the 3rd "B" ball the pattern returns to the 1st A ball. Now set the speed, spin, and distance controls for ball B similar to A, and set the left-right position control for "B" to -3 (3 dashes to the left of "0"). Use the step and sample button to test ball "B". Now use the remote control (on/off switch) to play the whole pattern. You should see the Amicus deliver two balls to the center of the table, followed by three balls to the forehand corner of the table (then repeating to the center, etc.) Congratulations you have just created your first training pattern. Understanding ball positioning modes Now we move on to one of the more challenging aspects of using the Amicus. When you first power on the Amicus you will notice that above the "Place" button the yellow "Pr." light is on, and above the "Ball type" button, the green "Pr." button is on - these are the default modes and you will probably do much of your training using these settings Tamasu Butterfly Europa GmbH Am Schürmannshütt 40a, Moers Phone Fax Website:
13 Ball "Place" button The ball place button can select three different ball positioning modes: Pr. (Program), Separ. (Separate), and Rnd (Random), indicated by the 3 yellows lights on the control panel. 24. In Program mode - "Pr." light is on - Ball A is sent to left-right position A, Ball B is sent to L-R position B, Ball C is sent to L-R position C, and Ball D is sent to L-R position D. [These four Left-Right positions are determined by the four horizontal levers on the right side of the control panel] 25. In Separate mode - "Separ." light is on - the 1st ball of a given pattern is sent to the L-R position A, the 2nd ball to the L-R position B, 3rd to C, and 4th to D, repeating with the 5th ball to L-R position A, etc. 26. In Random mode - "Rnd." light is on - the Amicus will randomly deliver balls, selecting from the L-R positions you have chosen. Ball "Place" mode examples An example of the 'Program Mode' was used at the beginning of this chapter... if you remember - Ball A (two balls) was sent to position A, and Ball B (three balls) was sent to position B. Lets now move on to examples of the 'Separate Mode' and 'Random Mode'. Separate Mode example: Using the same setup as before...ball A (two balls) and ball B (three balls), try this... select the 'Separate Mode' by pressing the 'Place button', (the yellow light below "Separ" should now be on). Then press the remote on/off button to play the pattern. You should notice that the: 27. 1st ball (A) is sent to position A 28. the 2nd ball (A) is sent to position B 29. the 3rd ball (B) is sent to position A 30. the 4th ball (B) is sent to position B 31. and the 5th ball (B) is sent to position A In the above example, balls are delivered to two separate L-R positions. To select additional positions - use the up and down arrow keys, as you do this a yellow light will turn on next to the position(s) you have selected. Balls would then be sent in this order: 32. 1st Ball - Position A 33. 2nd Ball - Position B 34. 3rd Ball - Position C 35. 4th Ball - Position D 36. 5th Ball - Position A
14 Ball Type Button 37. In Program mode - "Pr." light is on - Balls are delivered in the order you have set by the ball type controls. 38. In Random mode - "Rnd." light is on - the Amicus will randomly select balls from one of the ball types you have made settings for (at least one of the ball number lights of a given ball type must be on in order to be a candidate). Ball Type mode examples All examples thus far have used the Ball Type - Program Mode. An example of Ball Type - Random Mode follows: Set Ball A for slow balls, Ball B for medium speeds balls, and ball C for fast. Then select Ball Type for 'random' the 'Rnd' light should now be on. Now play the pattern. You will notice that the Amicus is delivering the different ball types in no particular order... perhaps 1 fast ball, 1 slow, 2 medium, etc. In summary of understanding the "PLACE" and "BALL TYPE" modes: the "BALL TYPE" mode determines WHAT type of ball will be sent, either according to the order you have set or according to a random order. The PLACE mode determines WHERE balls will be sent: 39. Program Mode: Sending Ball A to position A, Ball B to position B, etc. 40. Separate Mode: Sending the 1st Ball to position A, 2nd to B, 3rd to C, etc. 41. Random Mode: Sending balls to random positions, pre-selected by using the arrow keys. Note: when using Random ball type and/or random placement modes there are no 'visual cues' (other than watching the ball itself) as to WHERE the next ball will be placed or WHAT type of ball will be delivered. Therefore when using these random features, you may want to limit the ranges of ball types or positions you are using.) 2005 Tamasu Butterfly Europa GmbH Am Schürmannshütt 40a, Moers Phone Fax Website:

15 C H A P T E R 5 - U S I N G T H E A D D I T I O N A L C O N T R O L P A N E L F E A T U R E S Using the memory feature By now you should have a good understanding of the left two-thirds of the control panel. Next we will move to the upper right hand corner of the control panel to learn how to use the memory feature. For starters, remember that you can only change the speed, spin, distance, and left-right position control, etc. when ALL memory lights are OFF. [If any of the memory lights are ON, you CANNOT make such changes.] There are 99 memory positions to which you can save and recall patterns you create. To select any of these positions you must use the "memory step button" (located just to left and right of the memory lights). Use the step button to move to any of the 99 positions. A blinking red light means that this memory position is free. A solid red light means that this position has a pattern saved to it. If any of the memory numbers are blinking then that memory slot position is free. If the memory numbers are solid then that position is full. Ok, let s try to save the previous pattern (two balls for A, three balls for B) to memory position "1". Using the step button, move to memory position 1 (which should be blinking if it is free). Next press and hold the save button until the red blinking light turns solid. You have just saved you first pattern! This pattern can be used again simply by using the memory step button to select the memory position you want, and then playing the pattern with the remote on/off switch. [You may also test the different ball types within your pattern using the sample and test buttons as before.] memory. Note: The frequency (balls/min), and play/pause settings CANNOT be saved in pattern To clear a pattern from memory 1. Use the memory step button to select the appropriate position. 2. Hold the save button, and press the step button (clearing) at the same time until the number starts to blink a few times to indicate that it has been cleared. The play/pause feature When training on the Amicus you have the choice of playing a pattern continuously, or using the play/pause feature! The play/pause feature allows you to play a pattern from 10 sec to 10 min, pause from 5 sec to 2 min, and then continue to play your pattern. Adjust the play knob to the desired number of minutes. Now simply select the desired time you wish to pause between play intervals, then play the pattern. The red light (just above theses knobs) indicates that you have enabled the play/pause feature.
16 The serve and continue feature The serve and continue feature allows you to serve one ball (ball A), and then continue with a pattern set by ball B, ball C, and ball D. To use this feature first set ball A to the type of 'serve' you want to receive... perhaps a short underpin ball for example. Then set ball B, C, and D to the desired ball types you want to be delivered after the serve. Next press the ball number button for ball A until all four green lights are blinking... this indicates that you are in serve and return mode. Next, simply play the pattern... the Amicus should deliver one ball of type, continuing with ball B, C, D, and then continuing with ball "B". Changing ball distance of a memory pattern In general ball type settings cannot be changed once in memory. There is however one exception to this rule. The 'ball distance' of pattern in memory can be increased or decreased by using the up and down arrows on the control panel. Note: When you adjust the ball distance in this way, the distance (height) of ALL balls within a given memory pattern will be adjusted AFC (Automatic Frequency Control) mode Function which takes into consideration that the previously projected ball was fast or slow, backspin or topspin. Depending on that simulating a real game shoots the next ball faster or slower for the real time experience. To access this function press and hold down the STEP and SAMPLE on the bottom right hand side of control unit. When you see the red LED light come on then the function is running. Example: A slow backspin ball needs more time to get from the robot to the player than a quick topspin ball needs. That s why the balls coming one after the other with different speed and spin do not follow each other in the same tempo. CA calibration function The machine sets (programs) a given type of ball in this function, which is shot only in case of pushing continuously the Sample button. The robot is adjusted correctly in case this sample ball reaches the table onto the middle line about cm from the end of the table. In case the robot does not shoot the ball onto the middle line, it is necessary to turn the whole machine in the right direction. In case the robot shoots the balls too long or too short regarding the adjusted distance from the basic line, then the and buttons have to be pushed enough times in order to reach the right length. (The robot remembers on this correctly set distance also after switching off the machine, so it is not necessary to make this calibration.) Attention! Only Sample and, buttons work during the calibration function, no other buttons can be used Tamasu Butterfly Europa GmbH Am Schürmannshütt 40a, Moers Phone Fax Website:
17 It is possible to get out from CA function with pushing any of Ball type A,B,C,D buttons, which in the same time means to start defining the ball that will be used or programmed. Usually in practice the CA function will be jumped through with activating Ball type A,B,C,D, regarding that it is necessary to make new calibration only quite seldom, for example in case the shooting wheels are getting worn or it is need of change the height of the machine. C H A P T E R 6 - M I S C. F E A T U R E S, M A I N T E N A N C E, A N D O P E R A T I N G I N F O R M A T I O N Delivering sidespin balls The Amicus robot is capable of delivering left (or right) sidespin balls. To use this feature simply loosen the large knob on the side of the robot head, and rotate the head to the left or the right. Use arrow and 'angle indicator' (located just above this knob) for exact angle settings (-45 degrees to + 45 degrees). Moving the robot using its wheels To move the robot with its wheels, simply tilt the robot backwards (in the direction of the control panel), and gently roll the robot forwards. Delivering balls from the corners of the table In normal usage, the robot delivers balls from the center of the table. You may however make the Amicus deliver balls from the right hand corner (or left hand corner) of the table. There are Velcro enabled openings on each end of the net where the robot can be placed in order the use this feature. You will need to place a box, or a bucket to catch the balls that fall through the center hole in the bottom of the net. Note: When delivering balls from these corners, the recycling feature will not work as there isn't a hole in the net for the balls to return into the robot's ball bin. Serve Practice The Amicus' net is a great tool for practicing serves. Simply move the robot and place a box or a bucket below the net to catch the balls as you practice your serves! Shoot wheels care The robot's 'shoot wheels' (there are two of them) will last for at least 500hrs. As these wheels begin to wear, the balls 'distance' will tend to vary for balls delivered at high speed. If this happens, the distance between these wheels will need to be adjusted. To do this, you will need to: Remove each of the two wheel covers using a Phillips head screwdriver Loosen the adjusting screws and set the correct spacing (a few millimeters narrower than the size of the ball you are using).
 and wheel from the motor shaft. Position new wheels on shaft and assemble in reverse order.")
![] Ball Jams Be sure that no small objects (other than the balls) enter the small opening at the bottom of the ball bin.](/docs-images/73/68576724/images/18-1.jpg "This can cause ball jams - the robot will not be able to feed balls to the shoot wheels.")
18 [If the wheels have worn such that this distance can no longer be adjusted, then you will need to have the wheels replaced. To do this, loosen and remove the set screw (and plastic spacer) and wheel from the motor shaft. Position new wheels on shaft and assemble in reverse order.] Ball Jams Be sure that no small objects (other than the balls) enter the small opening at the bottom of the ball bin. This can cause ball jams - the robot will not be able to feed balls to the shoot wheels. If a ball jam does occur, the Amicus automatically tries to correct the situation by turning the drive, and shoot wheels backward and forward for 3-4 seconds. If this does not correct the problem, you will need to disassemble the robot in reverse order (see assembly notes in chapter 2), and then remove the foreign object that caused the ball to jam. Turn the robot gently on the side and use a sturdy thin object and push the jammed balls along, going through the opening underneath the machine (see picture below). Stop Pin Maintenance The stop pin, necessary for ball delivery, requires 1-2 drops of oil every 4-6 months. The stop pin is located just above the pivot head (mechanism that directs balls to the various left right positions). Fuses If your robot cannot be turned on, it is possible that a fuse may be blown. [Be sure, of course, to first check if your robot was plugged in!] There are two fuses on the base of the robot. First unplug the robot, and carefully lay the robot on its side. Use a flat head screwdriver to unscrew the fuse sockets, and then replace the defective fuse. (Two spare fuses, T400ma, were included with your robot.) Adjusting Wheels If you need to adjust the wheels for any reason, first remove plastic covers from the two motors. Unscrew the big screw slightly and then slowly slide the wheel to the optimal position, and then tighten the screw (see picture below). The distance between the wheels should be 32mm. When it is time to replace the wheel follow these instructions. Unscrew the caterpillar screw that is located on the wheel supporter, remove the wheel from the shaft of the motor, then unscrew the three screws that keep the plastic tight.. Replace with the new wheel and you are ready to go Tamasu Butterfly Europa GmbH Am Schürmannshütt 40a, Moers Phone Fax Website:
19 APPENDIX I
20 Amicus 3000 Plus Table Tennis Robot Ball Type & Pattern Setup Sheet Modes Ball Type Settings Modes Balls/minute A B C D Place Ball Type Spd. Spin Dist. Spd. Spin Dist. Spd. Spin Dist. Spd. Spin Dist. Play Pause A B C D Balls/minute A B C D Place Ball Type Spd. Spin Dist. Spd. Spin Dist. Spd. Spin Dist. Spd. Spin Dist. Play Pause A B C D Balls/minute A B C D Place Ball Type Spd. Spin Dist. Spd. Spin Dist. Spd. Spin Dist. Spd. Spin Dist. Play Pause A B C D Balls/minute A B C D Place Ball Type Spd. Spin Dist. Spd. Spin Dist. Spd. Spin Dist. Spd. Spin Dist. Play Pause A B C D Balls/minute A B C D Place Ball Type Spd. Spin Dist. Spd. Spin Dist. Spd. Spin Dist. Spd. Spin Dist. Play Pause A B C D Balls/minute A B C D Place Ball Type Spd. Spin Dist. Spd. Spin Dist. Spd. Spin Dist. Spd. Spin Dist. Play Pause A B C D Notes: Ball Type Modes: Program (Pr): Robot delivers balls in the order you've selected (A, B, C, D, etc.) Random (Rnd): Robot randomly delivers balls from types you've selected Ball Placement: Program (Pr): Ball A to position A, B to B, C to C, D to D Separate (Separ): example: A1 to A, A2 to B, B1 to A, C1 to B, repeat Random (Rnd): Robot randomly delivers balls to positions you've selected 2005 Tamasu Butterfly Europa GmbH Am Schürmannshütt 40a, Moers Phone Fax Website:
21 APPENDIX II
22 Practical exercises The following examples of exercises for the TT ball machine Amicus 3000 Plus were prepared by a licensed trainer. All of the exercises, with the exception of the exercise 'Timo Boll' are shown for right-handed players. If the training player is left-handed, the ball paths must be changed accordingly. The description of the settings on the control unit of the ball machine are shown as examples of an appropriate implementation of the exercises. They can be individually adjusted to the performance level of the player, e.g. by changing the ball frequency. All of the ball parts are shown by arrows. The description above the graphic - solid arrows - refers to the balls of the TT ball machine Amicus 3000 Plus. The designations below the graphics - dashed arrows - refer to the balls and placing alternatives of the player. 1. 'Getting used to the ball' Counter ball Amicus 3000 Plus Counter ball/topspin 'Player' The TT ball machine Amicus 3000 Plus play counter balls according to the random principle onto a specific area of the table (e.g. half table). The beginner plays these balls back distributed over the whole table. Due to the random placing of the balls, the beginner's attention is drawn at an early stage to the necessity for movement and correct position play. The rate and the number of balls per minute should correspond to the particular performance level. The following settings on the control unit show an example of implementation. 'Ball A' 'Ball B' 'Ball C' 'Ball D' Ball Speed Spin Long-Short Left-Right Left 3.5 Left 2.5 Left 1.5 Ball/min. 20 Cycle Play 60 s / pause 30 s Place Pr Separ Rnd Ball type Pr Rnd 2005 Tamasu Butterfly Europa GmbH Am Schürmannshütt 40a, Moers Phone Fax Website:
23 2. Right/Left 'Amicus 3000 Plus Service Counter ball Counter ball Counter ball Counter ball Flip Counter / topspin Counter / topspin Counter / topspin Counter / topspin 'Player' This regular exercise begins with a service from the TT ball machine. After that, two counter balls onto the forehand and onto the backhand of the player follow. Depending on the playing system they are played back diagonally as a counter ball or as a topspin. 'Ball A' 'Ball B' 'Ball C' 'Ball D' Ball Speed Spin Long-Short Left-Right 0 Right 3.5 Left 3.5 Ball/min. 35 Cycle Play 40 s / pause 20 s Place Pr Separ Rnd Ball type Pr Rnd 3. 'Technique' Service Backspin ' Amicus 3000 Chop/flip Topspin 'Player This exercise is suitable for learning a technique. In this example the backhand topspin from a service/return situation is trained. A service from the ball machine is followed by a long backspin ball onto the backhand of the player who returns this ball as a backhand topspin. (Also suitable for training forehand topspin) 'Ball A' 'Ball B' 'Ball C' 'Ball D' Ball Speed 2 6 Spin Long-Short 2 4 Left-Right Left 2 Right 4 Ball/min. 20 Place Pr Separ Rnd Ball type Pr Rnd
24 4. 'Primorac' Service Backspin Topspin 'Amicus 3000' Flip / chop Backhand topspin Forehand topspin 'Player With the help of this exercise a service / return situation is trained. A short service of 'Amicus 3000 Plus' is followed by an aggressive chop ball or flip from the player (preferably on elbow/backhand), in order to avoid a hard topspin of the server. In reply to the following long backspin ball the player opens with a placed backhand topspin as a preparation for the down-the-line forehand topspin. The concluding forehand topspin is played as a smash and should as early as possible end the rally. 'Ball A' 'Ball B' 'Ball C' 'Ball D' Ball Speed 2 6 Spin -1-2 Long-Short 1 4 Left-Right Left 1 Right 4 Ball/min. 25 Cycle Play 40 s / pause 20 s Place Pr Separ Rnd Ball type Pr Rnd 5. 'Random' Backspin and topspin balls according to random principle 'Amicus 3000' Forehand topspin / forehand counter ball / forehand smash 'Player' This exercise makes it possible to train the perceptiveness of the player. The balls are played onto a certain part of the table (e.g. 3/4 of the forehand area) according to the random principle. The player does not know the order of the topspin and backspin balls. Thus the perception and ability of the player to differentiate is effectively trained. 'Ball A' 'Ball B' 'Ball C' 'Ball D' Ball Speed Spin Long-Short Left-Right Left 2.5 Right 2.5 Left 2.5 Right 2.5 Ball/min. 25 Cycle Play 40 s / pause 20 s Place Pr Separ Rnd Ball type Pr Rnd 2005 Tamasu Butterfly Europa GmbH Am Schürmannshütt 40a, Moers Phone Fax Website:
25 6. 'Nicole Struse' Service Backspin Topspin Topspin 'Amicus 3000' Topspin Topspin Topspin Topspin 'Player' This exercise for the footwork starts with a long service from 'Amicus 3000 Plus'. After a backspin ball onto the middle of the table a fast topspin of the ball machine onto the forehand and one onto the backhand of the player follow. These balls are played back with a topspin. This exercise is played at a time interval of 40 seconds, the service being played only once. After a pause of 20 seconds, the exercise starts again with a single service. 'Ball A' 'Ball B' 'Ball C' 'Ball D' Ball Speed Spin Long-Short Left-Right Left 3 0 Left 2 Right 2 Ball/min. 35 Cycle Play 40 s / pause 20 s Place Pr Separ Rnd Ball type Pr Rnd 7. 'Kong Linghui' Service Counter ball Counter ball Counter ball Topspin 'Amicus 3000' Chop Forehand topspin Backhand topspin Backhand topspin Forehand topspin 'Player' For the short/short situation, a ball placed by 'Amicus 3000 Plus' onto the wide forehand of the player results. This should as far as possible be played with a down-the-line forehand topspin. The next two balls of the TT ball machine are simulated blocks onto the variable backhand topspin of the player. By means of a diagonal, hard 'counter topspin' the player should end the rally. 'Ball A' 'Ball B' 'Ball C' 'Ball D' Ball Speed Spin Long-Short Left-Right Right 3 Left 2.5 Right 3.5 Left 2.5 Ball/min. 35 Cycle Place Pr Separ Rnd Ball type Pr Rnd
26 8. 'Falkenberg' Topspin Topspin Topspin 'Amicus 3000' Backhand topspin Forehand topspin Forehand topspin 'Player' Regular exercise for training the footwork. The player can, instead of the topspin ball, also play counter balls. From the backhand side in each case a backhand topspin and a forehand topspin are played. After that one ball onto the wide forehand follows which is also played back with a topspin. 'Ball A' 'Ball B' 'Ball C' 'Ball D' Ball Speed Spin 4 4 Long-Short 6 6 Left-Right Right 3.5 Left 2.5 Ball/min. 35 Cycle Play 40 s / pause 20 s Place Pr Separ Rnd Ball type Pr Rnd 9. 'Timo Boll' Service Backspin Counter ball Topspin 'Amicus 3000' Flip Backhand topspin Backhand topspin Forehand topspin 'Player' This exercise is for a left-handed player who is training against a right-handed player. After a service of 'Amicus 3000 Plus' the left-handed player plays a diagonal backhand topspin. This is played back with a block by the ball machine. The player now plays a backhand topspin onto the centre/elbow as preparation for the concluding forehand topspin. With the down-the-line forehand topspin from the backhand the player must win a point. 'Ball A' 'Ball B' 'Ball C' 'Ball D' Ball Speed Spin Long-Short Left-Right Right 3.5 Left 2 Left 2.5 Left 1.5 Ball/min. 35 Cycle Place Pr Separ Rnd Ball type Pr Rnd 2005 Tamasu Butterfly Europa GmbH Am Schürmannshütt 40a, Moers Phone Fax Website:
27 10. 'Backhand opener' Service Backspin Counter ball Counter ball Counter ball (high) 'Amicus 3000' Flip/chop Backhand topspin Forehand topspin Forehand topspin Smash 'Player' A complete rally according to a service/return situation is trained. The player opens after a service with a down-the-line backhand topspin. This ball is blocked into the forehand, whereupon a down-the-line forehand topspin then follows. The 'Amicus 3000 Plus' plays a further ball onto the forehand, which is played into the centre of the table. The rally ends with a smash by the player in response to the last high ball from 'Amicus 3000 Plus'. 'Ball A' 'Ball B' 'Ball C' 'Ball D' Ball Speed Spin Long-Short Left-Right Left 3 Right 3.5 Left Ball/min. 35 Cycle Place Pr Separ Rnd Ball type Pr Rnd 11. 'Matsushita' Service Topspin Topspin Topspin Topspin Topspin (high) Chop Defence Defence Defence Defence Smash In this exercise, the defensive player trains the exchange between defence and attack. After the service situation in each case two topspin balls from 'Amicus 3000 Plus' onto the backhand and onto the forehand follow. The defensive player wards these balls off. After a high and a shorter topspin to the table centre, the defensive player ends the rally with a forehand smash. 'Ball A' 'Ball B' 'Ball C' 'Ball D' Ball Speed Spin Long-Short Left-Right Left 3 Right 3.5 Left Ball/min. 32 Cycle Place Pr Separ Rnd Ball type Pr Rnd
28 12. 'Side spin' Service Topspin Topspin Topspin Topspin 'Amicus 3000' Flip/chop Forehand topspin Forehand topspin Forehand topspin Forehand topspin 'Player' With this exercise, the topspin against topspin game as well as the assessment of 'side spin balls' is trained. After a service by 'Amicus 3000 Plus' and the return by the player, side spin balls are played onto the forehand. With topspins alternating between diagonal and onto the table centre, the balls are played back. The topspin player terminates the ball exchange with a parallel 'counter topspin'. 'Ball A' 'Ball B' 'Ball C' 'Ball D' Ball Speed 2 14 Spin -2 5 Long-Short 1 6 Left-Right Left 1 Left 1.5 Ball/min. 32 Cycle Place Pr Separ Rnd Ball type Pr Rnd The side spin setting 3000 for the robot head is '45 to the right' 2005 Tamasu Butterfly Europa GmbH Am Schürmannshütt 40a, Moers Phone Fax Website:
29 APPENDIX III
30 Technical data / spare parts list Mains current: 110 V, 50 Hz AC voltage, approx. 50 w Shock-hazard protection class: I. The machine can be put into operation in the outdoor temperature range from 0-40 C. Fuses: 2 T 400 ma Spare parts list Control unit Charging motor Ejection disc Ball placing mechanism Fuse (T 400 ma/250 V) Casing for robot foot Motor casing ( 2 off) Collecting net Extension cable for remote control Ball speed motor Pivot head motor Axle for ejection disc Remote control Transformer Shell tube Ball container Net supporting frame Holder for control unit Motor for height adjustment Further spare parts on request! The electric product - ball machine AMICUS 3000 Plus - was subject to a type test and the type and version of the designs presented were found to be in conformity with the standard stated. EN : (1995) = IEC : ,2 EN :1992 ENV 50140:1993 EN 55014:1993 EN :1995 EN :1995 EN :1995 EN :1995 EN :1995 EN 55104:1995 EN :1994 as can be seen from the test reports with the Nos. E and E-00136/1. This test report states that the robot AMICUS 3000 Plus may bear the CE mark Tamasu Butterfly Europa GmbH Am Schürmannshütt 40a, Moers Phone Fax Website:
IMPORTANT: Please read instructions carefully prior to use!
 TABLE TENNIS ROBOT AMICUS ADVANCE OPERATION MANUAL IMPORTANT: Please read instructions carefully prior to use! 1. Assembly p.2 2. Control Panel (Quick Reference Guide) p.3 3. Operation p.4 3.1 Starting
IMPORTANT: Please read instructions carefully prior to use!
 TABLE TENNIS ROBOT AMICUS PROFESSIONAL OPERATION MANUAL IMPORTANT: Please read instructions carefully prior to use! 1. Assembly p.2 2. Control Panel (Quick Reference Guide) p.3 3. Operation p.4 3.1 Starting
IMPORTANT: Please read instructions carefully prior to use!
 TABLE TENNIS ROBOT AMICUS PROFESSIONAL OPERATION MANUAL IMPORTANT: Please read instructions carefully prior to use! 1. Assembly p.2 2. Control Panel (Quick Reference Guide) p.3 3. Operation p.4 3.1 Starting
S4W PRO ROBOT. User Manual. paddlepalace.com
 S4W PRO ROBOT paddlepalace.com 800-547-5891 503-777-2266 S4W Pro Taking Robot Technology to the Next Level The Paddle Palace S4W Pro takes robot technology to the next level. This innovative robot has
G2W PRO ROBOT. User Manual. paddlepalace.com
 G2W PRO ROBOT paddlepalace.com 1-800-547-5891 503-777-2266 Putting Robot Technology to Work for You The Paddle Palace G2W Pro robot is everything you need in a robot! This robot has two throw wheels with
A32W PRO ROBOT. User Manual. paddlepalace.com P P
 A32W PRO ROBOT paddlepalace.com P 1-800-547-5891 P 503-777-2266 Paddle Palace A32W Pro P Two throw wheels, for multiple spin options P Multiple Oscillation Options P Very durable, made with high quality
Inside Front cover This page will remain blank.
 Owner s Manual Inside Front cover This page will remain blank. 1 Table of Contents Parts of the AirCAT...3 Assembling the AirCAT...4 Attaching the wheels to the stand...4 Attaching the battery box to the
Misaligned Folds Paper Feed Problems Double Feeds Won t Feed FLYER Won t Run iii
 Operator s Manual Table of Contents Operator Safety... 1 Introduction... 2 Unpacking and Setup... 3 Unpacking... 3 Setup... 4 FLYER Overview... 5 FLYER Diagram... 5 Capabilities... 5 Control Panel... 6
User Manual GRI- 1500Li
 User Manual GRI- 1500Li Your Cart Tek caddy cart was thoroughly quality control checked and road tested before being shipped to your address. We do everything possible to assure that your caddy is in perfect
icreasepro Creaser Operators Manual
 6-2013 Version 3.0 icreasepro Creaser Operators Manual WWW.MBMCORP.COM 800-223-2508 TABLE OF CONTENTS SPECIFICATIONS.1a SAFETY PROCEDURES/CARE & MAINTENANCE..1b COMPONENT IDENTIFICATION 2 TOUCH SCREEN
Instruction and Practice Manual
 Instruction and Practice Manual Axiom Sports Manufacturing A Division of Fitec International 3525 Ridge Meadow Parkway Memphis, TN 38175 (901) 366-9144 www.axiomsports.com 1 Thank you for purchasing the
MSV PlayCoach V 150 Tennis Ball Machine User Manual
 MSV PlayCoach V 150 Tennis Ball Machine User Manual An important advice before using the machine. Please charge the lithium battery before you use it. - 1 - The delivery contains: 1x 2x 1x 1x 2x Put the
TrekMill USER'S MANUAL MM5050
 Read the safety and comfort guide in this manual before using this equipment. USER'S MANUAL TrekMill MM5050 Serial Number: Date Purchased: Find the serial number in the location shown below. CONTENTS Safety
OWNER'S MANUAL For Models 2040, 1040, & 540 NEWGY TABLE TENNIS ROBOT IMPORTANT: READ OPERATING INSTRUCTIONS CAREFULLY QUICK SET-UP,
 IMPORTANT: READ OPERATING INSTRUCTIONS CAREFULLY QUICK SET-UP, 540...2 QUICK SET-UP, 1040...3 QUICK SET-UP, 2040...4 OPERATION...6 ROBOT POSITIONS...12 MISC. ADJUSTMENTS...13 IMPORTANT NOTICES...15 TAKE-DOWN,
PROPORTIONING VALVE. Model 150 INSTRUCTION MANUAL. March 2017 IMS Company Stafford Road
 PROPORTIONING VALVE Model 150 INSTRUCTION MANUAL March 2017 IMS Company 10373 Stafford Road Telephone: (440) 543-1615 Fax: (440) 543-1069 Email: sales@imscompany.com 1 Introduction IMS Company reserves
EZee Glider Manual. Tools needed for Assembly: Wrench (included) Philips Screwdriver (not included) Assembly Instructions
 Philips Screwdriver (not included) Assembly Instructions") EZee Glider Manual Congratulations on your purchase of the EZee Glider! Your glider is designed for years of nearly carefree use by your child. These instructions include how to set up your glider and
EZee Glider Manual Congratulations on your purchase of the EZee Glider! Your glider is designed for years of nearly carefree use by your child. These instructions include how to set up your glider and
Squeegee Unit for MRS Multi-Recovery System
 En Operating Instructions Squeegee Unit for MRS Multi-Recovery System Translation of the original operating instructions Squeegee - MRS Table of Contents Safety Recommendations Technical Data - MRS Booth
Thank you for purchasing your new Empire Reloader B Sound-Activated 3-Speed Paintball Hopper!
 Thank you for purchasing your new Empire Reloader B Sound-Activated 3-Speed Paintball Hopper! Should you require any technical assistance on the use of this product, or if your product needs servicing,
Item # in1 Rotating Table. Inch BILLIARDS AIR HOCKEY TABLE TENNIS
 Item # 45-6066 3-in1 Rotating Table 3 BILLIARDS AIR HOCKEY TABLE TENNIS 84 Inch ! WARNING: Rotating game should be done under adult supervision. Rotating table may cause a pinching hazard for young children
Final Assembly Instructions Bikes with Quill Stems
 Final Assembly Instructions Bikes with Quill Stems Thank you for buying your new bicycle from L.L.Bean. Read these instructions carefully before beginning the final assembly. Prior to shipping, our expert
Final Assembly Instructions Bikes with Threaded Headsets
 Final Assembly Instructions Bikes with Threaded Headsets Thank you for buying your new bicycle from L.L.Bean. Read these instructions carefully before beginning the final assembly. Prior to shipping, our
USER MANUAL
 C Cimarron Sports 1-888-816-6517 www.cimarronsports.com Combo Pitching Machine USER MANUAL TABLE OF CONTENTS Thank you for purchasing the Cimarron Combo Pitching Machine. The Cimarron Combo Pitching Machine
OWNER S MANUAL.
 OWNER S MANUAL www.newgy.com 1 TABLE OF CONTENTS Welcome... Page 3 Quick Start of Your Robo-Pong 3050XL... Page 4 Operating Your Robot... Page 6 Drill Descriptions... Page 16 Quick Take-Down, Storage &
Mini Glider Manual. Your Glider comes partially assembled. The front wheel and the handlebars require assembly.
 Mini Glider Manual Congratulations on your purchase of the Mini Glider! Your glider is designed for years of nearly carefree use by your child. These instructions include how to set up your glider and
ASTER ELECTRONIC INTERACTIVE TABLE TENNIS GAME
 CAUTION: READ OPERATING INSTRUCTIONS CAREFULLY P ONG-M ASTER ELECTRONIC INTERACTIVE TABLE TENNIS GAME FOR FUN, EXERCISE, AND IMPROVING YOUR PING PONG GAME COMPONENTS...2 CONTROLS...2 SET-UP...3 PLAYING
Read Before Operating!
 Read Before Operating! IMPORTANT OPERATING INSTRUCTIONS THE DEUCE PITCHING MACHINE THROWS REAL REGULATION BALLS; HOWEVER, THE ACCURACY OF THE DEUCE DEPENDS ON THE QUALITY, HARDNESS AND TYPE OF BALLS YOU
MANUAL SEALLESS STEEL STRAPPING TOOL MODEL A
 OPERATION MANUAL / SPARE PARTS LIST MANUAL SEALLESS STEEL STRAPPING TOOL MODEL A337.0001 13.1912.01 13191201.en/MAS/ 10.02 INDEX PAGE 1 SAFETY INSTRUCTIONS 2 2 WARRANTY CONDITIONS AND LIABILITY 4 3 APPROPRIATE
VERSA BIKE RACK INSTRUCTIONS
 VERSA BIKE RACK INSTRUCTIONS Models #8, 8 Important This rack is designed for use with a or. receiver hitch. The rack is designed to hold a maximum of two bicycles. Do not use it for anything other than
Model 130M Pneumatic Controller
 Instruction MI 017-450 May 1978 Model 130M Pneumatic Controller Installation and Operation Manual Control Unit Controller Model 130M Controller is a pneumatic, shelf-mounted instrument with a separate
OWNER S MANUAL. 1
 OWNER S MANUAL www.newgy.com TABLE OF CONTENTS Welcome... Page Quick Start of Your Robo-Pong 050XL... Page 4 Operating Your Robot... Page 6 Drill Descriptions... Page 6 Quick Take-Down, Storage & Transport...
OWNER'S MANUAL LOCK-N-LOAD BULLET FEEDER (PISTOL)
") OWNER'S MANUAL LOCK-N-LOAD BULLET FEEDER (PISTOL) Table of Contents ASSEMBLY ASSEMBLY Pistol Bullet Feeder... Page 3 CHANGE-OVERS The Hornady Lock-N-Load Pistol Bullet Feeder is capable of feeding most
OWNER'S MANUAL LOCK-N-LOAD BULLET FEEDER (PISTOL) Table of Contents ASSEMBLY ASSEMBLY Pistol Bullet Feeder... Page 3 CHANGE-OVERS The Hornady Lock-N-Load Pistol Bullet Feeder is capable of feeding most
User Manual GRX- 1250Li
 User Manual GRX- 1250Li Your Cart Tek caddy cart was thoroughly quality control checked and road tested before being shipped to your address. We do everything possible to assure that your caddy is in perfect
TACTICAL/TECHNICAL TOOL KIT
 TACTICAL/TECHNICAL TOOL KIT Version 9.6 INSTRUCTOR COURSE RESOURCES Playing tennis successfully requires learning tactics and techniques. Tactics-first instruction connects tactics to techniques: Rather
Final Assembly Instructions Bikes with Threaded Headsets
 Final Assembly Instructions Bikes with Threaded Headsets Thank you for buying your new bicycle from L.L.Bean. Read these instructions carefully before beginning the final assembly. Prior to shipping, our
GRI-1300/1350Li. User Manual
 User Manual GRI-1300/1350Li Your Cart Tek caddy cart was thoroughly quality control checked and road tested before being shipped to your address. We do everything possible to assure that your caddy is
MASTER TRUING STAND TS-3. Optional Dial indicator set with brackets Dial indicator bracket set only
 MASTER TRUING STAND TS-3 3 2 1 3 8 9 4 10 7 6 5 12 13 Optional 1555-1 Dial indicator set with brackets 1556-1 Dial indicator bracket set only 49 11 16 14 15 48 32 31 37 38 20 19 17 18 34 39 21 36 22 33
TACTICAL/TECHNICAL TOOL KIT
 TACTICAL/TECHNICAL TOOL KIT Version 7.5 INSTRUCTOR COURSE RESOURCES Playing tennis successfully requires learning tactics and techniques. Game-based instruction connects tactics to techniques: Rather than
The Crease Matic 150 is quiet in operation and the drive motor shuts down if not used for a period of time.
 KAS Crease Matic 150 The new Crease Matic 150 is a fully programmable card creaser developed specifically for the short to medium run digital print market. Designed and Manufactured in the UK. It bridges
INSTRUCTIONS FOR THE 7FT REVOLVER 3-IN-1 MULTIGAMES TABLE
 INSTRUCTIONS FOR THE 7FT REVOLVER 3-IN-1 MULTIGAMES TABLE Please keep these instructions for future reference. Adult assembly required. This table is not a toy & is intended for use by or under the supervision
Parts of the Gun. Specifications XCR-C XCR-L. Optic Rail. Charging Handle. Sling Loop. Accessory Rails. Crane Stock. Flash Hider. Stock Pad.
 BEFORE USING THIS PRODUCT, CAREFULLY READ THOUGH MANUAL AND RETAIN IT FOR FUTURE REFERENCE. ECHO1USA AUTOMATIC ELECTRIC GUNS ARE INTENDED FOR AGES 18 AND ABOVE. THIS PRODUCT MAY CAUSE SERIOUS INJURY IS
7130 Lancer Rear Drive Magnetic Commercial Indoor Cycling Bike
 7130 Lancer Rear Drive Magnetic Commercial Indoor Cycling Bike Owner s Manual Made in Taiwan INDEX IMPORTANT SAFETY INFORMATION... 1 EXPLODED DRAWING... 2 PARTS LIST... 3 ASSEMBLY INSTRUCTION... 4-9 USER
mechanical APPLICATION
 mechanical APPLICATION Many SWAROVSKI ELEMENTS, such as Rivets, Jeans Buttons, Snap Fasteners, Decorative Buttons and Magnet Fasteners, can be applied manually or mechanically, using either semi- or fully
Santa Fe Cycles Assembly Guide Introduction
 Santa Fe Cycles Assembly Guide Introduction Congratulations on your purchase of your new Santa Fe bicycle. You have purchased a bicycle that has many features and qualities. Please take a few minutes and
Read Before Operating!
 Read Before Operating! IMPORTANT OPERATING INSTRUCTIONS THE DEUCE PITCHING MACHINE THROWS REAL REGULATION BALLS; HOWEVER, THE ACCURACY OF THE DEUCE DEPENDS ON THE QUALITY, HARDNESS AND TYPE OF BALLS YOU
Pressure Dump Valve Service Kit for Series 3000 Units
 Instruction Sheet Pressure Dump Valve Service Kit for Series 000 Units. Overview The Nordson pressure dump valve is used to relieve hydraulic pressure instantly in Series 00, 400, 500, and 700 applicator
222 Schwinn Recumbent Exercise Bike Parts List Full Size Hardware Chart Product Illustration Assembly Instructions
 222 Schwinn Recumbent Exercise Bike Parts List Full Size Hardware Chart Product Illustration Assembly Instructions FITNESS SAFEGUARDS AND WARNINGS Before starting any exercise program, consult with your
Repair instructions. Pivot bushing replacement. XL-AS10001RM-en-DE Rev B
 Repair instructions Pivot bushing replacement XL-AS10001RM-en-DE Rev B Table of contents Table of contents 1 General information... 3 1.1 Safety information...3 1.2 Legal information...4 1.3 Order and
TECHNICAL INFORMATION
 TECHNICAL INFORMATION Model No. Description RP2300FC, RP2301FC Router CONCEPT AND MAIN APPLICATIONS Models RP2300FC and RP2301FC are upgraded sister tools of our current plunge-type electronic router Model
Ecomow Electric Mower
 Ecomow Electric Mower 1100 Watt Operation Manual 2 Year Replacement Warranty ECO-320 - Type 1 0509 To view the entire range visit: www.ozito.com.au SPECIFICATIONS - MODEL NO. ECO-320 Motor Size: 1100W
Pfeiffer. Operating, assembly and maintenance instructions for discontinuous sampling valve Series 27i. 1. Design, operation and dimensions
 Operating, assembly and maintenance instructions for discontinuous sampling valve Series 27i This equipment may only be dismounted and disassembled by skilled staff, who are familiar with the assembly,
Lock-N-Load. Bullet Feeder
 Lock-N-Load Bullet Feeder table of contents steps Overview... 2 List of required hand tools... 2 1: Mounting the Bullet Feeder to the Bench... 3 2: Mounting the Bullet Feed Hopper... 4 3: Bullet Feed Hopper
Digital Melting Point Apparatus
 Digital Melting Point Apparatus Heating Plateau Ramping Start/Stop Plateau set Ramp stop Hold User Guide Version 1.1 Heating Viewing tube Sample Chamber IEC power inlet socket Power on/off Temperature
Paddle Bar Replacement
 This procedure is to help facilitate the replacement of the 23 Paddle Bar Assembly on the ANKOM Dietary Fiber Analyzer. Note: The following items will be sent in a replacement package as part of the 23
Final Assembly Instructions Bikes with 16 Wheel Size
 Final Assembly Instructions Bikes with 16 Wheel Size Thank you for buying your new bicycle from L.L.Bean. Read these instructions carefully before beginning the final assembly. Prior to shipping, our expert
Laboratory Mortar Mixer (Testing)
") TomTom-Tools GmbH Zelgli 20 8905 Arni info@tomtom-tools.com Switzerland www.tomtom-tools.com User Manual Version February 22, 2015 Laboratory Mortar Mixer (Testing) 1 Introduction The Laboratory Mortar
TomTom-Tools GmbH Zelgli 20 8905 Arni info@tomtom-tools.com Switzerland www.tomtom-tools.com User Manual Version February 22, 2015 Laboratory Mortar Mixer (Testing) 1 Introduction The Laboratory Mortar
Pectoral Machine. User manual E S S E N T I A L S T R E N G T H
 E L E M E N T and the cable E S S E N T I A L S T R E N G T H User manual 1 and the cable and The identification plate of and manufacturer, affixed on the back panel of the weight stack, gives the following
BR 27g. Operating, assembly and maintenance instructions for discontinuous sampling valve. 1. Design, operation and dimensions:
 Operating, assembly and maintenance instructions for discontinuous sampling valve BR 27g The equipment may only be dismounted and disasembled by skilled staff, who are familiar with the assembly, start-up,
600 / 600FC OWNER'S MANUAL
 PROGRESSION 600 / 600FC OWNER'S MANUAL Issue 2 / Version E - Dec. 10, 1997 Copyright 1997 GAMMA Sports - All Rights Reserved PROGRESSION 600 / 600FC OWNER'S MANUAL TABLE OF CONTENTS PAGE 1... WARRANTY
Thanks for shopping with Improvements! 20 Reel Mower with Catcher Item #
 Thanks for shopping with Improvements! 20 Reel Mower with Catcher Item # 411837 To order, call 1-800-642-2112 West Chester, OH 45069 0313 If you have any questions regarding this product, call 1-800-642-2112
USER GUIDE TO POWER ASSISTED BIKES
 USER GUIDE TO POWER ASSISTED BIKES 1 PAGE CONTENTS Page. 3 Unpacking Page. 3-4 Easy steps to get started Page. 5 General Assembly Instructions Page. 6 Aligning H/Bars, Page. 7 Tightening pedals onto Crank
Owner s Manual. Model H4685
 Owner s Manual Model H4685 TABLE OF CONTENTS Important Information.................................... 3 Parts.................................................. 4 Battery Installation......................................
Lectric Cycles Mid-Drive Electric Motor Installation
 Lectric Cycles Mid-Drive Electric Motor Installation This write-up describes the installation of a Lectric Cycles electric motor. The model is the e-rad Mid-Drive 750 Watt conversion kit, installed on
FIRST TEAM SPORTS, INC Storm Portable Series Assembly Instructions
 FIRST TEAM SPORTS, INC Storm Portable Series Assembly Instructions WARNING! WARNING! WARNING! THIS BASKETBALL SYSTEM IS SPRING LOADED AND SHIPPED UNDER TENSION. ATTEMPTING TO ASSEMBLE OR DISASSEMBLE ANY
LITERIDER 2&3 IMPORTANT WARNING. 2Bike (1x) Bolt (1x) Nut (1x) Small Hex Wrench (1x)
 Bolt (1x) Nut (1x) Small Hex Wrench (1x)") LITERIDER 2&3 3 Bike (1x) Bolt (1x) Flat Washer (2x) Nut (1x) Large Hex Wrench (1x) 2Bike (1x) wrench (1x) Small Hex Wrench (1x) keys (2x) Long Strap (1x) 2-Zip Strips (6x) 3-Zip Strips (9x) Wheel strap
LITERIDER 2&3 3 Bike (1x) Bolt (1x) Flat Washer (2x) Nut (1x) Large Hex Wrench (1x) 2Bike (1x) wrench (1x) Small Hex Wrench (1x) keys (2x) Long Strap (1x) 2-Zip Strips (6x) 3-Zip Strips (9x) Wheel strap
SERIES 2 RAMP OWNER S MANUAL TOOLS REQUIRED: BEFORE YOU BEGIN... Read and understand these instructions before beginning a ramp setup.
 SERIES 2 RAMP OWNER S MANUAL BEFORE YOU BEGIN... Read and understand these instructions before beginning a ramp setup. Use caution and care for your back when lifting, pushing, pulling, folding or unfolding
Code AWC20HP Air Compressor
 Code 951816 AWC20HP Air Compressor Index of Contents Index of Contents 02 Declaration of Conformity 02 What s Included 03 Safety Precautions 03 Specifications (AWC20HP Air Compressor) 04 Assembly Instructions
Konza District Pinewood Derby Track Parts And Assembly Instructions
 Konza District Pinewood Derby Track Parts And Assembly Instructions - 1 - Pinewood Derby Track Parts List: Box 1 of 3 2 each - Race Track Flat Sections 1 each - Race Track Finish Line Section 1 each -
Contents. Stainless Steel Side Block. 1.1 Separating the Side Block. Stainless Steel Side Block Reassembly of. Assembly from the Helmet Shell
 Separating the Side Block Assembly from the Helmet Shell Contents SSB-1 SSB-3 SSB-5 SSB-5 SSB-7 1.1 Separating the Side Block Assembly from the Helmet Shell 1.2 Side Block Assembly Replacement 1.3 Defogger
9A5N Solid State CW Paddle
 9A5N Solid State CW Paddle User manual Table of contents: 1. General description 2. Before you begin 3. Finger piece and/or battery installation 4. Interconnection 5. Lever(s) sensitivity adjustment 6.
Cag Speed III Sharpener Manual
 Contact Info... Cag One Skate Sharpeners Inc. 14 Mary St, unit D, Havelock, ON K0L 1Z0 Cag Speed III Sharpener Manual Toll free:888-884-4787 E-mail:sales@cagone.com Web: www.cagone.com www.cagone.com Teflone
MAGNETIC INDOOR CYCLING BIKE
 MAGNETIC INDOOR CYCLING BIKE SF-B1805 USER MANUAL IMPORTANT! Please retain owner s manual for maintenance and adjustment instructions. Your satisfaction is very important to us, PLEASE DO NOT RETURN UNTIL
A U T O O P E N S E R I E S C A P P R E S S O P E R A T O R S M A N U A L
 A U T O O P E N S E R I E S C A P P R E S S O P E R A T O R S M A N U A L Safety Instructions When using your heat press, basic precautions should always be followed, including the following:.. 3. 4. 5.
MRF SERIES. Instruction Manual
 MRF SERIES Instruction Manual BEFORE USING THIS PRODUCT, CAREFULLY READ THOUGH MANUAL AND RETAIN IT FOR FUTURE REFERENCE. ECHO1USA AUTOMATIC ELECTRIC GUNS ARE INTENDED FOR AGES 18 AND ABOVE. THIS PRODUCT
POWER ASSISTED BICYCLES OWNERS MANUAL
 POWER ASSISTED BICYCLES OWNERS MANUAL WE HAVE INCLUDED A BICYCLE OWNER S MANUAL WHICH YOU SHOULD REFER TO FOR ALL GENERAL CYCLE MAINTENANCE. CONTENTS Page. 3 Unpacking. Page. 3-4 Easy steps to get started.
HoldUp Plus2. Safety Kit included: See additional instructions for installation. REAR WHEEL TRAY. BASE (1x) lock WASHER (1x) KEY (2x) SAFETY CLIP (1x)
 lock WASHER (1x) KEY (2x) SAFETY CLIP (1x)") HoldUp Plus2 InsTAll This product on 2" hitch version of the HoldUp Front WHEEL TRAY assembly (1x) REAR WHEEL TRAY assembly (1x) wrench (1x) BASE (1x) bolt (8X) Lock WASHER (8X) Washer (8x) KEY (2x) SAFETY
HoldUp Plus2 InsTAll This product on 2" hitch version of the HoldUp Front WHEEL TRAY assembly (1x) REAR WHEEL TRAY assembly (1x) wrench (1x) BASE (1x) bolt (8X) Lock WASHER (8X) Washer (8x) KEY (2x) SAFETY
GV Standard X-Vent. Setup, Commissioning & Installation Guide
 GV Standard X-Vent Setup, Commissioning & Installation Guide Technical experts in the design, manufacture and supply of precision engineered, architectural rooflights for residential and commercial buildings.
INDOOR CYCLING BIKE SF-B1110 USER MANUAL
 INDOOR CYCLING BIKE SF-B1110 USER MANUAL IMPORTANT! Read all instructions carefully before using this product. Retain owner s manual for future reference. For customer service, please contact: support@sunnyhealthfitness.com
You have decided to buy an LP 10 E by STEYR SPORTWAFFEN the new dimension of match air pistols!
 Congratulations! You have decided to buy an LP 10 E by STEYR SPORTWAFFEN the new dimension of match air pistols! The world-beating air pistol with electronic trigger! The STEYR LP 10 probably is the most
1500 Follow Spot Yoke
 1500 Follow Spot Yoke Rev 1.1 2004 City Theatrical, Inc. Getting Started with the City Theatrical Follow Spot Yoke Congratulations on the purchase of your City Theatrical Follow Spot Yoke. The City Theatrical
TECHNICAL INFORMATION
 TECHNICAL INFORMATION Models No. TD0101, TD0101F Description Impact Driver L PRODUCT P 1/ 14 CONCEPT AND MAIN APPLICATIONS Models TD0101 and TD0101F are cost-competitive 100N.m-class impact driver developed
PLAYMATE igenie. Owner s Manual
 PLAYMATE igenie Owner s Manual PLAYMATE igenie Owner s Manual Serial #: METALTEK 455 Kitty Hawk Drive Morrisville, NC 27560 Tel: 919.544.0344 Fax: 919.544.1430 www.playmatetennis.com This page has been
IMPORTANT: RECEIVING INSTRUCTIONS:
 Instruction Sheet Sidewinder Mechanical Bender IMPORTANT: RECEIVING INSTRUCTIONS: Visually inspect all components for shipping damage. If any shipping damage is found, notify carrier at once.shipping damage
HOME ASSEMBLY INSTRUCTIONS
 HOME ASSEMBLY INSTRUCTIONS This Papillionaire Bicycle now belongs to you. It will take you to work, wait patiently outside your local cafe, and carry your groceries home. This is the start of your long-term
Trampoline & Enclosure Assembly Instructions
 Trampoline & Enclosure Assembly Instructions Safe user weight 250 lbs (115 kg) Version 718602 The information in this document is subject to change without notice. Copyright Springfree Trampoline Inc.
MATCHLESS BULKY PLYER FLYER HEAD
 MATCHLESS BULKY PLYER FLYER HEAD INSTALLATION AND USE FOR WHEELS BUILT BEFORE AND AFTER 1/19/2012 Find out more at schachtspindle.com Schacht Spindle Company 6101 Ben Place Boulder, CO 80301 p. 303.442.3212
I.H.S INSTALLATION INSTRUCTIONS
 I.H.S INSTALLATION INSTRUCTIONS TOOLS REQUIRED The following tools will be required for installation of your I.H.S. system. Item Qty Needed 9/16 Open End Wrench 2 3/4 Open End Wrench 1 1/2 Open End Wrench
OWNER'S MANUAL. Copyright 1999 ATS - All Rights Reserved
 OWNER'S MANUAL AL Issue 2 - August 19, 1999 Copyright 1999 ATS - All Rights Reserved OWNER'S MANUAL TABLE OF CONTENTS PAGE 1... WARRANTY PAGE 2... ASSEMBLY INSTRUCTIONS PAGE 4... MOUNTING THE RACQUET PAGE
ASSEMBLY GUIDE: Izip & Ezip Electric Bicycles with Rack-Top Mounted Batteries ( RTMB Bicycles )
") ASSEMBLY GUIDE: Izip & Ezip Electric Bicycles with Rack-Top Mounted Batteries ( RTMB Bicycles ) Please Refer to your Owner s Manual for Detailed Setup Instructions Technical & Customer Service: 1-800-377-4532
ASSEMBLY GUIDE: Izip & Ezip Electric Bicycles with Rack-Top Mounted Batteries ( RTMB Bicycles ) Please Refer to your Owner s Manual for Detailed Setup Instructions Technical & Customer Service: 1-800-377-4532
3 Scotch-Weld Polyurethane Reactive Adhesive Applicator Replacement Part Installation Guide
 3 Scotch-Weld Polyurethane Reactive Adhesive Applicator Replacement Part Installation Guide Description: AIR SUPPLY LINE KIT Product ID/Stock No.: 62-9895-0005-3 For use with: 3M Scotch-Weld Polyurethane
MAINTENANCE PROCEDURE FOR X 650
 MAINTENANCE PROCEDURE FOR X 650 X 650 25. juli 2005-1/6 MAINTENANCE PROCEDURE FOR X 650 2 ND STAGE WARNING: This maintenance procedure is only for appointed Scubapro technicians that completed a course
WELCOME TO THE REVOLUTION
 USER GUIDE WELCOME TO THE REVOLUTION THANK YOU FOR CHOOSING THE GCQUAD We listened to what you wanted - and created the most accurate, versatile and game-enhancing ball and club analysis solution available
HZ-300 HAZER MACHINE USER MANUAL. Congratulations on the purchase of your new ANTARI HZ-300 Haze Machine.
 HZ-300 HAZER MACHINE USER MANUAL Congratulations on the purchase of your new ANTARI HZ-300 Haze Machine. Read and save these instructions 2005 Antari Lighting and Effects Ltd 2 User Manual Antari HZ-300
PLAYMATE GRAND SLAM. Owner s Manual. Serial #:
 PLAYMATE GRAND SLAM Owner s Manual METALTEK 455 Kitty Hawk Drive Morrisville, NC 27560 Tel: 919.544.0344 Fax: 919.544.1430 www.playmatetennismachines.com Serial #: Rev A 2 PLAYMATE GRAND SLAM Copyright
Stringway ML100 Review. Stringway ML100. A Review MSRP $1,195.00
 Stringway ML100 A MSRP $1,195.00 The Stringway ML100 is a technical table top machine with features that are unique. The racquet support plate is adequate and the internal supports and hold down mechanics
WIND CLIPPER KTS ILLUM SCALE INC DEC CLIPPER WIND SYSTEM
 CLIPPER WIND KTS ILLUM SCALE DEC INC CLIPPER WIND SYSTEM TABLE OF CONTENTS INTRODUCTION PRE-TEST OF INSTRUMENT INSTALLING THE MASTHEAD SENSOR UNIT INSTALLING THE DISPLAY NORMAL OPERATION CHANGING THE
Congratulations, once again, on buying an E RIDER Model 18!!!!
 Congratulations, once again, on buying an E RIDER Model 18!!!! USER MANUAL We are sure you will be excited by the delivery of your brand new bike and you will be eager to start using your E RIDER as soon
FX IMPACT OWNER S MANUAL
 made in sweden FX IMPACT OWNER S MANUAL Warranty Information All FX Airguns carry a One Year Warranty against faulty workmanship and defective materials. If it becomes necessary, first contact the dealer
Impulse G3. Race System. User Guide V0412
 Impulse G3 Race System User Guide 60017 V0412 Materials Included Start gate Finish gate 4 gate supports 8 steel pull pins 8 gate support screws Spool of monofilament line 2 launch pods 2 launch triggers
Maintenance Manual. Note: This document is broken up into the following 6 sections of prescribed maintenance.
 How to Perform Maintenance On LPKF Circuit Board Plotters Requirements - LPKF Circuit Board Plotter - BoardMaster Software - 2.5 mm Allen wrench (for earlier model machines) - 3mm Allen Wrench - 4mm Allen
Parts List. Description. Additional Considerations. Installation Instructions. Dual/Elite Hydraulic Treadmill Kit (supplied by EPI)
") Page 1 of 9 Parts List Dual/Elite Hydraulic Treadmill Kit (supplied by EPI) Qty Description Treadmill Body 1 Treadmill Power Unit (per Treadmill Body) 2 Treadmill Decks (per Treadmill Body) 1 Treadmill
Page 1 of 9 Parts List Dual/Elite Hydraulic Treadmill Kit (supplied by EPI) Qty Description Treadmill Body 1 Treadmill Power Unit (per Treadmill Body) 2 Treadmill Decks (per Treadmill Body) 1 Treadmill